

Page 1

®
Synapse
SB67070 SIP Gateway from AT&T
Configuration Guide
For Use with AT&T Business in a Box
®
Over IP Flexible Reach Service
Issue 1
February 20, 2012
Page 2

TABLE OF CONTENTS
1 Introduction ..................................................................................................... 3
2 Special Notes.................................................................................................... 3
2.1 Emergency 911/E911 Services Limitations and Restrictions............................... 3
2.2 Special Notes/Unsupported SIP Features........................................................ 3
3 Overview ......................................................................................................... 4
3.1 SB67070 SIP Gateway Features.................................................................... 5
3.2 Tested Components .................................................................................... 5
3.3 Call Flow ................................................................................................... 6
4 Configuration Guide........................................................................................... 7
4.1 Software Version Compatibility ..................................................................... 7
4.2 Configuring Synapse for IP Flexible Reach Service ........................................... 8
4.2.1 Logging In to Synapse as Administrator................................................... 8
4.3 Configuring the SIP Gateway...................................................................... 10
4.4 Configuring the Dial Plan............................................................................ 12
5 Troubleshooting .............................................................................................. 14
5.1 Device Log............................................................................................... 14
5.2 General Troubleshooting Topics .................................................................. 15
Page 2 of 16
Page 3

1 Introduction
This configuration guide provides instructions for configuring the Synapse Business Phone
System for AT&T Business in a Box
guide describes how to configure the Synapse SB67070 SIP Gateway for BIB over IP
Flexible Reach Service.Documents related to this configuration gu ide include:
Synapse Installation Guide i17 or later
Synapse Administrator’s Guide i15 or later
You can view and download these documents from www.telephones.att.com/synapseguides
®
(BIB) over IP Flexible Reach Service. Specifically, this
2 Special Notes
This section describes limitations and special considerations when using the Synapse
SB67070 SIP Gateway with the IP Flexible Reach Service.
2.1 Emergency 911/E911 Services Limitations and Restrictions
Although AT&T provides 911/E911 calling capabilities, AT&T does not warrant or represent
that the equipment and software (e.g., IP PBX) reviewed in this customer configuration
guide will properly operate with AT&T IP Flexible Reach to complete 911/E911 calls;
therefore, it is the Customer’s responsibility to ensure proper operation with its
equipment/software vendor.
While AT&T IP Flexible Reach services support E911/911 calling capabilities under certain
Calling Plans, there are circumstances when that E911/911 service may not be available, as
stated in the Service Guide for AT&T IP Flexible Reach found at
http://new.serviceguide.att.com
relocation of the end user’s CPE, use of a non-native or virtual telephone number, failure in
the broadband connection, loss of electrical power, and delays that may occur in updating
the Customer’s location in the automatic location information database. Please review the
AT&T IP Flexible Reach Service Guide in detail to understand the limitations and restrictions.
. Such circumstances include, but are not limited to,
.
NOTE: N11 (including 911) calls are not supported unless AT&T IP Flexible Reach Local
Service is ordered!!!
2.2 Special Notes/Unsupported SIP Features
Passing Calling Number marked private
T.38 Fax and Super G3 fax machines
SIP Diversion information. Call forwarding is supported within the Synapse PBX. Caller
ID information for the forwarded call is not retained. The caller does not receive an
indication that the call was forwarded.
Transferred calls will be looped through the Synapse IP PBX for the duration of the call
and will occupy two trunks. Synapse does not use SIP REFER to handle transferred
calls.
Page 3 of 16
Page 4
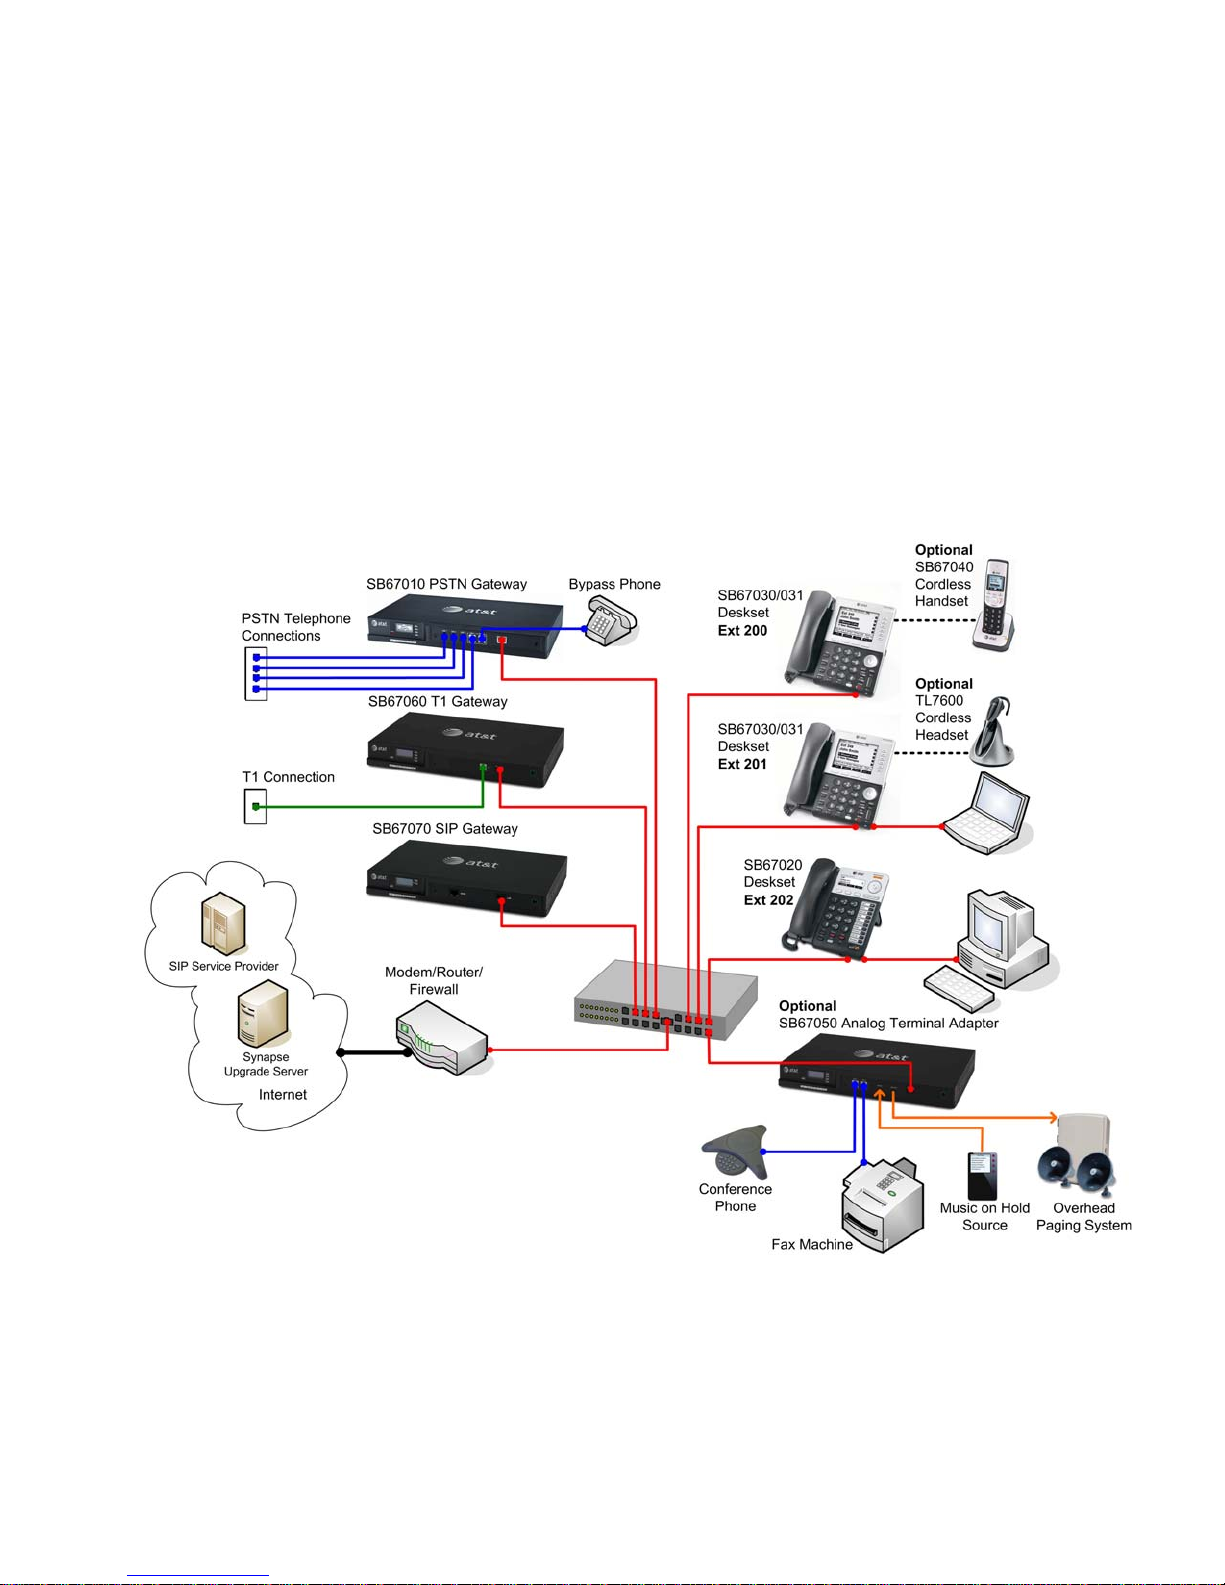
3 Overview
This configuration guide assumes that your Synapse system is installed and that users are
able to make internal (Deskset to Deskset) calls. A Synapse System must include one of
more of the following devices:
Desksets (SB67030/031 and/or SB67020 Desksets). The system supports up to 100
Desksets.
Gateways. At least one Gateway must be installed. The system supports up to four
SB67010 PSTN Gateways, one SB67060 T1 Gateway, and one SB67070 SIP Gateway.
You can install any combination of Gateway models in a system, as long as you do not
exceed the supported number of each Gateway model.
For more information, see Figure 1: Sample Synapse System.
Figure 1: Sample Synapse System
Page 4 of 16
Page 5
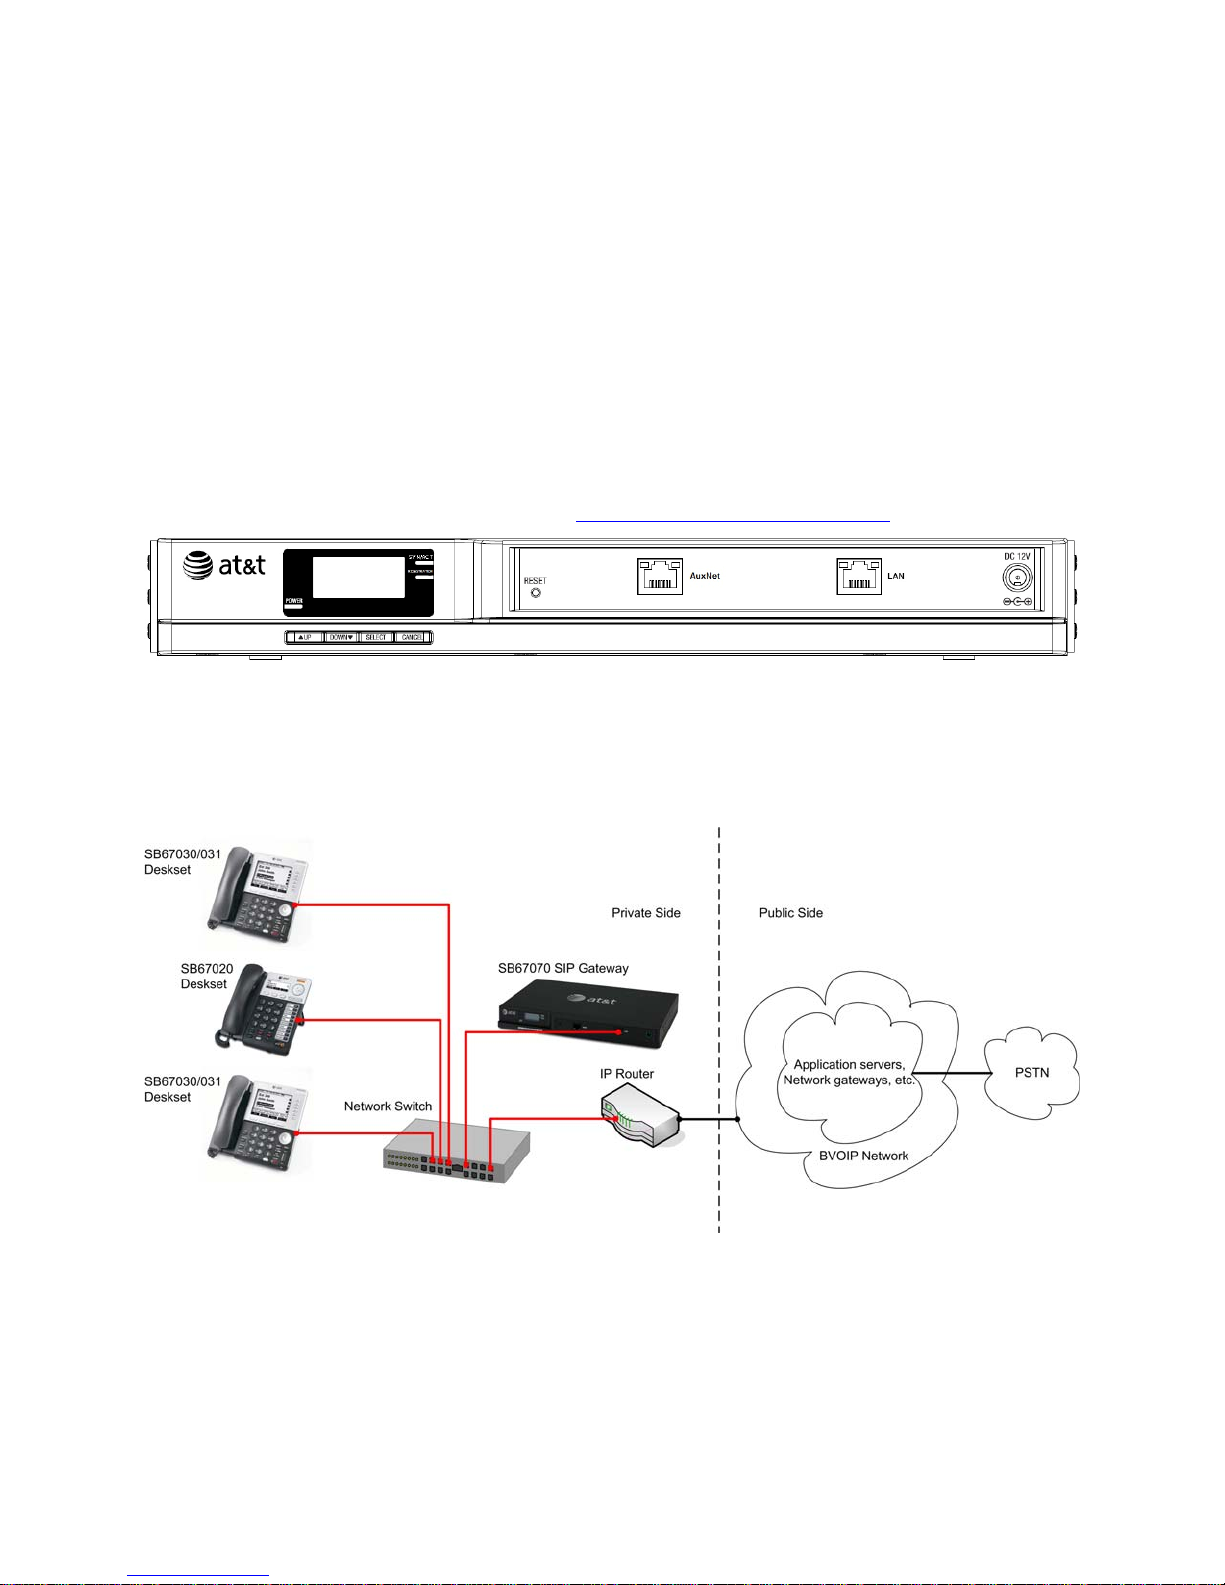
3.1 SB67070 SIP Gateway Features
A LAN 10/100 BaseT Ethernet port connects to the existing Synapse network.
A four-line LCD display with four hard keys provides status information, such as the
device IP address, and allows basic network configuration and firmware upgrades.
Device configuration and system configuration, such as SIP Account information,
available through the Web User Interface (WebUI).
Supports up to 16 simultaneous voice calls.
Additional System features, including Direct Inward Dial (DID) and configurable dial
plan.
For more information about Synapse, visit http://telephones.att.com/smb
Figure 2: SB67070 SIP Gateway Front Panel
.
3.2 Tested Components
All Synapse Desksets and Gateways must be running the same software versions (2.0.0 or
later).
Page 5 of 16
Page 6

3.3 Call Flow
Inbound Call Flow:
1. A PSTN phone originates a call to an AT&T IP Flexible Reach service number.
2. The PSTN routes the call to the AT&T IP Flexible Reach service network.
3. The AT&T IP Flexible Reach service routes the call to Synapse System at Customer Site.
4. Synapse System applies any necessary digit manipulations based upon the DID and
routes the call to a hunt group, phone or a fax endpoint.
Outbound Call Flow:
1. Synapse System phone or fax endpoint originates a call for delivery to AT&T IP Flexible
Reach service network.
2. Synapse System applies any necessary origination treatment (verifying permissions,
determining the proper route, selecting the outgoing trunk, etc.) and routes the call to
AT&T IP Flexible Reach service network.
3. The AT&T IP Flexible Reach service network delivers the call to PSTN.
4. PSTN delivers the call to a phone or fax en dpoint.
Page 6 of 16
Page 7

4 Configuration Guide
This section describes how to configure the SIP Gateway Account Settings to support AT&T’s
IP Flexible Reach Service.
4.1 Software Version Compatibility
Systems with software versions 2.0.0 and later support the features described in this guide.
All Gateways and Desksets must have the same software versions installed.
To determine the software version of the SB67070 SIP Gateway from the device front
panel, press SELECT, SELECT, and then DOWN. The software version appears.
To determine the SB67020 Deskset software version, press MENU, then 4, and then
to display the software version.
To determine the SB67030/031 Deskset software version, press MENU, then 4. See
the P Firmware version.
To determine the software version of all installed devices, log in as administrator. See
“Logging In to Synapse as Administrator” on page 8. Then click Det
to see the software versions and other information. There may be a delay as the system
gathers this information.
ailed Site Information
To update device software, see “Updating Devices” in the Synapse Administrator’s Guide,
available at www.telephones.att.com/synapseguides
Page 7 of 16
.
Page 8

4.2 Configuring Synapse for IP Flexible Reach Service
The Synapse WebUI allows you to configure the SIP Gateway for IP Flexible Reach Service.
4.2.1 Logging In to Synapse as Administrator
To access the Synapse WebUI and log in:
1. Connect your computer to the same IP subnet as the Synapse system, or ensure that
devices on different subnets are able to communicate. For example, you can connect
your computer to the PC port on the back of a Deskset.
2. On the Deskset, press MENU then 4. The Deskset Information screen appears.
3. Find the IP address on the Deskset Information screen.
4. Open a browser. Depending on your browser, some of the pages presented here may
look different and have different controls.
5. Type the Deskset IP Address in the browser address bar and press Enter. The Login page
appears.
6. Enter your login credentials. If logging in for the first time, enter admin in the Login
Name field and 12345 in the Password field, then click Login. You can change your
Admin ID and password once you are logged in.
7. Click topics from the navigation list on the left side of the WebUI to see them. For your
security, the WebUI times out after being idle for 10 minutes, after which you must log
in again.
Page 8 of 16
Page 9

Page 9 of 16
Page 10

4.3 Configuring the SIP Gateway
To configure SIP Account Settings:
1. In the navigation menu at left, click SIP Gateway Settings. The SIP Account Settings
page appears.
2. Select SIP Trunking as the Account Type.
3. Select Create New Account, or select an account to edit. If you have already created
an account, a Delete Account button appears. Clicking Delete Account deletes the
account and loads an empty account page.
4. Enter the SIP Gateway Basic Settings.
a. Enable or Disable the account. You must enable the account before it can be
used. Disabling the account does not erase the settings associated with the
account.
Page 10 of 16
Page 11

b. Enter the Account Name. The SIP account name appears on the Dial Plan
Settings page and the Trunk Reservation page.
c. For Max Calls, enter the number of simultaneous call sessions you
purchased. The maximum value is 16. Setting the Max Calls to a v a lue that is
less than the current number of Trunk Reservations for the SIP Account will
generate an error.
d. Enter the Display Name. The Display Name is the text portion of the Caller
ID that is displayed for outgoing calls.
e. Enter the User Name as provided by AT&T. The User Name, also known as
the Account ID, is usually the company's main number. Synapse will only
accept digits for a User Name.
f. Leave the Auth User Name and Auth User Password fields blank.
5. Enter the SIP Gateway Account Registration Settings.
a. Select Static Registration.
b. Enter the number of seconds for Registration Expires. This setting applies to
dynamic registration. It is a re-registration timeout value sent to the SIP
Provider. This is usually overriden by a re-registration interval determined by
the service provider’s response. The default setting is 3600 seconds and
should only be changed on the advice of your service provider.
6. Enter the SIP Gateway Account Server Settings.
a. Enter the SIP Server Address or URL.
b. If necessary, enter the SIP Server Port. Port 5060, the default setting, is
typically used for SIP transmission.
c. Enter the Registrar Server Address or URL if it is different than the SIP
Server Address or URL.
d. Enter the Registrar Server Port if it is different than the SIP Server Port. If a
Registrar Server address or URL is entered in the field above, it may not be
necessary to enter a Registrar Server Port.
e. Enter the Outbound Proxy Server Address or URL if it is different than the
SIP Server Address or URL.
f. Enter the Outbound Proxy Server Port if it is different than the SIP Server
Port. If an Outbound Proxy Server address or URL is entered in the field
above, it may not be necessary to enter an Outbound Proxy Server Port.
Configure the Codec Configuration.
7.
a. Enable or disable audio codecs. Yo
to the Enabled Codecs list, or click < Remove to add it to the Disabled
Codecs list.
b. Arrange the enabled audio codecs. Select a codec, then click or to
change the order.
Page 11 of 16
u can click Add > to add the selected codec
Page 12

The SIP Gateway uses the audio codecs in the order they are listed on a per
call basis. You can choose codecs based on the speed versus audio
performance required.
8. Click Apply to save your changes.
The SIP Gateway Registration LED should turn green when the SIP Gateway has
successfully registered to AT&T IP Flexible Reach Service.
4.4 Configuring the Dial Plan
Before configuring the Dial Plan, see “Dial Plan Settings” in the Synapse System
Administrator’s Guide i15 or later available at http://telephones.att.com/synapseguides
To configure Synapse Dial Plan settings:
1. In the navigation menu at left, click Dial Plan Settings. The Dial Plan Settings page
appears.
.
2. Set the Default Routing Priority. Ensure that the AT&T IP Flexible Reach Service SIP
Account that you configured is included in the priority list. You can:
Page 12 of 16
Page 13

exclude a trunk by selecting it, then clicking < Remove. You may want to exclude a
trunk if it is being used for a fax line or a door phone line, for ex ample.
move a trunk up or down the priority list by selecting it, then clicking or .
3. Set the Call Log/Messages Prefix according to your Dialing Rules. You can enter a
maximum of eight digits using only the characters 0–9, #, *, or P. Leave the field blank
if the Dialing Rules do not use a number for external line access.
4. Enter or modify Dialing Rule patterns. For more information, see “About Dialing Rules” in
the Synapse System Administrator’s Guide.
5. Select a Route for each Dialing Rule pattern as required. Th e list of routes includes all
available trunks in the system, as well as the Default Routing Priority. You can route a
Dialing Rule pattern to use the SIP Gateway only, or to use the Default Routing Priority.
6. Click Apply to save these settings.
Page 13 of 16
Page 14

5 Troubleshooting
Note: For customer service, repair, replacement, or warranty service, and all questions
about this product, visit our web site at www.telephones.att.com/smb
or call
1 (888) 916-2007. In Canada dial 1 (888) 883-2474.
5.1 Device Log
If you have trouble with your system and you require customer service, they may need the
device log for troubleshooting purposes. You can generate a device log on the Device Log
page.
You can also configure a device log prior to generating the log. Your Synapse Product
Support specialist may want to see specific information in the device log. If so, you must
configure the device log using a configuration file that your Synapse support person
provides.
To configure the Device Log:
1. In the navigation menu at left, click Device Management, then Device Log.
2. In the Device Log list, select the desired device.
3. Under Configure Device Log, click Browse... and select the Device Log Configuration
file.
4. Click Configure Device Log. After configuration is complete, you can proceed with
generating the Device Log, as described below.
To generate the Device Log:
1. In the navigation menu at left, click Device Management, then Device Log. The
Device Log page appears.
2. In the Device Log list, select the desired device and click Save Device Log.
Page 14 of 16
Page 15

3. It takes a minute for the file to generate. A pop-up box then asks you where to save the
file on your computer.
After the download is complete you should provide the file to the installer or customer
service.
5.2 General Troubleshooting Topics
SIP Gateway REG LED is RED or SIP Registration status on the WebUI is Unknown.
Cause Action
Incorrect SIP account settings. Make sure your SIP Account settings are set
as per your SIP service provider’s
requirements.
Network connection problems. Make sure you have a reliable Internet
connection for the SIP Gateway.
Make sure the SIP service is not down.
SIP Gateway is not working.
Cause Action
No power to the Gateway. Check the front panel LEDs on the Gateway:
Make sure the Power LED is on. If not,
connect power to the Gateway.
Make sure that the SYN/ACT and
REGISTRATION LEDs are both on solid
GREEN.
Incorrect SIP account settings. Make sure your SIP Account settings are set
as per your SIP service provider’s
requirements.
Network connection problems. Make sure the SIP Gateway is synchronized
to the system. Check the WebUI Detailed
System Information page.
Make sure you have a reliable Internet
connection for the SIP Gateway.
Make sure the SIP service is not down.
Page 15 of 16
Page 16

Calls on the SIP Gateway terminate unexpectedly.
Cause Action
Issues with SIP account settings. Make sure that your SIP account is
registered. The REGISTRATION LED on the
SIP Gateway front panel should be solid
GREEN and the Registration Status on the
WebUI SIP Account Settings should show
Registered.
On the WebUI SIP Account Settings page,
ensure Static Registration is not selected.
Incorrect SIP account settings. Make sure your SIP Account settings are set
as per your SIP service provider’s
requirements.
Network connection problems. Make sure the SIP Gateway is synchronized
to the system. Check the WebUI Detailed
System Information page.
Make sure you have a reliable Internet
connection for the SIP Gateway.
Try port forwarding on the router, the port
specified for the SIP Server to the SIP
Gateway LAN address.
Make sure the SIP service is not down.
Calls on the SIP Gateway have intermittent audio.
Cause Action
Too many simultaneous calls approaching or
exceeding available network bandwidth.
Calls on the SIP Gateway have one-way audio.
Enable G.729 codec, or give G.729 priority
over G.711.
Increase network bandwidth to allow for the
maximum number of simultaneous calls you
have purchased.
Cause Action
Incorrect LAN configuration. Check your LAN configuration for the
Page 16 of 16
Gateway. We recommend using the IP
subnet 192.x.x.x.
 Loading...