

Page 1

DOC20191209
AT&T RADIANT™ Max
User Guide
Page 2

Contents
Getting started .......................................................9
Introduction .........................................................10
About the user guide ................................................... 10
Set up your phone ....................................................11
Parts and functions .................................................... 11
Battery use ........................................................... 15
Install a SIM/SD Card ................................................... 17
Turn your phone on and off .............................................. 20
Use the touch screen ...................................................21
Complete the setup screens .............................................22
Basic operations .....................................................23
Home screen and Apps list ..............................................24
Phone settings menu ................................................... 27
Portrait and landscape screen orientation .................................28
Capture screenshots ...................................................29
Applications .......................................................... 29
Phone number ........................................................ 38
Airplane mode ........................................................ 39
Enter text ............................................................ 40
Google account ......................................................44
Lock and unlock your screen ............................................48
Home screen basics ...................................................49
Status bar and Notication panel ......................................... 52
Customize the Home screen .............................................57
Making connections ..................................................63
Phone .............................................................64
Make a call ........................................................... 64
Call settings .......................................................... 73
2
Page 3

Contacts ............................................................75
Add a contact ........................................................ 75
Edit a contact ......................................................... 81
Delete a contact ......................................................82
Share a contact ...................................................... 83
Messaging ..........................................................84
Text and multimedia messages .......................................... 84
Gmail ............................................................... 88
Internet and social networking ..........................................92
Chrome browser ....................................................... 92
Facebook ............................................................ 93
Connectivity .........................................................94
Transfer les between your phone and a computer ..........................94
Wi-Fi ................................................................. 97
Bluetooth ............................................................. 98
Apps and entertainment .............................................105
Camera and video ..................................................106
Camera overview .....................................................106
Take photos and record videos .......................................... 109
Camera settings ...................................................... 111
View pictures and video using Photos .................................... 113
Edit photos .......................................................... 115
Share pictures and videos ..............................................117
Calendar ........................................................... 118
Navigation apps .....................................................122
Google Search ....................................................... 125
Calculator ........................................................... 127
Clock ............................................................... 129
Entertainment and activities ..........................................136
YouTube ............................................................136
3
Page 4

Settings ...........................................................138
Basic settings .......................................................139
Network & internet ...................................................141
Wi-Fi ................................................................ 141
Wi-Fi Calling ......................................................... 144
Mobile network ....................................................... 145
Data usage .......................................................... 145
Hotspot & tethering ...................................................146
Airplane mode ....................................................... 148
VPN (Virtual Private Networks) ........................................... 148
Private DNS .......................................................... 149
Wireless Emergency Alerts .............................................. 149
Connected devices ..................................................150
USB ................................................................. 150
Pair new device ...................................................... 151
Connection preferences ............................................... 151
Bluetooth ............................................................ 151
Android Beam ....................................................... 153
Cast ................................................................ 154
NFC ................................................................ 154
Printing ............................................................. 154
Files received via Bluetooth .............................................155
Chromebook ........................................................ 155
Apps & notications .................................................156
Recently opened apps ................................................156
Notications .........................................................157
Screen time .......................................................... 158
Default apps ......................................................... 158
Permission manager .................................................. 158
Special app access ................................................... 158
4
Page 5

Battery ............................................................159
Battery consumption notication ........................................ 160
Battery Saver ......................................................... 160
Battery Manager ..................................................... 161
Battery percentage ................................................... 162
Last full charge ....................................................... 162
Screen usage since full charge ......................................... 162
Display ............................................................163
Brightness level ....................................................... 163
Night Light ........................................................... 164
Adaptive brightness ................................................... 164
Wallpaper ...........................................................164
Dark theme .......................................................... 164
Screen timeout ....................................................... 164
Auto-rotate screen .................................................... 164
Font size ............................................................164
Display size .......................................................... 165
Screen saver .........................................................165
Lock screen display ................................................... 165
Sound .............................................................166
Media volume .......................................................166
Call volume. . . . . . . . . . . . . . . . . . . . . . . . . . . . . . . . . . . . . . . . . . . . . . . . . . . . . . . . . . 166
Ring volume ......................................................... 167
Alarm volume ........................................................ 167
Vibrate for calls ....................................................... 167
Do Not Disturb .......................................................167
Shortcut to prevent ringing ............................................. 167
Phone ringtone ....................................................... 167
Default notication sound .............................................. 167
Default alarm sound ..................................................167
Other sounds and vibrations ............................................ 168
5
Page 6

Storage ............................................................169
Storage manager .....................................................170
SD card ............................................................. 170
Privacy ............................................................171
Permission manager .................................................. 172
Show passwords ......................................................172
Lock screen ......................................................... 172
Autoll service from Google .............................................172
Google location history ................................................ 172
Activity controls ......................................................172
Ads ................................................................ 172
Usage & diagnostics ..................................................173
Location ...........................................................174
Recent location requests ............................................... 175
App permission ......................................................175
Wi-Fi and Bluetooth scanning ........................................... 175
Emergency Location Service ............................................ 175
Google Location Accuracy ............................................. 175
Google Location History ...............................................175
Google Location Sharing ..............................................175
Security ...........................................................176
Google Play Protect ...................................................177
Find My Device ....................................................... 177
Security update ...................................................... 177
Screen lock .......................................................... 178
Fingerprint ........................................................... 180
Smart Lock .......................................................... 181
Device admin apps ................................................... 182
SIM card lock ........................................................ 182
Encryption & credentials ............................................... 183
Trust agents .........................................................183
Screen pinning ....................................................... 183
6
Page 7

Accounts ..........................................................184
Add account ........................................................184
Automatically sync data ...............................................184
Accessibility ........................................................185
Real-Time text call .....................................................185
Volume key shortcut ................................................... 186
Downloaded services .................................................186
Text-to-speech output ................................................. 186
Display .............................................................. 187
Interaction controls ................................................... 187
Audio & on-screen text ................................................. 188
Experimental ........................................................ 188
Digital Wellbeing & parental controls ....................................189
Your Digital Wellbeing tools .............................................189
Ways to disconnect ...................................................189
Reduce interruptions .................................................. 189
Show icon in the app list ............................................... 189
Parental controls ...................................................... 189
Google ...........................................................190
System ............................................................190
Languages & input ...................................................190
Gestures ............................................................ 193
Date & time .......................................................... 194
Backup ............................................................. 195
Reset options ........................................................ 195
Multiple users ........................................................ 196
About phone .......................................................198
Getting help .......................................................200
For assistance ......................................................201
Troubleshooting ......................................................201
Specications ........................................................ 204
7
Page 8

Licenses ............................................................ 205
Copyright information ................................................. 205
Safety and use .....................................................206
Important health information and safety precautions .......................207
Electrical safety. . . . . . . . . . . . . . . . . . . . . . . . . . . . . . . . . . . . . . . . . . . . . . . . . . . . . . . 207
Safety precautions for proper grounding installation ........................ 207
Safety precautions for power supply unit .................................. 208
Protect your phone ...................................................215
FCC Regulations ...................................................... 219
RF Exposure Information (SAR) .......................................... 220
Hearing Aid Compatibility ............................................221
Warranty ..........................................................222
8
Page 9

Getting started
The topics in this section will introduce you to your phone, help you get set up
with service, provide an overview of the phone screen, and get you started
with basic phone operations.
9
Page 10

Introduction
The following topics describe the basics of using this guide and your new phone.
About the user guide
Thank you for purchasing your new U705AA Smartphone. The following topics
explain how best to use this guide to get the most out of your phone.
Before using your phone
Read the Safety Information Guide that came with your device thoroughly for
proper usage.
Accessible services may be limited by subscription contract conditions.
Descriptions in the user guide
Note that most descriptions in this guide are based on your phone’s setup at
the time of purchase. Unless otherwise noted, instructions begin from the
phone’s Home screen, which is displayed by pressing the Home button .
Some operation descriptions may be simplied.
Screenshots and key labels
Screenshots and other illustrations in this user guide may appear differently on
your phone. Key labels are simplied for description purposes and differ from
your phone’s display.
Other notations
In the user guide, the phone may be referred to either as “phone,” “device,” or
“handset.” A microSD™ or microSDHC™ card is referred to as an “SD card” or a
“memory card.”
10
Page 11
Set up your phone
The following topics give you all the information you need to set up your
phone and wireless service for the rst time.
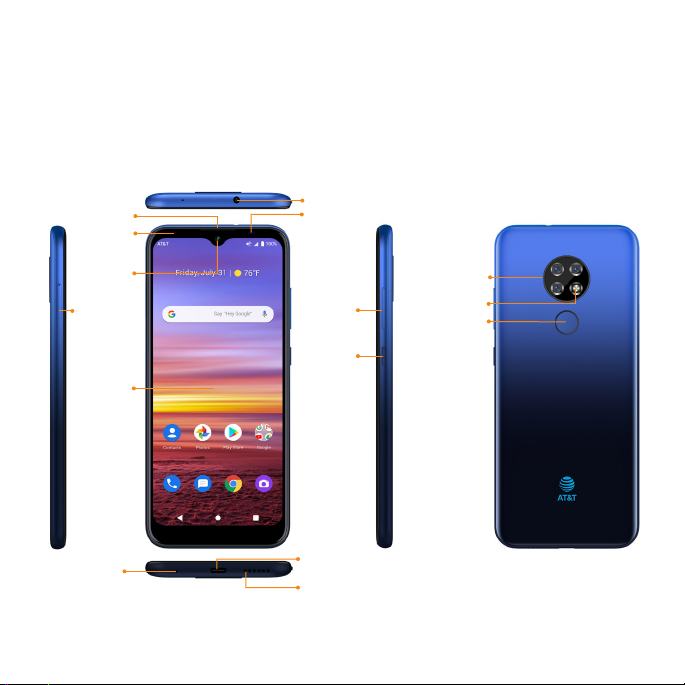
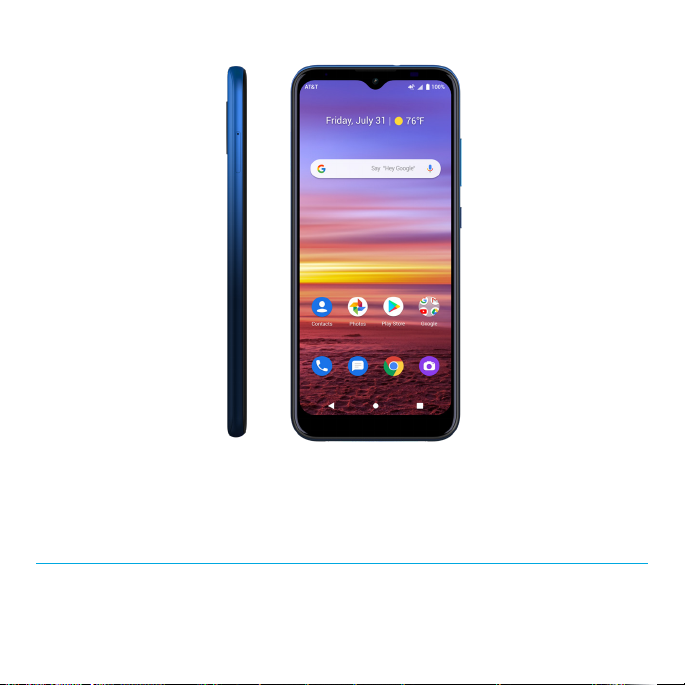
Parts and functions
These topics illustrate your phone’s primary parts and key functions.
Headset port
Receiver
LED
indicator
Front
camera
SIM tray
Touch
screen
Proximity and light sensor
Rear camera
Volume
keys
Power
key
Flash
Fingerprint
sensor
Microphone
USB charging port
Speaker
Note: Your phone’s screens and app layouts are subject to change. This user
guide uses sample images only.
11
Page 12
Part Description
Fingerprint sensor Unlock your phone with a touch of your nger.
Flash
Front camera
Headset port
LED indicator
• Brighten photos taken indoors or at night.
• Use as a ashlight to see in dark areas.
Take pictures and record videos while facing the
screen.
Plug in a headset (sold separately) to
listen to music or for convenient, hands-free
conversations.
Be informed of status changes and notications
on the phone with an LED indicator light on the
front display.
• A blinking green light indicates a notication
was received.
• A solid red light while not connected to a
charger indicates the battery is less than 15%.
• While charging, a solid red light indicates the
battery is less than 95%.
• While charging, a solid green light indicated
the battery is more than 95%.
• If a notication is received while the phone
is charging, the indicator will blink green.
The notication lights have priority over the
battery lights.
12
Page 13
Part Description
Microphone
Transmit your voice electronically for a call,
voice recording, or Google Assistant.
• Press to turn the screen on or off.
Power key
• Press and hold to turn the phone on or off.
• Press along with the Volume down key to take
a screenshot.
Proximity and light sensor
A sensor will automatically dim or brighten the
screen according to the environment.
• Take pictures and record videos with a
13+5+2 MP lens.
Rear camera
• Use features such as the wide-angle lens,
super macro, and Portrait mode.
Receiver Hear the caller and automated prompts.
SIM tray
Insert your Nano SIM card and microSD for
service and additional storage.
Speaker Listen to calls, automated prompts, and music.
13
Page 14
Touch screen
Part Description
• View information needed to operate
your phone.
• Access your phone’s features and
applications.
USB charging port
Volume keys
Connect the USB cable (included) for charging,
or connect other accessories.
Adjust the volume for ringtones, media,
notications, and system sounds.
CAUTION! Inserting an accessory into the incorrect jack may damage the phone.
14
Page 15
Battery use
The following topics explain how to care for your phone’s non-removable battery.
Battery cautions
Storage: Avoid storing or leaving the phone with no charge remaining.
Saved information and settings may become lost or changed, or the
battery may become unusable. Charge once every six months before
storing or leaving unused for a long period of time.
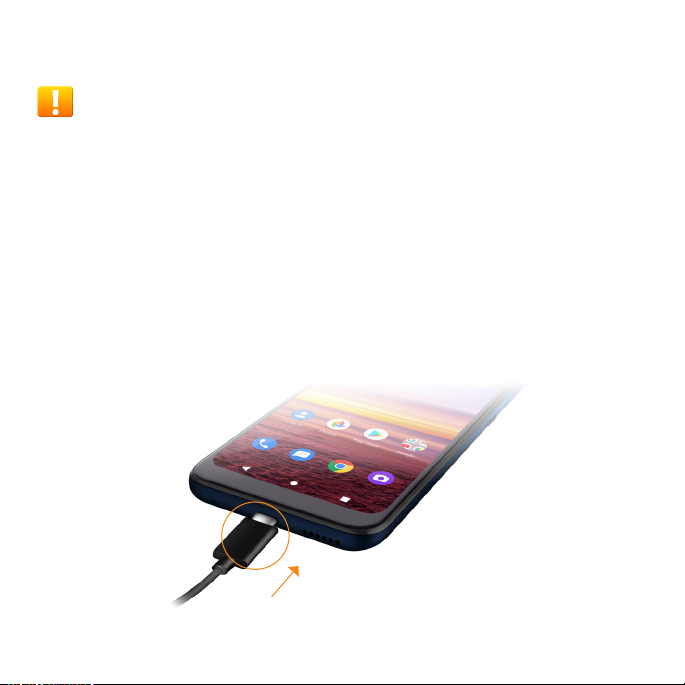
Charge the battery
Follow these instructions to charge your phone’s battery using either the
included AC adapter or via USB connection on your computer.
Charge using the AC adapter
1. Connect one end of the data cable to the USB port located on the bottom
of your phone.
15
Page 16

2. Connect the other end to the power adapter.
3. Connect the power adapter to an electrical outlet to fully charge your phone.
• Use the power adapter that comes with your phone; using other adapters
may damage your phone.
• Charging your phone with a USB cable connected to a laptop will take
longer than with the power adapter.
• The phone will power off automatically when the battery is too low. Charge
the battery if this happens. When the battery is critically low, the phone
may need a few minutes to build a charge before turning back on. Playing
games or performing other activities while charging may drain the battery
and cause it to power off.
• The battery will gradually discharge if it is left unused for a long period of
time. Before using the battery again, you must recharge it in order to power
on and use your phone normally.
16
Page 17
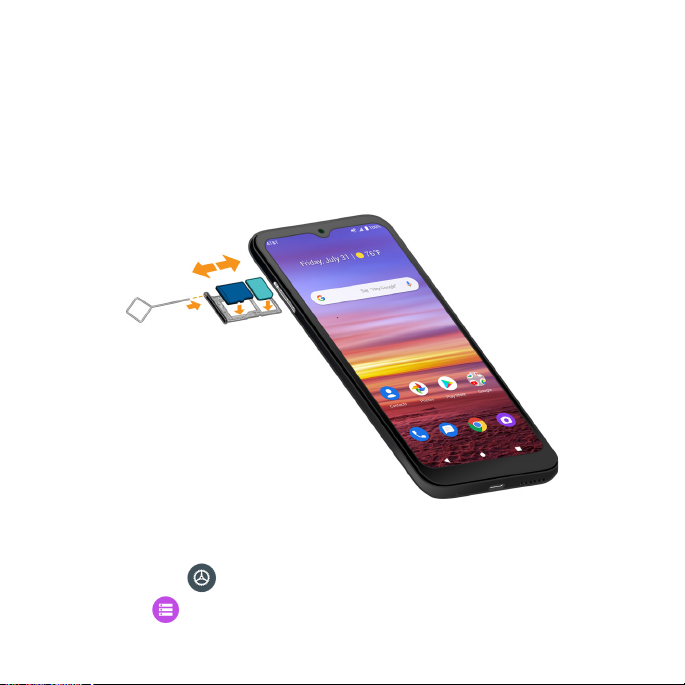
Install a SIM/SD Card
Insert a Nano SIM/microSD card
1. Insert the SIM Card Tray Pin into the card tray slot and remove the
SIM card tray.
2. Place the Nano SIM card and microSD card into the tray.
3. Gently slide the card tray back into the slot.
Mount an SD card
1. With an SD card inserted, swipe up from the Home screen to access Apps
and tap Settings .
2. Tap Storage > SD card.
3. Tap MOUNT on the prompted screen.
17
Page 18
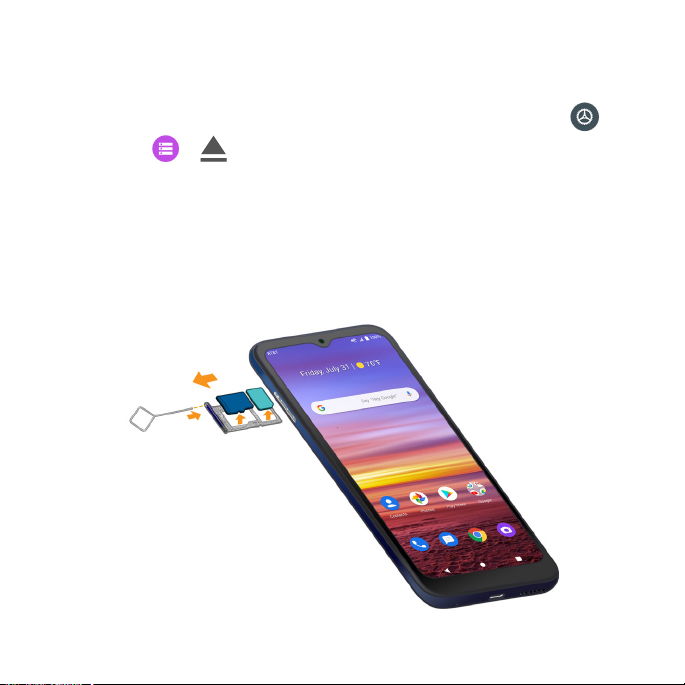
Unmount an SD card
Always unmount an SD card before removing it from your phone to avoid
corrupting or damaging the les on the SD card.
1. From the Home screen, swipe up to access Apps and tap Settings .
2. Tap Storage > .
Your SD card is now safely unmounted. To use this SD card again, you will need
to remove (see below) and mount it again.
Remove an SD card
Insert the SIM Card Tray Pin into the card tray slot and remove the SIM card tray.
Pull out the card tray slot and remove the SD card.
18
Page 19

Format an SD card
When you insert an optional SD card for the rst time, it is recommended that
you format it on your phone.
Note: Formatting your SD card will erase all les on the card. Make sure to
back up your les in another location before formatting.
1. From the Home screen, swipe up to access Apps and tap Settings .
2. Tap Storage > SD card.
3. Tap Menu to access the Options menu, then tap Storage settings.
4. Select Format or Format as internal, then tap FORMAT SD CARD to conrm.
All data on the SD card is erased, and the card is now formatted for use on
your phone.
19
Page 20
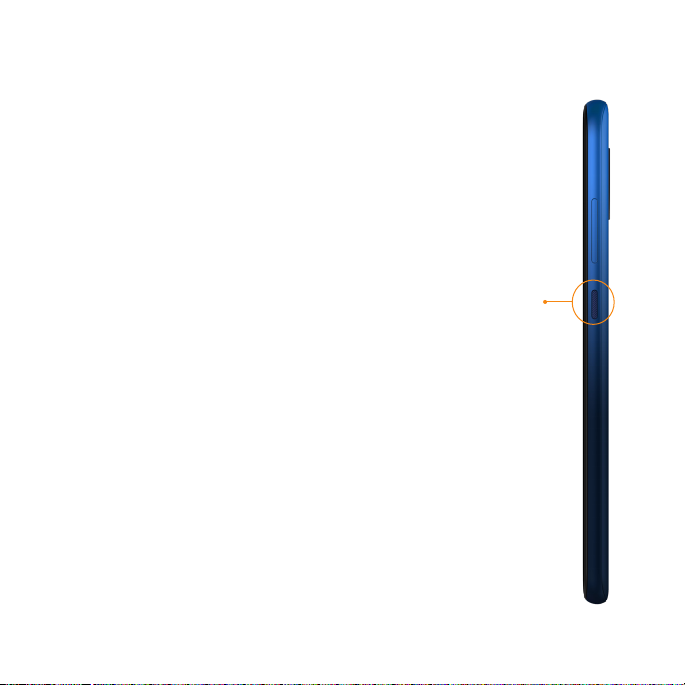
Turn your phone on and off
The instructions below explain how to turn your phone on and off.
Turn your phone on
Press and hold the Power key until the device turns on.
Turn your phone off
1. Press and hold the Power key.
2. Tap Power off.
Power
key
20
Page 21
Use the touch screen
Your phone’s touch screen lets you control actions through a variety of
touch gestures.
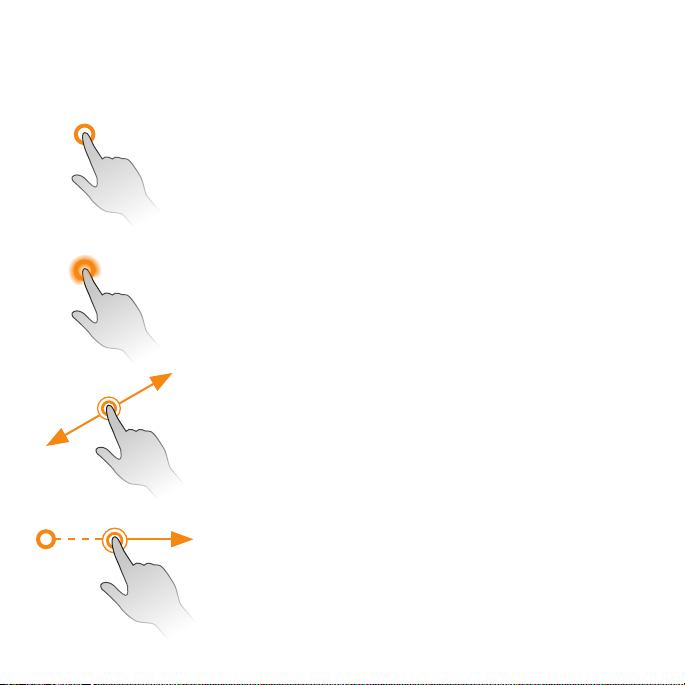
Tap or touch
Tap or touch with your nger to type characters into the
on-screen keyboard, select and open applications and
settings, or press on-screen buttons.
Touch and hold
Touch and hold an item to view available options (for
example, a contact or link in a Web page), or to move
icons or widgets.
Swipe or slide
Quickly drag your nger vertically or horizontally across
the screen to swipe or slide.
Drag
Touch and hold your nger with slight pressure, then
move your nger slowly across the screen to drag. While
dragging, do not release your nger until you have
reached the target position.
21
Page 22
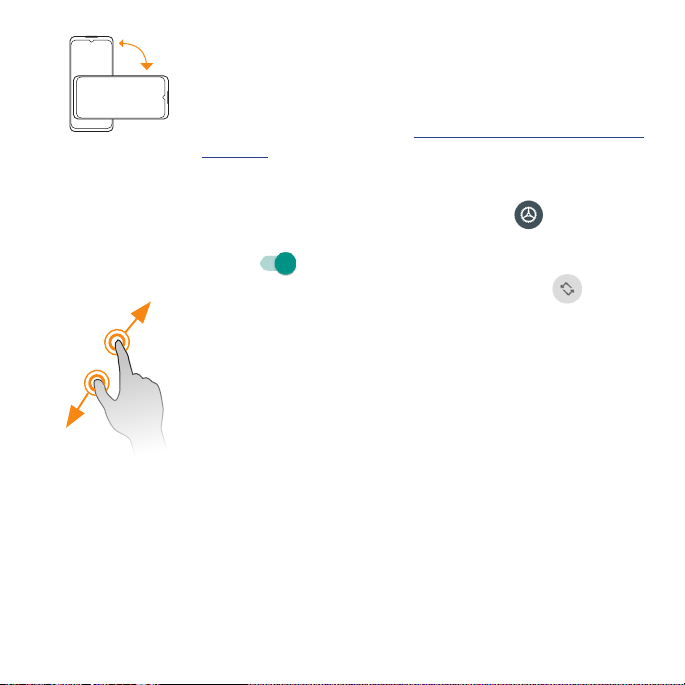
Rotate
Rotate the phone sideways to automatically change
the screen orientation from portrait to landscape. When
entering text, you can turn the phone sideways to bring
up a bigger keyboard. See “Touch screen keyboards” on
page 40 for more details.
Note: To activate Auto-rotate mode, swipe up from Home
screen to access Apps and tap Settings > Display >
Advanced > Auto-rotate screen, and slide the switch to
the On position. You can also activate it by dragging
the Status bar down and tapping Auto-rotate .
Pinch and spread
Use your thumb and forenger in a pinching motion on
your screen to zoom out, or spread them to zoom in when
viewing a picture or a web page. (Move ngers inward to
zoom out and outward to zoom in.)
Complete the setup screens
Once your service has been activated, you will need to run Setup. The Setup
Wizard will appear to guide you through the basic settings on your device.
You will be prompted to select the language you want to use, set up your
Wi-Fi connection, enter your name, set a screen lock method, sign in to your
Google™ account, select location services, and more.
Follow the remaining instructions to nish your phone setup.
22
Page 23
Basic operations
The following topics outline basic features and operations of your phone.
23
Page 24
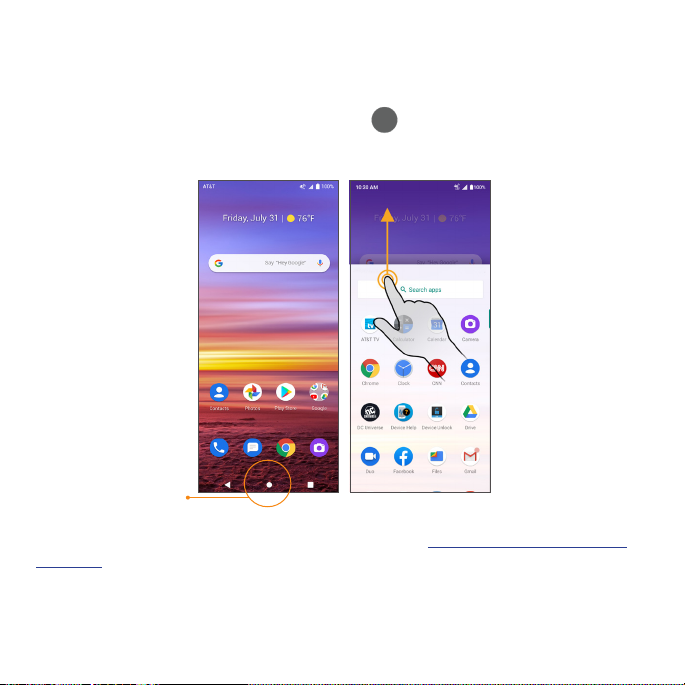
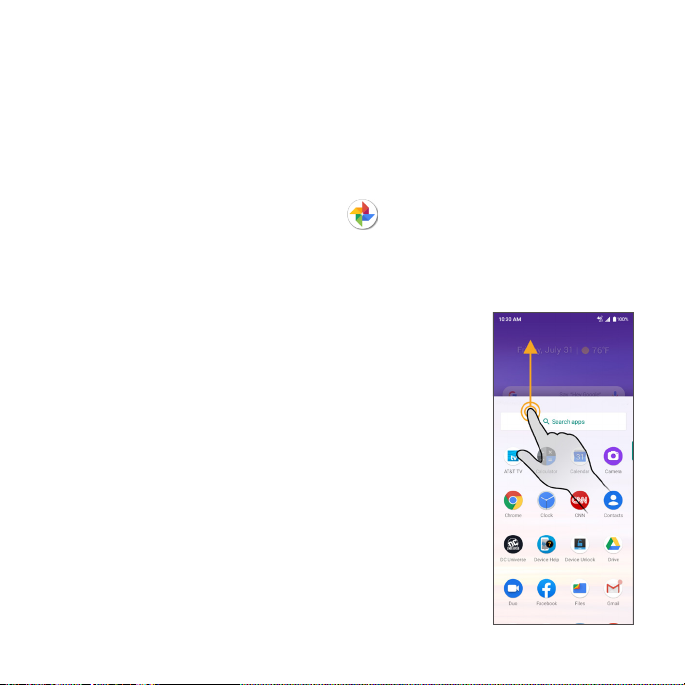
Home screen and Apps list
Most of your phone’s operations originate from the Home screen or the Apps
(applications) list.
1. From any screen, press the Home button to display the Home screen.
2. From the Home screen, swipe up to access the Apps list.
Home
For information about using the Home screen, see “Home screen basics” on
page 49.
24
Page 25
Select options and navigate screens
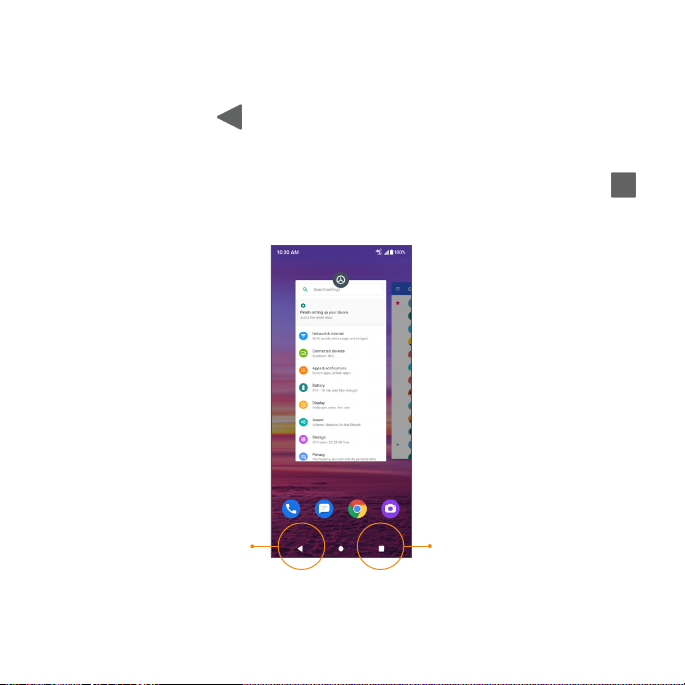
Tap icons, on-screen buttons, and other items to open or activate the
assigned function.
• Tap the Back button to return to the previous screen.
Recent applications
View your recently used applications by tapping the Recent Apps button .
Recent AppsBack
25
Page 26
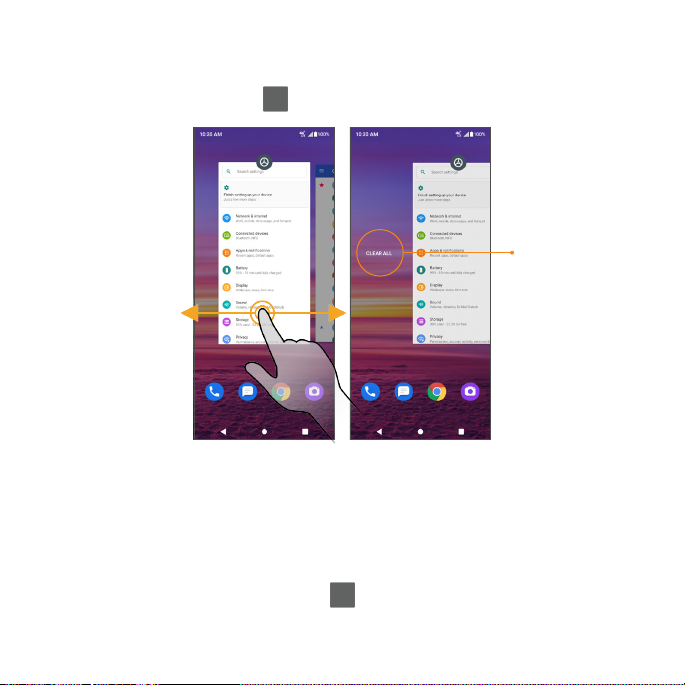
Switch between recently opened apps
You can easily switch between the apps you’ve recently opened.
Tap the Recent Apps button to see your recently-opened apps.
Tap to clear all
apps
1. Swipe right or left through the cards to nd an app and tap it.
2. To close an app, swipe up on it.
3. To close all of the apps and clear the list, slide to the far left of the list and tap
CLEAR ALL.
You can tap the Recent Apps button twice to quickly switch between the
two most recently used apps.
26
Page 27
Phone settings menu
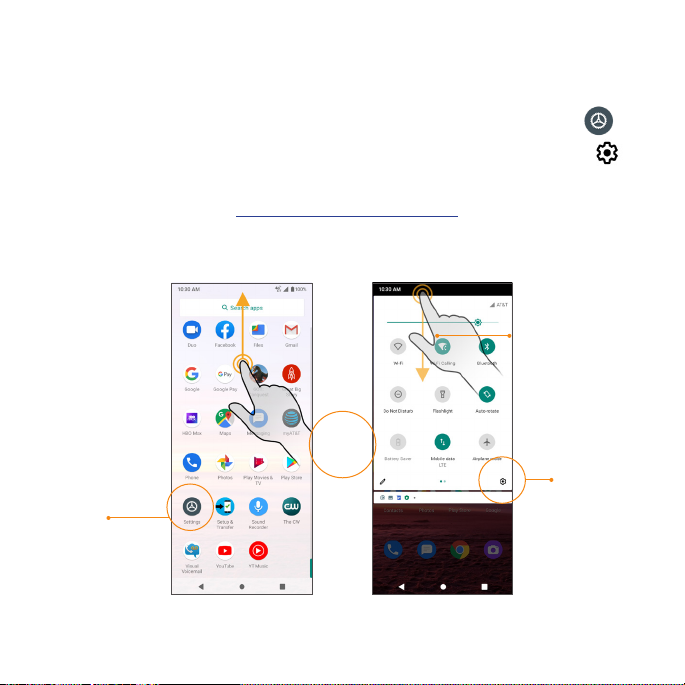
You can customize your phone’s settings and options in the Settings menu.
There are two ways to access the Settings menu:
• From the Home screen, swipe up to access Apps and tap Settings .
• From any screen, swipe the Status bar down twice and tap Settings .
For more information, see “Basic settings” on page 139.
Swipe down twice
“or”
Settings
Settings
27
Page 28
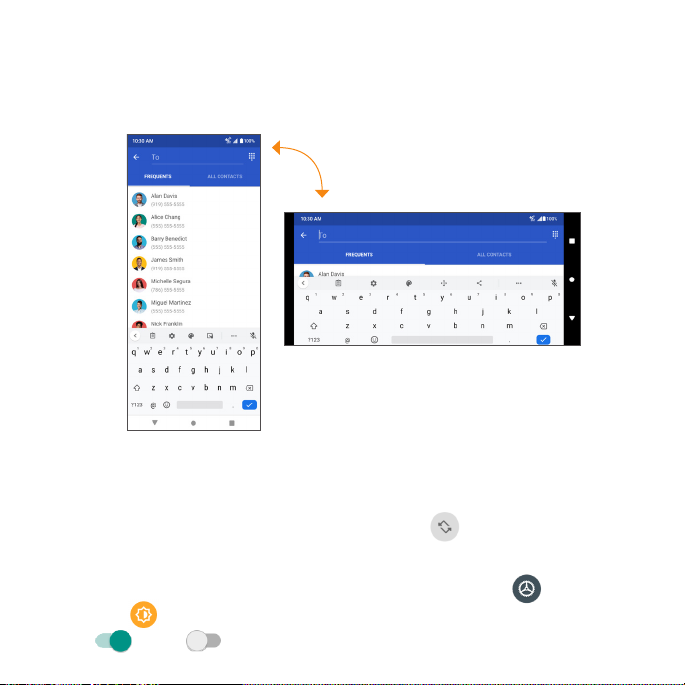
Portrait and landscape screen orientation
The default orientation for your phone’s screen is portrait (vertical), but many
apps will change to landscape orientation (horizontal or widescreen) when
the phone is rotated sideways.
Note: Not all screens can be used in landscape orientation.
Turn screen rotation on or off
• Drag the Status bar down and tap Auto-rotate to turn it on or off.
• You can also set the rotation option from the Settings menu. From the
Home screen, swipe up to access Apps and tap Settings . Tap
Display > Advanced > Auto-rotate screen and slide the switch to the
On or Off position to activate or deactivate screen rotation.
28
Page 29
Capture screenshots
There are two ways to capture a screenshot:
• Press and hold the Power key and Volume down key at the same time to
capture a screenshot of the current screen.
• Touch and hold the Power key from the screen you want to capture, and
tap Screenshot in the popup menu.
Your screenshots will be stored in the Screenshots album in the phone’s Photos
app. From the Home screen, tap Photos > Albums > Screenshots.
Applications
The following topics describe how to access the Apps list and launch
applications on your phone.
Launch apps
All installed apps can be accessed and launched
from the Apps list.
1. From the Home screen, swipe up to access the
Apps list.
2. Tap an app icon to launch the app.
29
Page 30
Work with apps
App folders
1. From the Home screen, touch an app folder to open it. Tap an app shortcut
to launch the app.
2. To add more apps to the folder, drag each app over to the folder. See “Add
folders to the Home screen” on page 61.
Tap to rename
Open folder
30
Page 31

App shortcuts
Tap and hold an app icon on the Home screen or Apps list to display a
shortcut menu that lets you quickly access common app functions.
Note: Not all apps support the App shortcuts feature.
31
Page 32

Control app permissions
The rst time you open an app, you’ll be asked to grant permissions to access
certain data or features. This ensures that you have full control of which apps
have authorized access.
If you don’t want to grant access for an app, choose DENY. If you choose
DENY in a trusted app, you may not be able to use the app or access all the
functions. To modify permission settings, follow the steps below:
1. From the Home screen, swipe up to access Apps and tap Settings .
2. Tap Apps & notications > Advanced > Permission manager.
3. Select a category. Tap the app you want to modify permissions for and
select Allow or Deny to adjust the permission settings.
Note: These options may vary.
4. You can also access permission settings by touching and holding the app
on the Home screen or Apps list, tapping to access the App info screen,
and then tapping Permissions.
Set default apps
You can choose default apps for web browsing, text messaging, and more.
1. From the Home screen, swipe up to access Apps and tap Settings .
2. Tap Apps & notications > Default apps.
3. Choose your default web browser, phone app, messaging app, and more.
32
Page 33

Choose default apps
Some actions can be performed with more than one app. When performing
an action for the rst time, you may be prompted to choose an app. You can
choose to use an app only this time by tapping JUST ONCE, or tap A LWAY S to
set that app as the default.
You can change the default app at any time in the Settings menu.
1. From the Home screen, swipe up to access Apps and tap Settings .
2. Tap Apps & notications > Default apps.
To change the default app for opening links, continue with the steps below:
1. Tap Apps & notications > Default apps > Opening links.
2. Tap the app you want to set and tap Open supported links.
3. Choose Open in this app to set this app as the default to open when you
tap a link. You can also choose Ask every time or Don’t open in this app
according to your preference.
33
Page 34

Disable an app
You can disable some default apps which can’t be uninstalled to avoid them
running in the background and downloading data.
1. From the Home screen, swipe up to access Apps, and tap Settings .
2. Tap Apps & notications > SEE ALL APPS.
3. Tap the app you want to disable to access App info screen.
4. Tap DISABLE.
Tip: You can also disable apps by touching and holding the app on the Home
screen or in the Apps list, tapping to access the App info screen, and
tapping DISABLE.
34
Page 35

Apps list
The Apps list expands to include any apps you download and install on
your phone. The following table outlines the primary apps that have been
preinstalled on your phone.
App Function/Service
Calculator
Calendar
Camera Take and share pictures and videos.
Chrome
Clock
Contacts Manage all of your contacts in one place.
Perform basic and advanced mathematical
calculations.
Create and manage events, meetings, and
appointments, organize your time, and
schedule reminders for important events.
Surf the Internet with Google’s easy-to-use
web browser.
Set alarms, view time zones around the world,
use a stopwatch, set a timer, and use your
phone as a desk clock.
35
Page 36

App Function/Service
Store les on Google servers, synchronize les
Drive
across devices, and share les with other
Google accounts.
Duo
Files
Make free high-denition video calls to your
friends and family.
Access all of your documents, pictures,
videos, and downloads.
Send, receive, and manage your email
Gmail
messages. This app supports email accounts
for Gmail, Yahoo!®, Hotmail®, and more.
Search for information saved on the phone
Google
and within phone applications as well as on
the Internet.
Google Pay
Pay with your Android phone at participating
stores and within mobile apps.
Determine your location, nd directions,
Maps
browse local businesses and attractions, rate
and review places, and more.
Messaging Send and receive text messages.
36
Page 37

App Function/Service
Phone
Photos
Play Movies & TV
Play Store
Settings
Place and receive calls, use voicemail, set up
and manage contacts, and more.
Manage your photos and back them up to
your Google account.
Buy or rent movies and TV shows, and watch
them on your TV, smartphone, tablet, etc.
Download new Android apps, books, movies,
and music to your phone.
Adjust options, personalize your phone, view
device information, and more.
Sound Recorder Record sounds and play them back.
YouTube
YT Music
Watch videos or upload your own with the
world’s largest video-sharing site.
Stream and browse playlists, albums, and
artists from YouTube Music.
37
Page 38

Phone number
Follow the instructions below to view your phone number.
1. From the Home screen, swipe up to access Apps and tap Settings .
2. Tap About phone .
3. You will see the phone number listed under Phone number.
Phone number
About phone
38
Page 39

Airplane mode
Airplane mode turns off all functions that emit or receive signals while leaving
your phone on so you can use apps that don’t require a signal or data.
To turn on Airplane mode
1. From the Home screen, swipe up to access Apps and tap Settings .
2. Tap Network & internet > Advanced > Airplane mode.
3. Slide the switch to the On position to activate Airplane mode.
You will see the Airplane mode icon in the Status bar.
To turn off Airplane mode
1. From the Home screen, swipe up to access Apps and tap Settings .
2. Tap Network & internet > Advanced > Airplane mode.
3. Slide the switch to the Off position to deactivate airplane mode.
Your phone’s wireless connection features will be restored.
Tip: You can also access Airplane mode through the Quick Settings menu.
Swipe the Status bar down twice to access the Quick Settings menu and tap
Airplane mode to enable or disable data transmissions.
Note: If you do not see Airplane mode in the Quick Settings menu, swipe to the
right to locate it.
39
Page 40

Enter text
You can type on your phone using one of the available touch screen
keyboards or Google Voice Typing.
Touch screen keyboards
Your phone offers Google touch screen keyboards for entering text. The
keyboard appears automatically on-screen when you tap a text entry eld,
and can be used in either portrait or landscape mode. You can also use
Google Voice Typing to enter text using your voice (see “Google Voice Typing”
on page 41 for details).
Note: Keyboard layouts and options may change depending on the app
currently in use. For example, if you’re entering text into a web search, a Search
icon may appear instead of an Enter key.
40
Page 41

Google keyboard
The Google keyboard offers a traditional QWERTY keyboard setup for entering
text by tapping keys (like on a computer), along with options that allow
you to enter text faster and more accurately, such as continuous key input,
personalized usage dictionaries, and more.
Access Google keyboard settings
1. From the Home screen, swipe up to access Apps and tap Settings .
2. Tap System > Languages & input > Virtual keyboard > Gboard.
Google Voice Typing
Google Voice Typing uses Google Voice recognition to convert speech to text.
Tap Gboard
Tap and speak
41
Page 42

Tips for editing text
Your phone has many options to make entering text easier, including copying,
cutting, and pasting text, using voice-to-text input, customizing the user
dictionary, using predictive text, and more.
To edit text you have already entered
1. Touch and hold or double-tap the text you would like to edit.
2. Drag the tabs to adjust the highlighted selection.
3. The following options will appear: Cut, Copy, Paste (if you have text copied
on the clipboard), Share, and Select all (if there is more than one word
available to select).
Tap and hold
or double-tap
to select text
42
Page 43

To insert new text
1. Touch where you want to type, or touch and hold a blank space. The cursor
will blink and the tabs will show. Drag the tab to move the cursor.
2. Tap the tab to view the pop-up menu, then tap Paste to insert any text you
have previously copied.
Tap to insert
43
Page 44

Google account
You will need a Google account to access several phone features, such
as Gmail, Google Maps, Duo, and Google Play. Enter your Google account
information to access Google apps. These apps sync between your phone
and your online Google account.
Create a Google account
If you do not already have a Google account, you can create one online or
using your phone.
Note: You can also create and sign into your Google/Gmail account from the
Settings menu.
Create a Google account online
1. Using a computer, visit google.com.
2. On the main page, click Sign in > Create account > For myself.
3. Follow the prompts to set up your account:
a. Enter your rst and last name, a desired username/Gmail address, and
create and conrm a password.
b. Add a phone number or secondary email for security (optional).
c. Enter basic personal information.
4. Tap I agree to accept Google’s Privacy and Terms and nish your Google
account setup.
44
Page 45

Create a Google account using your phone
1. From the Home screen, swipe up to access Apps and tap Settings .
2. Tap Accounts > Add account.
3. Tap Google and then tap Create account > For myself.
45
Page 46

4. Follow the prompts to set up your account. Tap Next to proceed between
steps, which may include:
a. Enter your basic information such as rst and last name.
b. Enter a desired username/Gmail address.
c. Create and conrm a password.
d. Add a phone number for security, or tap Skip.
e. Review your account info. Tap Next to conrm.
5. Tap I agree to accept Google’s Privacy and Terms and nish your Google
account setup.
46
Page 47

Sign in to your Google account
If you have a Google account but have not yet signed in with your phone,
follow these instructions to sign in to your Google account.
1. From the Home screen, swipe up to access Apps and tap Settings .
2. Tap Accounts > Add account > Google.
3. Enter your email address or phone number and tap Next.
4. Enter your password and tap Next.
5. To sync your account information, tap your account. Select the apps you
would like to sync with your phone and then tap Menu > Sync now.
Tap Sync now
Select items to sync
47
Page 48

Important: AT&T policies often do not apply to third-party applications.
Third-party applications may access your personal information or require us
to disclose your customer information to the third-party application provider.
To nd out how a third-party application will collect, access, use, or disclose
your personal information, check the application provider’s policies, which can
usually be found on their website. If you aren’t comfortable with the third-party
application’s policies, do not use the application.
Lock and unlock your screen
You can quickly turn your phone screen off when not in use, and unlock it
when you need it.
Note:For information on how to adjust the time before the screen turns off, see
“Display” on page 163.
Turn the screen off when not in use
To quickly turn the screen off, press the Power key. Pressing the Power key again
or receiving an incoming call will turn on your phone screen and display the
lock screen.
To save battery power, your phone screen will automatically turn off after being
idle for a period of time. You will still be able to receive messages and calls
while the phone’s screen is off.
Turn the screen on and unlock it
1. To turn the screen on, press the Power key.
2. Swipe up from the bottom of the screen to unlock it.
If you have set up a screen lock, you will be prompted to unlock your phone.
See “Screen lock” on page 178 for details.
48
Page 49

The following topics describe how to use and customize your phone’s home
screen, understand the Status bar, and use the Notication panel.
Home screen basics
The Home screen is the starting point for your phone’s applications, functions,
and menus. You can customize your Home screen by adding application
icons, shortcuts, folders, widgets, and more.
Home screen layout
Your Home screen extends beyond the initial screen. Swipe left or right to
display additional screens.
Status bar
Notication area
Widgets
Back button Recent Apps button
Home button
Status area
App icons
49
Page 50

Item Description
App icons
Add shortcuts to your favorite apps to the
home screen.
Back button Tap to return to the previous screen.
Home button Tap to display the main Home screen.
View notications for incoming messages,
Notication area
missed calls, application updates, and more.
Drag the Status bar down to display the
Notication panel.
• Tap to display a list of recently used apps.
Recent Apps button
• Double tap to swap between your last two
used apps.
View phone and service status information
Status area
such as signal strength, battery status, Wi-Fi and
data connectivity, ringer status, and time.
Status bar
Widgets
Icons indicate your phone’s status (on the right
side) and notications (on the left side).
Add customizable quick access to app
functions on your phone’s Home screen.
50
Page 51

Extended home screens
In addition to the main Home screen, your phone features extended Home
screens to provide more space for adding icons, widgets, and more. Press the
Home button to display the main Home screen, then swipe to the right to
move from the main screen to an extended screen.
To add a new Home screen, drag an app icon or a widget to the right edge of
the main screen and release the icon. A new extended screen will be added.
Tip: While on an extended screen, press the Home button to return to the
main Home screen.
51
Page 52

Status bar and Notication panel
Quickly view your phone’s status and notications at the top of the screen.
Status bar
The Status bar at the top of the Home screen provides phone and service
status information on the right side and notication alerts on the left. To view
the Notication panel or access the Quick Settings menu, drag the Status bar
down from the top of the screen.
Main status icons (Right side)
Icon Status
3G data service
4G LTE data service
Airplane mode enabled
Battery (charging)
Battery (full charge)
Bluetooth® connected
GPS in use
52
Page 53

Icon Status
Headphones
Hotspot
Mute on
Network (full signal)
Network (roaming)
No Network
Speakerphone enabled
Vibrate on
Wi-Fi® enabled
Wi-Fi® Calling enabled
53
Page 54

Main notication icons (Left side)
Icon Notication
Alarm
Download
Event
Keyboard active
Missed call
New Gmail
New text or MMS message
New voicemail
Software update available
Update successful
USB connection
Warning
Wi-Fi® Calling
Note: Additional notication icons may appear. All notications may be
accessed through the Notication panel.
54
Page 55

Notication panel
Your phone’s notications appear at the left side of the Status bar. Access the
full Notication panel by dragging down the Status bar to check notications,
download updates, open messaging apps, access the Quick Settings menu,
and more.
Open the Notication panel
1. Swipe down on the Status bar.
2. To check notications, tap an item in the list.
55
Page 56

Close the Notication panel
Swipe up to close the Notication panel, or tap the Back button .
Notication panel layout
The Notication panel gives you access to both notications and the Quick
Settings menu.
To access the Quick Settings menu:
1. Swipe the Status bar down to display the Notication panel.
2. Swipe the Status bar down again to access the full Quick Settings menu.
56
Page 57

Customize the Home screen
Learn how to set the wallpaper and add, move, or remove shortcuts, widgets,
and folders from the Home screen.
Operations for rearranging the Home screen
To move widgets and app shortcuts icons
From the Home screen, touch and hold an app or widget and drag it to the
desired location.
To delete widgets and app shortcuts icons
From the Home screen, touch and hold an app or widget and drag it to
Remove at the top of the screen to delete from Home screen.
To display the Home screen menu
From the Home screen, touch and hold an empty space to display the Home
screen menu. Change wallpapers, add widgets, and adjust other Home
screen settings from the Home screen menu.
57
Page 58

Change the wallpaper
1. From the Home screen, touch and hold an empty space, then tap
Wallpapers on the Home screen menu.
Tip: You can also access the Wallpapers menu from the Settings menu.
From the Home screen, swipe up to access Apps and tap Settings >
Display > Wallpaper.
Touch and hold
an empty space
Tap Wallpapers
Choose a
wallpaper source
Choose which
wallpaper to set
2. Choose to select the wallpaper from your photos or wallpapers on
the phone.
3. Tap Set wallpaper and choose to set the wallpaper on the Home screen,
Lock screen, or both.
58
Page 59

Add shortcuts to the Home screen
Add shortcuts for quick access to favorite apps from the Home screen.
1. From the Home screen, swipe up to access Apps.
2. Touch and hold an app icon and drag to move it.
3. Drag the icon to an empty location on one of the Home screens. The
shortcut is added to the Home screen.
Add widgets to the Home screen
Widgets are self-contained apps on the Home screen. Unlike a shortcut, which
will open an app, widgets can perform certain functions without navigating
away from the Home screen. You can create widgets for a specic contact, for
bookmarks to web pages, your calendar, email, and more.
59
Page 60

1. From the Home screen, touch and hold an empty space, and then tap
Widgets in the Home screen menu.
Touch and hold
an empty space
Tap Widgets
2. Touch and hold a widget, then drag it to an empty location on one of the
Home screens. The widget will be added to the Home screen.
60
Page 61

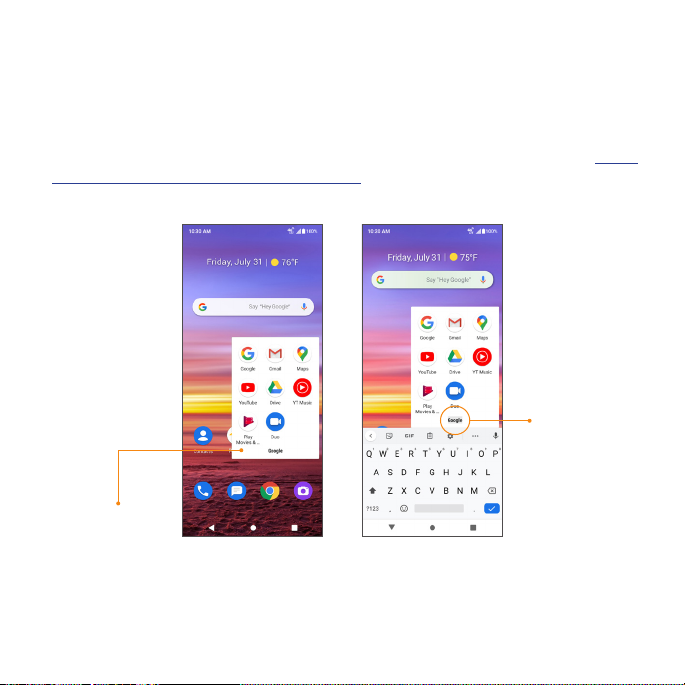
Add folders to the Home screen
You can group Home screen shortcuts into folders for convenient access.
1. Drag an app icon and release it over another app icon on the Home screen
to create a folder.
Drag an icon over
another icon
Type folder name
2. Type a name for the folder, and then tap .
3. To add more app shortcuts to the folder, touch and hold an app icon and
drag it on top of the new folder.
61
Page 62

Change folder names
Once you have added folders, you can change the name easily from the
folder display.
1. Tap the folder to open it.
2. Tap the folder name, type a new name, and then tap .
Tap to rename folder
62
Page 63

Making connections
The topics in this section will explain how to help you make connections, from
phone calls and maintaining contacts, to text messages, email, Internet, and
international services.
63
Page 64

Phone
Make a call
From the Home screen, tap Phone .
• If the keypad does not appear on the screen, tap to open it.
• Enter a phone number in the keypad to make a call. Tap to make a
Voice Call.
• To view recent calls, tap the Recents tab.
• During a call, you can tap at the bottom of the screen to hang up.
• Calls can also be made from other apps that contain your contact
information. Simply tap the phone number to make a call.
64
Page 65

Make a call with Wi-Fi Calling
1. From the Home screen, tap Phone .
2. If the keypad does not appear on the screen, tap to open it. Enter a
phone number in the keypad to make a call.
3. Tap to make the call.
4. During a call, you can tap at the bottom of the screen to hang up.
• Calls can also be made from other apps that contain your contact
information by simply tapping the phone number.
Note: You must have an active Wi-Fi connection to send or receive calls and
messages with Wi-Fi Calling. Wi-Fi Calling service must be activated on the
device before it can be used.
65
Page 66

Receive a call
The Incoming Call screen is displayed when a call is received, along with the
caller’s numbers and other information you’ve entered for that contact. When
you receive a phone call from someone who is not stored in Contacts, only the
default caller ID icon and phone number appear on the Incoming Call screen.
• To answer a call, swipe u p.
• To reject a call, swipe down.
• Press any side key to mute the ringer.
• Any missed calls are logged in Call History .
66
Page 67

Reject a call and send a text message
You can reject an incoming call and automatically send a quick response text
message to the caller.
1. When a call arrives, tap on the bottom left corner of the screen. The
ringtone or vibration will stop, and you will see a list of quick preset responses.
2. Tap one of the messages or write your own to send to the caller.
You can edit the preset quick responses from the Call Settings menu. From the
Phone app, tap Menu > Settings > Quick responses and edit or create the
quick responses.
67
Page 68

In-call screen layout and operations
While you’re on a call, you will see a number of on-screen options.
In-call screen layout
Tap the on-screen options to activate them during a call.
On-screen options
68
Page 69

On-screen options
Item Description
Overow
Menu
Speaker
Tap and select Switch to RTT to send the caller a
Real-time text during a call.
Tap to turn the speakerphone on or off.
Warning: Because of higher volume levels,
do not place the phone near your ear during
speakerphone use.
Mute
Keypad
Hold Tap to hold the current call.
Add call Tap to initiate a 3-way conference call.
End call End the current call.
Merge Join two currently active calls (conference).
Mute the microphone during an active call. Tap
again to unmute the microphone.
Tap to show the on-screen keypad. Use the keypad
to enter additional numbers, for example, an
extension or access code.
69
Page 70

Swap Swap the calls.
Route the phone’s audio through a connected
Bluetooth headset.
• When the call is routed to a Bluetooth headset,
the current call area shows the Bluetooth call
icon ( ).
Note: The Headset button is activated to show
the current call is routed to the connected
Bluetooth
Bluetooth headset.
• To route the current call back to the phone,
tap Phone to temporarily use the phone. Tap it
again to route the call back to the connected
Bluetooth headset.
• When Bluetooth or the Bluetooth headset is
turned off, the call will be routed through either
the earpiece or speaker and shows ( ).
Hang up all Hang up all active calls.
Hang up
holding
Hang up on hold calls.
70
Page 71

Place a call from Contacts
You can place phone calls directly from your Contacts list.
1. From the Home screen, tap Phone .
2. Tap Contacts to display the Contacts list.
Tap Phone
3. Tap a contact.
4. Tap a contact’s number to call to place a call.
5. To end the call, tap .
Tap Contacts
71
Page 72

Call from Recents
The Recents list allows you to view recently received, placed, or missed calls.
1. From the Home screen, tap Phone .
2. Tap Recents to display the Call Log.
Tap to call
Tap Phone
3. Tap to place a call.
Tap Recent
72
Page 73

• You can tap a contact in the Call Log to display more options.
• Create new contact: Create a new contact from an unknown number.
• Add to a contact: Add an unknown number to an existing contact.
• Send a message: Send a text message to the contact/number.
• Block number: Block the contact/number.
• Call details: View detailed call information.
Tap a contact to
display options
Call settings
Congure your voicemail options and a number of other settings for your calls.
Call settings options
1. From the Home screen, tap Phone .
2. Tap Menu > Settings.
3. Congure your phone settings.
73
Page 74

Setting Description
Display options Choose how to sort and display your contacts.
Sounds and vibration
Adjust call and ringtone volume, change your
alert tones, activate Do Not Disturb, and more.
Edit or create quick response text messages.
Quick responses
See “Reject a call and send a text message” on
page 67 for more information.
Calls
Blocked numbers
Voicemail
Set Fixed Dialing Numbers, call forwarding, call
barring, and more.
Manage numbers and contacts you
have blocked.
Set up voicemail, manage notications,
and more.
Congure RTT settings, enable or disable
Accessibility
hearing aid compatibility, and enable or
disable noise reduction.
About View more information about your phone.
74
Page 75

Contacts
Add a contact
You can add contacts from the Phone app. Enter details such as name, phone
numbers, email addresses, mailing addresses, and more.
1. From the Home screen, tap Contacts .
2. Tap to add a contact.
Choose where
to save contact
3. If you have multiple accounts on your phone, select where you want to save
the contact.
• Select Phone contact to save your contact on your phone only; they will
not be synced with your Google account.
• Select an account such as Google to save the contact to that account.
These will be synced automatically with your account.
75
Page 76

• Select your SIM card or SD card name to save the contact to your SIM card
or SD card. Your contact will be available on any phone your SIM card or
SD card is mounted in.
Tap to
add photo
Add contact
information
4. Use the keyboard to enter information.
Note: To select a type (label) for a phone number, email address or postal
address (such as Mobile, Home, Work, etc.), tap the arrow and select the
appropriate type.
5. When you are nished, tap SAVE.
76
Page 77

Save a phone number
You can save a phone number to Contacts directly from the phone keypad.
1. From the Home screen, tap Phone > Keypad .
2. Enter a phone number and tap Create new contact to add a new contact
or tap Add to a contact to add the number to an existing contact.
Select an option
3. To add the number to an existing contact, tap the contact you want to
update and add the number to the desired eld. To add a new contact,
enter the name and any additional information.
4. Tap SAVE.
77
Page 78

View contacts
View a contact’s details.
1. From the Home screen, tap Contacts .
2. Tap a contact to view their details.
78
Page 79

Contacts screen layout
Menu
Favorites
Contact image
Index
Search
Contact name
Add new
79
Page 80

Item Description
Add new Add a new contact.
Contact
Favorites
Tap to show contact’s details, place a call, send a
message, and more.
Add a contact as a favorite. You can view your
favorite contacts in the Phone app.
Index Browse contacts alphabetically.
Menu
View your contacts by labels or accounts, and
adjust settings.
Search Search contacts.
80
Page 81

Edit a contact
Add or edit a contact’s information, assign a photo, customize with a unique
ringtone, and more.
1. From the Home screen, tap Contacts .
2. Tap a contact to view their details
3. Tap Edit .
Edit
4. Tap the eld you want to change or add.
5. Add or edit the information, and then tap SAVE.
Note: To select a category for a phone number, email address, or postal
address (such as Mobile, Home, Work, etc.), tap the arrow near the eld.
81
Page 82

Delete a contact
You can delete a contact from the contacts details page.
1. From the Home screen, tap Contacts .
2. Tap a contact to view its details.
3. Tap Menu > Delete.
4. Tap DELETE.
Menu
Delete
82
Page 83

Share a contact
You can quickly share contacts using Bluetooth, Gmail, or text messaging.
1. From the Home screen, tap Contacts .
2. Tap a contact and tap Menu > Share.
3. Select how you’d like to share the contact information card (vCard).
Share
Method to share
• Messaging: Send the vCard in a text message. You can send the
information in an existing conversation thread, or create a message for a
new conversation thread. See “Send a multimedia message (MMS)” on
page 86 for more information about sending messages.
83
Page 84

• Gmail: Send the vCard as a Gmail attachment. See “Create and send an
email message” on page 88 for more information on sending emails.
• Bluetooth: Send the vCard via Bluetooth. See “Bluetooth” on page 98 for
information on pairing and sending via Bluetooth.
• Drive: Save the vCard to your Google Drive.
Messaging
Send instant messages, media, and more with text and multimedia messaging.
Text and multimedia messages
• With text messaging (SMS), you can send and receive instant text messages.
• Multimedia messages (MMS) can contain text, photos, audio and video les,
contact information cards (vCard), and more.
Note: See your service plan for applicable charges for messaging.
Send a text message (SMS)
1. From the Home screen, tap Messaging .
2. Tap Compose .
3. Enter a contact name or mobile number in the To eld.
• Enter phone numbers, contact names, or email addresses directly in the To
eld. If you’re sending the message to several contacts, separate the phone
numbers with a comma. As you enter information, any matching phone
numbers from your Contacts list are displayed. Tap the matching contact to
add them as a recipient.
84
Page 85

• Scroll to nd and select the contacts to whom you want to send the
message. You can also select Contact Groups as recipients.
4. Tap the text box and compose your message.
Enter a phone number
or contact name
Select a contact
Text message box
Note: Messages exceeding a limited amount of characters will be delivered
as one message but may incur additional charges. A counter appears below
Send to tell you how many characters you have entered and how many
characters are left.
5. When done, tap Send to send the text message.
Note: Your text message automatically becomes a multimedia message if you
enter an email address as the recipient, attach an item, or compose a very
long message.
85
Page 86

Send a multimedia message (MMS)
1. From the Home screen, tap Messaging .
2. Tap Compose .
3. Fill in one or more recipients. See “Send a text message (SMS)” on page
84 for more information on entering recipients.
4. Tap the text box to compose your message.
5. Tap Add to the left side of the text box.
6. Select a multimedia item to attach to your message:
• Camera : Take a photo or record a video.
• Picture : Select a saved photo or video.
• Audio : Record and send a voice recording.
Note: Attachment options may vary.
7. After adding an attachment, you can tap to view it, and tap to delete
the attachment.
8. Tap Send to send the MMS message.
Text and MMS options
1. From the Home screen, tap Messaging .
2. Tap Menu > Settings. You can set the following:
• Default SMS app: Set the default SMS app.
• Outgoing message sounds: Enable or disable sounds when
sending messages.
86
Page 87

• Notications: Enable or disable notication icons when messages are
received.
• Sound: Choose your messaging audio alert. This can only be accessed
when Notications are enabled.
• Vibrate: Enable or disable vibration when receiving messages. This can
only be accessed when Notications are enabled.
• Advanced:
• Group messaging: Enable or disable the ability to send MMS messages
to multiple recipients in a group.
• Your phone number: View your phone number.
• Auto-retrieve: Enable or disable the ability to automatically retrieve and
download incoming MMS messages.
• Delete old messages: Enable or disable automatic message deletion.
This feature automatically deletes messages older than 90 days to save
storage space.
• Set delete period: Adjust the amount of time messages will be kept
before being automatically deleted. This can only be accessed when
Delete old messages is enabled.
87
Page 88

Gmail
Use Gmail to send, receive, and manage your email messages. Before using
Gmail, you must sign into your Google account on your phone. See “Google
account” on page 44 for details on signing in or creating an account.
Note: You can use the Gmail app to manage email for other accounts, such
as Yahoo!, Hotmail, Outlook, and more.
Create and send an email message
1. From the Home screen, swipe up to access Apps and tap Gmail .
Tip: You can also access Gmail from the Google folder on the Home screen.
2. From the inbox, tap to compose a new email message.
3. Enter the message recipient(s), subject, and message, and then
tap Send .
Inbox
Recipient
Subject
Message
Compose
new mail
Send email
Attach File
88
Page 89

Email composition options
• Add Cc/Bcc recipients: In the mail composition window, tap in the
To bar to add Cc/Bcc recipients.
• Attach photos or videos: In the mail composition window, tap >
Attach le. Tap the le you want to attach.
• Save as a draft (Send later): While composing your message, tap
Menu > Save draft, or press the Back button to save as a draft.
• Delete mail being composed: While composing your message, tap
Menu > Discard.
Note: View your drafts and sent mail from the inbox by tapping > Drafts
or > Sent.
89
Page 90

Open an email message from a notication
When a new email is received, you will see in the Status bar.
1. Swipe the Status bar down to display the Notication panel.
2. Tap the new message from the Notication panel.
If you have two or more new email messages, tapping the notication will
open the Gmail app.
90
Page 91

Email settings
You can access settings for the Gmail app and for your individual email
accounts from the Gmail Settings menu.
1. From the Home screen, swipe up to access Apps, and tap Gmail .
2. Tap Menu > Settings.
3. Tap General settings to access settings for all accounts, or tap an account
name to congure settings for a specic email account.
Note: Available settings are subject to change.
91
Page 92

Internet and social networking
The following topics describe how to connect to and use the Internet on your
phone and how to access popular social networking sites such as Facebook,
Duo, and more.
Chrome browser
From the Home screen, tap Chrome to browse the Internet, search for
information, and bookmark your favorite web pages for convenient access.
Browsing web pages
1. Tap the address eld.
2. Enter a web address or a keyword to browse for web pages.
Adding a bookmark
1. Open the web page you want to bookmark.
2. Tap Menu > .
Opening a bookmark
1. From the Chrome browser screen, tap Menu > Bookmarks.
2. Select the bookmark of the website you want to view.
Customizing browser settings
1. From the Chrome browser screen, tap Menu > Settings.
2. In the Settings list, you can select options to customize the browser.
Tip: For more information, visit: google.com/intl/en/chrome/browser/mobile/.
92
Page 93

Post updates, see what your friends are up to, upload pictures and check-ins,
and more with on-the-go Facebook access.
Sign in to your Facebook account or create a new account
1. From the Home screen, swipe up to access Apps and tap Facebook .
2. Enter your mobile number or email and password and tap Log In, or tap
Create New Facebook Account to join Facebook.
3. Once completed, your Facebook account will be added to your phone.
Use Facebook
Once you’ve either created an account or signed in, you can post and view
updates, upload pictures, tag locations, and more, all from your phone.
1. From the Home screen, swipe up to access Apps and tap Facebook .
2. Tap What’s on your mind? to type an update. You can also share photos
and videos, start a live video, scroll through your Facebook feed, and more.
93
Page 94

Connectivity
The following topics address your phone’s connectivity options, including USB
le transfer, Wi-Fi, Bluetooth, IR connectivity, and more.
Transfer les between your phone and a computer
You can use the USB cable to connect your phone directly to your computer
and transfer music, photos, and other content les.
For example, if you have a music album stored on your computer that you
want to transfer to your phone, you can attach your phone to the computer
and copy the les to the music folder.
File transfer tips
If you want to save data to an SD card on your phone, make sure the SD card
is installed and active. For more information, see “SD card” on page 170.
Important: Do not remove the SD card while transferring data.
Data exchange may use the methods outlined in the following table:
Method Description
File Transfer
PTP
Transfer les between your phone and PC such
as photos, videos, and music.
Transfer photo and video les between your
phone and PC.
94
Page 95

Transfer les between the phone and a computer
1. Connect your phone to your computer using the USB charging cable.
• Insert the end of the cable to the charger/accessory jack at the bottom of
the phone.
• Insert the USB end of the cable into an available USB port on your
computer. You may need to remove the USB cable from the AC adapter to
access it.
2. Drag the Status bar down to display the Notication panel. You will see
Charging this device via USB.
95
Page 96

3. To transfer les from your phone to your computer:
• From the Home screen, swipe up to access Apps and tap Settings .
• Ta p Connected devices > USB.
• Tap File Transfer. You can also select other options available.
4. On your computer, navigate to the detected device (such as through the
My Computer menu) and open it.
5. If available, select a drive (Internal shared storage or SD card).
6. Select a folder and copy les from your computer to your phone or from your
phone to your computer.
7. When done, disconnect your phone from your computer.
96
Page 97

Wi-Fi
Wi-Fi provides wireless Internet access over distances of up to 300 feet. To use
your phone’s Wi-Fi, you need access to a wireless access point or hotspot.
Turn Wi-Fi on and connect to a wireless network
1. From the Home screen, swipe up to access Apps and tap Settings .
2. Tap Network & internet > Wi-Fi.
3. Slide the Wi-Fi switch to the On position.
4. Wi-Fi is enabled. Tap Wi-Fi to see the names and security settings of in-range
Wi-Fi networks.
5. To disable Wi-Fi, slide the Wi-Fi switch to the Off position.
6. Tap a Wi-Fi network to connect, enter the password (if applicable), and then
tap CONNECT.
Your phone will be connected to the Wi-Fi network. You will see in the
status bar. For more information on Wi-Fi see “Wi-Fi” on page 141.
97
Page 98

Bluetooth
Bluetooth is a short-range communications technology that allows you to
connect wirelessly to a number of Bluetooth devices, such as headsets and
hands-free car kits, Bluetooth-enabled handhelds, computers, printers, and
wireless phones. Bluetooth communication range is approximately 30 feet.
The following table describes different options and functions available with
certain Bluetooth accessories.
Function Description
Audio output Wirelessly listen to music, podcasts, etc.
Hands-free calls
Data exchange Exchange data with Bluetooth devices.
Call hands-free, using Bluetooth-capable handsfree devices and headsets.
98
Page 99

Enable Bluetooth
To enable Bluetooth
1. From the Home screen, swipe up to access Apps and tap Settings .
2. Tap Connected devices > Connection preferences > Bluetooth.
3. Slide the Bluetooth switch to the On position.
• To disable Bluetooth, slide the Bluetooth switch to the Off position.
Note: Turning on Airplane Mode disables all network features including calling,
messaging, mobile data, Wi-Fi, and Bluetooth. To still use Wi-Fi and Bluetooth,
turn them on in Settings or in the notication panel.
Tip: Turn off Bluetooth when not in use to conserve battery power.
99
Page 100

Pair Bluetooth devices
To pair Bluetooth devices
1. From the Home screen, swipe up to access Apps and tap Settings .
2. Tap Connected devices > Pair new device.
Pair new device
• Nearby devices will appear under Available devices.
• If a target device is not detected, ensure that the device is powered on
and is discoverable, then tap Refresh to search again.
3. Tap a device under Available devices and follow the on-screen instructions
to pair with the device.
• Methods to accept a Bluetooth connection differ depending on the
devices being used.
100
 Loading...