

Page 1
Page 2

TABLE OF CONTENTS
CHAPTER 1. BEFORE USING YOUR AT&T QUICKFIRE
PACKAGE CONTENTS ............................................................................................ 6
HANDSET DESCRIPTION ........................................................................................7
THE FUNCTION KEYS .......................................................................................................... 8
DISPLAY INDICATORS .......................................................................................................... 9
BATTERY USAGE .................................................................................................12
BATTERY INSTALLATION.................................................................................................... 12
BATTERY REMOVAL ........................................................................................................... 12
BATTERY CHARGING ......................................................................................................... 13
USING AT&T SIM CARD ....................................................................................... 14
INSERTING THE AT&T SIM CARD ....................................................................................... 14
REMOVING THE AT&T SIM CARD ...................................................................................... 14
USING microSD CARD ......................................................................................... 15
INSERTING THE microSD CARD ......................................................................................... 15
REMOVING THE microSD CARD ........................................................................................ 15
USING QWERTY KEYPAD .................................................................................... 16
BLOCKING ANTENNA WHILE MAKING A CALL ................................................... 18
CORRECT/INCORRECT FINGER POSITION ......................................................................... 18
BATTERY HANDLING INFORMATION................................................................... 19
IEEE STANDARD FOR RECHARGEABLE BATTERIES FOR CELLULAR TELEPHONES .............. 19
CHAPTER 2. BASIC OPERATION
TURNING THE PHONE ON/OFF ............................................................................ 22
TOUCH SCREEN LOCK MODE .............................................................................. 22
USING SHORTCUT KEY ........................................................................................ 22
IDLE SCREEN ....................................................................................................... 23
USING THE TOUCHSCREEN ................................................................................. 23
MENU SUMMARY ............................................................................................... 27
12-UP MAIN MENU........................................................................................................... 27
LANDSCAPE MODE MENU ................................................................................................ 29
BASIC FUNCTIONS .............................................................................................. 30
MAKING A CALL................................................................................................................ 30
ANSWERING CALLS .......................................................................................................... 31
WAIT/PAUSE FEATURE ...................................................................................................... 31
3-WAY CALLING ................................................................................................................ 32
CALLER ID FUNCTION ....................................................................................................... 32
CALL WAITING FUNCTION ................................................................................................ 32
ADJUSTING VOLUME ........................................................................................................ 33
MAKING AN INTERNATIONAL CALL .................................................................................. 33
DURING A CALL .................................................................................................. 34
1
Page 3

TABLE OF CONTENTS
MUTE (UNMUTE) .............................................................................................................. 34
SPEAKERPHONE ................................................................................................................ 34
RECENT CALLS .................................................................................................................. 34
FIND NAME ....................................................................................................................... 34
MESSAGING ...................................................................................................................... 35
BLUETOOTH....................................................................................................................... 35
MAKING AN EMERGENCY CALL .........................................................................36
911 IN LOCK MODE .......................................................................................................... 36
911 USING ANY AVAILABLE SYSTEM ................................................................................ 36
CHAPTER 3. MEMORY FUNCTION
STORING A PHONE NUMBER ..............................................................................38
ENTERING LETTERS, NUMBERS & SYMBOLS ....................................................... 40
USING QWERTY KEYBOARD.............................................................................................. 41
STANDARD INPUT MODE .................................................................................................. 42
NUMERIC MODE ............................................................................................................... 42
SYMBOL MODE ................................................................................................................. 43
EMOTICON MODE ............................................................................................................. 43
MAKING A CALL THROUGH THE CONTACT LIST ..................................................44
ONE-TOUCH DIALING ....................................................................................................... 44
CHAPTER 4. QUICKFIRE TIPS & TRICKS
QUICKFIRE TIPS & TRICKS ...................................................................................46
NAVIGATING & TOUCH SCREEN TIPS ................................................................................ 46
MESSAGING TIPS .............................................................................................................. 46
BROWSING TIPS ................................................................................................................ 47
MUSIC TIPS ....................................................................................................................... 47
CAMERA TIPS .................................................................................................................... 48
GENERAL TIPS ................................................................................................................... 49
CHAPTER 5. MENU FUNCTION
AT&T MUSIC ....................................................................................................... 52
MUSIC PLAYER .................................................................................................................. 52
SHOP MUSIC ..................................................................................................................... 53
MUSIC ID .......................................................................................................................... 54
XM RADIO ......................................................................................................................... 54
MUSIC VIDEOS .................................................................................................................. 55
THE BUZZ .......................................................................................................................... 55
COMMUNITY .................................................................................................................... 56
MUSIC APPS ...................................................................................................................... 56
2
Page 4

3
3
TABLE OF CONTENTS
MESSAGING ........................................................................................................ 57
CREATE NEW MESSAGE .................................................................................................... 57
INBOX ............................................................................................................................... 58
OUTBOX ............................................................................................................................ 59
SENT ................................................................................................................................. 59
DRAFTS ............................................................................................................................. 60
IM ..................................................................................................................................... 61
EMAIL ............................................................................................................................... 63
VOICE MAIL ...................................................................................................................... 64
YELLOWPAGES ....................................................................................................65
FIND. MAP. SAVE. GO......................................................................................................... 65
MEDIA NET .........................................................................................................66
MEDIA NET HOME ............................................................................................................ 66
FAVORITES ........................................................................................................................ 66
ENTER URL ........................................................................................................................ 67
HISTORY ............................................................................................................................ 67
SETTINGS .......................................................................................................................... 68
MEDIA MALL ....................................................................................................... 69
SHOP RINGTONES ............................................................................................................. 69
SHOP GAMES .................................................................................................................... 69
SHOP GRAPHICS ............................................................................................................... 69
SHOP MULTIMEDIA ........................................................................................................... 69
SHOP APPLICATIONS ......................................................................................................... 70
SHOP VIDEOS .................................................................................................................... 70
MEDIA NET HOME ............................................................................................................ 70
CELLULAR VIDEO ................................................................................................71
CELLULAR VIDEO OPTIONS ............................................................................................... 71
MY STUFF ...........................................................................................................72
RINGTONES & AUDIO ........................................................................................................ 72
IMAGES ............................................................................................................................. 73
VIDEOS .............................................................................................................................. 74
ADDRESS BOOK .................................................................................................. 75
FIND NAME ....................................................................................................................... 75
ADD NEW .......................................................................................................................... 81
GAMES & APPS ................................................................................................... 83
GAMES .............................................................................................................................. 83
APPS ................................................................................................................................. 83
AT&T GPS ............................................................................................................ 87
AT&T NAVIGATOR ............................................................................................................. 87
ORGANIZER & TOOLS .......................................................................................... 88
Page 5

TABLE OF CONTENTS
CAMERA ........................................................................................................................... 88
CALENDAR ........................................................................................................................ 9 0
ALARM .............................................................................................................................. 91
CALCULATOR .................................................................................................................... 92
TIP CALCULATOR .............................................................................................................. 92
TO DO ............................................................................................................................... 93
WORLD TIME ..................................................................................................................... 93
NOTEPAD .......................................................................................................................... 94
UNIT CONVERTER ............................................................................................................. 95
VOICE MEMO .................................................................................................................... 95
STOPWATCH...................................................................................................................... 96
SETTINGS ............................................................................................................ 97
PROFILE ............................................................................................................................ 97
DISPLAY ............................................................................................................................ 98
BLUETOOTH..................................................................................................................... 100
DATE & TIME ................................................................................................................... 102
PHONE ............................................................................................................................ 103
CALL ................................................................................................................................ 106
SECURITY ........................................................................................................................ 109
APPLICATIONS ................................................................................................................ 112
SOFTWARE UPDATE ........................................................................................................ 115
VOICE COMMANDS .......................................................................................... 116
CHAPTER 6. PC CONNECTIVITY
PC CONNECTIVITY ............................................................................................ 118
SET UP BLUETOOTH MODE FOR THE QUICKFIRE ............................................................. 118
PAIRING THE QUICKFIRE WITH A PC ............................................................................... 119
MAKING DIAL-UP NETWORKING .................................................................................... 122
PAIRING A BLUETOOTH HEADSET TO THE QUICKFIRE ..................................................... 127
MAKING DIAL-UP NETWORKING VIA USB ...................................................................... 128
MUSIC SYNC ................................................................................................................... 130
MASS STORAGE DEVICE.................................................................................................. 131
CHAPTER 7. SAFETY INFORMATION
SAFETY .............................................................................................................. 134
WARRANTY ....................................................................................................... 160
4
Page 6

5
5
CHAPTER 1
BEFORE USING YOUR AT&T QUICKFIRE
CHAPTER 1. BEFORE USING YOUR AT&T QUICKFIRE
This chapter provides important information about your
AT&T Quickfire handset including:
Package Contents
Handset Description
Battery Usage
Using AT&T SIM Card
Using microSD Card
Using QWERTY Keypad
Blocking Antenna while Making a Call
Battery Handling Information
Page 7
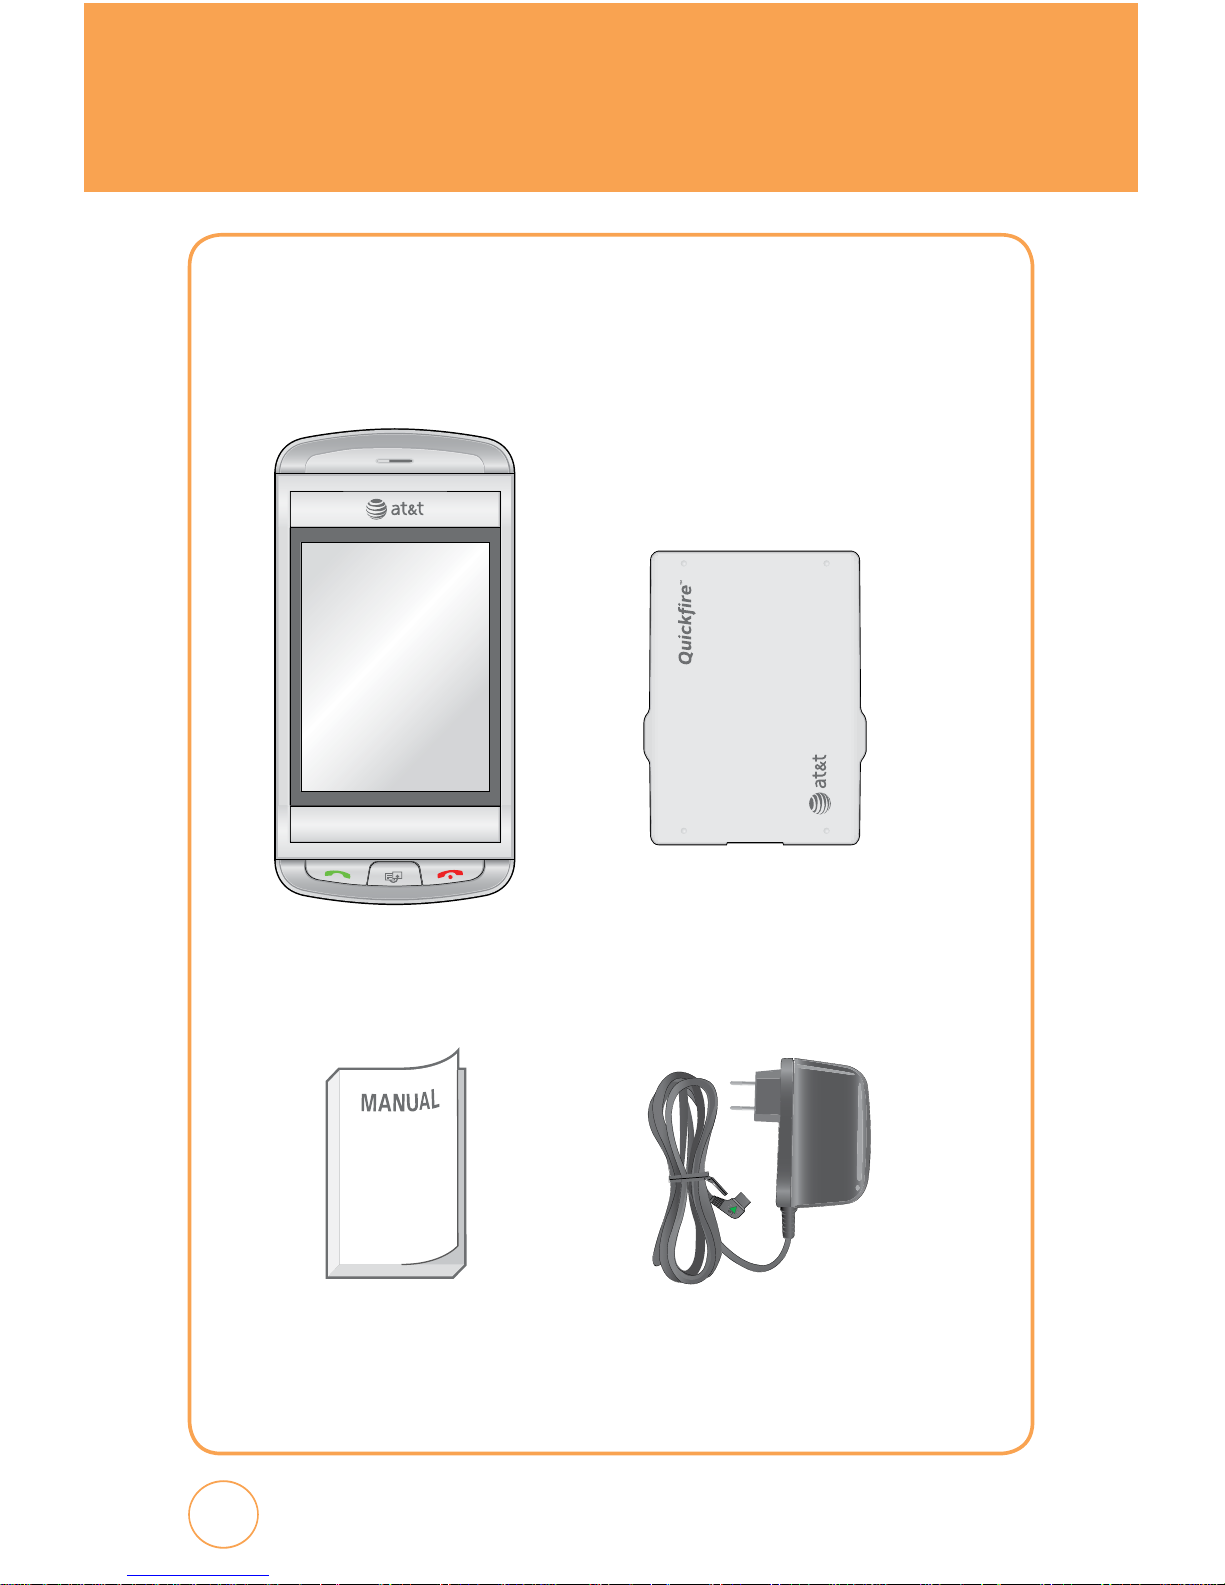
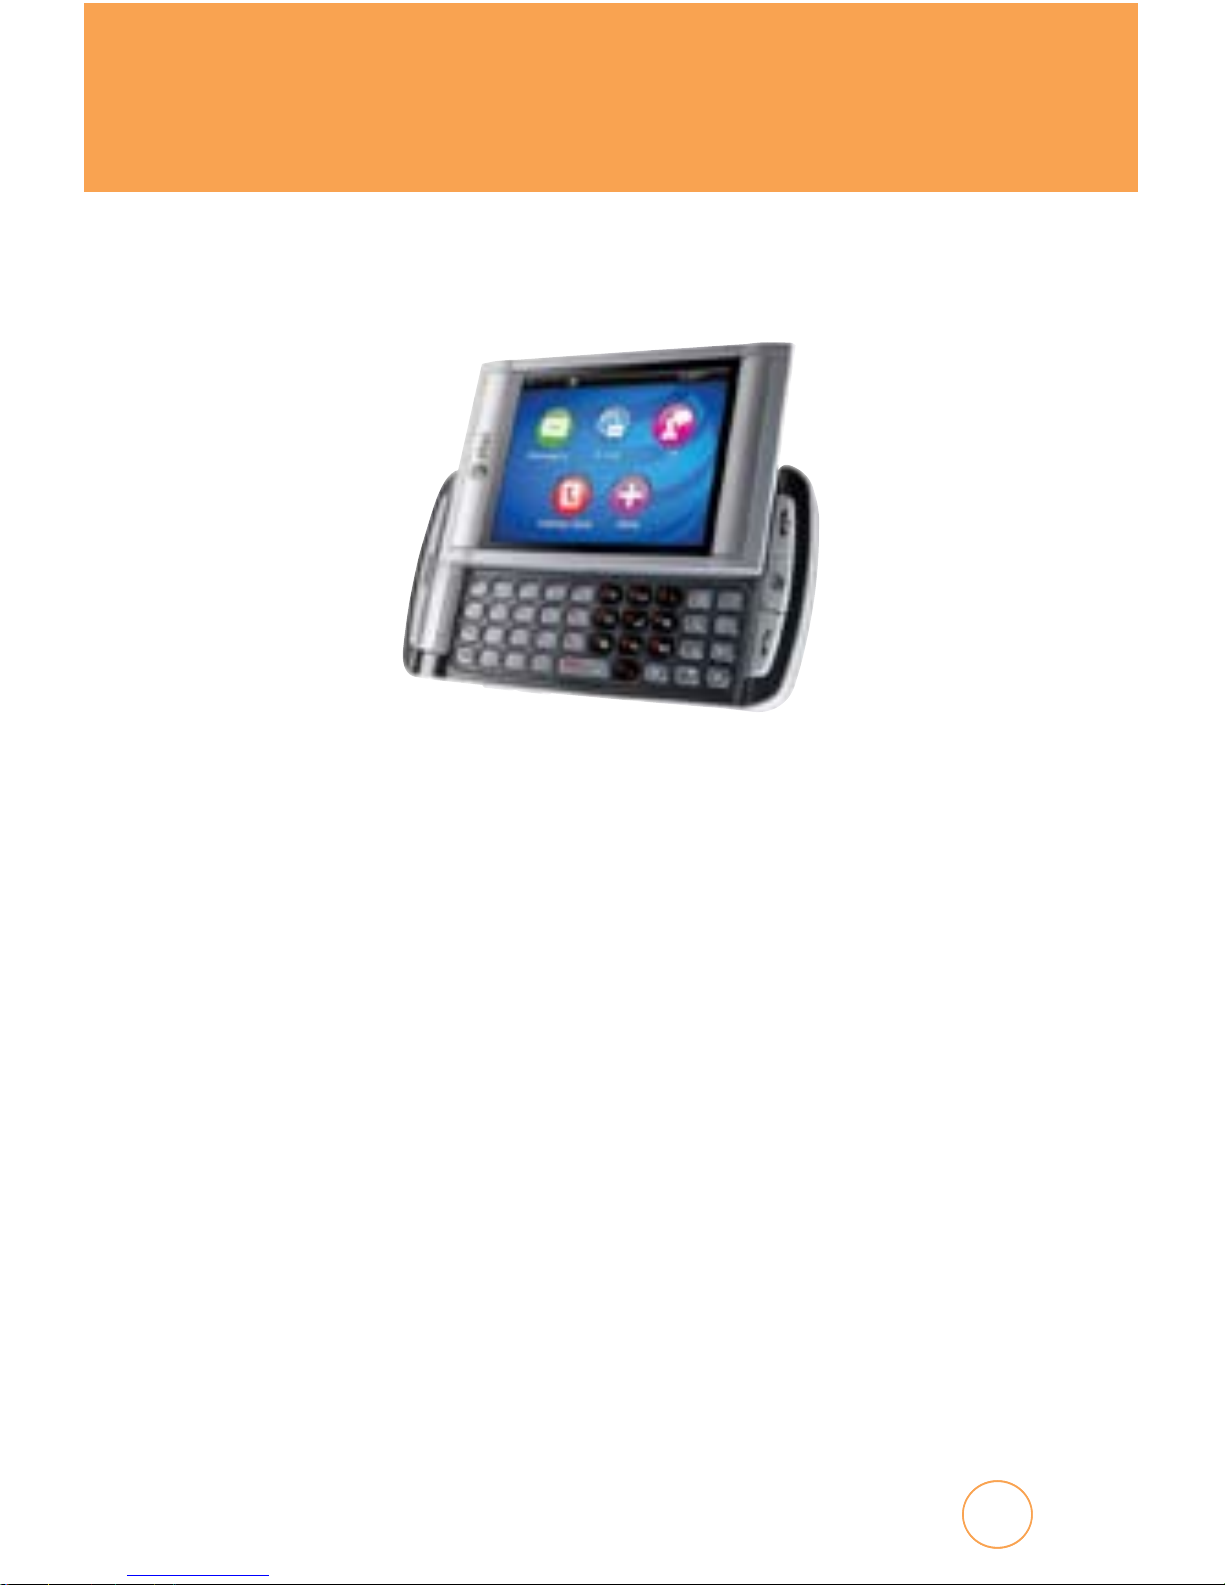
PACKAGE CONTENTS
This package should include all items pictured below.
If any are missing or different, immediately contact the retailer where
you purchased the phone.
6
Handset Standard Battery
Manual AC Charger
Page 8
7
7
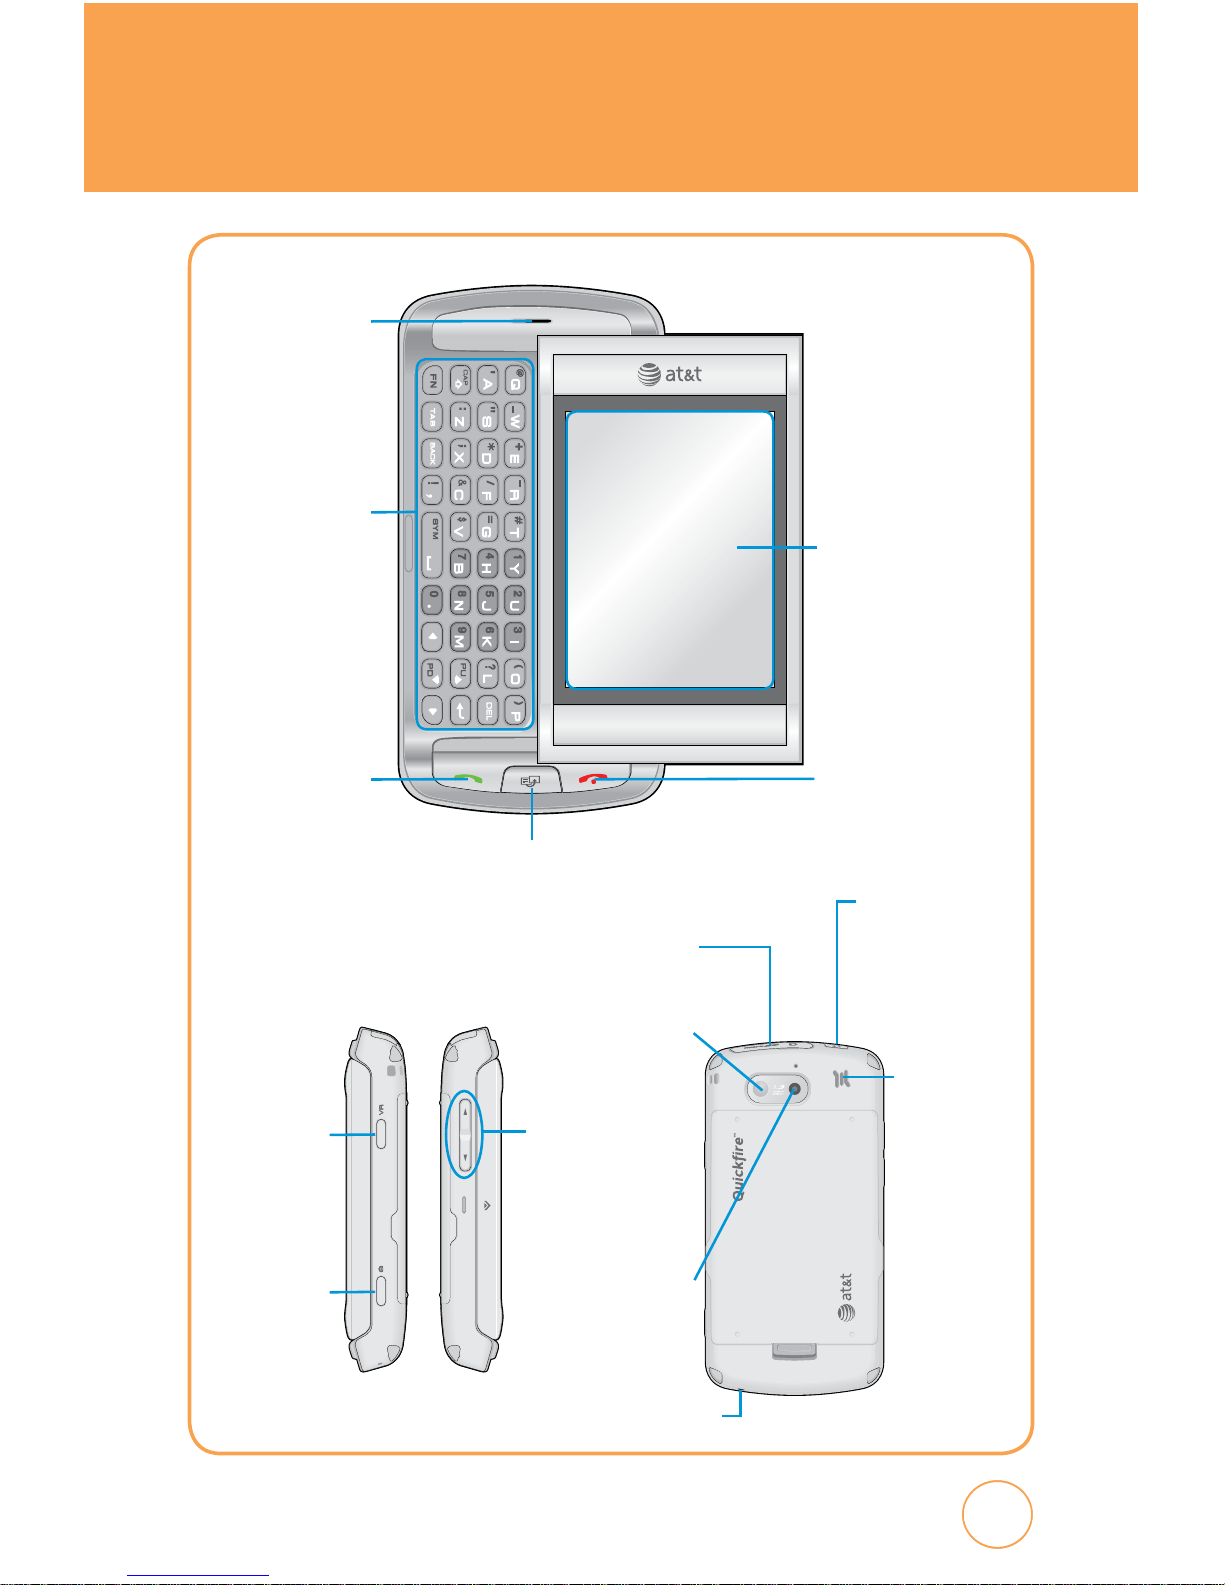
HANDSET DESCRIPTION
Earpiece
Main Display
with Touch
Screen
Shortcut Key
QWERTY
Keypad
SEND Key END Key
Volume
Up/Down
Keys
VR Key
Camera
Key
Power and
Hold/ Screen
Lock Mode
Key
microSD/Ear Jack
or Charger slot
External
Speaker
Mirror
Camera
Lens
Microphone
Page 9
HANDSET DESCRIPTION
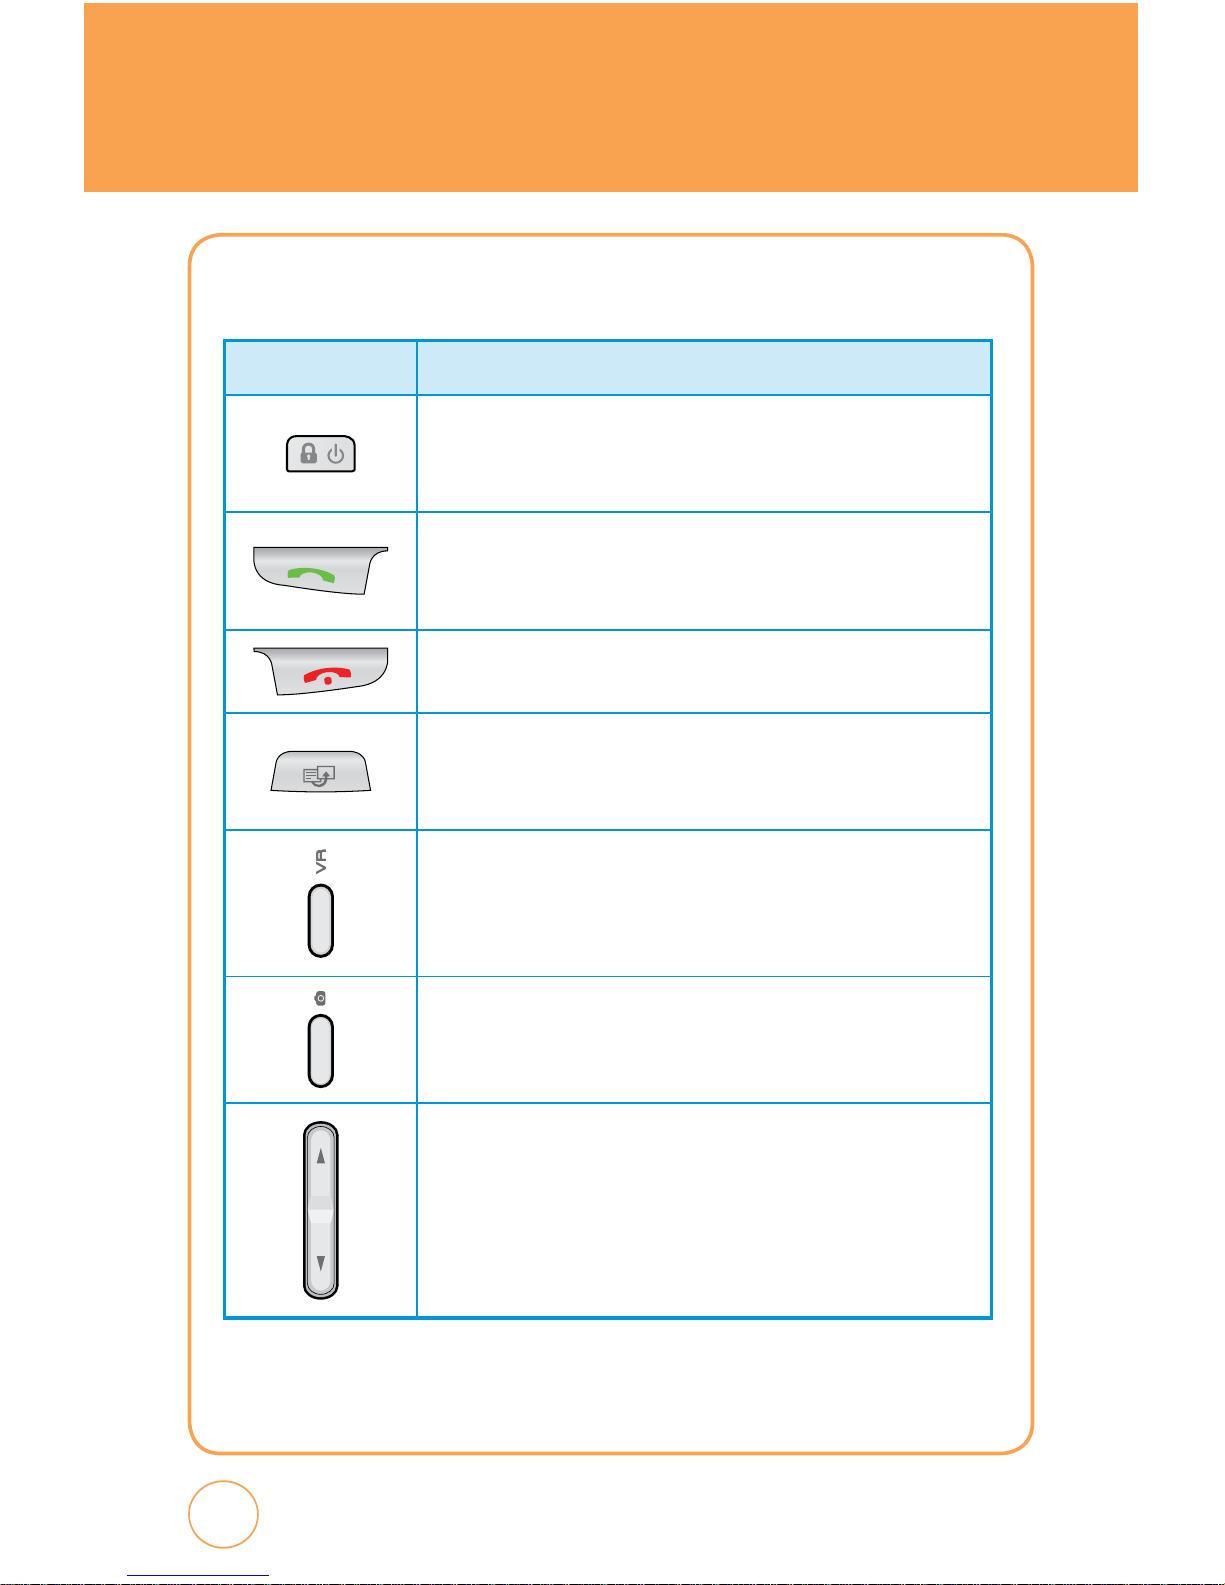
THE FUNCTION KEYS
KEY Descriptions
Power/Screen Lock Mode Key
Press and hold to turn the phone on/off.
Short press to screen lock mode the phone.
Send Key
Press to make or receive a call or in idle mode, press to
access the All calls list.
End Key
Press to terminate a call or to return to idle mode.
Shortcut Key
Press to launch the Quick List such as Main Menu, Call,
Messaging, Browser, Music Player.
Voice Command Key
Press to activate Voice Command.
Camera Key
Press and Hold to launch the camera application in Idle or
main menu screen.
Side Volume Key
Allows you to adjust the ringer volume in standby mode or
adjust the voice volume during a call. The volume key can
also be used to scroll up or down to navigate through the
different menu options. Press to mute the incoming call
ringer.
8
Page 10
9
9
HANDSET DESCRIPTION
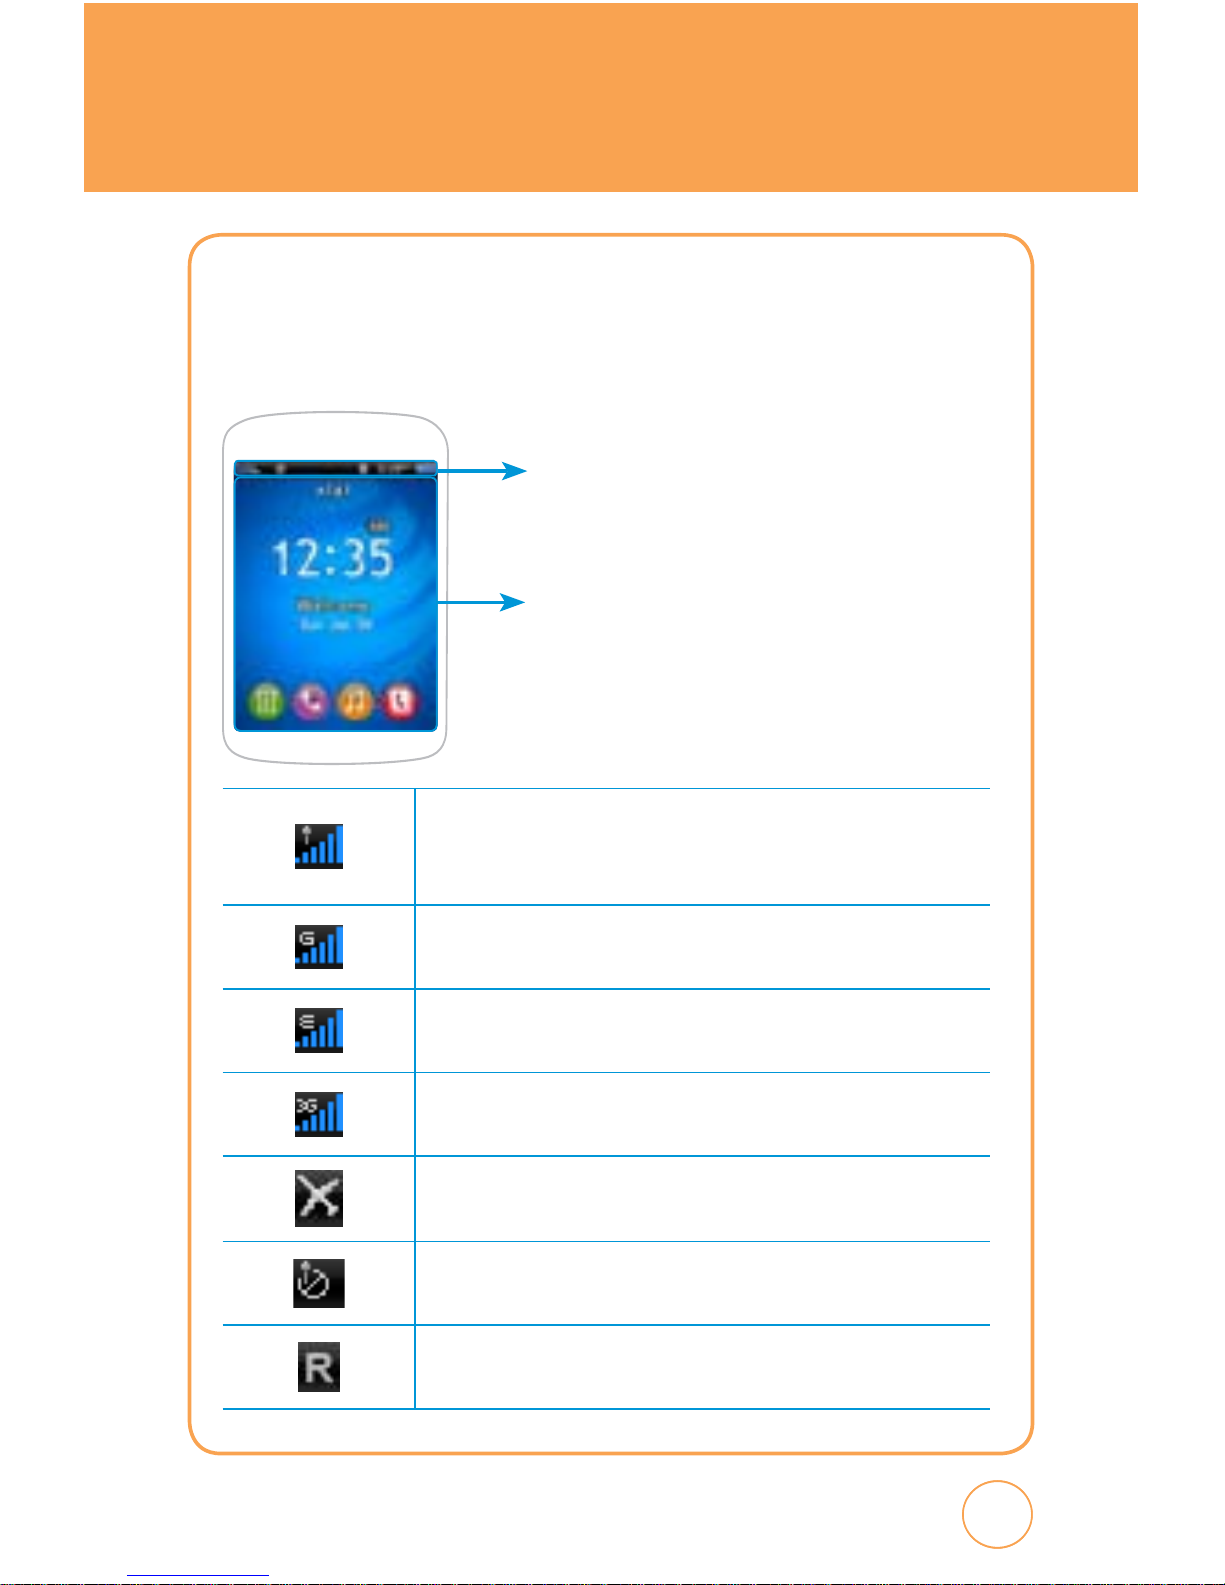
DISPLAY INDICATORS
The idle mode display appears when you are not on a call or using the
menu. You must be in idle mode to dial a phone number.
Signal Strength
Current signal strength: the more lines, the stronger the
signal.
GPRS Signal Strength
GPRS service is available.
EDGE Signal Strength
Edge service is available.
3G Signal Strength
3G service is available.
Airplane mode
No service
Indicates the phone cannot receive a signal from the system.
Roaming
Phone is out of home area.
Text & Graphic Area
Display Indicators
Displays various icons.
Page 11
HANDSET DESCRIPTION
10
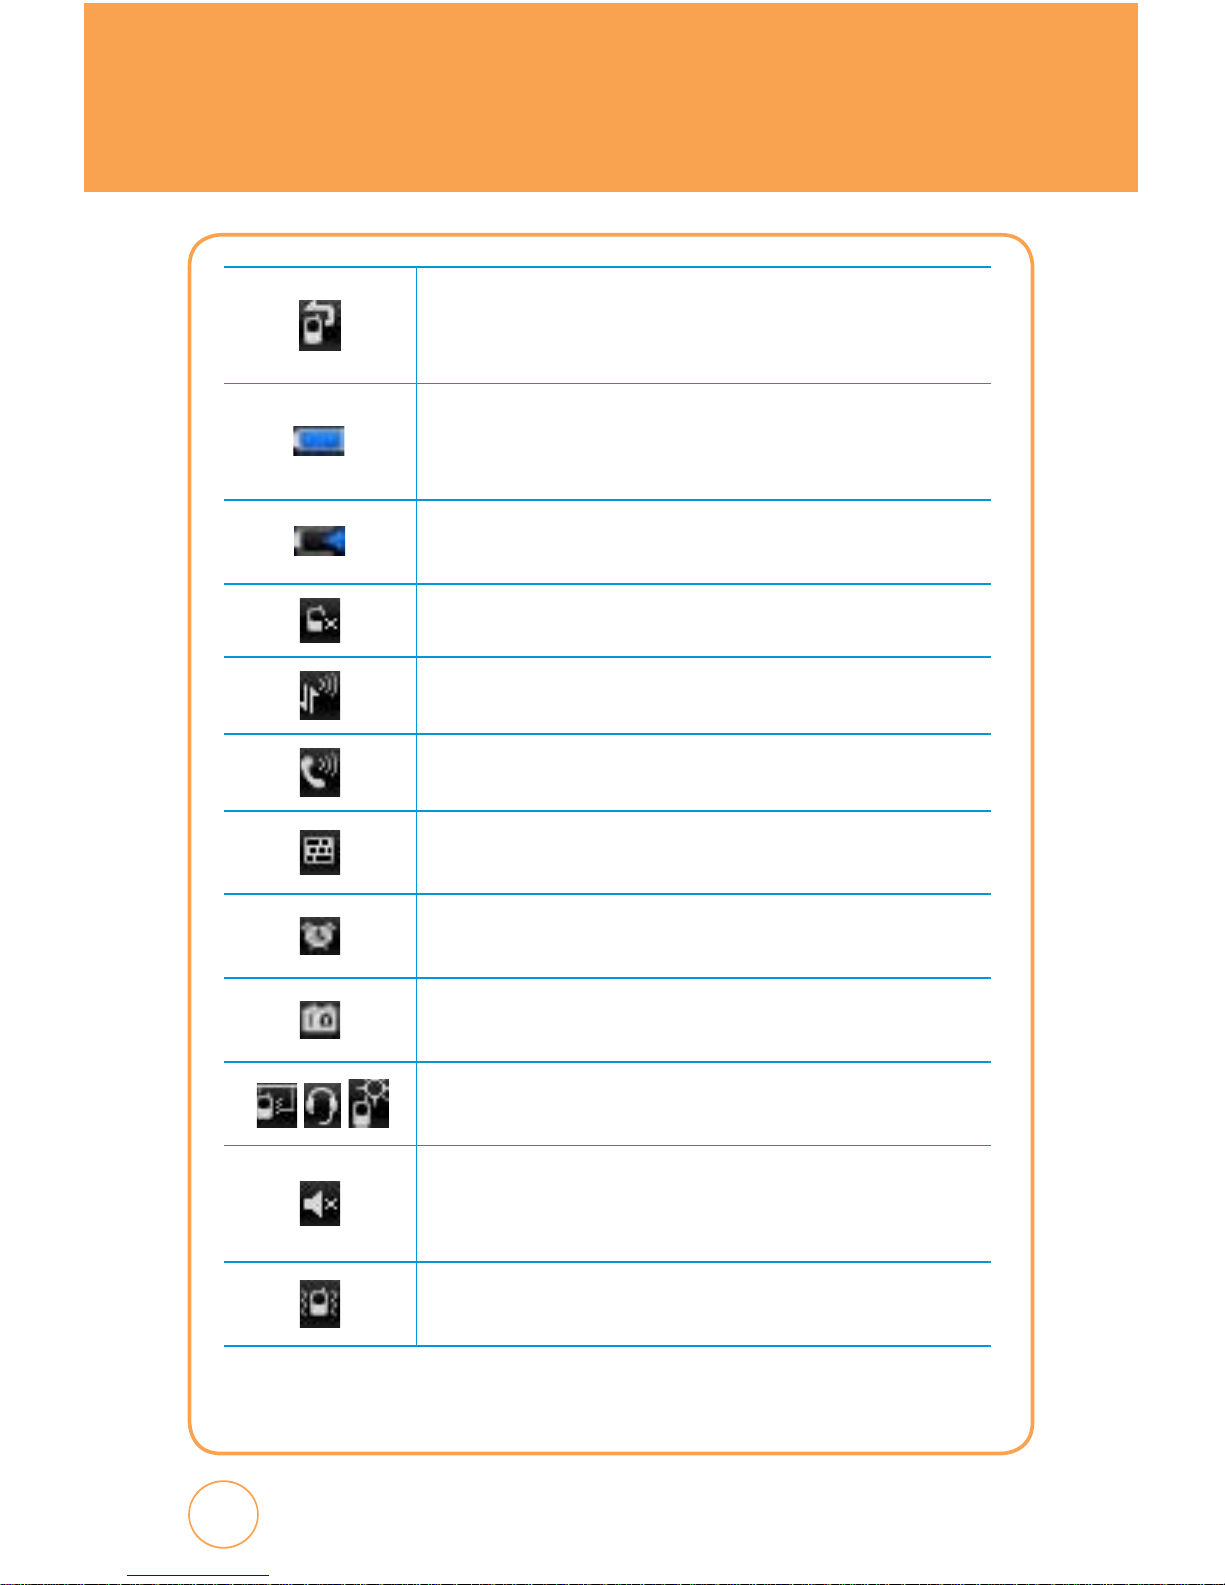
Call forward
Appears when your incoming phone calls are being
forwarded to another number.
Battery
Battery charging level — the more blocks, the stronger the
charge.
Battery charging
Indicates the battery is charging.
Missed call
Data call
Voice call
TTY
Indicates your Quickfire is active in TTY mode.
Alarm on
Appears when an alarm is set.
Scheduler on
Appears when a Scheduler event is set.
Profile Icon Status
Indicates Meeting, Headset or Outdoor mode is active.
Silent All
Phone is set to Silent - no sound will be made to notify you of
incoming calls or messages.
Vibrate All
Phone will vibrate to notify you of an incoming call.
Page 12
11
11
HANDSET DESCRIPTION
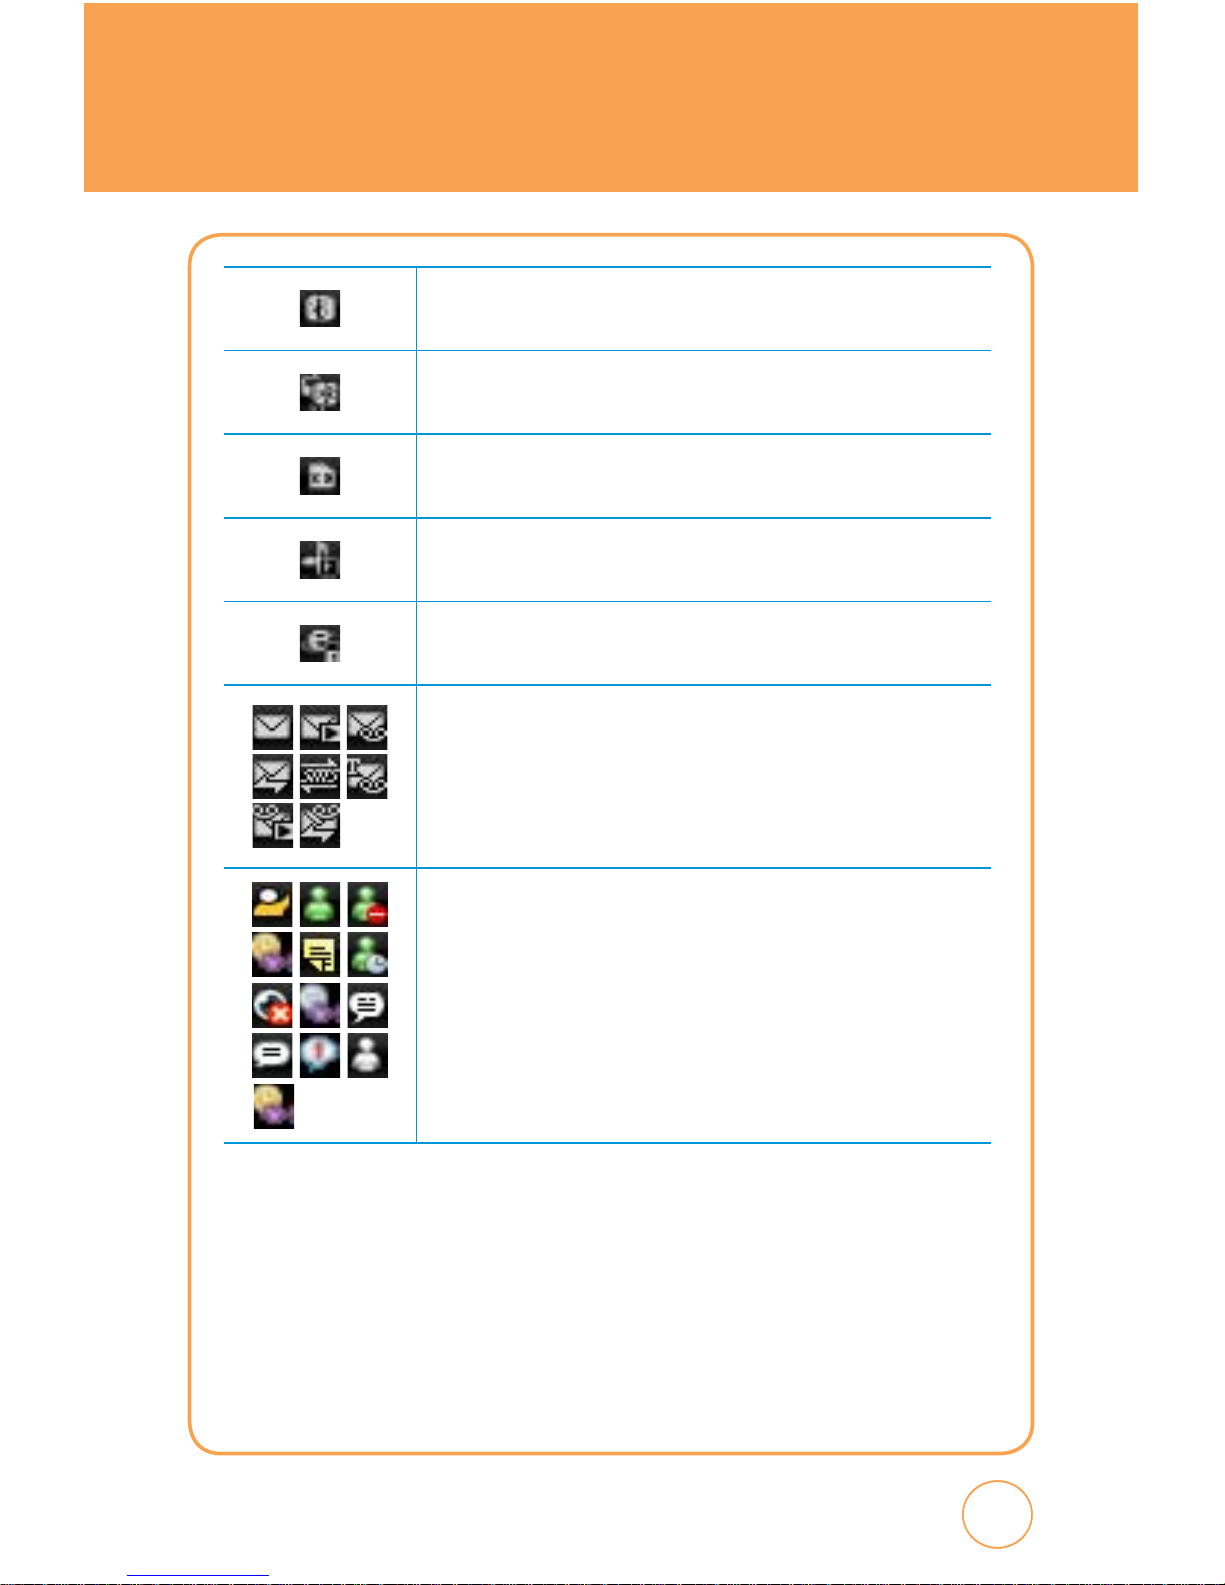
Bluetooth on
Indicates Bluetooth mode is active.
Bluetooth connected
Indicates Bluetooth Connected.
External memory
Indicates a microSD card is inserted.
Music player
Indicates Music player is active.
Secure WAP
Indicates Secure WAP connection.
Message Icon Status
Icons indicate Text message, MMS message, Voice mail, WAP
push, OTA, text message + voice mail, MMS message + voice
mail, WAP push + voice mail.
You’re also notified by a visual and audible alert.
IM
Icons indicate AIM Online, MSN Online, MSN Busy, Yahoo
Busy, AIM away, MSN Away, AIM Invisible, Yahoo Invisible,
AIM Message, MSN New Message, Yahoo Message, MSN
Appear Offline, Yahoo Available
Page 13
BATTERY USAGE
12
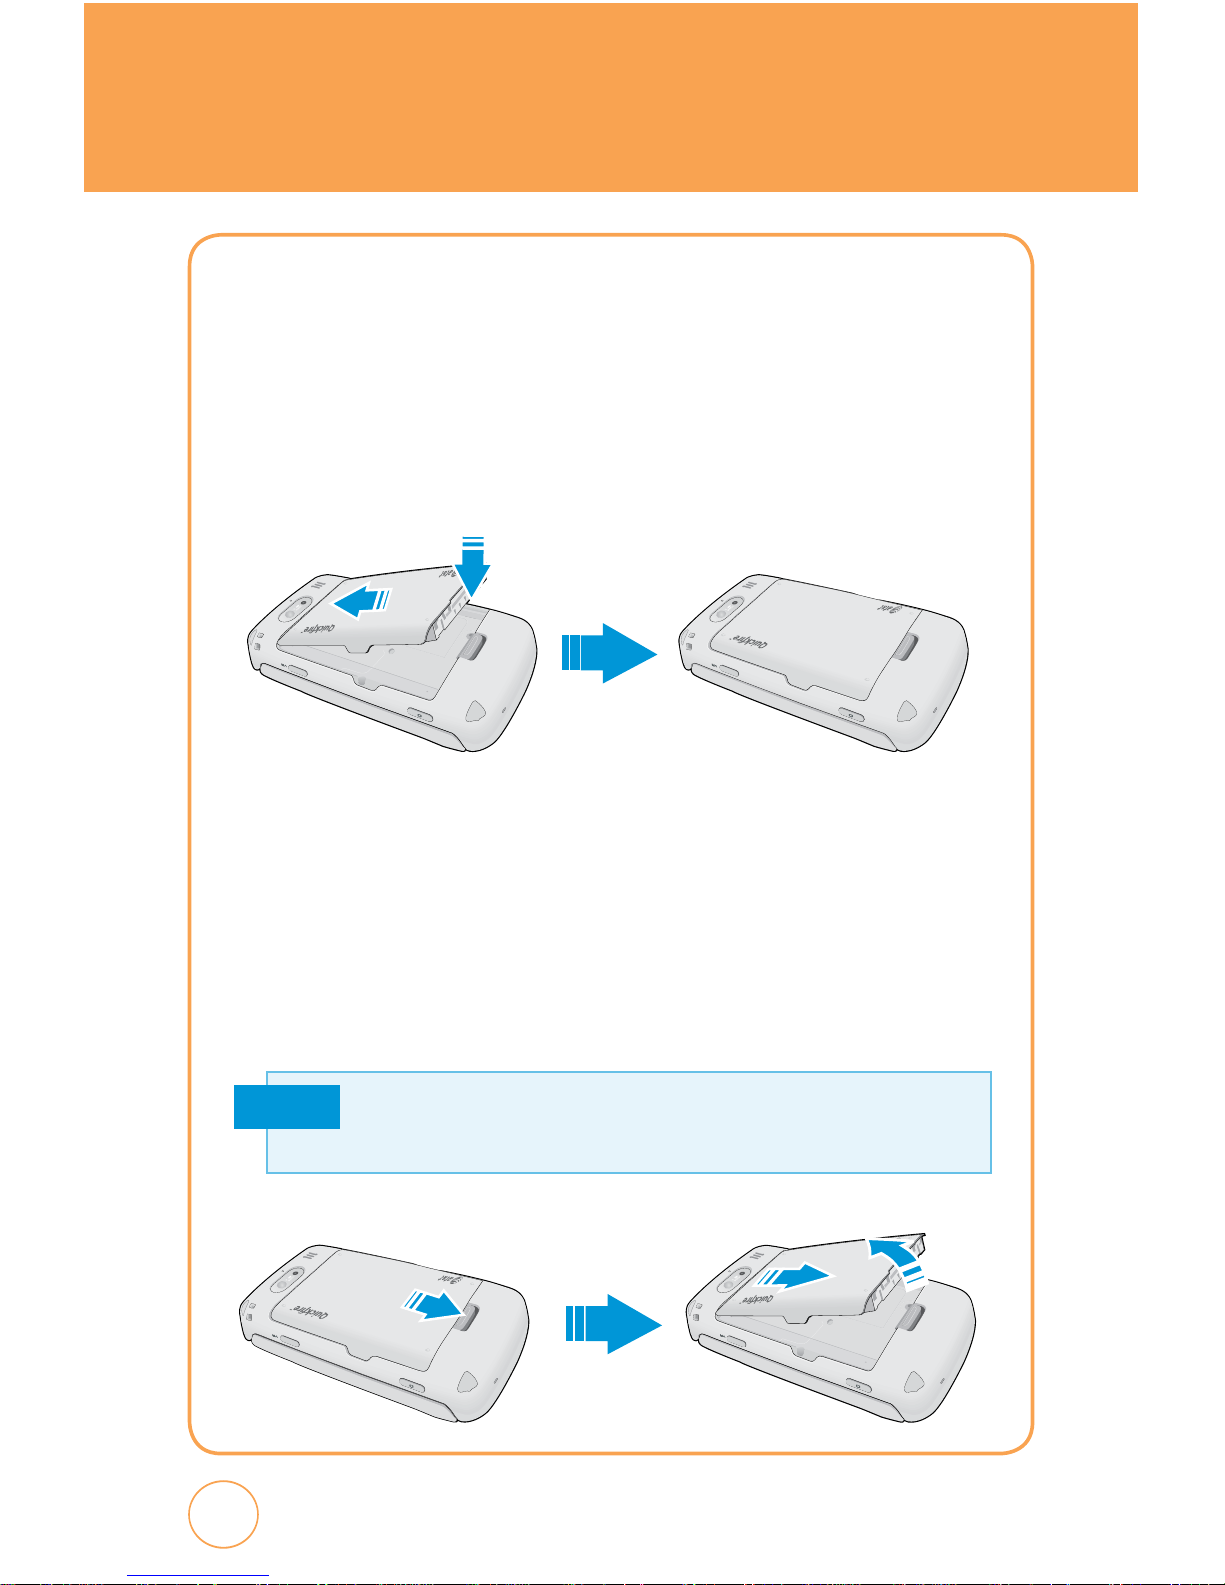
BATTERY INSTALLATION
1.
Place the battery (label side up) on the back of the phone so the
metal contacts match up on the battery and in the battery cavity.
2.
Slide the battery down into the battery cavity until it locks into
place.
BATTERY REMOVAL
1.
Push up the release latch button, then slide the battery off the
phone.
2.
Lift the battery up and out of the battery cavity from the top of the
battery.
If the battery is not correctly placed in the compartment, the handset
will not turn on and/or the battery may detach during use.
Note
Page 14
13
13
BATTERY USAGE
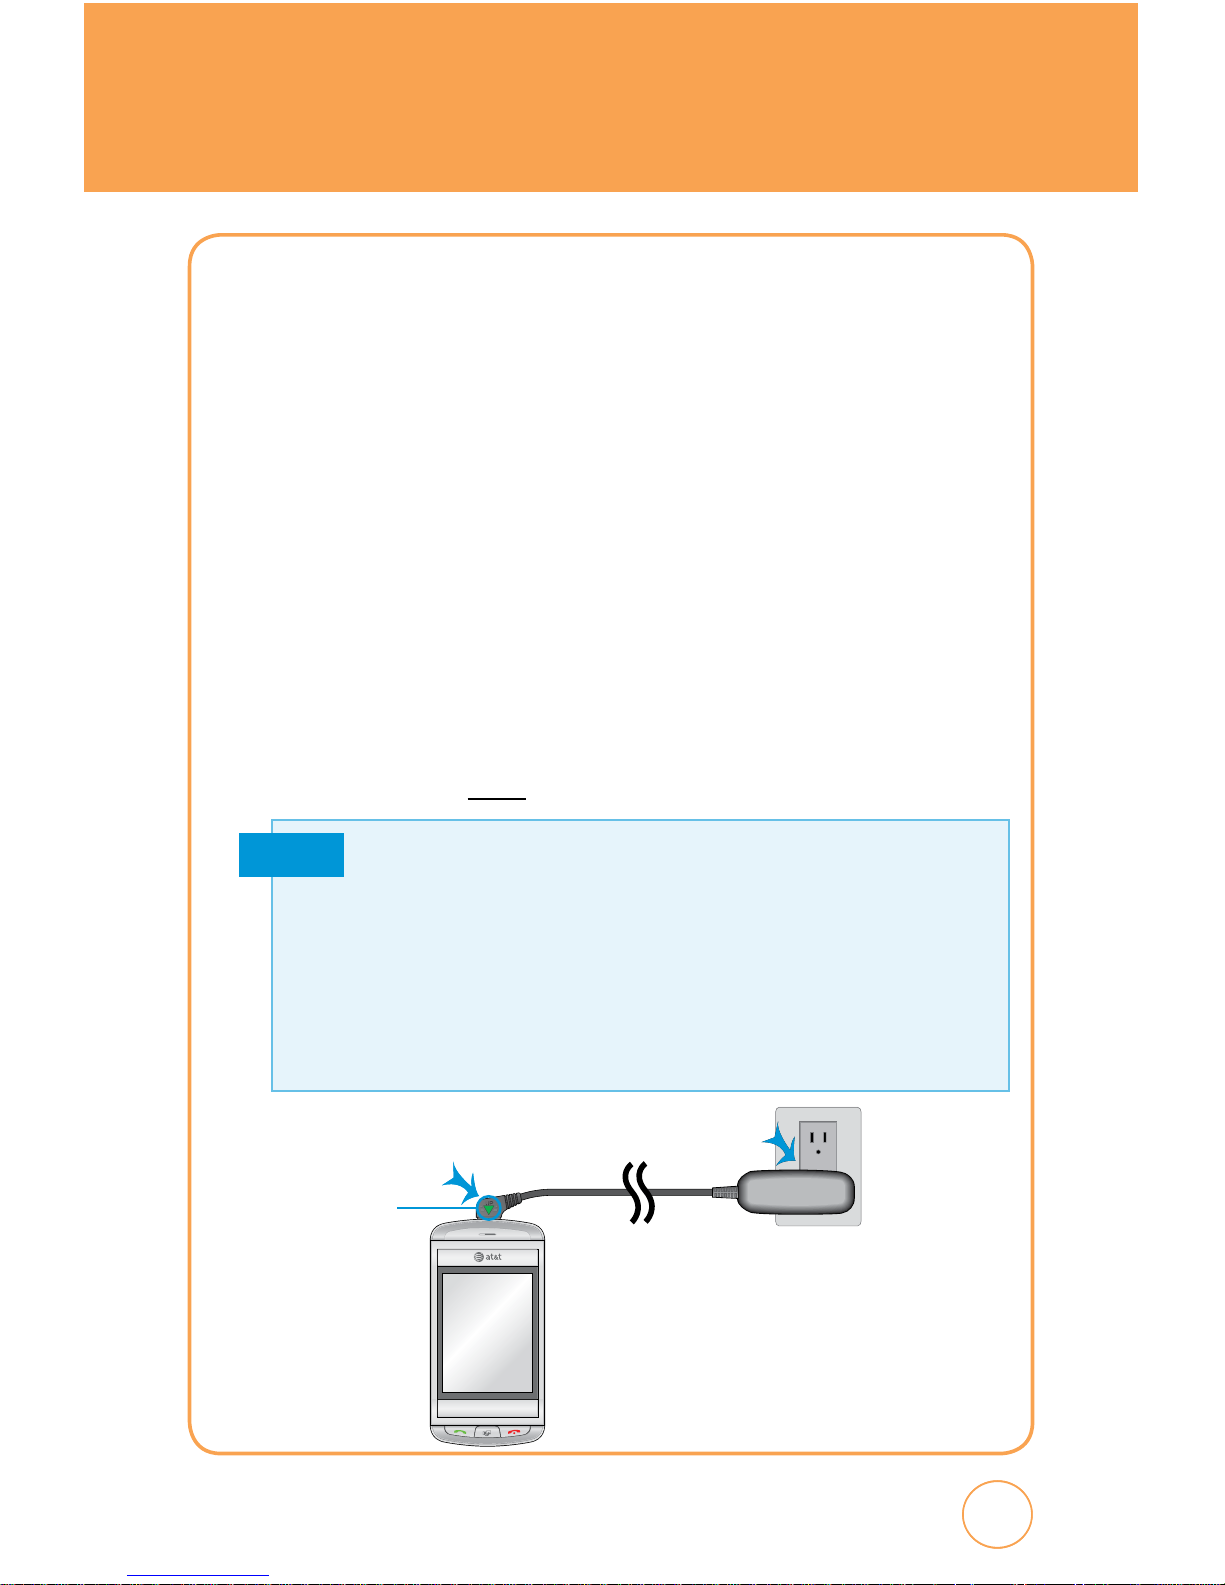
BATTERY CHARGING
POWER CONNECTION
1.
Plug the AC Charger into a standard outlet.
2.
To access the charging port located on the upper side of your
Quickfire, as seen on page 7, open the flap and plug the other end of
the AC Charger into the charging port. The battery must be installed
onto the phone to work properly.
3.
The clearly marked, embossed arrow on the AC Charger adapter
should always be face-up on the same side as the display screen when
it is inserted into the Quickfire phone. See the diagram below for
proper positioning and insertion of the AC Charger adapter into the
phone. You should never force the AC Charger adapter into the phone.
Note
• When you charge the battery with the phone powered off, you will see a
charging status screen. You cannot operate the phone until it is powered on.
• The battery is not charged at the time of purchase.
• Fully charge the battery before use.
•
It is more efficient to charge the battery with the handset powered off.
• The battery must be connected to the phone in order to charge it.
• Battery operating time gradually decreases over time.
• If the battery fails to perform normally, you may need to replace the battery.
Please refer to the Manufacturer's Warranty on page 160 for further
information.
Embossed
arrow should
always face up
Page 15

USING AT&T SIM CARD
14
INSERTING THE AT&T SIM CARD
You’ll always need an AT&T SIM card to use your mobile phone. This
contains important information about your mobile phone and network.
The message “Insert SIM“ appears when the AT&T SIM card is not
installed. Please take care of your AT&T SIM card and don’t keep it near
magnetic and electronic devices as this can interfere with data storage
and network operations.
1.
Lift the battery out of the device.
2.
Slide the SIM card in under the metal grooves in the SIM card slot.
Make sure the SIM card’s metal contacts are facing down and the cut
corner is at the upper left.
REMOVING THE AT&T SIM CARD
1.
Lift the battery out of the device.
2.
To remove the SIM card, push down on tab .
Slide it away from socket .
Page 16
15
15
USING microSD CARD
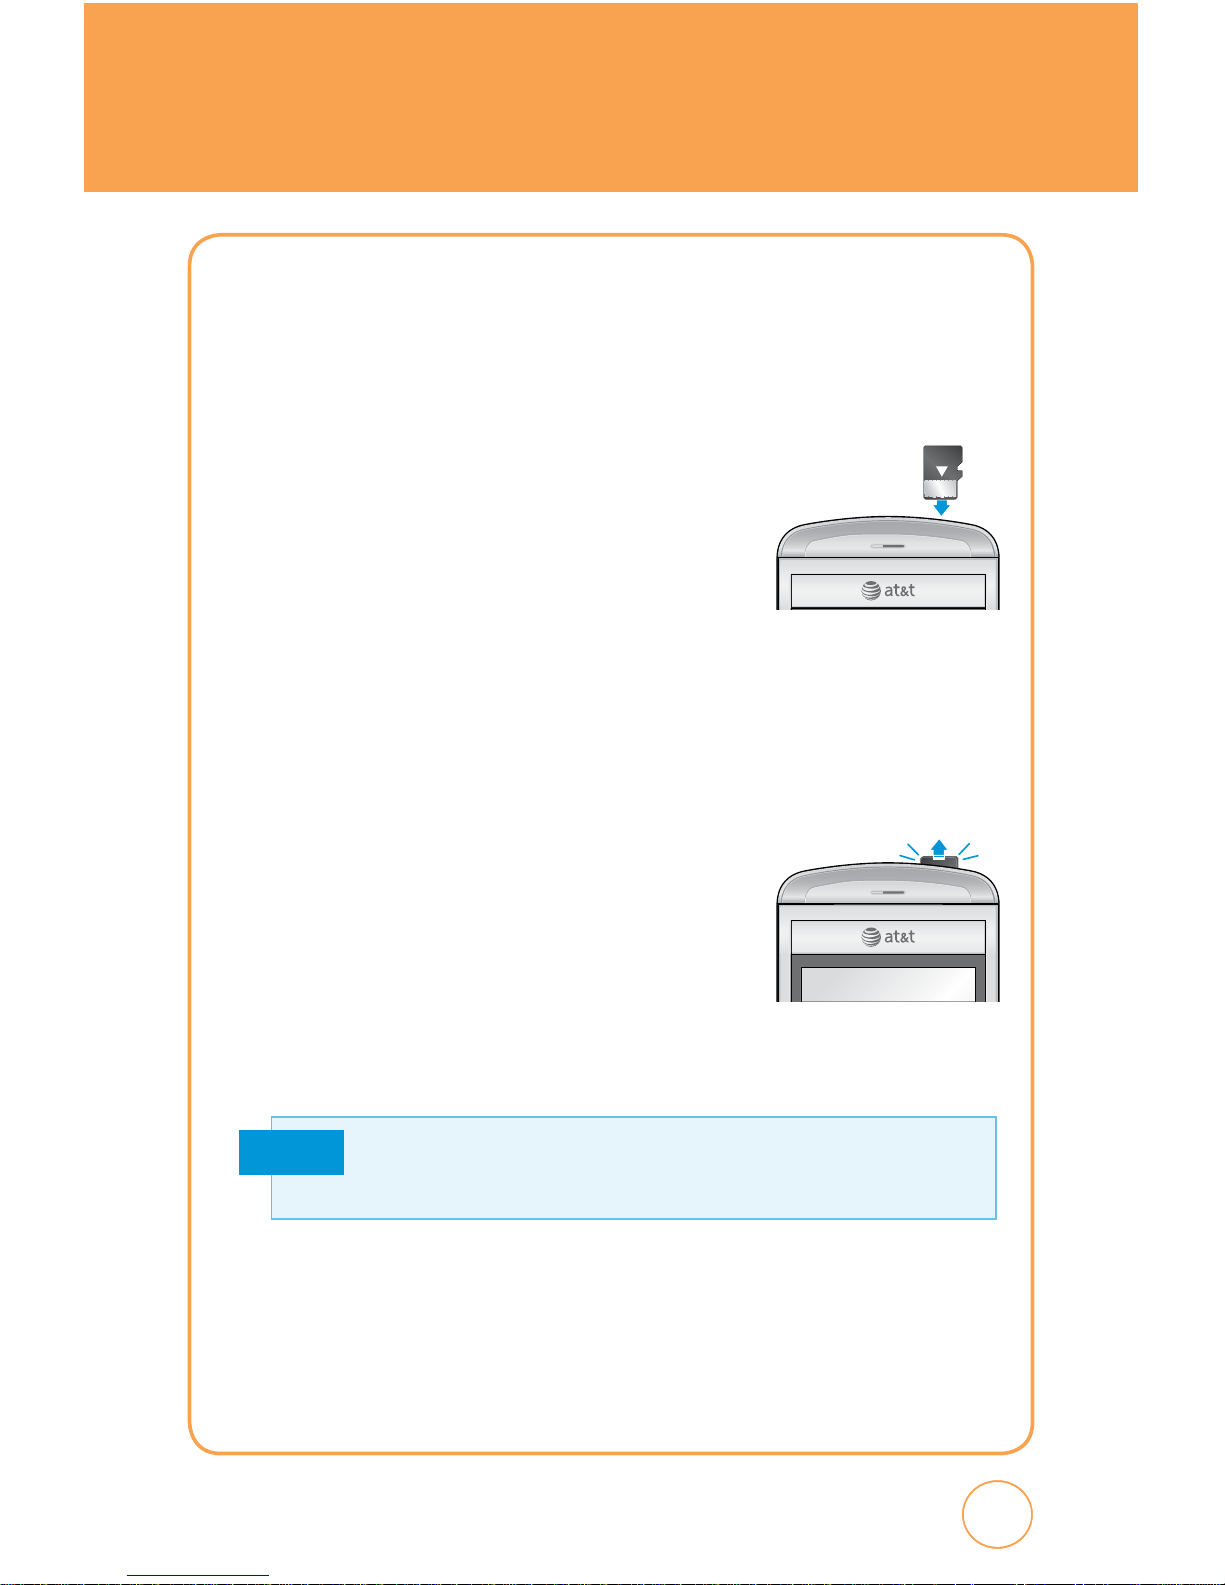
INSERTING THE microSD CARD
The microSD card stores sounds, images, photos and videos, music, and
other files. To install your microSD card:
1.
With the microSD card slot opened and
the gold contacts facing down, insert the
microSD card into the slot.
2.
Push the card in until it clicks into place.
Close the microSD card slot.
REMOVING THE microSD CARD
To remove the microSD card:
1.
Open the microSD card slot. Use your
thumb to press and release the microSD
card. It will pop-out to allow you to remove
the card.
2.
Remove the card and close the microSD
card slot.
Memory cards with over 32 GB of storage capacity will not work with
this phone.
Note
Page 17
16
USING QWERTY KEYPAD
16
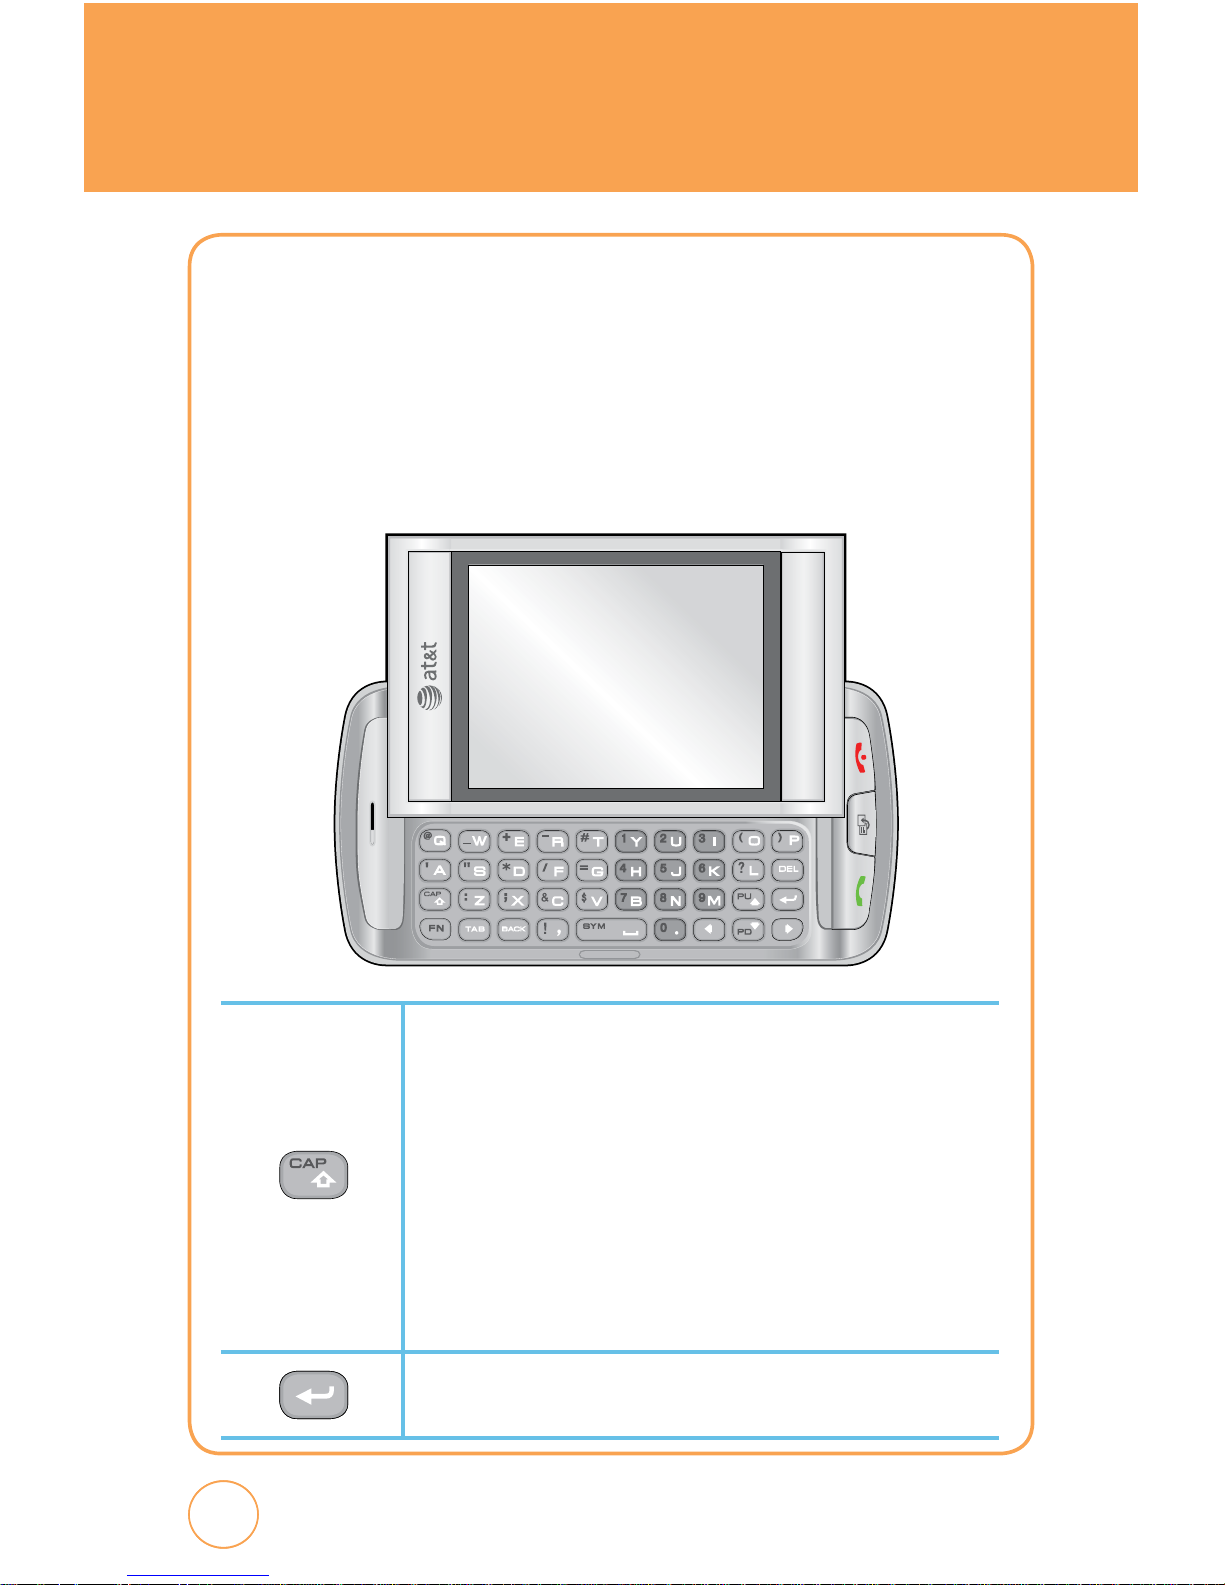
Your Quickfire features a specifically designed QWERTY keyboard that
provides a superior typing experience for easy and comfortable text
writing for SMS or e-mail messages, notes and other functions. You
can use all of the phone functions with the keyboard either closed or
open. When you open the keyboard you have the extra benefit of a full
messaging keyboard.
Caps/Shift Key
To type upper-case letters, hold down the Caps/Shift key and
then press one or more letter keys. To type upper-case letters
continuously, use the CAPS-LOCK mode. To change to the CAPSLOCK mode, press the FN Key then the Caps/Shift Key. Once the
CAPS-LOCK mode is set, you can type upper-case letters only. To
deactivate, press the FN Key then the Caps/Shift Key. To type an
upper-case letter for the first letter of a word only, simply press
the Caps/Shift key once. Then, the first letter you type will be
upper case while the rest will be lower-case.
Enter Key
Press the Enter key to insert a line break.
Page 18

17
USING QWERTY KEYPAD
FN Key
To type the special character or numbers that appear in orange on
the keys, press the applicable key while holding down the FN key. To
type special characters or numbers consecutively, use the FN-LOCK
mode. To change to the FN-LOCK mode, double-tap the FN key.
You can type special characters or numbers only in this mode. To
deactivate, double-tap the FN key again. To type a special character
or number for the first letter of a word only, simply press the FN key
once. Then, the first letter you type will be a special character or
number while the rest will be normal letters. To access other special
characters that do not appear on the keyboard, press FN + Space.
Back Key
Press to return to the previous page.
DEL Key
Press the Delete Key to delete a character to the left of the text
cursor. Press and hold to delete the entire entry.
TAB Key
Press the TAB Key to easily navigate between multiple windows.
Sym/Space Key
Press the Space Key to type a blank space.
Press the FN Key + Space Key, to open the Symbol Pad.
Arrow Key
Press the arrow keys for directional movement.
Numeric Key
Press the FN Key + Corresponding Key to enter the number.
Page 19
BLOCKING ANTENNA WHILE
MAKING A CALL
18
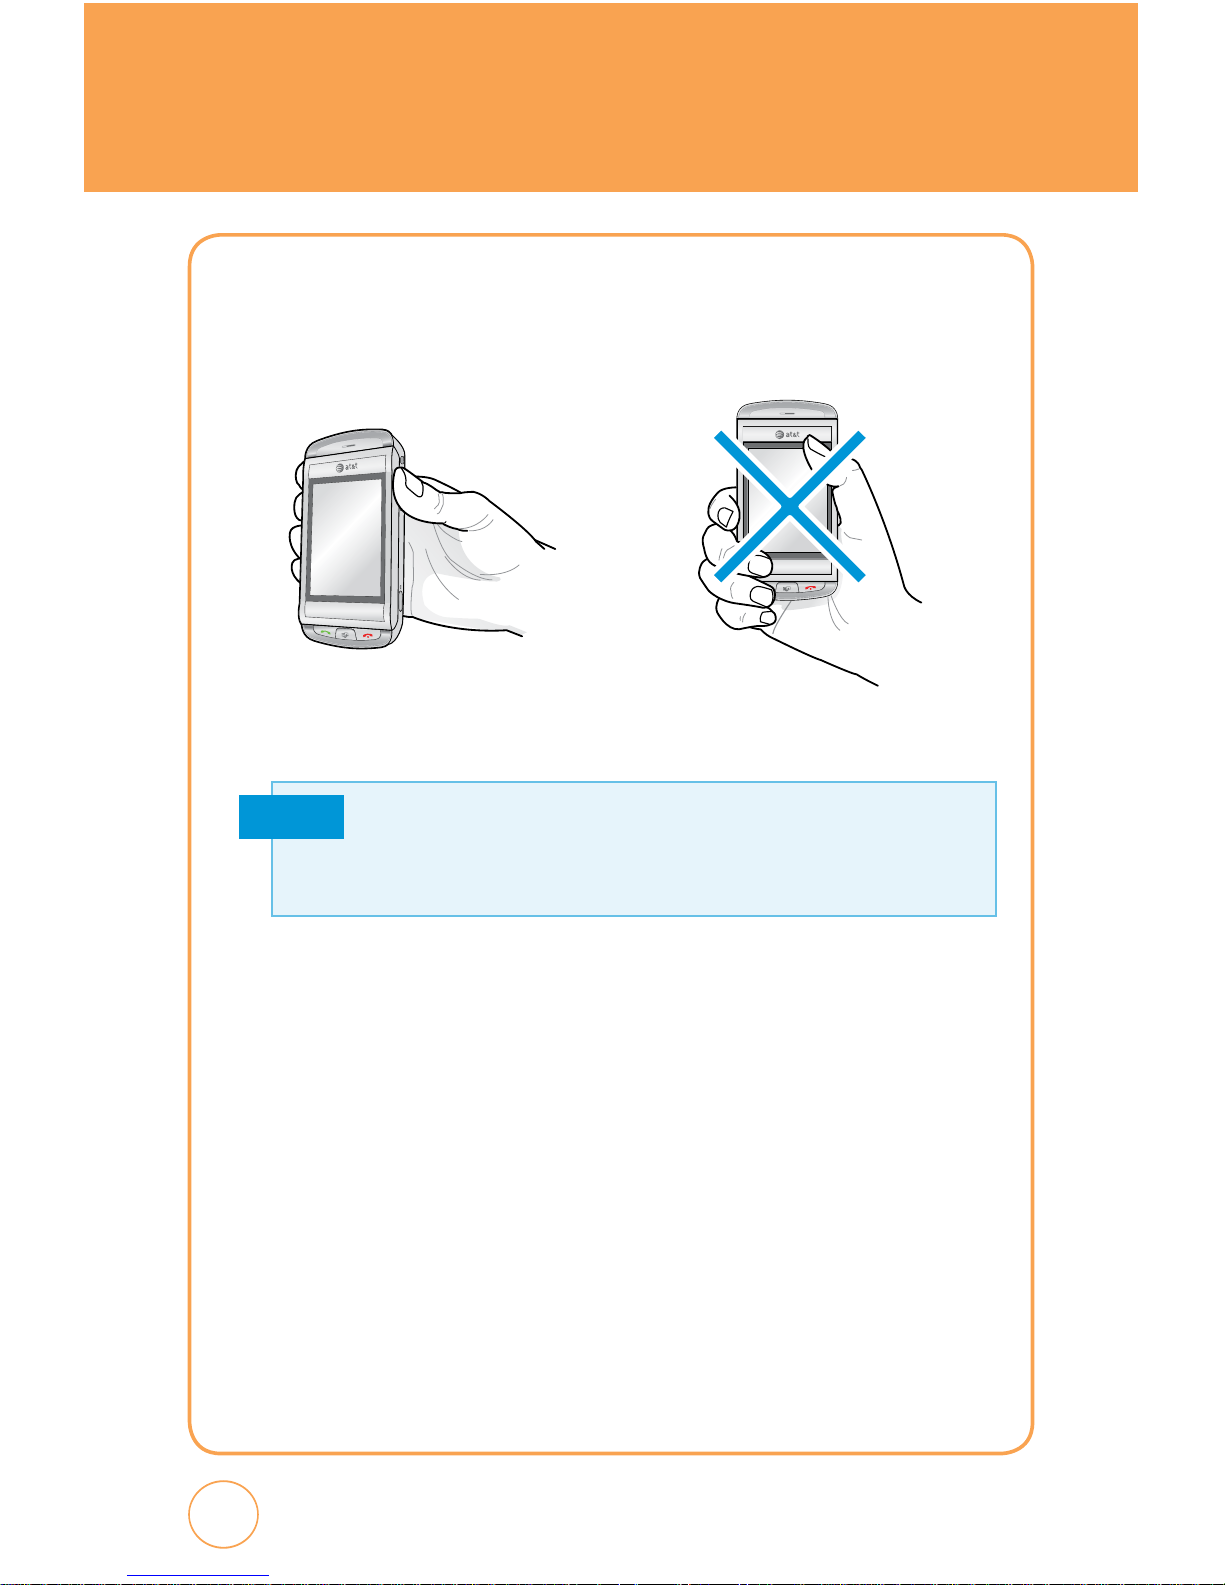
CORRECT/INCORRECT FINGER
POSITION
CORRECT FINGER POSITION INCORRECT FINGER POSITION
Note
Your Quickfire is equipped with an intenna. For optimal call quality, hold
the phone by the gripped edges on the side and avoid touching the top
and bottom of the phone.
Page 20

19
19
BATTERY HANDLING INFORMATION
IEEE STANDARD FOR RECHARGEABLE
BATTERIES FOR CELLULAR
TELEPHONES
• Do not disassemble or open, crush, bend or deform, puncture, or shred.
• Do not modify or remanufacture, attempt to insert foreign objects into
the battery, immerse or expose to water or other liquids, or expose to
fire, explosion, or other hazard.
• Only use the battery for the system for which it was specified.
• Only use the battery with a charging system that has been qualified
with the system per this standard. Use of an unqualified battery or
charger may present a risk of fire, explosion, leakage, or other hazard.
• Do not short circuit a battery or allow metallic or conductive objects to
contact the battery terminals.
• Replace the battery only with another battery that has been qualified
with the system per this standard. Use of an unqualified battery may
present a risk of fire, explosion, leakage, or other hazard.
• Promptly dispose of used batteries in accordance with local
regulations.
• Battery usage by children should be supervised.
• Provide an explanation of security implementation, per 10.2.1.
• Avoid dropping the phone or battery. If the phone or battery is
dropped, especially on a hard surface, and the user suspects damage,
take it to a service center for inspection.
• Improper battery use may result in a fire, explosion, or other hazard.
Page 21

MEMO
20
Page 22
21
21
CHAPTER 2
BASIC OPERATION
CHAPTER 2. BASIC OPERATION
This chapter addresses and explains the basic features of your
Quickfire including:
Turning the Phone On/Off
Touch Screen Lock Mode
Using Shortcut Key
Idle Screen
Using the Touchscreen
Menu Summary
Basic Functions
During a Call
Making an Emergency Call
Page 23
BASIC OPERATION
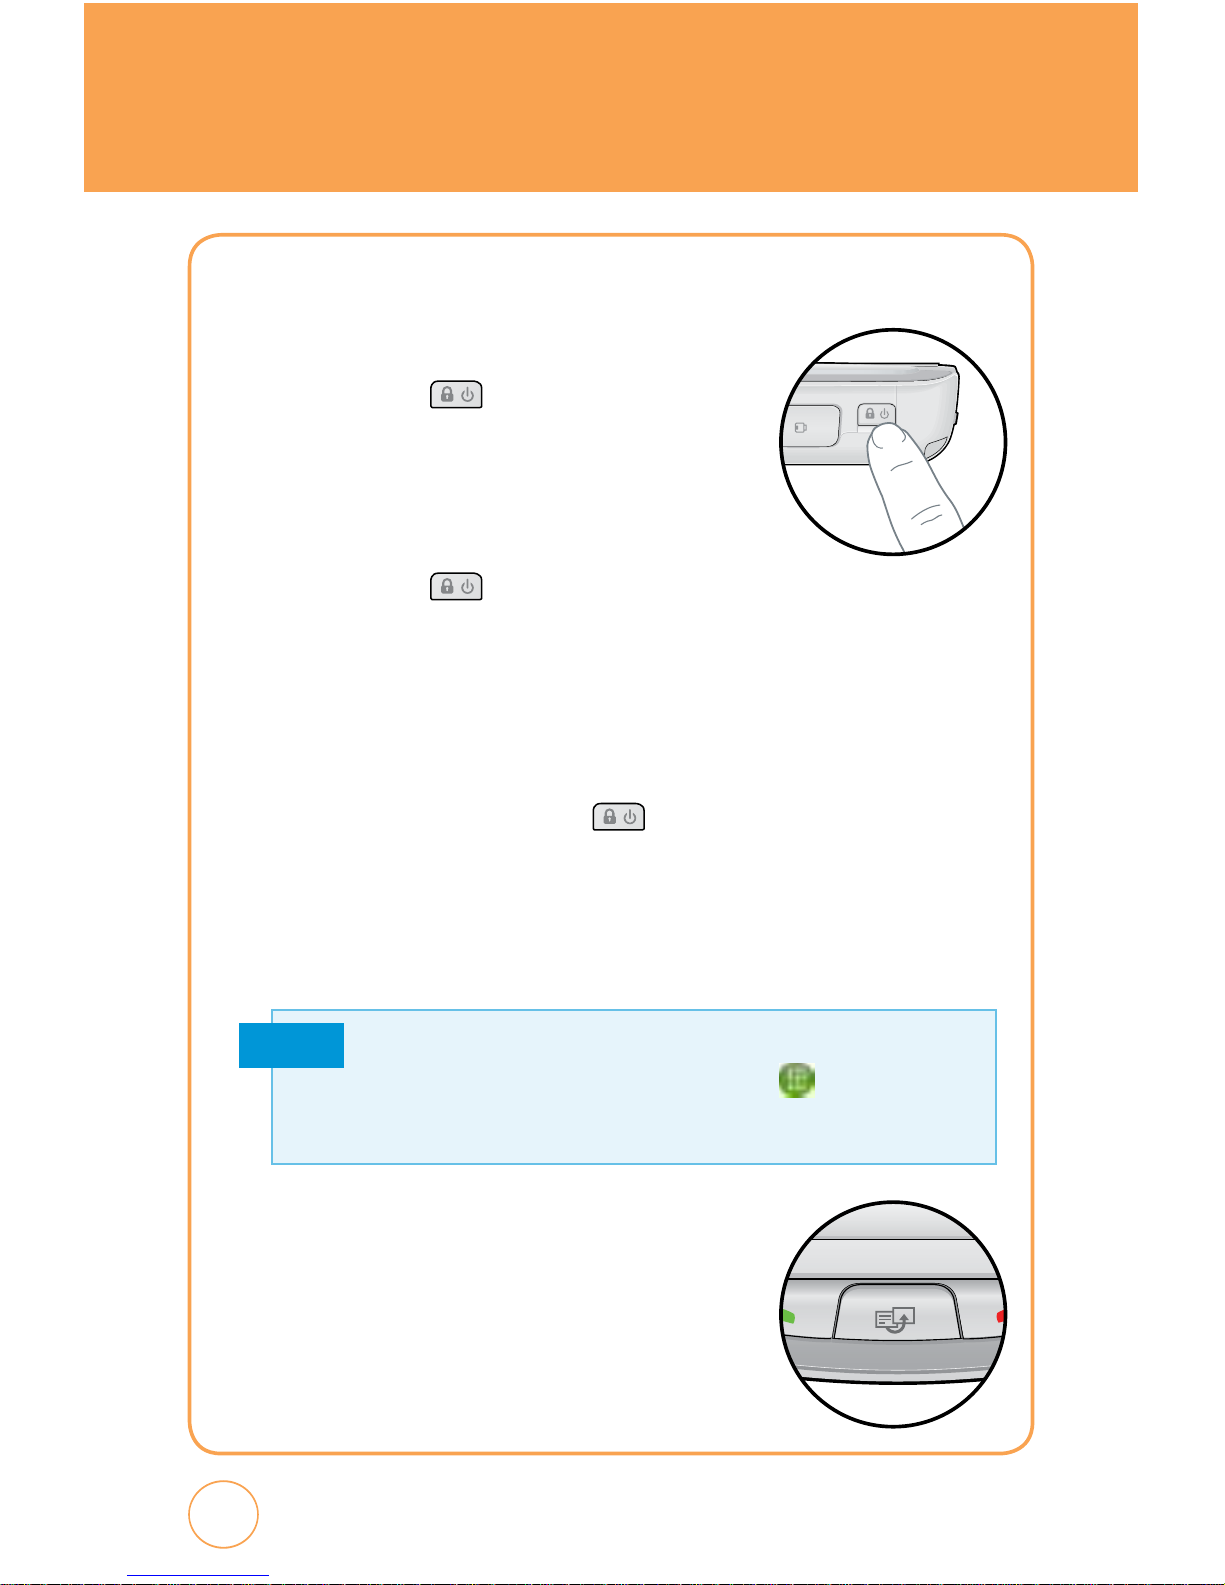
TURNING THE PHONE ON/OFF
1.
To turn on the phone, press and hold the
POWER button for a few seconds until
the AT&T animation appears and the melody
begins to play at same time.
2.
To turn off the power, press and hold the
POWER button for a few seconds.
3.
Power off AT&T animation appears and the melody begins to play
at same time.
TOUCH SCREEN LOCK MODE
Quickly pressing the Power button temporarily turns off the display
and locks your device. You will still be able to receive messages and calls
while your device is in Lock Mode. To wake up your device, press the
Lock Icon on the screen then touch the Falling Key. Or, simply open the
QWERTY keyboard.
USING SHORTCUT KEY
The Shortcut Key allows you to quickly access
frequently used programs and functions including
the Main Menu, Call, Messaging, Browser and
Music Player.
22
Note
Your device automatically goes into lock mode when you leave it idle
after 1 minute. To change this time go to
Menu
>
Settings
>
Display > Auto Lock
, select the time you prefer and press Save on your
touch screen.
Page 24
23
23
BASIC OPERATION
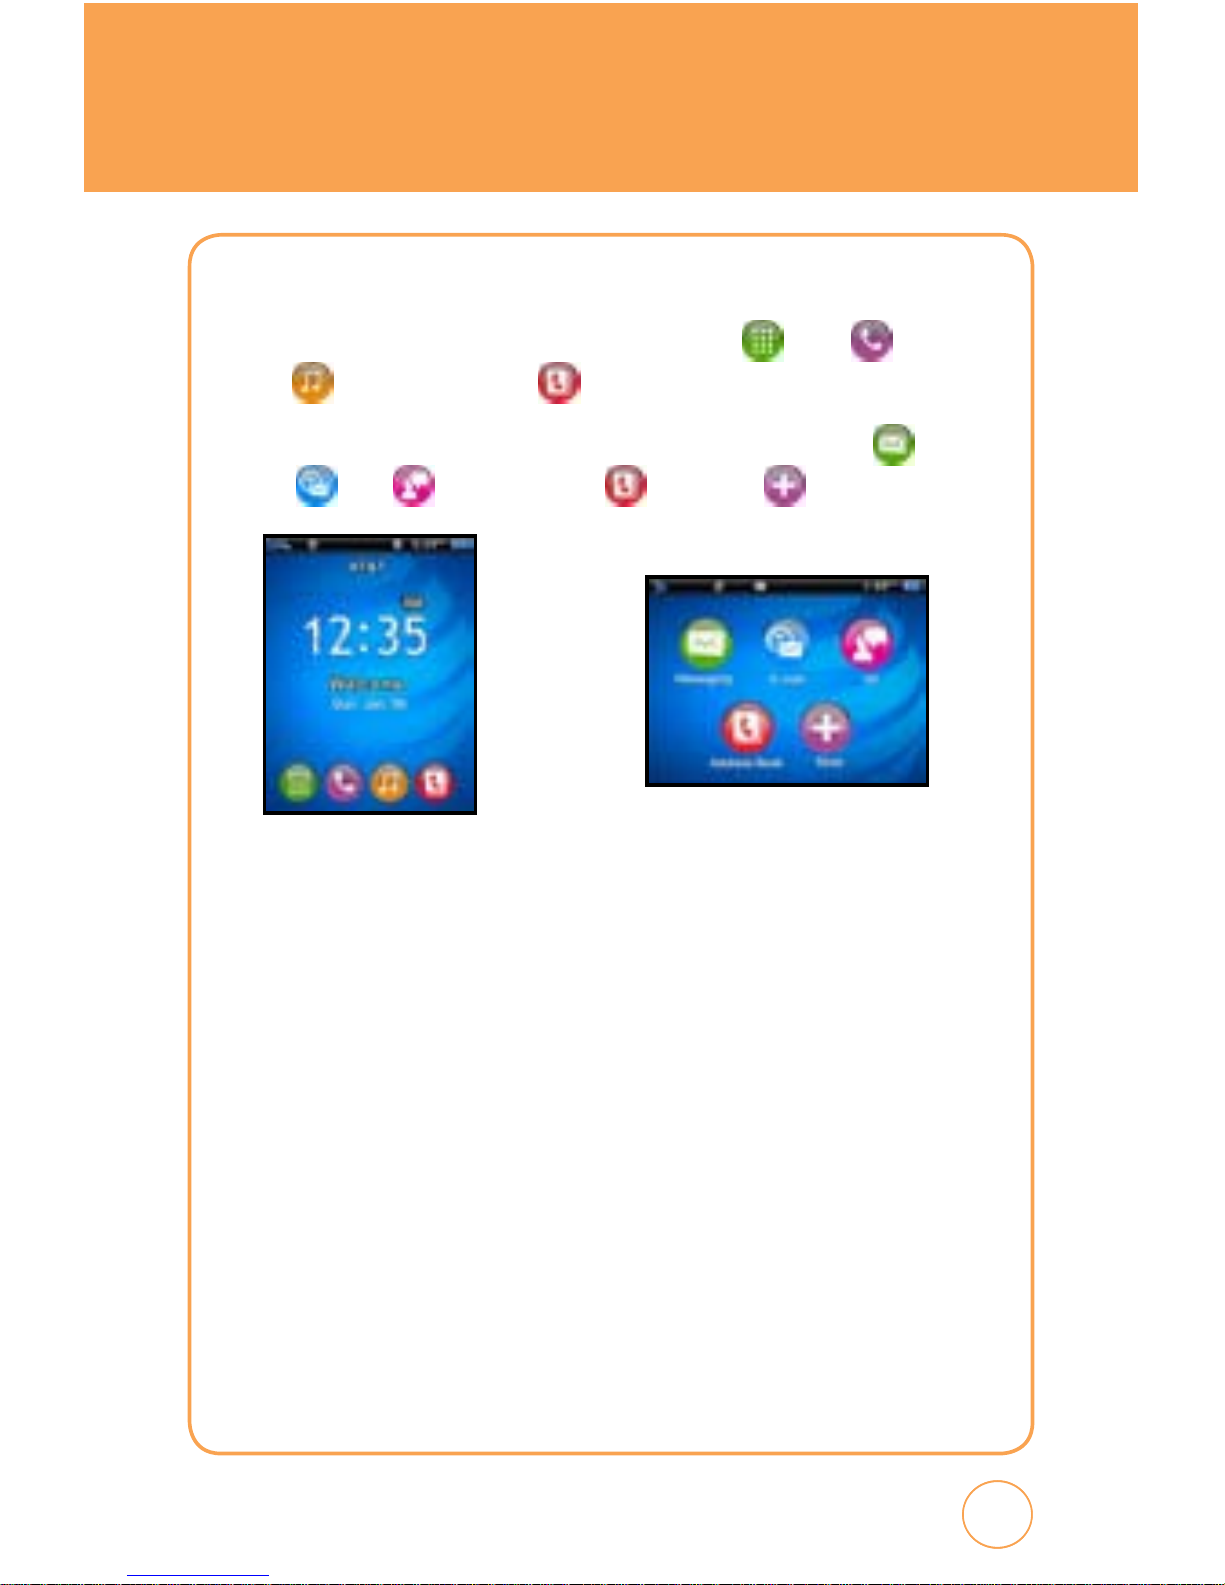
IDLE SCREEN
From the Idle screen, you can access Main Menu , Call , AT&T
Music
and Address Book .
From the Landscape mode screen, you can access Messaging
,
E-mail
, IM , Address Book and More .
USING THE TOUCHSCREEN
CAUTIONS FOR TOUCH KEYS
• Make sure your hands are clean and dry.
•
You do not need to press hard on the touch keys to make them work.
Do not subject the product to severe impact, as this may damage the
touch key sensors.
•
Use the tip of your finger to press exactly on the touch key you want,
being careful not to touch the keys for other functions.
•
Touch keys may not work normally if a mobile phone case or plastic
cover is covering them. Also, touch keys may not work if you are
wearing gloves.
Page 25
24
24
BASIC OPERATION
• Keep metal and other conductive materials away from the surface of
the touch keys, as contact with them may result in an error.
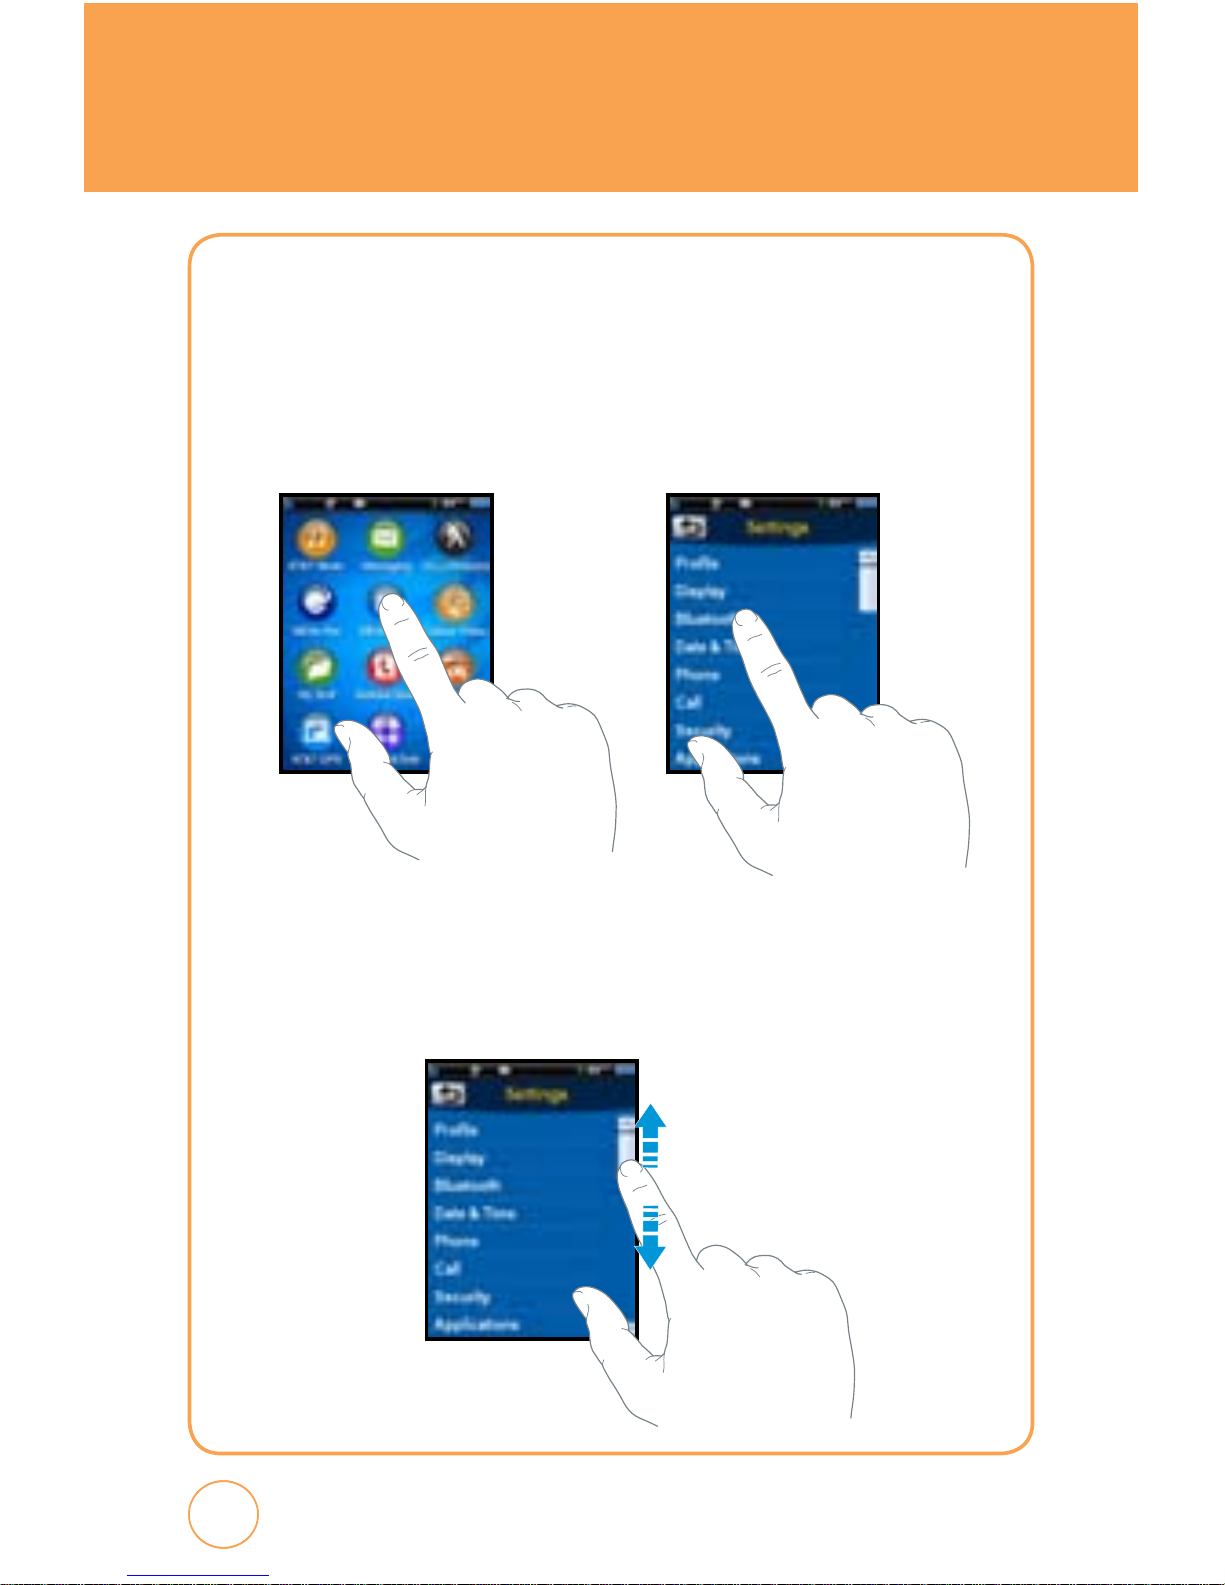
TO OPEN A SCREEN MENU ITEM:
1.
Tap any application or sub menu item.
TO USE THE SCROLL BAR:
1.
Tap and hold the scroll bar and drag up or down. On some screens
such as webpages, you can also scroll side to side.
Page 26
25
BASIC OPERATION
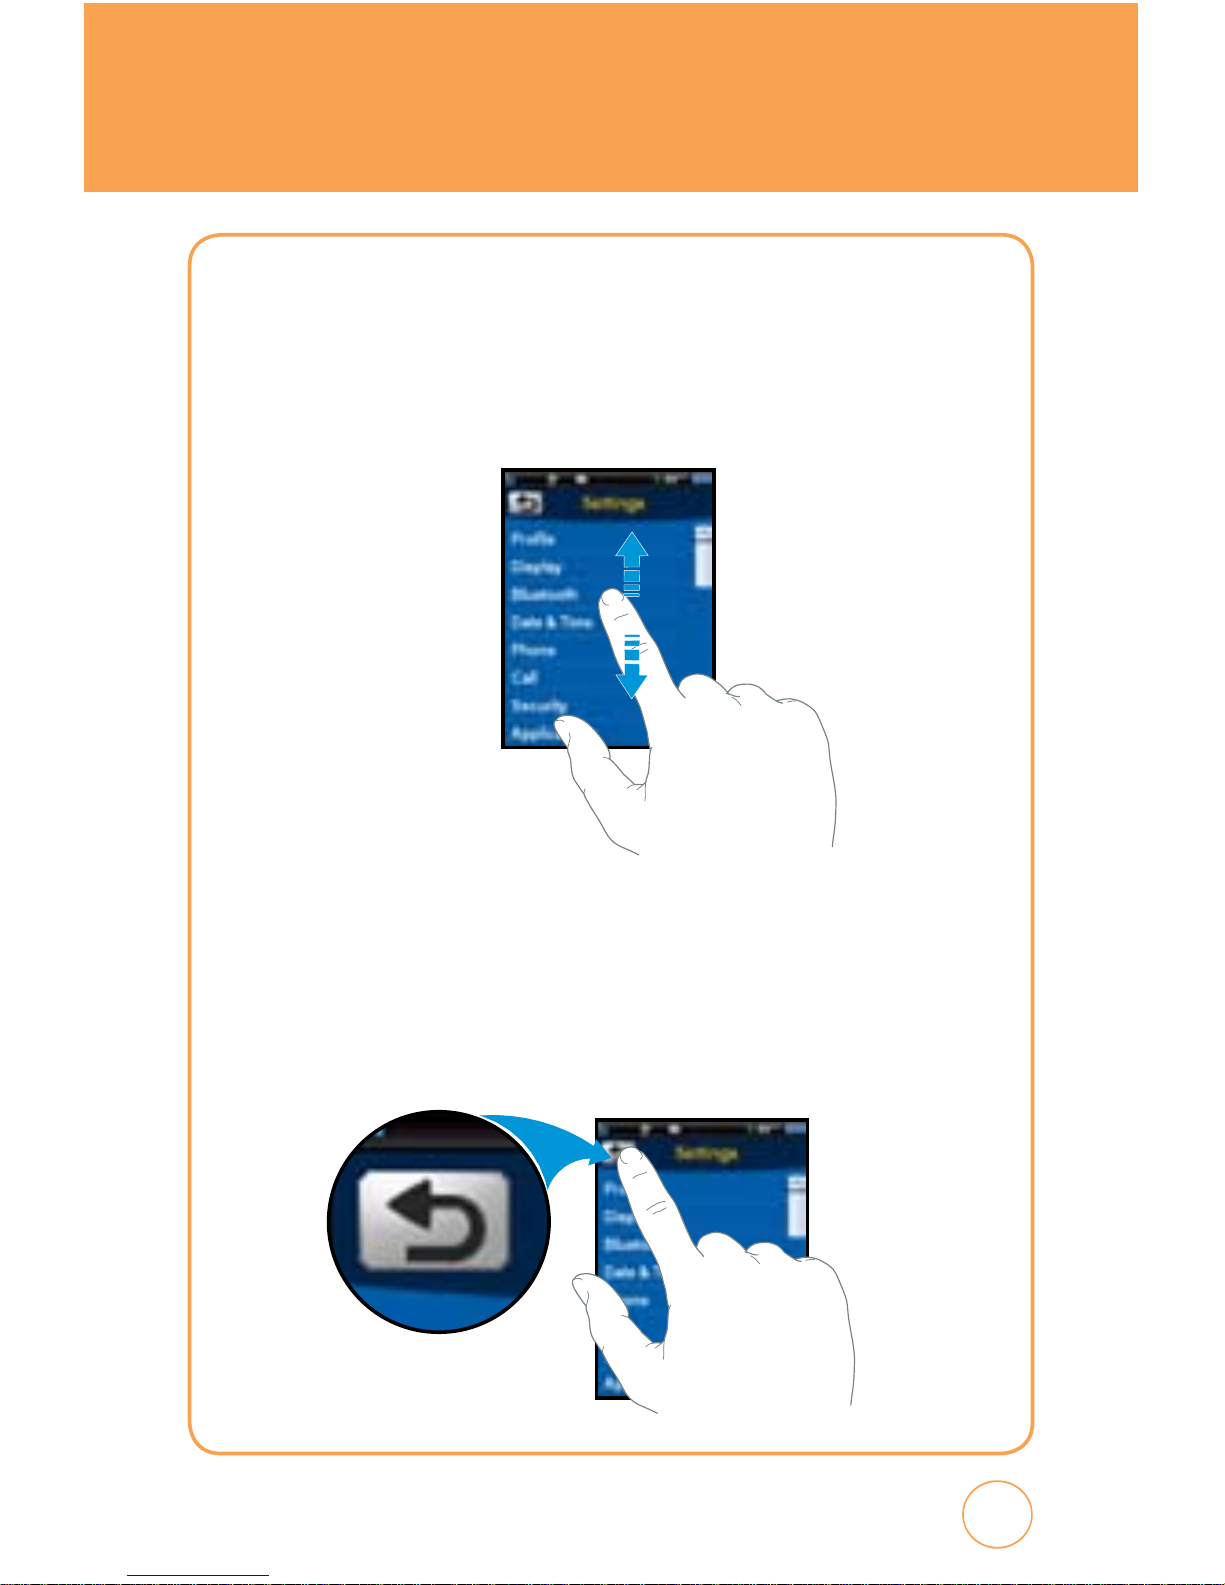
TOUCH SCREEN SCROLLING
1.
You may touch and drag text on the screen up or down in the
direction you want to move it, or use your finger to quickly flick the
text in the direction you want it to move.
TO RETURN TO THE PREVIOUS SCREEN:
1.
Tap the return button.
Page 27
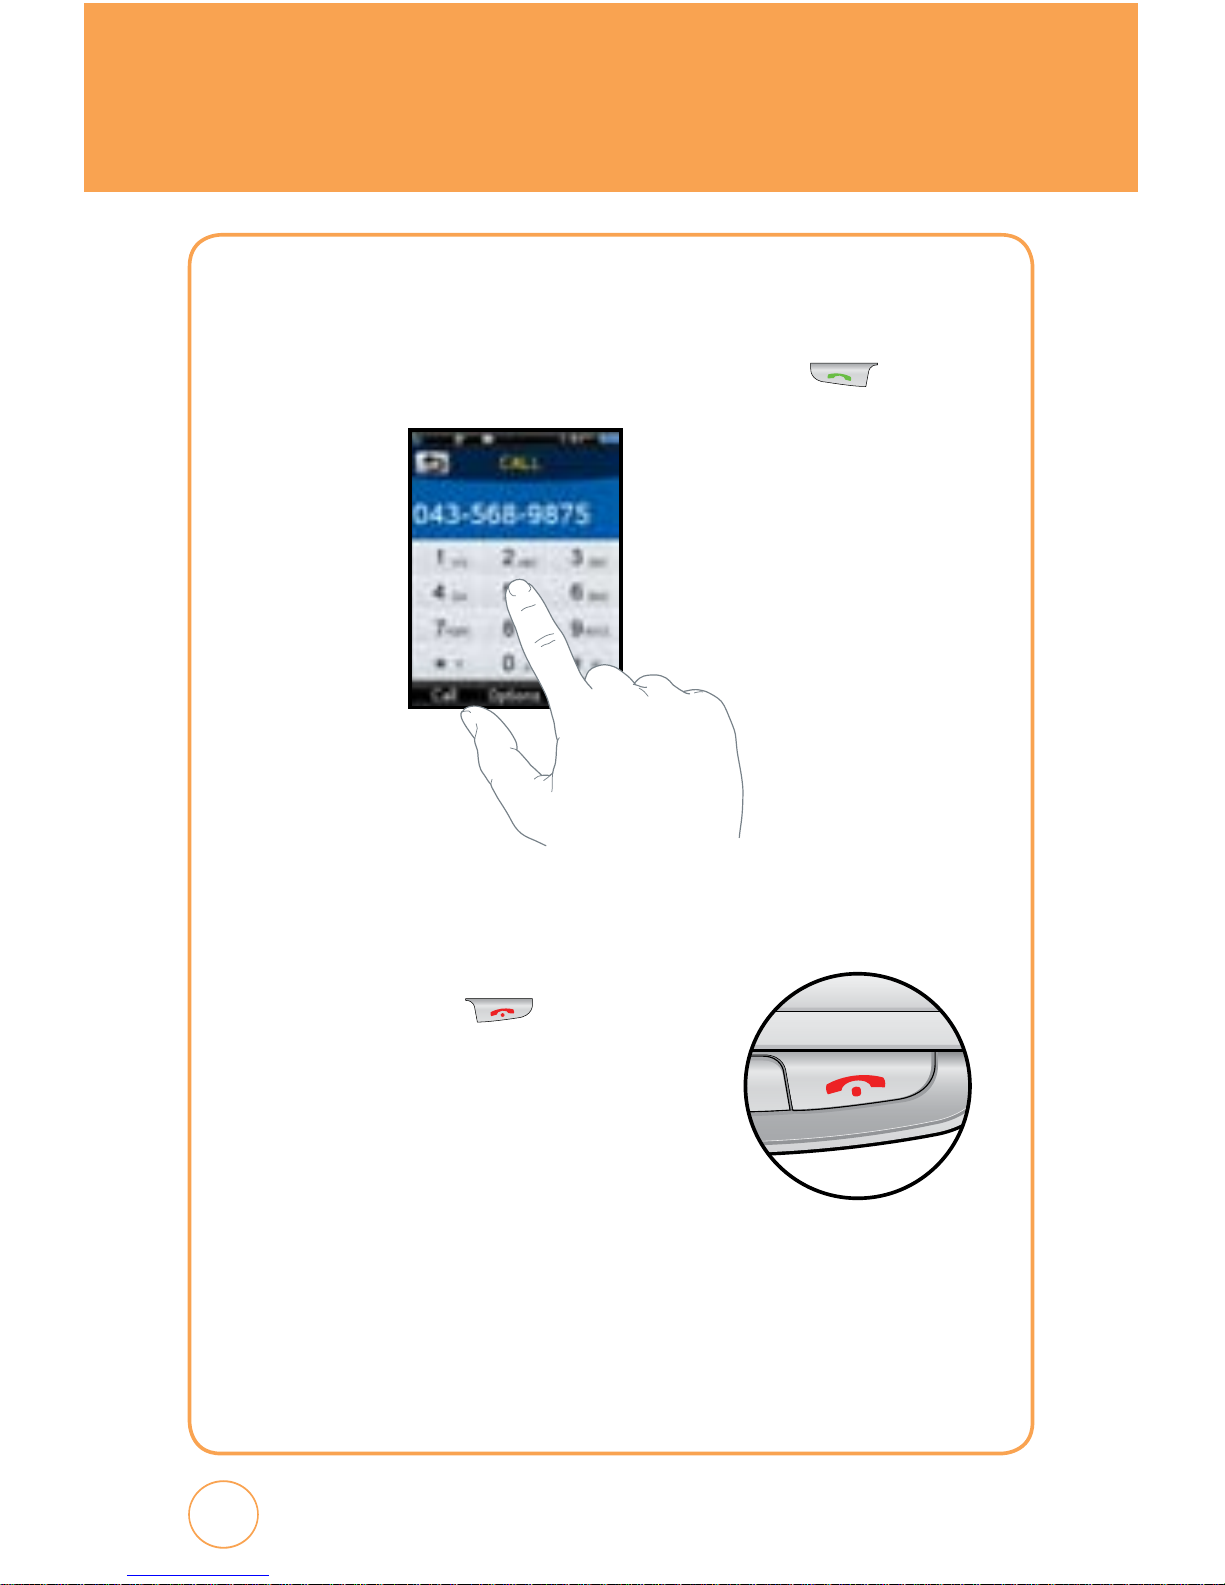
BASIC OPERATION
MAKING A CALL WITH THE SCREEN DIAL BUTTON
1.
Simply touch the screen dial button with your finger to enter the
phone number then tap
Call
or press the SEND Key .
TO RETURN TO THE IDLE SCREEN:
1.
Press the END Key multiple times to
close all the running application to return
to IDLE screen.
26
Page 28

27
27
MENU SUMMARY
12-UP MAIN MENU
1. AT&T Music
1.1. Music Player
1.1.1. Now Playing
1.1.2. All Music
1.1.3. Albums
1.1.4. Artists
1.1.5. Playlists
1.1.6. Genres
1.1.7. Settings
1.2. Shop Music
1.3. Music ID
1.4. XM Radio
1.5. Music Videos
1.6. The Buzz
1.7. Community
1.8. Music Apps
2. Messaging
2.1. Create New Message
2.2. Inbox
2.3. Outbox
2.4. Sent
2.5. Drafts
IM
Email
Voice Mail
3. YELLOWPAGES
4. MEdia Net
4.1. MEdia Net Home
4.2. Favorites
4.3. Enter URL
4.4. History
4.5. Settings
5. MEdia Mall
5.1. Shop Ringtones
5.2. Shop Games
5.3. Shop Graphics
5.4. Shop Multimedia
5.5. Shop Applications
5.6. Shop Video
5.7. MEdia Net Home
6. Cellular Video
7. My Stuff
7.1. Ringtones & Audio
7.2. Images
7.3. Videos
8. Address Book
9. Games & Apps
9.1. Games
9.2. Apps
10. AT&T GPS
10.1. AT&T Navigator
11. Organizer & Tools
11.1. Camera
11.2. Calendar
11.3. Alarm
11.4. Calculator
11.5. Tip Calculator
11.6. To Do
11.7. World Time
11.8. Notepad
11.9. Unit Converter
11.10. Voice Memo
11.11. Stopwatch
Page 29

MENU SUMMARY
28
12. Settings
12.1. Profile
12.1.1. General
12.1.2. Outdoor
12.1.3. Meeting
12.1.4. Headset
12.1.5. Flight
12.2. Display
12.2.1. Wallpaper
12.2.2. Style
12.2.3. Greeting Banner
12.2.4. Backlight
12.2.5. Theme
12.2.6. Auto Lock
12.3. Bluetooth
12.3.1. Bluetooth
12.3.2. Search Device
12.3.3. Paired Device List
12.3.4. My Phone’s Visibility
12.3.5. My Phone’s Name
12.3.6. Supported Services
12.4. Date & Time
12.4.1. Time Zone Update
12.4.2. Date Format
12.4.3. Time Format
12.5. Phone
12.5.1. Language
12.5.2. Network Selecting
12.5.3. Network Profile
12.5.4. Headset Type
12.5.5. USB Connection Mode
12.5.6. Memory Meter
12.5.7. Phone Information
12.6. Call
12.6.1. Answer Mode
12.6.2. Auto Redial
12.6.3. Minute Minder
12.6.4. Call Forwarding
12.6.5. Call Waiting
12.6.6. Caller ID
12.6.7. Call Barring
12.6.8. TTY
12.7. Security
12.7.1. Phone Lock
12.7.2. PIN Code Request
12.7.3. Change Phone Password
12.7.4. Change PIN Code
12.7.5. FDN
12.7.6. Master Reset
12.7.7. Master Clear
12.8. Applications
12.8.1. Messaging Settings
12.8.2. Browser Settings
12.8.3. Address Book Settings
12.8.4. Camera Settings
12.9. Software Update
12.9.1. Continue Update
12.9.2. Check for Update
Page 30

29
29
MENU SUMMARY
LANDSCAPE MODE
MENU
1. Messaging
1.1. Create New Message
1.2. Inbox
1.3. Outbox
1.4. Sent
1.5. Drafts
2. E-mail
3. IM
4. Address Book
5. More
5.1. Call
5.2. AT&T Music
5.3. Recent Calls
5.4. YELLOWPAGES.COM
5.5. MEdia Net
5.6. MEdia Mall
5.7. Cellular Video
5.8. My Stuff
5.9. Games & Apps
5.10. AT&T GPS
5.11. Organizer & Tools
5.12. Settings
Page 31

BASIC FUNCTIONS
30
MAKING A CALL
MAKE A CALL FROM DIALPAD
1.
In Idle mode, tap the Call icon .
2.
On the Phone keypad, simply touch the number key with your finger
to enter the phone number. If you tap a wrong number, tap
Clear
to
erase a number. To erase the entire number, press and hold
Clear
.
3.
Tap
Call
on your device to place the call or press the SEND Key
.
MAKE A CALL FROM PHONE BOOK
1.
In Idle mode, tap the Address Book icon . Your Phone Book list
appears.
2.
Tap and hold scroll bar and drag up or down with your finger.
3.
Tap the desired contact in the Phone Book list, then tap the phone
number that you want to call.
4.
To place the call, tap
Call
or press the SEND Key .
MAKE A CALL FROM CALL HISTORY
1.
In Idle mode, press the SEND Key .
2.
You can select to view different types of calls including: All Calls,
Received Calls, Dialed Calls and Missed Calls.
3.
Select the desired contact or phone number, then tap
Call
or press
the SEND Key .
Page 32

31
31
BASIC FUNCTIONS
ANSWERING CALLS
1.
When your Quickfire rings or vibrates, tap
Answer
or press the SEND
Key to answer the incoming call. (Depending on your phone’s
settings, you may also answer incoming calls by opening the phone
or by pressing any digit key.)
WAIT/PAUSE FEATURE
Pauses are used for automated systems (i.e., Voicemail, calling cards).
Insert a pause after a phone number then enter another group of
numbers. The second set of numbers is dialed automatically after the
pause. This feature is useful for dialing into systems that require a code.
1.
To insert a wait/pause, enter a phone number then press and hold
the * button until “T“ appears, or press and hold the # button
until “P“ appears.
2.
Tap
Call
to dial.
•
Type “P“
: When you call automated systems (like banking services), you are
often required to enter a password or account number. Instead of
manually entering the numbers each time.
•
Type “T“
: A two second pause stops the calling sequence for two seconds
and then automatically sends the remaining digits.
To ignore incoming calls, tap
Ignore
or press the END Key .
Page 33

BASIC FUNCTIONS
32
3-WAY CALLING
With 3-Way Calling, you can talk to two people at the same time. When
using this feature, the normal airtime rates will be applied for each of
the two calls.
1.
Enter the number you wish to call then tap
Call
.
2.
Once you have established the connection, enter the second number
you wish to call then tap
Call
.
3.
When you’re connected to the second party, tap
3-Way call icon
again to begin your 3-Way call.
CALLER ID FUNCTION
Identifies caller by displaying their phone number. If the caller’s name
and number are already stored in your phone book, their name will
appear.
CALL WAITING FUNCTION
Notifies you of an incoming call when you are already on a call by
sounding a beep tone and displaying the caller’s phone number.
1.
To answer another call while on the phone, press the SEND Key
. This places the first call on hold. To switch back to the first
caller, press the SEND Key
again.
Call Waiting is a system dependent feature. Please contact your service
provider for details.
Note
This is a system dependent feature. Please contact your service provider
for details.
Note
Page 34

33
33
BASIC FUNCTIONS
ADJUSTING VOLUME
Adjusts the volume of the ringer, key beep and earpiece.
1.
In idle mode, press the Side Volume Key up or down. Choose
from “General“, “Outdoor“, “Meeting“, “Vibrate“, “Silent“, “OFF“
or “Level 1 ~ Level 7“.
MAKING AN INTERNATIONAL CALL
1.
Press and hold on the Phone keypad until the “+“ sign
appears. The “+“ replaces the international prefix of the country
that you are calling.
2.
Enter the full phone number you want to dial, then tap
Call
or press
the SEND Key .
• To adjust the conversation phone volume, you must do it during a call.
Adjusting the volume at another time will affect the ring, notification,
and Music sound levels.
• When you activate Vibrate mode, sound will automatically be muted
and your device will vibrate when an incoming call is received.
Note
Page 35

DURING A CALL
34
MUTE (UNMUTE)
If you press Mute during a call, the person you are speaking with cannot
hear you or any sounds from your side of the conversation. However, you
can still hear them. To activate Mute during a call, tap
Mute
.
SPEAKERPHONE
To activate speakerphone during a call:
1.
To activate the speakerphone while in answering or calling modes,
tap
SPK On
(Speakerphone On/Off).
RECENT CALLS
To view your Recent Call List during a call:
1.
Tap
Options
, then tap
Recent Calls
.
FIND NAME
To select a phone number in your internal Contact List:
1.
Tap
Options
, then tap
Find Name
.
• To deactivate, tap
Unmute
.
• The phone will automatically unmute in “Emergency Call“ or “Callback
Mode“.
Page 36

35
35
DURING A CALL
MESSAGING
To send a text message during a call:
1.
Tap
Options
, then tap
Messaging
.
BLUETOOTH
To connect to a Bluetooth-enabled device, such as a wireless headset
(sold separately):
1.
Tap
Options
, then tap
Bluetooth
.
Page 37

MAKING AN EMERGENCY CALL
36
The 911 feature puts the phone in the Emergency Call Mode when you
dial the preprogrammed emergency number 911. It also operates in Lock
Mode and outside the service area.
911 IN LOCK MODE
The 911 call service is available even in Lock Mode.
1.
Enter “911“, then tap
Call
.
2.
The call connects.
3.
When the call ends, the phone returns to Lock Mode.
911 USING ANY AVAILABLE SYSTEM
1.
Enter “911“, then tap
Call
.
2.
The call connects.
3.
The phone maintains Emergency Mode and the phone can receive
an incoming call from any available system.
However, it can’t make a call.
The 911 call does not appear in the Emergency call list.
Note
Page 38

37
37
CHAPTER 3
MEMORY FUNCTION
CHAPTER 3. MEMORY FUNCTION
This chapter addresses memory functions including:
Storing a Phone Number
Entering Letters, Numbers & Symbols
Making a Call Through the Contact List
Page 39

STORING A PHONE NUMBER
The phone book stores up to 500 entries.
1.
In Idle mode, tap the Call icon .
2.
From the Phone Screen, enter the phone number, then tap
Options
>
Save Contact
.
3.
Tap “Phone (“New Entry“ or “Existing Entry“)“ or “SIM (“New
Entry“ or “Existing Entry“)“.
4.
If “Existing Entry“ is selected, your contact list is displayed. Choose
the entry to add the number, then tap
Done
. Select the type of
number you are adding from the icon list. Tap
Save
. Tap primary
phone number, then tap
Done
to save contact.
5.
If “New Entry“ is selected, the New entry icon list appears. Tap to
choose the type of number you are adding. Enter a name by tapping
the “First Name“ and “Last Name“ fields. To change the input
mode, tap
Options
. Tap to enter information in other fields for the
contact, including “Mobile“, “No Group“ and “Ringtone“.
•
Phone number:
To insert another phone number for the contact, enter the
phone number. Tap to select type (Mobile, Home, Office,
Pager, Home FAX, Office FAX, Etc Number) of phone
number.
•
Group:
To set a group for the contact, highlight the Group Name. Tap to
select “No Group“, “Business“, “Family“ or “Friends“.
•
Ringtone:
To set a ringtone for the contact, highlight a Ringtone. Tap to
select “AT&T Ringtone“, “Basic Ringtone 1 ~ Basic Ringtone 3“,
“Sky lounge“, “Rainforest“, “Fighters“, “Love“, “Funny guy“
or “Happiness“.
38
Page 40

39
39
STORING A PHONE NUMBER
Tap
Options
the
Add Optional Field
to access the following options:
•
Mobile
•
Home
•
Office
•
Pager
•
Etc Number
•
Home FAX
•
Office FAX
•
E-mail
•
URL
•
Instant Message
•
Picture
•
Birthday
•
Company
•
Job Title
•
Address
•
Memo
6.
To store the entry in your contact list, tap
Save
.
Page 41

ENTERING LETTERS,
NUMBERS & SYMBOLS
The input mode will automatically be activated when it is necessary to
enter letters and numbers. There are 4 available modes: Alphabet mode
(Abc/ABC), Numeric mode (123), Symbol mode (Symbols) and Emoticon
mode (Emoticon). The input mode indicator appears on the lower
portion of the display when letters and numbers are entered.
Using the touch screen keypad:
Tap
Options
To change the entry mode - [Abc] [123] [Symbols]
[Emoticon]
Tap
Del
Tap to delete a character. Tap and hold to delete
the entire entry.
Tap
abc icon
Tap to select a letter case of the standard
text input. [Abc], [ABC] and [abc] indicate the
standard text input. Tap to change mode.
Tap
icon
Tap to accept a word and add a space.
40
Page 42

41
41
ENTERING LETTERS,
NUMBERS & SYMBOLS
USING QWERTY KEYBOARD
Your device has a specifically designed QWERTY keyboard that
provides a superior typing experience on a small handheld for easy and
comfortable input. You can use all of the handset functions with the
keyboard either closed or open. When you open the keyboard you have
the extra benefit of a full messaging keyboard.
The handheld includes a fully-functional QWERTY keyboard you can use
to compose text for email messages, notes, and so on.
Using the QWERTY Keypad:
Tap
Options
To change the entry mode - [Symbols] [Emoticon]
Press
Del Key
Press to delete a character. Press and hold to
delete the entire entry.
Press
SYM Key
Press the Space key to type a blank space.
Press
CAP Key
To type upper-case letters, hold down the CAP key
and then press one or more letter keys. To return
to typing lower-case letters, press and release the
CAP key and then press a letter key.
Press
FN Key
To type the number or symbol printed in orange
at the top of a key, hold down the orange-colored
FN key and then press one or more letter keys. To
return to typing letters, press and release the FN
key and then press a letter key. To write in number
or symbol printed in orange at the top of a key
only, press the FN key twice.
Page 43

ENTERING LETTERS,
NUMBERS & SYMBOLS
STANDARD INPUT MODE
Use the QWERTY keyboard to enter letters, numbers and characters.
1.
Enter letters using the keypad. To change the input mode,
tap
Options
.
2.
To enter a space, press
SYM Key
. The cursor will
automatically move to the next column.
3.
Repeat until letters are entered.
4.
To delete one letter, press
Del Key
.
To delete the entire entry, press and hold
Del Key
.
NUMERIC MODE
To enter numbers:
1.
Press the
FN Key
.
2.
To enter a number, press its corresponding digit key. To enter
numbers consecutively, double-press the
FN Key
.
42
For best performance in low-light environments, your handset includes
a backlight feature that can illuminate both the display and the
keyboard so you can keep reading and typing.
Note
Page 44

43
43
ENTERING LETTERS,
NUMBERS & SYMBOLS
SYMBOL MODE
To enter symbols:
1.
Tap
Options
>
Symbols
.
2.
Tap the / keys to locate the symbol you want to enter then press
Done
.
EMOTICON MODE
To enter Emoticons:
1.
Tap
Options
>
Emoticon
.
2.
Tap the / keys to locate the Emoticon you want to enter then
press
Done
.
Page 45

MAKING A CALL THROUGH
THE CONTACT LIST
44
ONE-TOUCH DIALING
Ideal for frequently dialed numbers, this feature allows entries in your
contact list to be dialed via the keypad with only one key press.
ONE-TOUCH DIALING
2-9: Press and hold the corresponding memory number for more than
1 second.
• If no phone number is stored in the location entered, “Empty Speed
Dial Assign Now?“ will appear on the screen.
• Location 1 is reserved for voicemail. Location 2-9 are unassigned.
To assign a speed dial location, please see page 78.
Note
Page 46

45
45
CHAPTER 4
QUICKFIRE TIPS & TRICKS
CHAPTER 4. QUICKFIRE TIPS & TRICKS
Quickfire Tips & Tricks
Page 47

QUICKFIRE TIPS & TRICKS
NAVIGATING & TOUCH SCREEN TIPS
• For optimal touch screen performance, use the tip of your finger to
touch the center of a touch key. A light tap will do. (Do not use a
foreign object or your fingernail on the screen.)
• Press and drag your finger up or down to scroll. A beep will sound
when you’ve reached the top or bottom of a menu. To return to the
previous screen tap the
Back icon
. You may also press the BACK
button on your keyboard.
• When scrolling on the text screen, touch and drag the text on the
screen up or down in the direction you want to move it, or use your
finger to quickly flick the text in the direction you want it to move.
You can also navigate through text and applications using the up and
down arrows on your QWERTY keyboard.
• You may also scroll thru the text screen by pressing the Volume Up/
Down key on the side of your Quickfire. This allows for a page scroll.
MESSAGING TIPS
• To send a text message, slide open the QWERTY keyboard. Tap the
Messaging
and select
Create New Message
. Input your message,
then Tap To, input the phone number then tap Send. You may also
switch back and forth by pressing the TAB key
on your keyboard.
• To add media to your message, press Add Media, and select from an
image, video or audio.
46
Page 48

47
QUICKFIRE TIPS & TRICKS
BROWSING TIPS
• To access the mobile web from idle mode, tap the
Menu icon
,
select
MEdia Net
, then choose Media Net Home.
• To personalize your Media Net home page, from the MEdia Net home
page, tap EDIT (next to “My Links”). Tap the content you would like
added, moved, or deleted from your MEdia Net home page.
• To increase or decrease the size of the onscreen text, press
and select your viewing size.
MUSIC TIPS
• To listen to music on your device, insert your microSD™ card (gold
contacts facing up towards the screen) with music saved on it into the
slot at the top of the phone. From idle mode, tap
AT&T Music
,
select Music Player from the list, then choose your song.
• To adjust the volume, press the Volume Up/Down Keys located on the
upper left side of your Quickfire.
• To purchase music from your device, tap
AT&T Music
from idle
mode, then select Shop Music.
Page 49

QUICKFIRE TIPS & TRICKS
CAMERA TIPS
• To take a picture, press and hold the Side Camera Key or, in
Idle mode, tap the
Menu icon
and select
Organizer & Tools
>
Camera
>
Camera
. Rotate the phone horizontally. Press the Camera
Key to take the picture.
• To record video, press and hold the Side Camera Key
or, in
Idle mode, tap the
Menu icon
and select
Organizer & Tools
>
Camera
>
Camcorder
. Rotate the phone horizontally. Press the Side
Camera Key to start/stop recording.
• For quick access to camcorder from camera screen (or vice versa) tap
the top right icon
– or – .
• To adjust the brightness, use the controls on the lower right bottom of
the display.
• To zoom in or out of a photo, tap the
T icon
or the
W icon
that
appears in the lower left corner of the display. The zoom function will
only work on the camera if the resolution is set to 640 X 480 or 320 X
240, and on the camcorder if the resolution is set to 176 X 144.
• To send a picture or video via message after taking it, tap the Envelope
icon that appears in the middle of the bottom of the display
48
Page 50

49
QUICKFIRE TIPS & TRICKS
GENERAL TIPS
• To turn your Quickfire on/off, press the Power Key
.
• Quickly pressing the Power button temporarily turns off the display
and locks your device. Unlock the device by pressing the Lock Icon on
the screen then touch the Falling Key. Or, simply open the QWERTY
keyboard.
• To personalize your Quickfire, in idle mode, tap the
Menu icon
and
select
MEdia Mall
. From here, you can shop for and download
ringtones, games, graphics, multimedia files, applications and videos.
• To access turn-by-turn voice and onscreen driving directions, in idle
mode, tap the
Menu icon
and then tap
AT&T GPS
. Tap AT&T
Navigator then follow the on-screen directions.
• To stay organized and on schedule with time-saving tools including
a calendar, alarm clock and calculator, tap the
Menu icon
then
select
Organizer & Tools
.
• To watch news, sports, weather and entertainment clips on the go, tap
the
Menu icon
then tap
Cellular Video
. You are then taken to
your default Cellular Video homepage.
Page 51

50
50
MEMO
Page 52

51
CHAPTER 5
MENU FUNCTION
CHAPTER 5. MENU FUNCTION
This chapter addresses accessing the menu and using its
functions and features to customize your Quickfire.
AT&T Music
Messaging
YELLOWPAGES
MEdia Net
MEdia Mall
Cellular Video
My Stuff
Address Book
Games & Apps
AT&T GPS
Organizer & Tools
Settings
Voice Commands
Page 53

AT&T MUSIC
MUSIC PLAYER
The built in Music Player is an application that can play music files. The
music player supports files with extensions AAC, AAC+, eAAC+, MP3,
WMA, 3GP, MP4(Audio only), and M4A. Launching the Music Player
allows you to navigate within your Music Player folders and select
playback material.
1.
In Idle mode, tap the
Menu icon
and select
AT&T Music
>
Music
Player.
Menu options include:
•
Now Playing:
Opens the current play list.
•
All Music
: View all the music stored on your Quickfire and/or memory card.
•
Albums
: View all your music by album.
•
Artists:
View all your music by artist.
•
Playlists
: Create your own playlists by choosing songs from the All Songs
menu list.
•
Genres:
View all your music by genres.
•
Settings
- Play Via:
Tap “Phone“ or “Bluetooth“.
- Shuffle:
Tap “On“ or “Off“.
- Repeat:
Tap “All“, “Off“ or “One“.
- Equalizer:
Tap “Normal“, “Rock“, “Pop“, “Classical“, “Jazz“ or “Bass“.
52
Copyrights of music files may be protected by copyright and intellectual
property laws. Therefore, it may be required to obtain necessary
permissions or licenses before you can reproduce or copy the materials.
In some countries, national law prohibits copying of copyrighted
materials for personal archive as well. Prior to downloading or copying
the files, please ensure that you adhere to the applicable laws and laws
of corresponding countries or regions regarding the Terms of Use of
materials.
Note
Page 54

53
53
AT&T MUSIC
SHOP MUSIC
Selecting Shop Music from the AT&T Music sub menu launches the
browser to a music landing page from which you can purchase music
from 3rd party stores and personalization content from AT&T. Some sites
are data intensive (i.e. previews via streaming) so the user should have
an unlimited MEdia bundle like the MEdia Max 200.
1.
In Idle mode, tap the
Menu icon
and select
AT&T Music
>
Shop
Music.
Tap
Options
to access:
•
History:
Displays the list of sites visited.
•
Display:
Select “Page Map“ or “Page Layout“.
•
Search:
Enter the text then press
Search
.
•
Tool
- Send URL:
Send a URL via text message.
- Page Info:
Display site information.
- Save Item:
Save an item to “Phone“ or “SD Card“.
•
Settings
- Help:
Displays help information.
- Certificates:
Displays Certificate information.
- Preferences:
Tap to select user preferences including Font Size, Encoding,
Title Region and Secure Prompt.
- Clear Cache:
Tap “Yes“ or “No“.
- Clear Cookies:
Tap “Yes“ or “No“.
- Clear History:
Tap “Yes“ or “No“.
- Clear Auto-complete:
Tap “Yes“ or “No“.
Additional charges may apply. Please contact your service provider for
further information regarding your plan.
Note
Page 55

54
54
MUSIC ID
MusicID is an application which uses the onboard microphone to
analyze a song sample and then compare it to a remote database of
songs. Once the application completes the analysis of the song sample,
it then provides you with the name of the song, artist and album art as
well as opportunities to buy related content.
1.
In Idle mode, tap the
Menu icon
and select
AT&T Music
>
Music
ID
.
2.
Follow the on-screen prompts. Menu options include:
•
ID song!:
Allows you to find out information of unknown music by sending
the sound of the unknown music to the web. If the web identifies
the song, it returns with relevant information of the song.
•
manage IDs:
Once a song has been identified through the MusicID, you
can see the list of songs in this folder.
•
help me out:
Information for how to use this java application.
•
exit:
Ends the application and exits.
XM RADIO
Selecting XM Radio from the Games & Apps sub menu launches a
preinstalled java application. The application allows the user to listen to
dozens of channels of digital radio on your mobile phone. Get unlimited
access to commercial-free music, the latest Hip Hop, R&B, Rock, Jazz,
Country anywhere you go.
1.
In Idle mode, tap the
Menu icon
and select
AT&T Music
>
XM
Radio
.
AT&T MUSIC
Page 56

55
This product will use a large amount of data. Please contact your
service provider to determine which plan best fits your device,
additional charges may apply.
Warning
MUSIC VIDEOS
Selecting Music Videos from the AT&T Music sub menu launches a
browser which takes you directly into the Music Video section of Cellular
Video. From this menu, you will have access to music videos from the
latest artist as well as programming from AT&T, MTV,VHI, and CMT
among others. Simply click on a video and begin watching!
Additional charges may incur when downloading music video contents.
Contact your service provider for further information.
Note
1.
In Idle mode, tap the
Menu icon
and select
AT&T Music
>
Music
Videos
.
THE BUZZ
Selecting The Buzz from the AT&T Music sub menu launches a
preinstalled java application (e.g. Billboard). The application allows the
user to obtain relevant music industry news and information including
charts, news, and concert locations.
1.
In Idle mode, tap the
Menu icon
and select
AT&T Music
>
The
Buzz
.
AT&T MUSIC
Page 57

56
56
COMMUNITY
Selecting Community from the AT&T Music sub menu launches the
browser to either one or more of the hot user communities. The
application allows the user to interact with their friends and the
community as well as review artist fan sites.
1.
In Idle mode, tap the
Menu icon
and select
AT&T Music
>
Community
.
MUSIC APPS
Music Apps is a group of internet-based music applications, including
MySpace,Billboard Mobile Channel, Hip Hoptionary, Hip Hop Official by
GoTV, and a search option for other features. All of these applications
are by subscription only, and require a large amount of data streaming.
AT&T strongly recommends that if you subscribe to one of these
subscription services that you also subscribe to an appropriate unlimited
Data rate plan for your handset.
1.
In Idle mode, tap the
Menu icon
and select
AT&T Music
>
Music
Apps
.
AT&T MUSIC
Page 58

57
CREATE NEW MESSAGE
To send a new message:
1.
Slide open the QWERTY keyboard. Tap the
Messaging icon
and
select
Create New Message
.
2.
Input your message.
From the
Message
screen, tap
Options
to choose from:
•
Symbols:
Allows you to enter symbols.
•
Emoticon:
Allows you to enter emoticons.
•
Add Contacts:
Allows you to insert contact information into the message.
•
Sending Settings:
- Priority:
Select “High“, “Normal“ or “Low“.
- Validity Period:
Select “1 Hour“, “2 Hours“, “1 Day“, “1 Week“ or
“Maximum“.
- Delivery Report:
Select “On“ or “Off“.
- Read Report:
Select “On“ or “Off“.
The “Priority“ and “Validity Period“ menus only appear when you create
MMS message.
•
Add Format:
Allows you to access the Text Templates, Subject, vCard and
vCalendar.
•
Slide Duration:
Enter the slide duration time. (1~30sec)
•
Save as Drafts:
To save a message to “Drafts“ folder.
•
Add Slide:
Allows you to add a slide to your message.
• Preview:
To preview a created MMS massage.
The “Slide Duration“, “Save as Drafts“ and “Preview“ menus only appear
when you create MMS message.
From the
Message
screen, tap
Add Media
to add an Image, Video or Audio file
to your message:
3.
Tap To, input the phone number.
From the To screen, tap
Options
to choose from:
•
Recent Message:
Look up a number from your recent message list.
MESSAGING
Page 59

MESSAGING
•
Recent Calls:
Look up a number from your recent call list.
•
Change to To:
Tap to access the “To“ field.
•
Change to CC:
Tap to access the “CC“ field.
•
Change to BCC:
Tap to access the “BCC“ field.
You may also add a number from your address book by tapping Contacts and
looking up a phone number from your Contact List.
The “Sending Settings“ and “Preview“ menus only appear when you create
messages.
4.
To send message, tap
Send
.
INBOX
The Inbox manages received messages.
1.
Slide open the QWERTY keyboard. Tap the
Messaging icon
and
select
Inbox
.
From the
Inbox
screen, tap
Options
to choose from:
•
Delete Read messages
•
Select&delete:
“Delete Selected message?“ >
Yes
or No.
•
Delete all:
“Delete all Messages?“will appear. Tap
Yes
or No.
2.
Tap a message. The message is displayed. To reply to the message,
tap Reply, to delete it, tap Delete.
From the
Inbox
screen, tap
Options
to choose from:
•
Reply:
Replies to the message.
•
Forward:
Send the message to another person.
•
Save contact:
Save the phone number in contacts.
•
Extract data:
Extract phone number, e-mail, URL included in the message.
•
Save item:
Select to save a graphic, sound or other object included in MMS.
•
Information:
To show received message information.
The “Reply“, “Save item“, and “Information“ menus only appear when you
receive MMS message.
58
Page 60

59
59
MESSAGING
OUTBOX
To manage Outbox messages:
1.
Slide open the QWERTY keyboard. Tap the
Messaging icon
and
select
Outbox
.
2.
To delete a message, tap
Options
. Tap
Select & Delete
or
Delete All
>
Yes
or No.
3.
Tap a message. The message is displayed.
From the
Outbox
screen, tap
Options
to choose from:
•
Play:
To play Outbox MMS message.
•
Edit:
Change the recipient’s number or a message.
•
Information:
To show Outbox message information.
•
Error Status:
To show send Error message information.
The “Play“, “Error Status“ and “Information“ menus only appear when you
receive MMS message.
4.
To resend message, tap
Resend
.
SENT
To manage Sent messages:
1.
Slide open the QWERTY keyboard. Tap the
Messaging icon
and
select
Sent
.
2.
To delete a message, tap
Options
. Tap
Select & Delete
or
Delete All
>
Yes
or No.
3.
Tap a message. The message is displayed. To forward the message to
another recipient, tap Forward. To delete the message, tap Delete.
Page 61

MESSAGING
From the
Sent
screen, tap
Options
to choose from:
•
Information:
To show sent message information.
•
Forward:
Send the message to another person.
DRAFTS
To manage Drafts messages:
1.
Slide open the QWERTY keyboard. Tap the
Messaging icon
and
select
Drafts
.
2.
To delete a message, tap
Options
. Tap
Select & Delete
or
Delete All
>
Yes
or No.
3.
Tap a message. The message is displayed.
From the
Drafts
screen, tap
Options
to choose from:
•
Symbols:
Allows you to enter symbols.
•
Emoticon:
Allows you to enter emoticons.
•
Add Contacts:
Allows you to insert contact information into the message.
•
Sending Settings:
- Delivery Report:
Select “On“ or “Off“.
- Read Report:
Select “On“ or “Off“.
•
Add Format:
Allows you to access the Text Templates, Subject, vCard and
vCalendar.
•
Save as Drafts:
To save a message to “Drafts“ folder.
•
Add Slide:
Allows you to add a slide to your message.
From the
Drafts
screen, tap
Add Media
to allows you to insert images, videos
and/or audio to your message.
4.
To send message, tap
Send
.
60
Page 62

61
61
MESSAGING
IM
IM allows you to use your AIM, Windows Live and Yahoo! Messenger on
your Quickfire. You can exchange messages with your friends and check
their online status while you're away from the computer.
SET UP IM
1.
Slide open the QWERTY keyboard. Tap the
IM icon
.
2.
Tap the IM community service you want to use.
SIGN IN
1.
Tap and type your existing ID.
2.
Tap the password field and type your password.
3.
Tap
Sign In
.
4.
A list of contacts appear on the screen.
5.
Tap
Options
to change your status or add a contact. You can sign
in multiple communities.
6.
To sign into another community, tap
Home
and tap the other IM
community service you want to use.
7.
Tap and type your existing ID.
8.
Tap the password field and type your password.
Page 63

62
62
MESSAGING
SEND IM
1.
Select a contact who you want to send IM.
2.
Tap
Options
>
Send IM
.
3.
Type your message in the input field, then tap
Send
.
4.
Tap
Options
to insert emoticon or quick text.
RECEIVE IM
1.
Select a conversation that you want to join.
2.
Tap
Options
>
Open
.
Once you’re signed in, you can receive an IM even if you are not in the
IM menu.
SIGN OUT
1.
Tap the IM community service you want to sign out of.
2.
Tap
Options
>
Sign Out
.
Page 64

63
MESSAGING
EMAIL
Email allows you to access your Yahoo! Mail, AOL Mail, AIM Mail,
Windows Live Hotmail, AT&T Yahoo!, BellSouth and Other provider’s
accounts on your Quickfire.
SET UP EMAIL
1.
Slide open the QWERTY keyboard. Tap the
Email icon
.
2.
Tap the email provider you want to use.
SIGN IN
1.
Tap and type your existing email ID.
2.
Tap the password field and type your password.
3.
Tap
Sign In
.
4.
You can choose
Inbox, Drafts, Sent
and
Trash
.
5.
Tap
Options
to select Read, Delete or Compose New.
OPENING AN EMAIL
1.
Tap
Read
after highlighting the email subject line you want to open
by scrolling the bar.
2.
Once the email opens, tap
Options
to Reply, Forward, Delete.
DELETING AN EMAIL
1.
Tap the email you want to delete by scrolling the bar.
2.
Tap
Options
>
Delete
Page 65

64
64
MESSAGING
VOICE MAIL
Voicemail allows callers to leave voice messages in your voice mailbox,
and lets you review, play, and delete your voice messages any time you
are in your Carrier’s network coverage area.
1.
In Idle mode, push
Shortcut Key
and select
Messaging icon
> select
Voice Mail
or tap the
Main Menu icon
> select
Messaging icon
> select
Voice Mail
. Or, from the phone screen,
tap and hold the
(1) icon
.
Page 66

65
YELLOWPAGES
FIND. MAP. SAVE. GO.
Selecting YELLOWPAGES.COM Mobile from the Games & Apps sub menu
launches a preinstalled java application.
It maps a business and gets step-by-step directions to or from saved
locations, including home or from recent searches. Then save favorites
and access them on the go from wherever you happen to be.
1.
In Idle mode, tap the
Menu icon
and select
YELLOWPAGES icon
.
Page 67

MEDIA NET
MEDIA NET HOME
MEdia Net is one of the services provided by AT&T and it gives you
access to all the cool things you can do with your wireless phone. Once
connected, the homepage is displayed. The content depends on the
service provider.
With MEdia Net you can access your local weather, news &
entertainment, sports scores, tones, games, apps, and so much more.
FAVORITES
While navigating through either the Internet or the MEdia Net pages,
you can bookmark a site to quickly and easily access it at a future time.
The URL addresses of the bookmarked sites are stored in the Favorites
folder, wherein you can either use the 6-preset URL addresses or store
your own favorite URL addresses.
1.
In Idle mode, tap the
Menu icon
and select
MEdia Net icon
>
Favorites
.
2.
Tap a bookmark item on the Favorite list. The preset URLs consist of:
•
My Account
•
Chat
•
News
•
Sports
•
Weather
•
Cellular Video
Tap
Options
to access the following options:
•
Add Folder:
Allows you to add a new folder to your Favorites List.
•
Add Favorite:
Allows you to add a new URL address to your Favorites List.
•
Delete All:
“All Items will be deleted. Delete all?“ will be display >
Yes
or
No.
66
Page 68

67
67
MEDIA NET
3.
Tap Go to launch the website.
Tap
Options
to access the following options:
•
Send:
Send the URL address via text message.
ENTER URL
1.
In Idle mode, tap the
Menu icon
and select
MEdia Net icon
>
Enter URL
.
2.
Enter the URL address using the keypad. To change the input mode,
tap
Options
. The following modes are available:
•
T9Word:
Allows you to enter characters by pressing one key per letter. In
this mode, tap “T9“ to display alternative words.
•
Abc:
Allows you to enter alphabet characters.
•
123:
Allows you to enter numbers.
•
Symbols:
Allows you to enter symbols.
3.
Tap Go to go there directly.
HISTORY
The History list provides you with a list of the most recently visited web
sites. These entries can be used to return to previously unmarked web
pages.
1.
In Idle mode, tap the
Menu icon
and select
MEdia Net icon
>
History
.
2.
Tap a website on the History list.
3.
To clear the History, tap
Delete All
. All Items will be deleted. Delete
all?“ will appear. Tap
Yes
or No.
Page 69

MEDIA NET
SETTINGS
1.
In Idle mode, tap the
Menu icon
and select
MEdia Net icon
>
Settings
. Select from the following options:
•
Help:
Displays the browser version and copyright information about the
browser.
•
Certificates:
Accesses certificate information from your Quickfire.
•
Preferences:
Changes the settings for the web browser to suit your
preference.
•
Clear Cache:
Clear the cache.
•
Clear Cookies:
Clears saved cookies.
•
Clear History:
Clear the list of recently visited URLs.
•
Clear Auto-complete:
Clear automatically fills in character for browser
recognized words.
68
Page 70

69
69
MEDIA MALL
The Media Mall topics covered in this section are shopping for
Ringtones, Games, Graphics, Multimedia, Applications, Themes, Videos
and MEdia Net Home the MEdia Home site.
SHOP RINGTONES
This menu option connects to AT&T’s ringtone download site.
1.
In Idle mode, tap the
Menu icon
and select
MEdia Mall icon
>
Shop Ringtones
.
SHOP GAMES
This menu option connects to AT&T’s game download site. This allows
users to download the various games by connecting to the Internet.
Downloaded games appear in your Games folder.
1.
In Idle mode, tap the
Menu icon
and select
MEdia Mall icon
>
Shop Games
.
SHOP GRAPHICS
This menu option connects to AT&T’s graphic download site, where
you can shop for graphic images. Downloaded graphics appear in your
Graphics folder.
1.
In Idle mode, tap the
Menu icon
and select
MEdia Mall icon
>
Shop Graphics
.
SHOP MULTIMEDIA
This allows you to connect to AT&T’s multimedia download site where
you can shop for multimedia (video) files. Downloaded files appear in
your Videos folder.
Page 71

MEDIA MALL
1.
In Idle mode, tap the
Menu icon
and select
MEdia Mall icon
>
Shop Multimedia
.
SHOP APPLICATIONS
This allows you to connect to AT&T’s application download site
where you can shop for applications. Downloaded files appear in your
Applications folder.
1.
In Idle mode, tap the
Menu icon
and select
MEdia Mall icon
>
Shop Applications
.
SHOP VIDEOS
This allows you to connect to AT&T’s video download site where you can
shop for videos. Downloaded videos appear in your My Stuff folder.
1.
In Idle mode, tap the
Menu icon
and select
MEdia Mall icon
>
Shop Videos
.
MEDIA NET HOME
The MEdia Net Home menu option allows you to quickly access your
MEdia Net homepage using the built-in browser. This page gives
you quick access to information such as local weather, sports scores,
horoscope information and quick links to the previously mentioned
shopping sites.
1.
In Idle mode, tap the
Menu icon
and select
MEdia Mall icon
>
MEdia Net Home
.
70
Page 72

71
71
CELLULAR VIDEO
Your Quickfire is equipped with a browser which allows you to access
the Internet and upload media files directly to your phone. These media
files display using the built-in Media Player. Accessing the browser is
data intensive and additional charges may apply.
CV brings you quick, on-demand access to news, sports, weather and
entertainment video clips. Catch up on TV’s hottest shows, funniest
comedians, biggest headlines and latest sports scores. You can even
personalize your homepage for quick access to your favorites. In
addition, the CV service automatically streams localized weather
information to your personalized “News & Weather“ page each and
every day.
1.
In Idle mode, tap the
Menu icon
then tap
Cellular Video icon
.
You are then taken to your default Cellular Video homepage.
2.
Highlight the desired media clip or select from one of the available
categories and tap the screen.
CELLULAR VIDEO OPTIONS
1.
In Idle mode, tap the
Menu icon
then tap
Cellular Video icon
and tap the screen.
Page 73

72
72
MY STUFF
RINGTONES & AUDIO
1.
In Idle mode, tap the
Menu icon
and select
My Stuff icon
>
Ringtones & Audio
.
2.
Tap
Phone
or
SD Card
.
Tap
Options
to access the following options:
•
Copy to SD Card:
To copy the selected ringtone or audio.
•
Move to SD Card:
To move the selected ringtone or audio.
•
Delete Multimedia:
To delete a selected ringtone or audio.
When accessing ringtones or audio files from your SD card, the file
must be placed in the Audio folder under Media on your card.
Note
3.
Tap
AT&T Ringtone, Basic Ringtone 1~3, Sky lounge, Rainforest
,
Fighters, Love, Funny guy
and
Happiness
.
Tap
Options
to access the following options:
•
Send Message:
To send a message.
•
Assign:
Select “Incoming Call“ or “Alarm Tone“.
•
Rename:
To rename a selected ringtone or audio.
4.
To play, tap
Play
.
5.
To delete a ringtone or audio file, tap
Delete
, “Delete item?“ will
appear. Tap
Yes
or No. Only ringtones you have downloaded can be
deleted.
Page 74

73
MY STUFF
IMAGES
1.
In Idle mode, tap the
Menu icon
and select
My Stuff icon
>
Images
.
2.
Tap
Phone
or
SD Card
.
Tap
Options
to access the following options:
•
Copy to SD Card:
To copy the selected image.
•
Move to SD Card:
To move the selected image.
•
Delete Multimedia:
To delete a selected image.
3.
Tap
AT&T Globe, Cloud, Water Button, Spring, Waterdrops on The
Window, Silk, White Rose, Skyline, Bridge
or
Sandy Beach
.
4.
To preview an image, tap
Preview
.
Tap
Options
to access the following options:
•
Send Message:
To send a message.
•
Send to Snapfish:
To send a message to HP’s online Snapfish® service.
•
Assign to Wallpaper:
To set wallpaper image.
•
Rename:
To rename a selected image.
5.
To delete an image, tap
Delete
. “Delete item?“ will appear. Tap
Yes
or No. Only images you have downloaded can be deleted.
Page 75

74
MY STUFF
VIDEOS
1.
In Idle mode, tap the
Menu icon
and select
My Stuff icon
>
Videos
.
2.
Tap
Phone
or
SD Card
.
Tap
Options
to access the following options:
•
Copy to SD Card:
To copy the selected video clip.
•
Move to SD Card:
To move the selected video clip.
•
Delete Multimedia:
To delete a selected video clip.
3.
Tap the video you want to view.
4.
Tap
Play
, to play a video.
Tap
Options
to access the following options:
•
Send Message:
To send a video message.
•
Rename:
To rename a selected video clip.
5.
To delete a video, tap
Delete
. “Delete item?“ will appear. Tap
Yes
or No.
74
Page 76

75
75
ADDRESS BOOK
Stores up to 500 entries, each of which can be assigned to a group.
Entries can be retrieved by name or group.
1.
In Idle mode, tap the
Menu icon
and select
Address Book icon
.
FIND NAME
Retrieves an entry by name and calls the primary number by simply
pressing the SEND Key
. You can review all the entries stored
in your contacts list or quickly find an entry by entering a name or its
character string.
1.
The list of names in your contacts is displayed alphabetically.
2.
Enter a name or scroll through the list. If more than one contact is
listed, highlight the contact you want.
3.
Tap the contact. The contact information is displayed.
4.
To edit the contact information, tap
Edit
. The Edit Contact screen will
appear with the selected contact information shown.
See page 38 for “Storing a Phone Number“.
5.
To save the entry, tap
Save
. To return to the previous page, tap the
BACK icon
at the top of the page.
6.
Tap
Options
to access the following options:
• Group List
• Speed Dial List
• Copy to
• Delete Contact
Page 77

76
ADDRESS BOOK
• Service Dial Number
• My Number
• Address Settings
GROUP LIST
This menu allows you to manage group information. By default,
there are 4 existing groups: “No Group,“ “Business,“ “Family“ and
“Friends.“ You can also configure a ring tone for a group so that the
group ring tone sounds when a call from a specific contact address
within that group arrives and there is no ring tone configured for the
specific contact address. A maximum of 20 groups is allowed.
1.
In Idle mode, tap the
Menu icon
and select
Address Book icon
>
Options > Group List
.
Add new group
1.
Tap
Add New
to add a new group name. Tap
Phone
or
SIM
.
2.
Input a new group name.
3.
To save a new group, tap
Save
.
Setting a ringer type for a group
1.
Select an existing group name.
2.
Tap
Options > Set Group Ringtone
.
3.
Tap “AT&T Ringtone“, Basic Ringtone 1 ~ Basic Ringtone 3“,
“Sky lounge“, “Rainforest“, “Fighters“, “Love“, “Funny guy“ or
“Happiness“.
4.
Tap
Save
.
76
Page 78

77
77
ADDRESS BOOK
Change group name
1.
Select the group you want to rename. Only new groups you added
can be changed.
2.
Tap
Options > Rename Group
.
3.
Input a new group name.
4.
To change the name, tap
Save
.
Select & Delete
1.
Select an existing group name. (Except No Group)
2.
Tap
Options > Select & Delete
.
3.
Tap the contact you want to delete, tap check or uncheck.
Or, tap
All
.
3.
Tap
Done
, then“Delete?“ will appear. Tap
Yes
or No.
Delete group
1.
Select an existing group name. Only new groups you added can
be changed.
2.
Tap
Options > Delete Group
.
3.
“Delete Group“ will appear. Tap
Yes
or No.
Page 79

78
ADDRESS BOOK
SPEED DIAL LIST
This menu allows you to configure the speed dial numbers. You can
select a number from 2 to 9 as a speed dial. You can configure speed
dial numbers for any of the 8 numbers for a specific contact address so
that a contact address may have multiple speed dial numbers.
1.
In Idle mode, tap the
Menu icon
and select
Address Book icon
>
Options > Speed Dial List
.
2.
To assign a phone number to a location, select the location.
“Empty“ appears if the location is available.
Note
3.
Tap a name from your contact list. If the contact has more than
1 number saved, tap the correct number for the Speed Dial
location is shown.
4.
You will see the contact name next to the Speed Dial location
number in the Speed Dial lists.
5.
To reset the speed dial locations, tap
Reset All
. “Reset all speed
dial?“ will appear. Tap
Yes
or No.
6.
Tap the speed dial # location.
To call the contact, tap
Call
.
To change the speed dial location, tap
Switch
, then tap the new
speed dial location.
To reset a specific speed dial location, tap
Reset
.
78
Page 80

79
79
ADDRESS BOOK
COPY TO
This menu allows you to copy all of the information from your SIM
card to your handset and vice versa. If a name is duplicated during the
copying operation, the information is also duplicated. Options include:
•
SIM to Phone:
You can copy the entry from the SIM card to the phone
memory.
•
Phone to SIM:
You can copy the entry from the handset memory to the SIM
card (not all the data will be copied).
1.
Tap
Options > Copy to
.
2.
Tap “Phone -> SIM“ or “SIM -> Phone“.
3.
Tap the contact you want to copy, tap check or uncheck.
Or, tap
All
.
4.
To copy all phone number, tap
Done
.
5.
“Copy selected contacts?“ will appear. Tap
Yes
or No.
DELETE CONTACT
To delete an entry:
1.
Tap
Options > Delete Contact
.
2.
Tap the contact you want to delete, tap check or uncheck.
Or, tap
All
.
3.
To delete all phone numbers, tap
Done
.
4.
“Delete selected contacts?“ will appear. Tap
Yes
or No.
Page 81

80
ADDRESS BOOK
SERVICE DIAL NUMBER
You can view the list of Service Dialing Numbers (SDN) assigned by
your network provider. Such numbers could include the emergency,
directory assistance and voice mail numbers.
1.
Tap
Options > Service Dial Number
.
MY NUMBER
Displays and edit your phone number.
1.
Tap
Options > My Number
. Your phone number will appear next
to 1.
2.
Tap
2 (empty), 3 (empty)
or
4 (empty)
. Enter the additional
information, then tap
Save
.
3.
To return to the previous page, tap the
BACK icon
at the top
of the page. The Name or Data you enter now will appear instead
of
2 (empty), 3 (empty)
or
4 (empty)
.
ADDRESS SETTINGS
To select your address settings:
1.
Tap
Options > Address Settings
.
Tap
Options
to access the following options:
•
Save Location:
Tap “Always Ask“, “Phone“ or “SIM“ then tap
Save
.
•
View:
Tap “All“, “Phone“ or “SIM“ then tap
Save
.
•
Memory Status:
Displays the current status of the phone memory and
the SIM card.
•
SIM Number Type:
Tap
Add
. Input the new number then tap
Save
.
80
Page 82

81
81
ADDRESS BOOK
•
Change Hidden Key:
Input the new hidden key. (This is used to Lock your
SIM Card address book. The default hidden key
code is “00000000”. Please contact AT&T Customer
Service for your Hidden Key code.)
ADD NEW
Adds a new entry.
1.
Tap
Add New
, then tap
Phone
or
SIM
.
2.
When adding a new contact to your address book you may choose
to save the information in either the Phone or SIM memory. Saving
a contact in the Phone location allows you to add additional fields
such as number type (mobile, home, office, etc.), email, picture,
etc. Please note, some of these options may not be available when
storing on the SIM, such as adding a picture or ringtone.
3.
Fill in the fields as they are selected.
Phone Book fields(SIM):
•
Name:
Enter name >
Done
.
•
Phone Number:
Input the number > OK.
•
No Group:
Tap “No Group“.
Tap
Add New
. > To save location, tap
Phone
or
SIM
. Input the
new group name
>
SAVE
.
Tap
Options
to access the following options:
Add Optional Field, Delete Optional Field, Save as Hidden Entry
Phone Book fields(Phone):
•
First Name:
Enter first name >
Done
.
•
Last Name:
Enter last name >
Done
.
•
Number Type:
Tap “Mobile“, “Home“, “Office“, “Pager“, “Home FAX“,
“Office FAX“ or “Etc Number“. Input the number
> OK.
Page 83

ADDRESS BOOK
•
No Group:
Tap “No Group“, “Business“, “Family“ or “Friends“
>
Input the
new group name
>
SAVE
.
•
Ringtone:
Tap “AT&T Ringtone“, Basic Ringtone 1 ~ Basic Ringtone 3“,
“Sky lounge“, “Rainforest“, “Fighters“, “Love“, “Funny guy“ or
“Happiness“
>
Save
.
Tap
Options
to access the following options:
Add Optional Field, Delete Optional Field
4.
To save the entry, tap
Save
. To return to the previous page, tap the
BACK icon
at the top of the screen.
See page 38 for more detailed information about storing a number.
Note
82
Page 84

GAMES & APPS
GAMES
1.
In Idle mode, tap the
Menu icon
and select
Games & Apps
>
Games
.
2.
Tap the game you want to play then follow the on-screen directions.
APPS
1.
In Idle mode, tap the
Menu icon
and select
Games & Apps
>
Apps
.
2.
Tap the application you want to access then follow the on-screen
directions.
BILLBOARD
The application allows the user to obtain relevant music industry news
and information including charts, news, and concert locations.
1.
In Idle mode, tap the
Menu icon
and select
Games & Apps
>
Apps > Billboard
.
MOBITV
MobiTV brings your Quickfire to life. Watch news, sports, weather, and
entertainment clips via AT&T’s high-speed data network while on the go.
1.
In Idle mode, tap the
Menu icon
and select
Games & Apps
>
Apps > MobiTV
.
2.
Tap
MobiTV
.
3.
Tap the show you wish to view.
83
Page 85

84
GAMES & APPS
84
MOBILE BANKING
Mobile Banking is an application that allows you to quickly and easily
access your financial accounts. You can check account balances, view
and pay bills and review your transactions.
1.
Access your bank's Online Banking site and enroll in Mobile
Banking.
2.
Download the Mobile Banking application to phone. You will
receive a text message shortly to complete the download.
3.
Tap the link in the message to download.
4.
In Idle mode, tap the
Menu icon
and select
Games & Apps
>
Apps > Mobie Banking
.
5.
Enter the Initiation Code, provided during your bank enrollment,
into the required field.
6.
Establish a six-digit PIN to unlock the application. This is your
personal code providing you future access to the Mobile Banking
application.
PEOPLE
People provides up-to-the-minute celebrity news, photos and more
directly on phone. PEOPLE Mobile is the easiest way to stay updated
on your favorite celebs.
1.
In Idle mode, tap the
Menu icon
and select
Games & Apps
>
Apps > People
.
Page 86

85
AT&T NAVIGATOR
AT&T Navigator, with GPS enabled directions, is the fastest way to
get where you are going - whether across town or across the country.
You can always find your way with turn-by-turn voice and on-screen
directions. Find whatever you need on the road, including restaurants,
and business listings.
1.
In Idle mode, tap the
Menu icon
and select
Games & Apps
>
Apps > AT&T Navigator
.
MUSIC ID
MusicID is an application which uses the onboard microphone to
analyze a song sample and then compare it to a remote database of
songs.
1.
In Idle mode, tap the
Menu icon
and select
Games & Apps
>
Apps > Music ID
.
XM RADIO
The application allows the user to listen to dozens of channels
of digital radio on your mobile phone. Get unlimited access to
commercial-free music, the latest Hip Hop, R&B, Rock, Jazz, Country
anywhere you go.
1.
In Idle mode, tap the
Menu icon
and select
Games & Apps
>
Apps > XM Radio
.
85
GAMES & APPS
Page 87

86
GAMES & APPS
86
MOBILE EMAIL
Allows you to access your Yahoo! Mail, AOL Mail, AIM Mail, Windows
Live Hotmail, AT&T Yahoo!, BellSouth and Other provider’s accounts
on your Quickfire.
1.
In Idle mode, tap the
Menu icon
and select
Games & Apps
>
Apps > Mobile Email
.
INSTANT MESSAGING
Allows you to use your AIM, Windows Live and Yahoo! Messenger
on your Quickfire. You can exchange messages with your friends and
check their online status while you're away from the computer.
1.
In Idle mode, tap the
Menu icon
and select
Games & Apps
>
Apps > Instant Messaging
.
YELLOWPAGES.COM
The Yellowpages.com application provides quick and ready access
maps a business and gets step-by-step directions to or from saved
locations, including home or from recent searches. Then save favorites
and access them on the go from wherever you happen to be.
1.
In Idle mode, tap the
Menu icon
and select
Games & Apps
>
Apps > Yellowpages.com
.
Page 88

87
AT&T NAVIGATOR
AT&T Navigator, with GPS enabled directions, is the fastest way to
get where you are going - whether across town or across the country.
You can always find your way with turn-by-turn voice and on-screen
directions. Find whatever you need on the road, including restaurants,
and business listings. Get where you’re going faster! Save your favorite
locations, get traffic updates, and one-click re-routing.
1.
In Idle mode, tap the
Menu icon
and then tap
AT&T GPS
.
2.
Tap
AT&T Navigator
.
3.
Select the Drive To option.
4.
Select the address option and choose the Type it option.
5.
Enter the address for your desired destination and select Done. AT&T
GPS Navigator™ will validate the address and generate your route.
GPS works on a separate satellite signal than your wireless carrier. For
best results when using GPS services:
• Be outdoors and have a clear view of the sky. Hold the phone without
blocking the antenna.
• Start
AT&T GPS
and select a
Drive To
route before driving to acquire
the initial GPS signal.
• Keep the device turned on to optimize subsequent uses of GPS.
• In some cases, acquiring the initial position may take up to 2-3
minutes.
87
AT&T GPS
Page 89

88
ORGANIZER & TOOLS
88
CAMERA
TAKE A PICTURE
Taking pictures with your Quickfire’s built-in camera is as simple as
choosing a subject, pointing the lens and pressing a button.
1.
In Idle mode, tap the
Menu icon
and select
Organizer & Tools
>
Camera
>
Camera
or press and hold Camera Key .
2.
Point the camera lens at your subject. You can check the picture framing
through the display screen.
Tap
Options
to choose from:
• View Photos: The list of the photos in the currently selected memory appears.
• Self Timer: To select self timer “0ff“, “5secs“ or “10secs“.
• White Balance: Allows you to select the white balance mode to adjust
the color balance of photos. Adjust by tapping the
/
and selecting from “Fluorescent“, “Daylight“, “Cloudy“,
“
Automatic“ or “Incandescent
“.
• Image Effect: Tap
/
to select from “Gray“, “Negative“, “Sepia“ or “No
Effect
“
.
• Fun Frame: Highlight a fun frame from the list.
• Resolution: To select resolution “1280x960“, “640x480“, “320x240“.
• Quality: To select Quality “Economy“, “Normal“ or “Fine“.
• Save to: To select save to
“Phone Memory“, “SD Card“
.
3.
Press the Camera Key to take the picture.
4.
After taking the picture it will be displayed.
To save the picture, press the Camera icon at the bottom left of the
screen.
To take another picture without saving the picture you just took,
press the Trash Can icon at the bottom right of the screen.
Page 90

89
89
ORGANIZER & TOOLS
To send the picture to someone, press the Envelope icon in the
middle of the bottom of the screen.
TAKING A VIDEO
Taking video with your Quickfire’s built-in camera is as simple as
choosing a subject, pointing the lens and pressing a button.
1.
In Idle mode, tap the
Menu icon
and select
Organizer & Tools
>
Camera
>
Camcorder
.
Tap
Options
to choose from:
• View Videos: The list of the videos in the currently selected memory appears.
• Image Effect: Tap
/
to select from “Gray“, “Negative“, “Sepia“ or “No
Effect“.
• Resolution: To select resolution “320x240“ or “176x144“.
• Quality: To select Quality “Economy“, “Normal“ or “Fine“.
• Save to: To select save to
“Phone Memory“ or “SD Card“
.
2.
Press the Side Camera Key to take the camcorder.
3.
To stop recording, press the Side Camera Key .
To Pause/Resume recording, tap
Pause/Resume
.
4.
After taking the camcorder it will be displayed.
To save the video, tap Video icon at the bottom left of the screen.
To take another video without saving the video you just took, tap
the Trash Can icon at the bottom right of the screen.
To send the video to someone, tap the Envelope icon in the middle
of the bottom of the screen.
Page 91

90
ORGANIZER & TOOLS
90
CALENDAR
Sets an event and reminds you of that event.
1.
In Idle mode, tap the
Menu icon
and select
Organizer & Tools
>
Calendar
.
ADD NEW EVENT
1.
Tap to choose a date in the Scheduler. Tap
Add
to add an event to
the Scheduler.
•
Title:
Enter the event title >
Save
.
•
Start:
Enter the start date >
Done
.
•
Time:
Enter the time. Tap AM/
PM > Done
.
•
End:
Enter the end date >
Done
.
•
Time:
Enter the time. Tap AM/
PM > Done
.
•
Summary:
Enter the Summary >
Save
.
•
Location:
Enter the location >
Save
.
•
Alarm:
Tap “Off“, “On Time“, “15 Min Before.“, “1Hour Before.“, “1Day
Before.“, “2Days Before.“, “1 Week Before.“ >
Save
.
•
Repeat:
Tap “Once“, “Daily“, “Mon to Fri“, “Mon to Sat“, “Weekly“,
“Monthly“, “Annually“ >
Save
.
2.
Tap
Save
.
3.
The date of the event will be marked on your Calendar.
VIEW ADDED SCHEDULER
1.
Tap / to select a date in the Calendar, then tap to view the
event for that day.
2.
Tap
Add
to add an event to the Scheduler.
Page 92

91
91
ORGANIZER & TOOLS
Tap
Options
to access the following options:
•
Select & Delete:
“Delete Selected Items?“ will appear. Tap
Yes
or No.
•
Delete All:
“Delete all Items?“ will appear. Tap
Yes
or No.
3.
Tap event to see the details for the event.
4.
Tap
Edit
to edit the event, then tap
Save
to save the event.
5.
Tap
Delete
to delete event in the Scheduler. “Delete Schedule?“
will appear. Tap
Yes
or No.
TODAY SCHEDULER
To view the Today Scheduler:
1.
Tap
Today
.
ALARM
The alarm function allows you to set up multiple separate alarms. You
can also set the time, repetition interval and alarm sound.
1.
In Idle mode, tap the
Menu icon
and select
Organizer & Tools
>
Alarm
.
2.
Tap
Add
to set a new alarm.
•
Set:
Tap “On“ or “Off“ >
Done
.
•
Time:
Enter the time. Tap AM/
PM > Done
.
•
Repeat:
Tap “Once“, “Mon to Fri“, “Mon to Sat“, “Sat to Sun“ or “Daily“
>
Done
.
•
Snooze:
Tap “5 min“, “10 min“, “15 min“ or “20 min“ >
Done
.
•
Ringtone:
Tap a ringtone for the alarm sound.
3.
Tap
Save
.
Page 93

92
92
ORGANIZER & TOOLS
4.
To delete all the alarms, tap
Delete All
. “Delete all Items?“ will
appear. Tap
Yes
or No.
CALCULATOR
The calculator allows you to perform general mathematical functions,
such as addition, subtraction, multiplication, and division.
1.
In Idle mode, tap the
Menu icon
and select
Organizer & Tools
>
Calculator
.
2.
Enter the numbers to get the value you want. To cancel a
calculation, tap C . To clear the display, tap (0).
TIP CALCULATOR
This feature allows you to quickly and easily calculate the tip amount
based on the total bill as well as the split of the total bill based on the
number of people.
1.
In Idle mode, tap the
Menu icon
and select
Organizer & Tools
>
Tip Calculator
.
2.
Tap
Bill
, enter the amount of the bill then tap
Done
.
3.
Tap
Tips
, enter the percentage of the tip, then tap
Done
.
4.
Tap
Persons
, enter the number of people splitting the bill, then tap
Done
.
5.
The amount that each person pays appears in the
Each Pays
field.
Page 94

93
ORGANIZER & TOOLS
TO DO
This feature allows you to save and manage a to do list.
1.
In Idle mode, tap the
Menu icon
and select
Organizer & Tools
>
To Do
.
2.
Tap
Add
to set a new To Do item. Enter the following fields:
•
Title:
Enter the title >
Save
.
•
Due Date:
Tap to choose a date in the Scheduler.
•
Summary:
Enter the summary >
Save
.
•
Priority:
Tap “High“, “Normal“, “Low“ >
Save
.
•
Status: Tap
“In Progress“, “Completed“ >
Save
.
3.
Tap
Save
.
Tap
Options
to access the following options:
•
Select & Delete:
“Delete Selected Items?“ >
Yes
or No.
•
Delete All:
“Delete all ToDo?“will appear. Tap
Yes
or No.
WORLD TIME
The World Time function provides time information on major cities
worldwide.
1.
In Idle mode, tap the
Menu icon
and select
Organizer & Tools
>
World Time
.
2.
Tap
Set
, then tap / to choose a city.
Tap Country & City, to view city list.
•
DST:
Specifies whether the current time of the selected place is adjusted to
Daylight Savings Time.
Page 95

ORGANIZER & TOOLS
94
3.
Tap
Done
.
4.
Tap
Delete All
to delete world time. “Delete all Items?“ will appear.
Tap
Yes
or No.
NOTEPAD
To access the notepad:
1.
In Idle mode, tap the
Menu icon
and select
Organizer & Tools
>
Notepad
.
ADD MEMO
1.
Tap
Add
to add a new memo.
2.
Input the memo then tap
Save
.
3.
Tap
Delete All
to delete the memos. “Delete All?“ will appear.
Tap
Yes
or No.
VIEW MEMO
1.
The list of all memos, in saved order is displayed.
2.
Tap a memo.
EDIT MEMO
1.
The list of all memos, in saved order is displayed.
2.
Tap a memo.
3.
Tap
Edit
to edit the memo >
Save
.
Page 96

95
95
ORGANIZER & TOOLS
DELETE MEMO
1.
The list of all memos, in saved order is displayed.
2.
Tap a memo.
3.
Tap
Delete
. “Delete this memo?“ will appear. Tap
Yes
or No.
UNIT CONVERTER
This function converts any measurement into a unit you want. There are
5 types of units that can be converted: Distance, Area, Volume, mass and
Temperature.
1.
In Idle mode, tap the
Menu icon
and select
Organizer & Tools
>
Unit Converter
.
•
Unit:
Tap “Distance“, “Area“, “Volume“, “Mass“ or “Temperature“ >
Done
.
•
Input:
Tap “mm“, “cm“, “m“, “km“, “in“, “ft“, “yd“ or “mi“ >
Done
.
•
Output:
Tap “mm“, “cm“, “m“, “km“, “in“, “ft“, “yd“ or “mi“ >
Done
.
2.
Tap
Reset
.
VOICE MEMO
Voice Memo allows you to record a reminder message that can be up to
4 minutes. To record a memo:
1.
In Idle mode, tap the
Menu icon
and select
Organizer & Tools
>
Voice Memo
.
2.
To record a voice memo, tap
Start
.
To pause/resume a voice memo, tap
Pause/Resume
.
Page 97

ORGANIZER & TOOLS
96
3.
To stop recording a voice memo, tap
Stop
.
•
Save:
The saved memo appears in the My Stuff folder.
(
Menu icon
>
My Stuff
>
Ringtones & Audio
)
•
Save & Send Msg:
To save and send the memo in a message.
•
Cancel:
To cancel voice memo.
STOPWATCH
You can simultaneously time up to 10 different events.
1.
In Idle mode, tap the
Menu icon
and select
Organizer & Tools
>
Stopwatch
.
2.
To measure a time period:
• To start, tap
Start
.
• To stop the timing, tap
Stop
.
To continue timing, tap
Continue
.
• Tap
Lap
to save the time at one instance. You can show up to 10 times.
• To stop the stopwatch, tap
Stop
.
• To review the results, scroll through the list.
• To reset it, tap
Reset
.
Page 98

97
97
SETTINGS
Customizes your Quickfire and optimizes performance through a variety
of settings.
PROFILE
1.
In Idle mode, tap the
Menu icon
and select
Settings
>
Profile
.
2.
Tap
General, Outdoor, Meeting
or
Headset
.
•
Call Alert Type:
Tap Ring, Vibrate, Ring & Vibrate, Ring After Vibrate or
Silence >
Save
.
•
Ring Tone:
Tap Phone or SD Card.
Tap AT&T Ringtone, Basic Ringtone 1 ~ Basic Ringtone 3, Sky
lounge, Rainforest, Fighters, Love, Funny guy, Happiness >
Save
.
•
Ring Volume:
Tap Off or Volume 1 ~ Volume 7 >
Save
.
•
Message Alert Type:
Tap Ring Once, Ring Periodically, Ring & Vibrate or
Silent >
Save
.
•
Message Tone:
Tap Tone 1, Tone 2, Others or Off >
Save
.
•
Keypad & Touch Volume:
Tap Off or Volume 1 ~ Volume 7 >
Save
.
•
Multimedia Volume:
Tap Off or Volume 1 ~ Volume 7 >
Save
.
3.
Tap
Flight
. This allows you to use only the phone’s features that
do not require the use of the wireless network when you are in an
airplane or in places where the wireless network is prevented. If
you set the flight mode on, the icon will be displayed on the screen
instead of the network signal icon.
•
On:
You cannot make (or receive) any calls, including emergency calls, or use
other features that require network coverage.
•
Off:
You can deactivate the flight mode and restart your handset to access
the network.
Tap On or Off >
Save
.
Page 99

SETTINGS
98
DISPLAY
WALLPAPER
Allows you to choose the kind of background to be displayed on the
phone.
1.
In Idle mode, tap the
Menu icon
and select
Settings
>
Display
>
Wallpaper
.
2.
Tap “AT&T Globe ~ Sandy Beach“. If you have taken any pictures
and saved them to your device, they will appear here as well.
3.
Tap
Save
.
STYLE
Allows you to choose how the Idle screen will appear.
1.
In Idle mode, tap the
Menu icon
and select
Settings
>
Display
>
Style
.
2.
Scroll through the styles by tapping
<
/ >.
3.
Tap OK.
GREETING BANNER
The greeting is your personal label for your Quickfire. It appears on the
main screen along the top of the display.
1.
In Idle mode, tap the
Menu icon
and select
Settings
>
Display
>
Greeting Banner
.
2.
Tap “On“ or “Off“.
Page 100

99
99
SETTINGS
3.
If you select “On“, the current greeting text is displayed.
Tap
Del
to delete the greeting, then enter your new greeting.
Tap
Options
to change the input mode.
4.
Tap
Save
.
BACKLIGHT
Turn on the backlight on the display and keypad for easy viewing in dark
places.
DISPLAY
1.
In Idle mode, tap the
Menu icon
and select
Settings
>
Display
>
Backlight > Display
.
2.
Tap “5 secs“, “10 secs“, “20 secs“, “1 min“ or “3mins“.
3.
Tap
Save
.
KEYPAD
1.
In Idle mode, tap the
Menu icon
and select
Settings
>
Display
>
Backlight > Keypad
.
2.
Tap “5 secs“, “10 secs“, “20 secs“ or “Always off“.
3.
Tap
Save
.
 Loading...