

Page 1

AT&T
®
PARTNER® PagePac
Installation and Use
Page 2

Copyright © 1993, AT&T
All Rights Reserved
Printed in U.S.A.
NOTICE
Every effort was made to ensure that the information in this manual was complete and accurate at the time of
printing. However, information is subject to change.
Federal Communications Commission (FCC) Information
For important FCC interference, registration, and repair information, see Appendix C of this book.
Trademarks
PARTNER is a registered trademark of AT&T.
PagePac and PageGuard are registered trademarks of HARRIS CORPORATION Dracon Division.
Warranty
AT&T provides a limited warranty to this product. Refer to “AT&T Limited Warranties and Limitation of Liability”
in Appendix C.
Ordering Information
The order number for this book is 518-455-016. To order copies of this book call 1 800 432-6600 in the U.S. or
1 800 255-1242 in Canada. For more information on how to order this and other system reference materials, refer
to “Reference Materials” in the section entitled “About This Guide.” For information on ordering repolacement
parts, accessories, and other compatible equipment, refer to “Ordering Information” in the section entitled
“Auxiliary Equipment”, page 1-4.
AT&T 518-455-016
0II722615-001
May 1993, Issue 2
Support Telephone Numbers
In the U.S., AT&T provides a toll-free customer helpline 24 hours a day. Call the AT&T NTSC group at 1 800
552-3293 or the AT&T Helpline at 1 800 628-2888 if you need assistance when installing, programming, or using
your system.
For assistance in Canada, contact your local AT&T authorized dealer.
ii
Page 3

Contents
About This Guide
1.
2.
Overview
■
■
■
■
Installation
■
■
■
■
Features and Capabilities
Module Components
Auxiliary Equipment
Specifications
Important Safety Instructions
Before You Start
PARTNER PagePac Module Installation
Selecting the Interface Mode
v
1-1
1-2
1-3
1-4
1-5
2-1
2-2
2-3
2-4
2-11
3.
4.
Page/Speaker Mode Installation
■
PARTNER PagePac Paging Access
Doorspeaker Mode Installation
AT&T Doorspeaker
■
3-1
3-2
4-1
4-2
iii
Page 4

5.
Accessory Features
Installing a Music Source
■
Volume Adjustment (Page/Music)
■
■
Using a Microphone with the PARTNER PagePac System
■
Night Bell Service
5-1
5-2
5-3
54
5-5
6.
7.
A.
Programming
■
Overview
■
Programming Options
Programming Procedures
■
Night Bell
■
Ring Down
■
Operating Procedures
Overview■
■
Primary Paging Zones
Auxiliary Paging Zone
■
■
Input Priorities
Troubleshooting
6-1
6-2
6-2
6-5
6-9
6-10
7-1
7-2
7-2
7-6
7-7
A-1
B.
C.
IN
Secondary Circuit Protection
FCC and Warranty Information
Index
B-1
C-1
IN-i
iv
Page 5

About This Guide
This manual provides all the necessary information for installing the
PARTNER® PagePac® paging system with a PARTNER® Plus or
PARTNER® II AT&T phone system. In addition, complete information
covering product features and capabilities, as well as operation and test
instructions, will be covered.
How to Use This Guide
If you are not familiar with the operation of your PARTNER Plus or
PARTNER II AT&T phone system, take some time to review the
accompanying user/installation manuals for those systems. This will
provide a better foundation for installation of the PARTNER PagePac
module with your AT&T phone system.
This manual should be read in its entirety before attempting to install the
PARTNER PagePac module.
Section 1 provides an overview of the PARTNER PagePac module
FEATURES AND CAPABILITIES, along with a description of what has
been included with your PARTNER PagePac module.
Section 2 covers INSTALLATION. This section provides necessary
information for installing the PARTNER PagePac module with your
PARTNER Plus or PARTNER II AT&T phone system and connecting
customer provided auxiliary equipment to the PARTNER PagePac module.
Section 3 continues with installation steps and wiring examples for
PAGE/SPEAKER MODE. This section contains Zone 1 and 2 remote
amplifier configurations, Zone 3 auxiliary paging features, and a quick-test
to ensure that your installation is operational at this point.
Section 4
steps specifically for adding doorspeaker equipment to zones 1 and 2.
Configuration information, wiring examples, and a quick-test are also covered.
Section 5 contains ACCESSORY FEATURES information for installing a
music source, a high fidelity microphone, adjusting music/page volume
from a touch-tone phone, and connections for Night Bell service.
Section 6 has the necessary programming information; refer to this
section once the PARTNER PagePac module (and auxiliary equipment)
have been installed and tested.
Section 7 contains OPERATING PROCEDURES information for each of
the PARTNER PagePac features and provides useful examples.
Appendixes cover TROUBLESHOOTING, SECONDARY CIRCUIT
PROTECTION, and FCC and WARRANTY INFORMATION.
provides DOORSPEAKER MODE information and installation
Use the Contents and Index to locate specific items of interest.
v
Page 6

Product Safety Labels
This book contains several safety labels, identified by a
CAUTION:
Indicates the presence of a hazard that will or can cause minor personal
injury or property damage if the hazard is not avoided.
WARNING:
Indicates the presence of a hazard that can cause severe or fatal personal
injury if the hazard is not avoided.
Carefully read all WARNING labels. Opening the PARTNER PagePac
module or phone system backplane will expose you to hazardous
voltages, which can cause severe personal injury or death. Also read
“Safety Instructions” on page 2-2 before performing any installation
procedures.
Reference Materials
If you do not have the PARTNER Plus or PARTNER II “Communications
System Installation and Use” guide, please order the appropriate manual
from AT&T. This guide contains important information pertaining to the
installation, programming, and operation of the PARTNER Plus phone
system.
To order additional reference materials, call the AT&T Customer
Information Center:
In the U.S.: 1-800-432-6600
In Canada: 1-800-255-1242
How to Comment on This Guide
A feedback form is located at the end of this guide, after the appendixes.
If the feedback form is missing, send your comments and
recommendations for changes to: A. Sherwood, AT&T, Room 2A-25, 99
Jefferson Road, Parsippany, NJ 07054 (Fax: 201 887-6898).
vi
Page 7

Overview
Contents
1
Features and Capabilities
Module Components
Auxiliary Equipment
■
Ordering Information
Specifications
1-2
1-3
1-4
1-4
1-5
Overview 1-1
Page 8

Features and Capabilities
Programming is accomplished
through your PARTNER system
phone or a standard touch-tone
phone.
This port is also used to program
the PARTNER PagePac paging
system.
The PARTNER PagePac paging system can be installed with an AT&T
PARTNER Plus or PARTNER II communications system. Listed below is
an overview of the basic features of the PARTNER PagePac paging
system along with some of the additional capabiltiies this module provides:
■
Primary Paging Zones (Zones 1 and 2) — Provides two independently
fully-programmable zones, each of which can be configured for speaker
output, door control, or an auxiliary amplifier. In addition, adjustment of
the two primary zones’ speaker volumes can be accomplished simply
from any PARTNER system phone or any standard touch-tone phone
on the PARTNER system.
■
Auxiliary Amplifier Zone (Zone 3) — provides a third, 0 dBm (600
ohms termination) output zone and a control closure suitable for
connection to a remote amplifier.
Telephone Access — Connects to a PARTNER station port, a
■
PARTNER CO port (see trunk adapter below), or PARTNER Page port.
Permits a user to page by dialing the telephone access port from a
PARTNER system phone or a standard touch-tone phone.
■
Remote Volume Adjustment — Permits the customer/installer to adjust
the volume of each primary zone by means of the keys on any
touch-tone telephone on the PARTNER system. This feature is
especially useful for speakers which are hard to reach, such as
high-ceiling locations (zones 1 and 2).
*If you use equipment that
rebroadcasts music or other
copyrighted materials, you may
be required to obtain a license
from a third party such as
ASCAP or BMI.
■
Microphone Attendant Access — Provides an interface input for
microphone access pages.
■
Night Bell — Connects to a PARTNER (station) port that has been
configured for night service. Generates tones over the paging system
when an incoming call is detected.
■
Music Input* —
Connects to a music source. Music will be routed to all
specified zones when paging is not active.
■
Paging Amplifier — Provides a maximum of 4 watts of power for each
of the two primary paging zones. Supports voice coil (3.4 Vrms)
speakers only (zones 1 and 2).
■
Talkback — Allows specified paging speakers to be used as an
intercom (zones 1 and 2).
■
Door Control — Connects a paging zone up to two Doorspeakers.
Provides both Door Bell and Door Ajar inputs and a Door open output
(zones 1 and 2).
■
Trunk Adapter — Permits the user to conserve PARTNER station ports
by connecting the paging system to a PARTNER CO port through an
external Trunk Adapter.
■
Zone Overload Warning — Detects when one of the primary paging
zones is drawing too much power and automatically turns on a warning
light and temporarily suspends output to the zone.
1-2 Overview
Page 9
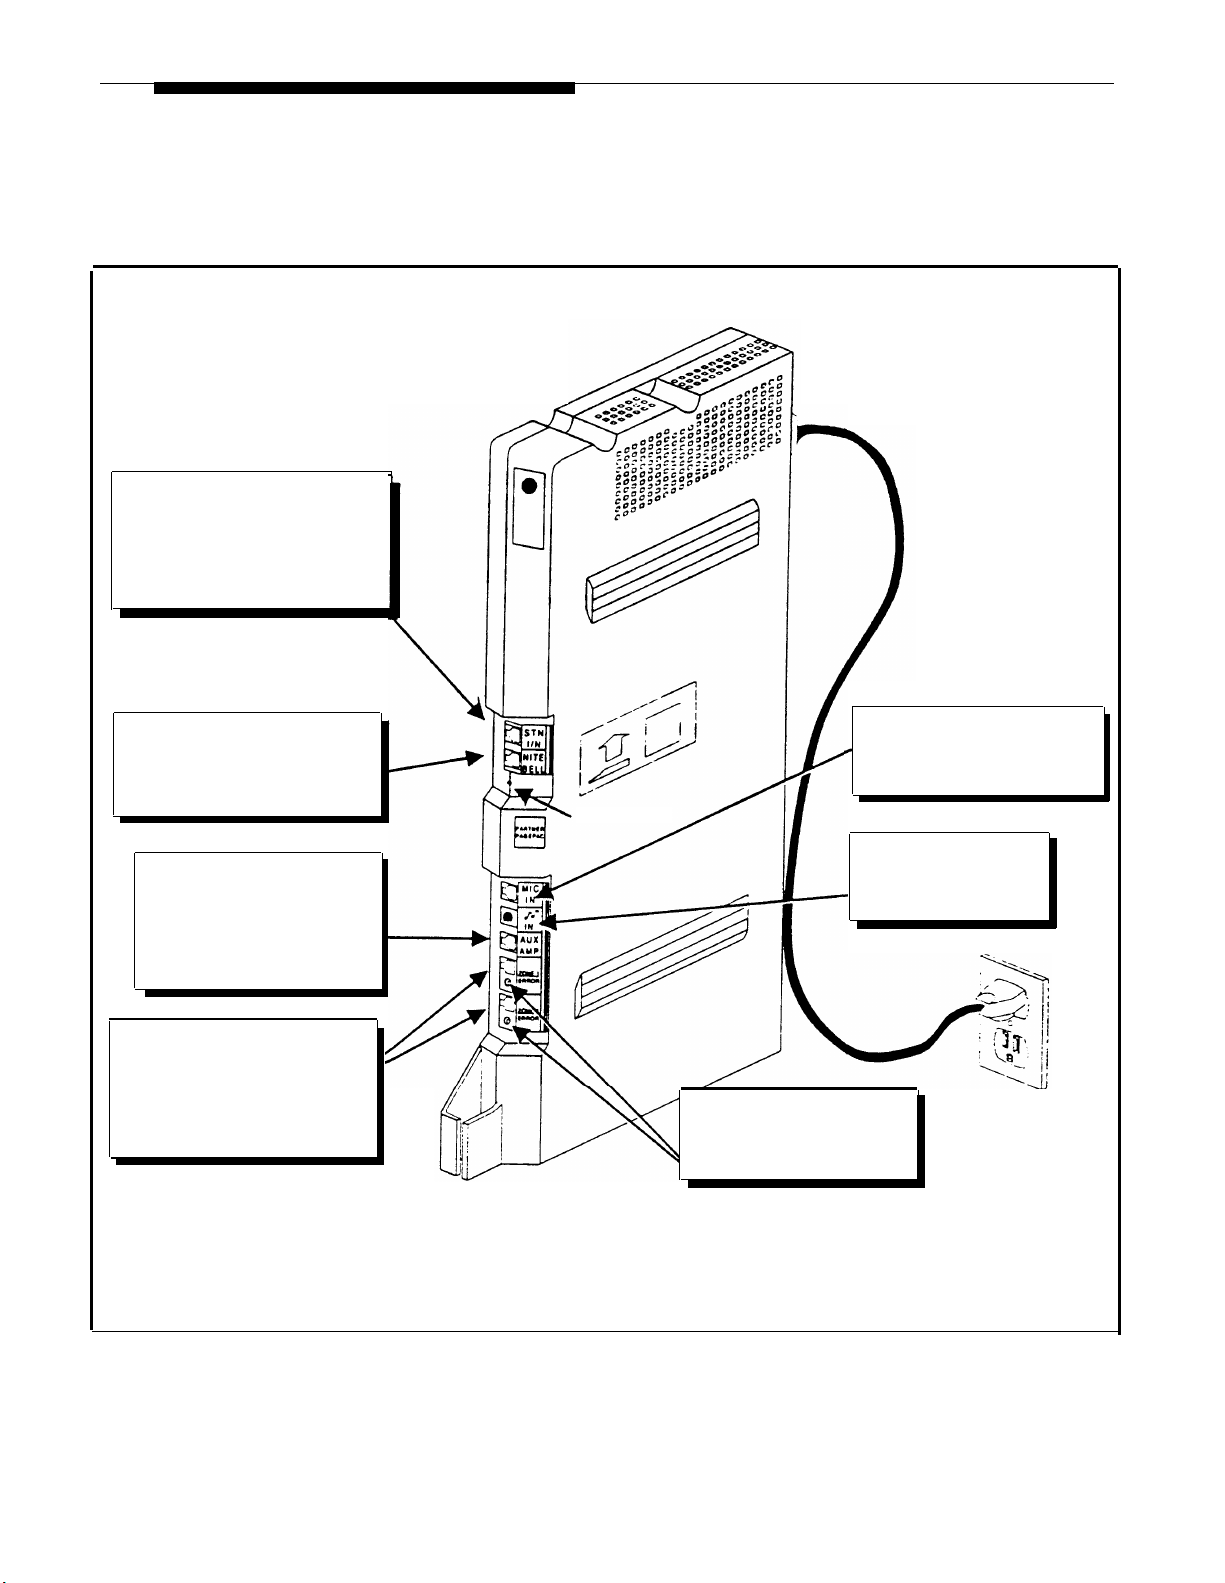
Module Components
STATION INTERFACE RJ-11 JACK
This jack is the PARTNER PagePac
interface to your PARTNER Plus or
PARTNER II phone system. Any one
of three connection modes ensure
the best possible compatibility to
your current phone system.
The PARTNER PagePac unit can be mounted directly to a wall or on a
desk next to your current PARTNER Plus or PARTNER II phone system
installation (see Section 2, Installation for complete information). The
information key in Figure 1-1 below illustrates the location and description
of the PARTNER PagePac features.
PARTNER PagePac
Module
NIGHT BELL SERVICE
Through this RJ-11 jack and your
current PARTNER phone system,
night bell service is integrated in to the
PARTNER PagePac paging system.
AUXILIARY AMPLIFIER (ZONE 3)
This RJ-11 jack provides a
0 dB page/music output
along with a contact
closure pair for connection
to a customer provided
auxiliary amplifier.
Zone 1 and Zone 2
These two RJ-45 jacks can be
individually configured for page/
speaker zones, auxiliary amp zones,
or doorspeaker zones - providing
an audio pair as well as three
contact closure pairs.
MICROPHONE INPUT
Connect a high-fidelity microphone
to this RJ-11 jack for simple
attendant paging access
POWER ON LED
MUSIC INPUT
The RCA jack can be used
to connect a customer
provided music source.
ERROR LEDs
Error LEDs are provided to signal
if paging zone draws too much
current (1.2 Amps max.)per zone.
Figure 1-1. PARTNER PagePac Paging System Features (Inputs / Outputs)
Overview 1-3
Page 10

Auxiliary Equipment
Ordering Information
The PARTNER PagePac paging system provides full-paging capability to
your small or large business. In addition, this module provides an interface
for an AT&T Doorspeaker. Listed below are the various speakers,
amplifiers, and doorspeaker products recommended for use with the
PARTNER PagePac.
■
IMPORTANT: Voice Coil (3.4V)
speakers only for direct
connections to zones 1 and 2.
Speakers — a full range of speaker products is available for use with
the PARTNER PagePac module–from wall or ceiling mount speakers to
horn-type speakers. Refer to Table 3-1 (page 3-4) for the speaker best
suited for your application.
NOTE: The PagePac 6 Plus is
NOT supported.
IMPORTANT: The PARTNER
Plus Doorphone PEC 5324-003
is NOT compatible with the
PARTNER PagePac paging
system.
Amplifiers — Depending on your paging applications, several amplifiers■
(auxiliary) are available. These include the PagePac 6 (PEC
5323-006), a 6-watt small amplifier, PagePac 20 (PEC 5323-005), a
20-watt small amplifier, or the PagePac Plus D20, D100, or 0300
series AmpIiCenters (PECs 5328-020, 5328-100, 5328-300) designed
for larger area paging demands.
■
Microphone — The AT&T Microphone (PEC 5335-400) is compatible
with the PARTNER PagePac module. This microphone provides
excellent audio fidelity and has an On/Off contact closure.
■
Doorspeaker — The AT&T Doorspeaker (PEC 5330-120) is compatible
with the PARTNER PagePac module. This indoor/outdoor speaker can
be surface or flush-mounted to a wall and provides a push-button for
alerting inside personnel that the door needs attention.
1-4 Overview
Page 11

Specifications
Table 1-1 PARTNER PagePac System Specifications
Capacities
PARTNER PagePac
■
Three-zone paging, doorspeaker, and AUX amp modes
Compatible with AT&T PARTNER Plus and PARTNER II Communications systems
■
Dimensions and
Weights
Electrical
Specifications
Extension Jack
Specifications
(PARTNER
System)
Environmental
Requirements
PARTNER PagePac
11"(D) x 17"(H) x 1.5"(W) or 4.8 lbs or
27.9 cm x 43.2 cm x 3.8 cm 2.2 kgs
■ Door Latch: rated at ■
1 amp
■
Primary Paging
Output: 4-watts per
Contact Closures: Remote Amp = 1 amp contacts
Door Latch contacts rated at 1 Amp 120 VAC/50 VDC
■
Talkback Sensitivity: with 500 µVrms, 1 KHz, at spkr leads.
Compression threshold: -17dBm (measured at tip and ring)
channel
AUX Port Output:
■
0dBm
Ringing voltage: +5 VDC, –140 VDC peak-to-peak; trapezoidal wave shaping
■
■
Talk battery: 35 to 38 Volts
Ringing frequency: 20 Hz
■
■
Mount on a wall or study, level surface at least 2 feet (0.6 meters) from the floor. For
Electrostatic Discharge: per Bell Publication 48002,
■
Section 3.3.2.5
ventilation, wall mounting is required for 2-module systems (strongly recommended for
1-module systems)
■
Locate within 5 feet (1.5 meters) of an electrical outlet not controlled by a switch and within 5
feet (1.5 meters) of the network interface jacks, when using supplied 7-foot (2.1-meter) cords
■
Operating temperature 32° to +104°F (0° to +40°C), not in direct sunlight
Humidity 15%–90%, noncondensing
■
■
For proper ventilation and easy replacement of modules, provide at least 1 foot (0.3 meters)
clearance at the top and sides and 2 feet (0.6 meters) at the front and bottom.
■
Locate in an area free of excess moisture, corrosive gases, dust, and chemicals
Electrical
Requirements
Local Phone
Company
Information
■
90-130 VAC, 50-60 Hz, 3-prong outlet separate ground, separately fused at 15 Amps
Outlet must not be controlled by an on/off switch
■
■
Grounding to comply with Underwriters Laboratories (UL) 1459:
A. An insulated grounding conductor that is not smaller in size and equivalent in insulation
material and thickness to the grounded and ungrounded branch circuit supply conductors,
except that it is green with or without one or more yellow stripes, is to be installed as part
of the circuit that supplies the product or system.
B. The ground conductor mentioned in item A is to be connected to ground at the service
equipment.
C. The attachment-plug receptacles in the vicinity of the product or system are all to be of a
grounding type, and the grounding conductors serving these receptacles are to be
connected to earth ground at the service equipment.
Jack type: RJ11C and RJ-45
■
■
Loop start and Dry loop lines
FCC Registration Number: Pending
■
Overview 1-5
Page 12

Installation
Contents
2
Important Safety Instructions
Additional Safety Instructions for Installation Personnel
■
Before You Start
How is Your Phone System Configured?■
Important Configuration Information
■
PARTNER PagePac Module Installation
Mounting the PARTNER PagePac Module
■
Connecting to AC Power
■
Selecting the Interface Mode
Interface Mode Connections■
Trunk Adapter Connections (Trunk Adapter Mode Only)
■
PARTNER PagePac Telephone Access
■
2-2
2-2
2-3
2-4
2-4
2-4
2-5
2-7
2-11
2-13
2-14
2-15
Installation
2-1
Page 13

Important Safety Instructions
Always follow these basic safety precautions when using the PARTNER
PagePac paging system and PARTNER PIus or PARTNER II phone
system.
1.
Read and understand all instructions.
2.
Follow all warnings and instructions marked on the product.
DO NOT block or cover ventilation slots and openings. They prevent
3.
the product from overheating. DO NOT place the product in an
enclosure that does not have sufficient ventilation.
Never spill liquid on the product or drop objects into the ventilation
4.
slots and openings. Doing so may result in serious damage to the
components.
5.
Repair or service must be performed by a qualified repair person.
6.
The product is provided with a three-wire grounded type plug. This is
a safety feature. Do not defeat the safety purpose of the grounding
type plug. DO NOT staple or otherwise attach the AC power supply
cord to the building or surface.
7.
DO NOT use the product near water or in a wet or damp place (such
as a wet basement).
Additional Safety Instructions for Installation Personnel
Install the product to meet all the environmental and electrical
requirements listed in the specifications (see page 1-5).
1.
DO NOT install telephone wiring during a lightning storm.
2.
DO NOT install telephone jacks in a wet location unless the jack is
specially designed for wet locations.
Never touch uninsulated telephone wires or terminals, unless the
3.
telephone line has been disconnected at the network interface.
4.
Use caution when installing or modifying telephone lines.
5.
The PARTNER PagePac unit must be securely wall mounted.
CAUTION:
If any wiring from the extension jacks leave the building premises, you must
install AT&T 503A1 IROB protectors (see Appendix B).
2-2 Installation
Page 14
Before You Start
Before installing your PARTNER PagePac paging system, read and
understand the safety instructions on page 2-2. In addition, be sure to
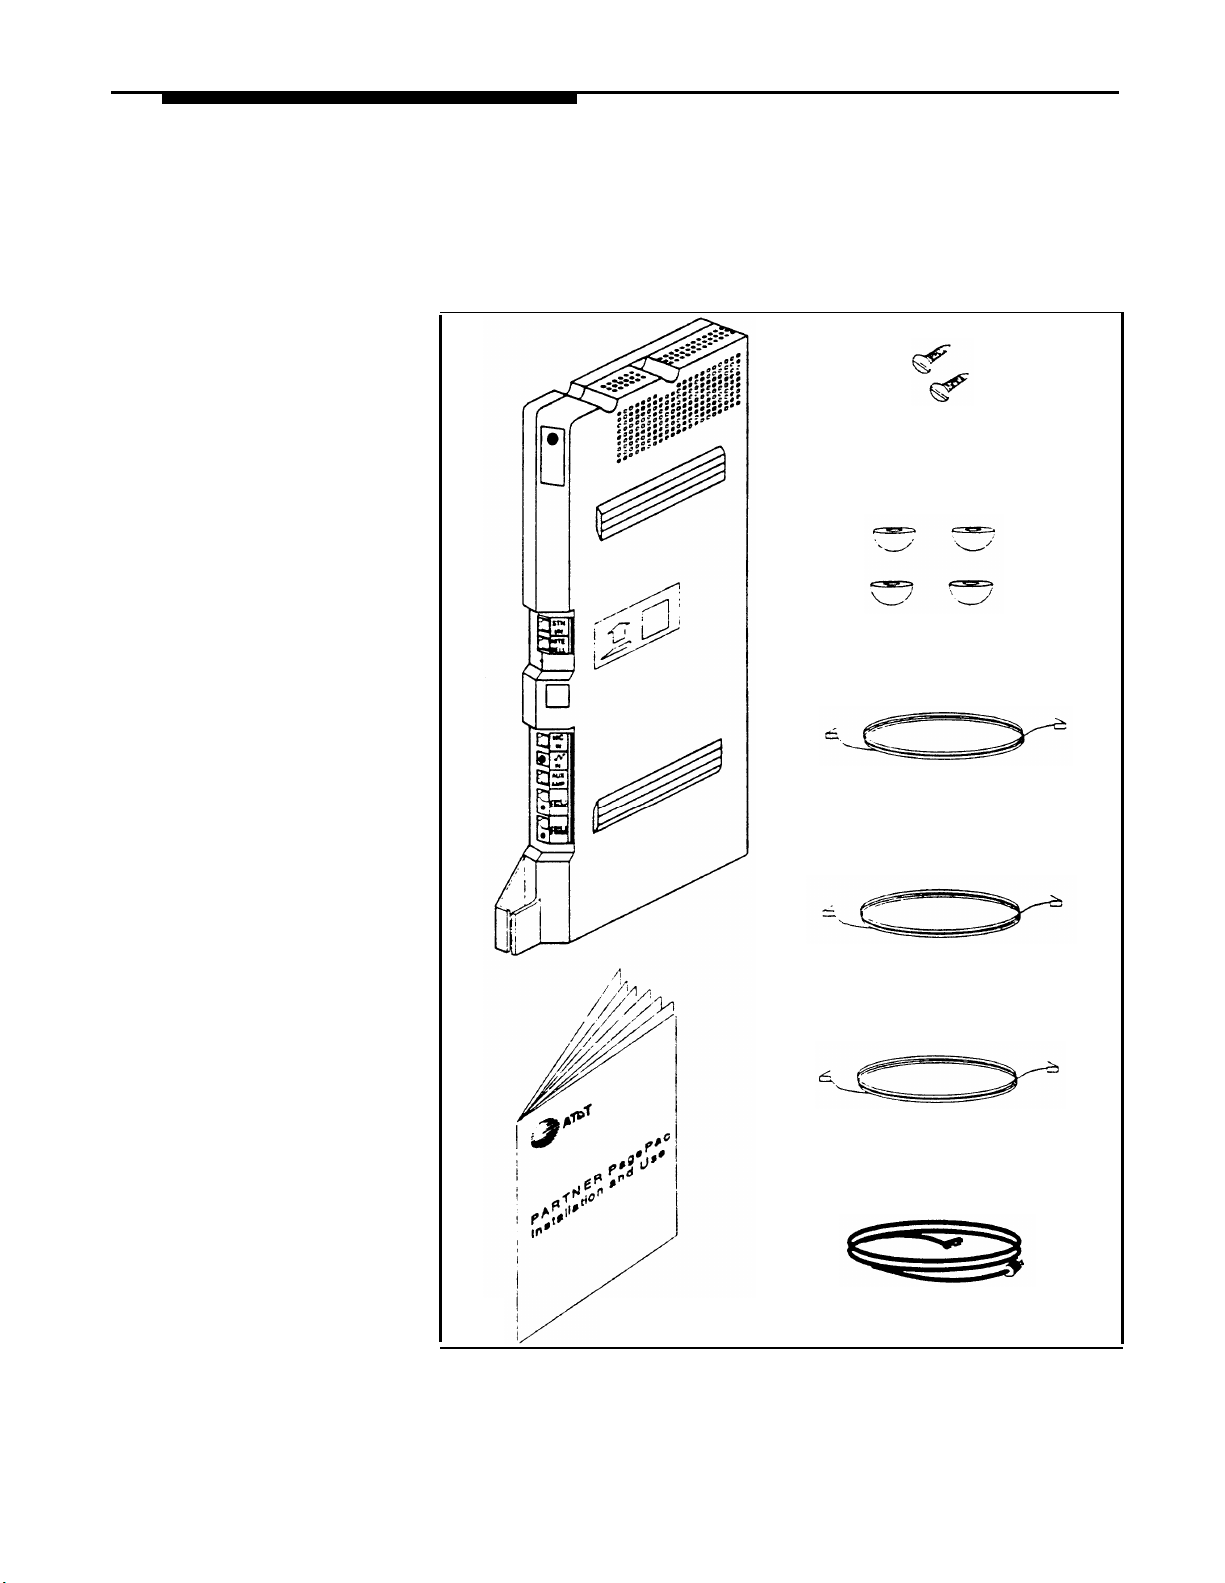
have the necessary parts. Provided below in Figure 2-1 are the contents
of the shipping carton. In addition, you will need a screwdriver if you
mount the paging system to a wall. For testing purposes, you will need a
PARTNER system phone or a standard touch-tone phone.
PARTNER
PAGEPAC
MODULE
#8
WOOD
SCREWS
RUBBER
FEET
INSTRUCTIONS
(7-FOOT)
RJ-11 TELEPHONE
LINE CORD
(7-FOOT)
RJ-45 TELEPHONE
LINE CORD
(7-FOOT)
RJ-45 TELEPHONE
LINE CORD
(6-FOOT)
AC LINE CORD
Figure 2-1. Shipping Carton Contents
Installatlon 2-3
Page 15

How is Your Phone System Configured?
The first step in the installation process is to determine how your
PARTNER Plus or PARTNER II is set up for your particular application. As
explained fully in your PARTNER Communications System documentation,
several types of modules are available—each of which provides specific
features. For instance, a PARTNER PIus with eight telephone lines and 24
telephone extensions would have four 206 modules in addition to the
required Processor module. Depending on how these extensions are
organized within your business, you may need additional paging capability
throughout a large building or even several buildings. The PARTNER
PagePac module supports up to three independently controlled and
programmed paging zones.
Important Configuration Information
Before actual hardware is installed, it is important to determine what
specific components will be used and what options will be selected.
Take time now to make a check list of the parameters for your installation
requirements. This will be a useful tool later when installing the hardware
and programming parameters into the PARTNER PagePac module.
PARTNER PagePac Module Installation
lMPORTANT: Even if your
PARTNER Plus/II has an open
slot in the carrier, do NOT use
it for the PARTNER PagePac
module.
NOTE: Refer to Appendix B for
Secondary Surge Protection
Information.
■
You can install the PARTNER PagePac module on a wall or on a flat
sturdy surface above the floor (such as on a table or desk). Wall
mounting is recommended. Complete step 1 below and continue as
directed.
■
Two #8 screw—for mounting the system on a wooden surface—are
included with the system. If you are mounting the system on wallboard,
metal or masonry, use the proper fasteners for the wall type and weight
of the system (approximately 11 lbs.) Purchase them at any hardware
store. You will also need a screwdriver to mount the system. Complete
step 1 below and continue as directed.
■
For testing the system, you will need a PARTNER system telephone.
CAUTION:
Do not connect the AC power cord until the system is fully installed.
To prevent damage to the system or installation location, the
environmental and electrical conditions must meet the specification
on page 1-5.
2-4 Installation
Page 16
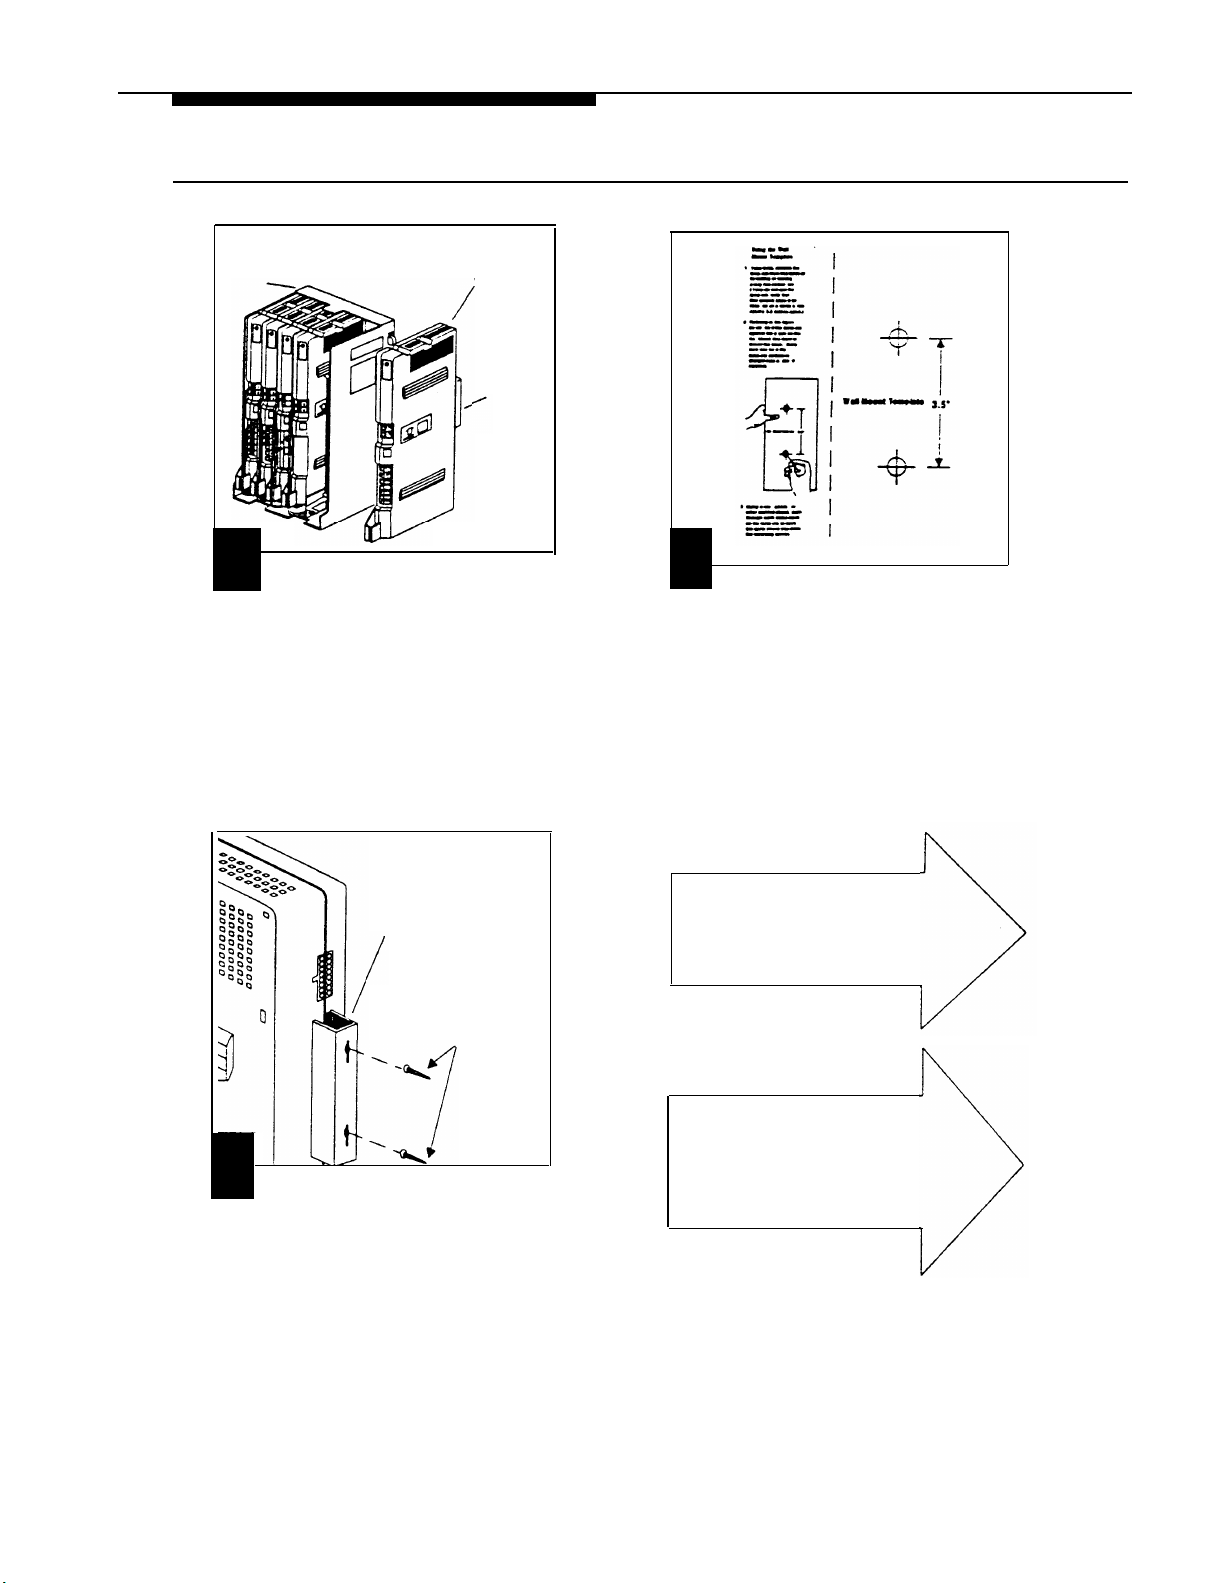
Mounting the PARTNER PagePac Module
(Using Mounting Bracket)
PARTNER
CARRIER
1
The PARTNER PagePac module
provides a mounting bracket at the back of
the unit. The bracket allowsthe PARTNER
PagePac to be mounted to a wall, close to
the PARTNER Communication System
carrier. Although the PARTNER Pagepac
can be mounted next to the carrier, the
module cannot be installed directly into the
carrier.
PARTNER
PAGEPAC
MODULE
MOUNTING
BRACKET
2
Use the Wall Mount Template and
the included instructions to mark the
mounting screw locations on a wall. The
Wall Mount Template is located at the end
of this section.
Note: Mount the PARTNER PagePac
within 5 feet of the PARTNER Plus or
PARTNER II phone system.
MOUNTING
BRACKET
POSITION BRACKET
ONTO SCREWS
IN WALL
3
Use screws appropriate for the
type of wall surface. Drive screws so
head of screw is approx. 5/16" from wall
surface. Position mounting bracket
key-hole openings over screw heads.
Once bracket is in place onto screws, the
PagePac unit should be secure and not
easily moved side to side. You may need
to tighten screws slightly to provide a
better fit to the bracket.
For mounting the PARTNER
PagePac
surface, continue to the
next page . . . .
If you have completed
mounting the PARTNER
PagePac using the mounting
bracket turn to page 2-7 for
Connecting to AC Power.
FLAT
onto a wall
Installation 2-5
Page 17

Mounting the PARTNER PagePac Module
MOUNTING FLAT
ONTO WALL ...
go to steps 2 and 3.
TABLE MOUNTING...
skip steps 2 and 3.
Place the module flat
on the surface with
the rubber feet down.
The module should
not slide easily.
(Flat onto Wall or Desk)
1
For either desk or wall mounting,
attach the 4 rubber feet to the mounting
tracks on the bottom side of the module.
3
Insert the screws into the screw
holes at the top and bottom of the module. Tighten until the rubber feet are snug
against the wall. There must be a 3/8”
gap between the wall and the rest of the
module. Do not overtighten—the module
will warp and fail to operate.
Go to Connecting
to AC Power" on
the next page.
Go to next page.
2
Hold the PARTNER PagePac in
place on the wall with the telephone
jacks facing left. Leave at least 1 foot
clearance at the top, bottom and back,
and at least 2 feet in front. This allows
you to access the jacks and provides
adequate ventilation.
Note: Mount the PARTNER PagePac
within 5 feet of the PARTNER Plus or
PARTNER II phone system.
2-6 Installation
Page 18
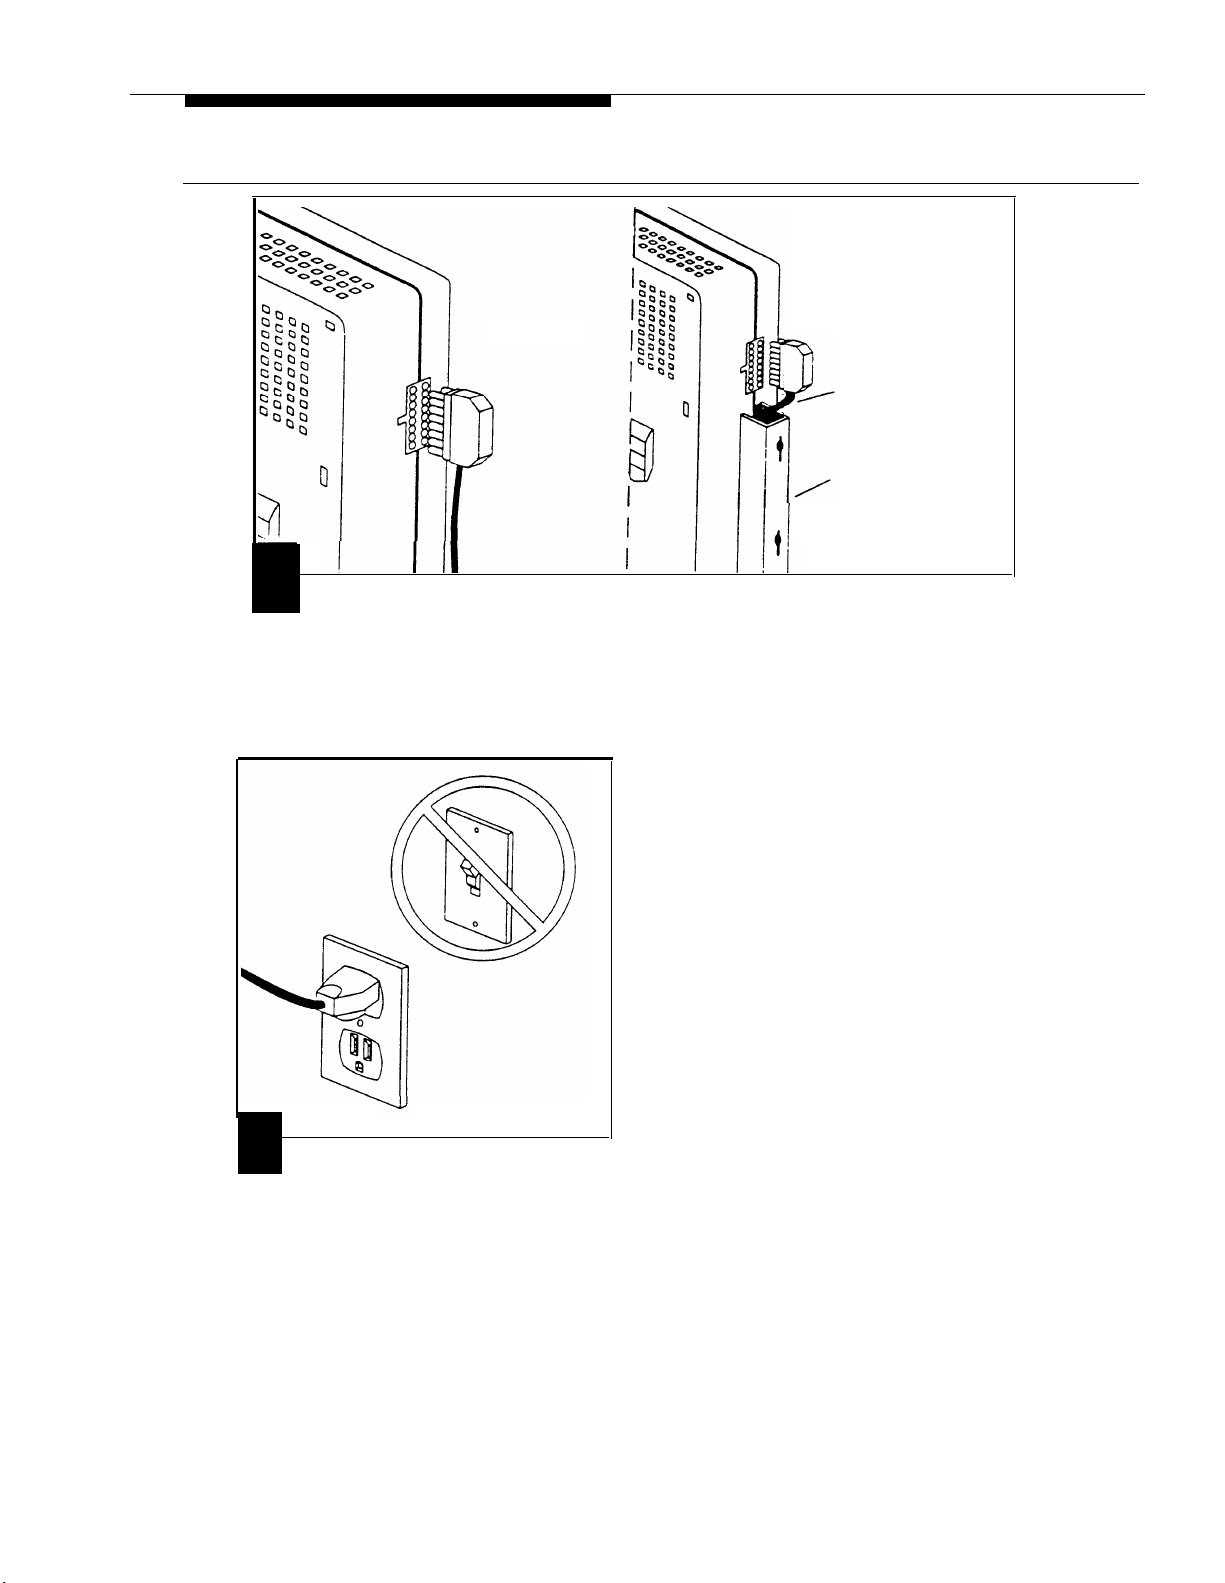
Connecting to AC Power
CONNECTING
AC POWER
1
A Connect the AC power cord to
the AC connector at the back of the
PARTNER PagePac module. Press
firmly until it clicks as it locks into place.
CONNECTING
AC POWER
(USING MOUNTING BRACKET)
AC CORD
MOUNTING
BRACKET
B If the PARTNER PagePac
mounting bracket has been used to
install the unit to a wall, the AC cord
can be fed through the bracket for a
cleaner looking installation.
2
Plug the other end of the power
cord into a grounded wall outlet. The
outlet must not be controlled by a switch.
The green light below the night bell
jack on the module should come
on (see Figure 2-2). If it does not,
see “Troubleshooting” in Appendix A.
Installation
2-7
Page 19

This page intentionally left blank
Page 20
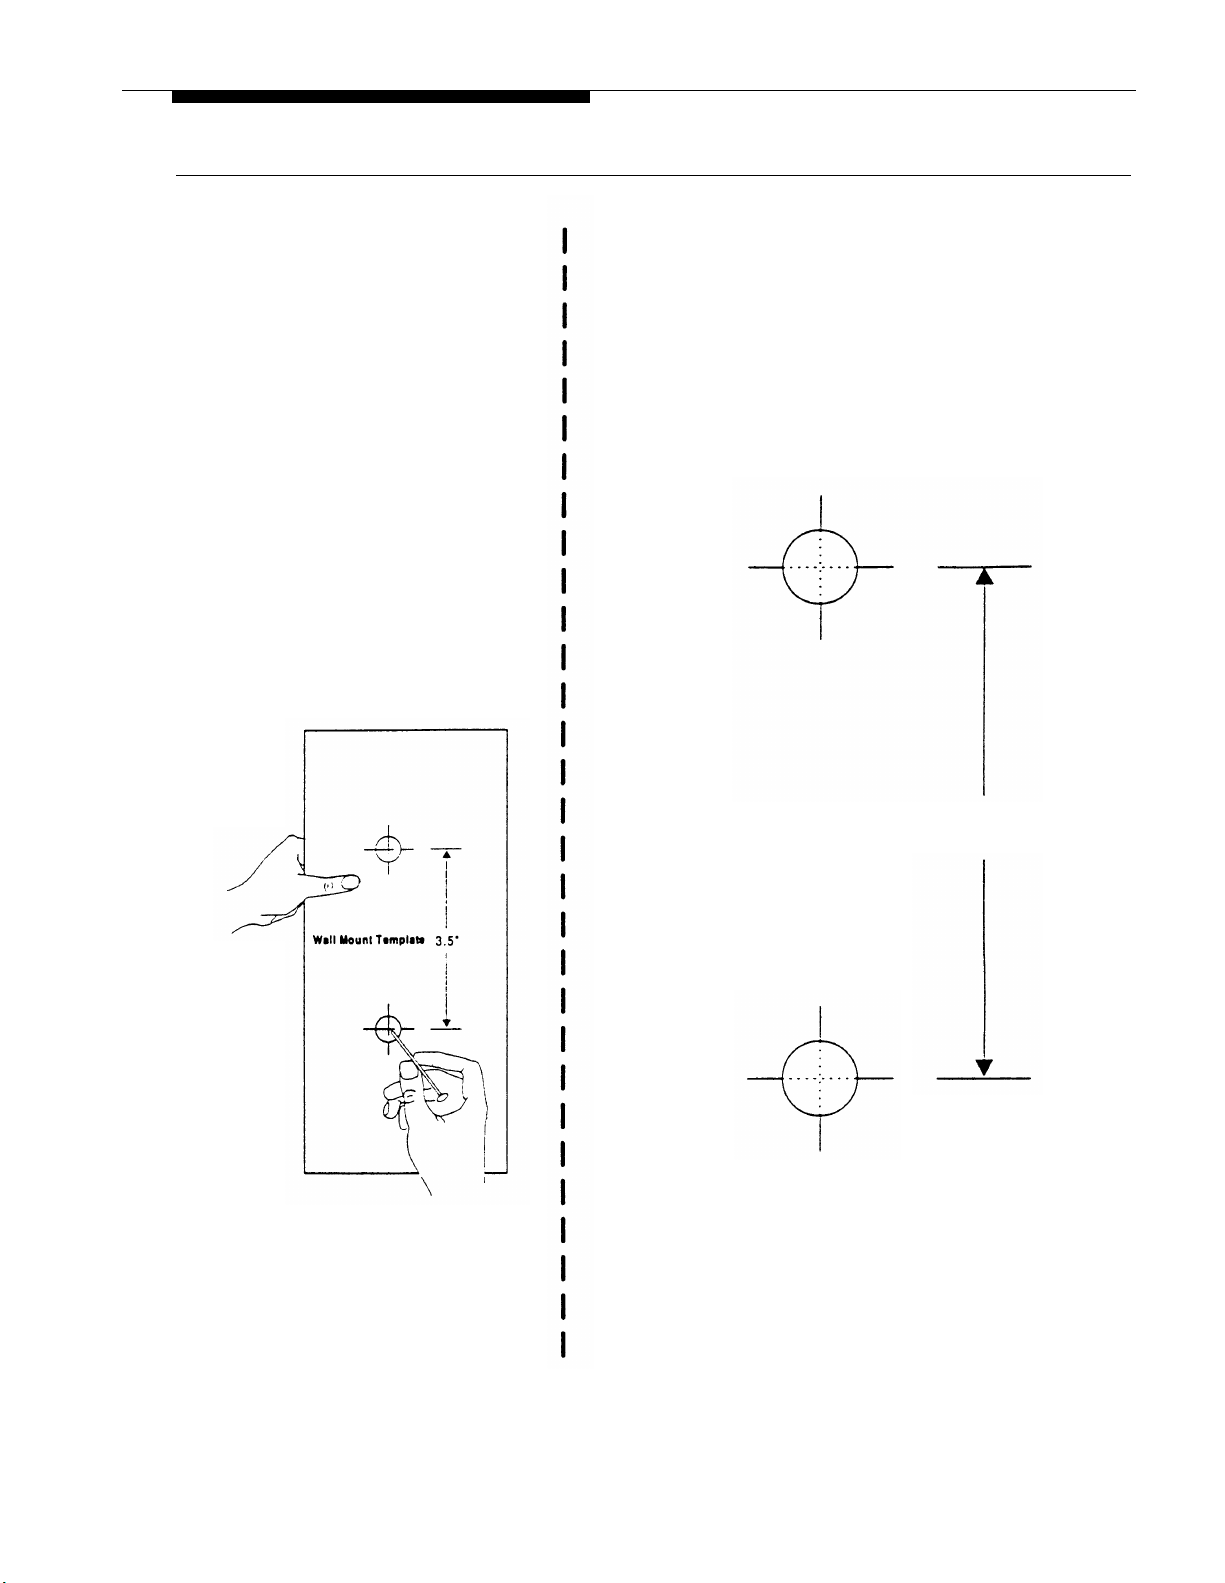
Wall Mount Template
Using the Wall
Mount Template
1.
If you wish, remove the
template from this booklet
by cutting or tearing
along this dotted line.
(If you do not use the
template, note that
that screws should be
installed on a verticle line,
exactly 3.5 inches apart.)
2. Refering to the figure
below, hold the template
against the place on the
wall where you want to
mount the base. Make
sure you hold the
template perfectly
straight (use a level if
needed).
Wall Mount Template
(for use with mounting bracket)
3.
Using a nail, pencil, or
other pointed object, push
through each cross mark
on the template to mark
the spots where you drive
the mounting screws.
3.5"
Installation 2-9
Page 21

This page intentionally left blank
Page 22

Selecting the Interface Mode
NOTE: Dry Loop Mode is the
preferred interface method for
connection to your PARTNER
Plus/II communications system.
Refer to pages 2-12 through 2-15
for complete connection
information.
IMPORTANT: When using
Station Mode all CO lines for
that extension must be
REMOVED. Refer to your
PARTNER Plus/II manual for
“Custom Line Assignment
Feature” information.
For Station Mode, “Automatic
Privacy” should be set for this
extension to avoid accidental
broadcast of phone
conversations.
Once the PARTNER PagePac module has been mounted, the PARTNER
PagePac unit can be connected to the PARTNER Plus/II phone system.
The PARTNER PagePac RJ-11 STN I/N jack provides for connection to
one of the ports on the PARTNER Plus/II system. The PARTNER
PagePac module is capable of operating in two primary modes: Station
Mode or Dry Loop Mode.
Dry Loop Mode permits the PARTNER Pagepac paging system to be
connected to the Page Port on the PARTNER II and PARTNER Plus
system’s Processor Module. This option frees up one of the system station
ports (extensions). See Table 2-1 and Figure 2-2 for cabling instructions.
Station Mode can be used when there is an available station port
(extension) that will not be needed by the PARTNER Plus or PARTNER II
system. See Table 2-1 and Figure 2-2 for cabling instructions.
Trunk Adapter Mode can be used in the event that neither a Station Port
nor a Page Port is available. In this case connections are made to one of
the PARTNER Plus or PARTNER II system trunk (line) ports and presents
a dry loop interface to the PARTNER PagePac paging systems. This
option requires the use of an AT&T PARTNER PagePac Trunk Adapter
with included power supply (PEC 5335-301). Table 2-1 and Figure 2-2
provide cabling information. See further Trunk Adapter installation
instructions on pages 2-13 through 2-15.
Table 2-1. Select One of the Following Interface Mode Cable
Connections
Interface Mode
(Connect Cable Between)
Dry Loop Mode
Station Mode1
Trunk Adapter Mode
1
When using Station Mode all CO lines for that extension must be Removed;
set
“AUTO PRIVACY’
2
Requires an AT&T PARTNER PagePac Trunk Aapter (PEC 5335-301) to be connected
between the PARTNER system and PARTNER PagePac cable connections.
(See Figure 2-3, page 2-14.) When using Trunk Adapter Mode, users should set “AUTO
PRIVACY” to “Assigned.”
2
to
“Assigned.”
PARTNER PARTNER
PagePac Module
STN I/N Port
STN I/N Port Spare
STN I/N Port
System Module
PAGE Port on
Processor Module
Spare LINE Port
EXTENSION Port
Installation 2-11
Page 23

IMPORTANT:
Dry Loop Mode
Considerations
■
Dry Loop Mode is the preferred method of connection to the PARTNER
Plus or PARTNER II Communications system.
■
Once the PARTNER PagePac module has been accessed, the unit will
remain active until the user takes some action, i.e. “hangs up.”
IMPORTANT:
Station Mode
Considerations
IMPORTANT:
Trunk Adapter Mode
Considerations
To ensure full use of “PFT” (Power Failure Transfer) in your PARTNER
Plus or PARTNER II phone system during an emergency or power outage
conditions when selecting “Station Mode,” these extensions are NOT
recommended for use for primary paging access:
PARTNER Plus system: Stations 10, 11, 16, 22, 28
■
■
PARTNER II system: Stations 10, 11, 16, 22, 28, 34, 40, 46, 52
■
Remove all CO lines using the “Line Assignment” feature. Refer to
your PARTNER Plus/II Installation and Use manual.
■
For Station Mode “Automatic Privacy” should be set to “Assigned” for
the station designated as the PagePac station interface. Refer to your
PARTNER Plus/II Installation and Use manual under “Automatic
Privacy.”
■
During a page, if 30 seconds elapses without any activity, the PagePac
system will automatically hang up.
■
All pages are limited to a maximum of 2 minutes in duration. The
PagePac system will automatically hang up once this time is exceeded.
Do NOT use these Central Office lines for these systems:
■
PARTNER Plus system: CO lines 1, 3, 5, 7
■
PARTNER II system: CO lines 1, 3, 5, 7, 9, 11, 13, 15
2-12 Installation
■
For Trunk Adapter Mode “Automatic Privacy” should be set to
“Assigned.” This avoids users from bridging onto the paging system.
Refer to your PARTNER Plus/II Installation and Use manual under
“Automatic Privacy.”
A standard telephone can access the paging system by using Direct
■
Line Pickup; refer to your PARTNER Plus/II Installation and Use
manual.
■
If the PARTNER PagePac module has been accessed, the unit will
remain active until the user takes some action, i.e. “hangs up.”
Page 24

Interface Mode Connections
Once you have decided on the best interface mode for your PARTNER
system configuration (Dry Loop Mode, Station Mode, or Trunk Adapter
Mode), follow the steps below to make the appropriate interface
connections:
NOTE: Additional installation
instructions are provided for
Trunk Adapter Mode on
page 2-10.
1. Use a standard 7-foot, 4-pin RJ-11 modular cable (provided) to
connect the PARTNER Plus or PARTNER II system to one of the
following PARTNER PagePac modules (refer to Table 2-1 and Figure
2-2). Connect the modular cable from the PARTNER PagePac
module’s “STN I/N” port to:
– Page Port on processor module (for Dry Loop Mode) or
– Station Port (for Station Mode), or
– Trunk Port (for Trunk Adapter Mode).
2. Route cord through bracket at bottom of modules. Leave at least
2 feet of slack so that you can easily reconnect cord during
replacement.
3. Plug the PARTNER power cord into the AC outlet, 110V/60 Hz. Use
the special power cord (supplied) to connect the PARTNER PagePac
unit to the selected AC outlet.
FOR DRY LOOP
MODE CONNECT
TO "PAGE" ON
PROCESSOR
MODULES
FOR TRUNK
ADAPTER
MODE CONNECT
TO TRUNK
FOR STATION
MODE CONNECT
TO EXTENSION
7-FOOT LONG
4 WIRE - FOR
TELCO ACCESS
PROVIDED
FROM PARTNER
PAGEPAC
STN/IN PORT
206
MODULE
PROCESSOR
MODULE
(PARTNER PLUS,
PARTNER II)
PARTNER PAGEPAC
MODULE
(WALL-MOUNT)
INSTALLATION
Figure 2-2 Cable Connections for Selected Interface Mode
Installation 2-13
Page 25

Trunk Adapter Connections (Trunk Adapter Mode Only)
If Trunk Adapter Mode has been selected as the best interface connection
for your requirements (pages 2-7 and 2-8), continue with the following
procedure:
Required materials:
– AT&T PARTNER PagePac Trunk Adapter (PEC 5335-301)
– Standard modular telephone cord (7 feet, provided)
Follow the steps below to install the AT&T Trunk Adapter (see Figure 2-3):
1.
Connect the PARTNER PagePac Trunk Adapter modular cord to the
PARTNER PagePac module STN/IN port.
2.
Connect the PARTNER PagePac Trunk Adapter jack J2 to the
available Trunk (Line) Port on the selected PARTNER system module.
4.
Route cord(s) through bracket at bottom of modules. Leave at least
two feet of slack so you can remove modules.
5.
Connect the PARTNER PagePac Trunk Adapter 24 volt power supply
(supplied) to AC power.
TO 206, 200,
OR 400 MODULE
206
MODULE
TRUNK (LINE)
PORT
4 WIRE RJ
CABLE
TO 24 VDC POWER SUPPLY
(INCLUDED WITH PAARTNER
PAGEPAC TRUNK ADAPTER
PEC 5335-301)
TO PARTNER
PAGEPAC
STN/IN PORT
PARTNER PAGEPAC
UNIT
Figure 2-3 Trunk Adapter Installation for PARTNER PagePac
Module
2-14 Installation
Page 26

PARTNER PagePac Telephone Access
Establishing telephone access provides a means to talk to the PARTNER
PagePac unit for programming and accessing the various features.
If you have configured your PARTNER PagePac system:
For Dry Loop Mode (connection to Page Port) you will need to dial
INTERCOM ] [ 7 ] [ 0 ].
[
For Station Mode operation, you will need to dial the extension number
connected to the PARTNER PagePac paging system. For example, if you
have configured the PARTNER PagePac paging system with a cable
connecting from the PARTNER PagePac STN I/N port to
extension 20 of a PARTNER Plus system module, you would dial [
2 ] [ 0 ] the first time you wish to access PARTNER PagePac features and
[
programming capabilities.
For Trunk Adapter Mode you will need to select the trunk which is
connected to the PARTNER PagePac unit by pressing the appropriate
LINE ] button. For standard telephone access, use Direct Line Pickup.
[
Each input to the PARTNER PagePac module has its own priority. If more
than one input is active at the same time, the signal with the highest
priority will take precedence over all the others. In addition, if a
higher-priority input becomes active while a lower-priority input is being
processed, the PARTNER PagePac module will abandon the lower-priority
input in favor of a higher priority input.
INTERCOM ]
Continuing
Installation ...
NOTE: Once you have
completed the Page/Speaker
Mode installation steps in Section
3, you can use the Quick Test
procedure at the end of that
section.
The input priorities, from highest to lowest, are as follows:
■
Microphone input
■
Station input
■
Door input
■
Night Bell input
■
Music input
Your PARTNER PagePac should now be installed (mounted to a wall or
placed onto a desk), and your PARTNER PagePac module has been
connected directly to your PARTNER Plus or PARTNER II phone system.
Section 3 continues the installation steps for PAGE/SPEAKER MODE and
covers Zone 1 & 2 remote amp configurations along with Zone 3 auxiliary
paging features. At the end of Section 3 is a Quick Test to ensure your
installation has been successful.
Section 4 deals exclusively with DOORSPEAKER MODE and what is
necessary to configure Zones 1 or 2 for doorspeaker functions. Section 4
also provides a Quick Test to ensure proper installation.
Installation
2-15
Page 27

Page/Speaker Mode Installation
Contents
3
PARTNER PagePac Paging Access
■
Talkback Capabilities
■
Remote Amplifier Mode (Zones 1 and 2)
■
Auxiliary Paging Zone (Zone 3)
■
Connecting Speakers
■
Connection Block
■
Quick Test (Paging to Loudspeakers)
3-2
3-2
3-2
3-2
3-4
3-6
3-7
Page/Speaker Mode lnstallation
3-1
Page 28

PARTNER PagePac Paging Access
Primary Paging
Zones
(Zones 1 and 2)
Refer to Section 4 for
Doorspeaker Mode installation.
Refer to Section 5 for adding
Night Bell service.
The PARTNER PagePac can be configured differently depending on your
particular situation. Two primary zones (Zone 1 and Zone 2) can be
individually configured for Page/Speaker Mode, Doorspeaker Mode, or
Remote Amplifier Mode.
Both zones 1 and 2 provide a 4 watt on-board amplifier power switch to
drive voice coil (3.4V) speakers in Page/Speaker Mode and Doorspeaker
Mode. Each zone provides a RJ-45 jack which supplies an audio pair
(which is used in all modes), a contact closure pair (used for the
Doorspeaker and Remote Amplifier Modes) and four wires for the Door
Bell and Door Ajar inputs (used in Doorspeaker Mode). The primary
paging zones provide paging, hands-free talkback (programmable), music,
and tone output on the audio pair.
Talkback Capabilities
NOTE: Auxiliary paging zone will
NOT support talkback.
See Table 3-1 for available
speaker.
The PARTNER PagePac has the unique ability to provide individuals with
the ability to talkback over selected speaker zones 1 or 2. “Hands-Free”
talkback is available in both Page/Speaker and Doorspeaker Modes. Refer
to Section 6 for complete programming information for this feature.
Remote Amplifier Mode (Zones 1 and 2)
Refer to Figures 3-2 and 3-3.
NOTE: PagePac 6 Plus cannot
be used as a remote amplifier.
In “Remote Amplifier Mode,” the Audio Pair provides the signal inputs to
the amplifier, and the control closure pair is used to operate the
Page/Music switch on the amplifier. The Door Bell and Door Ajar inputs
are ignored.
A Remote Amplifier zone provides the same paging features as a
Page/Speaker zone. The chief difference is that the PARTNER PagePac
module closes the relay on the control closure pair when it is presenting a
signal (Page, Tone, or Music) on the audio pair, and opens the relay contacts
when the zone is idle (see Figure 3-1 for example installation).
Auxiliary Paging Zone (Zone 3)
NOTE: Zone 3 provides a
0 dBm signal for a Remote
Amplifier.
NOTE: The Auxiliary Paging
Zone (Zone 3) cannot be
configured in Doorspeaker Mode.
NOTE: PagePac 6 Plus cannot
be used as an auxiliary amplifier.
Zone 3 of the PARTNER PagePac module is called the Auxiliary Paging
Zone. This Zone is intended for connection to a paging amplifier, such as
the AT&T AmpliCenter series. The Auxiliary Paging Zone operates in the
same fashion as a Primary Paging Zones (zones 1 and 2) configured in
Remote Amplifier mode. The chief difference is that, unlike Zones 1 and 2,
Zone 3 does not provide an on-board 4-watt amplifier paging or the ability
to provide talkback.
3-2 Page/Speaker Mode Installation
Page 29

CAUTION:
For remote amplifier locations, a
PageGuard (P/N 22050-930) or
PARTNER IROB (PEC 60612)
may be required for protection
from potential telephone network
electrical disruptions (refer to
Appendix B).
REMOTE/AUXILIARY AMP CONNECTION
PARTNER
PAGEPAC
MODULE
TO ZONE 1,
ZONE 2, OR
ZONE 3
A remote amplifier can be within the same building as the PARTNER
PagePac module or at a remote location. The auxiliary paging zone port is
located at the front of the PARTNER PagePac module and is a modular
connector labeled AUX AMP (see Figure 1-1). This zone can be used for
paging, background music, and tones. The 0 dBm output is suitable for
driving an amplifier, but is not suitable for direct connection of the speaker.
The AUX AMP port provides two leads for the audio pair and two leads for
contact closure (see Figure 3-1).
HORN
SPEAKER
AC POWER
USE APPROPRIATE
TELEPHONE RJ CABLE
FROM EXTERNAL
OUT TO
SPEAKERS
AUXILIARY AMPLIFIER
(AMPLICENTER D300)
MUSIC SOURCE
SHIELDED
CABLE
AUDIOPAIR
AND CONTACT
CLOSURE PAIR
FROM ZONE 1 OR 2
(ZONES 3 IS 0 dBm)
AUXILIARY AMPLIFIER BACK PANEL
TO PAGE INPUT
OF AMPLIFIER
D300
(EXPANDED VIEW)
Figure 3-1 PARTNER PagePac Connections ( Zones 1, 2, or 3) to a Remote Amplifier
Page/Speaker Mode Installation 3-3
Page 30

Connecting Speakers
NOTE: Use Voice Coil speakers
only.
NOTE: In some situations you
may be able to extend a run
farther than 600 feet, by using
fewer speakers and/or Iarger
diameter wire.
NOTE: Listed speakers are
capable of Talkback.
Standard voice coil ceiling speakers (indoor ceiling-type or P-Tec) and
horn speakers may be used with the PARTNER PagePac module. Use
only voice-coil 3.4 Vrms type speakers and use only the appropriate model
speaker for your situation (see Table 3-1). It is important not to exceed the
number of speakers or speaker run length maximums shown in Table 3-2
below.
Table 3-1 Recommended Speakers
Paging
Area
Open or Closed
Office Areas,
Conference
Room, Etc.
Hallways
Private Office
Front/Back
Door*
Open Industrial
Area or
Outdoors
*NOTE: Doorspeaker cable runs should use the “Home Run” method and should not
exceed 1500 feet.
Mounting
Location
On Wall or Ceiling
Above Ceiling
On Wall or Ceiling
Placed on Desk
On Wall
On Wall or Pole at
Least 15 ft. Above
Ground
Speaker Type
(Voice Coil)
Universal Cabinet
or P-TEC
Recessed Ceiling
or P-TEC
Universal Cabinet
Desktop
Door Speaker
1 Watt Horn
w/ taps
AT&T
Order No.
PEC 5330-105
PEC 5330-100
PEC 5330-215
PEC 5330-100
PEC 5330-105
PEC 5330-110
PEC 5330-120
PEC 5331-100
NOTE: Speaker quantities to the
right DO NOT apply to Zone 3,
which can drive a remote
amplifier which is only limited by
the amplifier power output
(wattage).
NOTE: 4 watts are available per
zone.
Table 3-2 Speaker Limitations
Total Speakers
Speakers Per Run*
Maximum Length of Speaker Run
(24 AWG Copper Wire)
*A run is a Iine of one or more speakers that connects directly to PARTNER PagePac
module. If using both horns and standard speakers, each horn counts as four standard
speakers.
**Depends on 1-Watt Horn Speaker tap settings - see documentation provided with
speaker.
3-4 Page/Speaker Mode Installation
PARTNER PagePac
Paging Systems
Standard
Indoor speakers
Per Zone
(Zones 1 and 2)
12
4
600 Feet
Horn Speakers Per
Zone
Zones 1 and 2)
3 to 16**
1
300 Feet
Page 31

Run Speaker
Cable
There are two methods of wiring speakers: from speaker-to-speaker and
Home Run (refer to Figure 3-2). When wiring speaker-to-speaker, cable is
run from the PARTNER PagePac module to the nearest speaker location,
from that location to the next, and so on, until all locations are connected.
When wiring Home Run, cable is run from the PARTNER PagePac
module to each speaker location. A combination of both methods may be
used, but the maximum distance for each cable run is 600 feet.
Recommended cable size is 24-22 AWG minimum with “shielded” cable
for all speakers with Talkback.
Connect Speaker
Cable
When all speakers have been installed, connect speaker cable using one
of the methods described above. Each zone must have its own dedicated
speaker cable run. Refer to Figures 3-2 and 3-3, along with the Installation
Instructions provided with your speakers for specific installation procedures.
AT&T 103A
CONNECTION
TO ZONE 1 OR
ZONE 2 PORT
HOME RUN METHOD
66-TYPE
CONNECTION
BLOCK
BLOCK
SPEAKER-TO SPEAKER METHOD
TWO
WIRES
TWO
WIRES
TWO
WIRES
SPEAKERS
SPEAKERS
TO ZONE 1 OR
ZONE 2 PORT
Figure 3-2 Speaker Run Methods
AT&T 103A
CONNECTION
BLOCK
AUDIO PAIR
Page/Speaker Mode Installation 3-5
Page 32

Connection Block
NOTE.: Auxiliary Port can utilize
an RJ-11 modular cable direct to
PagePac or AmplCenter RJ-11
jack. No Connection block is
needed.
ZONES 1 OR 2
SPEAKER/
REMOTE AMP
WIRE PAIRS
AUDIO PAIR
ZONE 1 (OR 2)
SPEAKERS
CONTACT
CLOSURE
PAIR
+
–
+
–
RJ-45 WIRE
➨
➨
➨
➨
➨
Zones 1 and 2 on the PARTNER PagePac module have an RJ-45
modular jack interface. To connect the various audio pair wires (and
contact closure pair wires), it is recommended you use a standard
full-modular 8-pin cable to connect from the PARTNER PagePac module
to an AT&T 103A block, which in turn can connect to a 66-type connection
block if needed. Figure 3-3 provides a typical wiring example and includes
the pinout connections for the RJ-45 cable, as well as the 103A block
terminal pinouts.
TO SPEAKER RUNS /
CONNECTING BLOCKS OR
REMOTE AMPLIFIERS
OUTPUT
COLOR
RED
GREEN
BLACK
YELLOW
RJ-45
TERMINAL
NUMBER
4
5
3
6
103A
TERMINAL
OUT
2
1
5
6
NOTE: YOU MAY CONNECT DIRECT
TO SPEAKERS OR AMPLIFIERS OR
AN ADDITIONAL CONNECTING
BLOCK (e.g. 66 TYPE BLOCK)
MODULAR RJ-45
CONNECTOR
(8-WIRE)
RJ-45 MODULAR CABLE FROM
PARTNER PAGEPAC ZONE 1 OR
ZONE 2 (PROVIDED)
Figure 3-3 Example Speaker / Remote Amplifier Connection Block Wiring
3-6 Page/Speaker Mode Installation
AT&T 103A BLOCK
(OR EQUIVALENT)
NOTE: IT IS RECOMMENDED
THAT EACH ZONE HAVE ITS
OWN CONNECTING BLOCK
Page 33

Quick Test (Paging to Loudspeakers)
■
At this point your PARTNER PagePac module has been installed along
side your PARTNER Plus or PARTNER II phone system. In addition,
you should have installed the necessary speakers, connecting blocks,
and wiring within your business.
■
The following test will ensure your PARTNER PagePac module is
operating correctly by making a page over the loudspeakers to zone 1,
zone 2, and zone 3 (remote amp).
You Will Need:
NOTE: If tests do not
result in proper paging
over loudspeakers, refer
to “Troubleshooting” in
Appendix A.
A Remote Amp zone, refers
to a primary zone configured as
a remote amp (with a separate
amp). This is output (fixed) from
AUX port.
A PARTNER System telephone (do NOT use a standard telephone).
To Access the PARTNER PagePac Module
For Dry Loop Mode (connection to Page Port) you will need to dial:
[ INTERCOM ] [ 7 ] [ 0 ].
For Station Mode operation, you will need to dial [
INTERCOM ] ,
followed by the extension number connected to the PARTNER
PagePac paging system. For example, if you have configured your
PARTNER PagePac paging system with a cable connecting from the
PARTNER PagePac STN I/N port to extension 20 of the PARTNER
Plus system module, you would dial [
INTERCOM ] [ 2 ] [ 0 ] the first time
you wish to access PARTNER PagePac features and programming
capabilities.
For Trunk Adapter Mode you will need to select the trunk which is
connected to the PARTNER PagePac unit by pressing the
appropriate [
LINE ] button. For standard telephone access, use Direct
Line Pickup.
Zone 1 Test (For NON-remote amp configurations)
Dial [ 1 ] (for zone 1 page).
1.
You should hear the pre-announcement tone (3/4 second tone) out of
the zone 1 loudspeakers. All other zones will be quiet.
2.
Speak into the telephone transmitter.
You should hear your voice over the loudspeakers.
3.
# ] (to return to PARTNER PagePac dial tone).
Dial [
You should hear the PARTNER PagePac dial tone in the receiver.
Zone 2 Test (For NON-remote applications)
4.
Dial [ 2 ] (for zone 2 page).
You should hear the pre-announcement tone (3/4 second tone) out
of the zone 2 Ioudspeakers. All other zones will be quiet.
5.
Speak into the telephone transmitter.
You should hear your voice over the loudspeakers.
Page/Speaker Mode Installation
3-7
Page 34

NOTE: Zone 3 will always
be configured as a remote
zone and does not need to
be programmed as a
remote zone.
Dial [
6.
# ] (to return to PARTNER PagePac dial tone).
You should hear the PARTNER PagePac dial tone in the telephone
receiver.
Zone 3 Test (automatically is set for remote amp)
7.
Dial [ 3 ] (for zone 3 page).
You should hear the pre-announcernents tone (3/4 second tone) out
of the zone 3 loudspeakers. All other zones will be quiet
Speak into the telephone transmitter.
8.
You should hear your voice over the loudspeakers.
# ] (to return to PARTNER PagePac dial tone).
Dial [
9.
You should hear the PARTNER PagePac dial tone in the telephone
receiver.
Zone 1 or 2 Test (Configured as a Remote Amp)
NOTE: If paging system does not
respond as indicated, refer to
“Troubleshooting”, Appendix A.
If zones 1 and/or 2 have been configured as a remote amp zone, you will
need to tell (program) this to the PARTNER PagePac module before you
can page to those zones.
Quick Programming
Dial [ ✳ ] [ ✳ ] (to start programming).
1.
You should hear a different dial tone in the telephone receiver.
6 ] [ 0 ] (for type of zone).
Dial [
2.
You should hear two beeps followed by the programming mode dial
tone in the telephone receiver.
Dial the zone number you wish to program as a remote zone (1, 2).
3.
You should hear two beeps (again) in the telephone receiver.
4.
3 ] (selecting a remote amp).
Dial [
You should hear three beeps in the telephone receiver, followed by
the programming mode dial tone.
Test
Dial [ # ] (to return to PARTNER PagePac dial tone).
5.
You should hear the PARTNER PagePac dial tone in the telephone
receiver.
Dial the zone number you have configured as a remote amp (1 or 2).
6.
You will hear the pre-announcement tone over the selected zone’s
loudspeakers.
NOTE: If another zone has been
configured as a remote amp
zone (zone 1 or 2) repeat the
above steps but change the zone
number dialed in step 6.
Speak into the telephone transmitter.
7.
You should hear your voice over the loudspeakers.
3-8 Page/Speaker Mode Installation
Page 35

Doorspeaker Mode Installation
Contents
4
AT&T Doorspeaker
Connection Blocks
■
Quick Test (Doorspeaker Equipment)
■
4-2
4-3
4-5
Doorspeaker Mode Installation 4-1
Page 36

AT&T Doorspeaker
The PARTNER PagePac module is compatible with the AT&T
DoorSpeaker (PEC 5330-120) and will also provide door ajar*, electronic
strikeplate* and door bell* support from either zone 1 or zone 2. The
NOTE: Zone 3 does not support
Doorspeaker Mode.
AT&T DoorSpeaker can be surface or flush mounted to a wall at the front
or rear entrance of your business.
*IMPORTANT:
Electronic strikeplate and door
ajar equipment and installation
is customer provided.
When the Doorspeaker button (see Figure 4-1) is pressed, the PARTNER
PagePac module will alert inside personnel that the door needs attention
by either ringing an extension (Ringdown Mode) or providing a tone over
the paging system (Door Alert Mode). In addition, once communications
have been made with the doorspeaker, the door can be remotely opened
by inside personnel by entering the appropriate touch-tone code (refer to
Section 7).
Figure 4-1 AT&T Doorspeaker-PEC 5330-120
IMPORTANT:
Door Action
■
■
Considerations
■
4-2 Doorspeaker Mode Installation
The PARTNER Plus Doorphone, PEC 5324-003, will not work.
Ringdown Mode is only supported in Station Mode configuration.
Door Alert Mode is available in all three configuration modes: Dry Loop
Mode, Station Mode, and Trunk Adapter.
Page 37

Connection Blocks
The PARTNER PagePac module provides an 8-pin (four pair) RJ-45 jack
for both zone 1 and zone 2. To connect the various audio pair wires,
contact closure pair wires, and door bell and door ajar pair wires to the
PARTNER PagePac module’s RJ-5 jack, it is recommended you use a
standard full-modular 8-pin cable to connect from the PARTNER PagePac
module to an AT&T 103A block (see Figure 4-2). The 103A block can in
turn be connected (via 22-24 AWG wire) to an AT&T 66-type block (see
Figure 4-2 for an example DoorSpeaker installation).
ZONE 1 AND 2
DOOR WIRE
PAIRS
DOOR BELL
PAIR
DOOR AJAR*
PAIR
AUDIO PAIR
ZONE 1 (OR 2)
SPEAKERS
CONTACT
CLOSURE
PAIR DOOR
UNLOCK (TO
STRIKEPLATE)
+ ➨
– ➨
+ ➨
– ➨
+ ➨
– ➨
+
– ➨
*NOTE: IF DOOR AJAR IS NOT
OPTIONED, YOU MUST JUMPER
OUTPUT LEADS 4 AND 7. IF A
STIKEPLATE DEVICE IS NOT USED
LEAVE THESE CONTACTS OPEN
RJ-45 WIRE
➨
COLOR
BROWN
ORANGE
GREEN
➨
BLACK
YELLOW
SLATE
BLUE
RED
RJ-45
TERMINAL
NUMBER
8
1
7
2
4
5
3
6
103A
TERMINAL
OUT
8
3
7
4
2
1
5
6
MODULAR RJ-45
CONNECTOR
TO
DOORSPEAKER
AND DOOR DEVICES
103A BLOCK OUT
AT&T 103A BLOCK
(OR EQUIVALENT
AT&T COMCODE #)
RJ-45 MODULAR CABLE FROM
8-WIRE
RJ CABLE
PARTNER PAGEPAC ZONE 1
OR ZONE 2 PORT
Figure 4-2 AT&T 103A Connection Block Used For Doorspeaker Installation
Doorspeaker Mode Installation 4-3
NOTE: EACH ZONE REQUIRES
ITS OWN CONNECTING BLOCK
Page 38

PARTNER
PAGEPAC
UNIT ZONE 1 /
ZONE 2
WIRE PAIRS
PARTNER
PAGEPAC
MODULE
66 TYPE BLOCK
DOORSPEAKER CAN RING
MULTIPLE EXTENSIONS
(RINGDOWN MODE)
(2 wire)
*DOORSPEAKER #1
(PEC 5330-120)
(4 wire)
STRIKEPLATE
CONTACT
CLOSURE
(NOT PROVIDED)
(2 wire)
DOOR AJAR
DEVICE
(NOT PROVIDED)
JUMPER IF
NOT USED
103A BLOCK
RJ-45 TELEPHONE
LINE CORD
103A BLOCK
RJ-45 TELEPHONE
LINE CORD
66 TYPE BLOCK
*IMPORTANT: ONLY THE DOORSPEAKER
PEC5330-120 IS COMPATIBLE WITH THE
PARTNER PAGEPAC MODULE. DO NOT
USE ATT PARTNER DOORPHONE
PEC 5324-003
(2 wire)
(4 wire)
(2 wire)
*DOORSPEAKER #2
(PEC 5330-120_
STRIKEPLATE
CONTACT
CLOSURE
(NOT PROVIDED)
DOOR AJAR
DEVICE
(NOT PROVIDED
JUMPER IF
NOT USED
Figure 4-2 PARTNER PagePac Module Connections to Remote Doorspeaker Equipment
4-4 Doorspeaker Mode Installation
Page 39

Quick Test (Doorspeaker Equipment)
■
At this point your PARTNER PagePac module has been installed along
side your PARTNER Plus or PARTNER II Phone system and you have
completed the Page/Speaker installation steps outlined in Section 2.
In addition, you should have installed the necessary Doorspeaker
equipment (Doorspeaker, electronic strikeplate, door ajar device,
connecting blocks, and wiring) within your business.
■
The following test will ensure your PARTNER PagePac is operating
correctly by providing two-way communications with a Doorspeaker,
opening a doors strikeplate contact closure and determining if a door
ajar device has been activated.
You Will Need:
NOTE: If tests are not
as expected, refer
to "Ttoubleshooting" in
Appendix A.
A PARTNER System telephone and another person to activate the
DoorSpeaker.
Zone 1 and/or Zone 2 (Configured for Doorspeaker Mode)
If zone 1 or 2 has been configured as a Doorspeaker Mode zone, you will
need to tell (program) this to the PARTNER PagePac module.
To Access PARTNER PagePac Module
For Dry Loop Mode (connection to Page Port) you will need to dial:
[ INTERCOM ] [ 7 ] [ 0 ].
For Station Mode operation, you will need to dial [
INTERCOM ],
followed by the extension number connected to the PARTNER
PagePac paging system. For example, if you have configured your
PARTNER PagePac paging system with a cable connecting from the
PARTNER PagePac STN l/N port to extension 20 of the PARTNER
Plus system module, you would dial [
INTERCOM ] [ 2 ] [ 0 ] the first time
you wish to access PARTNER PagePac features and programming
capabilities.
For Trunk Adapter Mode you will need to select the trunk which is
connected to the PARTNER PagePac unit by pressing the appropriate
LINE ] button. For standard telephone access, use Direct Line
[
Pickup.
IMPORTANT:
Only Doorspeaker PEC
5330-120 is compatible with
the PARTNER PagePac
module. DO NOT use AT&T
PARTNER Plus Doorphone
PEC 5324-003 (there should be
NO LED on the doorspeaker
face plate).
You should hear the PARTNER PagePac dial tone in the telephone
receiver.
Quick Programming
Dial [ ✳ ] [ ✳ ] (to start programming).
1.
You should hear a different dial tone in the telephone receiver.
2.
Dial [ 6 ] [ 0 ] (for type of zone).
You should hear two beeps in the telephone receiver.
Doorspeaker Mode Installation
4-5
Page 40

To Program/Test a second
Doorspeaker, repeat these steps
with the appropriate zone number.
Dial the zone number you wish to program as a Doorspeaker
3.
Mode zone (1, 2).
You should hear two beeps followed by the programming dial tone in
the telephone receiver.
4.
Dial [ 2 ] (to select Doorspeaker Mode).
You should hear three beeps followed by the programming dial tone.
Test
Dial [ # ] (to return to PARTNER PagePac dial tone).
5.
You should hear the PARTNER PagePac dial tone in the telephone
receiver.
Hang up.
6.
Have your assistant press the Doorspeaker button (for selected zone
7.
1 or 2).
NOTE: The default Doorspeaker
action is Door Alert Mode; refer
to Section 6 for Ringdown Mode
information.
NOTE: To access the
PARTNER system, refer to the
previous page.
Refer to Section 6 for
programming options.
Refer to Section 7 for complete
operating information.
The person at the door should hear the door alert tone from the
Doorspeaker.
You (the person at the telephone) should hear the door alert tone
over the other zones’ loudspeakers.
Pick up the phone receiver and access the PARTNER system.
8.
You should hear in the telephone receiver 1 beep if the button at
door 1 has been pressed, or 2 beeps if the button at door 2 has been
pressed.
You should now have two-way communications with the Doorspeaker.
Dial [ O ] [ P ] [ E ] [ N ] (to open remote door; only if strikeplate is used).
9.
The door’s electronic strikeplate should open so the person at the
door can enter.
If the person at the door leaves the door open more than 30 seconds,
10.
a door ajar alert can be heard over the page/speaker zones.
4-6 Doorspeaker Mode Installation
Page 41

Accessory Features
Contents
5
Installing a Music Source
Volume Adjustment (Page/Music)
Using a Microphone with the PARTNER
PagePac Module
Night Bell Service
5-2
5-3
5-4
5-5
Accessory Features
5-1
Page 42

Installing a Music Source
NOTE: If you use equipment
that rebroadcasts music or other
copyrighted materials, you may
be required to obtain a license
from a third party such as
ASCAP or BMI.
The PARTNER PagePac module provides a music source interface
Ω
(impedance of 100k
) for background/foreground music applications. Use
a standard audio cable with RCA jacks. Connect the AT&T FM (PEC
5335-510) or AM-FM (PEC 5335-505) music source from the music source
output to the music input (RCA jack) on the PARTNER PagePac module
(see Figure 5-1).
PARTNER
PAGEPAC
MODULE
AM/FM MUSIC SOURCE
(PEC 5335-505) or
FM MUSIC SOURCE
(PEC 5335-510)
DIGITAL MESSAGE SYSTEM
(PEC 5335-600)
RCA CABLE TO
MUSIC IN PORT
5-2 Accessory Features
Figure 5-1. Connections for External Music Source
Page 43

Volume Adjustment (Page/Music)
Refer to Section 6 for volume
output levels.
NOTE: Music can be played over
primary zones (zones 1 and 2)
and the auxiliary zone (zone 3).
Volume level is adjusted from a PARTNER system telephone (Figure 5-2).
Eight different volume levels can be selected by entering the proper DTMF
code (3 dB per key stroke). The PARTNER PagePac default background
music level is set at 4 and the default page level is set at 6 (refer to
Table 6-3). Programming instructions for changing the music/page volume
levels are provided in Section 6. Page/Music volume adjustment function
will work only for zones 1 and 2. Volume levels or Zones 1 and 2, and for
Page or Music, can be adjusted separately.
Figure 5-2. Volume Level Adjusted From PARTNER Phone
Accessory Features 5-3
Page 44

Using a Microphone with the PARTNER PagePac Module
Many installations, such as restaurants and retail stores, require
microphone access for paging. The AT&T Microphone (PEC 5335-400)
provides a switch activated ON/OFF contact closure, and will install easily
to the modular port at the front of the PARTNER PagePac module labeled
MIC IN. Microphone access can be configured for a per zone page or all
call (all zone) page. Microphone enable/disable parameters are set in the
PARTNER PagePac programming mode (see Section 6).
PARTNER
PAGEPAC
MODULE
HIGH FIDELITY
MICROPHONE
(PEC 5335-400)
RJ-11 CABLE TO
MIC IN JACK
Figure 5-3. Microphone Connections to PARTNER PagePac System
5-4 Accessory Features
Page 45

Night Bell Service
IMPORTANT:
Station Mode
Considerations
NOTE: Refer to Section 6 Night
Bell programming instructions
and Section 7 for Operation
Information.
IMPORTANT:
All lines on the Night Bell
extension should be set to “No
Ring”. (Refer to Sections 6
and 7 for Programming and
Operation.)
NOTE: Connect RJ-11 cable
from PARTNER PagePac
module Night Bell port to
appropriate station port. (Refer to
Sections 6 and 7 for
Programming/Operation.)
To ensure full use of “PFT” (Power Failure Transfer) in your PARTNER
Plus or PARTNER II phone systems during an emergency or power
outage conditions when selecting “Station Mode,” these extensions are
NOT recommended for use for primary paging areas:
■
PARTNER Plus system: Stations 10, 11, 16, 22, 28
■
PARTNER II system: Stations 10, 11, 16, 22, 28, 34, 40, 46, 52
The PARTNER PagePac provides a NIGHT BELL port. This RJ-11 jack
connects to a station port (Extension) on the PARTNER system that has
been configured for night bell service (see Figure 5-4). Once configured,
the PARTNER PagePac can detect an incoming ring signal and generate
tones over the paging system until the incoming call is terminated or
someone answers the call. The Night Bell feature has lower priority than
Microphone access, Paging and Doorspeaker, but has a higher priority
than background music.
PARTNER
206
MODULE
PAGEPAC
MODULE
(WALL-MOUNT
lNSTALLATION)
FROM PARTNER
PAGEPAC
NITE BELL PORT
Figure 5-4. Night Bell Service Installation
PARTNER
PAGEPAC
NIGHT BELL
PORT
Accessory Features 5-5
Page 46

Programming
Contents
6
Overview
Programming Options
System Programming Options■
■
Zone Programming Options
Programming Procedures
■ System Programming Procedure
Zone Programming Procedures
■
Night Bell
Night Bell Programming Procedure
■
Ring Down
■ Ring Down Programming Procedure
6-2
6-2
6-2
6-3
6-5
6-6
6-7
6-9
6-9
6-10
6-10
Programming 6-1
Page 47

Overview
After installing the Partner PagePac hardware as described in Sections 2
through 5, you can customize the system to meet the requirements of your
business. This chapter describes available programming options and
procedures.
Programming Options
There are two types of programming options. System Options affect the
overall operation of the system. Zone Options affect the operation of a
single zone.
System Programming Options
■
Connect Password —
telephone interface to enter the correct password before being
permitted to use the system. A special dial tone indicates that the
system is waiting for the Connect Password to be entered. This option
is disabled by default.
Requires a user who dials in through the
Disable this feature if operating
in Silent Monitor mode (Dry Loop
or Trunk Adapter Mode).
If Pre-Announcement Tone is
disabled, the Talkback feature
must be turned on for the
Talkback Warning Tone to be
heard.
■
Programming Password — Requires a user who dials in through the
telephone interface to enter the correct password when the
programming mode is entered. A programming confirmation tone
indicates a correctly entered programming password. This option is
disabled by default.
■
Door Unlock Code — Specifies the sequence of digits a user must
enter in order to activate the contact closure (door strike plate) for the
active door. The default value is 6736 (corresponding to the letters
OPEN on the keypad).
■
Pre-Announcement Tone Enabled — Sends a tone to a zone (and to
the user's station, for a telephone page) when the zone is selected.
(Available in all zones.) This option is enabled by default.
(Automatically turned off when calling a doorspeaker.)
■
Talkback Warning Tone Enabled — Sends a tone to a zone (and to
the user’s station, for a telephone page) when the page is selected in
talkback mode, advising anyone within range of the zone that
conversation is being monitored. (Available in Zones 1 and 2 only.)
This option is enabled by default.
■
Confirmation Tone Enabled — Sends a tone to the user’s station (for a
telephone page) when a zone is selected. This is ignored if
Pre-announcement Tone or Talkback Warning Tone is enabled
(available in all zones). This option is enabled by default.
6-2 Programming
■
Reset to Factory Defaults — Causes all System and Zone parameters
to revert to their factory default settings. (See Tables 6-1 and 6-2 for
factory default settings.)
Page 48

Zone Programming Options
■
Type of Zone — Specifies whether a primary paging zone is to be
operated in Page/Speaker, DoorSpeaker, or Remote Amplifier mode.
The default setting is Page/Speaker. Setting this parameter causes all
other options for the zone to be set to the defaults for the specified
zone type. (See Table 6-3 for default settings by zone type.)
■
Ring Down mode only available
in Station Mode.
Door Action — Valid only for a primary paging zone optioned as a
Doorspeaker. Specifies the alerting action taken when the Door Bell is
pressed: Door Alert or Ring Down. The default setting is Door Alert.
Page/Tone Level — Specifies the volume of pages and tones sent to
■
the primary paging zone. (Available in Zones 1 and 2 only.) Settings
range from 0.5 Vrms (Level 1) through 3.4 Vrms (Level 8). Default is
1.9 Vrms (Level 6). (See Tables 6-3 and 6-4.)
■
Music Level — Specifies the volume of background music sent to a
primary paging zone. (Available in Zones 1 and 2 only.) Settings range
from 0.5 Vrms (Level 1) through 3.4 Vrms (Level 8). Default is
1.1 Vrms (Level 4). (See Tables 6-3 and 6-4.)
NOTE: Disabling for a
doorspeaker zone keeps the
zone from being selected as part
of a group, but does not prevent
it from being selected individually
(in Silent Monitor mode—Dry
Loop and Station Mode only).
Night Bell requires programming
me PARTNER Plus/II system for
Night Service. See page 6-9.
NOTE: The MLC-6 cordless
phone (and some standard
phones) cannot send continous
DTMF tones.
■
Station Page Enabled — Specifies whether the zone will be selected
when the user dials the zone number (or the number of a group that
includes the zone) on the telephone keypad. This option is disabled by
default for Doorspeaker, enabled otherwise.
■
Music Enabled — Specifies whether background music will be sent to
the zone when paging is not active. (Available in all zones.) This
option is disabled by default.
■
Talkback Enabled — Allows talkback for a primary paging zone. This
option is enabled by default for Doorspeaker, disabled otherwise.
(Available in Zones 1 and 2 only.) Talkback works only for a
single-page zone.
■
Night Bell Enabled — Sends the night bell tone to the zone when there
is activity on the Night Bell input. (Available in all zones.) This option
is disabled by default for Doorspeaker, enabled otherwise.
■
Pass DTMF to Zone — Routes DTMF tones which are entered during a
page to the zone without processing. (Available in all zones.) This
option is disabled by default.
■
Microphone Page Enabled — Selects the zone when contact closure of
the microphone input is activated. (Available in all zones.) This option
is disabled by default for Doorspeaker, enabled otherwise.
The door alert tone can be sent
to any zone, including zone 3.
■
Door Alert Enabled — Routes the door alert tone to the zone when the
Door Bell is pressed or when Door Ajar is detected. (Available in all
zones.) This option is disabled by default for Doorspeaker, enabled
otherwise.
Programming 6-3
Page 49

Table 6-1 Factory Default Settings—System Options
System Option
Reset to Factory Defaults
Connect Password
Programming Password
Door Unlock Code
Confirmation Tone Enabled
Pre-Announcement Tone Enabled
Talkback Warning Tone Enabled
6736 (OPEN)
Table 6-2 Factory Default Settings—Zone Options
Zone Option
Type of Zone
Door Action
Page/Tone Level
Music Level
Station Page Enabled
Music Enabled
Talkback Enabled
Night Bell Enabled
Pass DTMF to Zone
Microphone Page Enabled
Door Alert Enabled
1 = DTMF digit 1 is ON (enabled)
0 = DTMF digit 0 is OFF (disabled)
Zones 1 and 2
Page/Speaker (1)
Not applicable
1.9 Vrms (6)
1.1 Vrms (4)
Yes (1)
No
(0)
No
(0)
Yes (1)
No
(0)
Yes (1)
Yes (1)
Not supported
Not supported
Not supported
Not supported
Yes
No (0)
Not supported
Yes
No
Yes (1)
Yes
Default
–
None
None
Yes
Yes
Yes
Zone 3
(1)
(1)
(0)
(1)
6-4 Programming
Page 50

Table 6-3 Default Settings By Zone Type
Primary Paging Zones
Zone Option
Page/Speaker
Door Action
Page/Tone Level 1.9 Vrms (6)
Music Level 1.1 Vrms (4)
Station Page Enabled
Music Enabled
Talkback Enabled
Night Bell Enabled
Pass DTMF to Zone
Microphone Page
Enabled
Door Alert Enabled
Note 1: Default parameter setting is No (0), which causes the zone to be excluded from group pages. (Group pages are
discussed in Section 7.) However, a Doorspeaker zone may always be selected in Silent Monitor mode by performing a
single-zone page (zone number 1 or 2).
Not supported
Yes
(1)
No
(0)
No
(0)
Yes
(1)
No
(0)
Yes
(1)
Yes
(1)
(Zones 1 and 2)
Doorspeaker
Door Alert (1)
1.9 Vrms (6)
1.1 Vrms (4)
Note 1
No
(0)
Yes (1)
No
(0)
No
(0)
No
(0)
No
(0)
Remote Amp Aux Amp
Not supported.
0.655 Vrms (2)
0.655 Vrms (2)
Yes (1)
No (0)
No (0)
Yes (1)
No (0)
Yes (1)
Yes (1)
Auxiliary Zone
(Zone 3)
Not supported
Not supported
Not supported
Yes (1)
No (0)
Not supported
Yes (1)
No (0)
Yes (1)
Yes (1)
Programming Procedures
To change a factory default setting or a user-programmed setting, you
must first access the PARTNER PagePac system.
If you have configured your PARTNER PagePac system:
For Dry Loop Mode (connection to Page Port) you will need to dial
INTERCOM ] [ 7 ] [ 0 ].
[
For Station Mode operation, you will need to dial [
followed by the extension number connected to the PARTNER
PagePac paging system. For example, if you have configured the
PARTNER PagePac paging system with a cable connecting from the
PARTNER PagePac STN I/N port to extension 20 of a PARTNER
Plus system module, you would dial [
you wish to access PARTNER PagePac features and programming
capabilities.
If a Connect Password has been
enabled, you will hear a special
tone. Enter the Connect
Password.
For Trunk Adapter Mode you will need to select the trunk which is
appropriate [ LINE ] button. For standard telephone access, use Direct
Line Pickup.
INTERCOM ] ,
INTERCOM ] [ 2 ] [ 0 ] the first time
Programming 6-5
Page 51

System Programming Procedure
To change any system programming option:
1.
Access the PARTNER PagePac System (see page 6-5).
2.
Dial [ ✳ ] [ ✳ ] (followed by the programming password, if one has
been configured).
You will hear the special programmming mode dial tone.
NOTE: See "System
Programming Options” on
page 6-2 for descriptions of the
options provided.
3.
Dial the appropriate buttons to change or verify an option:
Connect
Password
[ 3 ] [ 0 ] to change
[ 3 ] [ 1 ] to verify
Connect
Password
Zero to six DTMF
digits; terminated by
# if fewer than six
digits specified
Programming
Password
] [ 2 ] to change [ 3 ] [ 4 ] to change
[ 3
[ 3
] [ 3 ] to verify
Programming
Password
Zero to six DTMF
digits; terminated by
# if fewer than six
digits specified
NOTE: The [ # ] key can be
pressed to cancel an
uncompleted programming
option; you will hear the
programming mode dial tone
(this does not apply to step 4 for
Connect Password, Programming
Password, or Door Unlock Code).
Door Unlock
Code
[ 3 ] [ 5 ] to verify
Confirmation
Tone Enabled
[ 4
] [ 0 ] to change
[ 4
] [ 1 ] to verify
Pre-
Announcement
Tone Enabled
] [ 2 ] to change
[ 4
[ 4 ] [ 3 ] to verify
Talkback
Warning
Tone Enabled
[ 4
] [ 4 ] to change
[ 4
] [ 5 ] to verify
If configured correctly, you will hear the Configuration tone (two
beeps). (If configured incorrectly, you will hear the Error tone, and
will be returned to the Programmming Mode dial tone.)
4.
Dial the appropriate value:
Door Unlock
Code
One to four DTMF
digits; terminated
by # if fewer than
four digits specified
Confirmation
Tone Enabled
] for No
[ 0
] for Yes
[ 1
Pre-
Announcement
Tone Enabled
] for No
[ 0
] for Yes
[ 1
Talkback
Warning
Tone Enabled
] for No
[ 0
[ 1
] for Yes
[ 2 ] [ 5 ] [ 3 ] [ 2 ] [ 7 ]
(CLEAR)
If dialed correctly, you will hear the Configuration Complete tone
(three beeps). (If dialed incorrectly, you will hear the error tone.) You
will be returned to the programming dial tone.
5.
To terminate the programming mode, press [
# ].
You will hear the PARTNER PagePac dial tone.
Reset to
Factory
Defaults
[ 1 ] [ 0 ]
Reset to
Factory
Defaults
6-6 Programming
Page 52

Zone Programming Procedures
To program Type of Zone, Door Action, Page/Tone Level, or Music
Level (Zones 1 and 2 only):
Access the PARTNER PagePac System (see page 6-5).
1.
✳ ] [ ✳ ] (followed by the programming password, if one has been
Dial [
2.
configured).
You will hear the special programming mode dial tone.
NOTE: See "Zone Programming
Options" on page 6-3 for
descriptions of the options
provided.
3.
Dial the appropriate buttons to change or verify an option:
Type
of Zone
[ 6 ] [ 0 ] to change
[ 6 ] [ 1 ] to verify
Door
Action
[ 6
] [ 2 ] to change
[ 6 ] [ 3 ] to verify
Page/Tone Level
[ 6
] [ 4 ] to change
[ 6 ] [ 5 ] to verify
Music
[ 6
] [ 6 ] to change
] [ 7 ] to verify
[ 6
If configured correctly, you will hear the Configuration tone (two
beeps). (If configured incorrectly, you will hear the Error tone, and
will be returned to the Programming Mode dial tone.)
Dial [ 1 ] for zone 1 or [ 2 ] for zone 2.
4.
If dialed correctly, you will hear the Configuration tone again (two
beeps.) (If configured incorrectly, you will hear the Error tone, and will
be returned to the Programming Mode dial tone.)
5.
Dial the appropriate button to choose an option:
Type
of Zone
[ 1 ] for Page/Speaker
[ 2 ] for Doorspeaker
] for Remote Amplifier
[ 3
[ 1
[ 2 ] for Ring Down
Door
Action
] for Door Alert
Page/Tone Level
] through [ 8 ] for
[ 1
Amplifier Level (See
Table 6-4)
Music
Level
[ 1
] through [ 8 ] for
Amplifier Level (See
Table 6-4)
Level
NOTE: The [ # ] key can be
pressed to cancel an
uncompleted programming
option; you will hear the
programming mode dial tone.
If dialed correctly, you will hear the Configuration Complete tone
(three beeps). (If dialed incorrectly, you will hear the error tone.) You
will be returned to the programming dial tone.
6.
To terminate the programming mode, press [
# ].
You will hear the PARTNER PagePac dial tone.
Programming
6-7
Page 53

Table 6-4 Amplifier Levels
NOTE: See "Zone Programming
Options" on page 6-3 for
descriptions of the options
provided.
Level
1
2
3
4
5
6
7
8
Voltage
0.5 Vrms
0.655 Vrms
0.86 Vrms
1.1 Vrms
1.4 Vrms
1.9 Vrms
2.5 Vrms
3.4 Vrms
dBu
–3.8
–1.5
0.9
3.0
5.1
7.8
10.2
12.7
To enable or disable Station Page, Music, Talkback, Night Bell, Pass
DTMF to Zone, Microphone Page, or Door Alert:
1.
Access the PagePac System (see page 6-5).
2.
✳ ] [ ✳ ] (followed by the programming password, if one has been
Dial [
configured).
You will hear the special programmming mode dial tone.
3.
Dial the appropriate buttons to change or verify an option:
Station Page
Enabled
[ 7 ] [ 2 ] to change
] [ 3 ] to verify
[ 7
Music
Enabled
[ 7 ] [ 4 ] to change
[ 7 ] [ 5 ] to verify
Talkback
Enabled
[ 7 ] [ 6 ] to change
[ 7 ] [ 7 ] to verify
Night Bell
Enabled
[ 7 ] [ 8 ] to change
[ 7 ] [ 9 ] to verify
Pass DTMF to
Zone Enabled
] [ 0 ] to change
[ 9
[ 9
] [ 1 ] to verify
Microphone
Page Enabled
[ 9
] [ 2 ] to change
] [ 3 ] to verify
[ 9
Door Alert
[ 9 ] [ 4 ] to change
[ 9
] [ 5 ] to verify
If configured correctly, you will hear the Configuration tone (two
beeps). (If configured incorrectly, you will hear the Error tone, and
will be returned to the Programming Mode dial tone.)
4.
1 ] for zone 1, [ 2 ] for zone 2, or [ 3 ] for zone 3 (Zones 1 and
Dial [
2 only for Talkback).
If dialed correctly, you will hear the Configuration tone again (two
beeps.) (If configured incorrectly, you will hear the Error tone, and
will be returned to the Programmming Mode dial tone.)
5.
0 ] to disable; dial [ 1 ] to enable.
Dial [
If dialed correctly, you will hear the Configuration Complete tone
(three beeps). (If dialed incorrectly, you will hear the error tone.) You
will be returned to the programmming dial tone.
Enabled
6-8 Programming
Page 54

To terminate the programming mode, press [
NOTE: The [ # ] key can he
pressed to cancel an
uncompleted programmming
option; you will hear the
programmming mode dial tone.
6.
You will hear the PARTNER PagePac dial tone.
Night Bell
The PARTNER Plus/II system provides a mode of operation called Night
Service. By pressing a single button on the system phone at extension
10, the customer can cause incoming after-hours calls to ring on a
specified group of extensions.
The PARTNER PagePac module provides additional capabilities to the
Night Service feature by allowing Night Bell to ring to one or more paging
zones.
Night Bell Programing Procedure
1.
Refer to your PARTNER Plus/II
manual for complete Night
Service programming procedures.
Make the physical connections for Night Bell service as described in
Section 5.
2.
Use the PARTNER Plus/II Line Ringing feature to set all lines on the
Night Bell extension to "No Ring."
# ].
3.
Using the PARTNER Plus/II Night Service Group Extensions (#504)
programming feature, place the Night Bell Station into the Night
Service group.
4.
Use the PARTNER Plus/II Night Service Button (#503) procedure to
activate the Night Service feature (if not already done) see Figure 6-1.
MLS-18D
MLS-12D
Figure 6-1 Turning Night Bell Service On/Off
NIGHT SERVICE
BUTTON
MLS-34D
Programming 6-9
Page 55

Ring Down
Note: Ring Down mode can only
be used when the PARTNER
PagePac module is connected to
a PARTNER Plus/II station port.
Ring Down will not work in Dry
Loop or Trunk Adapter Mode.
The PARTNER PagePac module allows a Doorspeaker Mode zone to be
configured in either Door Alert or Ring Down mode. In Door Alert mode,
activity on the door is signaled by broadcasting a Door Alert tone over the
paging speakers. In Ring Down mode, door activity is signaled by
requesting the PARTNER PIus/II switch to dial one or more specified
extensions.
Ring Down Programming Procedure
Use PARTNER Plus/II programming procedure #604 or #605 to
Refer to your PARTNER Plus/II
manual for complete Doorphone
programming procedures.
IMPORTANT:
Ring Down Mode
Considerations
1.
designate the extension that is connected to the PARTNER Plus/II
station interface as a doorphone extension.
Use the PARTNER PIus/II Doorphone Alert Extensions (#606)
2.
procedure to identify up to five extensions that are to be run when the
PARTNER PagePac module detects Door Bell or Door Ajar.
If both PagePac zones are configured to be doorspeakers, only one
PARTNER doorphone option (#604 or #605) can be programmed, not
both. Therefore, if both doorspeakers are used in Ring Down mode, it is
not possible to distinguish between the two.
If doorspeakers are to be used and it is necessary to distinguish between
the two doorspeakers when they ring, use the PagePac in Door Alert
Mode. This way the distinctive rings are available for each doorspeaker.
6-10 Programming
Page 56

Operating Procedures
Contents
7
Overview
Primary Paging Zones
Page/Speaker Mode
■
Doorspeaker Mode■
Remote Amplifier Mode
■
Auxiliary Paging Zone
Input Priorities
7-2
7-2
7-2
7-4
7-6
7-6
7-7
Operating Procedures
7-1
Page 57

Overview
At this point the PARTNER PagePac hardware should be installed as
described in Sections 2 through 5. The module should also be
programmed with factory default settings or user selections as described in
Section 6. You are now ready to use the system. This chapter describes
the procedures for operating the PARTNER PagePac system.
Primary Paging Zones
Refer to Section 6 for
programmming the type of zone
mode, and for descriptions and
programming of the various zone
options.
Zones 1 and 2 of the PARTNER PagePac system are called the Primary
Paging Zones. Each of these zones can be programmed to operate in
Page/Speaker Mode, Doorspeaker Mode, or Remote Amplifier Mode.
Page/Speaker Mode
Paging Procedure
A Page/Speaker Mode zone is
intended for connection to one or
more voice coil speakers.
To change a factory default setting or a user-programmed setting, you
must first access the PARTNER PagePac system.
1.
If you have configured your PARTNER PagePac system:
For Dry Loop Mode (connection to Page Port) you will need to dial
[ INTERCOM ] [ 7 ] [ 0 ].
For Station Mode operation, you will need to dial [
followed by the extension number connected to the PARTNER
PagePac paging system. For example, if you have configured the
PARTNER PagePac paging system with a cable connecting from the
PARTNER PagePac STN I/N port to extension 20 of a PARTNER
Plus system module, you would dial [
you wish to access PARTNER PagePac features and programming
capabilities.
INTERCOM ] [ 2 ] [ 0 ] the first time
INTERCOM ] ,
If a Connect Password has been
enabled, you will hear a special
tone. Enter the Connect
Password
7-2 Operating Procedures
For Trunk Adapter Mode you will need to select the trunk which is
connected to the PARTNER PagePac unit by pressing the
appropriate [
Line Pickup.
You will hear the PARTNER PagePac dial tone in the telephone
receiver.
Dial the zone or zone group to which the page is to be made:
2.
[ 1 ]
— Zone 1
[ 2 ]
— Zone 2
[ 3 ]
— Zone 3
LINE ] button. For standard telephone access, use Direct
[ 4 ]
— Zones 2 and 3
[ 5 ]
— Zones 1 and 3
[ 6 ]
— Zones 1 and 2
[ 7 ]
— All Zones
Page 58

3.
Speak into the telephone transmitter to make your page.
Paging Options
NOTE: Talkback Mode works
only for a single-zone page.
During a page, you can dial [
# ] to go back to the PARTNER
PagePac dial tone; dial another zone number or zone group number
to switch to that zone or zone group.
4.
Hang up the telephone.
Pre-Announcement Tone:
If Pre-Announcement Tone is configured, it will be issued before a page to
all speakers in the selected zone or group.
Talkback Mode:
1.
Follow steps 1 and 2 of the Paging Procedure, above.
In your telephone receiver, you can monitor conversation from the
zone enabled for Talkback Mode.
2.
Speak into the telephone transmitter to page, or listen to someone
speaking at the zone. (One person can speak at a time; the person
speaking into the telephone will take precedence over the person
speaking at the zone.)
Hang up the telephone.
3.
If Talkback Warning Tone is enabled, a tone will be sent to the zone
enabled for talkback, to advise anyone within range of the zone that
conversation is being monitored. This tone is also sent to your
telephone receiver.
By default Doorspeaker does not
receive a microphone page.
Refer to Night Bell Programming
in Section 6.
Microphone Page Enabled:
1.
Turn the switch on the microphone to ON.
2.
Speak into the microphone to make your page.
Your page will be heard at any zone where Microphone Page is
enabled.
Turn the microphone switch to OFF.
3.
Night Bell Enabled:
When Night Service is enabled by the button on the system phone at
extension 10:
An outside call comes in.
1.
All system phones selected in the Night Service Group will ring.
Ringing will be heard at all zones where Night Bell is enabled.
Pick up any telephone on the line that is configured for Night Bell to
2.
connect to the incoming call.
Night Bell will stop ringing over the paging system.
Operating Procedures
7-3
Page 59

Music Enabled:
NOTE: Paging or other higher
priority options will override
background music. See page
7-7.
MLC-6 cordless telephones and
certain standard telephones
cannot provide continuous DTMF
tones.
Doorspeaker Mode
Door Bell
The Door Alert signal is triggered
by either a door bell or a door
ajar condition.
If no answer, Doorspeaker will
automatically hang up after 30
seconds.
If a music source is selected, all zones with Music enabled will play music,
as long as other functions are not being used.
Pass DTMF to Zone:
All touch-tones entered during a page will be routed to any zone with the
DTMF to Zone option enabled. If this option is enabled you cannot use the
[ # ] key or select another zone option.
A Doorspeaker Mode zone is intended for connection to a single
Doorspeaker. Connections can also be made for a door bell, door ajar
sensing device, and electronic strike plate control. Doorspeaker mode is
available to zones 1 and 2 only.
Door Alert Mode:
If the Door Action option has been configured for Door Alert:
Someone rings the door bell.
1.
At each zone where Door Action is enabled (Zone 1 or 2), you will
hear a high-low cadence, sounding once for Zone 1 (Door 1), and
twice for Zone 2 (Door 2). This tone repeats every five seconds for
half a minute, unless the user answers the door.
The first iteration of the Door Alert tone is also played over the
speaker of the active door. If no Door Alert tone is heard at the
Doorspeaker the PagePac is busy. The user at the door should wait
and try again.
The Ring Down is triggered by
either a doorbell or a door ajar
condition.
Station Mode only.
If no answer, Doorspeaker will
automatically hang up after 30
seconds.
7-4 Operating Procedures
2.
Answer the Doorspeaker by dialing into the system. (See step 1 of
the Paging Procedure, page 7-2.)
If Door Alert is in progress, you will hear a door identification tone in
your telephone receiver (one beep for Zone 1 (Door 1), two beeps for
Zone 2 (Door 2)), before being connected to the speaker of the active
door.
Ring Down Mode:
If the Door Action option has been configured for Ring Down:
1.
Someone rings the door bell.
Refer to Section 6 for programming Doorspeaker Alert Extensions.
The Doorspeaker Alerf Extensions that have been programmed on
the PARTNER switch will ring. The Doorspeaker tone will be heard
at the Doorspeaker speaker.
Pick up the ringing extension to answer the door.
2.
Page 60

Door Ajar
Door Alert Mode:
The Door Alert signal is triggered
by either a door bell or a door
ajar condition.
If you acknowledge the Door Ajar
condition, no further alert will
occur until the door is closed.
The Ring Down is triggered by
either a door bell or a door ajar
condition.
Refer to Section 6 for
programming Doorspeaker Alert
Extensions.
If the Door Action option has been configured for Door Alert
1.
A door has been opened, but not closed within 30 seconds. A Door
Ajar is detected.
At each zone where Door Alert is enabled (Zone 1 or 2), you will hear
a high-low cadence, sounding once for Zone 1 (Door 1), and twice for
Zone 2 (Door 2). This tone repeats every five seconds for half a
minute, unless the user acknowledges the Door Ajar condition (or the
door is closed).
2.
Dial into the system. (See step 1 of the Paging Procedure, page 7-2.)
If Door Ajar is in progress, you will hear a door ajar tone in the
telephone receiver (a constant rising and falling tone, or siren).
3.
Acknowledge the Door Ajar condition by entering any touch-tone digit.
You will hear a door identification tone (one beep for Zone 1, two
beeps for Zone 2) before being connected to the speaker of the
active door.
If you hang up without acknowledging the Door Ajar condition, the
alert will be repeated after 30 seconds.
Ring Down Mode:
If the Door Action option has been configured for Ring Down:
1.
A door has been opened, but not closed within 30 seconds. A Door
Ajar is detected.
The Doorspeaker Alert Extensions that have been programmed on
the PARTNER switch will ring.
2.
Pick up the ringing extension to answer the door.
If Door Ajar is in progress, you will hear a door ajar tone in the
telephone receiver (a constant rising and falling tone, or siren).
Acknowledge the Door Ajar condition by entering any touch-tone digit.
3.
You will hear a door identification tone (one beep for Zone 1, two
beeps for Zone 2) before being connected to the speaker of the
active door.
If you hang up without acknowledging the Door Ajar condition, the
ringing will be repeated after 30 seconds.
Operating Procedures
7-5
Page 61

Door Unlock
NOTE: Silent Monitor can only
be programmed if configured for
Dry Loop or Trunk Adapter Mode.
Any time you are connected to a door zone—whether in response to a
Door Bell or Door Ajar condition, or as a result of paging to a DoorSpeaker
in Silent Monitor mode (see below)—you may operate the door strike plate
if one has been installed:
The default for this code is
[
O
] [ P ] [ E ] [ N ].
Silent Monitor
NOTE: If used in Station Mode,
silent monitor will cut off after
2 minutes. (The system hangs up
after 30 seconds if no activity is
detected.)
Enter the Door Unlock Code on the phone keypad.
1.
The system will activate the control pair on the zone for four seconds,
or until it detects that the door has been opened and closed.
This Doorspeaker feature allows for silent monitoring of a Doorspeaker
zone:
Make a single-zone page to a Doorspeaker zone: follow steps 1 and
1.
2 from Paging Procedure, page 7-2.
The Pre-Announcement Tone will be suppressed. You can monitor
conversation at the Doorspeaker zone.
You can speak into the telephone transmitter, or listen to someone
2.
speaking at the Doorspeaker zone. (One person can speak at a
time; the person speaking into the telephone will take precedence
over the person speaking at the Doorspeaker zone.)
3.
Hang up the telephone.
Remote Amplifier Mode
Music/Page levels are adustable.
Door Bell/Door Ajar inputs are
ignored (see Figure 3-3).
This mode is intended for connecting a primary paging zone to a paging
amplifier. A Remote Amplifier zone provides the same paging features as
a Page/Speaker zone, except that the audio pair has a 0.655 Vrms output
(default Level 2), and the system closes the relay on the control pair when
presenting a signal (Page, Tone, or Music) on the audio pair, and opens
relay contacts when the zone is idle.
Auxiliary Paging Zone
Zone 3 of the PARTNER PagePac system is called the Auxiliary Paging
Zone. This zone is intended for connection to a paging amplifier. The
audio pair provides a nominal 0 dBm signal to the audio inputs of an
amplifier. The Auxiliary Paging Zone operates in the same fashion as a
Primary Paging Zone configured in Remote Amplifier Mode, as described
above. The main difference is that Zone 3 does NOT provide Talkback or
an on-board paging amplifier. The Auxiliary Paging Zone ignores the Door
Bell and Door Ajar inputs.
7-6 Operating Procedures
Page 62

Input Priorities
Each input to the PARTNER PagePac system has its own priority. If more
than one input is active at the same time, the signal with the highest
priority will take precedence over all the others. In addition, if a
higher-priority input becomes active while a lower-priority input is being
processed, the PARTNER PagePac system will abandon the lower-priority
input in favor of the higher-priority input.
The input priorities, from highest to lowest, are as follows:
■
Microphone input
■
Station input
■
Door input
■
Night Bell input
■
Music input
IMPORTANT:
Input Priority
Considerations
Door Waiting — If a user is making a telephone page and someone
presses a door button, the PARTNER PagePac module will provide one
beep for Door 1 and two beeps for Door 2 in the telephone receiver. The
user at the telephone may dial the [
to the door and disconnect from current page.
Microphone/Telephone Page — a microphone page is in progress and
someone calls in over the telephone interface, the PARTNER PagePac
module will generate a busy signal in the telephone receiver.
Microphone Pages — A microphone Page has priority over a telephone
page. If a telephone page is interrupted by a microphone page, the
telephone user will hear eight seconds of busy signal in the receiver, and
should hang up.
Door Alert Tone — If the PARTNER PagePac module is busy (a
higher-priority input is active or another Doorspeaker is in use), a person
at a door will not hear the Door Alert tone until the PARTNER PagePac
module is no longer busy.
# ] key (within 15 seconds) to connect
Operating Procedures
7-7
Page 63

Troubleshooting
In Case of Difficulty
A
If you have a problem with your system, you may be able to solve it
yourself by following the appropriate troubleshooting procedures described
in this appendix. If you still need help, In the U.S., AT&T provides a
toll-free customer help line 24 hours a day at 1-800-628-2888. For
assistance in Canada, contact your local AT&T authorized dealer.
If you call, have the following information ready so that the representatives
can better help you:
The kind of system you have and release number, if present (for
■
example, PARTNER Plus, Release 2).
In addition to the PARTNER PagePac Module, provide the number of
■
206 or other expansion modules, and any other information on the
labels in the center of the modules.
■
The number of line and extensions in your system.
If you followed a troubleshooting procedure and need more help, tell the
representative what you did.
Operation During a Power Failure
System phones will not work during a power failure—you must use a
standard touch-tone or rotary telephone. For more information about
setting up your system for a power failure, see Preparing for a Power
Failure in Chapter 2 of the PARTNER System manual.
The system maintains settings for approximately 100 hours (four days)
after it stops receiving power. After 100 hours without power, all settings
return to the factory settings. The PARTNER PagePac Module, however,
maintains settings indefinitely.
A-1 Troubleshooting
Page 64

Troubleshooting
The charts below and on A-3 describe various problems that can occur,
possible causes for each problem, and steps you can take to try to solve
the problem yourself.
Table A-1. Troubleshooting Guide
Problem
Nothing Works
No Sound From One Or
More Speakers In Any Zone
While Others Work.
Music Does Not Work, But
Paging Does.
Corrective Action
Check power LED
Ensure power cord has been attached.
Check volume control on problem speaker(s).
Check page volume level setting (see
Programming Section 6).
Check all connections to speakers.
Check wire to speakers
Replace bad speaker with good one. If speaker
cannot be replaced immediately, wire around it
to ensure service to the remaining speakers.
View Zone Error LEDs while making a page.
This could indicate possible short in speaker
wiring.
NOTE: Look for a mix of voice coil and 70 volt
speakers. Replace all 70 volt speakers with
voice coil type.
Check music volume level setting (see
Programming Section 6).
Ensure music is turned on for appropriate zones.
A-2 Troubleshooting
Do Not Hear Page.
Adjust volume control on music source.
Ensure that the power supply to the music
source is plugged in and if an outlet is used,
ensure outlet has power.
Check music source.
Check all connections and wire.
Ensure there is power to paging unit. LED is on.
Check that zone type is correct. (See
Programming Section 6.)
Check all connections and wire.
Check for correct speakers. The correct speaker
should be a voice coil type only.
Verify page input with Craft Test Set TS22 or
equivalent.
Page 65

Table A-1. Troubleshooting Guide (continued)
Problem
No Talkback or Very Low
Volume.
No Talkback Warning Tone.
Door Speaker Dead.
Door Ajar Inopcrative. Verify door ajar switch contacts remain open
Do not Hear Door Attention Verify that the “DOOR ACTION” option is set
Tone Over Paging System
When Door Phone Button
Pressed.
Door Ajar Signals
Continuously.
Verify talkback is enabled. (See Programmmg
Section 6.)
Verify Talkback Warning Tone has been
enabled.
Check all connections and wiring.
Verify zone is programmed for door operation
(see Programming Section 6).
Check Zone Overload LEDs while paging.
Ensure correct Doorspeaker type is installed
(NO LED on face plate).
during open door period.
Check wiring from door switch to PagePac.
for “DOOR ALERT” for the Doorspeaker zone,
and that “DOOR ALERT’ is enabled for the
Paging zones. (See Programming Section 6.)
Door ajar switch stuck open or wiring from
switch to PagePac module open.
If door ajar feature not required, verify door ajar
pair strapped together.
Corrective Action
Door Unlock Code Returns Incorrect door unlock code entered. Check with
Error Tone.
Unable to Select Zone.
Poor Talkback or Noisy Ensure speaker does not run near bad electrical
Talkback.
Paging and Music are
Garbled.
system administrator for correct code.
Door alert not activated.
Verify zone is enabled in “STATION PAGE
ENABLED” section.
circuits, fluorescent light fixtures, electric
motors, etc.
Check speaker wire for shorts.
Look for staples driven through wire.
Check all connections.
Ensure that there are not too many speakers on
run or zone.
A-3 Troubleshooting
Page 66

Secondary Circuit Protection
Important Information
This equipment is for use on telephone wiring containing a secondary
circuit protector. This paging equipment requires a Harris Dracon model
22060-930 PageGuard® or AT&T IROB (PEC 60612) Secondary Circuit
Protector where applicable (see Figure B-1).
The secondary circuit protector must be located between the primary
protector and the paging equipment. Refer to the Important Safety
Information and lnstallation Steps below.
B
Important Safety Information
■
The PageGuard is used when connecting paging equipment directly to
telephone lines that may be exposed to high voltage power lines.
■
Never install telephone wiring during a lightning storm.
■
Never install telephone jacks in wet locations unless the jack is
specifically designed for wet locations.
■
Never touch uninsulated telephone wires or terminals unless the
telephone line has been disconnected at the network interface.
■
Use caution when installing or modifying telephone lines.
B-1 Secondary Circuit Protection
Page 67

Installation Steps
Save these Instructions.
TELCO
DEMARCATION
CO LINES
PROVIDED
BY
TELCO
1.
Install the PageGuard module plug to the CO telephone lines (see
Figure B-2).
2.
Connect the green wire on PageGuard to earth ground.
3.
Plug a modular connector from the paging equipment telephone line
interface to the modular connector on the PageGuard.
PROVIDED
BY
TELCO
MAIN BUILDING
PAGING
EQUIP.
PROTECTION LOCATIONS
A = PRIMARY CIRCUIT PROTECTOR
B = SECONDARY CIRCUIT PROTECTOR
BUILDING #2
PAGING
EQUIP.
PAGING
EQUIP.
U.L SPECS
497
497A
Figure B-1. Example Confirmations Requiring Secondary Protection When Paging
Equipment is Connected Directly to the Telephone Network.
B-2 Secondary Circuit Protection
Page 68

TELEPHONE EQUIPMENT
CONNECTED TO NETWORK
CONNECT GREEN WIRE
TO EARTH GROUND
CONNECT MODULAR PLUG
TO TELEPHONE LINES
(i.e., PBX/KTS/CENTREX)
OUT TO
SPEAKERS
PAGEGUARD
(P/N 22060-930)
NOT INCLUDED
Figure B-2. PageGuard Installation.
PAGING
EQUIPMENT
(POWERMATE)
TO INPUT SIDE OF
PAGING EQUIPMENT
PGEGRD.DRW 10/22/91
B-3 Secondary Circuit Protection
Page 69

FCC and Warranty Information
FCC Statement (Part 68)
Component registration for the PARTNER PagePac module has been
applied for from the Federal Communications Communication (FCC) in
accordance with Part 68 of its Rules. Located on this equipment is a label
that contains, among other information, the FCC registration number. If
requested, this information must be provided to the telephone company.
C
Registered equipment may not be used with Coin Telephone Lines.
Equipment may be used with Party Lines in areas where state tariffs
permit such connections and when equipment is adaptable for such
service.
If trouble is experienced, the equipment should be disconnected
(unplugged) from the interface to determine if this equipment, the host
equipment, or the telephone line is the trouble source. If this equipment is
determined to be malfunctioning, it should not be reconnected until repairs
are effected.
Connection to host equipment is via a 6-position modular jack (74D
Connecting Block). Equivalent connections may be used. This equipment
is designated to be installed in a foolproof manner. Permission of the host
equipment owner, who may determine the means of connection, is
required for connection.
Repairs to this equipment, other than routine repairs, as stated in the
Service Manual can be made only by the manufacturer or its authorized
agents.
If the equipment causes harm to the telephone network, the local
telephone company may temporarily discontinue your service and, if
possible, notify you in advance. If advance notice is not practical, you will
be notified as soon as possible. You will be given the opportunity to
correct the problem and informed of your right to file a complaint with
the FCC.
C-1 FCC and Warranty Information
Page 70

The local telephone company may make changes in its facilities,
equipment, operations, or procedures that could affect the proper
functioning of your equipment. If they do, you will be given adequate notice
in writing to allow you an opportunity to maintain uninterrupted telephone
service.
FCC Registration (Part 15)
Radio Frequency Interference
The PARTNER PagePac module generates and uses radio frequency
energy and if not installed and used in strict accordance with the
manufacturers instructions, may cause interference to radio and television
reception. Testing is being conducted for compliance with the limits for a
Class A device in accordance with the specifications in Subpart J of Part
15 of the FCC Rules. This testing is designed to provide reasonable
protection against such interference. However, there is no guarantee that
interference will not occur in a particular installation If this equipment does
cause interference to radio or television reception, which can be
determined by turning the Power to the unit off and on, the user is
encouraged to try to correct the interference by one or more of the
following measures:
■
Reorient the radio or TV receiving antenna.
■
Relocate the PARTNER PagePac unit with respect to the radio or
TV receiver or vice-versa.
■
Plug the PARTNER PagePac unit into a different outlet so that it
and the radio or TV receiver are on different branch circuits.
If necessary, the user should consult the dealer or an experienced
radio/television technician for additional suggestions. The user may find
the following booklet, “How To Identify and Resolve Radio-TV Interference
Problems,” helpful. This booklet was prepared by the Federal
Communications Commission (FCC) and is available from the U.S.
Government Printing Office, Washington, DC 20402. Stock order No.
004-000-00345-4.
C-2 FCC and Warranty Information
Page 71

Warranty Information
Limited Warranty and Limitation of Liability
AT&T warrants to you that the product will be free from defects in material and workmanship when title
passes to you. If you notify AT&T that the product has failed to operate as warranted within one year of the
date title passes to you, AT&T will, at its option, repair or replace the component or components of the
product that failed to operate as warranted. Any repair or replacement components may be new or
refurbished and will be provided on an exchange basis. If AT&T determines that the product cannot be
replaced, AT&T will refund the purchase price to you. If you purchased the product directly from AT&T,
AT&T will perform warranty repair on your premises in accordance with the terms and conditions of AT&T's
"Business Day“ or "Around-the-Clock” warranty plans. The details of AT&T's warranty plans may be
obtained from AT&T. If you purchased the product from an authorized dealer, you will be covered by AT&T’s
authorized dealer warranty plan during the warranty period. Contact your authorized dealer for details of
AT&T's authorized dealer warranty plan. AT&T’s obligation to repair, replace or refund as set forth
above is your exclusive remedy.
The limited warranties provided above do not cover damages, defects, malfunctions or product failures
caused by:
■
Failure to follow AT&T's installation, operation or maintenance instructions;
■
Unauthorized modification or alteration of the product or its components;
■
Product abuse, misuse or the negligent acts of persons not under the reasonable control
of AT&T;
■
Actions of third parties and acts of God other than power surges (e.g., lightning).
This limited warranty applies only to the product purchased directly from AT&T or purchased directly from an
authorized AT&T dealer. This limited warranty does not apply to products purchased or operated outside the
United States. You may be required to provide AT&T with proof of purchase before AT&T will perform any
warranty repair or provide any warranty replacements.
EXCEPT AS SPECIFICALLY SET FORTH ABOVE, AT&T, ITS AFFILIATES, SUPPLIERS AND DEALERS
MAKE NO WARRANTIES, EXPRESS OR IMPLIED, AND SPECIFICALLY DISCLAIM ANY WARRANTY OF
MERCHANTABILITY OR FITNESS FOR A PARTICULAR PURPOSE. EXCEPT FOR PERSONAL INJURY, THE
LIABILITY OF AT&T, ITS AFFILIATES, SUPPLIERS AND DEALERS FOR ANY CLAIM, LOSS, DAMAGE OR
EXPENSE FROM ANY CAUSE WHATSOEVER, REGARDLESS OF THE FORM OF THE ACTION, WHETHER
IN CONTRACT, TORT OR OTHERWISE, SHALL NOT EXCEED THE LESSER OF DIRECT DAMAGES
PROVEN OR THE REPAIR OR REPLACEMENT COST OF THE SYSTEM OR THE SYSTEM’S PURCHASE
PRICE. IN NO EVENT SHALL AT&T, ITS AFFILIATES, SUPPLIERS AND DEALERS BE LIABLE FOR
INCIDENTAL, RELIANCE, CONSEQUENTIAL OR ANY OTHER INDIRECT LOSS OR DAMAGE (INCLUDING
LOST PROFITS OR REVENUES SUSTAINED OR INCURRED IN CONNECTION WITH THE SYSTEM). THIS
LIMITATION OF LIABILITY SHALL SURVIVE FAILURE OF THE EXCLUSIVE REMEDY SET FORTH IN THE
LIMITED WARRANTY ABOVE.
Installation and Maintenance Information
There are several types of installation and maintenance plans available from AT&T and/or your dealer.
Please call your AT&T sales representative or authorized dealer for details.
For warranty service, contact your AT&T representative or authorized dealer.
C-3 FCC and Warranty Information
Page 72

Index
A
AC power
Connecting to
AC power cord
Accessory features
Amplifier levels
To change
Amplifiers
PagePac amps
ASCAP
Audio pair
Automatic privacy
Auxiliary amplifier
Auxiliary amplifier zone
Auxiliary equipment
Auxiliary paging zone
B
Before you start
BMI
Bracket
Wall mount template
C
C.O. lines
C.O. telephone lines
Cable connections
Configuration complete tone
Configuration information
Configuration tone
Confirmation tone enabled
To change
Connect password
To change
Connection block wiring
Diagram
Connection blocks
Contact closure
2-7
2-7
5-1 - 5-5
6-8
1-4
1-2
4-3
2-12
1-3
1-2
1-4
7-6
2-3
1-2
2-5
2-9
2-12
B-2
2-11
6-7
2-4
6-6
6-2, 6-4
6-6
6-2, 6-4
6-6
3-6
4-3
5-4
D
Default settings
By zone type 6-5
Difficulty
Direct line pickup
Door action
Door action programming
To change
Door ajar
Pair wires
Door alert enabled
To change
Door alert mode
Door alert tone
Input priority 7-7
Door bell
Door control
Door input
Input priority
Priority level
Door unlock code
To change
Door waiting
Input priority
Doorspeaker alert extensions
Doorspeaker
Diagram
Doorspeaker
Installation diagram
Doorspeaker button
Doorspeaker mode
Operating procedures
Dry loop
Considerations
Dry loop mode
Programming
E
Electronic strikeplate
Error LEDs
Error tone
1-4 - 1-5, 4-2, 4-6, 7-4, 7-6
2-12, 2-15
6-3 - 6-4, 7-5
6-2, 6-4, 7-6
A-1
6-7
4-2, 7-5
4-3
6-3 - 6-4
6-8
4-2, 7-4
7-4
7-4
1-2
7-7
2-15
6-6
7-7
7-5
4-2
4-3
4-2
3-2, 4-5
7-4
2-12
2-11, 4-2
6-5
4-2
1-3
6-7
IN-1
Page 73

Extension port
External music source
Connections diagram
F
Factory default settings
Connect password
Door unlock code
Pre-announcement tone enabled
Programming password
Reset
Talkback warning tone enabled
Zone options
FCC and warranty information
FCC information
FCC registration
Part 15
FCC statement
Part 68
Features
Features and capabilities
Feedback form
G
Green LED
Group extensions
Night bell service
H
Hands free
Help line
How to comment on this guide
Feedback Form
How to use this guide
I
Important safety instructions
Input / outputs
Input priorities
Considerations
Installation
Clearance
Interface mode connections
Module
Page/Speaker mode
Trunk adapter mode
Installing a music source
Interface connections
2-1 - 2-7, 2-9, 2-11 - 2-15
2-11
5-2
6-4
6-4
6-4
6-4
6-4
6-4
6-4
C-1 - C-3
C-2
C-1
1-3
1-2
vi
2-7
6-9
3-2
ii, A-1
vi
vi
2-2
1-3
2-15, 7-7
7-7
2-6
2-13
2-4
3-1 - 3-8
2-14
5-2
2-13
Interface mode
Cable connections
Dry loop/station/ and trunk
adapter modes
Selecting
Station mode
Trunk adapter mode
IROB
L
Limited warranty
Limitation of liability
Line ringing
Night bell service
ii
M
Microphone
Access for paging
Input priority
Microphone attendant access
Microphone connections
Diagram
Microphone input
Priority level
Microphone page
Microphone Page enabled
To change
Telephone page
Input priority
Module components
Modules
Available
Mounting
v
Flat onto wall
Onto table or desk
Music enabled
To change
Music input
Input priority
Priority level
Music level
Background
N
Network interface
Night bell
Appropriate station port
Extension
2-11
2-11
2-11
2-11
2-11
B-1
C-3
6-9
1-4
5-4
7-7
1-2
5-4
1-3
2-15
7-3
6-3 - 6-4
6-8
7-7
1-3
2-4
2-6
2-6
6-3 - 6-4, 7-4
6-8
1-2 - 1-3
7-7
2-15
6-3 - 6-4
5-3
1-1
1-2
5-5
5-5
IN-2
Page 74

Port
Programming procedures
Night bell
Installation diagram
Service
Night bell enabled
To change
Night bell input
Input priority
Priority level
Night bell service
On/off
Night service button
Diagram
O
103A connection block
Diagram
Operating procedures
Ordering information
Overview
P
Page port
Page/speaker mode
operating procedures
Page/tone level
Page/tone level programming
To change
PageGuard
Installation
Pages
Limited to
Paging access
Paging procedures
Dry loop, station, and trunk
adapter mode
PARTNER carrier
Open slot
PARTNER communications system
Plus/II
PARTNER II
PARTNER PagePac
Maintaining settings
Mounting flat onto wall
Mounting onto desk or table
PARTNER PagePac connections
5-5
6-9
5-5
5-5
6-3 - 6-4
6-8
7-7
2-15
1-3, 7-3
6-9
6-9
4-3
7-1 - 7-7
ii, 1-4
1-1 - 1-5
2-11, 2-13
7-2
6-3 - 6-4
6-7
B-1
B-2
2-12
3-2
7-2
2-4
2-4, 2-12
1-2, 2-2
A-1
2-6
2-6
Diagram
PARTNER PagePac module
Features
Installation
Mounting bracket
PARTNER PagePac Trunk Adapter
PARTNER Plus
PARTNER Plus system
PARTNER system phone
PARTNER II system
Pass DTMF to zone
Pass DTMF to zones enabled
To change
PFT (power failure transfer)
Phone system
Configured
Power failure
Operating during
Power failure transfer
Power supply
Pre-announcement tone
Enabled
To change
Primary paging zones
Operating procedures
Zones 1 and 2
Product safety labels
Programming
Overview
Programming mode dial tone
Programming options
Programming password
To change
Programming procedures
For dry loop, station, and trunk
adapter mode
Q
Quick test
Doorspeaker equipment
Dry loop mode
Paging to loudspeakers
Station mode
Trunk adapter mode
R
Radio frequency interference
Reference materials
3-3
1-3
2-4
2-5
2-14
1-2, 2-2
5-5
2-3
5-5
6-3 - 6-4, 7-4
6-8
2-12
2-4
A-1
5-5
2-14
7-6
6-2, 6-4
6-6
1-2
7-2
3-2
vi
6-1 - 6-10
6-2
6-6, 6-7
6-2
6-2, 6-4, 6-7
6-6
6-5
4-5
4-5
3-7
4-5
4-5
C-2
vi
IN-3
Page 75

Ordering
Remote amplifier mode
Remote doorspeaker
Diagram
Remote volume adjust
Reset to factory defaults
Ring down mode
Programming procedure
Ring down mode considerations
Ringdown mode
S
Safety Instructions
Installation personnel
Secondary circuit protection
Shipping carton contents
Diagram
Silent monitor
Silent monitor mode
66-type block
Speaker run methods
Diagram
Speaker/page mode installation
Speakers
Voice coil
Specifications
Specifications
Dimensions and weight
Environmental
Phone company information
Standard touch-tone phone
Station input
Input priority
Priority level
Station interface
Station mode
Considerations
Programming
Station page enabled
To change
Station port
STN l/N port
Connections
Support telephone numbers
Helpline
System options
System programming options
System programming procedure
vi
3-2, 7-6
4-4
1-2
6-2, 6-6
6-3, 7-4 - 7-5
6-10
6-10
4-2
2-2
1-1 - 1-3
2-3
2-3
7-6
6-2 - 6-3
4-3
3-5
3-1 - 3-8
3-2
1-4
1-5
1-5
1-5
1-5
2-3
7-7
2-15
1-3
2-11, 4-2, 6-3
2-12
6-5
6-3 - 6-4
6-8
2-13
2-11, 2-13, 2-15
2-14
6-2
6-2
Change options
System phones
T
Talkback enabled
Talkback
Capabilities
Talkback enabled
To change
Talkback mode
Talkback warning tone
Enabled
Talkback warning tone enabled
To change
Telephone access
Dry loop/station /and trunk
adapter modes
Telephone lines
Telephones
PARTNER system and standard
touch-tone
Template
Wall mount
Touch-tone phone
Use during power failure
Trademarks
Troubleshooting
Troubleshooting guide
Trunk adapter
Trunk adapter mode
Connections
Considerations
Programming
Trunk port
Type of zone
Type of zone programming
To change
V
Voice coil speakers
Volume adjustment
Page/music
Volume level
Diagram
ii
W
Wall mount template
Warranty
1-2, 2-14, 4-2
6-6
8-1
6-4
1-2, 6-2
3-2
6-3
6-8
7-3
6-2
6-4
6-6
1-2, 2-15
2-15
B-1
2-3
2-9
8-1
ii
A-1 - A-3
A-2
2-11
2-14
2-12
6-5
2-13
6-3
6-7
1-4, 3-2
5-3
5-3
2-9
IN-4
Page 76

Installation and Maintenance
Warranty information
Wiring
Z
Zone
Type
Zone 1 and zone 2
Zone options
Zone overload warning
Zone programming options
Zone programming procedure
C-3
C-3
2-2
6-4
1-3
6-2
1-2
6-3
6-7
IN-5
 Loading...