

Page 1

User's Manual
for Cordless Digital Answering
AT&T
Fold open this manual for information about this
telephone's installation and operation. Please read
Part 1 — Important Product Information, included
rn -v'-.i/r .> •,'l-nr'!'
System Teleniione 7650
© 1996 Lucent Technologies Inc. All rights reserved.
AT&T and the globe symbol are trademarks of AT&T Corp. licensed to Lucent Technologies Inc.
Parti
Printed in Mexico. Issue 2
Page 2
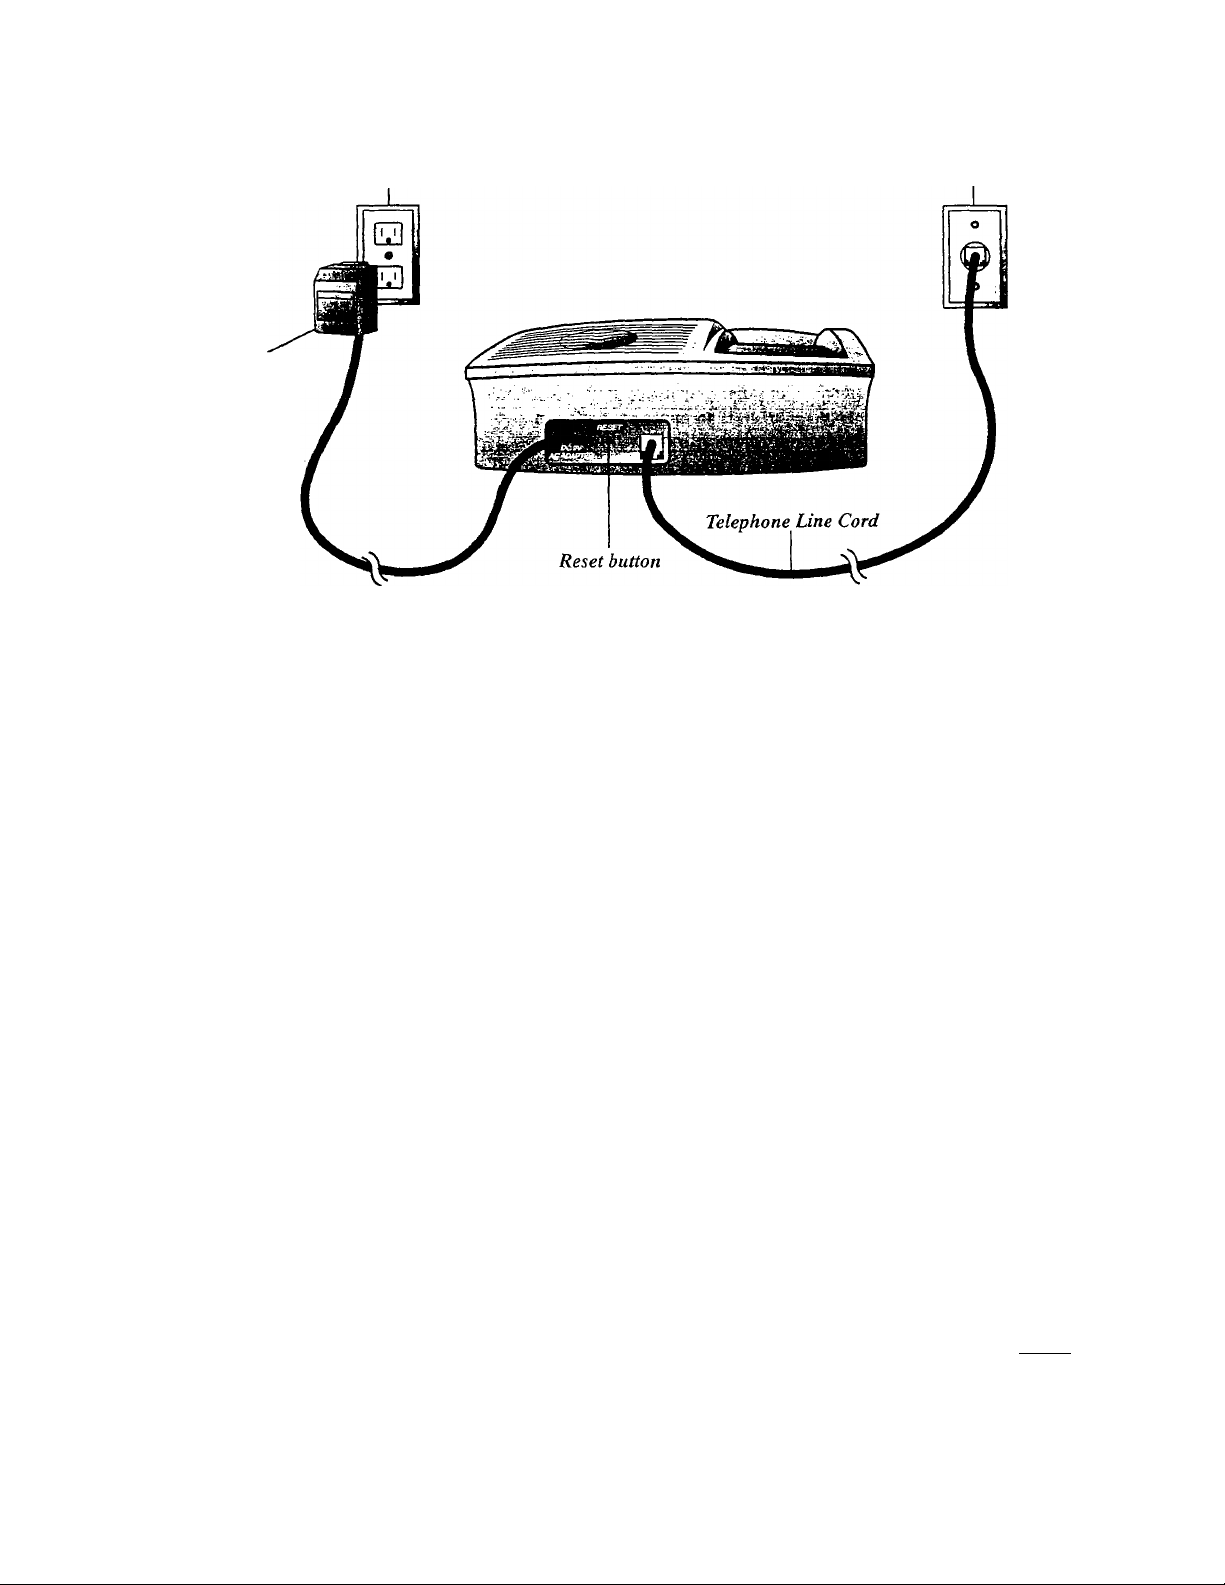
IHSTBllATION
AC Adapter
Standard AC Outlet
Modular Wall Jack
TABLE INSTALLATION
Choose a spot near an electrical
outlet and a telephone jack.
••This phone requires a modular
telephone jack and a standard
electrical outlet (1 lOV AC).
• The outlet should not be con
trolled by a wall switch; if the
switch is turned oif, the phone will
not operate.
Install the handset battery.
••Remove the battery case cover on
the handset by pressing on the
indentations and sliding the cover
downward.
••Plug the battery pack cord into the
handset and rest the cords on top
of the battery pack.
••Replace the cover by sliding it
on its track up over the banery
compartment until it snaps
firmly in place. (For an illustra
tion of battery installation, see
"BATTERIES.")
Install the base battery.
••Turn the unit over.
••Open the battery cover by gently
pulling on the movable tab,
••Connect the 9-volt battery and
place it in the compartment.
••Close the battery cover.
Set the dial mode switch on the
bottom of the base to TT if you have
touch tone service, or DP if you
have dial pulse/rotary service.
Set the ringer switch.
Set the switch to ON (the handset
will ring) or OFF (the handset will
not ring).
Connect the telephone line cord.
Plug one end of the telephone line
coru into ihe jack on me top side
of the base. Plug the other end of
the line cord into a modular jack.
Make sure the plug snaps firmly in
place.
7 Plug in the power cord.
Plug the AC adapter on the power
cord into an electrical outlet.
NOTE: When you connect the unit to
an electrical outiei. the system automati
cally besins to format (initialize)
digital memory. The memory format
routine takes approximately S seconds.
While the system formats memory, the
.VIessage Window counts down from S
to 0.
8 Charge the handset batteries for
4 hours.
Place the handset in the base. The
CHARGING light on the base
goes on to show the handset is in
the right position to charge the
DcUtcncs.
9 Check for dial tone.
After the batteries are charged,
pick up the handset and extend the
base antenna. Press Thone ; the
PHONE light should go on and you
should hear a dial tone.
Page 3

INSTALLATION
PHONE light goes on while
handset is on a call.
CHARGING light goes on while
handset battery is charging.
Base Antenna
(extended)
LO ВАТТ BASE goes on when
base battery power is low.
Directory Card
Message Alert
Ringer Switch
WALL M0UNTIN8 INSTALLATION
1 Follow Steps 1-5 in TABLE
INSTALLATION.
2 Choose and mark the mounting
position.
The mounting screws should screw
into a wooden smd within the wall.
Use the Wall Mounting Template
and a pencil to mark the screw
positions on the wall.
3 Install the mounting sleeves and
screws.
Start the screw holes in the marks
you made on the wall. Now slip
the mounting sleeves onto the
screws, with the larger end of the
sleeve toward the screw head.
'i c .iCrc '.'S ill i''c I’c’ y~".
started, and tighten until the smaller
end of the sleeve is flat against the wall.
4 Reverse the switchhook.
In order to "hang up" the handset
when the base is wall mounted,
you'll need to remove the
switchhook, reverse it, and replace
it Lii die bci^e.
Ring Select
Connect the telephone line cord.
Plug one end of the telephone line
cord into the jack on the top side of
the base. Plug the other end of the
line cord into a modular jack. Make
sure the plug snaps firmly in place.
Mount the base on the wall.
Hold the base so the mounting
sleeves on the wall fit into the holes
on the bottom of the base. Slide
the base down onto the mounting
sleeves until it locks into place.
Follow Steps 7-9 in TABLE
INSTALLATION.
Use CLOCK with CHANGE to
set or change time/day.
Use ANNC with CHANGE to
record outgoing announcement.
Use CHANGE wUh
CLOCK and ANNC.
Page/Find
Setting the Clock
The clock feature will record the day and
time of each message received.
To set the clock
1 Press CHANGE. then clock'. You hear
a day of the week.
2 Press REPEAT' or FORWARD'. Until yOU
hear the correct day.
3 Press CLOCK to hear the hour.
4 Press REPEAT or FORWARD Until yOU
hear the correct hour. Make sure
the hour is correct for AM or PM.
5 Press CLOCK' to hear the minute.
6 Press REPEAT or FORWARD Until yOU
hear the correct minute.
7 Press CLOCK . You will hear the day
and time setting.
To review the clock
• Press CLOCK. You will hear the day
and time settins.
Page 4

BATTERIES
CAUTION: To reduce the risk
of fire or injury to persons or
A
damage to the telephone, read and fol
low these instructions carefully.
• For the handset, use only the
battery provided with this
phone, or AT&T Replacement
Battery 4051.
• Do not dispose of the battery in a
fire. The cell might explode.
• Do not open, puncture or mutilate
the battery. Released electrolyte is
corrosive and might cause damage
to the eyes or skin. It might be toxic
if swallowed.
Charging the Handset
Battery Pack
You’ll know the batteries need charging
when:
• The phone beeps four times when
you press IPHONE! .
• The LOW BATTERY light on the
handset is on.
• The phone does not respond when
you press IPHONE', and no lights go on.
installing/Replacing
the Battery Pack
1 Remove the battery case cover on
the handset by pressing on the
indentation and sliding the cover
downward.
2 Lift out the old battery pack and
unplug it from the handset.
3 Hold the new battery pack and
plug the cord into the handset.
Place the battery pack in the case
so the cords rest on top of the
battery pack.
4 Replace the cover by sliding it on
its track up over the battery case
until it snaps firmly in place.
5 The new batteries must be
charged before using the phone.
Place the handset in the base and
allow it to charge for 4 hours. The
telephone might operate before that,
but for best performance, let the
handset batteries charge fully.
Battery Case
Installing/Repiacing
the Base Battery
The base battery provides backup power
to retain memory in case of power
failure.
1 Turn the unit over.
2 Open the battery cover located on
the bottom of the base, on the
upper right. Gently pull on the
moveable tab to open.
3 Connect a new 9-volt alkaline
battery and place it in the
compartment.
4 Close the battery cover.
IMPORTANT: Do not dispose of
batteries in household garbage. For
information about recycling or proper
disposal, consult your local solid waste
(garbage) disposal organization.
Place the handset in the base so the
CHARGING light goes on. The
batteries will be fully charged in 4 hours.
Once the batteries are fully charged, you
need only put the handset in the base
when the LOW BATTERY light goes on.
I/it’s more convenient for you, you
can leave the handset in the base all
the time. It is impossible to over
charge the batteries.
If you get a low-battery signal even
after 4 hours of charging, the battery
should be replaced.
Battery
Case Cover
Battery Pack
Page 5

TELEPHONE OPERATION
Making a Call
1 Press :PHONE', and wait for the
PHONE light to go on.
2 Vv lien you hear a dial toue. uiai liic
number. "
NOTE: You might experience a slight
delay before you hear a dial tone, as the
AutoSelect® feature searches fora clear
channel.
Answering a Call
If the handset is in the base, lift
the handset. The PHONE light goes
on, and the call is connected.
If the handset is away from the
base, press ¡phone . The PHONE
light goes on, and the call is
connected.
Ending a Call
If you are near the base, place the
handset in the base.
If you are away from the base,
press 'OFF .
Redial
Temporary Tone
If you have dial pulse (rotary) ser\'ice,
this feature allows you to enter codes or
tones needed to operate answering
machines, or use electronic banking
services, calling cards, and other special
services. This feature will operate most
special services; however, some serv'ices
may actually require a touch tone line.
To be sure, ask the company that
provides the special service.
1 Dial the call, then press ioiTeT.
Any buttons pressed after this send
tone signals.
2 After you hang up, the phone
automatically returns to dial pulse
(rotary) dialing.
NOTE: If you have touch tone sen’ice.
you do not need to use the Temporary
Tone feature.
Page
The Page feature allows you to signal
someone at the handset from the base.
• Press '.PAGEJFiW'. on the base. A 3-part
paging tone will sound at the
handset.
End a call:
PHONE light goes on
while you are on a calL
Answer calls and access
special subscriber calling
services requiring
switchhook flash.
Redial last call made.
Temporary Tone
The last number dialed on this phone is
stored in redial memory until you dial
another number.
1 Press iPHONEi. and wait for the
PHONE light to go on.
2 When you hear a dial tone, press
\REDIAU..
Special Telephone Services
If you subscribe to special local
telephone company services like Call
Waiting or Call Forwarding, you can
access them by pressing .phone, whenever
you would press the switchhook on a
regular phone.—This is like the Flash
button on some other phones.
Find
This feature is useful if you misplace the
handset.
To locate the handset using this
feature:
Press and hold pagejfind. on the base for
approximately three seconds. A
repeating paging tone is sounded in the
handset.
To cancel the Find feature, press W
on the handset or iPAGEF^m on the base.
NOTE: The Find feature will turn itself
off in approximately 3 minutes if you
haven't turned it off before then.
Page 6

MEMORY
ANS SYSTEM
light goes on while
Answering System
is accessed from
handset.
Access Answering
System Operation
from handset.
Change channels.
-Store or access
memory dialing
numbers.
LOW BATTERY light
goes on when battey
needs to be charged.
This cordless phone can store nine
telephone numbers that you can dial just
by pressing MEMORY: and one of the
number buttons.
Storing a Number In Memory
Make sure the handset is OIT.
; Press [MEMORY:. The PHONE light
flashes.
1 Enter the phone number (up to 16
digits).
4
Press '.MEMORY'.
Press any number button from
5
1 to 9 for the memory location
where the number is to be stored.
A three-part tone confirms that the
number was stored properly. If you
hear a long buzzing tone, or nothing
at all, press then follow the
steps above to store the number
again.
NOTE; You may choose to store
emergency numbers in memory locations.
The manufacturer assumes no
responsibility for customer reliance upon
this memory feature.
Dialing a Number in Memory
1 Press "PHONE'.
2 Press ■WMORf.
3 Press the number button (1-9) you
assigned to the number you're
calling.
Directory Card
There is a directory card with an erasable
surface located on the base to record
names or telephone numbers of the
iiLilVitJ-Ci.o Mi iiiCiiiv-xj i. .
To write on the card, remove the plastic
cover by inserting a pointed object in
the hole and prying the cover up until it
pops out.
NOTE: The numbers stored in memory
might be lost when you change the
handset batteries or if the batteries run
down completely; if this happens, you'll
need to store the numbers again.
Replacing a Stored Number
You can replace a stored number by
storing a new number in its place.
Storing a Pause
in a Memory Dial Number
If this phone is connected to a
switchboard, you might have to dial an
access number (usually 9) to get an
outside line. You can store the access
number and a pause in the dialing
sequence; the pause allows the
switchboard enough time to get an
outside line dial tone.
1 When storing a memory number
(see above), press and hold the
number button of the digit that
comes just before the pause, until a
second beep is heard. This inserts
a 2-second pause.
2 You can insert a longer pause by
continuing to press and hold the
number button of the digit that
comes before the pause. A beep is
heard for each 2-second pause
inserted.
NOTE: Each pause you store is counted
as a digit. You can store up to 16 digits
in each memory location.
For example, to store 9, PAUSE,
555-1234 in memory location 3:
Press MEMORY . Press and hold l ,
until a second beep is heard. Then
p_ p J X -i. -4. d.
MEMCm 1.
Page 7

OPERATING RANGE
This cordless telephone operates at the
maximum power allowed by the Federal
Communications Commission (FCC).
Even so, the handset and base can
communicate over only a certain
distance — which can vary with the
locations of the base and handset, the
weather, and the construction of your
home or office. For best performance,
keep the base and handset antennas fuUy
extended.
If you receive a call while you are out
of range, the handset might not ring —
or if it does ring, the call might not
connect when you press iPHONe-. Move
closer to the base, then press \phonei to
answer the call.
If you move out of range during a
phone conversation, you will hear noise
or interference. To improve reception,
move closer to the base.
If you move out of range without
pressing the phone will be left “off
the hook.” To hang up properly, walk
back into range, periodically pressing
until the PHONE light goes off.
Changing Channels
This cordless telephone has an advanced
25-channel AutoSelect® feature that
minimizes the chance of interference.
Every time you answer or make a call,
the AutoSelect feature automatically
searches for and selects a clear channel.
In the unlikely event you notice noise
or interference while using the handset:
1 Press \CHANNEL.
2 If the interference doesn't clear,
continue to press iCHANNEU, until you
find a clear channel (your call will
not be interrupted)
— OR —
Move closer to the base and press
\CHANNEU.
NOTE: You must be in range to change
channels. If you press channel while out of
range, you might lose the call. If you do
lose the call, place the handset in the base
for a few seconds, then make the call again.
Page 8

RNSWERIH6 SYSTEM OPERATION.
Answering System Operation from the Base
Mailboxes
This answering system has two voice
mailboxes which provide a convenient
way to share an answering system with
Vjllici illCillUCiS ut your UUUscilOid or
business. "
Callers can choose in which mailbox
they wish to leave a message by press
ing 'Q] or -2] on a touch tone phone after
the system answers. Callers not using a
touch tone phone can leave a message
in Mailbox 1.
Record an Announcement
1 Press {CHANGE'.
2 Press iANNC\. After you hear a
beep, record your announcement.
Speak in a normal voice, about 9
inches from the base unit, and avoid
background noise. Make sure you
tell your callers to press [ij to record
in Mailbox 1, and to press 2 to
record in Mailbox 2.
3 When you are finished, press ¡stopi .
Review Your Announcement
Press [mic'i. The recorded announce
ment will play until the end or until you
press isTOPi.
Ring Seiect/Toll Saver
This answering system has three Ring
Select choices: 2,4, and TS (toll saver).
Set to 2 if you want the system to
answer calls after the second ring.
Set to 4 if you want the system to
answer calls after the fourth ring.
Set to TS (toll saver) if you want the
system to answer calls after the second
ring when you have new messages, and
after the fourth ring when you do not
have new messages. On this setting,
when you call from another location for
messages, you can hang up after three
rings knowing you have no new
messages, thus saving on toll charges.
Automatic Answering Operation
The system is ready to answer calls
when it is turned on and the memory is
not full.
After playing your announcement and
sounding a beep, the system records
your caller’s message; it stops when the
caller hangs up or is silent for more than
7 seconds. Messages can be up to 2
minutes long. The system can store up to
10 minutes of announcements and
incoming messages.
NOTE: Callers can press 5; to bypass
the announcement after it begins.
Message Window
The Message Window displays the
total number of messages (up to 9). If
the Message Window is blank, the sys
tem is off and will not record messages.
Mailbox Lights
The light for a mailbox blinks when you
have new messages waiting in that
mailbox. The light is on steady when
you have old messages in the mailbox.
Message Alert
You can set the system to beep every 15
seconds to notify you when new
messages have been received. Set the
MESSAGE ALERT switch on the right
side of the unit to ON.
Message Volume Control
Use the message VOLUME control
( ) to adjust the sound of your in
coming messages. Move the control to
find a comfortable listening level. This
does not affect the level of the announce
ment heard by callers.
Listening to Your Messages
Press and release 'mailbox f or mailbox2':.
The system begins playing all messages
in the selected mailbox. Pause message
playback by pressing .stoP'. Press the
appropriate mailbox button or forward'
when you want to resume playback.
Save Your Messages
After you hsten to your messages, the
system automatically saves them, and is
ready to answer new calls.
Delete Messages
To delete all messages,
1 Press iDEterc:. Both mailbox lights
flash rapidly.
2 Press the appropriate mailbox
button. Only messages that have
been listened to will be deleted.
To delete a selected message, press and
release \DELete\ while the message is
playing. The system deletes the
message shown in the window, and
continues with the next message.
You can replay a deleted message
before the system announces "End of
messages." Press and release irepeat)
until the window displays the deleted
message you want to replay.
Repeat and Review Messages
If you want to hear a message again, tap
■REPEAT'. To return to an earlier message,
press and release ¡repeat' until the num
ber of that message is displayed. To
repeat part of a message (review), hold
down .REPEAT: for a few seconds, then
release it to resume playing. (The
system beeps while the button is held
down.)
Forward and Skip Messages
Press and release iForward^ to skip to the
next message. The window displays the
numbers of the messages.
To skip only part of a message (cue),
hold down I FORWARD for a few seconds,
the release it to resume playing. (The
system beeps while the button is held
down.)
To pause during a message, press and
release 'Stop':. To continue playback,
press MAILBOX 11 or mailbox 2:.
lo listen to new messages only, press and
hold the mailbox button for 1.5 seconds.
Page 9

ANSWERING SYSTEM OPERATION.
Answering System Operation from the Base
Stop message playback
or recording
Fonvard/Skip Messages
Record a memo
(with MAILBOX)
Message Alert
Repeat/Review Messages
Message Volume Control
Priority Calling
Callers to whom you've given the
Priority Calling Code will be able to
signal you that they are calling. Callers
must use a touch tone phone.
Your caller should
1 Dial your telephone number.
2 When the announcement begins to
play, press ;#! ;¥ (the Priority
Calling Code).
3 The system beeps three times, then
pauses. Both you and the caller can
hear the beeps. This is repeated
until you answer the phone.
Ring Select
1 If the handset is away from the
base, press \anssystem\ and wait for
the ANS SYSTEM light to go on.
2 You will hear you own announce
ment and the caller’s message.
3 To end the caU without answering,
press and release (off], or return the
handset to the base
— OR —
To pick up the call, press iphcwei. The
PHONE light will go on and the
answering system will stop. (If the
answering system doesn’t stop,
press IPHOWEI.I
Message Window
ON/OFF
Delete Messages
Mailbox 2
Mailbox 1
Microphone
1 On the base, tap ‘memo\.
2 Select mailbox n or \mailbox2 . The
system beeps.
3 Begin recording your memo.
4 Press :STPP! when you are finished.
(If the memory is full, or if you do
not select a mailbox within 15 sec
onds, the system sounds 5 beeps.)
Remote Access Code
The Remote Access Code is a 2-digit
security code which lets you access your
answering system remotely. The factory
setting is 50, but you can change this.
If you do not answer after 30 seconds,
the caller hears two beeps, indicating the
system is ready for another command.
The caller can then press 5 and leave a
message after the beep.
Call Screening/Call intercept
Call Screening lets you listen to your
incoming calls without answering the
phone. While screening a call, you can
also use the cordless handset or lift the
handset of any extension phone to talk
to the caller. When you intercept a call.
the system stops playing or recording,
and prepares to answer future calls.
Record a Message
When System is OFF
If you receive a call when the answer
ing system is off, the system answers
after 10 rings. The caller can then press
g after the 2-beep signal. If the system
is not full, it beeps and begins record
ing the message.
Record a Memo
You can leave a memo in either mailbox.
The memo will be saved as a message.
and will be played during message
playback.
1 Press iCHANGP,, then press WCUF\. Valid
codes are 50-99. The system says
"Enter new code."
2 Press ¡REPEAT; to decrease the number
— OR —
Press ¡FORmRO. to increase the number.
3 Press fsTOPi when you reach the
desired code. The system
announces your new code.
To review the Remote Access Code,
press (coon The system announces the
code.
Page 10

.ANSWERING SYSTEM OPERATION..
Answering System Operation from Cordless Handset or Remote Touch Tone Phone
You can operate the answering system
from the cordless handset, or from any
touch tone phone away from your home
or office. The labels above the number
K . .4 , . . . . 1. . . M ! • • ' 1
11.) V^n LtiL. llUiiUjsCl. will
remind you of the correct buttons to
press for each operation.
Connect With the
Answering System
(from the cordless handset)
1 Press IANSSYSTEM',.
The ANS SYSTEM light goes on.
2 The system announces whether or
not you have messages, then beeps
twice and is ready to accept a command.
* /(ausG N£*us6
3 Press [Y] or [^ . The system now
prompts you to select a mailbox.
(from a remote touch tone phone)
1 Dial your telephone number.
2 When your answering system
responds, enter your 2-digit Remote
Access Code. The system announces
whether or not you have any
messages, then beeps twice and is
ready to accept a command.
3 Press Q] or . The system now
AU use HSffUSG
prompts you to select a mailbox.
NOTE: If you do not enter a command
or select a mailbox, the system plays
back all messages in both maiboxes.
Remote Access Code
The Remote Access Code is a 2-digit
security code which lets you access your
answering system remotely. The factory
setting is 50, but you can change this
number.
To change remote access code
1 Press after the two beeps.
2 Enter a new code between 50 and 99.
3 If the entry is valid, the system an
To review remote access code
• Press after the two beeps. The
cmnUE coof
nounces your code, followed by two
beeps. If the entry is invalid, you
will hear a 5-beep signal.
CODS
system announces your code,
followed by two beeps.
Play All Messages
Press and release ff).
Р|ЧП ЧЧ'М Only
Press and release ■
Save Messages
The system automatically saves
messages after playback.
Delete Messages
To delete all messages in a particular
mailbox, press jj] , then the desired
mailbox number (1 or 2).
Repeat
Press and release g]. The system now
plays the current message from the be
ginning. To 20 to the previous message,
press and release ^ .
- яеег ^
Forward
Press and release |]g] while the system
is playing a message to advance to the
next message. Each time you press and
release [|] the system advances to the
гашйг
next message.
Stop
Press [5'| while the system is playing a
message. The system stops playing,
beeps twice, and is ready to accept a
command.
Outgoing Announcement
To record an announcement
1 Press gj, [2. The system beeps
2 Press when you are done. If
3 The system beeps and replays the
To review announcement
• Press [7] after the 2-beep signal.
CHANGE АЖ
and then begins recording.
you pause for more than 7 seconds,
the system will stop recording.
announcement.
Record a Memo
1 Press '.ANS SYSTEM',.
2 Press ¡TlrMEM0/2WAY\.
Enter mailbox number (1 or 2). The
system beeps.
_________
Record a Memo
Press ANS SYSTEM,.
^UEUQ
Press itone-X»:.
vnf 11Hr>y or
system beeps.
4 Begin recording your message.
5 When you are finished, press ^ or
OFF on the cordless handset, or
hang up if you are on a remote touch
tone phone.
Clock
To review time/day setting
Press and release [|]. The system
announces the current day/time setting,
and beeps twice to indicate it is ready to
accept a command.
To change time/day setting
1 Press and release ¡¥j, . The sys
CHANCE QJKK
tem announces the current day setting
2 To set day, press and release
to move a day earher, or to
move a day later. When you hear
the correct day, go on to set the hour.
3 To set the hour, press and release
^. The system announces the cur
rent hour setting. Press and release
HEPUT РОШЯО
or 1^ to move the hour up or
down. When you hear the correct
hour setting, go on to set minutes.
4 To set minutes, press and release
CLOeX
. The system announces the cur
rent minute setting. Press and release
REftlT FORWARD ,
fj; or ¡6] to move the setting up
or down. When you hear the
conect minute setting, press
5 The system announces the new
time/day setting, and beeps twice to
show it is ready for another command
Room Monitor
You can call the system from any
remote touch tone phone and listen to
activity in the room. Press D Ж to listen
for 30 seconds. For another 30 seconds,
press J Ж again.
Page 11

IN CASE OF DIFFICULTY
If you have difficulty operating this
phone, try the suggestions below.
If you still have trouble, call the
National Service Center at 1 800
222-3111.
To turn Answering System Offfrom a
remote location
1 Dial your telephone number.
2 When the answering system
responds, enter your 2-digit Remote
Access Code. The system
announces whether or not you have
any messages, then beeps twice and
is ready to accept a command.
3 Press ¡#i, % to turn the system Off.
To turn Answering System On from a
remote location
1 Dial your telephone number.
2 Let the phone ring at least 10 times.
When the answering system
responds, enter your 2-digit Remote
Access Code. The system
announces whether or not you have
any messages, then beeps twice and
is ready to accept a command.
3 Press ;#!, [0] to turn the system On.
If the phone doesn’t work at all, check
these items first:
• Make sure the AC Adapter on the
power cord is plugged into an
outlet not controlled by a wall
switch.
• Make sure the telephone line cord
is plugged firmly into the base unit
and the telephone jack.
• Make sure the base antenna is fuUy
extended.
• If the phone does not beep when
you press iPHONEi. the batteries
might need recharging.
• Tf th'? LOW B.MTLRY ligh' on.
the batteries need recharging.
• Make sure the battery pack is
installed correctly.
• If you have rotary service on your
phone line, make sure the dial
MODE switch is set to DP.
• If the above suggestions don’t solve
the problem, try resetting the
______
security code (see below).
________
If you hear a two-beep signal when you
try to use the handset:
• The handset and base are not
communicating properly. You
might be out of range while
attempting to dial. Move closer
to the base and try the call again.
■ If moving closer to the base
doesn’t help, the handset and base
might be set to different security
codes.To reset the code, try the
following:
- Place the handset in the base,
and check to make sure the
CHARGING light is on. Wait
15 seconds, then pick up the
handset and press '-phoneI. The
phone should operate properly.
If it doesn’t, try the next step.
• Place the handset in the base,
and check to make sure the
CHARGING light is on.
Unplug the AC adapter from
the outlet, wait 15 seconds,
then plug it in again. The
CHARGING light should go
on. Wait another 15 seconds,
then pick up the handset and
press PHONE'. The phone should
operate properly. If it doesn’t,
try the next step.
• Pick up the handset, open the
battery compartment, and un
plug the battery pack. Wait 15
seconds, then reinstall the
battery pack, close the battery
compartment, place the
handset in the base, and check
to make sure the CHARGING
hght is on. Wait another 15
seconds, then pick up the hand
set and press ^honei . The phone
should operate properly.
If you have no dial tone, check all the
previous suggestions. If you still don’t
hear a dial tone, disconnect the phone
and try another phone in the same jack.
If there is no dial tone on that phone
either, the problem is probably in your
wiring or local service. Call your local
telephone company.
If you hear noise or interference when
using the phone:
•• Make sure the base and handset
antennas are fully extended.
“ You may be out of range. Move
closer to the base.
• Press and release channel to change
to another of the 25 channels
available. If the noise is
exceptionally loud, move closer to
the base before changing channels.
« Household appliances plugged into
the same circuit as the base can
sometimes cause interference. Try
moving the appliance or the base
to another outlet.
■ The layout of your home or office
might be limiting the operating
range. Try moving the base to
another location, preferably on an
upper floor.
If you lose a call after changing
channels:
• You were probably cilmost out of
range. Move closer to the base
before changing channels. Before
placing the call again, set the
handset in the base for at least
15 seconds.
If the phone does not ring when you
receive a call:
% Make sure the ringer switch on the
base is set to on.
• Make sure the telephone line cord
is connected firmly to the base and
the telephone jack. Make sure the
power cord is plugged into an outlet
not controlled by a wall switch.
• You might be too far from the base.
Move closer to the base.
• 'i’ou laigill iia\c luo luaii) cxlcii-
sion phones on your telephone
line to allow all of them to ring.
Try unplugging some of the other
phones.
• Try changing the channel.
Page 12

IN CASE OF DIFFICULTY
If you hear noise in the handset and
the buttons don’t work:
• The base unit and handset might not be
set to the same security code. Place
the handset in the base for at least
15 seconds to reset the security code.
If you hear other calls while using the
phone:
» Press iCHANNEL. to Change to another
channel.
• Disconnect the base from the
telephone jack and plug in a regular
telephone. If you still hear other
calls, the problem is probably in
your wiring or local service. Call
your local phone company.
If your announcement is incomplete:
The unit is voice-activated and will stop
recording if you pause for more than
seven seconds. Try recording the
announcement without pausing.
If messages are incomplete:
• The system can accept messages up
to two minutes long.
• If the caller pauses for more than
seven seconds, the system stops
recording and disconnects the call.
• If the memory becomes full during
a message, the system stops
recording and disconnects the call.
If you have difficulty hearing messages
Try adjusting the volume control on
the base.
IJ the Message 'Window is buink:
* Make sure the power cord is
plugged into an electrical outlet not
controlled by a wall switch.
• Inspect the connection at the back
of the answering system.
If the system does not answer after the
correct number of rings:
• Make sure the system is ON; the
Message Window should be lit.
• If Toll Saver is on, the number of
rings changes from four to two
when you have messages waiting.
• In some cases, the system might be
affected by the ringing system used
by the local telephone company.
• If the memory is full or the system
is off, the system answers after
10 rings.
If the system does not respond to remote
commands:
• Make sure you are calling from a
touch tone phone. When you dial a
number, you should hear tones; if
you hear clicks instead, the phone
is not a touch tone phone.
• Some telephones transmit only one
brief tone each time you press a key.
If you are using one of these
telephones, the answering system
might not detect your Access Code
while the announcement is playing.
Wait until the announcement is
over, and enter your code again.
• There might be noise interference
on the phone line you are using.
Press the dial buttons firmly.
• Make sure you are entering your
access code correctly.
NOTE: After a power failure the Access
Code might revert to the factory setting
of 50.
Other Problems:
• Make sure you have followed the
instrnctior^ in thi'-'. I'n'M'iM:''’ TO
correct the problem.
■ If you cannot correct the problem,
press the Reset button on the back
of the base unit. The system deletes
the announcement and any
messages, and begins the
formatting routine explained in the
-------
Installation section of this manual.
Page 13

Page 14

PHONE OFF ANS SYSTEM
REDIAL MEMORY CHANNEL
AUUSC N£WUSC
1
obc^
2
r
^ghi^
4
AhN~ ja>t
''pq^ MTir/
1
/*/
5
8
Oite- =
tone
^ oper
*
0
aiMktsc
del
3
moo
6
9
CHMC€
^ 'N
#
Page 15

.1^
<1 > I *
tíjmcm
Page 16

 Loading...