

Page 1

2
User's Manual for
Cordless Digital
Answering System
Speakerphone 7630
© 1998 Philips Consumer Communications L.P. All rights reserved.
Printed in Mexico. 848232849 Issue 1AT&T
Part 2
Please read Part 1 — Important Product Information,
included in your package.
Page 2

CONTENTS
INSTALLATION ...........................................2
T able/Desk Installation............................. 5
For W all Installation ................................. 6
TELEPHONE OPERATION
At the Handset........................................8
Making a Call ........................................... 8
Answering a Call ...................................... 8
Ending a Call ............................................ 8
Handset Volume Control........................... 8
Flash ......................................................... 8
Redial........................................................ 8
Hold .......................................................... 8
T emporary Tone........................................ 9
Voice Security........................................... 9
Page/Intercom........................................... 9
Handset Locator...................................... 10
Recording a Phone Conversation............ 10
Power Reserve Feature ........................... 10
TELEPHONE MEMORY
At the Handset.......................................11
Storing Memory Numbers ...................... 11
Dialing Memory Numbers...................... 12
Dialing Number Stored in M1 ................ 12
Replacing a Stored Number.................... 12
Memory Guard ....................................... 12
TELEPHONE OPERATION
At the Base........................................... 13
Answering a Call .................................... 13
Accessing a Call at the Speakerphone .... 13
Speakerphone V olume Control ............... 13
Mute........................................................ 13
Hold ........................................................ 13
Page/Intercom......................................... 13
OPERATING RANGE ................................. 14
Changing Channels................................. 14
ANSWERING SYSTEM SET-UP.................. 15
Turning the System On/Off .................... 15
Speaker Volume Control ......................... 15
About Mailboxes .................................... 15
Setting the Clock .................................... 15
Announcement Options .......................... 16
Selecting Y our Announcement................16
Recording Y our Announcement.............. 16
Announcement Play/Silent ..................... 17
Feature Set-Up........................................ 17
Ring Select and T oll Saver ..................... 17
Audible Message Alert ........................... 18
Remote Access Code .............................. 18
Priority Call Signal ................................. 18
Base Ringer Setting ................................ 19
Reviewing Feature Settings .................... 19
ANSWERING SYSTEM OPERATION
At the Base...........................................20
Answering Calls ..................................... 20
Call Screening/Intercept ......................... 20
Announcement Bypass ........................... 20
Listening to Your Messages .................... 21
Saving Messages .................................... 21
Deleting Messages.................................. 22
Recording a Memo ................................. 22
Message Guard Power Fail
Protection System ................................... 22
ANSWERING SYSTEM OPERATION
At Cordless Handset or
Touch Tone Phone ................................23
Connecting with the Answering System. 23
Remote Access Commands .................... 24
Playing Messsages.................................. 24
Deleting Messages.................................. 24
Call Screening ........................................ 25
Recording Outgoing Announcement ...... 25
Recording a Memo ................................. 25
Setting the Clock .................................... 25
Remote ON/OFF .................................... 26
Recording a Message When
System is Off .......................................... 26
Changing Settings................................... 26
Reviewing Settings ................................. 27
Exit Remote Access................................ 27
Audible Signals ...................................... 27
HANDSET BATTERIES................................28
Replacing the Handset Battery Pack ...... 29
IN CASE OF DIFFICULTY .........................30
7630_book.1AT&T 8/12/98, 6:27 PM1
1
Page 3
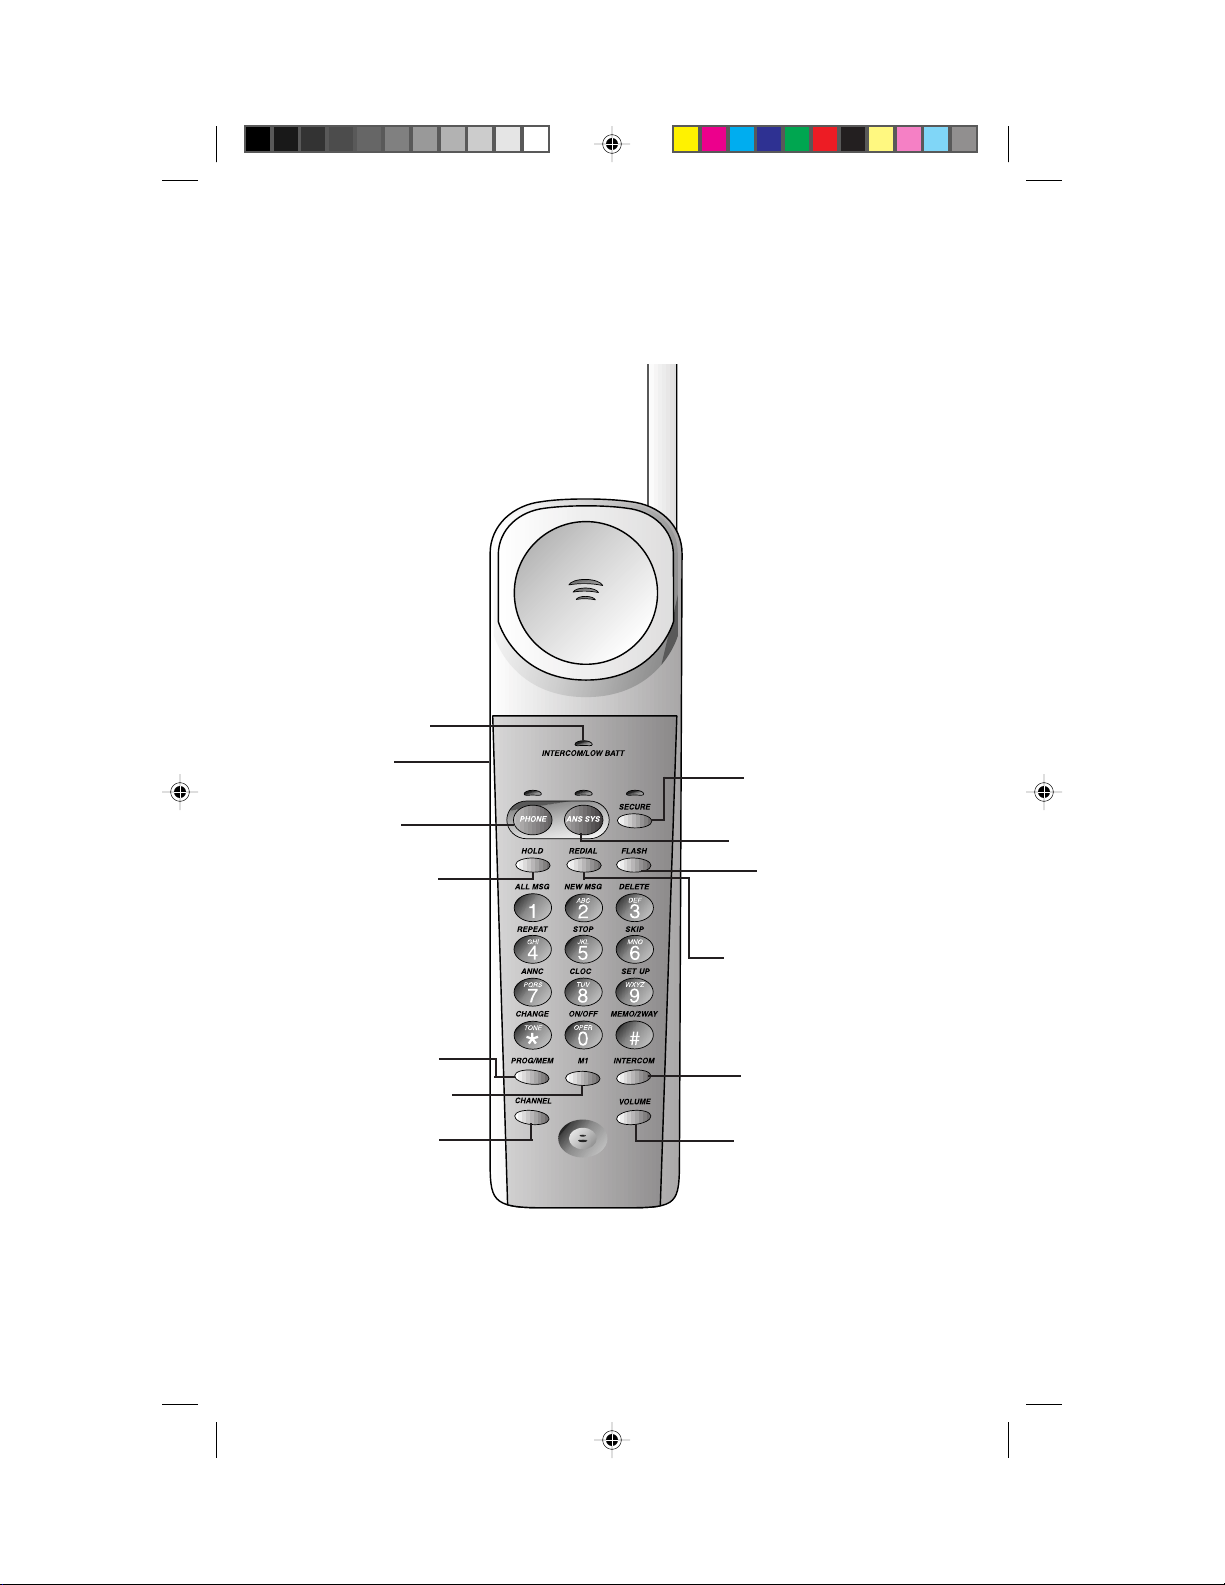
INSTALLATION
Light goes on when
intercom is in use;
flashes when battery
needs rechar ging
Set RINGER
to ON or OFF
Make, answer
or end a call
Put caller on hold
Store and access
numbers in
telephone memory
Memory location M1
Change channel
Activate Voice Security
feature
Access answering system
Access custom-calling
services
Redial last number called
Answer page from base
Adjust listening volume
2
7630_book.1AT&T 8/12/98, 6:28 PM2
Page 4
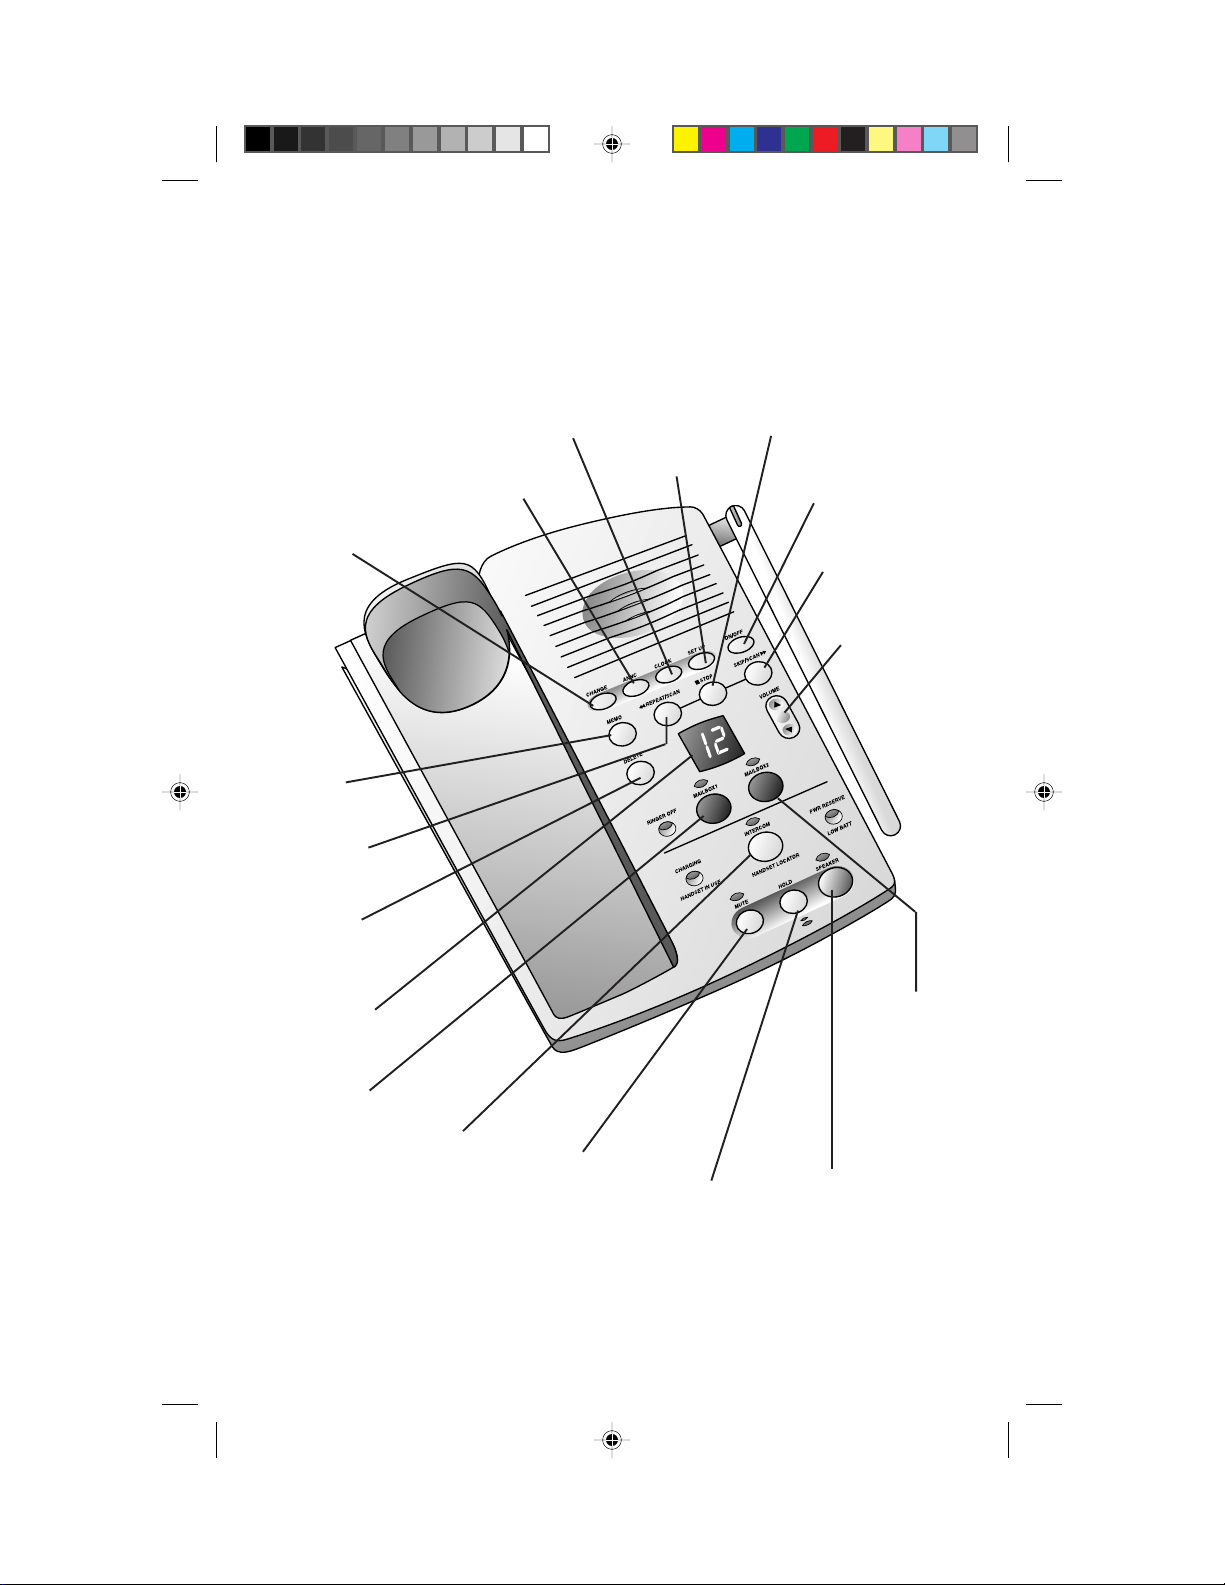
INSTALLATION
Record/review
outgoing announcement
Use with other buttons
to change settings
Record
a memo
Repeat all
or part of message
Delete all or
some messages
Message
Counter
displays number
of messages
Set/hear day & time
Set answering
system features
Stop message playback
Turn answering
system on or off
Skip all or part
of message
Adjust
speaker
volume
Mailbox 2
Mailbox 1
Page the handset
for two-way
conversation
7630_book.1AT&T 8/12/98, 6:28 PM3
Mute the microphone
Activate speakerphone
Put caller on hold
3
Page 5
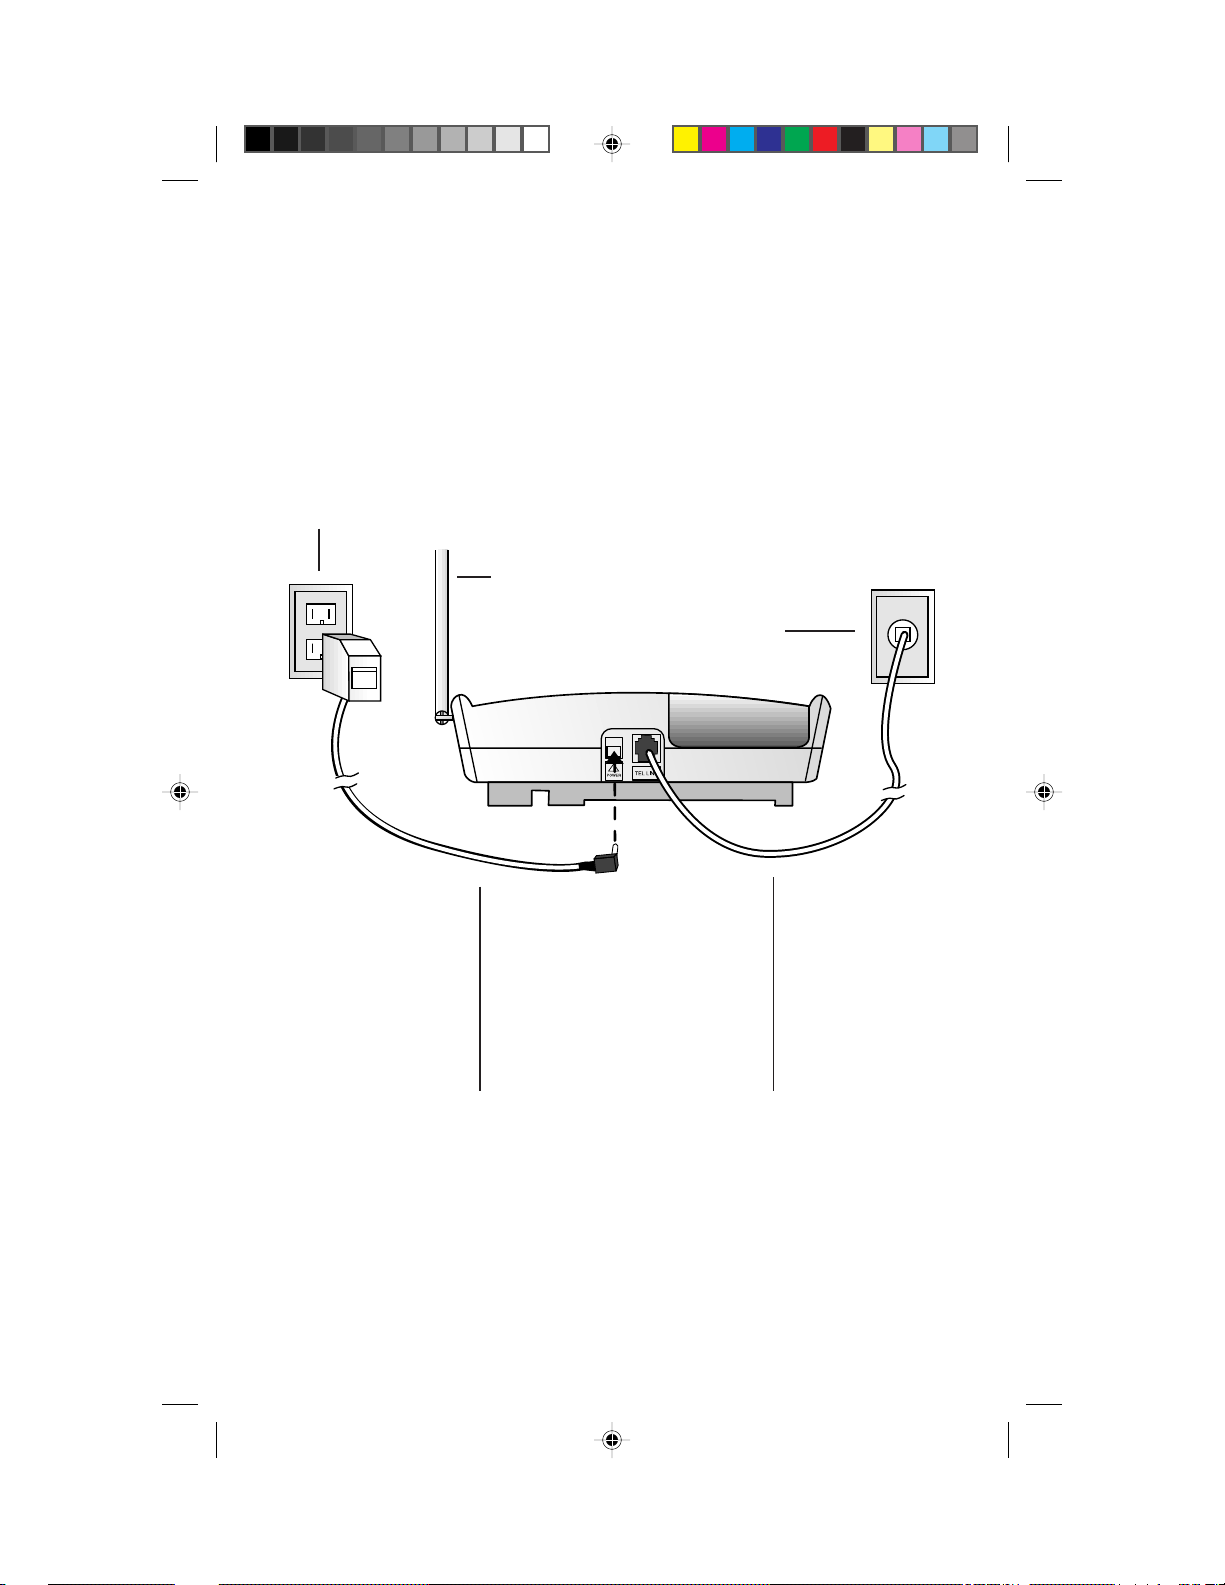
INSTALLATION
Standard
electrical
outlet
Keep base
antenna
upright.
Modular jack
!
Power cord Telephone line cord
4
7630_book.1AT&T 8/12/98, 6:28 PM4
Page 6

INSTALLATION
Table/Desk Installation
1 Choose a spot near an electrical outlet and a telephone jack.
This phone requires a modular telephone jack and a standard electrical
outlet (110v AC) not controlled by a wall switch.
2 Install the handset battery.
• Remove the battery compartment cover on the handset by pressing
on the indentation and sliding the cover downward.
• Plug the battery pack connector into the handset and place the
battery pack in the case. (See figure in section on "Handset
Batteries.")
• Place the battery case cover on the handset by sliding it on its track
up over the battery case until it snaps firmly in place.
3 Set the RINGER switch.
Set the switch on the side of the handset to ON so the handset will ring.
When this switch is set to OFF the handset will not ring.
NOTE: If you set the RINGER switch to OFF, the handset battery will last longer .
However, when the RINGER is set to OFF, you will always need to press P
on the handset to answer a call, even if the handset has been in the base.
4 Install the power reserve batteries.
• Turn the base upside down.
• Push in on the two tabs at the large end of the triangular mounting
bracket, and lift it off the unit.
• Push in the tab on the battery compartment door, and open it.
• Insert the 4 AA batteries provided with the phone. When replacing
batteries, always use four new alkaline or heavy-duty batteries.
• Close the battery compartment door.
• Reattach the mounting bracket by inserting the tabs into the slots.
Push down on the large end of the base to lock it into place. Make
sure the larger end is toward the top of the telephone. The telephone should sit flat on your table or desk during use.
5 Connect the telephone line cord.
Plug one end of the telephone line cord into the jack labeled TEL
LINE on the back of the base. Plug the other end of the line cord into a
modular phone jack. Make sure the plug snaps firmly in place.
6 Connect the power cord.
Plug the power cord into the jack labeled POWER on the back of
the base. Plug the AC adapter on the power cord into an electrical
outlet not controlled by a wall switch.
CAUTION: Use only the AC power adapter supplied with this telephone. Power Supply HADW-1; Input:120V AC, 60 Hz, 16 W; Output
12V DC, 900mA.
7630_book.1AT&T 8/12/98, 6:28 PM5
5
Page 7

INSTALLATION
NOTE: When the system is first connected to AC power, it begins an automatic
initialization routine. After this routine is complete, the Message Counter
flashes CL, indicating the clock needs to be set. See “Setting the Clock” in the
Answering System Set-up section of this manual.
7 Rotate the base antenna so it is fully upright.
8 Charge the handset batteries before use.
Place the handset in the base and charge the batteries for 4 hours. The
CHARGING light on the base goes on to show the handset is in the
right position to charge the batteries.
9 Check for dial tone.
After the batteries are charged, pick up the handset. Press P; the
PHONE light should go on and you should hear a dial tone. Press
P again to turn the phone off.
10 Set the dial mode.
If you have touch tone service, the phone is ready to use as soon as the
batteries are charged.
If you have dial pulse service you’ll need to change the dialing mode.
When the phone is off, press P, p, #, #, #, 3 to set
the dial mode to Dial Pulse. To return to touch tone dialing (with touch
tone service), press P, p, #, #, #, 8.
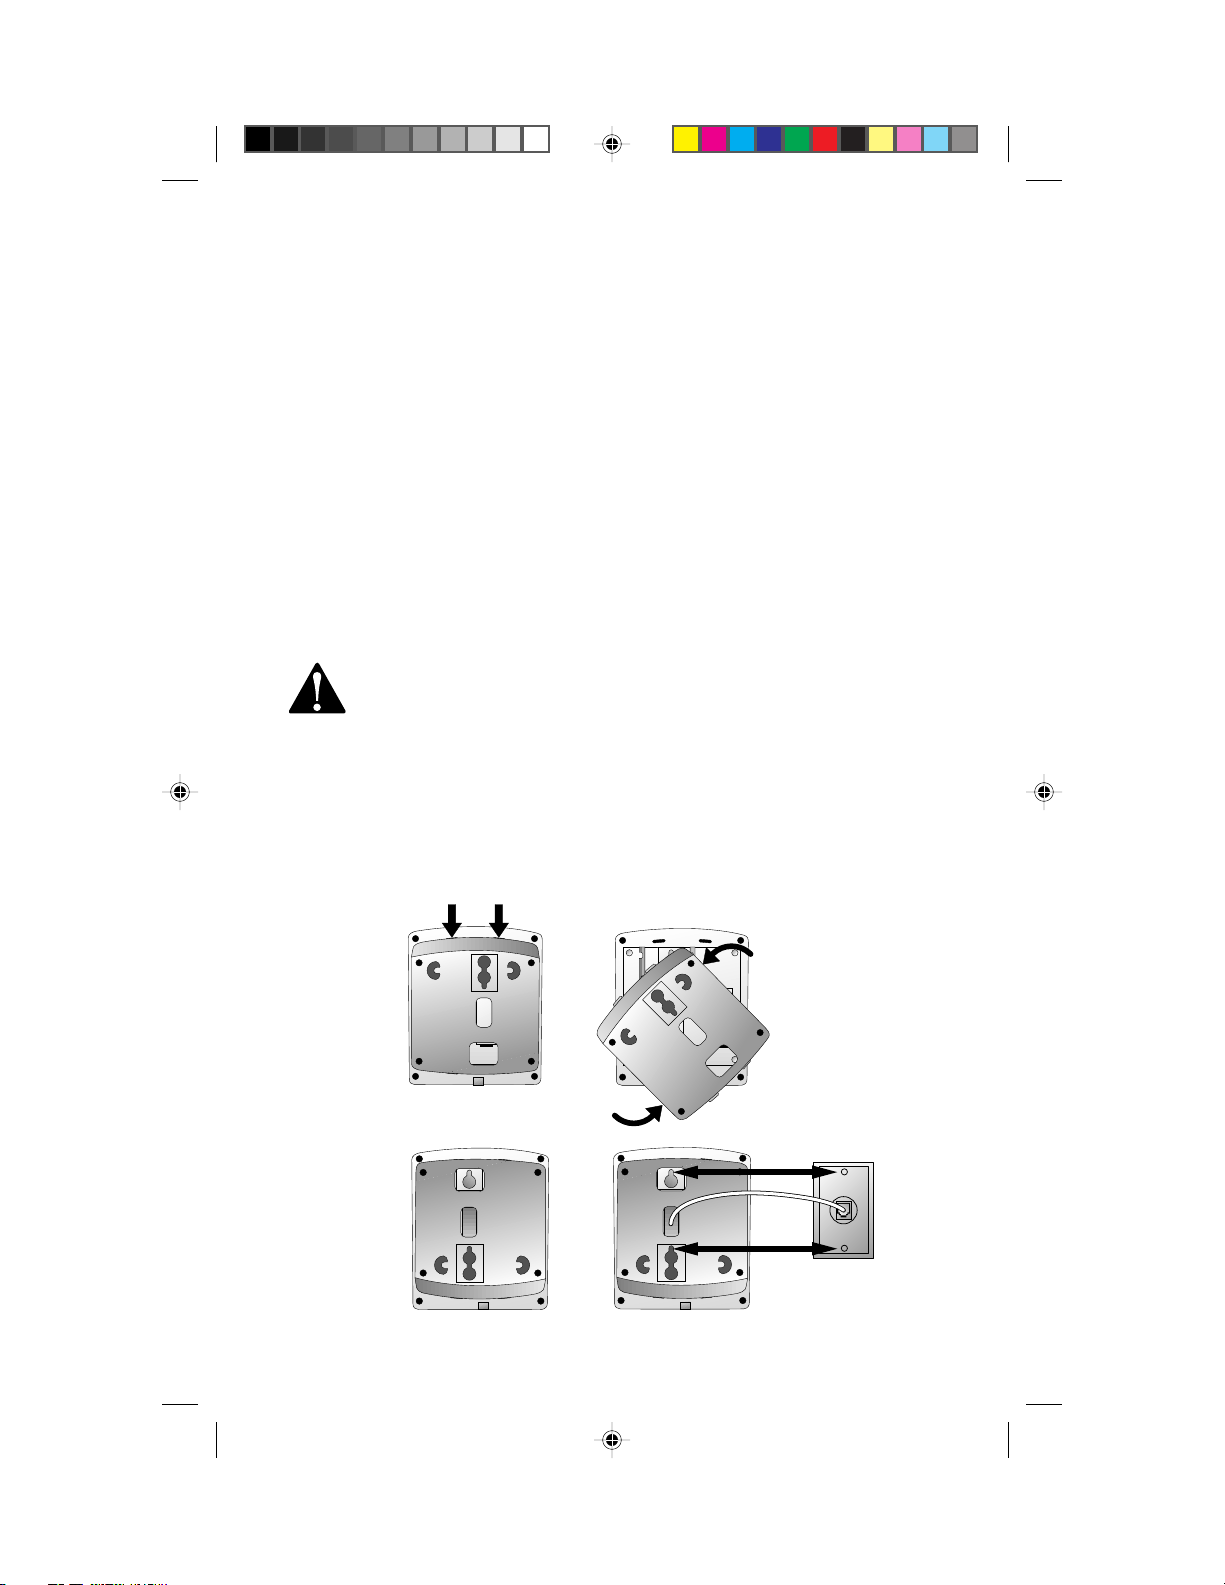
For Wall Installation
The wall mounting bracket is a wedge-shaped plastic piece attached to the bottom
of the base. You’ll need to attach this piece so the thickest end of the bracket is
facing the floor when you wall-mount the base.
1 Follow Steps 1 to 4 in Table/Desk Installation, except do not re-
attach the wall mounting bracket.
2 Connect the power cord to the telephone.
Plug the power cord into the jack labeled POWER on the back of
the base.
3 Guide the power cord from the jack through the straight channel
on the base.
Let the excess cord extend straight out of the end of the channel that is
farthest from the jack.
4 Connect the telephone line cord.
Plug one end of the line cord into the jack on the base. Guide the cord
from the jack through the curved channel on the bottom of the base.
Wrap any excess line cord around the 2 crescent-shaped tabs on the
underside of the wall-mounting bracket. (Make sure you leave enough
cord free to extend to the wall jack.)
6
7630_book.1AT&T 8/12/98, 6:28 PM6
Page 8
INSTALLATION
5 Feed the free end of the line cord through the rectangular opening
in the center of the bracket.
6 Replace the bracket.
Place the bracket back on the base so that the thicker end will be at the
bottom of the base when wall-mounted.
7 Connect the line cord to the wall jack.
Make sure it snaps firmly into place.
8 Mount the base on the wall.
Hold the base so the mounting knobs on the wall plate fit the keyhole
slots on the base. Slide the base down onto the knobs until it locks
into place.
9 Plug the AC adapter on the power cord into an electrical outlet not
controlled by a wall switch.
CAUTION: Use only the AC power adapter supplied with this tele-
phone. Power Supply HADW-1; Input:120V AC, 60 Hz, 16 W; Output
12V DC, 900mA.
Note: When the system is first connected to AC power, it begins an automatic
initialization routine. After this routine is complete, the Message Counter flashes
CL, indicating the clock needs to be set. See "Setting the Clock" in the Answering
System Set-up section of this manual.
10 Follow Steps 7 to 10 in Table/Desk Installation.
7630_book.1AT&T 8/12/98, 6:28 PM7
7
Page 9

TELEPHONE OPERATION
At the Handset
Making a Call
1 Press P on the handset (the PHONE light goes on).
2 When you hear a dial tone, dial the number.
Answering a Call
If the handset is in the base, lift the handset. The PHONE light goes on and the call
is connected.
— OR —
If the handset is away from the base, press P on the handset. The PHONE
light goes on and the call is connected.
NOTE: Although ringing stops when you answer, you might not be able to hear
the other party until the PHONE light goes on steadily.
Ending a Call
Press P on the handset
— OR—
Place the handset in the base
Handset Volume Control
The handset volume can be set to three different levels. Each time you press V
on the handset the level of what you hear through the handset changes. Changing
this setting does not affect what the other party hears.
Flash
Press F to activate custom-calling services such as Call Waiting or 3-Way
Calling. You may have to press other buttons before or after F as explained in
the custom-calling instructions provided by your local phone service company.
Redial
The last number dialed (up to 16 digits) on this phone is stored in redial memory
until you dial another number.
1 Press P and wait for the PHONE light to go on.
2 When you hear a dial tone, press R.
8
7630_book.1AT&T 8/12/98, 6:28 PM8
Page 10

TELEPHONE OPERATION
At the Handset
Hold
Press H to put a call on hold. The PHONE light on the handset flashes.
To return to the call, press H again
— OR —
Press P on the handset
— OR —
Press K on the base
— OR —
Lift the handset of an extension phone on the same line.
Temporary Tone
NOTE: If you have touch tone service, you do not need to use the Temporary
Tone feature.
If you have dial pulse (rotary) service, this feature allows you to enter codes or
tones needed to operate certain answering machines or to use electronic banking
services, calling cards, and other special services. This feature will operate most
special services; however, some services may actually require a touch tone line.
To be sure, ask the company that provides the special service.
1 Dial the call, then press *. Any dial buttons pressed after this send
touch tone signals.
2 After you hang up, the phone automatically returns to dial pulse
(rotary) dialing.
Voice Security
Activating Voice Security reduces the chance of your conversation being inadvertently overheard by a neighbor’s cordless phone or other radio receiving equipment
within range of your phone.
T o activate Voice Security , press s. The SECURE light goes on.
T o deactivate Voice Security, press s again.
NOTE: Activating this feature may reduce the sound quality of your calls.
Page/Intercom
1 Press I on the handset. When the INTERCOM/LOW BATT
light on the handset goes on, you can speak to the base, and the base
can respond.
2 Press I on the handset to close the intercom connection.
7630_book.1AT&T 8/12/98, 6:28 PM9
9
Page 11

TELEPHONE OPERATION
At the Handset
Handset Locator
This feature is useful if you misplace the handset.
To locate the handset using this feature, press and hold the INTERCOM/HAND-
SET LOCATOR button on the base for approximately four seconds. A repeating
paging tone is sounded in the handset.
T o cancel the handset locator feature, press h on the handset or the INTERCOM/HANDSET LOCATOR button on the base. The Handset Locator feature
will turn itself off in approximately three minutes if you haven’t turned it off before then.
NOTE: The handset RINGER switch must be set to ON to operate this feature.
Recording a Phone Conversation
Using the handset (not the speakerphone), you can record a phone conversation up
to 3 minutes long. You can listen to the recording as you do any other messages.
NOTE: This unit does not sound warning beeps to let the other party know that
the call is being recor ded. To ensure that you are in compliance with any state and
federal regulations that concern recording a telephone call, you should start the
recording process and then inform the caller that you are recording the call.
1 Press a, then
the handset.
2 Press 1 or 2 to select in which mailbox the conversation will be
recorded. The system beeps and begins recording.
3 To stop recording, press 5.
"
at any time during a phone conversation at
Power Reserve Feature
The power reserve batteries in the base allow you to use your cordless handset to
make and answer calls in the event of a power failure.
T o ensure that this feature will be available during power failure, replace the power
reserve batteries with fresh heavy-duty or alkaline batteries when the PWR
RESERVE BATT LOW light on the base goes on. The power reserve feature will
not work if you install or replace the power reserve batteries during a power outage.
The phone requires AC power to recognize that new batteries have been installed.
NOTE: The Power Reserve feature allows you to make and answer calls in the
event of a power failure (if the power reserve batteries have power). Other
features will not function during power failures.
10
7630_book.1AT&T 8/12/98, 6:28 PM10
Page 12

TELEPHONE MEMORY
At the Handset
This cordless answering system can store 20 different phone numbers that you dial
by pressing p and two of the number buttons. The cordless answering
system can also store a telephone number that you dial by pressing only M.
Storing Memory Numbers
1 Make sure the handset is off.
2 Press p.
3 Enter the phone number (up to 16 digits).
4 Press p.
5 Press two number buttons (01 to 20) for the memory location where the
number is to be stored
—OR—
Press M.
6 You will hear a three-part tone that confirms the number was stored
properly. If you hear a long buzzing tone, or nothing at all, press
P, then follow the step above to store the number again.
For example, to store 555-1212 in memory location 9, press p,
then press 5 5 5 1 2 1 2, p, 0 9.
NOTE: You may choose to store emergency numbers in memory locations. The
manufacturer assumes no responsibility for customer reliance upon this feature.
Storing a Pause in a Memory Number
If this phone is connected to a switchboard, you might have to dial an access number (usually 9) to get an outside line. You can store the access number and a pause
in the dialing sequence; the pause allows the switchboard enough time to get an
outside line dial tone.
When storing a number in memory, press and hold down the number button that
comes before the pause until you hear the second beep. This inserts a 1.5-second
pause after that digit. If you hold the number button down longer, you will hear
more beeps as additional pauses are stored.
NOTE: Each pause you store is counted as a digit. You can store up to 16 digits in
each memory location.
For example, to store 9, P AUSE, 555-1212 in memory location 3, press p,
then hold down 9 until you hear a second beep. Then press 5 5 5 1 2 1 2,
p, 0 3.
7630_book.1AT&T 8/12/98, 6:28 PM11
11
Page 13

TELEPHONE MEMORY
At the Handset
Storing a Number Just Dialed
Whenever you make a telephone call, you can store the number you dialed in
memory. Press R instead of entering the telephone number when storing
memory numbers.
Dialing Memory Numbers
1 Press P.
2 Press p.
3 Press the number buttons (01 to 20) you assigned to the number you’re
calling.
For example, to dial the number you assigned to location 6, press P,
p, 0, 6.
Dialing Number Stored in M1
1 Press P.
2 Press M.
Replacing a Stored Number
You can replace a stored number by storing a new number in its place.
Memory Guard
The phone numbers you store in memory are protected from loss when you change
the handset battery, or in the event of a power failure.
12
7630_book.1AT&T 8/12/98, 6:28 PM12
Page 14

TELEPHONE OPERATION
At the Base
Answering a Call
To answer using the Speakerphone, press K on the base. The SPEAKER
light goes on, and the call is connected. To end the call, press K again.
Conecting to a Call With the Speakerphone
You can make a call at the handset, and then switch to using the speakerphone.
1 Make a call at the handset.
2 Press K on the base to connect to the call.
3 Press P on the handset to disconnect the handset.
4 To end the call, press K on the base.
Speakerphone Volume Control
Press + to increase speakerphone volume. Press - to decrease volume.
Mute
Mute allows you to hear your caller, but prevents the caller from hearing you.
To activate the Mute feature, press U. The MUTE light on the base goes on.
T o deactivate the Mute feature, press U again.
Hold
Press H. The speaker light flashes.
To return to the call, press H again
— OR —
Press P on the handset
— OR —
Press K on the base
— OR —
Lift the handset of an extension phone on the same line.
Page/Intercom
1 Press the button on the base. This sends a
three-part paging tone to the handset.
2 When the I button on the handset is pressed and when the
INTERCOM/LOW BATT light on the handset goes on, the handset and
base can communicate with each other without tying up the telephone line.
3 Press I on the handset to close the intercom connection.
NOTE: The handset RINGER switch must be set to ON to operate this feature.
7630_book.1AT&T 8/12/98, 6:28 PM13
13
Page 15

OPERATING RANGE
This cordless telephone answering system operates at the maximum power allowed by the Federal Communications Commission (FCC). Even so, the handset
and base can communicate over only a certain distance — which can vary with the
locations of the base and handset, the weather, and the construction of your home
or office. For best performance, make sure the base antenna is fully upright, as
shown in the Installation section of this manual.
If the handset is moved to a point where the base and handset can no longer communicate, you are “out of range.” When you try to make a call, the handset will
sound two short beeps to indicate that you are out of range.
If you receive a call while you are out of range, the handset might not ring —
or, if it does ring, the call might not connect when you press P. Move closer
to the base, then press P again to answer the call.
If you move out of range during a phone conversation, you will hear noise or
interference. To improve reception, move closer to the base.
If you attempt to hang up while you are out of range, the phone will be left “off
the hook.” T o hang up, walk back into range, periodically pressing P until the
PHONE light goes off.
Changing Channels
This cordless telephone has an advanced 25-channel Auto Select feature that minimizes the chance of interference. Every time you answer or make a call, the Auto
Select feature searches for and selects a clear channel.
In the unlikely event that you hear noise or interference while using the handset:
1 Press h.
2 If the interference does not clear, continue to press h until you
find a clear channel (your call will not be interrupted)
— OR —
Move closer to the base and press h.
NOTE: You must be in range to change channels.
14
7630_book.1AT&T 8/12/98, 6:28 PM14
Page 16

ANSWERING SYSTEM SET-UP
Turning the System On/Off
The answering system must be on in order to use any answering system functions.
When the answering system is on, the Message Counter is on (a steady or flashing
display). To turn the answering system on, press O on the base. The system
announces “The machine is on.”
T o turn the system off, press O again. The system announces “The machine is of f.”
Speaker Volume Control
Press + or - on the base to adjust speaker volume, from 0 (lowest) to 7 (highest).
If the volume setting is set to 7 and you press +, or if it's set to 0 and you press
-, you'll hear a beep to let you know you're already at the maximum or minimum
setting.
About Mailboxes
This answering system offers you 2 voice mailboxes, providing a convenient way
to share an answering system with other members of your household or business.
Callers using a touch tone phone can select the mailbox in which their messages
will be recorded by pressing 1 or 2 after the system answers the call. Those not
using a touch tone phone, or those who do not press 1 or 2 can still leave messages;
those messages are automatically recorded in Mailbox 1.
Setting the Clock
You’ll need to set the clock so it can record the day and time that each message
is received.
1 Press C. The Message Counter displays CH.
2 Press L. The system announces the current day setting.
3 To change the day setting, hold down n or N
until the correct day is announced. Then release the button.
4 Press L. The system announces the current hour setting.
5 To change the hour setting, hold down n or N
until the correct hour is announced. Then release the button.
6 Press L. The system announces the current minutes setting.
7 To change the minutes setting, hold down n or N
until the correct minutes are announced. Then release the button.
8 Press L. The system announces the new day and time.
To check the current clock setting, press L.
7630_book.1AT&T 8/12/98, 6:29 PM15
15
Page 17

ANSWERING SYSTEM SET-UP
Announcement Options
Before using this answering system, you can record an announcement (up to 3
minutes long) that callers will hear when the system answers a call. When you
record your announcement, make sure you indicate who has been assigned each
mailbox, and that callers should press 1 or 2 to access the appropriate mailbox.
For example,
“Hello. You’ve reached Meadowlark Nursery . To leave a message for Ms.
Arbor, press 1. To leave a message for Mr. Cardinal, press 2. If you don’t
have a touch tone phone, wait for the tone.”
Y ou can record up to three dif ferent announcements — A, B, and AO. Announce-
ments A and B are used when you want the system to record callers’ messages.
Announcement AO (announcement only) is used when you want to give informa-
tion to callers. (Some businesses use this announcement to advise callers of their
hours of operation.) By selecting A, B or AO, you decide which announcement
your callers will hear when the system answers a call.
If you choose not to record an announcement for A or B, the system answers with
a prerecorded announcement: “Hello. Please leave a message after the tone.” The
system does not have a prerecorded announcement for AO.
Selecting Your Announcement
1 Press C. The Message Counter displays CH.
2 Press u until you hear "Selected announcement is —."
3 Use n or N to move to the announcement option
you want.
4 Press S.
Recording Your Announcement
1 If the announcement you want to record is the currently selected
announcement (A, B, or AO) go to step 2.
If not, select the announcement by following Steps 1-4 in "Selecting
Your Announcement" then go to Step 2 below.
2 Press C.
3 Press A.
4 When the system prompts you, begin recording your announcement.
Your announcement can be up to 3 minutes long. Speak in a normal
tone of voice, about 9 inches from the microphone.
16
7630_book.1AT&T 8/12/98, 6:29 PM16
Page 18

ANSWERING SYSTEM SET-UP
5 When you are finished, press S. The system plays back the
announcement, and the Message Counter displays AP (Announcement
Play). If the announcement did not record successfully, you’ll hear an
error tone indicating you need to record again.
To review the announcement at any time, press A.
Deleting an Announcement
1 Select the announcement you want to delete.
2 Press A.
3 Press D while the announcement is playing. The system beeps
once when the announcement is deleted.
Announcement Play/Silent
Your system comes set so you can hear your announcement when the system answers a call. You can reset the system so you won’t hear the announcement.
Press and hold A for approximately 2 seconds, until the current setting (AP for
Announcement Play, or AS for Announcement Silent) is displayed. Continue to
hold down A until the display changes, then release the button.
Feature Set-Up
Y ou can set up one feature at a time as described below , or you can set up a feature,
and then move on to set up another feature. After you change one feature press
u until you hear the voice prompt for the next feature you want to change.
Ring Select and Toll Saver
Use Ring Select to select how many times the phone will ring before the system
answers a call. Set for 1 to 7 rings, or set to SA for Toll Saver (Ring Select is
preset to 4). When you set the system to SA, the system answers after 4 rings
when you have no new messages, and after 2 rings when you have new messages.
1 Press C.
2 Press and release u until you hear "Number of rings...". The
Message Counter displays the current Ring Select setting.
3 Press n or N to change the setting.
7630_book.1AT&T 8/12/98, 6:29 PM17
17
Page 19

ANSWERING SYSTEM SET-UP
Audible Message Alert
If you want the base to beep once every 15 seconds to notify you that new messages
have been received, set the Message Alert to on (the Message Counter displays +
for on and – for off.
1 Press C.
2 Press and release u until you hear "Message Alert is...". The
Message Counter displays the current Message Alert setting.
3 Press n or N to change the setting.
Remote Access Code
The Remote Access Code allows you to access features and functions of the answering system from a touch tone phone. The Remote Access Code is preset to
500, but you can change it to any three-digit number from 500 to 999 following the
steps below.
NOTE: Do not use the same code as the Priority Calling Code.
1 Press C.
2 Press and release u until you hear "Remote Access Code is...".
The system announces the current Remote Access Code.
3 Press n or N to change the first digit. Press
u to move to the second digit.
4 Press n or N to change the second digit. Press
u to move to the third digit.
5 Press n or N to change the third digit. Press
u to save. The system announces the new Remote Access Code.
Priority Call Signal
When a caller enters the Priority Calling Code from a touch tone phone, the system beeps loudly to alert you that you have a priority call. You’ll need to provide
select callers with the Priority Calling Code (preset to 999), in order for them to
use this feature.
1 Your caller dials your telephone number from a touch tone phone.
2 When the announcement begins to play, your caller can enter the
Priority Calling Code.
3 The system beeps 3 times, then pauses. This continues for up to 30
seconds, unless you answer the phone.
4 If you do not answer, your caller can press 5 to stop the priority call
signal.
18
7630_book.1AT&T 8/12/98, 6:29 PM18
Page 20

ANSWERING SYSTEM SET-UP
Changing the Priority Calling Code
The priority calling code comes set to 999, but you can change it to any three-digit
number from 500 to 999 following the directions below .
NOTE: Do not use the same code as the Remote Access Code. If you set the
Remote Access Code and the Priority Calling Code to the same number, the
phone will always interpret that number as the Remote Access Code.
1 Press C.
2 Press and release u until you hear "Priority Call Code is...". The
system announces the current Priority Calling Code.
3 Press n or N to change the first digit. Press
u to move to the second digit.
4 Press n or N to change the second digit. Press
u to move to the third digit.
5 Press n or N to change the third digit. Press
u to save. The system announces the new Priority Calling Code.
Base Ringer Setting
1 Press C.
2 Press and release u until you hear "Base ringer is...". The
Message Counter displays + if the ringer is on; – if the ringer is off.
3 Press n to change the setting. When you set the ringer to off,
the BASE RINGER OFF light on the base goes on.
Reviewing Feature Settings
You can check the status of the feature settings by pressing u.
7630_book.1AT&T 8/12/98, 6:29 PM19
19
Page 21

ANSWERING SYSTEM OPERATION
At the Base
Answering Calls
When you’ve selected Announcement A or B and turned the system on, the caller
hears the announcement you recorded, followed by a beep. During the announcement, callers can press 1 or 2 to select a mailbox, or they can wait for the beep to
leave a message in Mailbox 1. A caller can leave a message up to 3 minutes long.
If the message is longer than 3 minutes, or if the caller is silent for more than 7
seconds, or if the system runs out of memory , the system beeps once and hangs up.
If you’ve selected Announcement AO, callers hear your announcement. If a caller
doesn’t enter a mailbox number before the announcement ends, the system plays
to the end of the announcement, then hangs up. (If you want a caller to be able to
leave a message when announcement is set to AO, instruct him or her to press #
or a mailbox number while the announcement is playing.)
If the system if OFF and the phone rings, the call will be answered after 10 rings
and the caller will hear "The machine is off." If the system is ON and the memory
is full, the call will also be answered after 10 rings. The caller will hear "Memory
is full." Remote access commands to change the ON/OFF status are explained
in "ANSWERING SYSTEM OPERATION–From Cordless Handset or Touch
T one Phone."
Call Screening/Intercept
Set the system to answer calls, and set the volume control so you can hear the
caller’s message.
If you decide to take the call, press P on the handset or K on the base.
If you pick up an extension phone during the announcement and the announce-
ment does not stop right away, press and release the telephone switchhook or press
S on the base.
Announcement Bypass
You might want to let frequent callers know they can press # on a touch tone phone
when they hear your announcement begin. The system then stops playing your announcement and beeps so that the caller can immediately begin recording a message.
20
7630_book.1AT&T 8/12/98, 6:29 PM20
Page 22

ANSWERING SYSTEM OPERATION
At the Base
Listening to Your Messages
As the system plays back messages in a mailbox, the Message Counter displays
the number of the message playing. Before playing each message, the system
announces the day and time the message was received. After playing the last
message, the system announces “End of messages.”
Play all messages in a mailbox
Press and release the appropriate l button. If you have no messages
in that mailbox, the system announces “No messages.”
Play new messages only
Hold down the appropriate l button for about 2 seconds, until the
system begins playing. If you have no new messages in that mailbox, the
system announces “No new messages.”
Repeat entire message
Press and release N.
Back up to earlier message
Press and release N until the Message Counter displays the
number of the message you want.
Repeat part of a message
Hold down N for a few seconds, then release it to resume
playing. The system beeps while the button is held down.
Skip to next message
Press and release n.
Skip ahead to a later message
Press and release n until the Message Window displays the
number of the message you want.
Skip part of a message
Hold down n for a few seconds, then release it to resume playing.
The system beeps while the button is held down.
Stop message playback
Press and release S.
Saving Messages
The system saves your messages automatically until you delete them, and can
store approximately 12 minutes of messages, memos and announcements (up to a
maximum of 99 messages). When memory is full, or the maximum number of
messages is recorded, the Message Counter flashes an F. You’ll need to delete
messages to make room for new ones.
7630_book.1AT&T 8/12/98, 6:29 PM21
21
Page 23

ANSWERING SYSTEM OPERATION
At the Base
Deleting Messages
Delete all messages in a mailbox
Press and release D, then press the l button of the mailbox you want
to clear. The system announces “Messages deleted.” The Message Counter displays the number of messages in the other mailbox. If you haven’t listened to all
of the messages, the system sounds an error tone, and does not delete messages.
Delete selected messages
Press and release D while the message you want to delete is playing. The
system beeps once, and continues with the next message. If you want to check that
you are deleting the right message, you can press N to replay a message before deleting it.
When the system reaches the end of the last message, the messages not deleted are
renumbered, and the Message Counter displays the total number of messages
remaining in memory.
Replay deleted message
Before the system announces "End of Message," you can replay a deleted message. Press N until the message window displays the number of the
deleted message. Once the system announces "End of Message," you cannot
replay a deleted message.
Recording a Memo
You can record a memo to be stored as an incoming message. The memo can be
up to 3 minutes long, and will be played back with other messages.
1 Press and release m on the base. Both mailbox lights blink rapidly.
2 Press a l button to select a mailbox for the memo. After the
beep, speak toward the microphone. The Message W indow displays the
length of your memo.
3 To stop recording, press S.
Message Guard Power Fail Protection System
With the Message Guard Power Fail Protection System, your messages and
announcements will be saved in the event of power failure.
22
7630_book.1AT&T 8/12/98, 6:29 PM22
Page 24

ANSWERING SYSTEM OPERATION
At Cordless Handset or Touch Tone Phone
This cordless answering system allows you to retrieve messages and access other
features even when you are away from your home or office. Additionally , you can
use the cordless handset to access answering system features when you are within
range of the base.
Whether you are using the cordless handset or calling from a touch tone phone,
you press the same buttons. The only difference is the way you connect with the
answering system.
Connecting with the Answering System
From the Cordless Handset
When the RINGER switch is set to ON, the ANS SYS light on the handset flashes
to let you know you have new messages. To access the answering system:
1 Press a on the handset, and wait for the ANS SYS light to go on.
2 The system announces the number of messages, and then beeps twice.
3 After the two beeps, the system is ready to accept a command.
4 To end the connection with the answering system, press a or
return the handset to the base.
From a Touch Tone Phone
1 Dial your telephone number.
2 When the outgoing announcement begins to play, enter your Remote
Access Code.
3 The system announces the number of messages, then beeps twice.
4 After the two beeps, the system is ready to accept a command.
Voice Help Menu
The Voice Help Menu allows you to use the answering system from your cordless
handset or from a remote touch tone telephone, even if you do not know or remember the various command codes. Once you have connected with the answering
system, press 5. The system announces a list of operations and the buttons you
need to press. At the end of the list, the system beeps twice to indicate it is ready
to accept a command. You can access the Voice Help Menu any time after the
system has given you the two-beep signal that it is ready to accept a command.
7630_book.1AT&T 8/12/98, 6:29 PM23
23
Page 25

ANSWERING SYSTEM OPERATION
At Cordless Handset or Touch Tone Phone
Remote Access Commands
Playing Messages
1 Connect with the answering system.
2 After the two beeps, wait 4 seconds. The system plays back messages
in Mailbox 1
— OR—
Press and release 1, then enter a Mailbox number (1 or 2), to play all
messages in that mailbox
— OR —
Press and release 2, then enter a Mailbox number (1 or 2) to play only
new messages in that mailbox.
3 To repeat a message, press and release 4 while the message is
playing. Each time you press and release 4, the system backs up one
more message.
If you're calling from a touch tone phone that sends a continuous tone
when you hold down a button, you can repeat part of a message by
pressing and holding 4. Release 4 to resume playing.
To skip a message, press and release 6 while the message is playing.
Each time you press and release 6, the system advances one more
message.
If you're calling from a touch tone phone that sends a continuous tone
when you hold down a button, you can skip part of a message by
pressing and holding 6. Release 6 to resume playing.
To stop message playback, press 5.
To save messages, hang up.
To play messages in another mailbox
After playing messages in one mailbox, the system announces “End of
messages” and beeps twice. You can then press 1 (all messages) or 2
(new messages only) and enter the number of the other mailbox.
Deleting Messages
Connect with the answering system and begin playing messages.
To delete a selected message, press and release 3 while the message
is playing.
To delete all messages in a mailbox, after you listen to all messages in
the mailbox and hear "End of Messages", press 3 and then the mailbox
number.
24
7630_book.1AT&T 8/12/98, 6:29 PM24
Page 26

ANSWERING SYSTEM OPERATION
At Cordless Handset or Touch Tone Phone
Call Screening
You can uses the cordless handset to listen to callers as they leave messages. You
can speak to a caller by pressing P.
To monitor a call:
1 If the handset is away from the base, press a.
2 To end monitoring without taking the call, press a or put the
handset in the base.
Recording Outgoing Announcement
1 Connect with the answering system.
2 Press * 7. The system beeps to signal that it's ready to accept a
command.
3 Record your announcement.
4 Press 5 to stop recording. The system beeps and plays back your
announcement, then beeps twice and is ready to accept a command.
Reviewing your announcement
1 Connect with the answering system.
2 Press 7. The system plays your announcement, then beeps twice and is
ready to accept a command.
Recording a Memo
1 Connect with the answering system.
2 Press #, then enter the number of the mailbox where you want the
memo recorded, and begin speaking after the beep.
3 Press 5 when you are finished.
Setting the Clock
1 Connect with the answering system.
2 Press * 8. You will hear the current day, followed by “To change,
press 6 or 4. To change the hour, press 8.”
3 Press 4 to move back a day , or 6 to move forward a day.
4 Press 8. The system announces the current hour setting, followed by
“T o change press 6 or 4. To change the minutes press 8.”
5 Press 4 to decrease or 6 to increase hour.
6 Follow the same procedure to change the minutes setting.
7 The system announces the new time setting, then beeps twice to
indicate it is ready to accept a command.
7630_book.1AT&T 8/12/98, 6:29 PM25
25
Page 27

ANSWERING SYSTEM OPERATION
At Cordless Handset or Touch Tone Phone
Remote ON/OFF
Review ON/OFF Status
Connect with the answering system. Press ). The system announces the current
status, then beeps twice and is ready to accept a command.
Turning System Off
1 Connect with the answering system.
2 Press * 0. The system announces "The machine is off," then beeps
twice to indicate it is ready to accept a command.
Turning System On
When the system is off, it answers after 10 rings, and announces “The machine is
off,” then beeps twice to indicate it is ready to accept a command. Press * 0. The
system announces "The machine is on," then beeps twice.
Recording a Message When System is Off
Press # when the system answers after 10 rings. The system will beep to signal
you to begin speaking.
Changing Settings
1 Connect with the answering system.
2 Press *, 9. You hear “To listen to settings, press 9.”
3 Press 9. You hear the currently selected announcement, followed by
“T o select a different announcement, press 6 or 4.”
4 Press 6 or 4 to change the selected announcement. Press 9 to save
the setting.
5 The system announces the current ring select setting, followed by "To
change the number of rings or select toll saver, press 6 or 4."
6 Press 6 to increase number of rings, or 4 to decrease number of rings.
Press 9 to save the setting.
7 The system announces the current message alert setting, followed by
"To turn on or off, press 6 or 4."
8 Press 6 or 4 to change the setting. Press 9 to save the setting.
9 The system announces Remote Access Code, followed by "To select the
first digit, press 6 or 4, then press 9."
10 Press 6 to increase the first digit or 4 to decrease it, then press 9 to
save it. Continue in the same way for the second and third digits.
26
7630_book.1AT&T 8/12/98, 6:29 PM26
Page 28

ANSWERING SYSTEM OPERATION
At Cordless Handset or Touch Tone Phone
11 The system announces the Priority Calling Code, followed by "T o
select the first digit, press 6 or 4, then press 9."
12 Follow Step 10 to change the Priority Calling Code.
13 The system announces the current base ringer setting, followed by "T o
turn on or off, press 6 or 4."
14 Press 6 or 4 to change the setting. Press 9 to save the setting.
15 Press 5 to exit the set-up menu.
Reviewing Settings
1 Connect with the answering system.
2 Press 9. The system will announce the current settings.
Exit Remote Access
If you are using a touch tone phone, hang up the telephone. If you are using the
cordless handset, press a.
Audible Signals
Sound Meaning
Long ringing Incoming call
Single beep Valid button press
Three-part tone Page
Repeating 3-part tone Handset locator
Two short beeps Handset is out of range
Four short beeps Low battery
Four long beeps Base busy
Long buzzing tone Error - unsuccessful action
Series of ascending tones Action has been successful
7630_book.1AT&T 8/12/98, 6:29 PM27
27
Page 29

HANDSET BATTERIES
The handset batteries need charging when:
• The phone beeps four times when you press P.
• The INTERCOM/LOW BATT light on the handset is on when the phone
is off.
• The INTERCOM/LOW BATT light on the handset flashes when the phone
is on.
• The phone does not respond when you press P, and no lights go on.
Place the handset in the base so the CHARGING light goes on. The batteries will
be fully charged in 4 hours. Once the batteries are fully charged, you need only put
the handset in the base when the LOW BATT light flashes.
If it is more convenient for you, you can leave the handset in the base all the time.
It is impossible to overcharge the batteries. If you get a low battery signal even
after 4 hours of charging, the battery should be replaced.
CAUTION: To reduce the risk of fire or injury to persons or
damage to the telephone, read and follow these instructions carefully.
• Use only replacement battery 4051.
• Do not dispose of the battery in a fire. The cell might explode. Check
with local codes for special disposal instructions.
• Do not open or mutilate the battery. Released electrolyte is corrosive and
may cause damage to the eyes or skin. It may be toxic if swallowed.
• Charge the battery provided with or identified for use with this product
only in accordance with the instructions and limitations specified in this
manual.
• Observe proper polarity orientation between the battery and battery
charger.
28
7630_book.1AT&T 8/12/98, 6:29 PM28
Page 30

HANDSET BATTERIES
Replacing the Handset Battery Pack
1 Remove the battery compartment cover on the handset by pressing on
the indentation and sliding the cover downward.
2 Lift out the old battery pack and unplug it from the handset.
3 Hold the new battery pack and plug the cord into the handset. Place
the battery pack and wires in the compartment, as shown below.
4 Replace the cover by sliding it on its track up over the battery compart-
ment until it snaps firmly in place.
5 The new batteries must be charged before using this telephone. Place
the handset in the base unit and allow it to charge for 4 hours. The
telephone may operate before that, but for best performance, let the
batteries charge fully.
7630_book.1AT&T 8/12/98, 6:29 PM29
29
Page 31

IN CASE OF DIFFICULTY
If you have difficulty operating this telephone answering system, try the suggestions below. If you still have trouble, call 1 800 722-9125.
If the phone does not work at all
• Make sure the power cord is plugged into the base and an electrical outlet.
• Make sure the telephone line cord is plugged firmly into the base unit
and the telephone jack.
• If the phone does not beep or beeps four times when you press P,
the batteries might need recharging.
• If the LOW BATT light is flashing, the batteries need recharging.
• Make sure the handset battery pack is installed correctly.
• If the battery pack still will not charge, replace it with replacement
battery 4051.
• If the above suggestions do not solve the problem, try resetting the
security code, as described below.
• Place the handset in the base, and check to make sure the CHARGING light is on. Wait 15 seconds, then pick up the handset and
press P. The phone should operate properly. If it doesn’t, try
the next step.
• Place the handset in the base, and check to make sure the CHARGING light is on. Unplug the AC adapter from the outlet, wait 15
seconds, then plug it in again. The CHARGING light should go on.
W ait another 15 seconds, then pick up the handset and press P.
The phone should operate properly . If it doesn’ t, try the next step.
• Pick up the handset, open the battery compartment, and unplug the
battery pack. Wait 15 seconds, then reinstall the battery pack,
close the battery compartment, and place the handset in the base.
The CHARGING light should go on. Wait another 15 seconds,
then pick up the handset and press P. The phone should
operate properly.
If you hear two-beep signal when you try to use the handset
• The handset and base are not communicating properly. You might be
out of range while attempting to dial. Move closer to the base and try
the call again.
• If moving closer to the base does not help, the handset and base might
be set to different security codes. Reset the security code, described in
the section above.
If you have no dial tone
Check all the previous suggestions. If you still do not hear a dial tone, disconnect
the phone and try another one in the same jack. If there is no dial tone on that
phone either, the problem is probably in your wiring or local service. Call your
local telephone service company.
30
7630_book.1AT&T 8/12/98, 6:29 PM30
Page 32

IN CASE OF DIFFICULTY
If you hear noise or interference when using the phone
• You may be out of range. Move closer to the base.
• Press h to change to another of the 25 channels available. If the
noise is exceptionally loud, move closer to the base before changing
channels.
• Household appliances plugged into the same circuit as the base can
sometimes cause interference. Try moving the appliance or the base to
another outlet.
• The layout of your home or office may be limiting the operating range.
Try moving the base to another location, preferably on an upper floor.
If the phone does not ring when you receive a call
• Make sure the handset ringer switch is set to ON.
• Make sure the telephone line cord is connected firmly to the base and
the telephone jack. Make sure the power cord is plugged into an outlet
not controlled by a wall switch.
• You might be too far from the base. Move closer to the base.
• You might have too many extension phones on your telephone line to
allow all of them to ring. Try unplugging some of the other phones.
If you hear other calls while using the phone
• Press h to change to another channel.
• Disconnect the base from the telephone jack, and plug in a corded
telephone. If you still hear other calls, the problem is probably in your
wiring or local service. Call your local phone company.
If your telephone misdials or
you don’t hear the other person right away
• It might take a few seconds for your handset to find a good connection
to the phone system. While it is searching, the PHONE light blinks
rapidly. Do not start dialing until the PHONE light is on steadily.
• If you have dial pulse (rotary) service, you’ll need to reset the dial
mode. Press P p, #, #, #, 3.
• If you have TONE service and you hear clicks when you are dialing, you’ll
need to reset the dial mode. Press P p, #, #, #, 8.
If you hear noise in the handset and the buttons don’t work
The base unit and handset might not be set to the same security code. Place the
handset in the base for at least 15 seconds to reset the security code.
If speakerphone conversation sounds distorted
After the phone is powered up, the speakerphone initializes for about 10–15
seconds the first time it is used. Conversation should be clear after this.
7630_book.1AT&T 8/12/98, 6:29 PM31
31
Page 33

IN CASE OF DIFFICULTY
If messages are incomplete
• If a caller leaves a very long message, part of it may be lost when the
system disconnects the call after 3 minutes.
• If the caller pauses for more that seven seconds, the system stops
recording and disconnects the call.
• If the system’s memory becomes full during a message, the system
stops recording and disconnects the call.
If you have difficulty hearing messages
Check the volume setting.
If the system does not answer after the correct number of rings
• Make sure that the 2-digit message counter in the base is on. If it is off,
press O.
• If Toll Saver is on, the number of rings changes to two when you have
new messages waiting.
• In some cases, the system may be affected by the ringing system used
by the local telephone company.
• If the memory is full or the system is off, the system answers after 10 rings.
If CL appears in the Message Counter
You need to reset the clock.
If the system does not respond to remote commands
from a remote touch tone phone
• Make sure you are calling from a touch tone phone. When you dial a
number, you should hear tones. If you hear clicks instead, the phone is
not a touch tone telephone.
• The answering system may not detect the Remote Access Code while
your announcement is playing. Try waiting until the announcement is
over before entering the code.
• Make sure you enter your Remote Access Code correctly.
• There may be noise or interference on the phone line you are using.
Press keys firmly.
If your outgoing announcement isn't clear
• If you record your announcement at the base, make sure you speak in a
normal tone of voice, about 9 inches from the base.
• Make sure there is no "background" noise (TV, music, etc.) while you
are recording.
• For best sound quality, record the announcement using the cordless
handset.
32
7630_book.1AT&T 8/12/98, 6:29 PM32
Page 34

2
Cordless Digital Answering System
Speakerphone 7630
ANSWERING SYSTEM OPERATION
1 Dial telephone number and wait for
system to answer.
2 Enter Remote Access Code.
3 After the system beeps twice,
enter a command from the other
side of this card.
Your Remote Access Code ______
(The preset code is 500)
© 1998 Philips Consumer Communications L.P.
All rights reserved. Printed in Mexico.
848232864 Issue 1AT&T
2
Cordless Digital Answering System
Speakerphone 7630
ANSWERING SYSTEM OPERATION
1 Dial telephone number and wait for
system to answer.
2 Enter Remote Access Code.
3 After the system beeps twice,
enter a command from the other
side of this card.
Your Remote Access Code ______
(The preset code is 500)
© 1998 Philips Consumer Communications L.P.
All rights reserved. Printed in Mexico.
7630_WC.1AT&T 8/12/98, 6:25 PM1
848232864 Issue 1AT&T
Page 35

Play all messages 1, then mailbox
in mailbox number
Play new messages
in mailbox number
Save messages Hang up
Delete message being played 3
Delete all messages 3, then mailbox
in mailbox number after you hear
Repeat 4
Stop playback 5
Skip message 6
Change announcement * 7, after beep,
Review day/time settting 8
Change day/time setting * 8
Review settings 9
Change settings * 9
Review on/off status 0
Change on/off status * 0
Voice Help Menu 5 any time you hear
2, then mailbox
"End of messages"
press 5 to end
2 beeps
2, then mailbox
"End of messages"
press 5 to end
2 beeps
7630_WC.1AT&T 8/12/98, 6:26 PM2
 Loading...