

Page 1
Page 2
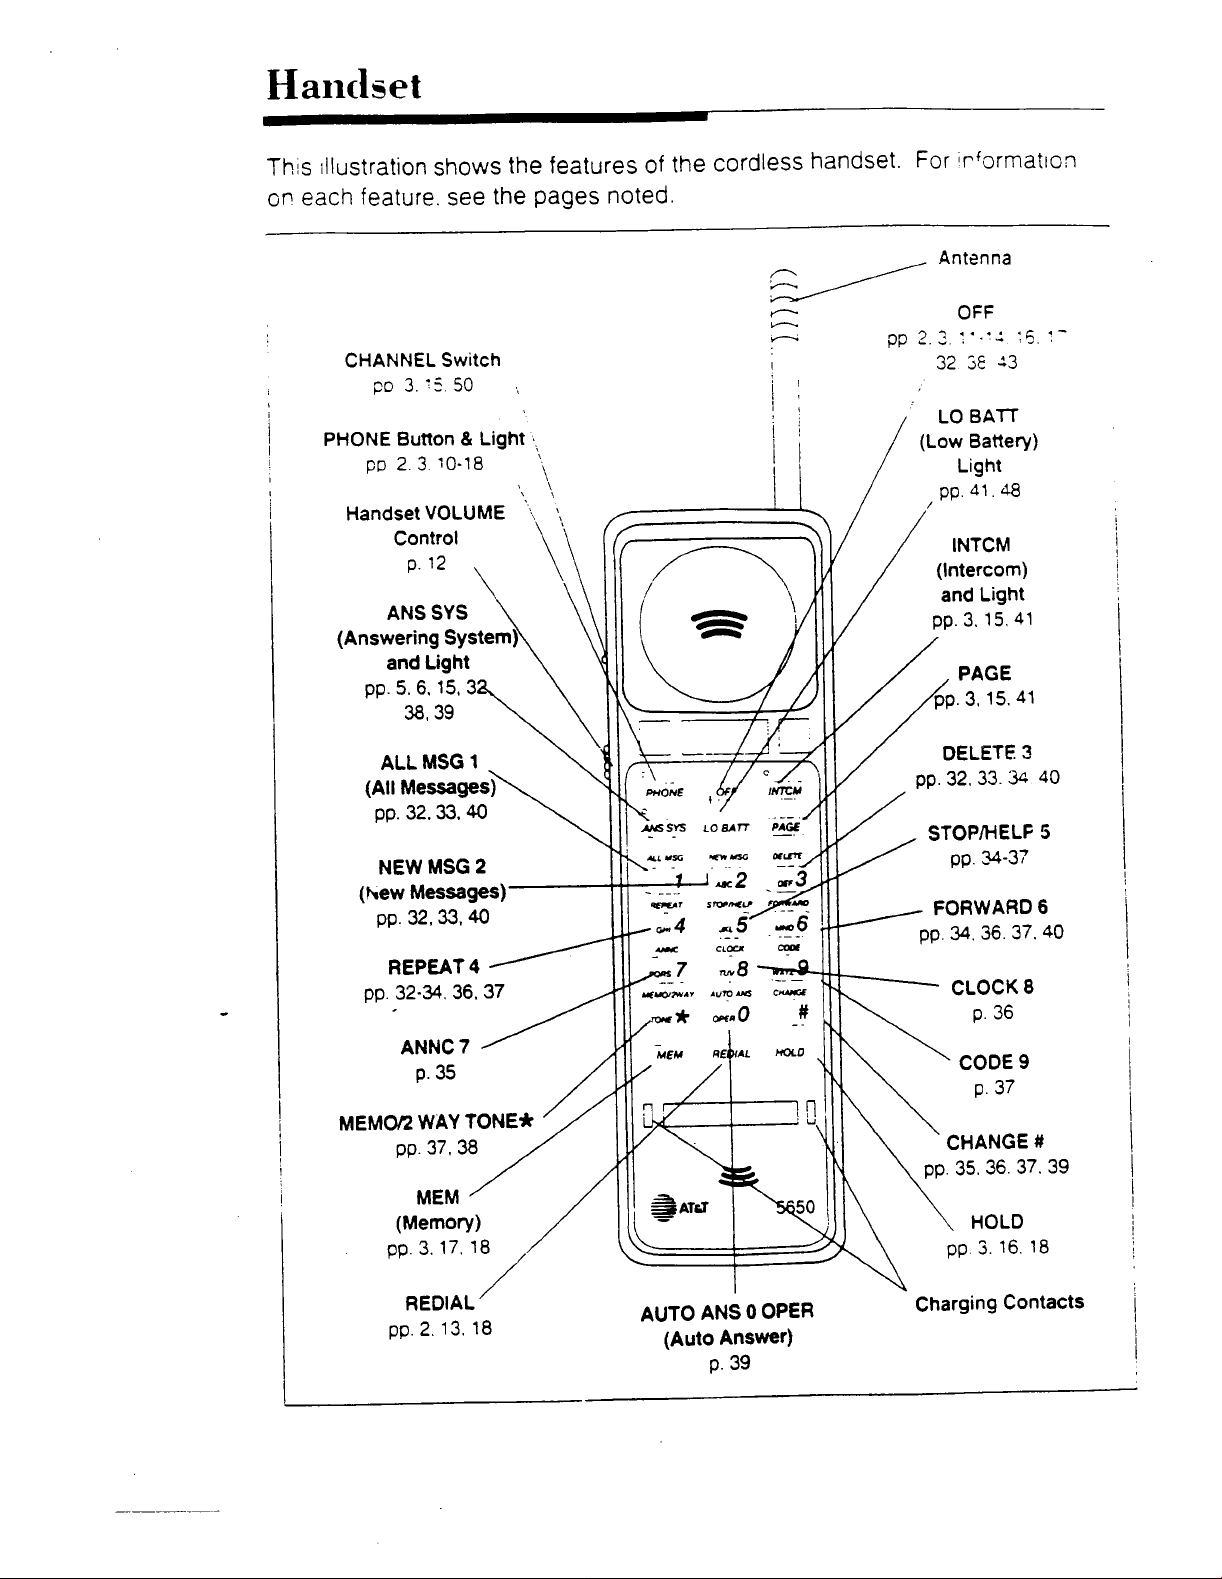
Handset
This illustration shows
or?
each
feature. see
CHANNEL Switch
p03.:5.50
PHONE Button
PD
2
3
Handset VOLUME
Control
&
10-18
the
Light
\
pp.
5.6.
15,
3
3639
\
the
features of the cordless handset.
pages noted.
w
n
Lh
n
I
,-
i
:
I
I
4
>\
',
%,
\
'i
~----3
1
,
For
Antenna
pp
2
3
32
LO BArr
(Low Battery
1,
/
Light
,
PP
IMtrta
IIW I W1.I
(Intercom) and Light
;rformatlcn
OFF
1'::
:5
'-
3I
43
41
4.8
ALL MSG
(All ~essagesj\
pp. 32.33.40
NEW MSG
(hew
Messages)
pp. 32,3340
REPEAT
pp. 32-34.36, 37
ANNC
MEMOR WAY TONE*
DO.
. .
p.
35
37.
1
2
4
7
38
MEM
REDIAL
pp. 2.
'
13. 18
\
I
-
--..
.-0.14
M
AUTO ANS
(Auto Answer)
'
1
Lo&
11.J
crou
.--MI
-v
.-
0
OPER
STOPNELF
pp.
-
cy
FORWARD
pp.
34.
Charging Contacts
34-37
-.
--
36.
37.40
6
5
.-
Page 3
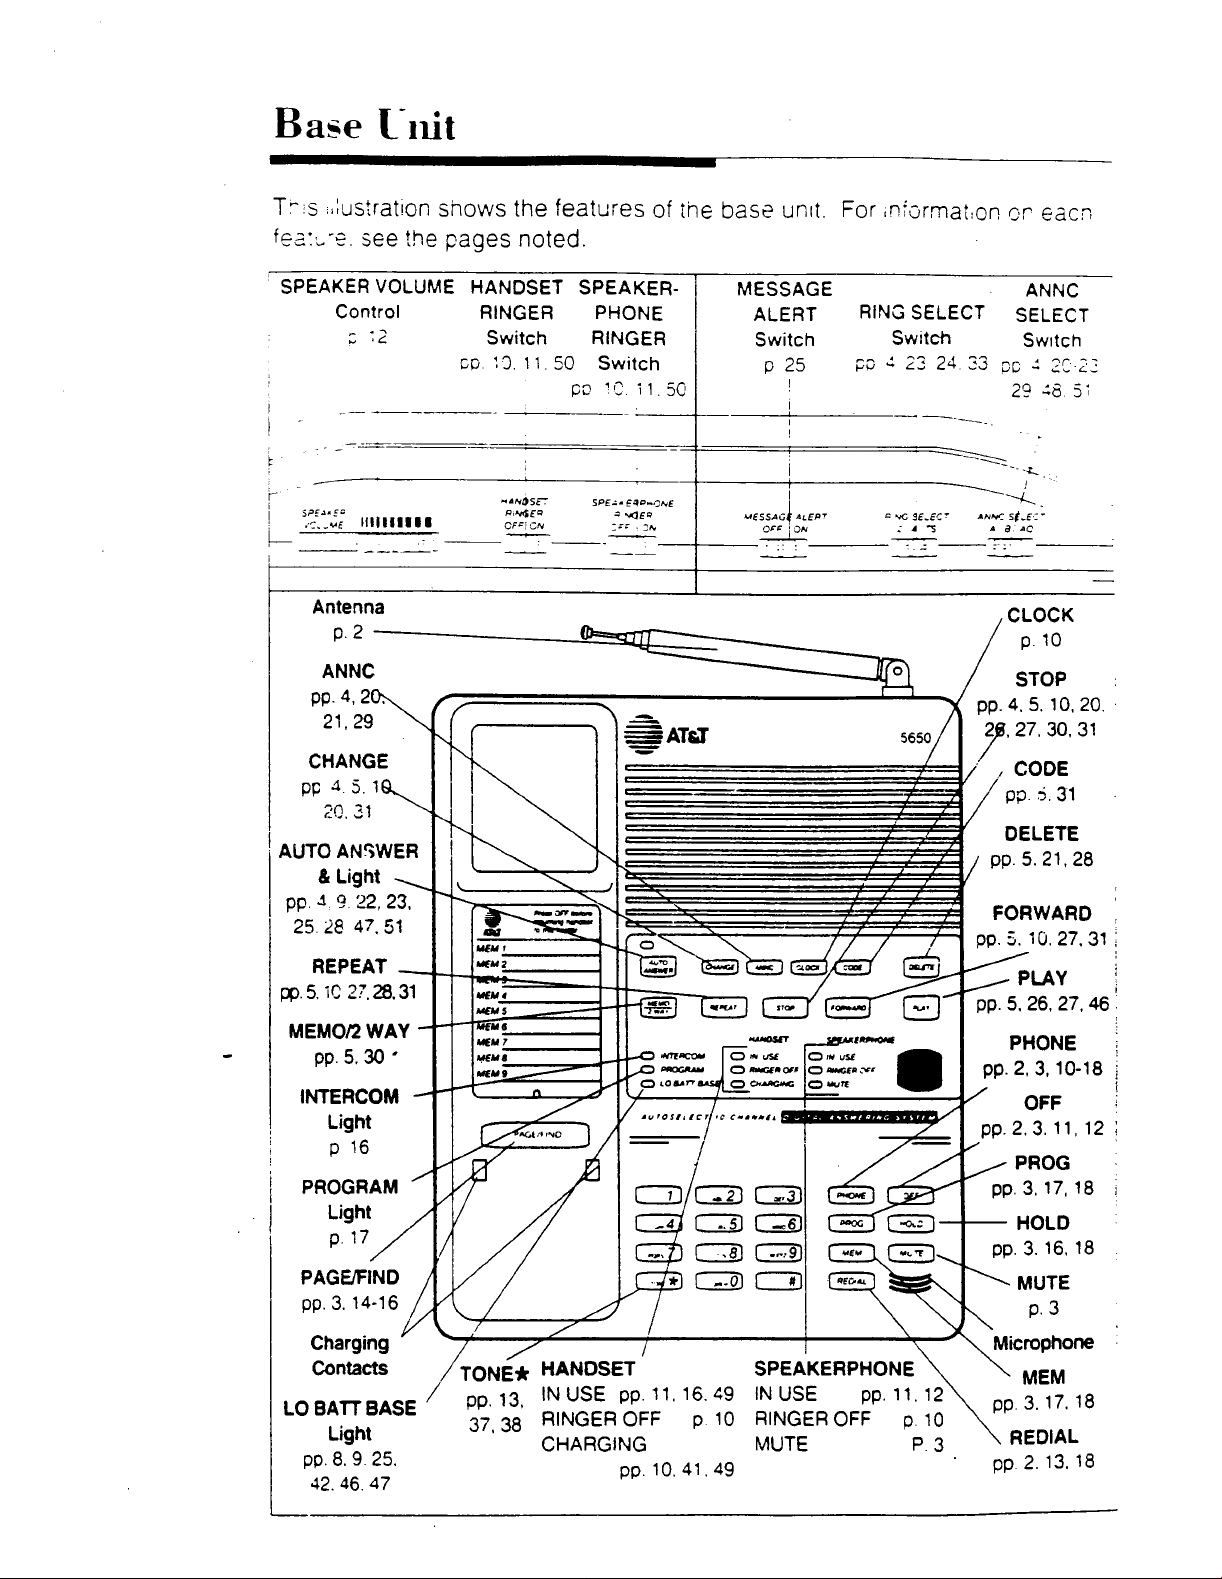
Base
T-
s
~EZ:L-E.
SPEAKER VOLUME HANDSET SPEAKER-
hit
llus!ratlon snows the features of
see
!he
pages noted.
Control RINGER PHONE
2
:i
co
Switch
:3
11
50
pa
RINGER
Sw~tch
'C
71
50
ine
bass
unt
For
Ini~rmat:on
cr
eacn
,
CLOCK
ANNC
21.29
CHANGE
pp
20.21
j'
e,
AUTO AN5WER
&
Light
,
pp.
A.
9
22,23,
25.28 47.51
REPEAT
pp.5.
iC
MEMOR WAY
pp. 5.30
INTERCOM
Light
P
PROGRAM
PAGEFIND
pp.
3.
Charging Contacts
Light
pp.
8.9.25.
42.
2'.28.31
16
14-16
46. 47
,
'
-
/
/
k'
-
/TON&
/
pp.
4.
7.
27.
i'
.
CODE
/
pg. 5.31
DELETE
pp.
5.
FORWARD
pp.
5.
/
,
PLAY
pp. 5.26.27,
PHONE
pp.
2,
/
OFF
pp. 2.3. 11, 12
,
/
PROG
pp. 3, 17, 18
-
HOLD
pp. 3. 16. 18
HANDSET
PP.
13, INUSEpp.11.16.~9 INUSE pp.11.12 pp,3,17,18
37,38
RINGER CHARGING MUTE
OFF
pp. 10.41.49
p 10 RINGER
SPEAKERPHONE
OFF
p
P.
10
\
3
REDIAL
pp
2.13.18
5. lo, 20.
309
31
21,28
10.27. 31
46
3, 10-18
i
Page 4
Table
of
Contents
Tcrss
Ars.:s-
Part?
C1lt.t:
2~
What
They
7;
Machine Operation
Ni-t
Mean
Making Calls
Ar,swering Calls
Speakerphone Operaiion 12
VOLUME
Controls 12
Adding the Handset or Base to a Call 13
Redial 13
Special Telephone Services 13
Temporary Tone 13
Page 14
Find 14
Operating Range 14
Using the
Intercom and Page 15
Handset Locator (Find) 16
Programmmg a Number
Into Memory 17
Dialing a Number Stored
in Memory
Directory Cards 17
Storing
a
Redial Number
in Memory 18
Programming a Pause in a
Memory Dial Phone Number 18
-
Programmiong and Dialing Long
Numbers or Sequences
Changing or Replacing a
Stored Number 19
Answering System
At
Owration:
Announcements to Callers 20
VOLUME Control 2 1
Setting System to Answer Calls 22
Setting System to Announce Only 23
Ring Select 2
Toll Saver 24
Message Window and Indicators 24
Message Alert 2 5
The Base
4
3
7
11
11
-
17
18
20
3
Listening to Your Messases
Saving hilessages
De!e:ing Messages
When the Memory Is
Screening Incommg
',;I
Cails
Priorlty Callmg
Recording a Telephone Ccrversat~zRecording a Memo
The Access Code -.
.&lsu.ering S!steni Operation:
Awa~ From The Base
Operating the Answering System
Using the Cordless Handset
Operating the Answering System
Using a Touch Tone Phone Away
From Your Home or Office
Additional Message Operations 34
Voice Help Menu 35
The Outgoing Announcement
Working With the Clock 36
The Access Code 36
Recording a Memo 37
Recording a Telephone Conversation 38
Call Monitoring
Cali Intercept 39
Turning the Answering System
On or
Off
Batteries
About the Handset
Charging !he Batteries 4
Replacing the Battery Pack 42
Replacing the Base Battery
Batteries
The Portable Cradle
About the Portable Cradle 43
Wall Mounting 44
Maintenance
Taking Care of Your Phone 46
In Case of Difficulty
Interference Information:
Part
FCC
Rules
15
of
Index
Wall-Mounting Template
Service Return Form
--
--
--
Wallet Cards
2
6
2
1
28
id
7
a
2
9
2
0
3
3
X
<,
3
2
3
2
3 3
35
38
3 9
4 1
4
4
43
46
4
53
54
57
5 7
5
1
1
2
7
9
O
Copyright
TM Trademark
1994
of
AT8T
ATBT.
All
r~ghts
reserved.
Page 5
Quick
Telepllontt
-
-
Reference
-
Operation
Guide
-
Before using your cordless phone for
the first time, you must leave the
handset in the base for at least
10
hours to fully charge the batteries.
NOTE:
cordless hagdset
If
you are planning to
any
distance from
take
the
the base, make sure that the handset
and
base
antennas are extended fully
and that the telephone line
base
will
.the
is relatively
give
you
.
-
..
.
stmight.
the
best
rnge;-""
-
-
;.
.-
..-,
reception
4:
"-?.
.+.-
cord
Doing
,.
,::'--
.
-
at
the
this
over
-:
-
-
Making Calls
Hanging Up
If
you
sre near the base
place the handset In the base.
If
the handset is away from the
unit, press
To
hang up a speakerphone call,
press
If
you
portable cradle,
hang up.
NOTE:
lOfF
on the handset.
I
i
on the base unit.
place
the
handset
first
Pressing
1-1
unit,
you
base
in the
press to
is the same
can
as picking up the receiver or pressing
the switchhook. Pressing is the
same as hanging up.
!
;
1
Press
[m
on the handset, wait for
dial tone, then dial the number from
the handset.
To
make a
phone, press
and dial
call
using the speaker-
ij-1
the
number from the base unit.
-
on the base unit,
-
-
Answering Calls
If
the handset is in the base, just pick
up the handset.
When the handset is away from the
base, press
To answer a
phone, press
[PHONE]
call
(=]
on the handset.
using the speaker-
on the base unit.
When the handset is in the portable
cradle, press
[-I
to answer the call.
Using the Speakerphone
To make a call, press
1-1
on the
base unit, wait for dial tone, and dial
the number on the base unit dial pad.
When the person answers, speak
toward the microphone.
-
To hang up, press
loFf
on the base
unit.
To answer a call, press
[m]
and
speak toward the microphone.
Using Redial
Press
[-I
then
1-1
to redial
the last number called from either the
handset or the base.
Page 6
,
Hold
Memory
When
speakerphone a-ess
I
put a call on hold
I
I
To return to the call. press
I
Mute
When using the speakerphone, press
[MUTE]
microphone.
To return to normal operation, press
[ME]
Using the Intercom
From the handset, press
nal the base unit. Then press
,From the base unit, press and release
using
to temporar~iy turn off the
again.
L-1
When the other person answers,
speak towara the microphone.
the harldset or
-
HOLD
to
PHONE1.
[PAGE]
[m].
to signal the handset.
to sig-
I
1
I
You must use the buttons on the
base un~t to program numbers Into
memory. To program a number Into
memory. press
phone number you w~sh to store.
press
number button from 1 to
You may use either the handset or the
base to dial a stored number from
memory. To dial
ory, press
number button for the memory loca-
tion of the number you want to call.
Changing Channels
If
a call, press
the handset. If the noise is very loud,
move closer to the base beidre
changing channels or you might
lose the call.
[mi,
you experience interference during
m,
and then press
a
[-I,
(-1
d~al the tele-
a
9.
number from rrlem-
(MEMI,
and the
on the side of
,
I
I
'
j
I
To end an intercom conversation, press
,I
on the handset or base unit.
I
Using Find
Press on the base and hold
it down for two seconds to begin a
repeating paging tone at the handset.
When vou locate the handset, turn the
Find
feature off by pressing
the handset or
[-I
on the base.
(Continued)
on
Page 7
QtLi~k
A
long
Signals
A
three-part warbling tone
A
page signal.
Four short
Reference
warbling tone
an
incoming call.
beeps
The batteries need charging.
Two
short
beeps
You are attempting to dial or use
intercom, or use the answering
out
system, but are
Rapid
You
beeping
forgot
(In the earpiece)
to
press
of range.
ioFFJ
handset.
Guide
- ~ -
~
on the
(ronti,rueci)
Recording Your Outgoing
j
Announcement
i
i
1.
Prepare your announcement.
!
2.
Set the
6
3.
Press
wait
4.
Speak toward thebase
tone of voice.
5.
When you have finished the
announcement, press
ANNC
or
AO.
[wl,
for
the system to
SELECT
then
Switch
-
.&&C
-la
bec
in
..
ISTOP!.
tc
rl
l~orral
A
four-part tone
Memory
The
A
long
Memory
The
Dial
number
bang
Dial
number
properly; store the number
One
beep
You
pressed a number
getting
A
repeating
a
dial
(when storing
numbers)
was
stored properly.
tone
numbers)
was
not
tone.
series
of
(when
stored
key
nine
storing
again.
after
short
beeps
You
have
placed
the
handset
in
the
n3moteholderMp~[oFFI.
One
bmp
The
messages
activated).
Repeating three
Prionty
every
15
seconds
answering system
(when Message Alert
beeps
call
has been
activated.
has
new
is
Automatic Answering Operation
The
answering system
is
ready
to
answer calls whenever the AUTO
ANSWER
on, press
Announce
Light is on.
If
the
light
is
AUTO ANSWER^.
Only
To set the system to answer calls
and
give
an announcement without
taking messages, set the ANNC
SELECT switch to AO. Ensure
you have recorded an outgoing
announcement for AO.
Ring
Set the
or
Select/Toll
RING
TOLL
SAVER.
Saver
SELECT Switch to
not
2.
4
i
!
i
I
I
,
4
I
Page 8
Listening to Your Messages
Ail
of
---
Playmg
and release
Playing
hold
New
[m
Your Messages: Press
PLAY..
Messa~;es Only: Press and
until the system begms play-
Ing messages. then release the button.
'
Clearing Messages: Press and hold
,
:DELETE;
i
Saving Messages: Unless you press
im,
i
saves messages.
'
Repeating a Message: Press and
i
:
release
!
playing at the beginning of the message.
You may press and release
many times
until the system beeps once.
the system automatically
(-1.
The
system resumes
1-1
as
you wish until you reach
the messages you want repeated.
Skipping a Message: Press and
release
resumes playing at
1-1.
The system
the
beginning of
the next message. You may press
and release
[FORWARD?
as many times
as you wish until you reach the message that you want to hear.
Interrupting Message Playback: Press
and release
!m]
to interrupt any
message playback operation. Press
'and release
[m]
a
second time to
reset the system and exit the message playback mode.
ing else in the next
If
you do noth-
30
seconds, the
system will reset itself to the end of
the last message, so that none are
accidently erased.
as
'
I
Recording a Memo
I
i
1.
When the phone
press
'~€M0/2
system to beep. Speak
base
:
2.
To stop recording. press
in
a normal tone
IS
WAY
nor
an2
In
SSE
~vZ,i
tcba:2?2
of
vcx-c
STOP
'cr
'-e
:rle
Recording a Telephone Conversation
1.
During a phone conversation, press
(-1,
and then inform your
caller that you are recording the call.
2.
To stop recording, press
!STOP;.
The Access Code
Displaying the Access Code at the
Base: Press
[CODE].
Changing the Access Code at the
Base: Press
Press
-1
(-1,
then
I
CODE
(to increase the code
!.
displayed) or (to decrease
the code displayed). Press
ml
when the number you want is
displayed. You may use any two-digit
number from
10-99,
except
30.
Operating the Answering System Using the Cordless Handset
Establishing a Connect~on with the
Answering System: Press on
the cordless handset and wait for the
ANS
SYS
Light to go on.
-
I
I
I
!
:
Listening to Your Messages:
Press
[11
to listen to all of your
messages.
(Con
t~nued)
-
.3
Page 9
Quick
-
Operating the Answering
System Using the Cordless
Handset
Reference
(continued)
Guide
(corrtir,cced)
Operating the Answering
System
Handset
Using
(continued)
the Cordless
Press
messages.
Press
message.
Press
messages.
Press to save messages.
Press to repeat a message.
Press
Press to Interrupt message
playback (PAUSE).
Press
playback mode.
The Outgoing Announcement: Press
a
to hear your outgoing announcement. Press
your announcement.
The Clock: Press
dayhime setting. Press
change your dayltime setting.
'
to
listen
to
del~ie a selected
'3
@
to skip a message.
a
@
13,
to
new
to delete
to exit message
then
@
@
to hear your
m,
all
to change
then
@
to
To
Record a Telephone
Conversation: While on call.
:
ANSSYSj,
I
I
,
i
I
versation.
I
with state and federal
i
i
regarding recording a telephone cail.
i
you should begin the recording
process and
you are recordmg the call. Press
stop recording.
To
Check Answering System Status:
Press
To Change Answering System Status:
Press
then
To
@I.
m,
then
to
record
ensure that
regulations
then
tell the caller
@.
the
you
press
ccr-
com;!y
that
to
;
I
1
The Access Code: Press
your access code. Press
'to change youreaccess code.
To Record a Memo: When the
phone is not in use, press
record a memo.
Is]
@I,
to hear
then
@
to
Page 10
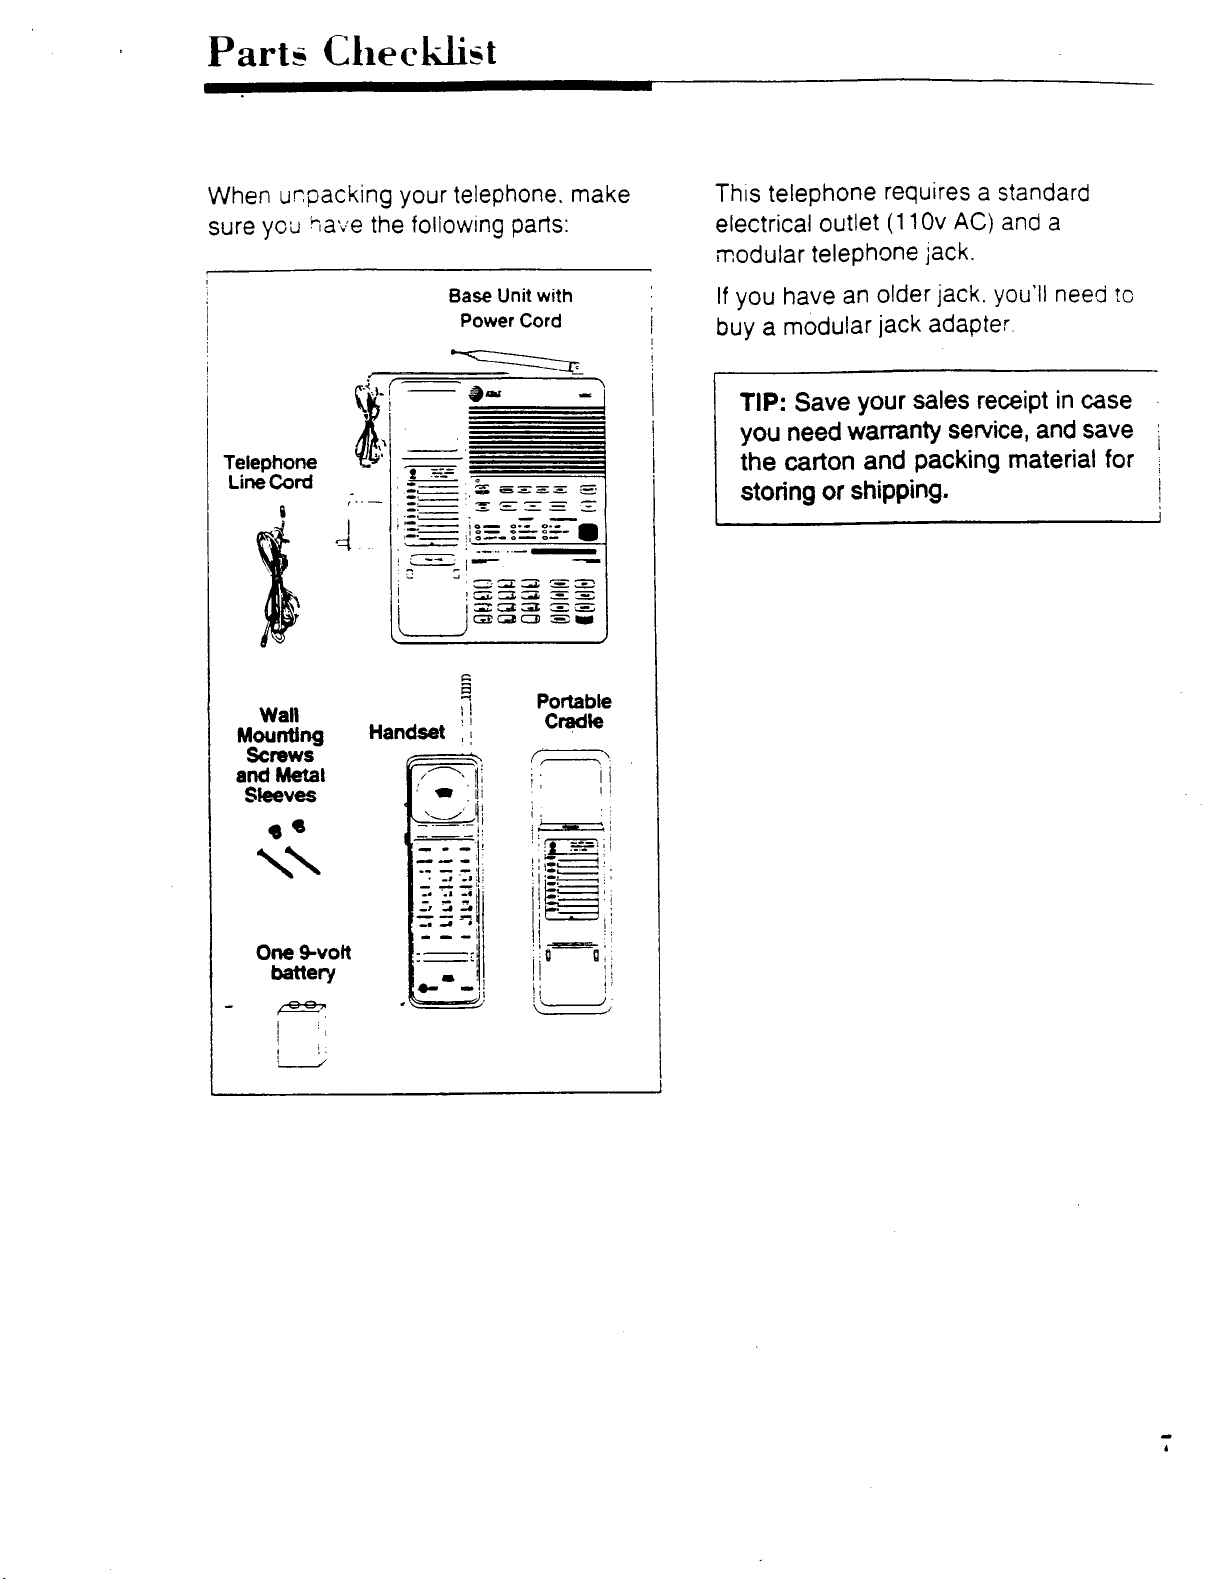
When urpacking your telephone. make
sure
you
+lave
the following parts:
Base
Unit
with
Power Cord
Telephone
Line
Cord
f
u
Wall
Mounting
Scmws
and
Metal
Sleeves
Handset
-I
I
I
!
1
,
Portable
Cradle
This telephone requires a standard
electrical outlet (1 10v
AC)
and a
modular telephone jack.
If
you have an older jack, you'll need
buy a modular jack adapter
TIP:
Save your sales receipt in
case
you need warranty service, and save
the
carton and packing material for
storing
or
shipping.
?c
:
i
1
\\
One
-
8*
4vott
batter/
-
I
I
,
!.
!d
Page 11
1
Choose a spot
outlet
Your phone requires a mod~lar telephone lack and a standard
outlet
not be controlled
the switch is ever turned
phone
and
(1
10v
will not operate.
near
a
telephone
AC).
The
by
an electrical
jack
eiecxcal
outlet skould
a
wall
s:*,,ltch:
off,
the
~f
NOTE:
To
avoid losing your
announcement or messages stored in
memory, you should leave the system
connected to
ing
the base battery.
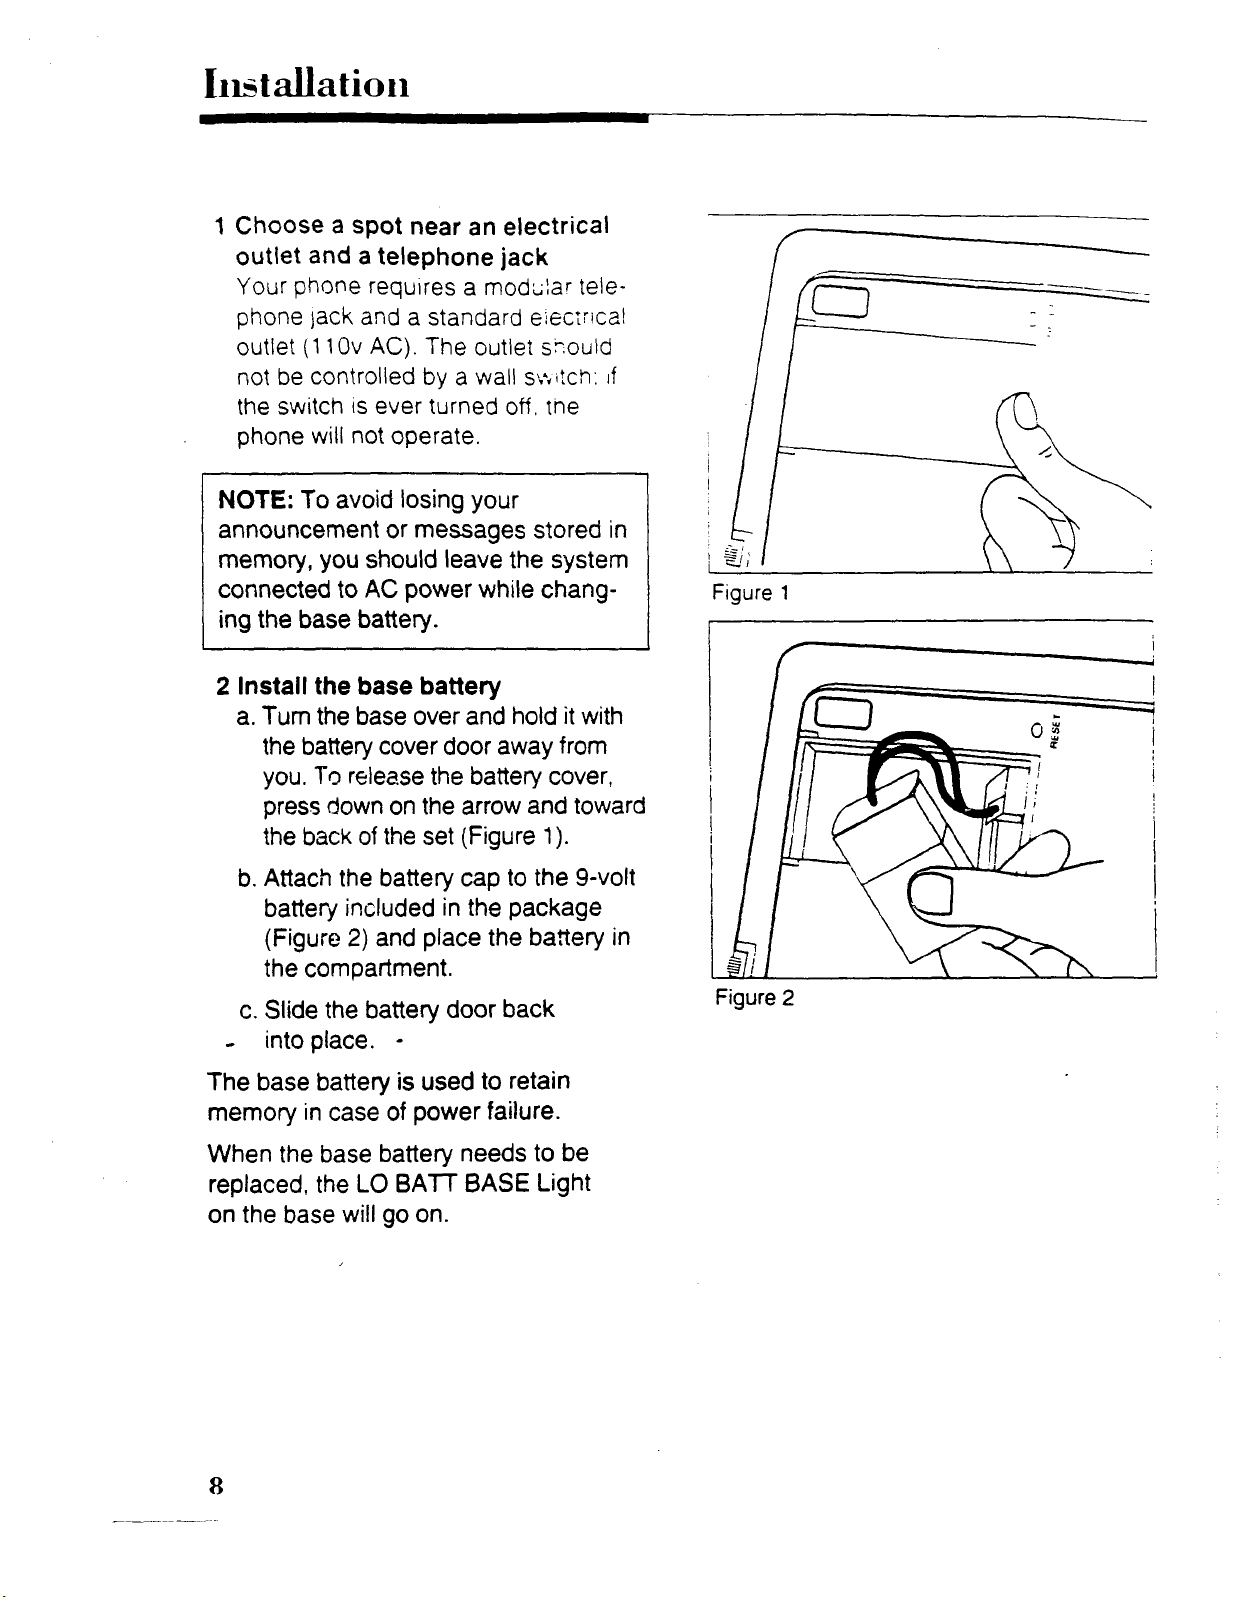
2
Install the base battery
a. Turn the base over and hold
AC
power while chang-
it
with
the battery cover door away from
you.
To
release the battery cover,
press
the back of the set (Figure
b.
Attach the battery cap to the 9-volt
down
on the arrow and toward
1
).
battery included in the package
(Figure
2)
and place the battery in
the compartment.
c.
Slide the battery door back
-
into place.
Figure
Figure
1
2
The base battery is used to retain
memory in case of power failure.
When the base battery needs to be
replaced, the
LO
BAlT
BASE Light
on the base will go on.
Page 12
3
Set DlAL
Set
the
if
you have touch tore sewice,
PULSE
MODE
DlAL
switch
MODE
switch to
TONE
or
if
you have dial pulse (rotary)
service. If you have difficulty dialing.
see page
49.
To change dial mode
during a call. see Temporary Tone on
page
4
Connect the telephone line cord
13.
The telephone line cord has a snap-in
plug on each end. Insert one of the
plugs into the jack in the rear of the
base unit. Insert the other plug into a
telephone jack. Make sure the plugs
snap into place.
5
Plug
in
the
power
cord
Plug the AC adapter on the power
cord into an electrical outlet not controlled
bv
a wall switch. When you
connect the unit to an electrical out-
let, the system automatically begins
formatting digital memory. This takes
about
80
seconds.
0
0
0
I
I
Figure
INTERCOM
PROGRAM
LO
SATT SASE
1
HANDSET
0
IN
USE
0
RINGER OFF 0 RINCEir
0
CHARGING
0
0
SPEAKEPPHCS,
rN
iiSE
CFE
MbTE
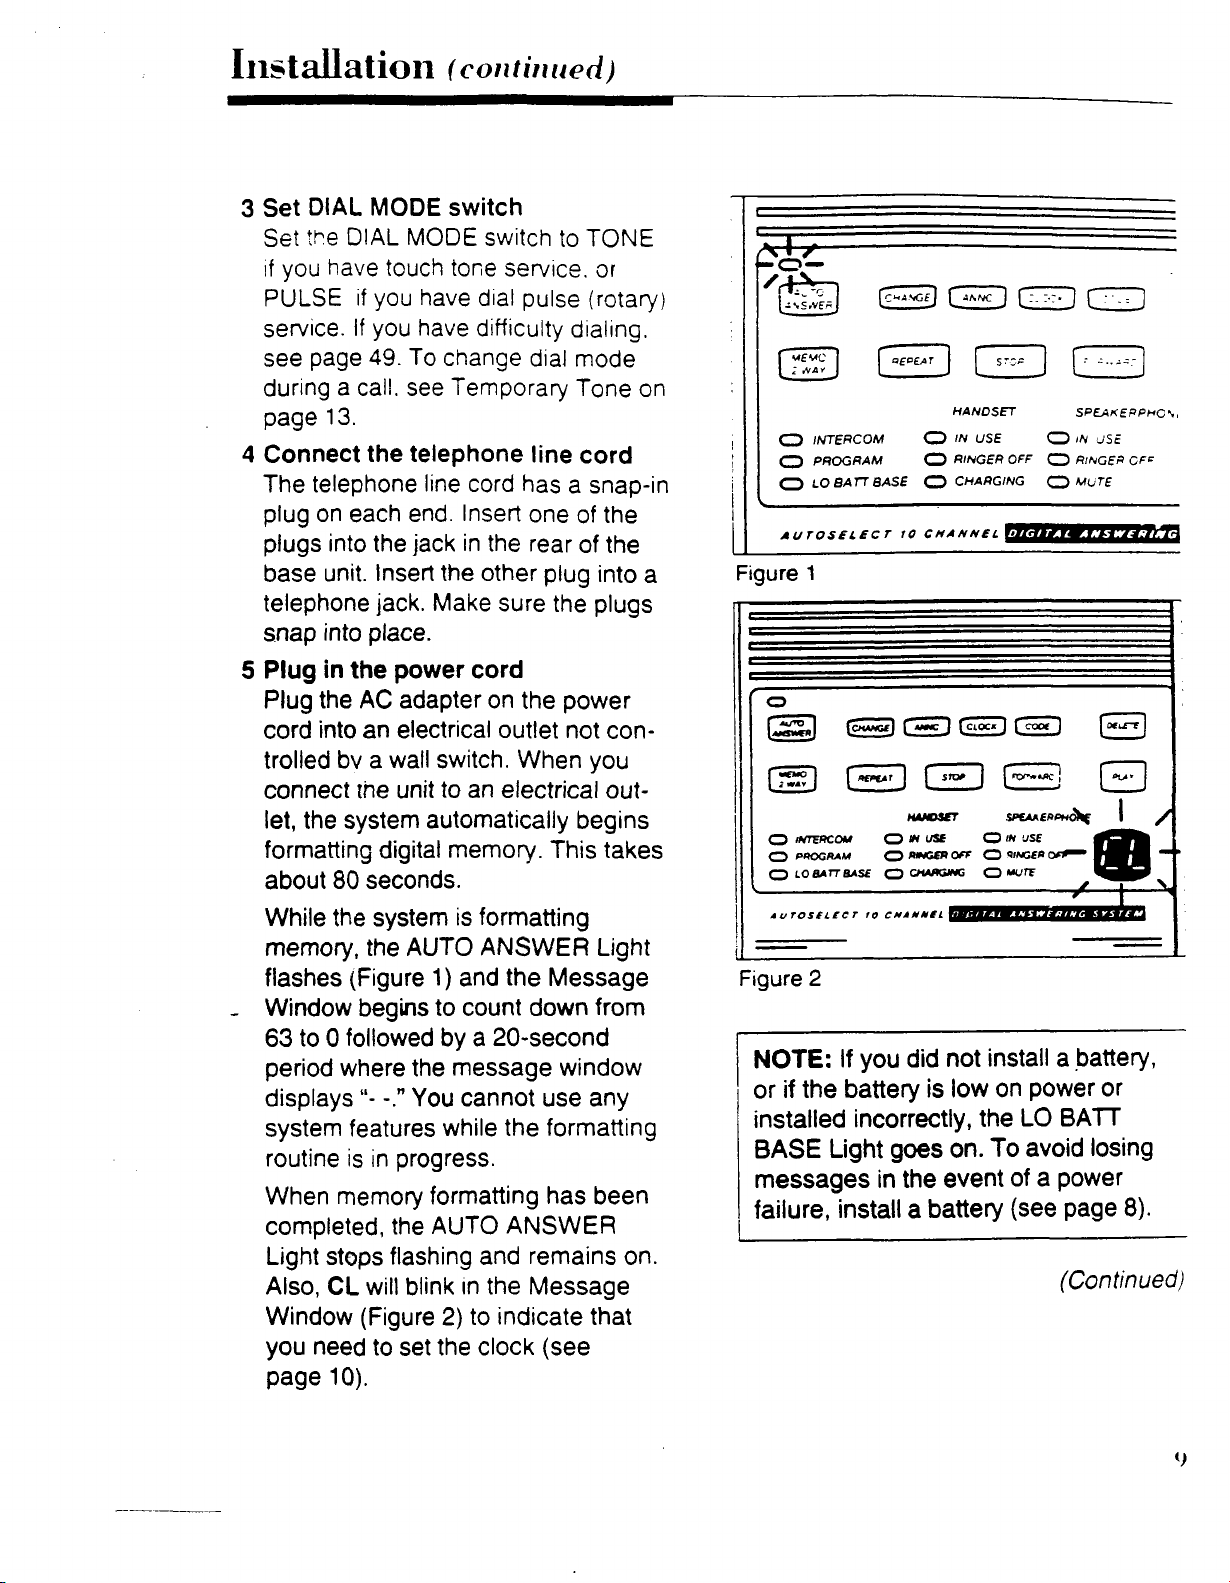
While the system is formatting
memory, the
flashes (Figure
-
Window begins to count down from
63
to 0 followed by a 20-second
AUTO
ANSWER
1
)
and the Message
period where the message window
displays
"-
-."
You cannot use any
system features while the formatting
routine is in progress.
When memory formatting has been
completed, the
AUTO
ANSWER
Light stops flashing and remains on.
Also,
Window (Figure
CL
will blink
In
the Message
2)
to indicate that
you need to set the clock (see
page
10).
Light
Figure
2
NOTE:
If you did not install a battery,
or if the battery is low on power or
installed incorrectly, the
BASE
messages
Light goes on. To avoid losing
in
the event of a power
LO
BATT
failure, install a battery (see page
-
-
(Con
8).
tinued)
Page 13
6
Set the Clock
The
Clock feature
and !me of each message rece~ved.
To
set the clock:
a.Set the SPEAKER VOLUME
Control on the side of the base
to a comfortable level.
NOTE:
must follow the steps quickly.
pause for more than
system will announce the complete
day and time setting.
complete day and time and it is not
correct, you
6b.
steps
To set
b.Press
You will hear a day of the week.
c.Press
To set
d.Press
e.Press (to decrease) or
-
1-1
the correct hour. Make sure the hour
is correct for a.m. or p.m.
While setting the clock, you
need
It
is
helpful to review all
before you begin.
dsy
i=J,
!XZVI
until you hear the correct day.
hour
iCrOCKl
(to increase) until you hear
w~ll
record the day
If
you
30
seconds, the
If
you hear the
to start over at step
of
the
then
m*.
or
[FORWARD!
to hear an hour.
To set minutes
f.Press
g.
Press
1-1
correct minutes.
h.Press
and time.
To review day and time:
[CLOCKJ
1-1
(STOP]
to hear minutes.
(to decrease) or
(to increase) until you hear
.
You will hear the day na. Now press
Press
-1.
7
Set the RINGER Switches
Two RINGER
turn the telephone rrr~ers for
the handset or the
You can dial
w~th either one or both rrngers
Set the HANDSET and SPEAKEaPHONE RINGER Switches on
base unit to
ring. When the Switches are se!
OFF,
RINGER
light whenever RINGER
set to
8
Fill in the telephone number
On the handset, insert a pointed
object into the hole in the window,
and gently pry up the window until
pops out. Write your phone nljmber
on the card and replace the window
9
Charge the handset batteries for
10
Place the handset in the base and let
the batteries charge for
You can use the cordless handset
before the
sure to return the handset to the base
so it can :hge fully. The CHARGING Light on the base unit will light to
show the batteries are charging.
more information about the batteries.
see pages
1
0
Check for dial tone
After the batteries are charaed.
up the handset and extend;ts anten-
the phone will
OFF.
hours
Sw~!cn~s
Sass
or
answe-
ON
so the phone
not
OFF
Lights on the base
10
hours are up, but be
41
-42.
[PHONE]
The PHONE Light should light, and
you should hear the dial tone.
see "In Case of Difficutty," page
(0N.OFF)
ai1ob.v
yc,
e1:-rr
umt
or
calls
nor-3.
c"
wli
ring.
T9e
Switches
10
hours.
on the handset.
If
t2
r-
cC:
tr?
::
will
are
card
it
For
pick
not.
49.
:
Page 14

You can make calls from the handset
anywhere w~thin range of the base.
Usually when you use the handset close
to the base. you won't have to extend
the handset antenna. However, your
phone
both antennas fully extended.
Using
Pick up the handset and press
The
the HANDSET IN
will both light. When you hear a dial
tone, dial the number.
If
press
[W]
wilf work best
the
handset:
PHONE
you
make a mistake when dialing,
Light on the handset and
to hang up, then press
to get dial tone again.
if
you always keep
USE
L~ght on the base
I;.
Hanging
If you are near the base you
place the handset back n the base
to end the call.
If
you are usmg the handset
the base. you must press
the call - otherw~se your phone
"off the hook" and callers w~ll get a
s~gnal.
If you place the handset In the port~ble
cradle. you must press
call. If you forget, the handset w~ll sound
a series of beeps.
To end a speakerphone call, press
on the base unit.
Answering
up:
Calls
cal
away
-
OFF
'OFF1
to end
to
er2
w~ll
kc-
2e
hsj
the
:OFF
You must always press before
you can diai a call on the handset.
You can
using the switch on the side of the handset. See page
adj~ist the handset volume
12
for more information.
Using the speakerphone:
Press
SPEAKERPHONE
base will light. When you hear a dial
tone over the speaker, dial the number
on the base unit. When the person
answers, speak toward the microphone.
(It doesn't matter whether the handset is
in the base or not
speakerphone either way.)
[='I
NOTE:
handset or base, the Message Window
shows
display
dL
on
the
base unit. The
IN
USE
Light on the
-
you can use the
When making a call from the
The Message Window will
dL
until the call is ended.
When you receive a call, borh the
~f
handset and base unit will ring
RINGER Switches are set to ON.
You can answer calls using :he handset,
or by using the speakerphone at the
base unit.
Using
If your phone rings when the handset is
in the base, just pick up the handset and
answer the call as you would on any
other phone. Occasionally, especially
when you pick up the handset between
rings, you may not be connected. If this
happens, press
to connect the call.
If the handset rings when it's out of the
base
up the handset, extend the antenna and
press
the
handset:
[MI
-
or in the portable cradle - pick
to answer the call.
on the handset
both
Page 15
Telephone
Operation
(cor,ti,~ueci)
Using the speakerphone:
To
ans~rier
base
phone.
handset is
use the speakerphone either way.)
Hanging
To end a handset call, either place the
handset back in the base, or press
on the handset.
To end a speakerphon~ call. press
on the base unit.
NOTE:
portable cradle, you must press to
hang up, or
nal. If you forget to press
handset
a
call,
press on the
unt
and speak toward the micro-
(It
doesn't matter whe!her the
in
the
base or not - you
up:
If
you place the handset in the
callers
will
get a busy sig-
I,
will
beep rapidly to remind you.
can
'OFF'
the
Speakerphone Operation
Answering Calls:
Press
micrz~bone.
Hanging
To
-
OFF
NOTE: Pressing
as picking up the handset on a regular
phone. Pressing is the same as
hanging up.
VOLUME
Handset VOLUME Control:
Slide the handset
toward the top of the handset to
increase,
handset to decrease, the sound
the handset. This will not affect what the
other party
PHONE,
Up:
Pang
up
a
on the base.
Controls
or
toward the bottom of the
is
and speak
speakerphone
[PHONE]
VOLUME
hearing.
tc;*;ara
is the same
the
ca!l.
pr3s
Control
level
in
The base unit also works as a speaker-
phone. It allows you to make and
receive calls without using the handset.
You can use the speakerphone while
the handset is in or out of the base.
Making Calls:
1.
Press
SPEAKERPHONE IN USE Light will
light.
2.
When you hear the dial tone over the
speaker, dial the number
manually or by Memory Dialing.
3.
When the party answers, speak
toward the microphone.
I-1
on the base unit. The
-
either
SPEAKER
During the call you may want to use the
SPEAKER VOLUME Control to adjust
the
speaker volume to a more comfort-
able listening level. (This doesn't affect
how your voice sounds to the caller
that's controlled automatically.)
VOLUME Control:
-
Page 16
If
someone
you can join the conversation on
speakerphone. Just press
IS
speaking on the handset.
the
:PHONE:
on the
base unit. (It's much like picking up an
extension.) Either party can then leave
the conversation by pressing
I
!OFF.
Likewise, if you're using the speakerphone, someone at the handset can join
the conversation by pressing
the handset, then leave by pressing
[PHON€~
on
m.
The call will remain connected as long
as either the handset or the speakerphone remains on the line. (To discon-
nect the call, the buttons on the
base unit and handset must be
pressed
.)
If
you have dial pulse (rotary) telept-ior:e
service, this feature lets yoil enter
the
codes or tones needed to operate
answering machines. or to use electronic banking
services.
calling cards. and
other special services.
First dial the call normally. Then turn on
the Temporary Tone feature
the
[mj
key. You can then press the
by
pressins
numbers or symbols you need and your
phone will send the proper signals.
To end the call, press
(,
or place the
handset back in the base. The phone will
automatically switch back to dial pulse.
The Temporary Tone feature will operate most special services over a dial
pulse line. However, some services may
actually require a touch tone
line.
To be
sure, ask the company that provides the
special service.
Your
telephorle can redial the last
number dialed from the handset or base.
Press
press
[PHONE]
1-1.
for the dial tone, then
fhe phone number will
remain in the redial memory until you
dial another number.
Special
If
you subscribe to special services like
Telephone
Senices
call Waiting or Call Forwarding, press
and
release
I=]
on the handset
whenever you would normally press the
switchhook on a regular phone. This is
just like the Flash feature on some other
phones.
NOTE:
service,
If
you have touch tone
you
do not need to use the
Temporary Tone feature. This feature
is used only when the phone is set for
dial pulse dialing.
(Con
tinuec
Page 17
Telephone
Operation
(corltirlrretI)
You
can
use
the Page feature
base to signal someone at the handset
To do so, press and release
on the base. This will sound a three-part
paglng tone at the handset.
This feature is useful if you misplace the
handset. To locate the handset using the
Find feature, press
base and hold it down until you hear a
second beep. This starts a repeating
paging tone at the handset, anda signal
at the base {just to let you know that the
feature
When you locate the handset, cancel
the paging tone by pressing on the
handset, or
The Find feature will turn itself off in
about three minutes
turned it off before then.
is
en;.
L-1
[PAGE/FIND]
on the base.
if
you haven't
from
the
PAGE.FlN0
on the
For best
handset and base antennas
the
;%hen uslng your handset away
the base.
It
is a good idea to make a few tr;al
in and around your home or office
become familiar w~th the operating
in your particular surroundings.
If
You Go Out
If
you move out of range during a
phone conversation,
or interference. To improve reception.
move closer to the base.
If
you try
almost out of range, you will hear
short beeps when you press
closer to the base and press
the call
remain "off the hook."
If
you try to make a call when out of
range, you w~ll hear
when yog press
the base, and press
make the call.
perfornance
telephone lme cclrd
of
Range:
you
to
end a call when you are
-
otherwise your phone will
two
[-I.
PHONE^
keer,
SG!~
tl-e
as
vde''
fcrliy
extef-ws
fror-
will
hear noise
m.
:
shcrt beeps
Move closer to
again to
as
cz'ls
to
iar;e
two
Move
to end
Operating
Your cordless telephone operates at the
maximum power allowed by the Federal
Communications Commission (FCC).
Even so, your handset and base unit
can communicate over only a certain
distance
locations of the base unit and handset.
the weather. and the construction of
your home or office:
Range
-
which can vary with the
If you receive a call while you are out of
-
range, the handset might not ring
it does ring, the call might not connect
when you press
the base, then press
answer the call.
I-1.
Move closer to
i-I
again to
or if
Changing Channels
Your Cordless Answering System
has an advanced 1 Ochannel
feature that minimizes the chance of
interference. Every time you answer
or make a call, the
provides the clearest channel.
Autoselect
~uto~elect"
5650
circuit
Page 18
Telepho~le
Operation
continued)
In the udikely event you notice noise
or interference while using your phone.
press and
another of the
rekase
10
'JHANNEL~
to change to
available channels.
If
the noise doesn't clear, switch channels
again until you find
a
quiet
one. Your call
will not be interrupted, and the message
indicator on the base will display the
number of the new channel for a few
seconds. (Channels are indicated by
the symbols
number
CO
-
C9.)
The channel
is
also displayed when you
remove the handset from the base,
and when you press
or
I=]
If
the noise is exceptionally loud, move
on the handset.
[B!,
jrlVTCM!
closer to the base before pressing
I-]
If
you
in the
mite
-
or you might lose the call.
do
lose the call, place the handset
ba~e
far
a few seconds, then
the
cail
again.
If
the noise or
interference continues, see "In Case of
Difficulty," on page
-
-
NOTE:
You
must be in range to
change channels.
while out
'might
lose
the
50.
If
bll.
you press
of
range,
you
!
NOTE:
I
I
intercom is about the same as for
I
regular telephone calls. You must
The
operating range for the
be within range to turn the Intercom
I
on or off, or to page someone at the
\
I
other end.
Paging Someone at the Other
If
you are at the handset, you can pase
End
someone at the base unit, and vice versa.
If
you are at the handset, press
and release
I-).
This will sound
a three-part paging tone at the base
unit. Press and release
to acti-
vate the intercom. You can then speak
with the person at the base
unit through
the handset.
If
tie answering system in tht; base is
busy answering a call or playing messages, or
tem's base is
if
the speakerphone
in
use, yob'll get a 3-beep
in
the sys-
signal at the handset to indicate that the
unit
is
unabls
to
give you access to the
intercom. When the base is idia again,
you'll be able to use the intercom.
If
you are at the base unit, press and
release to signal the handset.
This will sound a three-part paging tone
at the handset. When the person
answers, speak toward the base.
Usulg
Your
the
AT&T
Intercoiu
--
-
and
Page
Cordless Answering System
can also work as a two-way intercom
between the handset and the base
unit.
This
does not tie up your telephone
line
-
you can still receive calls when
using the intercom..
Answering a Page
If you are at the handset and hear the
three-part paging tone, press and
release
r.
This turns on the intercom and lets you speak to the person at
the base.
(Con
tinwed)
Page 19
Telephoae
If
YCL
-9
3:
:he base and hear the
Operation
;hree-pa7 ;qing tone, wait for the
i\TERCOM
Light to go on and then
speaic t~ward the base. You'll hear
!he
other person through the speaker
(co,rtircrced)
Th s feature w~ll be useful
forget where you've left your
S~GL 2 ~CC;
ha-cser
E'.F'
Ending an lntercom Conversation
To end an Intercom conversation and
:"rn off the intercom. press
.-
,OFF
on the
handset or base.
Answering a Call During an
lntercom Conversation
If
you receive a call while using the intercom, press to turn off the intercom and connect the incoming call.
Using the lntercom During
Phone
Call
a
First place the call on hold by pressing
:HOLD!.
you are
Lights on the handset and the
SET
Th?? vse the ~ntercom. While
usr:
the intercom, the
PHONE
HAND-
IN
USE
Light on the base will flash
to show that your call has not been disconnected. The person on the other end
of the phone call will not
be able to hear
your intercom conversation.
To locate the handset eas~ly. press
I
PAGE;FIND:
about two seconds, or until you hear
on the base unit and hold
;:
a
second beep. This will begin a repeaxg
page tone at the handset. Listen for
the paging tone and follow
handset. Once you find it, press
it
to find
ir.2
cn
the handset to cancel the paging tone.
You can also cancel the Find signal by
pressing
If
it is not shut off beforehand, Find will
[-I
on the base.
automatically shut itself off after about
If
three minutes.
the handset
by pressing and holding
you havec't located
by
then, turn -.- Find on again
LPRI;E,FINDi
on
the base.
.
To return to the call, just press
This disconnect$ the intercom
reconnects the call.
(ONE].
and
Page 20

Your
AT8T
can store
that
you
and
one of the numbe:
Cordless Answering System
nlne
can
differem phone numbers
dlal
just by
pressing
buttons.
To store:
1.
Make sure both the handset and
speakerphone are OFF.
2.
Press and release
,unit. The PROGRAM Light will light.
3.
Enter telephone number using the
dial pad on the base. (The number
can be up to
4.
Press ar
ber button
tion where the number is to be stored.
You will hear a four-note tone that confirms the number was stored properly
and the
you hear a long buzzing tone, or nothing
at all, press and release
[m]
Repeat the above steps to program
another telephone number, assigning
each phone number to a different
number button.
PROGRAM
and store the number again.
CAUTION:
interrupted, the numbers stored in
memory may be lost. To reenter the
numbers, follow the preceding steps.
16
T!
yelease
(I
-9)
If power to the base is
;PROG~
digits long.)
(-1,
for the memory loca-
Light will turn
on the base
then a num-
off.
If
then
Dialing
in
Memory
To
dial:
You can dial
on the handset, or on the base unit
when using the speakerphone.
1.
Press and release
dial tone.
2.
Press and release
3. Press assigned number button
For example, to dial the number you
assigned to key
[PHONE],
Directory
Write your telephone number and the
telephone numbers (or names) that you
want to store in each memory location
on the directory cards on the base, the
handset and the portable cradle.
To use the directory card concealed
the back of your handset, press the arrow
and slide the door toward the top of the
handset until it snaps in place (Figure
The directory card has an erasable sur-
face. If you write in pencil, you'll find
easy to change names when necessary
a
Nlilulwr
a
W],
Cards
Stored
number in Memory either
[m
to get
MI.
(1
-9).
"6",
you wou!d press
161.
In
1).
~t
(Continued)
17
Page 21
NOTE:
handset. slide it onto the track and
back
If
you
dialed in the memory, from the base.
press
unused number button (1 to
Propammhg
Me~nury
If
your phone is connected to a switchboard, you may have to dial a special
number (usually
line. When programming an outside
number in memory, program the access
number and a pause into the dialing
sequence. The pause will allow the
Switchboard
an outside line dial tone.
NOTE:
counted
to
TO
press
when storing the number. This inserts
a
1.5
pause, press
Each press makes the pause
onds longer; each pause takes up one
space of the 16 number capacity.
if
the door slips off the
In place.
want to store the last numDer
i,
16
digits in each memory location.
insert a pause in a phone number.
[mj
second pause. To insert a longer
[RED~ALI,
Dial
endugh time to give you
Each
pause you
as a digit.
at the appropriate point
(WI
[Wl,
a
Pause
Phone
"9)
to get an outside
You
two or more times.
then any
9).
in
Nuther
store
can store up
a
1.5
is
sec-
For example. to store
555-1234 in memory location
you would:
PROG
1.
Press
2.
Press
3.
Press
4.
Dial
5.
Press
6.
Press
If
you need to store a number longer
than 16 digits-for your alternate long
distance service or for telephone bank-
ing, for
between two arfferent memcry locat~ons.
Assign the first part of the number to cne
memory location, and assig~ the second
part to another.
For
301-999-8765 555-1 234-56789,
might divide it like this:
555-1 234-56789
To store the first part of this sequence.
press
[m
sequence, press
-
-
9.
'HOLD
.
555-1
MEM.
-,
,&I.
example--divide the number
example,
[PROG],
g.
.
234.
to
store
-
@@ITJ@~~~~EH
TO store the second part of this
IPFlOGl,
9-PAUSE-
2
El
El
El
6.
YOU
%
Z
Z
mmmmm[~m~~~.
To dial the com~lete number, press
[~]~lm'(wait for dialing to stop).
[MEMI,
121.
Page 22

It
is best to split the number at pauses
or convenient breaks in the sequence,
especially if you need to wait for necessary tones or signals before continuing.
Changing
Stored
You can change or replace a stored
number
its
place.
or
Replacing
a
>umber
by
storing a new number in
Page 23

hwc-erhg
Svstein
Operation:
At
The
Base
Before uslng your
should record an annouccement. Th~s
what callers
will
answering
hear
wnen
sys!err. yoil
IS
the system
answers a call.
You can record three d~fferent announce-
ments on this system:
When your system is se: to
Announce Only,
play the
A0
announcement, but
not record messages. (See page
A.
B.
and
it
w~ll
answer calls and
AO.
AO.
it
will
23,
"Setting System to Announce Only.")
To use the system, you only need to
record one announcement. However if
you record more than one, you can then
change the announcement without
recordins
announcement callers
a
new one.
(See
Yo select the
will
hear," page
21
To record an announcement
1
Prepaie your announcement.
The maximum length of an announce-
ment is four minutes.
If
the length of
the announcement exceeds four min-
-
utes, the Message Window display*
blinks to indicate that you need to
record again.
A
total of about
26
minutes is available for the outgoing
announcement and for all incoming
messages-the shorter your
announcement, the more time
for incoming messages.
Example for Announcement A
or
B:
"Hello. I can't come to the phone right
now. Please leave your name, number,
and a short message after the beep.
Thank you."
.)
RING SELECT
2
4
TS
7
--
+
I
Figure
Figure
1
2
A
SELECT
B
-"
A0
Microphone
.,
ANNC
Example for Announcement AO:
"Hello. I can't come to the phone right
now. Please call back after
9AM.
Thank you."
2
Move
ANNC
SELECT, located at the
left side of the unit, to the announcement you want to record (Figure
3
Press
[-I,
then
The system beeps once when it
begins to record. While recording, the
Message Window shows the length
of the announcement in seconds.
4
Speak towards the microphone
2)
(Figure
5
Press
See page
Wmdo
w
in a normal tone of voice
i
24
displays.
when you are finished.
for
explanations
of
Message
I
1).
Page 24

The avmuncement plays back automat-
ically.
The blessage Window dispisys
If
i\lf
necessary. adjust VOLUME.)
AP.
the announcement did not record
successfully. the Message Window
display' blinks to indicate that you need
to record again.
To play back your announcement at
any
time
1
Move
announcement (A,B, or
ANNC
SELECT to the
AO)
you want
to play back.
2
Set VOLUME to the middle.
3
Press
NOTE
AO,
cement to callers,
(ANNCl.
If
ANNC
the
system
SELECT
will
play
but
does not record
is set to
the announc-
incoming messages.
I
I
SPEAKER
VOLUME
If
you have not recorded an
announcement for the setting
select, the
will
blink. Either
1111111111
Message
choose
you
W~ndow display'
another
announcement or see To record
an announcement," page
20.
,
I
I
1
I
1
I
While your system plays back an
announcement, the Message Window*
shows
AP
(Announcement Play).
To delete an announcement
1
Move
-
announcemeht ( A,
ANNC
SELECT
6,
to the
or AO) you
want to delete.
2
Press
[m]
to begin playing the
announcement.
3
Press
announcement
(DELnf]
while the
is
playing.
The system will beep once and the
Message Window display will blink when
the announcement has been deleted.
Either record
move
ANNC
a
new announcement, or
SELECT to another setting.
To select the announcement callers
will hear
Move
announcement:
ANNC
SELECT to the desired
A,
0.
or AO.
To
bypass
the announcement
Callers with a touch tone telephone can
bypass your announcement
Q
after the announcement begins.
by
pressing
The
system skips the rest of the announce-
ment, beeps, and begins recording.
You may want to inform frequent callers
this feature.
Volume
Use
Control
SPEAKER
VOLUME Control
to adjust the volume of the system's
speaker. Slide the switch
until you find
a comfortable listening level.
See
page
24
Window
for explanations
displays.
of
Message
(Conbnued,
cf
2
1
Page 25

After
you have recorded your
announcements, the AUTO ANSWER
Light should be on, indicating that the
system is ready to answer calls. The
Message Window shows the number of
messages stored in
messages have been received).
If
the
AUTO
press and release
on
the system.
-
NOTE:
AUTO
ANNC
ANSWER
To
record
ANSWER
SELECT
memory
Light is not
[AUTO
ANSWER!
callers'
tight must
must
be
set to
(0
if
to turn
messages,
be
on
A
no
on.
and
or
6.
the
Setting System to
If you do not want your system to answer
calls, press and release
Not
(AUTO
Cds
ANSWER'
.
When the system answers a call, the
caller hears the announcement you
selected, followed by a beep. After
beep, the system begins recording your
caller's message.
While the system is taking a call, the
-
Message Window displays
message is recorded, the display
'changes to show the total number of
recorded messages.
NOTE:
maximum
the caller is still speaking after four
minutes,
seconds, or if system memory
out (system memory is
in length),
and
Messages are limited to a
of four minutes
is
silent for more than seven
the
system will beep once
hang
up.
-.
each.
26
minutes
the
After a
If
runs
The
AUTO
but no other answering system features
will be affected.
When
the system will answer calls after
rings. You can then turn the system
on
if
you are calling from a touch tone
telephone (see page
ANSWER Light will
you
!urn
off
Automatic Answering.
39).
go
off.
10
Page 26

A&lswe~q
System
Operation:
When set for Announce Only. your
system will answer incoming calls, play
your announcement. and then hang up
without recording messages. This feature is
often used by businesses such as
movie theaters and doctors' off ices.
--
I
NOTE:
'
answer calls, the
i
Light must be on.
In order for the system to
AUTO
ANSWER
I
1
Set ANNC SELECT to A0 (Figure
1).
!
i
I
i
i
At
RlNG
Figure
the
SELECT
1
Base
ANNC
(cor~tirirtet/,
\\.
SELECT
'1
2
Change your announcement if
necessary (see page
The Message Window will display
(Figure
2)
to
remind
20).
you
that Announce
A0
Only is on.
Announce Only will not affect your access to
the system when you are away from home.'
Ring
Select
-To choose the ~umber of times the
phone rings before the system answers,
set
2,
-
RlNG
4,
Set
or
TS
to
SELECT
Switch (Figure
(Toll Saver).
2-
and the system will answer
3)
to
all calls on the second ring.
-
Set to
4-
and the system will answer
all calls on the fourth ring.
Figure
t
ALERT
2
RING
2
SELECT
4
TS A
ANNC
SELECT
B
A0
-
Set to
TS-
and the system will
answer calls on the second ring only if
you have new messages.
If
no new
messages have been recorded, the
system will answer on the fourth ring.
See
pages
32-40
for rnformatron about "Answermg
System
Operatron Away from
the
Base"
Figure
3
(Con
tWed
Page 27

Set the RING SELECT Sw~tch io TS
w~ll
(Toll Saver) when you
be call~ng
from another locat~on to check for mes-
sages.
If
you have new messages (ie.
messages you haven't listened to yet)
waiting, the system
rings. If there are no new messages
w~ll answer af-ter two
.
+he phone will rlng at least three tmes
before the system answers. You can
then hang up af-ter the third ring to avoid
paying long distance charges.
Yo~r s!is:em provides two me:-ccs of
2'
tr?fcr--;ng you about the stax
system's operation: Message
the
';AC~GV:
codes and indicator lights.
Message
Window
The Message Window displays one-and
two-cnaracter codes to give
yo^
a running
coun! of messages received. ard pro-
vides status information. See Table
1
below for explanations of these symbols.
NOTE:
the
Toll Saver works only when
system
is
on and memory
available. Otherwise, calls are
10
answered after
1
Display
rings.
Blinking Display
--
0-50
A0
AP
-
CL
(blmkmg)
AS
is
21
22
22
23
2
1
29
9
29
What
It
Means
No
announcement is stored in memory
Answering a call
Current message count
Announce Only is on
Playing your announcement
-OR-
1
!
I
1
I
I
1
I
I
1
Temporary display while setting unit:
setting indicates you will hear your announcement,
when system answers calls
Clock needs to be set
Temporary dlsplay while setting unit:
i
I
I
I
I
I
setting mdicates you will NOT hear your
announcement when system answers calls
CO-C9
FL
(blinking)
FL
(alternating with
current message count)
dL
21
15
20
28
11
Current cordless channel
Announcement length has exceeded four minutes
Memory is full
Making a call from the handset or base
Table
I
I
1
Page 28

Indicator
Lights
The LO
BATT
BASE
Light (Figure
1)
goes on to tell you when you need to
replace the bzse battery.
The
AUTO
ANSWER
See
page
Light (Figure
8.
1)
indicates whether the system is ready to
answer calls and record messages.
When the light is:
-
Off
-
the system will not answer
';AUTO
calls. Press
ANSWER',
to turn
the system on.
-
On steady
-
the system is ready to
answer calls and record messages.
-
Flashing
-
system is formatting
memory or memory is full.
Message
If
you wan? your system to beep
every
Alert
15
seconds to notify you when
new messages have been received,
set
MESSAGE
side of the iinit, to
ALERT,
ON
(Figure
located on the
2).
If
you
do not war3 to hear the beeps, set the
switch to OFF.
-
il
Figure
I
I
I
Figure
1
MESSAGE
OFF
2
ALERT
ON
RING
2
SELECT
4
TS
(Continued)
Page 29

-
Befor? slaylng your messages.
adjust
m~ddle sett~ng.
Durrn~ message playback. the system
announces
message was received.
the message. The hlessage Window
shows
played. The system beeps once after
each message and announces "End of
messages" after the last message plays.
The following options are available for
message playback. See art for the location of the buttons used.
To
press
To
(messages that were recorded after the
last time you listened to your messages),
hold down
begins
seconds) and then release
SPEAKER
the
number
play
all
and
release
play
oniy
playing
VOLUME
:he day and time that the
of
the message being
messages
my].
and
and
to
the
then plays
memos,
new messages
FL~.
Wait until the system
a message (about two
[m].
If_
there are new messages, the
system displays the number of the first
new message as it begins to
there are no new messages, the system
announces "No new messages" and the
IS
display
blank for a few seconds.
play.
If
Page 30

&&&we&%
To
interrupt a message,
press
~layq
stopped. press
resume playmg at the beginning of the
current message. press and release
second time to reset the system and
ex~t the message playback mode.
If
within
the system announces "End of messages"
and the Message Window re-displays the
total number of messages.
To
press and release
resumes playing at the beginning of the
arc
release
t5e
message where you
REPEAT;.
you do not continue playing messages
message.
Press and release
30
seconds after pressing
repeat a message,
Swtem
LSTOPJ.
:PLAY,
or
[REPEATI.
Operation:
To contiwe
FORWARD
!STOP
.
TO
a
;m
The system
At
the
The system saves your messages
matically
you play your messages, the systerr,
announces "End of messages" and :ne
Message Window shows the total n,mSe:
of messages stored in memory.
NOTE:
26
(up to
the memory
or some of the stored messages
before
recorded.
if
The system can save about
minutes of messages and memos
a
total of
any
Base
you do not delete them.
50
is
full, you must delete all
new
messages can
(continrce,/,
messages). When
z_:r,-
Xee:
be
1
I
I
I
I
To
replay
press and release
ber of the message is displayed.
To
skip a message,
press and release
tem stops p!aying, moves to the begin-
ning of
playing. The system advances one message each time you press and release
an
earlier message,
I-]
[-I,
the
next message, and resumes
until the num-
The sys-
[FORWARD7.
Page 31

,&wwering
To
delete all messages,
lister!
down
When the system beeps once and the
Message Window displays
release
1
i
1
tc
all
of
DELETE:
'DELETE:.
NOTE:
any messages that were stored in
memory are erased, whether or not
you have listened to them.
When you delete all messages,
S~vstem i Operation:
your messages. Then
for about two seconds.
0,
you can
hold
j
At
the
Base
tcor~tirrrtrtl)
To
delete
while the system is playing the message, press and release
system eraes the message corresponding
Message Wlndow, beeps once, and
continues with the next message.
there are
in memory,
"End of messages."
Before the system announces "End of
messages," you can replay a deleted
message by pressing and releasing
1-1
is displayed.
Once the system reaches the end of
the messages. the messages that were
not deleted are renumbered. The
Message Window will then show the
new
rem;
only
a
specific message,
[ml.
+o
the
number shown in the
no
more messages stored
tt-d
system announces
until the number of the message
-
-3.1
n"mber of messages
Y
in memory.
The
If
W1en
When the Message Window display'
shows
message count, the
recording memory is full. With no menory available for messages, the system
will answer calk after
not play the outgoing announcement nor
record messages. Insteac, the system
will beep twice.
The system answers after
so that you can still have remote access
to your machine. By using remote
commands, you can replay messages.
delete some or all messages, and
request other functions available on
the system. See "Answering System
Operation: Away from the Base,"
pages
'
See page
Window dfsplays.
the
Memory
FL
alternating with the cment
32-40.
24
for explanar~ons of Message
Is
Full
26
minutes
10
rings, but it will
10
of
rings
Page 32

.hm+-ering
Tc
screen calls. set
or
B.
Adjust
hear the caller's voice.
If you decide to take
the cordless handset, use the speaker-
phone or
phone on the same line !o talk to the
caller (See "Call Intercept." rage
/
NOTE:
not stop right away, press and
release the telephone switchhook
or press
I
VOLUME
lift
the handset of any tele-
If the ann.ouncement does
(-1.
System
ANNC
a
SELECT
so that you can
call. either use
Operation:
to
A
39).
1
At
the
If
you do not want to be disturbed.
system
However.
you do want to receive. inform the caiier
Priority Calling.
When the caller enters the Priority
Calling Code from a touch tone
telephone, the system beeps loudly
to alert you to a priority call.
The Priority Calling Code is set at
cannot be changed.
To
1.
WIII
if
use
Priority
Dial your telephone number.
Base
answer the phone
there is a
Calling,
(corrtirt~tpfl,
particular
a
caller should:
for
call
yc,?
yo^.
!?at
#
#
and
oi
The user can choose to not hear their
outgoing announcement whi!e screening
incoming calls. press
To silence the outgoing announcement,
press (for at least
The message window display will
change from
To restore to
-
least two seconds. The message window display will change from
Release
Iml.
AP
AP,
to
press
AS.
2
seconds).
Release
1x1
for at
AS
Ir(NNCI.
to
AP.
2.
When the announcement begins to
play, press and release
3.
The system will beep three times.
then pause. This pattern
until the telephone is picked
beeps are audible to the caller
well as in the home.
If the telephone is not answered after
seconds, the caller will hear two beeps.
indicating that the system is ready for
the next remote command. The caller
can then press and release
leave a message after the beep.
@
twice).
la,
@
is
repeated
up.
0.
(Con
(i.e..
The
as
30
and
t~nuec
Page 33

,Amwering
System Operation:
At
the
Bme
(co,,tircctcvl)
NOTE:
warning beeps to let the other party
know that they are bemg recorded. To
ensure that you are in compliance
with any federal or state regulations
regardmg recording a telephone call,
you should start the recording
process and then inform your caller
that you are recording the call.
To begin recording,
at any time during a phone conversation.
The system beeps once and begins to
record.
To stop recording,
release
To listen to the recording,
instructions under "Listening to Your
Messages," page
Th~s unit does not sound
press
press and
(-1
ImI.
follow the
26.
,
'
I
I
I
I
I
I
Recording
You can record a memo to
played as if it were an inccmi?g message.
To
begin
After the system beeps once. speak
towards the microphone. While you are
recording, the Message Window shows
the length of the memo in seconds.
a
Memo
recording,
press
ue
stored and
I-.
To stop recording,
The system will store the memo with
your messages and will update the
message count.
To listen to the memo,
instructions under "Listening to Your
Messages." page
NOTE:
the memory is full, you will hear four
rapid beeps.
If you press and
press
26.
[m.
follow the
:
Page 34

~
--
The preset access code is
gives you access to your messages.
memos and announcements when you
call in from another locat~on. You can
use the preset code. or choose your
own. If you change the code. be sure tc
write it down so
your system when you are away from
your home or office.
Displaying the Access
-
10.
ycu'll be able to access
Code
p~
This code
at the Base
1
Set message VOLUME control to the
middle.
2
Press
code displayed in the Message
Window and hear it anncunced. The
access code can be changed from
the preset number
number from
I=].
You will see the access
(1
0)
to any 2-digit
10
-
99,
except
30.
3
Press
REPEAT
nurrber displayed.
r~ORWARD
to decrease the
to Increase
or
-
4
Press
number is displayed.
5
To
number, press
will announce the
display
NOTE:
wallet cards with you when you leave
the base, for
remote touch tone
your
STOP
see and hear the selected
Take one of the enclosed
access
when the desired
-
:COO€
it
in the Message Window
a
quick reminder of
code.
.
The system
new
code and
commands
and
Changing the Access Code
at the Base
1
Set
SPEAKER
the middle.
-
2
Press
see the access code displayed in the
Message Window and hear it
announced.
[el,
VOLUME control to
then
[=I.
You
will
Page 35

Answering
Svstem
Operation:
Away
Establishing a Connection with the
Answering System
Press
Light to go on. The system will announce
the number of messages you have (for
example: "You have three messages").
and then beep twice to indicate that
ready to accept a command.
If
it
doesn't receive any instructions rn a
few seconds, the system will automati-
.
cally play all of your messages for you.
You can allqw the system to play your
messages, or you can use the number
buttons on the handset to direct the sys-
tem to
tions. lristructions for the most frequently
used commands are listed below, and
instructions for the crther operations
begin on page
The labels above the number buttons
will remind you of the correct button to
press for each operation. The Voice
Help Menu is also available for assist'ance (see page'35 for instructions).
To end the connection from the
cordless handset, press
return the handset to the base.
-
Listening to Your Messages
The
will blink when you have messages.
-
Playing All
Press and release
The system will play all of the mes-
sages and then beep twice to indicate
that it is ready to accept
command.
from
ANS
SYS.
perfcm
ANS
SYS
the
and wait
any
of
35.
Light on the handset
of
Your
13
Base
for
the ANS SYS
the other opera-
m,
Messages
(ALL
a
new
or
MSG).
it
is
-
Playing New Messages Only
Press
The sys:eT
sages recoraed slnce the last
messages were checked. ana
beep twce to indrcate that
to accept a new command.
-
Saving Messages
This
old messages after playback. After
performing any answering system
operation, simply press
cordless handset (or return the handset to the base).
-
Deleting Selected Messages
To delete only a selected message,
press and release
the message is playing.
you delete the right message,
must press Q (DELETE) before the
beep that indicates the end of the
message.
a
after listening to
(DELETE) when you are sure you
are deleting the right message.
-
Deleting All Messages
Listen to all messages. Press and
release
a).
beeps twice to indicate that it is ready
to accept a new command.
NOTE:
all messages, the message window
resets to
cannot be replayed.
and
release
wil
system
(REPEAT) to replay the message
The system resets itself and then
automatically saves
If
necessary, you can press
8
(DELETE) twice (ie.
Once the system has deleted
0
and the deleted messages
-?-
(NEW
play
only
a
(DELETE) while
it,
then press
-
those
it
i
To
h:SG
-r
r9Fe
irer
IS
reazi
on the
be sure
ysu
@
a
I
s-
32
Page 36

are listed below
Establishing a Connection with the Answering System
1
Dial your phone n~mber.
NOTE: When the RING
'
switch is set to TOLL
I
system will answer after two rings
/
there are new messages and after
four rings if there are no new mes-
sages. When you call, if you hear the
third
ring
you'll
left
a
message since the last time
someone called to check on messages. Hang up before the fourth ring,
i
and you'll save the cost of the call.
2
When the answering system answers
and the cutgoing announcement
begins to play, enter
code. (It is not necessary to wait
for the announcement to finish.)
-The system willannounce the number of
messages you have (for example: "You
have three messages"), and then beep
twice to indicate that it is ready to accept
a command.
If it doesn't receive any instructions in a
few seconds, the system will automatically play all of your messages for you. You
can allow the system to play your messages, or you can use the number buttons on the
perform any of the other operations.
Instructions for the most frequently
used commands and other operations
know
phope to d~rect the system to
SELECT
SAVER.
that no one has
your
the
if
access
You can use the wallet
you of the correct button
each operation. The
is also available for assis:awe i see
page
To end the connection from the 0i;:siae
telephone line, simply hang up.
35
for ~nstructions).
Listening to Your Messages
-
Playing All of Your Messages
Press and release
system will play all of the messages
and then beep twice to mdicate that
is ready to accept a new command.
-
Playing New Messages Only
Press and release
The system will play only those messages recorded since the last time
messages were checked. and then
will beep twice to indicate that it is
ready to accept a new command.
-
Saving Messages
This system automatically saves old
messages after playback, unless you
command it to clear messages. After
performing any answering system
operation, simply hang up the phone.
-
Deleting Selected Messages
To delete only a selected message.
press and release
the message is playing. To be sure
you delete the right message, you
must press
beep that indicates the end
message. If necessary. you can press
@
(REPEAT) to replay the message
after listening to it. then press
(DELETE) when you are sure you are
deleting the right message.
131
czr?
t~
rErrlyrj
tc
press
VOICE
,El
(DELETE) before the
Hei?
(ALL
121
(NEW
a
(DELETE) while
'07
!.kr;i
MSG).
MSG).
of
the
3
(continued.:
The
it
it
Page 37

-
Deleting All Messages
L.s:s~
reiease
-
3
-
beeps twice to rrccate that
:J
ail messages. Press
(DELETE)
twce
and
{ie.
3
The syter -?sets rtseli and then
rt
1s
ready
to accept a new csrnrnand
NOTE:
1
i
all messages, the message window
)
resets to 0 and the deleted messages
i
cannot be replayed.
Once the system has deleted
1
1
Sack at any time. (See
Message
PlaySack,"
Interrupting Message
"lnt~rr~~:
beiow
J
Playback
Press and release (STOP
The system will stop
If
you do not enter a new comrrar
in
30
seconds, the system
to the end
old
messages
of
the last message. so
will
playing
wrll
not be erased
new call comes in.
-2
-
EEL2
2
.a.
.:p
acva-c~
tixi
~*;hc::
3
-
Additional
Message
Operations
Repeating a Message
Press and release
j4/
(REPEAT). The
system will stop playing, return to the
beginning of the current message, and
then resume playing. Each time you
press and release (REPEAT), the
system will back up one more message.
When you've heard the messages you
wanted repeated, you can then let the
system play until it reaches the end of
the last message,
-
or
you can interrupt
message playback at any time. (See
"Interrupting Message Playback," below.)
Skipping
Press and release
a Message
i6)
(FORWARD). The
system will stop playing, advance to the
beginning of the next message, and
resume playing. Each time you press
and release
16]
(FORWARD), the system
will advance one more message. When
you've heard the messages you wanted
to play, you can then let the system play
until it reaches the end of the last message, or you can interrupt message play-
NOTE:
Pressing a (STOPIHELP)
when the system is performing an
operation
stop. Pressing
when
the Voice Help Menu
page
Replaying
the
35.
will
signal
@
system
Cleared
the system to
(STOPIHELP)
is
idle
will
activate
described
Messages
on
Before the system announces "End of
a
messagesn,
replayed by pressing
the number
deleted message can be
@
(REPEAT) until
of
the message is displayed
in the Message Window. However, once
the system announces "End of messages", a deleted message cannot be
replayed.
I
i
I
I
Page 38

The Voice Help Mew a!lows you to use
your answering Sys:ern from another
location even
if
you don't know the various command codes. Once you have
established a connection with the
answering system (as described on
page
32),
the Voice
Help
Menu will
guide you through all the other codes
you will need for
full access.
You can access the Voice Help Menu
any time after the system has given you
the two-beep signal to indicate that it is
ready to accept a command.
Using the Voice Help Menu
Press and release (STOP~HELP).
The system wiil announce a list of oper-
ations and the buttons you need to press
to activate them.
For example, if you access the Voice
Help Menu as soon as you make contact
with the answering system, by pressing
a
(STOP!HELP), you will hear:
At
the
end of the rneriu
WIII
beep twice to mdcate
to
accept a conmand.
the number fcr the fc;nctlon
Its:,
If
ycu
the
systs.~
!hat
~t
IS
readl~
have h~ard
you
:%ap:.
simply press that number Sutton.
Once you've established a connection
with the answering system (as descr~bed
on page
32),
you can re.view and change
your outgoing announcement from the
cordless handset or from another touch
tone phone away from your home
or office.
You can work with your outgoing
announcement any time after the system
has given you the two-beep signal to indicate that it is ready to accept a command.
Reviewing Your Outgoing
Announcement
Press and release
a
(ANNC). The sys-
tem will play your outgoing announce-
ment, and beep twice to indicate that
it
is
ready to accept a command.
'TO save messages, hang up."
'70
delete messages, press
'70
play all messages, press
3 3
1
."
'To play new messages, press
'70
record a new announcement,
press
#
7."
'To change access code, press
"TO leave a memo, press
'70
change time, press
"For time, press
'70
play announcement, press
8."
"For answer on (off). press
"For help, press
5."
#
*.I'
8."
#
0."
."
2."
#
7."
9."
Changing Your Outgoing
Announcement
1
Press and release
[A
(CHANGE), wa~t
to hear two beeps, and then press
(ANNC). The system will beep twice
signal that it is ready to record.
2
Record your new announcement.
Press and release
Is]
(STOP/HELP\
when you are done.
to
Page 39

Once
~~ith the answering system (as described
on page
the day and t~me setting on your clock
from the cordless handset or from another touch tone phone away from your
home or office.
You can work with the clock setting any
time after the system has given you the
two-beep signal to indicate that it is
ready to accept a command.
~w've
es:ablished a connect~on
32)-
you can review and change
Reviewing the DayKime Setting
Press and release (CLOCK). The
answering system will announce the
current dayt~me setting and then beep
twice to indicate that it is ready to accept
commmd.
a
Changing
Press and release
wait to hear two beeps, and then
press
announce the current day setting.
the
Daymime Setting
@
(CLOCK).
I'FJ
(CHANGE),
The system will
3
To
set hour
Press and release
sysrern will ~nn~uice
hour settmg Press ana
(REPEAT)
move the hour setting dc~.:
Each time you press one
buttons. the system w~ll acr,s,-LC
hour When you hear the
hour, go on to set minutes
4
To
set minutes
Press and release
system will announce the current
mmute setting. Press and release
(REPEAT) or @ (FORWARD) to
move the minute setting down or
Each time you press one of these
buttons, the system will announce the
minute. When you hear
minute, press
The system will announce the nei.:
dayltrme setting and then beep twce
to indicate that it is ready to accept a
command.
or
ITJ
tCLGCr(
!ne
c,-e--
re
ease
(FORVJA"",:
2-
,:
of
:-rs
C~TX:
@
(CLOCK,
tbe
correct
(STOPiHELP).
'-3
5
:-E
-
ye
Y
up.
To
set
day
,
Press and release
move the setting to a day earlier in
the week, or
move the setting to a day later in the
week. Each time you press one of
these buttons, the system will
announce the day. When you hear
the correct day, go on to set the hour.
[61
141
(REPEAT) to
(FORWARD) to
The
Access
The access code is the code you use
to gain access to your messages and
memos when you are calling the system
from a telephone away from your home
or office. The access code
set at
or choose your own. If you change !tre
code, be sure to write it down so that
you'll be able to gain access to your
system. If you do forget the code. ycu
can display the code at the base (see
page
10.
31).
Code
is
or.~g~nally
You can use the preset code
Page 40

Once ycu've es:ablished a connection
with
tbe
answermg system (as described
on page
the access code from
set or from another touch tone phone
away from your home
You
time after the system has given you the
two-beep signal to indicate that
ready to accept a command.
32).
yo3
can
review and change
the
cordless hand-
Gr
office.
can
work with the access code any
it
is
Once you've estabhshea
w~th
the answermg system (as descr
on page
yourself or anyone else who has ac:Ess
to the system. When the system
messages, it plays the memo alon~
the other messages on the system.
32).
you can record a memc
a
connec;
cn
z~r)
plaks
;cp
Reviewing
Press and release
system will announce the current access
code and then beep tw~ce to indicate
that it is ready to accept
Changing Your
1
Press and release
wait to hear two beeps, and then
press
announce the current access code.
2
Press and release
move the access code to a lower
number, or
the access code to a higher number.
Each time you press one of these but-
tons, the system will announce the
-
access code.
3
When you hear the code you want,
press and release
You may use any two-digit number
from
will announce the new access code
setting and then beep twice to indicate that it is ready to accept a com-
mand.
Your
isl
(CODE).
10-99,
Access
zm
(CODE).
Access
i/J
The system will
14)
i6j
(FORWARD)
@
except
30.
Code
The
a
command.
Code
(CHANGE),
(REPEAT) to
to move
(STOPIHELP).
The system
You can record
the system has given you the two-beep
signal to indicate that it is ready to
accept a command.
a
memo any time af?er
Recording a Memo
1
Press and release
WAY). The system will beep once
and begin to record.
2
Speak into the phone in a normal
tone of voice. Just as
the system will accept memos up to
four minutes in length.
3
When you are finished, press
and release
system will record the day and time
that you left the memo, reset itself to
answer calls again, and then beep
twice to indicate that it
accept a command.
lFJ
[-I
(STOPIHELP). The
(MEMO12
with
messages,
is
ready to
(Continued)
Page 41

--
-
--
Once you've establ~shed a ccr-ect~on
wlth the
cordless handset accord~ng to
~nstruct~ons on paoe
answering
sys:ern
32)
(us
-2
:ne
you can
the
record a telephone conversat~cn The
telephone
conversation
will
be .ecorded
along wlth other messages
As
calis come In, the arswerlns
:vIII
answer and record messages
long as
~t
IS set for automat~c
sysSr-
as
ans;.er
operztion. You can use the cordless
handset to l~sten to the callers as
tr,~;/
leave messages, and you can speak
a caller d~rectly
Intercept," on page
~f
you
wlsh (see 'Cail
39).
-
-3
:c
1
While you are having a cocversat~on
on the cordless handset, press and
release
ANS
2
When the indicator lights to show that
you have made
[q
SYS
indicator to light.
a
and wait for the
connection with the
answering system, press and release
[TONE*-;
(MEM012WAY).
The system
will beep once and begin to record.
NOTE: This unit does not sound
warning haeps to let the other party
know that the call
To ensure that you are
is
being recorded.
in
compliance
with any federal or state regulations
regarding
recording
a
telephone call,
you should start the recording
process and then inform the caller
that you are recording the call.
Monitoring Calls
1
If the handset is away from the base
press and release
ANS
for the
2
When the light goes on to show that
SYS
[m\
Light to go on.
and walt
you have made a connection with the
answering system, you will hear your
own announcement am the caller's
message through the handset.
3
To end monitoring without answerins
the call, press and release
return !he handset to
the
[
base.
or
3
To stop recording, press and release
a,
or end the telephone call.
To listen to the recording. follow
the instructions for listening to your
messages, on page
26.
Page 42

urning the the answerinc - system
is taking a call
announcement or wh~le the system is
recording the caller's message
can interrupt the answering system and
take the call. If the cordless handset is In
the base. just pick up the handset and
speak to the caller. If the handset is
away from the base, press
take the call as soon as the
Light goes on. You can also pick up the
handset of any extension phone on the
same line to take the call.
The answering system should stop play-
ing the announcement (or recording the
message).
press and -elease the switchhook of the
extension pnme yoti are using, or press
[PHONE]
cm
-
during
If
it doesn't stop, quickly
the handset.
the
ou!gomg
i
PHONE]
PHONE
-
you
and
You
can perform the operat~ons
described below using the cordless
IS
handset. However, this feature
bly most useful
office from another touch tone phone
and find that the system doesn't answer
even after four rings.
1
Establish a connection with the base.
either by pressing
cordless handset, or by dialing your
phone number. Even
ANSWER
answer
connected to
will beep twice to indicate it is ready
to accept the remote access code.
Enter your code.
You can change the staius by
pressing
the
two-beep signal, and then press-
@
ing
announce "Answer On" if you are
setting the system to answer calls
or "Answer
system to not answer calls, The
system will then beep twice to indicate it is ready for a new command.
if
you call your horre
is
OFF,
after
10
AC
@
(CHANGE),
(AUTO
Off'
(m
if
AUTO
the system will
rings (as long
power).The system
ANS).
The system wiil
if you are setting the
prccz-
Or
on the
as
it is
waiting for
(Continued
Page 43

When the
If.
,:.-e"
the
-AUTO
can'! leave a message, the
be that the message
can listen to the messages and men
clear the messages so that tQe system
will begin taking
Memory
,,9u
follow steps 1 and 2 io :urn
ANSWER
Is
on
Full
ana
you
?roc,!eT
memcnJ
calk again.
!s
s!dl
fdil.
may
You
Press
your messages. or
listen to your new messages.
selectively delete a message
ing
being played. Remember that you can
also use
any messages that you've already
heard. When the system has played all
messages
Messagest
that it
this time. you can delete all of your messages
The system will delete all messages.
'F
(ALL
3
(DELETE)
a
is
ready to accept a zommand.
by
pressing
MSG)
(FORWARD)
it
will announce "End
and
beep twice
to lis:en to all of
(NEW
while that message is
to skip over
a
(DELETE)
MSG)
You
by
of
to
indicata
to
can
press-
At
twice.
Page 44

Batteries
The handset of your cordless telephone
is powered by rechargeable ba!?er~es.
The
patented Battery-Saver feature
extends the life of these batteries, and
lets you use the phone for
ods between charges.
The batteries charge automatically
whenever the handset
If
you usually leave the handset in the
base between calls, that's enough to
keep the batteries charged. But if you
keep the handset out of the base for
long periods, you will need to charge
the batteries about every seven days
by leaving the handset in the base
overnight
You'll know the batteries need charging
when:
-
The phone beeps four times when
you press the
INTCM
-0
-
The
flashes or stays on steadily.
-
-
The phone does not respond
you press at the handset. and
none of the lights go on.
(abc~t
buttons.
LO
BATT
10
hours).
[=I.
Light on the handset
longer
IS
in the base.
1-1,
peri-
or
when
Place the handset
CHARGING Light on the base
to show the handset is sea:ed prcpEr
and the batteries are charging.
be fully charged in
use your telephone before that. but
best to let the batteries charge fully.
Once the batteries are fully charged, you
need only put the handset in the base
when the
If
it's more convenient for you to do
so, you can leave the handset in the
base all the time. It is impossible to
overcharge the batteries.
If
the
The batteries can be recharged many.
many times, but
signal even after
the battery pack should be replaced
(see below).
,,
,
',
.
set, use only AT&T Replacement
Battery 4051.
To purchase replacement batteries. vis~t
your local AT&T Phone Center Store. or
call the
1800222-3111.
LO
batteries
CAUTION:
,.
fire and damage to the telephone
AT&T National Service Center at
in
the Sase.
10
hours. You
BAT
Light flashes.
don't
if
charge
you get a low battery
10
hours
To avoid the risk of
of
The
w~il
!I=-:
-
;
They
car.
N:
;.iil
s
properly
charging,
(Continued)
Page 45

Batteries
1
Remove the battery case cover
by
pressing on the arrow
sliding the cover downward.
2
Lift
out the old battery
unplug it from the handset (Figure
Discard the old battery
in a trash compactor or a fire.
(corttirlrcetl)
iines
pack
pack.
and
and
1).
but not
Figure
-
1
IMPORTANT:
pack contains nickel and cadmium.
not bum or puncture
other batteries
or
punctured,
erial
which
dispose
infomiion
disposal,
waste (garbage)
dispasal
3
Hold the new battery pack and plug
the cord into the handset.
battery pack in the case so the cords
-
rest on top
4
Replace the battery case cover
sliding it on its track up over the battery case until it snaps firmly in place.
of
organization.
The rechargeable battery
the
battery. Like
of
this
type,
if
it
could
could
it
in
household
about
consult
of
release
cause
your
collection
the battery pack.
injury.
gabage.
recycling
lacal
or
it
is burned
toxic mat-
Do
Place the
Do
not
For
by
g
Figure
2
NOTE:
machine memory, you should leave
the system connected
while changing
To
avoid
the
losing your answeling
to
AC
power
base
battery.
I
i
I
I
.
5
The new batteries must
before using your telephone.
the handset in the base unit and allow
it to charge for
phone will operate before that, but for
best performance, let the batter~es
charge fully.
10
hours. Your tele-
be
charged
Place
Replacing
This battery is used to retain answering
s,ystem memory in case of power failure
When the battery needs to be replaced.
the LO
will light (Figure
tery, follow the directions on page
the
BAlT
BASE
Base
2).
Battery
Light on the base
To
replace the bat-
8.
Page 46

The
The Portable Cradle provides a convenient place to keep your handset when it's
away from the base. Set it up
ent room. in the garage, or anywhere
you frequently take your handset.
The
Directory Card for listing your Memory
Dialing numbers.
remove the plastic window by gently prying it up with a pointed object.
to mount your cradle on a wall, set the
card and window aside and follow the
wall mounting instructions on page
Portal~le
portable cradle has a Memory Dial
To
Cradle
In
a differ-
fill in the card, first
If
you plan
44.
IMPORTANT:
To
make
it's ~n !he portaSle cradle, kee:, !he
antennas on the base and handse!
extended.
If your handset rings when it's In the
portable cradle, pick it up and press
'PHONE
end
To
before placing the handset in the
portable cradle.
I,
series of nine short beeps.
NOTE:
charge
base
batteries,
in
sure the handset rings
jto answer the call.
the call, you must press
If
you forget to press
the handset
The
the
does.
you must
the
base.
will
remind you with a
portable cradle does not
handset
To
batteries as the
recharge the handset
place
the
whei
handset
f;,,.,
i
I
;
I
(Con
tin
ued)
Page 47

The
Portahle
Cradle
(rorltircrteci)
Tools you will
a
pencil or ball-point pen, a Ph~ll~ps head
(+)
screwdnver, and the Wall Mountmg
Template at the back of th~s booklet.
1
Select a sturdy spot.
Choose a place for your portable
cradle where you can screw into
wood - or into a wooden
within the wall. (Plaster or wallboard
alone won't hold the screws securely
enough.)
2
Mark the mounting holes.
To mark the position of the mounting
screws, hold the mounting template
over the spot you've chosen, and
press
crossmarks (Figure
3
Install the mounting sleeves and
a
need:
pencil point through the
A
nail, a hammer.
stud
1).
screws.
Start the screw hoies by lightly tapping a nail into the marks you made.
Remove the nail from the wall. Then
slide the mounting sleeves onto the
-
screws as shown. Insert the screws
into the holes you started, and tighten them until the mounting sleeves
are flat against the wall (Figure
2).
1
1
Figure
I
I
I
I
Figure
1
Step
2
\
Wad,
,
9url
"q
*.mo<.,.
--.---
1
-:;-
-----
(~!
~==E.Z
\
,-
I
No-
1
======
.-----
-.-----
L-
--->
@@
I
---<
'\
\.
I
i
i
;
'
!
I
1
I
I
Page 48

The
4
Portable
Remove and reverse the handset
hook.
You must now reverse !he handset
hook so it will hold the handset.
opening behind the Directory Card
you'll see a dot marked
a pencil or pen point, press on the
dot and push upward to release the
hook from its slot (Figure
Now turn the hook so the rounded
edge is pointing up, and the word
PRESS
the hook back down into the slot until
it snaps into place. The rounded
edge should now be sticking out
(Figure
is facing you (Figure
3).
Cradle
PRESS.
1).
(ror~tirtcreri)
In the
With
2).
Slide
Figure
1
Figure
2
5
Replace the
Directory
6 Mount
on
Place the portable cradle on the wall
so the mounting screws fit into the
holes on the back. Then, holding the
portable cradle firmly against the
wall, slide it downward to lock it onto
the
the
the
wall.
mountmg sleeves (Figure
Memory Dial
Card
and
window.
portable cradle
-
4).
Figure
3
Figure
4
4
.i
Page 49

--
T~IS -21emme contarns complex
it
elect-mrz parts: treat
Avoid Rough Treatment
Place the handset down gently. Save the
or~g~r.al packing materials to protect your
telepwne
Cleaning Your Telephone
Your telephone has a durable plastc
caslng that should retain ~ts luster for
many years. Clean it with only a soft,
slightly damp cloth. To remove stains;
use a mild soap. Never use detergents,
excess water, treated cloths or harsh
abrasives of any kind.
Power
In the event of a power failure, the
system will not operate. However, if
the base battery is
access code and message count will
be
retained for several hours.
if
you ever need to sh~p it.
Failure
Recovery
with care.
well charged, the
If
you see
you should:
-
Set the clock (see page
-
Play back your announceme?:
page
-
Review your access code (see
31
the factory setting.
If the message display indicates there
are messages, press and release
The system will play any new or saved
messages.
To
avoid
access
ing
a
the
Light
CL
flashmg in the
21
),
and record
)
to determine
loss
of
code,
power
new
is
lit
and
outage,
battery
(see
if
it has reve0e.j
the
clock
message
be
when
page
8).
wind^,,:
361
if
necessxi
function,
count dur-
sure
to
LO
BAlT
r
see
pasE
!c
-
PLAY
install
BASE
i
1
1
i
I
A
flashing
indicates that power to the system was
interrupted, and that the battery was not
-
installed or wai too low to Dower the unit.
CL
in the Message Window
Page 50

I11
Case
If your answering system does not work
properly.
below before seeking repair assistance.
Message Window is Blank
Make sure the power cord is securely
plugged into an electrical outlet not controlled by a wall switch. Inspect the connection at the back of the system.
of
Difticulty
!ry
the following suggestions
-
If
the memory is full or the system
is off. the system answers after
10
rings. See "When the Memory
Is
Full."
page
28.
or.
for remcte
operation. "Turning the Answer~ng
System
System Beeps When New Messages
Are Recorded
On
or
Off
,"
page
39.
Messages Are Incomplete
-
The system can accept messages
to four minutes long.
a very long message, part of it may
be lost when the system disconnects
the call after four minutes.
-
If
the caller pauses for more than
seven seconds, the system stops
recording and disconnects the call.
-
If
the system's memory becomes full
during a message, the system stops
recording and disconnects the
Difficulty
Check VOLUME. See Volume Controls"
on page
System Does Not Answer After
Correct Number of Rings
Hearing Messages
12.
If
a caller leaves
up
ca!l.
To stop the beeps, move MESSAGE
ALERT to
LO
BAlT
If
the battery used for backup power is
missing, low on power, or incorrectly
installed, the
turn on.
sages in the event of
install a new battery immediately as
explained in "Install the Base Battery"
on page
CL Appears
If
the
power failure, CL blinks in the window to
indicate that the clock should be reset.
To set the clock, follow the instructions
on page
Message Window Display Blinks
OFF.
BASE
To
prevent the loss of mes-
8.
clock stops running because of a
36.
Light Is On
LO
BATT
In
Message Window
BASE Light will
a
power failure,
-
Make sure that the AUTO ANSWER
light is on. See "Setting System to
Answer Calls" on page
-
If
Toll Saver is on, the number of
rings changes from four to two when
you have new messages waiting.
See "Ring Select" on page
-
In some cases, the system may be
affected by the ringing system used
by the local telephone company.
22.
23.
The display
blinks when
ed for the system. If you had previosly
recorded an announcement,
been lost because a power failure
occurred when no battery backup
available to retain messages in the
system's memory.
in
the Message Window
no
announcement is record-
it
may have
(Con
was
tinuec
Page 51

System Answers Calls But Does Not
Record Messages
-
ANNC
hlove
SELECT
!t
to A or
ray
B.
be se! to
A0
System Does Not Respond to Remote Commands
-
Make sure you are call~ng from a touch
tone phone. When you dial a number.
If
you should hear tones.
clicks lns?ead. the phone
you hear
IS
not a touch
tone telephone.
-
Some telephones transmit only one
brief tone each time you press a key.
If you are using one of these telephones, the answering system may
not detect your Access Code while
the announcement is playing. Wait
until
:9e announcement is over and
enter your code again.
There may be noise interference on
the phone line you are using. Press
dial buttons firmly.
Make sure you are entering your
Access Code correctly. See "Access
Code" on page
NOTE:
If
power
backup battery
battery power was low,
36.
failed
was
when
missing
the
the
or
Access
Code may have reverted to the
of
preset value
If
your answering system does not work
10.
properly, try the following suggestions
before seeking repair assistance.
If
the phone doesn't work at all:
-
h:ae
ssie
the
power
cord
IS
r)l&;e:
~n
-
f$la.te
p~~ssed f~rmly mto the base
the
-
Maqe sure the handset antenna
sure
the telephone
telephone jack.
i~rie
ccr2
ur
and
:
s
an':
ttie
telepnone lme cord are fully extended
-
If
the phone does not beep
press
m,,
the handset batteriez
need recharging. See page
If the
LO
BAT
Light is flashing,
when
41.
yc,
the batteries need recharging. See
page
41.
Make sure the battery pack is
installed correctly. See page
42.
Unplug the system and connect it to
If
~t
another modular jack.
still does
not work, try another teli phone; if
neither works, the problem is not in
your answering system. The trouble
may be caused by local talephone
company lines, central office equip-
ment, or your wiring.
If the
above
suggestions don't
solve
the problem, try this:
Place the handset in the base and press
the RESET button located on the bottom
of the base near the battery compartment using a paper clip, pencil point or
small pen point. Leave the handset in
the base for
10
seconds to reset the
phone and security code.
NOTE:
Pressing RESET will erase
all
answering system messages.
.
Page 52

If
you get a two-beep signal when you
try to use your handset:
The two-beep signal means that the
handset
properly. Thls problem may be caused by
something as simple as being out of
range while attempting to dial or use the
intercom.
to solve the problem by moving closer to
the base and trying the call again.
If this doesn't help, the problem may be
that your handset and base are set to
different security codes. To reset the
security code, try the suggestions below:
-
-
-
NOTE:
answering system messages.
and
5ase are not communicating
If
that's the case. you'll be able
Place the handset in the base,
and check to make sure that the
CHARGING Light is on. Wait
onds, and then pick up the handset,
extend
[RZW
handset and the
Light on the base should go on, and
your phone should operate properly.
If it doesn't, try the next step.
Place the handset in the base,
and check to make sure that the
CHARGING Light is on. Press the
RESET bution located on the bottom
compartment using a paper clip,
pencil point or small pen point.
The CHARGING Light should go on
again. Wait another
and then pick up the handset,
extend the antenna fully and press
I-.
handset and the HANDSET IN
?h?
antenna fully and press
The PHONE Light on the
HANDSET
of
the base near the battery
Pressing
The PHONE Light on the
RESET
15
will erase all
seconds,
15
sec-
IN USE
USE
Light on the base should go on, and
your phone should'operate properly.
If
it
d?esn'?,
-
Pick up the handset, open
the battery compartment and unplug
the battery pack. Wait
and the.n reinstall the battery pack.
place the handset in the base and
check to make sure that the
CHARGING
er
15
seconds, and then pick up the
handset, extend the antenna fully
and press
Light on the handset and the
HANDSET IN USE Light on the
base should go on, and your
phone should operate properly.
If
you have no dial tone:
First, check all the previous suggestions.
If
you still don't hear the dial tone, disconnect the phone and try another phone in
the same jack.
that phone either, the problem
wiring or
telephone company for assistance.
If
you have trouble dialing calls:
If
you cannot dial any number successfully using the tone dialing method, you
might have dial pulse (rotary) service.
Move the DlAL MODE switch to the
PULSE position (see page
hang up and redial the number.
If
you have touch tone service, you can
use either tone or pulse dialing modes.
If you set the DlAL MODE switch to
TONE, numbers will be dialed much
more quickly.
local
try
the next step.
15
seconds.
Light is
I-).
If
there is no aal tone on
service. Contact your local
on.
Wait anoth-
The PHONE
is
in your
9),
then
(Continued)
Page 53

111
Case
of
Difficulty
(rontinrred)
If you hear noise or interference when
using the phone:
The ac~anced Autoselect feature of
your phone normally should select a
clear cfiannel for you. In some situa-
tions. however, you might notice some
noise or interference when uslng your
phone. Follow the suggestions below.
-
Make sure the handset antenna is fully
extended and the telephone line cord
to the base is untangled.
-
You
may
be out of range. Move closer
to the base.
-
Press and release
to another of the
nels. If the noise doesn't clear, keep
switching channels until you find a
clear one.
-
If the base unit is plugged into the
same
may hear noise or interference.
moving the appliance or the base unit
to another outlet.
-
The layout of your home or off ice may
be limiting the operating range.
moving the base to another location
-
-
If you lose a call after changing
channels:
You may have been almost out of range.
Move closer to the base before changing
channels. Before placing the call again,
return the handset to the base for
seconds.
circuit as other appliances, you
preferably-on an upper floor.
[CHANNEL]
10
available chan-
to switch
Try
Try
10
If
the phone does not ring when you
receive
If you hear other calls
phone:
-
-
If you hear noise in the handset, and
the antenna and line cord are fully
extended:
-
a
call:
Make sure the
to
ON.
If
you are away from the
sure the handset antenna
extended and the telephone
to the base is untangled.
Make sure the telephone line cord
connected firmly to the base un~t and
the telephone jack. Make sure the
power cord is plugged in.
You may be too far from the base unit.
Move the handset closer to the base.
You may have too many extension
phones on your telephone line to allow
all of them to ring.
some of the other phones.
Try
pressing
channels.
Press
Disconnect your base unit from the
telephone jack, and plug in a regular
telephone.
the problem is probably in your wiring
or
phone company.
Make sure the power cord is plugged
in, the handset and the base antennas
are fully extended and the telephone
line cord is untangled.
[CHANNEL!
local
service. Call your local tele
RINGER
Try
I-I,
to change channels.
If
you still hear other calls,
switch
base
IS
fui!:i
II~
unplugging
to change
while
using
,s
set
nae
ccrd
your
IS
-
'Make sure you are in range.
-
Your base unit and handset may not
be set on the same security code.
base
Return the handset to the
1
0
seconds to reset the security code.
for
Page 54

If
you
have difficulty entering
numbers in Memory:
-
Revievi "Programming a Number into
Memory," pacje
are presstng the correct sequence of
buttons.
-
If
the number is more than
long. make sure you follow the
instructions under "Programming
and Dialing
Sequences." page
-
Make sure no other telephones are
off the hook while you are entering a
number.
-
Try
calling the number you want to
enter into memory and then following
the "Storing
Memory" instructions on page
If
the
AUTO
work:
Make sure fhe power trmsforrner is
securely piugged into an electricai outlet
not controlied by a wall
the connection at the back cf the
answering system.
ANSWER
17.
to make sure you
Long
Numbers or
18.
a
Redial Number in
Light does not
saitch. Inspect
16
digits
18.
If you have difficulty hearing
messages:
-
Check the VOLUME control.
page
If the system answers but
record:
-
The ANNC
set to
-
The message memory may be full;
so, delete some or all of the messages
If the system does not answer af-ter
the correct number
-
-
-
-
12.
SELECT
AO.
Move it to A or
Make sure that the AUTO
Light
is
on. If it is not. press and
release
If
the
of rings changes from four to two
when you have messages waiting.
See page
If
the system
the system is
after
In
affected by the ringing system used
the local telephone company.
(AUTO
ANSWER].
TOLL
SAVER
23.
is
off,
10
rings. See
some cases, the system may be
Switch may
of
rings:
is on, the number
filled with messages or
the system answers
page
See
does
not
B.
ANSWER
28.
be
if
by
-
If your announcement is incomplete:
The unit is voice-activated and will stop
recording
seconds. Try recording the announcement without pausing.
If your messages are incomplete:
-
The system can accept messages up
to four minutes long.
a very long message, part of it may
be lost when the system disconnects
the call after four minutes.
-
If the caller pauses for more than
seven seconds, the system stops
recording.
if
you pause for more than four
If
a caller leaves
If
the system does not respond to
remote touch tone commands:
-
Make sure you are calling from a
touch tone phone. As you dial
number, you should hear tones.
you hear clicks instead, the phone
is not a touch tone telephone.
a
If
Page 55

I11
Case
of
Difficulty
-
I
NOTE:
,
send short, timed tones no matter
how long
I
button. If you are using one of these
'
telephones, the answering system
i
may not detect your access code
while the announcement is playing.
I
Wait until the announcement is over
I
I
and enter your access code again.
i
-
on the phone line you are using.
Press keys firmly.
-
access code correctly (see page
Some touch tone phones
you
hold down a wmber
ae
may be noise or interference
Make sure you are entering your
(co,~tirtcted)
r
,
I
I
I
1
i
33).
Other
Make sure you have followed all the
instructims in this rna~ual to try
correct
If
the
1
Problems
to
tile
problem.
you continue to.have problems, cali
AT&?
800
National Service
22241
11.
Center
at
Page 56

Interferelice
Some telephone equipment generates.
uses, and can radiate radio-frequency
energy and, if not installed and used
properly, may cause interference to
radio and
Your AT&T product has been tested and
found to meet the standards for a Class
B
digital device. as specified in Part
of the
are designed to provide against such
interference in a residential installation.
However, there is no guarantee that
interference will not occur in a particular
installation.
If
your
ence to radio or television reception
when it's in use, you might correct the
interference with any one or all of these
measures:
television
FCC
Rules. These specifications
AT&T
product causes interfer-
hlfomlation:
reception.
15
Part
13
of
FCC
If
you need assistance,
our National Service Center at
1
800
222-31 11.
I
The user
tions to this telephone, not expressly
approved by
i
user's authority to operate the
I
equipment.
is
cautioned that modiflca-
AT&T,
Rule
could void the
you
can
call
-
Where it can be done safely, re-orient
the receiving television or radio
antenna.
-
To
the extent possible, relocate the
television, radio, or other receiver
with respect to the telephone
equipment.
--
If
your telephone product runs on
power, plug your product into an
outlet that's not on the same circuit as
one used by your radio or television.
AC
AC
Page 57

Index
AC Adas:er
Access Code
5.
G.
31
33
36
37
46
ALL
MSG
ANNC,
ANNC
ANNC SELECT
Announcements
Announce Onlv
[ANS
SYS~
ANS SYS Light
Answering Calls
Answering Machine
Answering Page
Answering System Operation
At the Bsse
Away From tne Base
Antennas
[AUTO
AUTO ANSWER Feature
AUTO ANSWER Light
-
AUTO ANS
Automatic answering
17
ANS
Z
4,6.2C.21.
WE$
3,
[om]
32. 33
4
20. 21.29
Sw1tc3
4.
20-23. 29. 48. 51
29.
35.46.51
4. 20. 23
5. 6. 15. 32. 38. 39,41
5. 32, 38
2, 11, 12, 16,22
4-5, 20-31
5-6,
2. 1 1, 14, 48, 49, 50
4,
22,
9,
22, 23, 25, 28, 47, 51
Autoselect
BaseUnit
Batteries
2,7,8,9, 10, 17,41-42.43,47,48,49
2,3,5,7,10,11,12,13,14
9
48 52
40
35
4, 13
15
32-40
25, 51
39,40
39
22
14,50
Caii Fonvard~nc
Cali
Intercept
Gal!
VanCor~ng
Call Screen~ng
Call
Waltlng
-CHANNEL,
CHANGE
Change
Changing Channels
Charging Batteries
CHARGING Light
:
'
-
-
,-I
--
-
,-
3
10. 41. 49
[CLOCK]
CLOCK
Clock Feature
@I
9, 10, 36. 46, 47
[mF]
CODE
DELETE
IoErnE]
Deleting Messages
DIAL MODE Switch
Dial Pulse Service
Dial Tone
Directory Cards
Ending a Call (See Hanging
FCC Information
Find Feature
[.R#imig
FORWARD
Handset
@!
a
a
2,3,7,10,11.12.13.14.17
32, 33, 34, 40
5.
5,
6. 28. 33
9. 13, 49
2. 10, 11. 12, 49
17. 43, 45
3, 14, 16
5, 10. 27, 31
34, 36. 37, 40
27.
14,53
13
-
?O
ur
n
3
-
L,"
13
-n
3
31J
10
36
5. 31
37
28
9,
49
Up)
-
C
-
Battery Case Cover
Battery, 9-volt
Battery Pack
Battery Saver Feature
8, 42
7, 8, 42
42, 48, 49
4 1
Handset Batteries
Handset Hook
HANDSET IN USE Light
Handset Locator
4
1
45
11. 16. 49
16
Page 58

Handset
Hanging
:HOLD
--
In
Case
Indicator Lights
Instal!ation
[INTCM
Intercom
INTERCOM
Interference
Listening to Messages
LO
LO
Losing a Call
Maintenance
VOLUME
Up
of
i
BATT
BATT
BASE Light
Handset Light
Control
Difficulty
Light
3, 14, 15, 48,
11,12
2.
11.
12.
13, 14
3,
16,
18
47-52
25
8-1
0
3, 15, 41
3, 15, 16
16
50,
52, 53
26, 30, 32
8,9, 25, 42,46,47
41,48
14, 15, 50
46
-
;OFF
2.
3.
11,
12.
13. 14.
Operating
PAGE
-
Page Feature
I
PACE~FIND
Paging 15
Parts Checklist
Pause
Range
J
[PHONE]
2,
3,
10-18, 29, 39.41,43. 48.49
PHONE Light
(PLAV]
Portable Cradle
Power Cord
16.
2.
!
10,
2, 7,
17,
32.
38.
43
1.
14,
15.
43.
50
3.
14.
3,
14.
15.
11,
16. 39,49
5,
26, 27, 46
1 1,
12,43-45
7, 9,47, 48, 50
15
15
16
7
18
Making Calls
[m]-
Memory
Memory Dial Directory Card
Memory Dialing
MEM0!2
-MESSAGE
Messages
Message Volume Control
Message Window
Microphone
Modular Jack Adapter
[MUTE]
NEW
Noise
MSG
3, 17-19, 27, 28, 40, 47, 51
WAY
ALERT
5,22,24-28,32-34,40,47,48,51
12,21,26,47,51
9,
20-24, 26-31, 34, 46, 47
(See Interference)
2,
11,
12, 14
3, 17, 18
17, 43, 45
3, 12, 17
530
37,38
25,47
2,3, 11,12
32,
33,
7
3
40
Power Failure
Priority Calling
[PROG]
PROGRAM Light
PULSE
Quick Reference Guide
Recording Announcements
Recording Memo
Recording a Telephone
Conversation
[XijiK]
REPEAT
[REPEA]
Replacing Base Battery
Replacing Battery
RESET
RINGER
RINGER Switches
@
OFF
32, 33, 34,36, 37
5, 10, 27,
Pack
Lights
46,48
29.
3,
17, 18
17
9,
49
2-6
4, 20
5,
6,30,
37
5, 6, 30, 38
2, 13, 18
28,
31
8
42
48,49
10
10.
11.
50
(Continued)
-
.-P
-
a-3
Page 59

Saf
e!y
31.
42
Screenmg
Security Codes
Service
Speakerphone
SPEAKERPHONE
SPEAKER
Specral Telephone Services
[m]
STOPIHELP
Storing Numbers
Teleptv:?
Telephore Line
Telephone Number Cards
Temporary Tone Feattire
TOLL
Calls
Returr: Form
2.
VOLUME
4,5,
in
Line
Cord
Jack
SA'VER
3.
10.
1
IN
USE
Control
10,
12,
10,20,26,27,30, 31
34, 35, 36, 37
Memory
7,
7.
8,
4, 23, 24, 33, 47, 51
1.
12.
Light
21.
9,
14,48, 50
9,
48,
57
13.
17
11.
12
26,
31
13
17-1 9
49,
50
10
13
[m
Tones
-
Touch Tone Service
Voice Help Menu
VOLUME Controls
10,12,21,26,29,31,47,51
Wall Mounting Template
Wallet Cards
3, 4, 13, 14, 16, 17, 48
9, 13,21,29,48,49, 51,52
13, 37, 38
32, 33, 34, 35
44,57
31, 33, 59
Page 60

To Establish A Connection With The
Answering System:
1.
Dial your phone number.
2.
When the system answers and the announce-
ment begins, enter your access code. The
system will announce the number
sages you have and then beep twice to ~ndicate that it is ready to accept a c~mmand.
3.
Enter the code for the operation you want.
(See the list on the opposite side of this card,
@
or press
for a Voice Help Menu.)
cf
mes-
I
To Establish A Connection With The
Answering System:
1.
Dial
2.
When the system
announcement begins.
access
the
number
then
ready
3.
Enter the
want.
side
Voice Help Menu.)
Wallet
your
phone number.
answers
code.
The
system
of
messages
beep tw~ce
to
accept a command.
(See
of
this card,
code
for
the
list
to
or
Card
enter
will
you
indicate
the
operation
on
the
press
and
that
opposlte
the
your
announce
have
anc
it
IS
yo2
for
a
To end the connection with the answering system, just hang op. If you have not cleared mes-
sages, they will be saved automatically.
The system's access code is set at
a
Press
Voice Help Menu.
Press
Press
Press
Press
Press
Press
Press
Press
announcement.
Press
Press
Press
day/time setting.
Press
Press
when the system is idle to access the
(r
to listen to all of your messages.
121
to listen to new messages only.
[sl,
a
to delete all messages.
[4j
to
repeat a message.
(el
to skip a message.
a
to mterrupt message playback (PAUSE).
a
171
a,
@
Ir],
a
[rl,
to exit message playback mode.
to hear your outgoing
then
to hear your dayhime setting.
then
to hear your access code.
then
to change your announcement.
181
to change your
to change your access code.
To
end the connection with the
ing system, just hang
deleted messages, they will be saved
automatically.
The system's access code is
is-----------------------------------------
I
I
!
i
i
j
1
Cut along dotted
lines and insert
in wallet
I
reference.
I
L------------------------------------------
1
I
I
j
To Establish A Connection With The
Answering
1.
Dial your phone number.
!
2.
When the system answen and the
!
announcement begins, enter your
access code. The system will announce
j
the number
j
then
I
ready to
Wallet
System:
of
bee^
twice to indicate that it
kcept
up.
for
Card
messages you have and
a
command.
If
you
set
easy
answer-
have
nct
at
is
Press
Press to hear system status.
Press
@
to record a memo.
[rl,
then @ to change status.
59
3.
Enter the code for the operation
want. (See the list
side
of
this
card,
Voice
To end the connection with the
ing system, just hang up. If
cleared messages, they will be saved
automatically.
The system's
Help Menu.)
access
on
the opposite
or press
you
code is set at
you
Is]
for
answer-
have
.-
a
not
Page 61

Press
Press
Pvss
Press
Press
Press
5
to listen
18
to hear your da;;
F,
@
to hear your access
8,
5
to
to
all
then
to change
then & to change
record
a
of
ycu
t,-e
memc.
mmages
s;.tt:ng
!:::
2,
tine
~222
!z,*
access c9de
jet;?
I
I
I
I
I
1
I
I
I
i
I
I
!
---,,,,,,,,,,,-,
Press
a
when
.,-,-,-,--,----------------A
the
system is idle to access the
Voice Help Menu.
Press
a
to listen to all of your messages.
Press
a
to listen to new messages only.
press
a.
@
to clear all messages.
Press @ to repeat a message.
Press
a
to skip a message:
Press @ to ~nterrupt message playback.
Press
@,
@
to exit message playback mode.
press
'a
to hear your outgoing announcement.
Press
@,
then a to change your announcement.
Press
a
to hear your dayltime setting.
Press
m
.
then
to change your dayltime setting.
Press @ to hear your access code.
Press
m,
then @ to change your access code.
Press to record a memo.
Press to hear system status
Press
m,
then
101
to change status.
I
I
j
I
!
I
I
I
I
I
I
I
I
I
I
!
I
I
I
I
I
I
I!
I
I
j
I
1
!
I
I
I
I
I
I
I
I
I
Page 62

Page 63

Page 64

Page 65

Page 66

Page 67

Page 68

Page 69

 Loading...