

Page 1

USER’S MANUAL
Part 2
AT&T and the globe symbol are registered trademarks of AT&T Corp.
licensed to Advanced American Telephones.
© 2000 Advanced American Telephones. All rights reserved.
Printed in China. 850003047 Issue 1AT&T 5/00
Traditional
Telephone 100
Wall and Table
Please also read Part 1 —
Important Product Information.
Page 2
1
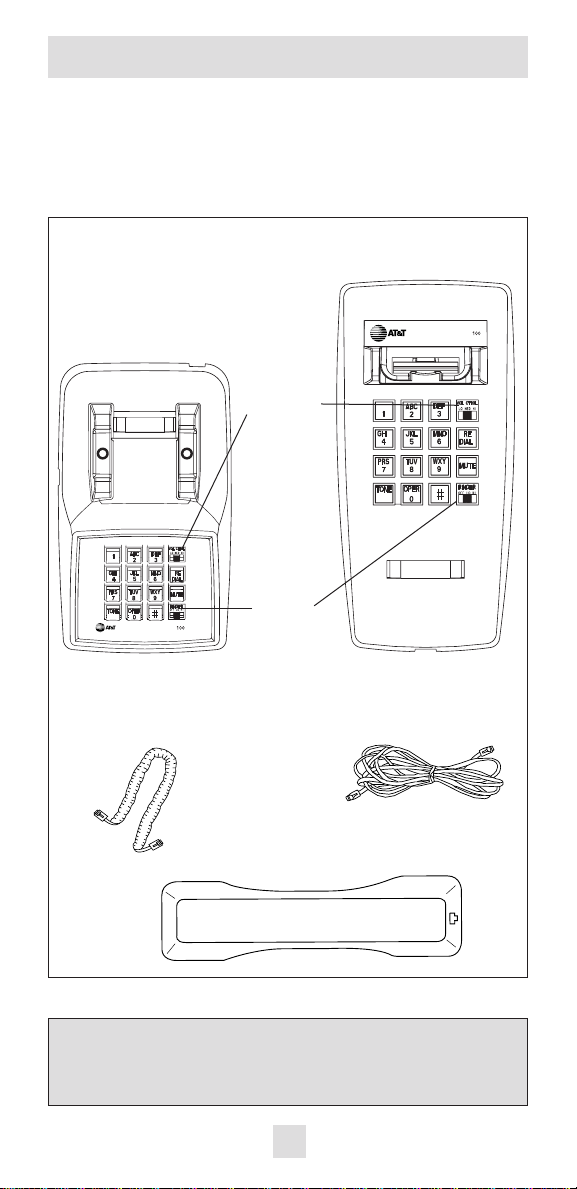
PARTS CHECKLIST
Remember to save your sales receipt in case you ever need
warranty service, and make sure this telephone package
includes the items shown below:
TELEPHONE BASE
Table Model
TELEPHONE BASE
Wall Model
Coiled
handset cord
Telephone line cord
TELEPHONE HANDSET
Receiver
volume
switch
Ringer
volume
switch
Dial Mode
This telephone has a selectable push-button dial and will
work with either tone or rotary telephone service.
Page 3

2
1. Set Dial Mode switch
This product comes set in
the tone (TT) mode. Make
sure you choose the
correct dialing method
(TT/DP); touch tone dialing
will not work if you have
dial pulse service.
2. Connect line cord to
telephone and wall jack
Plug one end of the line
cord into the jack on the
telephone and the other end
of the line cord into a
modular wall jack. Make
sure it snaps firmly into
place.
3. Connect handset to
telephone base
Plug one end of the coiled
handset cord into the jack
at the side of the telephone
base and plug the other end
into the handset. Then
hang up.
4. Check for dial tone
Lift the handset and listen
for a dial tone. If you can't
hear a dial tone, refer to
“In Case of Difficulty” and
try to correct the problem.
TO DISCONNECT the line
and handset cords, squeeze the
clip on the modular plug and
pull it out of the jack.
TABLE/DESK INST ALLATION
Dial Mode Switch
Page 4

3
1. Set Dial Mode switch
This product comes set in
the tone (TT) mode. Make
sure you choose the
correct dialing method
(TT/DP); touch tone dialing
will not work if you have
dial pulse service.
2. Connect the line cord
and install telephone on
wall jack
Plug the three-inch line cord
into the back of the telephone
and into a modular wall jack.
Then align the mounting
slots on the back of the
telephone with the studs
on the wall jack. Push the
telephone firmly against the
wall jack, and pull down
until it is held securely by
the mounting studs.
3. Connect handset to
telephone base
Plug one end of the coiled
handset cord into the
handset. Plug the other end
into the jack at the base of
the phone. Then hang up.
4. Check for dial tone
Lift the handset and listen
for a dial tone. If you can't
hear a dial tone, refer to
“In Case of Difficulty” and
try to correct the problem.
TO DISCONNECT the line
and handset cords, squeeze the
clip on the modular plug and
pull it out of the jack.
WALL INSTALLATION
Dial Mode Switch
Page 5

4
OPERATION
Receiver Volume Contr ol
The Receiver Volume Control can be adjusted for a comfortable
listening level. The switch has variable volume positions.
Redial
The telephone always stores in memory the last phone number
dialed. To dial the same number again, lift the handset and
press .
Erasing Redial
For privacy, you can erase the redial memory. Lift the handset,
then press any digit (1-9).
Mute
Hold down to turn off the handset microphone. You can
then talk privately to someone else in the room without the
person on the phone hearing you. You will still be able to hear
the other person, but anything you say will not be heard. When
you release the button, your caller will again be able to hear
your voice.
Ringer Volume Contr ol
The RINGER switch allows you to turn the telephone ringer OFF,
or set it to ring at LO or HI volume. You can dial or answer calls
normally when the ringer is off. Other telephones in your home
will still ring; they are not affected by the switch.
T emporary Tone Dialing
Temporary tone dialing is used only when you have rotary
service. This is useful if you need to send tone signals for
access for telephone banking or long-distance services.
To change from pulse (rotary) to tone dialing during a call:
1. With the Dial Mode switch set to
DP (dial pulse), dial a telephone
number.
2. Press ; all buttons pressed
after this will send tone signals.
3. After you hang up, the phone automatically returns to rotary service.
REDIAL
MUTE
TONE
*
Page 6

5
If you have difficulty operating this phone, try the
suggestions below.
No Dial Tone
☞ Make sure all plugs are connected properly. Inspect the
line cord connections at the modular jack and at the
telephone. Also inspect the coiled handset cord
connections at both ends.
☞ Unplug the telephone and connect it to another modular
jack. If it still does not work, try another telephone; if
neither telephone works, the problem is not in this
telephone. The trouble may be caused by local
telephone company lines, central office equipment, or
the wiring in your home.
Calls Cannot Be Dialed, Or Are Dialed Slowly
This product comes set in the tone (TT) mode. Make sure
you choose the correct dialing method (TT/DP); touch tone
dialing will not work if you have dial pulse service.
Telephone Does Not Ring
☞ Make sure the RINGER Volume switch is not set to OFF.
☞ If there are several other phones on the same line, try
disconnecting some of the other telephones. Having too
many telephones can also create problems such as low
ringer volume or impaired quality during calls.
Other Problems
For customer service, visit our website at
www.telephones.att.com or call 1 800 222-3111.
Please retain your receipt as your proof of purchase.
IN CASE OF DIFFICULTY
 Loading...