

Page 1
LF-22 Loop Finder - Operating Guide
Version 2 – 5/15/15
WARNING: The procedure for finding existing loops with the LF-22 describes walking around in the street
while looking at the tester. THE USER MUST TAKE ADEQUATE PRECAUTIONS TO PREVENT INJURY
FROM MOTORISTS (LIKE ESTABLISHING A WORKZONE, AND DIVERTING TRAFFIC). Do not take
chances with the “Superman” method, which is thinking you are clever enough and quick enough to stay out
of the way of traffic while intently watching the Loop Finder for signal strength readings! Be smart. Avoid
injury. Do the right thing. Establish a Work Zone and then do your work.
Thank you for purchasing the ATSI LF-22 Loop Finder. We hope this handy tool will help you maintain your
agency’s vehicle detection loop installations.
The LF-22 is designed to sense electromagnetic fields (EMF) and give a field
flux strength indication by lighting up a curved string of LED’s on the face of the
unit. The intended purpose is to allow traffic signal technicians to find the
electromagnetic field that is emitted by inductive loop wires that are being
excited by a working vehicle loop detector. With a little practice, the LF-22
operator can locate the approximate position of the loop wires that are installed
beneath the road surface.
The LF-22 gives a visual indication of the strength of the EMF that allows the
technician to identify and diagnose loop detection installations that fail to detect
high-bed truck trailers (for vehicle counting and classifying) or small vehicles
with low electromagnetic “footprints” (motorcycles and bicycles). The service
technician can also use the LF-22 to locate and mark loops that have been covered up by re-surfacing work.
This is helpful when nearby road repairs or utility work could destroy the loop if the equipment operators are
not aware of the location of the loop wires.
Twisted lead-in wires running between the junction box and the actual
loop emit a much weaker signal, and are much harder to detect.
Lead-in wires in the road surface are generally 5 inches or less below
the surface, and can usually be detected by the LF-22. Twisted
“Home Run” wiring, which connects the loop wires in the junction box
to the signal cabinet, are typically 12 to 24 inches below the surface,
sometimes run within a shield or metallic conduit, and usually cannot
be detected by the LF-22.
To use the LF-22, slide the left-most slide switch to the “ON” position,
and observe the signal strength and power on LEDs on the front of the
unit. All the LEDs should light up briefly, and the power on LED
should remain lit. The antenna in the LF-22 is most sensitive to EMF
lines of flux that pass through the unit perpendicular to the front panel,
so the instructions given here work when the unit is held horizontally,
or “flat” with respect to the ground, as show here. Start with the two
sensitivity switches in the up position to maximize the sensitivity, and
hold the unit “flat” to the ground at waist level and walk over the area
you want to survey, while watching the LEDs on the face of the LF-22.
You will begin to detect loop wires of the working loops.
Page 2
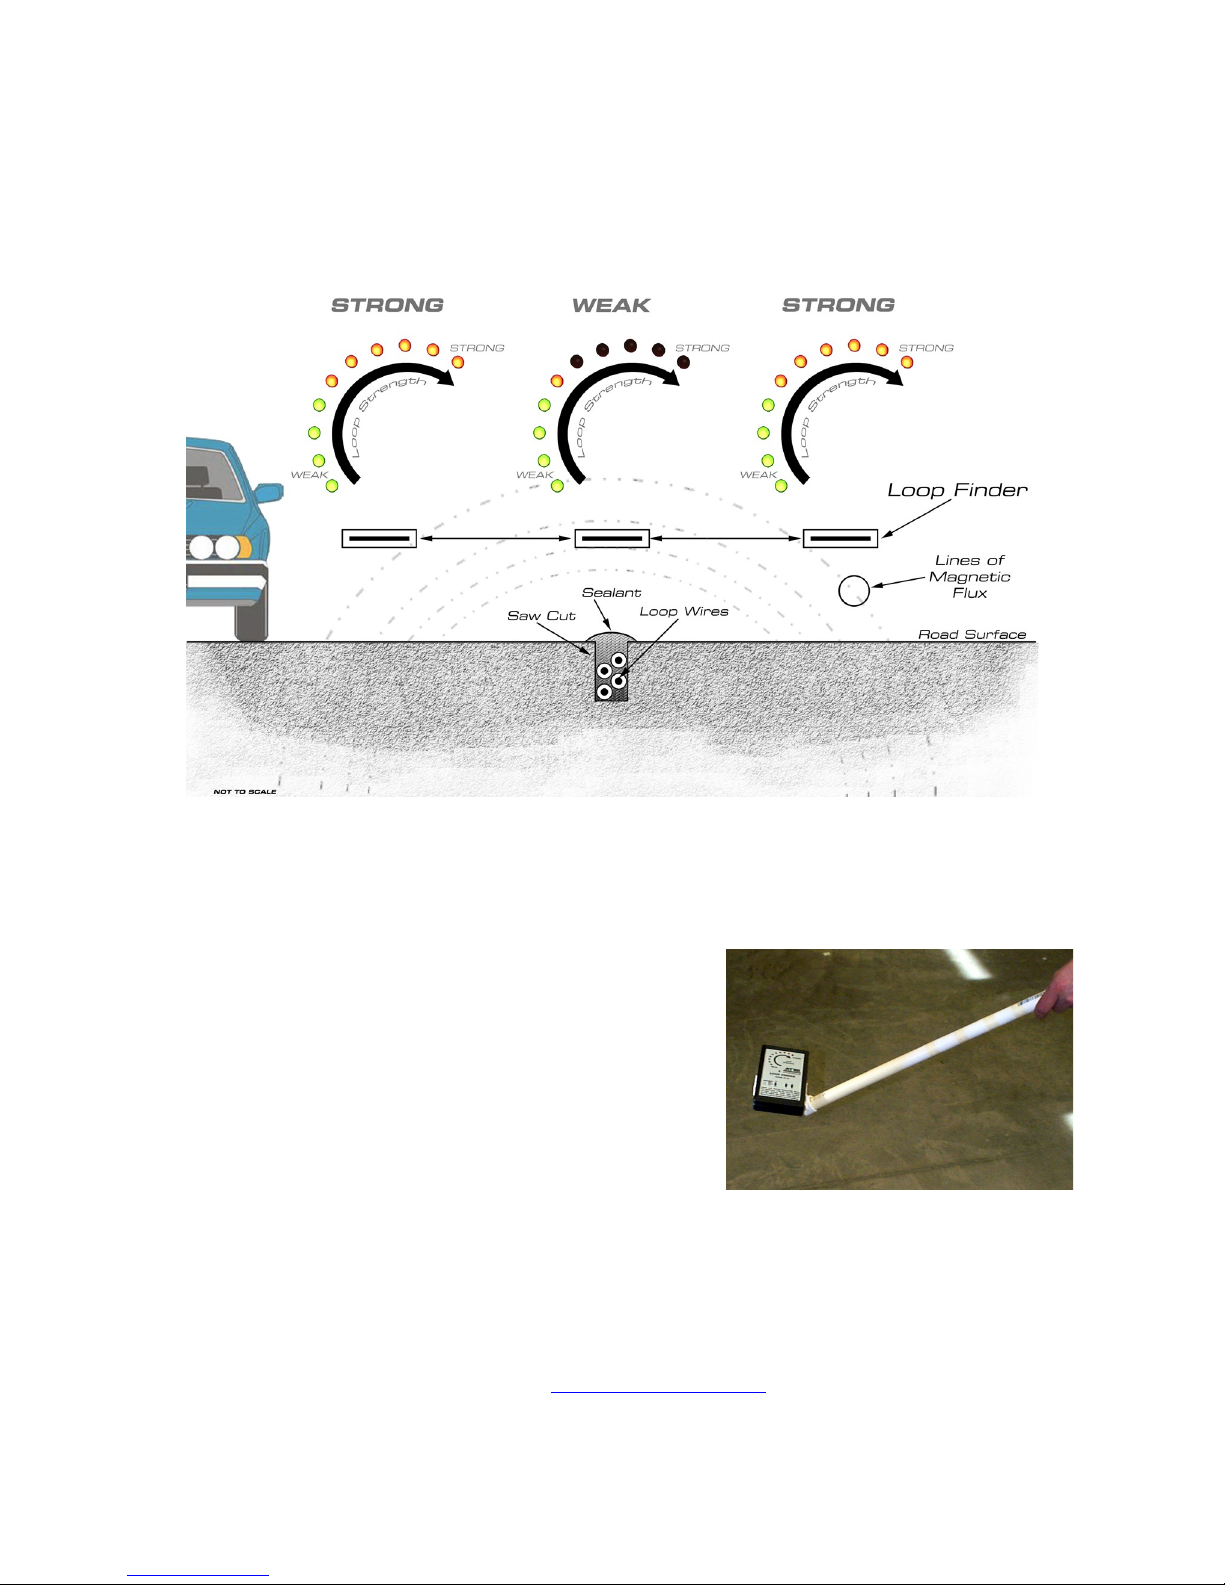
The lines of flux form a circular pattern around a properly installed loop wire, as shown in Figure 3 below.
When the antenna of the Loop Finder passes through the lines of flux in a “flat” orientation, the unit will give
the operator a “high-low-high” signal strength pattern with the signal meter LEDs that is centered over the
position of the wire (see Figure 3).
When you need to pinpoint the loop wires, reduce the sensitivity by adjusting the sensitivity switches on the
face of the unit, according to the instructions on the LF-22. This allows you to hold the unit closer to the loop
wires without having the loop strength reading at the maximum all the time. Continue to look for the HighLow-High pattern to locate the position of the wire, and then mark the pavement if desired.
Since you will want to hold the LF-22 flat and near the pavement,
we have included a bracket which will hold the unit and accept a
piece of ¾ inch CPVC pipe or conduit (provided by the user)
which forms the handle. This will allow you to stand upright while
using the LF-22. The one-handed operation allows you to hold a
spray can of marking paint in the other hand for loop marking.
The unit requires a standard 9 Volt battery for operation. The LF22 is shipped with a battery installed in the battery compartment,
which is on the backside of the unit. To replace the battery,
remove the two screws holding the battery compartment cover in
place and remove the battery from the battery lead. Install the
new battery in a similar fashion, making sure there is a good connection with the battery lead. Do not overtighten the battery compartment screws. Remove the battery for long-term storage of the unit.
We hope the LF-22 helps you with your signal maintenance activities. We are always interested in feedback
from users like you, good or bad, about the products we offer. Feel free to email or call ATSI with your
opinions about and any interesting uses for the LF-22 Loop Finder. Thanks for buying our product!
If you have any questions, please contact us at [email protected] or call us at (740) 592-2874.
NOTE: If the readings are erratic or the loop strength LEDs stay on, replace the batteries.
 Loading...