

Page 1
Atop Technologies, Inc.
1-port Modbus Gateway
MB5001C/MB5001C-Sis
User’s Manual
Version 1.0
Updated on 2010/07/28
Tel: 886-3-5508137
Fax: 886-3-5508131
http://www.atop.com.tw
Page 2

User Manual Version 1.0
MB5001C series 1-port Modbus Gateway
Copyright © 2010 Atop Technologies, Inc.
All rights reserved. Designed in Taiwan.
1
Important Announcement
The information contained in this document is the property of Atop Technologies, Inc. and is supplied for the
sole purpose of the operation and maintenance of products of Atop Technologies, Inc. No part of this
publication is to be used for any other purposes, and it is not to be reproduced, copied, disclosed,
transmitted, stored in a retrieval system, or translated into any human or computer language, in any form, by
any means, in whole or in part, without the prior express written consent of Atop Technologies, Inc.
Published by
Atop Technologies, Inc.
2F, No. 146, Sec. 1, Tung-Hsing Rd.
Jubei, Hsinchu 30261
Taiwan, R.O.C.
Tel: 886-3-5508137
Fax: 886-3-5508131
www.atop.com.tw
Copyright © 2010 Atop Technologies, Inc. All rights reserved.
All other product names referenced herein are registered trademarks of their respective companies.
Page 3

User Manual Version 1.0
MB5001C series 1-port Modbus Gateway
Copyright © 2010 Atop Technologies, Inc.
All rights reserved. Designed in Taiwan.
2
This document is intended to provide customers with brief descriptions on the product and to assist
customers to get started. For detail information and operations of the product, please refer to the manual in
the CD attached.
FCC WARNING
Class A for 1-port Modbus Gateway(MB5001C/MB5001C-Sis)
This equipment has been tested and found to comply with the limits for a Class A digital device
pursuant to Part 15 of the FCC rules. These limits are designed to provide reasonable protection
against harmful interference when the equipment is operated in a commercial environment. This
equipment generates, uses and radiates radio frequency energy and, if not installed and used in
accordance with the instructions, may cause harmful interference to radio communications.
Operation of this equipment in a residential area is likely to cause harmful interference in which
case the user will be required to correct the interference at his own expenses.
A shielded-type power cord is required in order to meet FCC emission limits and also to prevent
interference to the nearby radio and television reception. It is essential that only the supplied power
cord can be used.
Use only shielded cables to connect other devices to this equipment by RS-232 or RS-485 ports.
Be cautioned that changes or modifications not expressly approved by the party responsible for
compliance could void ones authority to operate the equipment.
Page 4

User Manual Version 1.0
MB5001C series 1-port Modbus Gateway
Copyright © 2010 Atop Technologies, Inc.
All rights reserved. Designed in Taiwan.
3
Contents
1. Introduction ................................................................................................... 5
1.1 Packaging ...................................................................................................................... 5
2. Hardware Setup ............................................................................................ 6
2.1 LED Indicators ............................................................................................................... 7
2.1.1 LAN LED .............................................................................................................. 7
2.1.2 COM Port LED ...................................................................................................... 8
2.1.3 RUN LED .............................................................................................................. 8
2.2 Installation Procedures .................................................................................................. 8
3. Software Setup ............................................................................................. 9
3.1 Configuration by DeviceView ......................................................................................... 9
3.1.1 Static IP ................................................................................................................ 9
3.1.2 Auto IP (Dynamic IP) .......................................................................................... 10
3.2 Configuration by Telnet Utility....................................................................................... 11
3.2.1 Login to the System ............................................................................................ 11
3.2.2 IP Setup .............................................................................................................. 12
3.2.3 Gateway Setup ................................................................................................... 12
3.2.4 Subnet Mask Setup ............................................................................................ 12
3.2.5 COM1 Setup ....................................................................................................... 13
3.2.6 Exit with Save and Reset .................................................................................... 13
3.2.7 Exit with Save and Reset .................................................................................... 13
3.2.8 Link 1 Setup ....................................................................................................... 13
3.2.9 Change Password .............................................................................................. 14
3.2.10 SNMP Settings ................................................................................................. 15
3.3 Configuration Using Web Browser ............................................................................... 15
3.3.1 Log in to the System ........................................................................................... 15
3.3.2 Change Password .............................................................................................. 16
3.3.3 Network Setup .................................................................................................... 17
3.3.4 Configure COM1 Settings ................................................................................... 19
3.3.5 Modbus Settings ................................................................................................. 19
3.4 Assign a New IP Address by ARP Command ............................................................... 20
5. SNMP Setup ................................................................................................ 22
Page 5

User Manual Version 1.0
MB5001C series 1-port Modbus Gateway
Copyright © 2010 Atop Technologies, Inc.
All rights reserved. Designed in Taiwan.
4
5.1 SNMP Network Management Platform ........................................................................ 22
5.2 Using NetworkView as an Example ............................................................................. 22
6. Diagnostics .................................................................................................. 24
6.1 Use Standard TCP/IP Utility Ping Command ................................................................ 24
6.2 Use DeviceView Configuration Utility Program ............................................................ 24
Appendix A: Management Utility ............................................................... 26
A.1. DeviceView utility Introduction ............................................................................... 26
A.2. Interface ................................................................................................................ 26
A.3. Functions ............................................................................................................... 27
A.3.1. Device Search ............................................................................................ 27
A.3.2. Firmware .................................................................................................... 30
A.3.3. Configuration .............................................................................................. 32
A.3.4. About ......................................................................................................... 35
Appendix B: Specifications ......................................................................... 36
B.1 Hardware Specifications .............................................................................................. 36
B.2 Software Specifications ............................................................................................... 37
B.3 Panel Layout and Connector Pin Assignments ............................................................ 37
B.3.1 Pin Assignments ................................................................................................. 37
B.3.2 Ethernet Port (RJ-45) ......................................................................................... 38
B.3.3 Power Terminal Block Connector ........................................................................ 38
B.4 Buzzer/LED Message .................................................................................................. 39
B.4.1 Buzzer ................................................................................................................ 39
B.4.2 LAN LED ............................................................................................................ 39
B.4.3 COM Port LED ................................................................................................... 39
B.4.4 RUN LED ........................................................................................................... 39
Appendix C: Upgrade System Firmware ................................................. 40
C.1 Upgrade Procedures ................................................................................................... 40
C.2 Critical Issues of Upgrading ........................................................................................ 41
C.3 Error Messages ........................................................................................................... 42
Appendix D: Disable System Firmware ................................................... 43
Appendix E: Specification ............................................................................ 44
Page 6

User Manual Version 1.0
MB5001C series 1-port Modbus Gateway
Copyright © 2010 Atop Technologies, Inc.
All rights reserved. Designed in Taiwan.
5
1. Introduction
Modbus is an industry adopted communication protocol based on RTU, ASCII, and TCP protocols for
various applications; these three protocols are commonly used by hardware equipments in the industry,
such as DCS, PLC, HMI, power load measurement, various sensor and measuring instruments. The
Modbus Gateway is capable of implementing the Modbus environment between different hardware
interfaces, thereby streamlining the process of management and application.
Diverse Hardware Infrastructure
Modbus Gateway supports the four most commonly used hardware communication interfaces, RS232,
RS485, RS422, and Ethernet. The simple-to-use configuration software provided with Modbus Gateway
can quickly modify the hardware interface to use, and easily switch to the existing hardware
communication infrastructure.
Switching between Modbus Protocols
Modbus Gateway supports the standard Modbus protocol and is capable of converting any Modbus
protocols between Modbus TCP and Modbus RTU or Modbus ASCII for all supported hardware
interfaces.
1.1 Packaging
Please check ones package contains the following items:
Atop MB5001C or MB5001C-Sis Modbus Gateway x 1
5 pins Terminal Block for Serial Connector x 1 (only for MB5001C-Sis)
3 pins Terminal Block for Power Connector x 1 (only for MB5001C-Sis)
Product CD containing configuration utility x 1
Wall-mounting screws x 2
Atop Modbus gateway quick start guide x 1
Optional Accessories:
1. DK-25 DIN-Rail Kit f
2. Power Adapter with DC jack- PIN 1.3φ output 5.0V 1A
(1) AD5V1A(US) Switching adapter
(2) AD5V1A(EU) Switching adapter
3. Power Adapter with Terminal block output 12V 1.25A
(1) US315-12(US) Switching adapter
(2) US315-12(EU Switching adapter
Page 7
User Manual Version 1.0
MB5001C series 1-port Modbus Gateway
Copyright © 2010 Atop Technologies, Inc.
All rights reserved. Designed in Taiwan.
6
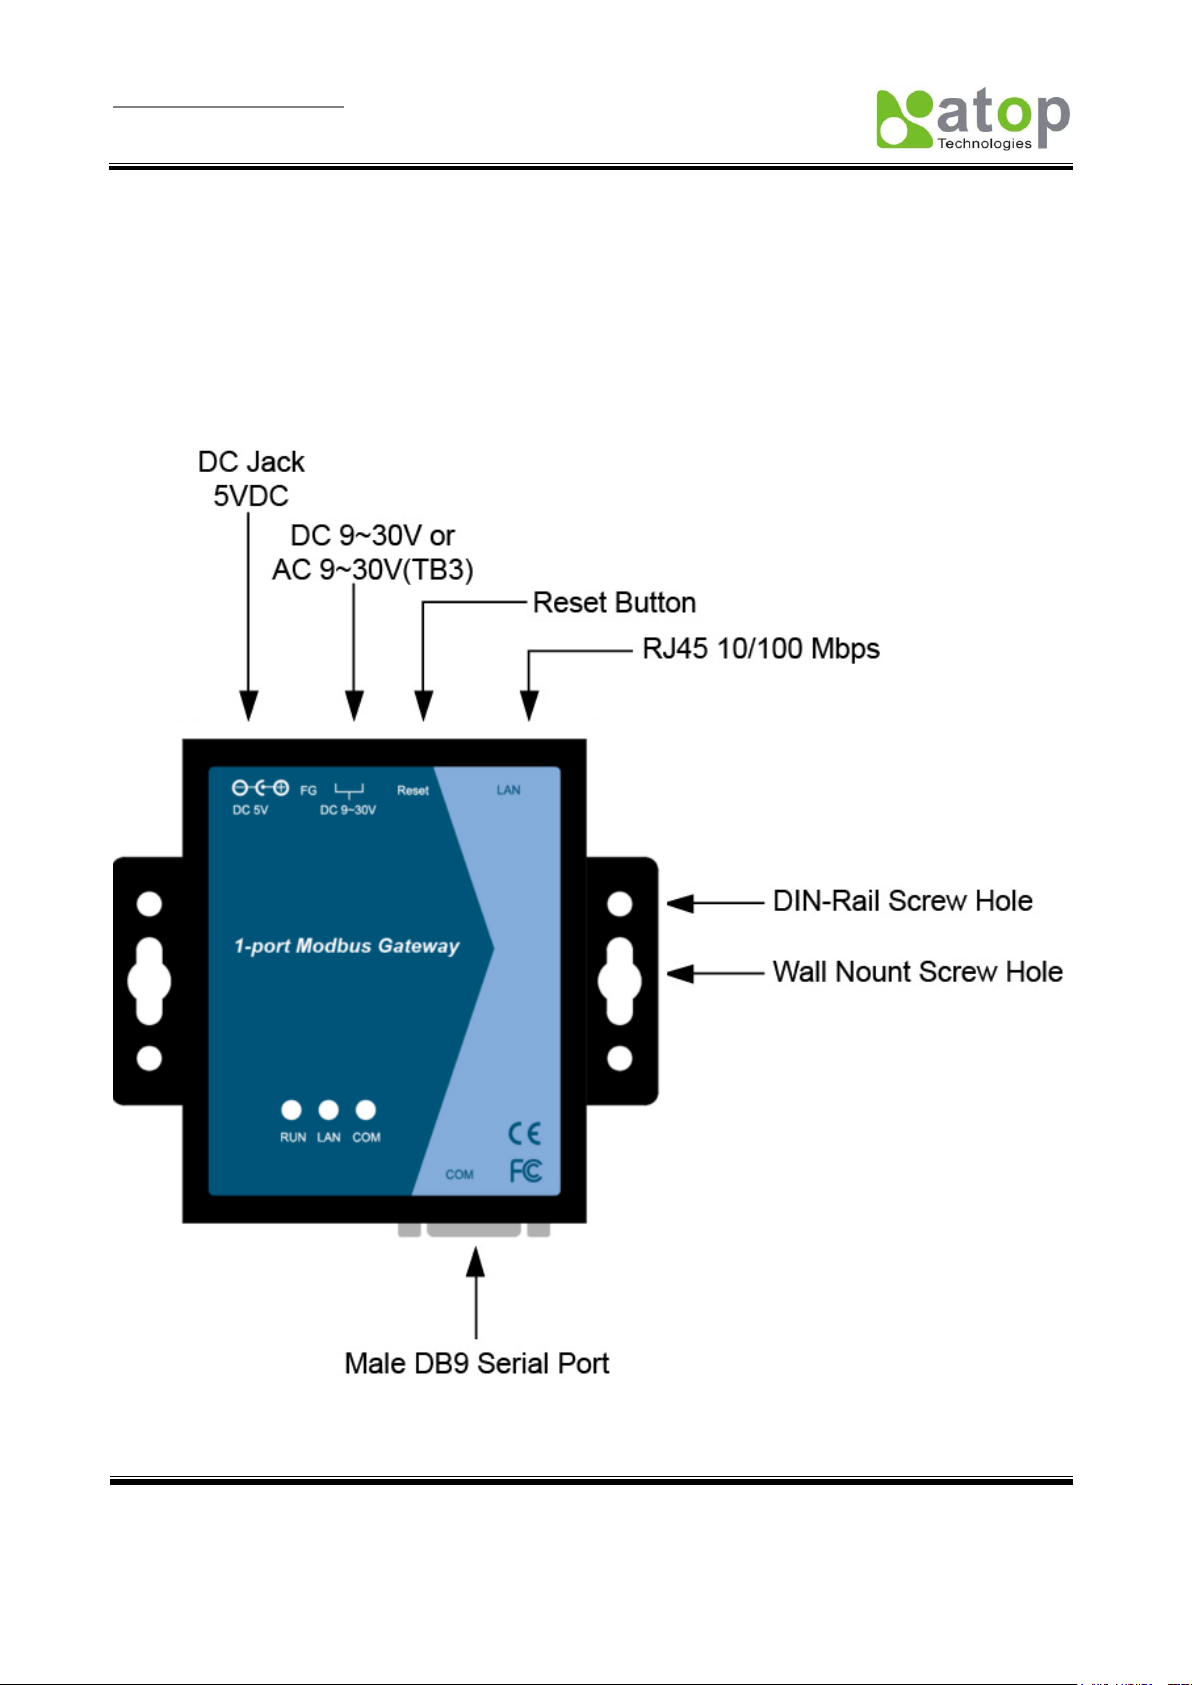
2. Hardware Setup
NOTE:
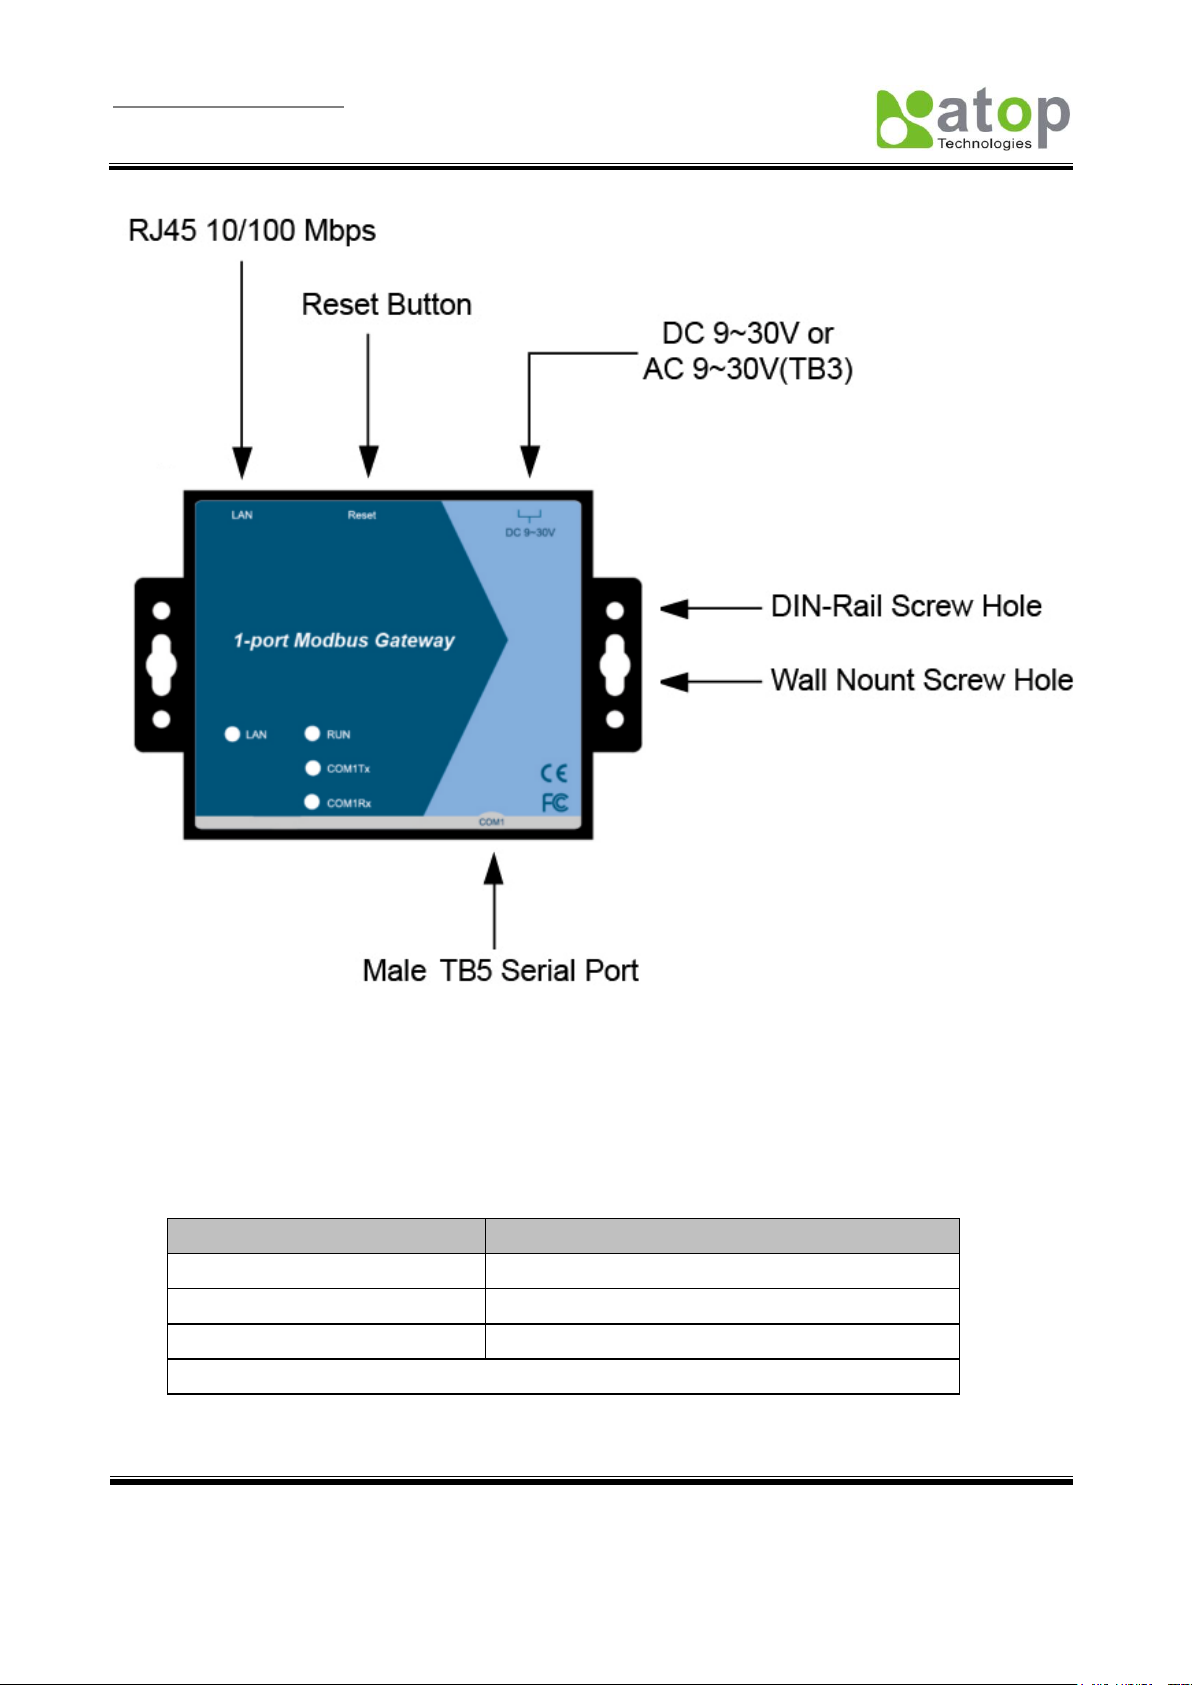
1. MB5001C (for RS-232), MB5001C-Sis (for RS422/485). Panel layout in Appendix A.3.1
2. One can press the reset button of MB5001C to reset the settings to the default value
Figure 2.1 shows the interfaces.
Figure 2.1 MB5001C interfaces.
Page 8
User Manual Version 1.0
MB5001C series 1-port Modbus Gateway
Copyright © 2010 Atop Technologies, Inc.
All rights reserved. Designed in Taiwan.
7
Message
Description
Off
Ethernet Disconnected
Blinking with Green
Data is transmitting on Ethernet for 100Mbps
Blinking with Orange
Data is transmitting on Ethernet for 10Mbps
Table 1. LAN LED Message
2.1 LED Indicators
2.1.1 LAN LED
Figure 2.2 MB5001C-Sis interfaces
Page 9

User Manual Version 1.0
MB5001C series 1-port Modbus Gateway
Copyright © 2010 Atop Technologies, Inc.
All rights reserved. Designed in Taiwan.
8
Message
Description
Off
No data is transmitting on COM port
Blinking
Data is transmitting on COM port
Table 2. COM Port LED Message
Message
Description
On
Jumper JP1 Pin1 and Pin2 are shorted to disable
AP firmware running
Blinking (rate: 0.5 Sec)
AP firmware is running normally
Table 3. RUN LED Message
2.1.2 COM Port LED
2.1.3 RUN LED
2.2 Installation Procedures
Step 1: Connect MB5001C to power source using 5V DC Jack(Note that DC Jack is 5V only, and only
use it with a power adaptor), or 9~30V DC Terminal Block power source.
Note:MB5001C provide two power inputs can be connected simultaneously to live DC
power sources. Anyone of the power inputs fails, the other live source acts as a backup
to support power needs automatically. The redundant dual DC power inputs give one
extra assurance of non-stop operation.
MB5001C : 5V DC Jack or DC 9-30V 3-pin Terminal Block power input
MB5001C-Sis: DC 9-30V 3-pin Terminal Block power input
Step 2: Connect MB5001C to Ethernet network. Use a standard straight-through Ethernet cable when
one connect it to a hub/switch, one also can connect it to ones PC„s Ethernet port via a
cross-over Ethernet cable for easy set up. However, in this case one need to make sure ones
PC is in the same network sub-net as MB5001C.
Step 3: Connect MB5001C‟s serial port to a serial device.
Step 4: Placement options. One can mount MB5001C to a wall/panel (Mounting screws included) or
Din-Rail rack (Require optional item model: Din-Rail-Kit DK-25).
Page 10
User Manual Version 1.0
MB5001C series 1-port Modbus Gateway
Copyright © 2010 Atop Technologies, Inc.
All rights reserved. Designed in Taiwan.
9
Property
Default Value
IP Address
10.0.50.100
Gateway
10.0.0.254
Subnet Mask
255.255.0.0
User Name
admin
Password
Null(leave it blank)
COM 1
9600,None, 8, 1, No flow control, buffer disabled, packet delimiter timer 2ms
Link 1
Type: TCP Server, Listen port 4660, Filter=0.0.0.0
SysName of SNMP
name
SysLocation of SNMP
location
SysContact of SNMP
contact
3. Software Setup
MB5001C Modbus Gateway is shipped with default settings shown in the following table:
3.1 Configuration by DeviceView
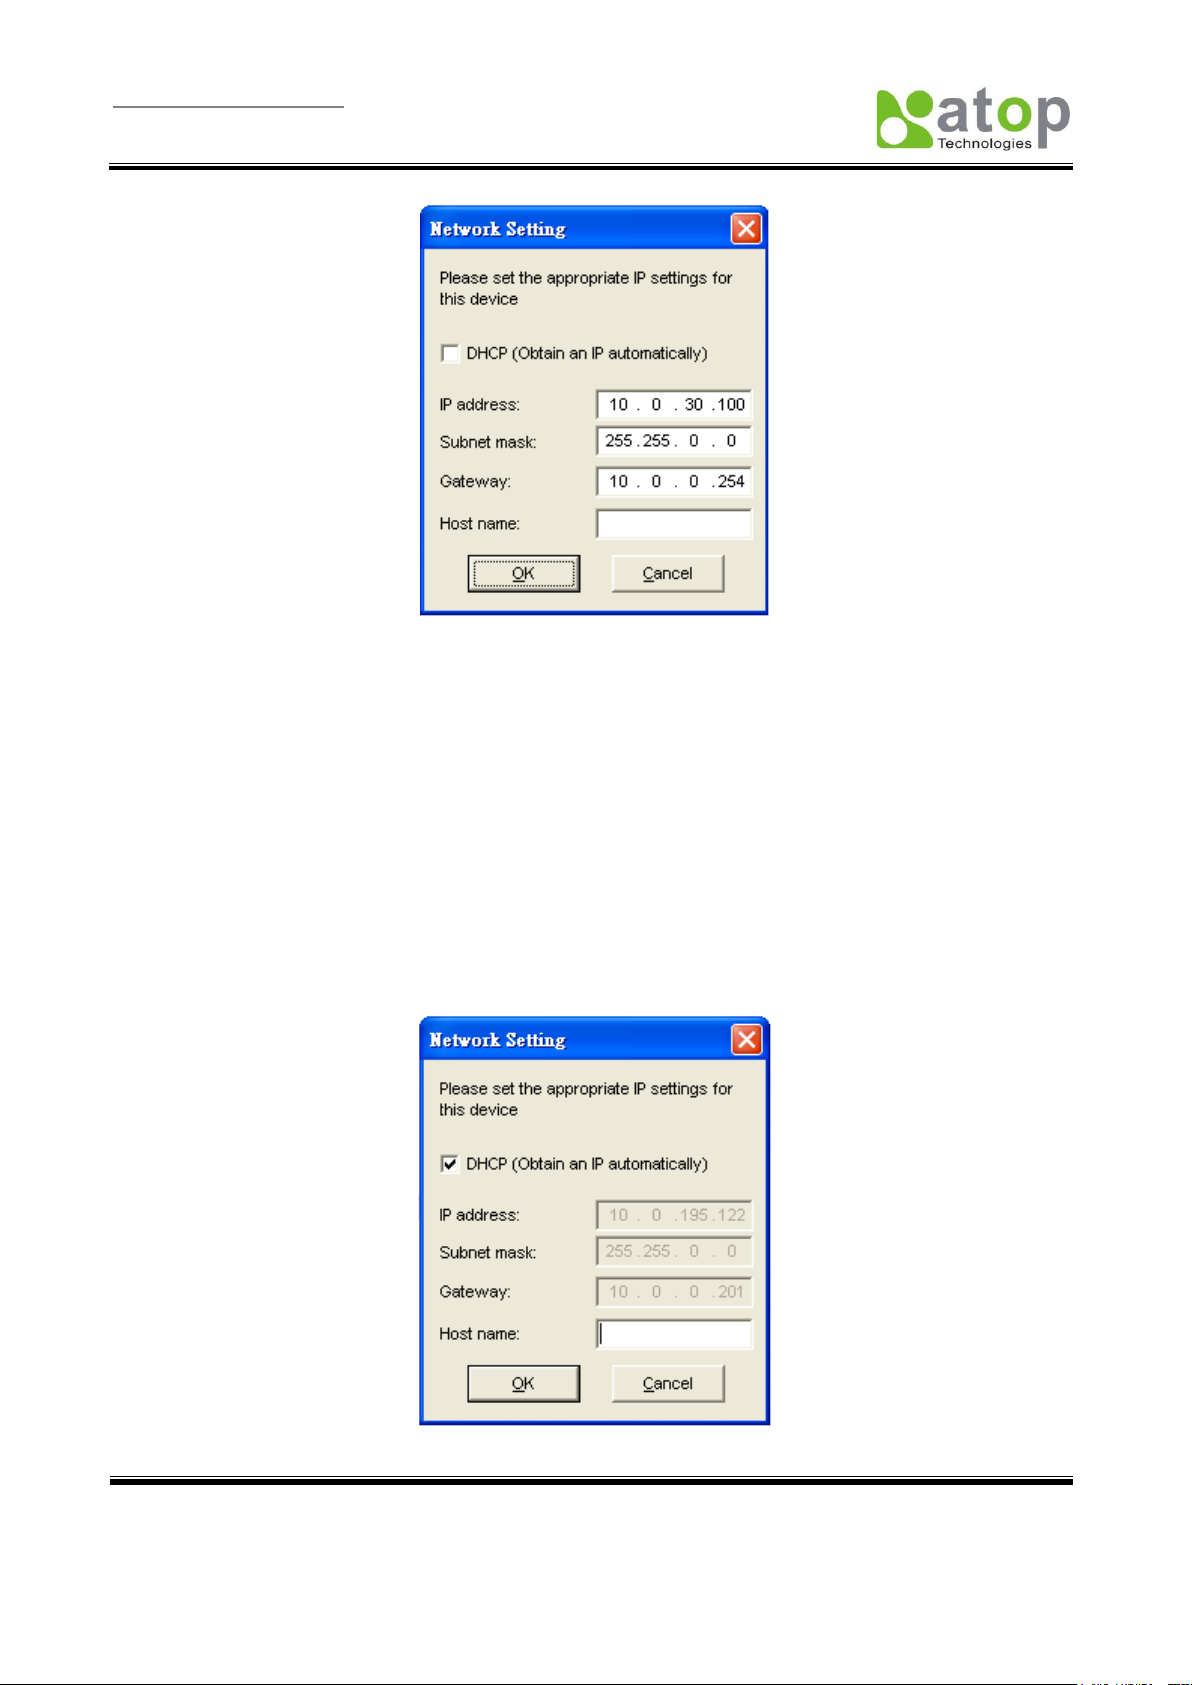
3.1.1 Static IP
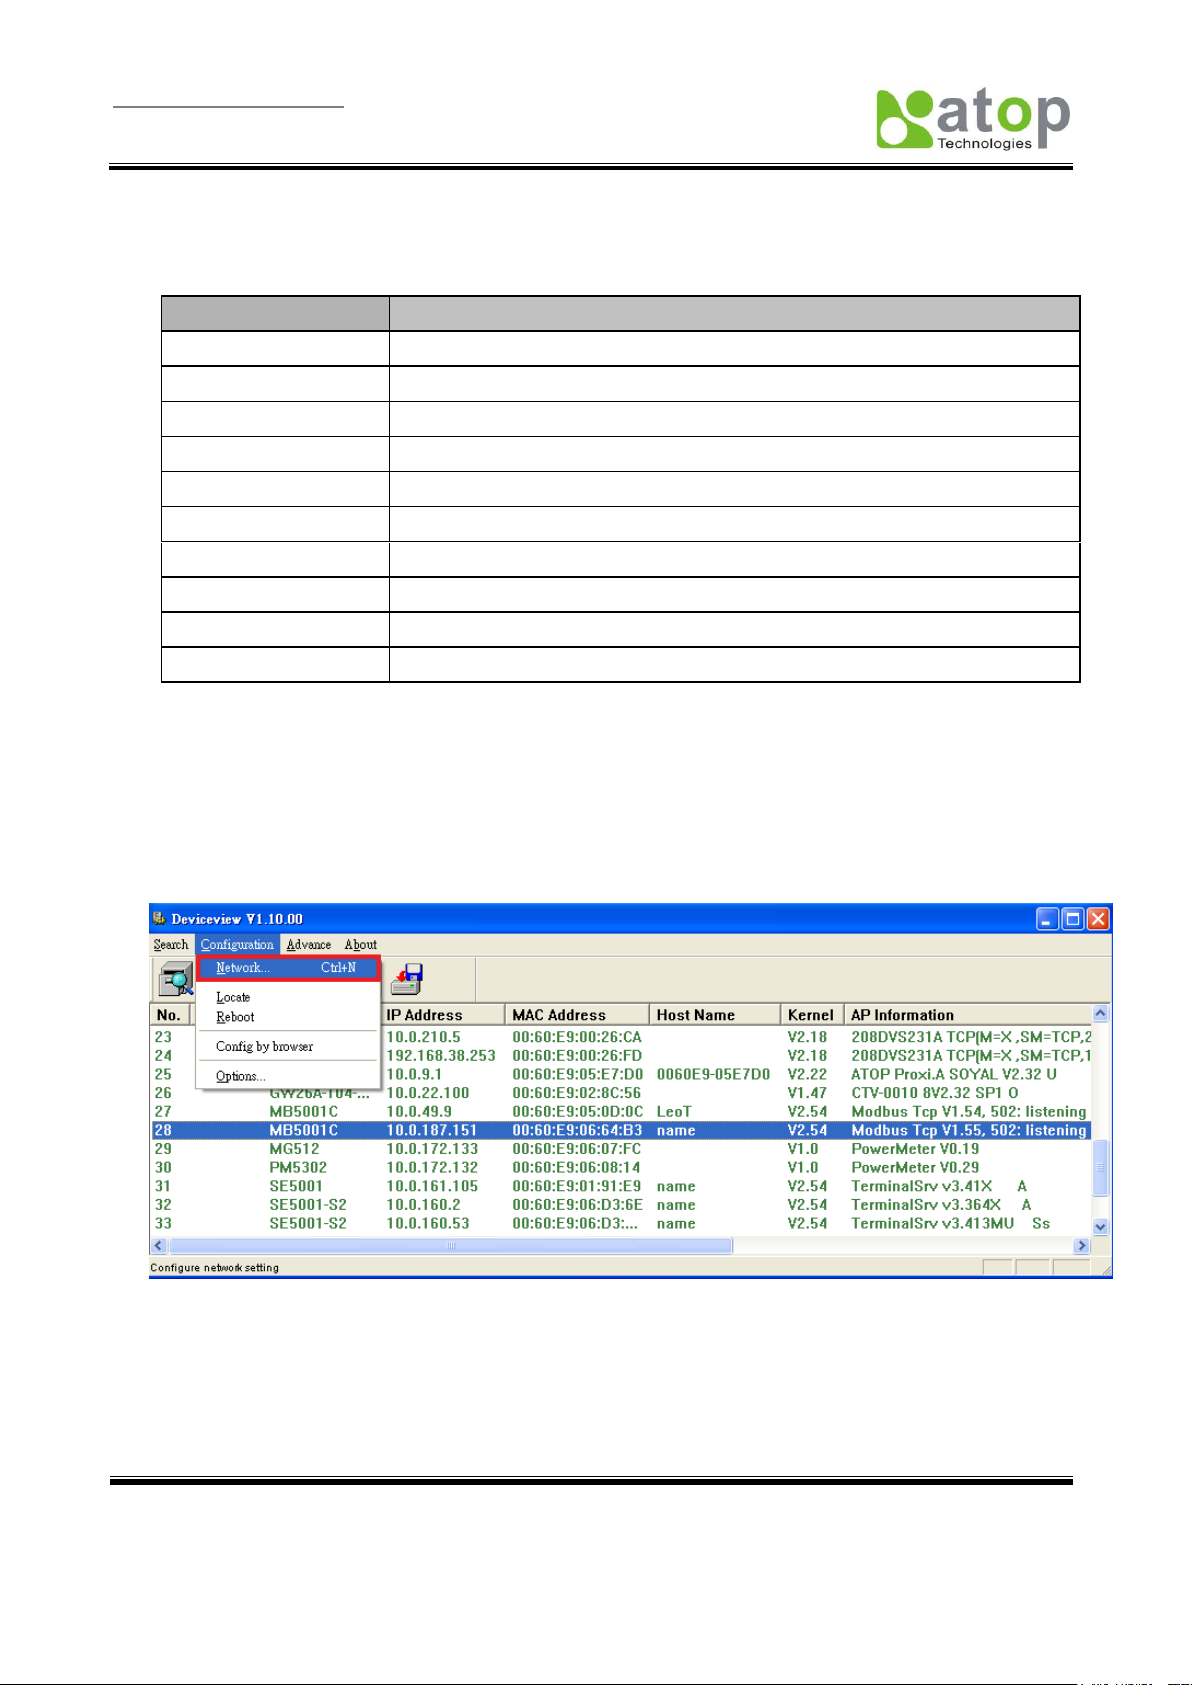
Use DeviceView that comes with product CD to configure the network parameters of MB5001C.
Please click “Configuration” button(ref Figure 3.1) then give it a static IP information.( Figure 3.2)
Figure 3.1 Configure by DeviceView
Page 11
User Manual Version 1.0
MB5001C series 1-port Modbus Gateway
Copyright © 2010 Atop Technologies, Inc.
All rights reserved. Designed in Taiwan.
10
3.1.2 Auto IP (Dynamic IP)
Figure 3.2 Static IP setup dialog window
A DHCP server can automatically assign the IP address and network settings. MB5001C supports the DHCP
function. By default, the DHCP function on MB5001C is disabled; one can use DeviceView software to
search network information automatically by following steps:
->Execute DeviceView (Figure 3.1)
->Click on the IP address of MB5001C in DeviceView
->Click “Config” button(It will pop-up Dialog Window)
->Check ”Auto IP” (Figure 3.3)
->Click “ Config Now” button(The MB5001C will restart and get IP from DHCP server automatically)
Figure 3.3 DeviceView Auto IP Dialog Window
Page 12
User Manual Version 1.0
MB5001C series 1-port Modbus Gateway
Copyright © 2010 Atop Technologies, Inc.
All rights reserved. Designed in Taiwan.
11
3.2 Configuration by Telnet Utility
One can use Telnet utility to change configuration settings of MB5001C by following steps:
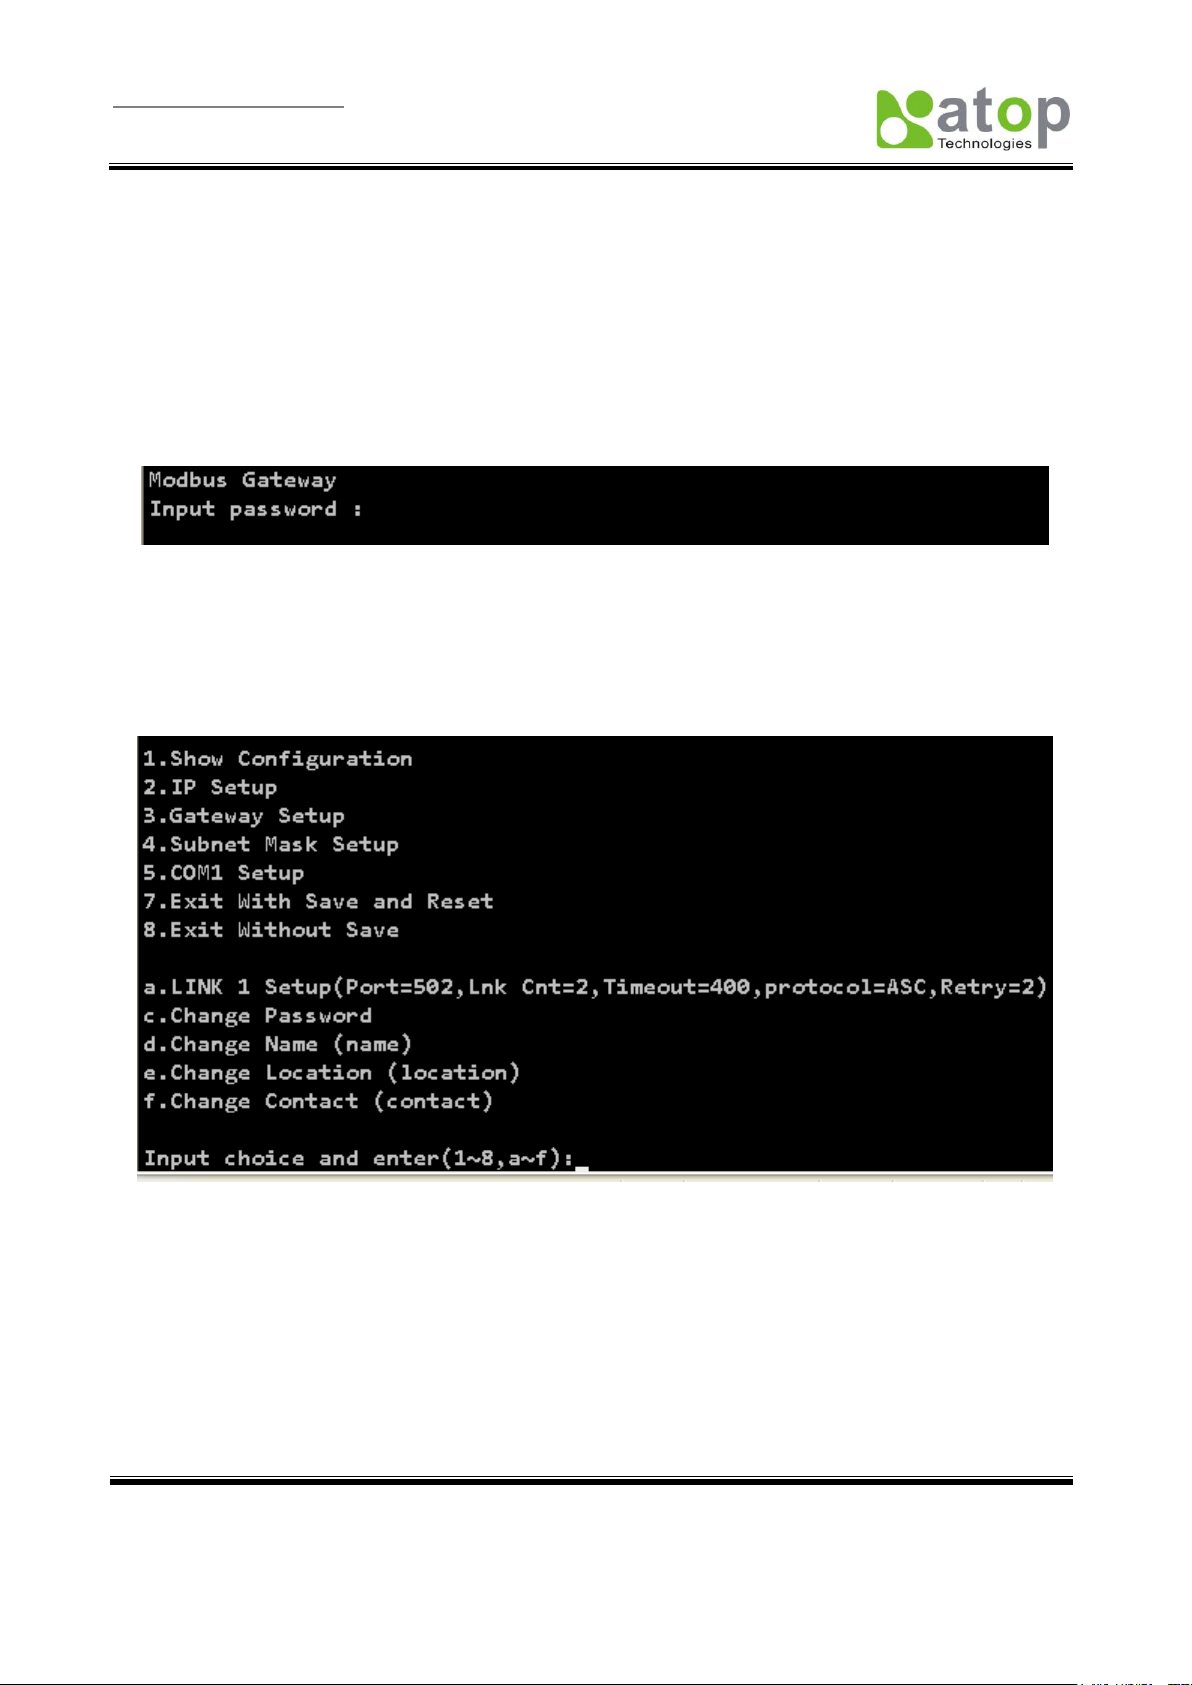
3.2.1 Login to the System
->Open Ms-DOS command prompt window
->Telnet to MB5001C using command “Telnet IP_address”.( For example:Input Telnet 10.0.50.100 in
Ms-DOS command prompt window).After telnet to MB5001C, system prompts for a password, the default
password is left it blank. (Figure 3.4)
Figure 3.4 Login to the system
Note: One can press the default button of MB5001C to reset the password to the default value.
1. After verifying the password, the following terminal screen appears.( Figure 3.5)
Note: Changes to networking parameters will take effect only when one exit and restart MB5001C.
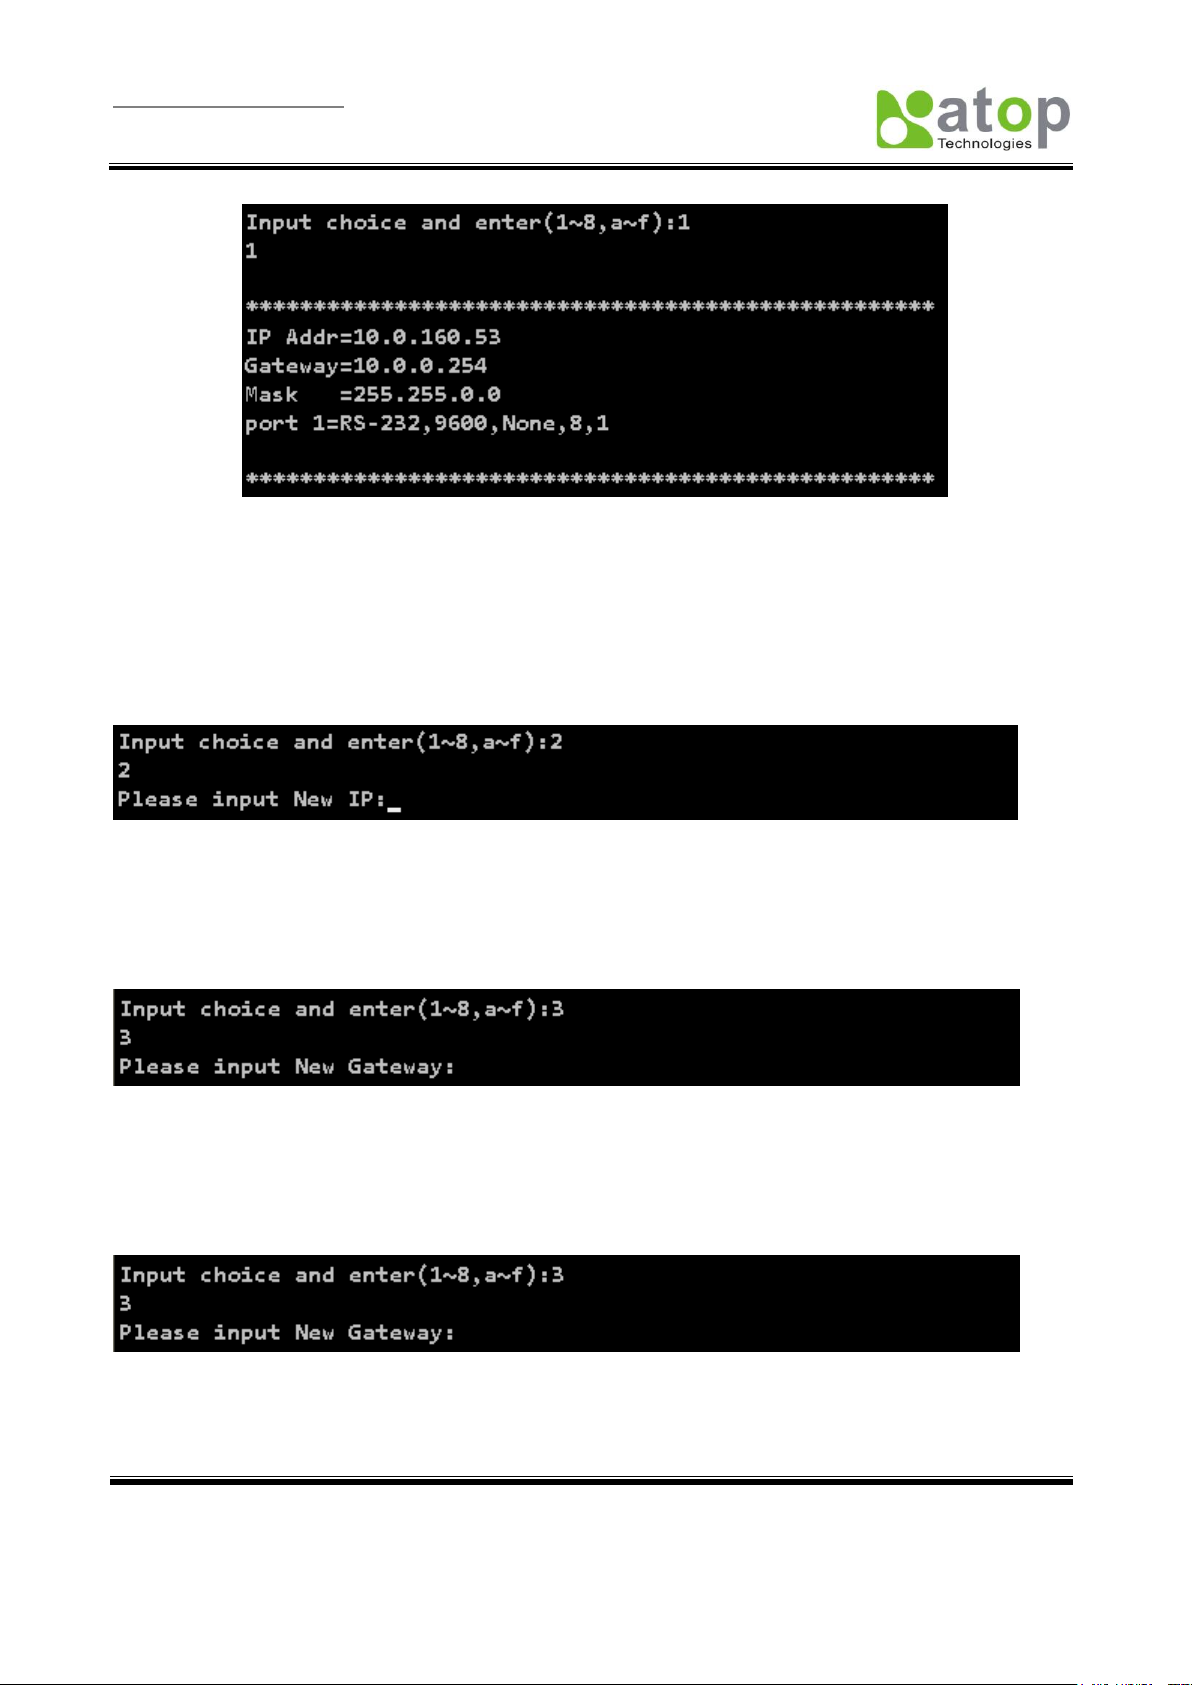
->Select “1” from “Input choice and enter (1~8,a~f):” to enter show configuration page as
following:( Figure 3.6)
Figure 3.5 Main menu
Page 13
User Manual Version 1.0
MB5001C series 1-port Modbus Gateway
Copyright © 2010 Atop Technologies, Inc.
All rights reserved. Designed in Taiwan.
12
Figure 3.6 Show Configuration
This page gives one the general information of MB5001C including IP address, Gateway, subnet mask,
and serial information of the device.
3.2.2 IP Setup
Select “2” from “Input choice and enter (1~8,a~f):” to Setup IP:( Figure 3.7)
Figure 3.7 IP Setup
3.2.3 Gateway Setup
Select “3” from “Input choice and enter (1~8,a~f):” to Setup Gateway:( Figure 3.8)
Figure 3.8 Gateway Setup
3.2.4 Subnet Mask Setup
Select “4” from “Input choice and enter (1~8,a~f):” to Setup Subnet Mask:( Figure 3.9)
Figure 3.9 Gateway Setup
Page 14

User Manual Version 1.0
MB5001C series 1-port Modbus Gateway
Copyright © 2010 Atop Technologies, Inc.
All rights reserved. Designed in Taiwan.
13
3.2.5 COM1 Setup
Select “5” from “Input choice and enter (1~8,a~f):” to Setup COM1. One can then give the COM port alias
name, set the baud rate and parity, determine number of data bit and stop bit, and decide if one want to use
flow control and the type of flow control one want to use. The following screen (Figure 3.10) illustrates how to
setup 9600 baudrate, none parity, 8 data bits, and 1 stop bit.
Figure 3.10 COM1 Setup
3.2.6 Exit with Save and Reset
Select “7” from “Input choice and enter (1~8,a~f):” to Exit with Save. Please choose this option to save all
the previous changes to EEPROM, the device will restart automatically.
3.2.7 Exit with Save and Reset
Select “8” from “Input choice and enter (1~8,a~f):” to Exit with Save. Please choose this option to discard
all the previous changes the device will close telnet connection automatically.
3.2.8 Link 1 Setup
Select “a” from “Input choice and enter (1~8,a~f):” to Exit with Save. The following screen (Figure 3.11)
illustrates how to set port to 502, connection to 2, input timeout to 400, protocol to ASCII, and retry to 2
times.
Page 15

User Manual Version 1.0
MB5001C series 1-port Modbus Gateway
Copyright © 2010 Atop Technologies, Inc.
All rights reserved. Designed in Taiwan.
14
Figure 3.11 Link1 Setup
3.2.9 Change Password
1. Select “c” from “Input choice and enter (1~8,a~f):”. The following screen (Figure 3.12) illustrates
how to change default empty password to “1111”.
Figure 3.12 change the password
2. If one want to change the password, please type the old password in the “Please input old
password” field, type the new password in the “Please input new password” and the “Please
verify new password” fields.
Note: One can press the default key of product to reset password to the default value.
Page 16

User Manual Version 1.0
MB5001C series 1-port Modbus Gateway
Copyright © 2010 Atop Technologies, Inc.
All rights reserved. Designed in Taiwan.
15
3.2.10 SNMP Settings
a. Select “d” from “Input choice and enter (1~8,a~f):” to change SNMP Name field.
Note that if you press enter, MB5001C will fill in a default name equal to its MAC.
b. Select “e” from “Input choice and enter (1~8,a~f):” to change SNMP Location field.
c. Select “f” from “Input choice and enter (1~8,a~f):” to change SNMP Contact field.
3.3 Configuration Using Web Browser
1. Make sure one PC is located on the same network sub-net as MB5001C
2. Open a web browser, then type in the IP address of MB5001C to be configured. Default user name
is admin and default password is null (leave it blank).
3. MB5001C‟s network, link mode and COM ports settings can be configured in different web pages.
4. Click “Save Configuration” to save settings.
5. Click ”Restart” button to make the change effective if necessary.
It is also possible to modify various settings through the web server interface. To do so, please follow the
steps below.
3.3.1 Log in to the System
1. From web browser, type in the IP address of MB5001C in the URL.
Example: http://10.0.50.100
2. The following authentication screen appears. (Figure 3.16) Please type in user name and password
then click on OK. The user name is admin and password is left it blank by default.
Figure 3.16 login the system via Web
3. The following overview page appears.( Figure 3.17)
Page 17

User Manual Version 1.0
MB5001C series 1-port Modbus Gateway
Copyright © 2010 Atop Technologies, Inc.
All rights reserved. Designed in Taiwan.
16
Figure 3.17 Overview
3.3.2 Change Password
1. Click on the “Security” link and the following screen appears.( Figure 3.18)
Figure 3.18 Change the password
2. Please input the old password in the “Old Password” field, input the new password in the “New
Password” and the “Verified Password” fields, and then click on “Save Configuration” to update
Page 18

User Manual Version 1.0
MB5001C series 1-port Modbus Gateway
Copyright © 2010 Atop Technologies, Inc.
All rights reserved. Designed in Taiwan.
17
the password.
Note: One can press the default key of product to reset password to the default value.
3.3.3 Network Setup
Click on the “Networking” link and the following screen appears. Fill in IP information under TCP/IP field.
Alternatively, one can do the configuration by clicking on DHCP to obtain auto IP address, gateway and
subnet mask information.
Enable SNMP by checking “Enable”, fill in network identification information under SNMP field and click on
the “Save Configuration” button to save the changes, please notice that the setting will not become effective
until one restart MB5001C.( Figure 3.20)
Figure 3.19 TCP/IP setup
Page 19

User Manual Version 1.0
MB5001C series 1-port Modbus Gateway
Copyright © 2010 Atop Technologies, Inc.
All rights reserved. Designed in Taiwan.
18
Figure 3.20 SNMP setup
Page 20

User Manual Version 1.0
MB5001C series 1-port Modbus Gateway
Copyright © 2010 Atop Technologies, Inc.
All rights reserved. Designed in Taiwan.
19
3.3.4 Configure COM1 Settings
Figure 3.21 Com1 Setup
Note :
1. The default Baud Rate of MB5001C is 9600 and it is associated with serial port COM respectively.
2. The default value for data packet delimiter is 0. When the delimiter is set to 0 (Auto), MB5001C will
automatically chooses the optimal delimiter according to the baud rate.
3. The “COM Type Selection” will show different port interface according to its selected port type.
4. After configuring the parameters, click on the “Save Configuration” button to save the changes, please
notice that the setting will not become effective until click “restart”.
3.3.5 Modbus Settings
Figure 3.22 Modbus Setup
Page 21

User Manual Version 1.0
MB5001C series 1-port Modbus Gateway
Copyright © 2010 Atop Technologies, Inc.
All rights reserved. Designed in Taiwan.
20
TCP Listen Port: Modbus/TCP Listen port. Default is 502.
Please note that Ethernet interface only support Modbus Slave.
TCP Connections(s): Maximum of four simultaneous Modbus/TCP connections is allowed.
Serial Reply Timeout: If the serial side does not respond with the specified time, data would be dropped
and not transmitted over TCP even if the gateway receives it later.
Serial Protocol: Select between Modbus/ASCII and Modbus/RTU.
Please note that Serial interface only support Modbus Master.
Serial Timeout Retry: If “0” is set, the gateway would not store TCP packets in the buffer. If the number is
greater than “0”, the gateway would store the TCP packets in the buffer and retries the specified times when
the Modbus device on the serial side does not respond.
Note: After configuring the parameters, click on the “Save Configuration” button to save the changes, please
note that the setting will not become effective until “restart” is clicked.
3.4 Assign a New IP Address by ARP Command
Use ARP command to assign a static IP address of MB5001C using its hardware MAC address. The MAC
address is printed on the rear side of device in the format of "0060E9-xxxxxx". The following example shows
how it works within MS-DOS command prompt window.
(For example change IP from 10.0.50.100 to 10.0.50.101,and the MAC address of MB5001C is
00-60-e9-11-11-01)
Step1: Add the new host IP to ARP table
->Open Ms-DOS command prompt window
->Input arp -s 10.0.50.101 00-60-E9-11-11-01 (Figure 3.26)
Figure 3.26. Ms-DOS command prompt window
Step2: Change to new IP via telnet port 1 (Figure 3.27)
->Input telnet 10.0.50.101 1
Note: The telnet will be fail and MB5001C will be restarted automatically, after restart the IP address
should be change to 10.0.50.101
Step3: Using new IP to configure MB5001C via telnet
->Input telnet 10.0.50.101
Note 1: When using this method to change IP address, PC's IP address and MB5001C 's IP address
must belong to the same subnet.
Page 22

User Manual Version 1.0
MB5001C series 1-port Modbus Gateway
Copyright © 2010 Atop Technologies, Inc.
All rights reserved. Designed in Taiwan.
21
Note 2: The changed IP address must be legal, otherwise it will be changed back to the default value
(10.0.50.100) after restart.
Figure 3.27. Assigning a new IP address by ARP command
Page 23

User Manual Version 1.0
MB5001C series 1-port Modbus Gateway
Copyright © 2010 Atop Technologies, Inc.
All rights reserved. Designed in Taiwan.
22
5. SNMP Setup
5.1 SNMP Network Management Platform
MB5001C is an SNMP device that allows many popular SNMP Network management platforms such as HP
Open View.
Depending on the network management tools one are using, device MB5001C information can be collected
from running the management tools including IP address, DNS name, system descriptions and NIC
information etc.
5.2 Using NetworkView as an Example
NetworkView is a compact network management tool from NetworkView Software, Inc.
(www.networkview.com). It discovers all TCP/IP nodes in a network using DNS, SNMP and ports information
and documents with printed maps and reports for future use.
First, download and install the tool on ones PC (Windows 2000 and Windows XP), then start NetworkView.
1. Click on the button to open a new file. The following screen shall appear, in the Addresses
field, Enter in the IP address range to search (Figure 5.1).
2. Click on “OK” and the following dialog box shall display the searching progress (Figure 5.2).
Figure 5.1 IP address searching
Page 24

User Manual Version 1.0
MB5001C series 1-port Modbus Gateway
Copyright © 2010 Atop Technologies, Inc.
All rights reserved. Designed in Taiwan.
23
Figure 5.2 Searching progress
3. After the search is completed, NetworkView will display the devices found in the main window, as
shown below (Figure 5.3).
Figure 5.3 NetworkView display the devices found
4. Double-click on the device icon to display information about the device, including IP Address,
Company, SysLocation (Max 15 characters), SysName (Max 9 characters) and types etc
(Figure 5.4).
Figure 5.4 NetworkView display device information
Note:
1. The NetworkView tool is limited to information extracting and viewing only.
2. To modify the configurations please use the web server, Telnet or DeviceView configuration utilities.
Page 25

User Manual Version 1.0
MB5001C series 1-port Modbus Gateway
Copyright © 2010 Atop Technologies, Inc.
All rights reserved. Designed in Taiwan.
24
6. Diagnostics
There are several ways one can check on the status and availability of MB5001C.
6.1 Use Standard TCP/IP Utility Ping Command
From Windows Start menu, select Run and type in “ping <TCP Server IP address>”.
If the connection is established, the Reply messages are displayed, otherwise it will indicate Request
timed out (Figure 6.1).
Figure 6.1 Standard TCP/IP utility ping command
6.2 Use DeviceView Configuration Utility Program
Use DeviceView configuration program that comes with the product CD or diskette to check on the
status of MB5001C. The status and version can be read from the tool.
For example, ‘listening’ means that COM1 is still waiting for TCP connection (Figure 6.2).
Page 26

User Manual Version 1.0
MB5001C series 1-port Modbus Gateway
Copyright © 2010 Atop Technologies, Inc.
All rights reserved. Designed in Taiwan.
25
Figure 6.2 DeviceView configuration Utility
Page 27

User Manual Version 1.0
MB5001C series 1-port Modbus Gateway
Copyright © 2010 Atop Technologies, Inc.
All rights reserved. Designed in Taiwan.
26
Caution Field
Description
!
IP conflict. There are two devices with the same IP address in the network.
@
The device is using DHCP.
<
The device is being located.
+
You have logged into the device.
?
MAC conflict. There are two devices with the same MAC address in the network.
Appendix A: Management Utility
A.1. DeviceView utility Introduction
DeviceView utility, developed by ATOP, is a special tool for device management and configuration. It can
realize the daily management on various ATOP network devices for address search, device positioning,
parameter configuring, and firmware downloading.
A.2. Interface
The operating interface of the DeviceView utility is shown below:
Page 28

User Manual Version 1.0
MB5001C series 1-port Modbus Gateway
Copyright © 2010 Atop Technologies, Inc.
All rights reserved. Designed in Taiwan.
27
A.3. Functions
A.3.1. Device Search
This function is applied to search devices in the network. There are four methods to search devices, Search
by Broadcast, Search by IP addresses, Search by MAC addresses and Rescanning devices by using the
current search method. To select the search methods, users click the “Search” on the main menu which is
shown below.
Alternatively, users can select by clicking the button on the toolbar as below.
Page 29

User Manual Version 1.0
MB5001C series 1-port Modbus Gateway
Copyright © 2010 Atop Technologies, Inc.
All rights reserved. Designed in Taiwan.
28
Broadcast Search
Once “Broadcast Search” is selected, a box will pop up as below. The user may type in or select different
broadcast address based on his own requirement.
Search by IP address
Once “Search by IP Address” is selected, an interface will pop up as below. Here user may have two options:
Select an IP address to search or Search device in the range of IP address.
Page 30

User Manual Version 1.0
MB5001C series 1-port Modbus Gateway
Copyright © 2010 Atop Technologies, Inc.
All rights reserved. Designed in Taiwan.
29
Search by MAC Address
If “Search by MAC Address” is selected, another box will pop up as below. Here the user may search in two
ways: “Search a MAC address to search” or “Search devices in the range of MAC address”
Page 31

User Manual Version 1.0
MB5001C series 1-port Modbus Gateway
Copyright © 2010 Atop Technologies, Inc.
All rights reserved. Designed in Taiwan.
30
Rescan
Once the user click the “Rescan” button on the toolbar, the DeviceView utility shall re-search devices by
using the current search way.
A.3.2. Firmware
This function is applied to downloading a firmware into the selected device. The user can enter the window
for downloading by firstly clicking a designated network device, and then selecting the submenu option
“Firmware Download” in the main menu option “Firmware”, or directly clicking the button Upgrade from disk.
Page 32

User Manual Version 1.0
MB5001C series 1-port Modbus Gateway
Copyright © 2010 Atop Technologies, Inc.
All rights reserved. Designed in Taiwan.
31
And then the user can select and download the required firmware from the disk, as shown in the figure below.
The user can also select several same devices at one time, and realize the firmware updating for them by
selecting Apply for all selected devices have same model.
Page 33

User Manual Version 1.0
MB5001C series 1-port Modbus Gateway
Copyright © 2010 Atop Technologies, Inc.
All rights reserved. Designed in Taiwan.
32
A.3.3. Configuration
This function is for device configuration to set up parameters, to import and to export the parameters, and to
set up some options. Here is the list of configurations: “Network”, “SNMP”, “COM Port”, “Locate”, “Reset”,
“Import Setting”, “Export Setting”, “Virtual COM”, “Config by browser” and “Options.” Users can carry out a
configuration operating through menu or by clicking the corresponded button on the toolbar, shown as the
figure below:
Page 34

User Manual Version 1.0
MB5001C series 1-port Modbus Gateway
Copyright © 2010 Atop Technologies, Inc.
All rights reserved. Designed in Taiwan.
33
Network
The user can modify the IP address of any selected device, shown as the figure below. You can statically
assign IP address, Subnet mask, and Gateway. Optionally, you can set up the device with a host name.
You can select DHCP option to obtain an IP address automatically.
Page 35

User Manual Version 1.0
MB5001C series 1-port Modbus Gateway
Copyright © 2010 Atop Technologies, Inc.
All rights reserved. Designed in Taiwan.
34
Locate
The user can apply this function to locate a device when its IP address is known, but its position is unknown.
If a device is selected, the device will appear to sing. Users can locate the device by selecting the
Configuration submenu Locate or clicking the Locate button on the toolbar.
Reboot
The device should be restarted after a successful modification of parameter configuration. Users can also
carry out a restart through the submenu option Reset.
The user can also select several devices at one time, and save the parameter information of these selected
devices into a designated parameter file by selecting "Save all the selected devices".
Configure by Browser
Some devices are supplied with build-in Web servers, which will be used to configure similar to DeviceView
software. Users can carry out any parameter setting directly through the submenu option “Config by
Browser”, and a Web browser is shown in the figure below.
Page 36

User Manual Version 1.0
MB5001C series 1-port Modbus Gateway
Copyright © 2010 Atop Technologies, Inc.
All rights reserved. Designed in Taiwan.
35
Options
The option is mainly applied to setting some common working rules of DeviceView utility, such as the device
search time interval or whether to display any device information tip. The dialog is shown in the figure below.
A.3.4. About
This function is mainly applied to displaying information of the DeviceView utility, shown in the figure below.
Page 37

User Manual Version 1.0
MB5001C series 1-port Modbus Gateway
Copyright © 2010 Atop Technologies, Inc.
All rights reserved. Designed in Taiwan.
36
Specifications
CPU
16-bit Embedded CPU
100MHz
Flash Memory
512K Bytes
SDRAM
512K Bytes
EEPROM
512 Bytes
Host
Communication
IEEE802.3 base band
TCP/IP, UDP, SNMP, HTTP, Telnet, ARP, BOOTP, DHCP, ICMP
Reset
Built-in default key to restore factory default settings
Watch Dog Timer
1.34 second hardware auto reset
Power failure threshold: 4.75V
SerialPort
Communication
One RS-232 or RS-485/RS-422 selectable
RS-232: EIA-RS-232C standard, Full Duplex, DB9
RS-485: 2/4 wires, Half/Full duplex, Terminal Block
RS-422: 4 wires, Half/Full duplex, Terminal Block
Parameters
1) Baud-rate: 1200 bps ~ 230Kbps
2) Parity: None, Even, Odd, Mark, Space
3) Data bits: 7,8
4) Stop bits: 1,2
5) Packet Delimiter: by inter-character timeout, by characters delimiter
6) Flow Control: None, Hardware CTS/RTS, Software Xon/Xoff
LED indication
RUN x 1
LAN x 1
COM port1
Power Requirement
5VDC Jack with Power Adaptor or DC +9~30V Terminal Block, 2.8 Watt
Max
Temperature
Operation:
Storage:
0℃ to 60℃
-20℃ to 70℃
Humidity
20%~90% non-condensing
Housing
65mm(L) x 78mm(W) x 28mm(H)
Appendix B: Specifications
B.1 Hardware Specifications
Page 38

User Manual Version 1.0
MB5001C series 1-port Modbus Gateway
Copyright © 2010 Atop Technologies, Inc.
All rights reserved. Designed in Taiwan.
37
Item
Specifications
Protocol
TCP/IP, UDP, HTTP, SNMP, ARP, Telnet, ICMP, BOOTP, DHCP
Configuration
Configuration information for both TCP/IP and serial ports is kept in
the EEPROM.
Configuration utilities of Windows 95/98/2000/NT/XP/2003 are
provided for configuring settings.
Internal Buffer Size
TCP receiving buffer size = 8K bytes
TCP transmitting buffer size = 16K bytes
RS-232 or RS-485/RS-422 receiving buffer size = 4K bytes
RS-232 or RS-485/RS-422 transmitting buffer size = 4K bytes
Pin#
RS-232
Full Duplex
for MB5001C Model
RS422/4-Wire RS-485
Full Duplex
for MB5001C Model
2-Wire RS-485
Half Duplex
for MB5001C Model
1
DCD
N/A N/A
2
RXD
TXD+
N/A (reserved)
3
TXD
RXD+
DATA+
4
DTR
N/A N/A 5
SG (Signal Ground)
SG (Signal Ground)
SG (Signal Ground)
6
DSR
N/A N/A
7
RTS
RXD-
DATA-
8
CTS
TXD-
N/A (reserved)
9
N/A N/A N/A
Pin#
RS422/4-Wire RS-485
Full Duplex
For MB5001C-Sis
2-Wire RS-485
Half Duplex
For MB5001C-Sis
1
T+ NC 2
T- NC
B.2 Software Specifications
B.3 Panel Layout and Connector Pin Assignments
B.3.1 Pin Assignments
DB9 Pin Assignments
The pin assignments of DB9 connector on MB5001C are shown in the following table:
Terminal Block Pin Assignments
The pin assignments of Terminal Block connector on MB5001C-Sis are shown in the following table:
Page 39

User Manual Version 1.0
MB5001C series 1-port Modbus Gateway
Copyright © 2010 Atop Technologies, Inc.
All rights reserved. Designed in Taiwan.
38
3
R+ Data+
4
R- Data-
5
SG (Signal Ground)
SG (Signal Ground)
Pin Assignment
568A Definition
568B Definition
Pin1
Green-White
Orange-White
Pin2
Green
Orange
Pin3
Orange-White
Green-White
Pin4
Blue
Blue
Pin5
Blue-White
Blue-White
Pin6
Orange
Green
Pin7
Brown-White
Brown-White
Pin8
Brown
Brown
B.3.2 Ethernet Port (RJ-45)
1. Category 5 UTP cable, 8 core wire.
2. RJ45 Connector.
3. RJ45 Pin Assignment
One can choose either 568A or 568B definition. If one want to make a crossover cable, one should use 568A
and 568B definition respectively in each terminal of a UTP cable.
B.3.3 Power Terminal Block Connector
Page 40

User Manual Version 1.0
MB5001C series 1-port Modbus Gateway
Copyright © 2010 Atop Technologies, Inc.
All rights reserved. Designed in Taiwan.
39
Message
Description
^===^===^===^===^===^===^... (1sec)
Watchdog problem, return service is required
^^^^^^^^^^^^^^^^^^^^^^^...
Memory problem, return service is required
^==^========^^ (5sec)
Startup OK but AP firmware is disabled
^==^========^^^ (5sec)
Startup OK and AP firmware is enabled
Table 1. Buzzer Message
Message
Description
LED Off
Ethernet Disconnected
LED blinking with Green
Data is transmitting on Ethernet for 100Mbps
LED blinking with Orange
Data is transmitting on Ethernet for 10Mbps
Table 2. LAN LED Message
Message
Description
LED off
No data is transmitting on COM port
LED on blinking state
Data is transmitting on COM port
Table 3. COM Port LED Message
Message
Description
LED on
Jumper JP1 pin1 and pin2 are short to disable AP firmware in the
flash memory.
LED blinking (rate: 0.5Sec)
AP firmware is running
Table 4. RUN LED Message
Note: It could be reversed for the pin of VIN- and VIN+.
B.4 Buzzer/LED Message
B.4.1 Buzzer
“ ^ “: Beep twice
“ = “: Beep off
B.4.2 LAN LED
B.4.3 COM Port LED
B.4.4 RUN LED
Page 41

User Manual Version 1.0
MB5001C series 1-port Modbus Gateway
Copyright © 2010 Atop Technologies, Inc.
All rights reserved. Designed in Taiwan.
40
Appendix C: Upgrade System Firmware
After the new version of firmware is released, customers can download it from www.Atop.com.tw After one
download the firmware, please follow these instructions listed below.
C.1 Upgrade Procedures
When one get a new software version, please follow the sequences below to upgrade ones MB5001C.
1. Connect a PC (Windows 95/98/NT/2000/XP) and MB5001C one wish to upgrade the firmware in the
same TCP/IP network. Use command ping or DeviceView program to verify their availability.
2. Prepare the download tool and press any key to edit its configuration file dapdl.cfg. dapdl.cfg file
can be found in the product CD.
3 Edit the "dapdl.cfg" file to fit ones system need, the content of the file looks like as the following.
Be sure to save ones modifications after the change is made.
Remote_IP 10.0.50.100
Load U5001ap.hex
The first line identifies the IP address of MB5001C, the second line identifies the firmware (.Hex file) name to
be downloaded.
4 Execute the utility program download.bat, it can be found in the product CD.
5 Input the user name and password credential, the new firmware will be downloaded.
6 MB5001C will automatically restart each time the firmware is successfully downloaded.
Page 42

User Manual Version 1.0
MB5001C series 1-port Modbus Gateway
Copyright © 2010 Atop Technologies, Inc.
All rights reserved. Designed in Taiwan.
41
C.2 Critical Issues of Upgrading
1 One can always abort the upgrading process by pressing the <Esc> key from host PC during the
upgrading process. MB5001C will restart automatically and the system remains intact.
2 If MB5001C does not receive any upgrading data within 30 seconds, MB5001C will restart
automatically and the system remains intact.
3 After the upgrading process finishes, MB5001C will program the flash memory and buzzer beeps 6
times then restarts. Normally, it takes around 10 seconds to complete the programming process. If
an error occurs during the programming process, MB5001C will clear the corresponding memory
and the system remains intact of what it was.
Page 43

User Manual Version 1.0
MB5001C series 1-port Modbus Gateway
Copyright © 2010 Atop Technologies, Inc.
All rights reserved. Designed in Taiwan.
42
Error Cause
Message
Comments
Illegal Hex file format
Hex File Text Error
Hex File Check-Sum Error
Hex File Format Error
Hex File End of Record Error
MB5001C handshaking problem
MB5001C ACK Start Address Error
MB5001C ACK Length Error
MB5001C Response Command Error
Configuration file
Remote IP not found
Open configuration file failure
C.3 Error Messages
Firmware upgrade may not be successful if errors occur during the process.
Page 44

User Manual Version 1.0
MB5001C series 1-port Modbus Gateway
Copyright © 2010 Atop Technologies, Inc.
All rights reserved. Designed in Taiwan.
43
Appendix D: Disable System Firmware
The AP (application program) firmware of MB5001C can be disabled. This function is used in the situation
that one downloaded a wrong version of firmware that caused the system crashed.
To disable the current version of firmware and prevent it from executing, please do the followings:
1. Turn the power off, open MB5001C case.
2. Short pin1 and pin2 of jumper JP1 on the right-top corner from the main board to disable AP
firmware.
3. Power on MB5001C.
4. Download the correct AP firmware to MB5001C.
5. Remove the pin 1 and pin2 of jumper JP1 to enable AP firmware.
6. Close the case and continue ones operations.
Page 45

User Manual Version 1.0
MB5001C series 1-port Modbus Gateway
Copyright © 2010 Atop Technologies, Inc.
All rights reserved. Designed in Taiwan.
44
Specifications
System
CPU
16-bit x86 Embedded CPU
Flash
512K Bytes
DRAM
512K Bytes
EEPROM
512 Bytes
Watchdog
Hardware built-in
Ethernet
Compliance
IEEE802.3
Port
1-port
Transmission Rate
10/100Mbps Auto-detection
Connector
RJ45
Auto MDI/MDI-X
Yes
Serial
Interface
RS232/422/485 software selectable(MB5001C)
RS422/485 isolation with software selectable(MB5001C-Sis)
Ports
1-port DB9 or TB5
Baud Rate
1200bps to 230Kbps
Parity
None, Odd, Even, Mark, Space
Data Bits
7 or 8
Stop Bits
1 or 2
Data Packet Delimiter
0 to 30000 mini sec. (0:auto)
Connector
9-pin D-Sub(DB9) / Terminal Block(TB5)
Power
Input
DC 5V for DC Jack
DC 9-30V for Terminal Block
Consumption
Max. 2.7W (MB5001C)
Max. 3.6W (MB5001C-Sis)
Environment
Operating
0°C~60°C (32°F~140°F)
Storage Temperature
-20°C~70°C (-4°F~158°F), 5~95%RH,(non-condensing)
Dimension
W x H x D
65mm x 28mm x 78mm.(MB5001C)
85mm x 28mm x 74mm.(MB5001C-Sis)
Software
Appendix E: Specification
Page 46

User Manual Version 1.0
MB5001C series 1-port Modbus Gateway
Copyright © 2010 Atop Technologies, Inc.
All rights reserved. Designed in Taiwan.
45
Configuration
Web console, Telnet
Device View
For Windows
Support Protocol
Modbus RTU,ASCII and TCP
Ordering Information
MB5001C
MB5001C-Sis
Modbus 1-port Gateway Compact(RS232/422/485 DB9 type serial port*1)
Modbus 1-port Gateway Compact(RS422/485 isolation TB5 type serial port*1)
Regulatory Approvals
FCC
FCC Part 15, Subpart B, Class A
CISPR 22:1997, Class A
ICES-003:2004, Class A
ANSI C63.4-2003
CE
EN 55022:1994+A1 :1995+A2 :1997, Class A
EN 61000-3-2:2000, Class A
EN 61000-3-3:1995+A1 :2001
EN 55024:1998+A1:2001+A2:2003
IEC 61000-4-2:2001
IEC 61000-4-3:2002+A1:2002
IEC 61000-4-4:2004
IEC 61000-4-5:2001
IEC 61000-4-6:2003+A1:2004
IEC 61000-4-8:2001
IEC 61000-4-11:2004
Shock
IEC 60068-2-27
Free Fall
IEC 60068-2-32
Vibration
IEC 60068-2-6
RoHS
Lead(Pb) Free
MTBF
454442 hrs(51.88 years) in 25℃ (MB5001C)
Warranty
5 years
Optional Accessories
Power Adapter
US315-12(US/EU): AC100~240V / DC 12V, 5.08mm pitch terminal block
AD5V1A(US/EU): DC5V for DC Jack
 Loading...