

Page 1
EH7510
Industrial Managed Ethernet Switch
User Manual
Version 1.0
October, 2011
TEL: +886-3-5508137
FAX: +886-3-5508131
http://www.atop.com.tw
Page 2

Atop Industrial Managed Ethernet Switch
EH7510
User Manual V 1.0
ii
Important Announcement
The information contained in this document is the property of Atop Technologies, Inc. and is
supplied for the sole purpose of operation and maintenance of Atop Technologies, Inc
products. No part of this publication is to be used for any other purposes, and it is not to be
reproduced, copied, disclosed, transmitted, stored in a retrieval system, or translated into
any human or computer language, in any form, by any means, in whole or in part, without
the prior explicit written consent of Atop Technologies, Inc.
Published by
Atop Technologies, Inc.
2F, No. 146, Sec. 1, Tung-Hsing Rd.
Jubei, Hsinchu 30261
Taiwan, R.O.C.
Tel: 886-3-5508137
Fax: 886-3-5508131
www.atop.com.tw
Copyright © 2011 Atop Technologies, Inc. All rights reserved.
All other product names referenced herein are registered trademarks of their respective
companies.
Page 3

Atop Industrial Managed Ethernet Switch
EH7510
User Manual V 1.0
iii
Table of Contents
Preface ........................................................................ 1
Chapter 1: Introduction ................................................ 2
1.1 What is a Managed Industrial Switch ........................................... 2
1.2 Software Features ....................................................................... 3
1.3 Hardware Features ................................................................ ...... 4
1.4 Power Requirements ................................................................... 5
1.5 Environmental Limitations ............................................................ 5
1.6 LED Indicators ............................................................................. 5
Chapter 2: Configuring with a Web Browser ................ 6
2.1 Web-based Management Basics ................................................. 6
2.1.1 Default Settings ....................................................................... 6
2.1.2 Login Process and Main Window Interface ............................. 6
2.2 Information ................................................................................... 8
2.2.1 Basic ....................................................................................... 8
2.2.2 Console ................................................................................... 9
2.2.3 Power Status........................................................................... 9
2.2.4 Protocol Status ...................................................................... 10
2.3 Administration ............................................................................ 11
2.3.1 System Settings ................................................................ .... 11
2.3.2 Password .............................................................................. 12
2.3.3 IP Settings ............................................................................. 13
2.3.4 Forwarding and QoS ............................................................. 14
2.3.4.1 CoS Mapping ................................................................... 17
2.3.4.2 ToS/DiffServ Mapping ....................................................... 18
2.3.5 Mirror Port ............................................................................. 19
2.3.6 System Time and SNTP ........................................................ 20
2.3.7 Modbus Setting .................................................................... 21
2.3.8 PTP Setting ........................................................................... 24
2.4 Port ................................ ................................ ............................ 26
2.4.1 Port Status ............................................................................ 26
2.4.2 Port Statistics ........................................................................ 27
2.4.3 Port Control ........................................................................... 28
2.5 Trunking ..................................................................................... 29
Page 4

Atop Industrial Managed Ethernet Switch
EH7510
User Manual V 1.0
iv
2.5.1 LACP .................................................................................... 29
2.5.2 Trunking ................................................................................ 30
2.6 Unicast/Multicast MAC ............................................................... 31
2.6.1 MAC Address Table .............................................................. 32
2.6.2 Add Uni/Multicast MAC ......................................................... 32
2.6.3 Filter MAC ............................................................................. 33
2.7 GARP/GVRP/GMRP .................................................................. 34
2.7.1 Multicast Group Table ........................................................... 34
2.7.2 GARP .................................................................................... 35
2.7.3 GVRP .................................................................................... 36
2.7.4 GMRP ................................................................................... 37
2.8 IGMP/IP Multicast ...................................................................... 38
2.8.1 IGMP/IP Multicast Table ........................................................ 38
2.8.2 Static IP Multicast ................................................................. 39
2.8.3 IGMP ..................................................................................... 41
2.8.4 IGMP Statistics ..................................................................... 42
2.9 SNMP ........................................................................................ 43
2.9.1 Community Strings ................................................................ 44
2.9.2 Trap Receivers ...................................................................... 45
2.9.3 SNMPv3 Users ..................................................................... 45
2.10 Spanning Tree ......................................................................... 46
2.10.1 Spanning Tree ..................................................................... 47
2.10.2 Spanning Tree Port ............................................................. 49
2.11 VLAN ....................................................................................... 50
2.11.1 VLAN Mode ......................................................................... 52
2.11.2 VLAN TABLE ....................................................................... 54
2.11.3 VLAN Setting ....................................................................... 55
2.11.4 VLAN PVID ......................................................................... 57
2.11.5 Example of using 802.1Q VLAN .......................................... 58
2.12 Port Security ............................................................................ 59
2.12.1 Static Port Security ............................................................. 59
2.12.2 Add Static MAC ................................................................... 61
2.12.3 802.1x and Radius .............................................................. 62
2.12.4 802.1.x ............................................................................... 63
2.12.5 802.1x Port.......................................................................... 64
2.13 ERPS/Ring .............................................................................. 65
2.13.1 DIP Switch .......................................................................... 65
Page 5

Atop Industrial Managed Ethernet Switch
EH7510
User Manual V 1.0
v
2.13.2 ERPS .................................................................................. 67
2.13.2.1 UERPS Settings (optional) ............................................. 71
2.13.3 iA-Ring ................................................................................ 73
2.13.4 Compatible-Ring ................................................................. 75
2.13.5 U-Ring ................................................................................. 76
2.14 LLDP ........................................................................................ 78
2.14.1 LLDP ................................................................................... 78
2.14.2 Neighbors ........................................................................... 79
2.15 System Warning ...................................................................... 80
2.15.1 Warning Event Selection ..................................................... 80
2.15.2 Alert Warning Events ........................................................... 82
2.15.3 SMTP Settings ................................................................ .... 83
2.16 Diagnosis ................................................................................. 84
2.16.1 Ping ..................................................................................... 85
2.17 System Log .............................................................................. 86
2.17.1 Syslog ................................................................................. 86
2.17.2 Event Log ............................................................................ 87
2.18 System ..................................................................................... 89
2.18.1 Backup/Restore .................................................................. 89
2.18.2 Firmware Upgrade .............................................................. 90
2.18.3 TFTP ................................................................................... 91
2.18.4 Factory Default .................................................................... 92
2.18.5 Reboot ................................................................................ 93
Chapter 3: Configuring with a Serial Console ............ 94
3.1 Serial Console Setup ................................................................. 94
3.2 Command Line Interface Introduction ........................................ 95
3.3 General Command .................................................................... 97
3.4 Command Example ................................................................... 97
3.4.1 Administration Setup using Serial Console ........................... 98
3.4.2 Spanning Tree Setup using Serial Console .......................... 99
Chapter 4: SwitchView & Topolog Diagram ............. 100
4.1 SwitchView .............................................................................. 100
4.2 Firmware Upgrade ................................................................ ... 101
4.3 Topology Diagram .................................................................... 102
Appendix A. ModBus Management Memory Map ... 103
Page 6

Atop Industrial Managed Ethernet Switch
EH7510
User Manual V 1.0
vi
Glossary ................................................................... 113
Page 7

Atop Industrial Managed Ethernet Switch
EH7510
User Manual V 1.0
1
Preface
This manual contains some advanced network management knowledge, instructions,
examples, guidelines, and general theories; designed to help users manage EH7510 and
use its software, a background in general theory is a must when reading it. Please refer to
the Glossary for technical terms and abbreviations.
Who Should Use This User Manual
This manual is to be used by qualified network personnel or support technicians who are
familiar with network operations; it might be useful for system programmers or network
planners as well. This manual also provides helpful and handy information for first time
users. For any related problems please contact your local distributor, should they be unable
to assist you, please redirect your inquiries to www.atop.com.tw.
Supported Platform
This manual is designed specifically for the EH7510 switch series.
Warranty Period
Atop technology provides a limited 5-year warranty for EH7510 switches.
Page 8

Atop Industrial Managed Ethernet Switch
EH7510
User Manual V 1.0
2
Chapter 1: Introduction
1.1 What is a Managed Industrial Switch
Atop’s EH (Ethernet Switching Hub) 7510 is a powerful managed industrial switch; a switch
is referred to as an OSI Layer 2* bridging device. Unlike an “unmanaged” switch, which is
normally found in homes or in SOHO environments and runs in “auto-negotiation” mode,
each port on a “managed switch” can be configured for its link bandwidth, priority, security,
and duplex settings. The managed switches can be managed by web browsers, Telnet, or
serial console. Since every single port can be configured to specific settings, network
administrators can better control the network and maximize network functionality.
EH7510 is an industrial switch (as opposed to a commercial switch); a commercial switch
simply works in a comfortable office environment. However, an industrial switch like EH7510
is designed to perform in harsh industrial environments, i.e., extreme temperature, high
humidity, dusty air, potential high impact or the presence of potentially high static charges.
EH7510 works fine even in these environments.
Atop EH7510 is designed to provide faster, securer, and more stable networks. One
advantage that makes EH7510 a powerful switch is that it supports technologies including
ERPS, iA-Ring, Compatible Ring and RSTP. These technologies provide better network
reliability, and decreases recovery time down to less than 20 ms.
EH7510 Ethernet Switch supports a wide range of IEEE standard protocols. This switch is
excellent for keeping systems running smoothly, reliable for preventing system damage or
losses, and friendly to all levels of users. The goal of this innovative product is to bring users
a brand new network-management experience.
*Note:
Throughout the manual, the symbol * indicates that more detailed information of the subject
will be provided at the end of this book.
Page 9

Atop Industrial Managed Ethernet Switch
EH7510
User Manual V 1.0
3
1.2 Software Features
Atop’s iA-Ring ERPS Technologies
- Improve network redundancy
- Fast recovery time (<20ms)
- iA-Ring Provides Ring Coupling and Dual Homing
Three User Friendly Interfaces Supported
- Web browser
- Telnet Console
- Serial Console
SNMP v1/v2/v3 Supported (with MD5 Authentication and DES encryption)
RSTP Support
QoS Traffic Regulation Supported
IGMP supported (with IGMP snooping)
Alarm System Supported (with E-mail Notification)
IEEE 802.1x (with RADIUS) Supported for Network Access Control
LACP Supported
Compatible Ring
U-Ring
SNTP
PTP
GVRP
GMRP
Spanning Tree
LLDP
Page 10
Atop Industrial Managed Ethernet Switch
EH7510
User Manual V 1.0
4
1.3 Hardware Features
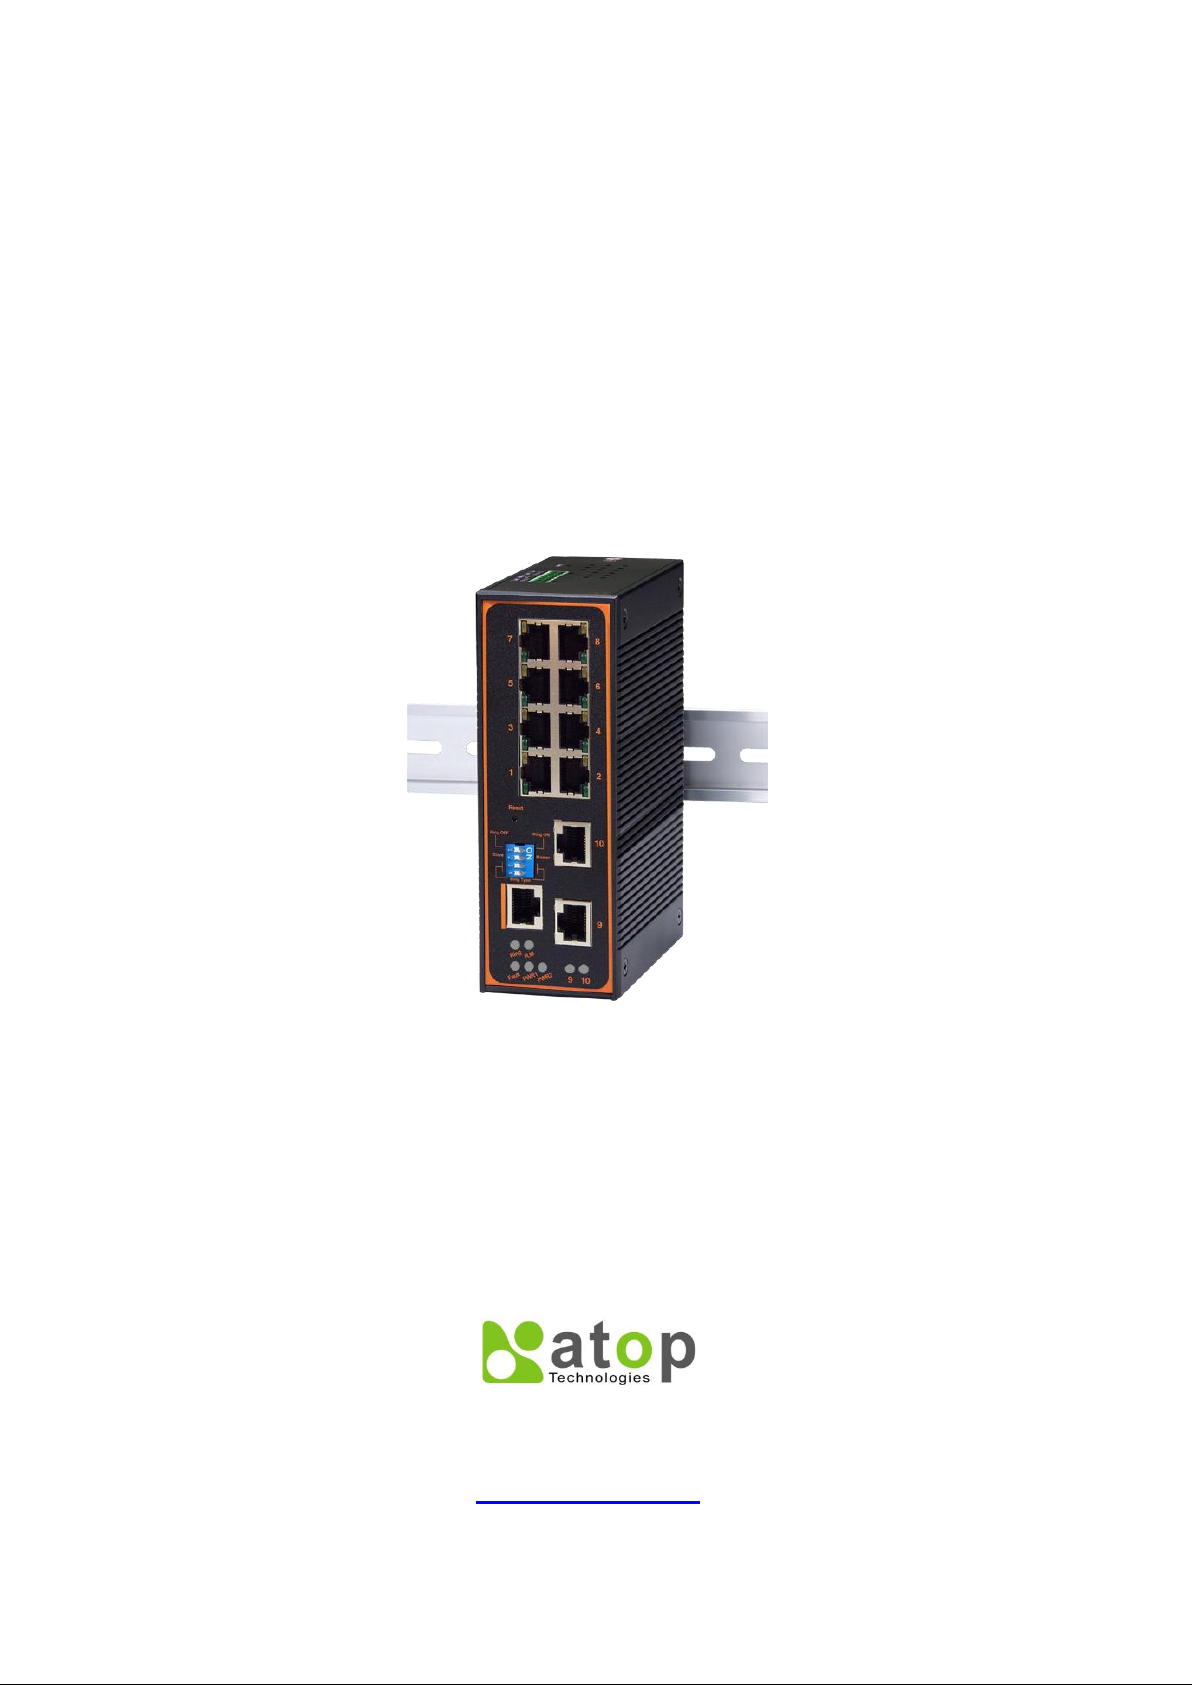
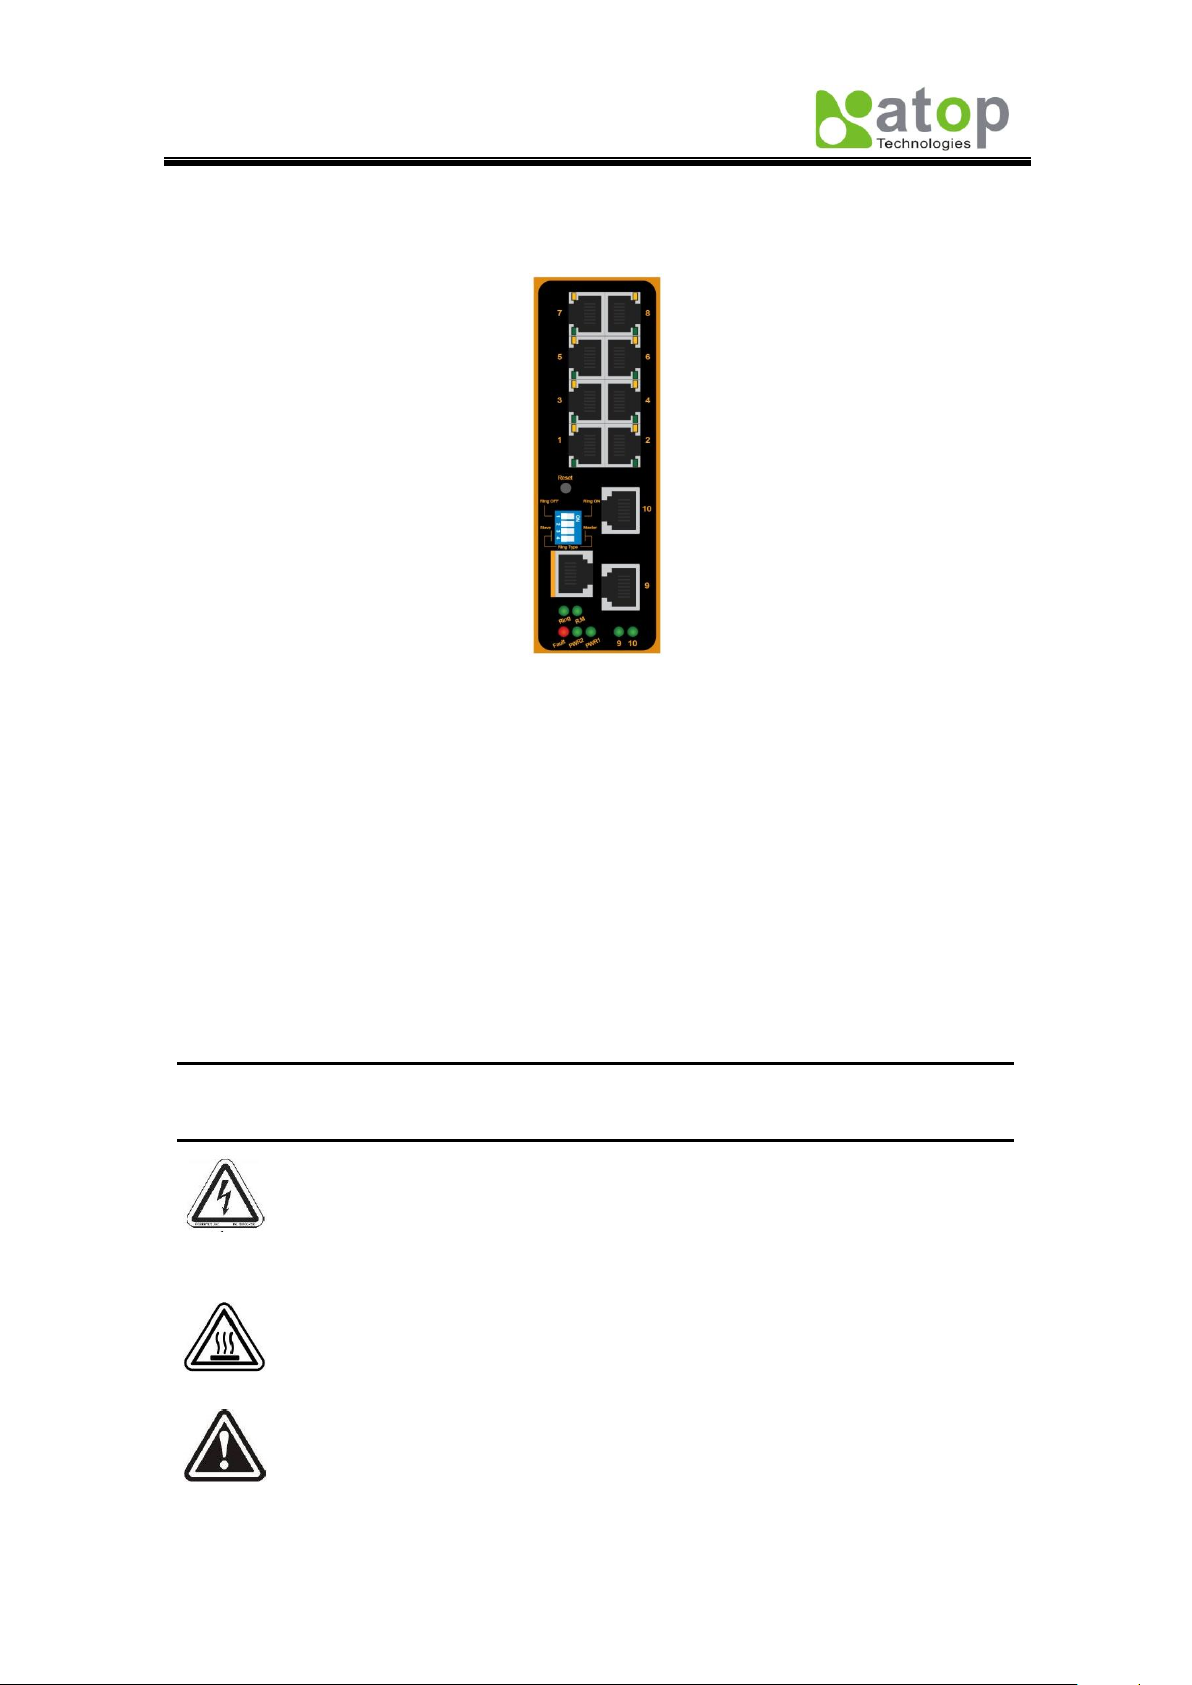
Device Appearance, Fig. 1.1:
Fig. 1.1
Dimensions: 53.4 mm (W) x 119.9 mm (D) x 145.7 mm (H)
Weight: approx 1.1kg
8 x 10/100M Ethernet ports (Port # 1~8)
2 x Gigabit Ethernet ports or 2 x Fiber ports (Port # 9~10)
1 x Serial Console Port
1x4 DIP switch
LED indicators
1 x Reset button
Caution
An approved Optical transceiver should be chosen to plug into the slot.
Never install or work on electrical or cabling during periods of lighting activity.
Never connect or disconnect power when hazardous gases are present.
WARNING: Disconnect the power and allow to cool 5 minutes before touching.
Caution: CLASS 1 LASER PRODUCT. Do not stare into the laser!
Page 11

Atop Industrial Managed Ethernet Switch
EH7510
User Manual V 1.0
5
1.4 Power Requirements
Dual Inputs: 12~48 Volts DC
Input Current: 1.2A Max.
1.5 Environmental Limitations
Operating Temp: -40°C ~ 80°C (or -40°F ~ 176°F)
Storage Temp: -40°C ~ 85°C (or -40°F ~ 185°F)
Relative Humidity (non-condensing): 5 to 95 %
Note: for UL policy, the maximum operating temperature is 60°C and the human
body can tolerate a maximum of 70°C.
1.6 LED Indicators
Port LED:
Green Light: Steady- Link up, Blinking- Data transmitting
Orange Light: on- full duplex, off- half duplex (refer to section Port)
PWR 1: Indicates power 1 status
PWR 2: Indicates power 2 status
Fault: Indicates Fault status
R.M: Indicates Atop’s Ring Master Status (Refer to section ERPS/Ring)
Ring: Indicates Atop’s Ring Status (Refer to section ERPS/Ring)
Page 12

Atop Industrial Managed Ethernet Switch
EH7510
User Manual V 1.0
6
Chapter 2: Configuring with a Web Browser
This chapter explains how to access EH7510 for the first time. There are three ways to
configure this Ethernet Switch:
1. Web browser
2. Telnet console
3. Serial console
The web browser and telnet console methods allow users to access the switch over the
Internet or the Ethernet LAN, while the serial console method requires a serial cable
connection between the computer and the switch; there are only a few differences among
these three methods.
2.1 Web-based Management Basics
Users can access EH7510 easily by their web browsers (Internet Explorer 7.0 and Mozilla
Firefox 3.5.7 or later versions recommended). We will proceed to use a web browser to
introduce EH7510’s functions; this web console interface is user-friendly.
2.1.1 Default Settings
Below there is a list of default factory settings; this information will be used during the login
process..
IP Address: 10.0.50.1
Subnet Mask: 255.255.0.0
Default Gateway: 10.0.0.254
User Name: admin
Password: NULL (leave it blank)
2.1.2 Login Process and Main Window Interface
Before the user access EH7510 switch’s configuration they have to log in; this can be done
in 3 simple steps.
1. Launch a web browser.
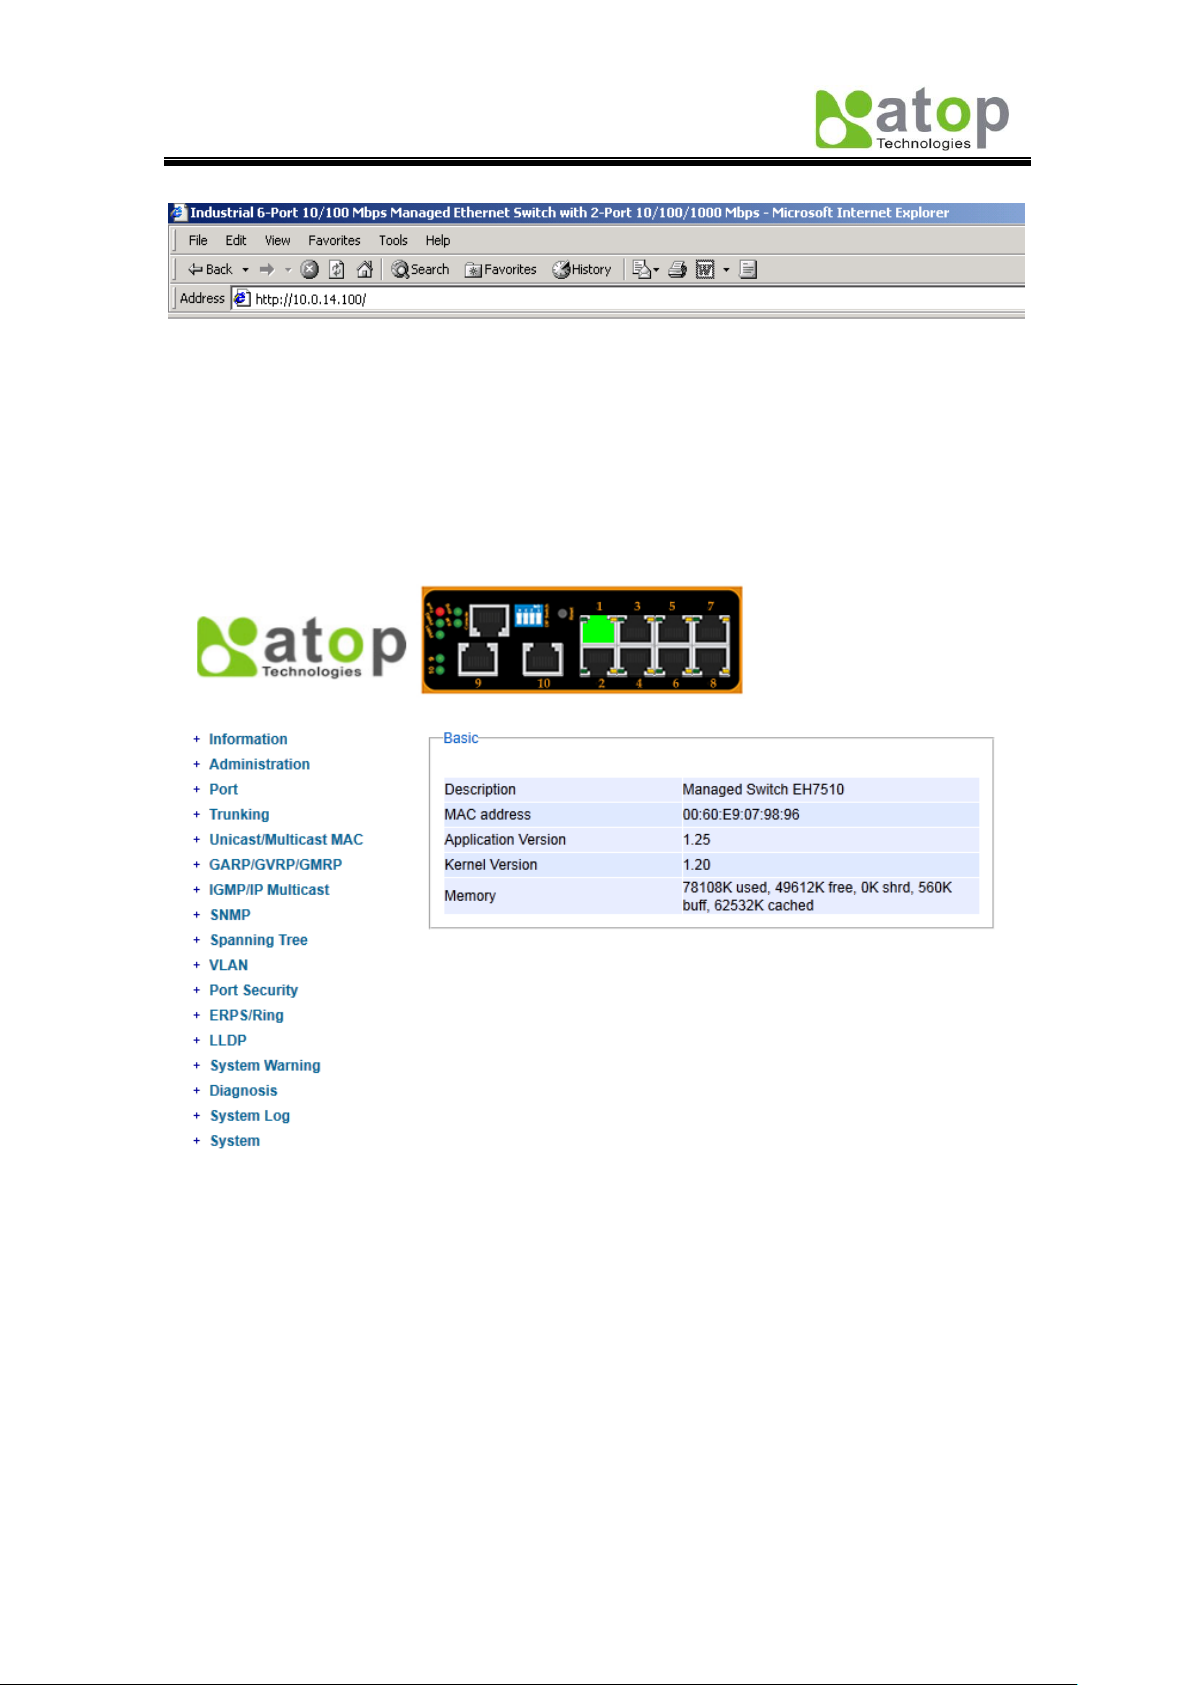
2. Type the switch’s IP address (e.g. https://10.0.50.48), (next page, Fig. 2.1).
Page 13
Atop Industrial Managed Ethernet Switch
EH7510
User Manual V 1.0
7
Fig. 2.1
3. Key in the username and password on the login window, and click “OK” to login.
*Note: Please take care on configuring the IP in your PC’s Settings when pairing the switch. *
After the login process, the main interface will show up, which should look as Fig. 2.2. The
main menu (left side of the screen) provides the links at the top level of the menu hierarchy
and allows them to be expanded to display lower level links. Note that in this case the port 1
is highlighted in green; this shows that the port is being connected to a LAN cable. Detailed
explanations of each sub-section will be addressed later as the need arises.
Fig. 2.2
Page 14
Atop Industrial Managed Ethernet Switch
EH7510
User Manual V 1.0
8
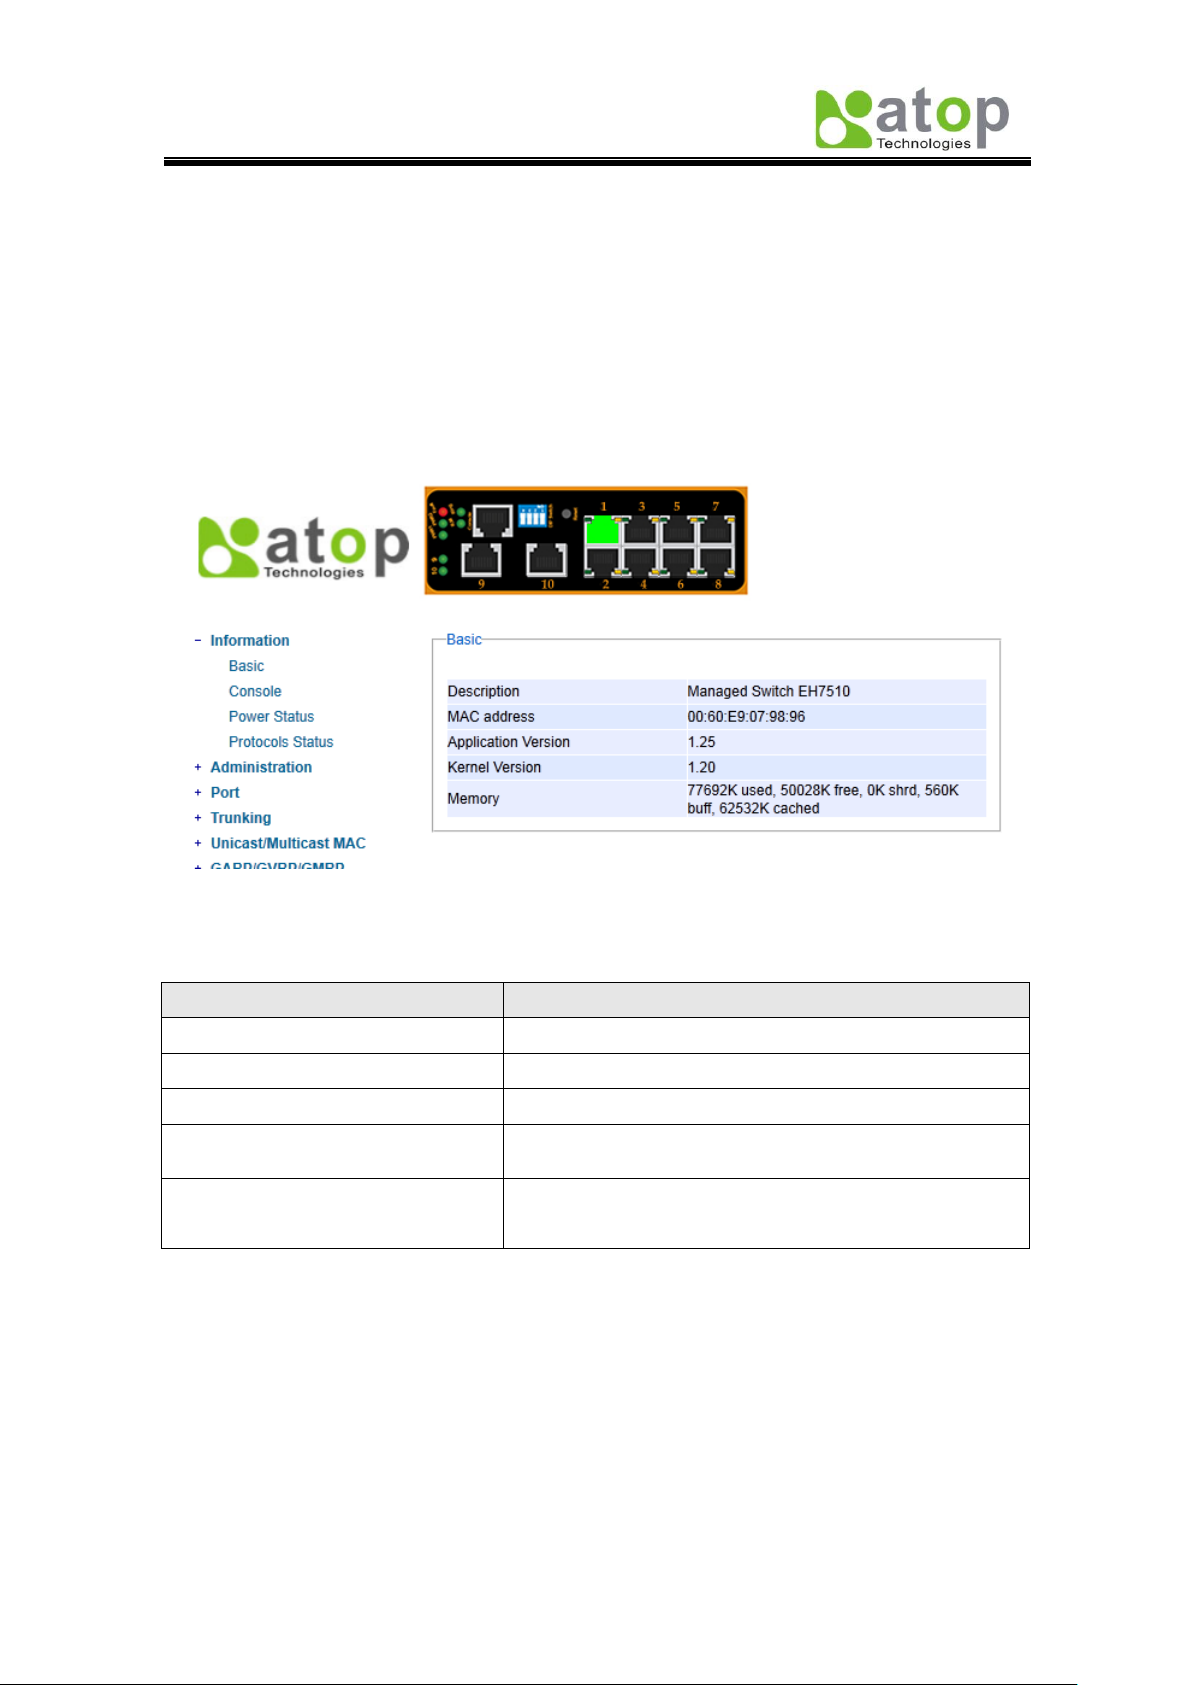
Label
Description
Description
Describes the model type of current device.
MAC address
Indicates MAC address* (See Appendix A).
Application Version
States current Application version of the device.
Kernel Version
Shows current Kernel Version of the device.
Memory
Shows current RAM’s size availability also shows the
cached and shared memory.
2.2 Information
To help users be familiar with the device, the Information section provides important details
of it; this is also the main welcoming screen once the user has logged in. The details make it
easier to identify different devices connected to the network; they are divided into four
sections.
2.2.1 Basic
An introduction to the equipment and net is done in this section, Fig. 2.3.
Table 2.1
Fig. 2.3
Page 15
Atop Industrial Managed Ethernet Switch
EH7510
User Manual V 1.0
9
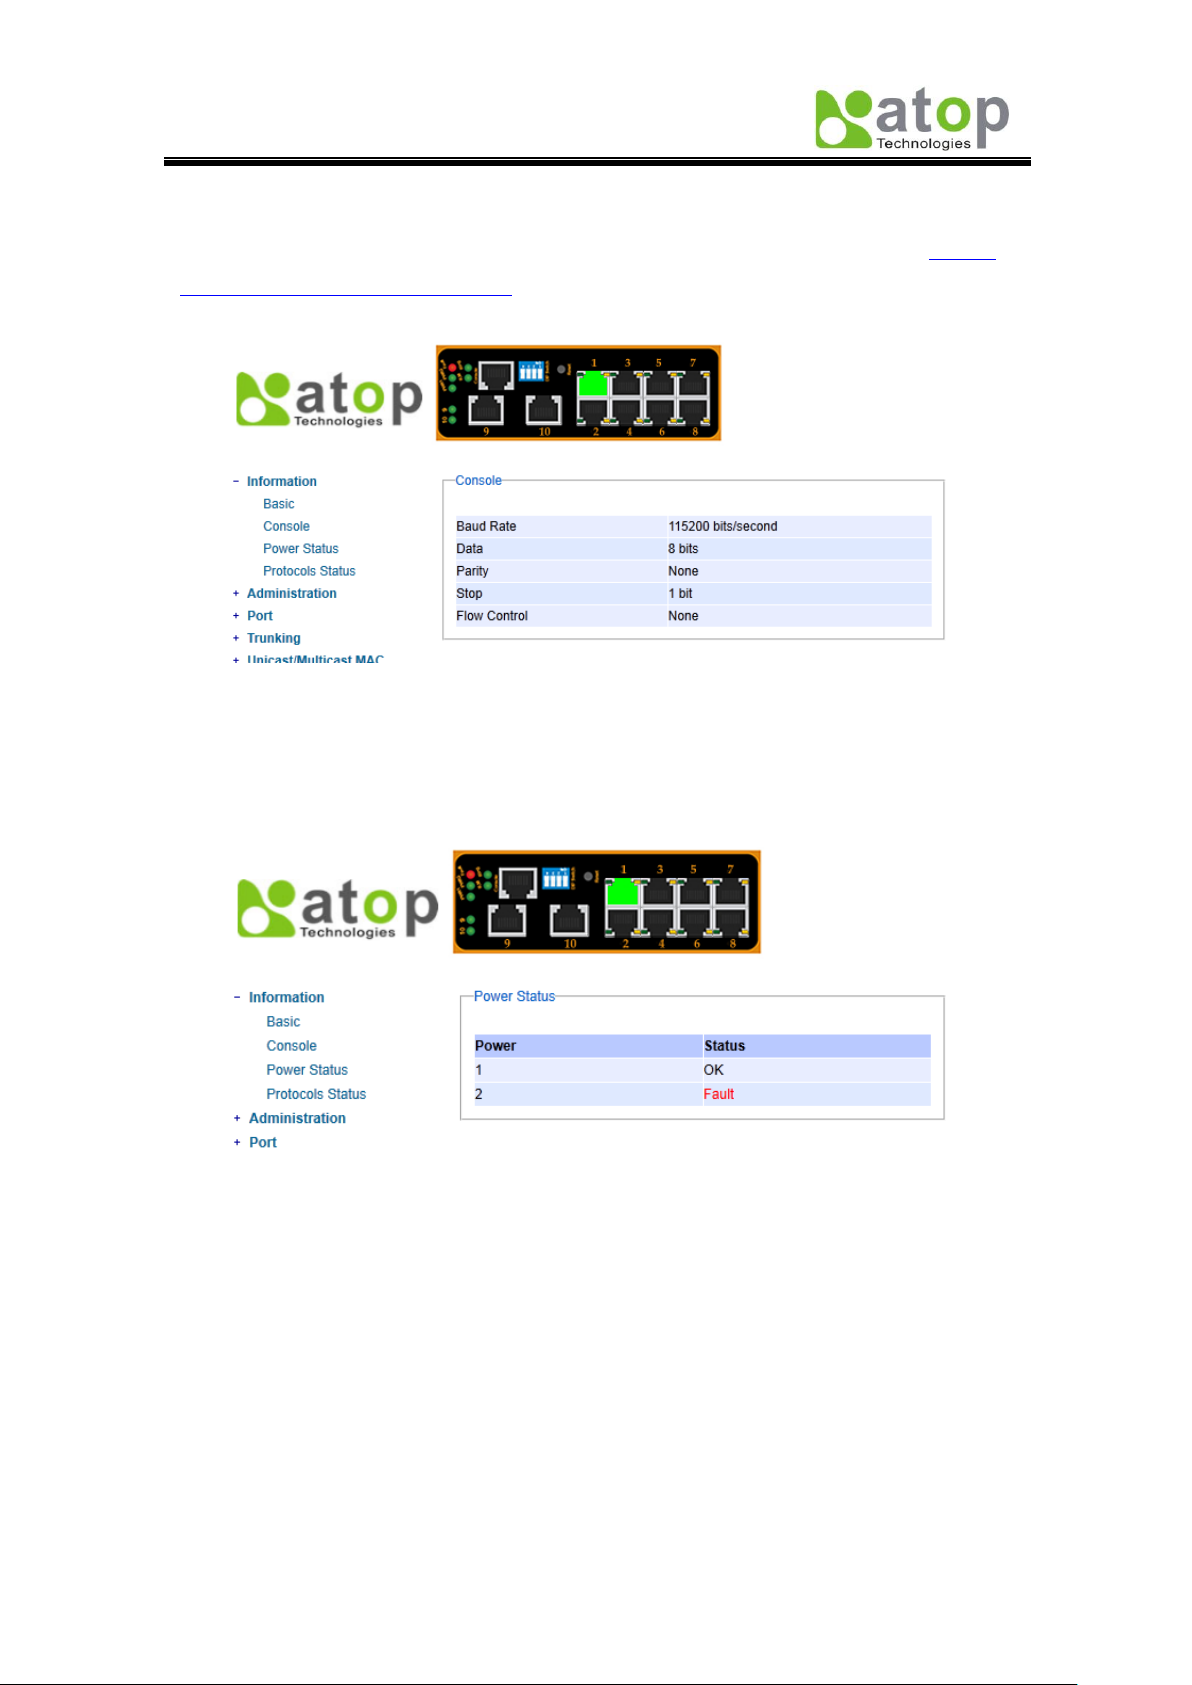
2.2.2 Console
In this chapter, we use a web browser for configuring the switch. However, there is a specific
page for the serial console method. The Console option is only for serial console; it
indicates the connection parameters related to the method.
Fig. 2.4
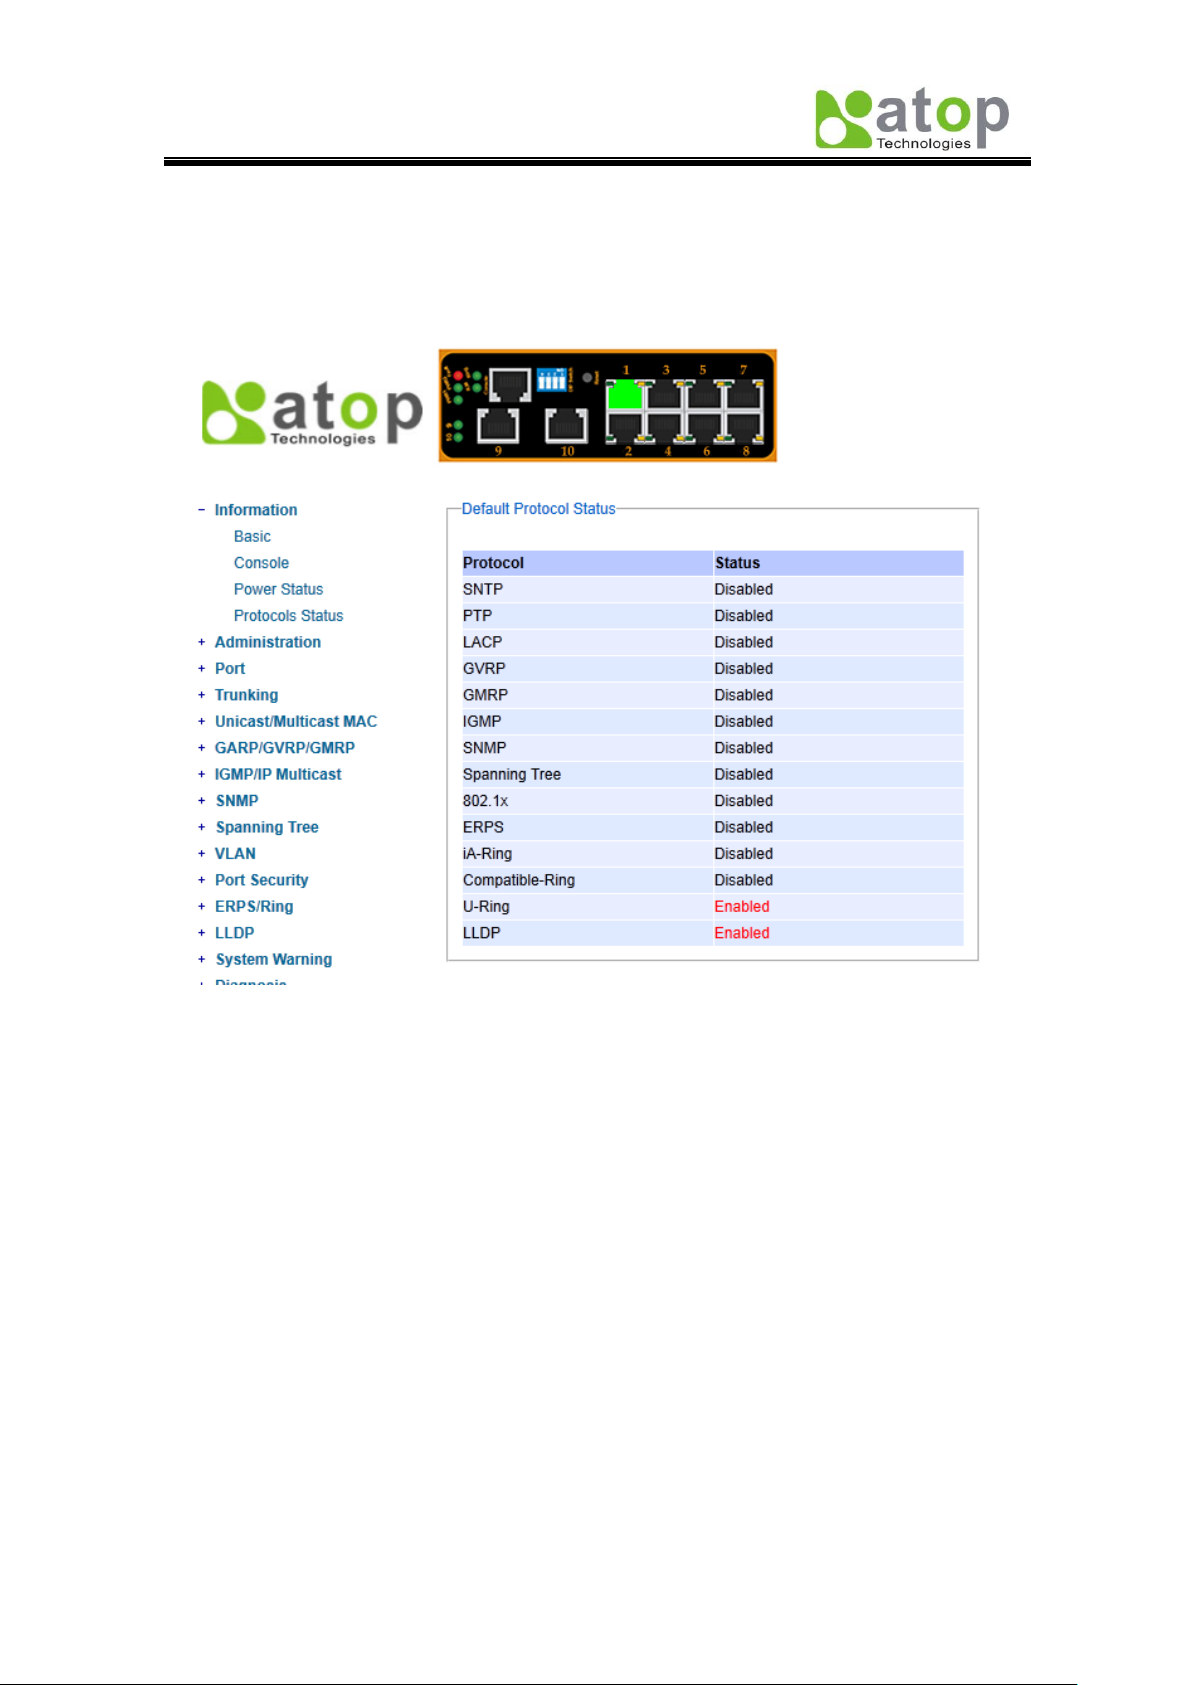
2.2.3 Power Status
EH7510 Managed Switch has dual VDC power inputs; Fig. 2.5 below, shows the status of
each power input.
Fig. 2.5
Page 16
Atop Industrial Managed Ethernet Switch
EH7510
User Manual V 1.0
10
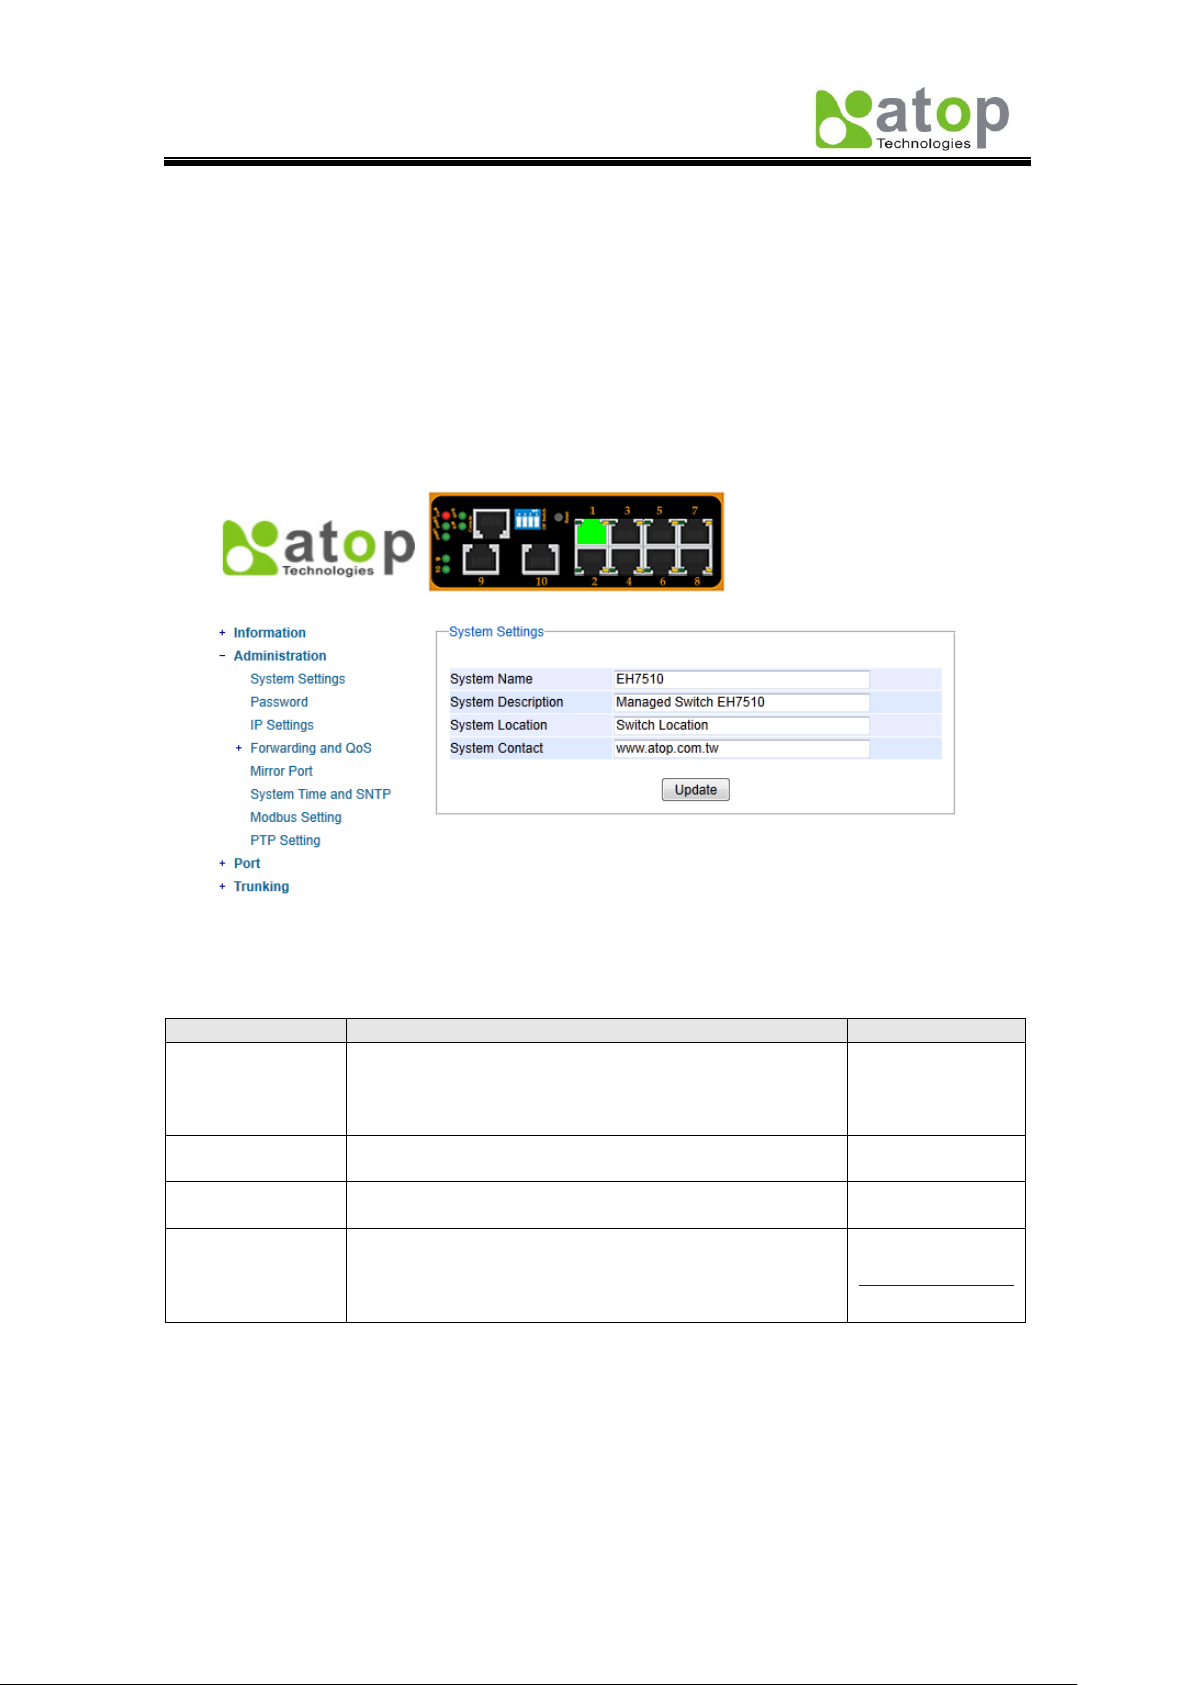
2.2.4 Protocol Status
Reports an overall status of each protocol; while users can view status all at once here,
detailed explanations of each protocol and methods will be provided in later sections, Fig.
2.6.
Fig. 2.6
Page 17
Atop Industrial Managed Ethernet Switch
EH7510
User Manual V 1.0
11
Label
Description
Factory Default
System Name
Specifies a particular role or application of different
switches. The name entered here, will also be shown
in Switch View and Device View.
Max. 63 Characters.
EH7510
System
Description
Detailed description of the unit.
Max. 63 Characters.
Managed Switch
EH7510
System
Location
Locations of different switch units.
Max. 63 Characters.
Switch Location
System Contact
Provides contact information for maintenance. Enter
the name of whom to contact in case a problem
arises.
Max. 63 Characters.
www.atop.com.tw
2.3 Administration
Here users will be able to make changes on System Settings, Password, IP Settings,
Forwarding and QoS, Mirror Port, System Time/SNTP, Modbus Setting and PTP
setting.
2.3.1 System Settings
Users can enter system’s details here; this information can help identify one specific switch
among all the devices in the network, (Fig. 2.7).
Table 2.2
Fig. 2.7
Page 18
Atop Industrial Managed Ethernet Switch
EH7510
User Manual V 1.0
12
Label
Description
Factory Default
Manager’s User name
User’s Name.
Max. 15 Characters.
NULL
Manager’s Password
Password.
Max. 15 Characters.
NULL
Confirmed Password
Re-type the Password. This has to be
exactly as the password entered in the
above field.
Max.15 Characters.
NULL
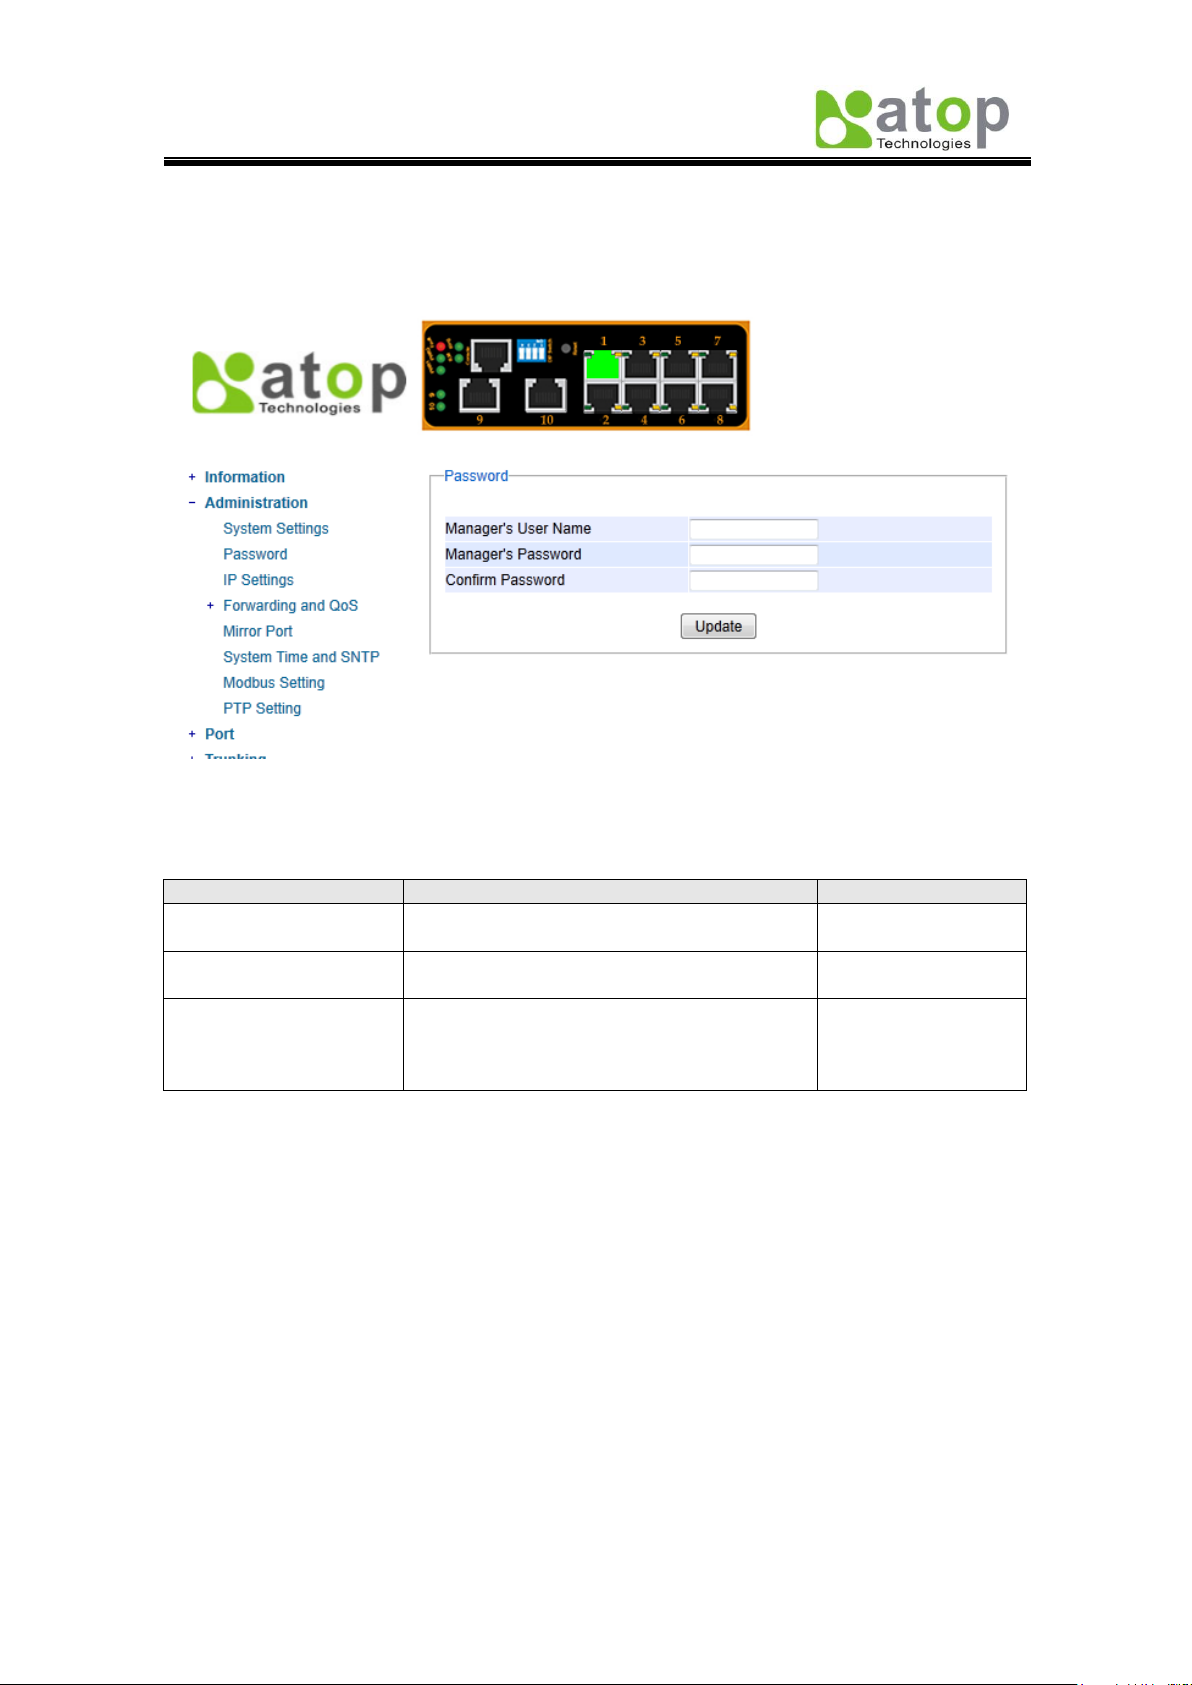
2.3.2 Password
Although no password is set for the device when it is manufactured, users can make
changes to assure overall system security, Fig. 2.8.
Table 2.3
Fig. 2.8
Page 19
Atop Industrial Managed Ethernet Switch
EH7510
User Manual V 1.0
13
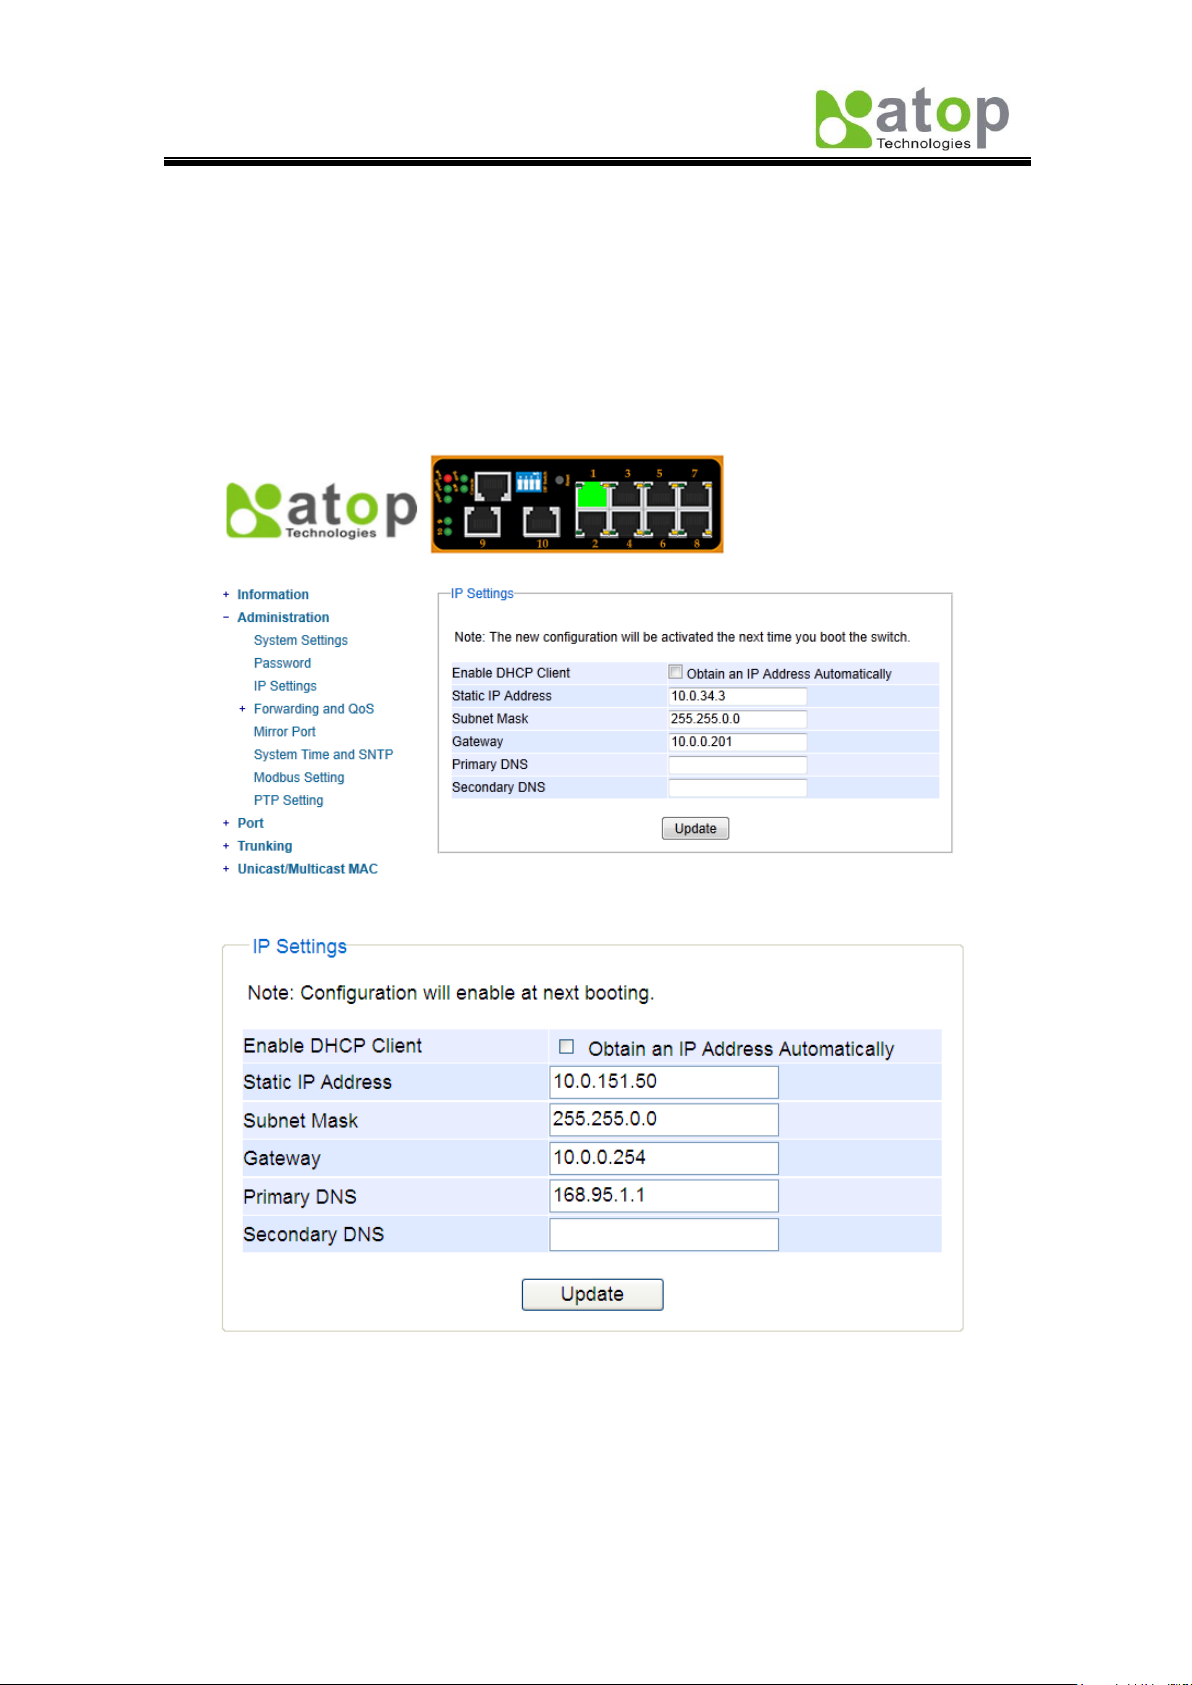
2.3.3 IP Settings
In this section, users may modify IP address functions to reconfigure the switch’s network
settings. Users can choose to enable DHCP (Dynamic Host Configuration Protocol)* here.
This function can obtain an IP address automatically; it provides automatic configuration and
eliminates the need for intervention by the administrator. Users can also opt to set up the IP
address and related fields manually; after each update, a reboot will be required before the
new settings are effective, Fig. 2.9.a.
Fig. 2.9.a
Fig. 2.9.b *Example*
Page 20

Atop Industrial Managed Ethernet Switch
EH7510
User Manual V 1.0
14
Label
Description
Factory Default
Enable DHCP
Client
By checking this box, an IP address will be
automatically assigned. Otherwise users can
set up the IP address manually.
Uncheck
Static IP address
Displays current IP address. Users can also
set new static IP address for the device.
10.0.50.1
Subnet Mask
Displays current Subnet Mask or set new
subnet mask.
255.255.0.0
Gateway
Shows current Gateway or set a new one.
10.0.0.254
Primary DNS
Sets the DNS IP address * used by your
network.
NULL
Secondary DNS
Sets the Secondary DNS IP address EH7510
will locate the secondary DNS server if the
Primary DNS Server fails to connect.
NULL
Table 2.4
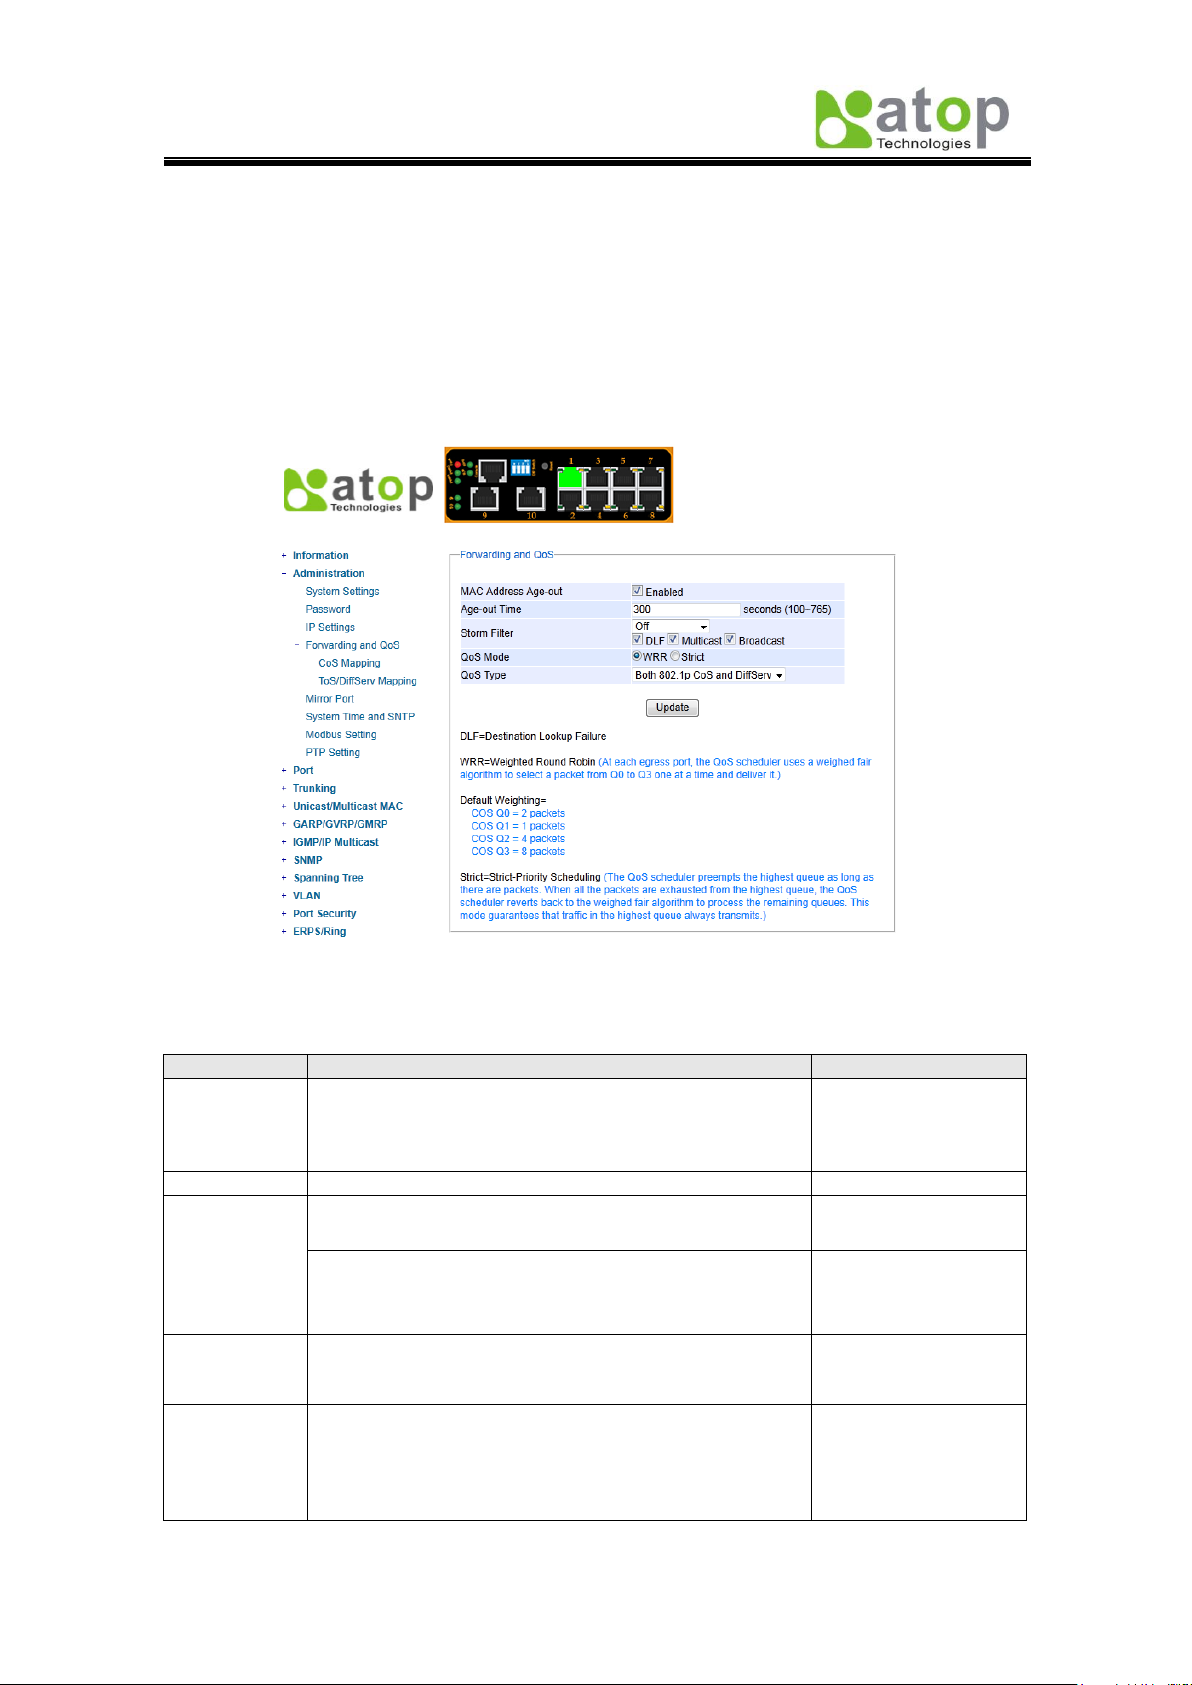
2.3.4 Forwarding and QoS
EH7510 provides:
Forwarding function
Filter functions
Quality of Service (QoS) functions
To make data delivery more reliable; for forwarding functions, users can set up an ageing
time, to avoid the case that a MAC address cannot be found, Fig. 2.10.
Filter Functions
Storm Filter Function:
For this function, users can select filtering levels,
- DLF Mode: Destination Lookup Failure. The switch will always look for a MAC
destination address first. In case that a MAC address cannot be found, which means
DLF occurs, the switch will forward the packets to all ports that are in the same VLAN.
- Multicast: This type of transmission sends messages from one host to multiple hosts.
Only those hosts that belong to a specific multicast group will receive it; also
networks that support multicast send only one copy of the information across the
network until the delivery path that reaches group members diverges. At these
diverging points, multicast packets will be copied and forwarded; this method can
manage high volume of traffic with different destinations while using network
bandwidth efficiently.
- Broadcast: Messages sent to all devices.
Page 21
Atop Industrial Managed Ethernet Switch
EH7510
User Manual V 1.0
15
Label
Description
Factory Default
MAC
Address
Ageing Time
Choose to enable MAC Address* ageing time
function. If enabled, when an entry reaches its aging
time, it will be cleared from the switch. Enabling this
function can cancel frame forwarding effectively.
Checked
Ageing Time
Specifies the ageing time. Range100 ~ 765 seconds.
300
Storm Filter
Select filter level from Off, 5%, 10%, 15%, 20%, or
25%.
Off
Enable storm filter function and choose from DLF,
Multicast and/or Broadcast traffic. See notes below
for a detailed description.
DLF, Multicast and
Broadcast enabled.
QoS Mode
Select the device QoS mode: WRR or Strict.
See notes below for a detailed description and
comparison.
WRR
Qos Type
802.1p CoS only: Switch only checks L2 802.1p CoS
priority bits.
Both 802.1p CoS and DiffServ: Switch checks both
types.
See notes below for a detailed description.
Both types are
selected.
QoS:
The main objective of Quality of Service is to transfer certain data packets either particularly
safe or as immediately as possible. With EH7510, users are able to prioritize traffic on the
network to ensure that high priority data can be transmitted as soon as possible. Network
traffic is controlled by a set of rules. These rules help classify different types of traffic and
define how each of them should be treated as they’re being transmitted. EH7510 can also
inspect both 802.1p CoS tags and DiffServ tag to provide consistent classification.
Table 2.5
Fig. 2.10
Page 22

Atop Industrial Managed Ethernet Switch
EH7510
User Manual V 1.0
16
QoS Mode:
- WRR: Weighted Round Robin. This method services all the traffic queues, but higher
priority queues still retain their advantage; this mode guarantees that in the event that
high-priority traffic exceeds the link capacity, lower priority traffic will still proceed and not
be blocked.
- Strict is Strict-Priority Scheduling. The QoS scheduler preempts the highest queue as long
as there are packets. When all the packets are exhausted from the highest queue, the
QoS scheduler reverts back to the weighed fair algorithm to process the remaining
queues. This mode guarantees that traffic in the highest queue always flows first.
QoS Type:
- 802.1p CoS: IEEE standard of layer 2 marking scheme. It specifies a priority value
between 0 and 7 that can be used by QoS to differentiate traffic. When this option is
enabled, EH7510 inspects the 802.1p CoS tag in the MAC frame to determine the priority
of each frame.
- DiffServ/ToS: DiffServ stands for Differentiated Services. It’s a networking architecture
that specifies a simple but scalable mechanism for classifying network traffic and
providing QoS guarantees on networks. It uses the DiffServ Code Point (DSCP, which is
the modern redefinition of the ToS). DiffServ/ToS function allows users to use up to 64
values to define service levels and set priority.
Settings of CoS and ToS can be accessed on the mapping tables in next two options.
Page 23
Atop Industrial Managed Ethernet Switch
EH7510
User Manual V 1.0
17
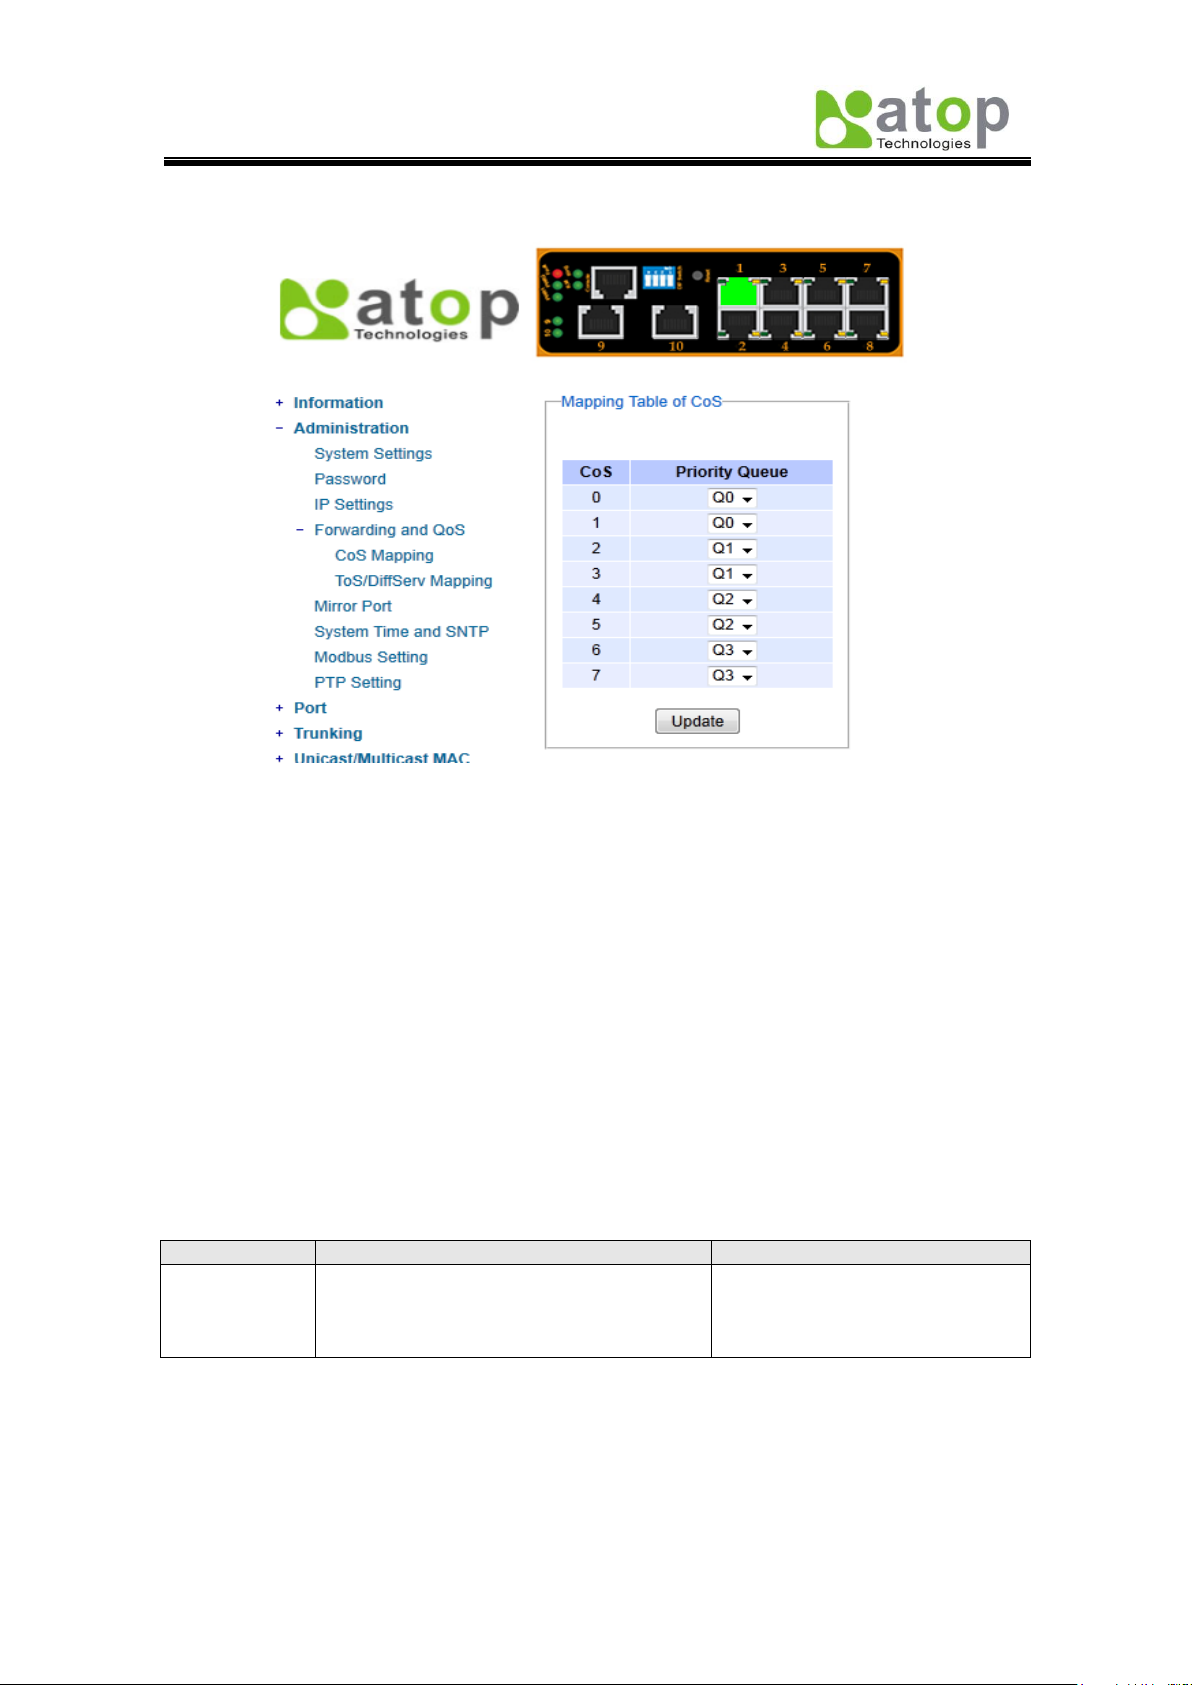
Label
Description
Factory Default
Priority
Queue
Set the mapping table of different CoS to
4 different level queues.
CoS 0, 1: Q0
CoS 2, 3: Q1
CoS 4, 5: Q2
CoS 6, 7: Q3
2.3.4.1 CoS Mapping
Fig. 2.11
The switch can classify traffic based on a valid 802.1p (CoS) priority tag. These options
allow users to map CoS to the different priority queues, Fig. 2.11.
The default queue weighting is assigned as follow:
Q0 = 2 packets (Lowest priority)
Q1 = 1 packets (Low priority)
Q2 = 4 packets (Median priority)
Q3 = 8 packets (High priority)
For example, Q3 has the highest priority, and it carries 8 packets, while Q0 has the lowest
priority, and it carries 2 packets. When CoS 6 is assigned to Q3, it has the highest priority.
When Co1 is assigned to Q0, it has the lowest priority. For CoS explanations, please refer
to page 14.
Table 2.6
Page 24
Atop Industrial Managed Ethernet Switch
EH7510
User Manual V 1.0
18
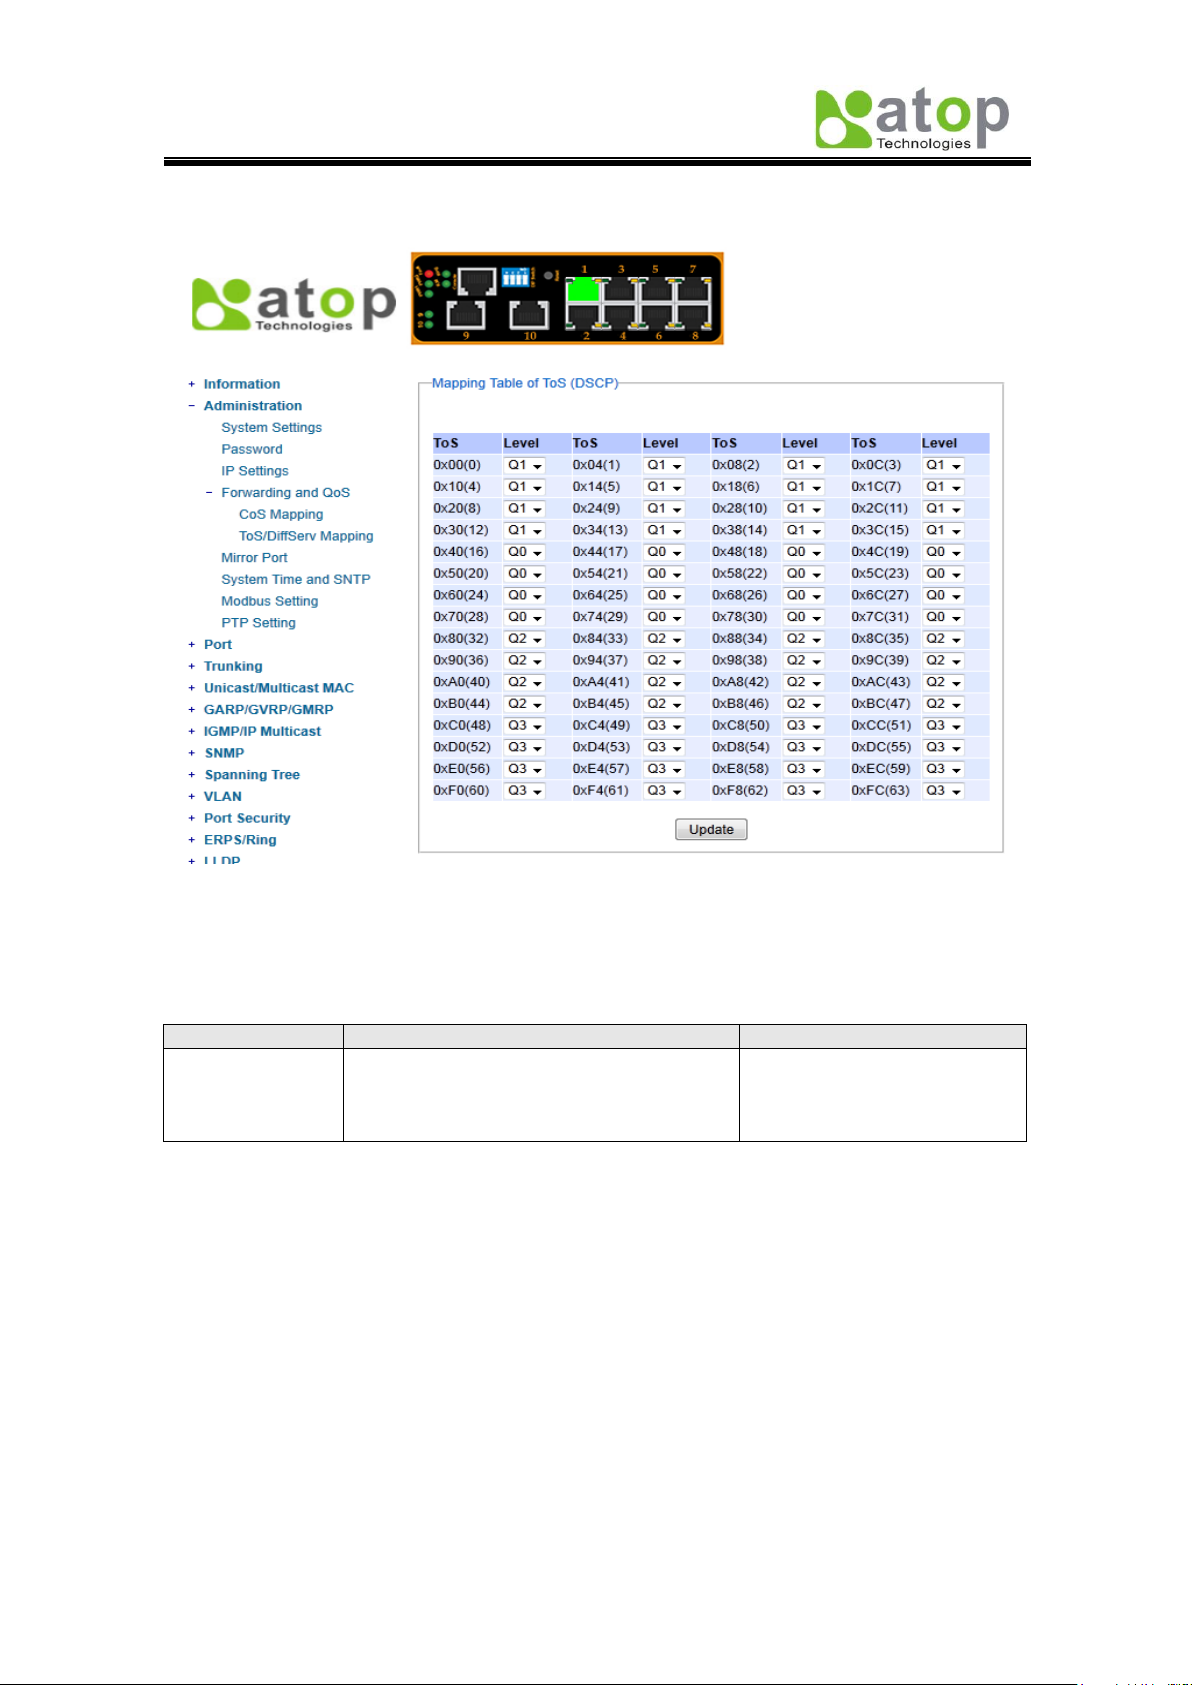
Label
Description
Factory Default
Level
Sets the mapping table of different ToS to
4 distinct output queues, which are Q0
(lowest), Q1 (los), Q2 (median), and Q3
(highest).
ToS 0~15: Q1
ToS 16~31: Q0
ToS 32~47: Q2
ToS 48~63: Q3
2.3.4.2 ToS/DiffServ Mapping
Fig. 2.12
The switch can classify traffic based on a valid DiffServ (ToS) priority tag; Fig. 2.12 shows
where users can map ToS to the different priority queues.
Table 2.7
For example, when ToS 0*F8 (62) is assigned to Q3, it has the highest priority. When ToS
0*40(16) is assigned to Q1, it has the lowest priority. For ToS explanations please refer to
page 14.
Page 25
Atop Industrial Managed Ethernet Switch
EH7510
User Manual V 1.0
19
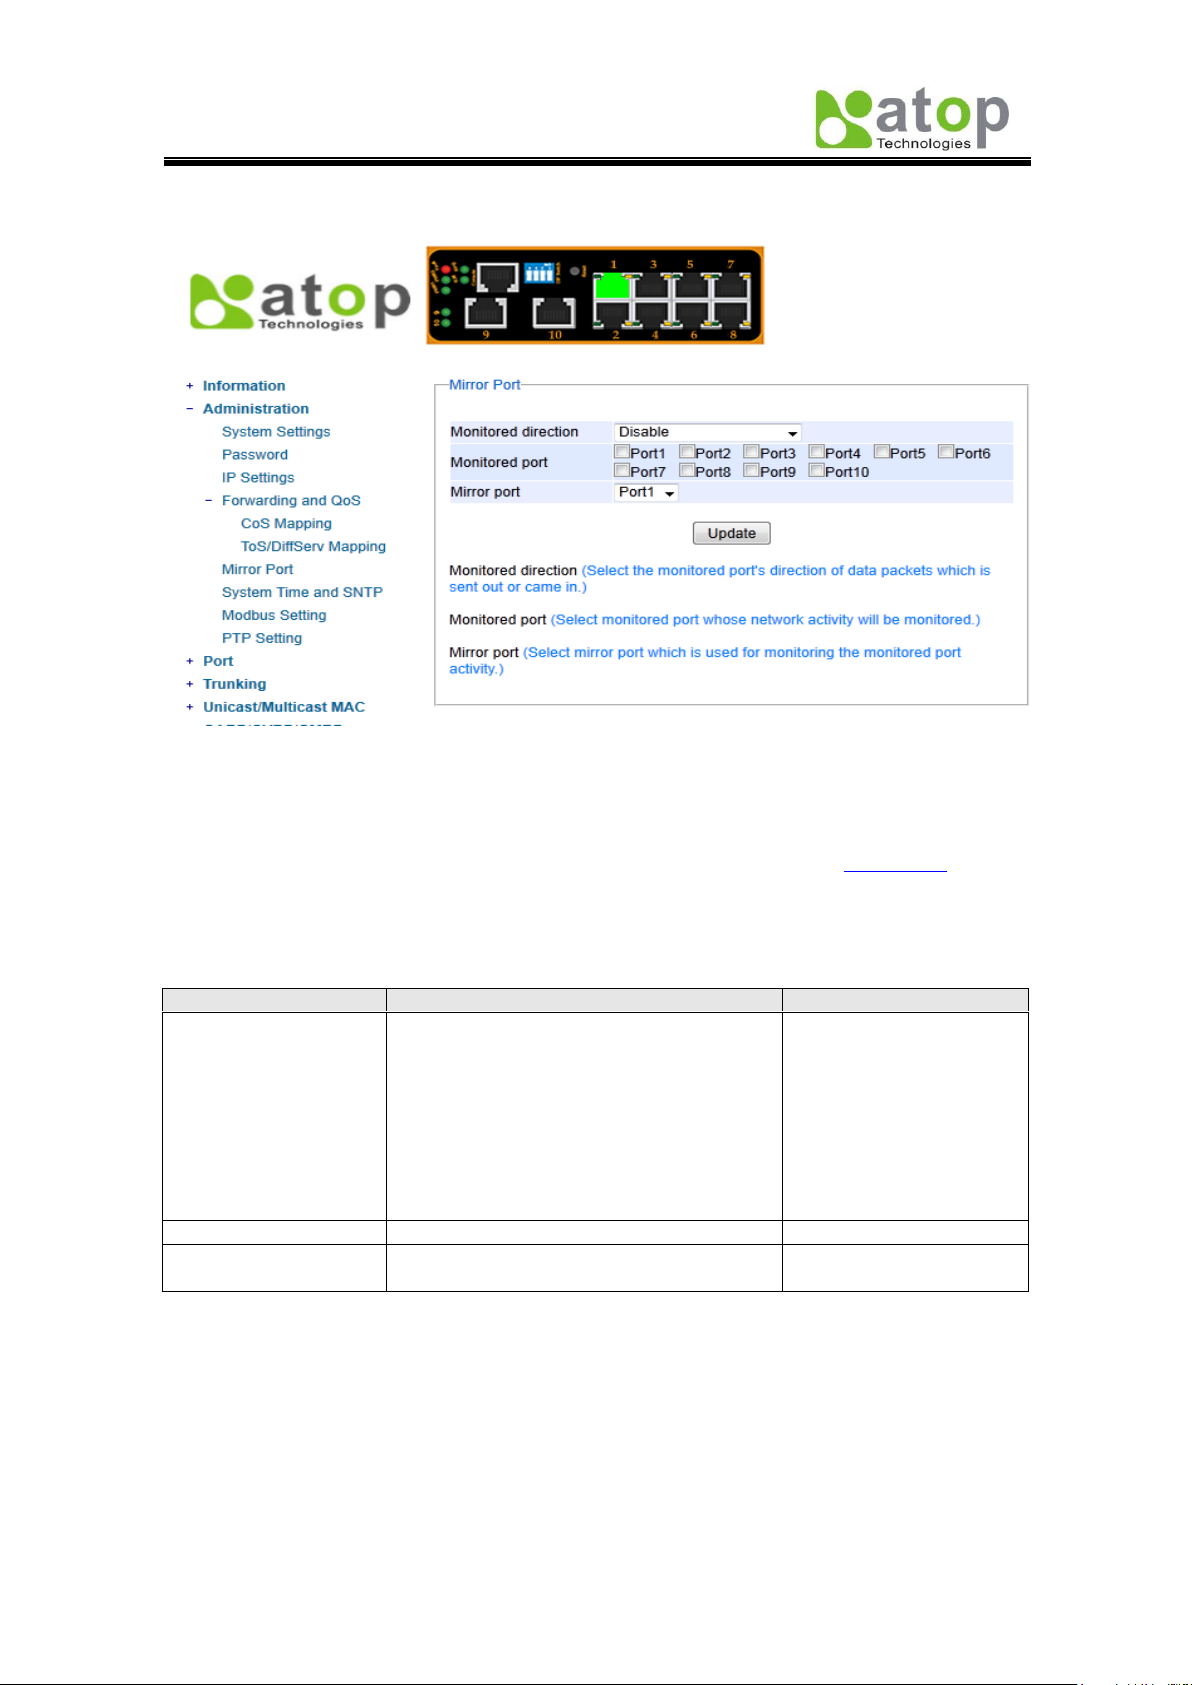
Label
Description
Factory Default
Monitored direction
Select the monitoring direction.
Disable: disable port monitoring.
Input data stream: monitor input data
stream of monitored ports only.
Output data stream: monitor output data
stream of monitored ports only.
Input /Output data stream: monitor both
input and output data stream of monitored
ports.
Disabled
Monitored Port
Select the ports that will be monitored.
Unchecked all
Mirror port
Select the mirror port that will be used to
monitor the activity of the monitored ports.
Port1
2.3.5 Mirror Port
Fig. 2.13
In order to help the network administrator keep tracks of network activities, EH7510
supports port mirroring, which allows incoming and/or exiting traffic to be monitored by a
single port that is defined as mirror port, (Fig. 2.13). IGMP snooping (Section 2.7) and
mirroring functions are mutually exclusive. When IGMP snooping is enabled, the port
mirroring function is disabled.
Table 2.8
Page 26
Atop Industrial Managed Ethernet Switch
EH7510
User Manual V 1.0
20
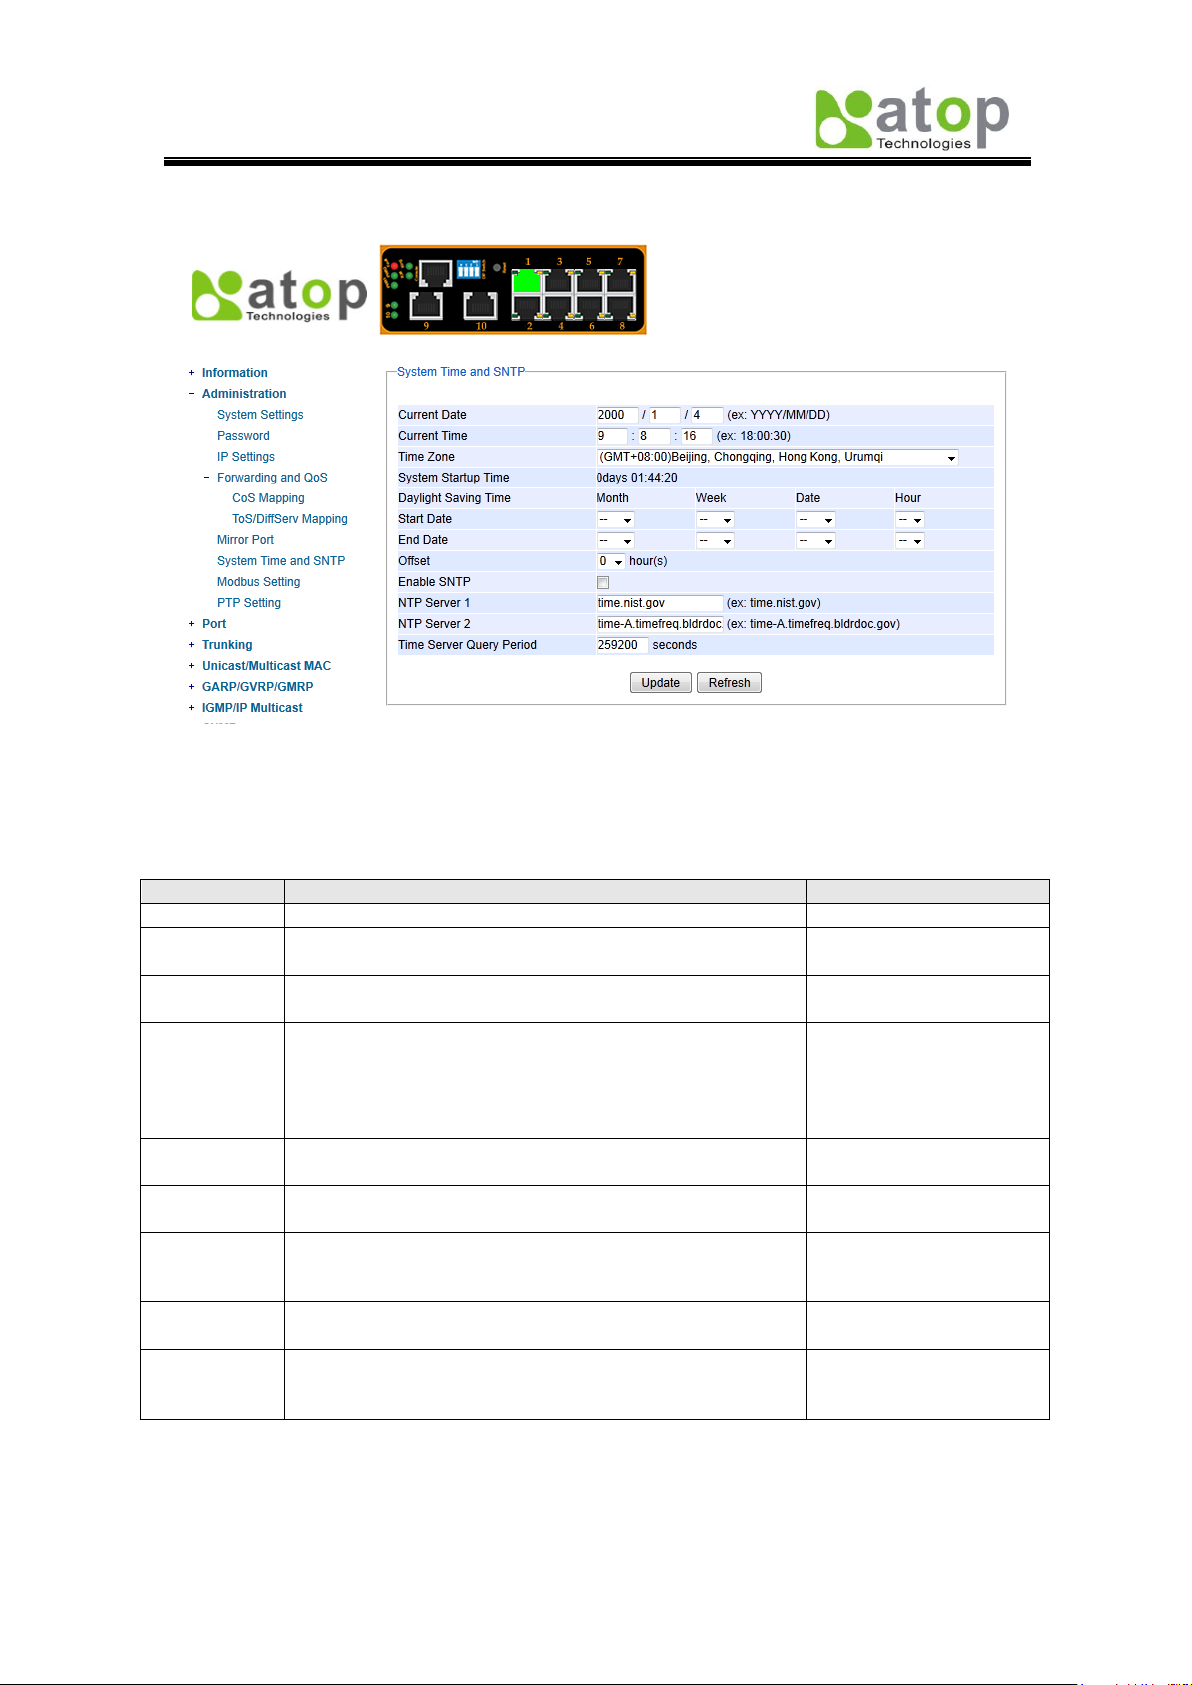
Label
Description
Factory Default
Current Date
Allows local date configuration in yyyy/mm/dd format
None
Current
Time
Allows local time configuration in local 24-hour format.
None
System
Startup Time
Indicates how long the switch has been working.
Dependant
Daylight
Saving Time
Start Date: defines the start date of daylight saving.
End Date: defines the end date of daylight saving.
Offset: decide how many hours to be shifted
forward/backward when daylight saving time begins and
ends. See note below.
None
Enable
SNTP
Enables SNTP function. See note below.
Unchecked
NTP Server
1
Sets the first IP or Domain address of NTP Server.
time.nist.gov
NTP Server
2
Sets the second IP or Domain address of NTP Server.
Switch will locate the 2nd NTP Server if the 1st NTP
Server fails to connect.
TimeA.timefreq.bldrdoc.gov
Time Zone
User’s current local time.
(GMT+08:00)Beijing,
Chongqing, Hong Kong
Time Server
Query
Period
This parameter determines how frequently the time is
updated from the NTP server.
259200 seconds.
2.3.6 System Time and SNTP
Fig. 2.14
This option, (Fig. 2.14) configures EH7510 time and date; it also supports Daylight Saving
Time and SNTP (See notes below for explanation).
Table 2.9
Note:
- Daylight Saving Time: In certain regions (e.g. US), local time is adjusted during summer
season in order to provide an extra hour of daylight in the afternoon, and the time shifted
Page 27
Atop Industrial Managed Ethernet Switch
EH7510
User Manual V 1.0
21
forward (or backward) is usually an hour.
- SNTP: Network Time Protocol. It is used to synchronize the computer systems’ clocks.
Two of the NTP server examples would be time.nist.gov and clock.stdtime.gov.tw.
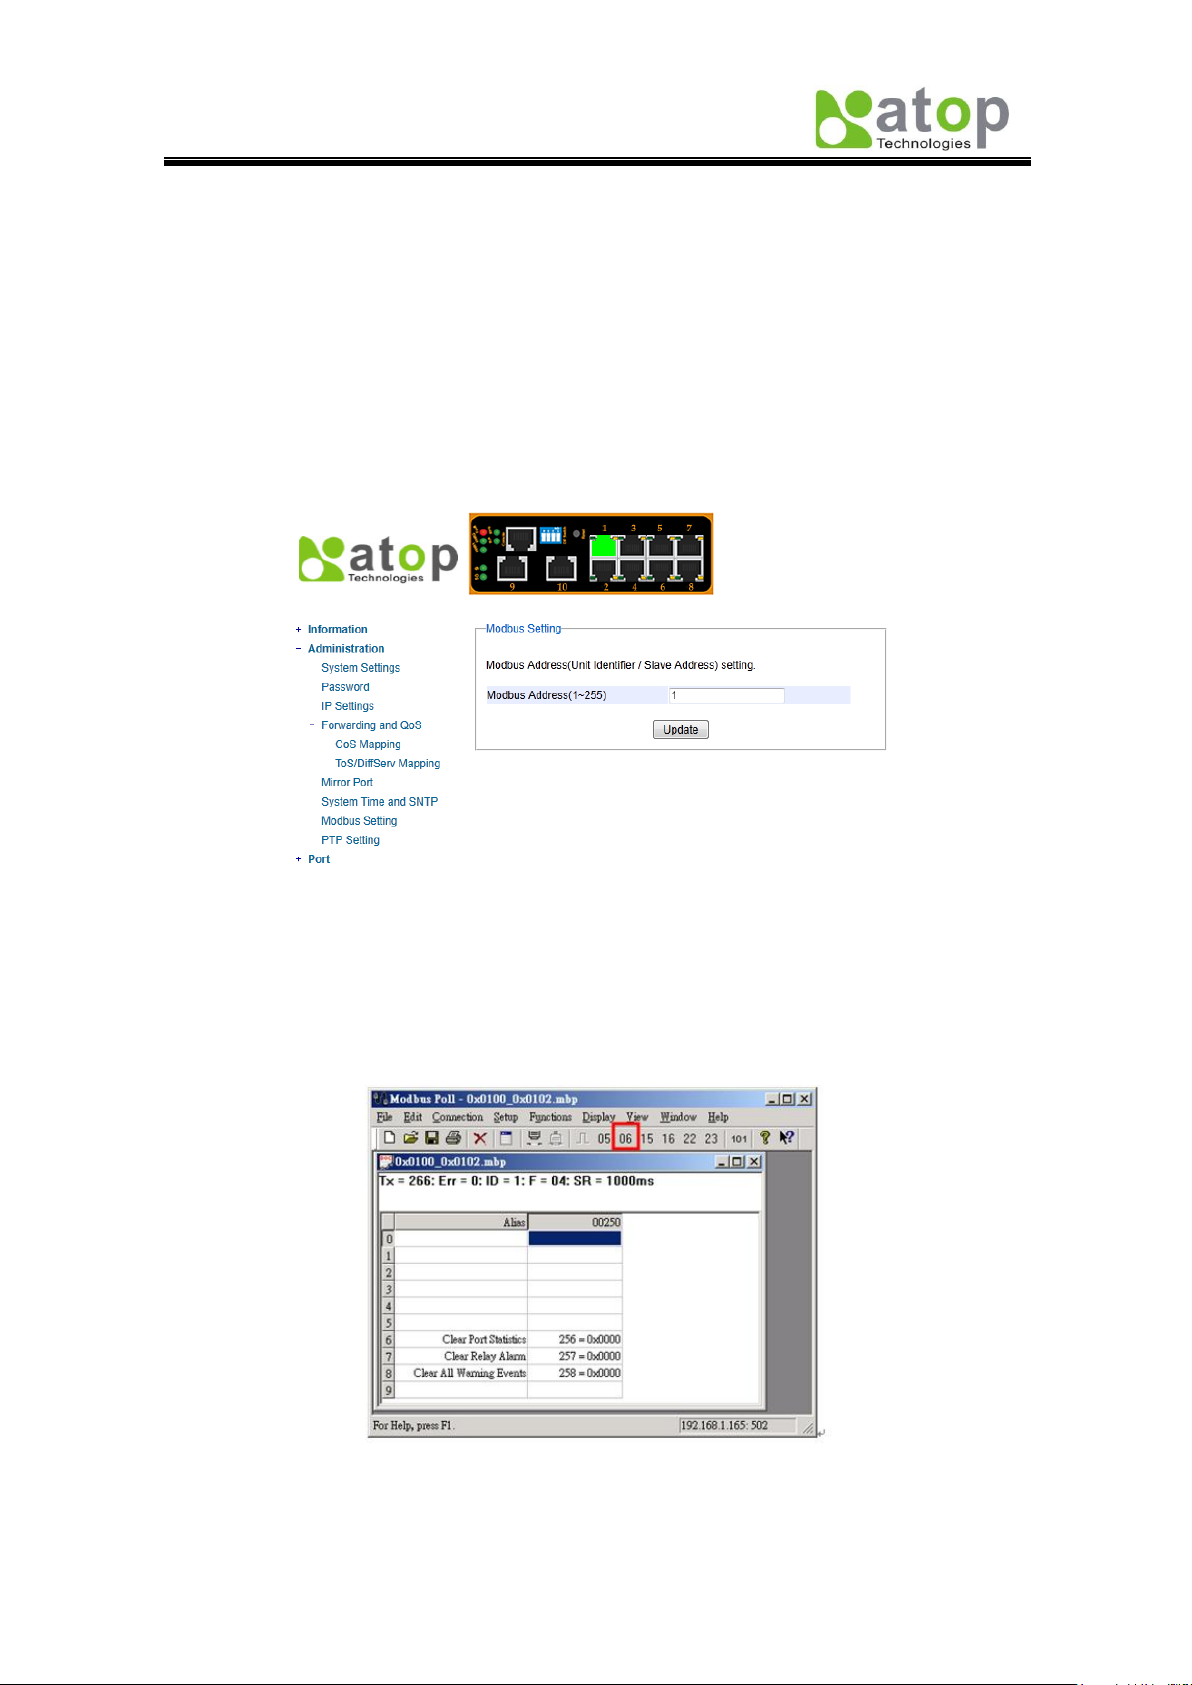
2.3.7 Modbus Setting
Modbus is a serial communication protocol which allows communication between devices to
be connected to the same network. It is used to connect a supervising computer to the
network, and thus control all the devices behind it.
Fig. 2.15
Fig. 2.15 shows where users can set up the modbus address; in addition to that, users can
use Modbus Poll for configurations. Setup steps are illustrated as follows:
1. Make sure the Modbus Poll is connected to your target EH7510.
2. Click on “06” on the top toolbar.
Fig. 2.16
Page 28
Atop Industrial Managed Ethernet Switch
EH7510
User Manual V 1.0
22
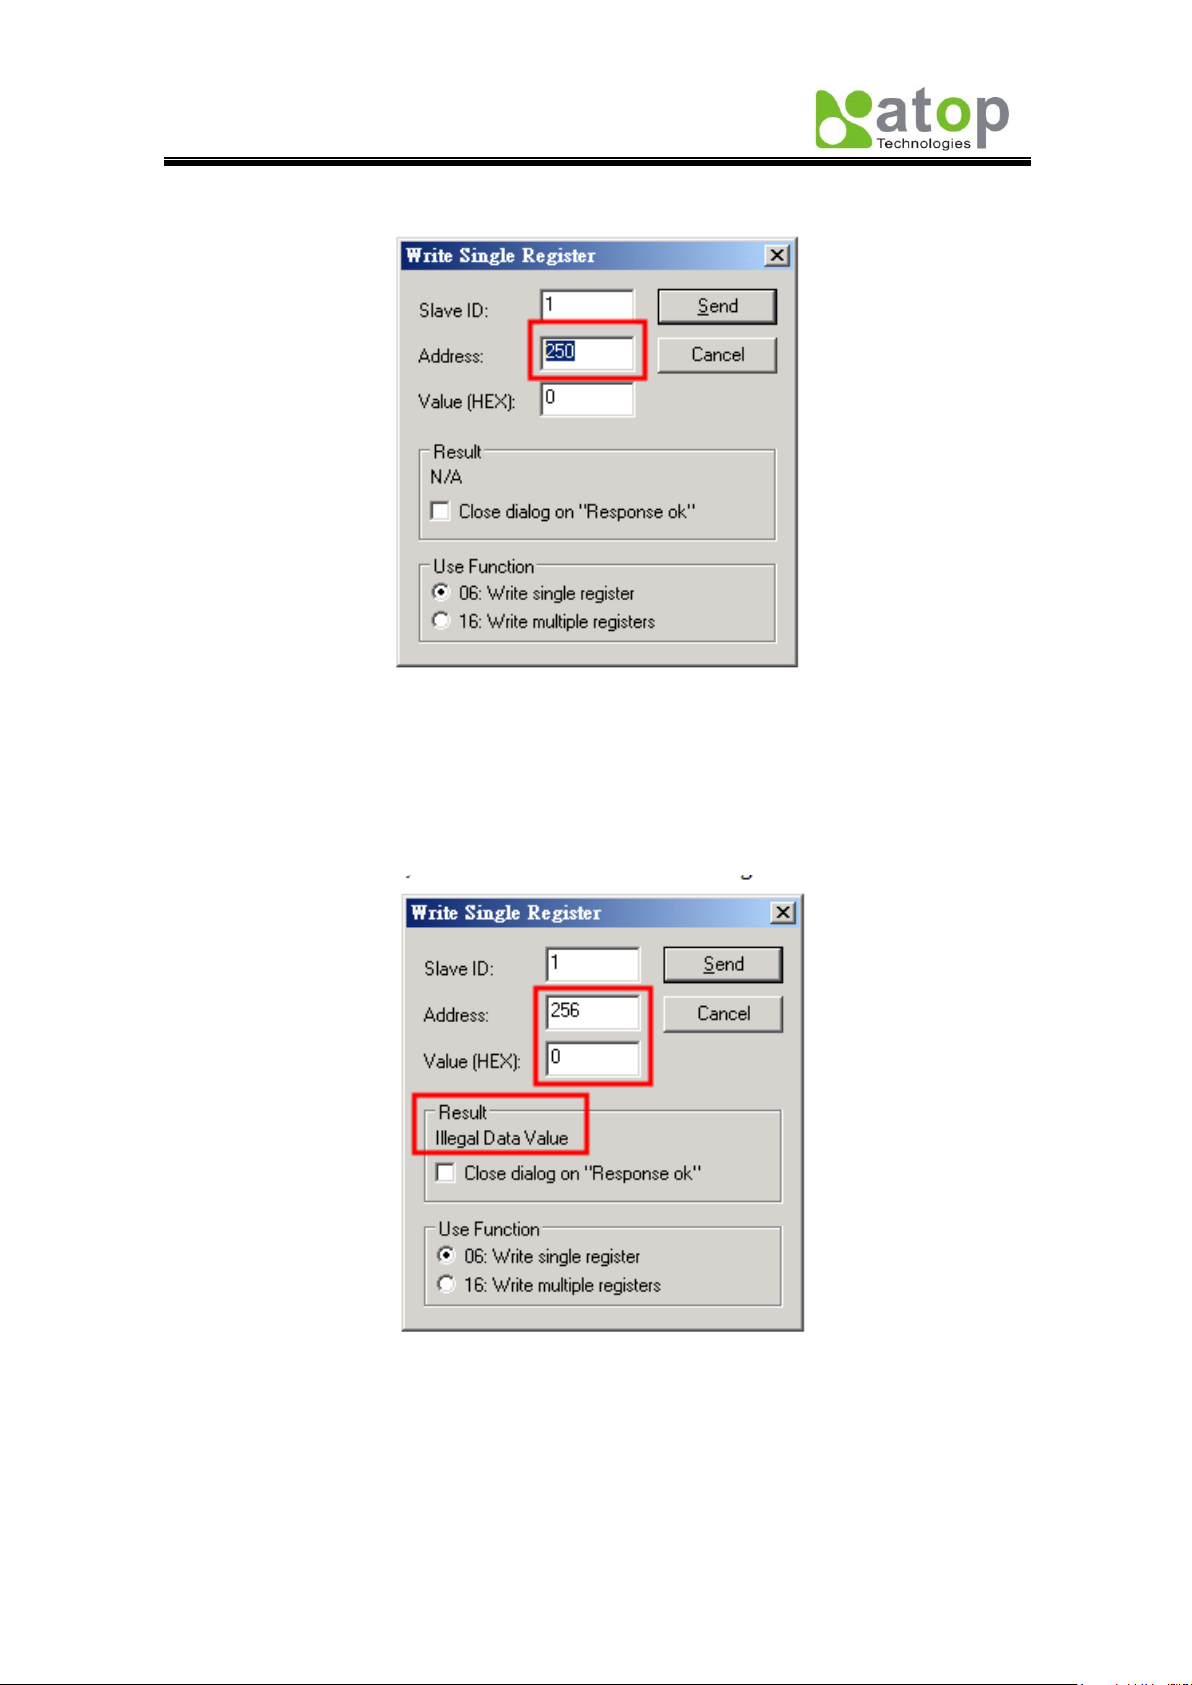
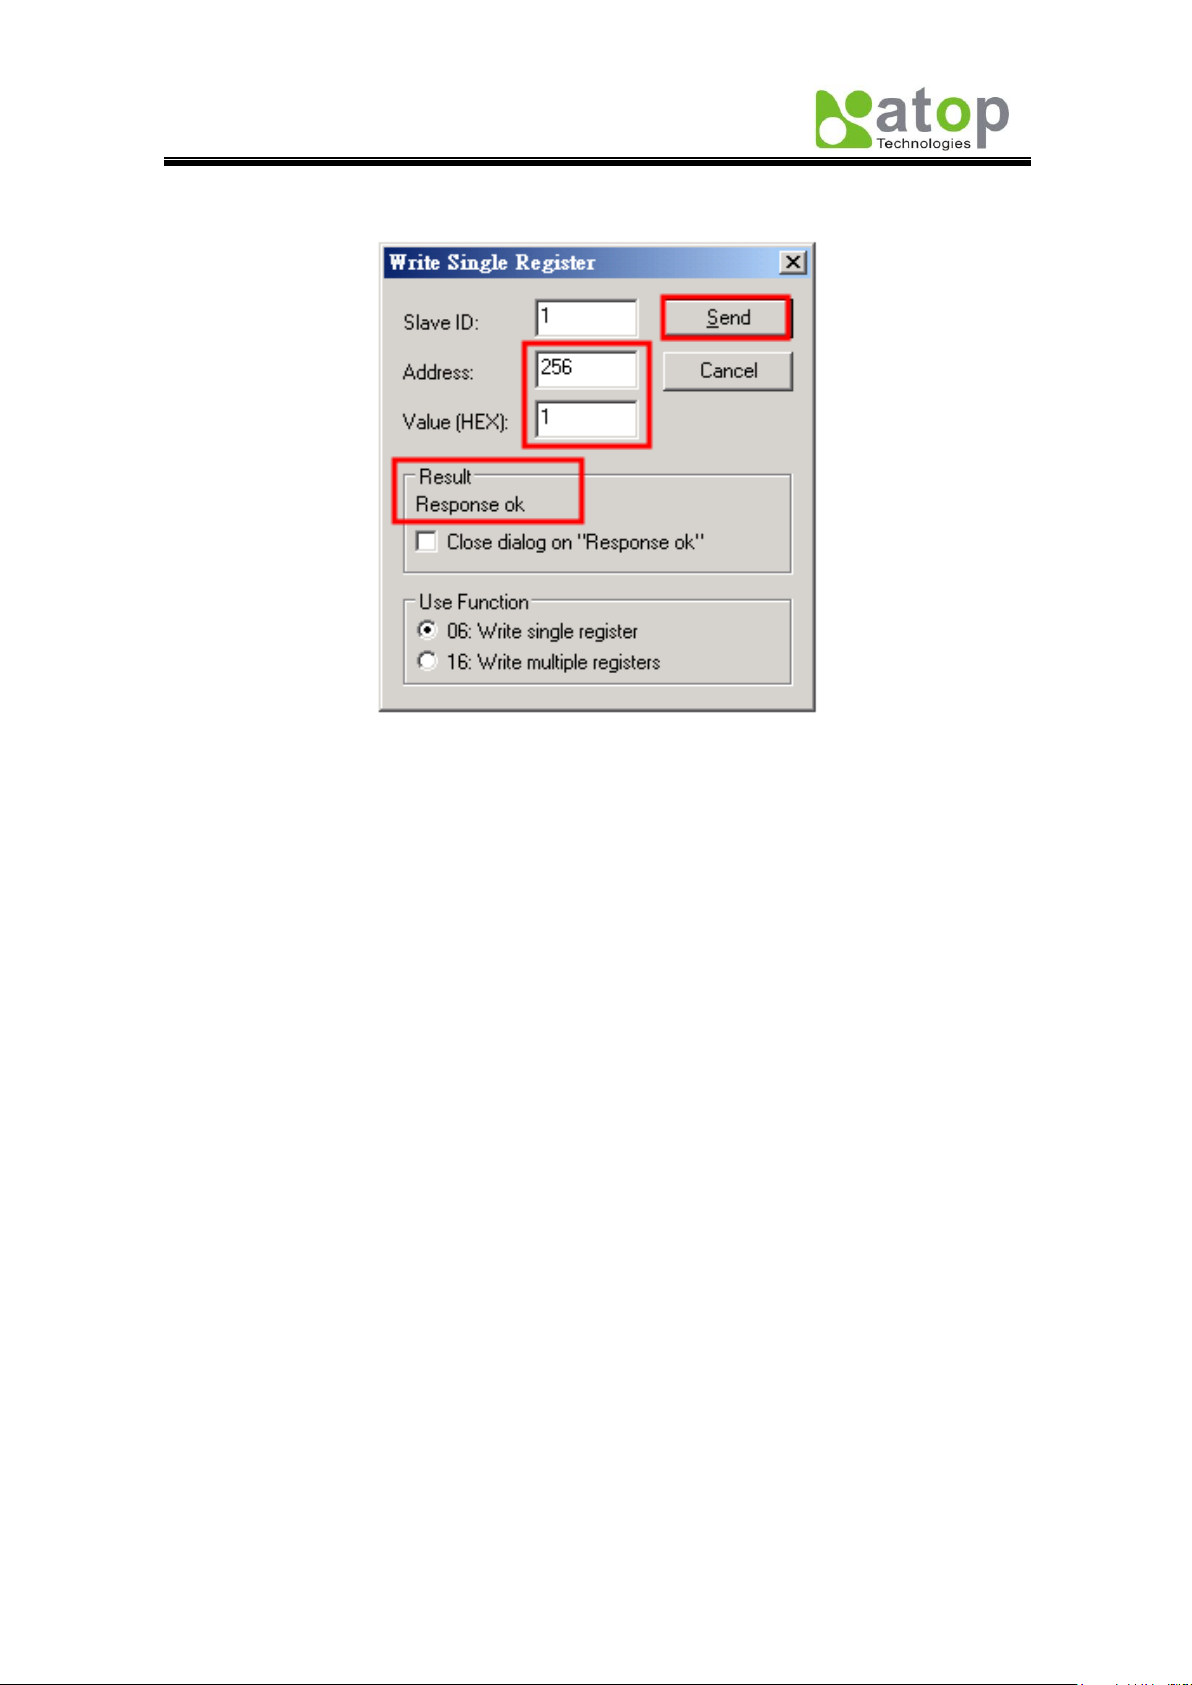
3. Set Address to a desired value between 250 and 256.
Fig. 2.17
4. Correct Value (HEX) has to be selected corresponding to Address entered above. As in
this example, Result shows “Illegal Data Value” since Address 256 can only take 1 as
Value (HEX).
Fig. 2.18
Page 29
Atop Industrial Managed Ethernet Switch
EH7510
User Manual V 1.0
23
5. If a correct Value (HEX) is selected, the process will be completed successfully.
Fig. 2.19
Page 30
Atop Industrial Managed Ethernet Switch
EH7510
User Manual V 1.0
24
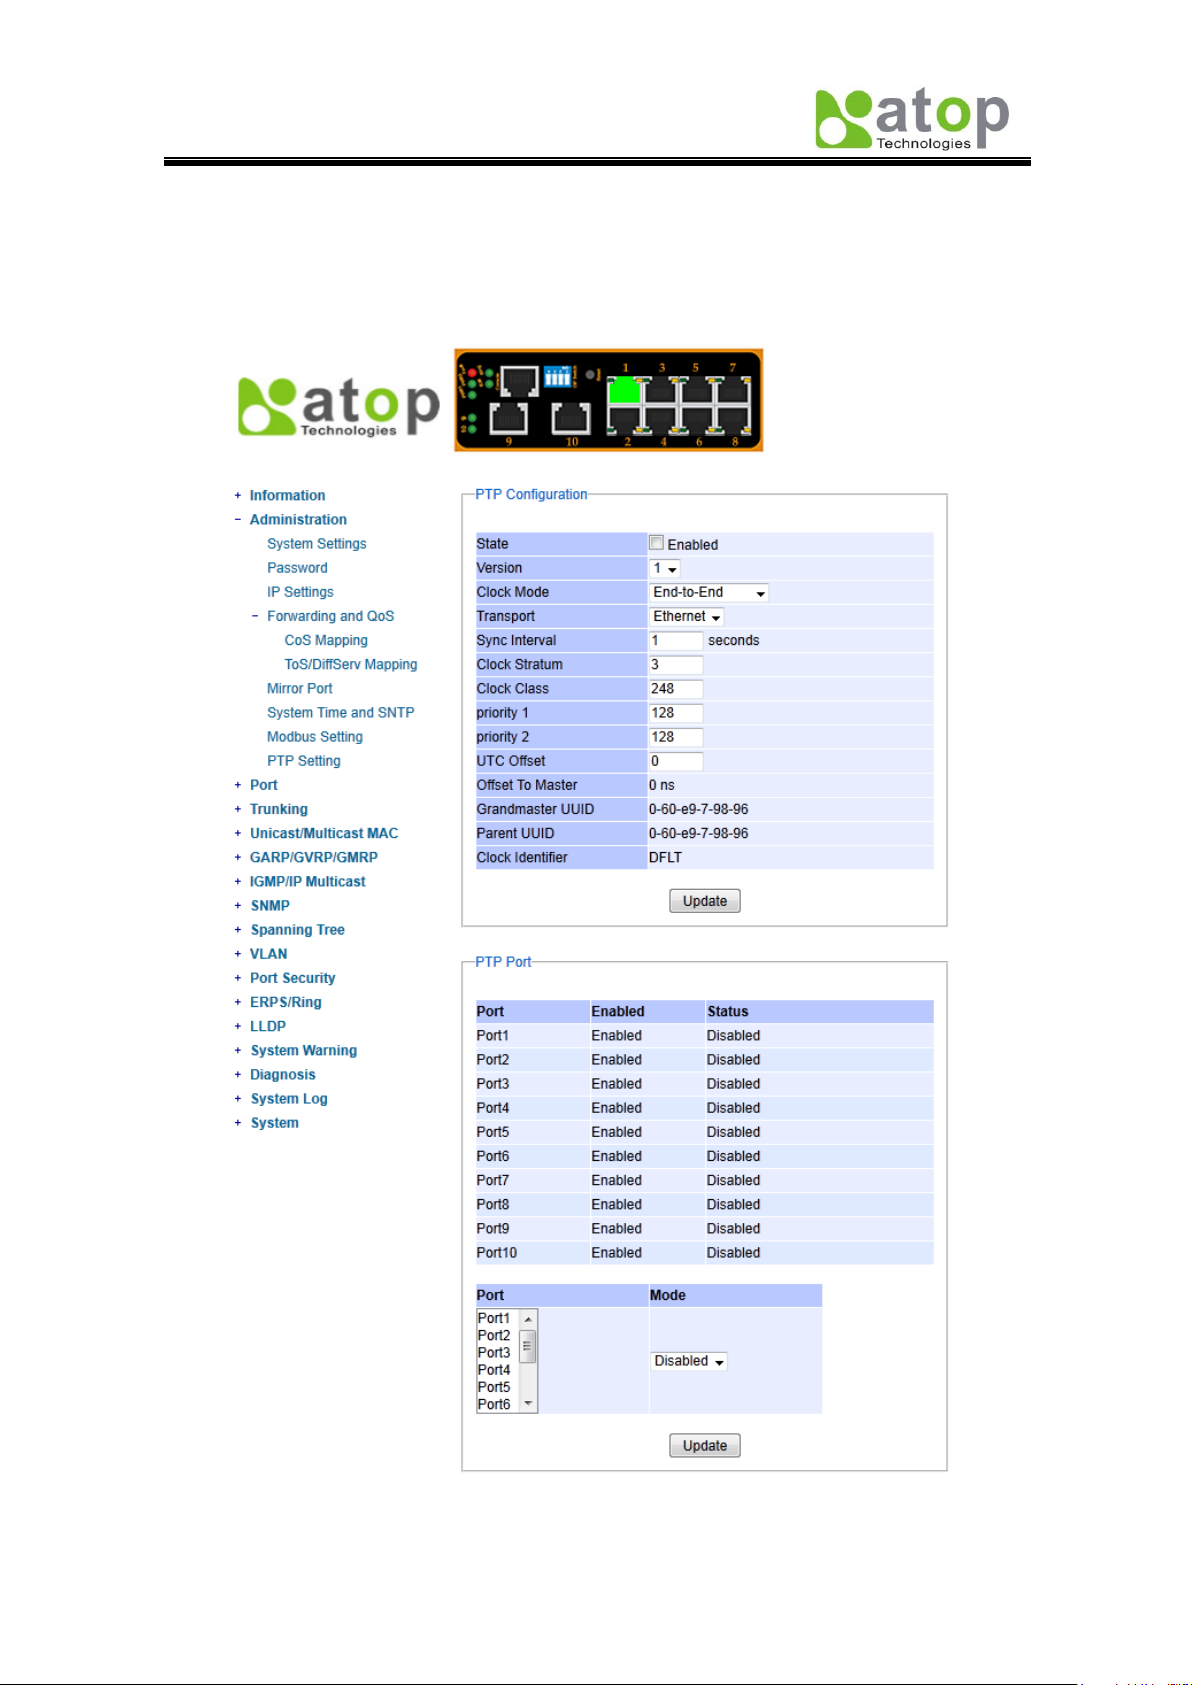
2.3.8 PTP Setting
The Precision Time Protocol (PTP) is a high-precision time protocol. It is for precise
synchronization of clocks on a local area network by measurement and control systems. Fig.
2.20 (on the next page), shows where to configure PTP and to see PTP status
.
Fig. 2.20
Page 31

Atop Industrial Managed Ethernet Switch
EH7510
User Manual V 1.0
25
Label
Description
Factory Default
State
Enabled/Disable the PTP function
Unchecked
Version
Set the PTP operation version
1
Clock Mode
PTP (Precision Time Protocol) clock type selection.
End-to-End
Transport
Ethernet (layer 2) multicast transport or layer 3 (UDP/IP)
multicast transports for PTP (Precision Time Protocol)
messages’ selection.
Ethernet
Sync Interval
Set the interval of the sync packet transmitted time
1
Clock
Stratum
To set the Clock Stratum. The lower values take
precedence to be selected as the master clock in the
best master clock algorithm.
3
Clock Class
Clock’s accuracy level, it’s an attribute of an ordinary or
boundary clock; denotes time traceability or frequency
distributed by the grandmaster clock. Please refer to
IEEE 1588-2008, Table 5 for definitions, allowed values,
and interpretation.
248
priority 1
To set the clock priority 1 (PTP version 2). The lower
values take precedence to be selected as the master
clock in the best master clock algorithm.
128
priority 2
To set the clock priority 2 (PTP version 2). The lower
values take precedence to be selected as the master
clock in the best master clock algorithm.
128
UTC Offset
UTC offset value
0
Offset To
Master
The offset time to the master clock
None
Grandmaster
UUID
The grand master UUID for PTP version 1
None
Parent UUID
The parent master UUID for PTP version 1
None
Clock
Identifier
The clock identifier for PTP version 1
None
Label
Description
Factory Default
Port
Port number
None
Enabled
The port mode information, it indicates that the PTP port
function is enabled or disabled.
None
Status
PTP port operation status
None
Mode
Enabled/Disabled PTP port function
Disabled
Table 2.10
The lower part of Fig. 2.20 shows how to configure PTP and to see its status per port.
Table 2.11
Page 32

Atop Industrial Managed Ethernet Switch
EH7510
User Manual V 1.0
26
2.4 Port
This function contains three options, which are,
Port Status Port statistics Port control
2.4.1 Port Status
Fig. 2.21
All ports status are shown,
Mode
Enable State(On or Off)
Link condition(Up or down)
Negotiation type(Auto or Force)
Speed (unit: Mbps)
Duplex
Flow Control
Rate Control
Security (802.1X port status).
*NOTE
- Negotiation: “Force” specifies forcing the speed and duplex as configured by users.
“Auto” specifies using auto negotiation to determine the actual speed and duplex to use.
- Duplex: “Half duplex” allows one-way communication at a time, while “Full duplex”
allows both-way communication at the same time.
Page 33

Atop Industrial Managed Ethernet Switch
EH7510
User Manual V 1.0
27
2.4.2 Port Statistics
Statistics for all ports showed (Fig. 2.22).
*NOTE
Fig. 2.22
- Link (Up or down): Actual link status of the port.
- Tx: Total number of unicast and non-unicast packets transmitted.
- Tx Error: Number of outbound packets which are chosen to be discarded even though no
errors have been detected to prevent them being transmitted.
- Tx Rate (Kbps): Speed of transmission.
- Rx: Total number of packets (not including faulty packets) received.
- Rx Error: Total number of faulty packets (including Oversize, Undersize, FCS, Alignment,
Jabbers and Fragments Errors packets) received.
- Rx Rate (Kbps): Receiving speed.
Page 34

Atop Industrial Managed Ethernet Switch
EH7510
User Manual V 1.0
28
Label
Description
Factory Default
Port
Port number on the switch.
Enable
Check the box to allow data to be transmitted and
received through this port.
All ports are enabled
Negoti
ation
Choose from Force or Auto. See notes below.
All ports Auto- Negotiation
is enabled.
Speed
Select either 10, 100,1000(Port 9, 10 only) Mbps
Port1~Port8: 100Mbps.
Port9, Port10: 1000Mbps.
Duplex
Select either Half or Full Duplex. See note below.
All ports are Full-Duplex
mode.
Flow
Control
Either on or off “Flow Control” to avoid packet
loss when congestion occurs.
All ports flow control is
disabled.
Rate
Control
Sets limits on its transmission rate for the
incoming and outgoing. Unit: kbps
All ports rate control is
disabled.
Throughput
Test
Click button to start test ingress and
outgoing rate of this port.
Note: The maximum rate test is limited under
98Mbps.
-
2.4.3 Port Control
Port settings are included to give users control over State (enabled or disabled), Port
Transmission Speed, Duplex, Flow Control, Rate Control and Throughput Test.
Fig. 2.23
Table 2.12
*Note:
- Rate Control: Outgoing and incoming values have to be set between 0 and 102400(for
100M) or 1024000(for 1000M)..
0 is to turn off rate control.
The values have to be integer multiples of 64 when rate is less than 1792Kbps. Ex: 64k,
128k .. 512k…1792Kbps.
Page 35

Atop Industrial Managed Ethernet Switch
EH7510
User Manual V 1.0
29
The value has to be an integer multiple of 1024 when rate is between 1792Kbps and
102400Kbps (for 100M) or 106496Kbps (for 1000M).. Ex: 2048K, 3072K… 102400Kbps.
The values have to be integer multiples of 8192 when rate is greater than 106496Kbps.
2.5 Trunking
EH7510 supports Link Trunking; it allows one or more links to be added together to form
one single but larger group. The advantage of this function gives the user more flexibility
while setting up network connections; the bandwidth of a link can be doubled or tripled. Also,
if one link is disconnected, the remaining trunked ports can share the traffic within the trunk
group; this function increases the redundancy for higher reliability.
2.5.1 LACP
LACP: IEEE standard, Link Aggregation Control Protocol.
This option shows the switch’s trunking information (Fig. 2.24); users can only specify the
system priority here. Other settings including defining a trunk group and specifying LACP
functions will be described in the next section.
`
Fig. 2.24
Page 36

Atop Industrial Managed Ethernet Switch
EH7510
User Manual V 1.0
30
Label
Description
Factory Default
LACP
Status
Shows whether LACP is active, passive, or
disabled.
Disabled
System
Priority
Indicates the system priority, in the range 1 ~
65535
32768
Group ID
Shows which trunk group this port belongs to.
-
LACP
Partner
Indicates whether LACP Partner information is
received at the corresponding port
-
Table 2.13
2.5.2 Trunking
There are four steps to setup a trunking group, Fig. 2.25.
Step 1: Select either Trk1 or Trk2 from Group ID.
Step 2: Choose whether to enable LACP (IEEE standard, Link Aggregation Control
Protocol).
Step 3: Select specific ports to be in this trunk group.
Step 4: Select specific ports in this trunk group to be LACP active.
Fig. 2.25
Page 37

Atop Industrial Managed Ethernet Switch
EH7510
User Manual V 1.0
31
Label
Description
Group ID
EH7510 can have up to 2 trunk group. Trk1 and Trk2.
LACP (Yes/No)
Enable/Disable LACP.
Ports
Specifies the member ports. Hold Control to select more than
one port at a time.
LACP Active
Specifies which ports within the group are LACP active. Nonselected ports would be LACP passive.
Apply
Click Apply to confirm changes.
Remove
Removes any existing trunk group.
Multicast
Unicast
Table 2.14
2.6 Unicast/Multicast MAC
This function includes three sub-pages
MAC Address Table Add Uni/Multicast MAC Filter MAC.
Multicast filtering improves the performance of networks that carry multicast traffic; this
section will explain what Multicast and Unicast are as well as their benefits, (Fig. 2.26).
- Unicast: This type of transmission sends messages to a single network destination
identified by a unique address. This method is simple but not widely used.
- Multicast: This type of transmission is more complicated. It sends messages from one
host to multiple hosts; only those hosts that belong to a specific multicast group will
receive the multicast. Also, networks that support multicast send only one copy of the
information across the network until the delivery path that reaches group members
diverges. At these diverging points, multicast packets will be copied and forwarded. This
method can manage high volume traffic with different destinations while using network
bandwidth efficiently.
Fig. 2.26
Page 38

Atop Industrial Managed Ethernet Switch
EH7510
User Manual V 1.0
32
Label
Description
Unicast/Multicast MAC
Displays MAC address.
VLAN
Displays VLAN ID.
Type
Displays whether the MAC address is dynamic or static.
Ports
Displays which port this MAC belongs to.
Clear Dynamic Entries
Clears all Dynamic MAC addresses.
2.6.1 MAC Address Table
Fig. 2.27
Information of current Unicast and Multicast MAC addresses is displayed as on Fig. 2.27.
Unicast would be shown first followed by Multicast MAC address.
Table 2.15
2.6.2 Add Uni/Multicast MAC
Fig. 2.28
Page 39

Atop Industrial Managed Ethernet Switch
EH7510
User Manual V 1.0
33
Label
Description
MAC address
Enter MAC address manually.
VLAN
Specify VLAN ID that this static MAC belong to
Type
-
Port(s)
Define which ports belong to this address
Add
Confirm and add the MAC address.
Remove
Remove any existing MAC address.
EH7510 also supports adding static MAC address manually (Fig. 2.28); the steps are as
follows,
Step 1: Enter MAC Address. Unicast address starts with 00 and Multicast address starts
with 01.
Step 2: Specify VLAN ID.
Step 3: Decide which ports belong to its corresponding address; use Ctrl to add more than
one port.
Table 2.16
2.6.3 Filter MAC
This function allows users to set MAC filter manually, see Fig. 2.29.a, and Fig. 2.29.b for an
example.
Fig. 2.29.a
Fig. 2.29.b *Example*
Page 40

Atop Industrial Managed Ethernet Switch
EH7510
User Manual V 1.0
34
Label
Description
MAC address
MAC address entered in this field will be blocked.
VLAN
Assign VLAN ID to this static MAC address
Remove
Remove this entry in filter table.
Add
Add the MAC addresses to the filter table
Label
Description
VID
VLAN identifier.
MAC address
Multicast group’s MAC address..
Static Ports
Statically joined ports through in Static MAC Table and to which
the multicast group traffic is forwarded.
GMRP Dynamic Ports
Dynamically joined ports through GMRP Application presently
on the group and to which the multicast group traffic is
forwarded.
Table 2.17
2.7 GARP/GVRP/GMRP
This function includes three options, GARP, GVRP and GMRP.
GARP: Generic Attribute Registration Protocol, also known as Multiple Registration Protocol
(MRP). It operates at the data link layer of OSI, and it defines the architecture, rules of
operation, state machines and variables for the registration and removing of attribute values.
GARP is used by two applications: GARP VLAN Registration Protocol (GVRP), and
GARP Multicast Registration Protocol (GMRP). GVRP provides a method to share VLAN
information dynamically and configure the needed VLANs. GMRP provides a mechanism
that allows bridges and switches to register trunking information dynamically. GVRP and
GMRP are similar, and the only difference is that GVRP works with VLAN but GMPR works
with Multicast MAC address.
2.7.1 Multicast Group Table
Table 2.18
Fig. 2.30
Page 41

Atop Industrial Managed Ethernet Switch
EH7510
User Manual V 1.0
35
Label
Description
Factory Default
Join Timer
Indicate the GARP Join timer, in 0 ~ 65535 seconds.
20 seconds
Leave Timer
Indicate the GARP Leave timer, in 0 ~ 65535 seconds.
60 seconds
LeaveAll
Timer
Indicate the GARP Leave All timer, in 0 ~ 65535
seconds.
1000 seconds
2.7.2 GARP
Fig. 2.31
Fig. 2.31 shows how to configure GARP timer:
Table 2.19
Page 42

Atop Industrial Managed Ethernet Switch
EH7510
User Manual V 1.0
36
2.7.3 GVRP
Fig. 2.32 indicates GVRP configurations and functions. When GVRP is enabled, the switch
which is an end node of a network needs only to add static VLANs locally. Others switches
dynamically learn the rest of the VLANs configured elsewhere in the network via GVRP.
Fig. 2.32
Page 43

Atop Industrial Managed Ethernet Switch
EH7510
User Manual V 1.0
37
Label
Description
Factory Default
GVRP
Enables or disables GVRP protocol.
Enables GVRP, the switch must be in 802.1q VLAN mode.
Disabled
Port
Enables or disables GVRP on each port. If users have
already define trunking group (e.g. Trk1), it can also be
selected to be enabled.
All ports are
disabled
Clear
Statistics
Clears all GVRP statistics counts
Clears the record
Table 2.20
2.7.4 GMRP
The above figure shows GMRP functions and configurations; when GMRP is enabled, the
switch allows to receive the “join” multicast group message from an end station. It then
creates dynamic multicast MAC address entry in MAC table and spreads this message to
other switches.
Fig. 2.33
Page 44

Atop Industrial Managed Ethernet Switch
EH7510
User Manual V 1.0
38
Label
Description
Factory Default
GMRP
Enables or disables GMRP protocol.
To enable GMRP, the switch must be in 802.1q VLAN mode
and IGMP snooping must be disabled.
Disabled
Port
Choose the ports to be GMRP enabled.
Disabled
Clear
Statistics
Clear all GMRP statistics counts
-
Table 2.21
2.8 IGMP/IP Multicast
This function contains four options (Fig. 2.34.a), which are:
IGMP/IP Multicast Table
Static IP Multicast
IGMP
IGMP Statistics.
IGMP: Internet Group Management Protocol is used on IP networks to establish multicast
group memberships. It operates above the network layer of OSI. One of the most important
features related to this protocol is IGMP snooping, which is supported by EH7510 and
greatly strengthens network functionality.
IGMP Snooping: It is the process of “listening” to IGMP network traffic. By listening to
conversations between different devices, it maintains a map of which links need which IP
multicast streams. This means multicasts may be filtered from the links which do not need
them, and IGMP snooping allows a switch to only forward multicast traffic to the links that
have requested it.
2.8.1 IGMP/IP Multicast Table
Fig. 2.34.a
Page 45

Atop Industrial Managed Ethernet Switch
EH7510
User Manual V 1.0
39
Fig. 2.34.b *Example*
This option shows:
1. The IGMP membership group table.
2. Static and dynamic IP Multicast table. The dynamic join port is added by the switch’s
IGMP snooping function. The static join port is manually added by the user.
2.8.2 Static IP Multicast
Fig. 2.35.a
Page 46

Atop Industrial Managed Ethernet Switch
EH7510
User Manual V 1.0
40
Fig. 2.35.b *Example*
Fig. 2.35.a, 2.35.b display current IP multicast addresses, and it allows users to add more
manually.
For example, an IP multicast group address is: 239.1.1.1; joining ports are Port1, Port2 and
Port5 with VLAN=1.
Users should key the IP in the IP Multicast Address column and click the corresponding
port’s number in the source column. Click the “Ctrl” key on the keyboard to add more ports.
Then click on the button, the IP address is then added as it can be seen on
Fig 2.35.b, above; to remove the static IP multicast address entry setting, click the
button. These procedures are similar as when we added Uni/Multicast
MAC address previously, the only difference being that the IP multicast address has the
form 239.XX.XX.XX.
Page 47

Atop Industrial Managed Ethernet Switch
EH7510
User Manual V 1.0
41
Label
Description
Factory
Default
IGMP Snooping
Choose to enable IGMP snooping.
To enable IGMP snooping, GMRP must be disabled
Disabled
IGMP Proxy
Choose to enable IGMP snooping. See note below.
Disabled
IGMP Fast-leave
Choose to enable IGMP Fast-leave. See note below.
Disabled
Router's IP
Display the multicast router’s IP address.
-
Router's Port
Display the port that is connected to multicast router.
-
2.8.3 IGMP
Fig. 2.36
Table 2.22
*NOTE:
IGMP Proxy: works as an intermediate server; when it receives a query message from the
router; it sends a report message to the router port. When it receives a report message
from a device in a new group, it sends a report message back to the router port. When it
receives a leave message from a device which is the only one in the group, it sends a
leave message to the router port and removes the device. Proxy is like a middle man that
handles information in between routers and computers.
Page 48

Atop Industrial Managed Ethernet Switch
EH7510
User Manual V 1.0
42
Fig. 2.37
IGMP Fast-leave: When a leave message is received, the ports in the group will be
immediately removed from the IP multicast entry.
2.8.4 IGMP Statistics
Fig. 2.38.a
Page 49

Atop Industrial Managed Ethernet Switch
EH7510
User Manual V 1.0
43
Fig. 2.38.b *Example*
IGMP’s statistics are shown in Fig. 2.38.a, and its example on Fig. 2.38.b.
2.9 SNMP
This section has four categories, which are
SNMP
Community Strings
Trap Receivers
SNMP V3 Users.
SNMP: Simple Network Management Protocol is a protocol for managing devices on IP
networks. It exposes management data in the form of variables on the managed systems,
which describe the system configuration. These variables can then be queried/ defined by
users.
Page 50

Atop Industrial Managed Ethernet Switch
EH7510
User Manual V 1.0
44
Label
Description
Factory Default
SNMP
Choose to enable SNMP V1/V2c/V3.
Disabled
Fig. 2.39.a
Table 2.23
2.9.1 Community Strings
EH7510 supports SNMP V1, V2c, and V3; V1 and V2c use a community string match for
authentication; there are three levels of authentications which are read-sysinfo-only, readall-only, or read-write-all. For example, in our default setting, the SNMP agent can access
all objects with read-all-only permissions using the string public. Another example is that the
string private has permission of read-write-all.
This option allows users to use a community string match for authentication; users can
specify the string names and the type of permissions on the String field, Fig. 2.39.a.
Page 51

Atop Industrial Managed Ethernet Switch
EH7510
User Manual V 1.0
45
Label
Description
Factory Default
Community
Strings
Define name of strings.
Max. 15 Characters.
Public(read-all-ony)
Private(read-write-all)
Type
Choose from read-sysinfo-only, read-all-only,
and read-write-all. See notes below for a
detailed explanation.
-
Label
Description
Factory Default
IP address
IP address of your Trap Server
NULL
Port
Trap Server service port.
162
Community
String
Community string for authentication.
Max. 15 characters.
NULL
Table 2.24
*NOTE:
Read-sysinfo-only: permission to read OID 1.3.6.1.2.1.1 Sub Tree.
Read-all-only: permission to read OID 1 Sub Tree.
Read-write-all: permission to read/write OID 1 Sub Tree.
2.9.2 Trap Receivers
EH7510 provides a trap function that allows an SNMP agent to notify the network
management system in case of a significant event, this allows users to configure SNMP
Trap setting, Fig. 2.39.b.
Fig. 2.39.b *Trap Receiver Example*
Table 2.25
2.9.3 SNMPv3 Users
SNMP V3 is an even securer protocol; users will be able to set a password and an
encryption key to enhance data security.
When choosing this option users can configure SNMP V3. EH7510 use MD5 (MessageDigest algorithm 5) for authentication password, and DES (Data Encryption Standard) for
data encryption, Fig. 2.39.a.
Page 52

Atop Industrial Managed Ethernet Switch
EH7510
User Manual V 1.0
46
Label
Description
Factory Default
Name
Admin: Administration level.
User: Normal user level.
Admin
Authentication
Password
Set password. If the field is left blank, there will be
no authentication.
Authentication password is based on MD5.
Max. 31 characters.
NULL
Confirm Password
Re-type the Authentication Password
NULL
Encryption Key
Set encryption key for securer protection.
Encryption is based on DES.
Max. 31 characters.
NULL
Confirm Key
Re-type the Encryption Key
NULL
Table 2.26
2.10 Spanning Tree
EH7510 provides the IEEE Standard Spanning tree functionality. The Spanning Tree
Protocol (STP) provides function to prevent switching loops and ensuring broadcast
radiation. A switching loop occurs in network when there are multiple connections between
two network switches or two ports. The loop creates broadcast radiation, the accumulation
of broadcast and multicast traffic on a computer network. As broadcasts and multicasts are
forwarded by bridges/switches to every port, the bridges/switches will repeatedly
rebroadcast the broadcast messages, and this can floods the network. STP creates a
spanning tree and disables those links of the network that are part of the spanning tree,
which leaves only a single active path between two nodes. This function avoids flooding and
increases network efficiency.
EH7510 also supports RSTP (Rapid Spanning Tree Protocol). It is an evolution of the STP.
It has a slightly changed topology, which helps to provide a much faster spanning tree
convergence.
Page 53

Atop Industrial Managed Ethernet Switch
EH7510
User Manual V 1.0
47
2.10.1 Spanning Tree
Fig. 2.40
Fig. 2.40 shows how to configure the Spanning Tree and indicates the parameters’ status.
Page 54

Atop Industrial Managed Ethernet Switch
EH7510
User Manual V 1.0
48
Label
Description
Factory Default
Spanning Tree
Choose to enable or disable Spanning Tree.
Disabled
Force Version
Select STP or RSTP.
RSTP
Priority
Configures the bridge priority in the range of 0 ~
61440.The switch with lower bridge priority has
more chance to become a root bridge.
32768
Maximum Age
If a device is not the root and it doesn’t receive
hello message in “Max. Age”, it will reconfigure
itself as a root.
See note below for “hello message”.
Range from 6 to 40 seconds.
20
Hello Time
Amount of time the root waits between sending
hello messages. See note below.
Range from 1 to 10 seconds.
2
Forward Delay
Configures the amount of time to wait before
checking to see if the device should change
from the learning state to the forwarding state.
Less delay time means changing state quickly.
Range from 4 to 30 seconds.
15
Root Priority
Indicates the current root priority value.
Dependant
Root MAC Address
Indicates the current root MAC address.
Dependant
Root Path Cost
Indication of cost. Higher cost means less
suitability for Spanning Tree topology.
Dependant
Root Port
Indicates the port that receives the best BPDU.
See note below.
Dependant
Root Maximum Age
Indicates the current root maximum ageing time
value.
Dependant
Root Hello Time
Indicates the current hello time value.
Dependant
Root Forward Delay
Indicates the current root forward delay time
value.
Dependant
Topology Changes
Indicates the time which topology change is
occurred.
Dependant
Last Topology
changes
Indicates the working time since last Topology
changes occurred.
Dependant
Table 2.27
*NOTE
- “Hello” Message: The root of the Spanning Tree topology periodically sends out a “hello”
message to other devices on the network to check if the topology is healthy.
- BPDU: In STP, to ensure that each bridge has enough information, the bridges use
special data frames called Bridge Protocol Data Units (BPDU) to exchange information
about bridge IDs and root path costs.
Page 55

Atop Industrial Managed Ethernet Switch
EH7510
User Manual V 1.0
49
2.10.2 Spanning Tree Port
Fig. 2.41 shows how to configure per-port Spanning Tree parameters and indicate each
port’s status.
Fig. 2.41
*NOTE:
- Recall that Tx Packets are those transmitted/sent out from EH7510, and Rx Packets are
packets received from connected devices, then
- Des Cost: (Designated Root) cost for a packet to travel from a port to the root in the
current Spanning Tree.
- Des Port: (Designated Port) port designated to send the best BPDU.
- Des Root: (Designated Root) device’s priority from which the port must communicate to
reach the Spanning tree’s root.
- Uptime: Indicates how long it has been up.
- Tx/Rx SPT: sending/receiving STP packet total count.
- Tx/Rx TCN: Topology change Notification
- Tx/Rx RSTP: sending/receiving RSTP packet total count.
Page 56

Atop Industrial Managed Ethernet Switch
EH7510
User Manual V 1.0
50
Label
Description
Factory Default
Port
Selects the ports to be configured.
Path Cost
Configures the port path cost in the range 1~200000000.
This value will affect the combination path cost. The lowest
combination path cost will be the best path to the Root
Bridge
200000
Priority
Configures the port priority in the range 0~240.
The port has the best route to the root bridge with the lowest
priority value.
This field is consist of :
128
P2P
Selects P2P Point to point connection type:
Force No: Force port P2P link to false.
Force Yes: Force port P2P link to true.
Auto: Select port P2P link to auto detection.
Force No
Edge
Choose whether it is an edge connection.
Uncheck
Table 2.28
2.11 VLAN
A Virtual Lane Area Network (VLAN) is a group of devices that can be located anywhere
on a network, but all devices in the group have connection with others as they’re physically
connected together. In other words, VLAN allows end stations to be grouped together even
if they’re not located on the same network switch. With traditional network, users usually
spend a lot of time on devices relocations, but a VLAN reconfiguration can be performed
entirely through software. Also, VLAN provides extra security because devices within a
VLAN group can only communicate with other devices in the same group; for the same
reason, VLAN can help to control network traffic. Traditional network broadcasts data to all
devices, no matter whether they need it or not. By allowing a member to receive data only
from other members in the same VLAN group, VLAN avoids broadcasting and increase
traffic efficiency ( next page, Fig. 2.42).
Page 57

Atop Industrial Managed Ethernet Switch
EH7510
User Manual V 1.0
51
Fig. 2.42
There are two common approaches to assigning VLAN memberships,
Port-based VLAN
Tagging-based (802.1q) VLAN
EH7510 supports both of them.
Page 58

Atop Industrial Managed Ethernet Switch
EH7510
User Manual V 1.0
52
Label
Description
Factory
Default
VLAN Mode
Choose either Port-Based or 802.1Q.
The switch will reboot after changing to VLAN
mode.
802.1Q
2.11.1 VLAN Mode
Port-Based VLAN (or Static VLAN equivalently) assignments are created by assigning
ports to a VLAN. If a device is connected to a certain port, the device will assign a VLAN to
that specific port; if users change the port connected, they must manually make a new portVLAN assignment for this new connection.
Steps to set up Port-Based VLAN:
1. On VLAN Mode page, select Port-Based -> Update -> Reset.
2. Select specific ports to be included to certain group.
Table 2.29
Fig. 2.43.a *Default screen*
Page 59

Atop Industrial Managed Ethernet Switch
EH7510
User Manual V 1.0
53
Label
Description
Factory Default
Group ID
Indicates the VLAN Group ID.
Group ID 1
Member
Adds specific ports to specific group.
Port 1 ~ Port10.
Fig. 2.43.b *Screen when on Port Based mode*
Table 2.30
*NOTE:
- VLAN Table, VLAN Settings, and VLAN PVID (following subsections) are not available for
Port-Based VLAN but only available for 802.1Q.
Page 60

Atop Industrial Managed Ethernet Switch
EH7510
User Manual V 1.0
54
Label
Description
Factory
Default
VLAN Mode
Choose 802.1Q.
The switch will reboot after changing VLAN mode.
802.1Q
Management VLAN ID
Configure the management VLAN ID that can be
accessed this switch.
Range from 1 to 4095.
1
802.1Q (or tagging-based equivalently)
Another VLAN mode that EH7510 supports is 802.1Q. Tagged frames are frames with
802.1Q (VLAN) tags that specify a valid VLAN identifier (VID). Untagged frames are frames
without tags or frames that carry 802.1p (prioritization) tags and only having prioritization
information and a VID of 0. When a switch receives a tagged frame, it extracts the VID and
forwards the frame to other ports in the same VLAN, Fig. 2.43.a, and Fig. 2.43.b.
Table 2.31
2.11.2 VLAN TABLE
Fig. 2.44.a, 2.44.b (example), displays the static and dynamic VLAN information of each VID.
Fig. 2.44.a
Fig. 2.44.b *Example*
Page 61

Atop Industrial Managed Ethernet Switch
EH7510
User Manual V 1.0
55
Label
Description
Factory
Default
VID
Indicates the VLAN ID number.
Dependant
Static Member Ports
Indicates the member ports to this VID.
This entry is created by user.
All ports
Static Tagged Ports
Indicates the ports that outgoing packet is tagged or
untagged.
Displayed: The outgoing packet is tagged from this
port.
Undisplayed: The outgoing packet is untagged from
this port.
This entry is created by user.
Dependant
Dynamic Member Ports
Indicates the member ports to this VID.
This entry is created by GVRP.
Dependant
Dynamic Tagged Ports
Indicates the member ports that outgoing packet is
tagged or untagged.
Displayed: The outgoing packet is tagged from this
port.
Undisplayed: The outgoing packet is untagged from
this port.
This entry is created by GVRP.
Dependant
Table 2.32
2.11.3 VLAN Setting
Fig. 2.45.a
Page 62

Atop Industrial Managed Ethernet Switch
EH7510
User Manual V 1.0
56
Label
Description
Factory Default
Name
The VLAN ID name that can be assigned by the user.
DEFAULT
VID
Configures the VLAN ID that will be added in static
VLAN table in switch.
The VLAN ID is in the range 2~4094.
Dependant
Member
Ports
Configures the ports to this specific VID.
All Ports
Tagged Ports
Configures the ports that outgoing packet is tagged or
untagged.
Selected: The outgoing packet is tagged from this
port.
Unselected: The outgoing packet is untagged from
this port.
Dependant
Fig. 2.45.b *Example*
Fig. 2.45 and 2.45.b (example), display the current VLAN entry configuration; note that
below there are the corresponding VLAN entries.
Table 2.33
*NOTE:
- Default settings only have VLAN ID on 1.To configure settings for VLAN ID other than 1,
users will have to assign ports to be in that VLAN group.
1. Go to VLAN Setting.
2. Fill in appropriate Name, VID, Member Ports, and Tagged Ports -> click on
Add/Modify.
3. Go to VLAN PVID.
4. Choose the same ports, and enter PVID (which is the same as VID).
Page 63

Atop Industrial Managed Ethernet Switch
EH7510
User Manual V 1.0
57
Label
Description
Factory Default
Port
Select specific ports to be configured the PVID value.
-
PVID
Configures the default 802.1Q VID tag assigned to specific Port.
The VLAN ID is in the range 1~4094.
1
2.11.4 VLAN PVID
Each port is assigned a native VLAN number, the Port VLAN ID (PVID). When an untagged
frame goes through a port, it is assigned to the port’s PVID.
Fig. 2.46 displays the ports’ default VLAN ID; the lower portion allows the user to configure
the port’s PVID.
Table 2.34
Fig. 2.46
Page 64

Atop Industrial Managed Ethernet Switch
EH7510
User Manual V 1.0
58
Label
Setting
Name
VLAN 2
VID 2 Member Ports
Choice Port 1, 2 and 3
Tagged Ports
Choice Port 2 and 3
Add/Modify
Click button after done
2.11.5 Example of using 802.1Q VLAN
To configure 802.1Q VLAN, use the Static VLAN Setting page. For example, set Port 1, 2
and 3 into a VLAN group name VLAN 2 with VID 2 and Port 3 are tagged, Fig. 2.47.
Users should follow below settings:
Table 2.35
To select more than one port, user can simply click the “Ctrl” Key in keyboard
Fig. 2.47
Page 65

Atop Industrial Managed Ethernet Switch
EH7510
User Manual V 1.0
59
2.12 Port Security
2.12.1 Static Port Security
802.1X: is an IEEE standard for port-based Network-Access Control, and it provides an
authentication mechanism to devices wishing to attach to a LAN or WLAN. This protocol
restricts unauthorized clients from connecting to a LAN through ports that are open to the
Internet. The authentication basically involves three parties (Fig. 2.49): a supplicant, an
authenticator, and an authentication server.
- Supplicant: The client device that request access to the LAN.
- Authentication Server: The server that performs the actual authentication. We use
RADIUS (Remote Authentication Dial-In User Service) as the authentication server.
Fig. 2.48
Page 66

Atop Industrial Managed Ethernet Switch
EH7510
User Manual V 1.0
60
- Authenticator: It is a network device that acts as a proxy between supplicant and
authentication server. It passes around information, verifies information with the server,
and relays response to the supplicant.
The authenticator acts like a security guard to a protected network. The supplicant is not
allowed access through the authenticator to the protected side of the network until the
supplicant’s identity has been validated and authorized. With 802.1X authentication, a
supplicant and an authenticator exchange EAP (Extensible Authentication Protocol, an
authentication framework widely used by IEEE). Then the authenticator forwards this
information to the authentication server for verification; if the authentication server confirms
the request, the supplicant (client device) will be allowed to access resources located on the
protected side of the network.
RADIUS: It is a networking protocol that provides authentication, authorization and
accounting management for devices to connect and use a network service.
Fig. 2.49
Page 67

Atop Industrial Managed Ethernet Switch
EH7510
User Manual V 1.0
61
Label
Description
MAC Address
Type the suitable MAC address.
Ports
Choose between ports.
Remove
Option to remove the corresponding MAC address
Add
Click to add a MAC address
VLAN
Specify the corresponding VLAN address to MAC address.
2.12.2 Add Static MAC
Fig. 2.50
Table 2.36
The procedure for adding a MAC address is simple, just type in it in the corresponding field,
choose the VLAN, the Port, and proceed to click on Add. Please remember that a MAC
address cannot be assigned to 2 different ports, this will produce an error message.
Page 68

Atop Industrial Managed Ethernet Switch
EH7510
User Manual V 1.0
62
Label
Description
Factory Default
802.1x
Choose whether to Enable 802.1X for all ports or
not.
Disabled
Radius Server IP
Set Radius server IP address.
192.168.200.99
Server Port
Set radius server port number.
The range is 1024 ~ 65535.
1812
Accounting Port
Set radius accounting port number.
The range is 1024 ~ 65535.
1813
NAS Identifier
Specifies 802.1X Network Access Server (NAS)
identifier string.
Max. 30 characters.
NULL
Shared Key
A key to be shared by EH7510 and the Radius
Server. Both ends must be configured to use the
same key.
Max. 30 characters.
NULL
Confirm Shared
Key
Re-type the Shared Key string.
Dependant
2.12.3 802.1x and Radius
Fig. 2.51
Configuration for 802.1x and Radius server information is shown on Fig. 2.51.
Table 2.37
Page 69

Atop Industrial Managed Ethernet Switch
EH7510
User Manual V 1.0
63
Label
Description
Factory Default
Quiet Period
Waiting time between requests when the
authorization has failed.
Range from 10 to 65535 seconds.
60
Tx Period
Waiting time for the supplicant’s EAP response
packet before retransmitting another EAP request
packet.
Range from 10 to 65535 seconds.
15
Supplicant Timeout
Waiting time for the supplicant response to the
authentication server’s EAP packet.
Range from 10 to 300 seconds.
30
Server Timeout
Waiting time for the authentication server’s
response to the supplicant’s EAP packet.
Range from 10 to 300 seconds.
30
Maximum
Requests
Maximum number of times to retransmit the
authentication server’s EAP request packet to the
supplicant before the authentication session times
out.
Range from 2 to 10 seconds.
2
Reauth Period
Time between periodic re-authentication of the
supplicant.
Range from 30 to 65535 seconds.
3600
2.12.4 802.1.x
Fig. 2.52
802.1x settings and configurations shown in Fig. 2.52.
Table 2.38
Page 70

Atop Industrial Managed Ethernet Switch
EH7510
User Manual V 1.0
64
Label
Description
Factory Default
Port
Set specific ports to be configured.
Option
Mode
Choose from:
FU: specifies forced unauthorized
FA: specifies forced authorized
AU: specifies authorization
NO: specifies disable authorization
FU
2.12.5 802.1x Port
802.1x Port information shown in Fig. 2.53.
Table 2.39
Fig. 2.53
Page 71

Atop Industrial Managed Ethernet Switch
EH7510
User Manual V 1.0
65
Label
Description
Factory Default
DIP Switch
Control
Enables or disables ERPS/iA-Ring/Compatible-Ring
configuration via hardware DIP Switch.
Unchecked
2.13 ERPS/Ring
2.13.1 DIP Switch
Fig. 2.54
This selection allows users to set the DIP Switch control; the DIP switches are located on
EH7510 outer case, so it’s another easy and convenient way to configure ERPS or iA-ring
or Compatible-Ring via DIP Switches (instead of modifying configuration on web browser).
Fig. 2.54 shows the current DIP Switch’s status; the bottom portion allows the user to modify
settings.
Table 2.40
After enabling the DIP Switch Control at DIP Switch page, users can control DIP Switch
following the mode selection below.
Page 72

Atop Industrial Managed Ethernet Switch
EH7510
User Manual V 1.0
66
DIP Switch
Off
On
1
Ring is deactivated
Ring is activate
2
Slave
Master
DIP Switch 3
DIP Switch 4
Ring Type
Off
Off
Select ERPS
Off
On
Select iA-Ring
On
Off
Select Compatible-Ring (only slave mode is
supported)
DIP 1 and 2 definition:
Table 2.41
DIP 3 and 4 definition:
Table 2.42
Factory default setting:
o DIP Switch 1: OFF (Ring is inactive)
o DIP Switch 2: OFF (Slave is selected)
o DIP Switch 3/4: OFF/OFF (ERPS is selected)
DIP switch 1 must be set to the “ON” position to enable DIP switches 2, 3, and 4. If
DIP switch 1 is set to the “OFF” position, then DIP switches 2, 3, and 4 will all be
disabled.
When DIP 1 is set to “ON”, the default ring ports are Port9 and Port10 (Port10 is
RPL port).
When the Compatible-Ring is selected, DIP 2 is unused.
For example, if users want to set this device to be a master in an ERPS Ring, DIP switch 1
and 2 should be on, and DIP switch 3 and 4 should be off. These settings define the device
to be a master with Port10 being RPL in an ERPS ring.
Page 73

Atop Industrial Managed Ethernet Switch
EH7510
User Manual V 1.0
67
R.M. LED
Ring LED
R.M. Definition
Ring Definition
Light on
Light on
There’s a RPL owner.
ERPS enabled.
All rings in normal condition.
ERPS enabled.
Off
On
No RPL owner.
ERPS disabled.
All rings in normal condition.
ERPS enabled.
Off
Off
No RPL owner.
ERPS disabled.
ERPS disabled.
Off
Blinking
No RPL owner.
ERPS disabled.
Ring in protection state.
ERPS enabled.
On
Blinking
There’s a RPL owner.
ERPS enabled.
Ring in protection state.
ERPS enabled.
LED Indicators of DIP Switch are as below,
Fig. 2.55
EH7510 is designed with two LEDs on the outer case for indicating current DIP switches’
status; these LEDs are for Ring and Ring Master as shown above (Fig. 2.55). There are
four possible outcomes, and each outcome indicates different ring status; these four
circumstances are addressed below.
Table 2.43
2.13.2 ERPS
Ethernet Ring Protection Switching (ERPS) is a protocol for Ethernet layer network rings,
and it specifies protection mechanism. The ring topology provides multipoint connectivity
economically by reducing number of links. ERPS provides highly reliable and stable
protection in the ring topology, and it never forms loops, which can affect network operation.
Page 74

Atop Industrial Managed Ethernet Switch
EH7510
User Manual V 1.0
68
RPL
Fig. 2.56
As Fig. 2.56 shows, each Ethernet Ring Node is connected to adjacent Ethernet Ring
Nodes participating in the same Ethernet Ring using two independent links (i.e. two ways).
In the Ethernet ring, loops can be avoided by guaranteeing that traffic may flow on all but
one of the ring links at any time. This particular link is called Ring Protection Link (RPL). A
control message called R-APS coordinates the activities of switching on/off the RPL. Under
normal conditions, this link is blocked by the Owner Node. Thus loops can be avoided by
this mechanism. In case an Ethernet ring failure occurs, the RPL Owner node will be
responsible to unblock its end of the RPL to allow RPL to be used for traffic. The RPL is as
the backup link when one link failure occurs.
Fig. 2.57
Page 75

Atop Industrial Managed Ethernet Switch
EH7510
User Manual V 1.0
69
Label
Description
Factory Default
ERPS
Choose whether to enable ERPS or not.
Disabled
Log
Choose to enable log.
Enabled
UERPS
Choose whether to enable UERPS.
When UERPS is enabled, ring ports periodically
sent a “heartbeat” packet to peer ring ports in order
to determine whether the link path (etc. wireless
bridge) is failure or alive.
If peer ring port cannot receive “heartbeat”
packets over 3 packets, the ring port will enter
protection state.
Note: This function affect the recovery time to
more than 20 ms.
Disabled
Heartbeat Interval
Set the Heartbeat Interval.
Range from 50 to 10000 milliseconds.
500 ms
RAPS VLAN
Create the ring by specifying the R-APS VLAN ID of
the ring.
VLAN ID ranges from 1 to 4094.
None
ERPS settings are shown on Fig. 2.57; users should disable the DIP Switch Control first in
order to set up ERPS parameters.
Table 2.44
After enabling the ERPS and adding a RAPS VLAN, users can click on for
more details and configurations, which are shown on Fig. 2.58.
Fig. 2.58
Page 76

Atop Industrial Managed Ethernet Switch
EH7510
User Manual V 1.0
70
Label
Description
Factory Default
ERPS VLAN
Indicate current RAPS VLAN ID.
None
Status
Choose to enable ERPS with this particular VLAN.
Disabled
West Port
Choose the West Port of the RPL.
Port9
East Port
Choose the East Port of the RPL.
Port10
RPL Owner
Choose to enable Owner Function.
Disabled
RPL Port
Select the Owner Port.
None
WTR Timer
Set the wait-to-restore (WTR) time of the ring in
minutes. Lower value has lower protection time.
Range from 0 to 12 minutes.
0
Holdoff Timer
Set the holdoff time of the ring.
Range from 0 to 10000 milliseconds.
0
Guard Timer
Set the guard time of the ring.
Range from 0 to 2000 milliseconds.
500
MEL
Set the maintenance entity group level (MEL) of the
ring.
Range from 0 to 7.
1
Propagate TC
Indicate the topology change propagation of the ring
ability.
Enabled
EH7510
A EH7510
B
RAPS VLAN
8 RAPS VLAN
8
ERPS RAPS
Enabled
ERPS RAPS
Enabled
West Port
1 West Port
1
East Port
2 East Port
2
RPL Owner
Enabled
RPL Owner
Disabled
RPL Port
West
RPL Port
none
Table 2.45
Using the same example as above, configurations of two switches can be set up individually
as follows:
Table 2.46
Fig. 2.59
Page 77

Atop Industrial Managed Ethernet Switch
EH7510
User Manual V 1.0
71
EH7510
C EH7510
D
RAPS VLAN
8 RAPS VLAN
8
ERPS RAPS
Enabled
ERPS RAPS
Enabled
West Port
1 West Port
1
East Port
2 East Port
2
RPL Owner
Disabled
RPL Owner
Disabled
RPL Port
none
RPL Port
none
Table 2.47
2.13.2.1 UERPS Settings (optional)
1. Prepare two EH7510 (EH7510 A and EH7510 B). We will use Port 7 and Port 8 on both
EH7510 for redundancy.
2. Connect EH7510 A and EH7510 B to the network or PC so you can access them. For
simplicity you can use Port 1 for Web configuration on both switches.
3. Open SwitchView (Management Utility) and change the IP of EH7510 B or both
switches, so the IP won’t be conflicting.
4. Open EH7510 A and B’s WebUI and setup ERPS settings like the following. You just
need to enable ERPS, Log, and UERPS. You need to press “Update” for the changes to
take effect.
Fig. 2.60
Page 78

Atop Industrial Managed Ethernet Switch
EH7510
User Manual V 1.0
72
5. On EH7510 A, Click “Configure” on RAPS VLAN and setup as the below figure.
Fig. 2.61
6. Open EH7510 B’s WebUI and setup ERPS settings like the following.
7. Connect EH7510 A’s Port 7 to EH7510 B’s Port 8. Connect EH7510 A’s Port 8 to
EH7510 B’s Port 7 (like cross-over) for the redundancy port.
8. If everything is setup properly, you will find EH7510 A to have the following ERPS state.
It will automatically block Port 8 to prevent network loop.
9. Now you can add any other bridge that you want in between the two EH7510s.
Fig.2.62
Fig. 2.63
Page 79

Atop Industrial Managed Ethernet Switch
EH7510
User Manual V 1.0
73
Trick: If you want to test the real throughput of your wireless bridge, you can find this
function under Port tically block Port 8 to prevent network loop.the changess failure or
alive.ing, loops can be avoided by guarant
Fig. 2.64
2.13.3 iA-Ring
EH7510 is designed to be compatible with iA-Ring protocol for providing better network
reliability and faster recovery time for redundant ring topologies; it is in the same category as
R Rings, but with its own protocol. It has been a successful development that reduces
recovery time to less than 20 ms. iA-Ring can be used for any single ring, which is shown on
the picture below (Fig. 2.65).
Fig. 2.65
Page 80

Atop Industrial Managed Ethernet Switch
EH7510
User Manual V 1.0
74
Label
Description
Factory Default
iA-Ring
Enable iA-Ring or disable iA-Ring.
Disabled
Ring Master
Enabled: Master Mode.
Disabled: Slave Mode.
Disabled
1st Ring Port
Select the primary port for the Ring.
Port9
2nd Ring Port
Select the backup port for the Ring.
Port10
Fig. 2.66
Fig. 2.66 shows iA-Ring redundancy protocol; users should disable DIP Switch Control and
ERPS first in order to enable/configure iA-Ring parameters on a web browser.
Table 2.48
Page 81

Atop Industrial Managed Ethernet Switch
EH7510
User Manual V 1.0
75
Label
Description
Factory Default
Compatible-Ring
Enables Compatible-Ring or disable CompatibleRing.
Disabled
1st Ring Port
Selects the primary port for the Ring.
Port7
2nd Ring Port
Selects the backup port for the Ring.
Port8
2.13.4 Compatible-Ring
Compatible-Ring is similar as iA-Ring, the only difference being it can be used for MOXA
rings as well. To get more details of this redundant ring protocol, please contact Atop.
Fig. 2.67
Fig. 2.67 shows how to set the Compatible-Ring redundancy protocol; users should disable
DIP Switch Control and ERPS first in order to enable/configure Compatible-Ring parameters
on the web browser.
Table 2.49
Page 82

Atop Industrial Managed Ethernet Switch
EH7510
User Manual V 1.0
76
2.13.5 U-Ring
U-Ring (Unicast Ring) Setup
Fig. 2.68.a *Example of a 2-bridge U-ring*
This configuration is for access between 2 points; in this example each point is connected to
the Access Points by an Ethernet LAN line and these in turn are connected by Wireless
Bridges 1 and 2. In the figure below, the same protocol is used instead of a wireless
connection between the Access Points there is a physical line.
Fig. 2.68.b
Page 83

Atop Industrial Managed Ethernet Switch
EH7510
User Manual V 1.0
77
Label
Description
Factory Default
Operation Status
Shows whether the device’s state is normal or
protected.
Dependant
1st Ring Port
Status
Displays the 1st ring port’s status.
Forwarding
2nd Ring Port
Status
Displays the 2nd ring port’s status.
Forwarding
U-Ring
Shows whether the Unicast ring is working.
Disabled
Ring Master
Shows whether the device is a slave or master on
this ring. For Slave option leave it as disabled.
Disabled
1st Ring Port
Displays whether this Ethernet port is being used for
the corresponding ring’s port.
Port 1
2nd Ring Port
Displays whether this Ethernet port is being used for
the corresponding ring’s port.
Port 2
Heartbeat Expire
Time interval between checking-packets.
1000
U-ring protocol could be used in the above environment, the APx could be:
Dump-switch
Transceiver
XDSL bridge
Care should be taken that if a dump-switch is used as an AP (Access Point) the one in the
other side must be a dump-switch as well; again care should be taken when connecting the
cables to the ports.
The main screen will look as follows.
Table 2.50
Fig. 2.69
Page 84

Atop Industrial Managed Ethernet Switch
EH7510
User Manual V 1.0
78
Label
Description
Factory Default
LLDP
Choose to either enable or disable LLDP.
Enabled
Tx Interval
To set the transmit interval of LLDP messages.
Range from 5 to 65535 seconds.
30
TxTTL
Tx Time-To-Live.
Amount of time to keep neighbors’ information. The
recommend TTL value is 4 times of Tx Interval.
Range from 5 to 65535 seconds.
120
2.14 LLDP
2.14.1 LLDP
Link Layer Discovery Protocol (LLDP) is an IEEE standard OSI layer-2 protocol. It’s used by
network devices for advertising their identity, capabilities, and neighbors’ information on a
local area network. It allows each network device, e.g. an EH7510 switch, to inform its
neighbors about its information and configurations periodically. As a result, all of the
networks devices would discover their neighbors across connected network links using this
standard mechanism.
Fig. 2.70 allows users to have options for enabling or disabling the LLDP, as well as setting
LLDP transition parameters. This function should be enabled if users want to use Device
View to monitor the switches’ topology of the whole network. For information of using Device
View, please refer to Chapter 4.
Table 2.51
Fig. 2.70
Page 85

Atop Industrial Managed Ethernet Switch
EH7510
User Manual V 1.0
79
Label
Description
Port
Indicates particular port number of the switch.
Chassis ID
Indicates the identity of the neighbor of this particular port.
Port ID
Indicates the port number of this neighbor.
Port Description
Shows a textual description of the neighbor port.
System Name
Indicates the system name/ hostname of the neighbor.
System Description
Shows a more detailed description of the neighbor’s system.
Management
Address
Indicates neighbor’s management IP address.
2.14.2 Neighbors
Fig. 2.71.a
Fig. 2.71.b *Example*
Fig. 2.71 allows users to view the information of each neighbor close to this switch, and its
example on Fig. 2.71.b.
Table 2.52
Page 86

Atop Industrial Managed Ethernet Switch
EH7510
User Manual V 1.0
80
2.15 System Warning
It is important for network administrators to know what’s happening in their networks, and
know where the events are happening. However, it is difficult to locate network devices that
are at the endpoints of systems. Thus Ethernet switches connected to these devices play an
important role of providing first-moment alarm messages to system administrators. This
means network administrators can be informed instantaneously when accidents happen.
EH7510 uses email and relay output to provide fast and reliable warn alerts for administrators.
2.15.1 Warning Event Selection
There are three different types of events: Port Events, Power Events, and System Events.
Port Events (Fig. 2.72), are related to the activities of a certain port, Power Events, keep
track of power status of the switch, and System Events, are related to the overall
functionalities of the switch.
Fig. 2.72
Page 87

Atop Industrial Managed Ethernet Switch
EH7510
User Manual V 1.0
81
Label
Description
Factory
Default
Port
Indicates the port number.
Port state event
Disable: Disables alarm function, i.e. no alarm
message will be sent.
Link Up: Alarm message will be sent when this
port/link is up and connection begins.
Link Down: Alarm message will be sent when this
port/link is down and disconnected.
Link Up /Down: Alarm message will be sent
whenever there’s a change, i.e. connection begins or
connection disrupted.
Disabled
Label
Description
Factory
Default
Power
Indicates specific power supply.
Power status event
Disable: Disables alarm function.
Power On: Sends an alarm when power is turned on.
Power Off: Sends an alarm when power is turned off.
Disabled
Label
Description
Factory Default
System log event
Disable: Disable power status detection.
0: (LOG_EMERG): Enable log level 0~7 detection.
1: (LOG_ALERT): Enable log level 1~7 detection.
2: (LOG_CRIT): Enable log level 2~7 detection.
3: (LOG_ERR): Enable log level 3~7 detection.
4: (LOG_WARNING): Enable log level 4~7 detection.
5: (LOG_NOTICE): Enable log level 5~7 detection.
6: (LOG_INFO): Enable log level 6~7 detection.
7: (LOG_DEBUG): Enable log level 7 detection.
See note below for specific log level description.
Disabled
Table 2.53
Table 2.54.a
Table 2.54.b
*NOTE:
- Log levels are inclusive. In other word, when log level is set to 0, alarm is triggered
whenever 0, 1, 2… 6, and/or 7 happen. When log level is set to 5, alarm is triggered
whenever 5, 6, and/or 7 happen.
0: Emergency: system is unstable
1: Alert: action must be taken immediately
2: Critical: critical conditions
3: Error: error conditions
4: Warning: warning condition
5: Notice: normal but significant condition
6: Informational: informational messages
7: Debug: debug-level messages
Page 88

Atop Industrial Managed Ethernet Switch
EH7510
User Manual V 1.0
82
2.15.2 Alert Warning Events
EH7510 warns its users in case any event occurs; a table in this section displays the
warning events (as shown in Fig. 2.73.b as an example). A short alarm message on the top
portion of the web browser interface; users can click the “Alarms!” to hyperlink to the
“Warning Events” web page. For example, the top of web page now displays “2 Alarms!”.
We can click the “2 Alarms!” to see the events. In this example, “2 Alarms!” means there
two events occurred:
1. port4 is down
2. port5 is up.
Fig.2.73.a
Fig. 2.73.b
Page 89

Atop Industrial Managed Ethernet Switch
EH7510
User Manual V 1.0
83
Label
Description
Factory
Default
Clear Relay Alarm
Sets Hardware Relay Alarm to off.
Relay is off
Clear All Warning
Events
Clears all warning events that are displayed.
Table 2.55
2.15.3 SMTP Settings
Simple Mail Transfer Protocol (SMTP) is an internet standard for email transmission across
IP networks. In case any warning events occur, the system can send an alarm message to
users through email. Here, users will be allowed to modify email-related settings for system
alarm, (Fig. 2.74.a 2.74.b).
Fig. 2.74.a
Page 90

Atop Industrial Managed Ethernet Switch
EH7510
User Manual V 1.0
84
Label
Description
Factory
Default
SMTP Server Address
Configure the IP address of email server
NULL
Sender E-mail Address
Configure the sender e-mail address.
NULL
Mail Subject
Type the subject of this warning message.
Max. 31 characters.
NULL
Authentication
Enable or disable authentication login.
If enabled, server will need authentication to
login; users will also need to setup username
and password.
Checked
Username
Set the user name (or account name) to login.
Max. 31 characters.
NULL
Password
Set the account password for login.
Max. 15 characters.
NULL
Recipient E-mail Address
1
Set the first receiver’s E-mail address.
NULL
Recipient E-mail Address
2
Set the second receiver’s E-mail address.
NULL
Recipient E-mail Address
3
Set the third receiver’s E-mail address.
NULL
Recipient E-mail Address
4
Set the fourth receiver’s E-mail address.
NULL
Save Configuration
Update these modifications.
Send Test E-mail
A test email can be sent to recipient to check
accuracy.
Table 2.56
Fig. 2.74.b
2.16 Diagnosis
EH7510 provides a Ping function, which is a simple but useful tool, for troubleshooting network problems, (next page Fig.2.75.a, b, c, d).
Page 91

Atop Industrial Managed Ethernet Switch
EH7510
User Manual V 1.0
85
2.16.1 Ping
Fig. 2.75.a
Fig. 2.75.b
Users can assign IP address or domain name to verify the network connectivity. After typing
the IP address/name, please click button to start the ping function; an example
is shown below.
Fig. 2.75.c
Page 92

Atop Industrial Managed Ethernet Switch
EH7510
User Manual V 1.0
86
Users will have the following result for a failed ping.
Fig. 2.75.d
*Note:
If users assign domain name instead of IP address, they should assign DNS* first. This can
be done through Administration > IP Settings. An example is shown below.
Fig. 2.76
2.17 System Log
This function contains two pages, Syslog and Event Log.
2.17.1 Syslog
Fig. 2.77 shows Syslog related settings configuration. The actual log event recorded will be showed in Event Log on next page.
Fig. 2.77
Page 93

Atop Industrial Managed Ethernet Switch
EH7510
User Manual V 1.0
87
Label
Description
Factory
Default
Enable Log Event to
Flash
Checked: Saving log event into flash memory.
The flash memory can keep the log event files
even if the switch is rebooted.
Unchecked: Saving log event into RAM
memory. The RAM memory cannot keep the log
event files after each reboot.
Uncheck
Log Level
Set the log level to determine what events to be
displayed on the next page (Event Log). Level
selected is inclusive.
For example, if 3 :(Log_ERR) is selected, all 0,
1 , 2 and 3 levels will be implied.
3: (LOG_ERR)
Enable Syslog Server
Checked: Enable Syslog Server.
Uncheck: Disable Syslog Server.
If enabled, all log events recorded will be sent to
the remote Syslog server.
Uncheck
Syslog Server IP
Set the IP address of Syslog server
0.0.0.0
Syslog Server Service
Port
Set the service port number of Syslog server
514
Table 2.57
2.17.2 Event Log
Fig. 2.78
Fig. 2.78 is an example of all of the events logs; they are sorted by date and time.
Page 94

Atop Industrial Managed Ethernet Switch
EH7510
User Manual V 1.0
88
Label
Description
Index
Indicates the index of a particular log event.
Date
Indicates the system date of this event has occurred.
Time
Indicates the system time of this event has occurred.
Startup Time
Indicates how long the system has been up since this
event occurred.
Level
Indicates the level of this event.
Event
Details description of this event.
Displays events on the last page.
Next page.
Click to display all events.
Click to clear all events
Table 2.58
Page 95

Atop Industrial Managed Ethernet Switch
EH7510
User Manual V 1.0
89
2.18 System
This function includes the following:
Backup/restore
Firmware upgrade
TFTP
Factory default
Reboot
2.18.1 Backup/Restore
Backup: Download the current EH7510 configuration to the computer as well as save it.
Fig. 2.79
Page 96

Atop Industrial Managed Ethernet Switch
EH7510
User Manual V 1.0
90
Restore: Upload EH7510 configuration to EH7510 unit from the computer, it will replace the
older configuration on EH7510.
Fig. 2.80
*Notes:
There’re two options which can store the username, password or network configuration, it
will prevent the user who can’t login due to a different username, password or network
configuration after settings are restored!
2.18.2 Firmware Upgrade
Select EH7510 firmware from the computer, and upgrade it via web interface.
Fig. 2.81
Page 97

Atop Industrial Managed Ethernet Switch
EH7510
User Manual V 1.0
91
2.18.3 TFTP
Trivial File Transfer Protocol. This protocol is designed to be small and easy to implement.
EH7510 allows users to upload configuration settings to a TFTP server, and users can also
download these settings when needed from the server.
Fig. 2.82.a
Fig. 2.82.b
Page 98

Atop Industrial Managed Ethernet Switch
EH7510
User Manual V 1.0
92
Label
Description
Factory
Default
TFTP Server IP Address
Sets the IP address or remote TFTP server
domain name.
NULL
Configuration File Name
Type in the name of the file to be uploaded or
downloaded.
NULL
Click to start download remote configuration into
Switch.
-
Click to start upload Switch configuration to
remote TFTP server.
-
This selection allows users to save the current configuration file to a remote TFTP server, or
replace download a configuration setting which already exits from a TFTP server.
Table 2.59
2.18.4 Factory Default
Users can reset EH7510 to default factory settings by clicking Reset.
Fig. 2.83
Page 99

Atop Industrial Managed Ethernet Switch
EH7510
User Manual V 1.0
93
2.18.5 Reboot
EH7510 provides an easy reboot function that only requires one click.
Fig. 2.84
Page 100

Atop Industrial Managed Ethernet Switch
EH7510
User Manual V 1.0
94
Chapter 3: Configuring with a Serial Console
EH7510 switch can also be configured by using serial console; this method is similar to the
web browser one. The options are the same, so users can take the same procedures as
those examples in Chapter 2.
3.1 Serial Console Setup
After users install Tera Term, perform the following steps to access the serial console utility.
1. Start Tera Term. In New Connection window, select serial and appropriate port.
2. Click Setup -> Serial Port.
Fig. 3.1
Fig. 3.2
 Loading...