


Atop Technologies
www.cloudproof.com.tw
CLOUDPROOF USER MANUAL
MODEL-APPLIED: M SERIOUS
APPLICABLE VERSION: 2.0.X

CLOUDPROOF USER MANUAL
1
Directory
Version Claims, Version Acknowledgement .......................................................................... 2
Chapter 1. Introduction and Quick Install........................................................................... 3
1-1. Production Introduction ........................................................................................ 3
1-2. Hardware Installation introduction ....................................................................... 4
1-3. Network Environment setup ................................................................................. 6
Chapter 2. Account management ....................................................................................... 9
2-1. Google Apps Registration ...................................................................................... 9
2-2. Account creation and modification ..................................................................... 12
2-3. Account synchronization ..................................................................................... 17
Chapter 3. User Interface ................................................................................................. 20
3-1. Login Page ........................................................................................................... 20
3-2. Mail function .............................................................................................................. 32
3-3. File function ......................................................................................................... 40
3-4. Contacts ............................................................................................................... 43
Chapter 4. Administrator Page ......................................................................................... 46
4-1. Network Setup and Net Management ................................................................ 46
4-2. System setup ....................................................................................................... 55
4-3. Diagnostic function .............................................................................................. 57
4-4. Configuration File and Firmware upgrade .......................................................... 59
Chapter 5. Advanced Application ..................................................................................... 62
FAQ ........................................................................................................................................ 62

CLOUDPROOF USER MANUAL
2
Version Claims, Version Acknowledgement
Legal Notices
Trademarks
Trademarks used in this text: Google and Google Apps are trademarks of Google
Corporation.
Standards Compliance
CE/FCC.
Acknowledgments
This product includes software developed by the At mail project
(http://atmail.org) which is under the Apache 2.0 Open Source license
http://www.apache.org/licenses/LICENSE-2.0.html
This product includes software developed by the ElFinder project
(http://elrte.org/elfinder) which is under the 3-clauses BSD license
http://www.opensource.org/licenses/BSD-3-Clause.

CLOUDPROOF USER MANUAL
3
Chapter 1. Introduction and Quick Install
1-1. Production Introduction
The Main purpose of ClouldProof M serious is to help organizations manipulate
cloud computing infrastructure in a flexible and reliable way, while they deploy
cloud service. Also, a value added service can be achieved by utilizing a hybrid cloud
model that makes the interoperability between public and private cloud.
ClouldProof M serious versions provide the interoperability with Google Apps. In a
common deployment, the CloudProof appliance is placed at an organization’s data
center with an IP configured that computers located in the organization can directly
connect to it.
The hardware installation is introduced in sectionn1-2, while the network setup is
introduced in section 1-3. Next, CloudProof M serious requires the creation of
information related to the public cloud. Section 2-1 includes configurations for
setting up connection with Google Apps. Section 2-2 includes configurations to
establish user account. After that, users can login CloudProof M serious, and begin
to use the related functions; please refer to chapter 3 for the detailed configuration.
Administrators can configure and manage the network and storage related functions
of CloudProof M serious; please refer to Chapter 4 for the detailed configuration.

CLOUDPROOF USER MANUAL
4
1-2. Hardware Installation introduction
1. Front panel introduction
Fig. 1-4
Main Part
Ethernet Port: 6 Ethernet ports including both M1000 and M2000 serious.
Console Port: 8-pin serial port interface, for vender maintenance.
POWER: LED showing green light, indicates the appliance is at booting
status.
H.D.D: LED showing fleshing light, indicates the system is reading or
storing data from to to the built-in hard disk.
LCD: LCD interface provides simple information for management use.
Button1~4: 4 buttons for controlling LCD interface.
Reserved Part(current not used)
B/P1, B/P2: Bypass LED, Green light indicates normal mode, red light
indicates bypass mode.
USB: 2 USB ports
RESET:Reset hidden button

CLOUDPROOF USER MANUAL
5
2. Rear panel introduction
Fig. 1-5
Ethernet port usage description
There are 6 Ethernet ports, and each has its respective function as below:
Port 1: Failover link port, Provides for Backup network link.
Port 2: Basic Link port
Port 3: Basic Link port
Port 4: Basic Link port
Port 5: Admin port, for administrator link use, default ip is 192.168.119.119.
Port 6: HA port, For High Availability function
Install introduction
There are 2 built-in hard disks which have been formatted for access by the
host. First time using this machine; please use Ethernet cable to connect to the
5th port on the host from a PC or NB which you use to configure the host. Since
the default IP of the host is 192.168.119.119, so it is necessary to configure the
PC or NB’s IP as 192.168.119.xxx, then connecting to the host’s web page and
starting to setup the network.

CLOUDPROOF USER MANUAL
6
1-3. Network Environment setup
1. First, please connect to the 5
th
port on the host from the administrator’s
computer, directly or through a switch. Then, change the IP address of the
administrator’s computer to 192.168.119.2, subnet mask to 255.255.255.0,
as through Control Panel -> Network Link -> LAN -> Content, (refer to Fig.
1-5).
Fig. 1-5
2. Start web browser (IE or Firefox), and key in the URL as
http://192.168.119.119, then the login page will show up.
3. Since the default administrator’s account name is “admin”, on the login page,
key in “admin” as User Name and its default password “XXXXXXXX” as
Password. Then press “Login”.
CLOUDPROOF USER MANUAL
7
Fig. 1-6
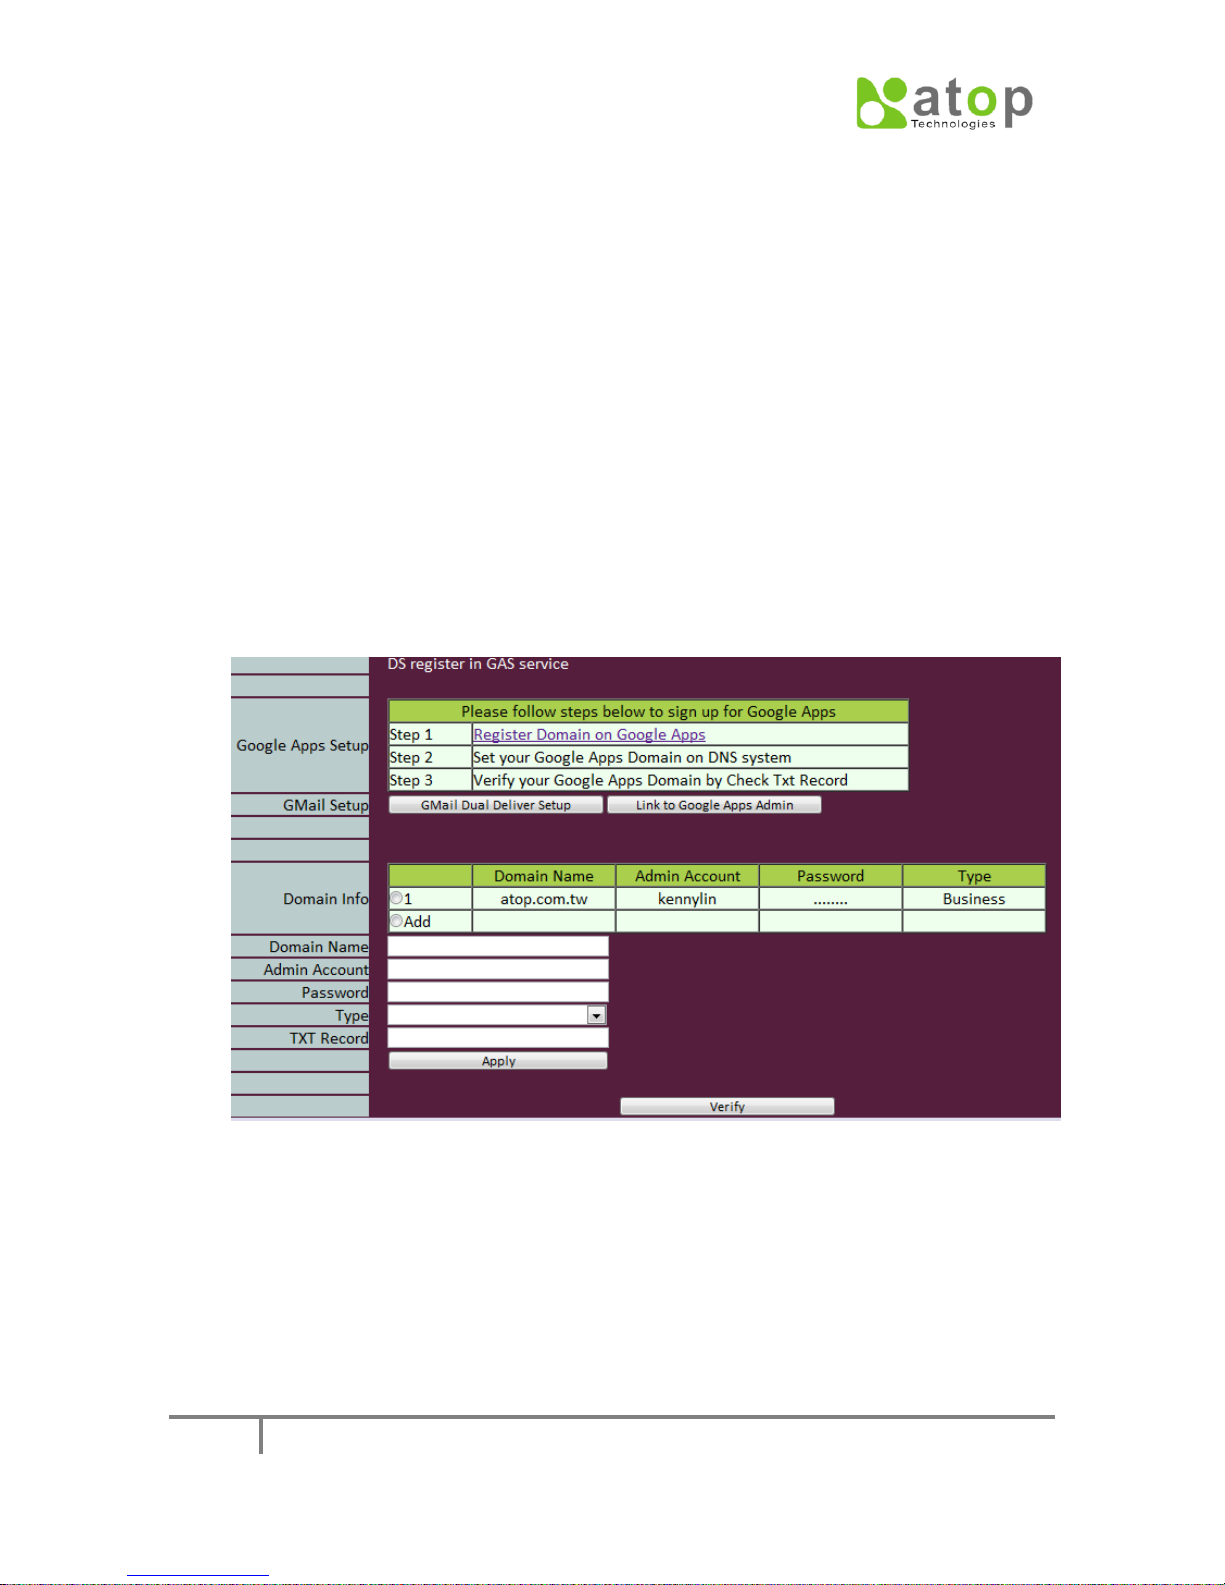
4. After successful Login, it will show up the Admin system setup page. There
are 2 parts on it, Menu section and Data setup section.
Menu Section
All of the function menu lists are here; they are designed as 2 layer menu.
Data setup Section
That’s where we configure the related parameter items.
Fig. 1-7

CLOUDPROOF USER MANUAL
8
5. Setup the basic network connectivity function: Network Setup -> Basic Net
Setup
Select NIC
Select which port to setup for service (Please use an additional cable to
connect this port to a switch).
CloudProof IP
Setup the IP address for providing the CloudProof service.
Subnet Mask
Setup the subnet mask
Gateway
Setup the Gateway IP.
Every entry needs be configured, and then press “Apply”.
6. So far, in order to verify the configuration processes are right, we can
change the previous administrator computer’s IP to an IP within the same
LAN as configured in STEP 5, and then connect the computer to the
configured service port, starting web browser and keying in the URL as the
configured service IP, and then make sure if the CloudProof login page
shows up.
CLOUDPROOF USER MANUAL
9
Chapter 2. Account management
2-1. Google Apps Registration
Google Apps registration includes 2 parts, to register your domain on Google and to
certify your domain using DNS. Then configure to store the registered domain related
information in CloudProof. And then open the mail service under the registered domain
on Google APPS, so now CloudProof can begin to synchronize with.
1. Register your Domain on Google APPS
Login to Admin page, click through “Google APPS -> DS Register in GAS Service”,
then the following page will show up.
2. Notice that, if you haven’t registered Domain on Google APPS, at first, you need
to press “Register Domain on Google APPS” to register your Domain. If you
already have Google APPS Domain, please go to step 3 directly. Now, we assume
you haven’t, so please press “Register Domain on Google APPS”. It will lead you
to the Domain registering page on Google APPS as below; here please follow
Google APPS’s registering steps.
Fig. 2-1

CLOUDPROOF USER MANUAL
10
Fig. 2-2
3. Key in Google APPS’s Domain related information on CloudProof. You can use
“Verify” to help make sure a successful certification of Google APPS Domain.
Key in the Domain Name, Admin Account, Password, Type and TXT Record.
Refer to the following figure.
Fig. 2-3
Domain Name
Key in your registered Domain Name on Google APPS.
Admin Account
Key in the Domain’s administrator’s account.
Password
Key in the Password of the administrator’s account.
Type
Key in the Type of the Domain (current available options are Free,
Business and Other).
TXT Record
Key in the Domain certification string you provided on Google APPS.(This is
for CloudProof to help certify the Domain. If you make sure that the Domain
has been certified or that the certification string been lost, please directly key
CLOUDPROOF USER MANUAL
11
in “CloudProof-Verify”as the replacing string.
Verify
After pressing “Apply” to apply the Domain, you could press this button, and
then CloudProof will use the string you typed in “TXT Record” to help certify
your registering Domain on Google APPS.
All the entries need be configured, after that, press “Apply” to apply the
domain.
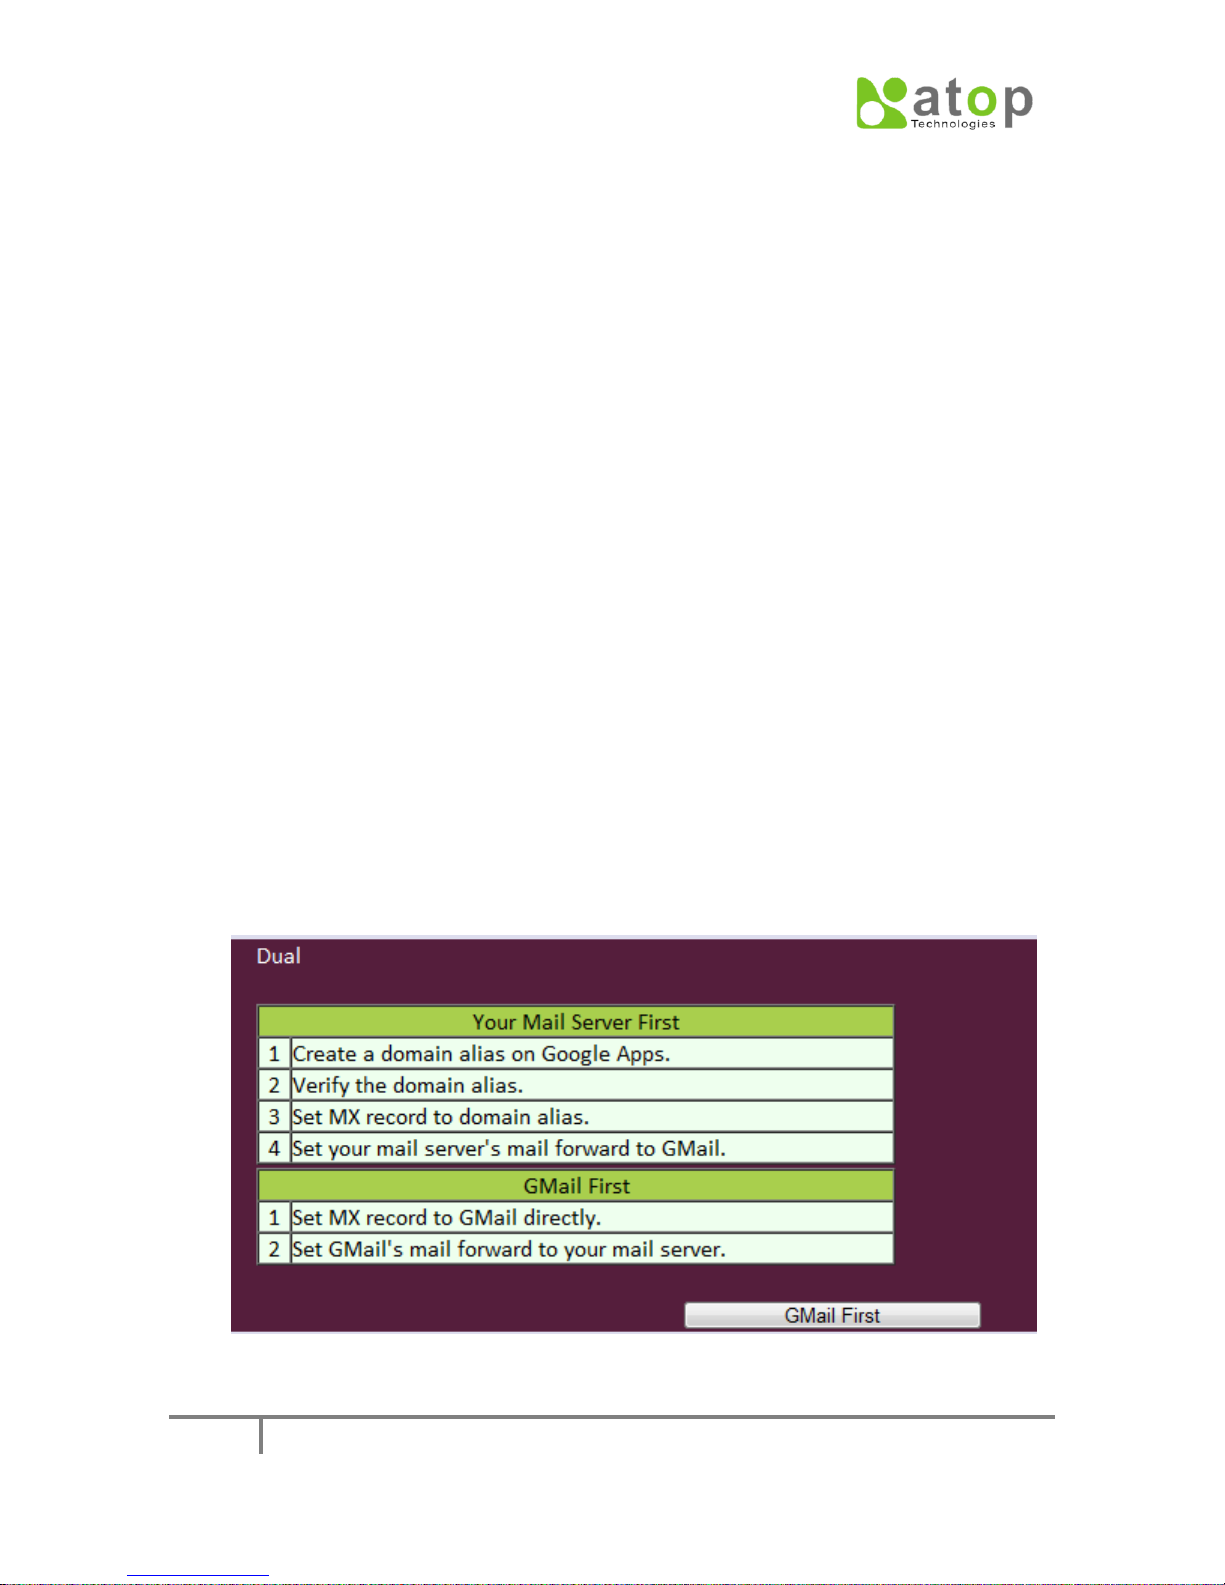
4. Mails Migration
As long as the registered Domain has been successfully certified by Google
APPS, the Google APPS’s Mail service becomes available for use. If you still
want your original Email server remaining active for service, and don’t want a
onetime completely transfer, then you have the choice to use the “Gmail Dual
Deliver” way. We provide a simple tutoring for using this function. Pressing
“Gmail Dual Deliver Setup” to enter the Google APPS Email configuration
tutoring page; refer to the following figure Fig. 2-4. You have 2 choices to use
this function. One is “Your Mail Server First”, which will use your original Email
server to forward mails to Google APPS’s alias Domain (Domain alias). The
other one is “Gmail First”; in this choice, the DNS MX will be configured to
resolve to Google APPS directly, and mails will be forward to your original
Email server.
After you complete the configuration, you can press the “Gmail Verify” button.
Then CloudProof will send a testing mail to the Domain administrator’s mail
box which you registered on Google APPS. So once you receive such a confirm
mail, then you can make sure you have configured your mail service
successfully.
Fig. 2-4
CLOUDPROOF USER MANUAL
12
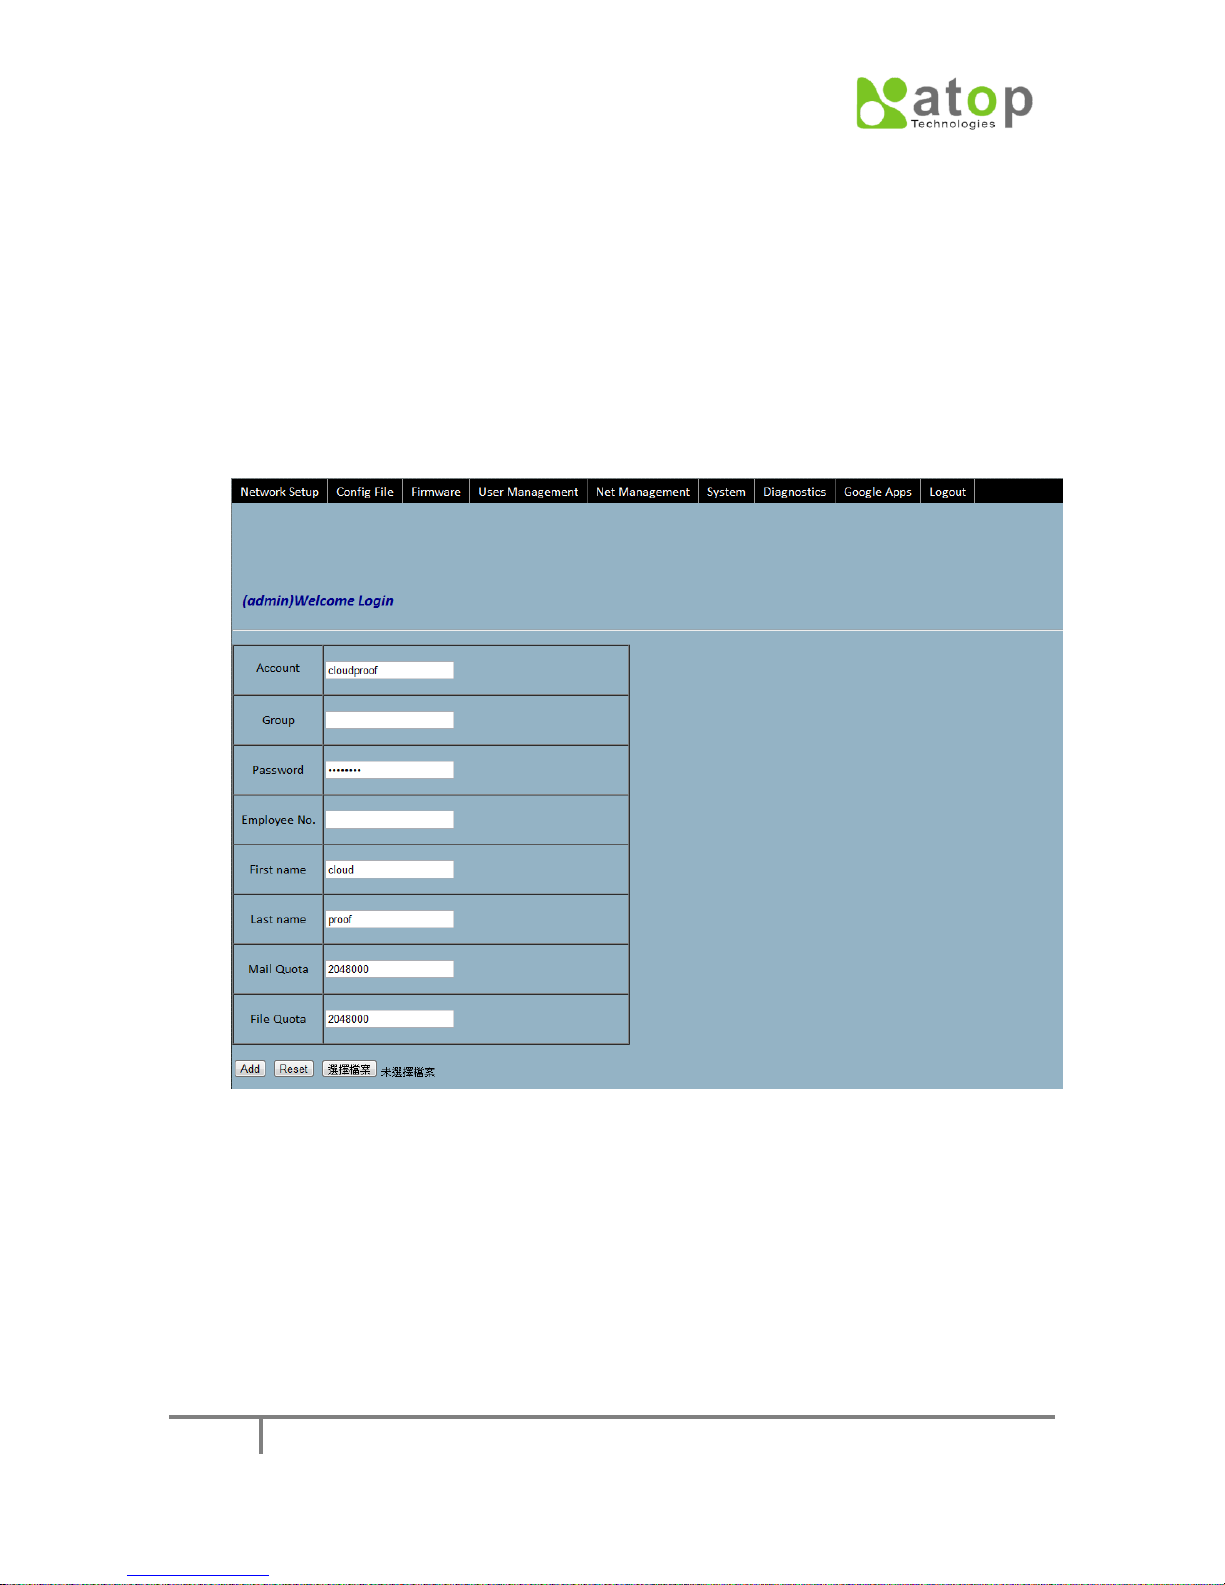
2-2. Account creation and modification
1. Account Creation
Before create the account, please make sure the Google APPS Domain
management configuration have been setup successfully, otherwise the
account could not be created. There are 2 ways to create accounts, one is
manually keying in, the other is importing from a csv format file. The menu
item for account creation is “Create” under “User Management”, entries for
manually keying in is referred to as following figure:
Each entry’s explanation is as below:
Account*: The account id to be created.
Group: The Group which the account belongs to.
Password*: The password for this account, at least 8 characters.
Note:
Administrator may not know all users’ passwords of cloud service (i.e. Google
Apps) or account server (i.e. LDAP), therefore, he/she can key 8 digitals
temporary passwords first. Once users login to CloudProof with their correct
passwords, CloudProof will check with Google Apps site or account server
and automatically update by the correct passwords.
Fig. 2-5

CLOUDPROOF USER MANUAL
13
Employee No.: Employee number of this user if any.
First name*: fist name of this employee
Last name*: last name of this employee
Mail Quota*: The upper limit of the mail capacity of this account, unit at KB. For
example, 2048000 are 2G.
File Quota*: The upper limit of the file capacity of this account, unit as KB.
Note:
Entries marked with * must be filled in.
After completing the entries keying, Click “add” bottom, the newly added
account will show up in the “Alter accounts list” table at the bottom of this
configuration page.
“Alter accounts list” is only a temporary area where you can check newly changed
contents reflecting “add” or “modify” actions did on accounts. It is necessary to
press the “save” button, so that permanent change to accounts can be executed.
In “Alter accounts list” table, check the check boxes before the accounts to be
added, and then press the “Save” button so that the permanent adding action be
done on the accounts. This process will cause a period of waiting time, referred as
the following figure.
Fig. 2-6
Accounts which have been successfully added will show in the User Management ->
List table. Accounts failed to be added will show in the “Alter accounts list” table
under User Management -> Create menu item, and failed reasons also be
displayed.
The other way to add accounts is through cvs format file importing. On the account
entry page opened through User Management -> Create, press “file select” button
to select on the local host the csv file to be imported, and then press “Add” button
to start importing the accounts.

CLOUDPROOF USER MANUAL
14
username
first name
last name
password
ckhero
Ck
Hero
12345678
jeanmaka
Jean
maka
12345678
kawasaki
Kawasaki
Misu
12345678
markchu
Mark
Chu
12345678
jerrywu
Jerry
Wu
12345678
paulyang
Paul
Yang
12345678
CSV format may look like as below:
The outcome of the importing will show in the “Alter accounts list” table. In this list,
check the accounts to be added, and then press “Save” to start the actual adding
action.
2. Accounts maintain
The way we modify an account is through User Management -> List menu item, in
the User Listing table, select the account to be modified and press “Modify”.
Fig. 2-7
Pressing “Modify” will show a modification page, referred as Fig. 2-8. In this page,
each item has its correspondent “Modify” button. For each item to be modified,
Key in the new value in the entry and press “Modify” button, then the change to
this account will be added to and reflect in the “Alter accounts list”.

CLOUDPROOF USER MANUAL
15
Fig. 2-8
Referred to Fig. 2-9, in “Alter accounts list” table, check the check boxes before the
accounts to be modified, and then press the “Save” button, so that the permanent
modification action will be done on the accounts. Accounts which have been
successfully modified will reflect in the User Management-> List table. Accounts
failed to be modified will remain in the “Alter accounts list” table, and failed
reasons be displayed.
Fig. 2-9

CLOUDPROOF USER MANUAL
16
3. Delete Account
The way we delete an account is through User Management -> List menu item, in
the User Listing table, select the account to be deleted and press “Delete” ,
Referred to Fig. 2-7. Press “Confirm” button, then this account will be added to the
“Alter accounts list”.
Referred to Fig. 2-9, in “Alter accounts list” table, check the check boxes before the
accounts to be deleted, and then press the “Save” button, so that the permanent
delete action will be done on the accounts. Accounts which have been successfully
deleted will reflect in the User Management-> List table. Accounts failed to be
deleted will remain in the “Alter accounts list” table, and failed reasons be
displayed.

CLOUDPROOF USER MANUAL
17
2-3. Account synchronization
Account synchronization is to maintain a synchronized copy between Google APPS
and CloudProof, currently this function only supports Google APPS for Business,
Google APPS for Education and Google APPS for Government.
1. Google APPS setup
From Google APPS’s Management Domain page, through Domain settings -> User
settings menu item, check the “Enable provisioning API”, and save changes, referred
to as the following figure.
2. CloudProof setup
After login CloudProof management page, through User Management -> Sync
Account, referred as Fig 2-11, Confirm the “user account synchronous” window to
start the synchronous process, referred as Fig. 2-12. Then it will bring up a Progress
Bar window to show the ongoing process status as how many percentages
completed, referred as Fig. 2-13. After the process completes, the “user account
synchronous” window will inform the successful status, press “exit” to exit this
window, referred as Fig 2-14. Now go to User Management -> List, referred as Fig.
2-15, you will see the accounts have been synchronized from Google APPS.
Accounts synchronized from Google APPS need to login CloudProof to setup
synchronous related configuration.
Fig. 2-10

CLOUDPROOF USER MANUAL
18
Fig. 2-11
Fig. 2-12
Fig. 2-13
Fig. 2-14

CLOUDPROOF USER MANUAL
19
Fig. 2-15
CLOUDPROOF USER MANUAL
20
Chapter 3. User Interface
3-1. Login Page
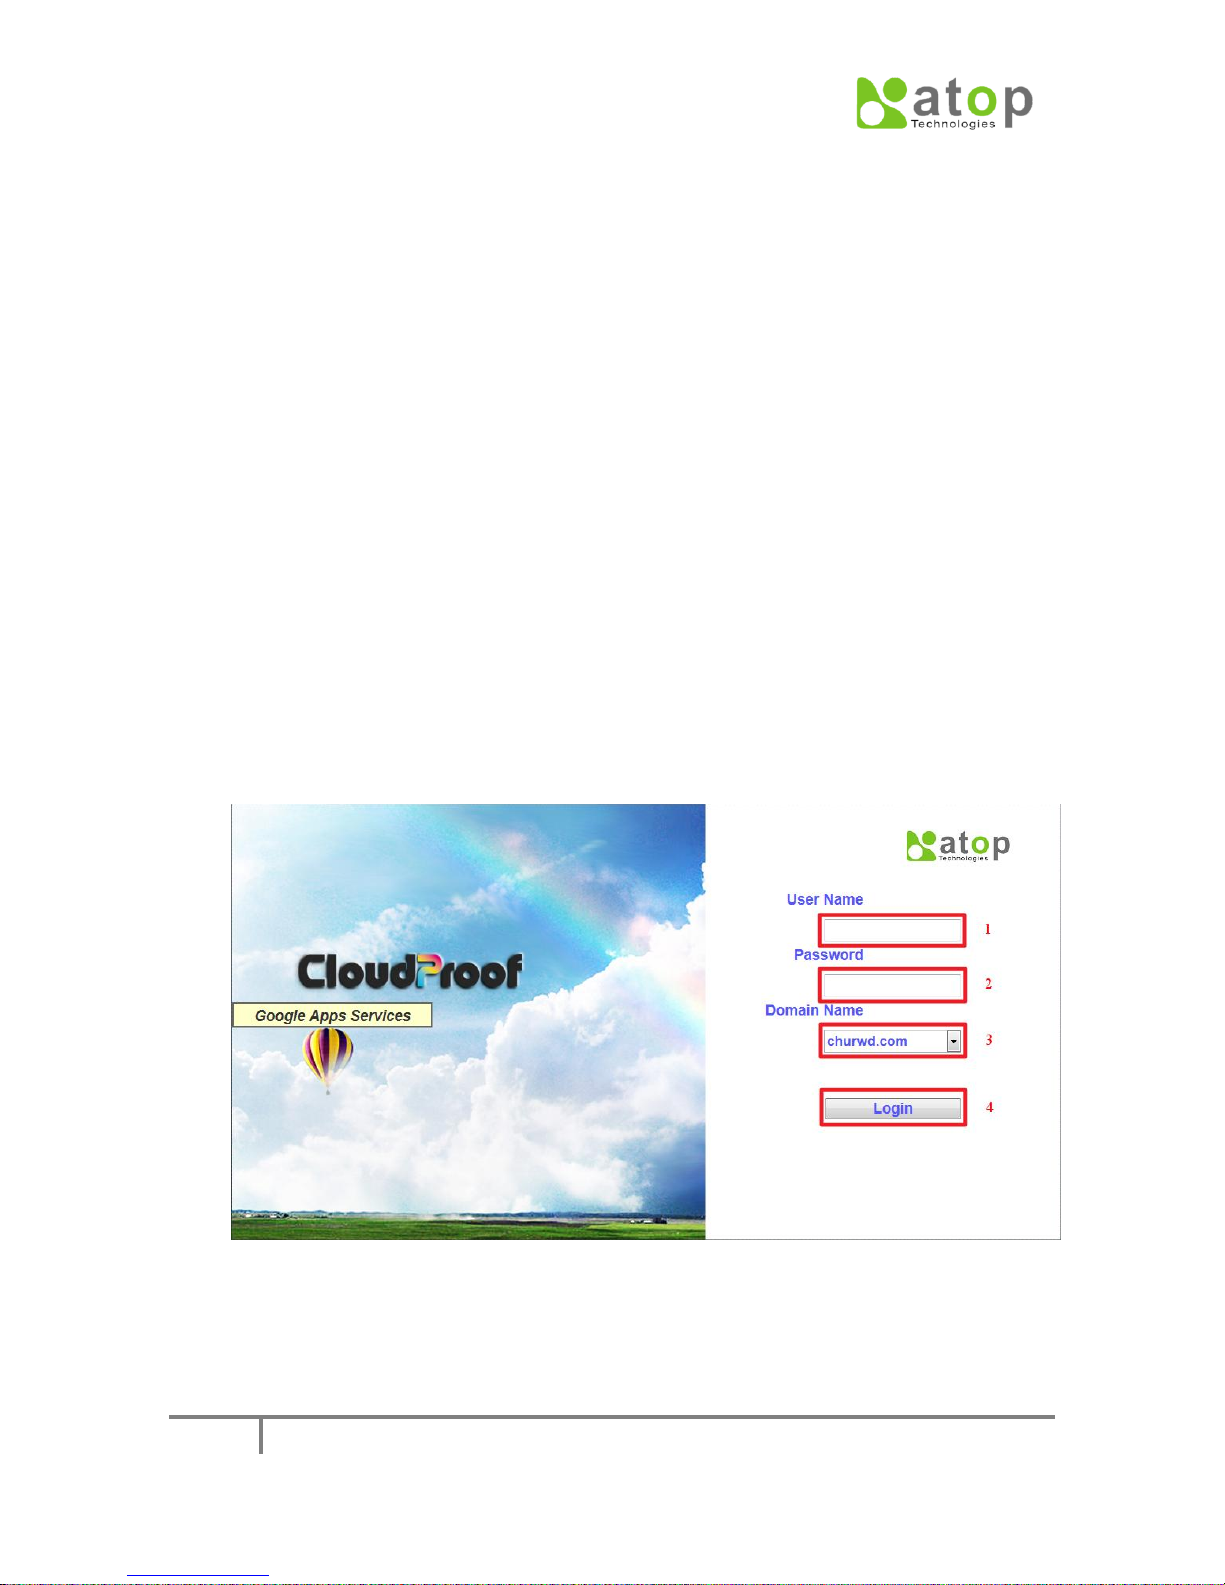
From CloudProof login page, user can not only login CloulProof, but also login the
remote cloud platform (by Google APPS
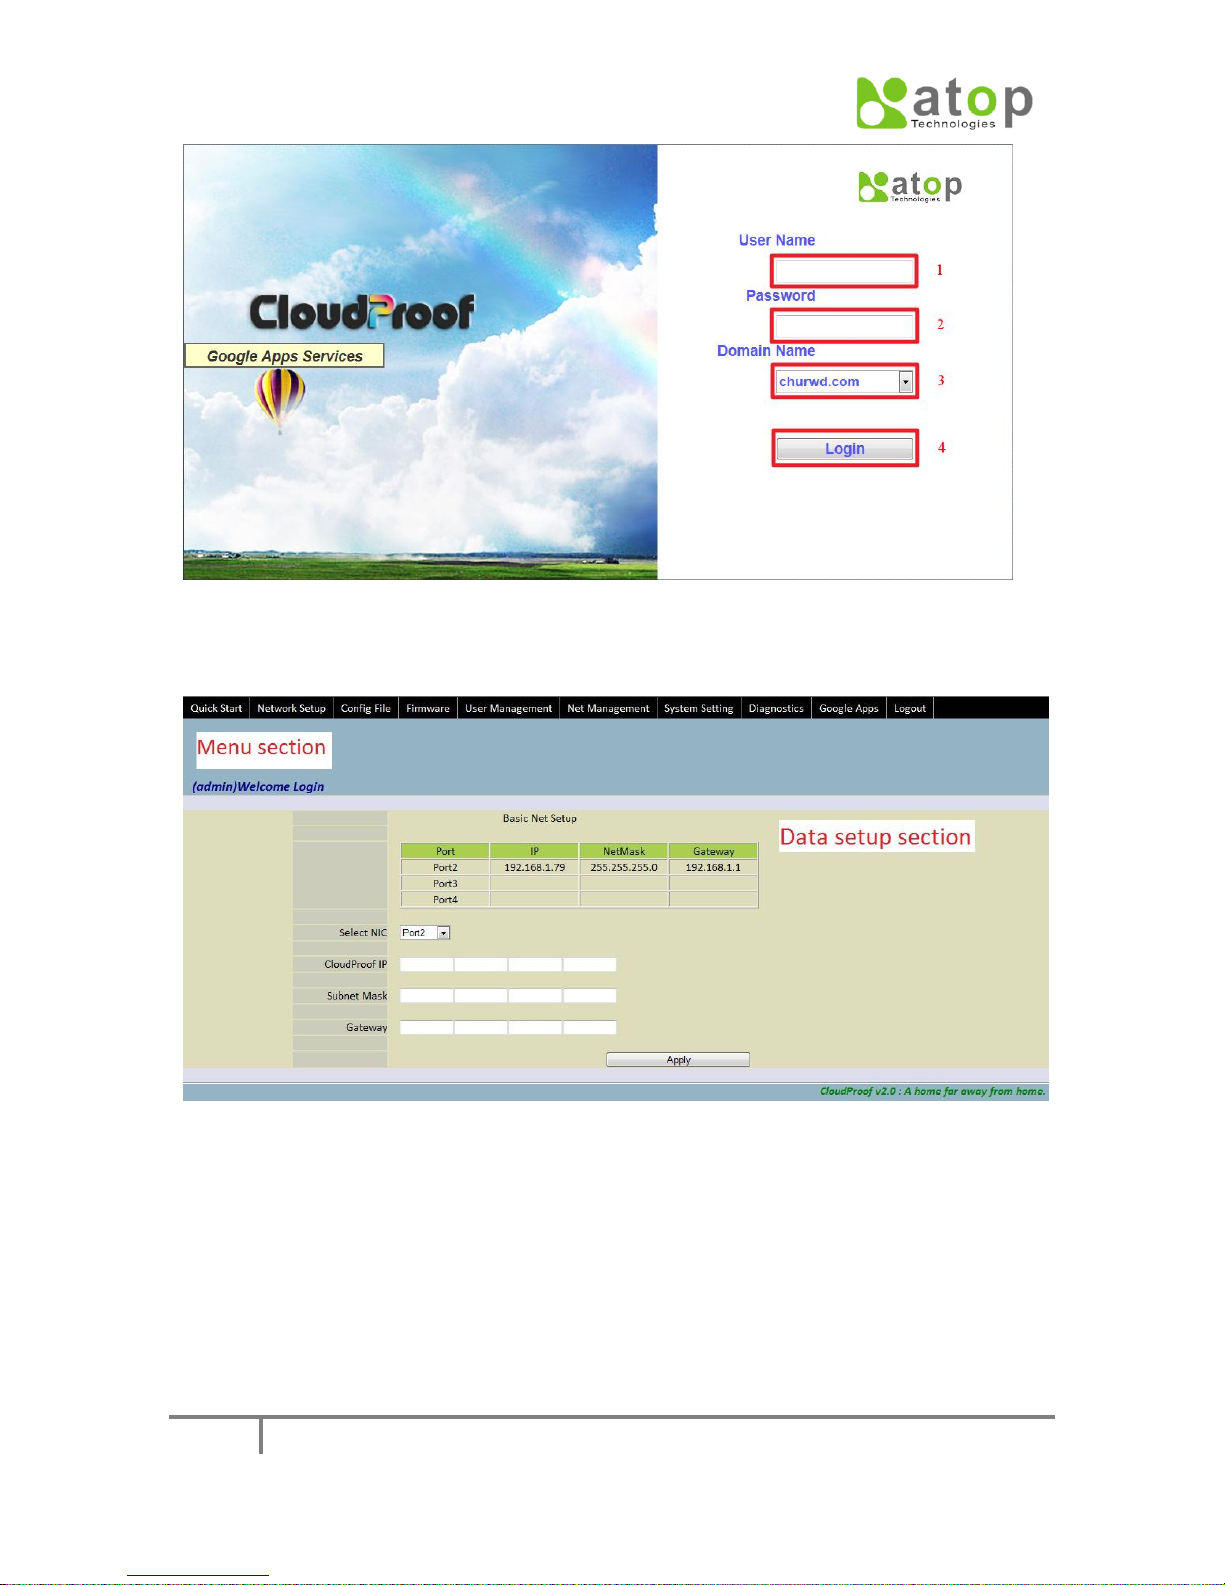
1. Login CloudProof from login page
Using following steps to login CloudProof:
Referring to the following figure, in the entry encircled by a red block and
marked with a red digit “1”, Key in your account.
Referring to the following figure, in the entry encircled by a red block and
marked with a red digit “2”, Key in your password.
Referring to the following figure, in the entry encircled by a red block and
marked with a red digit “3”, Key in your Domain.
Referring to the following figure, in the entry encircled by a red block and
marked with a red digit “4”, press to login CloudProof.
TM
hyper link), please referring to section 2.
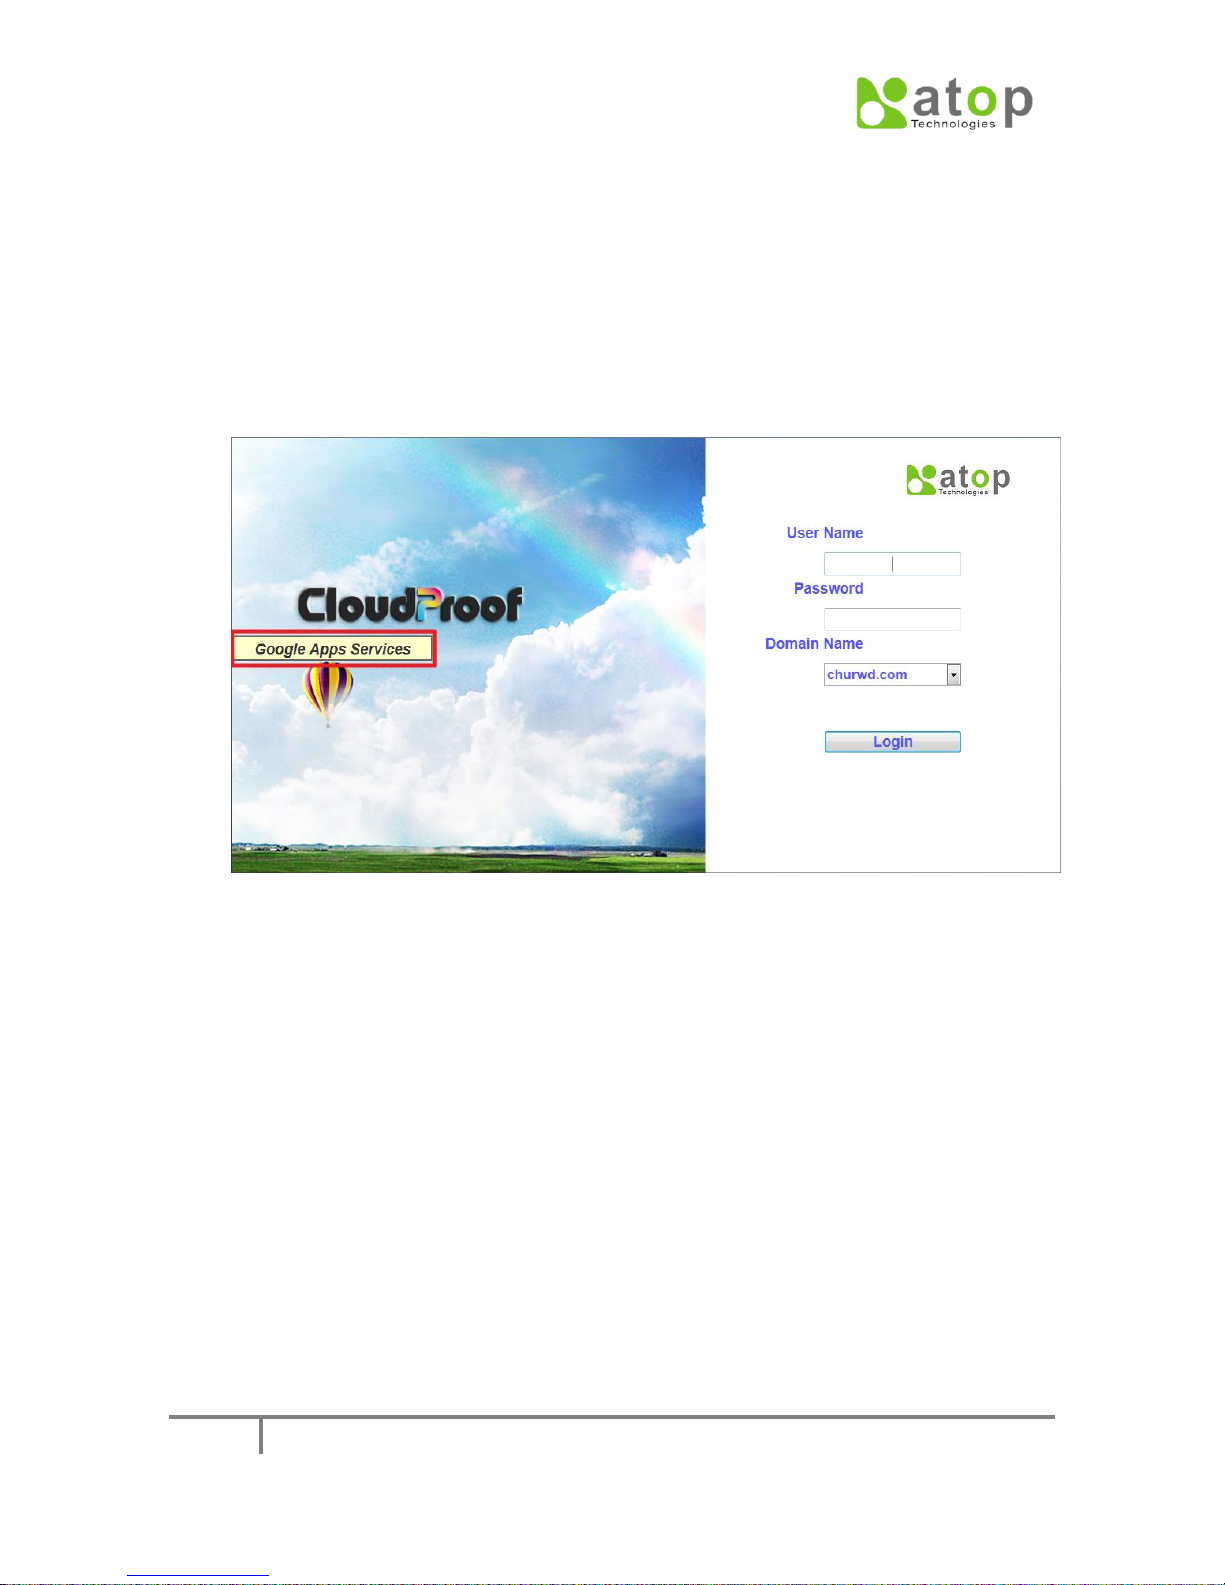
2. Login Google APPS by using hyper links from Cloud Proof. Pleas have some
notices before using this way:
By using this way, users will be redirected to the Domain belonging to Google
Fig. 3-1
CLOUDPROOF USER MANUAL
21
APPSTM.
Under network outage condition, users will be redirected to CloudProof itself,
so that users can still use services.
If it is enabling Single Sign On function on Google APPS
TM
, then the
authentication process will be linked to the Single Sign On authentication site
in the company.
Please begin with the following steps:
Move the mouse to the red block in the following figure;
Google APPS menu item will open automatically.
Fig. 3-2
You can press the correspondent Google APPS hyper link according to the
extended menu items in the following figure.

CLOUDPROOF USER MANUAL
22
Fig. 3-3
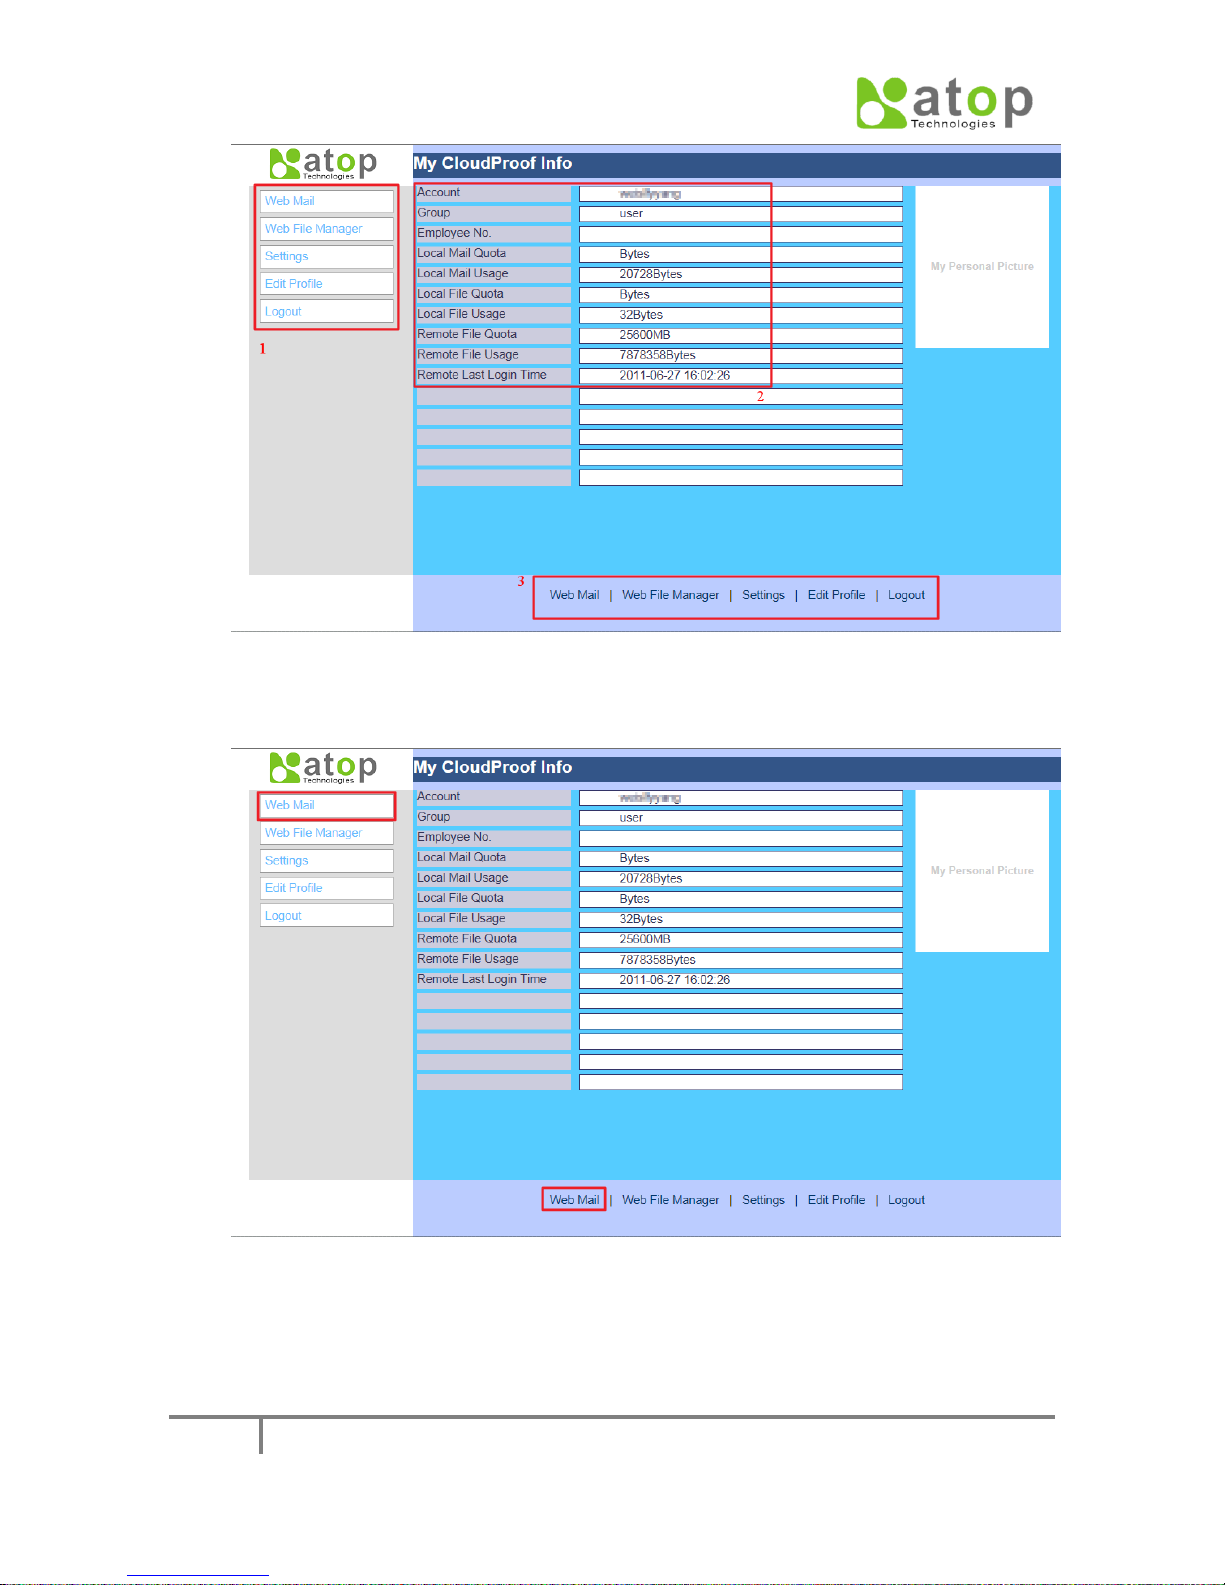
After users login
After the registering authentication process, users in ordinary identity will
enter this page.
This page includes 2 parts, user’s information in CloudProof system and the
Browsing function. Red digit “1” and “3” are browsing menu items, while “2”
is user’s information.
Fig. 3-4
CLOUDPROOF USER MANUAL
23
Fig. 3-5
Pressing the red-encircled hyper link in following figure will enter the “Web
Mail” page.
Pressing the red-encircled hyper link in following figure will enter the “Web
File Manager” page.

CLOUDPROOF USER MANUAL
24
Fig. 3-6
CLOUDPROOF USER MANUAL
25
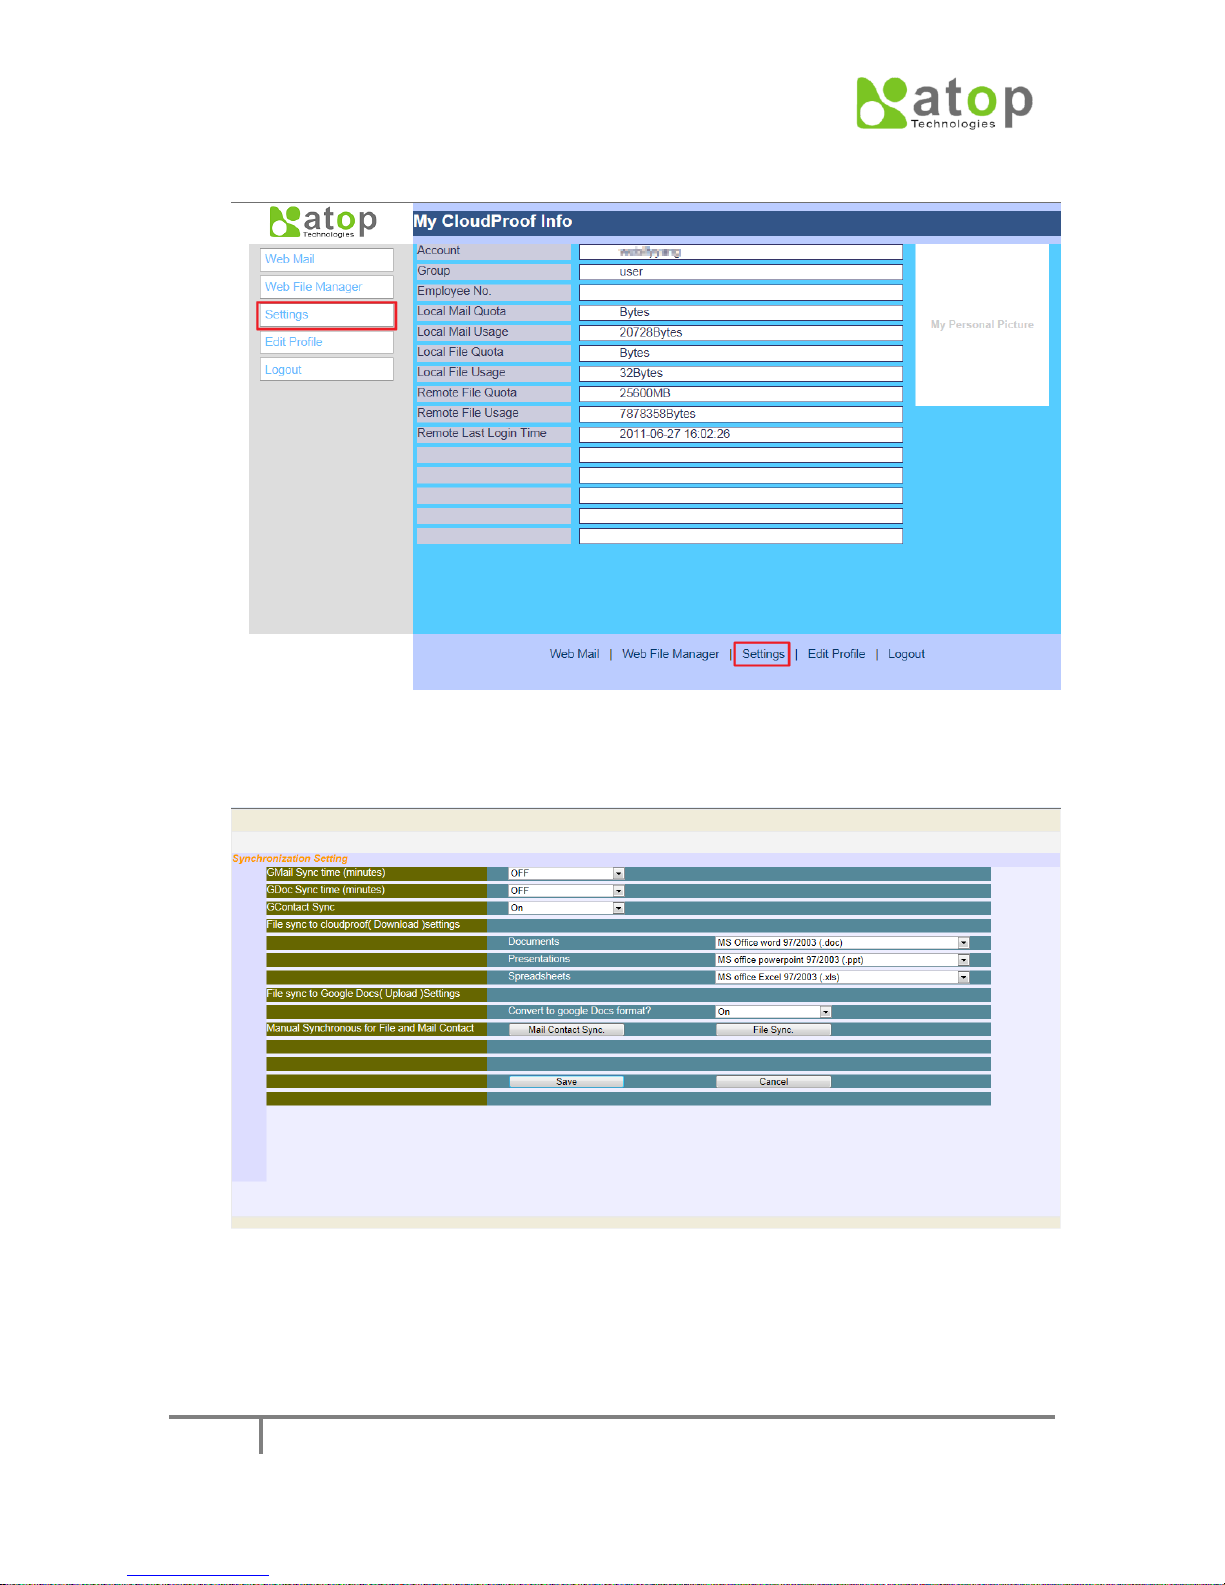
Pressing the red-encircled hyper link in following figure will enter the “Setting”
page.
Fig. 3-7
The main settings this page provides are Mail and File related synchronous
setting details.
Fig. 3-8

CLOUDPROOF USER MANUAL
26
The following figure is the settings for mail’s synchronous time, items in the
drop-down list menu indicate how long the period between the synchronous
processes is.
Fig. 3-9
The following figure is the settings for File’s synchronous time, items in the
drop-down list menu indicate how long the period between the synchronous
processes is.
Fig. 3-10
CLOUDPROOF USER MANUAL
27
The following figure is the settings for Mail Contact’s synchronous time, items in
the drop-down list menu indicate how long the period between the synchronous
processes is.
Fig. 3-11
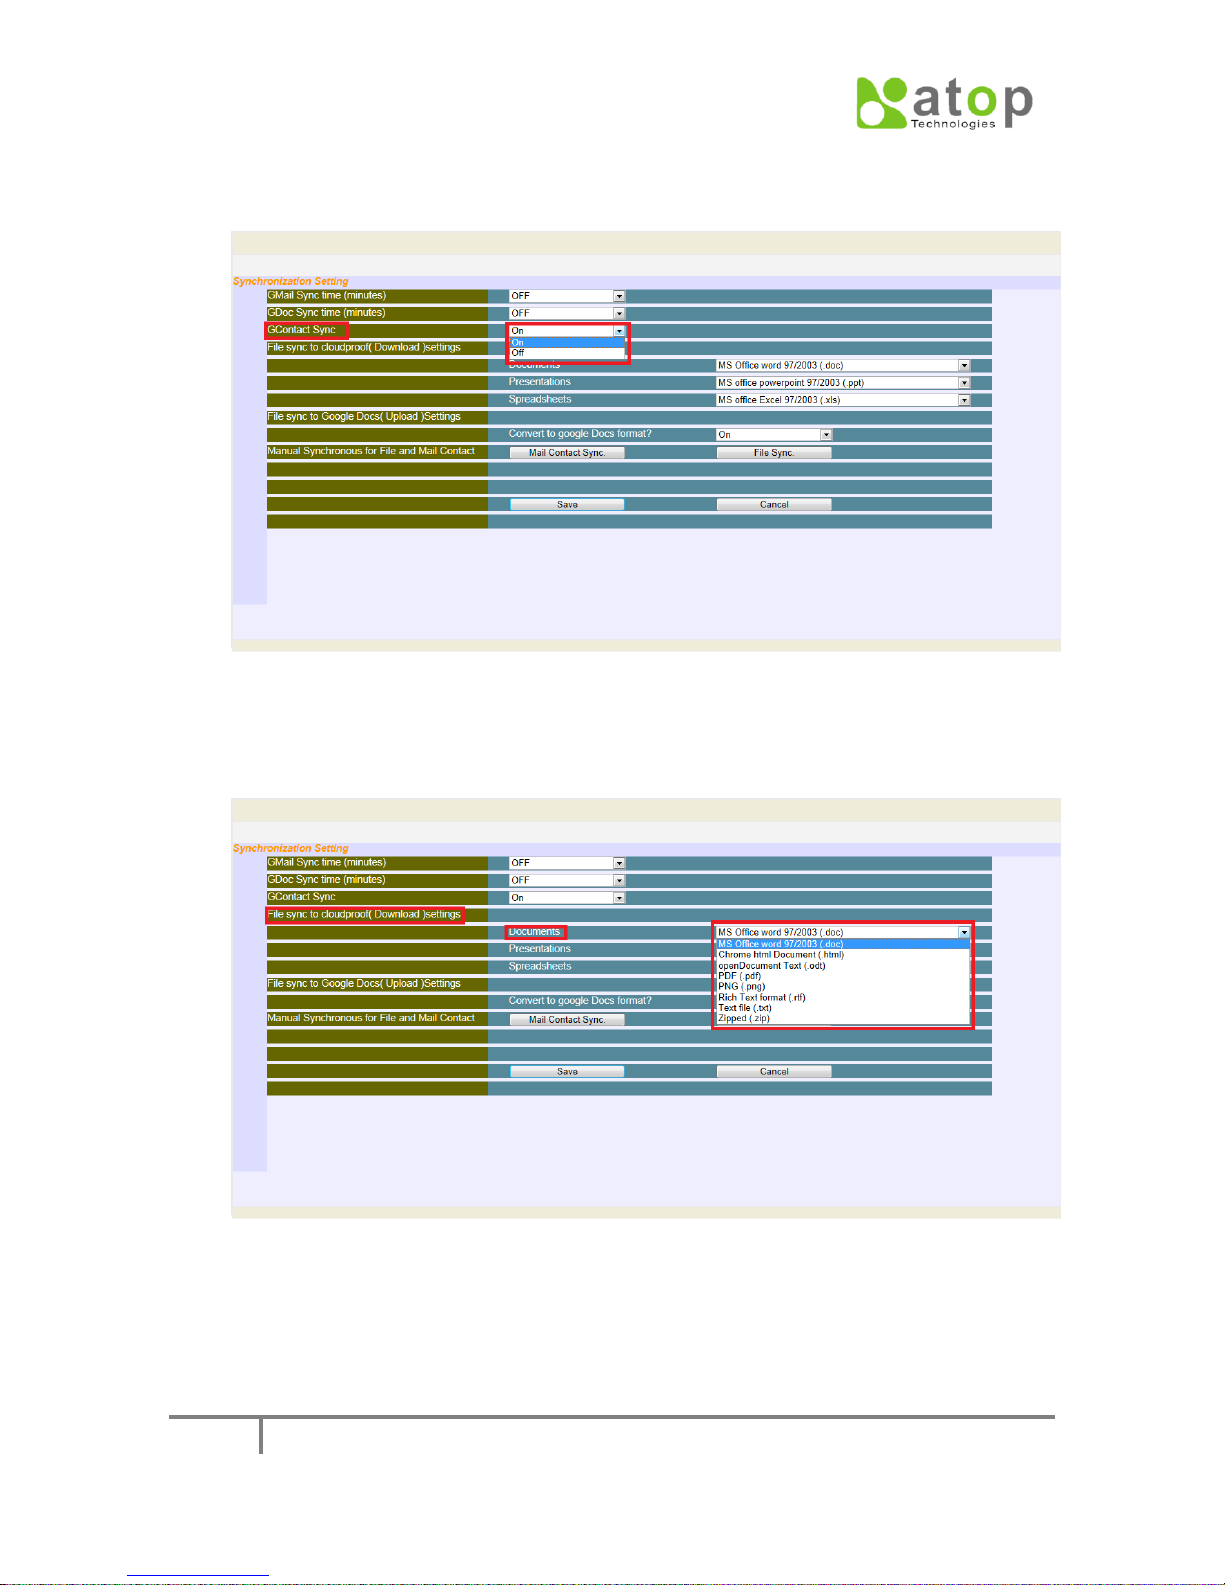
The following figure is the settings of format conversion for the file’s synchronous
download, items in the drop-down list menu indicate the optional formats for
Document’s conversion.
Fig. 3-12

CLOUDPROOF USER MANUAL
28
The following figure is the settings of format conversion for the file’s synchronous
download, items in the drop-down list menu indicate the optional formats for
Presentation’s conversion.
Fig. 3-13
The following figure is the settings of format conversion for the file’s synchronous
download, items in the drop-down list menu indicate the optional formats for
Spreadsheet’s conversion.
Fig. 3-14

CLOUDPROOF USER MANUAL
29
The following figure is the settings of format conversion for the CloudProof’s
synchronous upload, options in the drop-down list menu indicate if files’ format
is converted to Google’s file format.
Fig. 3-15
The following figure is the final confirming step, “Save” or “Cancel”.
Fig. 3-16

CLOUDPROOF USER MANUAL
30
The following figure is the setting that pressing the function button can manually
start synchronizing File and Mail Contacts with Google.
Fig. 3-17
Pressing the red-encircled hyper links both can enter “Edit Profile” setup page.
Fig. 3-18

CLOUDPROOF USER MANUAL
31
Users can modify personal information in the following page.
Fig. 3-19

CLOUDPROOF USER MANUAL
32
3-2. Mail function
One of the main functions CloudProof provides is the mail’s backup from Google APPS.
As long as new mails arrive at Google APPS, CloudProof will periodically copy them to
the local mail server. Once the Gmail service become unavailable, the mail server on
CloudProof can provide mail access including the last backup from Google APPS before
the Gmail’s service been unavailable. In CloudProof the Webmail interface is also
provided, through which users can read and send E-Mails.
In following sections, it will be described in detail of CloudProof Webmail’s operation
and configuration.
1. Setting of the time period between mails’ backup
After login into CloudProof, in the user’s personal page, press the right “setting”
button or the bottom “setting” hyper link to enter, referred as fig. 3-20.
The entry for the “Gmail Sync time(minutes)” is a drop-down list item, the options
are OFF, 10, 30, 60, 180, 360, 720 and 1440, 8 of them, which are the optional time
period for setting. After completing all of the setting items, pressing the bottom left
“Save” button, the settings will be recorded in the user’s personal configuration.
When the user next logins, “Gmail Sync Time” entry will show the current setting of
the time period.
2. Web Mail main page
After login into CloudProof, in the user’s personal page, pressing the right “Web
Mail” button or the bottom “Web Mail” hyper link, a new page will prompt which
shows the Mail interface, referred as Fig. 3-21.
Fig. 3-20

CLOUDPROOF USER MANUAL
33
Fig. 3-21
There are 4 sections in the mail interface, which are quick link buttons at the upper
left, function list at the top, mail directory list at the left and mail list in the middle,
respectively.
Quick link – included are Compose Mail (Compose new mail), List Mail (List mails
in the current directory), Settings (Personal mail function configuration) and
Search Email (Search Mails) icons, designed as icon hyper link.
Function list – Included are List Mail, Open Mail (Open the selected mail),
Compose, Search Email, Addressed (Contact), and Folders (mail directory
configuration) hyper links, designed as text hyper link.
Mail directory list – Mail directory can be personally categorized. A common mail
server will provide 5 directories, which are Inbox, Trash, Sent, Drafts and Spam. At
Gamil, in addition to the 5 directories, there has been added All, Starred (with a
star mark), Other, Advanced and Priority. If it is the currently opened directory, the
character type will be turned to bold type; by its side also showed is the number
of the unopened mails.
Mail list – Lists all mails in the current selected directory. When there are too
many mails, press the back-forward button at the bottom right corner or the
drop-down list menu for selecting subpage to choose which subpage to browse.
For switching between different directories, press the correspondent directory
hyperlink at the left mail directory list, then the mails belonging to it will be loaded
to the list. Mails not been opened will be displayed as bold type on the list, whilst
mails been opened will be displayed as general type, and with an opened icon in
front of the line. To manually change the status indicating it been opened or not,
move the mouse to the selected mail, clicking the right mouse button to show the

CLOUDPROOF USER MANUAL
34
quick menu, within which there are functions to mark the mail as read or not read,
then choosing one to change the mail’s status to you want.
3. Open the mail’s main page
There are 2 ways to open the mails: one is to click the mouse left button twice on
the target mail in the mail list, then the mail’s main page will be brought in. The
other one is to click the mouse left button once on the target mail in the mail list,
then the selected mail will be highlighted as reverse type, now by pressing the “Open
Mail” hyper link on the top function menu will it open the mail’s main page.
In the mail’s main page, on the top is the mail’s header information, on the right is the
scroll bar in case a mail is too long to be limited in a fix-sized frame, on the left is the
mail function list, with each of which indicates one function can be used here.
Back to – Back to the mail list page according to the current mail directory.
Reply – Reply to the sender, and switch to the composing new mail page.
Reply ALL – Reply all, including sender and receivers, and switch to the
composing new mail page.
Forward – Forward mail, and switch to the composing new mail page.
Delete – Delete mail.
Address Book – Add the sender to the contacts.
Print – Print mail.
Block Sender – Block the Sender from receiving mails from.
View headers – Display the original mail’s header.
Fig. 3-22

CLOUDPROOF USER MANUAL
35
Next – Display the next mail.
Previous – display the previous mail.
4. Composing mail main page
There are 4 function items through which to bring users to the composing mail page,
they are Compose, Reply, Reply ALL and Forward. For the page arrangement, on the
top of the main page is the header section, which is for entries of the “From”, “TO”,
“Cc”, “Subject”, and “Priority”, etc. columns. On the bottom middle is the mail
composing section. The mail editor provided by CloudProof provides HTML and
UTF-8 encoding, so that it adapts to all languages provided by the internet browser.
The page details are referred as Fig. 3-23.
Fig. 3-23
In the composing mail tool list on the left of the page, there are 7 functions
provided:
Send Mail – Send mail.
Back to –Back to the mail list page according to the current mail directory.
Add Recipients – Bring up a dialog window, referred as Fig. 3-24, through
which to add recipients into TO, Cc, BCC columns from existing contacts.
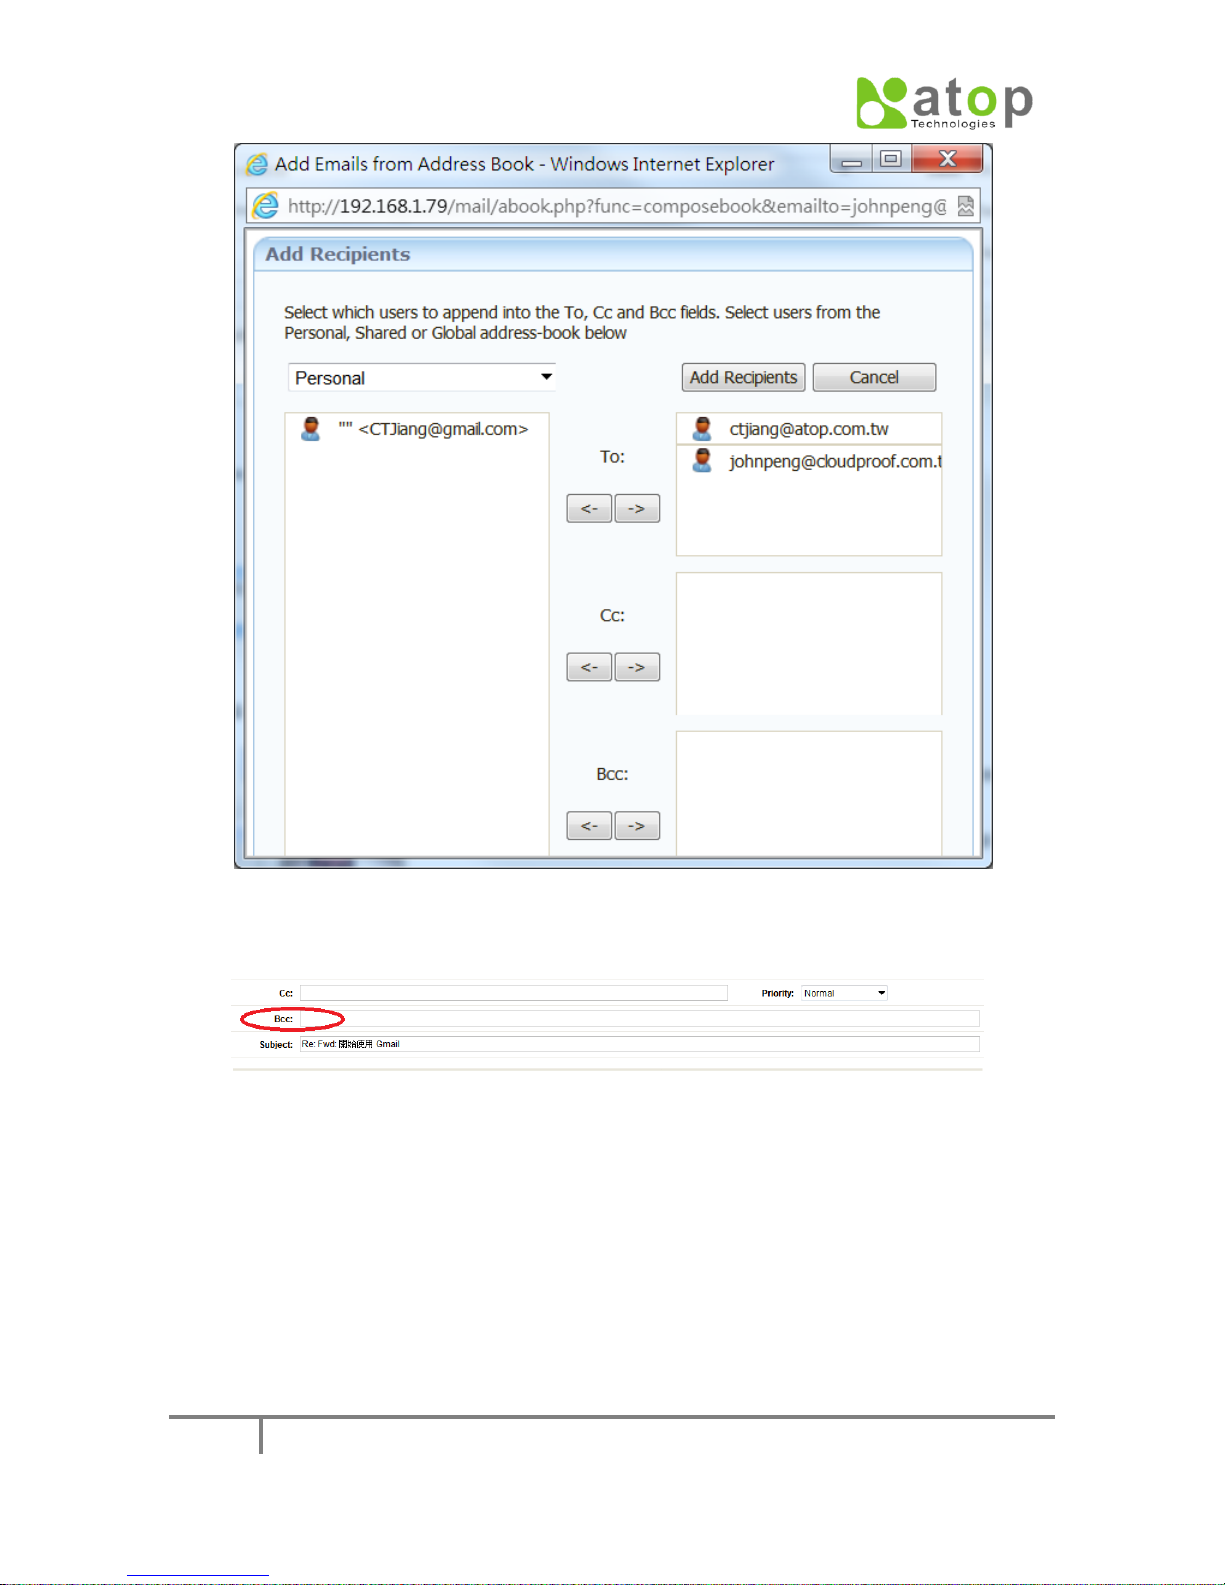
CLOUDPROOF USER MANUAL
36
Fig.3-24
Add BCC – Add a BCC column into the mail header, referred as Fig. 3-25.
Fig.3-25
Spell Check – Do English spell check for the composed mail content. While
launching, the mail content will be entrenched within a red block. Any word
not included in the dictionary will be indicated as red color character type and
underscored. Click the right mouse button will bring up a quick menu. The first
part of the menu is the word which is suggested for replacing. By choosing it,
will the red color-typed word be replaced by this word. Now, there will only
remain one item, “Resume Editing”, in the left function list. Pressing this item
will go back to the mail composing page. For every checked word, no matter
been modified or not, would never change to red color type again should we

CLOUDPROOF USER MANUAL
37
press the “Spell Check” button once more, for they have been regarded as
correct. The second part of the menu is “Add Word to Dictionary”, which can
add the red-colored word to the spell check dictionary. The third part is “Edit”,
which will make the problematic word to be enclosed with a red block, and
users can directly edit within it. After edit, pressing “Resume Editing” to go
back to mail composing page.
Fig.3-26
Attachments – Add attachments to the mail
Save Msg – Stop composing mail and go back to the current mail directory
list. The mail just composed will be saved to the “Drafts” mail directory.
5. Delete Mail
There are 3 ways to delete mails: First, in the opened mail page, press delete button.
Second, selecting the mail want deleted from the mail list, drag to the left “Trash”
directory. Third, move the mouse to the mail want deleted from the mail list, clicking
mouse right button to show the quick menu, and then press “delete” button in the
menu.
6. Search mail
The begin point for searching mail is from “Search Email” item in the top left quick
icons list or in the top function list. When pressing one of these 2 items, it will bring
out an additional searching tool list in the top of the mail list, referred as Fig. 3-27. To
use the advanced search function, press the “More” button in the tool list, the
outcome referred as Fig. 3-28.

CLOUDPROOF USER MANUAL
38
Fig.3-27
Fig.3-28
7. Mail directory setting main page
Pressing the “folders” button in the function list, the main page will switch to the
mail directory setting page. From a top-down view in this page, it will be divided into
4 parts, which are “Mail Folder”, “Create a New Mailbox”, “Rename Personal Folder”
and “Email to Mail Sorting”, the layout referred as Fig. 3-29.

CLOUDPROOF USER MANUAL
39
Fig.3-29
Mail Folder – This section shows information for every directory, including
directory name, total number of mails included in a directory, total file size
used by this directory and the delete function item of this directory. The delete
column of each directory includes 1 to 2 buttons, the left one is for deleting
directory and the right one is for deleting all mails in this directory. For the
default directories provided in the mail servers, there exists only the right
button, that is, you can’t delete these directories.
Create a New Mailbox – create a new mail directory.
Rename Personal Folder – Change the name of personal created mail directory.
Email to Folder Sorting – Move mails to specified mail directory according to a
specified Email Address or Subject.

CLOUDPROOF USER MANUAL
40
3-3. File function
File Synchronous is one of the main functions of CloudProof. File Synchronous can
synchronize the document files not only from Google Docs to CloudProof, but also
from CloudProof to Google Docs, so that users can access files any time any place.
Following, we will describe the operation and configuration of CloudProof Web File
Manager.
1. Setting of File Synchronous
Users login CloudProof, through the user’s personal page->Settings will enter
this page, referred as Fig. 3-30
Fig.3-30
To start file synchronous, configure “Gdoc Sync Time” for the synchronous time
(minutes), and then press “Save” to save the setting. Time options are as below:
10 minutes
30 minutes
60 minutes
120 minutes
240 minutes
360 minutes
720 minutes
1440 minutes
To setup the file formats of the synchronization from Google Docs to CloudProof,
configure “File Sync to CloudProof”. Currently the formats supported are as follow:
Document: doc, html, odt, pdf, png, rtf, txt, zip.
Presentation: ppt, pdf, png, swf, txt.
Spreadsheets: xls, csv, pdf, ods, tsv, html.
CLOUDPROOF USER MANUAL
41
To setup the file formats of the synchronization from CloudProof to Google Docs,
the limits of the conversion are as below:
Only support “Google Apps for Business”, “Google Apps for Education”,
“Google Apps for Government”.
Document: no matter the size of pages or character type, the upper limit is
512,000 bytes. After the upload document file converted into Google Docs
Format, the size of the file can’t exceed 1MB.
Spreadsheets: 400,000 cells, 256 columns for each work sheet. After the
upload spreadsheet file converted into Google Docs Format, the file size can’t
exceed 20MB, cell size 400,000 and column size 256 for each work sheet.
Presentation: the upper limit size of the presentation file established in
“Google Docs” is 10MB, probably 200 slides in equal. After the upload
presentation file converted into Google Docs Format, the file size limit is also
10MB.
If choose not to converting, then a single file size can reach 250MB. The
supported file formats are jpg, jpeg, png, bmp, gif, txt, html, odt, sxw, doc,
docx, pdf, rtf, pps, ppt, xls, xlsx, ods, csv, tab, tsv, swf, zip.
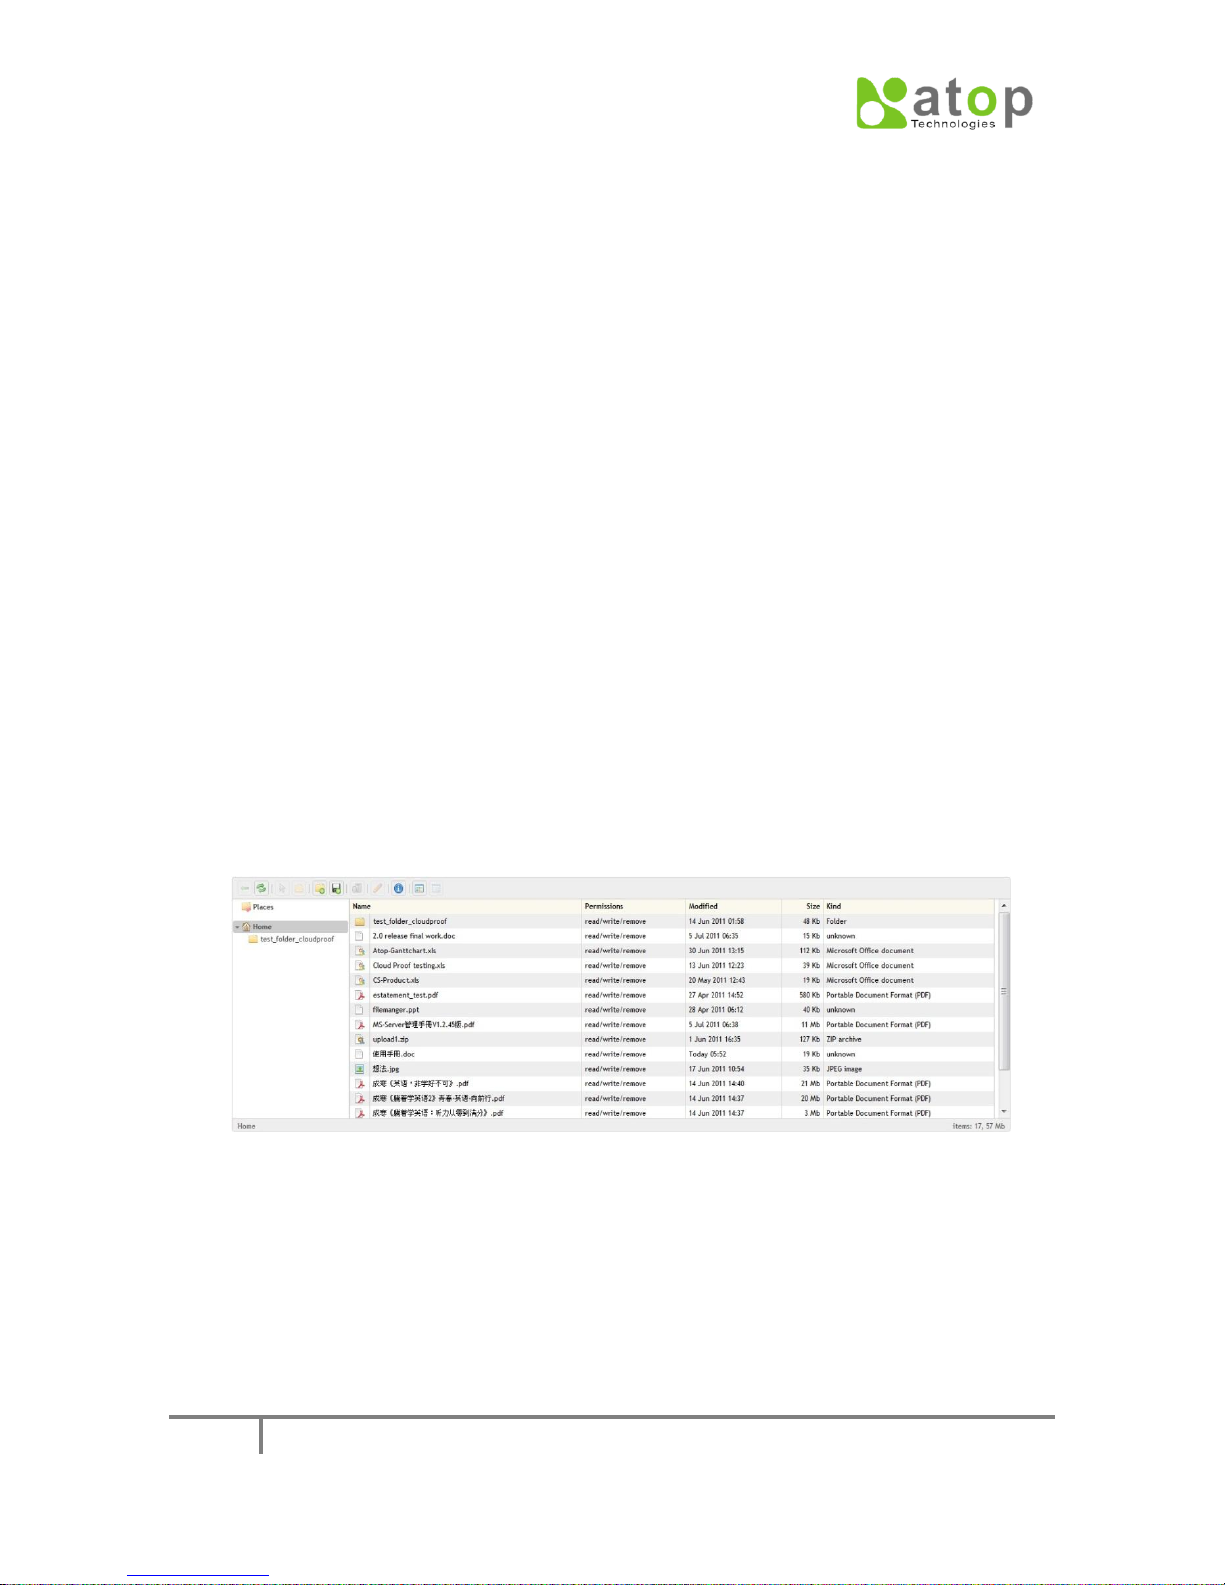
2. Access files through Web File Manager
Web File Manger is the file management interface of CloudProof, which enables
the users of Google Apps to use their internet browser to access the file data in
CloudProof.
Select “Web File Manager” in user page to enter the file interface, referred as Fig.
3-31.
On the top left Tool Bar, Functions in order are:
Back: Back to the upper layer folder.
Reload: Immediately synchronous the files in Google Docs.
Open: Open the selected file or folder.
New folder : Add a new folder
Upload files: Upload files, the interface is as Fig. 3-32.
Remove: Delete files.
Fig.3-31

CLOUDPROOF USER MANUAL
42
Rename: Rename a file or a folder.
Get Info: View the information of a file or a folder.
If users have started the File Synchronous in settings page, the File Synchronous to
Google Docs will be conducted according to the configured time of the user.
Fig.3-32

CLOUDPROOF USER MANUAL
43
3-4. Contacts
Contacts Synchronous is one of the main functions in CloudProof. Contracts Synchronous
can synchronize the contact records from Google Gmail to CloudProof. And users can
add new contacts to Google Gmail through CloudProof, so that while users are using
Gmail or CloudProof to send or receive Emails, they can view contacts information.
1. Settings of Contact Synchronous
Users login CloudProof, through the user’s personal page->Settings will enter this
page, referred as Fig. 3-33. Switch the “Gcontact Sync” from “OFF” to “ON”, then it
will start the Contacts Synchronous function (the default is synchronizing every 5
minutes).
Fig.3-33
2. The operation of Contacts interface.
Users login through “CloudProof -> Web Mail -> address”, will enter the Contacts
interface, referred as Fig.3-34.
Fig.3-34
CLOUDPROOF USER MANUAL
44
The interface will be described as follow:
X: Checked, then press “Delete Selected”, will delete the contact in Gmail in a
synchronous way.
To: Checked, press “Compose Msg”, can send group Email.
Cc: Select which contacts to send as “cc”.
Bcc: Select which contacts to send as secret “Bcc”.
Options:
Portrait: Browsing the detail information of the contact.
X: Delete this consact.
Compose: Compose Email.
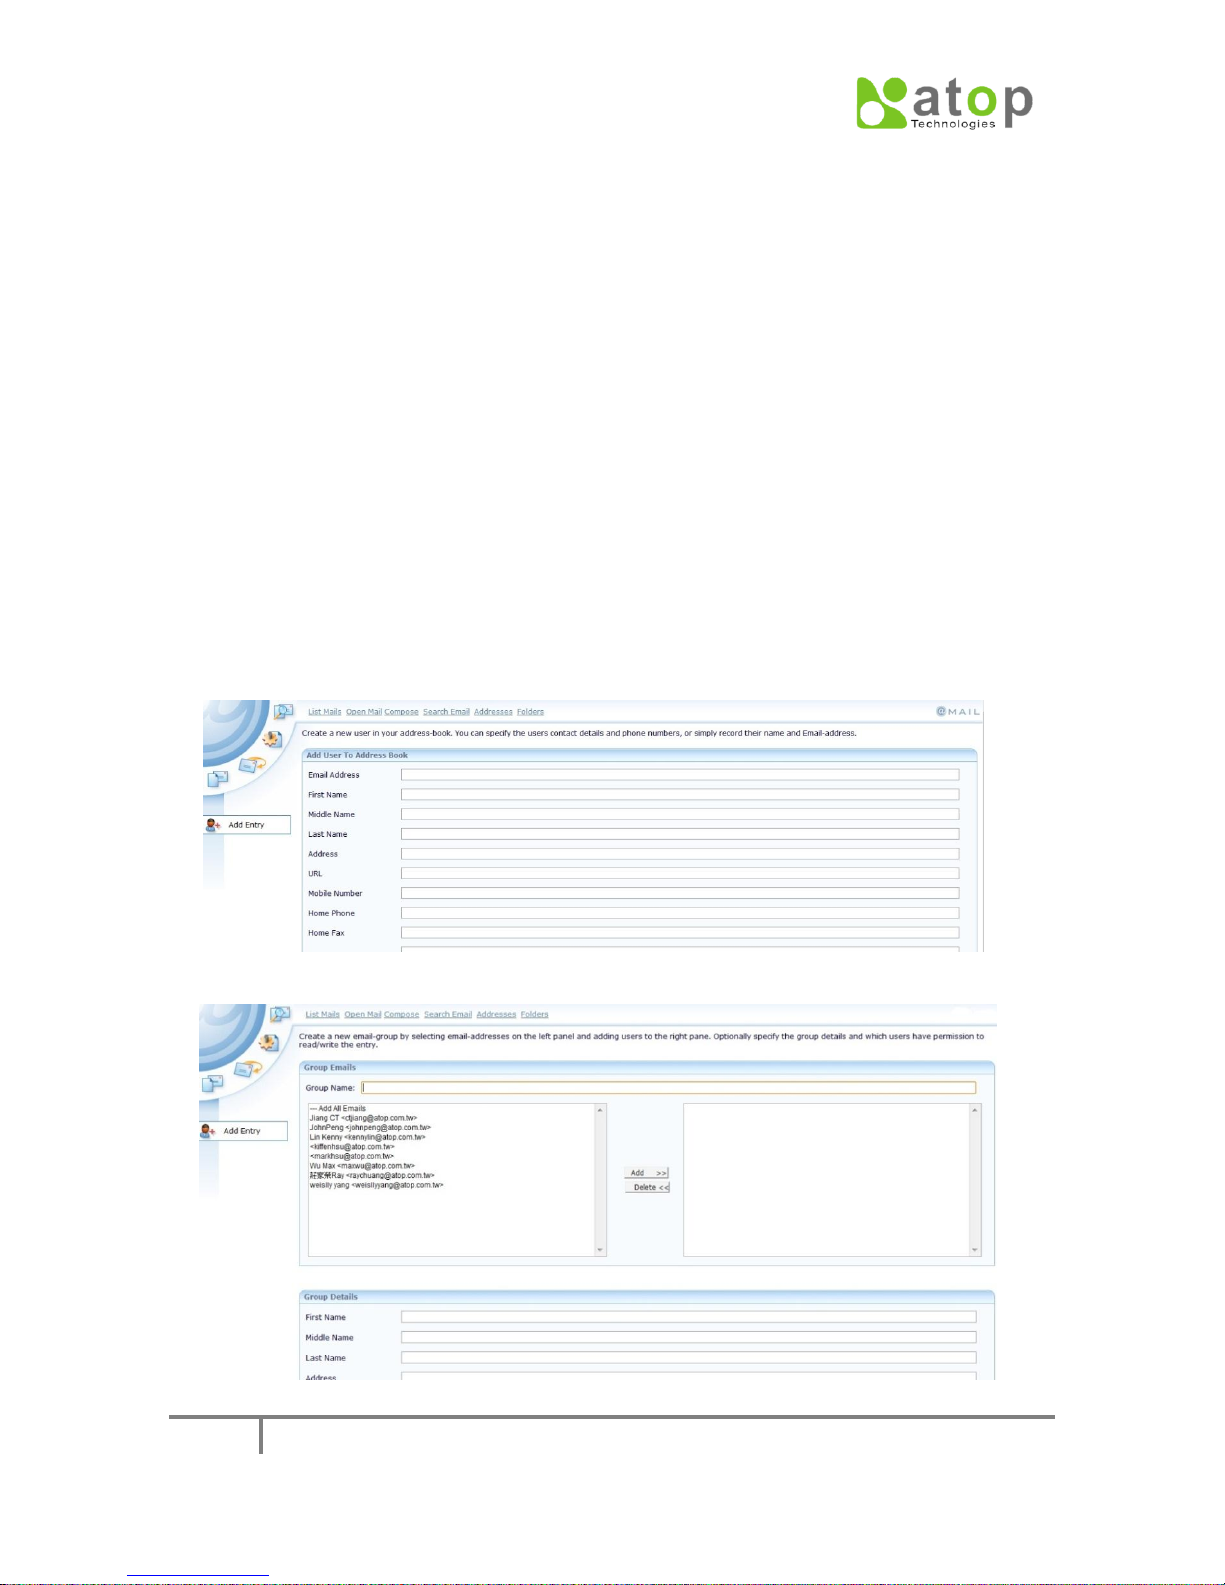
New Contact: Add a new contact, referred as Fig. 3-35. Pressing the “Add
Entry” will synchronously add the new contact in Gmail. (It is necessary to fill
all of the information completely)
New Group: Create Group, referred as Fig. 3-36.
Delete Selected: Delete the selected contact, and the update will be
synchronized to Gmail
Import: Import CSV file, creating contacts in a batch way, and and the update
will be synchronized to Gmail
Search: Search contacts.
Fig.3-35
Fig.3-36

CLOUDPROOF USER MANUAL
45
3. Contacts Synchronous limits
The limits of Contacts Synchronous are as follow:
Can’t synchronize with Gmail Contacts Group.
Only can synchronously add or delete Gmail Contacts’ CloudProof can’t update
their information.
It can display at most 5 Emails in a CloudProof Contact.
Groups created in CloudProof can’t be synchronized to Gmail.

CLOUDPROOF USER MANUAL
46
Chapter 4. Administrator Page
4-1. Network Setup and Net Management
This section covers the configuration and operation of Network Setup and Net
Management, those users need using admin account to login.
1. Failover Link
If it is concerned should WAN network link be broken or encounter a bad
signal condition, you can additionally setup another “Failover” link, companied
by enabling the “WAN-Detect” function (WAN-Detect setup will be included
later in this section). In this way, the “primary” WAN link and the “Failover”
link will backup each other. Followings are configurations for Adding “Failover”
links:
First, connect the port1 in CloudProof to the network that backups, then login
into the Admin system setup page, through “Network Setup -> Failover Link
Setup”.

CLOUDPROOF USER MANUAL
47
Fig.4-1
Select how to connect to internet
Choose one of the options, DHCP, PPPoE or Static IP, and then fill in the
correspondent parameters respectively.
PPPoE – Username
Fill in the account name provided by ISP.
PPPoE – Password
Fill in the password for the account name.
PPPoE – DNS1
Fill in DNS1 IP. (Optional)
PPPoE – DNS2
Fill in DNS2 IP. (Optional)
PPPoE – Demand
Demand idle time in seconds. (Must, default value is 0)
PPPoE – Firewall Mode
(Must, default value is “None”)
StaticIP – IP Address
Setup the server Failover IP.
StaticIP – Subnet Mask
Setup the subnet mask for the Failover IP
StaticIP – Gateway

CLOUDPROOF USER MANUAL
48
Setup the gateway IP for the Failover IP
After finish the setting, press “Apply”.
2. DNS setting
Setup the DNS Server IP which CloudProof requests for Domain Name
resolving, there provided 2 entries. After login the admin page, enter through
“Network Setup -> DNS”.
Fig.4-2
DNS1
Fill in the DNS1 IP. (Must)
DNS2
Fill in the DNS1 IP. (Optional)
After finish the entries, press “Apply”.
3. LACP (802.3ad) setting
Taking the advantage of 802.3ad Bonding technology, CloudProof combines
multiple network interface (limit to Port2~Port4) to aggregate the bandwidth
from CloudProof to LAN and to backup links from CloudProof to LAN. As long
as it is configured, the switch or storage equipment connected with must also
support this function and apply the correspondent settings.
After login the Admin page, enter through “Network Setup –> LACP
(802.3ad).

CLOUDPROOF USER MANUAL
49
Fig.4-3
IP Address
After combines 2 network interfaces (Bonding) into a new interface, this is the
IP of this new interface. This IP should still be the IP at the original LAN subnet.
Subnet Mask
Setup the subnet mask for the new interface IP
Gateway
Setup the default gateway for the new interface, which is the gateway to route
packets behind the LAN.
Bond Port
Select which 2 ports to combine (please remember to connect the ports you
want to a HUB or a Switch in advance).
After finish the setup, press “Apply”.
4. WAN-Detect setup
According to the Failover link setup introduced in the first sub-section, the
“primary” WAN link and the “Failover” link become each other’s backup link
while it also starts the “WAN-Detect” function. When this function implemented,
as soon as the main WAN link encounters problems, the default gateway to
which CloudProof sends packet for route will switch to the failover link one. This
function will take the primary link as the main link, that is, after the primary
recovers, route will switch back to the primary link.
After login to Admin page, enter through “Network Setup -> WAN Detect”.

CLOUDPROOF USER MANUAL
50
Fig.4-4
Fail Mode
Mode 1: As long as the one link broken, it switches to the other link.
Mode 2: Not only link broken, but also the quality of the link becoming
poor will cause the switching to the other link.
Primary eth
The Port configured for the network environment settings introduced in
the 3rd section of Chapter 1.
Secondary eth
The Port configured for the Failover Link Setup introduced in the first
section.
Every entry need be setup, after finishing, pressing “Apply” to start.
After start, pressing “Stop” can stop.
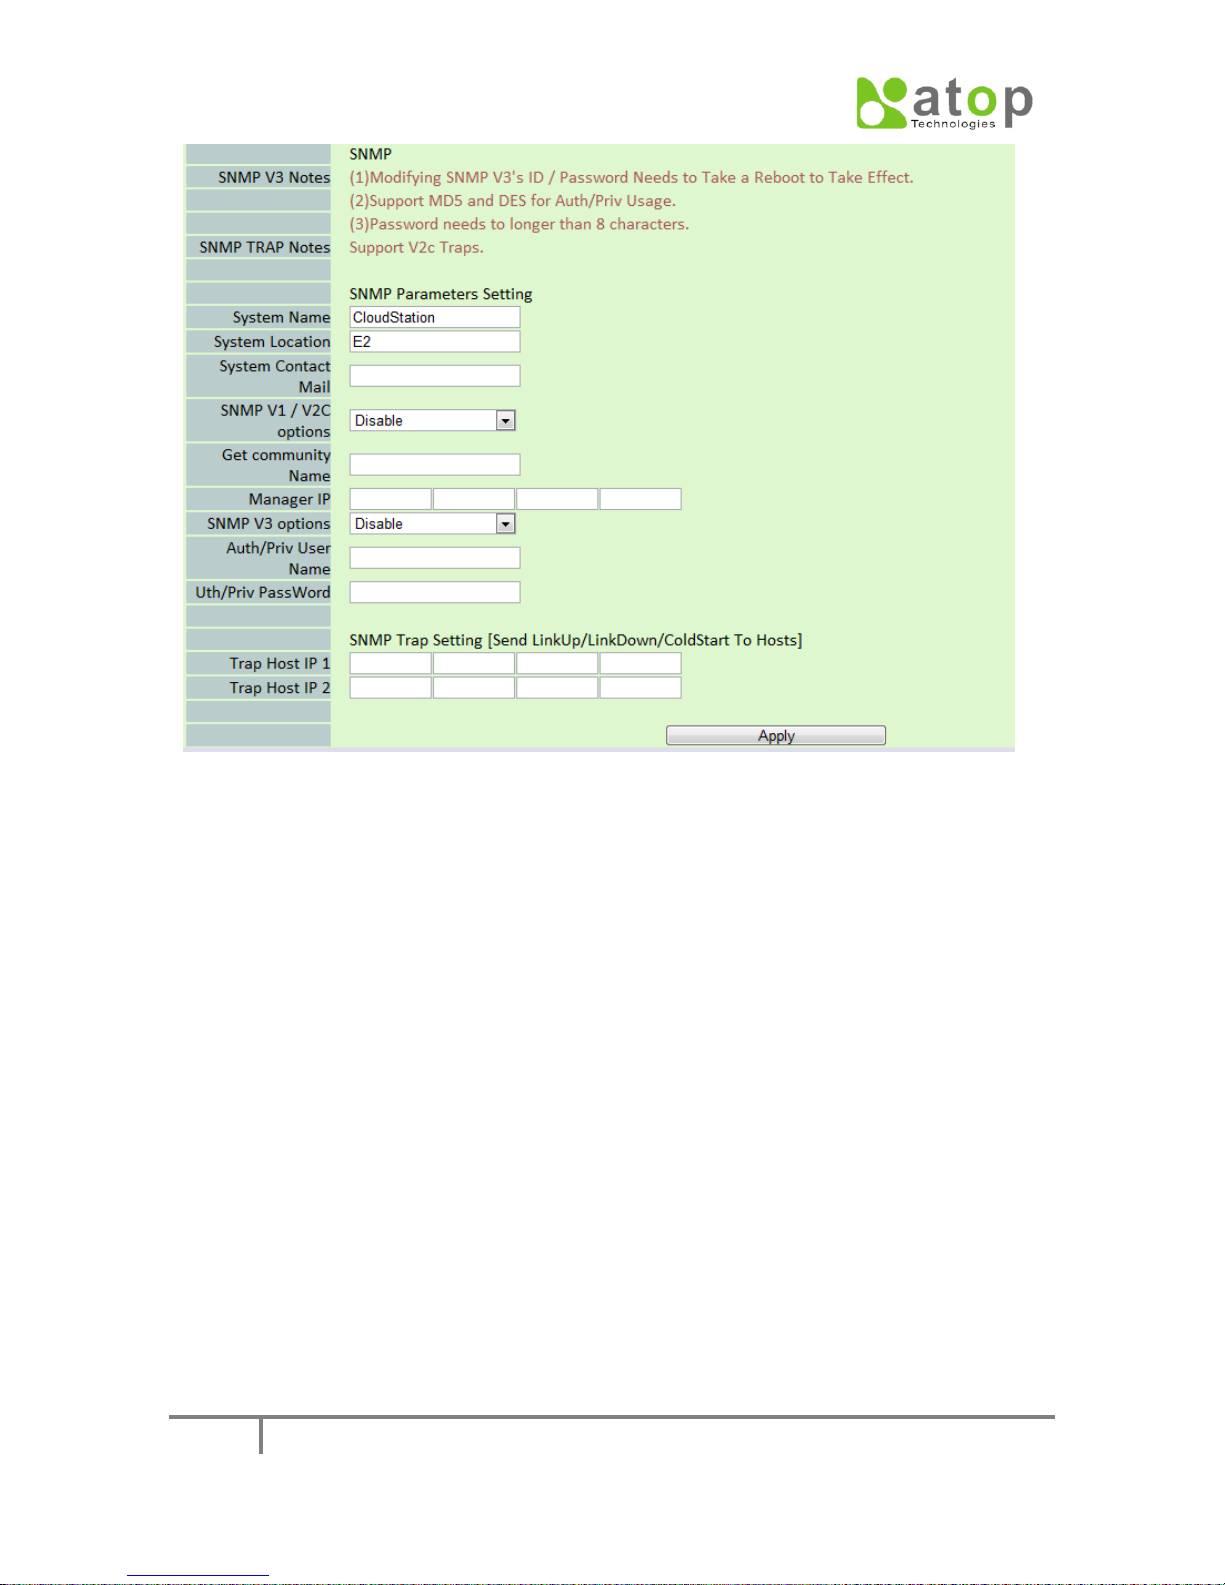
5. SNMP setup
SNMP (Simple Network Management Protocol) is a communication protocol
that provides host status monitoring for network administrators. The
information system administrators can get are host status, notification of
messages or events, etc. It is configured through “Net Management -> Snmp”.
CLOUDPROOF USER MANUAL
51
Fig.4-5
Entry parameters for setup SNMP are as follow:
System Name: The host’s name (hostname).
System Location: The host’s location.
System Contact Mail: Mail address which the host contacts.
SNMP V1/V2C option: SNMP V1 and V2C function On/Off option.
Get community Name: Administrator’s group name who can get the
information, generally the default value is “Public”.
Manager IP: The target IP which SNMP TRAP sent to.
SNMP V3 options: SNMP V3 function On/Off options.
Auth/Priv User Name: User name for SNMP V3 authentication
Auth/Priv PassWord: Password for SNMP V3 authentication
Trap Host IP 1: SNMP Trap target IP
Trap Host IP 2: SNMP Trap target IP
6. Syslog setup
Setup the remote syslog IP address, which receives the host’s system log
messages, generally provided for system maintenance. Enter through “Net
Management -> Syslog”.

CLOUDPROOF USER MANUAL
52
Fig.4-6
IP entry
Enter syslog server IP address.
7. Email setup
Setup the mail addresses which the host will send event messages to. In
certain conditions, the host will send messages concerning the host’s status to
system administrators. Enter through “Net Management -> Email”.
8. Net Security setup
If it is concerned should the service ports opened for CloudProof encounter
attacks, you can close certain unnecessary ports, or choose certain protections
for them, for example, DOS or Connection Limitation. Enter through “Net
Management -> Net Security”.
Fig.4-7

CLOUDPROOF USER MANUAL
53
Fig.4-8
HTTP Port
The HTTP login page port, default at 80, can be changed to another port (in case
confronts with other service ports, please choose a port number higher than 1024
as possible). If it is changed to a new port, the login URL should be changed to
“http://CloudProof IP: new port”.
HTTPS Port
The HTTPS login page port, default at 448, can be changed to another port (in case
confronts with other service ports, please choose a port number higher than 1024
as possible). If it is changed to a new port, the login URL should be changed to
“https://CloudProof IP: new port”.
Admin Port
The WEB management interface port, default at 8000, can be changed to another
port (in case confronts with other service ports, please choose a port number
higher than 1024 as possible). If it is changed to a new port, the management login
URL should be changed to “http://CloudProof IP: new port”.
Remote Users Service
May close some of the service ports that CloudProof doesn’t provide, Unchecking
the check box to close. The default is to open all.
Failover Link Web Service
May close Web service at the failover link, Checking “Enable” to open, “Disable” to

CLOUDPROOF USER MANUAL
54
close. The default is to open.
DoS (Denial of Service)
May prevent Syn-Flooding attacks, Checking “Enable” to open, “Disable” to close.
The default is to open.
Connection Limitation
To limit the number of connects to CloudProof from a same IP. In this way, malicious
connection attempts from a same IP can be prevented, checking “Enable” to open,
“Disable” to close. The default is to open.
All entries need be configured, after finishing, pressing “Apply” to start.
CLOUDPROOF USER MANUAL
55
4-2. System setup
System setup includes storage, time setup, etc. functions. They are described as
follow:
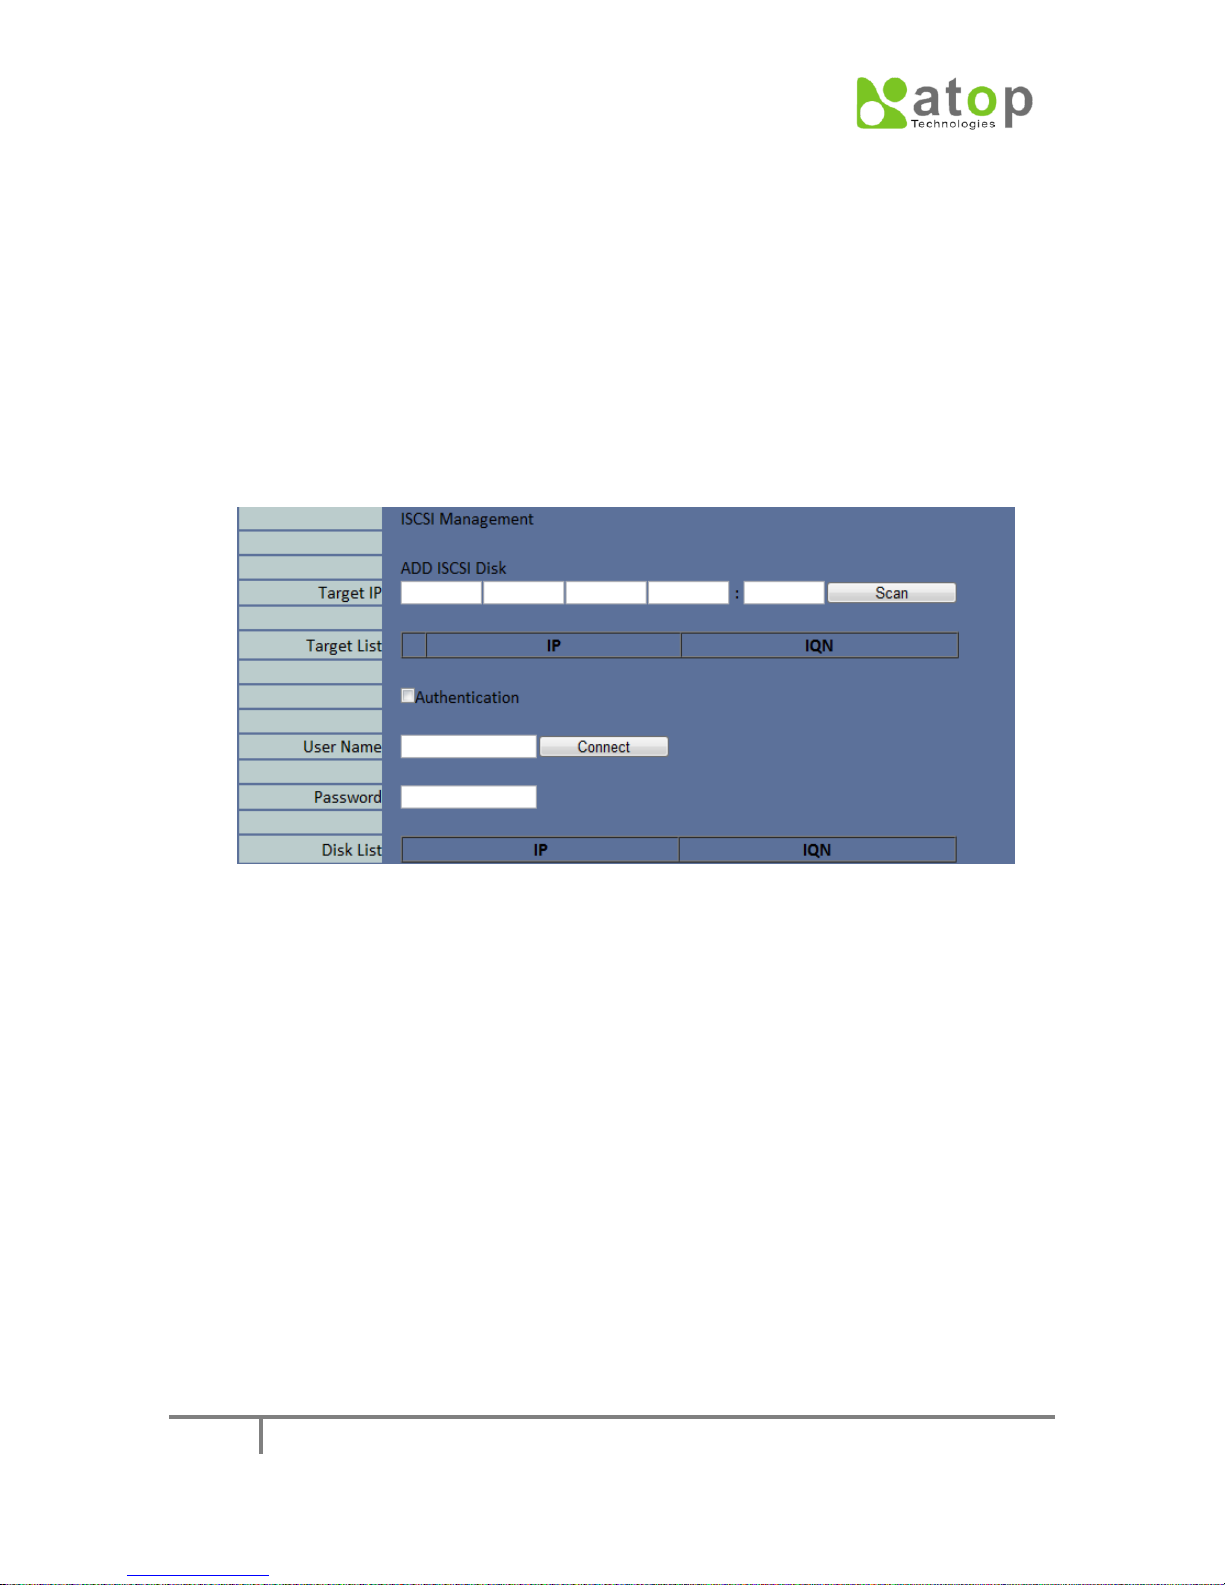
1. iSCSI Management
iSCSI storage device can be added into the storage capacity of CloudProof, to
increase the total storage capacity. To add iSCSI storage device, enter through
“System Setting -> iSCSI Management”
Fig.4-8
The management of iSCSI disc includes the scanning for iSCSI target, connect and
save.
iSCSI Scanning : Before connecting to iSCSI, it is necessary to get the target’s
disc list. Fill in the IP address of the target in the “Target IP” entry. If don’t
provide one, the last port entry will be 3260 as default. After finishing this
entry, press “Scan” to start the scanning action.
iSCSI connect : From the Target List generated after a successful scanning,
select the disc want create connect. If authentication is needed, check
“Authentication” and fill in user name and password, pressing “Connect” to
connect to iSCSI disc.

CLOUDPROOF USER MANUAL
56
2. System Time setup
Setup the system time. Login Admin page; enter through “System -> System
Time Setting”.
Fig.4-9
Set System Time Mode
May select the NTP automatic setting time mode, or the direct setting time mode,
filling in the correspondent information.
Time Zone
Select the time zone where CloudProof is located.
NTP Server
Fill in the NTP Server IP.
Time
Fill in time.
Date
Fill in date.
All entries need be configured, after finishing, pressing “Apply” to start.
3. Reboot
Enter through “System Setting -> Reboot”.
This page is for reboot the host. After filling in the administrator’s password, press
“Save” to start rebooting the host.
Fig.4-10

CLOUDPROOF USER MANUAL
57
4-3. Diagnostic function
The diagnostic function in the management page will help us understand the status of
how the host operates.
1. System status
Enter through “Diagnostics -> System Status”.
Entering the page in the following figure, it will display 2 tables of information:
“System Resource” and “Hardware Monitor”. System Resource indicates the
usage status of the system resource, including CPU, Memory, and the
capacity of system internal storage, file space and mail space.
Hardware Monitor indicates the condition status of hardware, including CPU
temperature, fan’s rotational speed, etc. This 2 information will be updated
every 30 seconds. You can observe time’s variation from the red color digit
updated in table columns on the following picture.
2. System Diagnostic – Ping :
Click through “Diagnostic -> Ping”.
In the entry encircled by a red block and labeled by “1” in the following
picture, enter IP;
Next, press the button encircled and labeled as “2”.
Fig.4-11

CLOUDPROOF USER MANUAL
58
Fig.4-12
Referred as the following figure, the correspondent information status table
will be displayed.
Fig.4-13
3. System Diagnostic – Arp table :
Click through “Diagnostic -> Arp table”.
Referred as the following figure, the correspondent information status table
will be displayed.
Fig.4-14
CLOUDPROOF USER MANUAL
59
4-4. Configuration File and Firmware upgrade
This section includes 2 important system functions in management page, Config File
and Firmware.
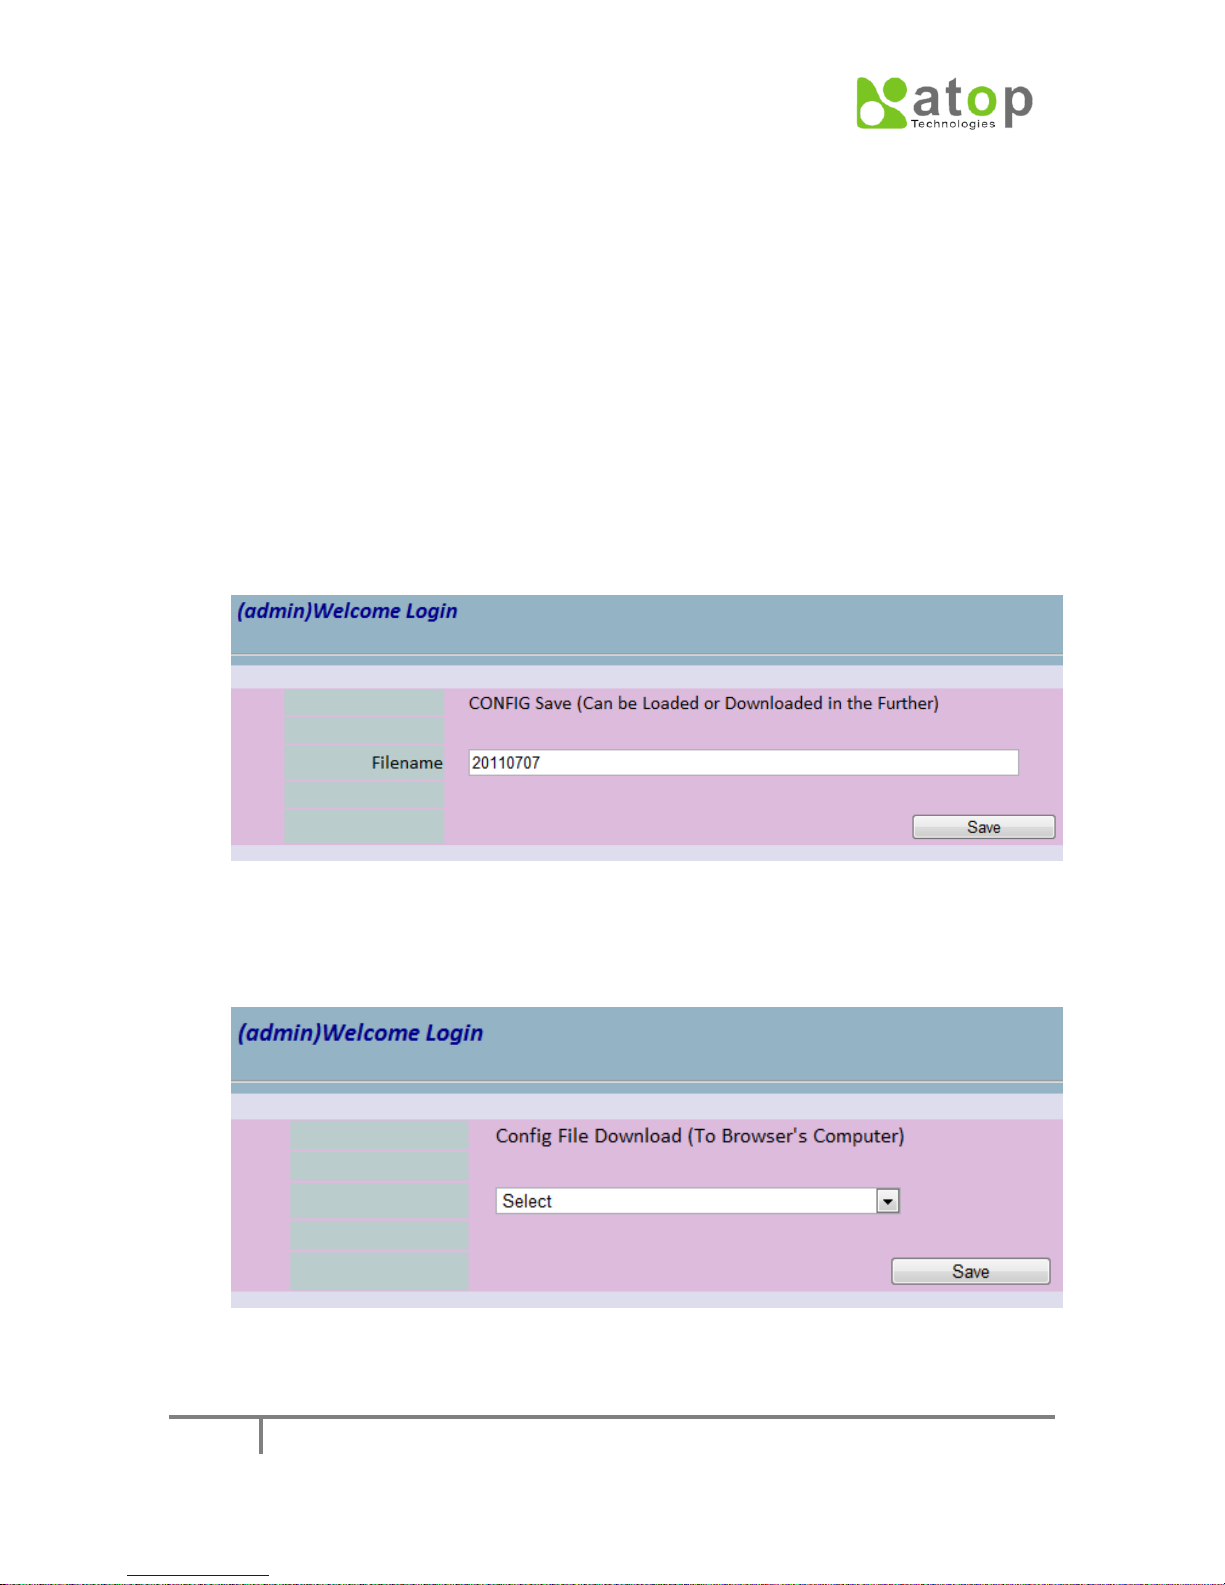
1. Config File Management
According to the configuration setup in the management page, it can be applied
Save, Download, Upload and Apply action to it.
Save: Administrator can save the current host configuration as an xml config
file, which can be latter loaded to restore the configuration. The steps are as
follow: Clicking through “Config File -> Save Temporary Configure to File”, in
entry “Filename”, fills in the file name and press “Save” to save, referred as
following figure.
Fig.4-14
Download : Clicking through “Config File -> Download”, in the “Select”
drop-down list, select the preferred xml config file once saved, then press
“Save” to download to the local computer, referred as following figure.
Fig.4-15
CLOUDPROOF USER MANUAL
60
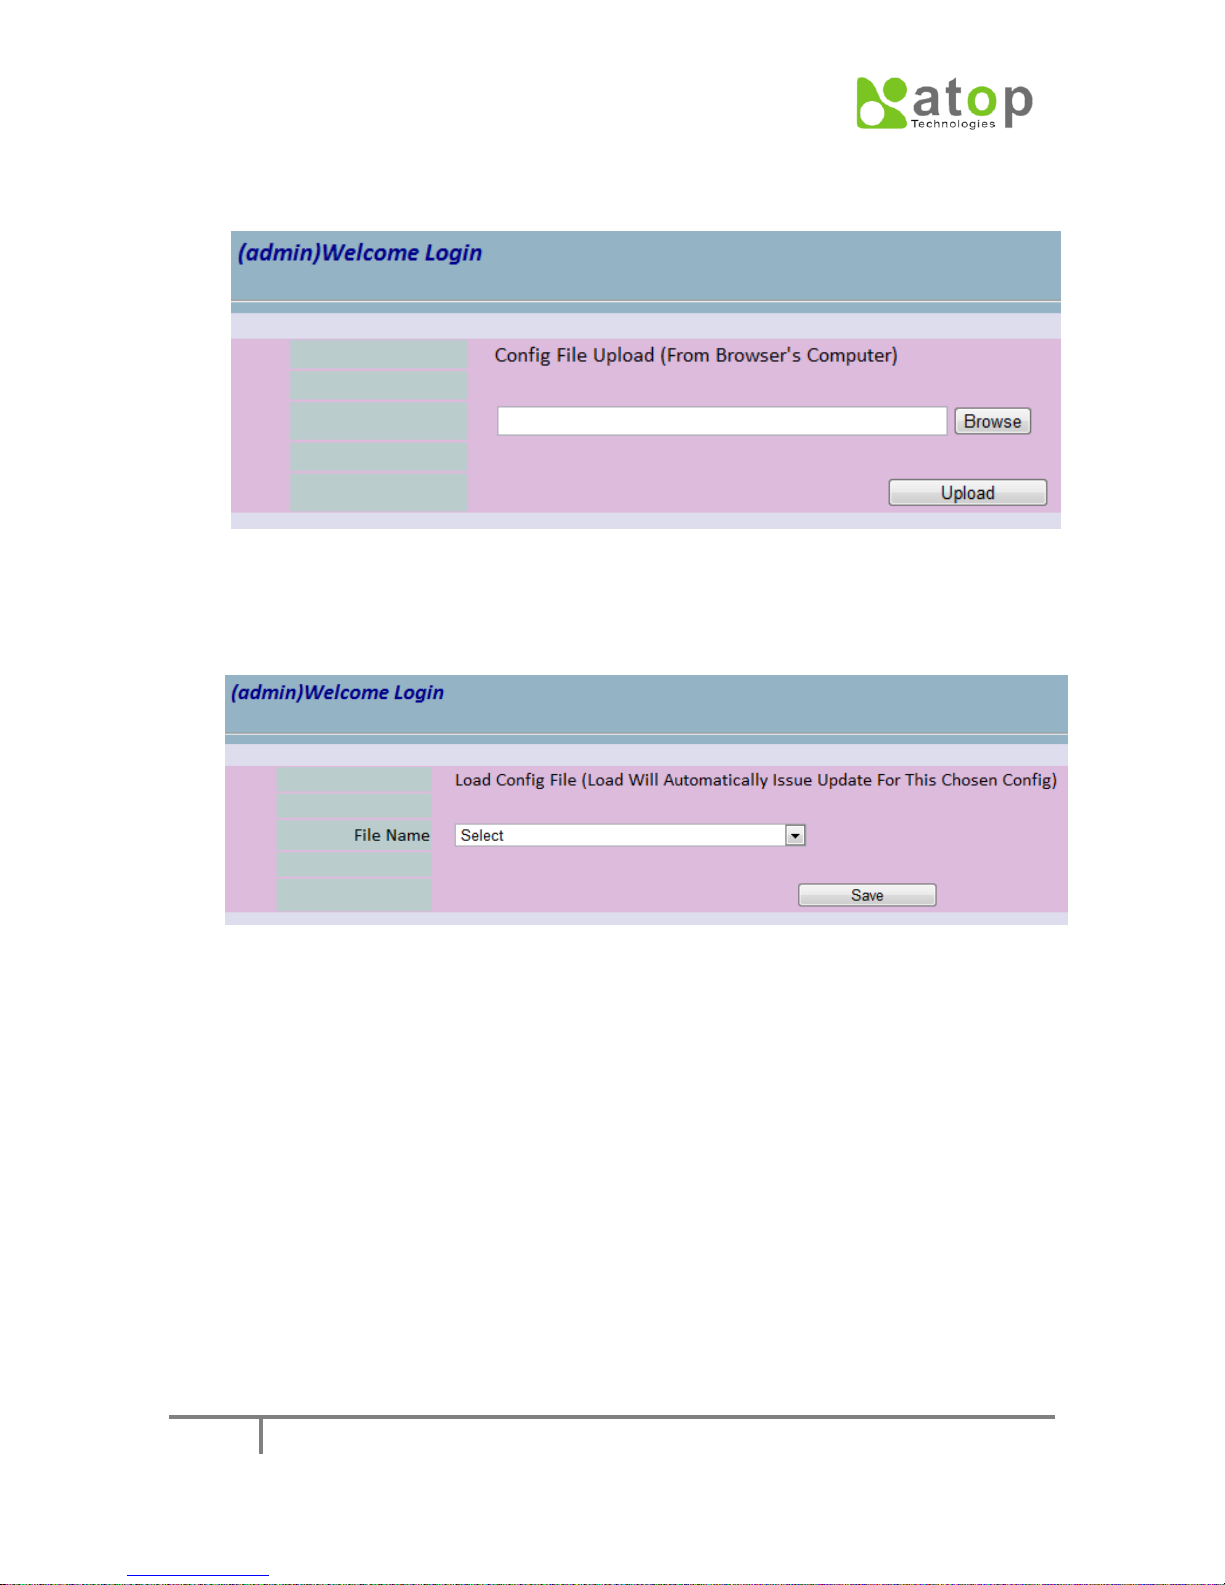
Upload config file: Clicking through “Config File -> Upload”, press “Browse” to
select the once saved xml config file from the local computer, then press
“Upload” to upload to the host, referred as following figure.
Fig.4-16
Apply the config file : Clicking through “Config File -> Load”, in the “File Name”
drop-down list, select the preferred xml config file, then press “Save” to
restore the host to this configuration, referred as following figure.
Fig.4-17

CLOUDPROOF USER MANUAL
61
2. Firmware Upgrade
Upgrade the firmware : Clicking through “Firmware -> Upgrade”, press “Browse”
to select the preferred firmware file (*.pkg) from the local computer, then
press “Upload” to upload to the host and upgrade its firmware, referred as
following figure.
Fig.4-18
Restore to the default firmware version: clicking through “Firmware ->
Default”, in “Admin password” entry, enter and re-enter the administrator’s
password, then press “Save” to start restoring to the default firmware,
referred as following figure. After finishing the above steps, the administrator
needs to restart the host.
Fig.4-19

CLOUDPROOF USER MANUAL
62
Chapter 5. Advanced Application
FAQ
 Loading...