

Page 1
USER' S MANUAL
Aton CL107
General
Getting Started
Basic Functions
SMS - Short Message Service
Call Lists
Handset & Base Setting
Extra Setting
Menu Structure Map
Warranty
Troubleshooting
Additional Information
6
12
17
22
28
36
44
50
51
53
54
Table of Contents
Page 2

The manufacturer is committed to continuous quality improve, for this reason
specifications and features may vary without prior notice.
Services such as Caller Display and SMS are available only if provided by your local
telephone network.
Ease of use - the large LCD display and the "cellular feeling" software
commands make the equipment user friendly, even by non expert people.
Color LCD display - customizable with wallpapers and backgrounds.
Alphanumeric phonebook - allows you to call your frequently used numbers
(up to 250). It saves your time and money, because you can quickly call them
and reduce the risk of wrong dialling.
Caller Display - to see who is calling and keep track of unanswered calls.
SMS capability - you can send and receive SMS messages just as a GSM
phone.
"Organizer" functions - your phone can be used as a convenient alarm, also
as a calculator.
Personal cordless network - you can create your personal cordless phone
network by connecting up to 5 (optional) handsets to your base. Moreover,
every handset can access up to 4 (optional) base units in order to extend the
total wireless coverage.
Handsfree operation - the
speakerphone of your handset allows you to enjoy the handsfree
conversations. Just put the handset on your desk and talk in total freedom.
Moreover, for operation in very noisy environments, you can also use the
external earphone/microphone.
12 polyphonic rings tones with sleep mode - the ring volume automatically
switches to the minimum volume in order not to disturb you in night time.
Very convenient if your phone is located near a bedroom.
Introduction
Congratulations on buying this cordless phone. Your new DECT (Digital
Enhanced Cordless Telephone) is designed with advanced features.
Moreover, there are a lot of features you will enjoy, the most important ones
are:
...and many others!
1
Note
Page 3

2
Warning Notes
Your DECT cordless telephone has been carefully designed to give you
years of safe, reliable performance. As with all electrical equipment,
however, there are a few basic precautions you should take to avoid hurting
yourself or damaging the unit:
!
!
!
!
!
!
!
!
!
!
!
!
!
!
!
!
Read the instructions in this handbook carefully. Be sure to save it for future
reference.
Read and follow all warning and instruction labels on the equipment itself.
Be sure to use only the supplied AC adapter and that your power source
matches the rating listed for it. If you are not sure, check with your dealer or
with your local power company.
Avoid strong shocks. Don't use the AC adaptor if it has received any hard
knocks or looks damaged in any way; immediately contact an authorised
service centre.
Grasp your handset firmly. Otherwise it may fall and be damaged.
Do not operate in an explosive atmosphere.
Do not use the phone near water, or spill liquid of any kind on it. If you think
that some liquid is penetrated into the phone, immediately unplug it, dry it by a
soft and clean cloth and contact your dealer.
Respect the environment conditions. All the parts of this equipment are
designed for indoor use only. Never expose them to extremely hot or cold
temperature. Don't expose the cordless telephone to excessive vibrations as
well as dusty or rainy places.
Never try to disassemble or service the equipment by yourself (aside from the
routine maintenance described in this handbook). It will immediately void the
warranty and you may cause damage requiring extensive repair work. Always
contact your local dealer for assistance.
Handle the batteries properly. Particularly, strictly follow the directions stated
in the handbook.
Never use the phone with non suitable batteries and charge them only with
the supplied base. The use of any non genuine parts can create hazards,
electric shocks and other risks. Moreover it will void the warranty.
In case of problems, please refer to this user's manual or contact your dealer
and/or the nearest official service centre. Every service operation not provided
by official service centres will void the warranty.
Use always good sense! Don't go on with any operations if you are not sure
what you are really doing. In case of doubts please contact your dealer.
This equipment is not able to make calls (including emergency ones) when the
mains power fails, when the handset batteries need to be charged (or are
faulty), when the keypad is locked.
This product must not be used near emergency medical equipment or by
people with medical equipment fitted (e.g. pacemakers). Moreover, the radio
signals between the handset and the base may interfere with hearing aids
causing strong noise.
When the handset is left off the base, then the display backlight will be turned
off after approximately 40 seconds to save battery power. Touching any key
will bring the backlight on at full brightness. After that you can use the handset
normally.
Page 4

3
Table of Contents
Feature List
The Unit Layout
Key Functions
Handset Display
Package Contents
Connection
Installing the Batteries
Charging the Handset Batteries
Turning Handset On/Off
Registering a New Handset
Deactivating a Handset
Setting Date & Time
12
13
12
13
Making a Call
Receiving a Call
Adjusting Voice Volume
Muting a Call
Using Speakerphone
Redialling Last Dialled Number
Flash Signal
Using a Pause
Out of Range Indication
Locking the Handset Keypad
Paging
6
8
9
11
15
14
14
16
17
18
18
18
19
19
19
19
20
20
20
Getting Started
Basic Functions
Table of Contents
General
Page 5

4
Setting Service Centre Number
Setting New SMS Alert
Writing/Sending/Storing a New Message
Using Inbox
Using Outbox
Explanation for the service MS over the fixed network“S ”
SMS- Short Message Service
Incoming Calls
Outgoing Calls
Phonebook
Reviewing/Dialling a Number in Incoming Calls List
Using Incoming Calls Options
Storing Phonebook Entries
Character Map
Reviewing/Dialling a Number in Phonebook
Using Phonebook Entries Options
Call Lists
Handset & Base Setting
23
22
26
25
27
29
28
28
29
30
31
30
33
32
24
Intercom
Call Transfer between Handsets
Setting Up a Three-way Conference Call
21
21
22
Selecting Ring Type & Volume
Setting Key Tone
Changing Handset & Base PIN Code
Changing Handset PIN
Changing Base PIN
Handset & Base Setting
34
36
35
34
35
Base Selection
37
Table of Contents
Page 6

5
Alarm
Setting Sleep Mode
Game-Sudoku
Calculator
Setting Access Code
Charge beep
Swisscom Menu
Extra Setting
Resetting the Handset or the Base
Setting Auto Answer
Setting Display
Selecting a Language
Changing Flash Time
Setting Call Barring
Resetting the Handset
Resetting the Base
Adjusting the Display Contrast
Selecting the Wallpaper
Selecting the Windows Style
Setting a Handset name
Menu Structure Map
Troubleshooting
Warranty
Technical Specifications
40
42
43
41
41
40
40
41
44
45
45
46
47
53
51
54
50
Additional Information
39
38
38
38
47
48
Maintenance/Warranty
Environmental impact
Conformity
52
52
51
Table of Contents
Page 7

6
Feature List
General
1.8G DECT technology with GAP
1.5 inches Large LCD display with 128 x 128 dots
matrix (5 lines) and 65K color
Phonebook with up to 250 entries
Outgoing calls list with up to 20 entries
Up to 5 handsets for optional for one base
Up to 4 bases for optional for one handset
12 Polyphonic ringtones and 3 ring melodies
4 ringer volume levels selectable
Three-way conference call
Call transfer
Vip ringer
Voice volume adjustable (5 levels)
4 languages selectable
LCD contrast adjustable (11 levels)
Flash time selectable
Key tone ON/OFF selectable
Charge beep ON/OFF selectable
Auto answer ON/OFF selectable
10 Wallpapers selectable
8 Window Styles selectable
PABX Access code setting
Handset Name setting
Talking time display
Internal call
PIN protection
Call barring
Handsfree
Mute function
Real clock
Keypad lock
Redial, Recall, Pause
Cordless Phone
Page 8

7
General
Preparation dialling
Swisscom Hotline
Sleep mode selection
Alarm
Calculator
Game-Sudoku
Illuminated keypad
FSK / DTMF Caller ID
Incoming calls list with up to 30 entries
Call back/Add to phonebook/Delete
New incoming call indicator
Private/Out of area
SMS ETSI protocol 1
Sending/receiving SMS (up to 160 characters)
Up to 40 Incoming SMS
Up to 5 Outgoing and draft SMS
New incoming SMS indicator
Subaddressing support
Reply/Forward/Call back/Add to Phonebook/Delete
Message Waiting Indicator (MWI)
Caller ID and SMS
Page 9
8
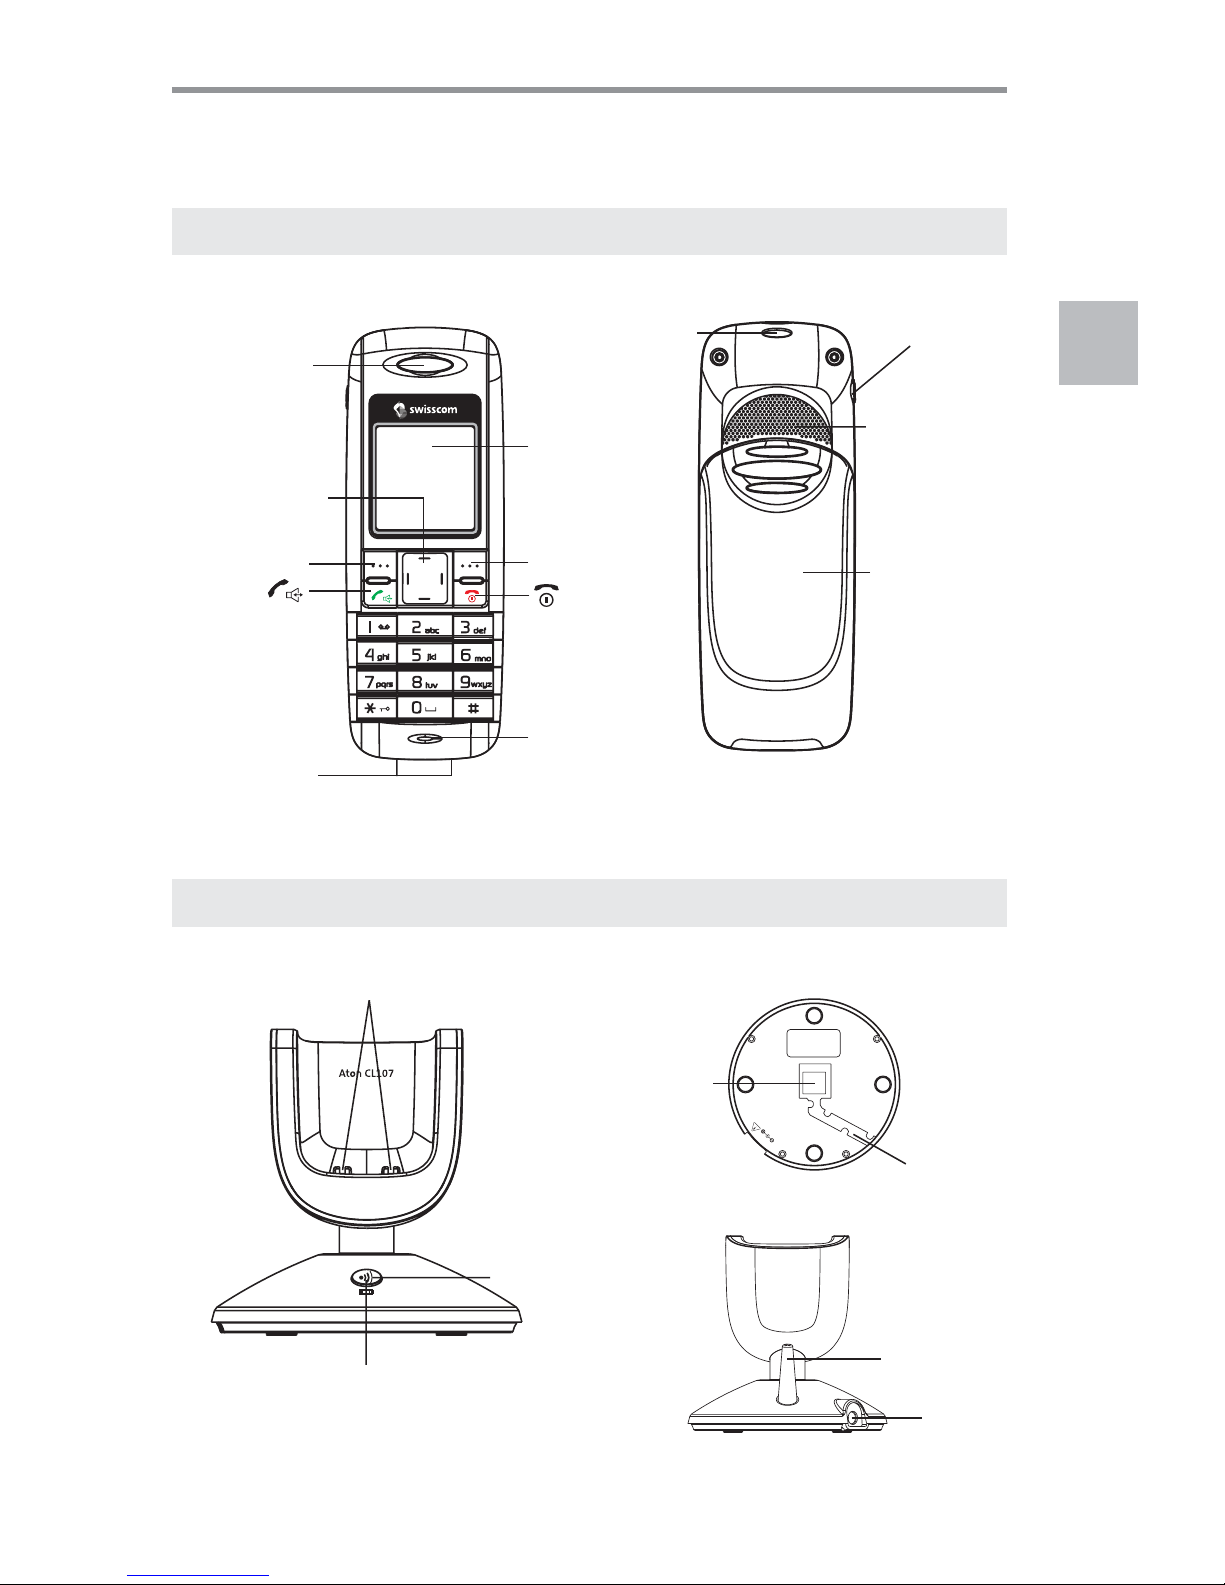
The Unit Layout
General
TEL.LINE
D
C
9
V
Paging key
Charging slot
Power
socket
Phone Line
socket
Routing
groove
Charging LED
Antenna
Earpiece
Microphone
Charge pins
LCD Screen
(1.5 inches)
Navigation keys
Left soft key
Right soft key
Earpiece
Terminal
Loudspeaker
Battery
compartment
cover
Hand strap
hole
Handset
Base
Page 10
9
General
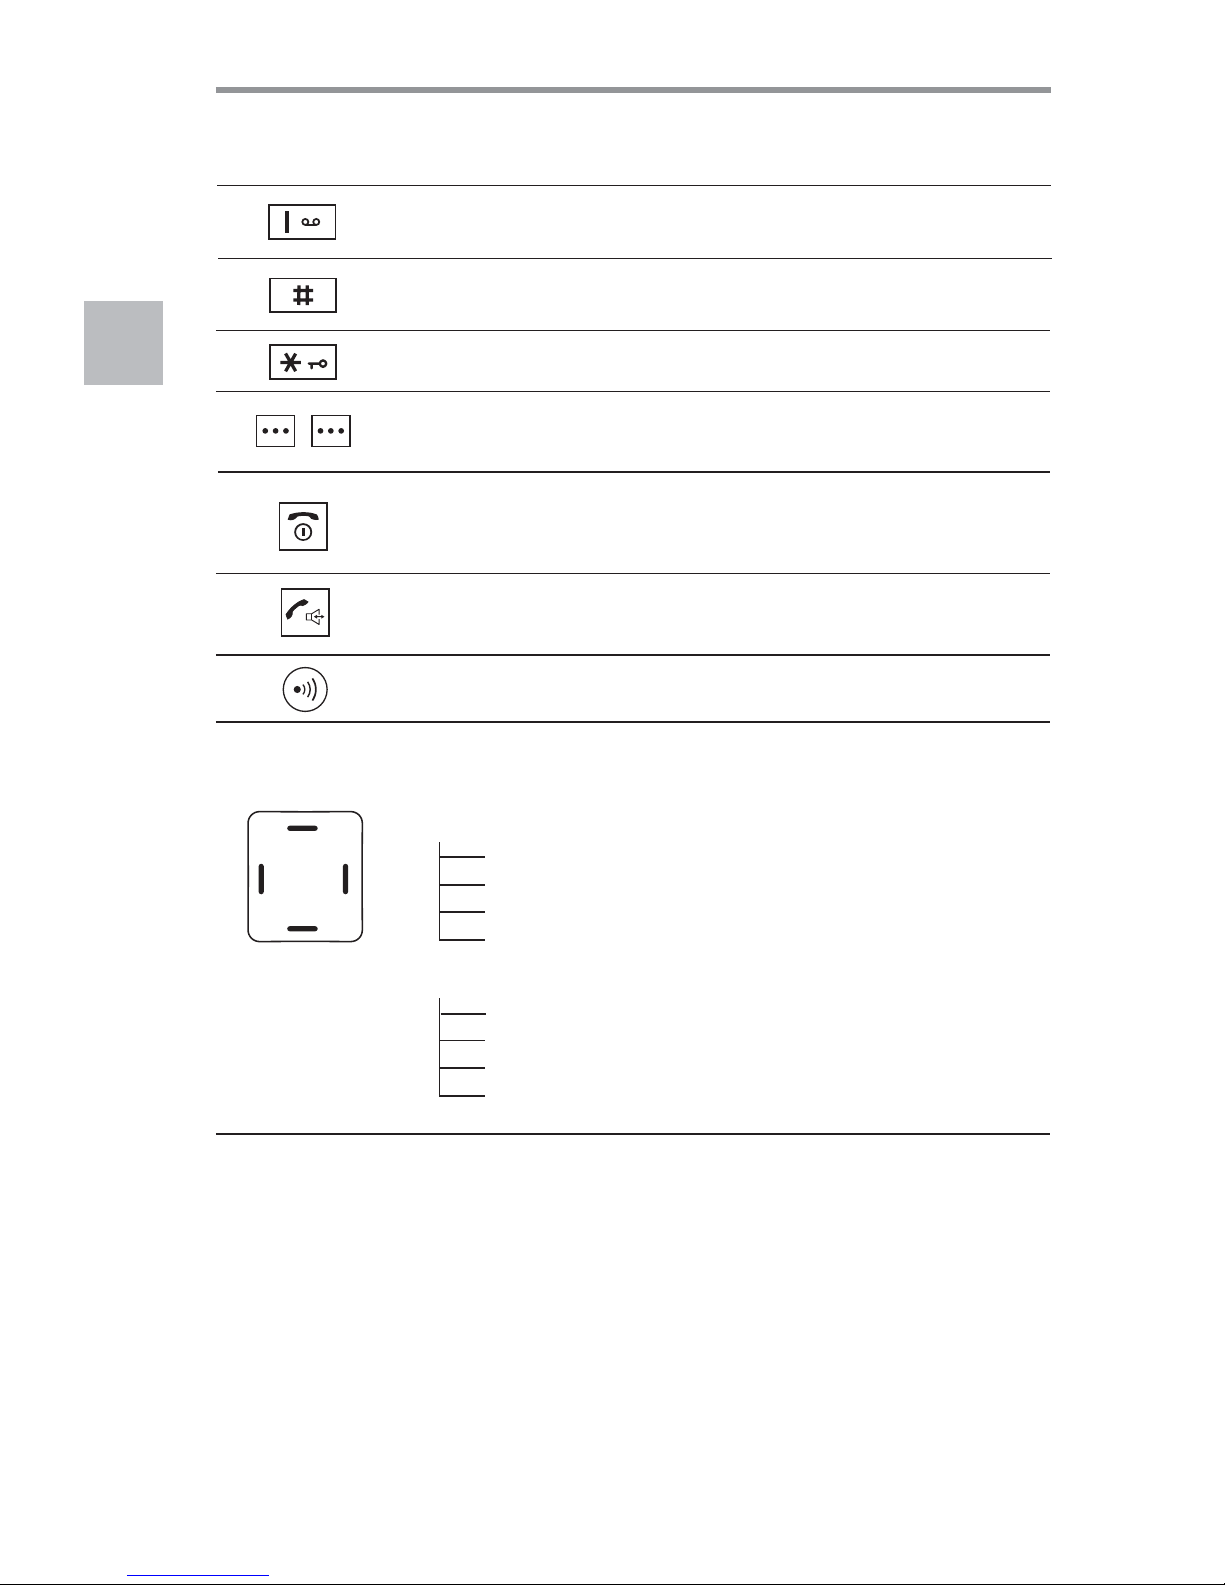
Key Functions
To locate the registered handset easily or register a new handset.
To enter # or switch between upper case and lower case in English
mode.
To scroll up/down when browsing selections.
To move the cursor to left/right when editing a record and use the
key to delete the wrong digits or characters.
In standby mode:
Left: One-touch for internal call.
Right: One-touch for incoming call list.
Up: One-touch for outgoing call list.
Down: One-touch for Phonebook.
In use mode:
Left: One-touch for internal call.
Right: Mute/Unmute the microphone.
Up: Increase receiver volume.
Down: Decrease receiver volume.
Left
Perform the functions indicated by the text immediately over them
(on the bottom line of the display) which changes time by time.
Press to turn the phone on. If held pressed, turns the phone off.
In menu mode, briefly press it to cancel your input and return to
standby mode. During a call, briefly press it to end the call.
Makes telephone calls and answers them. If pressed during a call,
activates the speakerphone for handsfree operation.
Press and hold to turn on/off keypad lock function.
Press and hold to dial out 086 in standby mode.
Page 11
10
General
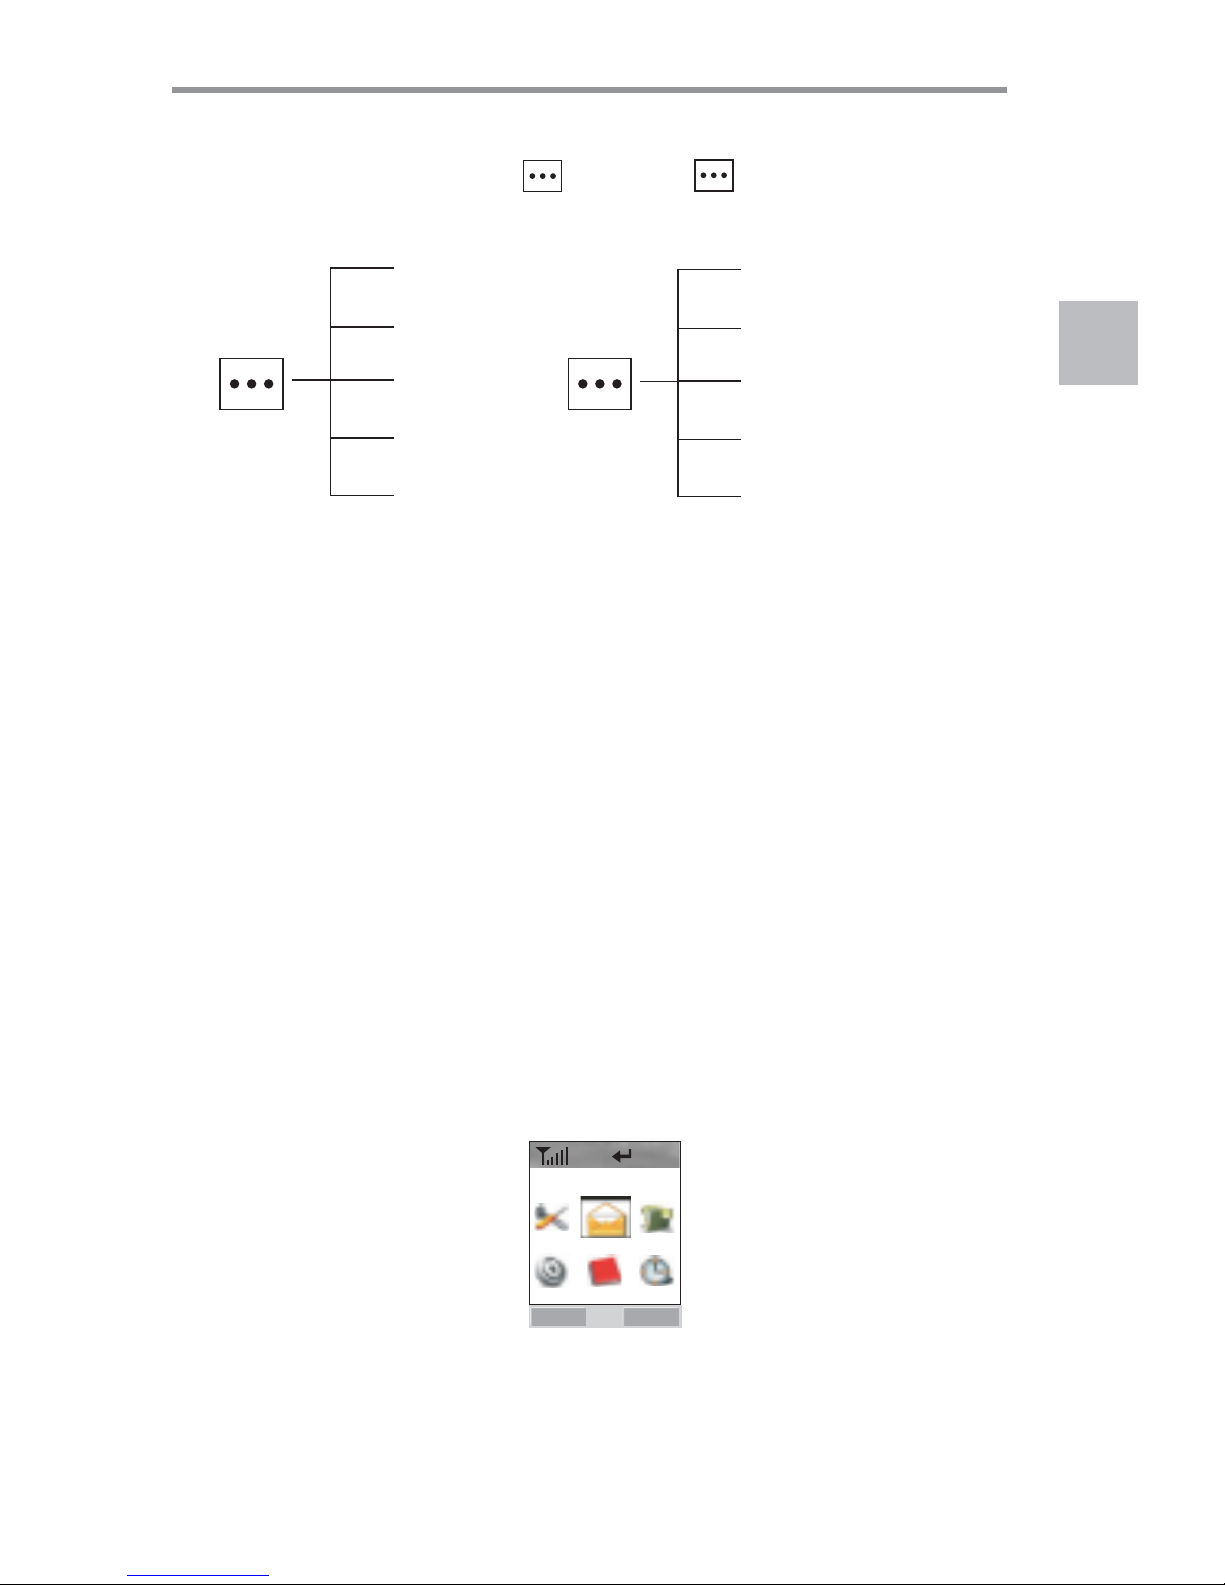
Display keys
SELECT
SAVE
R
CANCEL
PAUSE
REDIAL
ACCEPT
Left
Right
To switch between 2 callers (call waiting) or get a
new dial tone for another call.
R
Swisscom Contact Center number .0800 800 800
To redial the last outgoing number
REDIAL
To enter main menu. The LCD display shows as below:
To confirm.
In standby mode, to save numbers to Phonebook.
SELECT
SAVE
To insert a pause during dialling a number.
PAUSE
To cancel settings and go to the previous menu.
CANCEL
MENU
ACCEPT
To answer a call.
In different mode, press left and right buttons to initiate the
corresponding functions shown on the LCD display.
CLEAR
To clear digits or characters when you store phone numbers
or write messages.
CLEAR
MENU
SMS
CANCEL
SELECT
HOTLINE
HOTLINE
Page 12
11
General
A
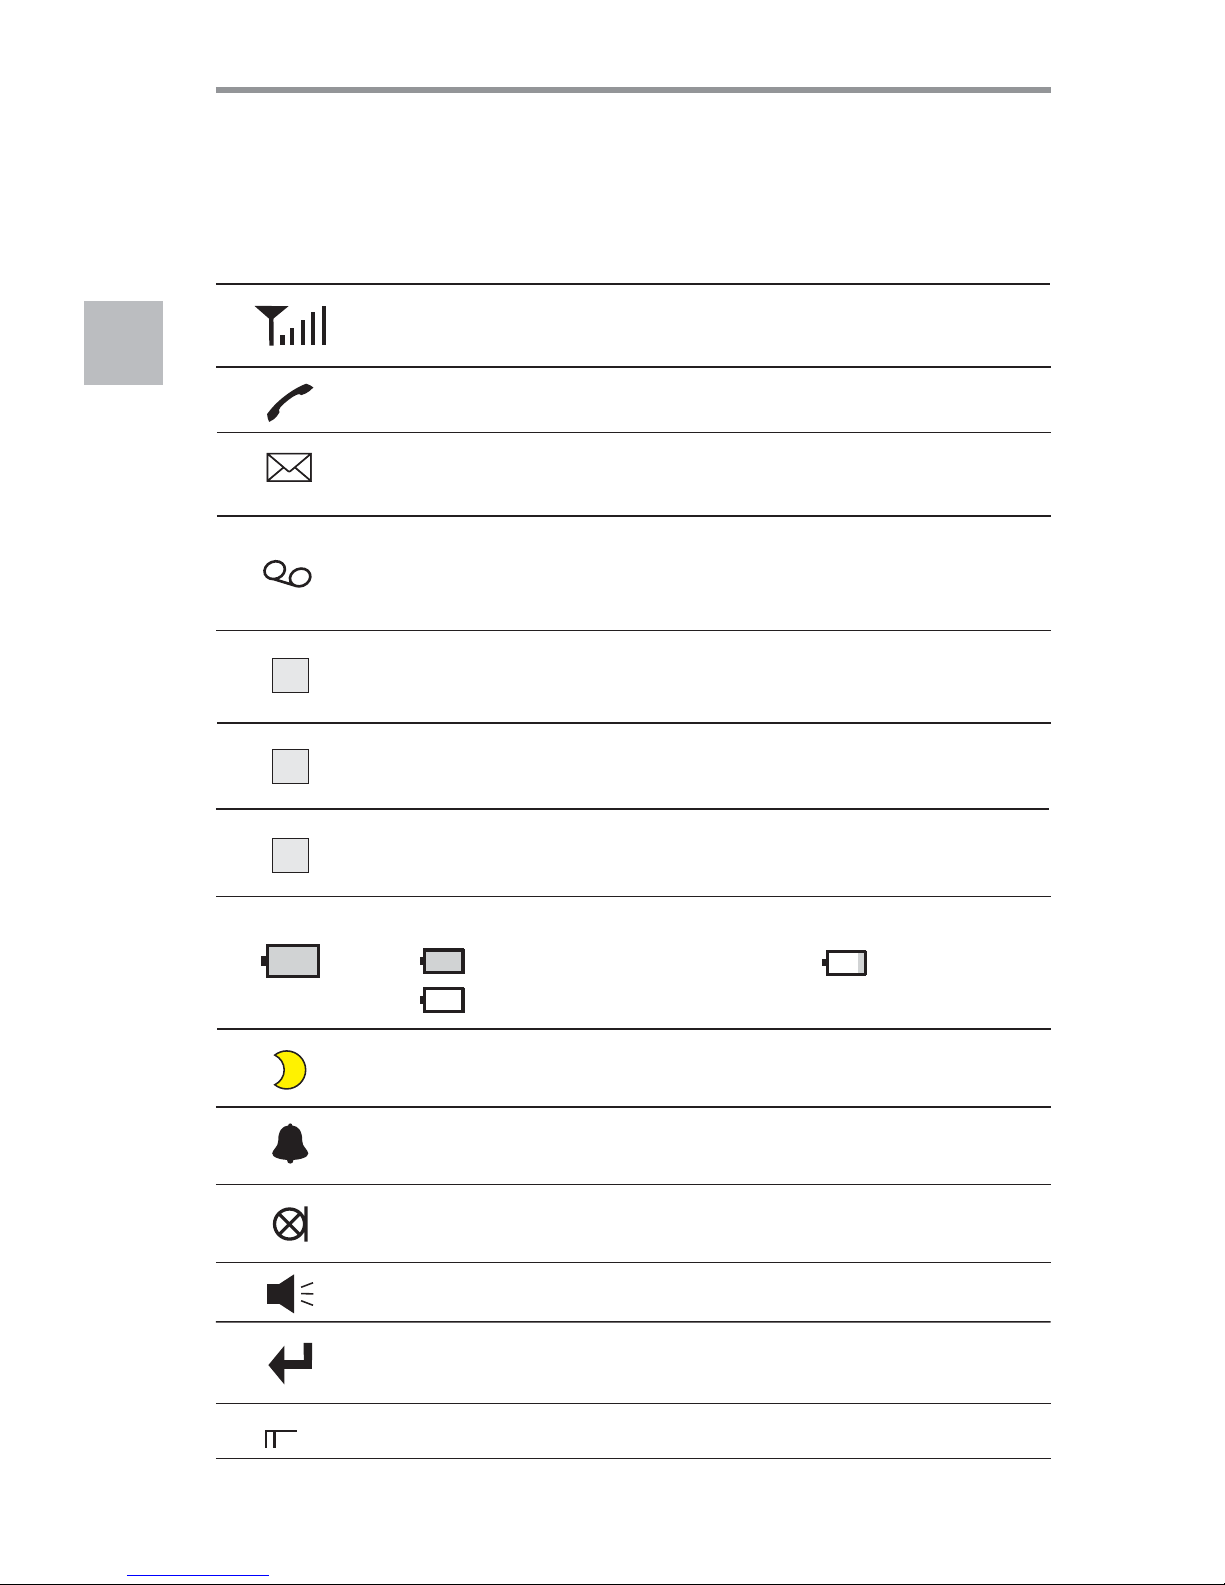
Information on the LCD display:
When the phone is in different mode, the LCD display shows different icons.
a
Handset Display
1
This icon appear when a new voice message has been
received in your Combox. It will disappear as soon as you
have called your Combox for retrival.
Indicates the line is engaged.
When this icon appears, it means that the character will
be entered in low case.
When this icon appears, it means that the character will
be entered in upper case.
Indicates battery charge level.
Fully charged status shown Low battery
Low battery warning
In standby mode, this icon will appear at the right of the
date if you have activated sleep mode.
When this icon appears, it means that you can only enter
digits.
Shows the current signal strength. The greater the number
of bars, the stronger the signal.
0
Indicates the microphone is temporarily muted during a
conversation.
Indicates the handsfree function is enabled.
Indicates you have missed one or more calls, and it will
disappear until you view the detail of the missed calls.
The icon appears when lock the keypad.
This icon appears at the left of time when you set an
alarm to ring at a specified time.
This icon indicates you have one or more new text
messages.
Page 13
12
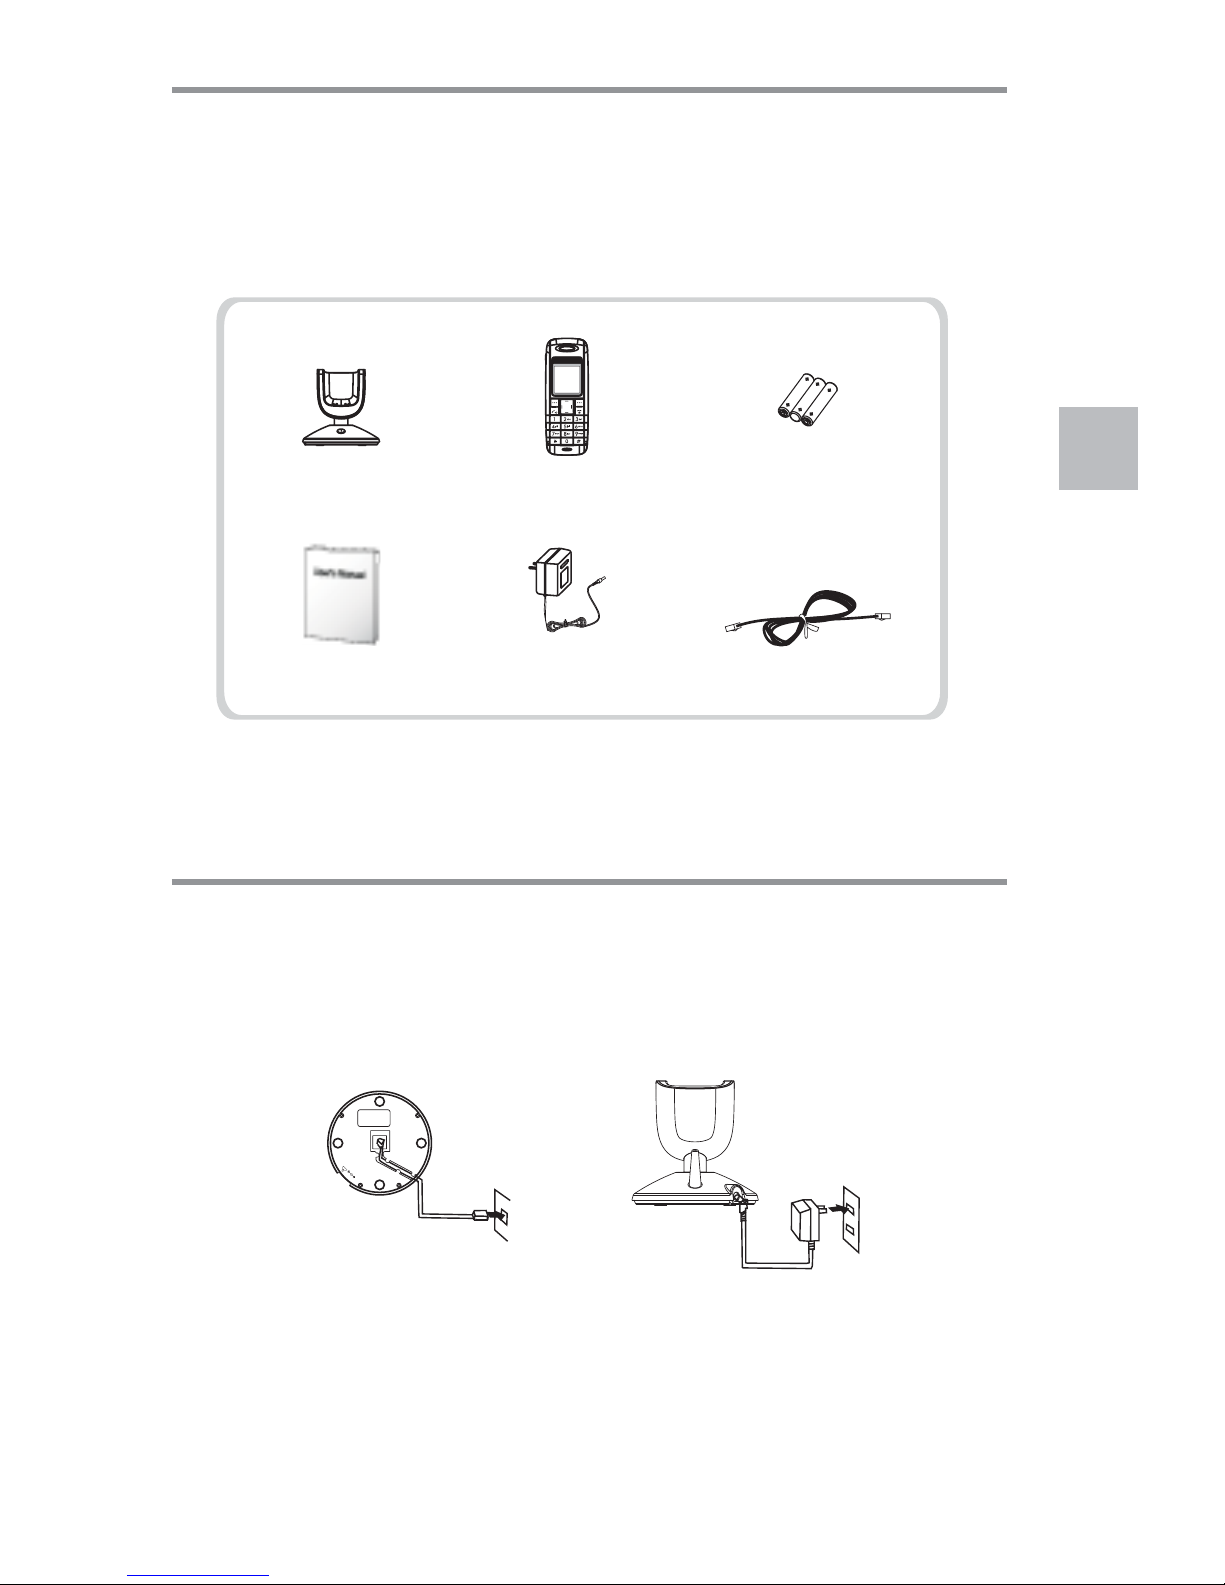
Package Contents
Once you have unpacked your phone, make sure that you have all the parts
shown below are available. If any piece is missing or broken, please
promptly call your dealer.
Switched power
supply*
Line cord*
User's manual
Base Handset
*The shape of the plugs can vary according to each country's specification.
3 x AAA Ni-MH
Rechargeable
batteries
Connection
Connect one end of the phone line cord to the phone line socket on the
bottom of the base, and the other end to a standard phone wall outlet.
Connect the modular end of the power adapter to the power socket of the
base, then plug the switched power supply into a standard AC wall outlet.
Route the cord through the routing groove as show.
1.
2.
3.
To AC wall outlet
Getting Started
To phone wall outlet
TEL.LINE
D
C
9
V
Page 14
13
Getting Started
1.
2.
3.
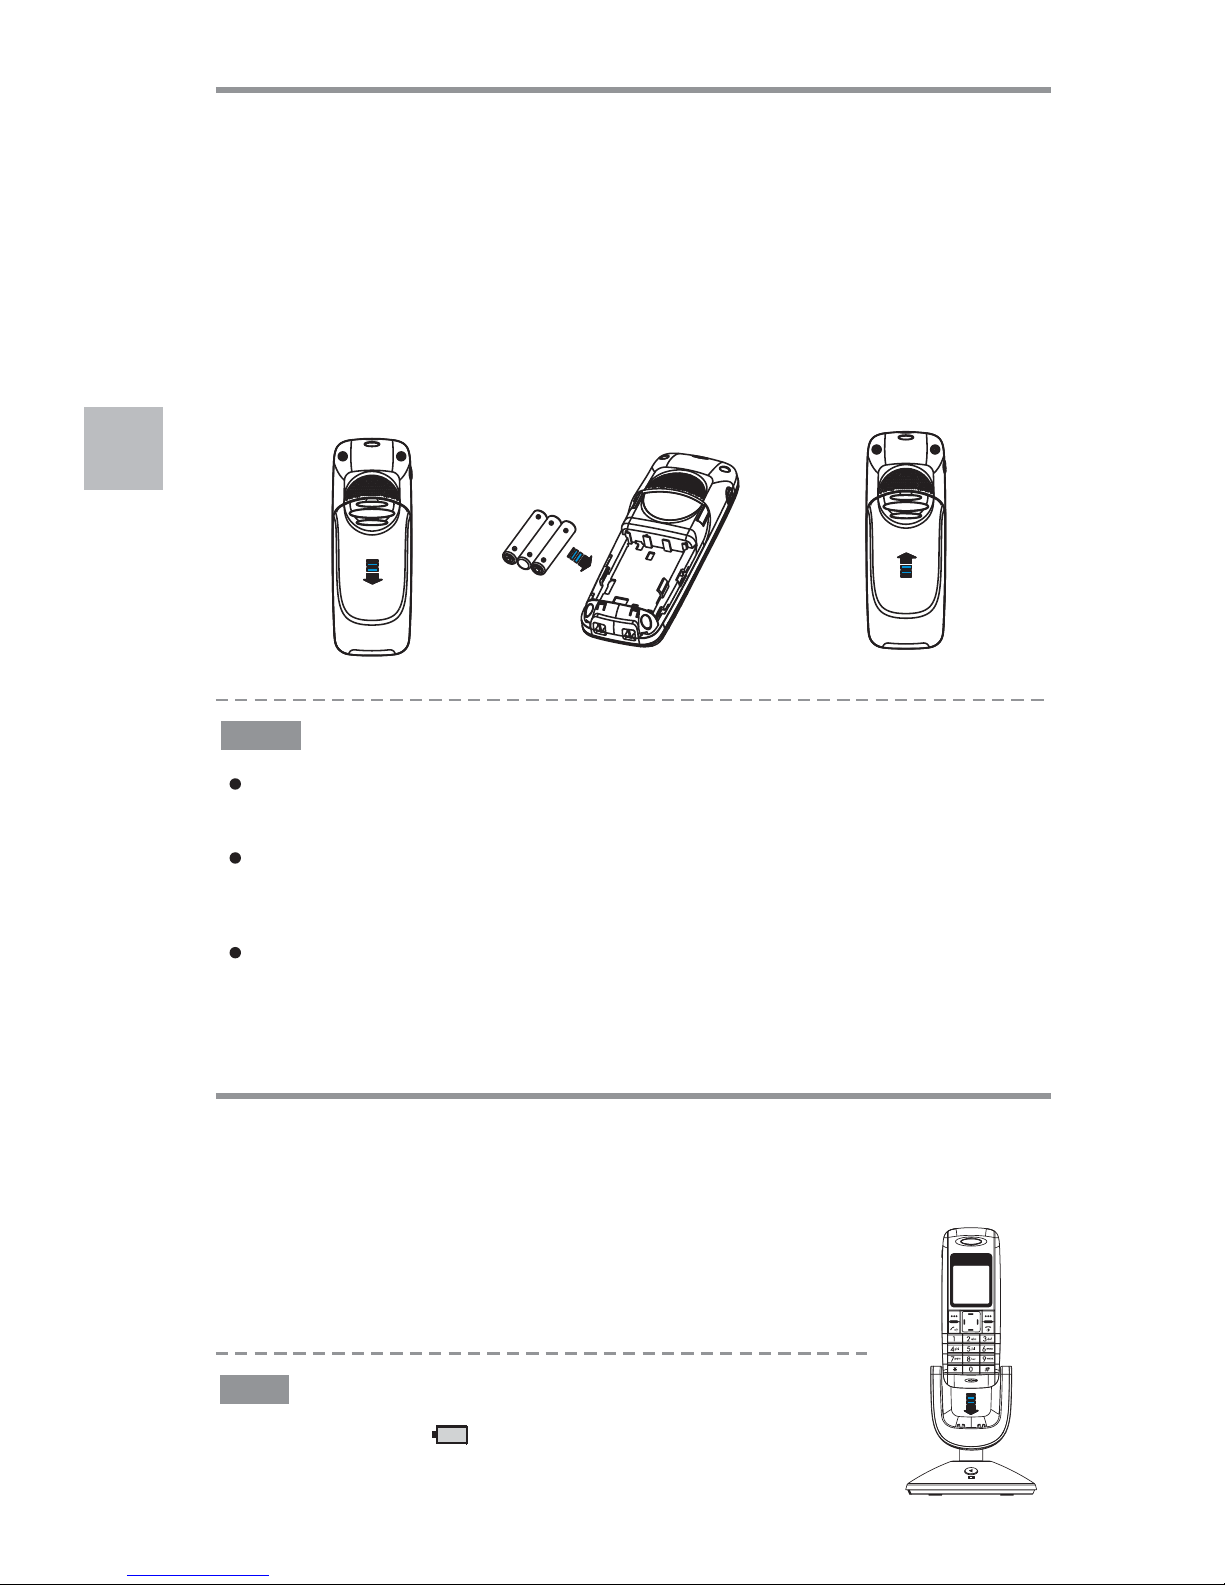
Installing the Batteries
Notes
Charging the Handset Batteries
Before initial operation, you should fully charge the handset's batteries for
15 hours or more.
To charge the handset, simply place it on the base, the charge
LED will be light.
When charging, the icon on the display will scroll.
Note
Slide the battery cover in the direction of the arrow and remove it.
Insert new batteries as indicated, matching correct polarity (+, -).
To replace the battery cover, slide the cover up until it snaps in place.
Three chargeable AAA Ni-MH batteries come with your phone. Install the
batteries before using your phone.
The batteries need to be replaced if they don't recover their full storage
capacity after recharging.
When replacing the batteries, always use some good quality Ni-MH rechargeable batteries. Never use other battery types especially
conventional alkaline batteries.
Reversing the orientation may damage the handset.
Page 15
14
Getting Started
Turning Handset On/Off
Nothing will appear on the display when the battery power is very low. You should fully
charge the handset before using it.
Note
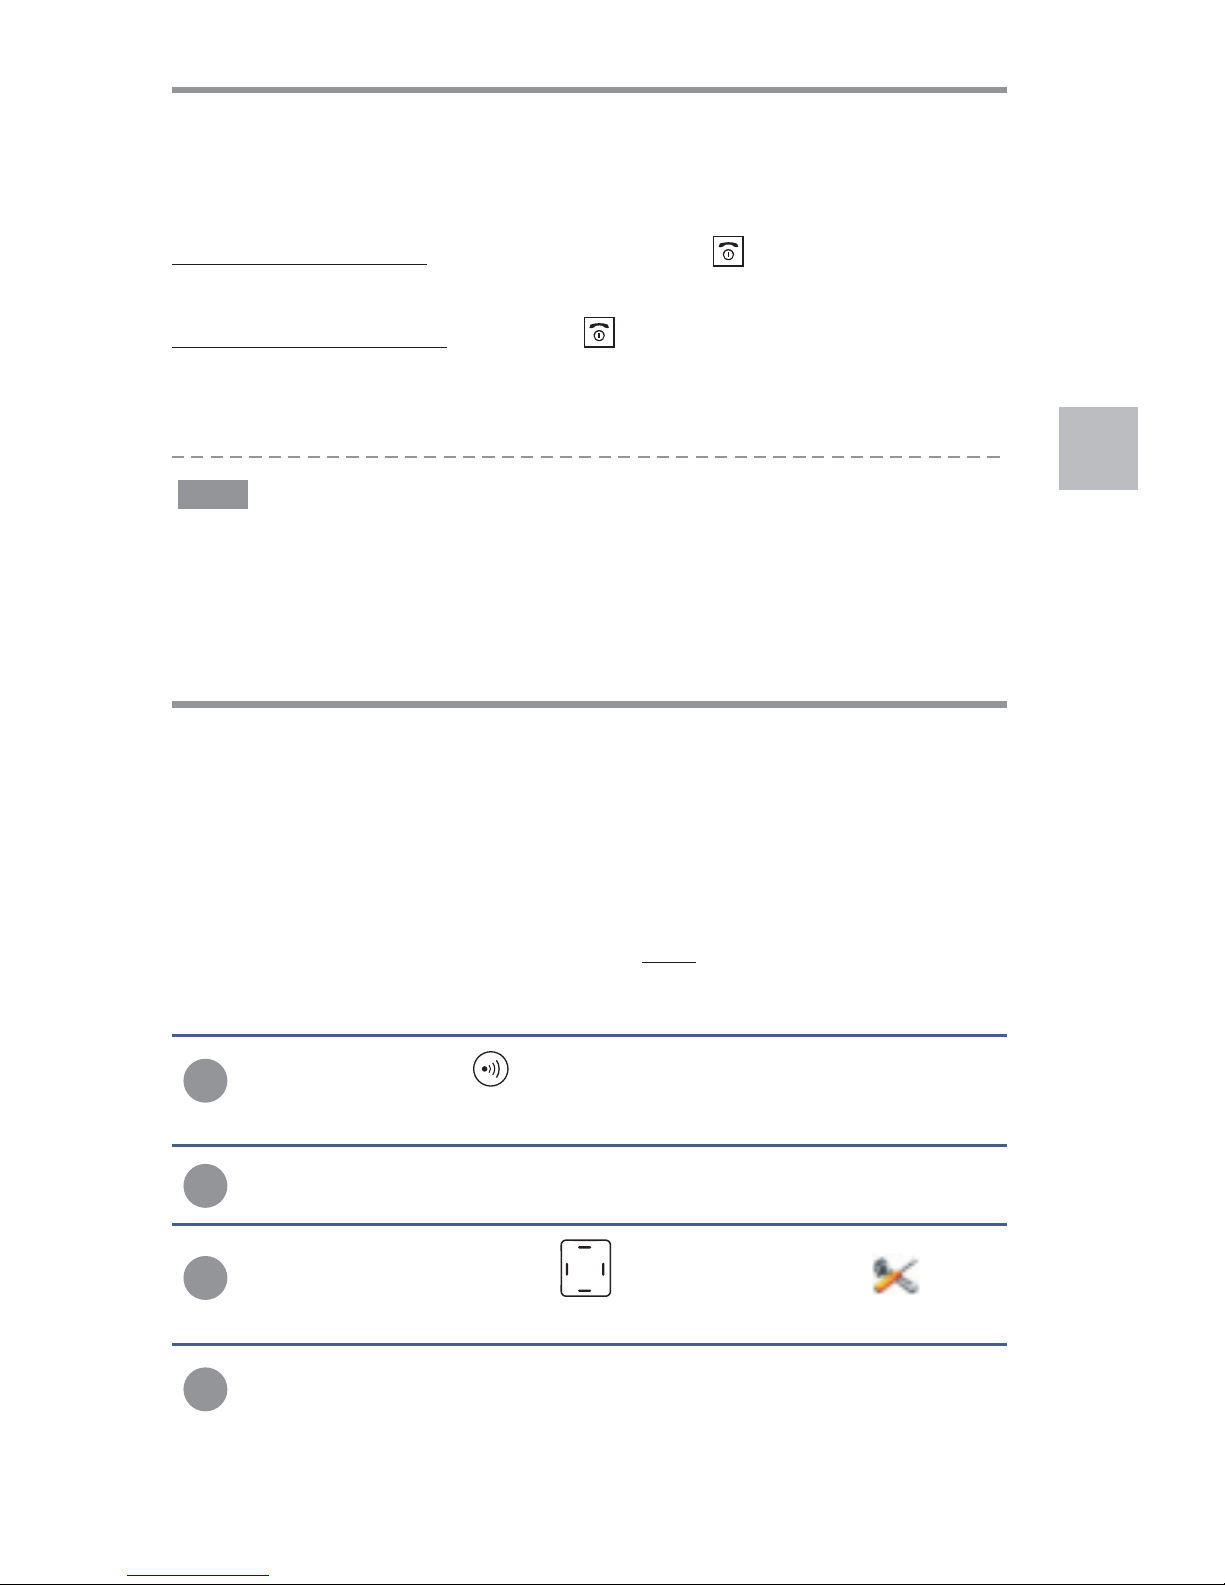
Registering a New Handset
You can register to your base additional handsets (up to 5 in total) in order
to share the same line with other people. To do that you should assign a
number to each new handset you will register. As you know, the supplied
handset is already registered with the number 1, in fact it shows . For
security reasons, the registration procedure can be done only by people
who are nearby your base and know the PIN which acts as phone's
authentication code.
HS(1)
base
1
2
Press key to display the main menu items.MENU
3
4
Press the or key to choose , then press
the key.
Up Down Register H/Set
SELECT
Press the navigation keys repeatedly to choose , then
press the key.SELECT
H/Set Setting
When you place the handset on the base, it automatically turns on.
(when it's off), press the button then you switch
the display on.
, keep the button pressed until " "
message appears. Then the display turns off.
To turn the handset on
To turn the handset off Goodbye!
Press and hold the button on the base unit for about 3 seconds,
then release the button.
Page 16
15
Getting Started
A handset can be registered to up to 4 different base units in order to extend the radio
coverage. A base can be used with up to 5 handsets in total. Obviously the base can
be accessed by one handset a time (because a base is connected to one line).
Note
5
6
Press key to confirm, the display shows a serious of digits
(register code). Press key again, then the display asks you
to enter the PIN code (preset to ) which acts as phone's
authentication code (AC). Enter this code and press the
key.
SELECT
SELECT
1590
SELECT
base
Press the or key to choose the base number you want.
Press the key in order to search the base. The display
shows " ".
Up Down
SELECT
Searching:
7
If the registration has performed successfully, the new handset will
show the phone and base numbers (e.g. ) and returns
to Standby mode.
HS(2) BS(1)
Deactivating a Handset
If necessary, you can clear the registration of a registered handset in order
to stop its access to one or more base units, but you can not deactivate the
handset you are using. Just deactivate it from another handset (of the same
type) which have registered to the same base. If only one handset or
different types of handsets are registered, it is not possible to deactivate the
handset. Please follow these steps:
1
Press key to display the main menu items.MENU
2
3
Press the or key to choose , then press
the key. Press the numeric key related to the handset
number you want to clear the registration, then press the
key. The display of the handset which you have cleared the
registration shows and it cannot be used anymore with
the base.
Up Down Release Handset
SELECT
SELECT
NOT SUB
Press the navigation keys repeatedly to choose , then
press the key. Enter the current base PIN (preset to )
and press the key.
SELECT 1590
SELECT
Base Setting
Page 17
16
Getting Started
Setting Date & Time
In Standby mode, the unit can show the current date and time to help you
keep your appointments.
You need to set the date and time so that the date and time when
messages or calls are received can be displayed correctly.
1
Press key to display the main menu items.MENU
2
3
Press the key to choose . The current settings are
displayed: the time on the upper line in the Hours:Minutes format
and the date in the Day-Month format in the lower line.
SELECT Clock
Press the navigation keys repeatedly to choose , then
press the key.SELECT
Extra
4
5
Press the key to save the setting.SELECT
Enter the current date and time using the number keypad (4 digits
for each as explained below in the notes).
The time setting must be entered in 24h format.
When setting the month, you can enter 1 digit or 2 digits at a time, but it displayed
in 2-digit format. (For example: To August, you can enter 8 or 08 in the month field,
but the display shows 08.)
In the state of FSK standard, the date and time will be automatically set when you
receive a call to this unit.
Notes
Page 18
17
Making a Call
You can dial numbers up to 25 digits which are shown in the display. If the
number is longer than 8 digits, the display automatically switches a smaller
font in order to accommodate the whole number. You can make your calls in
two ways.
1
2
3
To end the call, either press the key or replace the handset on
the base.
Dial a telephone number. The display shows the number as you
have entered it. When you hear your called party, speak with a
normal voice.
Traditional mode
Pick up the handset and press the key to engage the line. You
hear a dial tone, the icon appears in the icon area.
1
2
3
When the number correctly appears, press the key to dial it out.
Enter a telephone number. Check the number on the display.
High featured mode
This procedure is more convenient and reliable, because you can check the
number you have entered and eventually make corrections before dialling:
If you have made mistakes (i.e. the number you dialled is not the
one you wanted to call) modify it by using the key.Left
Basic Functions
Page 19
18
Basic Functions
Receiving a Call
When a call is received, the phone rings and the display shows "
". If the incoming call can be identified (i.e. caller's information is
transmitted from the network on which the call was made and the caller
doesn't hide it) you will also see the caller's number in the display.
, by pressing the key or the key. Or if the
handset is on the base and you have activated the " " function
(See page 39 for details), simply pick it up to answer the call, you don't
need to press any key. During the conversation, the display shows the
elapsed time.
To end the call, either press the key or replace the handset on the base.
Incoming
Call
ACCEPT
Auto Answer
Answer the call
The caller's identification can work only if your telephone network supports the service
as well as the caller's one. However the caller can still hide his/her number.
Note
Adjusting Voice Volume
During a conversation, press the or key to adjust the level of the
earpiece volume (or the handsfree speakerphone one, if activated). You can
adjust the volume in five levels which are showed by the bars of the icon .
The more bars filled blue, the louder the volume. When the last bar is filled
red, this means the voice volume reach the maximal level.
Up Down
Muting a Call
During a conversation, you can temporarily mute the microphone so that the
party on the other end of the line cannot hear you. During the period you
can still hear him/her. This mode allows you to have a conversation with
someone near you and avoid that the party at the phone is hearing what
you are saying.
, just press the key during the conversation:
the icon will appear on the display.
, just press again the key: the icon will
disappear and you will restore the normal condition.
To mute you microphone
To unmute the microphone
Right
Right
Page 20
19
Basic Functions
Redialling Last Dialled Number
Your phone allows you to quickly call again the last dialled number.
Pick up the handset and press the key to engage the line. Then press
the key to dial out the last dialled number.REDIAL
Flash Signal
When the line is engaged, the key sends the Flash signal. This key is
used in conjunction with special services (e.g. call waiting, conference etc.)
which can be available in your phone network. For further details please
contact your network telephone company. Moreover, if you are connected to
an extension of a switchboard (PABX), you can use the key to locally
transfer a call to another extension.
To transfer a call, or use the said special services, just press the key
while the line is engaged.
R
R
R
Using a Pause
A pause is useful when you access an interactive voice response system,
such as an automated banking system. A pause provides a delay of 3
seconds.
When you are dialling a number in Standby mode and need to insert a
pause, please press the key one time.PAUSE
Using Speakerphone
During a call, you may turn on the speakerphone built in the handset. In this
mode you can simply put your handset on a surface (e.g. a desk) and enjoy
the comfort of the handsfree conversation.
, press the key during a call (line engaged).
The icon appears on the display.
, and keep on talking in normal mode, press
again the key. The icon will disappear.
To turn the speakerphone on
To turn the speakerphone off
Page 21
20
Basic Functions
Locking the KeypadHandset
This function is useful to avoid unwanted function activations by accidentally
pressing any keys when you are carrying your handset. If you activate the
key lock, the keys are inhibited, except for the key.
In this condition, when a call comes in, you can answer the call by pressing
the key. When the call ends, the keys will be locked again.
, in the Standby mode just keep the key pressed till the
display shows the key lock icon .
, keep the key pressed again till the key lock icon
disappears from the display.
ACCEPT
ACCEPT
To lock the keys
To unlock the keys
Paging
You can page the handset from the base unit making it ringing with a
special ring. It's useful to locate a lost handset or call the user who currently
has the handset.
, briefly press the key located on the
base. All the phones registered with the base ring for 15 seconds.
, press the
again or any keys on the handset.
To send the paging signal
To stop the paging signal before 15 seconds are passed
Paging
Paging
If a call comes in while the handset is being paged, the handset stops the paging
operation and starts ringing normally in order to allow you to answer the call.
Note
Out of Range Indication
The bars at the right of the icon continuously show the signal strength
received from the base. If you are too far from the base, the radio signal
might become too weak and the phone might not access the telephone line.
In these conditions you can't make or receive phone calls, for this reason,
the icon turns to red.
0
0
Page 22
21
Basic Functions
Intercom
If you connected more than one handset to a base (you can connect up to 5
handsets to the same base), you can have a conversation between two
people using two different handsets.
1
2
3
If the called party can answer your call, he/she can press the key
and start talking. You can see the number of the handset of your
called party and the icon in your LCD display.
Press the number of the handset you want to contact (from 1 to 5).
Then the called handset starts to ring.
Pick up the handset and press the key, the display shows
"".
Left
INT->
4444
At the end of the conversation press the key to return to Standby
mode.
Call Transfer between Handsets
If you have more handsets registered to the same base, you can transfer an
outside call between the registered handsets.
1
2
When you are connected to an external call, press the key and
the number of the handset you want to contact
Left
(from 1 to 5).
If the called party can answer your call, he/she can press the key
and start talking.
3
If you want to transfer back the incoming call before the called party
answer, just press the key of your handset. The call will be
transferred back.
Left
5
Page 23

22
Setting Up a Three-way Conference Call
Explanation for the service MS over
the fixed network
“S
”
When you have both an external call and an intercom call in progress, you
can set up a three-way conference call, like this
Press and hold key of the your handset for more than 2 seconds to set
up a three-way conference call.
Note: The network operator must support the SMS function.
The SMS service allows the transmission or reception of text messages to
other devices. One message can have up to 160 characters. SMS service
can only be used, if the device supports the display of the subscriber
number (CLIP).
The sending number for SMS centre and receiving number
for SMS centre 1 are already preinstalled for Swisscom.
If the phone is connected to a PBX do not forget to enter the access code
(e.g. 0) before the number of the SMS centre.
In order to receive a SMS it is necessary that you have already sent at
least one SMS.
062 21000 062
21000
Basic Functions
Page 24
23
Setting Service Centr Numbere
To enable the SMS feature you should ask your service supplier the service
centre numbers and store it in your phone as below:
1
Press key to display the main menu items.MENU
2
3
Press the or key to choose , then press the
key.
Up Down SMS setup
SELECT
Press the key to choose .SELECT
4
Press the key to choose the .SELECT Service Centre
SMS
5
Press the or key to choose the ,
or . Then press the key.
Up Down For Receiving-1 For
Receiving-2 For Sending SELECT
6
If you choose the , enter the service number using the
numeric keys, then press the key. You can enter up to 16
digits.
If you choose the or , after
entering the service number (up to 16 digits), the display shows
" ", then enter the subaddress number ( ). Press
key to save the setting.
For Sending
SELECT
For Receiving-1 For Receiving-2
Subaddress: 0~9
SELECT
7
To return to the standby mode, press the key.
At step 6, if you make a mistake while entering a number, use the key to
correct it.
The default number of and are both 06221000.
CLEAR
For Receiving-1 For Sending
Notes
SMS - Short Message Service
Page 25
24
SMS - Short Message Service
Setting New SMS Alert
If you have activated this feature, when you receive a message, your phone
will generate a new SMS alert tone. The default setting is switching the alert
on which with icon.
1
Perform steps 1 to 3 of previous paragraph.
2
Press the or key to choose the .Up Down New SMS Alert
3
Press the key to activate the feature, and the icon will
appear at the right of the item.New SMS Alert
SELECT
4
To deactivate, press the key again, then the icon will
disappear.
SELECT
To return to the standby mode, press the key.
5
Page 26
25
SMS - Short Message Service
1
2
3
Press the key to access .SELECT Write Message
Press the key to access .SELECT
SMS
4
Enter the message text (up to 160 characters) by using the
alphanumeric keys, then press the key to choose:SELECT
Send
Store
stores the message in the folder without sending it.Outbox
5
If you previously selected , enter the phone number to whom
you want to send the message by using the keypad, or press the
key to enter the phonebook to choose a desired contact.
Then press the key to send.
When the message is being sent, the display shows "
", and then shows " " or " " according
to the sending result.
Send
Down
SELECT
SMS
Sending... SMS Sent Try Again!
Notes
Press key to display the main menu items.MENU
Writing/Sending/Storing a New Message
You can create a text message containing up to 160 alphanumeric
characters and send it as a SMS message. Opening the SMS input filed:
At step 4, to shift the case, press the key while entering text.
If you have an incoming call while creating a message, your phone will close the
text input filed and show the incoming call number automatically.
In some countries, you can send SMS messages to fixed line phones even if they
are not fitted with SMS capability. If your network operator fitted the line with the
SMS-to-voice conversion, the messages are delivered and "read" to the
addressee ad voice mail. Please contact your network operator for more details.
#
sends the message immediately to the desired destination.
Page 27
26
SMS - Short Message Service
1
2
3
Press the or key to choose , then press the
key. The display shows the sender's phone number, the
time in which the message was sent and the first part of the
message.
Up Down Inbox
SELECT
Press key to display the main menu items.MENU
Press the key to access .SELECT
SMS
4
Select a message that you want to read by using the key,
and press the key. The display will show the whole
message.
SELECT
5
You can access the following options by pressing the key:SELECT
Delete
Reply
Forward
Call Back
Add to Phonebook
Delete All
At step 2, the numbers to the right of each line show the number of related messages.
Those for show the number of new messages and the total number of
messages. If the total number is up to 40, then the display will show " " in the
standby mode.
If you have a voice mail service from your telephone company and a recorded
message is left, the display shows the black icon until you retrieve the voice mail
from your telephone company.
Inbox
Inbox Full
Notes
Using Inbox
While a message is being received, the display shows " ".
Then, if the message is received properly, the display shows "
" and the yellow icon until you read the message.
Your phone stores up to 40 messages recently received in the Inbox. You
can receive messages of 160 characters long. When you access
under the menu, you can read and edit the received messages.
SMS Receiving
New
Message
Inbox
SMS
353
To return to the pervious menu, press the key.
To return to the standby mode, press the key.
CANCEL
6
deletes the selected message.
replies by sending your reply message.
sends the received message to other person.
allows you to call the sender back.
saves the sender's number in your phonebook.
deletes all the received messages.
Page 28
27
SMS - Short Message Service
4
Select a message that you want to edit by using the or
key, and press the key to access the following options:
Up Down
SELECT
Edit
Delete
Delete All
Using Outbox
The on your phone stores the last 5 outgoing and draft messages.
If necessary, you can review or resend any message stored in the .
Outbox
Outbox
1
2
3
Press the or key to choose , then press the
key. The display shows the list of the outgoing messages.
Up Down Outbox
SELECT
Press key to display the main menu items.MENU
Press the key to choose .SELECT
SMS
At step 2, the numbers to the right of each line show the number of related
messages. Those for show the total number of messages.Outbox
Note
edits the selected message and then press the key
to send it or store it.
deletes the selected message.
deletes all the sent and stored messages.
SELECT
Page 29
28
Call Lists
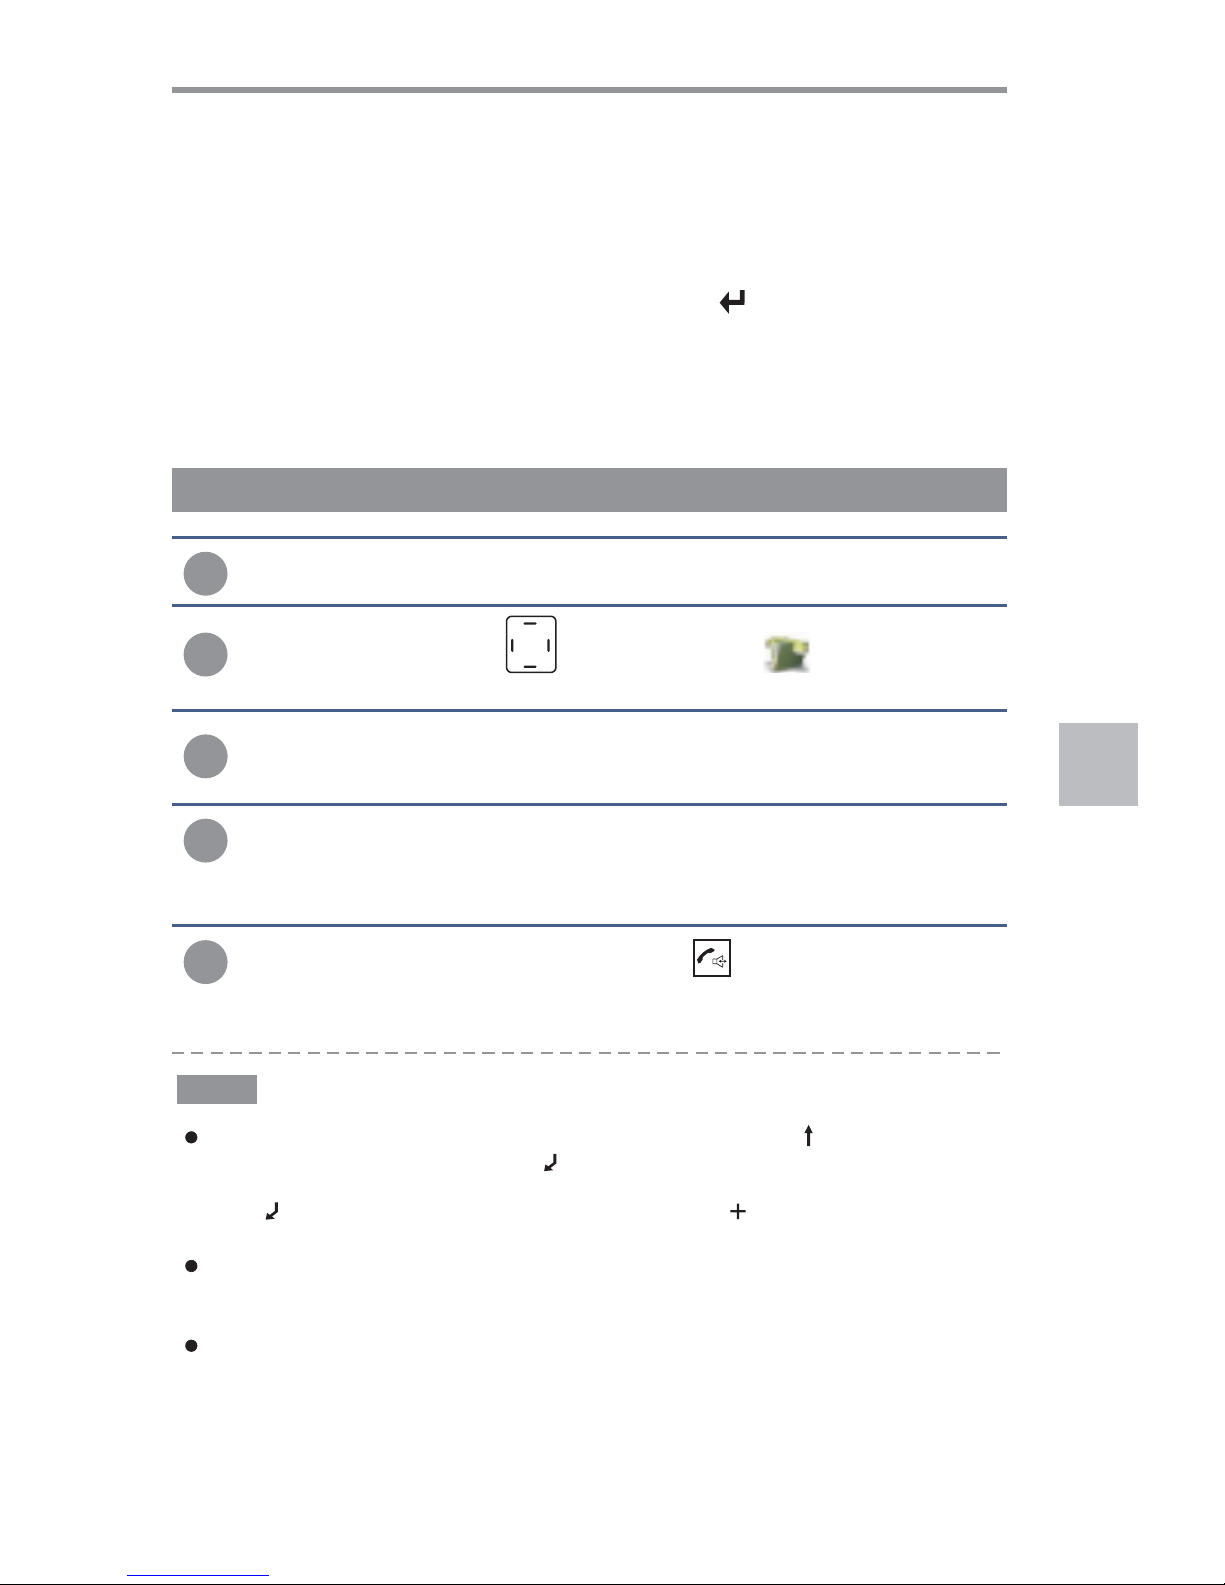
Incoming Calls
4
Scroll through the incoming calls list using the or key until
you find the desired number, and press the key. You will
see the date/time in which you received the call.
Up Down
SELECT
3
Press the key to access . The list of
incoming calls is displayed on the screen.
SELECT Incoming Calls
353
To place a call to the number, press the key.
5
At step 3, each item of the incoming list is marked with the icon if the call was
really a received call or with the icon if the call was missed (not answered or
dropped before you could do that). If a missed call has viewed the detail, then the
icon will disappear. If a caller's number repeat, the icon appears in the middle
of the icons area.
When the LCD display shows the message " ", you can press the
key to access the Incoming Calls list to view the details or press the
key to return to the Standby mode.
If an incoming call number is longer than 16 digits, the icon shows at the right
side of the time.
Missed Call xx
OK CANCEL
>>>
Notes
Review/Dialling a Number in Incoming Calls List
When you receive a call, if the caller's information is transmitted from the
network on which the call was made (and the caller doesn't hide it), the
caller's phone number is displayed. Moreover, when there is a received call
which you missed, the pop up message " " followed by the
number of missed calls (01, 02, etc.) and the icon will appear on the LCD
until you view the details of the missed call.
The last 30 received (or missed) calls are stored in the list,
and you can call the said numbers back, delete or store them in the
phonebook. To view the number you can go to the list.
Missed Call
Incoming Calls
Incoming Calls
Call Register
1
Press key to display the main menu items.MENU
2
Press repeatedly the key to choose , then press the
key.SELECT
Page 30
29
Call Lists
1
2
Find the desired number in the incoming calls list.
Press the key to display the information of the call.SELECT
4
3
Press the key to display the option menus.SELECT
Using Incoming Calls Options
You can save, delete or dial a number in the incoming calls list as follows:
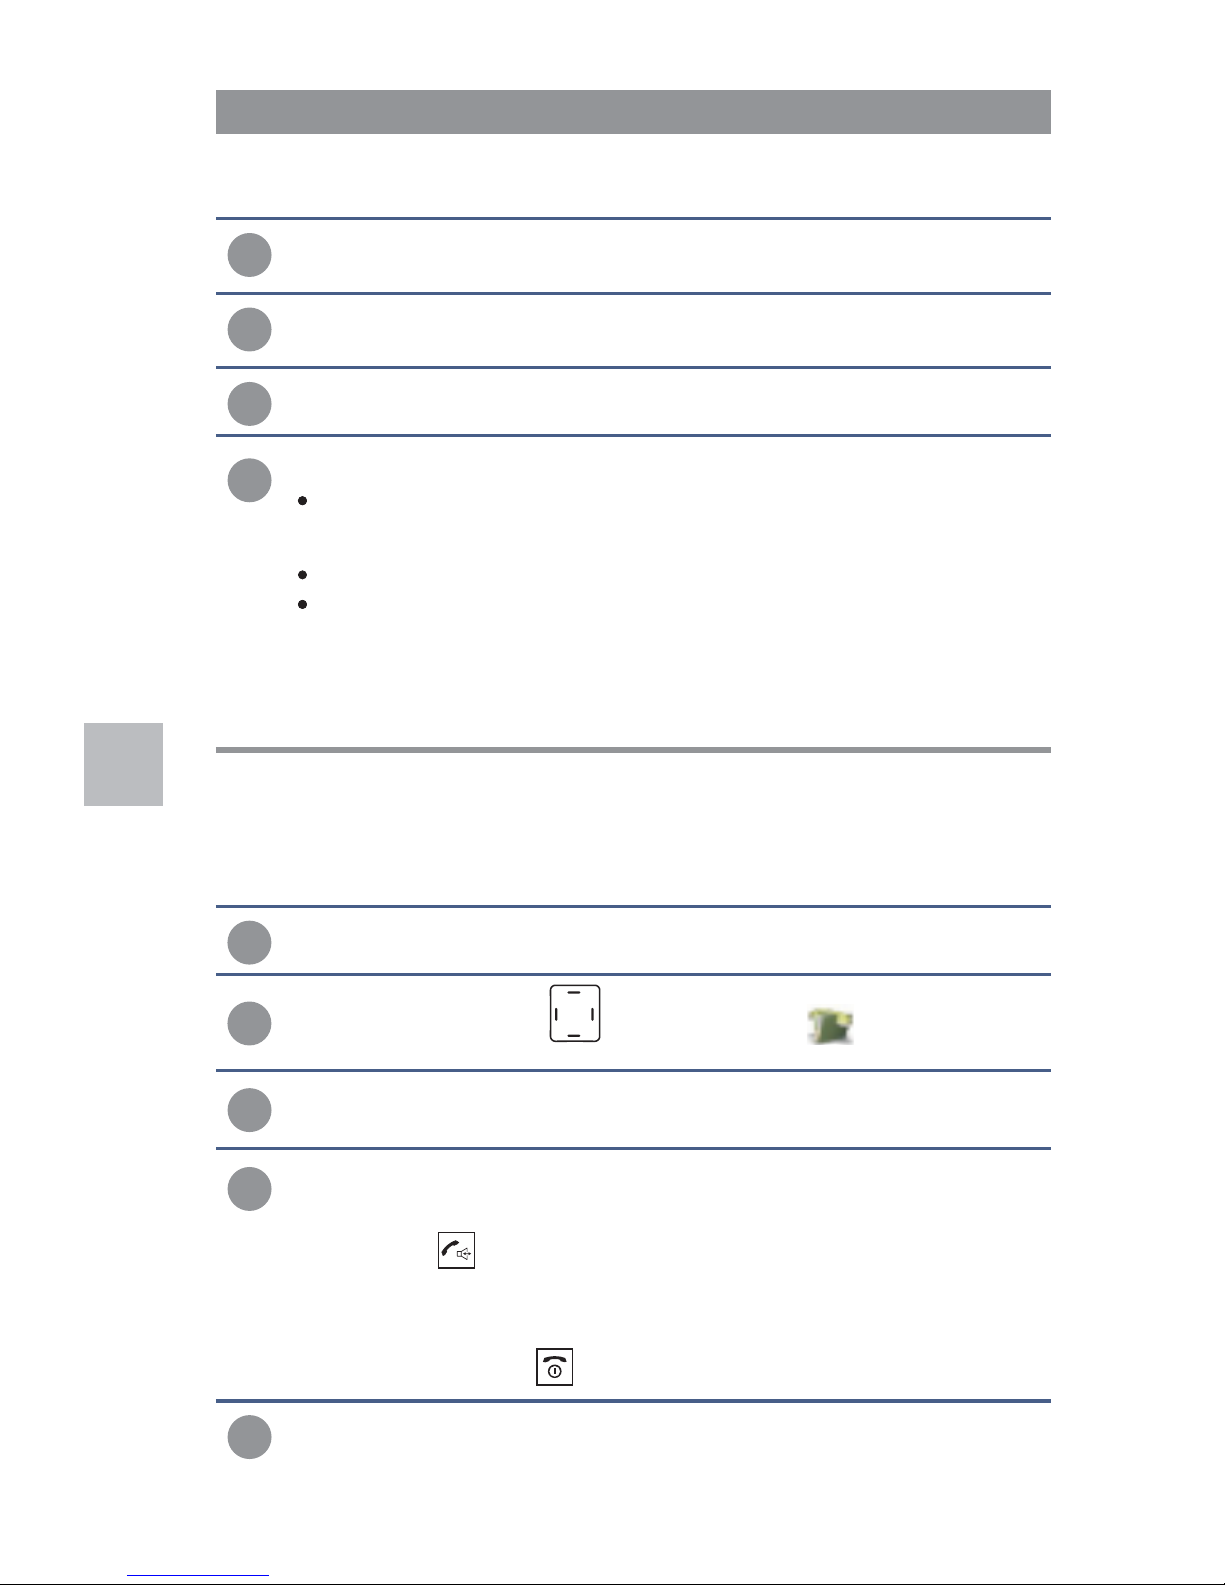
Outgoing Calls
The last 20 outgoing calls are stored in the list. You can
review, redial and save the last 20 dialled numbers.
Outgoing Calls
3
4
Press the or key to choose , then press
the key. The last dialled number is displayed on the screen.
Up Down Outgoing Calls
SELECT
Press the or key to find the desired number.
Press the key to add it to phonebook.
Or press the key to redial it.
Or press and hold the key to delete it.
Up Down
SAVE
*If you want to insert a pause, press the key.
*If you want to edit the number, press the key to delete it, then enter the
right digit.
PAUSE
Left
5
To exit, press key to delete the number digits one at a time or
wait for the unit to time out and return to Standby mode.
Left
Press the or key to choose the desired option:Up Down
Add to Phonebook
Delete
Delete All
allows you to save the number in the phonebook.
If the number is longer than 16 digits, the display shows " ",
press the key to copy 16 digits of the number to the phonebook.
Copy 16 digits?
SELECT
Call Register
1
Press key to display the main menu items.MENU
2
Press repeatedly the key to choose , then press the
key.SELECT
Deletes the selected incoming call number.
allows you to delete the whole incoming calls list (a
message asks if you really want to delete all the entries).
Press the key to confirm or to exit
without deleting the entries.
CANCELSELECT
Page 31
30
Call Lists
Phonebook
The phonebook built in your cordless phone allows you to store frequently
used numbers so that you can easily make a call without having to
remember or enter the phone number. Moreover, it reduces the risks of
wrong dialling. You can store up 250 entries in your internal phonebook,
each number can be up to 16 digits.
You can store the phonebook entries in the below stated modes: by using
the phonebook menu or in Standby mode.
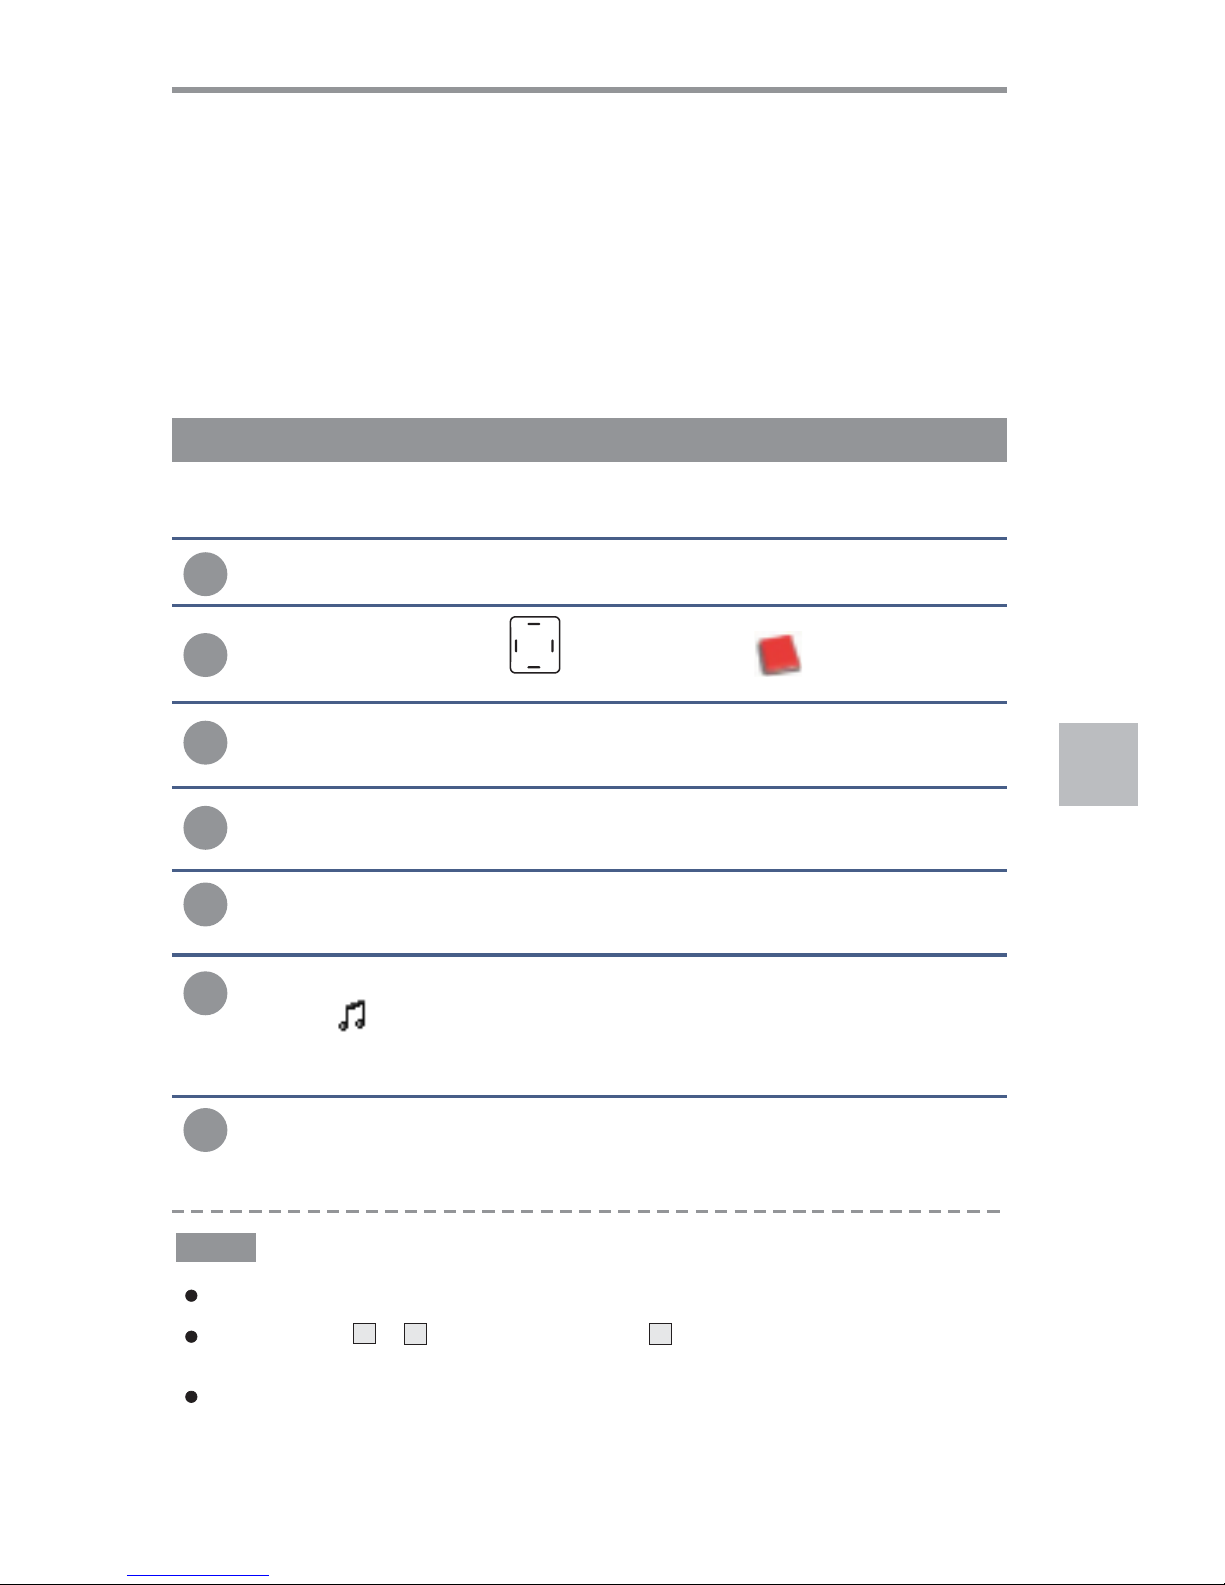
Storing Phonebook Entries
Way 1: by using the phonebook menu
1
Press key to display the main menu items.MENU
2
Press repeatedly the key to choose , then press the
key.SELECT
4
Enter a name that you want to use. For details of entering a name
please see the " ".Character Map
3
Press the or key to choose , then press the
key.
Up Down Add entry
SELECT
353
Press the key in order to move the cursor to the number field,
then enter the appropriate phone number (up to 16 digits).
Down
5
Phonebook
353
Press the key in order to highlight the ring type number at the
right of icon, then press the or key to select the ring
you like to associate to the number. Every time you select a ring, the
phone sounds with it.
Down
Left Right
6
353
Press the key to save the setting.SELECT
7
At step 4, to shift the case, press the key while entering text.
At step 5, the or icon is changed to the icon. It indicates that you can only
enter digits.
If you make a mistake while entering a number or name, press the key to
clear the last character. You can also use the or key to move on others
wrong characters, then press the key to clear them.
#
CLEAR
Left Right
CLEAR
Notes
A
a
1
Page 32
31
Way 2: in Standby mode
1
Enter a phone number in Standby mode, then press the key.SAVE
2
Complete storing the entry by starting from step 4 described in the
last paragraph of .Way 1
When you are entering the number in step 1, you can also insert one or more
dialling pauses in order to store them in the phonebook as well.
Note
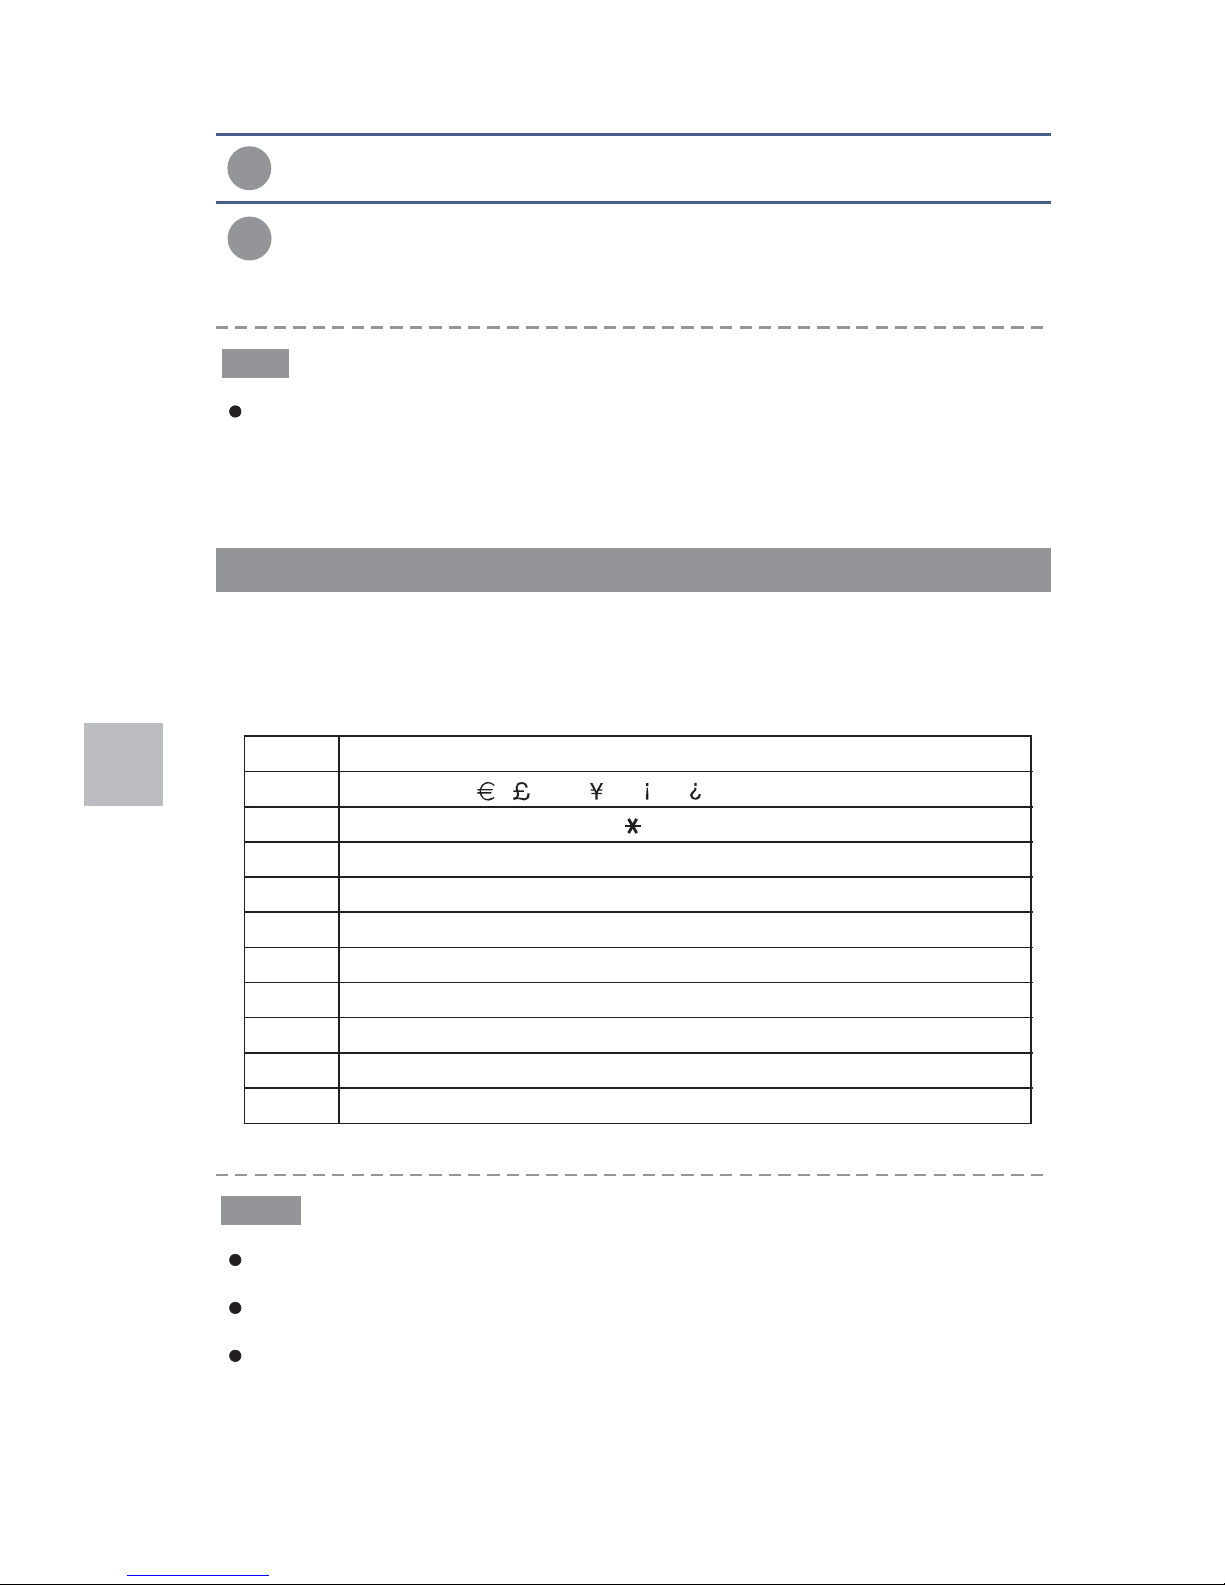
To enter a specific alphanumeric character, press one or more times the
relevant key for the required character according to the following table: once
for the first character, twice for the second and so on.
Key
Characters in the displayed order
0
1
2
3
4
5
6
7
8
9
(spc) 0
1.,;?!- #@&/:()"
ABCabc2
DEFde f3
GHIgh i4
JKLj k l5
MNOmno6
PQRSpqrs7
TUVtuv8
WXYZwxyz9
I P J
X
Y _ Z ` b
g h j
E q C F r D
$
J
$
To delete letters, use the key.
If you want to shift the case while entering letter, press the key.
When entering the same letter twice or a different letter on the same key, wait for
a few seconds for the cursor to move automatically, and then select the next letter.
CLEAR
#
Notes
Character Map
@ B ? G
Call Lists
Page 33
32
Call Lists
You can search the entries stored in the phonebook by entering the first
initial characters of their names (alphabetic search). You can also scroll
through the whole list of the phonebook entries in Standby mode without
accessing the menu.Phonebook
Review/Dialling a Number in Phonebook
Way 1: Alphabetic search
1
Press key to display the main menu items.MENU
2
Press repeatedly the key to choose , then press the
key.SELECT
4
Enter the first few letters of the name by using the alphanumeric
keys, and press the key. You can view the details of the
selected entry.
SELECT
3
Press the key to access .SELECT Review
353
Press the key to dial it.
5
Phonebook
Way 2: Searching by scrolling the phonebook list
1
2
Repeatedly press the or key to scroll to the desired entry.Up Down
4
3
Press the key to view the details of the selected entry.SELECT
Press the key to dial it.
Press the key in Standby mode. The display shows the whole
list of all of the Phonebook entries in alphabetical order.
Down
Page 34
33
Call Lists
1
2
Find the desired number in the phonebook.
Press the key to view the details of the selected entry.SELECT
4
Press the or key to choose the desired option:Up Down
Edit
Delete
Delete All
3
Press the key to display the option menus.SELECT
Using Phonebook Entries Options
You can edit, delete or dial it in the Phonebook as follows:
allows you to edit the number in the phonebook.
deletes the selected phonebook entry.
deletes all the phonebook entries.
Page 35
34
Handset & Base Setting
Selecting Ring Type & Volume
You can select your own external and internal ring sound and adjust the
volume. There are 12 polyphonic ringtones, 3 ring melodies and 4 volume
levels for choosing. You can also adjust the volume " " to turn off the ringer.0
1
2
3
Press the key to choose , or press the
key to choose , then press the key.
SELECT Ext Calls Ringer
Down Int Calls Ringer SELECT
Press the navigation keys to choose , then press the
key.SELECT
4
Press the or key to select the ring tone you like. Each
time you press the or key, the handset sounds with the
selected ring.
Left Right
Left Right
Press key to display the main menu items.MENU
H/Set Setting
5
Press the key to save the ring tone setting and enter the
ring volume setting.
SELECT
6
Press the or key to choose the volume level you want.
Each time you press the or key, the handset sounds with
the selected loudness.
Left Right
Left Right
7
Press the key to save the setting and return to the
previous menu.
SELECT
The default external ring is type 12 and internal ring is type 1. Both the default external
and internal ringer volume are level 4.
Setting the volume " " turns the ringer off. When a call comes in, only the incoming call
message appears on the display.
0
Notes
Setting Key Tone
Every time you press a key, your handset acknowledges it with a key tone.
You can disable the key tones for a silent use.
1
Press key to display the main menu items.MENU
Page 36
35
Handset & Base Setting
Changing Handset & Base PIN
Base and handset PIN's are required to protect your phone against
unauthorized use. There are set to at the factory. You can change the
PIN's as follows:
1590
1
2
3
Press the or key to choose , then press the
key.
Up Down PIN Code
SELECT
Press the navigation keys to choose , then press the
key.SELECT
Press key to display the main menu items.MENU
H/Set Setting
Changing Handset PIN
2
3
Press the or key to choose .Up Down Key Tone
Press the navigation keys to choose , then press the
key.SELECT
H/Set Setting
4
Press the key to activate the function, the icon will
appear at the right of the item.
SELECT
Key Tone
5
Press again the key to deactivate the function, and the
icon will disappear.
SELECT
The default setting is switching the key tone on which with icon. For a normal use,
we recommend to leave the key tone enabled: they make the use of the phone easier.
Note
5
4
Enter the current PIN code, then press the key.SELECT
5
Enter the new four-digits PIN you want to use, and press the
key.SELECT
Page 37
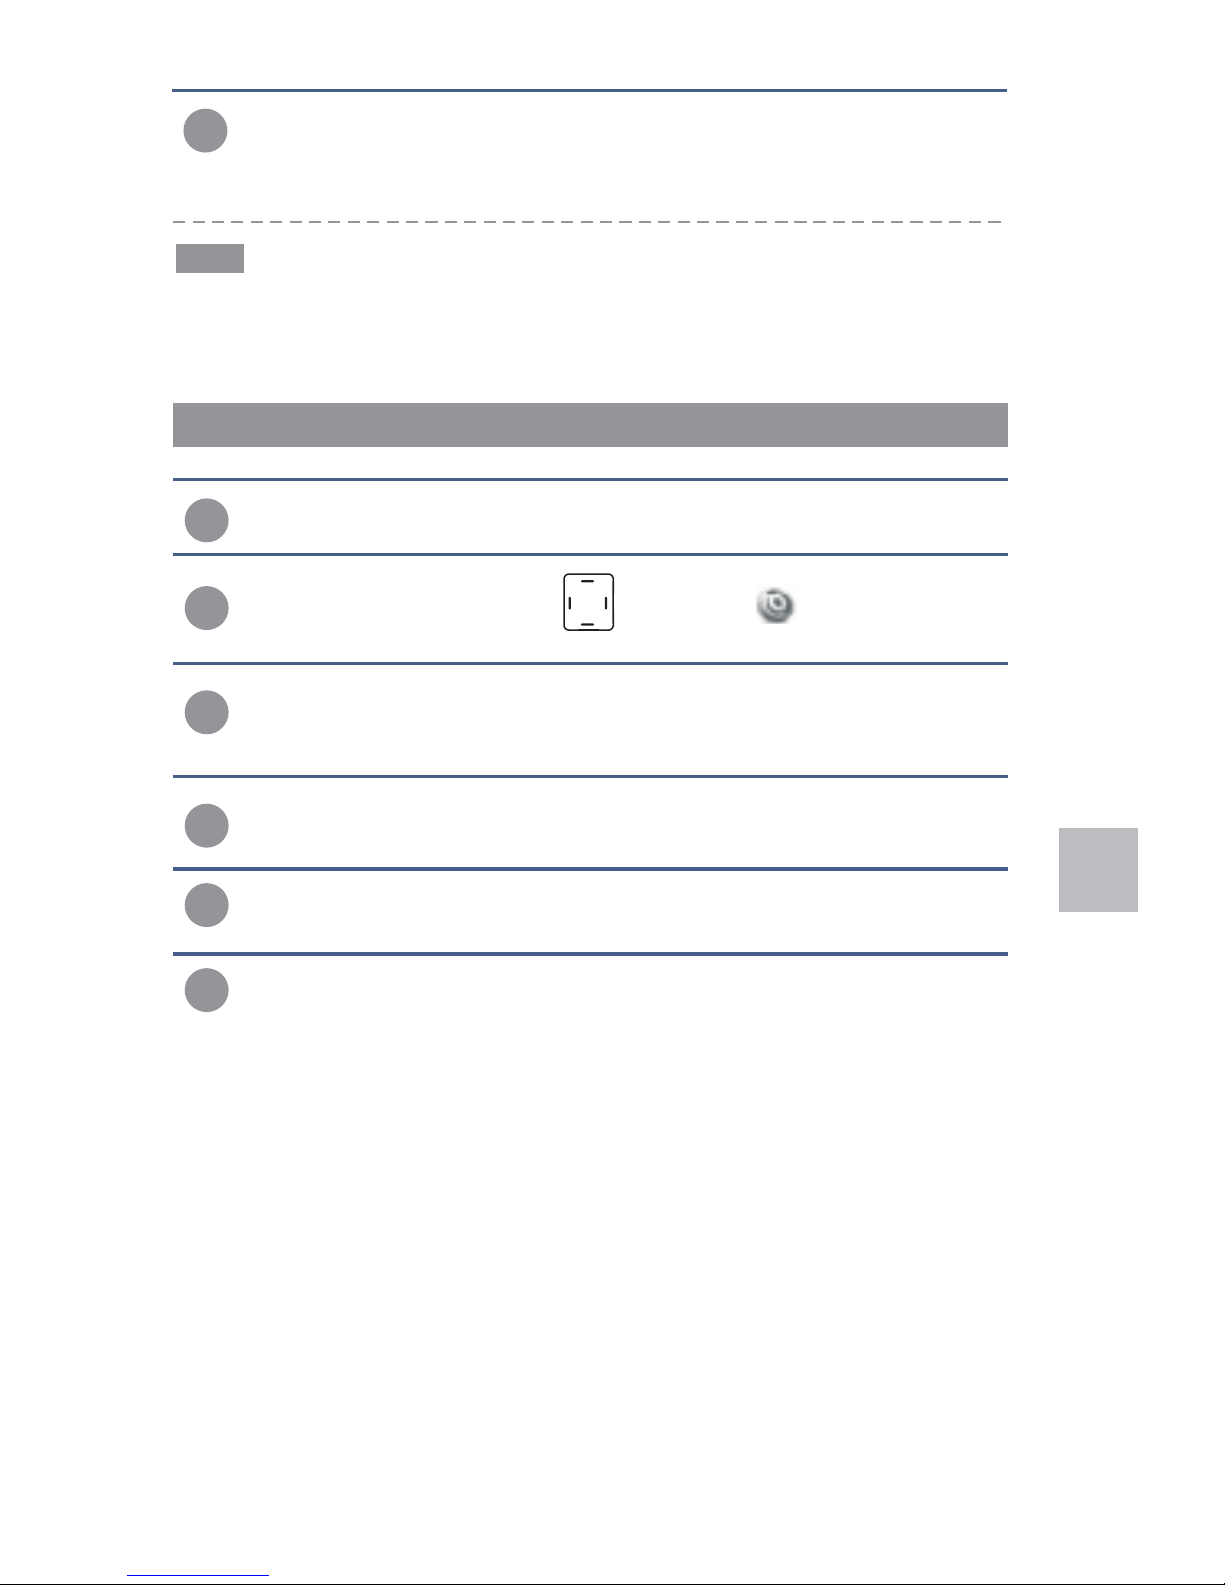
36
Handset & Base Setting
3
The handset asks you to enter the current base PIN code (the
default PIN is ). Use the numeric keys to enter and press
key.
1590
SELECT
At step 4, if you enter the wrong PIN, your phone will generate a warning sound.
Note
Changing Base PIN
1
2
Press the navigation keys to choose , then press the
key.SELECT
Press key to display the main menu items.MENU
Base Setting
4
Press the or key to choose , then press the
key.
Up Down PIN Change
SELECT
5
6
Enter the new PIN code again to confirm it, then press the
key to save the setting.
SELECT
Enter the new four-digits PIN you want to use, and press the
key.SELECT
6
Enter the new PIN code again to confirm it, then press the
key to save the setting.
SELECT
Page 38
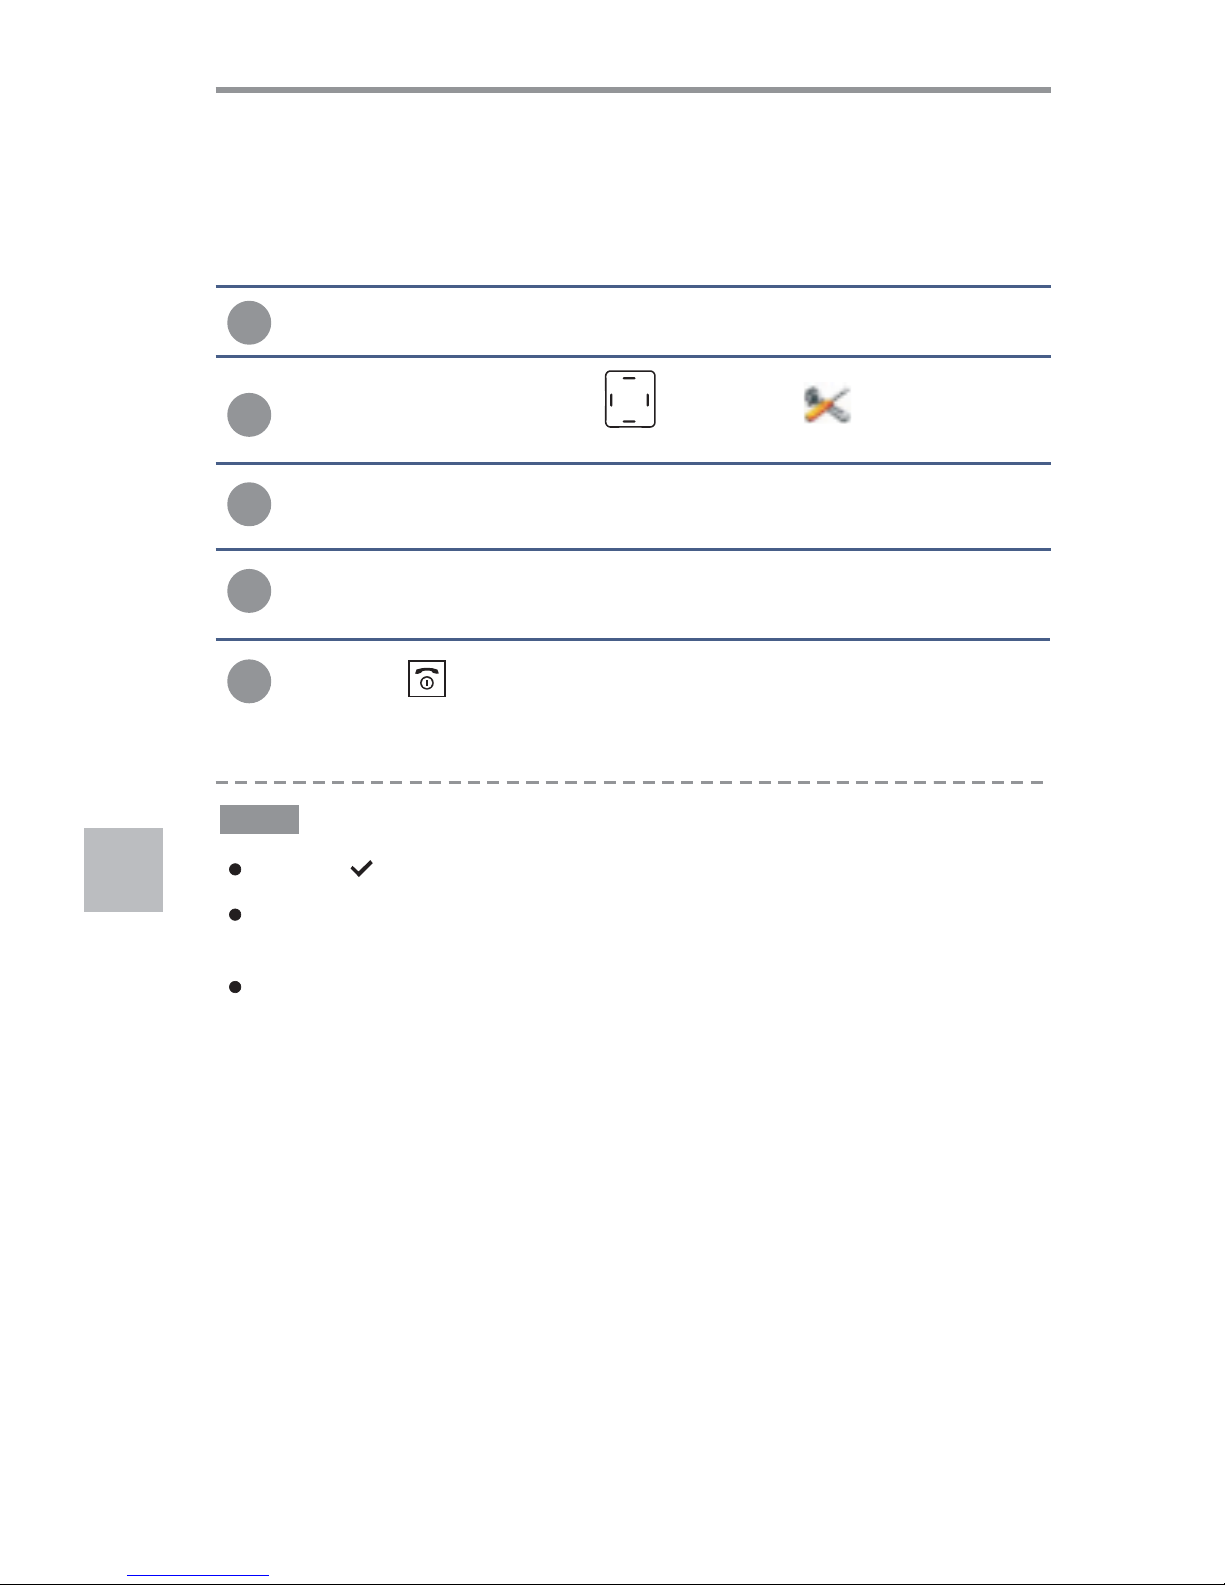
37
Handset & Base Setting
Base Selection
Your handset can be used with up to 4 base units, provided that it has been
previously registered with them. This menu option allows you to select the
base you want to use:
1
2
3
Press the or key to choose , then press the
key.
Up Down Select Base
SELECT
Press the navigation keys to choose , then press the
key.SELECT
Press key to display the main menu items.MENU
H/Set Setting
4
Press the or key to select the base you want, then press
the key.
Up Down
SELECT
The icon will appear at the right of the selected base.
If the selected base has not been registered with your handset, the display will
show " " (x is the base number 1~4).
At step 4 you can select " ". In this case the handset will automatically
find the first available unit when you lose contact while moving around.
NOT SUB x
Best Base
Notes
5
Press the key to return to Standby mode.
Page 39
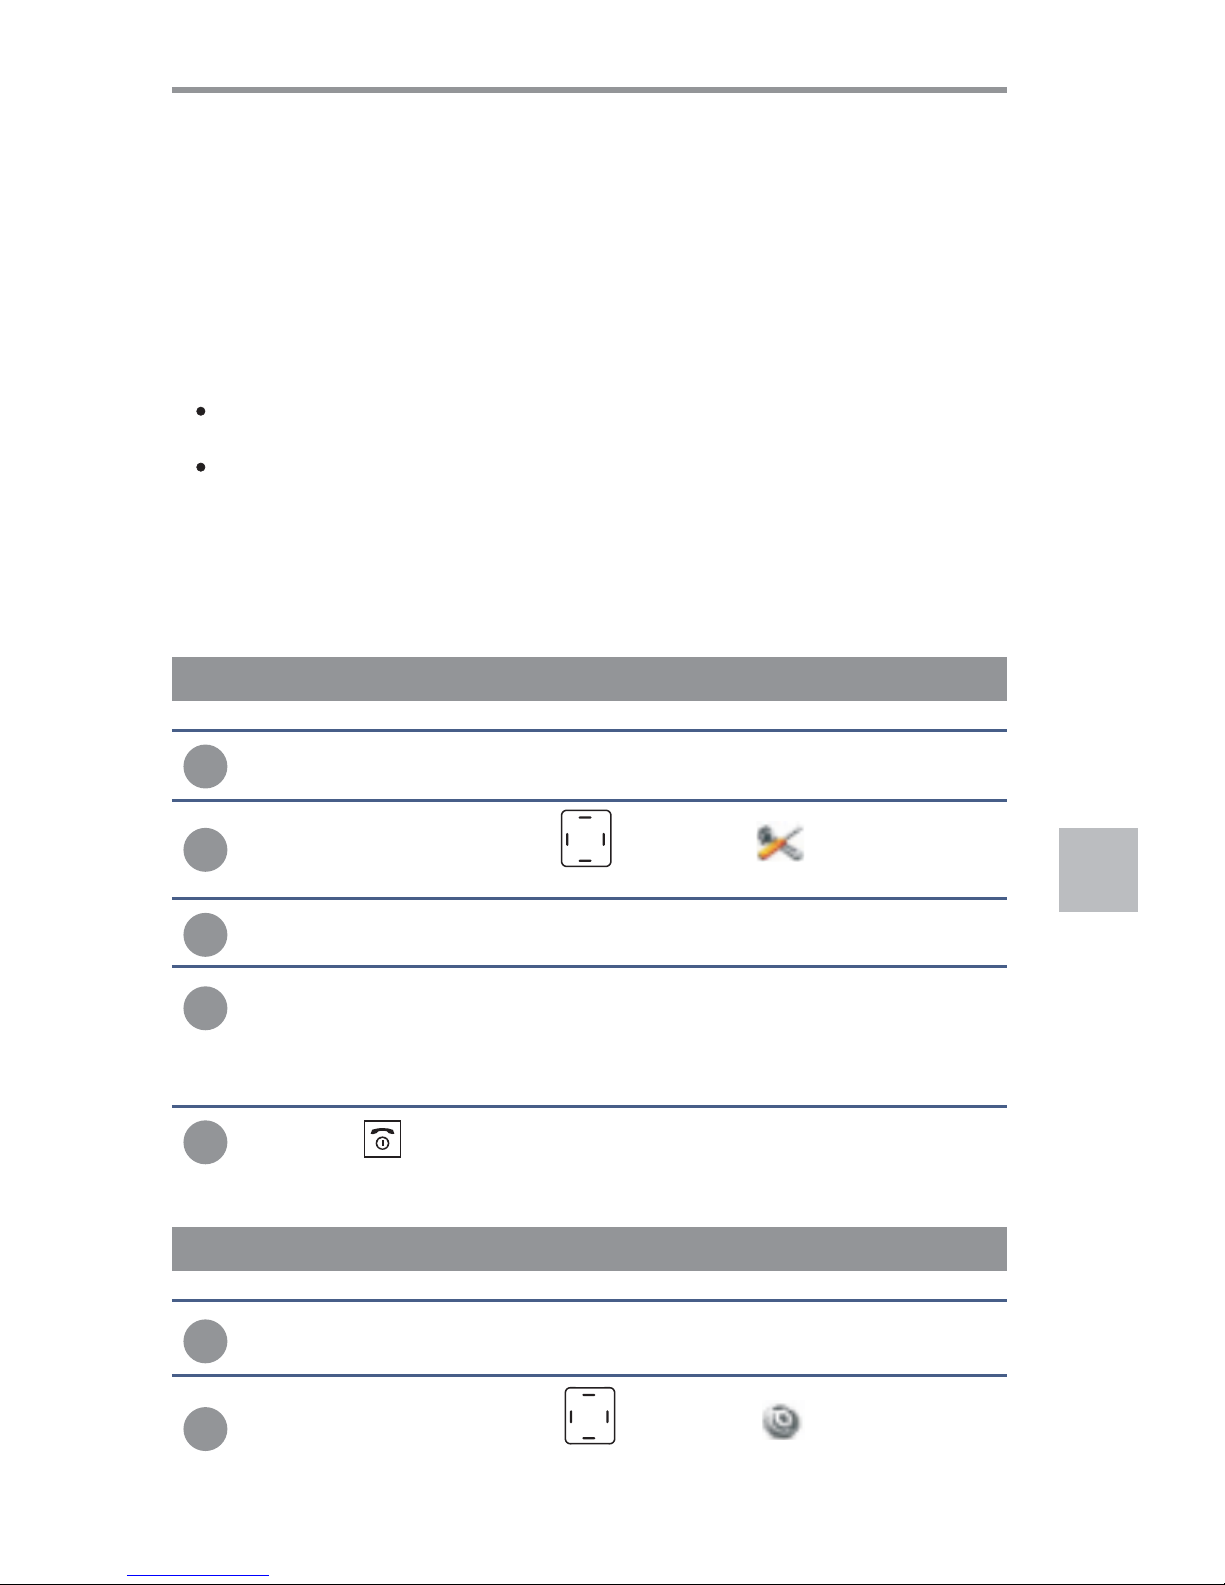
38
Handset & Base Setting
Resetting the Handset or the Base
If you reset the handset or the base, all the user selectable features restore
to the factory preset initial settings: When resetting the handset, the
phonebook, incoming/outgoing list and SMS outbox messages will be
erased. Resetting the base can only delete the inbox messages. The Flash
time and the SMS Service Center number can not be reset.
You can reset the handset without resetting the base or vice versa, it
depends on the scope you have. It is mainly useful for these purposes:
If you have made many wrong settings and you want to restore the
handset to the factory preset initial settings.
If the phone shows logical malfunctions (not correct symbols on the
display, incorrect behavior etc.), the problem can be caused by an AC
power supply noise or an electrostatic spike which can temporarily alter
the memory of the internal microprocessor. In this case the reset could
solve the problem.
1
2
3
Press the or key to choose .Up Down Handset Reset
Press the navigation keys to choose , then press the
key.SELECT
Press key to display the main menu items.MENU
H/Set Setting
4
The handset asks you to enter the current handset PIN code (the
default PIN is ). Use the numeric keys to enter and press
key, then the display shows " ", press the
key to confirm.
1590
SELECT Reset? SELECT
Resetting the Handset
1
2
Press the navigation keys to choose , then press the
key.SELECT
Press key to display the main menu items.MENU
Resetting the Base
Base Setting
5
Press the key to exit.
Page 40
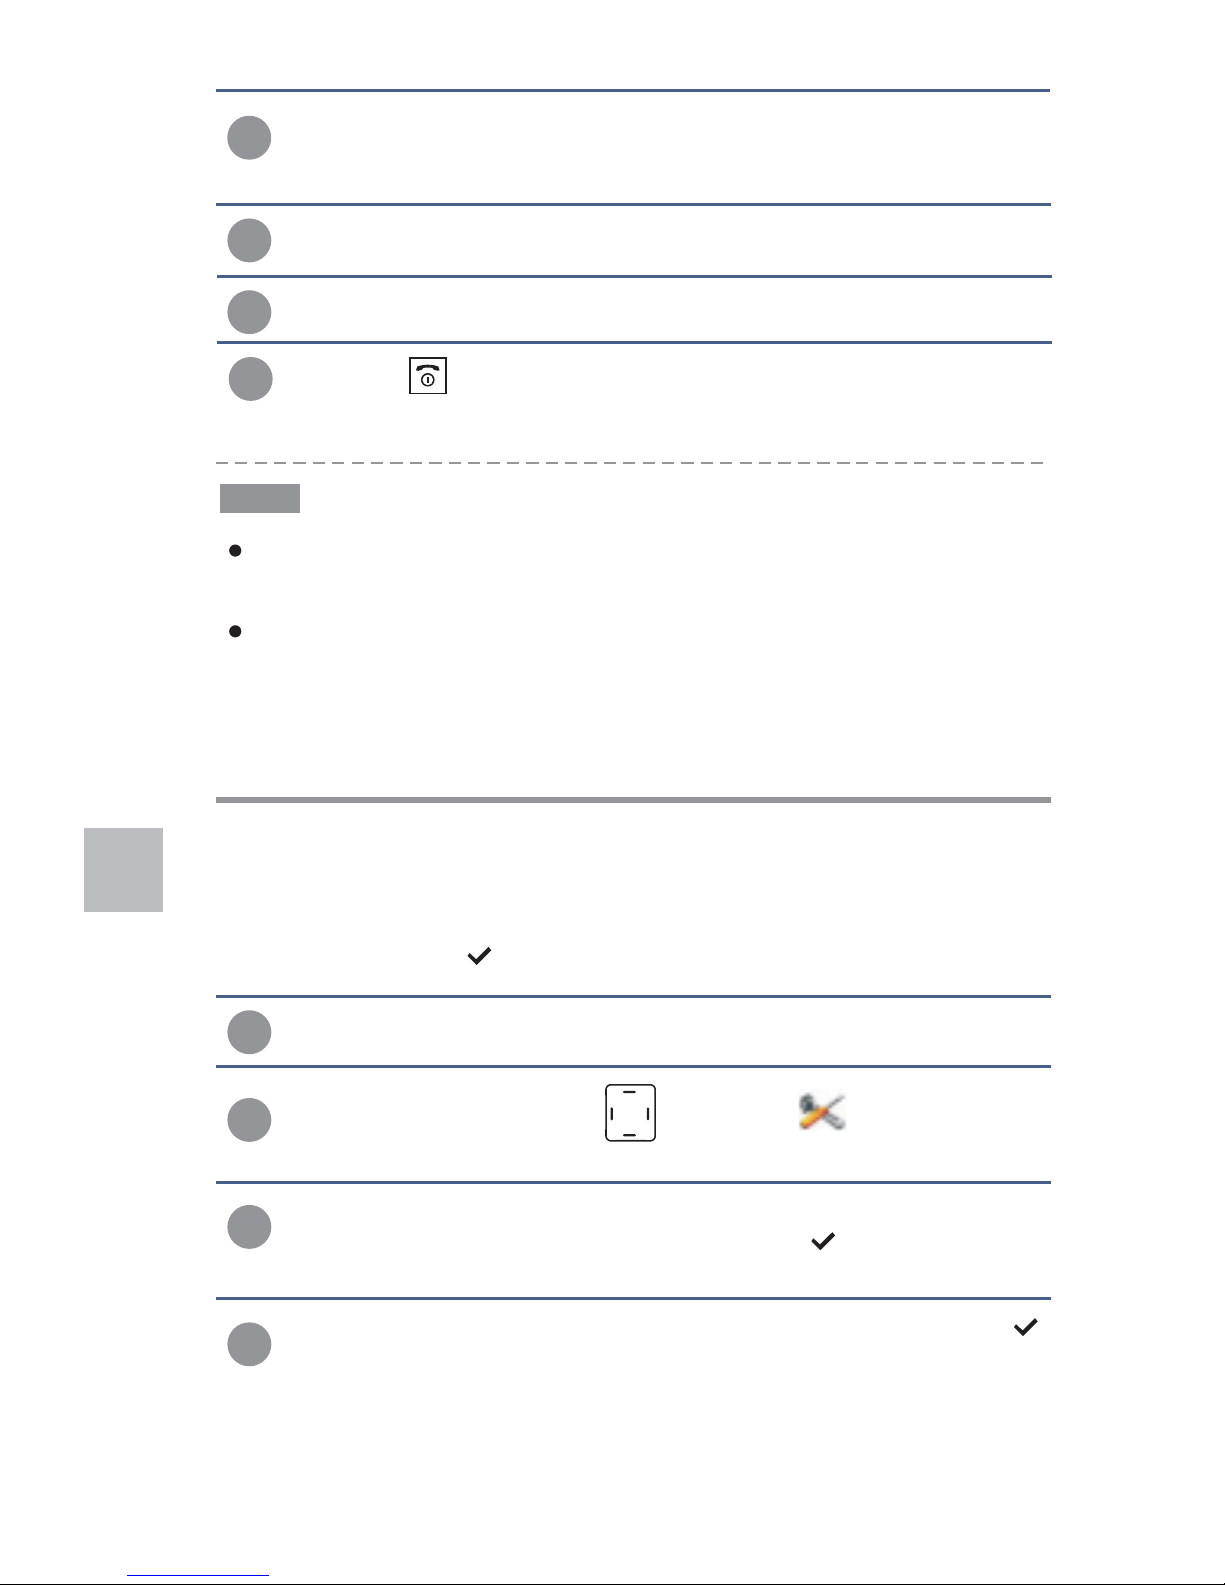
39
Handset & Base Setting
4
Press the or key to choose .Up Down Base Reset
5
The display shows " ", press the key to confirm.B Reset? SELECT
Be careful! When you reset the handset you will lose any date stored in it (e.g.
name and numbers in phonebook). Don't forget to note them down before
resetting the handset.
Resetting the base does not affect the handsets registered to the base.
Notes
Setting Auto Answer
With this feature, you can answer a call by just picking up the handset from
the base without pressing any key. The default setting is switching the
function on which with icon.
1
2
3
Press the or key to choose , then press the
key to activate the feature, and the icon will appear at
the right of the item.
Up Down Auto Answer
SELECT
Auto Answer
Press the navigation keys to choose , then press the
key.SELECT
Press key to display the main menu items.MENU
H/Set Setting
4
Press again the key to deactivate the function, and the
icon will disappear.
SELECT
6
Press the key to exit.
3
The handset asks you to enter the current base PIN code (the
default PIN is ). Use the numeric keys to enter and press
key.
1590
SELECT
Page 41
40
Handset & Base Setting
Setting Display
This adjustment will allow you to optimize the visibility of the display by
changing its contrast according to the environment conditions. The default
setting is level 06.
1
Press key to display the main menu items.MENU
2
3
Press the or key to choose , then press
the key.
Up Down Display Setting
SELECT
Press the navigation keys repeatedly to choose , then
press the key.SELECT
H/Set Setting
4
Press the key to access . The current setting
appears on the display.
SELECT Contrast
5
Press the navigation keys repeatedly to choose among the 11
available contrast levels, then press the key.SELECT
Using this feature, you can customize the standby display according to your taste
and needs (wallpaper and color).
Adjusting the Display Contrast
1
Perform steps 1 to 3 of previous paragraph.
2
Selecting the Wallpaper
Press the or key to choose , then press the
key. The current setting appears on the display. (The
default wallpaper is the orange one.)
Up Down Wallpaper
SELECT
3
Press the navigation keys to choose among 10 pre-defined
wallpaper images, then press the key.SELECT
Page 42
41
Handset & Base Setting
1
1
Perform steps 1 to 3 of paragraph "Adjusting the Display contrast".
Perform steps 1 to 3 of paragraph "Adjusting the Display contrast".
2
2
Selecting the Windows Style
Setting a Handset name
Press the or key to choose . The current
setting appears on the display. (The default style is type 00)
Up Down Window Style
Press the or key to choose , then press
the key. There is no preset handset name in this unit.
Up Down Handset Name
SELECT
3
3
Press the navigation keys to choose among 8 pre-defined
color styles, then press the key.SELECT
At this time, enter the name, up to 15 characters long, you want to
assign to the handset and then press the key. You will see
the icon at the right side of the item.
SELECT
Handset Name
Selecting a Language
You can change the language used to display the menu messages. There
are 4 different languages: English. The default
language is German.
German, French, Italian and
1
Press key to display the main menu items.MENU
4
Press the key to return to Standby mode. You will see the result
of your settings (name of the handset instead of the number of the
handset followed by the number of the base.)
5
To deactivate this feature, press the key again when the
LCD display shows the icon at the right side of the
item.
SELECT
Handset Name
Page 43
42
Handset & Base Setting
1
2
3
Press the navigation keys to choose , then press the
key.SELECT
Press key to display the main menu items.MENU
The handset asks you to enter the current base PIN code (the
default PIN is ). Use the numeric keys to enter and press
key.
1590
SELECT
Base Setting
Changing Flash Time
During a conversation, the key allows you to access the special services
offered by the telephone network or transfer a call to another extension
when you are connected to a PABX (Private Automatic Branch of eXchange).
If your key does not work properly, you need to adjust the Flash time as
follows:
R
R
4
Press the key to access . The display shows
the current setting.
SELECT Flash Time
5
Press the or key to choose the desired flash time, then
press the key. You can choose from 100ms,120ms, 300ms
or 600ms.
Left Right
SELECT
The default flash time is 100ms. We recommend to contact your service provider or
refer to your PABX user's manual in order to know the proper flash time to use with
your telephone network.
Note
2
3
Press the or key to choose , then press the
key. The current language appears on the display.
Up Down Language
SELECT
Press the navigation keys to choose , then press the
key.SELECT
H/Set Setting
4
Press the navigation keys to select the language you want,
then press the key.SELECT
Page 44
43
Handset & Base Setting
Setting Call Barring
You can set the phone to restrict numbers that can be dialled. Calls
beginning with the numbers you specify using this menu can not be dialled.
You can set up to 5 different restricted numbers containing up to 5 digits
each.
1
2
3
Press the navigation keys to choose , then press the
key.SELECT
Press key to display the main menu items.MENU
The handset asks you to enter the current base PIN code (the
default PIN is ). Use the numeric keys to enter and press
key.
1590
SELECT
Base Setting
4
Press the key to access , then press the
key.
SELECT Call Barring
SELECT
5
Press the or key to choose the barring memory location.Left Right
6
Enter the number you want to restrict (up to 5 digits) and then press
the key.SELECT
7
Enter your desired handset number which you want to restrict the
stored barring number. Then press the key to save the
setting.
SELECT
Page 45
44
Alarm
This option allows you to set one alarm that can ring once.
1
2
Press key to display the main menu items.MENU
Press repeatedly the key to choose , then press the
key.SELECT
3
Press the or key to choose , then press the
key.
Up Down Alarm
SELECT
4
You are now on the time field. Set the time with hh:mm format by
using the numeric keys.
Activating the Alarm Feature
5
Press the key to save the alarm time setting and enter the
alarm ring type setting.
SELECT
6
Press the or key to select the ring type for the alarm.Left Right
7
Press the key to save the setting and exit to the previous
menu. You can see the icon appears at the right of the
item.
SELECT
Alarm
Perform steps 1 to 3 of the last paragraph. Then the icon will
disappear.
Deactivating the Alarm Feature
Notes
At step 3 you need to enter the hour in 24-hour format.
In Standby mode, the icon will appear at the left of the time if you have activated
the feature.
Extra
Extra Setting
8
When the alarm sounds, press any key to switch it off.
Page 46
45
Extra Setting
Setting Sleep Mode
This feature allows you to not be disturbed by the ring sound at night. If the
sleep mode is activated, the ring volume automatically switches to volume
level 1 during time from 23:00 to 6:59.
1
2
Press key to display the main menu items.MENU
Press repeatedly the key to choose , then press the
key.SELECT
3
Press the or key to choose .Up Down Sleep mode
4
Press the key to turn on this feature. You can see the
icon appears at the right of the item.
SELECT
Sleep mode
Game-Sudoku
There is a game for you playing in the leisure time.
The game's instruction: You should input digits (1 to 9) in the empty grids
one at a time in order to fill in the whole layout, but it does not allow to input
the same digit in one row or one line.
2
Press key to display the main menu items.MENU
Press repeatedly the key to choose , then press the
key.SELECT
3
Press the or key to choose , then press
the key to start playing.
Up Down Game-Sudoku
SELECT
In Standby mode, the icon will appear at the right of the date if you have activated
the feature.
The default setting is switching the function off.
Notes
During playing the game, press key for help, and press the key again to return to
the game.
Note
1
Extra
Extra
Page 47
46
Extra Setting
Calculator
Using this feature, you can use the phone as a calculator. You can perform
calculations including addition, subtraction, multiplication and division on
your phone.
1
2
Press key to display the main menu items.MENU
Press repeatedly the key to choose , then press the
key.SELECT
3
Press the or key to choose , then press the
key.
Up Down Calculator
SELECT
4
Enter the first number (operand) using the numeric keys.
5
To select the operation for four calculation, press the or
keys to choose the required arithmetic symbol appears:
+(addition), -(subtraction), *(multiplication), /(division.)
Left Right
6
Enter the second number (second operand) using the numeric keys.
7
To erase any mistake and clear the display, press the key.
To insert a decimal point, press key or use the or key to select the " "
symbol.
CLEAR
Left Right .
Notes
To get the result, press the key.SELECT
Extra
Page 48
47
Extra Setting
Setting Access Code
Some telephone systems, such as PABX (Private Automatic Branch of
eXchange) or KTS (Key Telephone Systems), require an access code (e.g.
9 or 0) to access an external line and listen for the outside dial tone before
dialling the outside number. You can set your phone in order to
automatically insert one-digit access code when you use a phone number
from the received calls list. For details about the received calls list, see the
'".Incoming calls
1
2
Press key to display the main menu items.MENU
Press repeatedly the key to choose , then press the
key.SELECT
3
Press the or key to choose , then press the
key.
Up Down Access Code
SELECT
4
Use the or key to select the access code from 0 to 9. The
default setting is empty.
Left Right
5
Press the key to save the setting.SELECT
Extra
Charge beep
This feature allows you to switch the charge beep on or off. The default
setting is off.
1
2
Press key to display the main menu items.MENU
Press repeatedly the key to choose , then press the
key.SELECT
3
Press the or key to choose .Up Down Charge beep
4
Press the key to turn on this feature. You can see the
icon appears at the right of the item.
SELECT
Charge beep
Extra
Page 49

48
Extra Setting
Swisscom Menu
Hotline
Combox
Swisscom Contact Center 0800 800 800
On this freephone number, we would be happy to advise you on all aspects
of telecommunications: fixed network, mobile, broadband DSL, Bluewin TV,
billing questions and much more.
With Combox Basic, you can always be reached on the telephone. The
invisible answering machine answers any call you can t take personally and
registers the caller s messages digitally. You
and you You can operate your
Combox Basic worldwide from any fixed-line or mobile phone, listen to
messages and answer calls by simply pressing a key.
’
’ don need an additional
device don pay a subscription fee.
’t
’t
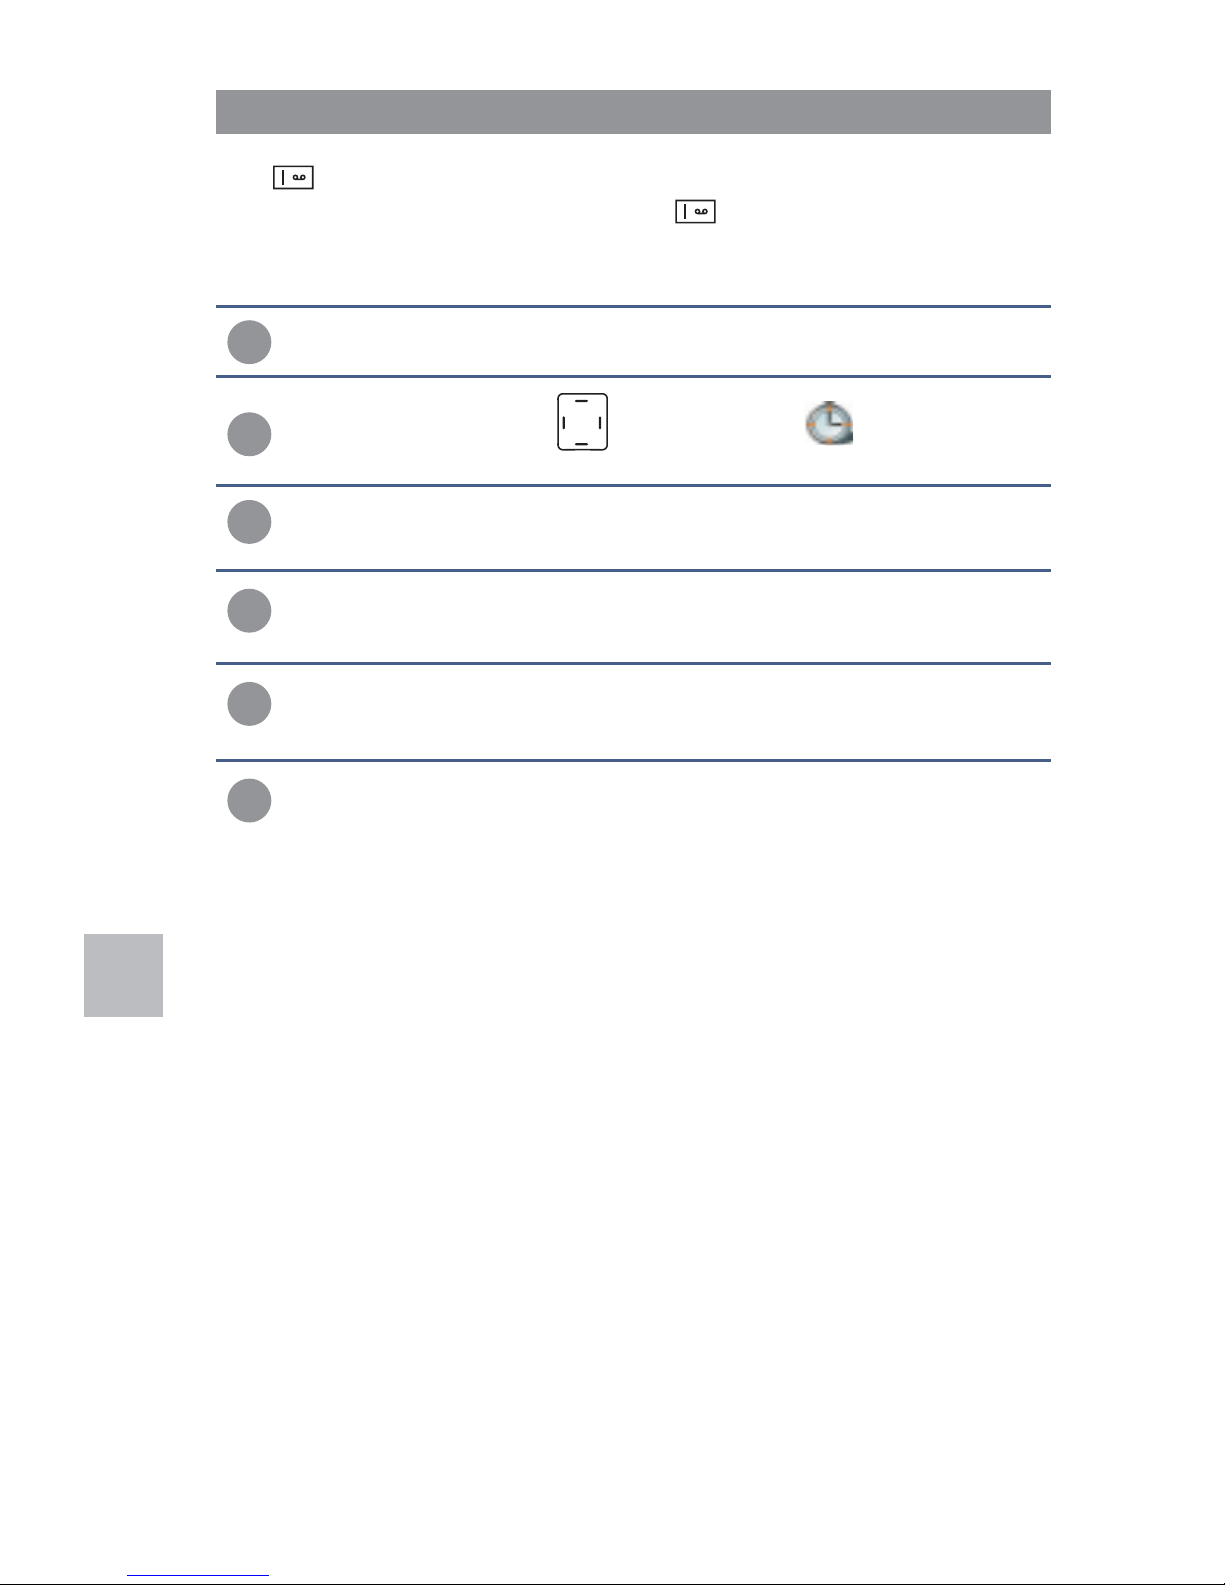
Message Waiting Indicator
Combox Basic can signal new messages on your telephone. If you don't
have a Swisscom Combox Basic yet, you can order it for free. To register
your Combox dial toll free number 0800 266 269 from your own telephone
and select Combox Basic.
- MWI icon On when a new voice message has been received in
your Combox Basic.
- MWI icon Off as soon as you have called your Combox Basic for
retrieval.
Page 50
49
1
2
Press key to display the main menu items.MENU
Press repeatedly the key to choose , then press the
key.SELECT
3
Press the or key to choose , then press
the key.
Up Down Swisscom Menu
SELECT
4
Press the or key to choose , then press the
key.
Up Down Edit Combox
SELECT
5
Use the numeric keypad to edit the number. Use the key to
delete the digit if necessary.
CLEAR
Extra
Combox
The key is for combox dialling. The number is stored in this
key at the factory. Press and hold the key in the standby mode to
dial the number out. You can also edit the number as follows:
086
6
Press the key to save the setting.SELECT
Extra Setting
Page 51
50
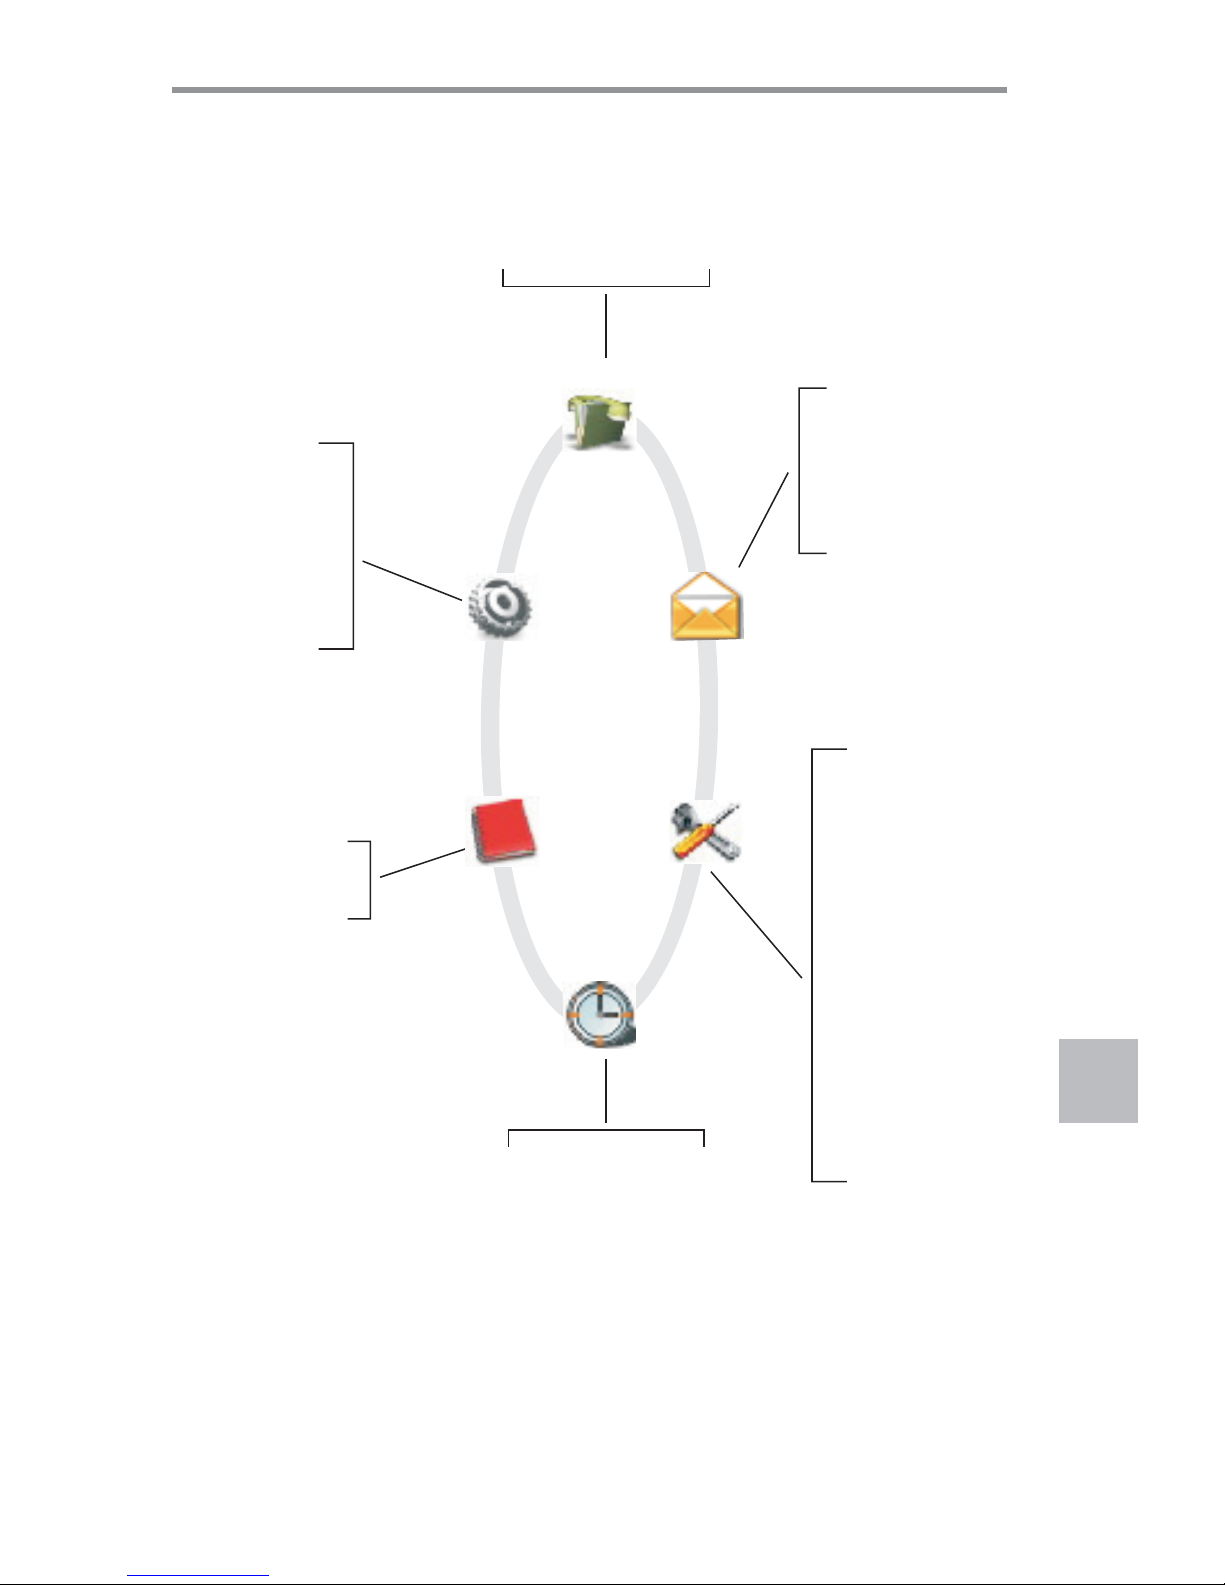
Menu Structure Map
Write Message
Inbox
Outbox
SMS setup
Review
Add entry
Clock
Alarm
Sleep mode
Calculator
Game-Sudoku
Access Code
Charge beep
Swisscom Menu
Flash Time
Release Handset
PIN Change
Base Reset
Call Barring
Incoming Calls
Outgoing Calls
Ext Calls Ringer
Int Calls Ringer
Key Tone
PIN Code
Register H/Set
Select Base
Handset Reset
Auto Answer
Display Setting
Language
Call Register
H/Set Setting
SMS
Extra
Phonebook
Base Setting
Menu Structure Map
Page 52

51
Maintenance/Warranty
Rental devices
Purchased devices
Batteries
General remark
If your phone does not operate properly, notify Technical Assistance (phone
number 175).
The repair and the fault action are free of charge.
Repair services are performed frees of charge within the warranty period in
accordance with the regulation of the warranty certificate. If a repair is
necessary, the device must be returned to the place of purchase.
If Technical Assistance is made available (during the warranty period as well),
the fault action is charged (route lump sum price as well as time expenses).
The repair costs are additional outside the warranty period.
Battery cells are considered material, which is not covered by the warranty
service. Defective batteries are not replaced free of charge. This applies to
rental and purchased devices.
Except for damage to wearing parts (cables, labels, batteries etc.) and
damage arising from incorrect handling such as dropping it or allowing fluid
to penetrate into handset etc.
1)
1)
Warranty
Page 53
52
At the end of its working life this device must not under any circumstances
be disposed of as normal waste. It must be taken to a point of sale or
central collection point for electronic and electrical devices in accordance
with the Swiss Ordinance on the Return, Taking Back and Disposal of
Electrical and Electronic Appliances (ORDEA).
The individual materials are recyclable as indicated. By reutilizing, recycling
or re-using them in any other form, you are making a major contribution
towards environmental protection.
Environmental impact
This device is intended to be operated on the analogue Swiss network.
Country-specific conditions have to be taken into account. If you have any
questions about the differences between the public phone networks, please
contact your specialist dealer or network provider.
Swisscom hereby declares that this device meets the essential
requirements and other relevant regulations laid down in Directive
1999/5/EC.
The Declaration of Conformity can be found the following web site:
under the rubric, Phone, Declaration of
Conformity.
www.swisscom.com/onlineshop
Conformity
Warranty
Page 54
53
Troubleshooting
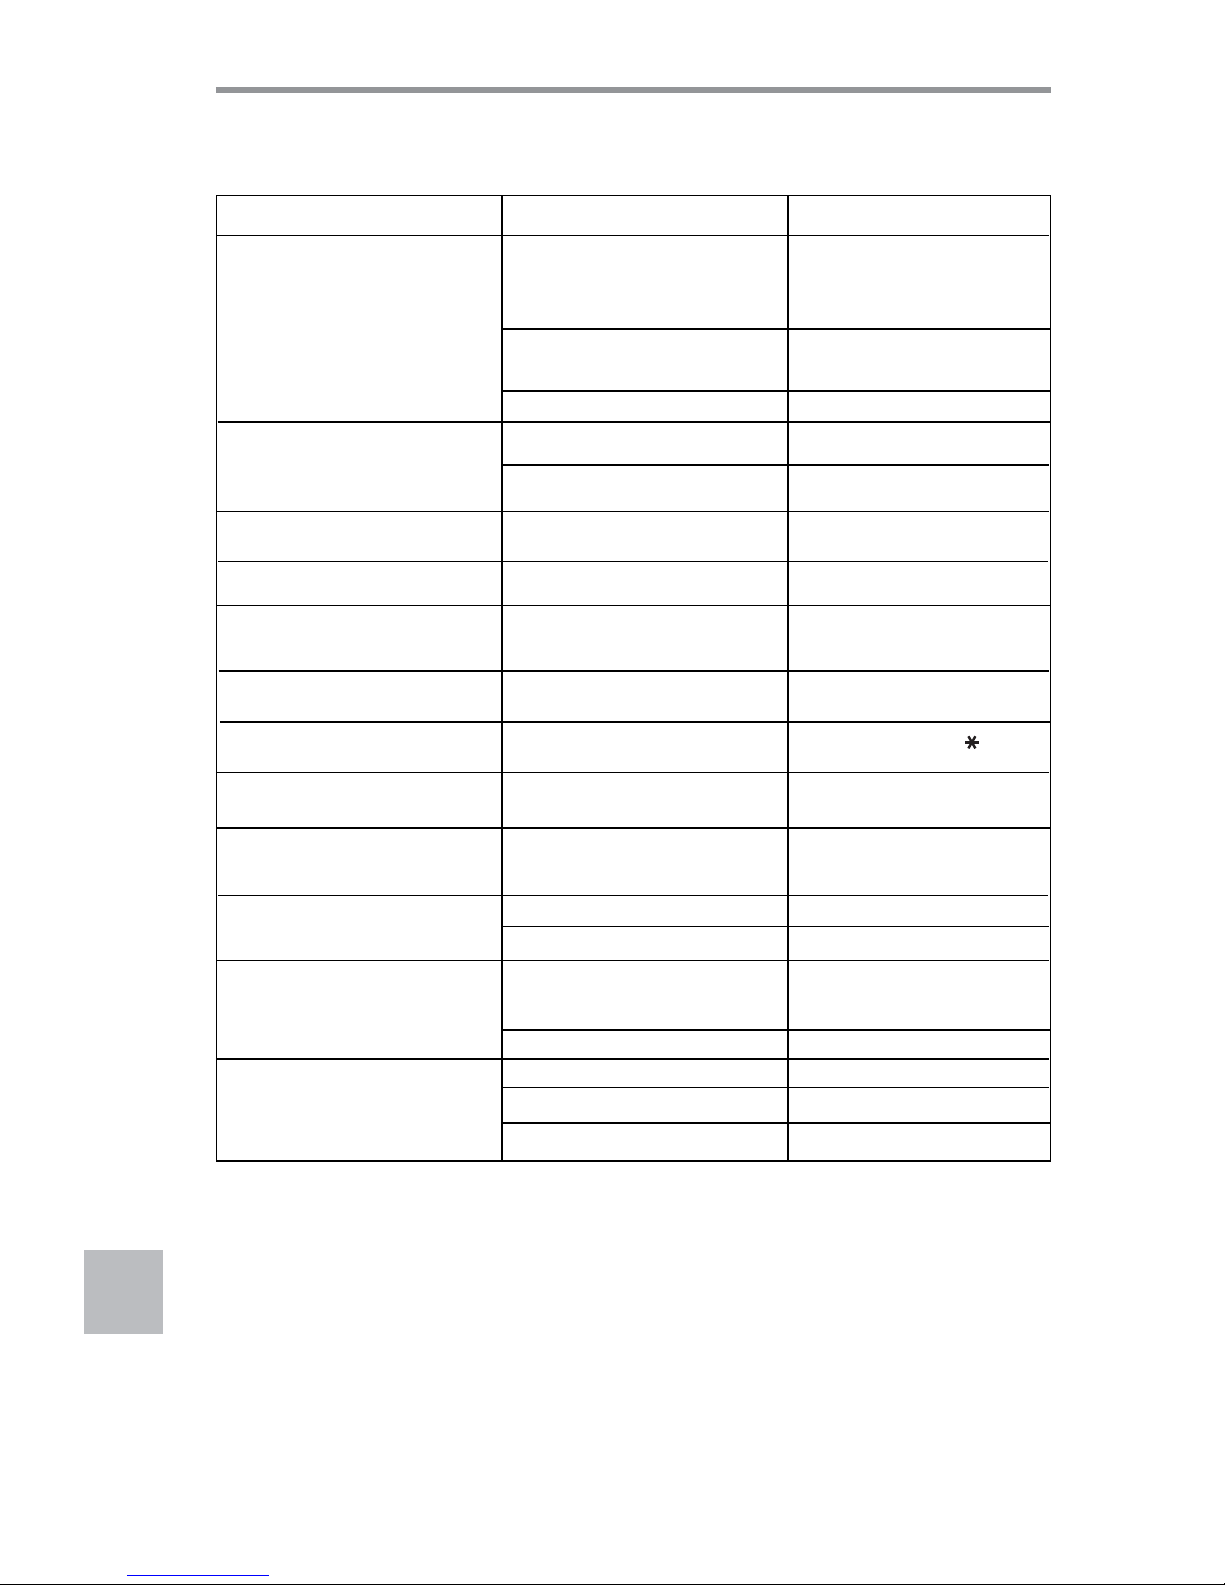
Troubleshooting
Symptom
Possible cause
Solution
The handset doesn't switch on.
Handset works, but doesn't access the base
unit.
Handset works and access the base unit,
but no dial tone is heard.
Handset works perfectly, but you hear a
beep during the phone calls.
Noise and audio interferences on your
phone calls.
Handset works perfectly, but doesn't ring
with incoming calls.
Handset can only receive calls. Keypad
locked.
The phone doesn't dial certain numbers.
Phone doesn't work properly with some
special services or if connected to an
exchange extension (PABX).
Battery duty is very low.
Logical malfunctioning in the handset or
base unit.
Cannot send and/or receive SMS messages,
or SMS Messages are received just as
voice messages.
Try charging the handset for few minutes,
then remove it from the base. If it still
doesn't switch on, check the battery
installation.
If you already did the above stated
operation unsuccessfully, try replacing
the batteries.
Contact an authorized service centre.
Check the connection of the AC power
adapter.
Try registering the handset to the base.
Check the connection of the line cord .
Check the battery charge and charge it if
necessary.
Get closer to the base unit. If you can
access more base units, try selecting a
closer one.
Select another ring level.
Try by keeping pressed the key.
Check the call barring function and
change it if necessary.
Check the Flash time and set it properly.
Clean them.
Replace the batteries.
Try resetting the handset or the base.
Contact an authorized service centre.
Set it to off.
Disconnect the other phones.
Set/check the SMS service centres.
Batteries discharged or not (well) installed.
Batteries damaged or not suitable.
Faulty handset.
No power connection in the base unit.
Handset not registered to the base unit or
lost registration.
Wrong connection of the phone line cord.
Batteries near to being fully discharged.
Handset too far from the base.
Ring volume level set to OFF.
You have the keypad lock function.
Outgoing calls barring function activated.
Flash time not properly set.
Charging contacts not clean.
Battery life reached the end.
AC power supply noise or electrostatic
spikes could temporarily altered the internal
memory.
Faulty handset or base unit.
Call barring is on.
Other SMS phones connected to the line.
Service centr s are not (properly) set.
activated
e
Page 55
Additional
Information
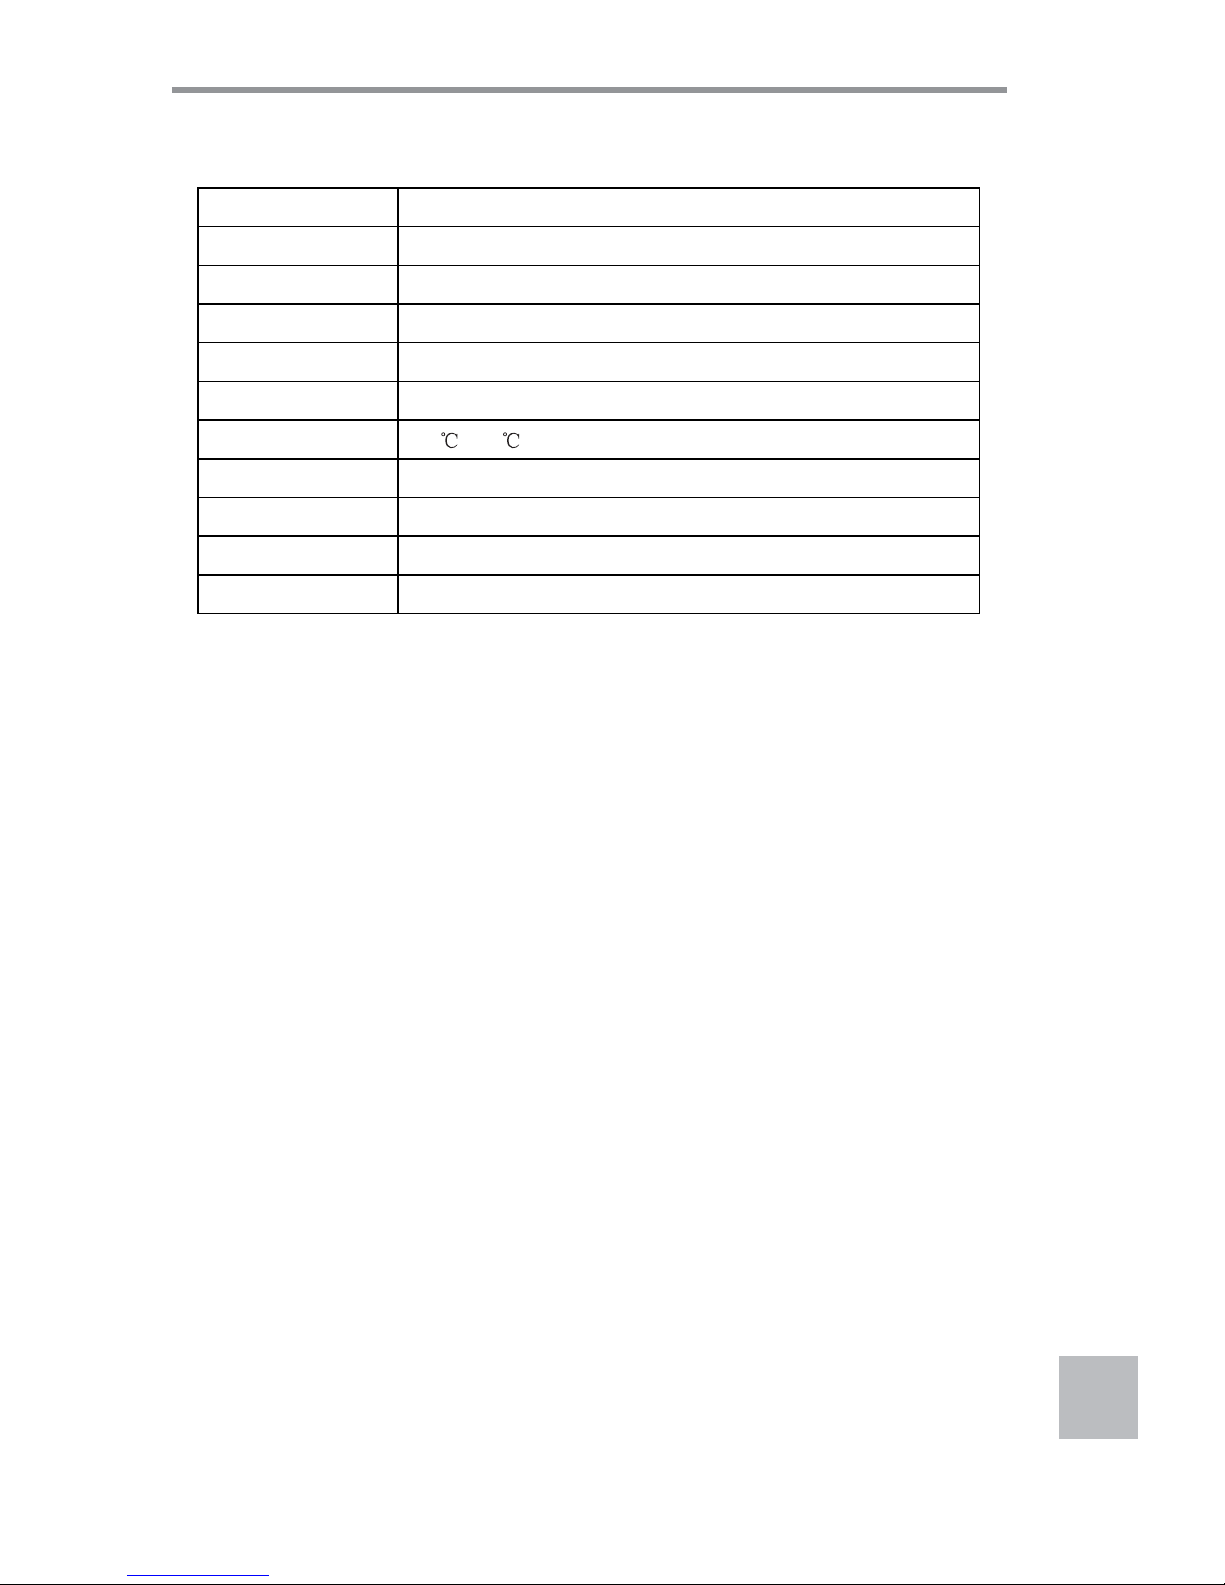
1.88~1.90 GHz
120 duplex channels
< 250 mW (24 dBm)
GFSK
<50KHz
15 hours
0~40
0%~90%
Base unit: 112; handset: 121
Base: 102 x 102 x 102; Handset: 123 x 46.6 x 23.8
Base input: ; Handset input: Ni-MH : 3.6V, 800 mA9 V , 300mA
DC
Frequency Range
Channels
RF Carrier Power
Modulation
Frequency Stability
Charging time
Ambient temperature
Humidity
Weight (grams)
Size (mm)
Power supply
Technical Specifications
54
 Loading...