

Page 1

W e striv e t o ensur e tha t ou r product s ar e o f th e highes t quality
an d fre e o f manufacturin g defect s o r missin g parts . Howev e r ,
yo u hav e an y problem s wit h you r ne w product,
D O NO T RETUR N I T T O TH E S T ORE ,
pleas e contac t u s tol l fre e @:
O r writ e to:
Escal a d e Spor t s
Cust o me r Servi c e Depa r tme n t
P .O . Bo x 8 8 9
Evansvill e I N 47706
Y ou r Mode l Numbe r
G04800W/F
hav e you r mode l numbe r whe n inquirin g abou t parts.
Please
Dat e Cod e
2 - G04800W/F - - HL
Whe n contactin g Escalad e Sport s pleas e provid e you r mode l numbe r , d at e
cod e (i f a pplicable ) an d par t n umbe r i f requestin g a replacemen t part . T hes e
number s ar e locate d o n th e product , packaging , an d t hi s owner s m anual .
Purchase Dat e
PLEASE RETAIN THIS INSTRUCTION MANUAL FOR FUTURE REFERENCE
1
Page 2
2
Make sure you understand the following tips before you begin to assemble your hockey table.
1. Start all bolts by hand before tightening.
2. Some drawings or images in this manual may not look exactly like your product. Please
read and understand the text before starting each assembly step.
FOUR ADULTS ARE REQUIRED TO ASSEMBLE
THIS 90" CONTOUR AIR HOCKEY TABLE WITH SCORELINX
Assembly Tips
Tools Required:
READ AND FOLLOW ALL ASSEMBLY, OPERATION, AND
SAFETY INSTRUCTIONS CAREFULLY. AT LEAST TWO
ADULTS ARE NEEDED TO PUT THIS HOCKEY TABLE
TOGETHER.
T1 - Allen Wrench (Included)
IMPORTANT! READ EACH STEP
IN THIS MANUAL BEFORE YOU
BEGIN THE ASSEMBLY.
Phillips Screwdriver
Furniture Polish and Cloth
CAUTION: THIS TABLE INCLUDES ONE SET OF DEVICE HOLDER
THIS HOLDER ONLY FOR SMART DEVICE SMALLER THAN 10 inch
Page 3
3
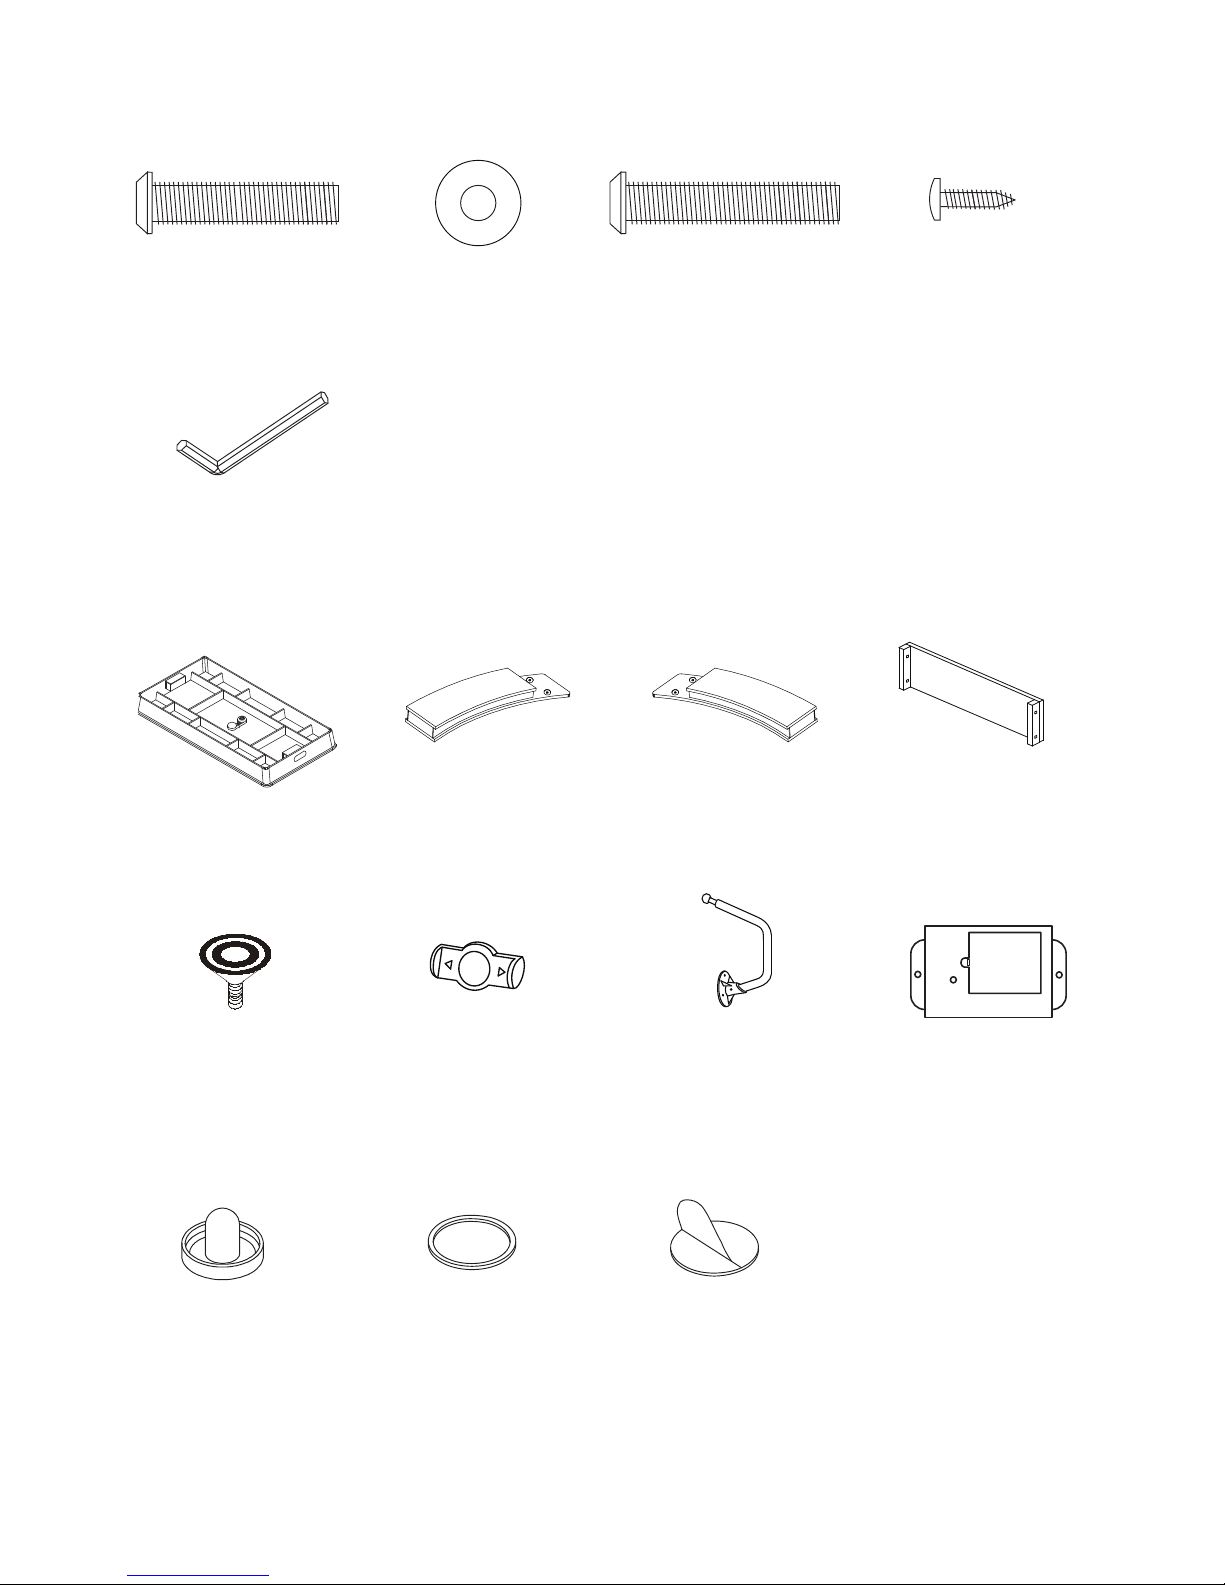
H1 = 8 pcs
H2 = 16 pcs
8.5 mm x 22 mm
8 mm x 35 mm
Allen Head Bolt
Flat Washer
H4 = 3 pcs
T1 = 1 pc
Black Striker
A1 = 4 pcs
Black Puck
A2 = 4 pcs
Felt Pad
A3 = 4 pcs
H3 = 8 pcs
8 mm x 40 mm
Allen Head Bolt
Allen Wrench
3.5 mm x 14 mm
Phillips Round
Head Screw
P1 = 1 pc
= 1 pc = 1 pc
P2 = 2 pcs
P3 = 2 pcs
Left Leg
Device Holder Device Holder Pole
(with Plastic Nut pre-installed)
(with Ball Connector
and Base pre-installed)
Right Leg
Air Hockey Cabinet
Leg Leveler
P5 = 4 pcs
P6
P7
= 1 pc
Bluetooth Battery Box
(factory installed)
P8
End Leg Panel
P4 = 2 pcs
w/ Air Motor and P8
Bluetooth Battery Box
HARDWARE IDENTIFIER
(To Scale)
(Not to Scale)
PARTS IDENTIFIER (Not to Scale)
NOTE: A3 Felt Pads may already
be attached to A1 Strikers.
Page 4
4
P3
P3
P2
H1
H1
H2
H2
P2
1 pc -
P1 Air Hockey Table Cabinet w/ Air Motor
P2 Left Leg2 pcs - P3 Right Leg2 pcs -
T1 Allen Wrench1 pc -
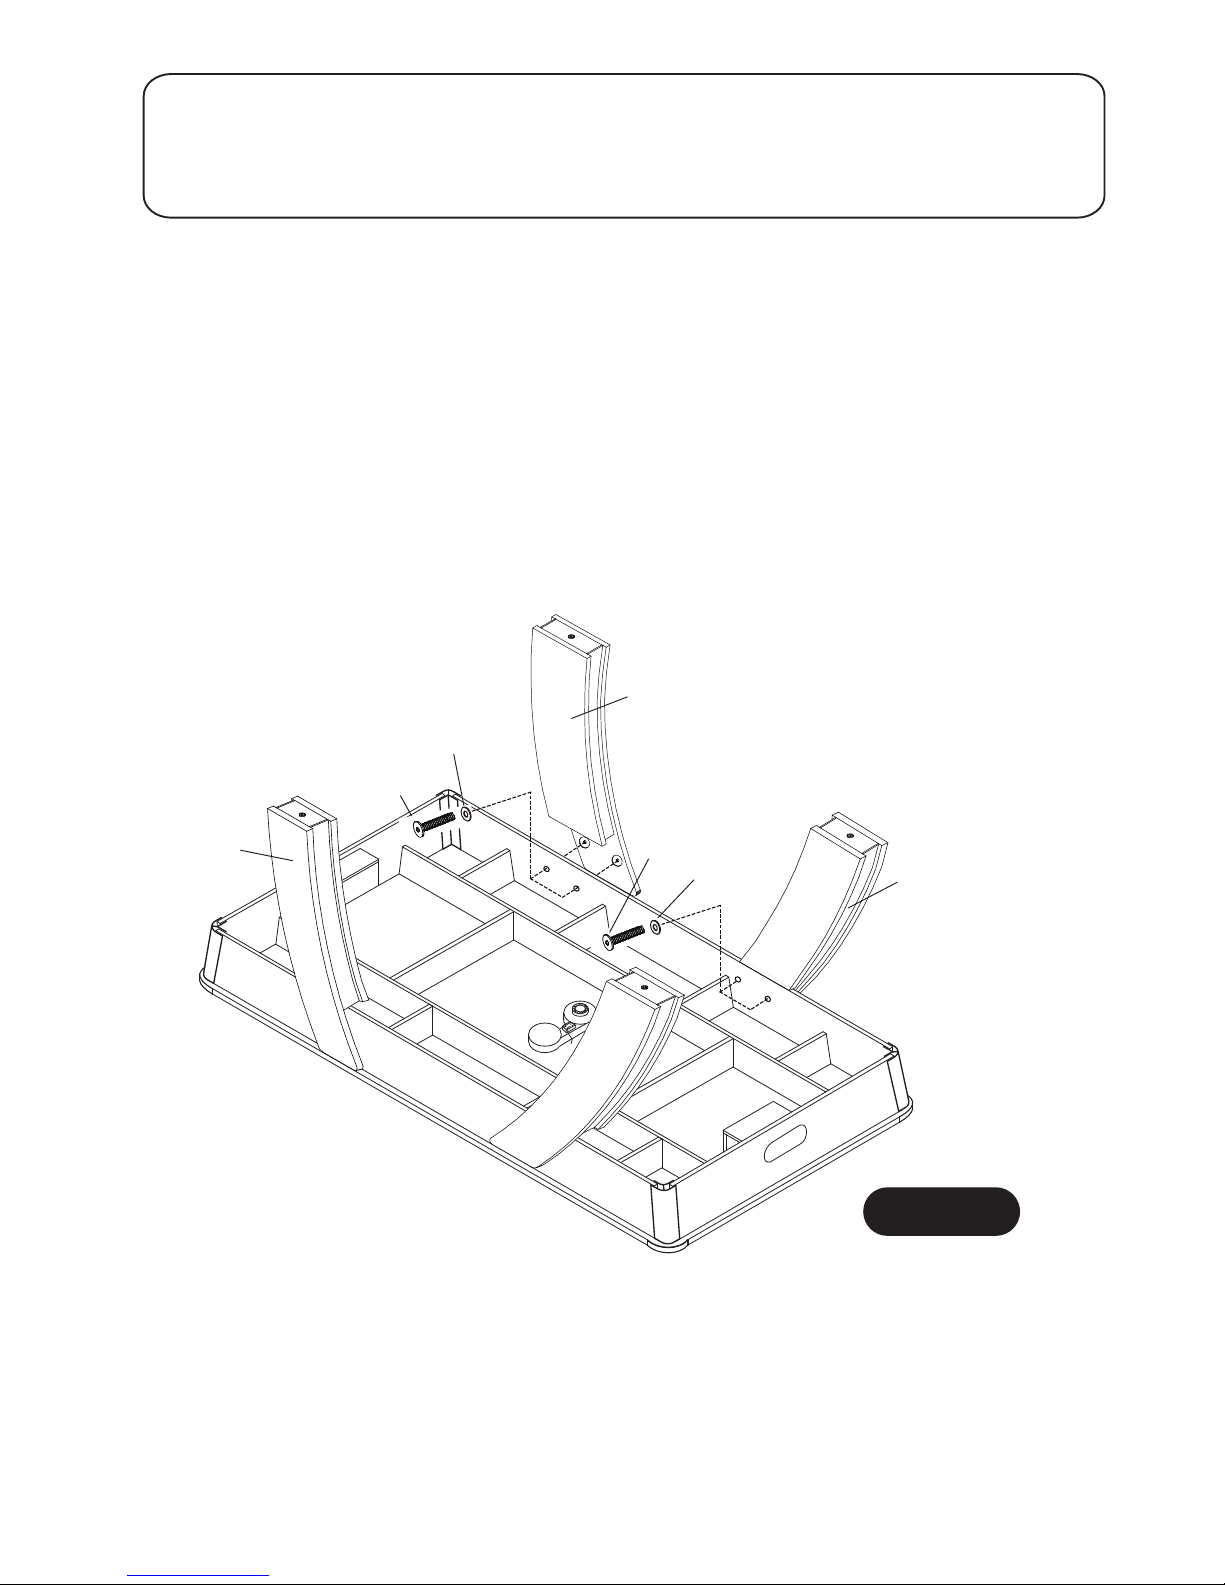
FIGURE 1
STEP:1
Leave Air Hockey Table Cabinet (P1) face down in the carton to assemble.
Install Left Legs (P2) and Right Legs (P3) onto Air Hockey Table Cabinet (P1) with Allen
Head Bolts (H1) and Flat Washers (H2) using Allen Wrench (T1) as shown in FIGURE 1.
Do not tighten Bolts (H1) at this time.
PARTS REQUIRED:
H1 8 x 35mm Allen Head Bolt 8 pcs - H2 8.5 x 22mm Flat Washer8 pcs -
Page 5
5
P5
P4
H3
H2
P8 Bluetooth
Battery Box
ON/OFF
SWITCH
H2
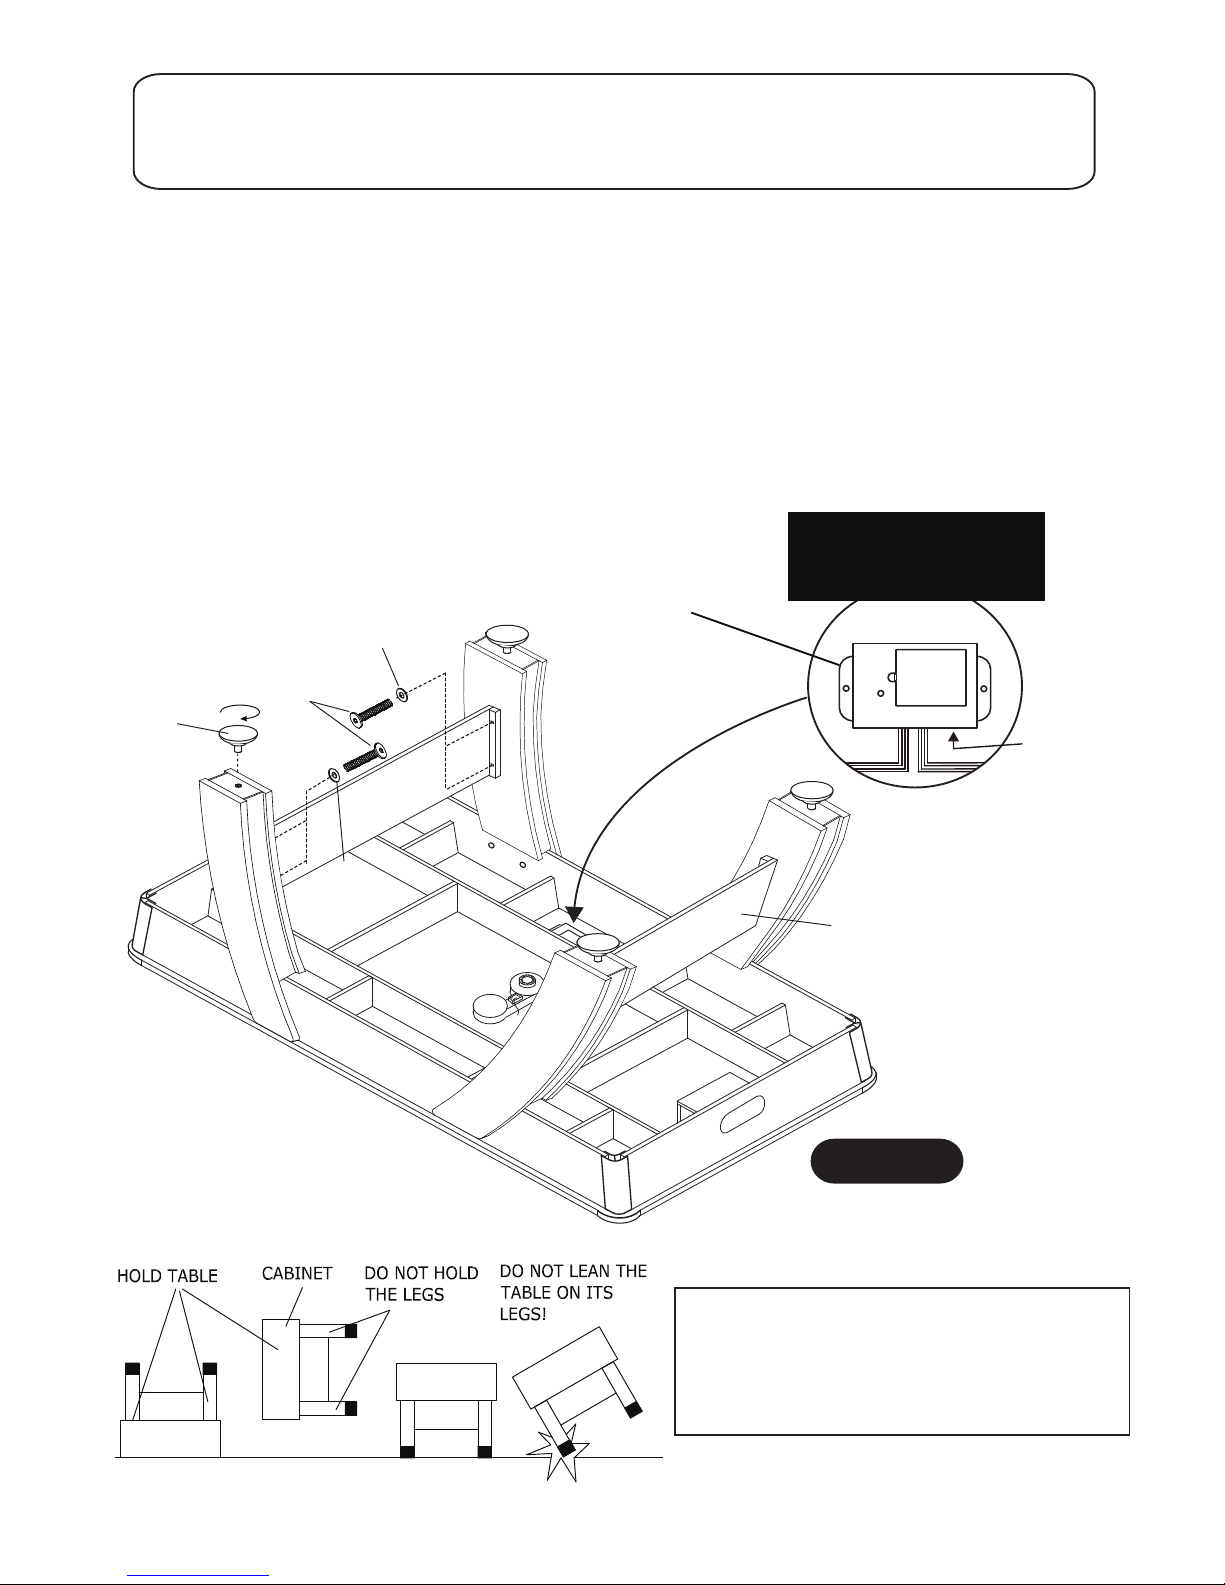
FIGURE 2
STEP:2
Install End Leg Panels (P4) onto the Legs using Bolts (H3) and Flat Washers (H2) as shown
in FIGURE 2.
Tighten Bolts (H1) from STEP 1 and Bolts (H3) at this time.
Screw P5 Leg Levelers into the bottom of each leg as shown in FIGURE 2.
Remove the battery cover of P8 Bluetooth Battery Box and insert 3 AA Batteries (not included)
into the battery compartment.
Lift the table assembly from the floor with at least four strong adults, turn it over, and set
the table assembly on its legs in the location where you will play.
PARTS REQUIRED:
H3 8 x 40mm Allen Head Bolt 8 pcs -
P4 End Leg Panel2 pcs - P5 Leg Leveler4 pcs -
H2 8.5 x 22mm Flat Washer8 pcs -
P4
See” FIRST TIME BATTERY INSTALLATION AND NOTICE “ , before installing batteries, located on page 10.
NOTE: Be careful to
match batteries to
battery box polarities
CAUTION: Four strong adults are recommended to flip
the table as shown.
1. Grab the table on the ground.
2. Turn the table over.
3. Place it on all four feet at the same time on the ground.
Page 6
6
P6
P6
P6
P7
H4
FIGURE 3
DETAIL A
DETAIL B
STEP:3
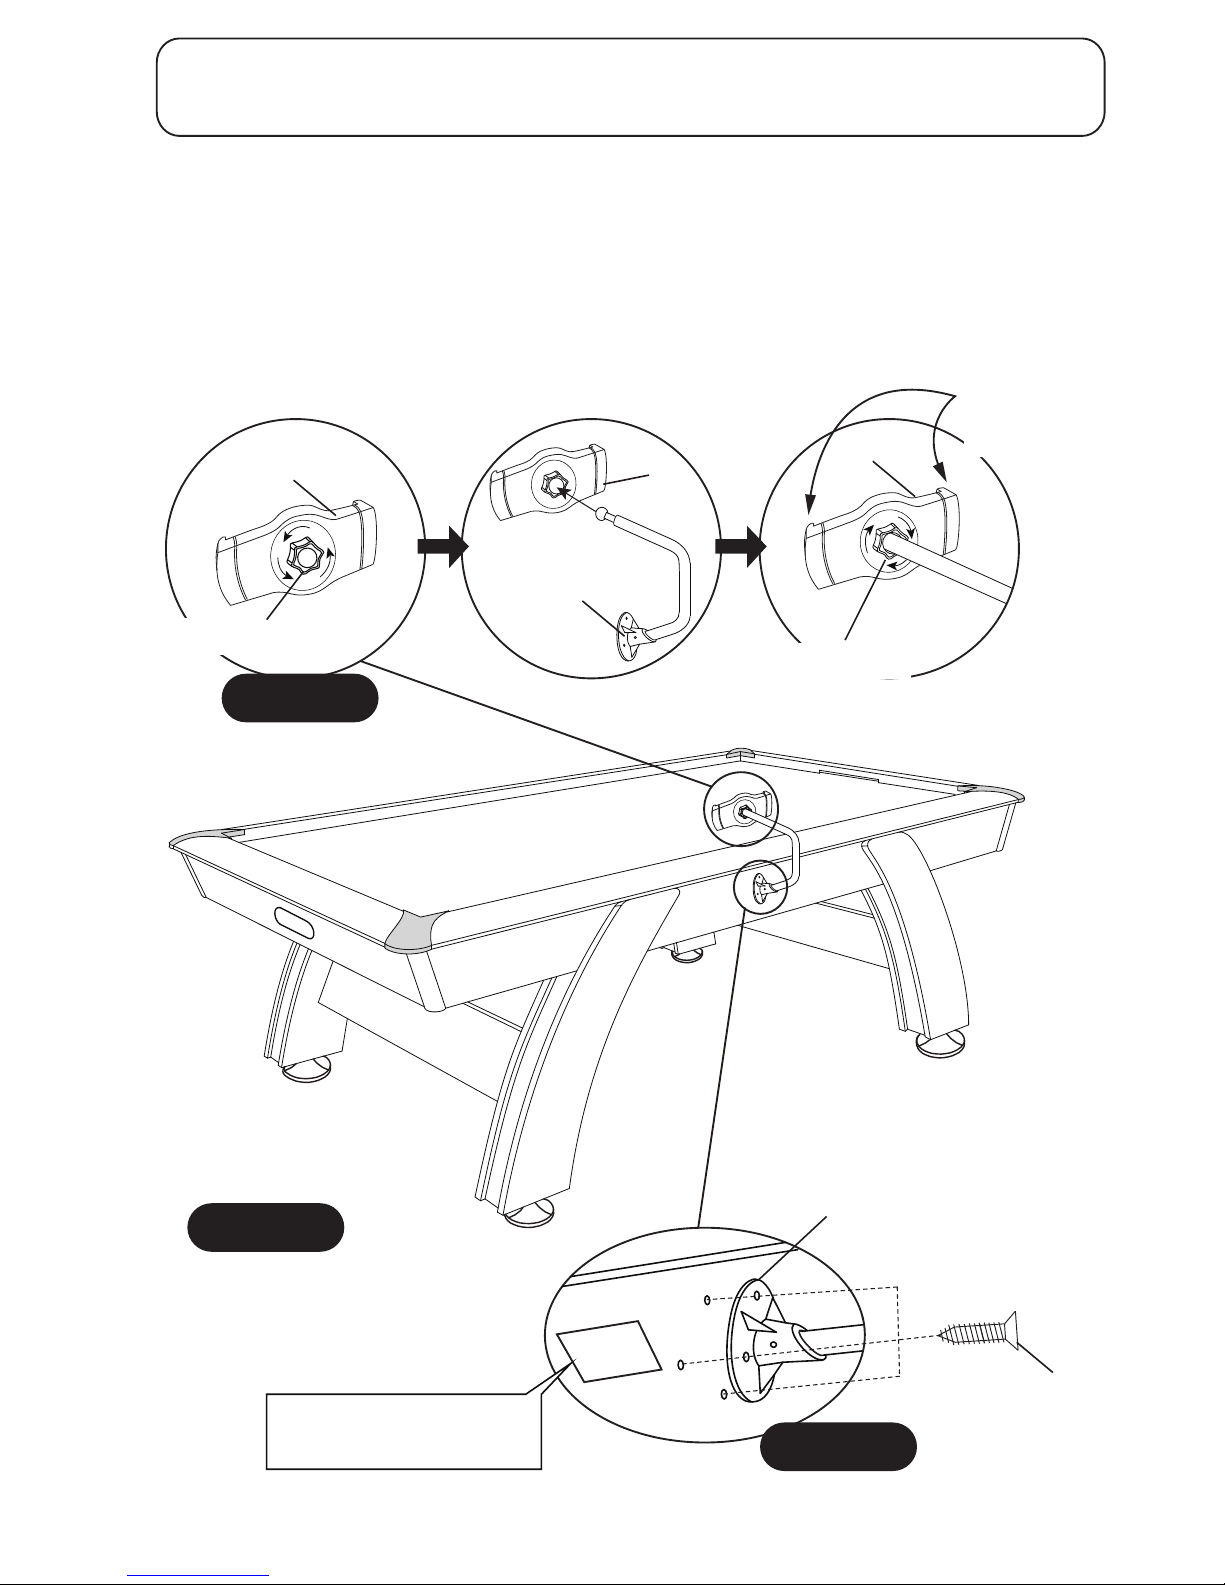
Attach the Base of P7 Device Holder Pole onto one side apron which has a label on it.
Screw the Base using pilot holes on this side apron with three H4 Scews as shown in DETAIL A.
Tighten, but do not strip out H4 screws.
Unscrew the plastic nut of P6 Device Holder, and insert the Ball Connector of P7 Device Holder
Pole into the P6 Device Holder. Lastly, adjust the angle of P7 Device Holder by Ball connector
and then tighten the Plastic Nut as shown in DETAIL B.
1 pc -
P6 Device Holder
PARTS REQUIRED:
H1 3.5 x 14mm Phillips Round Head Screw 3 pcs -
1 pc -
P7 Device Holder Pole
Base of P7 Device
Holder Pole
Plastic Nut
Plastic Nut
Jaws are
adjustable
Label
Install P7 Device Holer
Pole on this Side Apron
Page 7
7
This device complies with Part 15 of the FCC Rules. Operation is subject to the following two
conditions:
(1) this device may not cause harmful interference, and
(2) this device must accept any interference received, including interference that may cause
undesired operation.
1. Download the "Scorelinx" App to your device from
the Apple APP Store or Google Play. And you can
also Scan the QR code on the right.
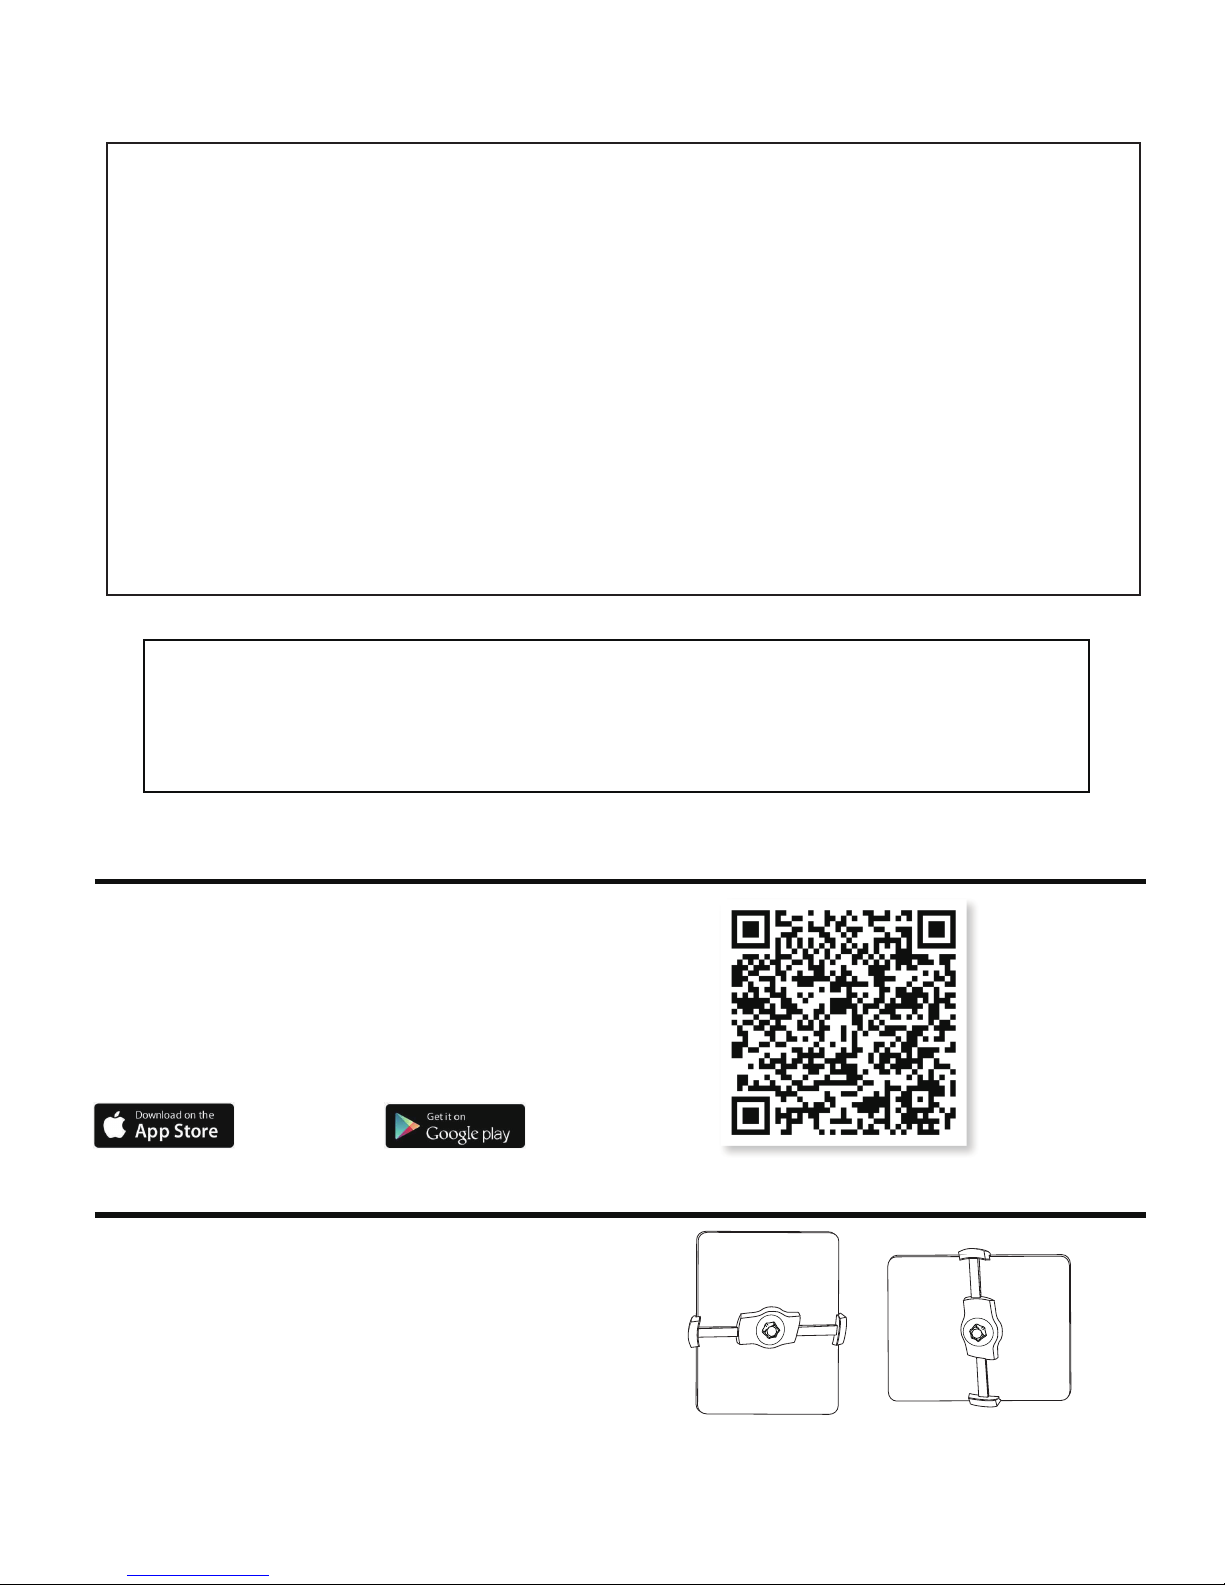
1. Place your Smart Device on P6 Device Holder, and
make sure your device is clipped tightly by the holder.
2. You can position your device both verticaly and
horizontally by rotating the Device Holder.
The Holder goes to vertical position to support tablet
view in landscape.
Note: The maximum work length of Device Holder
is 7.5 inch. This Holder only for Smart Device
smaller than 10 inch.
2. Follow the on-screen instructions to install the App.
DOWNLOAD “ScoreLinx” APP
POSITION YOUR SMART DEVICE
Phone System Requirements:
Android 4.4 / 16G and above.IOS 11 / 16G and above.
CARE AND USE OF YOUR HOCKEY TABLE
.2
rofdednetnisitcudorpsihT ROODNI .ylnoesu
.5
DO NOT
DO NOT
DO NOT
It is suggested that this table be placed close to wall thus allowing the air motor
cord to
Use a carpenters level to properly level table using the leg levelers.
NOT
be a trip hazard. Always turn air motor off when table is not in use.
.6
.elbatehtnonaelrobmilc,tis
.7
8.
9.
This will damage the legs..tignivomnehwelbatehtgard
.elbatehtnosknirdtes
For long life and best play from your air hockey table, apply spray furniture polish
to a clean cloth and wipe down the playfield with air motor running to make the
best play and frequently thereafter.
3.
4.
DO NOT
operate the motor if the cord is damaged in any way.
.1
Use only a suitable 120v AC household outlet, and insure the cord is not a trip hazard.
Congratulations! You have now assembled your Hockey Table. Please note the Care and Use
instructions below to ensure many years of trouble free use of your Hockey Table.
Page 8
8
1. Open the Bluetooth capability of your Smart Device.
2. Turn on the switch of P8 Bluetooth Battery Box under the table.
3. Open the "Scorelinx" APP on the phone and then the Bluetooth Box will automatically pair to your device.
4. Only one Bluetooth Battery Box can be paired to one Smart Device at one time.
5. Only open the APP on Smart Device at a time otherwise the Bluetooth connection will be interrupted.
6. Keep your Smart Device on the Device Holder to ensure constant Bluetooth connectivity.
Troubleshooting: Make sure Bluetooth is in the ON
position to pair to the the table. You can see the item
is successfully paired when you click on the Bluetooth
menu item in your settings and see the device is
properly paired.
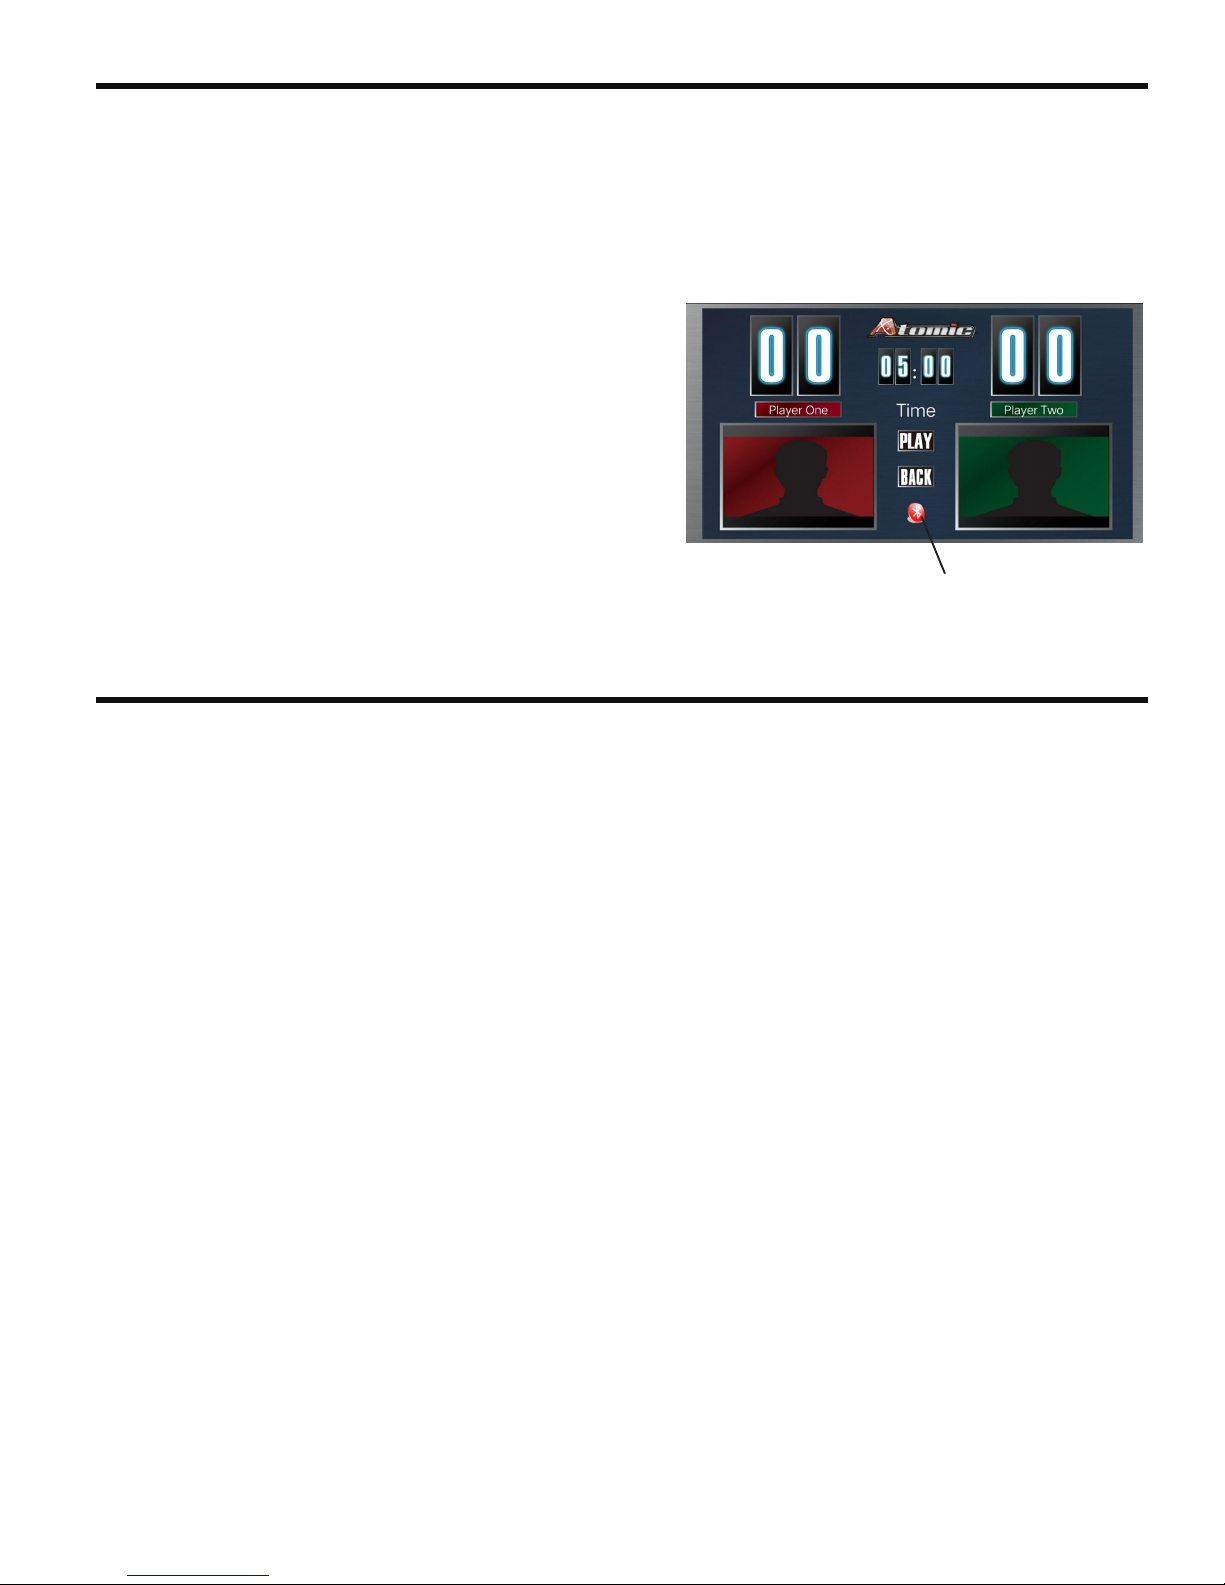
And in game interface, the RED Bluetooth icon will also
turn BLUE.
The normal time of Bluetooth connection is within 5-60
seconds.You can turn off and turn on the Switch of P8
Bluetooth Battery Box if connection timeout.
Do not forget to turn off the switch when you finish playing.
Bluetooth Icon
1. To play a quick game without utilizing the customized options, simply press start game and choose the
length of your game Choose 5,10, or 15 minutes and then press PLAY to start the game.
2. To edit the player name, press inside the Player box to activate the on screen keyboard, delete the word
“player” and enter your own name. Repeat this process for player two. Use the hide keyboard function in
lower right hand corner of the on screen keyboard to hide the keyboard when finished entering the names.
3. Press the camera icon and you will have the choice to upload a picture from your own picture gallery or
take a new photo to represent your avatar on the scoring display. After you take the photo, you simply
press the “USE PHOTO” to choose that photo. Or you can retake the photo if you want to use a different
one. Repeat this step for player 2
4. To create a custom voice command when you score a goal, simply press the Microphone icon and speak
into the phone. The microphone icon will trun red when recording. Press the microphone icon again to
end your recording After you are finished recording your voice effect, you can preview and playback
the recording if you wish before you use it for game play. To see how your new recording sounds, press
the speaker icon just below the microphone icon to hear it. You can repeat the recording process again if
you do not like what you have done to create a new one. Repeat the same process for player 2.
5. You would then press enter to advance to the next screen where you would select the game length.
6. Press "PLAY" to start the game.
7. When the "PLAYER 1" scores, the display on the "PLAYER 1" side increases by 1.
8. When the "PLAYER 2" scores, the display on the "PLAYER 2" side increases by 1.
9. The winner is the the player with the highest score when the game time ends.
Note: It is not mandatory that you select both a custom picture and sound recording. You can
choose to do both or none at all. You can choose your own celebration or heckle your opponent
with your recording. It’s up to you! Traditional goal scoring hockey horns will be the default
sound for goals scored if no custom sounds are recorded.
BLUETOOTH SETTINGS
HOW TO PLAY
Page 9
9
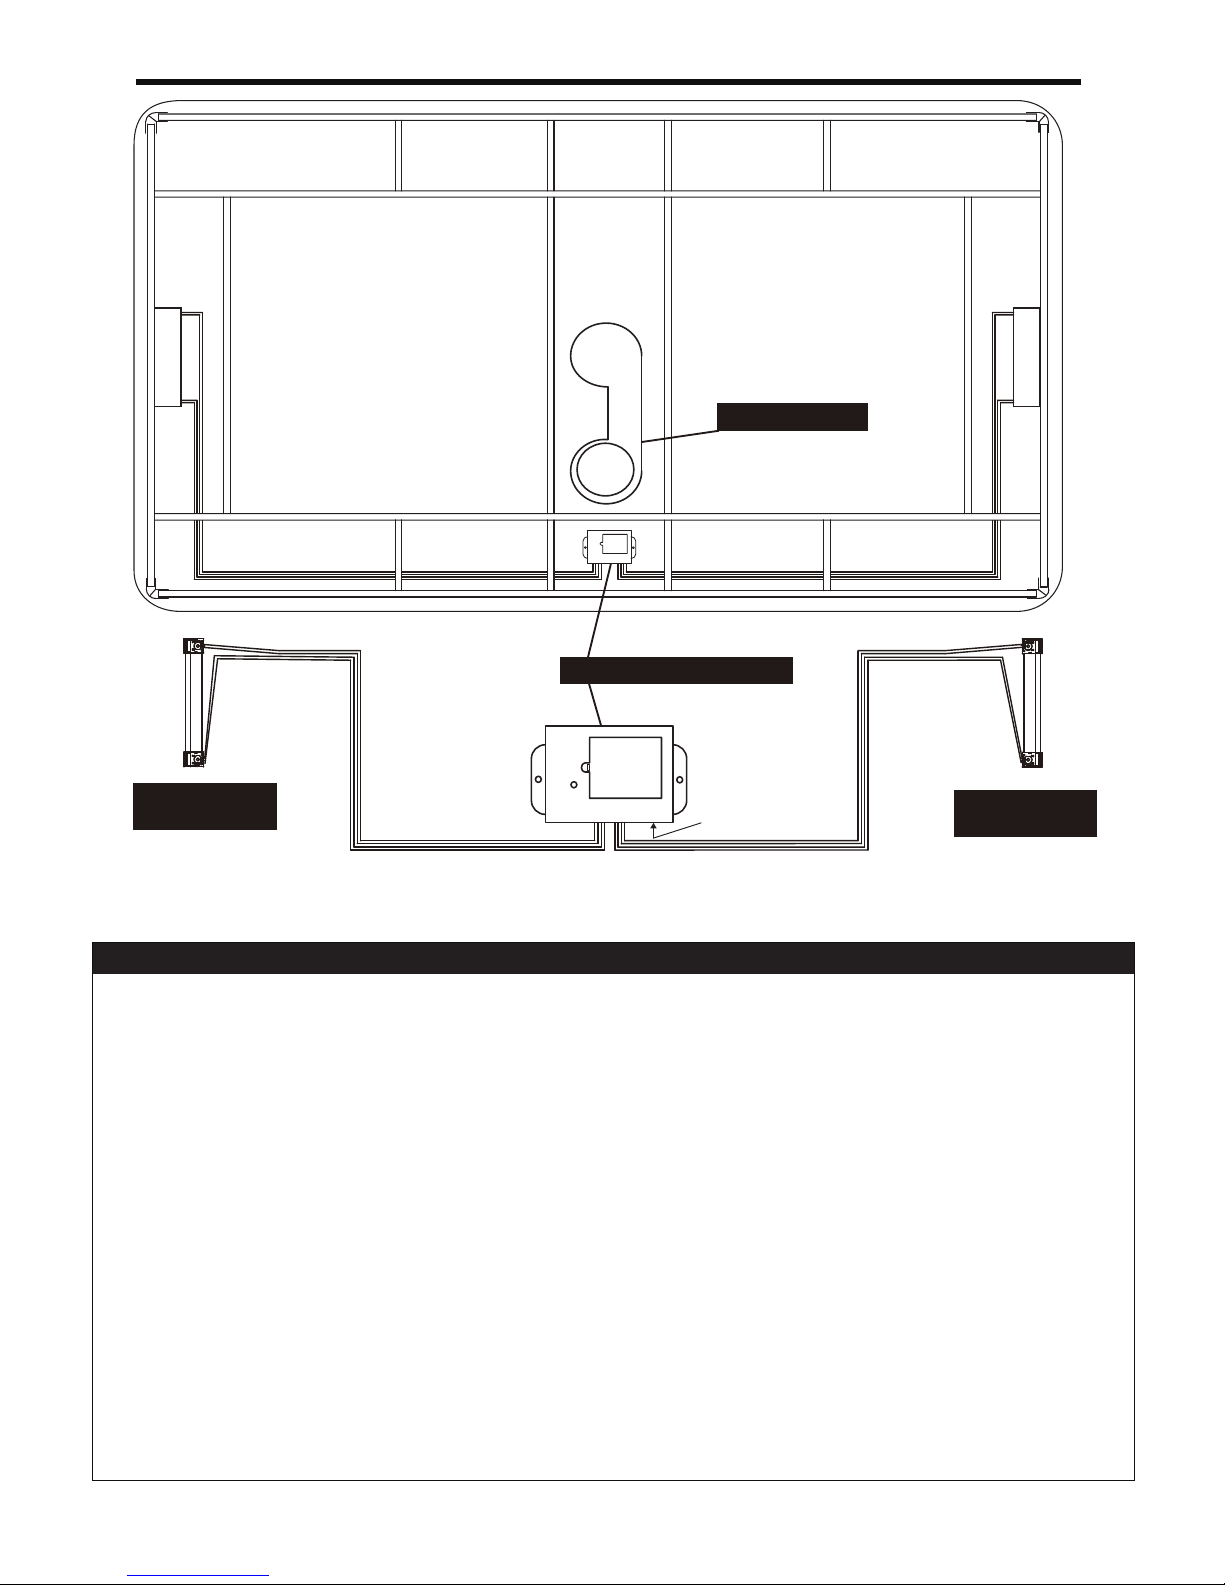
C1 Scoring
Sensors Module
ELECTRICAL CONNECTIONS & SPARE PARTS DRAWINGS
C2 Air Blower
P8 Bluetooth Battery Box
PRODUCT PARTS LIST
G04800HLH1
8 x 35 mm Allen Head Bolt
8
G04800HLH3
8 x 40 mm Allen Head Bolt
8
G04800HLH4
3.5 x 14 mm Phillips Round Head Screw
3
G04800HLT1
Allen Wrench
1
G04800HLH2
8 x 22 mm Flat Washer
16
G04800HLP2
Left Leg
2
G04800HLP3
Right Leg
2
G04800HLP4
End Leg Panel
2
G04800HLP5
Leg Leveler
4
G04800HLP6
Device Holder
1
G04800HLP7
Device Holder Pole
1
G04800HLP8
Bluetooth Battery Box
1
G04800HLA1
Black Striker
4
G04800HLA2
Black Puck
4
G04800HLA3
Felt Pad
4
G04800HLC1
Scoring Sensor Module
2
G04800HLP1
Air Hockey Cabinet w/ Air Motor
1
Part#
Description Qty
MODEL: G04800
C1 Scoring
Sensors Module
ON/OFF
SWITCH
Page 10

10
First Time Battery Installation:
Locate battery compartment for this product .
Use alkaline batteries for maximum performance .
Using a small Phillips head screwdriver – loosen and remove the battery compartment cover
screw(s).
Remove battery compartment cover .
Install new batteries only after reading the “ Battery Information NOTICE“ !
Replace compartment cover and secure cover with the cover screw . Do not over tighten and
strip out the screw .
Notice:
1. Remove and replace batteries when the electrical features of this product work slowly or are not
functional .
2. Do not mix old and new batteries .
3. Do not mix different types of batteries : Alkaline , Standard ( Carbon-Zinc) , or rechargeable
( Nickel-Cadmium batteries ) .
4. Use Alkaline Batteries for maximum performance .
5. Do not use damaged batteries .
6. Use only batteries of the same or equivalent type as recommended.
7. Install new batteries as per matching the battery polarity guide ( + & - , positive and negative ) inside
of the battery compartment . Correct battery polarity installation is critical as to not damage the internal
electrical components as well as insuring the correct functionality of the product .
8. Do not short circuit the battery terminals .
9. Always remove exhausted , leaking, weak , and batteries from long periods of nonuse from the
product . Battery leakage and corrosion can cause damage .
10. Check the battery terminals are clean and bright before installing new batteries.
11. Dispose of old batteries safely and per local battery disposal codes .
12. Do not dispose of batteries into a fire as they may explode or leak.
13. If removable rechargeable batteries are used , they are to be charged under adult supervision .
14. Rechargeable batteries are to removed from the product before they are charged .
15. If you use a battery charger, it should be examined regularly for damage to the cord , plug, enclosure,
and other parts. Do not use a damaged or malfunctioning charger until it is properly repaired.
16. Non rechargeable batteries must not be recharged .
17. Always remove batteries from this product for extended storage and or non-use .
18. Should this product cause , or be affected by, local electrical interference , move it away from other
electrical equipment . Reset ( switching off and back on again and or removing and reinserting the
batteries ) if necessary .
IMPORTANT: BATTERY INFORMATION
Please retain this information for future reference. Batteries must be installed / replaced by an adult .
Page 11

11
y ESCALADE n a f o e s a h c r u p e h t n o , r e n w o l a n i g i r o e h t o t s d n e t x e y t n a r r a w r e m o t s u c s i h T
. ) " t c u d o r P " e h t s a d e r r e f e r r e t f a n i e r e h ( t c u d o r P S T R O P S
: N O I T A R U D Y T N A R R A W 0 9 f o d o i r e p a r o f , r e n w o l a n i g i r o e h t o t d e t n a r r a w s i t c u d o r P s i h T
. e s a h c r u p l a n i g i r o e h t m o r f s y a d
: E G A R E V O C Y T N A R R A W t c u d o r p s i h t , r e n w o l a n i g i r o e h t o t s t n a r r a w S T R O P S E D A L A C S E
e s o p r u p d e d n e t n i e h t r o f d e s u n e h w p i h s n a m k r o w d n a l a i r e t a m n i s t c e f e d m o r f e e r f e b o t
N E E B S A H T C U D O R P E H T F I D I O V S I Y T N A R R A W S I H T . s n o i t i d n o c d n a e s u l a m r o n r e d n u
, E C I V R E S R E P O R P M I , E C N E G I L G E N , E S U E L B A N O S A E R N U , T N E D I C C A Y B D E G A M A D
R E H T O R O T C U D O R P E H T H T I W D E D I V O R P S N O I T C U R T S N I W O L L O F O T E R U L I A F
. P I H S N A M K R O W D N A L A I R E T A M N I S T C E F E D F O T U O G N I S I R A T O N S E S U A C
: T N E M E C A L P E R Y T N A R R A W , d o i r e p y t n a r r a w y a d 0 9 e v o b a e h t g n i r u D
e l b a r a p m o c a h t i w e c a l p e r r o s t n e n o p m o c t n e m e c a l p e r e d i v o r p l l a h s S T R O P S E D A L A C S E
e s a e l p , e r a c r e p o r p d n a e s u l a m r o n r e d n u e v i t c e f e d s i t c u d o r p f I . g n i s o o h c r u o t a t c u d o r p
. t p e D e c i v r e S r e m o t s u C r u o t c a t n o c
. t p e D e c i v r e S r e m o t s u C / 888-996-2729 - 1
: t a s u e t i r W r O
6 0 7 7 4 N I , e l l i v s n a v E , 9 8 8 x o B . O . P - . c n I , s t r o p S ® e d a l a c s E
. t p e D e c i v r e S r e m o t s u C : n t t A
: t a s u l i a m - E r O
m o c . s t r o p s e d a l a c s e @ gameroom
Other than shipping requirements, no charge will be made for such replacement of in-warranty
products.
: S R E M I A L C S I D Y T N A R R A W T U O G N I S I R A S E I T N A R R A W D E I L P M I Y N A
S E I T N A R R A W D E I L P M I E H T O T D E T I M I L T O N T U B G N I D U L C N I , E L A S S I H T F O
E R A , E S O P R U P R A L U C I T R A P A R O F S S E N T I F D N A Y T I L I B A T N A H C R E M F O
T R O P S E D A L A C S E . D O I R E P Y A D 0 9 E V O B A E H T O T N O I T A R U D N I D E T I M I L S
R E H T O R O T C U D O R P E H T F O E S U F O S S O L R O F E L B A I L E B T O N L L A H S
S E G A M A D R O S E S N E P X E , S T S O C L A T N E D I C N I R O L A I T N E U Q E S N O C
. E S U R E H T O Y N A F O R E M U S N O C E H T Y B D E R R U C N I
r o l a i t n e u q e s n o c r o s e i t n a r r a w d e i l p m i f o n o i t a t i m i l r o n o i s u l c x e e h t w o l l a t o n o d s e t a t s e m o S
. u o y o t y l p p a t o n y a m s n o i s u l c x e r o s n o i t a t i m i l e v o b a e h t o s , s e g a m a d l a t n e d i c n i
: S E I D E M E R L A G E L e v a h o s l a y a m u o y d n a s t h g i r l a g e l c i f i c e p s u o y s e v i g y t n a r r a w s i h T
.e t a t s o t e t a t s m o r f y r a v y a m h c i h w s t h g i r r e h t o
Y T N A R R A W D E T I M I L Y A D 0 9
Page 12

FCC Warning:
This device complies with Part 15 of the FCC rules and Industry Canada license-exempt RSS
standard(s). Operation is subject to the following two conditions: (1) this device may not cause
harmful interference, and (2) this device must accept any interference received, including
interference that may cause undesired operation.
The manufacturer is not responsible for any radio interference caused by unauthorized
modifications or change to this equipment. Such modifications or change could void the user’s
authority to operate the equipment.
The device has been evaluated to meet general RF exposure requirement.
To maintain compliance with FCC’s RF exposure guidelines, this equipment should be
installed and operated with a minimum distance of 20cm between the radiator and your body.
 Loading...