

Page 1

ATOM DELUXE LAWN EDGERS
2 and 4 Stroke Engines models 440 and 450
MULTI INTERNATIONAL GOLD MEDALS &
AWARD WINNING LAWN EDGERS & TILLERS
Operator /
Owner Manual
63899MA
1711
•
Safety Precautions
•
Assembling
•
Service
•
Operating and Edging Instructions
Important Manual – Do Not Throw Away
Manual always to be available for reference or
instructing new operators.
Introduction: Gasoline Lawn Edger
This Atom Gasoline Powered Edger is designed to the highest
standards to ensure you many hours of uninterrupted service.
Pay special attention to the safety precautions. Only persons
who understand this Manual are to operate the Edger.
To receive maximum performance and satisfaction from
your Edger, it is important that you read and understand the
maintenance and safety precautions before using the unit.
Contact your Atom dealer or the Atom distributor in your
area if you do not understand or cannot carry out any of the
operating instructions in this Manual.
Atom’s philosophy is to continually improve all of its products.
As a result, engineering changes and improvements are made
from time to time. Appearances may differ between models.
This manual covers information required to operate, maintain
and service this Atom Lawn Edger.
AS WITH ANY POWER TOOL IMPROPER USE CAN CAUSE
SERIOUS INJURY. Make sure this manual is read and carefully
understood before starting or operating this equipment.
The purpose of Safety
Warnings and Notes in
this Manual is to attract your attention to possible dangers and
deserve your careful attention and understanding. The Safety
Warnings in this Manual and on the Edger do not, by themselves,
eliminate any danger. The instructions or warnings they give are not
substitutes for proper accident prevention measures.
Failure to obey a safety warning can
result in injury to yourself and others.
Contents
Safety Warning Labels ....................................... 1
Safety Precautions ......................................... 2 - 3
Assembling the Edger ......................................... 3
Parts and Controls ............................................. 4
Fuels and Oils .................................................. 4
Starting and Stopping Instructions ....................... 5
Edging Instructions ............................................ 5
Maintenance Instructions ................................ 6 - 7
Troubleshooting Tips .......................................... 6
Lubrication of Gears .......................................... 7
Parts List and Parts Illustration .......................... 7-8
The information contained in this manual is also
available at www.atomindustries.com
Advises you of information or instructions vital
to the operation or maintenance of the equipment.
! SAFETY WARNING
! WARNING
! NOTE
Read operators manual Do not expose motor
to moisture
Wear eye protection
Keep bystanders away
15m (50 feet)
Blade cover label
SAFETY WARNING LABELS
MADE IN AUSTRALIA
ATOM Lawn Edgers have Australian and foreign Patents, Patent Pending, and Design Registrations.
FIG 1
FIG 2
Disconnect the
mains plug if the
cord is damaged or
entangled
ELECTRIC
PRODUCTS
ONLY
ACN 000 583 924
PAGE
160910
440.450_Deluxe Edger_manual_16.9.11.indd 1 17/10/11 1:02 PM
Page 2

FIG 4
Proper eye protection is a
must. The blade cover may not
protect the operator from all moving foreign objects, even
though the discharge is directed away from the operator,
as ricochets and bouncebacks may occur during edger
operations. Never operate an Atom Edger unless wearing
goggles or properly fitting safety glasses with adequate front
and side protection which comply with ANSI Z 87.1.
Safe use of an Atom Edger involves:
1.The Operator.
2.The Atom Edger.
3.The use of the Atom Edger.
THE OPERATOR
PHYSICAL CONDITION
Operator must be in good physical
condition and mental health, and not under the influence of
any substance (drugs, alcohol, etc.) which might impair vision,
dexterity or judgement (Fig 3).
Do not operate the Edger when fatigued. Be alert – if you get
tired while operating the machine, take a break. Tiredness may
result in loss of control. Working with any power tool can be
strenuous. If you have any condition that might be aggravated
by strenuous work, check with your doctor
before operating the machine
FIG 3
PROPER CLOTHING
Clothing must be sturdy and snug-fitting,
but allow complete freedom of movement
(See Fig 5). Avoid loose-fitting jackets,
flared or cuffed pants, or anything that
could trip the operator. Wear overalls or
long pants to protect your legs. DO NOT
wear shorts. Use of gloves when working
with the Lawn Edger is recommended.
Good footing is most important. Wear
sturdy shoes with nonslip soles. DO NOT
wear sandals, open footwear (flip-flops)
or operate with bare feet. In hot or sunny conditions, always
wear a hat and long sleeve shirt for protection against skin
cancers. Use of a good brand of sunscreen cream is also
recommended on exposed skin surfaces.
FIG 5
Replace immediately any worn or broken
debris deflector shield or blade cover.
Check from time to time that all screws are tight. Never operate
your machine if it is damaged, improperly adjusted or not
completely and securely assembled.
SAFE MAINTENENCE, REPAIR & STORING
Use only original Atom replacement parts for maintenance and
repair. Use of parts manufactured by others will void warranty
and/or may cause serious or fatal injury.
Always stop the motor, make sure
that the blades have stopped,
before adjusting blade height. Before doing any adjustment,
maintenance or repair work, or cleaning the unit or blades,
disconnect spark plug cap.
Follow the maintenance instructions in the appropriate section of
this manual. Any motor repairs should be carried out by a person
with suitable sevicing experience.
SAFE STARTING & WORKING CONDITIONS
Always inspect that the unit is in good working order before use.
When working with the Atom Edger, always wrap your fingers
tightly around each handle grip. Keep your hands in this position
to have your machine under control at all times. NEVER attempt to
operate the Atom Edger with one hand, as a loss of control may
result in serious or fatal injury. Make sure the handle grips are
in good condition and free of moisture, oil or grease. Use both
hands, one on each handle, to operate and control the edger.
Do not overreach. Keep proper footing and balance at all times.
PAGE 2
SAFETY PRECAUTIONS
As with any power tool, the use of the
edger with rotating blades may be
dangerous. It is important that you read, fully understand, and
observe the following safety precautions and warnings. Re-read
this operator’s manual and the safety instructions periodically.
Read and understand all labels attached to edger.
! WARNING
Do not lend, rent or sell this machine
without the operator’s manual. Be sure
that anyone using this unit understands the information contained
in this manual before use.
! WARNING
! WARNING
This Edger must
not be operated
by minors. Bystanders, especially children
and animals should not be allowed in the
area where a machine is in use and be at
least 15 metres (50 feet) away (Fig 4). If
approached switch off motor immediately.
When not in use store the edger out
of reach of children.
! WARNING
! WARNING
! WARNING
As with any power tool, some special
safety precautions must be observed to
reduce the risk of personal injury. Careless or improper use may
cause serious or even fatal injury.
! WARNING
SAFE FUELING INSTRUCTIONS
Gasoline is an extremely
flammable and explosive
fuel. Use extreme caution when handling gasoline.
Do not smoke or bring any fire or flame near the fuel.
! WARNING
Refuel outdoors only. Always switch off the engine and
allow it to cool before refueling. Relieve fuel tank
pressure by loosening fuel cap slowly. Never remove fuel
filler cap while engine is running.
Select bare ground for fueling, then move at least 3 metres (10
feet) from the fueling spot before starting the engine. Wipe off any
spilled fuel before starting your Atom Edger and check for leakage.
Always tighten fuel filler cap securely after fueling.
Always allow engine to cool before
refueling. Accidental spillage of gasoline
over hot engine could cause fire or explosion to occur with
consequent possible disfigurement or fatal injury. Wash and clean
hands after fueling.
! WARNING
SAFE STARTING
You should always inspect your unit before starting it. Make
sure the controls and safety devices are working properly.
Place the machine on firm ground or other solid surface in an
open area and stand with one foot on handle cross-brace base.
Maintain good balance and secure footing.
! NOTE
When you pull the starter grip, do not wrap
starter rope around your hand. Do not allow grip
to snap back, but guide starter rope slowly back to permit rope to
rewind properly.
Failure to follow this procedure may result in injury to hand or
fingers or may damage the starter mechanism.
The Atom Edger is a one-person machine.
To reduce risk of eye or other injury from
thrown objects, ensure that bystanders are at least 15 metres (50
feet) away during use. Replace immediately any worn or broken
debris deflector shield or blade cover. If approached, release
throttle trigger to immediately de-accelerate the engine to idle.
! WARNING
Prolonged use of any hand-held powered
machine exposing the operator
to vibrations may produce whitefinger disease (Raynaud’s)
phenomenon or carpal tunnel syndrome. These conditions reduce
the hand’s ability to feel and regulate temperature, produce
numbness and burning sensations, and may cause nerve and
circulation damage and tissue necrosis. Extensive hours of
continuous use is not recommended.
! WARNING
440.450_Deluxe Edger_manual_16.9.11.indd 2 17/10/11 1:02 PM
Page 3

PAGE 3
SAFETY PRECAUTIONS
(
CONTINUED
)
SAFE WORKING INSTRUCTIONS
AND IMPORTANT ADJUSTMENTS
Never operate your machine if it is damaged, improperly
adjusted or not completely and securely assembled. At correct
idle speed, the blade should not turn. Do not use the Atom
Edger with incorrect idle speed (refer Adjusting the Carburettor
instructions on page 6).
SAFE MAINTENANCE, REPAIR
AND STORING
Use only original Atom replacement parts for maintenance and
repair. Use of parts manufactured by others will void warranty
and/or may cause serious or fatal injury.
Always stop the engine, make sure
that the blade is stopped before
adjusting blade height, doing any maintenance or repair work,
or cleaning the unit or blade.
! WARNING
Follow the maintenance instructions in the appropriate section of
this manual. Any repairs should be carried out by an authorised
service dealer or person with suitable servicing experience.
A worn or damaged muffler is a fire
hazard and may cause loss of hearing.
Check to see that the muffler is in good condition. The lawn edger
must not be operated if the muffler is not functioning properly, is
damaged, or has been removed. In order to reduce the risk of
fire, do not modify or remove any part of the muffler and ensure
it is not worn or broken.
! WARNING
Remember that the risk of forest or grass fires is greater in hot
weather.
Never touch a hot muffler as burns
will result.
! WARNING
Store Atom Edger in a dry, high or blocked location and out of
reach of children.
Never store the machine with gasoline
inside a building where fumes may
reach an open flame or spark (e.g. gas or oil-fired heater
appliance, electric motor, etc.)
! WARNING
Before storing for a longer period, always empty the fuel tank.
Start and operate your unit outdoors
and in a ventilated area.
! WARNING
Keep the space behind and beside the engine clear at all times to
allow for the escape of hot and toxic exhaust fumes.
Operate your machine under good visability and daylight
conditions only. Work carefully.
The engine exhaust from this product
contains chemicals known to the State of
California to cause cancer, birth defects or other reproductive harm.
! WARNING
Do not touch hot engine during and
immediately after use as you may
burn yourself.
! WARNING
Check fuel filler cap for leaks at regular intervals. Use the
specified spark plug and make sure it and the ignition lead are
always in good condition.
ASSEMBLING DELUXE EDGER
1. Fit bolt #1 through captive plate #2 (Note: arrow to front), through handle tube
#3, main casing body, then handle tube #4 on other side. Screw on handle
knob #5 loosely.
2. Fit cross brace #6 to both handle tubes #3 & #4 using screws #7 and nuts #8.
3. Rest throttle cable and switch wire #9 on top of cross brace #6 and fit RH
throttle handle #10 onto end of handle tube #4. Use screw #7 & nut #8 to
secure handle. Repeat for left handle #11.
4. Clip throttle cable and switch wire #9 into slot on top
of cross brace (as shown in Fig. 7). Clip cable holder #13.
Tighten handle knob #5.
5. When assembled unit will look
like Fig. 8.
6. Adjust edger height with
handle adjuster #12.
Try hole 3 for first
edging attempt.
FIG 8
FIG 7
8
4
7
12
5
10
9
6
7
8
8
11
7
7
3
2
1
13
440.450_Deluxe Edger_manual_16.9.11.indd 3 17/10/11 1:02 PM
Page 4

18
1
16
15
4
5
3
PARTS & CONTROLS
1+2.The handles of the edger are held by both hands.
3. The throttle interlock which releases the throttle trigger which increases
the speed of the automatic safety clutch to engage and thus rotate
blades.
4. Handle knob for holding handle tubes onto housing.
5. Depth adjustment for adjusting wheel to regulate blade depth.
6. Handle to carry edger.
7. Blade cover reduces the risk of flying debris
and direct contact with the feet or hands.
8. Blades rotate when engine speed is
increased above idle.
9. Nut for holding blades (RH thread).
10. Wheel for moving and guiding edger.
11. Cross Brace, attaches
downward on handle.
12. Handle Tubes.
13. Warning labels.
14. Edge guide.
15. Fuel tank.
16. Carburettor primer.
17. Ignition ON/OFF switch.
18. Fuel tank cap.
19. Choke lever.
#13. WARNING LABELS. SEE PAGE 1.
Read operators manual Do not expose motor
to moisture
Wear eye protection
Keep bystanders away
15m (50 feet)
Blade cover label
Disconnet the mains
plug if the cord
is damaged or
entangled
FUELS & OILS
Fuel is extremely flammable. Handle it with care. Keep
away from ignition sources. Do not smoke while fueling
your equipment.
! WARNING
Pressure may build up in the canister.
Remove fuel cap slowly to avoid injury
from fuel spray. Replace fuel cap securely. Take care when
handling gasoline. Avoid direct contact with the skin and avoid
inhaling fuel vapor.
! WARNING
DANGER!
! WARNING
Always allow engine to cool
before refueling. Accidental spillage
of gasoline over a hot engine could cause fire or explosion
to occur. Before unscrewing fuel tank cap to fuel the engine,
clean the tank’s cap and area around it to ensure that no dirt
falls into the tank.
2 STROKE ENGINES – MODEL 450 4 STROKE ENGINES – MODEL 440
•
ALWAYS check your oil level every second or third fuel fill.
Regular check of oil levels is essential. Change oil after first
hour then every 6 hours. Lack of oil and infrequent change
of oil will destroy engine.
USE A PETROL AND OIL MIXTURE.
Only use 50:1 specialised 2-stroke
oils from lawn and garden equipment shops. Do not use
outboard engine oil.
REMEMBER...
•
Always mix two-cycle oil with clean regular or premium
unleaded gasoline before fuelling your engine. Never, ever
run your 2-stroke engine on gasoline alone. This will ruin your
engine and void all warranties.
•
Always use a clean gas can.
•
Never try to mix the oil and gasoline in the engine fuel tank.
•
Always mix oil and petrol in the proper proportions: 80ml of
50:1 two-cycle engine oil to 4 litres of unleaded petrol.
•
Old two-cycle fuel separates and ages. Do not mix more than
you will use in a month. Using old fuel may cause difficult
starting or engine damage. Shake fuel container to thoroughly
mix fuel before each use. Do not attempt to run your engine
on gasoline only, this will cause engine failure and void
engine warranty.
! WARNING
PAGE 4
FIG 8A
FIG 10
17
12
6
7
14
8
9
10
11
12
2
19
! NOTE
Use only clean regular or premium unleaded petrol
(gasoline) in your 2 or 4-stroke engine.
DO NOT USE ETHANOL BASED PETROL (GASOLINE).
IMPORTANT
FIG 9
•
Use clean, fresh regular or premium unleaded gasoline.
•
Check oil level before starting engine. Rest the Edger and
engine on a level surface and fill oil reservoir to correct level.
Do not overfill, or allow oil level to be below centre of dipstick.
•
Use engine manufacturer’s recommended clean oil (see
seperate booklet supplied) or SAE 10-30W synthetic oil.
Fill crankcase to correct level.
WARNING Using non-synthetic oil or 2 stroke oil will shorten
engine life.
Fill or add fuel to the tank only when the
edger is in a horizontal position as shown
(Fig. 10). Allow engine to cool down for at least 5 minutes before
adding fuel. Use a fuel funnel (not supplied) to prevent spills.
! NOTE
Ethanol fuels absorb water if left in fuel tanks for
long periods and can cause hard starting and
poor performance.
! NOTE
We do not
recommend
using E10 ethanol based
fuels.
440.450_Deluxe Edger_manual_16.9.11.indd 4 17/10/11 1:02 PM
Page 5

CHOKE ON
POSITION
(Choke lever up)
PAGE 5
STARTING & STOPPING INSTRUCTIONS
EDGING INSTRUCTIONS
1. The Atom Edger is very easy and
simple to use. You will soon become
an expert after a few edgings.
2. Thoroughly inspect the area
where the edger is to be used
and remove all stones, sticks,
wires and other foreign
objects.
3. Adjust blade height (Fig.15) and
with new blade, try No.2 position.
4. Start engine.
5. Use both arms extended
downwards, as in Fig. 16, hold
both handle grips firmly. Accelerate
engine by pushing down safety
interlock with thumb and pulling
trigger (Fig. 11).
Do not overload motor, allow it
to run freely. To stop blades
rotating, release trigger.
6. If blade is not deep enough,
or if digging too deep, adjust
blade height, to suit depth required
(Fig.15). It is always more
comfortable and relaxed to
have arms fully extended
downwards
as shown in Fig.16 and on
front cover illustration.
7. Do not lift handles by excessive
bending of elbows (Fig.17).
8. As cutting action begins, move the
lawn edger forward so that the
blade can cut the edge as you
move forward (Fig 16 & 18).
9. Continue at a moderate pace
until you are familiar with the
controls and the handling
of the Atom Edger.
! WARNING
10. Blade rotating speed should be fast
under load. If blade rotates slowly,
jams or stops in the ground (Fig.19),
lower handles or release trigger and
recommence (Fig. 18).
11. Clutch: The Atom Edger is equiped with
a safety clutch. DO NOT run edger if
blade is jammed, as clutch shoes will
prematurely wear and cause damage if
cutting blades do not rotate (Fig. 19).
! NOTE
A built in automatic centrifugal clutch disengages the
blade from rotating at engine idle speed. The clutch
engages the blade when the engine speed is increased.
13. Even with the grass growing over the concrete
and you cannot see the edge, you can feel the
edge of the concrete with the rotating blades
by slightly sideways tilting the handles of the
edger away from the concrete so that the
blades tilt towards the concrete and
skim below the concrete edge
which acts as a guide (Fig. 20).
Edger blades are made from
high tensile hardened spring
steel and will last a long time.
Once the edge is established
the second and subsequent
times around are very fast.
14. Sideways Tilting: Lower either
left or right handle to achieve
angle cutting (Fig. 21).
FIG 11
SWITCH
ON
SAFETY
INTERLOCK
THROTTLE
TRIGGER
FIG 15
HEIGHT
ADJUSTMENT
FIG 20
FIG 21
FIG 18
FIG 19
FIG 16
FIG 17
Place edger on ground in horizontal position. See Fig. 14 below.
COLD START
1. Switch engine on (Fig.
11). Engine starts at idle.
2.
Slide choke lever up to full choke ON position (Fig.
12).
3.
Press and release the primer bulb 10 times (Fig.13). For first time star
ting
of new unit, press primer bulb twenty times to remove any air from carburettor.
4.
Make sure you have a fir
m footing. With one foot on cross brace,
hold down motor with left hand. With right hand pull the starter grip
slowly until you feel it engage – and then give it a quick pull (Fig. 14).
5.
When engine star
ts to run allow it to run on half choke for a few seconds
to warm up, then push choke off (down) to engine run position.
6.
Throttle T
rigger (engine accelerator control) is operated by pushing
down interlock with thumb and pulling on trigger (Fig.11).
HOT OR WARM START
7.
Switch ignition on and follow instruction 3&4.
FLOODED ENGINE
8.
Ignition ON, choke lever OFF in run position.
9.
Pull starter rope up to 10 times to clear excess fuel.
FIG 14
FIG 12
FIG 13
Only operate unit
when moving
forward. DO NOT operate walking backwards,
as you may trip, fall and injure yourself.
10. If engine has excesive fuel that cannot be cleared, remove spark plug from engine and from spark plug terminal, crank engine to clear excess fuel,
wipe and dry spark plug of all fuel, re-install spark plug terminal, and retsart as above. Otherwise allow to stand for 30 minutes before restarting.
12. Edging along concrete edge: For position
of blade, align edge guide (at front of
blade cover) with edge of concrete. If
blade hits concrete, lower handles and
re-position blade at side of concrete.
! NOTE
Keep the inside of blade
guard clean, especially in
muddy conditions. A clogged guard can slow
down or stop blade rotation and may cause
damage to automatic safety clutch. Always
operate blade at high speed when edging.
To prevent damage to Edger body, untangle
and remove any grass, vines or wire that
may wrap around the blade drum.
FIG 22
To avoid personal
injury, never carry the
Edger while the motor is running. Never hold the
handle cross brace if the motor is running. (Fig.22)
Stop the engine prior to lifting or carrying.
The Lawn Edger can be transported by
guiding it on its wheel, or carrying it with
motor switched off holding handle between
blade cover and motor.
! WARNING
FIG 23
440.450_Deluxe Edger_manual_16.9.11.indd 5 17/10/11 1:02 PM
Page 6

PAGE 6
TROUBLESHOOTING TIPS
MAINTENANCE INSTRUCTIONS
FIG 26
FIT BLADES AT RIGHT ANGLES
2 SPIGOTS ON EACH BLADE
FIT INTO HOLES OF OTHER BLADE
BLADE REPLACEMENT
1. Use impact driver to undo blade
nut, then proceed to instruction 4.
Otherwise clean area around
dust cover #62936 and pry off with
screwdriver (Fig. 24) exposing 14mm
hex head (for unscrewing blade nut).
2. Through dust cover hole, place
14MM FULL 6 SIDED 6 pointed
socket spanner (do not use 12 sided
12 pointed socket spanner) over hex
head, and use 19mm (or adjustable)
spanner on blade nut.(Fig. 25).
3. Unscrew blade nut counter (anti)
clockwise (normal right hand thread).
4. Remove nut, one large washer and two blades (Fig. 26).
Before installing blade and washers, clean off all grit and
grease. Re-assemble these parts clean and dry. Fit large
washer, new blades #43105 with spiggots of one blade
interlocking with holes on opposite blade, large washer
and nut. Tighten nut to 15-20ft.lbs. (20-27Nm) or hand
tight with 8” (200mm) or longer spanner.
Hardened Atom spring
steel cross blades absorb
shock when rocks and
hard objects are hit,
ensuring long edger life.
Non-Atom edger blades do not absorb shock
due to solid stiff construction. Gear and edger
life is reduced. NO WARRANTY allowed if
damage to Atom unit caused by use of non
genuine Atom parts.
FIG 25
FIG 24
FITTING INSTRUCTIONS
USE ONLY ORIGINAL ATOM BLADES
#43105. Other blades have larger size
holes (1/2”) which will cause out-of-balance vibrations which will
damage unit and cause injury. Other blades can also break and
cause major injury. Circular blades must not be used. Only use
ORIGINAL Atom blades otherwise warranty is VOIDED.
! WARNING
Always use two blades as shown above. Never
use a single blade. Do not use other thicker
blades as you will damage the unit.
! NOTE
AIR FILTER MAINTENANCE ON ATOM TURBO ASSIST (PAT. PENDING)
Only required every 30 hours of use. Remove 2 cover screws and lift off cover. Remove filter sponge element, wash out oil with detergent
and dry sponge. With compressed air carefully blow out any oil in fine filter mesh. Refit foam air filter and screw cover on.
AIR AND FUEL FILTER MAINTENANCE ON HONDA
! NOTE
Clean and re-oil the air filter every
five hours of operation or daily.
1. The air filter (Fig.28) is one of the most important areas
to maintain. If it is not maintained, you will void the
warranty. Before cleaning, make sure the unit is turned off.
2. If filter torn or dirty replace.
3. Wash the filter in detergent and water. Rinse the filter
thoroughly and allow it to dry.
4. Apply enough clean SAE 30 or 2-stroke oil to saturate
the filter when squeezed. Squeeze the filter to spread the
oil and to remove excess oil. Re-install the filter element.
5. Replace fuel lines every 3 years, sooner if damaged.
If the unit is operated with dry or dirty filter or without
the air filter and/or carburetor air filter cover, you will
void the warranty.
! NOTE
AIR FILTER
FIG 27
FUEL FILTER
FIG 28
The fuel filter can be cleaned by hooking
out with a piece of wire and blowing with
compressed air
Honda has fixed high and low
jets. Requires carburettor to be
dismantled and cleaned if engine
runs incorrectly or is hard to start.
To adjust engine idle speeds on
Honda and Atom increase engine
speed by turning the screw
clockwise. To reduce idle speed
turn screw anti-clockwise.
Correct idle speed is fastest idle
that does not allow blades to turn.
To adjust Atom 450 engine use
Service Tool
P/N 63627
CARBURETTOR
ADJUSTMENTS
ATOM 450 ENGINE
PROBLEM CAUSE ACTION
1. Blades do not turn Loose blade nut or incorrect assembly. Tighten blade nut (or add washer
when operating
under nut).
Blade cover filled with dirt/grass /mud. Clean.
Blade stops under load when blade depth is Cut less depth.
too low.
Clutch slipping. Cut less depth or clean.
2. Motor lacks power or Cutting too deep. Raise cutting depth and see (1)
blade stops rotating above.
3. Heavy vibration Wrong blade fitted. Only use ORIGINAL Atom blade set
#43105
Worn clutch or clutch drum or damaged drive. Take to service dealer.
4. Engine will not run or Ignition switch is OFF. Turn switch on.
runs and stops.
Cleaning the
Choke ON. Push choke to OFF position.
carburettor may be
Partially empty fuel tank. Fill tank.
required.
Primer bulb not pushed enough times. Press primer bulb fully and slowly
5 times.
Engine is flooded Use starting procedure without choke.
Spark plug faulty Clean or replace.
440.450_Deluxe Edger_manual_16.9.11.indd 6 17/10/11 1:02 PM
Page 7

Page 8
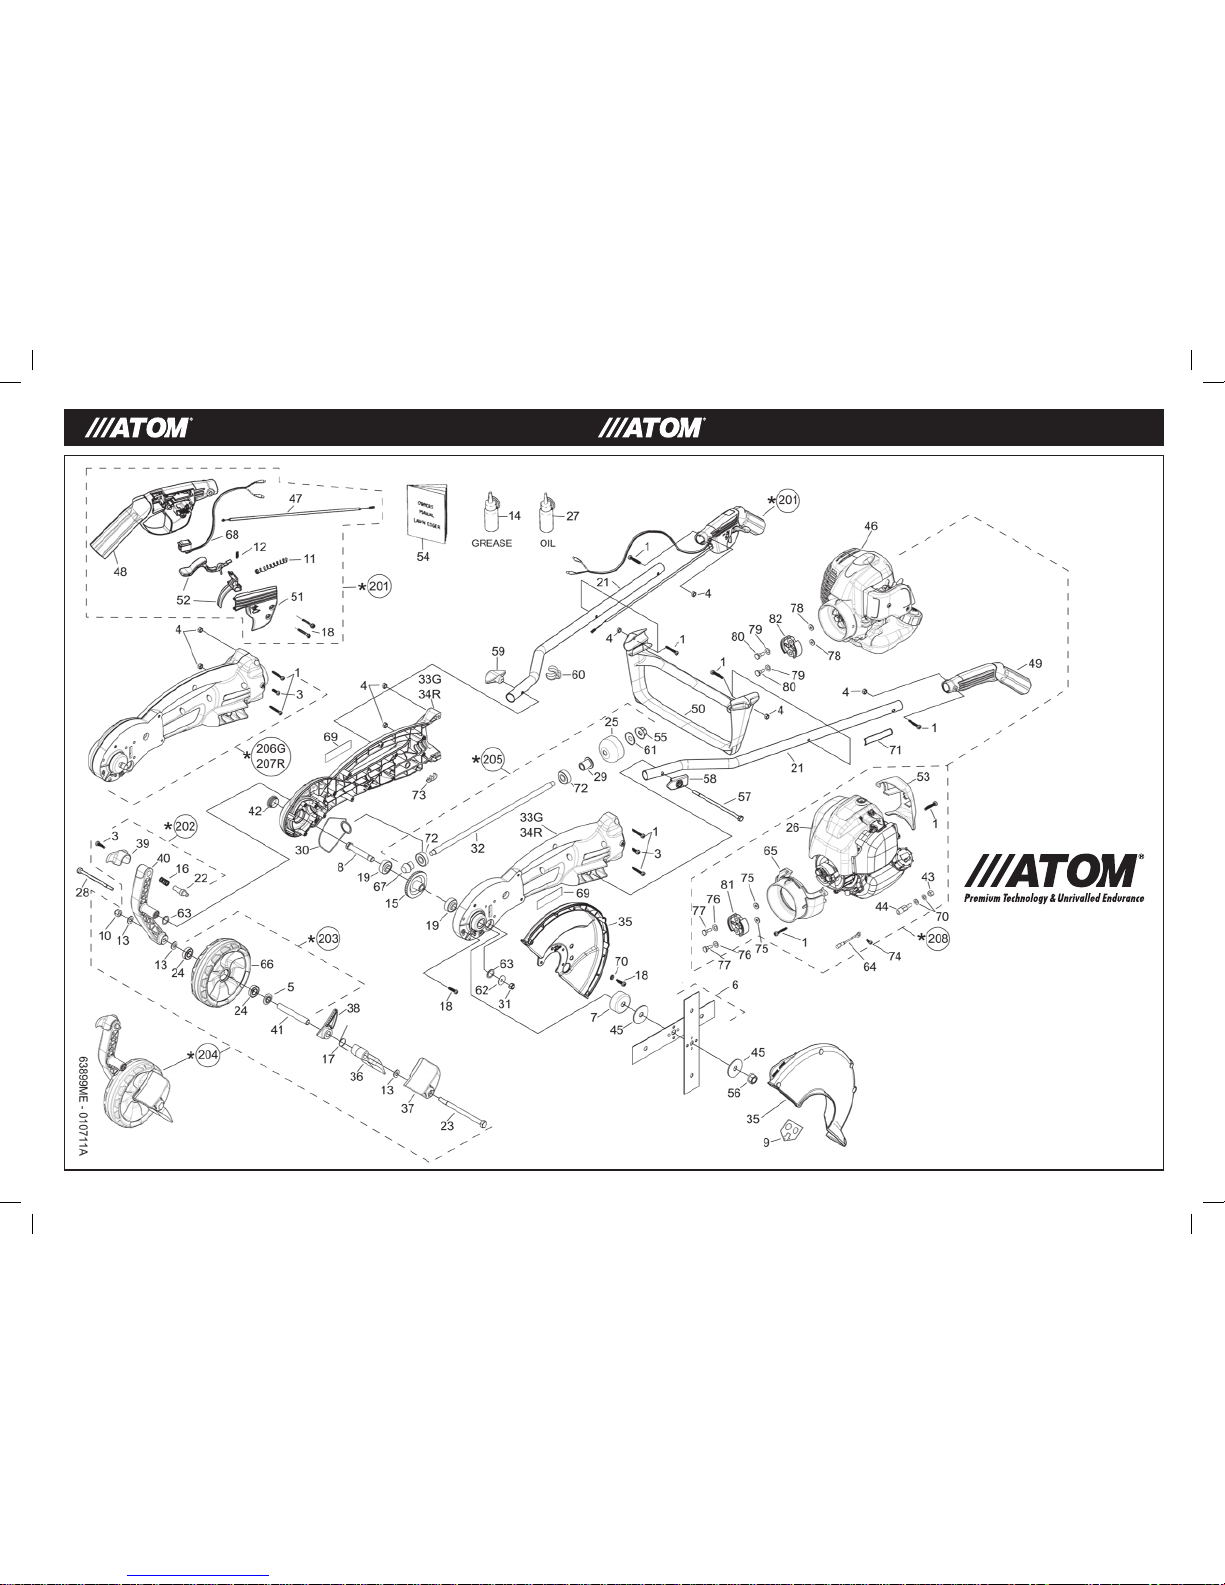
440 DELUXE RED 4-STROKE EDGER – 450 SEMI-PRO GREEN 2-STROKE EDGER
ATOM INDUSTRIES
9 Fred St. Lilyfield 2040
Sydney Australia
Tel: +61(0)2 9810 0194
Fax: +61(0)2 9810 6691
Email: sales@atomindustries.com.au
www.atomindustries.com
ATOM INDUSTRIES (NZ) Limited
FREECALL 0800 174 753
Fax: 0800 603 403
Email: sales@atomindustries.com.au
www.atomindustries.com
440.450_Deluxe Edger_manual_16.9.11.indd 8 17/10/11 1:03 PM
 Loading...