

Page 1

Edition 1.7
May 4, 2006
iSee 360i
User’s Manual
Page 2

Copyright
ATO reserves the right to make improvements in the products
described in this manual at any time without prior notice.
ATO makes no representation or warranties with respect to the
contents hereof and specifically disclaims any implied
warranties of merchantability or fitness for any particular
purpose. Further, ATO reserves the right to revise this manual
and to make changes in its content without obligation to notify
any person or organization of such revision or change.
This manual is copyrighted, all rights reserved. It may not be
copied, photocopied, translated, or reduced to any electronic
medium or machine-readable form without ATO’s prior
permission.
Manual copyright ©2006, Advanced Technology Office LLC.
Edition 1.7, May 2006.
Licenses and Trademarks
ATO and the ATO logo are trademarks of Advanced
Technology Office LLC. All other licenses and trademarks are
property of their respective owners.
-ii- iSee 360i User’s Manual
Page 3

Contents
Section 1. Getting Started..................................................1
Getting iSee Information ...................................................1
Meet the iSee 360i ............................................................1
What You Can Do With the ISee 360i...........................1
Features of the ATO iSee 360i......................................2
What You Need to Use the iSee 360i ...............................2
Supported iPods............................................................3
PC Requirements ..........................................................3
iSee 360i Controls.............................................................4
Accessories.......................................................................5
Standard iSee 360i Accessories ...................................5
Optional Accessories.....................................................6
Precautions .......................................................................7
Section 2. Setting Up Your iSee........................................9
Note the Serial Number and Register Your Product.........9
Step 1: Load the Battery in the iSee ...............................10
Step 2: Charge the iSee Battery .....................................12
Step 3: Install iSee files on your iPod .............................12
Enabling iPod Disk Use...............................................12
Disabling iTunes Auto-Launch ....................................13
Installation Options......................................................13
If Asked to Restart Your Computer .............................13
Step 4: Insert Your iPod in the iSee................................18
Plug In Headphones....................................................20
Step 5: Turn On the iSee Power.....................................20
A Final Step ....................................................................21
Battery Life and Battery Charging...................................22
Using the Battery Level Indicator ................................22
Battery Charging and the On/Off LED.........................22
Shutting Down the iSee ..................................................22
Normal Shutdown........................................................22
Emergency Shutdown and Reset................................23
Removing the iPod..........................................................23
iSee 360i User’s Manual -iii-
Page 4

Table of Contents
Section 3. Using the iSee ................................................25
Using the iSee Control Panel .........................................25
Viewing the Main Screen................................................ 27
Navigating the iSee Menus............................................. 27
Navigating a Settings Menu ........................................... 28
Playing Videos................................................................ 29
Changing Audio Volume ............................................. 30
Onscreen Indicators.................................................... 31
Changing Video Settings ................................................ 31
Video Settings............................................................. 31
Video Browse Settings................................................ 33
Listening to Music........................................................... 34
Changing Music Settings................................................ 35
Music Settings............................................................. 36
Song List Settings ....................................................... 37
Viewing Photos and Slide Shows................................... 38
Adding Background Music to a Slide Show ................ 39
Changing Photo Settings................................................ 40
Photo Settings............................................................. 40
Changing System Settings ............................................. 42
Changing Mosaic Settings.............................................. 43
Section 4. Recording Video............................................. 45
Video Recording Setup................................................... 45
Video Recording to the iPod........................................... 46
If You’re Using a Camcorder .......................................... 47
Recorded Video File Size ............................................... 47
Recording from Battery Power .......................................47
Changing the Record Settings........................................ 48
Viewing with the Standard Dock..................................... 49
Section 5. Using iPod Play-Through Mode.................... 51
How iTunes and iSee Share Your iPod.......................... 51
Three Ways to Use iPod................................................. 51
Using iPod Play-through................................................. 52
Section 6. About VidiScape Software ............................ 55
Section 7. Maintenance and Troubleshooting ..............57
Frequently Asked Questions ..........................................57
iSee Firmware ................................................................ 58
Finding the Firmware Version..................................... 59
Updating iSee Firmware .............................................59
Viewing Release Notes............................................... 60
Troubleshooting Tips ...................................................... 60
-iv- iSee 360i User’s Manual
Page 5

Appendix A: Specifications .............................................63
Mechanical Specifications ...........................................63
Communication and Interface .....................................63
Encoding and Decoding ..............................................64
Video and Audio ..........................................................65
Appendix B: Technical Support......................................67
Returning Your iSee........................................................67
Packing Your iSee ..........................................................67
Shipping Your iSee to ATO.............................................68
Appendix C: Warranty......................................................69
Index ..................................................................................71
iSee 360i User’s Manual -v-
Page 6

Table of Contents
This page intentionally left blank.
-vi- iSee 360i User’s Manual
Page 7

Section 1. Getting Started
Congratulations! Thank you for purchasing the ATOTM iSeeTM
360i Video Recorder for the Apple iPod®. This remarkable,
high-performance entertainment center turns your iPod mobile
digital device into a full-featured video player and photo display
with music. And together with its Standard Dock, your iSee
turns into a personal video recorder (PVR) as well.
Getting iSee Information
• Look at the iSee Quick Setup Guide to get your iSee up and
running in a hurry.
• Use this iSee 360i User’s Manual to learn how to record and
play videos, listen to music, and view photos on your iSee
360i. You’ll find more installation details here, too.
• See the manual Using VidiScape with Your iSee to learn
how to use VidiScape software to manage and convert
music, video, and picture files and download them to your
iSee.
Meet the iSee 360i
The iSee 360i is a mobile video accessory for the Apple iPod
product line. Plugging your iPod into the iSee 360i lets you
show video, view photos, and play music that you have placed
on the iPod using software from the iSee’s accompanying
application disc. The software lets you convert and compress
video files and store them on the iPod, all ready for playback
on the iSee. And besides playing files, the iSee also functions
as a handheld Personal Video Recorder.
What You Can Do With the ISee 360i
• Record compressed video to the iPod for playback.
• Play videos with sound, using the iPod’s headphones or
external speakers.
• Show photos individually or in slide shows.
• Zoom in and pan your digital photos.
• Play MP3 music.
• View video and photos, and play music, on the iSee or on
your TV.
• Protect your iPod and charge its battery.
iSee 360i User’s Manual -1-
Page 8

Section 1. Getting Started
Features of the ATO iSee 360i
• Elegant, lightweight mobile design: Look and feel of a
single unit with iPod docked.
• Handy iPod-like control panel: Easy to operate for iPod
veterans.
• 3.6” high-quality LCD screen: Watch high-quality content
in a mobile environment.
• User-friendly graphical interface: Intuitive and easy to use
for an effortless entertainment experience.
• Replaceable, rechargeable 2,200 mAh battery: Enjoy
video, music, and pictures for up to four hours, while
supplying additional power to the iPod.
• Double-duty AC adapter: Charges both the iSee and the
iPod at the same time.
• Video in: Record from TV, DVD, VCR, TiVo, camcorder or
other analog video source.
• Audio in: Record audio, along with video, from any analog
source.
• Video out: View video and photos on any TV.
• Audio out: Listen to audio on any external sound system.
• Multiple video formats (MPEG-2 or 4, Windows Media 9
or 10): iSee transcodes video files into MPEG-4.
• Image decode (JPEG): Turn the iPod into a photo viewer.
• Slide show mode: Create personal slide shows for family
and friends.
• Powerful video and photo features: Fast forward, reverse,
pause videos and slide shows; pan and zoom photos.
• iPod play-through mode: Allows listening to iPod’s original
music content, and viewing iPod video and photos on the
iSee’s larger screen.
• Software included: Software disc has VidiScape host
application and ArcSoft software to convert video, audio and
picture files for playing on the iSee.
What You Need to Use the iSee 360i
To use the iSee 360i you’ll need:
• A supported Apple iPod mobile digital device.
• An iPod USB cable to connect the iPod to your PC.
• PC running Windows XP or 2000 to load the VidiScape
software and download iSee-compatible video, music, and
picture files to your iPod.
-2- iSee 360i User’s Manual
Page 9

Section 1. Getting Started
Supported iPods
You can use your iSee with most iPod models, including the
following:
• iPod 20GB (clickwheel)
• iPod 20GB U2 Special
• iPod mini (with optional adapter)
• iPod nano (with optional adapter)
• iPod 30GB Video (with optional adapter)
A few iPod models are not supported. The following models
won’t fit into the iSee:
• Older iPods without dock connectors
• 3rd generation iPods, which have a row of buttons along the
top rather than the click wheel
• iPod Shuffle
• iPod Photo
For the latest up-to-date list of iPods you can use with your
iSee, visit www.isee-ato.com
.
PC Requirements
To install and use the VidiScape software for converting video,
audio, and pictures, you need a PC with:
• Microsoft Windows 2000, XP, or later
• DirectX9 (DirectX9c recommended). You can install this from
the iSee software disc if you don’t already have it.
iSee 360i User’s Manual -3-
Page 10
Section 1. Getting Started
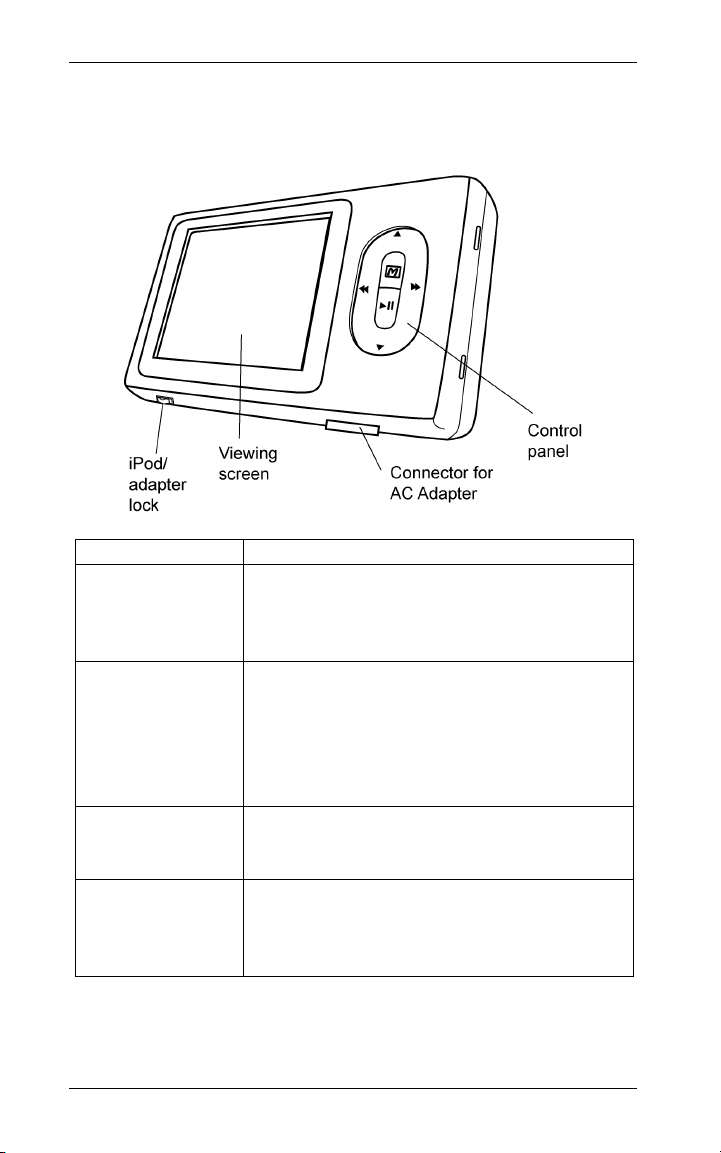
iSee 360i Controls
Front View
Control How to Use It
iPod/adapter
lock
Viewing screen Watch video.
AC Adapter
connector
Control panel Press to select and start video, slide
Secures a full-sized iPod, or an adapter
for iPod mini, nano, etc. Press to the right
(toward the connector) to unlock.
View slide shows.
Play music.
Connect iSee’s AC adapter here
show, or music, cycle through menus,
and control the iSee and iPod.
-4- iSee 360i User’s Manual
Page 11
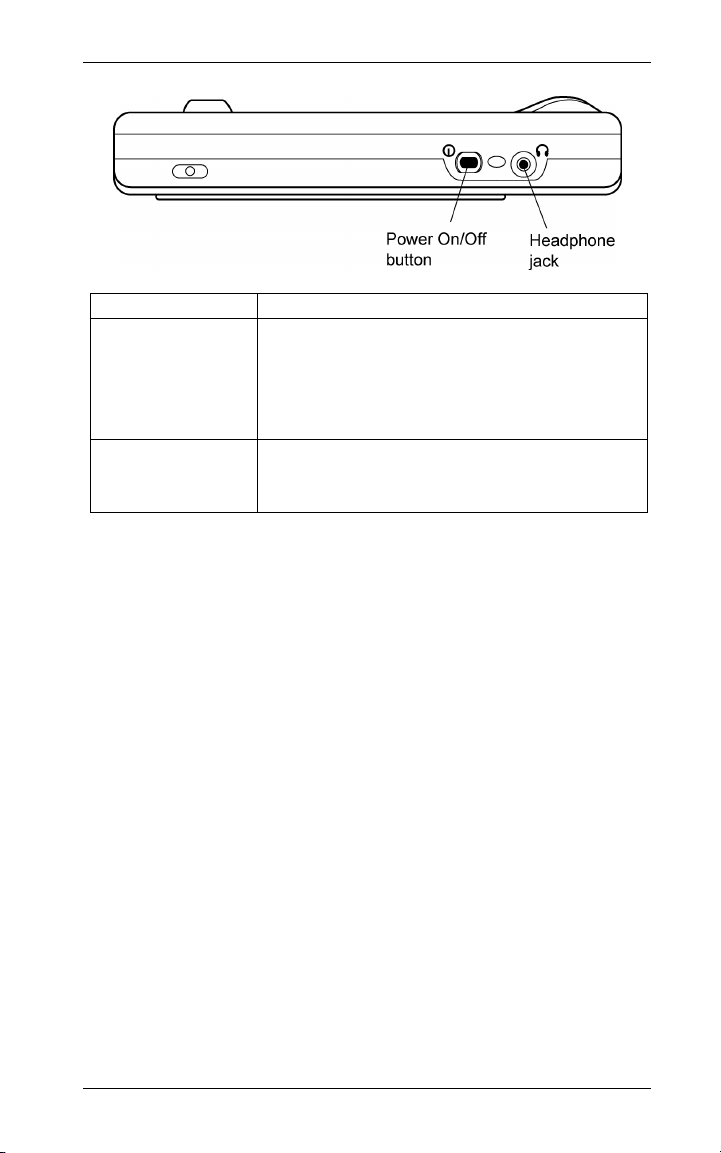
Top View
Section 1. Getting Started
Control How to Use It
Power On/Off
button
Headphone jack Attach iPod headphones or external
Press to turn iSee on. Press again and
hold for 1 second to turn it off. Press and
hold for 5 seconds for an emergency
shutdown (if the iSee is unresponsive).
speakers here.
Accessories
Accessories enhance the functionality of your iSee 360i and
make it even more fun to use.
Standard iSee 360i Accessories
Every iSee 360i comes with:
• AC adapter
• Protective sleeve
• ATO iSee software disc
• iSee User’s Manual
• Using VidiScape with Your iSee and PC
• iSee Quick Setup Guide
• A/V (audiovisual) cables
• Standard Dock
iSee 360i User’s Manual -5-
Page 12
Section 1. Getting Started
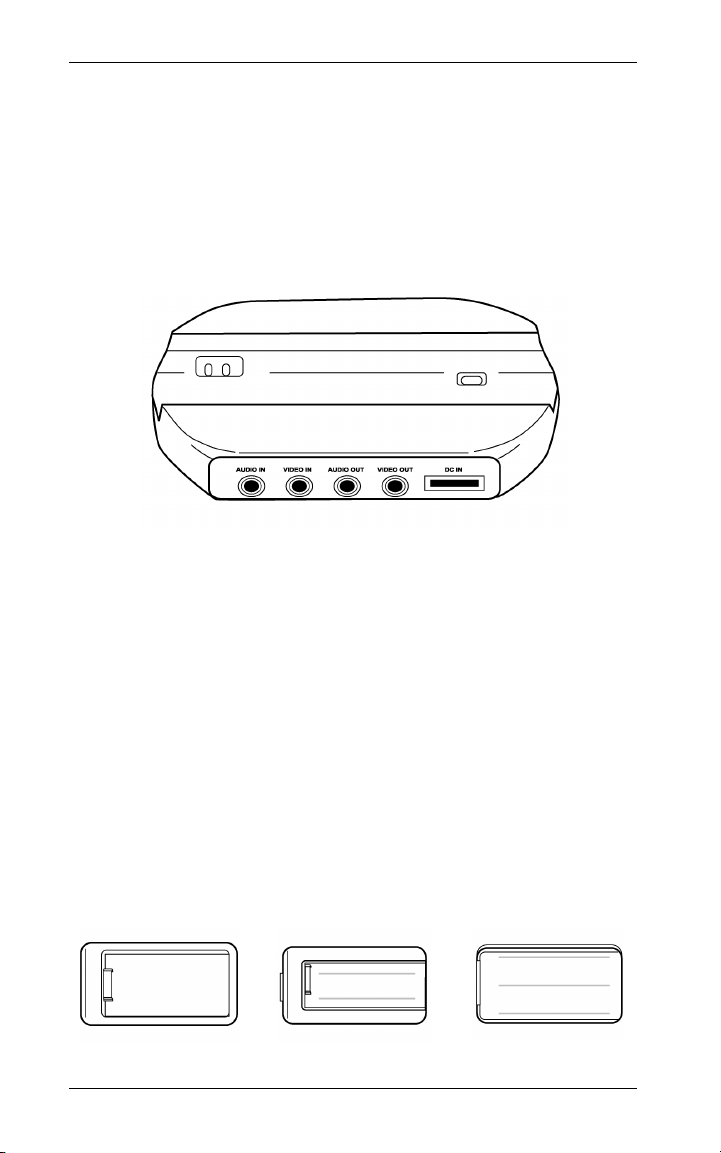
iSee Standard Dock
The Standard Dock offers a convenient stand for viewing your
iSee screen and for charging its battery. The Standard Dock
also lets you connect video and audio cables for recording
directly to your iPod, and sending video, pictures, and music to
a TV or media center.
iSee Standard Dock
Optional Accessories
Purchase these accessories separately to enhance your iSee
360i’s functionality:
• iSee mini Adapter: Lets you insert your iPod mini into the
iSee 360i.
• iSee nano Adapter: Lets you insert your iPod nano into the
iSee 360i.
• iSee video Adapter: A tray that allows your iPod video to fit
perfectly into the iSee 360i.
iPod mini
adapter
iPod nano
adapter
iPod video
adapter
-6- iSee 360i User’s Manual
Page 13

Section 1. Getting Started
Precautions
Although it’s rugged, your iSee requires reasonable care in its
installation and use.
• Clean the viewing screen only with a soft, lint-free cloth.
• Keep the area around your iSee clean from dust, smoke,
and other contaminants.
• Do not allow moisture or liquids, including water or cleaning
fluids, to touch the iSee. Thinner, benzene, or alcohol-based
solvents can mar the surface of your iSee.
• Do not drop or jolt the iSee.
• Do not attempt to open the iSee and service it yourself.
Removing the cover may damage the iSee and void your
warranty. Entrust service to experienced service personnel
only.
• Do not attempt to clean your iSee using solvent-based
cleaners.
• Follow all instructions carefully when you’re using the
Standard Dock or inserting or removing a custom adapter.
Caution: Be careful of static electricity. The iSee may stop
working and have to be restarted if operated in a strong
electrostatic environment.
iSee 360i User’s Manual -7-
Page 14

Section 1. Getting Started
This page intentionally left blank.
-8- iSee 360i User’s Manual
Page 15

Section 2. Setting Up Your iSee
Follow these simple instructions and you’ll be up and running in
no time.
Note the Serial Number and Register Your Product
First, note the serial number and date of purchase of your iSee.
Write the information here, so you’ll have a record:
My iSee 360i Serial Number Is:
The Date of Purchase Is:
You’ll need this information in case you need service, or if your
iSee is lost. Also, be sure to register your iSee at our website:
www.isee-ato.com
iSee 360i User’s Manual -9-
Page 16
Section 2. Setting Up Your iSee
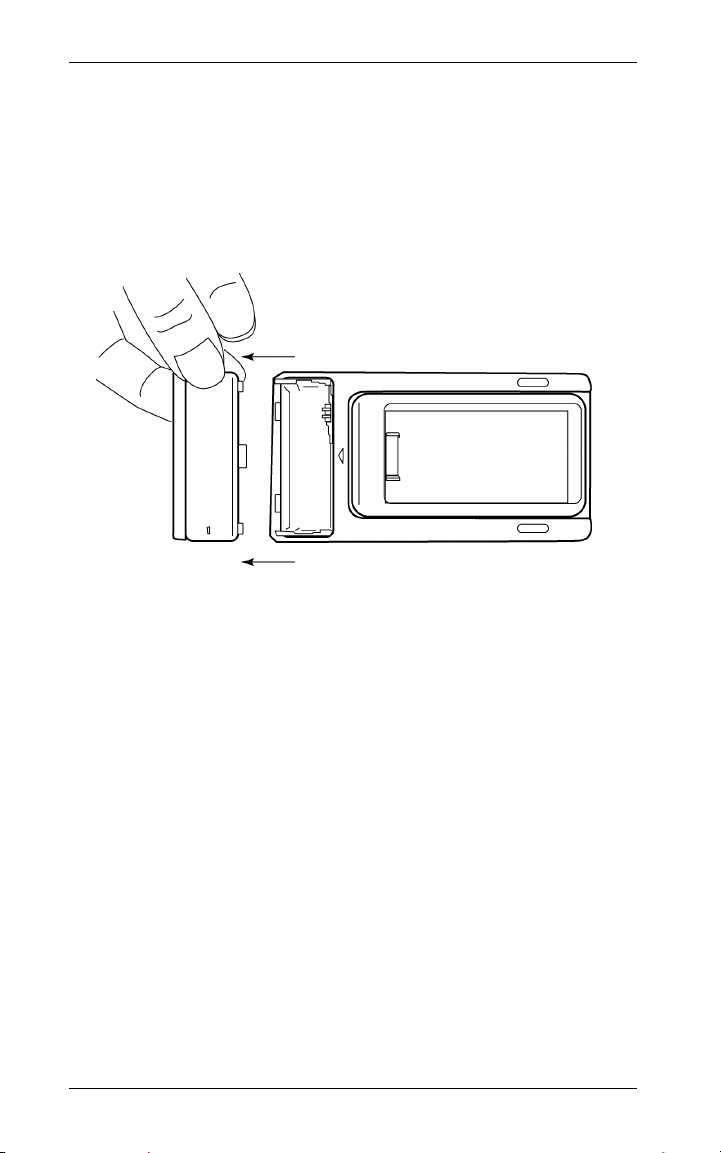
Step 1: Load the Battery in the iSee
To load the battery:
1. Open the iSee’s battery compartment by pulling up and out
on the battery cover.
Open the Battery Compartment
2. Unwrap the battery. Note the set of battery contacts.
-10- iSee 360i User’s Manual
Page 17

Section 2. Setting Up Your iSee
3. Place the battery into the iSee so the battery’s contacts mate
with those in the iSee.
Load the iSee Battery
4. Replace the battery cover.
iSee 360i User’s Manual -11-
Page 18
Section 2. Setting Up Your iSee
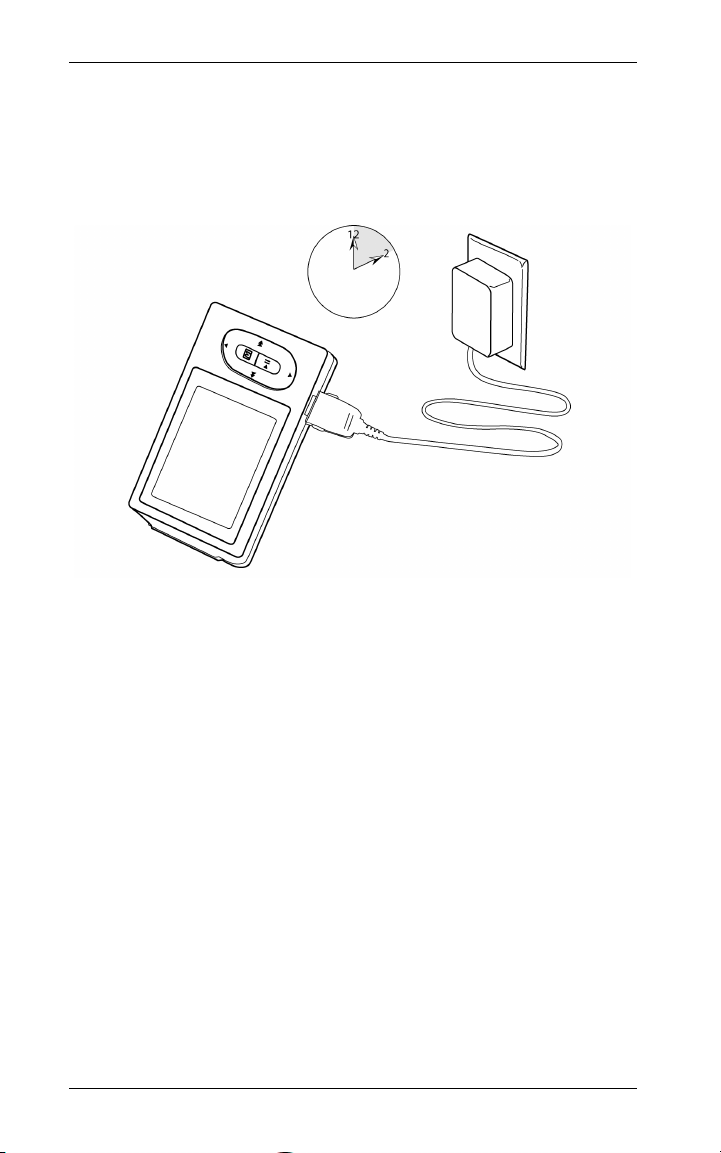
Step 2: Charge the iSee Battery
Before attempting to use the iSee, plug in the AC adapter and
charge the battery for two hours.
Charge the iSee Battery for 2 Hours First
While your iSee battery is charging, you can start installing the
iSee software on your computer.
Step 3: Install iSee files on your iPod
To install iSee software and sample files, you insert the iSee
software disc in your computer, then follow the instructions on
the computer’s monitor.
Enabling iPod Disk Use
As one of the steps, you are asked to enable disk use on your
iPod. This allows your iPod to be used much like a hard disk.
You enable disk use from the iTunes
(The iSee installer explains how.)
-12- iSee 360i User’s Manual
Edit | Preferences menu.
Page 19

Section 2. Setting Up Your iSee
Disabling iTunes Auto-Launch
If you’ve been using iTunes with your iPod, you know that
iTunes usually auto-launches (launches automatically)
whenever you connect your iPod to the computer. Disabling
iTunes auto-launch is optional, but it’s more convenient if you
do so, because the VidiScape installation replaces this iTunes
auto-launch with its own auto-launch selector. (The iSee
installer also explains how to disable iTunes auto-launch.) You
can always launch iTunes manually, simply by double-clicking
on the iTunes icon.
Installation Options
The installer displays several installation options. In most
cases, you’ll want to install all of the software and files on the
disc.
The installer places a VidiScape icon on your Windows
desktop, and places a shortcut to VidiScape in your Start
menu.
The iSee software disc contains:
• Driver files and other firmware that are installed on your iPod
to let the iSee work with your computer.
• Sample video, pictures, and music—including a convenient
tutorial video—that load automatically onto your iPod, so you
can get started using your iSee right away.
• VidiScape software for your computer that lets you manage
your media files (video, music, and photos) and download
them to the iSee. VidiScape also converts those media files
into formats that your iSee can play.
• ArcSoft MediaConverter software that is used by VidiScape
to convert a wide variety of media files for the iSee.
• DirectX 9, which is required by VidiScape. You don’t need to
install this if you already have DirectX 9 on your computer.
If Asked to Restart Your Computer
Depending on your computer’s current configuration and what
you install, you may be asked to restart your computer when a
particular installation step is complete. You can safely wait until
you’ve installed all software on your computer before you
restart. (In other words, you only have to restart once!)
iSee 360i User’s Manual -13-
Page 20
Section 2. Setting Up Your iSee
To install iSee software on your computer:
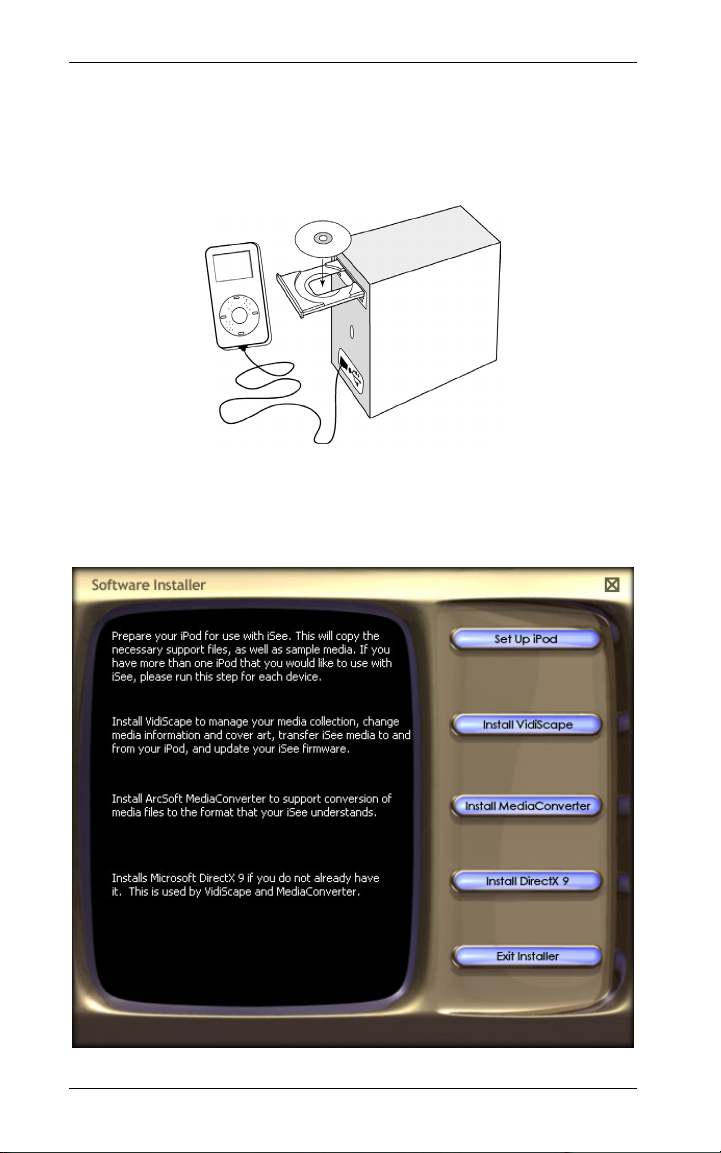
1. Insert the iSee software disc in the computer. You see the
iSee installer window.
Insert the iSee Software Disc
(If you don’t see the iSee installer window, use Windows
Explorer to double-click the Setup.exe file on the iSee
software disc.)
The iSee Installer Window
-14- iSee 360i User’s Manual
Page 21
Section 2. Setting Up Your iSee
2. On the iSee installer window, click the Set Up iPod button
and follow the prompts.
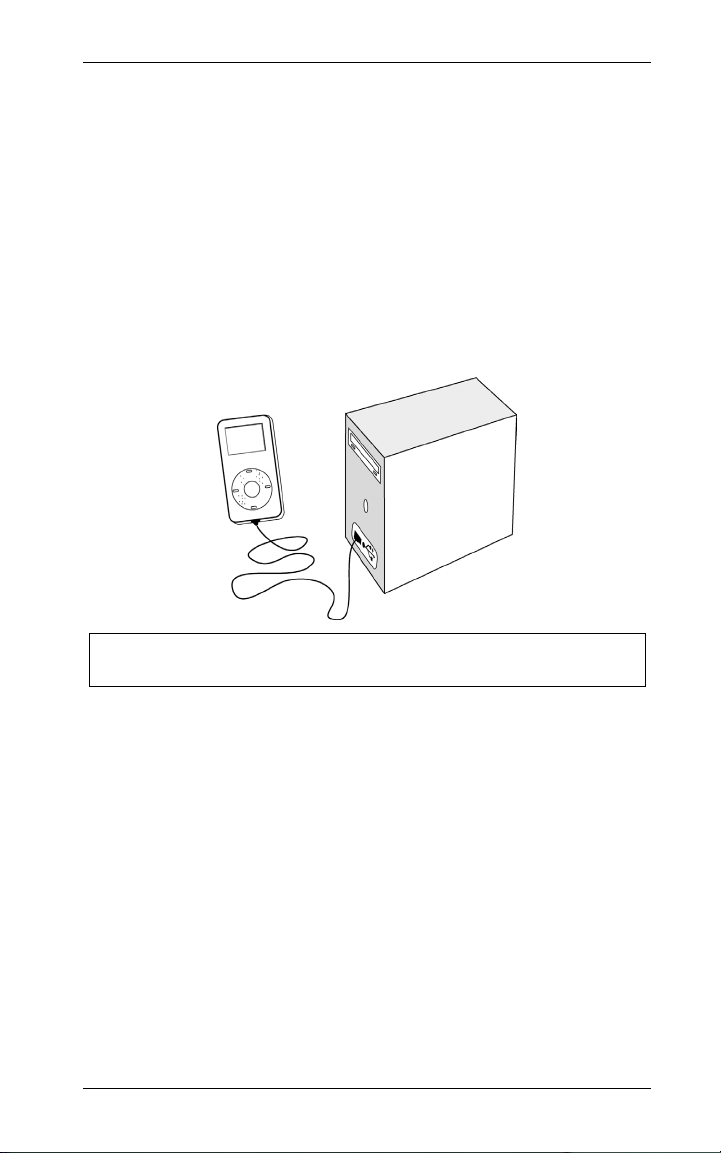
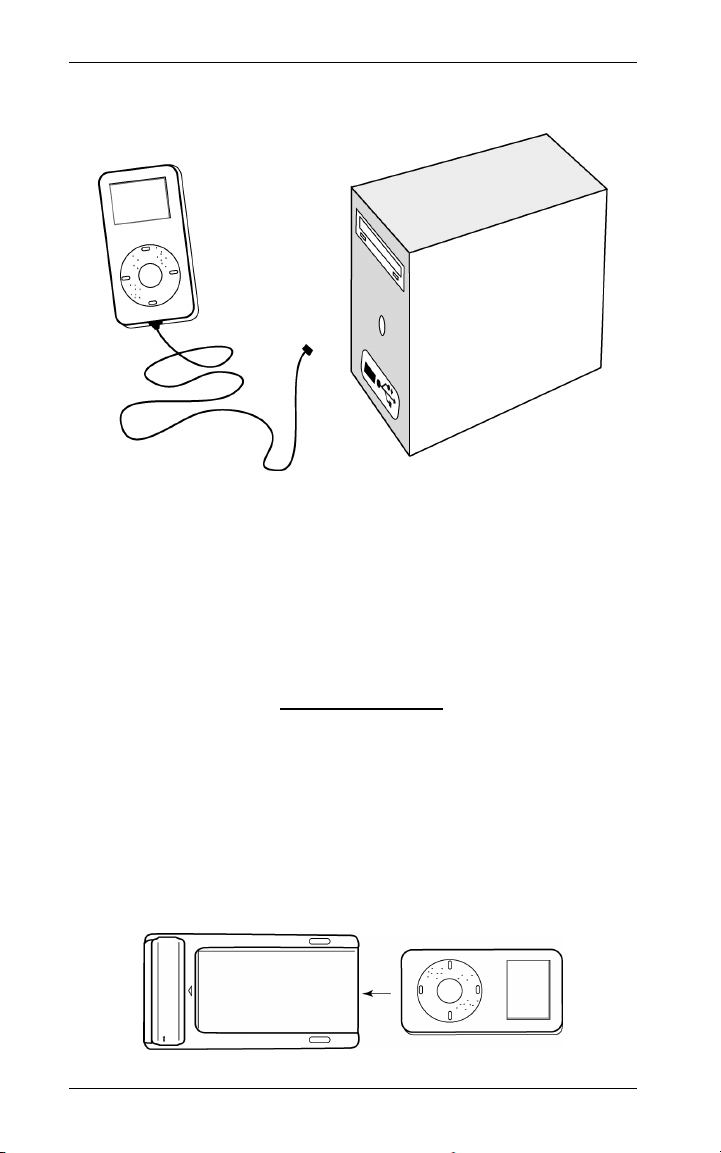
3. When prompted to connect your iPod, use a USB cable to
connect your iPod to your computer, then click OK. (After
connecting, you may have to wait a few moments before you
can successfully proceed; the iSee installer has to recognize
and evaluate your iPod.)
4. If iTunes launches, allow iTunes to update the iPod before
proceeding.
Connect Your iPod to the Computer
Note: For connecting to a PC, use a USB cable. Do not use
a FireWire (IEEE 1394) cable.
The installer automatically copies iSee drivers and sample
video and other files onto your iPod, ready for playing on the
iSee.
5. When you see the
Configure iTunes text box, open iTunes if it
is not already open on your computer. (To open iTunes, go
to the Windows
iTunes.)
Start menu, select Programs, and select
6. Move the
iTunes go to
Configure iTunes text box out of the way, and in
Edit | Preferences and choose the iPod tab.
7. Under the iPod tab, select the Music tab, if it’s not already on
the screen.
iSee 360i User’s Manual -15-
Page 22
Section 2. Setting Up Your iSee
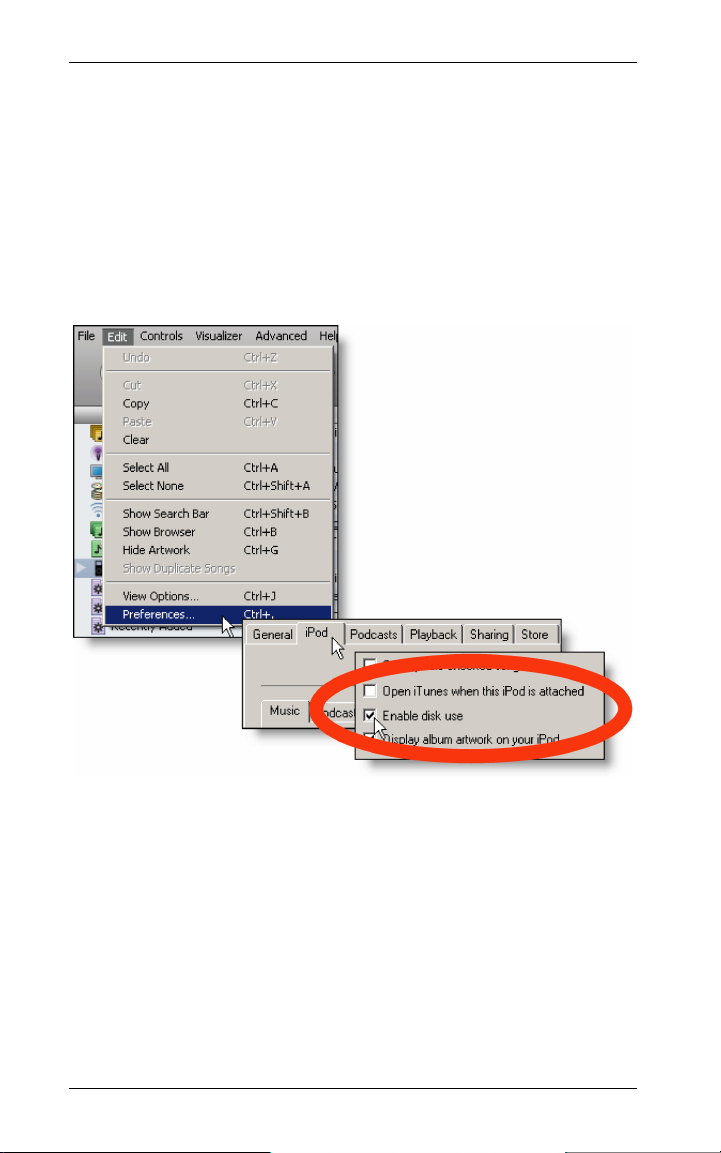
8. In the iTunes Music tab:
Optional but recommended: Turn off (uncheck) the box
marked
Required: Turn on (check) the box marked Enable disk
use
iPod when enabled for disk use, select
again
OK to proceed.
Open iTunes when this iPod is attached.
. (If you see a message about manually ejecting the
Do not warn me
and click OK.) If the box is checked but grayed, it’s
In iTunes, Disable Auto-Launch and Enable iPod Disk Use
9. When you’ve made the necessary changes, in the
Music tab
click OK.
10. When iTunes has finished updating the iPod with these new
settings, close iTunes.
11. Go back to the iSee installer’s
click
Done. (You don’t need to restart your computer after
this step.) You see the iSee installer window again.
Configure iTunes box and
-16- iSee 360i User’s Manual
Page 23
Section 2. Setting Up Your iSee
Note: Except for adding iSee files, this does not change the
iPod in any way. All music, video, or pictures you’ve loaded
with iTunes remain safe and undisturbed. Content from the
iSee and content from iTunes coexist peacefully within your
iPod.
12. In the iSee installer window, click on the Install VidiScape
button and follow the prompts to install VidiScape. Don’t
restart your computer or launch VidiScape yet.
13. Click the
Install MediaConverter button to install ArcSoft
MediaConverter. (You don’t need to restart your computer
yet.)
14. Go ahead and install DirectX 9.
-orIf you know you already have DirectX 9 on your computer,
go to the next step now to exit the installer.
15. When you see the installer window again, click the Exit
Installer
button to exit the installer.
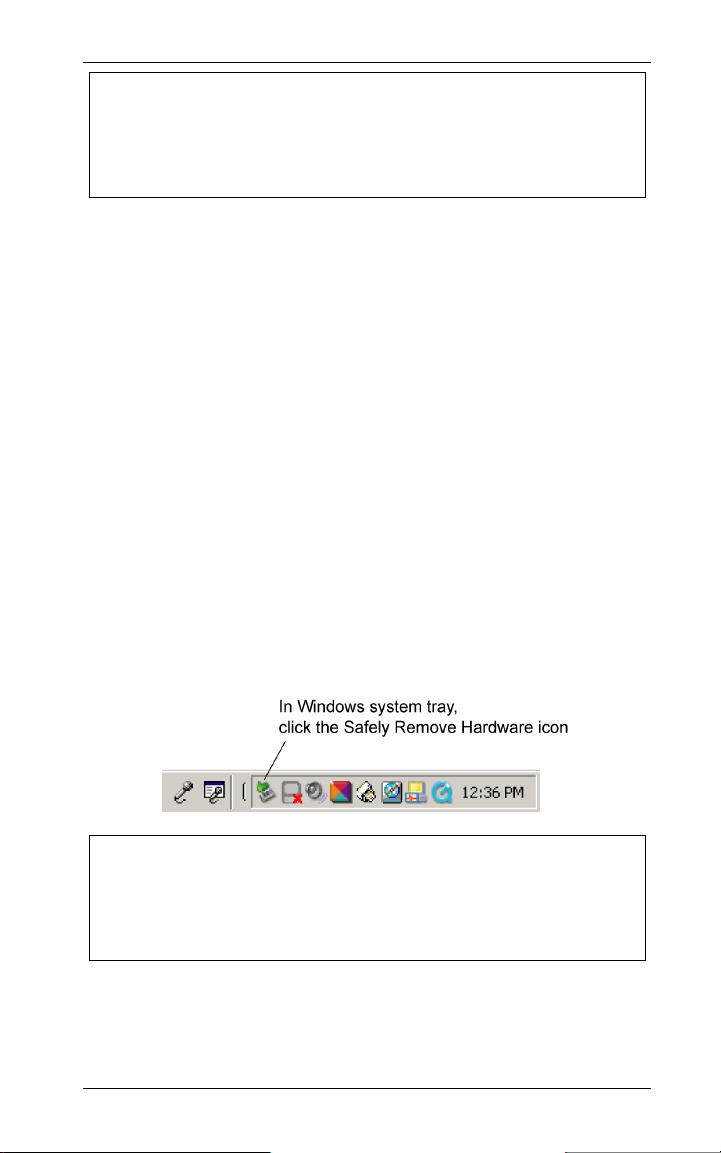
16. Remove the iSee Software disc from the computer, click the
Safely Remove Hardware icon in the Windows system tray,
wait for the iPod’s
and disconnect your iPod.
Do not disconnect screen to disappear,
Note: From now on, you should manually eject iPod before
each disconnect. To manually eject the iPod, you can either
a) Click the Safely Remove Hardware icon in the Windows
system tray; or b) Click VidiScape’s File | Eject Device
command.
iSee 360i User’s Manual -17-
Page 24
Section 2. Setting Up Your iSee
Eject the iPod, Then Disconnect It
When You’re Done Installing Software
17. Restart your computer to complete the installation of
VidiScape and other software.
Step 4: Insert Your iPod in the iSee
Now it’s time to insert your iPod into the iSee. If you have a
standard iPod, it will slide right in. If you have another iPod,
such as the iPod mini, iPod nano, or iPod video, you’ll need to
use an adapter. Adapters are available for purchase where you
bought your iSee, or at www.isee-ato.com
To insert a standard iPod:
1. Position the iPod so its screen is facing to the rear of the
iSee, and the iPod’s USB connector is oriented toward the
iSee.
2. Slide the iPod into the iSee until the connectors are mated
securely.
Inserting a Standard iPod Into the iSee
.
-18- iSee 360i User’s Manual
Page 25
Section 2. Setting Up Your iSee
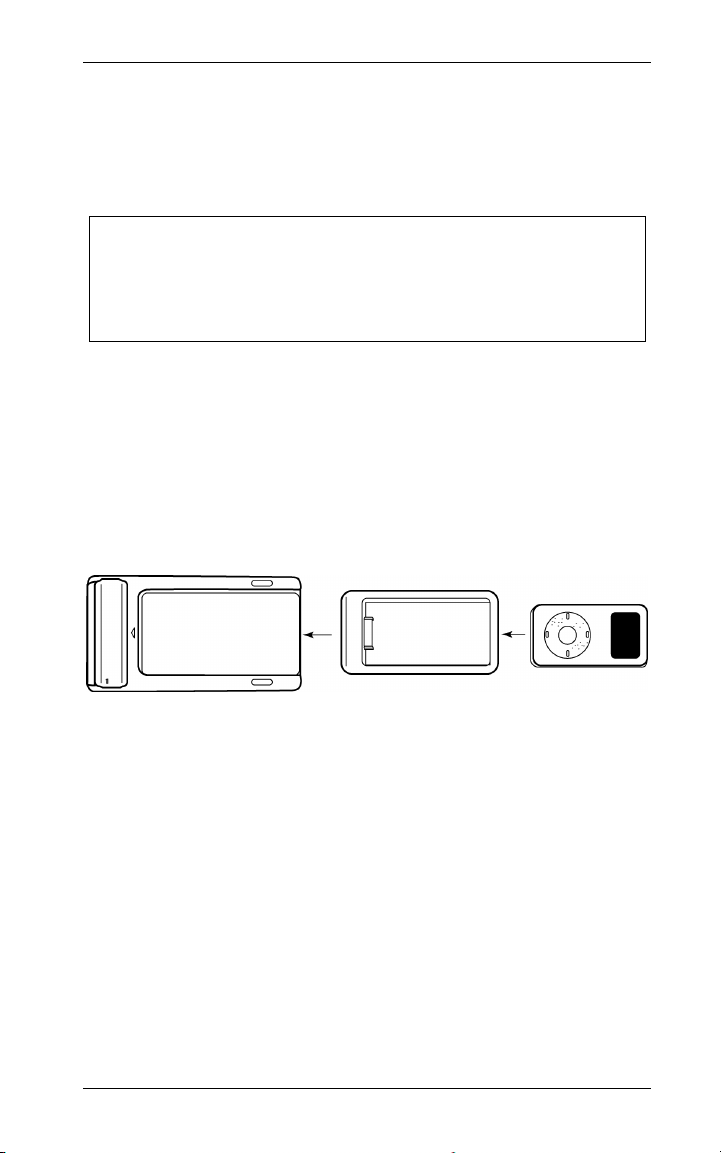
To insert an iPod mini, iPod nano, or iPod video:
1. Make sure you have the correct adapter for your iPod. Each
type of iPod has its own unique adapter. Adapters are
optional accessories and are available from your iSee
dealer.
Caution: If you have more than one type of iPod, be sure to
remove the adapter before attempting to insert a different
model iPod or adapter. Be especially careful if you have an
iPod video adapter. This is a sled that rests in the iSee to
position the iPod video correctly, and it’s easy to overlook.
2. With the iPod facing up, orient the adapter so its open
surface is also up, and so its inner USB connector is
positioned to mate with the iPod’s connector. (The iSee
video adapter has no inner USB connector.)
3. Slide the adapter over the iPod until the connectors mate
securely.
Using an Adapter with the iPod mini, nano, or video
4. Position the adapter so the iPod screen is facing to the rear
of the iSee, and the adapter’s outer USB connector is
oriented toward the iSee.
5. Slide the adapter into the iSee until the adapter clicks into
place and the connectors are mated securely.
iSee 360i User’s Manual -19-
Page 26
Section 2. Setting Up Your iSee
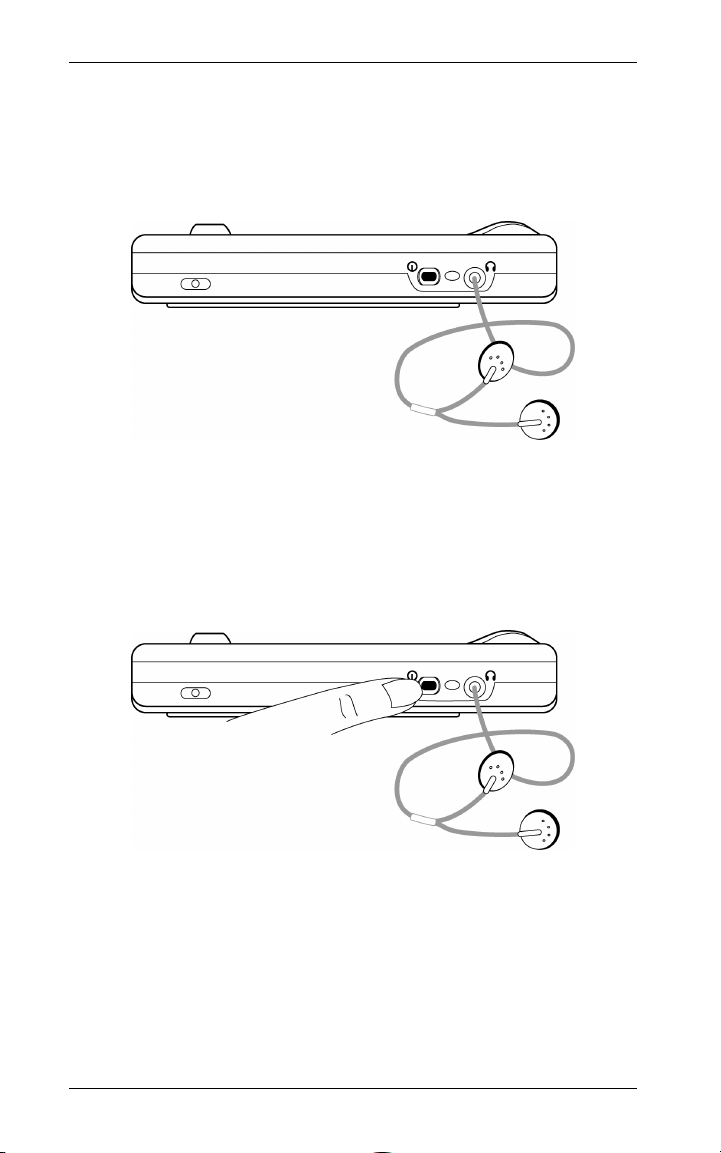
Plug In Headphones
To allow you to listen to music or video, plug your iPod’s
headphones into the iSee headphone jack.
Plug the iPod Headphones Into the iSee
Step 5: Turn On the iSee Power
Press the on/off button to turn on the iSee. The on/off LED is
illuminated, and you see the iSee logo in the iSee viewing
screen, followed by the main menu.
Turn On the iSee
-20- iSee 360i User’s Manual
Page 27

Section 2. Setting Up Your iSee
View the Main Menu
The main menu lets you control the iPod and the iSee. For
details, see “Section 3. Using the iSee.”
Caution: When you turn on
iSee, the docked iPod goes
into Do not disconnect
mode. Do not attempt to
remove the iPod while it is
docked in the iSee and the
iSee is on.
Don’t disconnect the iPod
while it displays this
A Final Step
Don’t forget to remove the transparent protective covering from
the iSee screen. And be sure to always transport your iSee in
its protective sleeve.
iSee 360i User’s Manual -21-
Page 28

Section 2. Setting Up Your iSee
Battery Life and Battery Charging
With a full charge, the iSee’s battery normally provides up to
four hours of power for watching video, listening to music, or
viewing pictures and slide shows. The battery also supplies
additional power to charge your iPod.
Using the Battery Level Indicator
During some operations, the battery level indicator appears in
the upper left corner of the iSee screen. It shows an
approximate representation of remaining iSee battery life.
Battery Charging and the On/Off LED
When the iSee is off and the AC adapter is connected, the iSee
is in sleep mode. It continues to charge its battery as well as
the iPod battery. The iSee's on/off LED blinks to indicate the
iSee battery charge level. A slow blink interval means the
battery is charging; the LED blinks more rapidly as the battery
nears full charge. When the LED no longer blinks, the iSee
battery is fully charged.
The battery level indicator gives an indication of
how much playing time is left.
Shutting Down the iSee
Here’s how to shut down your iSee.
Normal Shutdown
1. To turn off the iSee, press the power button for 1 second.
2. If you are going to remove the iPod from the iSee, turn off
the iSee and disconnect the AC adapter.
3. Once the iSee is shut down and you no longer see the “Do
not disconnect” screen on the iPod, you can remove the
iPod from the iSee player.
-22- iSee 360i User’s Manual
Page 29

Section 2. Setting Up Your iSee
Note: Shutting down the iSee does not shut off the iPod.
After shutting down the iSee, you can shut off the iPod
normally, by pressing and holding the iPod’s Play/Pause
button. Or the iPod switches off automatically after the
standard period of no user activity.
Emergency Shutdown and Reset
If the iSee appears unresponsive or seems to be operating
incorrectly, you can perform an emergency shutdown. This
resets the iSee and should allow recovery from any
malfunction.
To perform an emergency shutdown and reset:
1. Ensure the AC adapter is disconnected.
2. Press and hold iSee’s on/off button for 5 seconds. The iSee
will shut down.
3. Wait 30 seconds and press the on/off button to restart the
iSee.
4. If the iSee is still unresponsive, remove and reinsert the
battery.
Removing the iPod
To remove an iPod or an adapter:
1. Make sure power to the iSee is switched off and the AC
adapter is disconnected.
2. Look at the iPod’s screen to ensure it is blank or shows the
normal iPod menu. Do not remove the iPod if you see the
“Do not disconnect” screen.
3. If using an adapter, remove the iPod from the adapter first;
then go on to step 4 to remove the adapter from the iSee.
iSee 360i User’s Manual -23-
Page 30

Section 2. Setting Up Your iSee
4. Press the iPod/adapter lock to the UNLOCK position (in the
direction of the AC adapter connector) to unlock the iPod or
the empty adapter, then slide the iPod or adapter from the
iSee. Press outward at the base, between the battery and
the connectors. Do not use excessive force, as you can
cause damage or void the warranty.
Removing an iPod or an adapter
-24- iSee 360i User’s Manual
Page 31

Section 3. Using the iSee
Using the iSee Control Panel
You use the control panel to command the iSee. Simply press
the button for the action you want.
Control Panel
Button
Left ()
Up ()
iSee 360i User’s Manual -25-
How to Use It
• Move left in a list or a mosaic.
• Rewind while playing video.
• Pan left while viewing zoomed photo.
• Restart a playing song; next Left
goes to previous song.
• Adjust variable settings to the left.
• Go upward in a list or mosaic.
• Increase volume when playing music
or video.
• Pan up while viewing zoomed photo.
Page 32

Section 3. Using the iSee
Control Panel
Button
Menu ( )
Right ()
Select ( )
Down ()
How to Use It
• Click and hold to go to Settings
menu.
• Click once to go back to previous
screen.
• Move right to next item in list or
mosaic.
• Fast-forward in playing video.
• Pan right in zoomed picture.
• Go to next song when playing music.
• Adjust variable settings to the right.
• Select current item. Primary
selection button; means “Go forward”
or “Choice confirmed.”
• Play and pause video while in video
playback.
• Go downward in menu list or mosaic.
• Reduce volume when playing music
or video.
• Pan down in zoomed picture.
-26- iSee 360i User’s Manual
Page 33

Section 3. Using the iSee
Viewing the Main Screen
When you first turn on iSee, you see the main menu screen
showing three menu headings—MUSIC, VIDEO, and PHOTO.
You can use the control panel buttons to listen to music, show
pictures, play video, and control the iSee and the iPod.
In the Main Menu, Scroll Left and Right
or Browse Up or Down
Navigating the iSee Menus
Navigating the iSee menus is easy. Here’s all you really need
to know:
To scroll the main menu:
• In the main menu screen press the control panel Left ()
and Right () buttons to navigate through the major menu
headings. You see the selection highlight move to the
selected media.
• Use the control panel Left () button to scroll all the way left
to the iPOD heading.
• Use the Right () button to scroll all the way right to the
RECORD button.
iSee 360i User’s Manual -27-
Page 34

Section 3. Using the iSee
To browse the different media:
• With the main menu displayed and the selection highlight on
a media type (MUSIC, VIDEO, or PHOTO), you can:
Press Up () or Down () to browse the elements in that
media type (albums, video titles, or photos) one at a time.
-or-
Press Select ( ) to select the media type and see a
mosaic of albums, video titles, or photos.
To play media:
1. Once you have selected a media type, use the Up (),
Down (), Right () and Left () buttons to navigate within
the media type, then press Select (
) to choose one for
playing.
2. Press Select (
) again to begin playing.
3. While playing, press Select (
) to pause and resume.
To move back:
• Press the Menu ( ) button to “back up” through the menus.
(Press and hold the Menu (
) button to go to the main
System Settings menu.)
Navigating a Settings Menu
System settings menus have slider controls, toggle controls,
and dialog screens.
System Setting
Control
Slider Control
Example:
Toggle Controls
Example:
-28- iSee 360i User’s Manual
How to Use It
Use the Right () button to increase the
value; use the Left () button to
decrease the value.
Press Select (
), Left (), or
Right () to toggle between on (“X”) and
off.
Page 35

Section 3. Using the iSee
System Setting
How to Use It
Control
Dialog Screens
Example:
A setting label followed by three periods
(…) indicates one or more dialog
screens. Dialog screens give you
information or allow you to perform some
function. Use the Right () button to
advance to the next screen; the Left ()
button moves back to the previous
screen.
Playing Videos
To play a video, it must be on the iPod, and it must be in a
format the iSee can understand. To place iSee-ready videos on
the iPod you can:
• Load videos onto the iPod using the software shipped with
your iSee. (See the manual Using VidiScape with Your iSee
for more details.)
• Record video directly to the iPod with the iSee installed in
the Standard Dock. (See Section 4 of this manual for more
details.)
To play a video:
1. If you are not already in the main menu, use the Menu ( )
button until you see the main menu screen.
2. In the main menu use the control panel scroll buttons to
move the selection highlight to VIDEO. Then press
Select (
3. Use the scroll buttons to browse by moving the selection
highlight to different selections, then press Select (
choose a selection. You see a larger view of the selection,
with the accompanying title.
4. Press Select (
begins playing.
). You see a mosaic of video titles.
) to
) to begin playing the video. The video
iSee 360i User’s Manual -29-
Page 36

Section 3. Using the iSee
5. While the video is playing, you can use these buttons to
control it:
Press Select ( ) to pause the video. Press Select ( )
again to resume playing it.
Press Right () to fast-forward ahead in the video. Press
Right () again to move faster. Press and hold the button
to speed up to shuttle-style fast-forward, which allows you
to quickly move forward to any part of the video.
Press Left () to go backward in the video. Press Left ()
again or press and hold the button to increase the speed
of going backward. Press and hold the button to speed up
to shuttle-style fast-backward, which allows you to quickly
move backward to any part of the video.
Use the Up () and Down () buttons to change the
audio volume.
Press and hold the Menu ( ) button to see the Video
Settings menu.
Note: Longer video files can take a few moments to start
playing.
Changing Audio Volume
You can change the volume of music or other audio directly
from the iSee control panel while music is playing. Or you can
use the settings menus to change audio volume.
To change the audio volume directly from the control panel:
1. Start playing a video or music selection.
2. While the selection is playing, press iSee control panel’s the
Up () and Down () buttons to change the volume. You
see a graphical representation of volume in the display.
To change the audio volume using the System Settings menu.
1. Repeatedly press the Menu ( ) button until you see the
main menu.
2. With the main menu displayed, press and hold the Menu ( )
button. You see the System Settings menu.
-30- iSee 360i User’s Manual
Page 37

Section 3. Using the iSee
3. At the System Settings menu use the control panel scroll
buttons to place the selection highlight on
Volume. Then
press Right () to increase the volume, or Left () to
decrease the volume.
4. Press Menu ( ) again to get back to the main menu.
Onscreen Indicators
For many actions, such as a video playing or a change of
battery state, you see an indicator of your action appear briefly
in the iSee screen, along with the timecode and the battery
level indicator. The indicators fade after a few seconds to allow
unimpeded viewing.
Changing Video Settings
To change video settings:
1. When the iSee is playing a video, press and hold the
Menu (
2. Make any changes to the menu. The changes take effect
immediately.
3. Press Menu (
) button. You see the Video Settings menu.
) again. The video resumes playing.
Video Settings
For each setting, use the control panel scroll buttons to place
the selection highlight (showing the current selection) over the
setting. Then press Select (
toggle a check box; or press Select (
), Right (), or Left () to
) to activate a dialog
box; or press Right () or Left () to change a slider setting.
iSee 360i User’s Manual -31-
Page 38

Section 3. Using the iSee
Video Setting How to Use It
Volume Controls volume of music or video.
(Default is 5.)
TV-Out Turn on (“X”) to output iSee’s display to
a TV; off for normal display on the
iSee’s screen. (Default is normal
display.)
Note: Do not select TV-Out without a
TV connected, because when TV-Out
is enabled, the iSee screen is blank.
Channel Surf
Auto Play
You can press Select (
restart iSee to turn off TV-Out.
Turn on (“X”) for channel surf; off for
normal mode. (Default is normal
mode.)
With channel surf on: Press Right ()
for the next video, or Left () for the
previous video; this is like changing
channel (surfing) on a TV.
Press and hold Right () to seek
forward within a video, or Left () to
seek backward.
With channel surf off: Press Right ()
for fast forward within the video, or Left
() for fast rewind.
Press and hold Right () for seek
forward, or Left () for seek backward.
Turn on (“X”) to proceed automatically
from the end of one video to the
beginning of the next; off to return to
video browsing after playing a video.
(Default is off.)
) again or
-32- iSee 360i User’s Manual
Page 39

Section 3. Using the iSee
Video Setting How to Use It
Delete...
Video Browse Settings
The video browse settings let you change settings for video
browsing.
To change video browse settings:
1. If you are not already in the main menu, use the Menu ( )
button until you see the main menu screen.
2. In the main menu use the control panel scroll buttons to
move the selection highlight to VIDEO. Then press
Select (
3. Use the scroll buttons to browse by moving the selection
highlight to different selections, then press Select (
choose a selection. You see a larger view of the selection,
with the accompanying title.
4. To change settings for this screen, press and hold the
Menu (
browsing.
5. Make any changes to the menu. The changes take effect
immediately.
). You see a mosaic of video titles.
) button. You see the Settings menu for video
Displays current video ready for
deletion. Press Select (
the deletion or Menu (
use Left () and Right () to select a
different video to delete.
) to confirm
) to cancel. Or
) to
iSee 360i User’s Manual -33-
Page 40

Section 3. Using the iSee
Video Browse
How to Use It
Setting
Volume Adjust audio volume for video and
music. (Default is 5.)
TV-Out Turn on (“X”) to output iSee’s display to
a TV; or off for normal display on the
iSee’s screen. (Default is normal
display.)
Note: Do not select TV-Out without a TV
connected, because when TV-Out is
enabled, the iSee screen is blank. You
can press Select (
) again or restart
iSee to turn off TV-Out.
Delete...
Displays current video ready for deletion.
Press Select (
deletion or Menu (
) to confirm the
) to cancel. Or use
Left () and Right () to select a
different video to delete.
Listening to Music
Music is arranged in albums. The songs you want to play must
be in MP3 format on the iPod. (You can place songs on the
iPod using the VidiScape software. See the manual Using
VidiScape with Your iSee for more details.)
To play music:
1. Use the Menu ( ) button until you see the main menu.
2. At the main menu screen, use the control panel scroll
buttons to move the selection highlight to MUSIC. Then
press Select (
3. Use the scroll buttons to browse by moving the selection
highlight to different albums, then press Select (
choose an album. You see a list of songs in the album.
). You see a mosaic of music albums.
) to
-34- iSee 360i User’s Manual
Page 41

Section 3. Using the iSee
4. Press Select ( ) to start playing from the beginning; or
scroll to a song and press Select (
) to begin with that
song. You hear the song and see an indicator that it is
playing.
5. While the song is playing, you can use these buttons to
control play:
Press Select ( ) to pause. Press Select ( ) again to
resume playing.
Use the Up () and Down () buttons to change the
audio volume.
Press and hold the Menu ( ) button to see the Music
Settings menu.
Press Right () to move forward in the song list. Press
and hold the button to speed up; you can quickly advance
or retreat to any song in your library within seconds.
Press Left () once to restart the current song from its
beginning; or press Left () twice to go to the last song in
the song list. Press Left () again, or press and hold the
button, to increase the speed of going backward.
When the song finishes playing, the iSee proceeds
automatically to the next song in the album. The iSee will
continue to play every song in your library in a continuous loop.
In fact, unless you stop it, your iSee will play as long as it has
power.
Changing Music Settings
To change music settings:
1. When the iSee is playing a song, press and hold the
Menu (
2. Make any changes to the menu. The changes take effect
immediately.
3. Press Menu (
iSee 360i User’s Manual -35-
) button. You see the Music Settings menu.
) again.
Page 42

Section 3. Using the iSee
Music Settings
For each setting, use the control panel Scroll buttons to place
the selection highlight (indicating the current selection) on the
setting. Then press Select (
toggle a check box; or press Select (
box; or press Right () or Left () to change a slider setting.
), Right (), or Left () to
) to activate a dialog
Music Setting How to Use It
Volume Controls volume of music or video.
(Default is 5.)
TV-Out Turn on (“X”) to output iSee’s display to
a TV; off for normal display on the
iSee’s screen. (Default is normal
display.)
Note: Do not select TV-Out without a
TV connected, because when TV-Out
is enabled, the iSee screen is blank.
You can press Select (
restart iSee to turn off TV-Out.
Shuffle Turn on (“X”) to play the library’s songs
in random order; off to play in the list
order. (Default is list order.)
Delete...
Displays current song ready for
deletion. Press Select (
the deletion or Menu (
use Left () and Right () to select a
different song to delete.
) again or
) to confirm
) to cancel. Or
-36- iSee 360i User’s Manual
Page 43

Section 3. Using the iSee
Song List Settings
The song list settings let you change settings for song lists.
To change song list settings:
1. If you are not already in the main menu, use the Menu ( )
button until you see the main menu screen.
2. In the main menu use the control panel scroll buttons to
move the selection highlight to MUSIC. Then press
Select (
). You see a mosaic of music album titles.
3. Navigate to a music album and press Select ( ). You see
the song list for this album.
4. Highlight a song, then press and hold the Menu ( ) button.
You see the Settings menu for the song list.
5. Make any changes to the menu. The changes take effect
immediately.
Song List
How to Use It
Setting
Volume Adjust volume for video and music.
(Default is 5.)
TV-Out Turn on (“X”) to output iSee’s display to
a TV; or off for normal display on the
iSee’s screen. (Default is normal
display.)
Note: Do not select TV-Out without a TV
connected, because when TV-Out is
enabled, the iSee screen is blank. You
can press Select (
) again or restart
iSee to turn off TV-Out.
Delete...
Displays current song ready for deletion.
Press Select (
deletion or Menu (
) to confirm the
) to cancel. Or use
Left () and Right () to select a
different song to delete.
iSee 360i User’s Manual -37-
Page 44

Section 3. Using the iSee
Viewing Photos and Slide Shows
You can view individual photos, or display photos in a slide
show. You can also pan and zoom individual photos. The
photos must be .jpg (JPEG) files that have been loaded into the
iPod. You can convert and load photos using the software that
accompanies your iSee. (For more details, see the manual
Using VidiScape with Your iSee.)
To view a slide show:
1. If you are not already in the main menu, use the Menu ( )
button until you arrive at the main menu.
2. At the main menu screen, use the control panel scroll
buttons to move the selection highlight to PHOTO. Then
press Select (
3. Use the scroll buttons to browse by moving the selection
highlight to different photos, then press Select (
choose a photo. You see the photo displayed full-screen.
4. With the photo displayed, press Select (
a slide show. You see all photos displayed in sequence.
5. To pause a running slide show, press Select (
6. If you haven’t zoomed a photo, you can use Right () and
Left () to go to the next photo. Hold down either Right ()
or Left () to get a fast review of images.
). You see a mosaic of photos.
) to
) again to launch
).
-38- iSee 360i User’s Manual
Page 45

Section 3. Using the iSee
To pan and zoom a photo:
1. Select an individual photo; or halt a running slide show by
pressing Select (
).
2. Press and hold Select (
). You see the word Zoom in the
display for a moment, indicating the iSee is in zoom and pan
mode. While in this mode, you can:
Use Select ( ) to zoom in on the photo. Multiple
presses increase the zoom.
Use the Right (), Left (), Up () and Down ()
buttons to pan right, left, up and down.
Use Menu ( ) to zoom all the way out.
Adding Background Music to a Slide Show
You can add background music, allowing you to play a slide
show of photos with music accompaniment.
To play a slide show with music:
1. Start playing a music album. (See page 34 for how to start
playing an album.)
2. Then start the slide show normally. While playing the slide
show, you can use the Up () and Down () buttons to
control music volume.
iSee 360i User’s Manual -39-
Page 46

Section 3. Using the iSee
Changing Photo Settings
To change photo settings:
1. When the iSee is showing a photo or playing a slide show,
press and hold the Menu (
Settings menu.
2. Make any changes to the menu. The changes take effect
immediately.
3. Press Menu (
setting in effect.
Photo Settings
For each setting, use the control panel scroll buttons to place
the selection highlight (indicating the current selection) on the
setting. Then press Select (
toggle a check box; or press Select (
box; or press Right () or Left () to change a slider setting.
) again. You see the photo with the new
) button. You see the Photo
), Right (), or Left () to
) to activate a dialog
-40- iSee 360i User’s Manual
Page 47

Section 3. Using the iSee
Photo Setting How to Use It
Volume Controls volume of music.
(Default is 5.)
TV-Out Turn on (“X”) to output iSee’s display to
a TV; off for normal display on the
iSee’s screen. (Default is normal
display.)
Note: Do not select TV-Out without a
TV connected, because when TV-Out
is enabled, the iSee screen is blank.
You can press Select (
restart iSee to turn off TV-Out.
Caption Turn on (“X”) to see a caption
displayed with each photo; off for
normal mode. (Default is normal mode,
no caption.)
Slide Time Use Right () to increase the display
time for each photo in a slide show;
use Left () to decrease the time.
(Default is 2.)
Delete...
Displays current photo ready for
deletion. Press Select (
the deletion or Menu (
use Left () and Right () to select a
different photo to delete.
) again or
) to confirm
) to cancel. Or
iSee 360i User’s Manual -41-
Page 48

Section 3. Using the iSee
Changing System Settings
Besides the specific settings menus for each mode, the iSee
includes a main System Settings menu.
To view the main System Settings menu:
• At the main menu screen, press and hold the Menu ( )
button. You see the System Settings menu.
System Setting How to Use It
Volume Adjust volume for video and music.
(Default is 5.)
TV-Out
Reset Settings Press Select ( ) to reset all settings to
Turn on (“X”) to output iSee’s display to
a TV; or off (“O”) for normal display on
the iSee’s screen. (Default is normal
display.)
Note: Do not select TV-Out without a TV
connected, because when TV-Out is
enabled, the iSee screen is blank. You
can press Select (
iSee to turn off TV-Out.
their factory defaults.
) again or restart
-42- iSee 360i User’s Manual
Page 49

Section 3. Using the iSee
System Setting How to Use It
User Guide... Press Select ( ) to display firmware
version, usage hints and important
information about your iSee. Use
Right () and Left () to move through
the User Guide screens.
Changing Mosaic Settings
The Mosaic Settings menu allows you to control the size and
number of “thumbnail” pictures you see in the mosaic screen.
To change mosaic settings:
1. Use the Menu ( ) button until you see the main menu.
2. At the main menu screen, use the control panel scroll
buttons to move the selection highlight to MUSIC, VIDEO, or
PHOTOS. Then press Select (
thumbnail representations of the files.
3. Press and hold the Menu (
Mosaic Settings menu.
4. For each setting, use the control panel scroll buttons to place
the selection highlight (indicating the current selection) over
the setting. Then press Select (
to toggle a check box; or press Select (
dialog box; or press Right () or Left () to change a slider
setting. This changes the mosaic settings for all displays
(music, video, and photos).
). You see a mosaic of
) button until you see the
), Right (), or Left ()
) to activate a
iSee 360i User’s Manual -43-
Page 50

Section 3. Using the iSee
Mosaic Mode
Setting
Volume Adjust volume for video and music.
TV-Out Turn on (“X”) to output iSee’s display to
Caption Turn on (“X”) for captions showing
Mosaic Size
Delete...
How to Use It
(Default is 5.)
a TV; or off for normal display on the
iSee’s screen. (Default is normal
display.)
Note: Do not select TV-Out without a TV
connected, because when TV-Out is
enabled, the iSee screen is blank. You
can press Select (
iSee to turn off TV-Out.
information about the media (for
example, filenames); off for display
without captions. (Default is off.)
Controls size of thumbnail
representations. A larger number means
more, but smaller, thumbnails on the
screen. (Default is 3.)
Deletes the current object (album, video,
or photo). Press Select (
the deletion or Menu (
use Left () and Right () to select a
different object to delete.
) again or restart
) to confirm
) to cancel. Or
-44- iSee 360i User’s Manual
Page 51

Section 4. Recording Video
With the iSee and its Standard Dock, you can record video
from a camera, DVD, VCR, or other source directly to the iPod,
converting it to MPEG-4 video format for later playing on the
iSee.
Video Recording Setup
To set up for video recording, you need the iSee, the Standard
Dock accessory, and the A/V cables.
To set up for video recording:
1. Insert the iPod into the iSee.
2. Insert the iSee into the Standard Dock, making sure the
connector is seated securely.
3. Connect the audio output of a video source (camcorder,
DVD player, satellite TV, VCR, etc.) to the AUDIO IN
connector of the Standard Dock.
iSee 360i User’s Manual -45-
Page 52

Section 4. Recording Video
4. Connect the video output of the source to the VIDEO IN
connector of the Standard Dock.
5. (Optional) To monitor the recording on a TV or computer,
connect the Standard Dock’s AUDIO OUT connector to the
audio input of the TV or computer.
6. (Optional) Connect the VIDEO OUT connector to the video
input of the TV or computer.
The iSee screen is 320 x 240, but video is held internally in 640
x 480 resolution. Video transferred through the Standard
Dock’s Video Out connector is at the full 640 x 480 TV
resolution.
Video Recording to the iPod
With the setup shown above, you can now record video to the
iPod.
To record video on the iPod:
1. Start the video source (camcorder, VCR, etc.).
2. If you are not already in the main menu, use the Menu (
button until you arrive at the main menu. Use the Right ()
button to move the selection highlight to RECORD. Then
press Select (
3. You now see the word Preview along with a video preview
from your connected source. If you don’t see a video
preview, check your cable connections. See
“Troubleshooting Tips” on page 60.
4. Press Select (
message and a time counter, indicating that video is being
recorded by the iSee. The iSee is now recording to the iPod.
5. Press Select (
the recording is saved and you see the Video Browse screen
with the recorded video ready for playback, if desired.
).
) to begin recording. You see a Record
) to end recording. When recording stops,
)
-46- iSee 360i User’s Manual
Page 53

Section 4. Recording Video
6. To stop one recording and start another soon after—for
example to skip a commercial—press the Menu (
) button
to stop recording. The current recording is saved as a file,
and you see the preview screen, ready to record again.
Then:
When the commercial is over, press Select ( ) to begin
recording again. (You’ll be recording to a new file.)
-or-
To exit the preview screen, press the Menu ( ) button to
arrive at the main menu.
You can play the video files you’ve created, just as you play
any other video on your iSee. If you want to give the video a
name, move video files to your computer, or convert the video
to another format, use the software that accompanies your
iSee. (See the manual Using VidiScape with Your iSee
contained on the iSee software disc.)
If You’re Using a Camcorder
Some camcorders have Line-Out jacks, while others may use a
cable. Depending on your camcorder model, you may need to
purchase a female-to-female RCA adapter from your local
electronics store.
Recorded Video File Size
Recording video for one hour will create a video file on your
iPod of about 800 megabytes to 1 gigabyte.
Recording from Battery Power
When recording video, you can record without the AC adapter
connected to the Standard Dock. This enables mobile
recording—for example, from a handheld camera—without AC
available. Of course the iSee battery is used both to power
itself and to charge the iPod, so recording time will be limited.
iSee 360i User’s Manual -47-
Page 54

Section 4. Recording Video
Changing the Record Settings
You can change the settings for recording video.
To change the record settings:
1. (Optional) Start the video source (camcorder, VCR, etc.).
2. If you are not already in the main menu, use the Menu (
button until you arrive at the main menu. Use the Right ()
button to move the selection highlight to the RECORD
button. Then press Select (
3. You now see the word Preview (along with a video from the
video source, if connected.
4. Press and hold the Menu (
Settings menu.
Record Setting How to Use It
Volume Adjust audio volume for playback.
(Default is 5.)
TV-Out Turn on (“X”) to output iSee’s display to
a TV; or off for normal display on the
iSee’s screen. (Default is normal
display.)
Note: Do not select TV-Out without a TV
connected, because when TV-Out is
enabled, the iSee screen is blank. You
can press Select (
iSee to turn off TV-Out.
Delete...
Deletes a video. When you select
Delete..., you see the latest video you
recorded. You can choose this video or
scroll left or right to choose another
video to delete. Press Select (
confirm the deletion or Menu (
cancel. Or use Left () and Right () to
select a different video to delete.
).
) button to see the Record
) again or restart
) to
) to
)
-48- iSee 360i User’s Manual
Page 55

Section 4. Recording Video
Viewing with the Standard Dock
You don’t have to use the Standard Dock only for recording.
You can connect a television or multimedia system to the
Standard Dock and watch video or slide shows on your TV.
1. To view a video or slide show on your TV or computer,
connect the Standard Dock’s VIDEO OUT connector to the
video input of the TV or computer.
2. Connect the AUDIO OUT connector to the audio input of the
TV or computer.
3. Go to any of the settings menus and enable TV OUT. You
now see the iSee display on your TV.
4. Use the iSee control panel to start the video or slide show.
Note: The audio volume level on the screen or on the TV
indicates the audio level at the iSee headphone jack, not
the audio output of the Standard Dock.
iSee 360i User’s Manual -49-
Page 56

Section 4. Recording Video
This page intentionally left blank.
-50- iSee 360i User’s Manual
Page 57

Section 5. Using iPod Play-Through Mode
The iSee uses your iPod much as if the iPod were a hard disk.
And while that iSee-enabled iPod is connected to your
computer, VidiScape gives you access to all the iSee media
you’ve loaded onto the iPod.
How iTunes and iSee Share Your iPod
Using VidiScape to load iSee-specific music, video and
pictures onto your iPod does not change the other files you
have there. Any media content you’ve loaded onto the iPod
with iTunes remains safe and undisturbed. The media files
from iSee and iTunes coexist peacefully in separate areas of
the iPod, and don’t affect each other.
Hint: When the iPod displays “Do not disconnect,” it’s
operating as part of the iSee. When the iPod displays the
standard iPod menu or screen, it’s operating as an iPod.
The iPod’s disk space is shared by the iSee and iTunes. For
example, if you have a 30GB iPod with 10 GB of iTunes on it,
the iSee can use the remaining 20 GB for its files.
Three Ways to Use iPod
With your iPod inserted in iSee, there are actually three ways
to use it.
• iSee on: With iSee power on, you can play iSee content:
video, music, or photos that you’ve loaded with VidiScape.
And you can record video directly from live TV, DVD, VCR—
almost any video source.
• iSee off: When the iSee power is off, you can turn the iSee
over and use the iPod to play iTunes-loaded music, video,
and pictures just as you always have. To listen to iTunes
media, simply plug the headphones directly into the iPod.
The iSee continues to charge the iPod battery.
iSee 360i User’s Manual -51-
Page 58

Section 5. Using iPod Play-Through Mode
• iPod play-through: Or you can switch the iSee to iPod play-
through mode. This iSee main menu option actually lets you
“play-through” content loaded with iTunes. iPod play-through
mode lets you view iTunes-loaded video or photos on the
iSee’s larger screen, and control volume with the iSee
control panel. (You can also control volume, as well as
play/pause, fast forward, and rewind, with the iPod’s
controls.)
Using iPod Play-through
For iPod play-through mode, you select the iSee’s main menu
iPOD button, set the iPod’s (not the iSee’s) settings to TV Out
or Video Out, and start the iPod playing. Then you can view
and listen on the iSee. Briefly press the iSee’s Menu (
button to return to normal operation.
The following procedure gives details of how to use iPod playthrough to watch a video. You can use much the same
procedure to view a slide show or listen to music.
Note: This assumes you have an iPod that’s capable of
playing video.
To use iSee to watch an iPod video:
1. If you are not already in the iSee main menu, use the
Menu (
) button until you arrive at the main menu.
2. Use the Left () button to move the selection highlight to
iPOD. Then press Select (
). You see iSee display
changed to indicate iPod mode.
3. Flip your iSee over so you can see the iPod’s front panel.
4. On the iPod’s menu select
Videos. You see the iPod’s
Videos menu.
5. On the iPod’s Videos menu select
Video Settings. You see
the Settings menu for the iPod.
6. On the iPod, click the select button to set
TV Out to On.
)
-52- iSee 360i User’s Manual
Page 59

Section 5. Using iPod Play-Through Mode
7. On the iPod, click the iPod’s MENU button to go back to the
Videos menu.
8. On the iPod’s Videos menu, select the type of video to view:
Movies, TV Shows, Video Podcasts, etc.
9. On the iPod, select the video and start it playing. You see
Now Playing on the iPod’s screen.
10. Flip the iSee over and enjoy the video on the iSee’s larger
screen.
While the video is playing:
• Use the iSee control panel’s Up () and Down () buttons
to change the audio volume. (You can also adjust volume
with the iPod’s controls.) Other iSee controls have no effect.
• Turn the iSee over and use the iPod’s controls as you would
normally to stop and resume playing the video, fast forward
or go backward, etc.
• To return to normal iSee operation, click the iSee’s
Menu (
) button once.
Remember that to watch video on the iPod again, change the
iPod’s TV-Out setting back to Off.
iSee 360i User’s Manual -53-
Page 60

Section 5. Using iPod Play-Through Mode
This page intentionally left blank.
-54- iSee 360i User’s Manual
Page 61

Section 6. About VidiScape Software
The VidiScape software that accompanies your iSee is a
powerful all-in-one program for playing, managing, and
converting your media files.
With this application installed on your computer, you can
manage your media files and convert them into the formats you
need for playing on the iSee. You can convert video, photo and
audio files. VidiScape can even add cover art—the thumbnail
illustrations you view in the iSee window—for your audio and
video files.
What’s more, VidiScape is also a full-featured multimedia
player that lets you watch video, listen to music, and view
photos and slide shows on your computer. And VidiScape is
complemented by ArcSoft MediaConverter, a powerful
application for converting a wide variety of media files before
sending them through VidiScape to the iSee.
To learn more about working with VidiScape software, refer to
the manual Using VidiScape with Your iSee on the iSee
software disc.
iSee 360i User’s Manual -55-
Page 62

Section 5. About VidiScape Software
This page intentionally left blank.
-56- iSee 360i User’s Manual
Page 63

Section 7. Maintenance and Troubleshooting
This section gives hints about frequently asked questions,
updating your iSee firmware, troubleshooting, and more.
Frequently Asked Questions
Q: How do I get iSee-playable content onto the iPod?
A: For video, you can record directly to the iSee. For video,
photos, and music, you install and use VidiScape software on
your computer. VidiScape is available on the iSee software
disc. If you didn’t install VidiScape when you first set up the
iSee, insert the iSee software disc in your computer and install
VidiScape and ArcSoft MediaConverter.
Q: I used VidiScape to load some media files onto my iPod, but I
can’t play them unless the iPod is installed in iSee.
This is normal. iSee and iTunes files coexist peacefully in
separate areas of the iPod, and don’t affect each other. It
works like this:
• When you disconnect the iPod from your iSee, you can play
iTunes content on the iPod.
• And when you insert the same iPod into the iSee, you can
play iSee content.
• To view or listen to iTunes content on iSee, use iPod playthrough mode.
Q: I have several computers. Can I load VidiScape on each one
and connect my iSee to any of them?
A: Yes. You can install VidiScape on several computers,
connect your iPod to each different computer in turn, and
transfer media files from each computer to the iPod.
Q: Will the iSee software disc work on the Macintosh?
A: In the current version of the iSee 360i, there is no support
for the Macintosh. The next version of the iSee 360i and
VidiScape will support the Macintosh.
iSee 360i User’s Manual -57-
Page 64

Section 7. Maintenance and Troubleshooting
Q: I have iTunes installed on my computer and it interferes with
VidiScape. How can I turn off iTunes so it doesn’t launch when I
plug in my iPod?
A: To turn off the auto-launch of iTunes:
1. Connect your iPod to the computer and open iTunes.
2. In iTunes, go to
then the
Music tab.
Edit | Preferences and choose the iPod tab,
3. Turn off (uncheck) the box marked
iPod is attached
.
Open iTunes when this
Q: I have more than one iPod. How do I prepare multiple iPods
for use with the iSee?
A: With the iSee installer window open, disconnect the first
iPod, click the
Set Up iPod button again, and prepare another
iPod. You can run this step for each device.
Q: My iSee screen appears scratched.
A: Don’t forget to remove the transparent protective covering
from the iSee screen. If this covering is left in place, it can
make your iSee’s screen appear scratched.
iSee Firmware
Firmware, containing the instructions that operate your iSee, is
stored in flash memory on the iSee. Periodically, ATO issues
firmware updates for your iSee device. The updates may
provide new features, eliminate known problems, and generally
make your iSee operate even better. Updating firmware is
easy, and it’s something you should do on a regular basis.
Firmware updates come with release notes that you can view
with the iPod’s Notes menu.
-58- iSee 360i User’s Manual
Page 65

Section 7. Maintenance and Troubleshooting
Finding the Firmware Version
To find the firmware version of your iSee:
1. With the iSee main menu displayed, press and hold the
Menu (
) button to go to the System Settings menu.
2. On the System Settings menu use the control panel scroll
buttons to place the selection highlight on
press Select (
). You see an iSee screen that shows the
User Guide. Then
firmware version number.
Updating iSee Firmware
The iSee firmware update works like this: Whenever your
computer is connected to the Internet, VidiScape automatically
checks for any iSee firmware revisions and downloads them to
your iPod. You can also check manually from VidiScape’s Help
menu.
To install the firmware update:
1. Make sure your computer is connected to the Internet so that
VidiScape can check for updates automatically.
-orOn the computer, open VidiScape, and select
for Updates
to manually check for updates.
Help | Check
2. Connect your iPod to the computer as you normally do and
follow the instructions to download the iSee firmware update
to the iPod.
3. In VidiScape, click File | Eject Device. Wait to see the iPod's
normal menu. (The "Do not disconnect" display will
disappear.)
4. Attach the AC adapter to the iSee and plug the AC adapter
into an electrical outlet.
Caution: When updating firmware, make sure the iSee is
operating from the AC adapter.
5. Insert your iPod into the iSee and turn on the iSee power.
The iSee is automatically updated to the new firmware.
When the iSee restarts, your new firmware is functional.
iSee 360i User’s Manual -59-
Page 66

Section 7. Maintenance and Troubleshooting
Viewing Release Notes
Release notes that tell about changes made in the new
firmware are copied to the Notes section of your iPod.
To view the release notes:
1. Leave the iSee power off and turn the iPod on.
2. On the iPod, navigate to
release notes.
Extras | Notes and view the iSee
Troubleshooting Tips
Problem Solution
There’s a delay
before starting a
video or exiting from
a playing video.
I turned on the iSee,
but never see the “Do
not disconnect”
message on the iPod.
No display on iSee Make sure AC adapter or USB
This is normal. The iSee uses the
iPod’s hard disk, and hard disks
often have some delay in
responsiveness.
Turn the iPod off and remove it.
Turn the iSee off. Then reinsert the
iPod into the iSee and turn the iSee
on.
cable is securely attached to iSee.
Make sure iPod is plugged securely
into the iSee. The iSee requires an
iPod in order to operate.
Make sure you have not selected
TV-Out. When TV-Out is enabled,
the iSee screen is blank.
If you have just switched to
TV-Out, you can press
Select (
the iSee display.
Or turn the iSee off, then on
again to restore the display to
the iSee screen.
) again to revert to
-60- iSee 360i User’s Manual
Page 67

Section 7. Maintenance and Troubleshooting
Problem Solution
The iPod in my iSeewon’t turn on; there’s
no display on the
iSee.
If the battery on your iPod is
completely dead, the iSee may not
be able to start it. Turn off the iSee,
plug in the iSee’s AC adapter and
let the iPod battery charge for 10
minutes. Then turn on the iSee. The
iPod should turn on.
I turned on TV-Out,
without a TV
connected, and now
Turn the iSee off, then turn it on
again. The iSee “wakes up” set for a
display on its own screen.
there’s nothing on the
iSee screen.
No sound from
headphones.
Make sure headphones are plugged
securely into the iSee.
Make sure the volume is set to level
1 or greater.
No video preview
window when
recording.
Make sure you plug cables from the
video source (camcorder, VCR,
etc.) output to the AUDIO IN and
VIDEO IN connectors of the
Standard Dock.
See “Appendix B: Technical Support” on page 67 for details of
getting technical support or returning your iSee to the
manufacturer.
iSee 360i User’s Manual -61-
Page 68

Section 7. Maintenance and Troubleshooting
This page intentionally left blank.
-62- iSee 360i User’s Manual
Page 69

Appendix A: Specifications
Mechanical Specifications
Size 5.6” (L) x 3.2” (W) x 1.1” (H)
142mm (L) x 80mm (W) x 28mm (H)
Weight 6 oz. (without iPod)
Power 2,200 mAh lithium ion replaceable
rechargeable battery
Approximate
Battery Life
Screen 3.6” (320 x 240) TFT LCD
Connectors
Communication and Interface
Hardware
Features
Navigation
Digital Media
Management
iPod PlayThrough
Interface
User Input Oblong keypad
Up to 4 hours
Note: Battery life is dependent on both the
health of the iPod battery, and the content
being viewed. The iSee can get up to four
hours of battery life, generally providing
enough playing time to get through two
feature-length movies.
• Headphone out (mini-jack) connector
• Connector for AC adapter
• iPod connector (internal)
SD flash
Power reduction modes
• Video and audio play, pause, resume
• Fast forward (2x, 4x, 8x)
• Rewind (2x, 4x, 8x)
•
Manages and plays digital audio, video, and
photos
Displays video, still photos, and slide shows
from iPod on larger iSee 360i screen
iSee 360i User’s Manual -63-
Page 70

Appendix A: Specifications
Encoding and Decoding
Audio Import Supported file types for audio decoding by
VidiScape/MediaConverter:
• MP3
• WAV
• Unprotected WMA (Windows Media
Audio)
Audio Export
to iSee
Picture
Import
Audio file type output by VidiScape to iSee:
• MP3
Supported file types for picture files
imported to iSee:
• JPG, JPEG, GIF, TIFF, TIF, PNG, BMP
Picture
Export to
iSee
Picture file type output by conversion
software to iSee:
JPEG (.jpg)
Video Import Supported file types for video decoding by
VidiScape/MediaConverter:
AVI (Microsoft Video 1 format, Cinepak,
Intel Indeo, uncompressed, etc.)
ASF
Unprotected WMV (Windows Media
Player 9.0 required for WMV file
conversion)
MPEG-1
MPEG-4 in AVI format
QuickTime MOV (QuickTime 6.5
required for MOV file conversion)
Video Export
to iSee
Video file type output by conversion
software to iSee:
MPEG4 AVI, using Zoran COACH 7
codec
-64- iSee 360i User’s Manual
Page 71

Section 7. Maintenance and Troubleshooting
Video and Audio
Buffer 64MB buffer memory
Video-In Composite
Video-Out On iSee screen: 320 x 240 resolution·
Video-Out to TV, etc: NTSC composite,
640 x 480 resolution
(Video held internally as 640 x 480)
Audio codec On-chip audio VS codec
Video File
Length
Recorded
Video File
Multiple videos can be recorded, each up to
2.5 hours in length
Approximately 800MB-1GB per hour of
recorded video
Size
iSee 360i User’s Manual -65-
Page 72

Appendix A: Specifications
This page intentionally left blank.
-66- iSee 360i User’s Manual
Page 73

Appendix B: Technical Support
To contact ATO’s Technical Support Department:
• Visit our web site (www.isee-ato.com
technical support tab.
• Call our toll-free tech support line: 1-866-442-0019.
Call during the following hours:
Monday - Friday: 10:00 AM - 7:00 PM EST
Saturday: 10:00 AM - 4:00 PM EST
• Send us e-mail at techsupport@isee-ato.com
telephone number and the hours during which you can be
reached. Be as detailed as possible in describing your
problem. Please include system configuration, hardware and
software, as well as versions of iSee 360i used.
Returning Your iSee
To return your iSee to ATO, you need an RMA (Returned
Materials Authorization) number. You will need this number
before any ATO iSee can be returned for replacement. When
you have received the number from ATO, write the RMA
number in large bold numbers on the outside of the box, and
ship it to ATO.
) and choose the
. Include your
Packing Your iSee
Check the iSee to make sure there is no iPod installed. If
possible, pack your iSee in the original box.
If you no longer have the box, we recommend you pay a
packaging store (such as The UPS Store) to ship your iSee. If
you don’t have a packaging store in your area, ask for
packaging pointers when you contact us to get an RMA
number before returning any iSee.
iSee 360i User’s Manual -67-
Page 74

Appendix B: Technical Support
Shipping Your iSee to ATO
Be sure to write the RMA number on the outside of the
shipping box. Any iSee sent to ATO without an RMA number
will not be accepted.
All shipments must be sent postage prepaid. We recommend
that you insure your shipment, as ATO cannot be held
responsible for any damage that may occur during shipment.
-68- iSee 360i User’s Manual
Page 75

Appendix C: Warranty
ATO (“ATO”) warrants your iSee 360i and its accessories
against any defect in material and workmanship, under normal
use, for a period of one year following its date of purchase. In
the event this product is found to be defective within the
warranty period, ATO will, at its option, repair or replace the
defective unit.
This warranty is void: a) if the unit is operated or stored under
abnormal use and/or conditions; b) if the unit is repaired,
modified or altered, unless such repair, modification or
alteration is expressly authorized in writing by ATO; c) if the
unit is subjected to abuse, neglect, lightning strike, electrical
fault, improper packaging, or accident; d) if the unit is installed
improperly; or e) if the serial number of the unit is defaced or
missing.
ATO will not, under any circumstances, be liable for direct,
special, or consequential damages such as, but not limited to,
damage or loss of property or equipment, loss of profits or
revenues, cost of replacement goods, or expense or
inconvenience caused by service interruptions. Under no
circumstances will any person be entitled to any sum greater
than the purchase price paid for the unit.
To obtain warranty service, you must contact ATO’s Technical
Support Department by e-mail (techsupport@isee-ato.com
by calling 1-866-442-0019. The Technical Support Department
will attempt to diagnose and correct your problem. If the unit
does not function properly, they will provide you with a Return
Material Authorization (RMA) number. You may be asked to
furnish proof of purchase to confirm that the unit is still under
warranty.
All product returns must be authorized in advance by ATO.
Authorization is confirmed by issuance of the RMA number,
which must be written prominently on the outside of the box in
which the defective unit is returned to ATO.
) or
iSee 360i User’s Manual -69-
Page 76

Appendix C: Warranty
All iSee devices returned to ATO must be securely packaged
and shipped postage prepaid.
The iSee will be returned to the customer at ATO’s expense
when originating within the United States. For an iSee
originating outside of the United States, the customer is
responsible for shipping costs in both directions.
Note: Warranty validity is limited to that applicable in the
location where the iSee was originally purchased.
-70- iSee 360i User’s Manual
Page 77

Index
A
a/v cables, 5, 45
ac adapter, 5
connector, 4, 63
accessories
optional, 6
standard, 5
adapter, female-to-female for
camcorder, 47
audio
file types, 64
listening to, 34
audio in connector, standard
dock, 45
audio out connector, standard
dock, 46
auto play video, 32
B
backing up in menus, 28
battery, 63
and recording time, 47
charging, 12
life, 22, 63
loading, 10
battery level indicator, 22
browsing a media type, 28
buffer memory, 65
channel surf, 32
charging the battery, 12
connector
ac adapter, 4, 63
headphone, 63
standard dock audio in, 45
standard dock audio out, 46
standard dock video in, 46
standard dock video out, 46
control panel, 4, 25
D
delete
photo, 41
song, 36
video, 33
disable iTunes auto-launch,
13, 16
disconnecting iPod, 17
disk space use, 51
down button, 26
E
eject device command,
VidiScape, 17
ejecting iPod, 17
enable iPod disk use, 12, 16
F
C
camcorder, adapter may be
required, 47
caption
mosaic, 44
photo, 41
features, 2
firmware version, determining,
59
firmware, updating, 59
iSee 360i User’s Manual -71-
Page 78

Index
H
headphone connector, 5, 63
headphones, iPod, 19
highlight, selection, 27
I
indicator
battery level, 22
onscreen, 31
inserting iPod in iSee, 18
install DirectX 9, 17
install MediaConverter, 17
install VidiScape, 17
installer, 14
installing software, 14
iPod
do not disconnect mode, 21
ejecting, 17
inserting in iSee, 18
iSee disk space use, 51
removing, 23
setting up multiple, 58
iPOD main menu selection, 27
iPod mini
inserting, 19
iPod mini adapter, 19
removing, 23
iPod nano
inserting, 19
iPod nano adapter, 19
removing, 23
iPod play-through, 2, 51, 57,
63
controls during, 52, 53
scrolling to, 27
iPod video
inserting, 19
iPod video adapter, 19
removing, 23
iPod/adapter lock, 4
iPods supported, 3
iSee user’s manual, 1
iTunes
coexists with iSee, 57
content, playing in play-
through mode, 52
content, sharing with iSee,
51
disable auto-launch, 13, 16,
58
enable iPod disk use, 12,
16
L
left button, 25
M
M button, 28
Macintosh, future support for,
57
main menu, 21
record, 46, 48, 52
scrolling, 27
viewing, 27
media
browsing, 28
playing, 28
MediaConverter, 13, 55
audio file types, 64
installation, 17
video file types, 64
menu button, 26
mini adapter, 6
mosaic
caption, 44
size, 44
tv-out, 44
mosaic settings, 43
multiple computers, 57
-72- iSee 360i User’s Manual
Page 79

Index
music
adding to slide show, 39
delete, 36
playing, 34
settings, 36
shuffle, 36
tv-out, 36
N
nano adapter, 6
navigating menus, 27
navigating settings menu, 28
O
on/off LED, 20
blinking indicates battery
charge level, 22
P
pan photo, 39
PC requirements, 3
photo
caption, 41
delete, 41
pan and zoom, 39
settings, 40
tv-out, 41
viewing, 38
picture file types, 64
playing media, 28
playing video, 29
play-through, 2, 51, 57, 63
controls during, 52, 53
power on/off button, 5, 20
precautions, 7
protective sleeve, 5
Q
quick setup guide, 1
R
record
delete, 48
settings, 48
RECORD button, 46, 48, 52
scrolling to, 27
record setting
tv-out, 48
volume, 48
registration, 9
release notes, viewing, 60
removing the iPod, 23
requirements, minimum, 2
reset settings, 42
returning your iSee, 67
right button, 26
S
safely remove hardware icon,
17
sample media files, 13
screen, 4
remove protective covering,
21, 58
size, 63
select button, 26
selection highlight, 27
serial number, 9
service, 7
set up iPod, 15
settings
mosaic, 43
music, 36
navigating menus, 28
photo, 40
record, 48
song list, 37
system, 42
video, 31
video browse, 33
shuffle, 36
iSee 360i User’s Manual -73-
Page 80

Index
shutdown, 22
iPod, 23
normal, 22
with reset, 23
size, 63
slide show, 38
display time, 41
slide time, 41
slider control, 28
software
MediaConverter, 13, 55, 64
VidiScape, 13, 55
software disc, 57
song list
delete song, 37
settings, 37
tv-out, 37
song, deleting, 37
specifications, 63
standard dock, 6, 45
output volume not shown
on tv screen, 49
viewing video or photos, 49
static electricity warning, 7
support, 67
system menu, scrolling to, 42
system settings, 42
reset settings, 42
user guide, 43
T
technical support, 67
toggle control, 28
troubleshooting, 60
turning on iSee, 20
tv-out
mosaic, 44
music, 36
photo, 41
record setting, 48
song list, 37
system setting, 42
video, 32
video browse, 34
U
up button, 25
updating firmware, 59
usb required for PC, 15
user guide, system settings,
43
using VidiScape manual, 1
V
video
auto play, 32
channel surf, 32
delete, 33
deleting, 34
file size, 47
file types, 64
playing, 29
playing in iPod play-through
mode, 52
preview, 46, 48
recorded file length, 65
recorded file size, 65
recording, 45
resolution, 46
settings menu, 31
specifications, 65
tv-out, 32
video adapter, 6
video browse
delete video, 34
settings, 33
tv-out, 34
video in connector, standard
dock, 46
video out connector, standard
dock, 46
-74- iSee 360i User’s Manual
Page 81

Index
VidiScape, 13, 55, 57
multiple computers, 57
volume
changing from control
panel, 30
changing from settings
menu, 30
indicator shows headphone
volume, 49
music, 36
record setting, 48
system, 42
W
weight, 63
Z
zoom photo, 39
iSee 360i User’s Manual -75-
Page 82

Notes
iSee 360i User’s Manual -76-
Page 83

Notes
iSee 360i User’s Manual -77-
Page 84

Advanced Technology Office, LLC
865 Laurel Street For technical support:
San Carlos, CA 94070 www.isee-ato.com
USA 1-866-442-0019
 Loading...