

Page 1
P a g e | 1
USER GUIDE FOR:
XTV 131
Page 2

P a g e | 2
TABLE OF CONTENTS
1- General Introduction.
2
- Current Features.
3- Connections/Wiring Diagram.
4- Setup Menu Setting.
5
- Remote Control Operation.
6- Available Packages.
7- Available Channels.
8
- Available Subscriptions.
9- DVR Operation.
10- New Features
11
- Coming Soon Features.
12- Available Accessories.
13- Troubleshooting Error Messages.
14
- Billing Questions
15- Technical Questions.
16- Contact information.
17- Receiver Activation.
Page 3

P a g e | 3
1 – General Introduction:
The XTV 25 is one of the latest and most advanced ATN Network Receiver available in the market
now.
Right now, it can provide more than 700 Arabic channels from Nilesat, TurkSat, EUTelSat, Hotbird and
ARABSAT including special channel
s, directly through the Internet.
The TV signal is broadcast in near
-HD quality and can be received using an Internet speed of 2 Mbps,
which are within the capability of most Internet connections available worldwide.
2– Features:
The XTV 131 supports 2 different type of connections.
1- Composite Video
2- HDMI Connection
3- Digital Audio Out.
You can use any type of the 2 connections listed above to connect your box to the TV. You can also
connect the Composite & HDMI connection at the same time.
The Receiver provides an output of 1080I, 1080I50, 1080P24 & 1080P30 high resolutions for HDMI, and
720P,720P50 for near HD Quality Resolutions, as well as 576P,480P,480I,576I are available for the
HDMI
& Component output.
Note: setting Any of the high resolution output won’t affect the resolution of the S-Video, Composite
output, this will always 640i, which can be used if for you set up an unsupported output for the TV, and
the screen goes blank. Refer to the troubleshooting section for more information.
Page 4
P a g e | 4
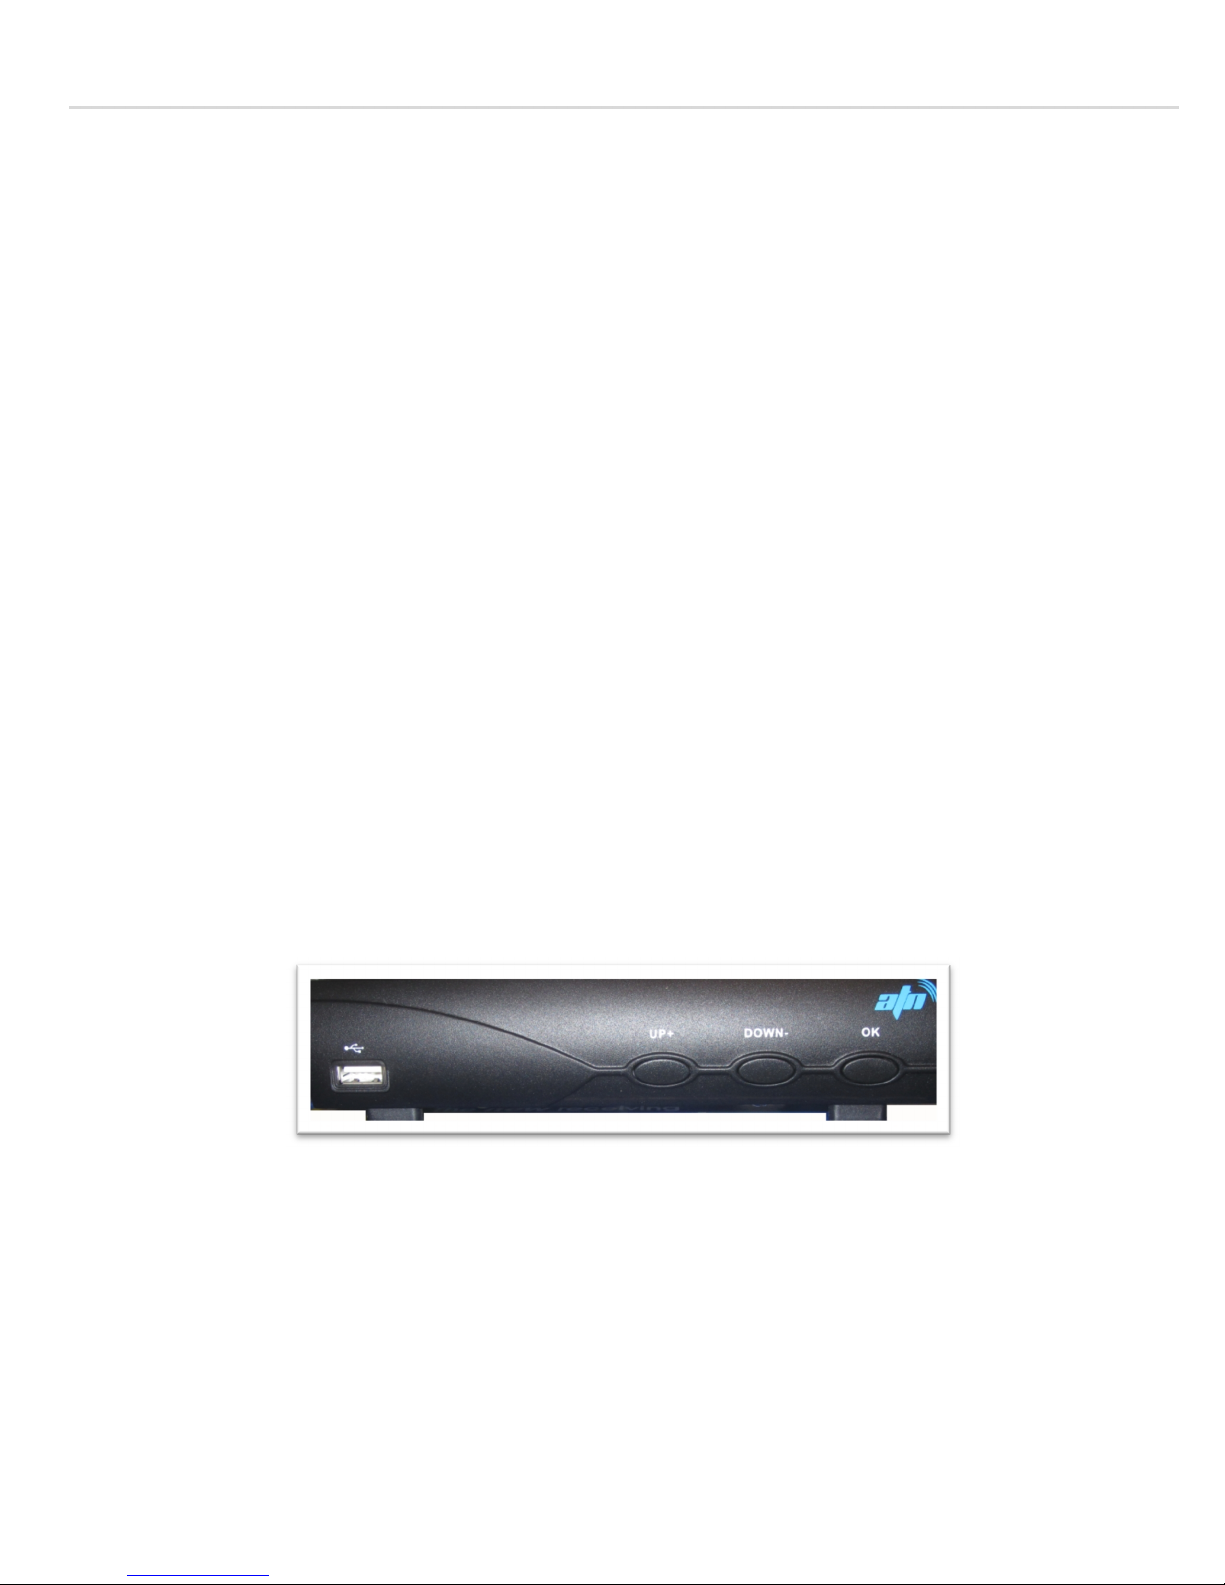
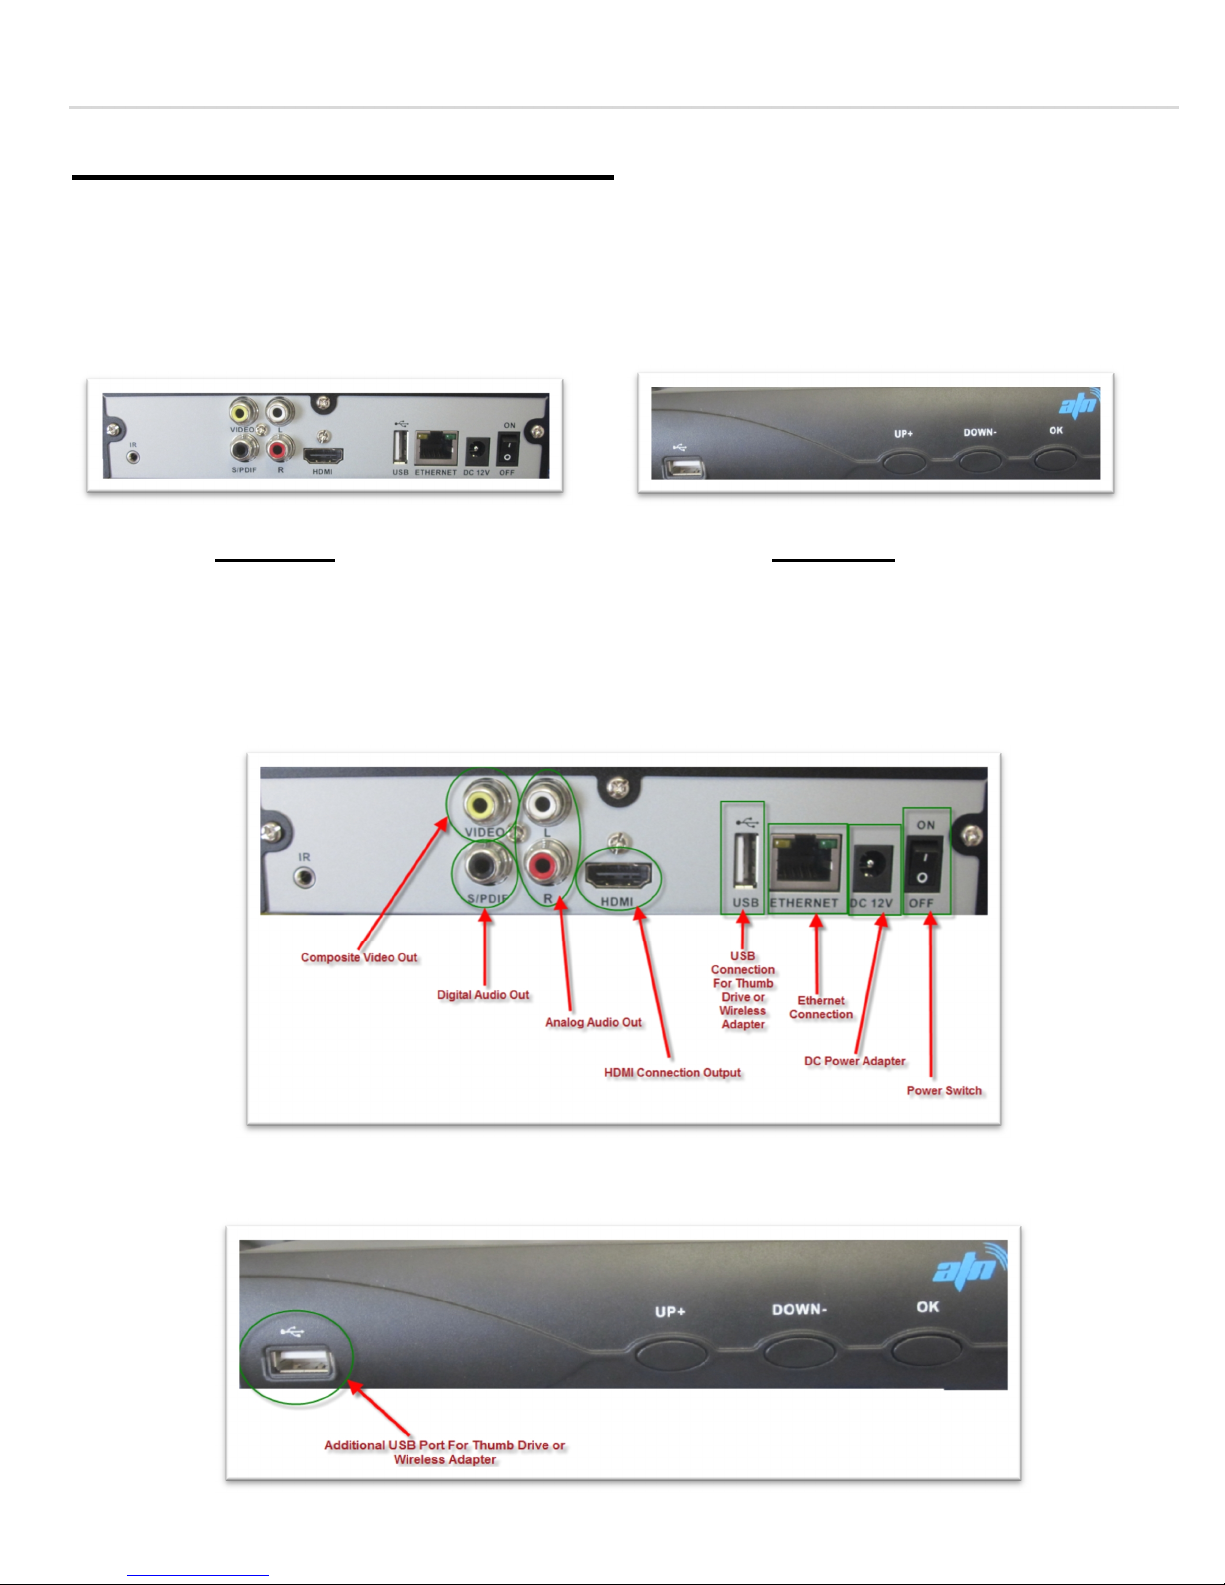
3– Connections/Wiring Diagram:
Below is a screenshot for the Receiver front & Back display.
Back View Front View
A Closer View for the back panel of the receiver:
A Closer View for the Front panel of the receiver:
Page 5
P a g e | 5
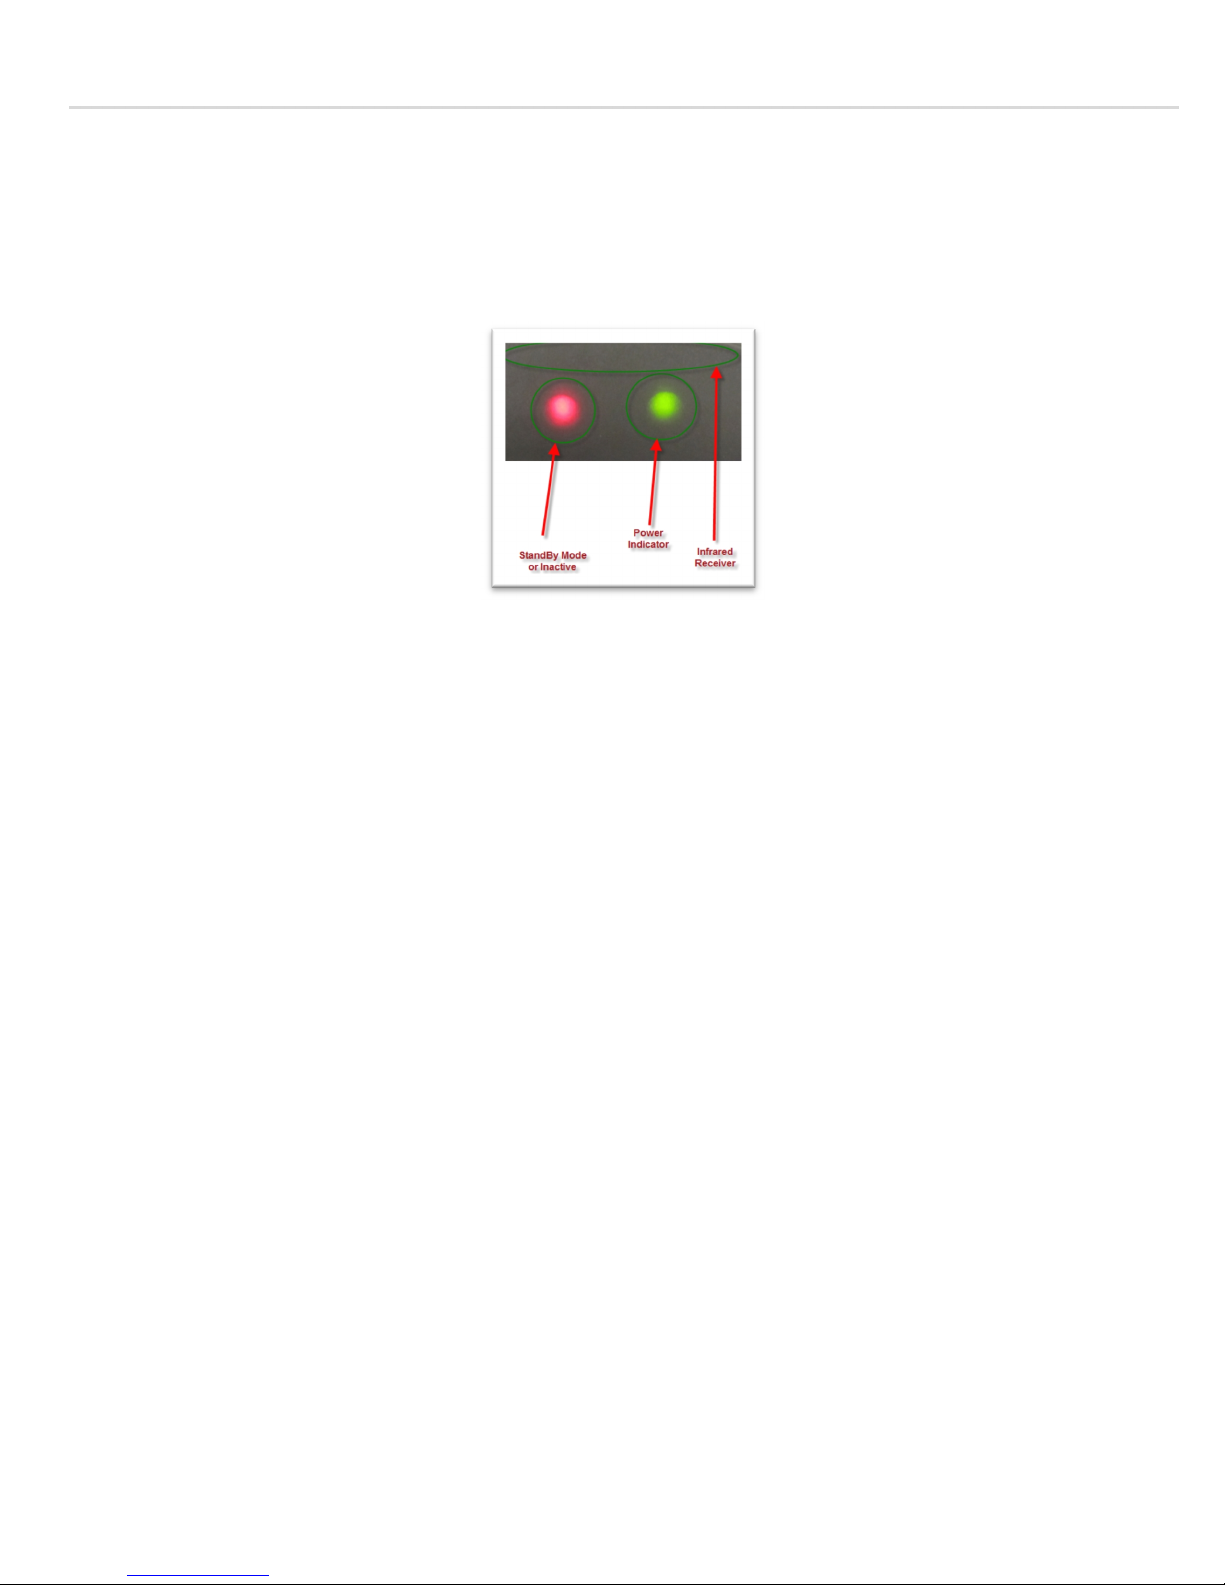
To know the status of the receiver, check the power/ (on-off-standby) indicator as shown in the
screenshot below:
If the On/off/Standby indicator is red, this
means that the receiver is not active.
If the receiver stays on one channel for more than 4 hours, the receiver will go into standby mode and
the TV screen
turns black; but the on/off/standby indicator will still be green, this means that the receiver
is i
n stand-by mode. If that indicator is red, this means that the receiver is off, and needs to be turned on
by pressing the power button on the remote control to bring the receiver back-on, or turning off then on
the switch from the back, this will reboot the receiver and turns ON again displaying channel “1” from the
“Channels” menu.
Note: When the receiver is switched off and if turned on again, the channel goes back to “1”, so you
need to press the “OK” button and
scroll to the channel you want, it does not memorize the last channel
viewed when the receiver is off. This default setting might be changed in later firmware.
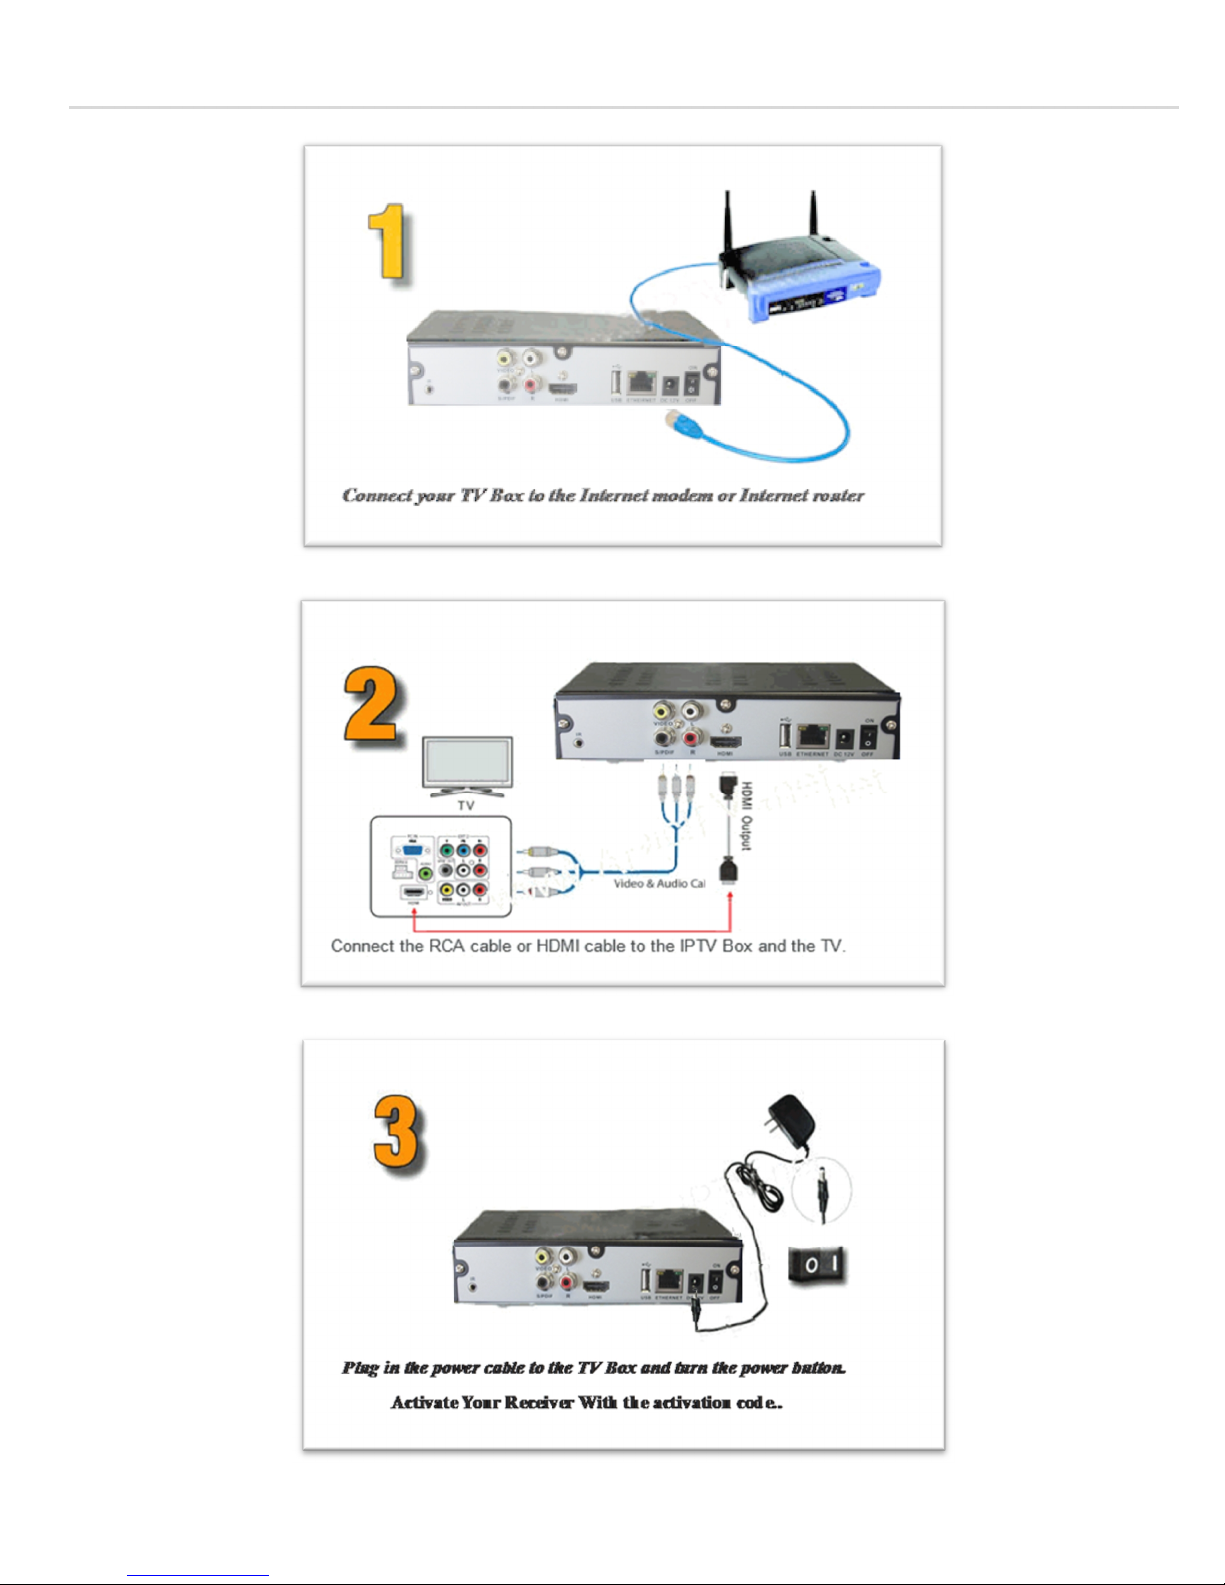
A Simple wiring diagram to connect your receiver with the TV is shown below:
Page 6
P a g e | 6
Page 7
P a g e | 7
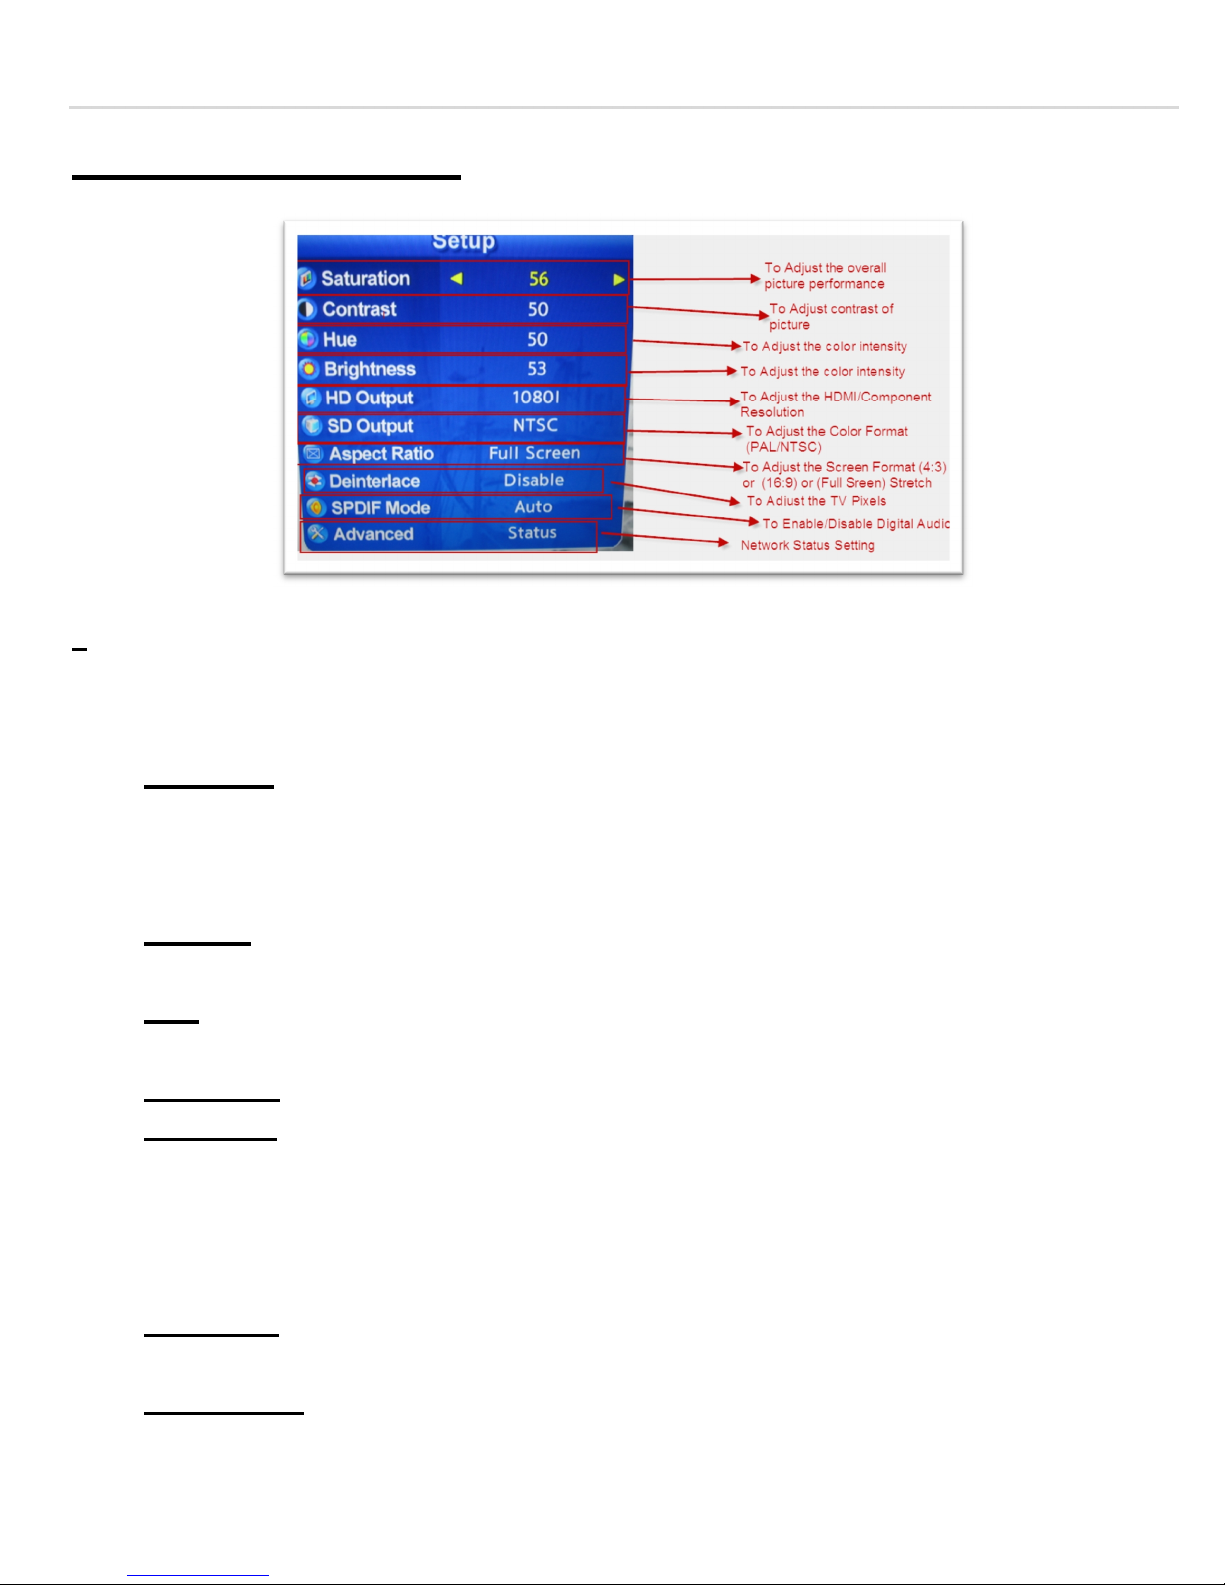
4– Setup Menu Setting:
The Setup menu can be accessed by pressing the “Setup” button on your remote to access some
advanced settings for the receiver. To scroll through each item, use the up/down arrow keys, to
adjust the value,
use the left/right arrow keys located around the “OK” button.
1- Saturation: If you realize that the picture is not clear or not saturated enough, you can
adjust that setting; a preview will apply immediately in background. Once you confirm you
are satisfied with the new setting, press the “OK” button to save
the setting, otherwise,
the previous setting will be reverted back.
2- Contrast: If you think that the picture has too much contrast or too low contrast, use that
option to adjust it accordingly.
3
- Hue: This will be used to adjust the level of color of the picture, if you find that the picture
doe
s not show full color on the TV or too much or dim colors.
4- Brightness: Adjusting the brightness of the screen
5
- HD Output: This setting can only be adjusted if you are using HDMI or Component Cables.
On S-Video/Composite output this does not apply. If you are using HDMI and you set it to
an unsupported resolution by your TV, and the screen turns black, then you can use one of
the above
Composite/S-Video connections to revert the setting back and then reconnect
the HDMI or component cables again.
6- SD Output: This can be used to adjust the color format, in USA; this setting should always
be NTSC, in other Europe/Middle East countries this needs to be set to.
7- Aspect Ratio: If your TV does not support widescreen, or if your TV does not show the
screen fully, you can adjust this setting to one of the 3 available settings, (4:3, 16:9, Full
Screen), this can also be accessed on the fly by pressing the Change Aspect Ratio “A/R”
button on your remote.
Page 8

P a g e | 8
8
- DE interlace: This setting should not be adjusted if your screen is clear, because this can
only be used in some cases when the screen flickers.
9
- SPDIF Mode: if you are using any of the digital audio connection (coaxial or optical), then
you can permanently set it to ON without having the system detect it, otherwise you can
either set it to Auto or OFF mode to permanently disable digital audio out.
10
- Advanced: This will actually show you some settings like receiver Serial Number, MAC
Address, Netwo
rk IP Address, Subnet Mask, and Gateway. This is a great troubleshooting
option to see if the settings are correct and to find out if the receiver is connected properly to
the internet. To access this menu, simply select this option and press the “OK” button to view
these settings, to exit that page, press the setup button.
Note: To exit out of the setup menu, the only way to do this is to press the setup menu again and
it will take you back to your default home screen.
·
Wired/Wireless Connectivity:
To connect the receiver to the network, 2 possible connections can be done:
1. Wired Connectivity: This connection is set by default and the ip address is set to DHCP,
where no further action is required if there is an issue with getting an auto ip address. To
change that setting, press the “setup” button, then go to “Networking” section, and click on
the “Network” sub
-menu.
Scroll using the remote control to the right panel and move the arrow key to “DHCP” section,
and select “OK”. The menu will change to “manual”, then enter the manual ip address
settings manually and press the “Red” button to save settings, to cancel press the “Back”
button
, to switch back, press “Manual” again.
2.
Wireless Connectivity: To connect using wireless, press the “setup” button, then go to
“Networking” section, and click on the “Network” sub
-menu Scroll using the remote control
to the right panel and move the arrow key to “Wired”, then press the “OK” button, the menu
will change wireless, and the receiver will start looking for “SSID” from the list. Once you find
the SSID you need to connect to, scroll using the arrow keys to that SSID and click OK, then
enter the security code (if any), and press the “Red” button on the remote to save. After
changing it, restart the box and you should be connected.
Note:
(The USB Network adapter must be connected to the receiver to use the wireless
feature, otherwise you will get a message saying that the USB adapter is not connected)
5– Remote Control Operation:
Page 9
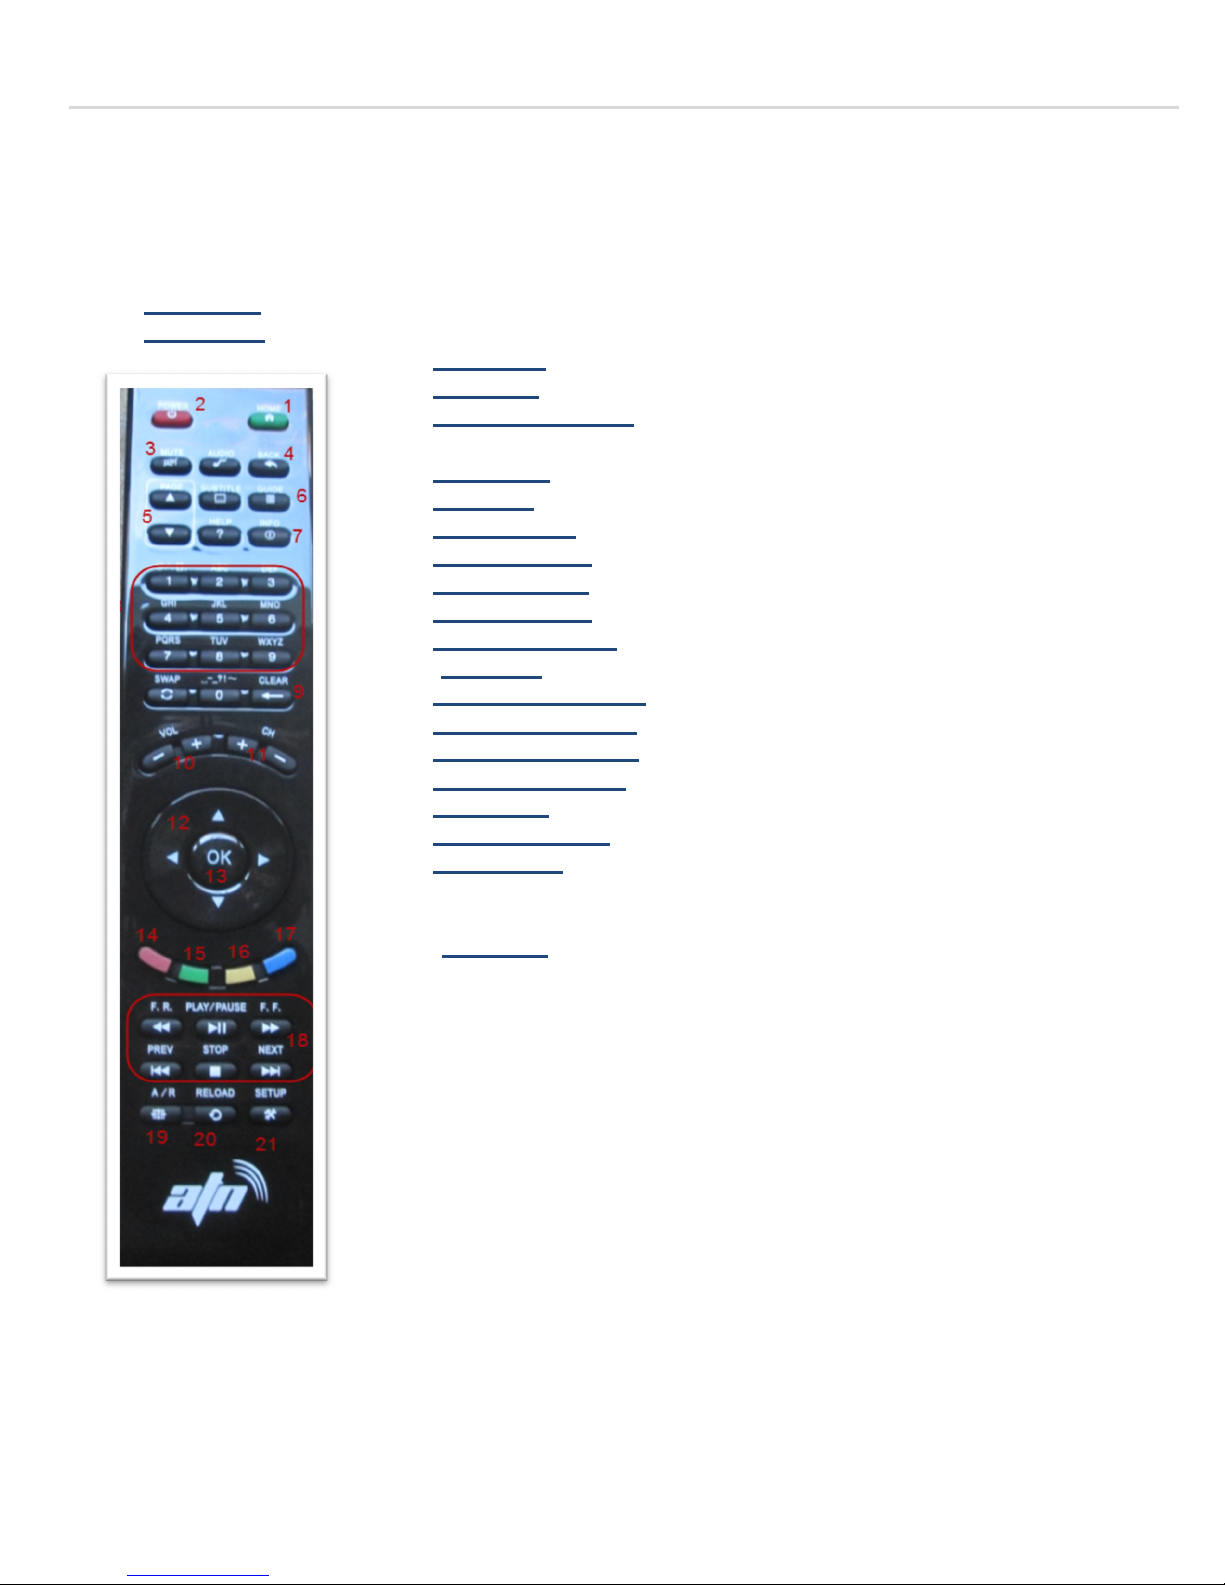
P a g e | 9
To use the remote control, follow the instruction above about each Button and how to use it. You can use the remote for
the full operation of the receiver.
1
- Home Button: Will return to main home channel “1”
2- Power Button: To Turn On/Off Receiver.
3
- Mute Button: Will temporary mute Receiver Audio.
4- Back button: will return to previous menu.
5- Page Up/Down buttons: will scroll the channel/Favorite menu one page
at a time.
6- Guide Button: will display the package menu.
7- Info Button: will display more info about the channel being viewed.
8
- Channel Buttons: For changing channels or Activation Code Input.
9- Back Space Button: To delete previous character on screen.
10- Volume Up/Down: To Adjust volume level
11- Channel Up/Down: To Change Channel Numbers sequentially.
12- Up/Down – Left/Right Navigation Buttons.
13- “OK” Button: to access the channel menu or confirm any setting.
14- Remove Favorite Channel or access YouTube video.
15- Add To Favorite Channel
16
- Hide/Unhide left column “Channel” menu.
17- Move Favorite Channel or Recording Menu.
18- DVR Buttons: Includes F.R , Play/Pause, F.F.,Prev, Stop, Next Buttons.
19- Aspect Ratio Button: Adjust screen fit 4:3, 16:9, Full Screen, Stretch.
20- Reload Button: will load back the default page “1” similar to the home
button but this can only be used if you are having
some issues with channels
21- Setup Button: Will allow you to access the setup menu.
Page 10

P a g e | 10
6– Available Packages:
Currently packages are bundled into 8 Major Packages, and 2 Sub Packages.
The Packages are as follows:
Packages: Arabic,ART,Indian,Turkey, Afghanistan,Pakistan,Kurdish,Iran,Africa.
The other 2 Packages are as follows:
1- “ATN All Channels”, which includes all available channels.
2
- “ART” Channels
With one subscription you get access to all the 8 packages for only $35/month.
ART Package comes with separate subscription for just $5/month.
7– Available Channels:
Due to the large amount of Channels available, and to the change of channels every time by adding more
channels, the list of channels below might vary from time to time, if you are interested to see what new channels
are added, please visit our website at: http://www.iptvtech.net to get a list of the latest channels.
To Access the Channel Menu, Simply Press the “OK” button, and a pop
-up box will display as follows:
Page 11

P a g e | 11
The left menus are Channels Available in each ent
ire package.
I- To add a channel to the Favorites, select the channel you want from the left menu where the
selected channel has a red rectangle around it,
and then press the “Green” button, and it will be
moved to the Favorites Menu.
II- To remove a favorite channel, point your cursor to the right menu, and select the unwanted
channel by highlighting it in “Red”, and then press the “Red” button on the remote, and the
channel will be removed.
III- To move a channel up or down on the favorites menu, select the channel you want to move on the
right menu, and press the “Blue” Button on your remote, then scroll to where you want the
channel to be moved and press the “OK” button. This will move the channel to that channel
number you selected. If you can’t see the channel, then press the “Reload” button on your
remote, and the channel will re
-appear normally.
IV- To hide the left menu, press the “Yellow” button on the remote, and you will only see the
favorites menu only.
Page 12

P a g e | 12
Note 1: The channels/Favorite management buttons can only be used when the pop up window is
displayed, it will function for youtube & DVR feature if it is used outside that pop-up menu.
Note 2:
The new channel list might not be always accurate, it might take time to update, but you
can go to the site and take a look and compare between this list and the list of channels on the
website for more accuracy.
Note 3: When more channels gets added, the channel number will change, so if you find out that
the channel number you entered should show a specific channel and not showing your favorite
channel, then you have to go back to the left menu, find the new updated channel number, and
add it back to your favorite menu and move it using the “Blue” button to the channel number you
used to.
Note 4: To watch a channel, select the “OK” Button on the highlighted channel.
Note 5:
“Time shift” beside the channel name indicates a pre-recorded channel shifted by 6 hours.
Page 13

P a g e | 13
Arabic Channels:
25 CHANNEL
- (249)
4 SHABAB QURAN - (141)
4SHABAB - (139)
4SHABAB 2 - (140)
4SHABAB QURAN - (501)
A1 JORDAN - (286)
A3 - (301)
ABU DHABI
- (207)
ABU DHABI DRAMA - (208)
ABU DHABI DRAMA
TIMESHIFT - (422)
ABU DHABI EMARAT - (209)
ABU DHABI EMARAT
TIMESHIFT - (519)
ABU DHABI SPORT 1 - (210)
ABU DHABI TIMESHIFT (518)
ABU DHABI TIMESHIFT (421)
ADALAH TV - (525)
AFAK TV - (171)
AFASI TV - (324)
AFASI TV TIMESHIFT - (565)
AFRAH - (260)
AGAPHY
- (344)
AGHANINA - (187)
AGHANINA TIMESHIFT (508)
AGHAPY - (577)
AHFAD AL MUKHTAR
- (319)
AHL AL QURAN - (567)
AJMAN TV - (221)
AJYAL - (128)
AL AAN TV - (155)
AL AAN TV TIMESHIFT (503)
AL AHD TV
- (412)
AL AHLY TV - (254)
AL RAHMA - (89)
AL SABAH - (226)
AL-AMAKEN DRAMA - (269)
AL
-AMAKEN DRAMA
TIMESHIFT - (540)
AL-ANBAR - (176)
AL-ANWAR - (338)
AL-AQEEQ - (597)
AL-BABELIYA - (174)
AL
-DAFRA TV HD - (41)
AL-DAFTRA TV HD - (454)
AL-DIYA - (467)
AL-DIYAR - (182)
AL-EYMAN - (294)
AL
-FAYHA - (172)
AL-FURQAN - (183)
AL-GAMIYA - (596)
FOUNON 1 TIMESHIFT (524)
FOX MOVIES - (32)
FOX MOVIES TIMESHIFT (33)
FOX SERIES - (34)
FOX SERIES TIMESHIFT (35)
FRANCE24 ARABIC - (12)
FURQAN TV
- (333)
FUTURE - (148)
FUTURE NEWS - (150)
FUTURE USA - (149)
FX ARABIA - (36)
FX ARABIA TIMESHIFT (461)
GALI KURDISTAN - (379)
GEAR ONE - (520)
GEM MUSIC - (402)
GHINWA - (282)
GLADIATOR - (43)
HADARA TV
- (175)
HALABA TV - (353)
HANIBAL - (315)
HAWAS TV - (602)
HAWLER - (410)
HC SOMALI
- (394)
HEMMA TV - (538)
HI TV - (401)
HOD HOD - (127)
HOGAR TV - (556)
HUDA TV - (328)
HURRA IRAQ - (6)
IFILM ARABIC
- (39)
IMAGINE MOVIES - (408)
IMAM HUSEIN 2 - (574)
INFINITY - (89)
IQRA - (331)
IRAQ TODAY
- (505)
ISHTAR - (184)
JORDAN - (285)
JSC 1 - (363)
JSC 1 HD - (364)
AL-IRAQIA SPORT - (192)
AL-KANAL - (240)
AL-KAWTHAR - (342)
AL-KOUT - (526)
AL-MAALY - (271)
AL-MANAR - (153)
AL
-MANARA - (327)
AL-MASIREH - (507)
AL-MASRY - (236)
AL-MOLED MUSIC - (257)
AL-MOLED MUSIC
TIMESHIFT
- (536)
AL-MOUSOL - (177)
AL-MUSTAKILLAH - (316)
AL-NAHAR DRAMA - (120)
AL-NAHAR DRAMA
TIMESHIFT - (498)
AL
-NAHAR MOVIES - (462)
AL-NAHAR MOVIES
TIMESHIFT - (463)
AL-NAHAR SPORT - (121)
AL-NAHAR TV - (119)
AL-RAYA - (199)
AL
-RAYA TIMESHIFT - (514)
AL-RESALA - (330)
AL-SAEEDA - (292)
AL-SAHRAA - (542)
AL-SALAM TV - (506)
AL
-SHABAB TV - (244)
AL-SHABAB TV TIMESHIFT (532)
AL-TUNISIA - (313)
AL-TUNISIA TIMESHIFT (561)
AL-ZAHABAIYA - (283)
AL
-ZAHRAA - (343)
AL-ZERAH - (598)
ALALAM - (8)
ALAQSA TV - (548)
ALAQSA TV - (288)
ALARABI DOC
- (15)
ALARABIA - (2)
ALARABIYA HADATH - (3)
ALBAGHDADIE - (162)
ALBAWADI - (405)
ALBAWADI TV - (225)
ALBEIT BEITAK CINEMA
(122)
ALBEIT BEITAK CINEMA
TIMESHIFT - (423)
ALBET BETAK DRAMA (123)
LBC TIMESHIFT - (441)
LCD TURKI SERIES - (464)
LIGHT TV - (544)
LINE SPORT - (272)
LOGOS TV - (346)
LYBIA AL AHRAR - (317)
LYBIA AWALAN
- (318)
LYBIA NATIONAL TV - (320)
LYBIA SHABABIA - (563)
LYBIA SPORT - (321)
M2 - (306)
M2 TIMESHIFT
- (560)
MAGHREB 1 - (303)
MAHBOBA - (138)
MAJD - (325)
MAJD QURAN - (326)
MAJESTIC CINEMA - (472)
MAKKAH TV
- (323)
MARMORKOS - (347)
MARMORKOS - (578)
MASRAWI AFLAM - (470)
MASRAWI AFLAM
TIMESHIFT - (471)
MASRAWI TV
- (256)
MASRIA ESC - (233)
MASRIA ESC 2 - (530)
MASRIA ESC TIMESHIFT (529)
MASRIYA ESC 2
- (234)
MASSAYA - (200)
MASSAYA TIMESHIFT - (515)
MAWAL TV - (91)
MAZZIKA - (262)
MAZZIKA ZOOM - (263)
MBC 1 - (22)
MBC 1 TIMESHI
FT - (23)
MBC 2 - (24)
MBC 2 TIMESHIFT - (25)
MBC 3 - (26)
MBC 3 TIMESHIFT - (458)
MBC 4
- (27)
MBC 4 TIMESHIFT - (442)
MBC ACTION - (31)
MBC ACTION TIMESHIFT (460)
ALETEJAH
- (168)
ALHANEEN MUSIC (189)
ALHANEEN MUSIC
TIMESHIFT - (510)
ALHAYAT 1 - (75)
ALHAYAT 1
TIMESHIFT
(425)
ALHAYAT 2 - (76)
ALHAYAT 2
TIMESHIFT (426)
ALHAYAT CINEMA (71)
ALHAYAT CINEMA
TIMESHIFT - (72)
ALHAYAT-SERIES (73)
ALHAYAT-SERIES
TIMESHIFT - (427)
ALHIWAR - (403)
ALHIWAR TUNISIA (312)
ALHYAT
-SERIES
TIMESHIFT
- (74)
ALIRAQIYA - (158)
ALJADEED - (147)
ALJADEED
TIMESHIFT (419)
ALJAZEERA - (1)
ALJAZEERA
CHILDREN (135)
ALJAZEERA
CHILDREN
TIMESHIFT - (428)
ALJAZEERA DOC (13)
ALJAZEERA
ENGLISH AL-HADATH - (534)
AL-HAFEZ - (571)
AL-HUJA - (575)
AL-HURRIA - (165)
ALBET BETAK
DRAMA
TIMESHIFT - (424)
ALDUNIA - (197)
ALDUNIA TIMESHIFT
-
(513)
ALEKHBARIA - (9)
ALESKENDRIA (241)
NATIONAL
GEOGRAPHIC
AD - (14)
NBN
- (151)
NESMA - (311)
NILE CINEMA - (77)
NILE CINEMA
TIMESHIFT (444)
NILE COMEDY - (81)
NILE COMEDY
TIMESHIFT (445)
NILE CULTURE - (82)
NILE DRAMA
- (78)
NILE DRAMA
TIMESHIFT (446)
NILE FAMILY AND
KIDS (481)
NILE FAMILY AND
KIDS (80)
NILE LIFE - (83)
NILE NEWS
- (480)
NILE SPORT - (84)
NOJOOM 2 - (215)
NOJOOM 3 - (216)
NOOR AL DUNYA (235)
NOOR ALSHAM (205)
NOOR DRAMA - (44)
NOOR DUBAI - (214)
NOOR DUBAI
TIMESHIFT (521)
NOUR SAT - (349)
NOUR SAT
TIMESHIFT (579)
(355)
ALJAZEERA GLOBAL - (360)
ALJAZEERA MUBASHER (356)
ALJAZEERA NEWS SPORT (361)
ALJAZEERA SPORT 1 - (358)
ALJAZEERA SPORT 2
- (359)
ALKAAS - (362)
ALKHALIJIAH - (266)
ALMAAREF - (341)
ALMASSAR TV - (411)
ALNAS TV
- (572)
ALOLA ANT - (305)
ALOLA INTERNATIONAL 2 (559)
ALQASSIM - (407)
ALQUDS - (289)
ALRAFIDEN
- (166)
ALRAI - (227)
ALRASHID - (161)
ALRIADIA SPORT - (309)
ALSAEED TV - (242)
ALSALAM ALEIKA - (569)
ALSEHA WALJAMAL
- (504)
ALSHAAB IRAQ - (167)
ALSHOROOQ - (296)
ALSHOROOQ TIMESHIFT (552)
ALSUMARIA
- (164)
ALSUNNAH - (337)
ALTAGHIER - (173)
ALTEET BELLY DANCE (261)
ALTEET BELLY DANCE
TIMESHIFT - (537)
ALTHAKAFIA
- (543)
ALWAN TV - (334)
ALWATAN - (222)
ALWATAN TIMESHIFT - (522)
ALWATAN+ - (223)
ALWATAN+ TIMESHIFT
(523)
ANB - (152)
ANN TV - (204)
ANWAR 2 - (339)
ARABICA TV - (156)
ARRABIA
- (557)
ART AFLAM 1 - (48)
ART AFLAM 1 TIMESHIFT (429)
ART AFLAM 2 - (49)
ART AFLAM 2 TIMESHIFT
(430)
CBC TV - (116)
CBC TV TIMESHIFT - (495)
CCTV ARABIA - (456)
CHABAB IRAQ - (191)
PLAY HEKAYAT - (465)
PLAY MOVIES
- (38)
PLAY MOVIES TIMESHIFT (447)
PRESS TV - (595)
QATAR - (354)
QETHARA TV
- (190)
QETHARA TV TIMESHIFT (511)
RESALAT ALISLAM - (568)
ROJHELAT - (389)
ROTANA AFLAM - (53)
ROTANA AFLAM TIMESHIFT
- (473)
ROTANA CINEMA - (54)
ROTANA CINEMA
TIMESHIFT - (55)
ROTANA CLIP - (58)
ROTANA KHALIGI
- (59)
ROTANA MASRIYA - (56)
ROTANA MASRIYA
TIMESHIFT - (57)
ROTANA MASRIYA
TIMESHIFT
- (474)
ROTANA MUSIC - (60)
ROTANA ZAMAN - (61)
ROTANA ZAMAN TIMESHIFT
- (62)
ROYA TV - (201)
ROYA TV TIMESHIFT - (516)
ROYALI SOMALI
- (395)
RTD-DJIBOUTI - (398)
RUSSIA ALYAUM - (5)
SADA EL BALAD - (247)
SAFA TV - (202)
SALA
H ALDIN - (180)
SAMA ALMOSOUL - (178)
SAMA CINEMA - (103)
SAMA CINEMA 2 - (104)
SAMA CINEMA 2 TIMESHIFT
ART CINEMA
- (50)
ART CINEMA TIMESHIFT (431)
ART HEKAYAT 1 - (51)
ART HEKAYAT 1 TIMESHIFT
- (432)
ART HEKAYAT 2 - (52)
ART HEKAYAT 2 TIMESHIFT
- (433)
ASHUR TV - (185)
ASSADISA - (558)
ASSOUFIA TV - (566)
ATHAKAFIA
- (270)
ATN CINEMA - (16)
ATN QURAN - (19)
ATN TEENZ - (18)
ATN ZAMAN - (17)
AUC CHANNEL - (186)
AWTAN TV
- (409)
AZAL YEMEN - (551)
AZHARI TV - (245)
AZHARI TV TIMESHIFT (533)
BADINAN TV - (594)
BAGHDAD
- (163)
BAHRAIN - (374)
BARAEM - (133)
BARAEM TIMESHIFT - (134)
BAYAN TV - (335)
BAYAN TV
- (335)
BBC ARABIC - (4)
BEDAYA - (404)
BELADI TV - (181)
BENA TV - (599)
BENGHAZI TV - (564)
BIN OTHAIMIN - (336)
BLUE NILE
- (298)
BLUE NILE TIMESHIFT (553)
BURHAN TV - (573)
CAIRO CINEMA - (114)
CAIRO
CINEMA TIMESHIFT (434)
CAIRO DRAMA - (115)
CAIRO DRAMA TIMESFIFT (435)
CAIRO TV - (237)
CANAL ALGERIA
- (300)
CARTOON NETWORK - (126)
CARTOON NETWORK
TIMESFIFT - (436)
CBC DRAMA - (117)
CBC DRAMA +
- (118)
CBC DRAMA + TIMESHIFT (497)
CBC DRAMA TIMESHIFT (496)
CIMA - (97)
CIMA TIMESHIFT (485)
CITRUSS TV - (157)
CLAQUETTE TV - (40)
CLAQUETTE TV
TIMESHIFT
(466)
CNBC ARABIA - (10)
CORAN - (329)
CTV COPTIC - (348)
DALEL TV
- (290)
DANAH TV - (284)
DELTA - (238)
DISCOVER ISLAM (570)
DIYALA TV - (179)
DM TV
- (217)
DREAM 1 - (94)
DREAM 1 TIMESHIFT (484)
DREAM 2 - (95)
DREAM 2 TIMESHIFT (96)
DREAM HD - (93)
DUBAI - (211)
DUBAI ONE - (212)
DUBAI ONE
TIMESHIFT
(438)
DUBAI SPORT 1 - (219)
DUBAI SPORT 2 - (220)
DUBAI TIMESHIFT (437)
DURRAH TV - (413)
DW TV ARABIA
- (406)
ELADALAH - (555)
ELCHOUROK
ALGERIA (554)
ELMOSAR3 SPORT
(196)
ENNAHAR ALGERIA (302)
ERI TV - (397)
ESTV - (399)
EURO NEWS
- (7)
FALASTINAH TV (546)
FALESTIN - (287)
FARAEEN - (246)
FATAFEAT
- (92)
FATAFEAT TIMESHIF (483)
FEKRA TV - (46)
FEZZAN TV - (603)
FORAT - (169)
FOUNON 1 - (224)
MOGA COMEDY - (488)
MOGA COMEDY TIMESHIFT
- (489)
MOSAR3 TV - (42)
MRT/UNIVERSAL - (396)
MTV LEBANON - (146)
MTV LEBANON TIMESHIFT (455)
MURITANIA - (400)
NAJAF TV - (170)
KURDMAX - (592)
KURDMAX TIMESHIFT (593)
KURDSAT - (386)
KUWAIT - (527)
LBC - (144)
LBC EUROPA - (142)
LBC EUROPA TIMESHIFT (143)
TIME TURKY TIMESHIFT (494)
TOP MOVIES - (37)
TOP MOVIES TIMESHIFT (452)
TOYOR ALJANAH 1
- (130)
TOYOR ALJANAH 2 - (131)
TRT ARABIA - (202)
TRT ARABIA TIMESHIFT (517)
TUNIS 7
- (310)
TUNIS ALYAUM - (562)
TUNISNA - (314)
TURKMENELI - (388)
UNIV 1 - (601)
UNRWA TV - (549)
VIN TV - (384)
WANASAH
- (90)
SHMOUS - (268)
SHMOUS TIMESHIFT (539)
SKY NEWS ARABIA (11)
SNTV SOMALIA - (391)
SOMALI CHANNEL (393)
SOMALI NATIONAL TV
(392)
SOMALISAT - (390)
SOUT AL SHAAB
- (79)
SPACEPOWER - (129)
SPACEPOWER
TIMESHIFT (500)
SRWAT TV - (416)
SSTV
- (299)
STAR CINEMA - (101)
STAR CINEMA 2 - (102)
STAR CINEMA 2
TIMESHIFT
- (491)
STAR CINEMA
TIMESHIFT (490)
SUDAN TV - (295)
SYRIA - (193)
SYRIA DRAMA
- (194)
SYRIA DRAMA
TIMESHIFT (195)
SYRIA EDUCATION (206)
SYRIA TIMESHIFT (512)
Page 14

P a g e | 14
Turkish Channels:
MEHTAP - (20)
MMC TURK - (34)
MMC TV - (760)
NEWROZ - (759)
NRT NEWS - (118)
NTV
- (691)
NTV SP - (731)
PEMBE - (824)
ROJ TV - (758)
ROJHELAT - (649)
RUMELI
- (646)
S AVRUPA - (19)
S-HABER - (22)
SEMERKEND - (42)
SHOPPING - (559)
KURD 1 TV - (117)
KURDISTAND
- (1)
KURDSAT - (119)
MALATYA TV - (634)
SHOW - (6)
SIM TV - (620)
SINEMA - (630)
SPEEDA TV - (537)
SRT TV - (40)
SYPSAK
- (765)
TATLISES - (18)
TEMPO - (28)
TGRT - (7)
TISHK TV - (654)
TNT TURKEY
- (11)
TRT 6 - (645)
TRT COCUK - (30)
TRT T - (29)
TURK - (26)
TURK 24
- (1054)
TURKC - (602)
TURKMENELI - (544)
TV 58 - (641)
TV1 TURK - (43)
TVT TURK
- (49)
ULKE TV - (48)
ULUSAL - (16)
VATAN TV - (639)
VIN TV - (961)
VIVA TV
- (625)
YAMURACK TV - (50)
YOL TV - (32)
YURDUM TV - (47)
African Channels:
AL-SAEDA - (524)
BLUE NILE - (411)
ERITREA - (506)
ETIOPIA - (795)
HC SOMALI - (856)
MURITANIA
- (507)
ROYAL - (910)
SNTV - (334)
SOMALI LAND - (343)
SOMALI TV - (547)
SSTV - (942)
SUDAN TV - (546)
UNIVERSAL - (648)
VOX AFRICA
- (732)
ZOAL TV - (528)
Persian Channels:
ALTEET DANCE (748)
ARIANA - (656)
ATV IRAN - (665)
AVA TV
- (689)
BBC PERS - (822)
BEUTY TV - (671)
EBC TV - (858)
FARSI 1 - (929)
FARSIFACE - (833)
GEM MUSIC - (663)
ICC TV
- (679)
IM-HUSSEIN - (827)
IRAN A TV - (835)
IRAN FMTV - (832)
IRAN MTN - (658)
IRAN MUSIC
- (826)
TV 20 - (828)
TV 4 IRAN - (674)
VOA PERS - (707)
ZEMZEM - (930)
IRIB 1 - (669)
IRIB 2 - (670)
KAHKESHAN - (676)
LIBYA TV - (830)
SAMEN TV
- (49)
SAT7 PERS - (772)
TAK TV - (688)
THE PERSIAN MOVIES (659)
MBC PERSIA - (523)
Kurdish Channels:
AGHANINA MUSIC
- (1035)
G KURDISTAN
- (859)
HANEEN MUSIC - (764)
HAWLER - (963)
IQRA - (331)
KANAL 4 TV - (984)
KIRKUK TV
- (1061)
MCP MUSIC
- (781)
MMC TV
- (760)
NEWROZ TV - (759)
NRT NEWS - (1058)
PAYAM - (430)
ROJ TV - (758)
ROJHELAT
- (649)
JSC 1 HD - (583)
JSC 10 - (373)
JSC 2 - (366)
JSC 2 - (365)
JSC 2 HD
- (367)
JSC 3 - (368)
JSC 4 - (369)
JSC 4 HD - (584)
JSC 5 - (370)
JSC 6 - (371)
JSC 7 - (585)
JSC 7 HD
- (586)
JSC 8 - (587)
JSC 9 - (372)
JSC 9 HD - (588)
JSC EURO 2012 - (582)
JSC MUBASHER MISR
(357)
KANAL 4 KURD - (382)
KANAL 4 KURD TIMESHIFT (439)
KARAMESH - (132)
KARBALA TV
- (340)
KARIZMA - (414)
KARMA - (345)
KHORTUM TV - (297)
KIRKUK - (387)
KNN NEWS
- (376)
KOREA TV - (281)
KOREK TV - (383)
KOREK TV TIMESHIFT (440)
KTV SPORT - (230)
KTV2
- (229)
KTV2 - (228)
KURD 1 - (381)
KURDISTAN - (385)
MBC DRAMA - (29)
MBC DRAMA TIMESHIFT (459)
MBC MAGHREB - (20)
MBC MAGHREB TIMESHIFT
- (21)
MBC MAGHREB TIMESHIFT
- (457)
MBC MAX - (30)
MBC4 LOW - (28)
MCP IRAQ MUSIC - (188)
MCP IRAQ MUSIC
TIMESHIFT - (509)
MEDI 1 SAT - (308)
MEHWAR - (250)
MEHWAR +2 - (535)
MELODY AFLAM
- (85)
MELODY AFLAM TIMESHIFT
- (443)
MELODY DRAMA - (86)
MELODY DRAMA TIMESHIFT
- (482)
MELODY HITS
- (87)
MELODY SPORT - (88)
MERGAB - (541)
MERSAL TV - (600)
MIRACLE - (350)
MISR 25
- (248)
MISR ZERAYA - (531)
MISURATA - (322)
MIX TV - (113)
MODERN HORRIA - (251)
MODERN KOORA - (253)
MODERN SPORT
- (252)
NOURSAT
ALSHABAB (580)
NRT KURDISTAN (377)
OMAN 2 - (589)
OMAN TV - (375)
ON TV - (124)
ON TV TIMESHIFT (499)
ONTV LIVE - (125)
ORIENT NEWS
- (203)
OSCAR DRAMA - (98)
OSCAR DRAMA 2 (99)
OTV LEBANON (145)
OTV LEBANON
TIMESHIFT (502)
OTV TIMESHIFT (417)
PALESTINE ALYAUM
- (547)
PANORAMA ACTION
- (63)
PANORAMA ACTION
TIMESHIFT
- (64)
PANORAMA
COMEDY - (67)
PANORAMA
COMEDY
TIMESHIFT - (68)
PANORAMA DRAMA
- (65)
PANORAMA DRAMA
2 - (66)
- (492)
SAMA CINEMA TIMESHIFT (448)
SAMA DUBAI - (213)
SAT 7 PLUS
- (351)
SAUDI 1 - (264)
SAUDI 2 - (265)
SAUDI SPORT 1 - (273)
SAUDI SPORT 1 HD - (275)
SAUDI SPORT 2 - (274)
SAUDI SPORT 2 HD - (276)
SAUDI SPORT 3 HD
- (277)
SAUDI SPORT 4 HD - (278)
SAUDI SPORT 5 HD - (279)
SAUDI SPORT 6 HD - (280)
SCOPE - (231)
SCOPE TIMESHIFT
- (528)
SELA - (267)
SEMSEM - (137)
SHA3BAYAT - (258)
SHA3BIYAT PLUS - (259)
SHADA SYRIA - (198)
SHAHED TV
- (232)
SHARJAH - (218)
SHARQIA NEWS - (160)
SHARQIYA - (159)
SHEBA TV - (293)
SHEFA TV
- (352)
PANORAMA DRAMA 2
TIMESHIFT - (479)
PANORAMA DRAMA
TIMESHIFT - (478)
PANORAMA FILM - (69)
PANORAMA FILM
TIMESHIFT - (70)
PAYAM - (378)
PELISTANK KURDISH - (591)
WELAD AL BALAD - (45)
WIN TV - (415)
YEMEN TODAY - (550)
YEMEN TV - (291)
ZAGROZ
- (590)
ZARGOZ - (380)
ZEE AFLAM - (47)
ZEE AFLAM TIMESHIFT (453)
ZEE ALWAN - (469)
ZOOM SPORT - (255)
ZWEINA BALADNA
- (545)
TAHA TV - (136)
TAHRIR TV - (243)
TAIBA TV - (239)
TAMAZIGH - (307)
TAQTAQ
- (468)
TARANEM TV - (581)
TELELIBAN - (154)
TELELIBAN
TIMESHIFT (418)
THAQALYN TV - (576)
TIME CINEMA
- (105)
TIME CINEMA
TIMESHIFT (449)
TIME COMEDY - (106)
TIME COMEDY
TIMESHIFT (450)
TIME DRAMA - (107)
TIME DRAMA
TIMESHIFT (451)
TIME ELSOBKI - (109)
TIME MAZIKA - (110)
TIME QURAN - (112)
TIME SPORTS - (111)
TIME TIATRO
- (108)
TIME TURKY - (493)
Page 15

P a g e | 15
KNN TV - (2)
KOMALA TV - (756)
KOREK TV - (983)
KURD 1 TV - (1060)
KURDSAT
- (3)
MAJD QURAN - (412)
SPEEDA - (537)
TISHK TV - (654)
TRT 6 - (645)
VIN TV - (1059)
ZAGROS
- (335)
Pakistani Channels:
ARIANA - (656)
ARY NEWS - (755)
DM DIGITAL - (701)
HIDAYAT TV - (747)
IMAGINE - (696)
IQRA PAK - (734)
MADANI CHANNEL
- (733)
MTA TV - (736)
NOOR TV - (746)
PDF TV - (685)
PEACE TV - (535)
PEACE URDU - (743)
PRIME TV
- (737)
PTV GLOBAL - (699)
TAKBEER - (697)
ART Package:
ART AFLAM 1 - (1)
ART AFLAM 2 - (2)
ART AFLAM 3 - (3)
ART HEKAYAT 1 - (4)
ART HEKAYAT 1 (TS)
- (5)
ART HEKAYAT 2 - (6)
ART HEKAYAT 2 (TS) - (7)
8- Available Subscriptions:
Subscriptions can be purchased in 4 different options For Arabic & ART Packages.
1- Every Month.
2- Every 3 Months.
3
- Every 6 Months.
4- Every 12 Months.
Purchasing Arabic Package, will allow you to access all channels available (Arabic, Persian,
Turkish, Indian, African, Pakistani, Kurd
ish) except the ART channels which can be purchased
separately.
Purchasing a 12-Month Subscription will save you approx. $50 less due to the special offer that
comes with the package, with Free ART Channels as well.
Page 16

P a g e | 16
9- DVR Operation:
Currently the DVR option is not fully functional and is in the process of development, but it works
with limitation of 20 min recording at the time being.
To use the DVR feature, a USB Thumb Drive that is fully formatted on windows 7 platform must
be used.
If the thumb drive is not properly formatted or is not formatted XFS file system, you will
get an error message on the screen when you try to record or press any of the DVR features.se
To watch a recorded event, follow the instructions below:
1- Plug the USB Thumb Drive in one of the 2 USB ports on the box.
2- From the remote control use the following buttons to control the DVR operation:
On the remote control, the playback features are:
a) The Back & Next Buttons are used to navigate through the entire contents of the USB
Thumb Drive.
b)
The RR & FF is used to move the beginning or the end of the recordings.
c) The Play/Pause Button is used to play existing recordings as well as pause any recording.
d) The Stop button that will stop playback or recording.
e)
The blue button will set the recording feature.
A Screenshot of the Recording Feature is as follows:
Page 17

P a g e | 17
To Record an event,
a) Press the blue button once while you are watching a channel.
b) A pop-up window will display with 2 options as shown in screenshot above, it can be set to
start recording now, or based on a schedule (start & end date/time) as well as the date for
the event.
c)
After selecting the recording time, press the OK button.
To cancel and go back to previous page, select the “Cancel” Button and click “OK”
If the recording was set to record now, the event will start to recording and a small red icon will
display on the corner of the TV indicating that recording is in progress. To stop the recording,
simply press the “Stop” button or Pause Recording, press the play/pause button. To resume
recording press the
Play/Pause button again.
If the recording was set on a schedule, then the recording will wait until the date & time set, and
stops when schedule end date has reached.
On both cases once the recording is complete, you can playback the recording by pressing on the
play
/Pause button, and the playback will start from the beginning.
If more than 1 recording was captured, you can skip one recording at a time by press the Back &
Next buttons accordingly.
Press the R.R & F.F to move to the First or last recording on the USB Drive
If you need to temporary stop the playback at any time, simply press the Play/Pause button and
the picture will pause, press the same button again to resume playback.
Note: because this feature is still under development, it is only limited to a 20 min recording time
limit only, and it will stop as soon as this time limit is reached.
Also make sure the Thumb Drive is
large enough to fit the recording.
Upon estimation, a 1 Gig Thumb Drive can record up to 15 mins of recordings.\
Page 18

P a g e | 18
10- New Features:
One of the exciting features in this receiver is that it can allow expansions to be added to it by
just restarting the box one new firmware is release. This will include all firmware, where it can
apply to the box on the fly directly from the provider.
1)
Latest feature allow you to watch youtube videos, this feature is accessible by clicking on
the red button
at no extra cost to you.
You can use the remote control to type inside, alphanumeric characters and search for any of
video, and watch it directly
on your TV. This feature can be accessed by pressing the “red”
button while watching any TV channel.
After entering the string you want, point the arrow keys to the search button and click on “OK”
and then scroll to your
favorite video and press the “OK” button again will open the video. To
exit out of the video and return back to your TV, simply press the “Home” button on the remote
and it will take you back to your original Channel page.
2) You can plug a USB thumb drive inside one of the USB ports, and by default, the receiver
will record live video on any channel you are watching up till the usb drive ge
ts full, then it
overwrites the recording to new recording, depending on the capacity of the drive used.
This feature is the instant time shift feature. This Is useful if you were watching a channel
and you missed anything, you can simply use the DVR playback feature listed in section “9”
like “Back”, ”Next”, ”Play/Pause” buttons on the remote control. To return back to the live
channel press the “Stop” button.
3) Another new feature is called “ATN Live TV”, this is a new feature that has been
introduced that allows you to watch most of the live channels directly on your “iphone”,
“ipad”, “ipod”, and even “Android phones”, as well as watch these exciting channels.
Unfortunately, this is not a free service and it requires a separate subscription if you are
planning to use it. You must be a current Subscriber to use this feature.
Page 19

P a g e | 19
If you are interested to use this feature, please call us at our number:
(201) 470-4333 to know more about pricing & requirements to use this feature.
It can be purchased for: 1 day,7 days, 30 days, 3 months, 6 months, 12 months.
Only eligible subscribers can use this feature with active subscription.
Once
purchased, you will be provided with a user name & password to use and you can enter
those credentials
on your mobile device and start to watch the channels.
11- Coming Soon Features:
Future Plan Enhancements and features include:
1- Channel Availability and Stability improvements.
2- Additional Channels & Packages to be added.
3- Fully Functional DVR Feature with lots of Features.
4- Adding more features to the Receiver
12- Available Accessories:
From the wiring diagram this receiver supports only wired connectivity to the internet, it does
not include a wireless. But if your receiver and the Router are away from each other, and there is
no way to run a network wire between the TV & the router, the only possible way is to use the
Power Line Adapter that can be purchased from any computer store, or it can be purchased
From Us. The Power Line adapter will allow you to use your existing power line wiring to transfer
internet data over the power wires to connect internet to your receiver.
Most Recommended Types:
1
- Netgear
2
- Linksys
3- D-Link
4
- TP-Link
Page 20

P a g e | 20
The speed should be at least 200Mbps to get a full non-intermittent picture from the internet to
the receiver, any device that does not meet the min. requirement or type, will display an
unstable
picture and we won’t be responsible for any issues caused by the other device used.
a) Power Line Adapter:
It comes set of 2 devices, connect the 1st adapter to the router, and the 2nd adapter to the
receiver.
All you need is to plug the 2 adapters in any power source outlet.
Note: The adapter should be plugged directly on the wall, it should not be connected to any
extension cord or surge protector, as this won’t guarantee the operation of the devices. Read the
device manual of the device on how to use them.
b) UHF Remote Extender :
Currently, the remote control that comes with the receiver is only set to use infra-red signal to
operate, but if UHF operation is required so that the remote can operate without having to point
it di
rectly to the receiver, a uhf remote extender needs to be purchased to allow the remote to
be used in any room around the house.
Page 21

P a g e | 21
This type of extender can be used by replacing the supplied battery with one of the existing
batteries in the remote, and pointing the transmitting sensor of the saucer to the infrared
receiver on the
IPTV box, which is located on the left side of the IPTV box.
c) HDMI Splitter :
HDMI Splitter can be used if you want to split the HDMI signal to 1 or more TVs at the same time,
The Screenshot below is used to connect 2 TVs to 1 Receiver.
If you need to connect more TVs, there are splitters in the market that can split the signal to 3 or
more TVs depending on the need.
d) Wireless HDMI Transmitter/Receiver:
If you need a way to connect 2 or more TVs in 2 different rooms in your house where it is not
possible or not easy to run a wire between the receiver and the 2nd TV, the best way is to buy this
type of Wireless HDMI transmitter/receiver below. This is a very sensitive device; it can work in
some cases.
Page 22

P a g e | 22
If you are interested to purchase this device, call us and we’ll explain to you if it can work with
your home structure. In order for the device to
operate properly, the front view of these 2
devices needs to be hanged on a wall in an open space; otherwise you will not get a signal.
This device works on a 2 story building structure as long as there is not too much interference
from the surrounding area.
The maximum transmission distance is approx... 100 ft. distance.
The signal quality is, but it is very sensitive to motion, so it should not be put in a location where
it can be susceptible to motion.
If you want to connect a 3rd TV, you need to purchase an additional receiver and connect it to
your new TV using the same process
above.
The exciting feature about this that it comes with t remote extender cable so that you can
control
you’re remote wirelessly as well without additional devices.
e)
HDMI Power link Audio/Video Transmitter/Receiver:
If you require a device that can use the Power Line to transmit the Audio/Video signal in a same
room, then this device is the proper one for you. It can only be used in the same room as
because due to the wiring connection in the house.
For more information, please contact us to
provide you more details about this device.
Page 23

P a g e | 23
This unit has 2 connections:
These 2 units come together and can be used in conjunction with the HDMI Splitter in section C.
f) Wireless Audio/Video Transmitter:
If you need a regular wireless audio/video transmitter that uses the Composite Audio/Video
connection without having to use the HDMI connection to connect to a 2nd TV, then this device is
the right for you.
Page 24

P a g e | 24
Wireless Transmitter and Receiver Kit: 5.8 GHz, Video/Audio, 7 Channels Selectable.
This device is the perfect device to get a good signal at the same time not interfering
with any other wireless device because it run on the 5.8 GHz frequency. It has 7
cha
nnels selectable if you decided to add more than 1 receiver to this package. You
can use this device in conjunction with HDMI to get 2 simultaneous signals to 2 TVs
without the need of any additional device, but the signal is only using composite
output.
g)
Infrared Remote Control Transmitter/Receiver:
If you need a remote extender that extends to your 2
nd
TV that is located anywhere
around the house, then the device below is the right fit where this does not use UHF,
Page 25

P a g e | 25
You connect the transmitter cable to your Receiver’s infrared receiver, and connect both
devices to the power line. All you have to do is to put the 2
nd
device (Receiver) close to
the 2nd TV and point your remote to the receiver to send the signal to the Box.
A good example would be similar like this one:
Page 26

P a g e | 26
13- Troubleshooting Error Messages:
a) You will see this Error Message when ATN has bad weather and/or the signal is from the satellite
is low. The picture will come back very soon.
b) This error message means that the connection between your IP TV Receiver and the Internet is
lost. Make sure the Internet cable is plugged into the IPTV Receiver and Internet Modem or
Internet Wireless.
Page 27

P a g e | 27
To try to resolve this issue, try 1st to reboot your Internet Modem and Wireless, and then reboot
your IPTV Receiver.
If you still see this error message after doing the steps above, please contact us to help you
resolve this issue.
c)
This error message means your IPTV Receiver is not connected to the Internet Ethernet cable.
d) This error messages appears on the TV if there is internet disconnection on the customer side.
Please contact your ISP, only if you receive this message on all channels.
Page 28

P a g e | 28
If you are having
any other issues, call us so we can help you out. If you want to call us, please
make sure that your internet connection is working, and you can access websites using a regular
PC. And make sure also the cables are properly connected and there is no problem with the port
or cable that runs between the router and the receiver.
Note: if you are having a choppy picture when trying to access all channels on your receiver, then
you might be experiencing network connectivity issues, to verify, go to this website:
http://www.speedtest.net
and run the test there.
If you get a speed of less than 2 Mbps, then there is an issue with your internet connection, and
you need to check with your ISP to see if the problem is with your cable modem or router or your
ISP. Once the issue has been resolved, then the picture should display normally and you should
get a clear and stable picture afterward.
14- Billing Questions:
If you are having issues with a charge on your credit card that you think it is incorrect, or the
improper amount
was charged, or any billing questions whatsoever, you should contact the
billing department immediately, billing department is available between 10 am till 7 pm Eastern
Time (Monday Through Friday Between 10 am till 7 pm).
The Billing Department Contact Number is: 1-855-872-4788
You need to contact this number
if also your subscription expired, or if you are having trouble activating
your receiver or if your credit card information has expired.
When calling please have the following information ready:
- Your Full Name
- Your Receiver’s Serial Number located on the bottom of the IPTV Box.
- Your Receiver’s MAC Address (if required) located on the bottom of the IPTV Box.
Note: The Receiver serial number starts with XVxxxxx where the “X” is the digits on the receiver.
Page 29

P a g e | 29
1
5- Technical Questions:
If you have any technical questions related to accessories to use, channel information, or any
other error messages that is not listed in section 13, please feel free to call us so we can try to
resolve the issue for you.
Our Technical Department is: (201) 470-4333 and ask for “Mr. Roland”.
Technical Support Hours: M – F (Monday Through Friday) from 9 am till 8 pm Eastern Time.
Note: Receiver is covered under warranty for 1 year, for any issues with your receiver, call us and
let us know, so we can give you the address to where to send the
broken Receiver and we will
ship a replacement box instead to you as soon as we can after we receive the broken Receiver
and the cost to fix or replace if applicable.
16- Contact information:
To contact us about any other questions, such as new channels, or suggestions, we would be
glad to listen to your feedback and we will try our best to meet most of the requirements if
possible.
Please call us on: (201) 470-4333 and ask for “Mr. Roland”.
Office Hours: Saturday: 10 am till 2 pm Eastern Time.
17- Receiver Activation/Activation Process:
After you purchase your receiver, the receiver requires activation. Once Receiver purchased, we
will be notified of the date & time the receiver purchased, and we need time to process your
credit card and verify all information are correct. Normally, we need between 24 to 36 hours to
receive the activation code. After we finish with this process you will receive an email with your
activation code that you can use to activate your receiver.
Once you receive your activation code, the process takes less than 5 mins to activate and it is
straight forward.
Page 30

P a g e | 30
Once you turn on the receiver after connecting and verifying that all cables are connected
properly and securely, and once the receiver’s Operating system loads successfully:
You will be see with the screen below asking for activation code:
Enter the activation code provided into the highlighted box above.
Note: make sure the digits entered are all Numeric, and press the OK button after each digit to make sure that it is
saved there, once you press on every digit you will get a drop down list containing characters & digits, you should
only select the digits by using the Up/Down arrow keys, and once you highlight that number, press the OK, then
the selected digit will show up in the box, enter all digits provided, and once you verify that the number is correct,
press the “OK” button, then y
ou get a confirmation popup window, that your receiver has been activated. And
Page 31

P a g e | 31
you can start watching the channels. If you get an error message saying that the number entered was incorrect,
you can have up to a max. Of 10 incorrect attempts, after those 10, the receiver will be locked and you won’t be
able to re
-activate it again up till 1 hour and you have to turn OFF and then ON again. So, in order to avoid this
issue, if you enter the code twice and it didn’t work as provided, then please call us to resolve the issue on: (201)
470-4333 during regular office hours.
Note: if you entered a digit incorrectly, you can delete it by using the “Clear” button on your remote.
You will also get this screen if your subscription or your credit card has expired. You need to call
our billing department to provide the updated information, and you will be provided with a new
activation code to re-activate your receiver.
 Loading...