

Page 1
AMERICAN
TECHNOLOGIES
NET WORK
CORP.
u s e r ` s g u i d e
Voyager
Page 2
The information in this manual furnished for information use only, is subject to change without notice, is not to be
construed as a commitment by ATN Corp.
ATN Corp. assumes no responsibility or liability for any errors or inaccuracies that may appear in this book.
©2001 ATN Corp. All right reserved.
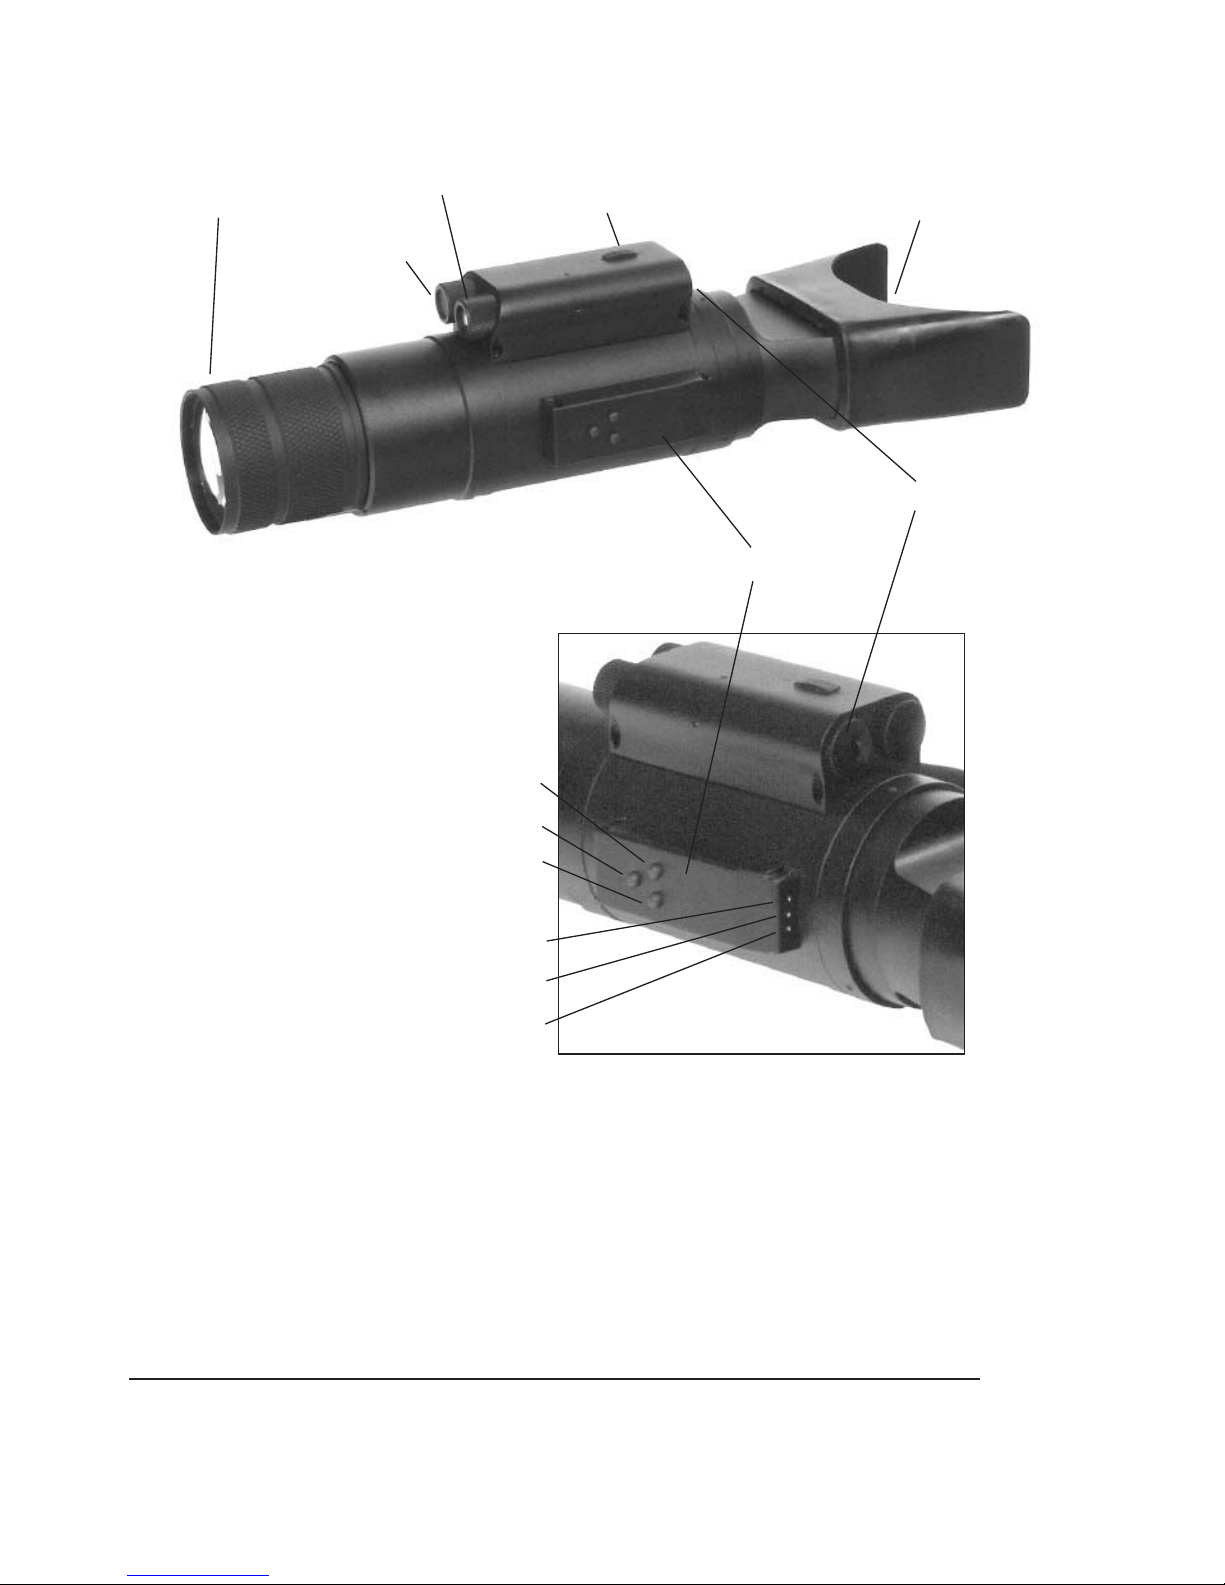
Lens assembly Ocular lens assembly
Infrared (IR)
illuminator
Battery housing
Smart sensor
Power button
Light intensifier tube brightness
green LED
Illuminator brightness red LED
“+” adjustment button
“-” adjustment button
“SL” selection button
Control panel box
Reticle brightness yellow LED
Page 3

2
APPLICATION
The Voyager Night Vision Monocular is designed for observation and identification of objects
at low light levels (less than 1. 0 lux) in the temperature range from - 40°F up to +110°F.
The Voyager Night Vision Monocular is a complex optic-electronic system for individual use.
The device consists of the objective lens assembly, ocular lens assembly, IR illuminator, and
the body. The body contains the image intensifier tube assembly with the integrated high
voltage power source and the battery housing. The battery housing cover houses two 3 Volt
Lithium, CR#123A batteries. Objective lens protective cover (not shown) is designed to protect the Voyager from high-level illumination. The pinhole in the center of the protective cover
allows the user to check the operation ability of the device in daylight conditions.
MASTER POWER SWITCH
The device is switched on by turning the main switch located on the top of the scope. The
Voyager is controlled by a built-in computer that regulates the functions of the scope.
LIGHT INTENSIFIER TUBE BRIGHTNESS
To adjust the brightness of the Voyager you will need to press the “SL” (Select key) key until the
green light lights up on the control panel. You can then adjust the power of the scope using the
“+” (increase) and “-” (decrease) key.
INFRARED ILLUMINATOR
To adjust the magnitude of the IR you will need to follow the same procedure as above, except
when pressing the “SL” key, please wait for the red light to light up.
SLEEP MODE
One of the greatest new features your Smart scope has is a “SLEEP” mode. This feature
greatly extends the life of your scope. Your scope will be automatically shut down if idle more
than 20 minutes. Activity means pressing any of the buttons or simply moving it back and forth
away from your face (when the smart sensor is activated). If your intention is to continue using
the Voyager simply press “SL” and it will come back on.
NOTE: The scope will be capable of running on “SLEEP” mode for more than 10 days and will be
ready to use at any moment. You don’t have to turn the unit off while you are using it (Voyager will
remember all your setting while “sleeping”). Use “ON/OFF” switch only to store the scope. The
proximity sensor will snap into action better in dark environment. Daylight testing and/or other
situations with intensive lighting may cause a temporary decrease of the proximity sensor’s performance.
FOCUSING
To focus the Voyager simply adjust the front lens as needed.
LOW BATTERY INDICATOR
When one of LEDs on control panel starts blinking it is time to change your batteries.
Page 4

3
SMART DIGITAL TECHNOLOGY
Smart Total darkness Technology finally provides the user total control in the hi-tech industry
of night vision. The Smart Series night vision monoculars have been designed with the latest
computer technology. Onboard computer detects the users intention of looking through the
oculars. When the ocular is brought to the users eyes the unit will be automatically turned on.
When removed from the eyes the monocular will be turned off (you must activate the proximity
sensor) . The user will never have to worry about turning his or her monocular on or off. Smart
series monocular automatically sense when it is no longer being used, and will shut down and
enter into sleep mode. All the controls and buttons are digital. Even if your batteries are low,
don’t worry the smart series will let you know.
To use the smart sensor of the Voyager and save the life of the scope as well as your batteries,
press both the “SL” key and the “+” key. The Voyager will be now turned off when you move
away from the scope. It will be turned on when you move back to the scope.
OPERATING
The Voyager is the second generation computerized night vision device that provides a big
performance advantage over the first generation devices. This system requires substantially
less light to function and produces an increased light amplification at ail levels. Eventually you
will see a much brighter, well defined image in the eyepiece.
As well as generally out performing their first generation counterparts, second generation tend
to have a longer operating life. Our patented Smart Technology increases that life in 5 times.
Your Voyager is also equipped with auto brightness control to avoid for scope to be overexposing to ambient light, while it maintains a balanced level of light in the eyepiece.
Generation two technology employs a complex micro channel plate consisting of tens of thousands of tiny electrically charged tubes that concentrate and increase the charge from the
photo-cathode, and create a highly accurate electron beam, recreating the visual image on
the phosphor screen.
PREPARATION FOR OPER ATION
Before getting started make sure to follow these steps:
• Take the monocular out of the case.
• Install the batteries into their housings with the polarity order shown on the battery housing
cover. Battery type: 3 Volt Lithium, #CR123A
• Switch on the monocular with the protective lens cover still attached to the lens.
• Make sure that the green luminance of the light intensifier tube is present.
• If the device is not to be used for extended period of time (more than 10 days) remove the
battery.
• Avoid touching lenses. If fingerprints or traces of dirt or dust appear, clean surface with a soft
dust cloth and glass cleaner.
“SL” button “–” button “+” button
Control
panel
“Smart” proximity sensor
Page 5

4
• Keep lens cap/daylight filter on when not in use.
• Avoid contact with dust, steam, and gas.
• The Voyager is not harmful to the user or the environment.
• Do not disassemble except to clean the front lens and the eyepiece: it will void your warranty.
• Evaluate the scopes function by looking through it in a lit environment with the daylight filter
lens cap on. Never use in daylight without the daylight filter lens cap on.
TROUBLESHOOTING
Q: Flashes, flickers, or clicking occur while operating
S: If it occurs within the first five minutes of inserting new batteries, it is normal and the device
will resume normal operation soon thereafter. If it occurs for more than 10 minutes, contact
your dealer or other authorized representative for instructions.
Q: Dark spots on screen.
S: These are cosmetic blemishes in the intensifier tube or dust particles accumulated on the
screen. Just like a TV, night vision intensifier tubes attract dust particles. These are easily
cleaned using photo-type cleaning equipment.
Q: Image not clear.
S: Adjust front lens at night. If problem persists, turn on IR.
Q: Fixed-pattern noise in a honeycomb shape.
S: Usually a cosmetic blemish characterized by a faint honeycomb-type pattern. It usually
occurs when viewing very bright lights. Adjust the brightness of the unit to reduce noise.
Q: LED’s keep turning off after a few moments.
S: This is the normal mode of operation. It will increase your scope batteries life and make you
harder to detect
Page 6

5
FEATURES
• Automatic and manual brightness control
• IR illuminator
• Camera/Camcorder adaptable
• Manual focus
• Installed S-25 photocathode with microchannel and fiberoptic plates
• 25mm flash resistant intensifier tube
• Water resistant
• Panoramic eyepiece for better viewing
• Superb multi-coated 6 element lens system
• Daylight filter
• Computerized Controls activate Voyager automatically
• Proximity Sensor increases the life of Voyager fivefold
• Adjustable tube and IR brightness.
SPECIFICATIONS
Magnification ............... 4.5x
Intensifier Tube ............ 2nd Gen; 25mm
Lens System ................ 110mm; F1.8
Field of View ................ 12°
Resolution ................... 32 lp/mm
Minimum Light Req...... 5x10
-3
lux
Range of Focus............ 3’ to
Power Supply............... Two 3V Battery
Battery Life .................. 30 hours
Dimensions.................. 37.5x10.0x7.2cm
Weight.......................... 1.8kg
Page 7

6
2 YEAR PRODUCT WARRANTY
This product is guaranteed to be free from manufacturing defects in material and workmanship
under normal use for a period of 2 (two) years from the date of purchase. In the event a defect
that is covered by the foregoing warranty occurs during the applicable period stated above, ATN, at
its option, will either repair or replace the product, and such action on the part of ATN shall be the
full extent of ATN’s liability, and the Customer’s sole and exclusive remedy. This warranty does not
cover a product (a) used in other than its normal and customary manner; (b) subjected to misuse;
(c) subjected to alterations, modifications or repairs by the Customer of by any party other than ATN
without prior written consent of ATN; (d) special order or “close-out” merchandise or merchandise
sold “as-is” by either ATN or the ATN dealer; or (e) merchandise that has been discontinued by the
manufacturer and either parts or replacement units are not available due to reasons beyond the
control of ATN. ATN shall not be responsible for any defects or damage that in ATN’s opinion is a
result from the mishandling, abuse, misuse, improper storage or improper operation, including use
in conjunction with equipment which is electrically or mechanically incompatible with or of inferior
quality to the product, as well as failure to maintain the environmental conditions specified by the
manufacturer. CUSTOMER IS HEREBY NOTIFIED THAT OPERATION OF THE EQUIPMENT
DURING DAYLIGHT HOURS OR UNDER ANY EXCESSIVE LIGHT CONDITIONS MAY PERMANENTLY DAMAGE THE INTERNAL COMPONENTS OF THE UNIT AND SAID DAMAGE WILL
NOT BE COVERED UNDER THIS WARRANTY. This warranty is extended only to the original
purchaser. Any breach of this warranty shall be waived unless the customer notifies ATN at the
address noted below within the applicable warranty period.
The customer understands and agrees that except for the foregoing warranty, no other warranties
written or oral, statutory, expressed or implied, including any implied warranty of merchantability or
fitness for a particular purpose, shall apply to the product. All such implied warranties are hereby
and expressly disclaimed.
LIMITATION OF LIABILITY
ATN will not be liable for any claims, actions, suits, proceedings, costs, expenses, damages or
liabilities arising out of the use of this product. Operation and use of the product are the sole responsibility of the Customer. ATN’s sole undertaking is limited to providing the products and services
outlined herein in accordance with the terms and conditions of this Agreement. The provision of
products sold and services performed by ATN to the Customer shall not be interpreted, construed,
or regarded, either expressly or implied, as being for the benefit of or creating any obligation toward
any third party of legal entity outside ATN and the Customer; ATN’s obligations under this Agreement extend solely to the Customer. ATN’s liability hereunder for damages, regardless of the
form or action, shall not exceed the fees or other charges paid to ATN by the customer or
customer’s dealer. ATN shall not, in any event, be liable for special, indirect, incidental,
or consequential damages, including, but not limited to, lost income, lost revenue, or lost
profit, whether such damages were foreseeable or not at the time of purchase, and whether
or not such damages arise out of a breach of warranty, a breach of agreement, negligence,
strict liability or any other theory of liability.
PRODUCT WARRANTY REGISTRATION
In order to validate the warranty on your product, ATN must receive a completed Product Warranty
Registration Card for each unit. Please complete the form below and immediately mail it to our
Service Center: ATN Corporation, 20 South Linden Ave., Suite 1B, South San Francisco CA 94080.
Products qualifying for warranty repair will be either repaired or replaced within 10 business days of
receipt of merchandise unless the customer is notified otherwise.
OBTAINING WARRANTY SERVICE
To obtain warranty service on your unit, take or send the product, postage paid, with a copy of your
sales receipt to our service center, ATN Corporation at the address noted above. All merchandise
must be fully insured with the correct postage; ATN will not be responsible for improper postage, or,
missing or damaged merchandise during shipment.
Page 8

For customer service and technical support, please contact
American Technologies Network Corp.
North American Office
20 S. Linden Ave. Suite 1B, South San Francisco, CA 94080
phone: 800-910-2862, 650-875-0130; fax: 650-875-0129
European Office
phone: 44(0)870-0111286, fax: 44(0) 845-3349142
The following countries can use our
toll free number 00 800 9102-8620
Austria, France, Germany, Holland, Italy, Spain, Sweden, Switzerland
www.atncorp.com
©2001 ATN Corporation
 Loading...