

Page 1
user`s guide
Important Export Restrictions! Commodities,
products, technologies and services contained in
this manual are subject to one or more of the export
control laws and regulations of the U.S. Government
a nd th ey fa ll un d er t he co nt r ol ju ri sd i ct io n of e it he r t h e
US Department of State or the US BIS-Depar tment
of Commerce. It is unlawful and strictly prohibited
to export, or attempt to export or otherwise transfer
or sell any hardware or technical data or furnish any
service to any foreign person, whether abroad or in
the United States, for which a license or written approval of the U.S. Government is required, without
f ir s t o b ta in in g t h e r e qu ir e d l i ce ns e o r wr i tt en ap pr ov al
from the Department of the U.S. Government having
j u r i s d i c t i o n . D i v e r s i o n c o n t r a r y t o U . S . l a w i s p r o h i b i t e d .
AMERICAN
TECHNOLOGIES
NETWORK
CORP.
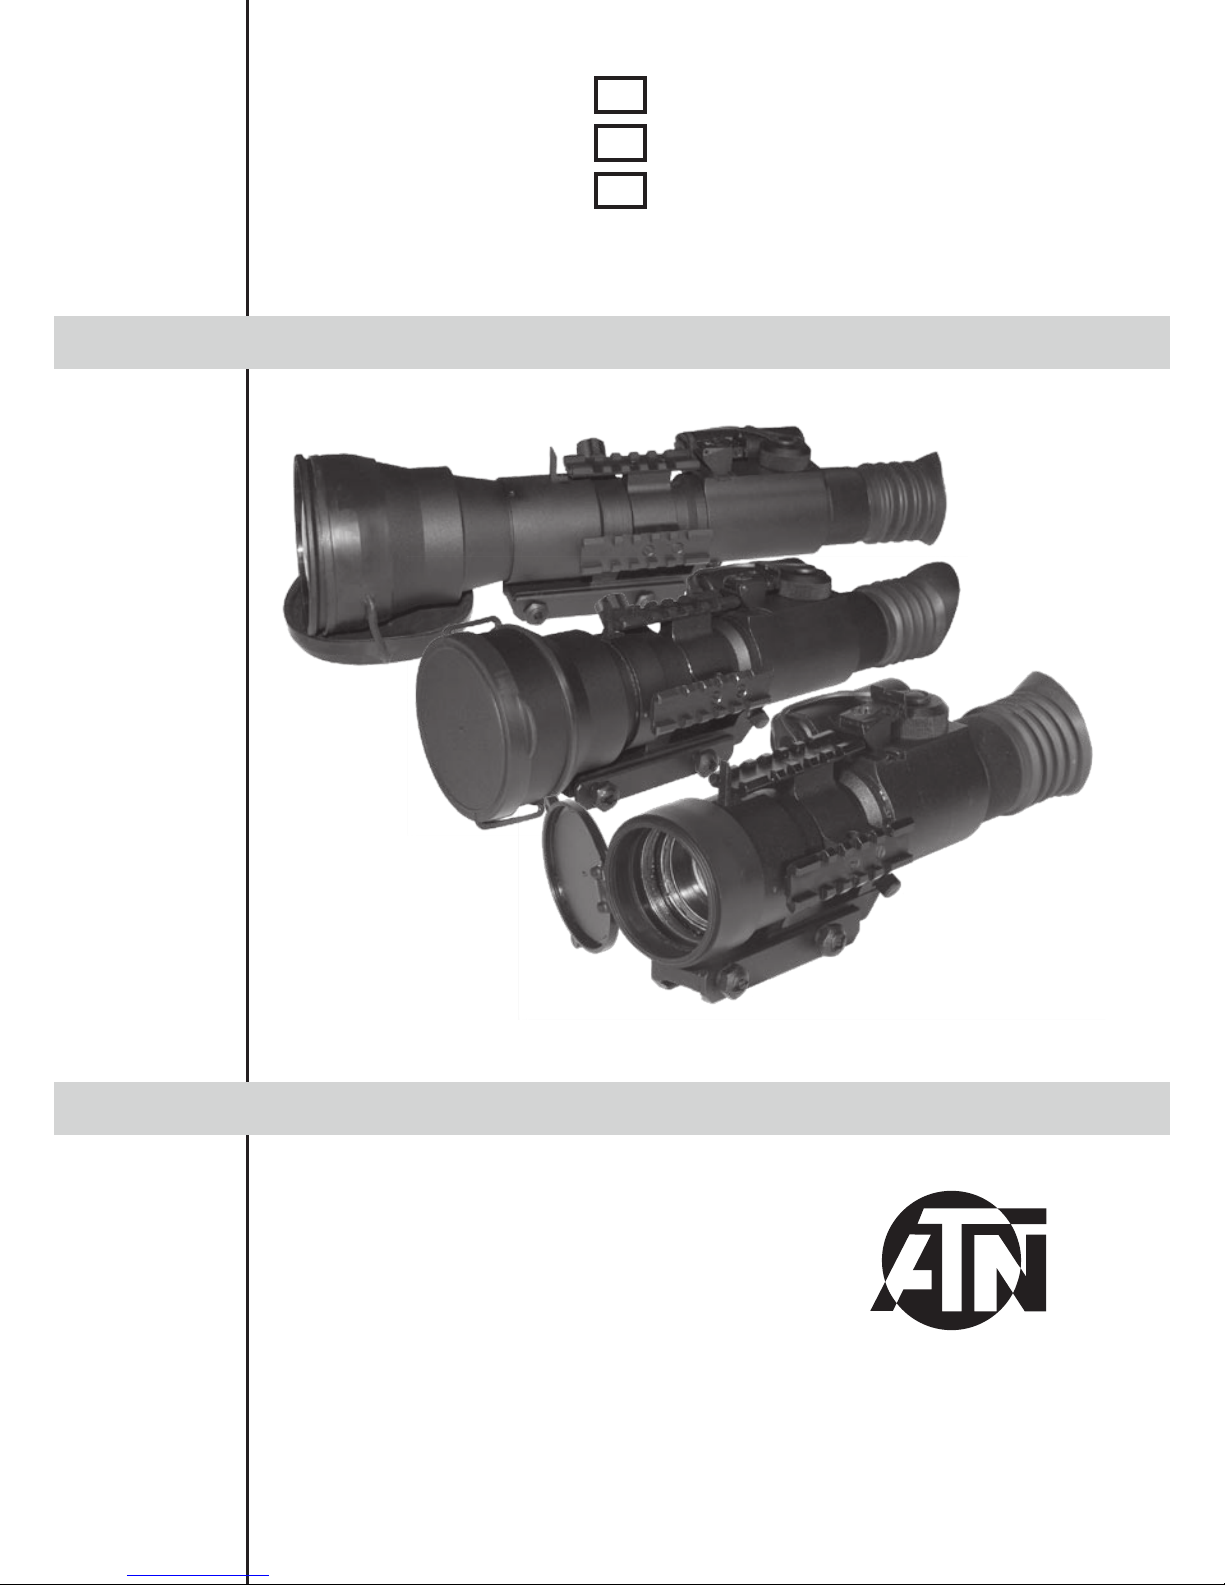
Trident Pro 2
Trident Pro 4
Trident Pro 6
ATN Trident Pro
Page 2
The information in this manual furnished for information use only, is subject to change without notice, is not to be
construed as a c o m m i t m e n t by ATN C o r p.
ATN C o r p. assumes no responsibility or liability for a ny errors or i n a c curac ies t h a t may appear i n t h i s boo k .
©2009 ATN Corp. All right reserved.
APPLICATION
The ATN Trident Pro from ATN is a rugged, night vision weapon sight that provides excellent
observation, target acquisition and aiming capabilities for the demanding sports shooter or
varmint hunter.
The Trident is available in a variety of Image Intensifier Tube configurations to fit into a wide
array of bu dgets.
The best optics, tubes and performance make the ATN Tr id en t Pr o on e o f th e b es t com mer ci al
night vision weapon sights there is!
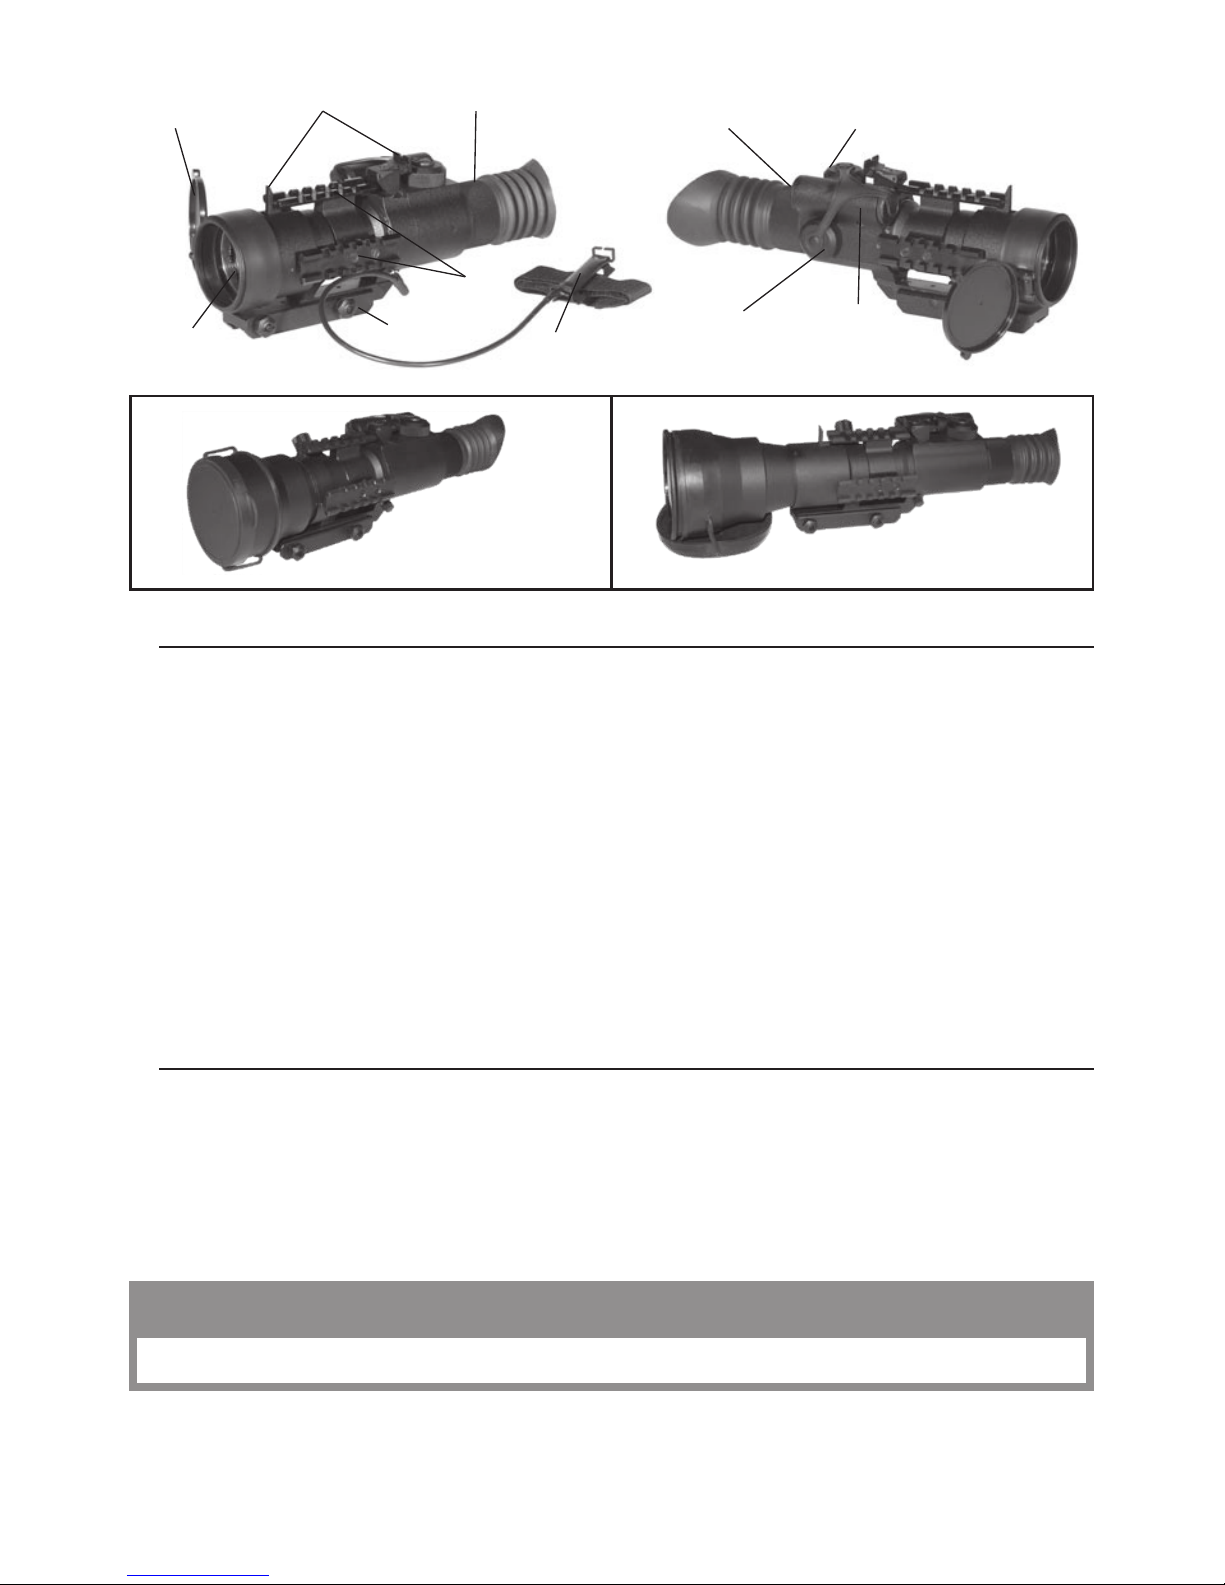
Operating
button
F1:1. 2 lens
Elevation
Windage
5 D i o pt e r
Battery
housing
Back- u p iron sights
Mounting
system
Picatinny
rails
Lens cap
•
LIG HT A ND COMPACT DESIGN
•
TOP-NOTCH PERFORMANCE WITH
PRO-ORIENTED DESIGN
•
ALL EXTERNAL SURFACES ARE A
NON-REFLECTIVE MATTE BLACK
FINISH (EXCEPT FOR THE OPTICAL
ELEMENTS )
•
BACK-UP IRON SIGHTS
•
“RED ON GREEN” RETICLE SYSTEM
WITH 1/ 2 MOA ADJUSTMENT
•
ILLUMINATED CENTER RED RETICLE
FOR OP TIMAL CONTRAST AGAINST A
DARK OR LIGHT TARGET
•
AUTOMATIC BRIGHTNESS CONT-
ROL(ABC) FOR TUBE PROTEC TION
• O NE-BUT TON OPERATION. CO N-
TROLS AND ADJUSTMENTS ARE
SIMPLE AN D EASY TO OPER ATE.
PUSH BUT TON POWER O N/ OFF. THE
RETICLE BRIGHTNESS VARIES FRO M
OFF TO FULL BRIGHT WITH A PUSH OF
A BUTTON
•
WATERPROOF 20M, 1 HOUR
•
MOUNTS TO STANDARD WEAVER
RAILS
•
TRIDENT IS DESIGNED TO USE
ONE 3V LITHIUM BAT TERY
FEATURES
Remote
control
TRIDENT PRO 2
TRIDENT PRO 4 TRIDENT PRO 6
Th is p roducT co nTa ins n aT u r al ru b b e r l aT e x w hich m ay cau s e allergic reac T i o ns .
CAUTION:
Page 3
2
SPECIFICATIONS
PREPARATION FOR OPERATION
Before getting started make sure to follow these
steps:
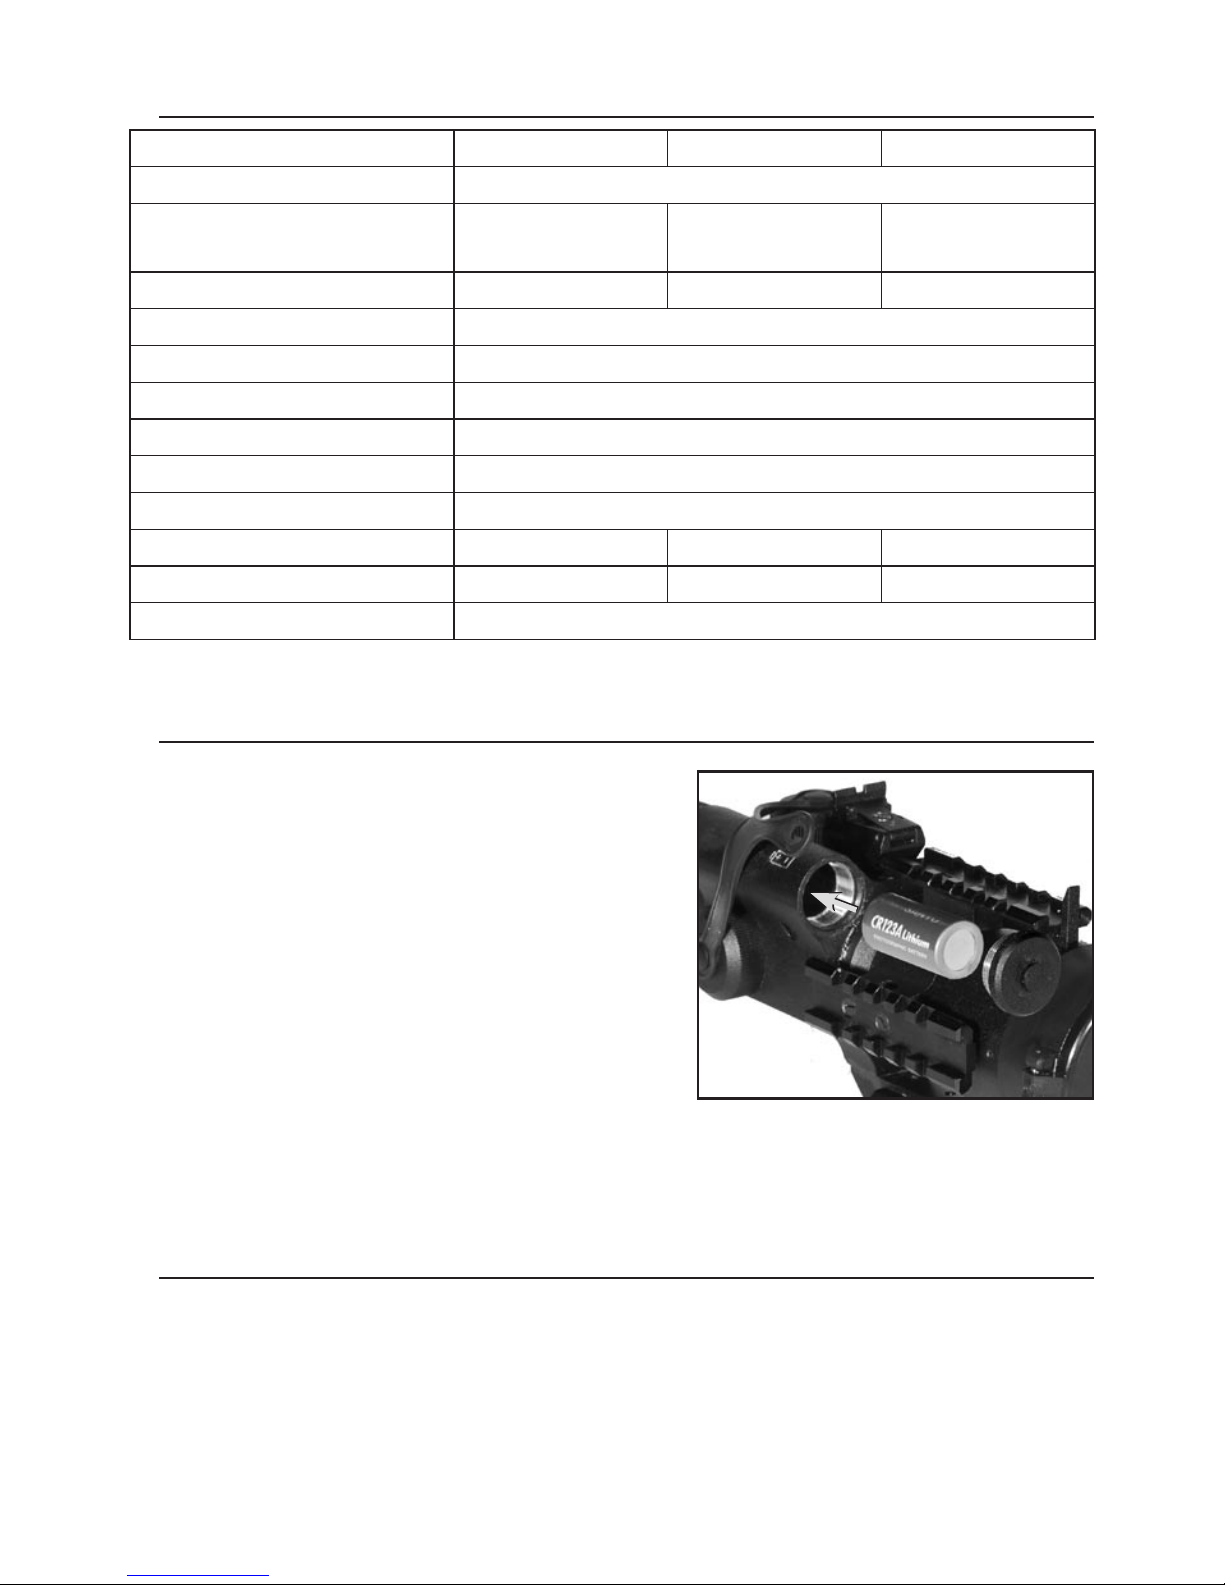
• Install the battery into its housing with the polarity
order shown on th e m ain body of the u nit.
• Switch on the scope with the protective lens cover
still attac hed to the lens.
• Make sure that the green luminance of the light
intensifier tube is present.
• Observe the scene, and adjust the diopter and/or
lens for optimal image clarit y.
• You may now enter a dark environment or simply
shut the lights of f in order to dar ken t he room.
• Next, remove the lens cap/daylight filter.
• Finally, you may want to turn the infra red (IR) illuminator on. Notice the ability of the scope to
see in total darkness with the aid of the IR illuminator.
OPERATING
MOUNTING
1. Slightly loose n t h e f i x ing screws on the 7/8 ” we aver mount built into the sc ope.
2. Place the scope on the weaver rail of th e fire arm.
3. T ighten the fixing screws.
NOTE: Fixing screws m ay need to be tightened after continuous shooting.
Battery
installation
* ATN reserves the right to change the above specifications at any time without notice
Trident PRO 2 Trident PRO 4 Trident PRO 6
Generation 2nd+
Magnification 2.5X
(5X w/A-focal Doubler)
4X 6X
FOV 18 deg. 9. 5 d e g . 6.5 d eg.
Reticle Red O n G r e e n
Windage & elevation adjustments 1/2MOA
IR illuminator Super 450mw
Bat tery life 60 hours
Operating Temperature -40°C to + 5 0 ° C
Storage Temperature -50°C to +70°C
Dimensions
10” x 3.2 ” x 2. 8 ” 12” x 4” x 2 .8” 15. 3 ” x 4 ” x 2.8 ”
Weight
2 l b 2.7 4.2
Diopter adjustment +/-5
Page 4

3
MOUNTING SYSTEM
The ATN Night Vision Riflescopes Mounting System allows to change the position of
the riflescope flexibly on the weapon in relation to a shooter in combination with the
fixed positions already available on the weaver rail. For this purpose in the base of
the mounting bracket there is a rail with a fixing projection. There are two grooves in the
mounting bracket for mounting this rail. Besides it is possible to change the position of
the riflescope additionally by 1/3 of inch. For doing this one needs to about-face the rail.
To change the position of the riflescope on the weaver rail additionally follow the steps
mentioned below:
1. Unscrew the t wo s crews, which at tach the rail to the m ounting bracket.
2. Take the rail out of t he groove.
3. About-face the ra il in case of neces sity.
4. Place t he rail into another groove.
5. Fi x t he rail with the t wo screws.
NOTE: If the rail does not come out easily, tighten one of the
removed screws into the threaded aperture in the middle of the
fixing projection of the rail. Rotate this screw, which will in turn
push the rai l out from the groove.
DIGITAL CONTROL
The ATN Trident Pro has a simpl e an d e a sy to op e r ate on e -but ton control and adjust m ent.
To turn on: Press the operation button by one short push
To turn of f: Press the operati o n b utton again by one shor t push
To adju s t ret i cle brightn e ss:
1) After turning scope on, press and hold operation button. Brightness will grow smoothly while the
button is kept pressed. Rel e a se the button when ne c essar y b r ightness is ach i eved.
2) Press and hold the button second time for smooth decrease of brightness. Adjustment could be
easily seen if you look through the scope while adjustment.
REMOTE CONTROL
Attach the Remote Control cable to connector on the bottom of
the body of device. Place the Remote Control on the weapon,
suiting your shooting style best and grip. Fix the Remote Control in this positio n w i th a m ontage strap.
To turn the scope on push the button of remote control. Keep
pres s ed bu t ton wh en obs er v ing s cene. T he sc ope i s turne d of f
immediately after rele a sing remote control but ton.
FOCUSING
To focus your riflescope you will need to adjust the diopter first thing. Simply turn the diopter clockwise until it stops. Then, while looking through the diopter at a subject, slowly turn the diopter back
counter clock wise until the grai n i n t h e i m ag e is sharp.
NOTE: We su ggest that you focus the diopter during daylight with the c ap on.
OPERATION EXTENDIBILITY
There are three detachable Picatinny rails on the body of the
scope for additional lighting, laser and other mission critical
tools. The rails fix with two screws as shown on the figure.
IR ILLUMINATION
Infra-red (IR) Illuminators are common for night vision technology. The IR light greatly enhances the
performance of your ATN Trident Pro scope, while remaining almost totally invisible to the naked
eye. In dark environment, power up the ATN Trident Pr o. Now, find a scene and examine it without
the IR on then with IR powered up. Note the difference in illumination. It is important to remember
Grooves
Rail with a
fixing projection
Screws
Mounting
system
Page 5

4
RETICLE
ATN Trident Pro reticle gives a clearly aiming point, even
when hard-to-see game blends into the background. Posts
and crosshairs center section covers a minimum of the
target and allow for less target coverage, making precision
shots on small t arget easy.
The size of illuminated red reticle correspond to 1 yards at
100 yards di stance.
IR Brightness
Adjustment
Battery
Housing
Fixation
Screw
IR Elevation
IR W i n d a g e
IR Focusing
that the IR illuminator is simply an infra red light source, and like any light source it may loose its
ef fectivene s s over a great distan c e.
To fix the IR illumin ator to the rifl e scope use the pi c atinny raile of the scope.
The IR illuminator control but tons are located on its side. To switch the Digital IR illuminator
on/off press “+” and “-” buttons simultaneously. When the IR illuminator is switched on you can
see the green LED lit. By pushing the buttons “+” and “-” you may adjust the IR brightness.
The IR beam is focusable to change the field of coverage. To change the beam width slightly turn
the IR l e ns.
You could change the IR control panel fitting your needs. The wrench included into the set should be
used for weakening the fixing nut located on the IR. Rotate the IR placing at in the most convenient
position. Tig h te n t h e n u t w i th the wrench to fix the new positio n .
WINDAGE AND ELEVATION
The vertical and horizontal adjustments for the ATN Trident Pro
can be achieved by turning the elevation and windage adjustment mechanisms (remove dust caps first). Each click equals
1/2 inch at 100 yards. When reaching the maximum range of
rotation do not use force.
CLEANING THE EYEPIECE
You m ay ne ed t o cl ea n th e eye pie ce o f th e ri fl e sc op e fr o m ti me t o ti me i n or de r to g uar an t ee t op p erfo r mance. When you receive your rifles c ope you should chec k for d u st o n t he eyepi e ce of the unit.
CAUTION: Use only Photographic lens cleaning tissue on these surfaces. Be careful not to scratch
or smudge any of these surfaces. When using compressed air to blow dust away, make sure to avoid
inverting the can while spraying. This can cause frozen propellant to exit the can, which can cause
serious problems with the glass and phosphor screen
Windage
Elevation
Windage
Illuminated
red reticle
Nut
Page 6

5
5X A-FOCAL LENS (optional)
The Trident Pro 2 with optional A-focal lens can be
used as a powerful 5x scope. To install A-focal lens
screw it into the front lens of Trident Pro 2.
WARNINGS AND CAUTIONS
• Always remember to turn off the ATN Trident Pro scope when it is not in use. If you do not plan on
using your scope for a period of more than 10 days, you should remove the batteries.
• Keep len s c ap on when not in use.
• Avoid cont a c t with dust, steam, and gas.
• T he s cope are not harmful to the user or the environme n t .
• Do not disassemble: it will void your warrant y.
• Evaluate the scopes function by looking through it in a lit environment with the lens cap put on.
Never use in daylight without the daylight filter lens cap on. Do not surpass ten minutes of test-
ing.
• N ever point th e s c ope at a b right light source.
• Adverse atmospheric conditions such as fog, smog, or haze and a lack of ambient light (moon or
starlight) may diminish the effective viewing distance. All technical data for this unit was compiled
in a c ontrolled environme n t .
• If you use the rubber eyecaps for a long period of time, you may suffer skin inflammation. If you
devel o p any sym p t o ms, consult a doc t o r i m mediately.
TROUBLESHOOTING
Q: Flashes, flickers, or c l i cking oc c ur w hile operating
S: If it occurs within the first five minutes of inserting new batteries, it is normal and the device will
resume normal operation soon thereafter. If it occurs for more than 10 minutes, contact your dealer
or o t her a u t horized serv i ce representative for ser vice instruc tions.
Q: Dark spots on scree n.
S: This may be dust on the lens, please clean according to instrutions. They may also be Cosmetic
blemishes in the intensifier tube which are a by-product of the manufacturing process. This is normal
and will not affect the life or per formance of the unit.
Q: Image not clear.
S: Adjust diopter ri n g . If pro blem persist s , in crease viewing dist a n ce
Q: Fixe d-pat ter n n o ise in a honeyc omb shape.
S: Usually a cosmetic blemish characterized by a faint honeycomb-type pattern. This usually occurs
when viewing very bright lights.
Q: A pat tern of dark thin lines whi c h look like chicken wire.
S: Turn on illuminator, if purchased. If illuminator doesn’t brighten image, replace bat teries. If prob-
lem persists, co n t act ATN fo r ser vic e in s tructio n s.
Page 7

6
04052009
2 YEAR PRODUCT WARRANTY
This product is guaranteed to be free from manufacturing defects in material and workmanship under
normal use for a period of 2 (two) years from the date of purchase. In the event a defect that is covered
by the foregoing warranty occurs during the applicable period stated above, ATN, at its option, will
either repair or replace the product, and such action on the part of ATN shall be the full extent of ATN’s
liability, and the Customer’s sole and exclusive remedy. This warrant y does not cover a product (a)
used in other than its normal and customary manner; (b) subjected to misuse; (c) subjected to alterations, modifications or repairs by the Customer of by any party other than ATN without prior written
consent of ATN; (d) special order or “close-out ” merchandise or merchandise sold “as-is” by either
ATN or the ATN dealer; or (e) merchandise that has been discontinued by the manufacturer and either
parts or replacement units are not available due to reasons beyond the control of ATN. ATN shall not
be responsible for any defects or damage that in ATN’s opinion is a result from the mishandling, abuse,
misuse, improper storage or improper operation, including use in conjunction with equipment which
is electrically or mechanically incompatible with or of inferior quality to the product, as well as failure
to maintain the environmental conditions specified by the manufacturer. CUSTOMER IS HEREBY
NOTIFIED THAT OPERATION OF THE EQUIPMENT DURING DAYLIGHT HOURS OR UNDER
AN Y E XCE SS IV E L IG HT C ON D IT IO NS M AY PE R MA NE N TLY DA MAG E TH E IN T ER NAL C OM PO NENTS OF THE UNIT AND SAID DAMAGE WILL NOT BE COVERED UNDER THIS WARRANTY.
This warranty is extended only to the original purchaser. Any breach of this warranty shall be waived
unless the customer notifies ATN at the address noted below within the applicable warranty period.
The customer understands and agrees that except for the foregoing warranty, no other warranties
writ ten or oral, statutory, expressed or implied, including any implied warranty of merchantability or
fitness for a particular purpose, shall apply to the product. All such implied warranties are hereby and
expressly disclaimed.
LIMITATION OF LIABILITY
ATN will not be liable for any claims, actions, suits, proceedings, costs, expenses, damages or liabilitie s ar isi ng o u t of t he u se o f thi s pr o du ct . Op er a ti o n an d us e of t he p r od uc t are the s ol e re s po ns i bi l it y of
the Customer. ATN’s sole undertaking is limited to providing the products and services outlined herein
in accordance with the terms and conditions of this Agreement. The provision of products sold and
services performed by ATN to the Customer shall not be interpreted, construed, or regarded, either
exp r es s ly o r im p lie d, as b ei n g for t he b ene fit o f or c rea t ing a ny ob lig ati on t o war d any t h ird p ar ty o f le gal
en t it y ou ts id e AT N a nd t he Cu st om er ; AT N’s ob li ga ti on s u nd er t hi s A gr ee me nt e xt en d s ol el y t o th e C us tomer. ATN’s li a bilit y h ereund er for dam a g es, r e gardl e ss of the form o r a c tion, sh a ll not exc eed
the fees or other charges paid to ATN by the customer or customer’s dealer. ATN shall not, in
any event, be liable for special, indirect, incidental, or consequential damages, including, but
no t li mi t ed to , lo st in c om e, lo st re v en ue , o r lo st pr of i t, w h eth er s uc h d am ag es we re f or es eea bl e
or not at the time of purchase, and whether or not such damages arise out of a breach of war-
ranty, a br e ach of a g reeme n t , neglige n c e, strict liabilit y o r a ny oth e r t heory of liab ili t y.
PRODUCT WARRANTY REGISTRATION
In order to validate the warranty on your product, ATN must receive a completed Product Warranty
Registration Card for each unit or complete warranty registration on our website at www.atncorp.com.
Please complete the included form and immediately mail it to our Service Center: ATN Corporation,
1341 San Mateo Avenue, South San Francisc o, CA 94080.
OBTAINING WARRANTY SERVICE
To obtain warranty service on your unit, End-user must notify ATN service department by calling 800910-2862 or 650-989-5100 or via e-mail service@atncorp.com to receive a Return Merchandise
Authorization number (RMA).
When returning please take or send the product, postage paid, with a copy of your sales receipt to our
service center, ATN Corporation at the address noted above. All merchandise must be fully insured
with the correct postage; ATN will not be responsible for improper postage or, missing or damaged
merchandise during shipment.
When sending product back, please clearly mark the RMA# on the outside of the shipping box. Please
include a letter that indicates your RMA#, Name, Return Address, reason for service return, Contact
information such as valid telephone numbers and /or e-mail address and proof of purchases that will
help us to establish the valid start date of the warranty. Product merchandise returns that do not have
an R MA l i ste d m ay be refused or a signif i cant delay i n pr o cessing may occur.
Estimated Warranty service time is 10-20 business days. End-user/customer is responsible for postage to ATN for warranty service. ATN will cover return postage/shipping to continental USA end-users/
customers after warranty repair only if product is covered by aforementioned warranty. ATN will return
product after warranty service by domestic UPS ground and/or domestic mail. Any other requested,
required or international shipping method the postage/shipping fee will be the responsibility of the
end-user/customer.
Page 8

Fo r cu s tomer ser v i c e a n d techni c a l sup p o r t, p l e a s e c o n t a c t
American Technologies Network Corp.
North American Office
1341 San Mateo Avenue, South San Francisco, CA 94080
phone: 800-910-2862, 650-989-5100; fax: 650-875-0129
European Office
phone: 44 ( 0) 8 70 - 0111286, fax: 44 ( 0) 845 - 3 34914 2
The f o l l owing countries can use o u r
to l l fr e e numb e r 0 0 8 00 910 2 - 862 0
Austria, France, Germany, Holland, Italy, Spain, Sweden, Switzerland
www.atncorp.com
©2009 ATN Corporation
 Loading...