

ATN Aries MK 258 User Manual

AMERICAN
TECHNOLOGIES
NETWORK
CORP.
u s e r ` s g u i d e
Aries Mk 258
The information in this manual furnished for information use only, is subject to change without notice, is not to be
construed as a commitment by ATN Corp.
ATN Corp. assumes no responsibility or liability for any errors or inaccuracies that may appear in this book.
©2001 ATN Corp. All right reserved.
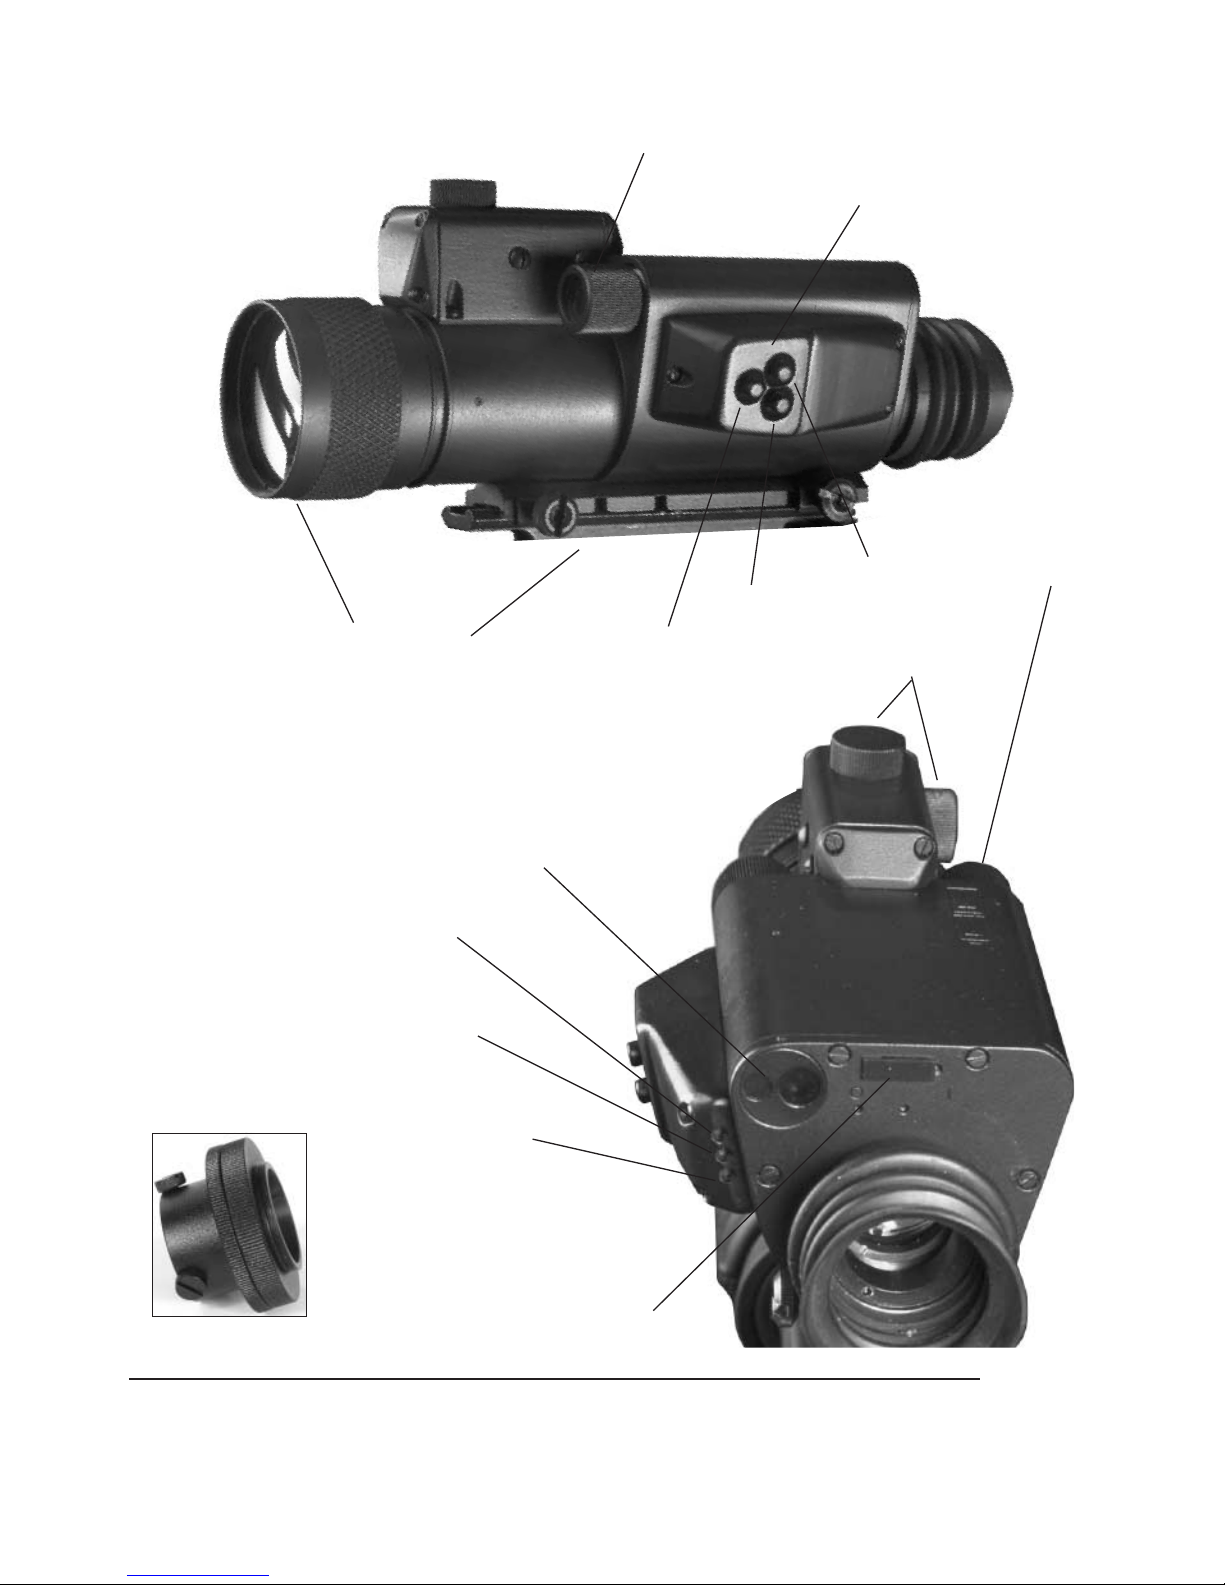
Master power switch
Proximity sensor
Manual focus
Internal windage
and elevation
Infra-red illuminator
Control panel
Mounts to standard
US weaver rail
Battery
housing
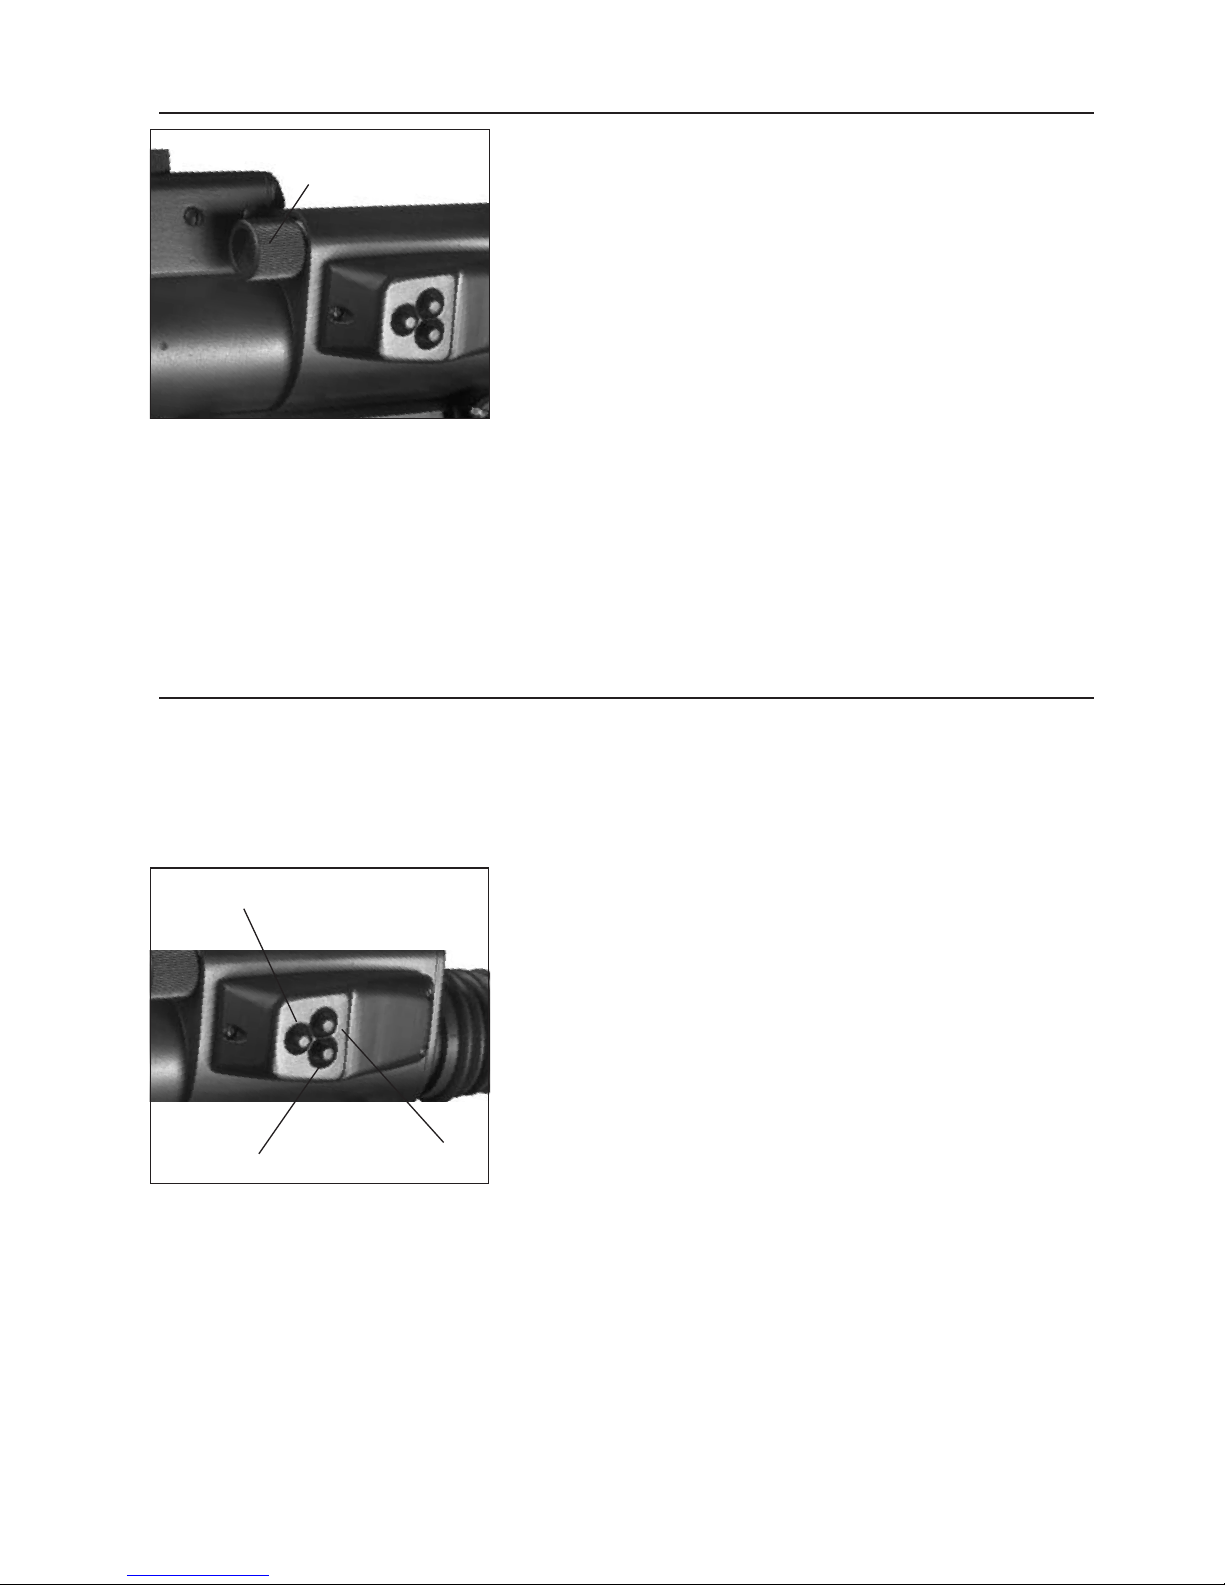
“SL” button
“+” button
“-” button
Reticle brightness
adjustment light
indicator (R )
Light intensifier
brightness light
indicator (B)
Infra-red illuminator
brightness adjustment
light indicator (I)
Camera adapter

2
APPLICATION
The Aries 258 night vision weapon scope is a complex computerized system for the observation of objects at low light levels (less than 1.0 lux. ) Containing an on board computer, these
scopes are some of the most advanced night vision weapon scopes in the world
The Aries 258 consists of the objective lens assembly, ocular lens assembly and the body.
The body contains the image intensifier tube assembly with the integrated high voltage power
source. The body also houses the electronics for the reticle, the computer console for the
“Smart Technology” as well as the battery compartment. The 100M infra-red illuminator is
located on the opposite side from the battery compartment.
The objective lens protective cover is designed to protect the lens from scratches and abrasions. This cover also protects the image intensifier tube from exposure to daylight or other
bright light sources. The protective cover acts as a daylight filter, note the pinhole in the center
of the lens cap.
NOTE: Please refrain from testing in the daylight for more than ten (10) minutes at a time.
MASTER POWER SWITCH
The master on/off switch is to be found on the back of the unit. Once the scope’s master
power switch is turned to the “ON” position, you will then be able to adjust the scope from the
control box.
CONTROL PANEL
The Cluster of three buttons on the side of the Aries 258 are your controls for the unit. The
“SL” button acts as a three way selection toggle. By pressing it once, you will see one of three
colored diodes, located on the rear side of the control box, light up. Make sure to keep both
eyes open, and we suggest that you use your right eye for aiming through the scope. This will
give you a HUD (Heads Up Display) of the scope’s functions while using the scope. The + and
- adjustment buttons increase and decrease the level of a particular function.
The three colored led diodes represent the mode of function of the scope. “B” for Brightness
of the light intensifier tube, “R ” for Reticle brightness, and “I ” for IR Illuminator brightness.
LIGHT INTENSIFIER TUBE BRIGHTNESS ADJUSTMENT
The green diode “B” represents light intensifier tube power ratio. Once this is lit you can
adjust the brightness of the light intensifier with the “+” and “–” adjustment buttons.
NOTE: The Aries 258 is a GEN 1 Night Vision device, adjustments Involving the light intensifier
tube will be subtle due to the nature of the design. Adjusting the tube’s power down will take
longer to take effect than adjusting it up. You may notice a persistent green glow after the unit
has been turned “OFF”(don’t keep pressing the key) this too is due to the nature of the design of
a GEN 1 light intensifier tube’s power supply.
RETICLE BRIGHTNESS ADJUSTMENT
By pressing the “SL” button again you will see a yellow diode “R ” light up next to the green
one. The yellow diode represents the reticle’s brightness. Adjustments should be easily seen
if you look through the Aries 258 while you work the “+” and “–” adjustment buttons.
To adust the brightness of the reticle, or to turn It off all together, use the buttons located on the
control box on the side of the unit press and hold one of the “+” or “–” adjustment buttons while
the yellow diode is lit and looking through the scope to see the change in brightness. When
desired brightness is reached, release the button.
3
INFRA-RED ILLUMINATION
By pressing the “SL” button a third time you will then see a
red diode “I ” light up. The red diode represents the 100M
infra-red illuminator’s brightness adjustment mode. Adjustments should be easily seen if you look through the Aries
258 while you work the “+” and “–” adjustment buttons.
Infra-red illuminators, or IR illuminators, are common to
night vision. The IR light greatly enhances the performance of the Aries 258, while remaining almost totally invisible to the naked eye. The IR illuminator on the Aries 258
is the 100M and is located near the windage and elevation
adjustments.
In a dark environment, power up the Aries scope. Now, find
a scene and examine it without the IR on, and with the IR on. Note the difference in illumination. It is important to remember that the IR illuminator is simply an infra red light source, and
like any light source, It may loose its effectiveness over a great distance.
You may desire a different field of coverage from the IR illuminator, if so the beam is focusable.
By turning the lens of the IR illuminator you will change the beam width slightly.
NOTE: The IR will automatically turn off when the unit’s main power switch is turned to the “off”
position.
SLEEP MODE
One of greatest new features, that your Smart scope has is a “SLEEP” mode. This feature will
extend the life of your scope many folds, set the scope to memorize your initial settings and
extend your battery life (by settings we mean only the digital settings. These include brightness of the tube, brightness of the reticle, and magnitude of the IR. ) The sleep mode works in
the following way:
The scope will automatically shut down if it dose not sense
any activity for 20 minutes. Activity includes pressing any
of the buttons ir simply moving it back and forth away from
your face. When activating the sleep mode the scope will
first warn you by turning off the reticle for 10 seconds. If
your intention is to keep using the scope, simply touch any
key and the scope will reactivate.
One of the reason why a “SLEEP” mode is programmed
into your scope is to preserve the life of light intensifier tube
and batteries in case you forget to turn your unit off. If you
notice that the reticle has turned off after 20 minutes, just
push “SL” button and the scope will return to its previous
settings.
If you would like to put your scope in the “SLEEP” mode
before the 20 minute period, just push the “SL” and “–” at the same time. Just push “SL” to
return to previous settings, the “Smart” scope will remember them. This will be a very valuable
feature if you are waiting for game to come, you could prepare all of the settings, place the unit
in “SLEEP” mode and activate it precisely when you need it. To disable the proximity sensor
press “SL” and “+” at the same time. In order to turn the proximity sensor back on, press” SL”
and “+” at the same time again.
NOTE: The scope will be capable of running on “SLEEP” mode for more than 10 (ten) days and
will be ready to use at any moment. Remember, you don’t have to turn the unit off while you are
using it (“Smart” sight will remember all the settings. ) Use master “ON/OFF” switch only to store
the scope. The proximity sensor will work best in a dark environment. Daylight testing and/or
Infra-red illuminator
“SL” button
“-” button “+” button
 Loading...