

Page 1
User’s Reference
TTFFTT LLCCDD MMoonniittoorr
HHiigghh rreessoolluuttiioonn
P/N : 97E9500280
Page 2
1
Contents
1. Precautions 2
2. Items
4
3. Setting up the LCD monitor
5
How to connect the power cord and the several cables to the LCD monitor. 5
Plug & Play 5
Warm-up Time 5
4. Adjusting The Monitor 6
How to use the Function Key. 6
Main OSD Menu 6
PICTURE 7
COLOR
7
OSD
7
MISC 7
MWE 7
5. Appendix 8
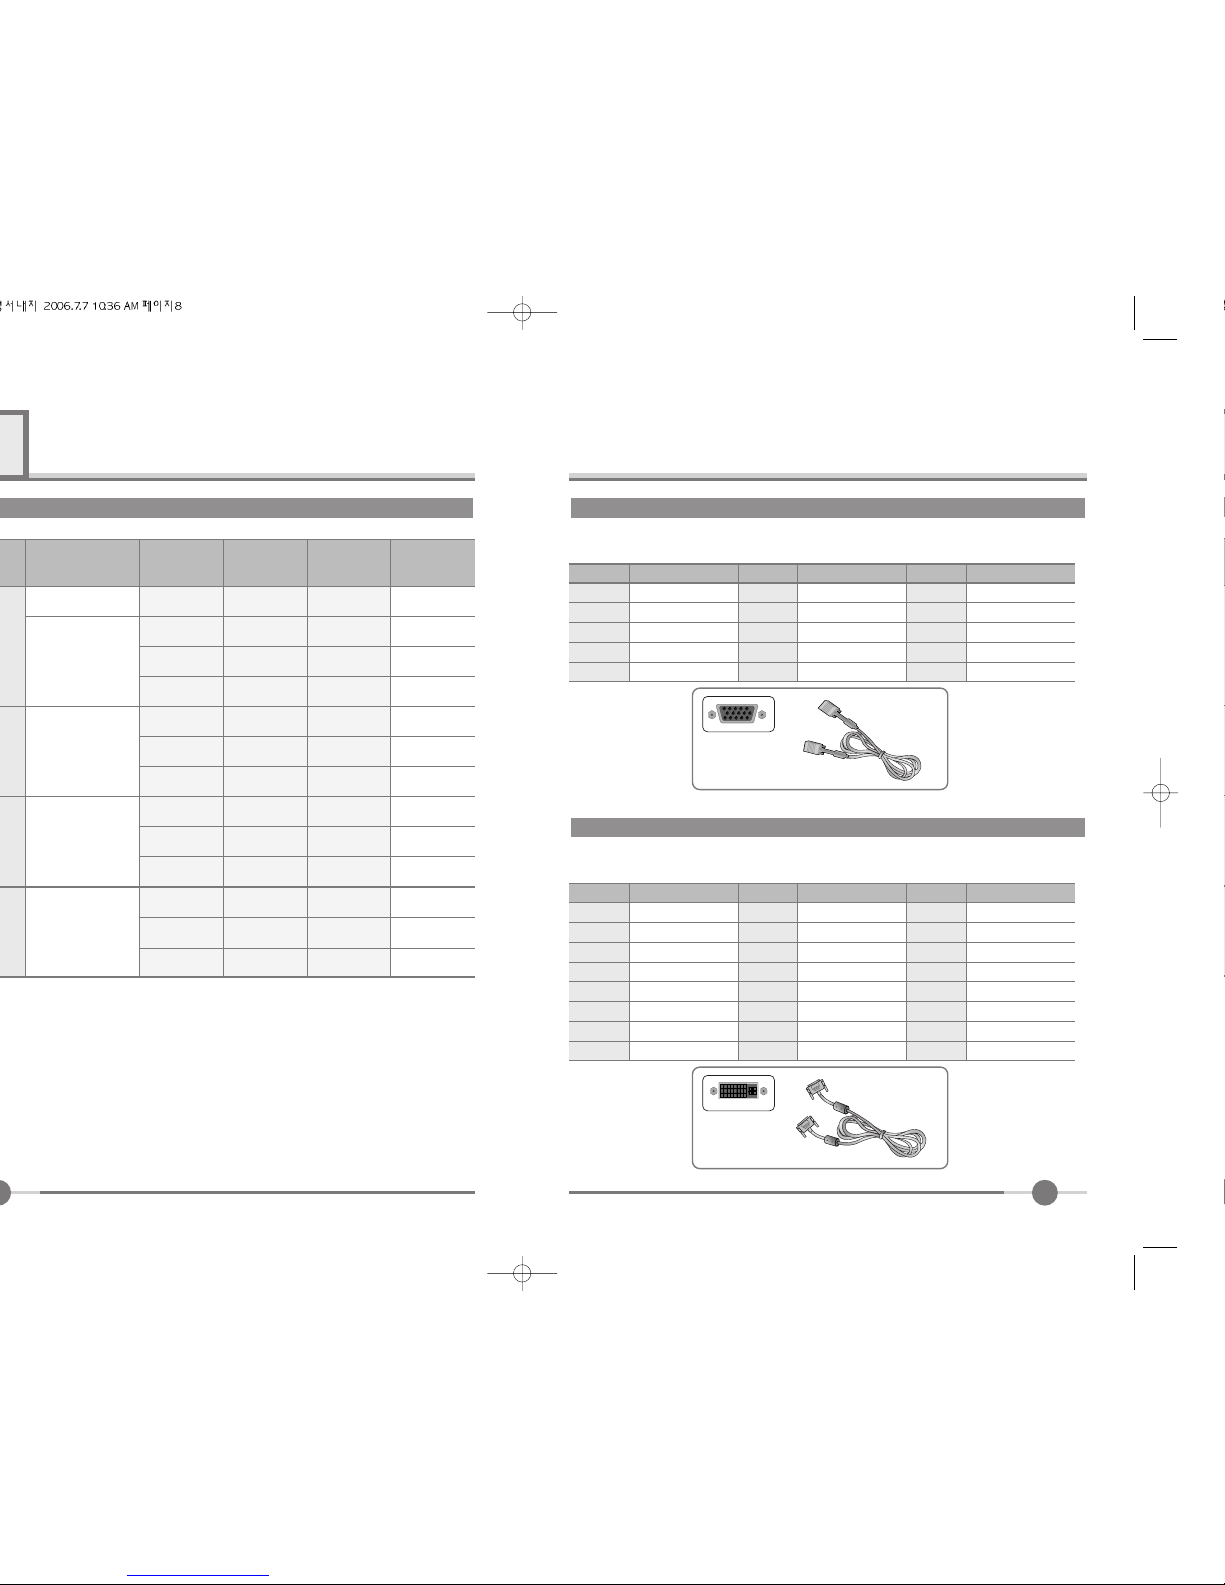
Display Modes 8
15-pin D-Sub Connector 9
DVI-D Connector 9
Power Saver 10
6. Troubleshooting 11
Page 3
32
Precautions
Power cord
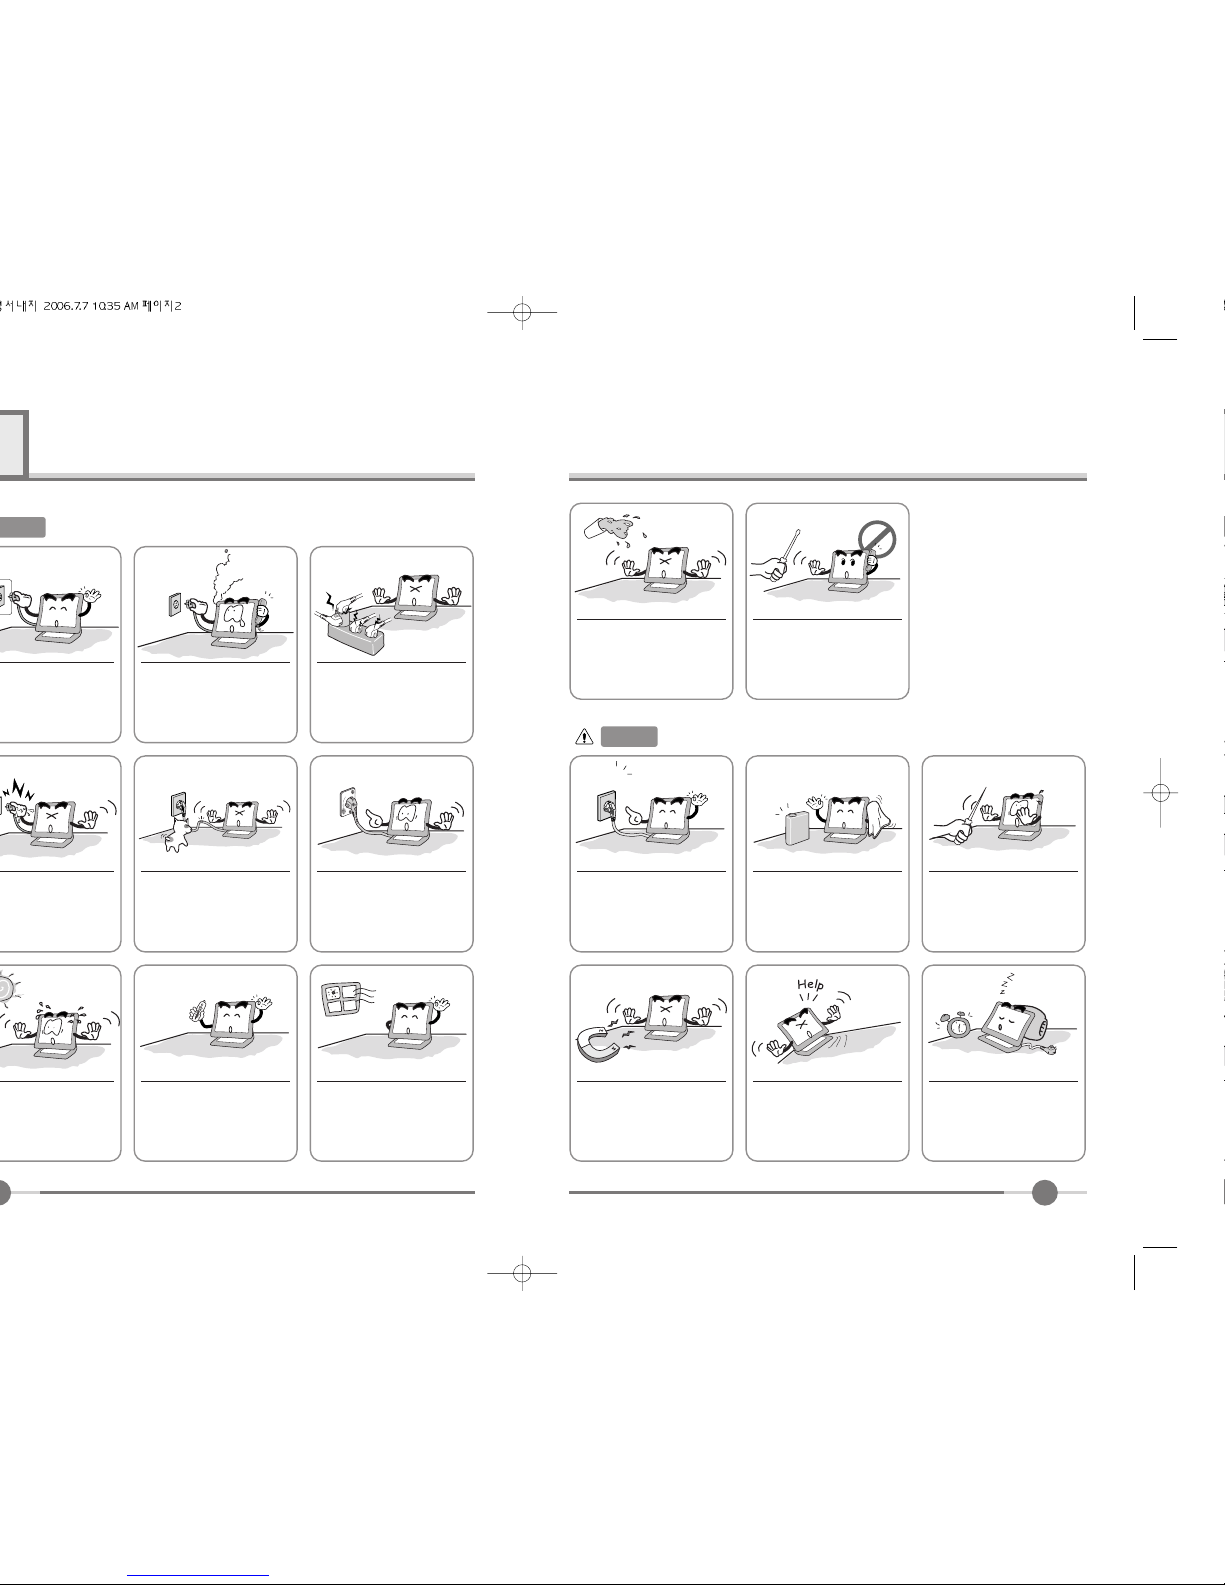
The following information will help you avoid the risk of electric shock, serious injury, and death.
Do not allow any object or liquid to enter inside the monitor.
There is the risk of electric
shock, fire, or damage to the
monitor.
Do not bend the power cord
excessively or place heavy objects
on it. Keep children and pets away
from the power cord as they may
damage the power cord. There is
the risk of electric shock and fire.
Do not use a damaged power
cord or plug. Make sure the
plug fits snugly into the outlet.
There is the risk of electric
shock or fire.
Keep the monitor away from high
temperature, humidity, and dust.
■Operating environment
=0~35degrees Celsius
■Operating environment
=30~80relative humidity.
Do not block the fan louvers.
There is the risk of fire or damage to the monitor.
220V
Use a proper voltage/current
level indicated
Do not clean the LCD with
abrasive chemicals.
There is the risk of damage to
the LCD.
Do not scratch and damage
the LCD with sharp objects.
Keep the monitor away from
objects and electrical appliances that may generate electromagnetic fields.
Place the monitor on a flat, stable surface. The monitor may
fall and there is the risk of
damage or injury
Unplug the power cord when
the monitor is not in use for a
prolonged period of time.
If you hear a noise or smell
smoke from the computer or
adaptor, unplug the power cord
immediately, and call the service
center. There is the risk of electric shock or fire.
Do not overload an electrical
outlet with too many devices.
There is the risk of fire.
Do not attempt to disassemble,
fix, or modify the monitor.
There is the risk of electric
shock or fire.
Caution :
The following information will help you avoid the risk of minor or moderate injury, or damage to the monitor.
Page 4
54
Items
Please make sure the following items are included with your monitor.
If any items are missing, contact your dealer.
User Manual
Cable
Stand
※
Push the hook until
hanging
LCD Monitor Power cord
Setting up the LCD monitor
3
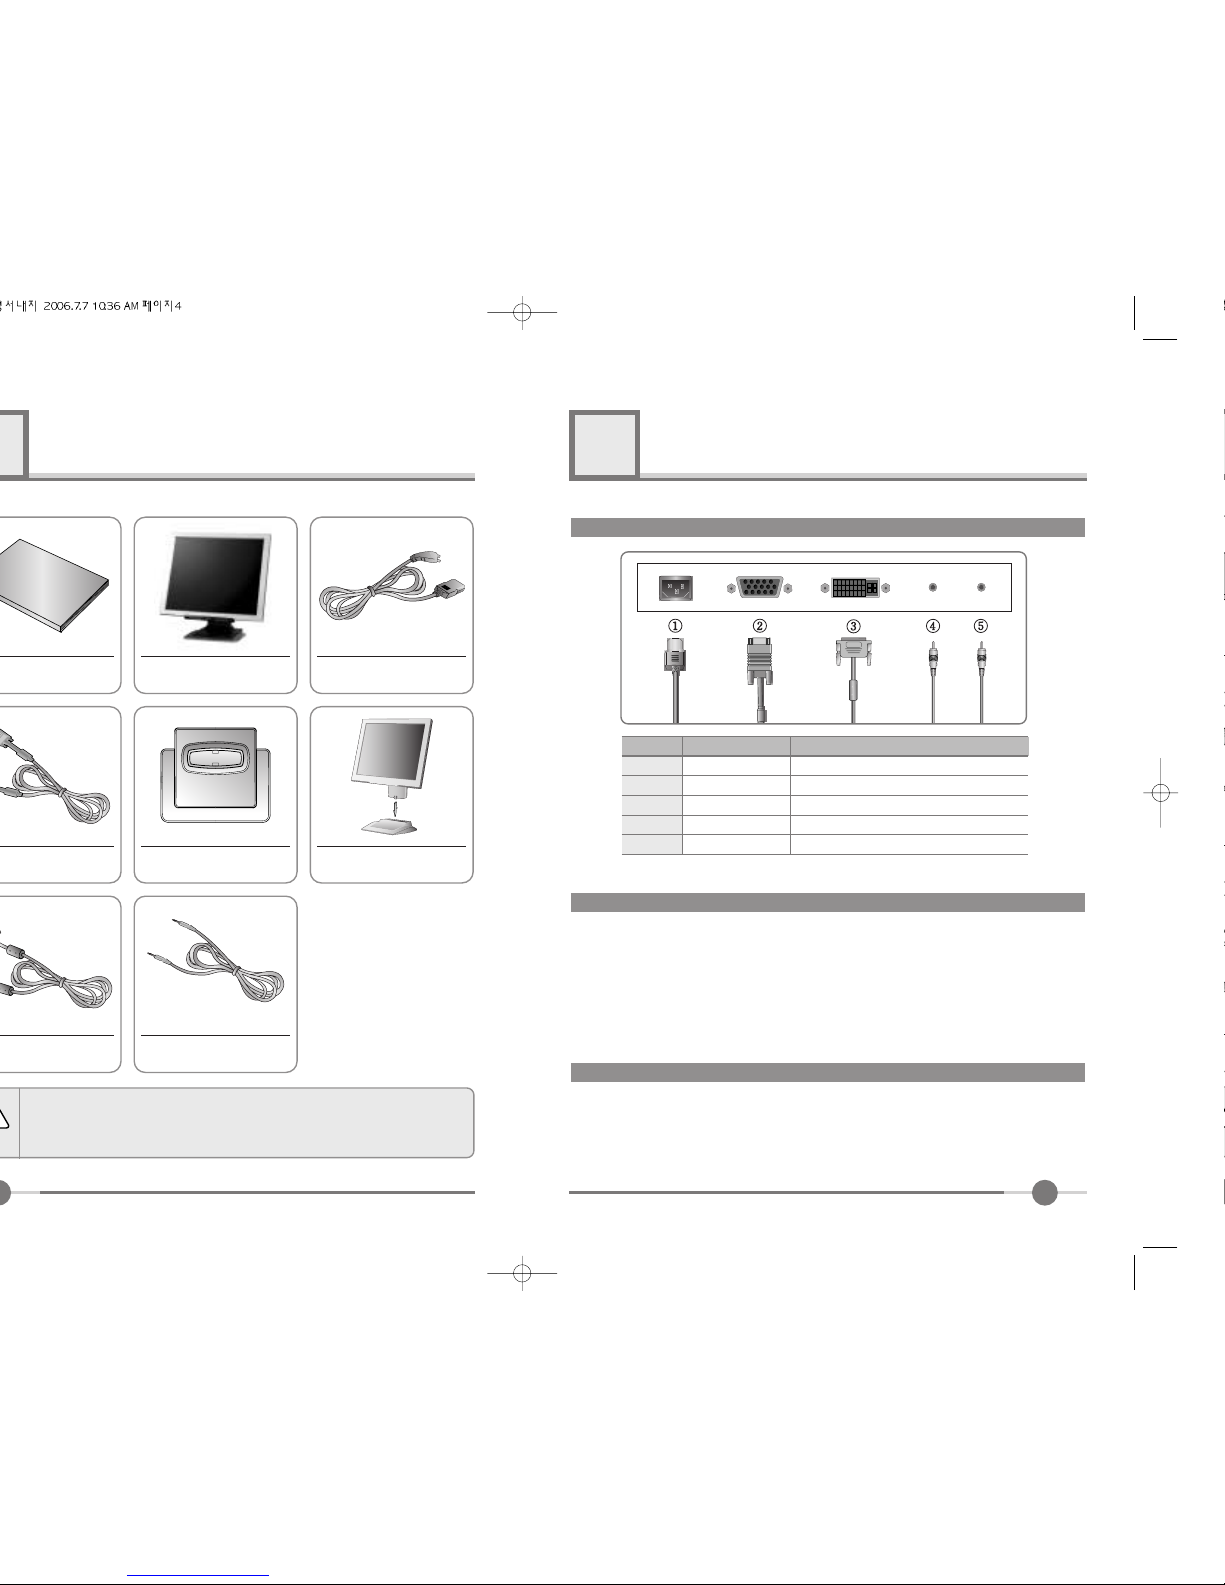
How to connect the power cord and the several cables to the LCD monitor.
Power
PC
DVI (Option)
SPK IN
SPK OUT
Power Cord
15-pin D-Sub Signal Cable
DVI-D Cable
*1
Audio Cable
*2
External Speaker Cable
*2
No. Cable connectionsName
All LCD monitors need time to become thermally stable whenever you turn on the
monitor after letting the monitor be turned off for a couple of hours. Therefore, to
achieve more accurate adjustments for parameters, allow the LCD monitor to be
warmed up for at least 30 minutes before making any screen adjustments.
Warm-up Time
The adoption of the new VESA Plug and Play solution eliminates complicated and
time consuming setup. It allows you to install your monitor in a Plug and Play compatible system without the usual hassles and confusion. Your PC system can easily identify and configure itself for use with your display. This monitor automatically tells the PC
system its Extended Display Identification Data (EDID) using Display Data Channel
(DDC) protocols so the PC system can automatically configure itself to use the flat
panel display.
Plug & Play
*1 : For DVI Model Only. *2 : For Audio Model Only.
*1 : For Audio Model Only.
*1
1
2
3
4
5
Page 5
76
Adjusting The Monitor
● BRIGHTNESS : Changes the overall light intensity of the images being displayed.
● CONTRAST :
Changes the ratio of light intensity between the brightest white and darkest black.
● H POSITION : Moves to the Left/Right.
*1
● V POSITION : Moves to the Top/Bottom.
*1
● PHASE : When image is not clear, you can use clock/phase menu.
*1
● CLOCK : When image is not clear, you can use clock/phase menu.
*1
● AUTO ADJUST :
You can select AUTO ADJUST”, this will optimize image quality automatically.
*1
PICTURE
BRIGHTNESS
CONTRAST
H POSITION
V POSITION
PHASE
CLOCK
AUTO ADJUST NO
COLOR
Color adjustment needs to be only for Analog mode.
● COLOR : There are user, bluish and reddish modes.
In case user has to set up RED”, GREEN”, BLUE in person, please select
user mode.
● RED,GREEN,BLUE : You can adjust red, green and blue values that you want.
● AUTO COLOR : Automatic adjust color(white level) for various input sources white level.
OSD
● OSD H POSI : Moves the OSD menu to the horizontal direction.
● OSD V POSI : Moves the OSD menu to the vertical direction.
● OSD TIMER : Shows the OSD Time displays from 10 to 40 sec.
● TRANSPARENCY : You can adjust OSD Transparency.
MISC
● LANGUAGE : Selects language in OSD menu.
● RECALL :
Discards current setting and replaced all parameters with the factory default values.
● INPUT SELECT : You can change the display mode.(Analog ↔ Digital)
● AUDIO : Sound Mute On/Off function.
*2
● VOLUME : You can adjust the volume.
*2
Notice : The first set-up was done when the goods are released from the factory.
After finishing the first set-up, please press Auto and optimize the screen.
MWE
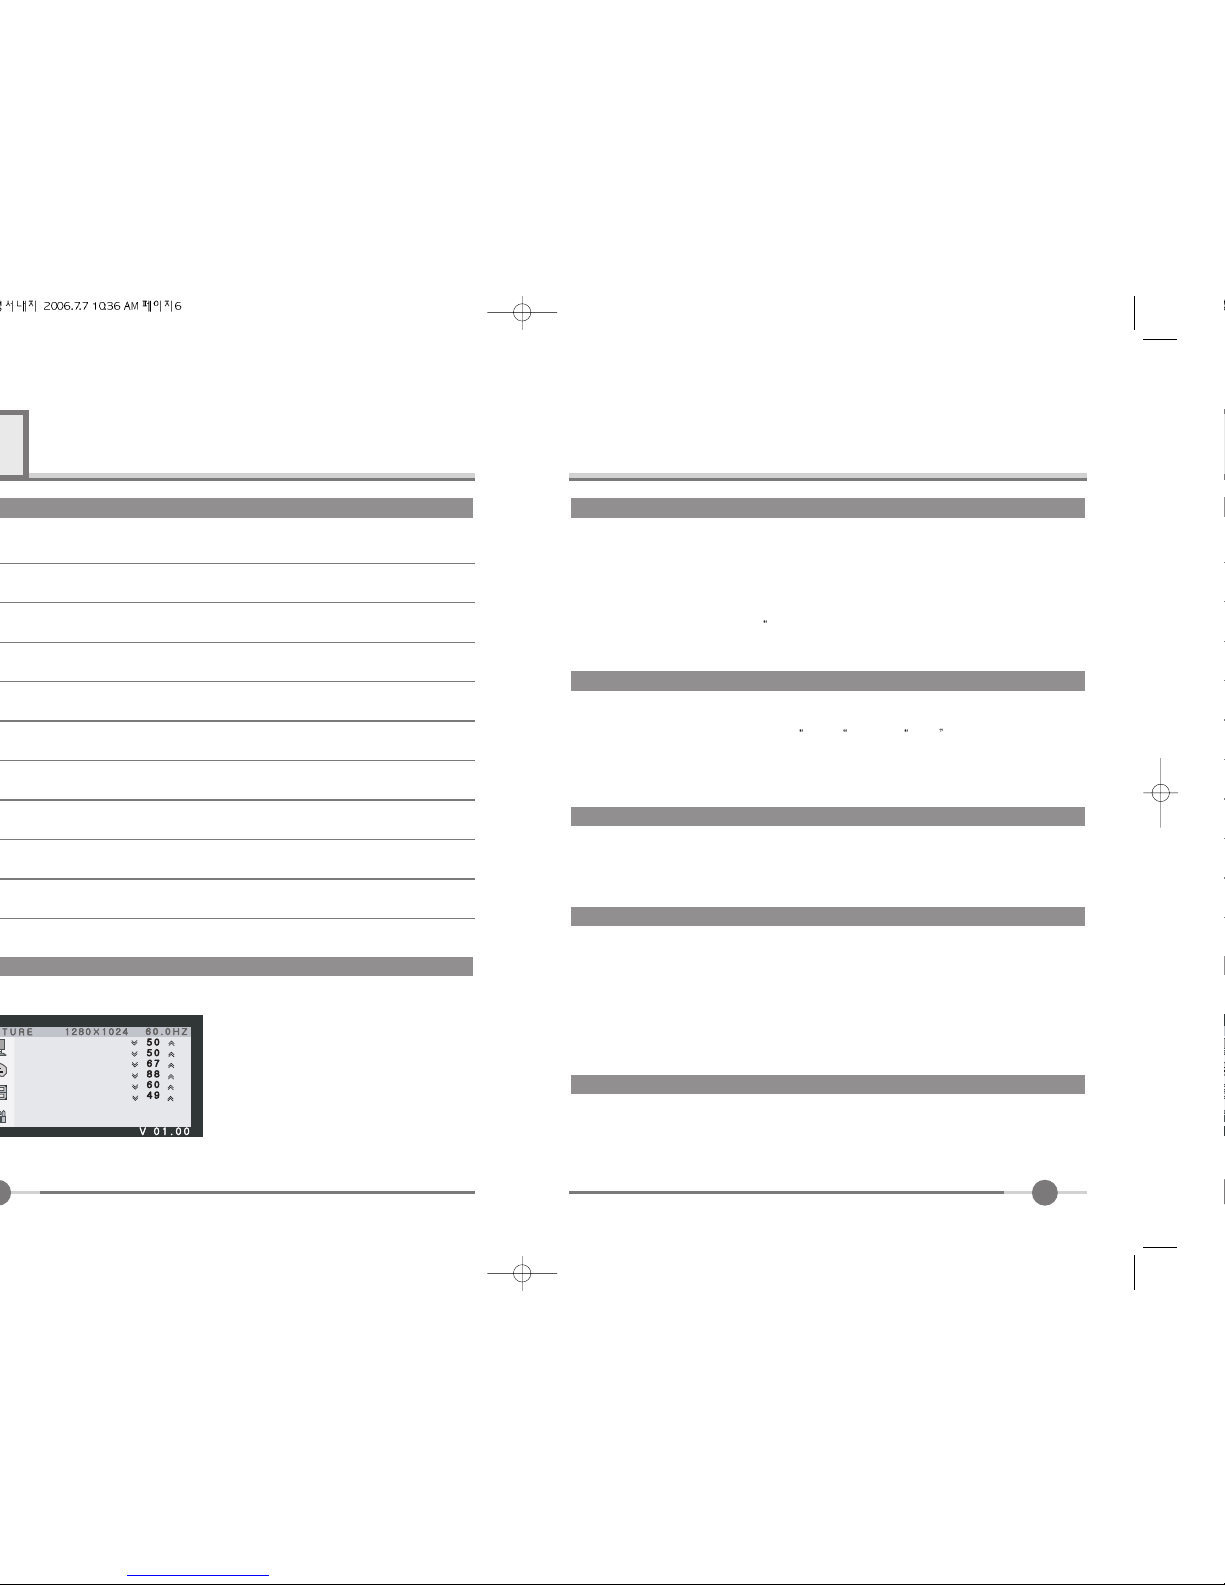
When you press MWE button, you can get into the following picture.
● ENTERTAIN : Movies, Video games
● TEXT : Documents
● INTERNET : Internet
● NORMAL : Normal
2. Second click : The OSD menu disappears.
*1
*2
*2
Ex) Internet, Games, Movies...
: 1. Move the on-screen highlighted command item to the next one.
2. Decrease the current option value.
: 1. Move the on-screen highlighted command item to the Previous one.
2. Increase the current option value.
*1 : For Analog Mode Only.
*2 : For Audio Model Only.
Page 6
Appendix
*1 : For Analog Model Only.
640 X 480
720 X 400
800 X 600
1024 X 768
Resolution
31.468
Horizontal
Frequency(KHz)
Vertical
Frequency(Hz)
Pixel Clock
Frequency(MHz)
Sync
Polarity(H/V)
31.468
35.000
37.500
37.879
48.077
46.875
48.363
56.476
60.023
70.087
59.940
66.670
75.000
60.300
72.188
75.000
60.004
70.000
75.029
28.322
25.175
30.240
31.500
40.000
50.000
49.500
65.000
75.000
78.750
-/+
-/-
-/-
-/-
+/+
+/+
+/+
-/-
-/-
+/+
1280 X 1024
63.981
79.976
*1
60.020
75.025
*1
108.000
135.000
*1
+,-/+,-
+/+
*1
9
15-pin D-Sub Connector
● Input signal : Analog RGB
● 15-pin D-Sub connector
DVI-D Connector
● Input signal : Digital
● DVI-D Connector
Pin No.
1
2
3
4
5
Analog Red Input
Analog Green Input
Analog Blue Input
Ground
DDC Ground
Pin No.
6
7
8
9
10
Signal Name
Analog Red Ground
Analog Green Ground
Analog Blue Ground
No Connect
Sync Ground
Signal Name Pin No.
11
12
13
14
15
Ground
DDC Data
Horizontal Sync
Vertical Sync
DDC Clock
Signal Name
Pin No.
1
2
3
4
5
6
7
8
TMDS DATA2-
TMDS DATA2+
DGND
NC
NC
DDC CLOCK
DDC DATA
Analog vertical Sync
Pin No.
9
10
11
12
13
14
15
16
Signal Name
TMDS DATA1-
TMDS DATA1+
DGND
NC
NC
+5V POWER
AGND
NC
Signal Name Pin No.
17
18
19
20
21
22
23
24
TMDS DATA-
TMDS DATA+
DGND
NC
NC
DGND
TMDS CLOCK+
TMDS CLOCK-
Signal Name
15-pin D-Sub Signal Cable
DVI-D Cable
Page 7
1110
Troubleshooting
What you see
Ensure that the power cord is firmly connected and the LCD
monitor is on.
“VIDEO MODE NOT
SUPPORTED” message
“NO SIGNAL” message
Screen is blank and power indictor
is off
�Check the maximum resolution and the frequency of the
video adaptor.
�Compare these values with the data in the Display Modes
Timing Chart.
�Ensure that the signal cable is firmly connected to the PC
or video sources.
�Ensure that the PC or video sources are turned on.
The image is too light or too dark
�Adjust the Brightness and Contrast.
�Refer to the Brightness/Contrast
The image color is not good
�Adjust the Color
�Refer to the Color
Image is not centered on the
screen
�Executes Auto Adjustment.
Screen is blank and power indicator
light is steady amber or blinks
every 0.5 or 1 seconds
�The monitor is using its power management system.
�Move the computer’s mouse or press a key on the key-
board.
Image is not stable and may
appear to vibrate
�Check that the display resolution and frequency from your
PC or video board is an available mode for your monitor.
On your computer check : Control Panel, Display, Settings
�Note : Your monitor supports multiscan display functions
within the following frequency domain:
Suggested Actions
6
ON Under 40W
-
Green
State
Power
consumption
Recovery
Time
LED Color
OFF Less than 2W Within2 sec Amber
Page 8
 Loading...