

Page 1
SMART ARM-based Microcontrollers
AT06467: Getting started with SAM D09/D10/D11
APPLICATION NOTE
Features
• Getting started with Atmel® | SMART SAM D09/D10/D11
microcontrollers and tools
• Getting started with SAM D11 Xplained PRO, SAM D10 Xplained Mini,
and Atmel Studio 6.2
Description
This application note helps the readers to get started with the Atmel SAM
D09/D10/D11 ARM® Cortex®-M0+ based microcontroller.
Atmel-42362B-Getting-Started-with-SAM-D09-D10-D11_AT06467_Application Note-11/2015
Page 2

Table of Contents
Features.......................................................................................................................... 1
Description.......................................................................................................................1
1. Getting the Device Datasheet....................................................................................3
2. SAM D Evaluation Platform....................................................................................... 4
2.1. SAM D11 Xplained Pro.................................................................................................................4
2.2. SAM D10 Xplained Mini................................................................................................................5
2.3. SAM D09 On-board......................................................................................................................7
3. Get the Tools..............................................................................................................8
3.1. Get Atmel Studio 6.2.................................................................................................................... 8
3.2. Get IAR Embedded Workbench for ARM.....................................................................................8
3.3. Get Atmel Software Framework (ASF).........................................................................................8
4. Atmel Studio 6.2 Users Getting Started.....................................................................9
4.1. Getting Started with SAM D11 Xplained Pro................................................................................9
4.2. Getting Started with SAM D10 Xplained Mini.............................................................................10
4.3. Getting Started with SAM D09....................................................................................................12
5. What’s next?............................................................................................................15
6. Revision History.......................................................................................................16
Atmel AT06467: Getting started with SAM D09/D10/D11 [APPLICATION NOTE]
Atmel-42362B-Getting-Started-with-SAM-D09-D10-D11_AT06467_Application Note-11/2015
2
Page 3

1. Getting the Device Datasheet
Web page:
http://www.atmel.com/products/microcontrollers/arm/sam-d.aspx?tab=overview
• Document: Atmel SAM D11 Datasheet (summary, complete) (.pdf)
• Document: Atmel SAM D10 Datasheet (summary, complete) (.pdf)
• Document: Atmel SAM D09 Datasheet (summary, complete) (.pdf)
• Select the required device (e.g. ATSAMD11D14A) and get the latest datasheet (.pdf file)
• Two versions of the datasheet are available:
– Complete version (includes all peripheral descriptions and electrical characteristics)
– Summary version (includes ordering information, pinout, and packaging information)
Atmel AT06467: Getting started with SAM D09/D10/D11 [APPLICATION NOTE]
Atmel-42362B-Getting-Started-with-SAM-D09-D10-D11_AT06467_Application Note-11/2015
3
Page 4
2. SAM D Evaluation Platform
The following development boards are available for evaluation of SAM D11/D10 devices:
1. SAM D11 Xplained Pro.
2. SAM D10 Xplained Mini.
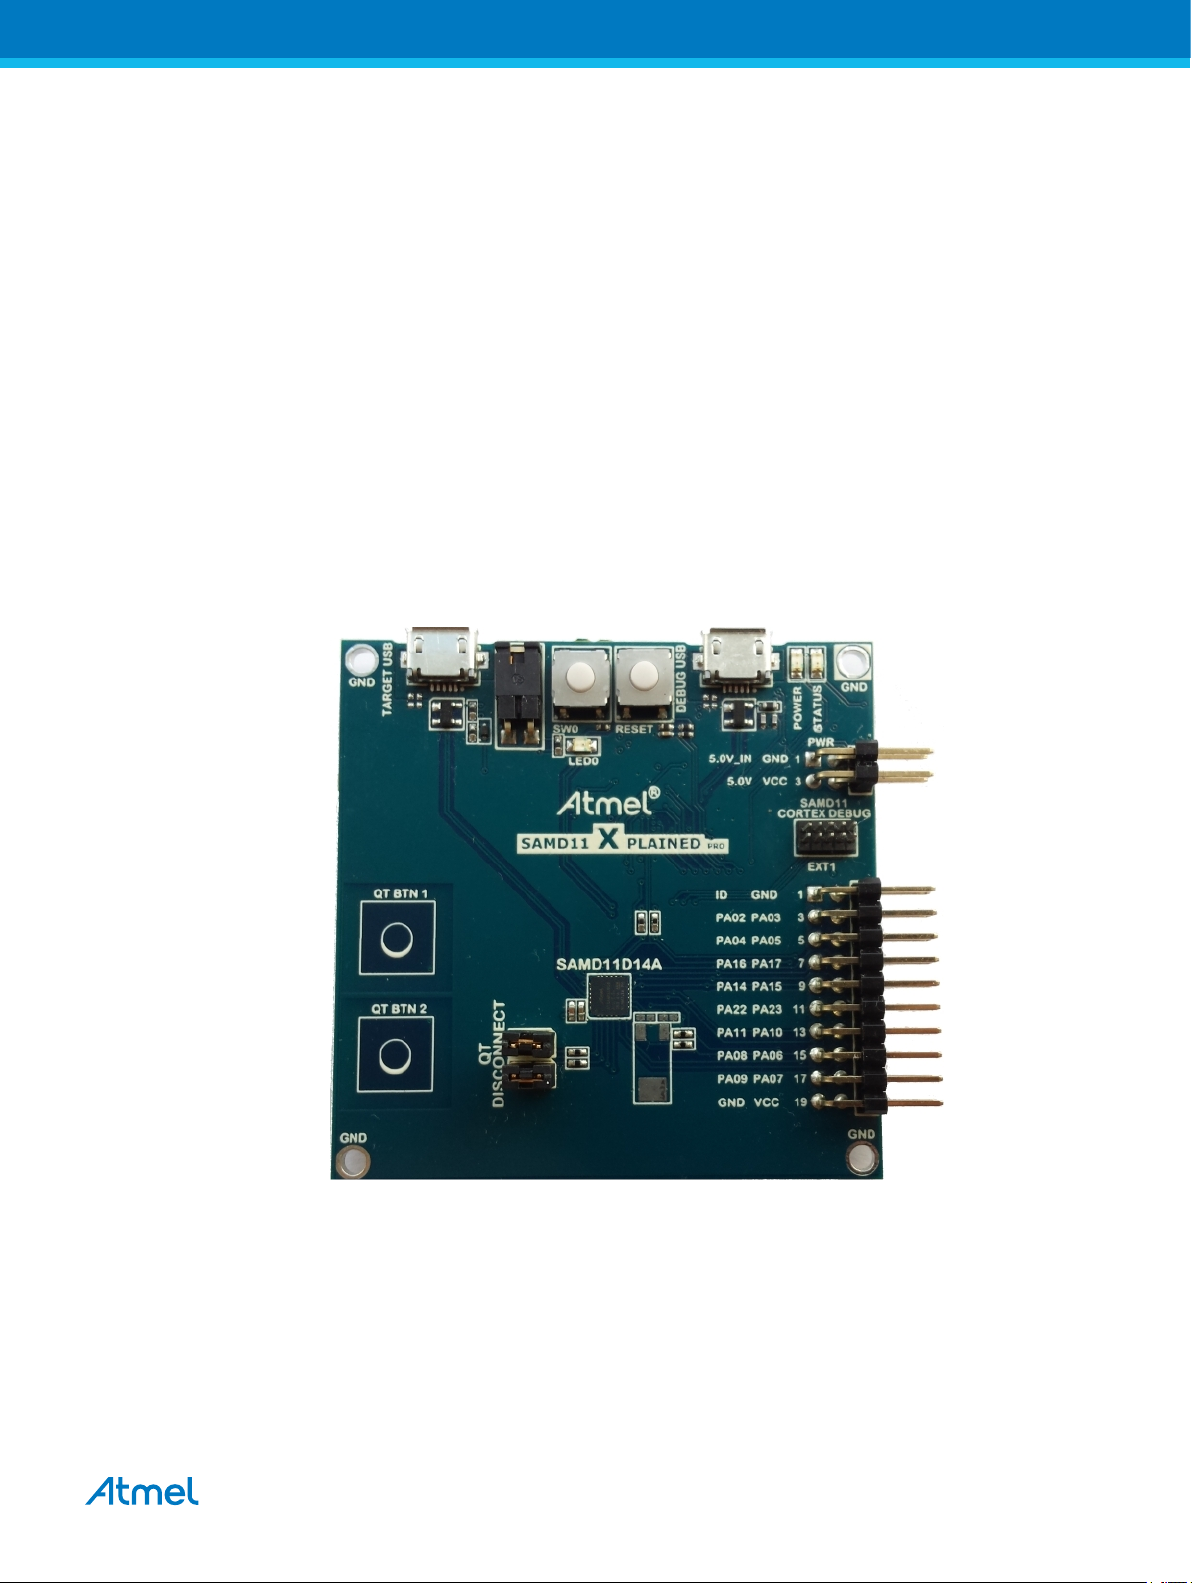
2.1. SAM D11 Xplained Pro
The Atmel SAM D11 Xplained Pro evaluation kit is a hardware platform to evaluate the ATSAMD11D14A
MCU. Supported by the Atmel Studio integrated development platform, the kit provides easy access to
the features of the Atmel ATSAMD11D14A and explains the steps to integrate the device in a custom
design.
The Xplained Pro MCU series evaluation kits include an on-board Embedded Debugger. No external tools
are required to program or debug the ATSAMD11D14A.
The Xplained Pro extension kits offers additional peripherals to extend the features of the board and ease
the development of custom designs.
Figure 2-1 SAMD11 Xplained Pro
Web page:
http://www.atmel.com/products/microcontrollers/arm/sam-d.aspx?tab=tools
Get the kit:
http://www.atmel.com/buy/
Document/file:
• Atmel-42349-SAMD11-Xplained-Pro_User-Guide.pdf
Atmel AT06467: Getting started with SAM D09/D10/D11 [APPLICATION NOTE]
Atmel-42362B-Getting-Started-with-SAM-D09-D10-D11_AT06467_Application Note-11/2015
4
Page 5

Key features:
• SAMD11D14A microcontroller
• One mechanical reset button
• One mechanical programmable button (SW0)
• One yellow user LED (LED0)
• USB device interface function
• Two QTouch buttons
• 32.768kHz crystal
• Standard Cortex Debug connector
• One Xplained Pro extension headers (EXT1)
• USB powered
• Supported with application examples in Atmel Software Framework
• Embedded Debugger
• – Auto ID for board identification in Atmel Studio 6.2 or later
– One yellow status LED
– One green board power LED
– Symbolic debug of complex data types including scope information
– Programming
– Data Gateway Interface: USART, TWI, four GPIOs
– Virtual COM port (CDC)
The SAM D11 Xplained Pro User Guide application note covers the instructions to power the kit, the
detailed information of the on board components, extension interface and the hardware guide.
2.2. SAM D10 Xplained Mini
The ATSAMD10 Xplained Mini evaluation kit is a hardware platform to evaluate the Atmel ATSAMD10
MCU. The evaluation kit comes with a fully integrated debugger that provides seamless integration with
Atmel Studio 6.2 (or later). The kit provides access to the features of the ATSAMD10 enabling easy
integration of the device in a custom design.
Atmel AT06467: Getting started with SAM D09/D10/D11 [APPLICATION NOTE]
Atmel-42362B-Getting-Started-with-SAM-D09-D10-D11_AT06467_Application Note-11/2015
5
Page 6
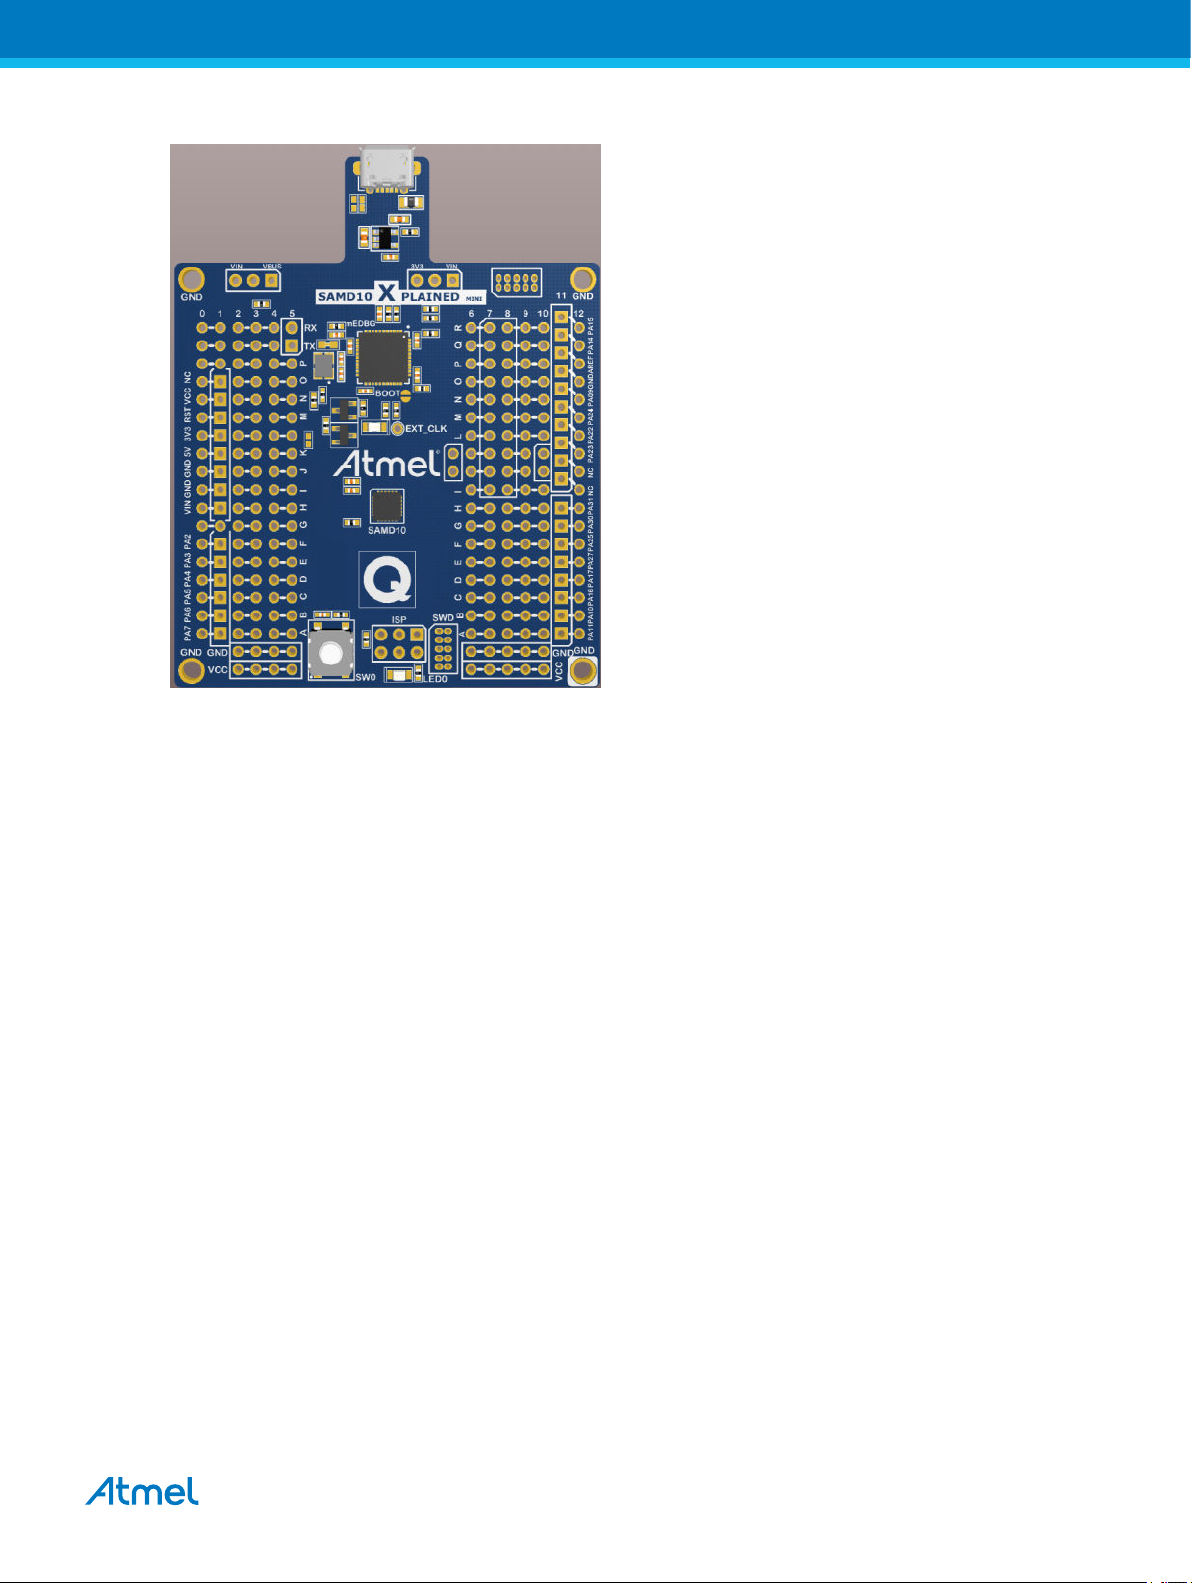
Figure 2-2 SAMD10 Xplained Mini
Web page:
http://www.atmel.com/products/microcontrollers/arm/sam-d.aspx?tab=tools
Get the kit:
http://www.atmel.com/buy/
Document/file:
• Atmel-42387-ATSAMD10-Xplain-Mini_User-Guide.pdf
Key features:
• ATSAMD10D14AM microcontroller
• One mechanical programmable button
• One QTouch button
• One yellow user LED
• The external 8MHz clock to ATSAMD10 (Target)
• Standard Cortex Debug connector
• One Xplained Mini extension headers (EXT1)
• USB powered
• Supported with application examples in Atmel Software Framework
• Embedded Debugger
– Auto ID for board identification in Atmel Studio 6.2 or later
– One green status LED
– Symbolic debug of complex data types including scope information
– Programming
– Data Gateway Interface: USART, TWI, four GPIOs
Atmel AT06467: Getting started with SAM D09/D10/D11 [APPLICATION NOTE]
Atmel-42362B-Getting-Started-with-SAM-D09-D10-D11_AT06467_Application Note-11/2015
6
Page 7

– Virtual COM port (CDC)
The SAM D10 Xplained Mini User Guide application note covers the steps to power the kit, the detailed
information of the on board components, extension interface, and the hardware guide.
2.3. SAM D09 On-board
Evaluation of SAM D09 can be performed using the SAM D10 Xplained Mini board and testing can be
performed on custom hardware. Steps start with evaluation of SAM D09 using a custom board is
explained in later part of this document.
Atmel AT06467: Getting started with SAM D09/D10/D11 [APPLICATION NOTE]
Atmel-42362B-Getting-Started-with-SAM-D09-D10-D11_AT06467_Application Note-11/2015
7
Page 8

3. Get the Tools
Atmel Studio 6.2 is the preferred IDE to get started with the SAM D09/D10/D11 devices and GCC
compiler. Atmel Software Framework (ASF) provides SAM D09/D10/D11 peripheral drivers. Example
projects are available in ASF for easy evaluation SAM D10/D11 MCU families. IAR™ compiler is
supported as well.
3.1. Get Atmel Studio 6.2
Web page:
www.atmel.com/atmelstudio
Document/file: Atmel Studio 6.2 installer (.exe)
Atmel Studio 6.2 is the IDE for developing and debugging firmware for the SAM D09/D10/D11
Microcontroller.
3.2. Get IAR Embedded Workbench for ARM
Web page:
http://www.iar.com/en/Products/IAR-Embedded-Workbench/ARM/
Document/file:
IAR installer for ARM.
Get SAM D11 Xplained Pro Embedded Debugger Software (Segger J-Link):
Web page:
http://www.segger.com/jlink-software.html
Document/file:
J-Link software.
This software is required to use the SAM D11 Xplained Pro embedded debugger with IAR IDE.
3.3. Get Atmel Software Framework (ASF)
Web page:
http://www.atmel.com/tools/avrsoftwareframework.aspx
Document/file:
• ASF update for Atmel Studio (.vsix) from ASF web page
• ASF update through Atmel Gallery https://gallery.atmel.com/
• ASF update through Tools > Extension Manager from Atmel Studio
• ASF standalone package for GCC makefile and IAR users
• Atmel AVR4029: Atmel Software Framework - User Guide
• Atmel AVR4030: Atmel Software Framework - Reference Manual
The ASF online documentation for the API and example usage are available at http://asf.atmel.com.
Atmel AT06467: Getting started with SAM D09/D10/D11 [APPLICATION NOTE]
Atmel-42362B-Getting-Started-with-SAM-D09-D10-D11_AT06467_Application Note-11/2015
8
Page 9
4. Atmel Studio 6.2 Users Getting Started
4.1. Getting Started with SAM D11 Xplained Pro
Requirements:
• Atmel Studio 6.2 or later
• ASF version 3.27 or later
• SAM D11 Xplained Pro board connected to Atmel Studio 6.2 through the embedded debugger USB
connector. The kit is powered by the USB.
Getting started
1. Launch Atmel Studio 6.2.
2. Connect the SAM D11 Xplained Pro board to the PC using a USB cable.
3. A page on SAM D11 Xplained Pro description will open in Atmel Studio.
4. This page contains external link to Device Technical Documentation, Datasheet, Kit user guide, and
Kit specific details, serial number, target name, etc. Also, there will be an option to open ASF
example projects.
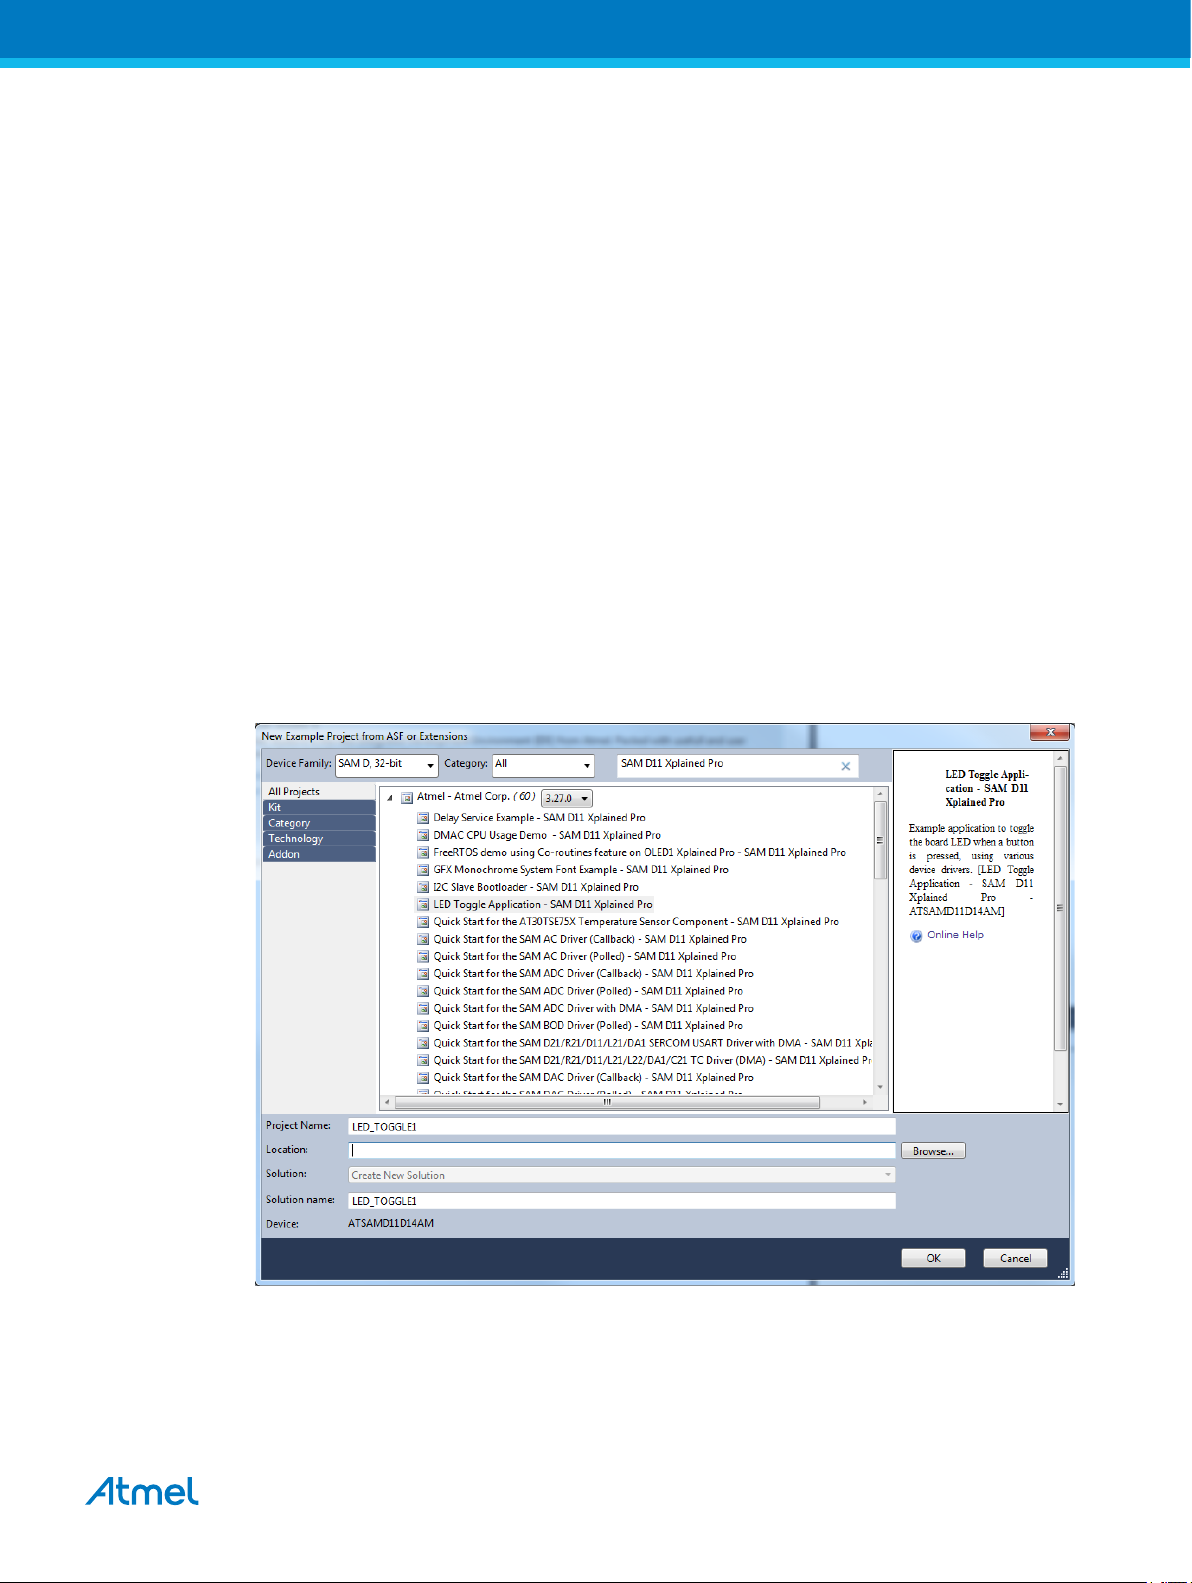
5. Go to File > New Example Project > select the device family and filter it to relevant examples.
6. Select the project LED Toggle Application, press OK, and accept the license agreement.
Figure 4-1 SAM D11 New ASF Example Project Window
7. Open project properties (Project > Properties or shortcut Alt+f7).
8. In Tool view (Tools > Device Programming), set the configurations – Tool (EDBG), and Interface
(SWD).
Atmel AT06467: Getting started with SAM D09/D10/D11 [APPLICATION NOTE]
Atmel-42362B-Getting-Started-with-SAM-D09-D10-D11_AT06467_Application Note-11/2015
9
Page 10

Figure 4-2 SAM D11 Tool Selection Window
9. Build the project: Build > Build solution or shortcut F7.
10. To load the code in the SAM D11 Xplained Pro and debug, select Debug > Start debugging and
break (shortcut Alt + F5).
11. The application is programmed and the debugger breaks in main.
12. To run the code, select Debug > Continue (shortcut F5).
4.2. Getting Started with SAM D10 Xplained Mini
Web page:
• Atmel Studio 6.2 or later
• ASF version 3.27 or later
• SAM D10 Xplained Mini board connected to Atmel Studio 6.2 through the embedded debugger
USB connector. The kit will be powered by the USB.
Getting started
1. Launch Atmel Studio 6.2 application.
2. Connect the SAM D10 Xplained Mini board to the PC using a USB cable.
3. A page on SAM D10 Xplained Mini description will open in Atmel Studio.
4. This page contains external link to Device Technical Documentation, Datasheet, Kit user guide, and
Kit specific details, serial number, target name, etc. There is an option to open ASF example
projects.
5. Go to, File > New Example Project > select the device family and filter it to relevant examples.
6. Select the project “LED Toggle Application”, press OK and accept the license agreement. The
project will be created and opened.
Atmel AT06467: Getting started with SAM D09/D10/D11 [APPLICATION NOTE]
Atmel-42362B-Getting-Started-with-SAM-D09-D10-D11_AT06467_Application Note-11/2015
10
Page 11
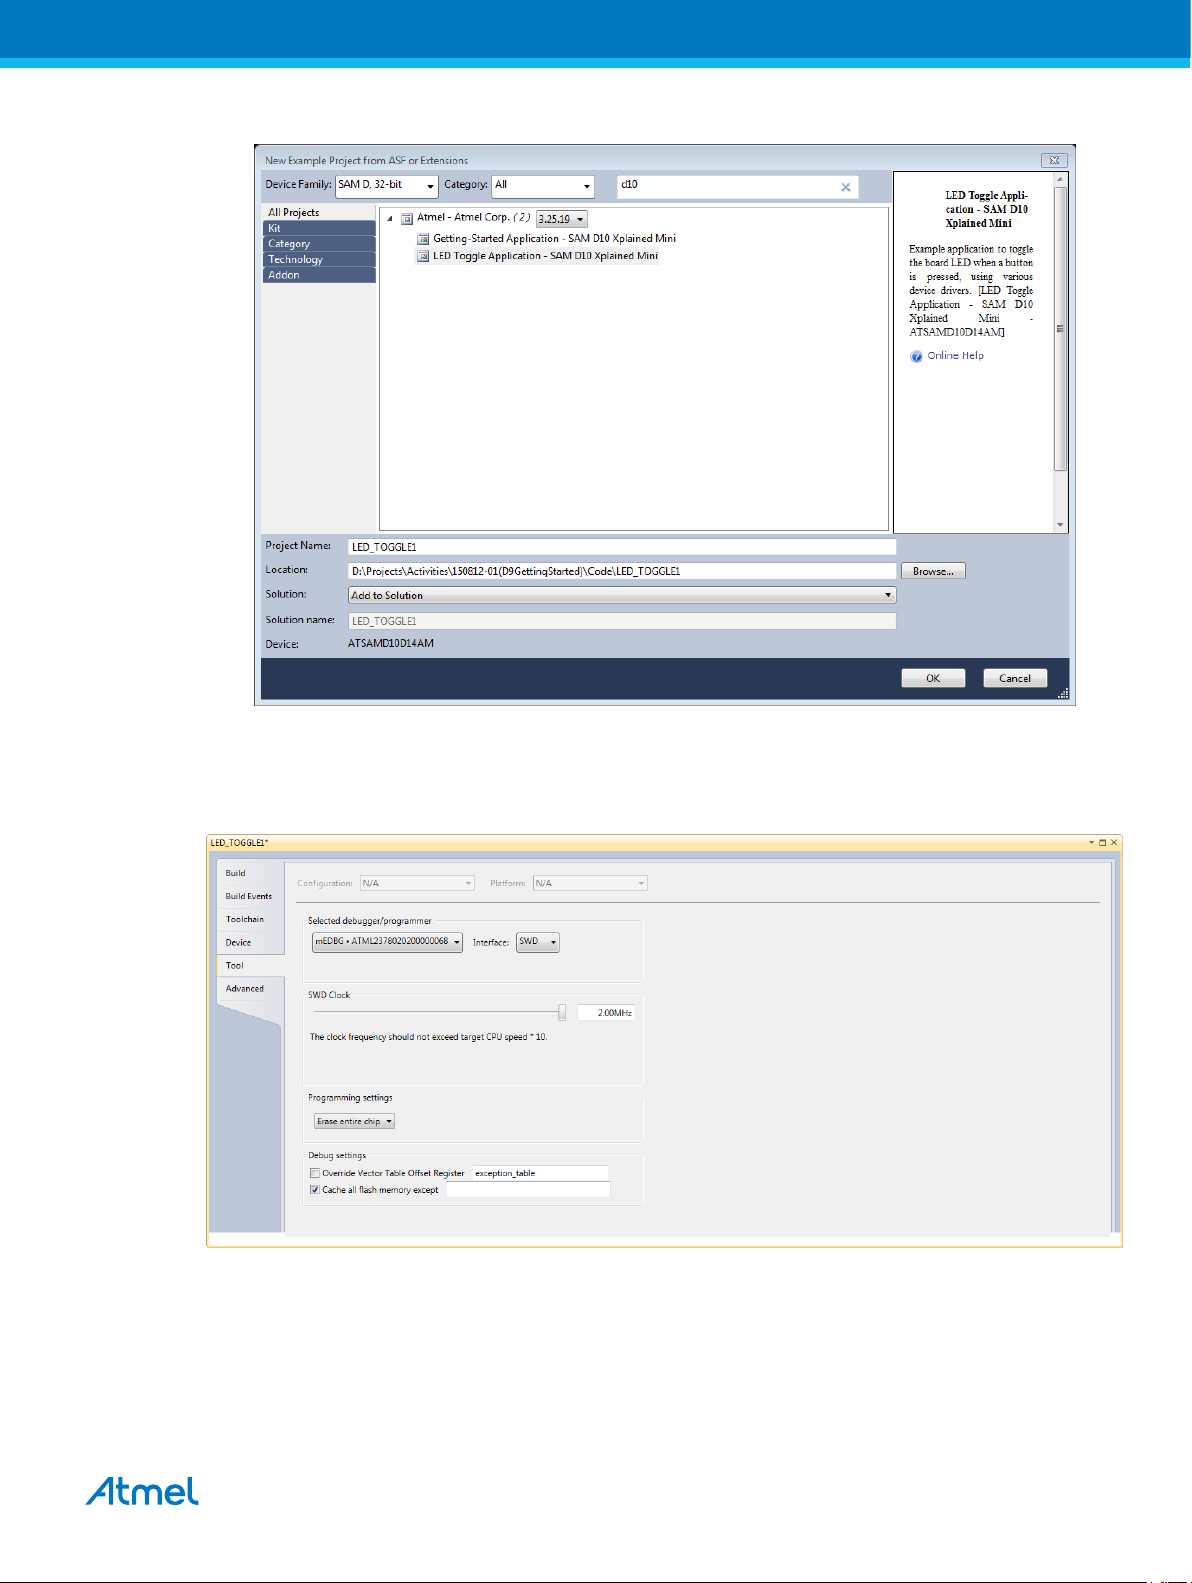
Figure 4-3 SAM D10 New ASF Example Project Window
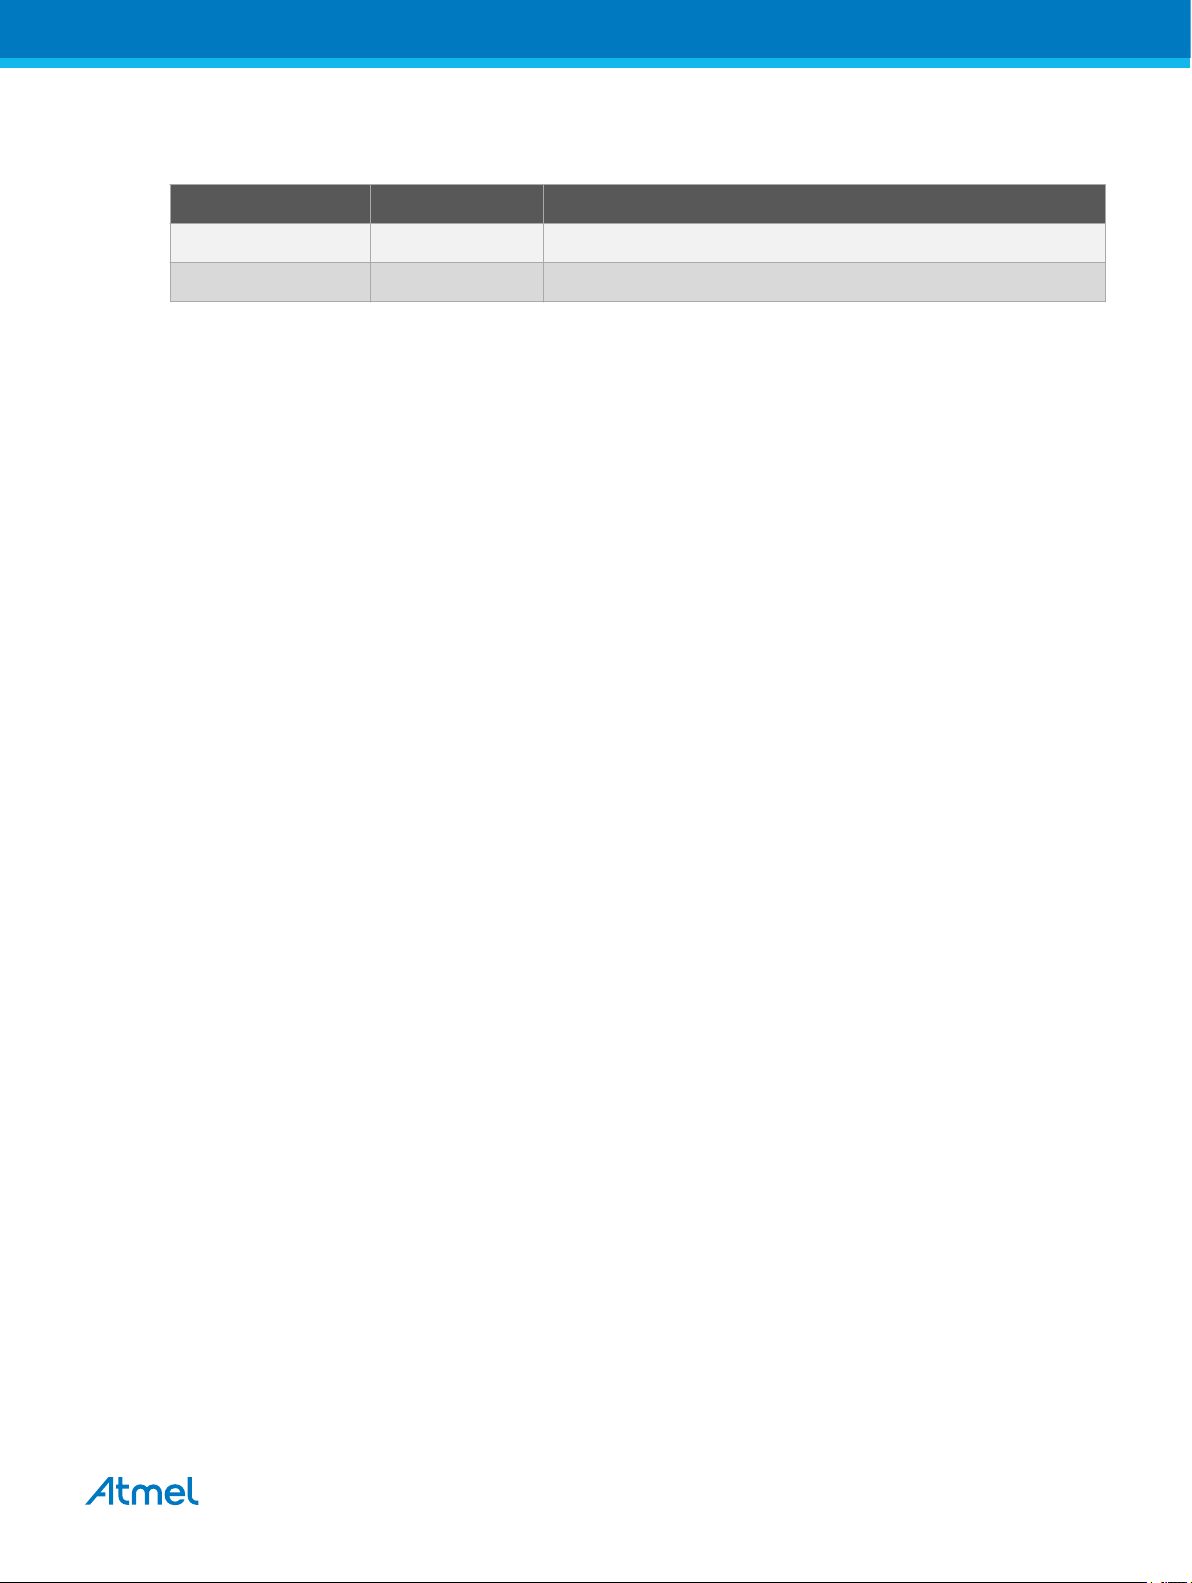
7. Open project properties (Project > Properties or shortcut Alt+f7).
8. In Tool view (Tools > Device Programming), set the configurations – Tool (mEDBG), and Interface
(SWD).
Figure 4-4 SAM D10 Tool Selection Window
9. Build the project: Build > Build solution or shortcut F7.
10. To load the code in the SAM D10 Xplained Mini and debug, select Debug > Start debugging and
break (shortcut Alt + F5).
11. The application is programmed and the debugger breaks in main.
12. To run the code, select Debug > Continue (shortcut F5).
Atmel AT06467: Getting started with SAM D09/D10/D11 [APPLICATION NOTE]
Atmel-42362B-Getting-Started-with-SAM-D09-D10-D11_AT06467_Application Note-11/2015
11
Page 12

4.3. Getting Started with SAM D09
Due to the functional compatibility of the architecture and peripherals, SAM D10 firmware can be used for
SAM D09 with limited or no change.
Requirements
• Custom board with SAM D09 device mounted. Refer Device datasheet for more details on
“Schematics and Programming ports”.
• Atmel Studio 6.2 or later
• ASF version 3.27 or later
• Atmel ICE Debugger to program/debug the device
Getting Started
1. Launch Atmel Studio 6.2. Go to File > New Project > GCC C Executable Project.
Figure 4-5 SAM D09 New Project Window
2. Select the device as ATSAMD09D14A from Device Selection window.
Atmel AT06467: Getting started with SAM D09/D10/D11 [APPLICATION NOTE]
Atmel-42362B-Getting-Started-with-SAM-D09-D10-D11_AT06467_Application Note-11/2015
12
Page 13

Figure 4-6 SAM D09 Device Selection Window
3. Go to Solution Explorer > main.c file and add the below code snippet to the main() function.
int main(void)
{
SystemInit();
PM->APBBMASK.reg |= PM_APBBMASK_PORT;
PORT->Group[0].OUTSET.reg = PORT_PA09;
PORT->Group[0].DIRSET.reg = PORT_PA09;
while (1)
{
PORT->Group[0].OUTTGL.reg = PORT_PA09;
}
}
4. Connect Atmel ICE debugger to ATSAMD09D14A available on the target board through SWG
interface. Refer the User Guide of Atmel ICE for more details on debugging a target board.
5. In Tool view (Tools > Device Programming), set the configurations – Tool (Atmel-ICE), and
Interface (SWD).
6. Build the project: Build > Build solution or shortcut F7.
7. To load the code and debug, select Debug > Start debugging and break (shortcut Alt + F5).
8. The application is programmed and the debugger breaks in main(). To run the code, select Debug
> Continue (shortcut F5).
Atmel AT06467: Getting started with SAM D09/D10/D11 [APPLICATION NOTE]
Atmel-42362B-Getting-Started-with-SAM-D09-D10-D11_AT06467_Application Note-11/2015
13
Page 14

Figure 4-7 SAM D09 Device Programming Window
9. The code snippet is supposed to toggle PortA pin 9 (PA09) at approximately 50kHz. This can be
verified by probing the pin using an oscilloscope.
10. The snapshot of waveform captured through oscilloscope is as follows:
Figure 4-8 Pin Toggle Output Waveform
Atmel AT06467: Getting started with SAM D09/D10/D11 [APPLICATION NOTE]
Atmel-42362B-Getting-Started-with-SAM-D09-D10-D11_AT06467_Application Note-11/2015
14
Page 15

5. What’s next?
• Atmel Studio videos: www.atmel.com/atmelstudio
• Atmel Studio help: Help > View Help (Ctrl+F1)
• ASF Getting Started: www.atmel.com/asf
• ASF online documentation: asf.atmel.com
• ASF Reference manual: asf.atmel.com
• Technical Documentation for various products:www.atmel.com/webdoc/
Atmel AT06467: Getting started with SAM D09/D10/D11 [APPLICATION NOTE]
Atmel-42362B-Getting-Started-with-SAM-D09-D10-D11_AT06467_Application Note-11/2015
15
Page 16
6. Revision History
Doc Rev. Date Comments
42362B 11/2015 Updated for SAM D09 device
42362A 8/2014 Initial document release
Atmel AT06467: Getting started with SAM D09/D10/D11 [APPLICATION NOTE]
Atmel-42362B-Getting-Started-with-SAM-D09-D10-D11_AT06467_Application Note-11/2015
16
Page 17

Atmel Corporation 1600 Technology Drive, San Jose, CA 95110 USA T: (+1)(408) 441.0311 F: (+1)(408) 436.4200 | www.atmel.com
©
2015 Atmel Corporation. / Rev.: Atmel-42362B-Getting-Started-with-SAM-D09-D10-D11_AT06467_Application Note-11/2015
Atmel®, Atmel logo and combinations thereof, Enabling Unlimited Possibilities®, and others are registered trademarks or trademarks of Atmel Corporation in U.S. and
other countries. ARM®, ARM Connected® logo, and others are the registered trademarks or trademarks of ARM Ltd. Other terms and product names may be
trademarks of others.
DISCLAIMER: The information in this document is provided in connection with Atmel products. No license, express or implied, by estoppel or otherwise, to any
intellectual property right is granted by this document or in connection with the sale of Atmel products. EXCEPT AS SET FORTH IN THE ATMEL TERMS AND
CONDITIONS OF SALES LOCATED ON THE ATMEL WEBSITE, ATMEL ASSUMES NO LIABILITY WHATSOEVER AND DISCLAIMS ANY EXPRESS, IMPLIED
OR STATUTORY WARRANTY RELATING TO ITS PRODUCTS INCLUDING, BUT NOT LIMITED TO, THE IMPLIED WARRANTY OF MERCHANTABILITY,
FITNESS FOR A PARTICULAR PURPOSE, OR NON-INFRINGEMENT. IN NO EVENT SHALL ATMEL BE LIABLE FOR ANY DIRECT, INDIRECT,
CONSEQUENTIAL, PUNITIVE, SPECIAL OR INCIDENTAL DAMAGES (INCLUDING, WITHOUT LIMITATION, DAMAGES FOR LOSS AND PROFITS, BUSINESS
INTERRUPTION, OR LOSS OF INFORMATION) ARISING OUT OF THE USE OR INABILITY TO USE THIS DOCUMENT, EVEN IF ATMEL HAS BEEN ADVISED
OF THE POSSIBILITY OF SUCH DAMAGES. Atmel makes no representations or warranties with respect to the accuracy or completeness of the contents of this
document and reserves the right to make changes to specifications and products descriptions at any time without notice. Atmel does not make any commitment to
update the information contained herein. Unless specifically provided otherwise, Atmel products are not suitable for, and shall not be used in, automotive
applications. Atmel products are not intended, authorized, or warranted for use as components in applications intended to support or sustain life.
SAFETY-CRITICAL, MILITARY, AND AUTOMOTIVE APPLICATIONS DISCLAIMER: Atmel products are not designed for and will not be used in connection with any
applications where the failure of such products would reasonably be expected to result in significant personal injury or death (“Safety-Critical Applications”) without
an Atmel officer's specific written consent. Safety-Critical Applications include, without limitation, life support devices and systems, equipment or systems for the
operation of nuclear facilities and weapons systems. Atmel products are not designed nor intended for use in military or aerospace applications or environments
unless specifically designated by Atmel as military-grade. Atmel products are not designed nor intended for use in automotive applications unless specifically
designated by Atmel as automotive-grade.
 Loading...