

Page 1
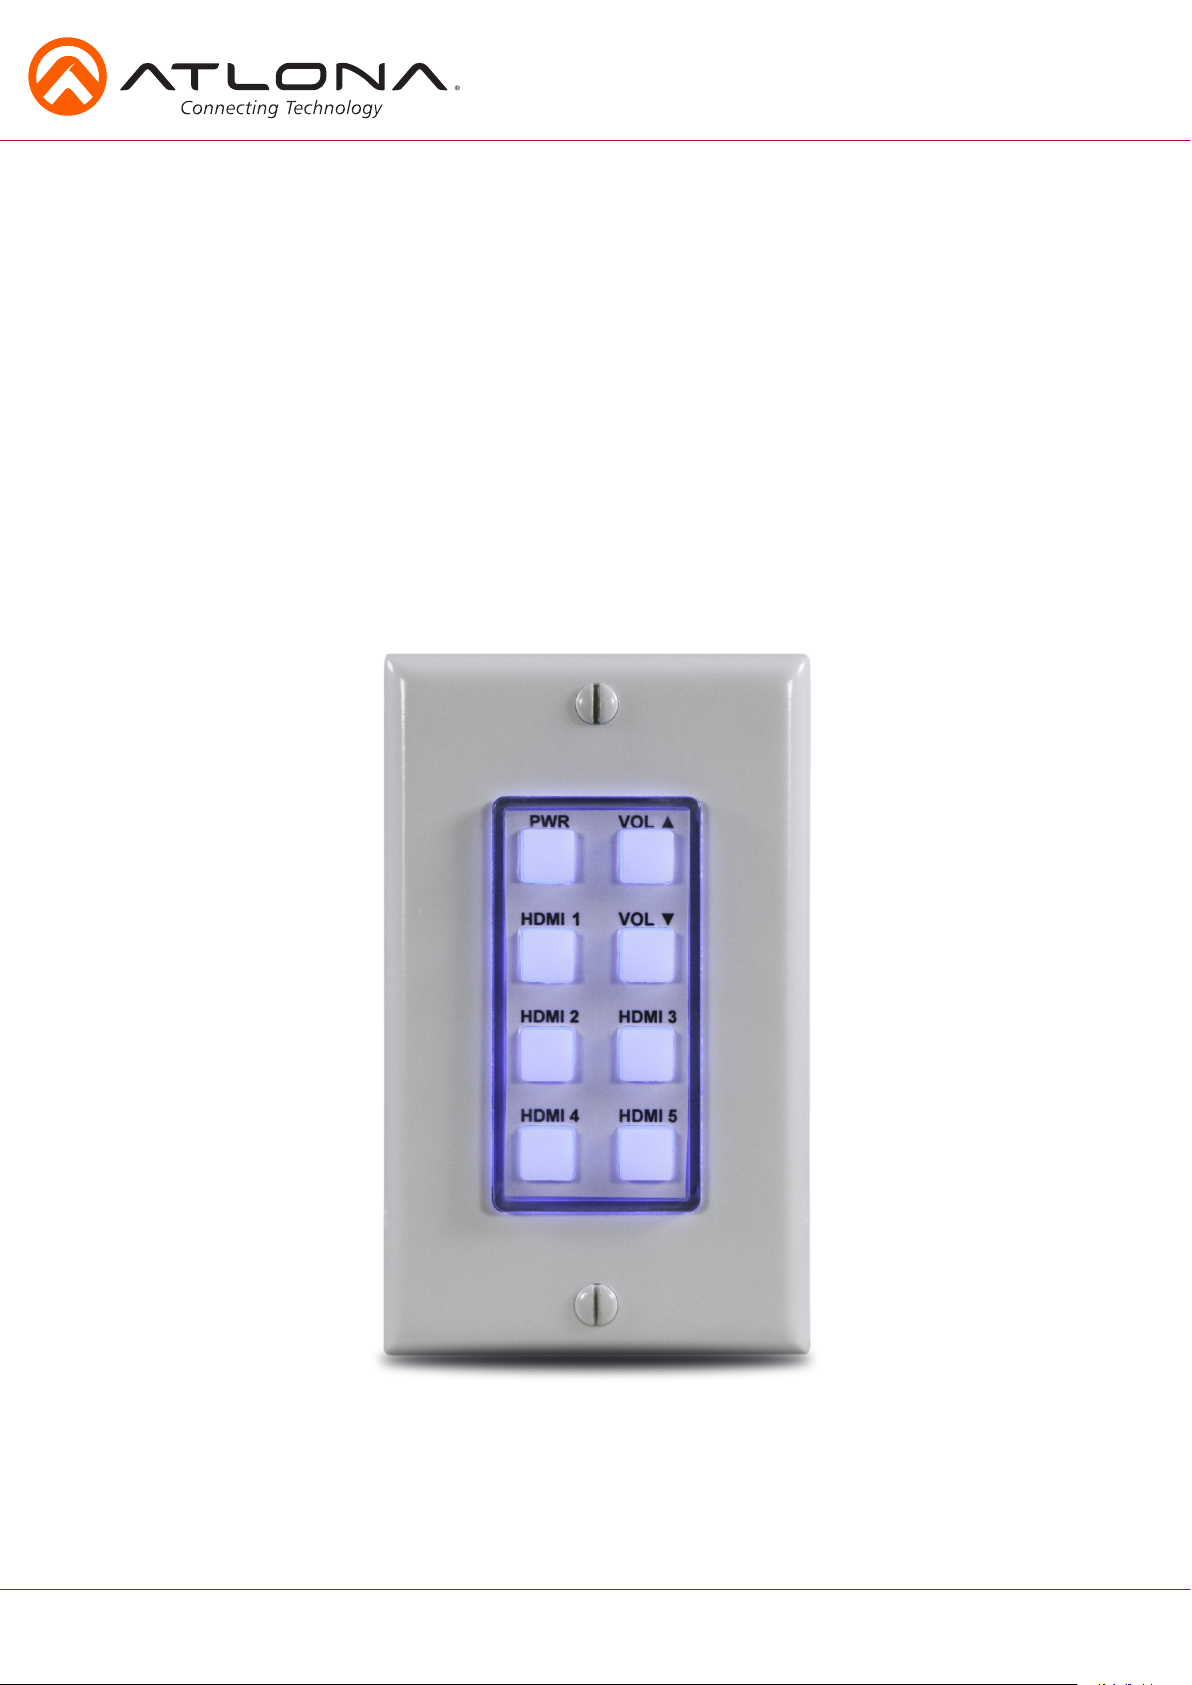
8-Button Network
Control Panel
AT-ANC-108D
User Manual
atlona.com
Toll free: 1-877-536-3976
Local: 1-408-962-0515
Page 2

Introduction
The Atlona AT-ANC-108D is an 8-button network control panel for Atlona IP-based switchers. It is designed
for easy configuration using the free Atlona Management System (AMS) software resource. Only one
category cable needs to be connected to the AT-ANC-108D ensuring fast, hassle-free installation of control
signal and power. Configuration is also fast. Simply download a configuration file from within AMS for
Atlona single output switchers such as the HDVS Series, SW-5 Series, AT-UHD-CLSO-601, or AT-UHDCLSO-612ED. Combined with Atlona IP-controllable switching products for huddle spaces, classrooms and
conference rooms, the network control panel acts as a remote control to send IP commands to the switcher.
The switcher in turns acts on those commands or translates the IP commands into RS-232 commands to
control external devices such as displays to create a seamless AV system. The AT-ANC-108D fits into a US
1-gang junction box and is compatible with Decora-style wall plates.
Package Content
• 1 x Unit
• 1 x Installation guide
• 1 x Decora face plate
• 1 x Blank button template
• 1 x Predefined button template
Features
• Remote control panel for Atlona IP-based products
• Fast installing, single cable integration
• AMS-configurable using downloadable templates
• Eight, soft-touch, back-lit buttons
• Two powering options: power from PoE router/switch or optional 5V power supply
• Installer-customizable, pre-cut label sheets
• Fits US 1-gang junction box with Decora wall plate
atlona.com
2
Toll free: 1-877-536-3976
Local: 1-408-962-0515
Page 3
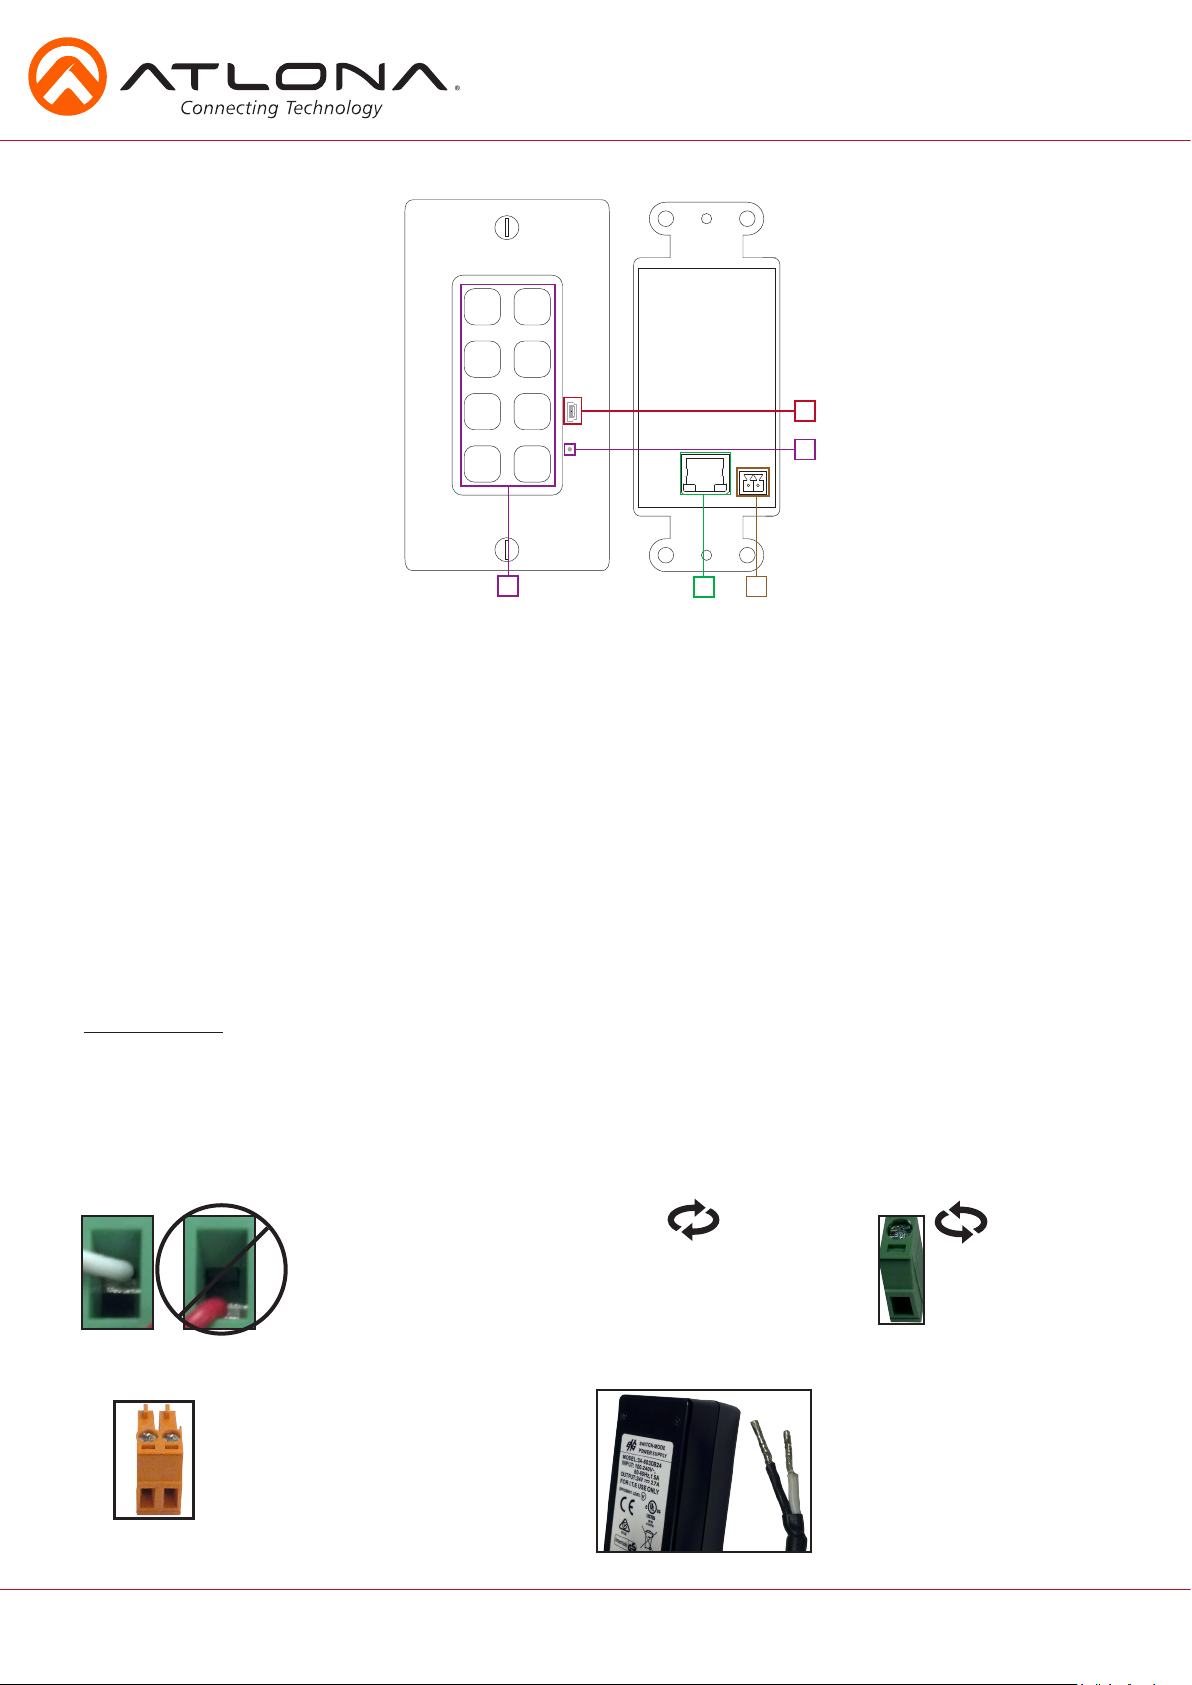
Panel Descriptions
+
DC 5V
4
5
-
1
3
2
1. Buttons - Preprogrammed buttons to control connected Atlona device
2. LAN port - Connect network switch or router for device control
Note: Connect a PoE switch or injector to provide power to the unit without the need for a 5V power supply
3. DC 5V - Connect optional 5V power supply to this port (purchasable at atlona.com)
4. Mini USB - Used for manually updating, if needed
5. Reset button - Used to reset the unit, in case of lock ups or loss of signal. Refer to Resetting the
AT-ANC-108D, on page 10, for more information.
Captive Screw
The captive screw connectors allow you to cut cables to a suitable length, reducing cable clutter
while providing a more reliable connection.
Connecting
When connecting the cables to the female captive screw connector it is important that the wires be
terminated correctly. The female captive screw connector has a contact plate at the top and must
have the wires touching it for signal to pass. When wired correctly (see picture A) the signal will pass,
incorrectly (see picture B) no signal will pass.
A
B
1
Power
atlona.com
The captive screw connectors have
a contact bar that is adjusted to
compress the wire against the top
contact plate. Use the screws at the
top of the connector to compress
the wire against the contact plate.
A female captive screw power
connector is included with the
optional power supply
(see picture 1)
Turn the screws clockwise to
raise the contact bar to the
upper contact plate and hold
the wires in place.
2
Black: - White: +
3
Clockwise
- +
Counter
Clockwise
Turn the screws counter
clockwise to lower the
contact bar to release the
wires.
The power cable
(picture 2) will have
exposed wires. Each
wire is encased in
a different colored
cover.
Toll free: 1-877-536-3976
Local: 1-408-962-0515
Page 4
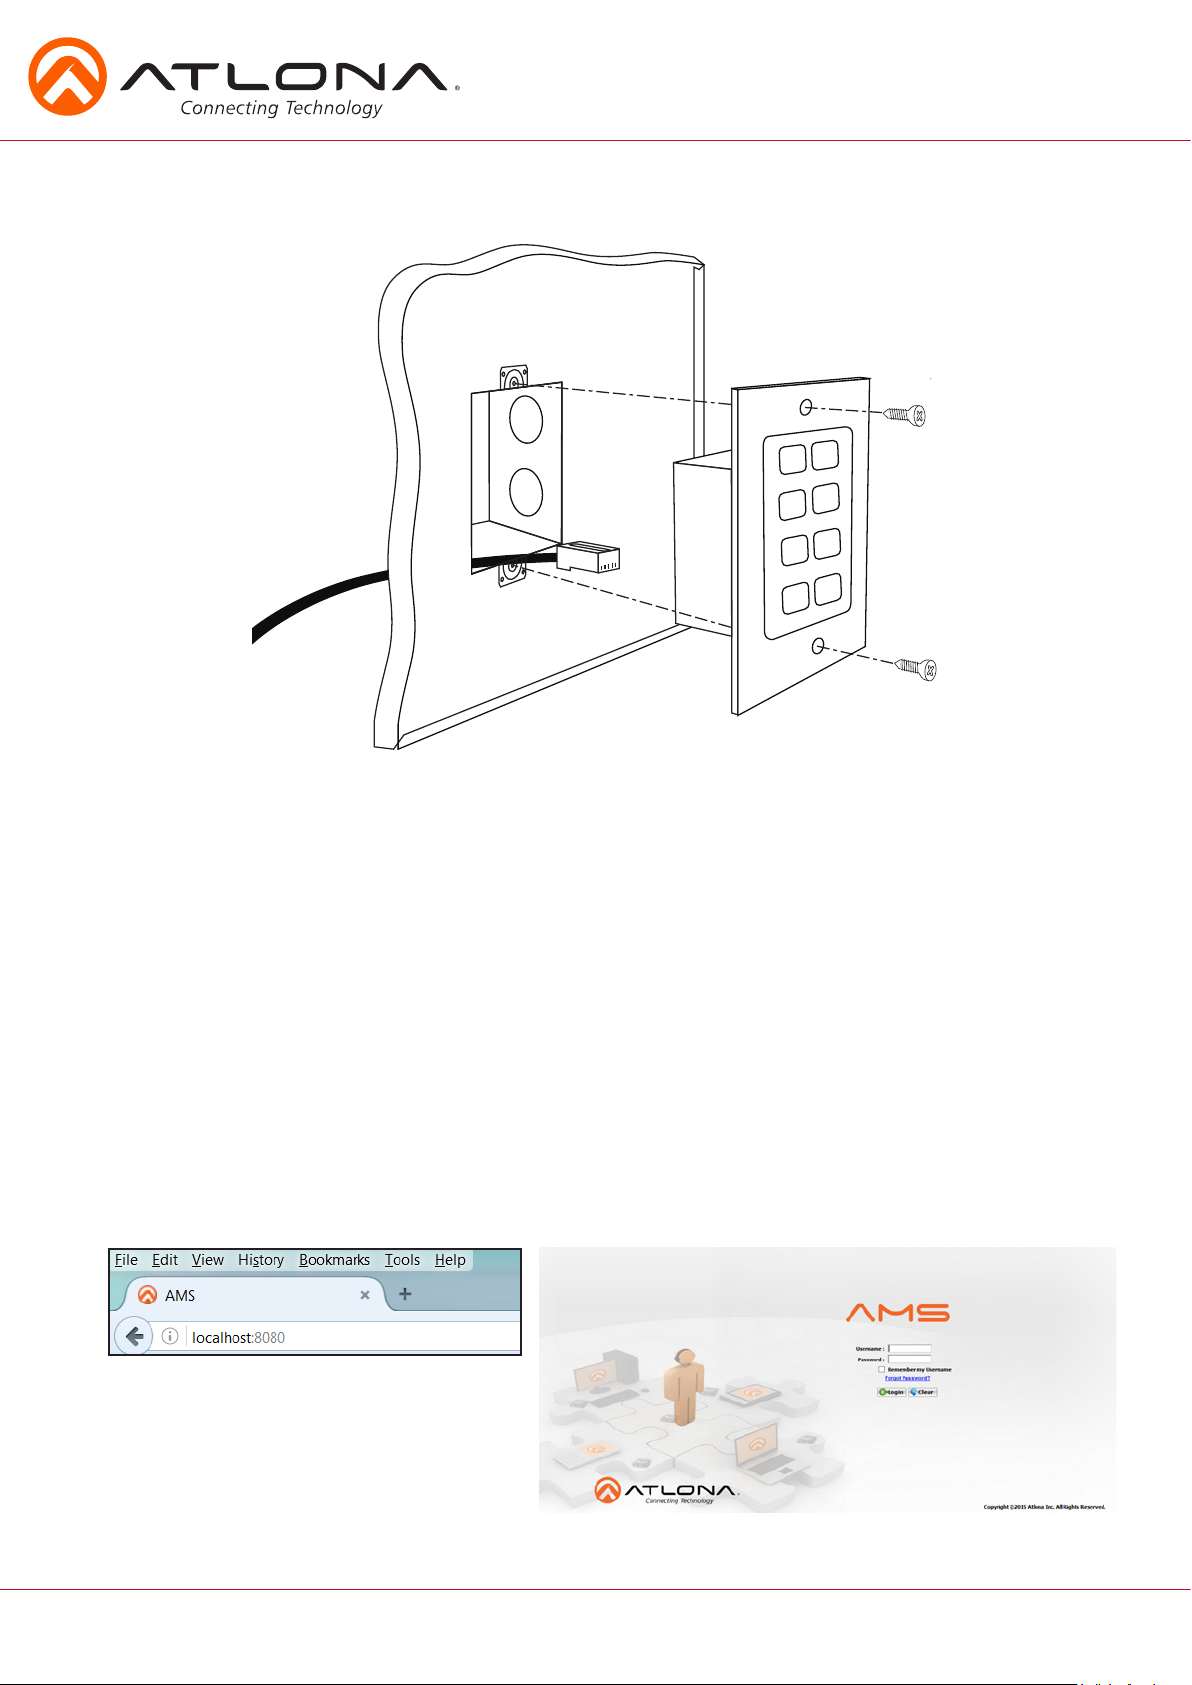
Mounting
The ANC-108D is a 1U wall plate. To install the unit, simply connect the Ethernet cable to the unit,
place the unit in the back box, and use the two wall plate screws to secure the unit to the box.
Ethernet
For convenience, the ANC-108D comes with DHCP on. This enables the switcher to be connected
to a network without knowing available IP addresses.
AMS
For simple and complete control, the ANC-108D is supported by the AMS. Follow the AMS
installation and discovery instructions found within the AMS manual.
To download AMS, go to http://atlona.com/product/at-sw-ams/
To get to the log in screen of AMS: type localhost:8080 into the web browser on the computer AMS is
running on. It will go straight to the log in for AMS.
A login screen will appear (this is the same log in for admin and general users). For the first log in
the username is “admin” and password is “admin123”.
atlona.com
4
Toll free: 1-877-536-3976
Local: 1-408-962-0515
Page 5
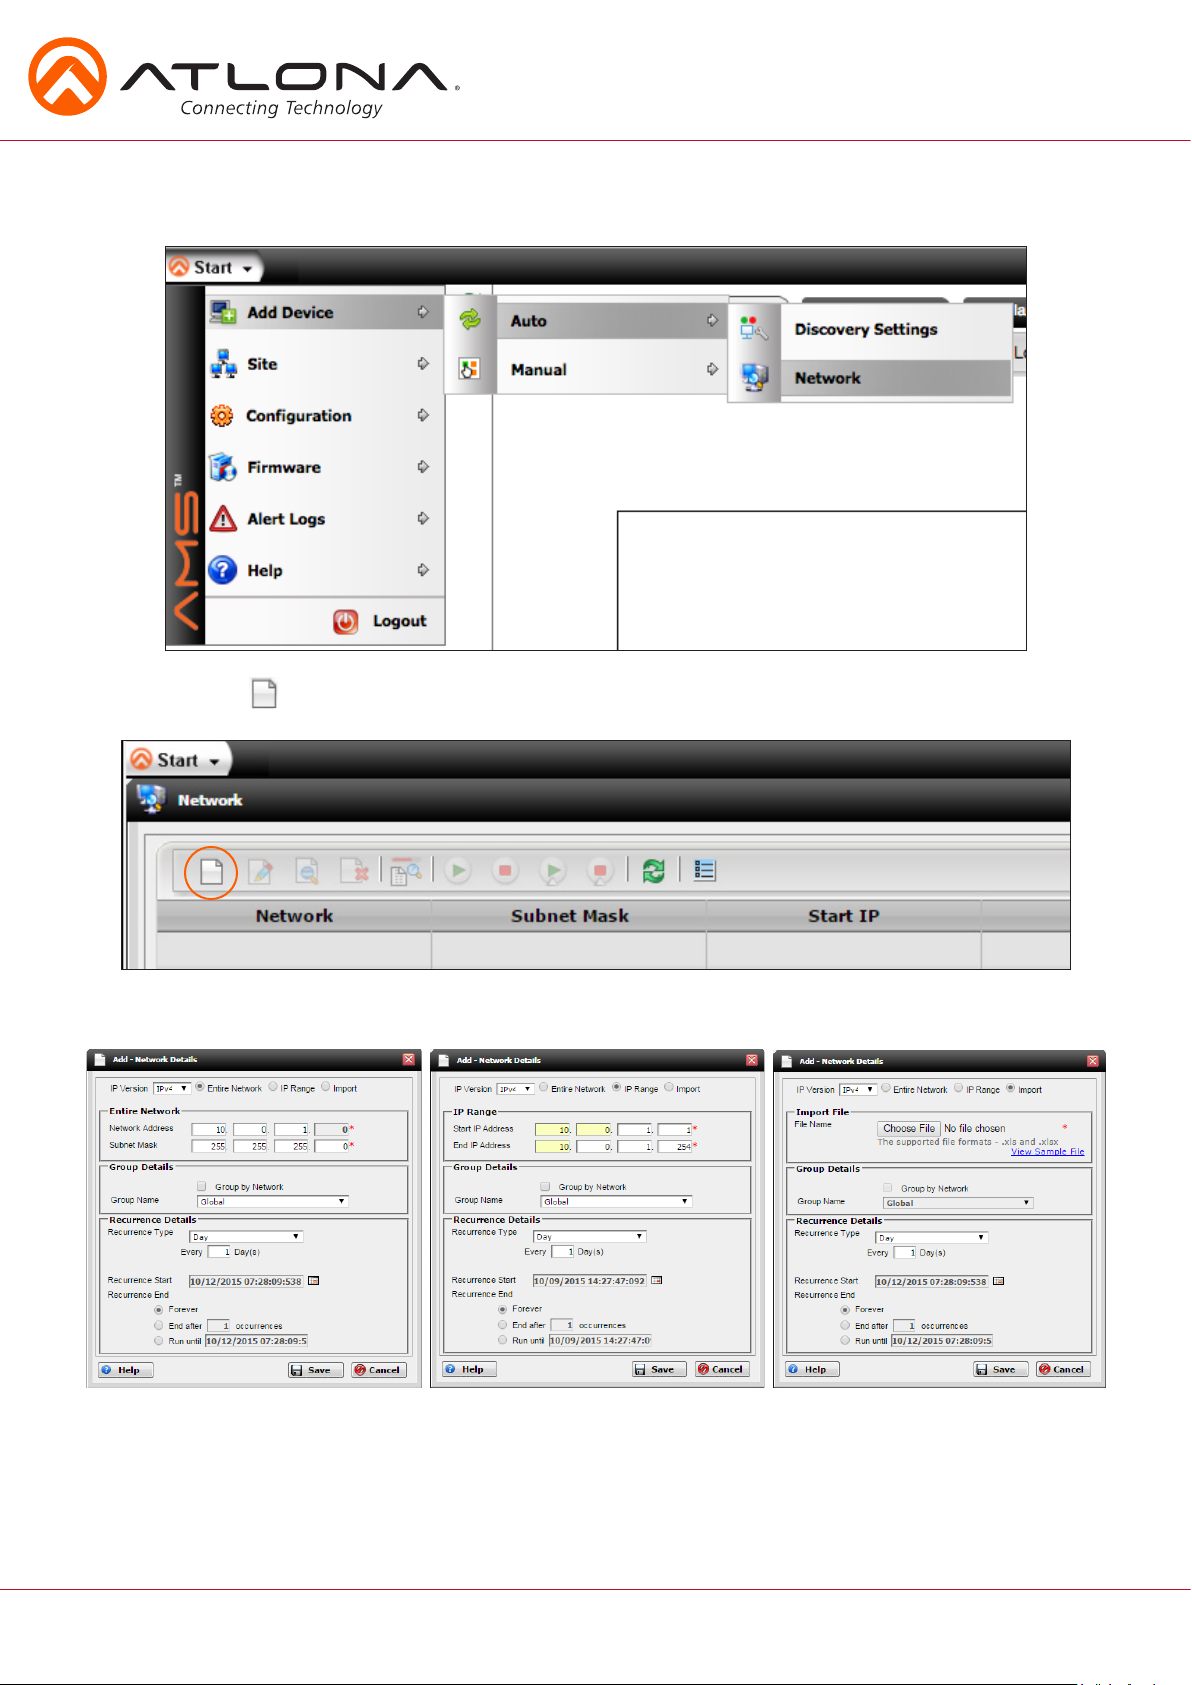
Click Start > Add Device > Auto > Network to run a network scan and locate all supported
Atlona devices.
Click the Add icon, near the upper-left corner of the screen.
There will be three options when adding through Auto: Entire Network, IP Range, and Import
The preferred option is selecting Entire Network.
atlona.com
5
Toll free: 1-877-536-3976
Local: 1-408-962-0515
Page 6

Enter the starting IP address and the subnet mask in the Add - Network Details dialog box.
Click the Save button to begin the discovery process.
The Discovery Process View dialog will be displayed during the discovery process.
All supported devices within the specified IP range will be discovered and added to the AMS
database.
atlona.com
6
Toll free: 1-877-536-3976
Local: 1-408-962-0515
Page 7

When the Nodes to be Scanned reaches 0, click the Close button on the dialog.
Right-click on the AT-ANC-108D device, from the Domain View, and click Associate Device from
the context menu.
The Associate Device dialog will be displayed.
Note that associating the AT-ANC-108D will cause the associated device to turn off DHCP and have
a static IP address. If these devices are connected to a DHCP-enabled LAN, then these IP addresses
need to be excluded from the DHCP pool to prevent IP conflicts.
Select the device type to be associated with the AT-ANC-108D, from the Device Type drop-down
list. The drop-down list will own display products that have been discovered and added to the
database by AMS.
atlona.com
7
Toll free: 1-877-536-3976
Local: 1-408-962-0515
Page 8

Select the device to be associated with the AT-ANC-108D, from the Device drop-down list.
The drop-down list will only display devices that are members of the selected Device Type.
Click the Associate button.
The Confirmation message box will be displayed. Click the OK button to message box.
The association process will begin and will take approximately 30 - 60
seconds. During this time, AMS is configuring the AT-ANC-108D to work
with the selected device. When the association process has completed,
the AT-ANC-108D will become a child of the associated device, under the
Domain View.
Note: During the association process, it is common for the AT-ANC-108D to temporarily
lose network connectivity. Once the association process is complete, and AMS shows the
AT-ANC-108D as unreachable, pinging the device will show the correct reachability status.
This can be done by right-clicking the AT-ANC-108D, hovering over Device, and clicking Ping
atlona.com
When a device contains a child, a “+” will appear next to
the parent device. Click the “+” to expand the node and
display the child. Once a node is fully expanded, a “-”
symbol will appear next to the parent. Click the “-” to
collapse the node and display only the parent device.
Toll free: 1-877-536-3976
8
Local: 1-408-962-0515
Page 9

The digital buttons displayed on AMS provide the same functionality as
the physical buttons on the AT-ANC-108D.
The AT-ANC-108D can be disassociated
from an associated device by rightclicking the AT-ANC-108D, then
clicking Disassociate Device from the
context menu. This will disassociate the
two devices and put the AT-ANC-108D
device into its default mode.
Button Functions
When linked to different devices, the ANC-108D buttons will change functionality to suite each
device. View the table below for how the power and volume buttons of the ANC-108D works with
each device.
Power On/Off
Control Command Device
Device PWON / PWOFF AT-UHD-CLSO-601
AT-UHD-CLSO-612
AT-UHD-SW-52
Display: Trigger CEC
Trigger IP
Trigger RS-232
Display: Trigger CEC
Trigger IP
Trigger RS-232
Display: Trigger CEC
Trigger IP
Trigger RS-232
TrigCEC on/off
TrigIP on/off
TrigRS on/off
TrigCEC1 on/off
TrigIP on/off
TrigRS on/off
TrigCEC1 on/off
TrigIP1 on/off
TrigRS1 on/off
AT-HD-SC-500
AT-HDVS-200-TX/TX-WP
AT-UHD-SW-5000ED
AT-UHD-CLSO-612ED
AT-UHD-SW-52ED
AT-UHD-HDVS-300
Note: For trigger commands to work, the device must be programmed with display commands (see device manual for
instructions to program display commands)
Volume +/- & Mute
Control Command Device
Device Vol +/-
Device VOUT +/-
Device VOL+/- AT-UHD-CLSO-601
Device VOUT1 +/- AT-UHD-SW-52
Display: Trigger IP
Trigger RS-232
atlona.com
Mute on/off
VOUTMute on/off
TrigIP1 vol+/TrigRS1 vol+/-
AT-HD-SC-500
AT-HDVS-200-TX/TX-WP
AT-UHD-CLSO-612
AT-UHD-CLSO-612ED
AT-UHD-SW-52ED
AT-UHD-SW-5000ED
AT-UHD-HDVS-300
Toll free: 1-877-536-3976
9
Local: 1-408-962-0515
Page 10

Resetting the AT-ANC-108D
Follow the procedure below to reset the AT-ANC-108D to the default IP address of 192.168.1.50.
The unit will be placed in static IP mode.
Remove the wall plate from the front of the AT-ANC-108D.
Locate the Reset button in the lower-right portion of the AT-ANC-108D.
+
-
DC 5V
Press and hold the button in the upper-right, then press the Reset button using the end of a paper
clip or other pointed object. The upper-right button will flash twice.
Release the upper-right button and the Reset button.
atlona.com
10
Toll free: 1-877-536-3976
Local: 1-408-962-0515
Page 11

Connection Diagram
AT-UHD-CLSO-612ED
POWER 1 2 3 4 5 6 ENTER MUTE
VOLUME
>
<
<
<
MENU
INPUT FUNCTION
DC 5V
+
-
AT-UHD-EX-100CE-TX
POWER
+
-
DC 48V
AT-UHD-EX-100CE-TX
ETHERNET
S
RX TX
IR OUT
RS-232
IR IN
FW
LINK
S
HDMI IN
HDBaseT OUT
AT-ANC-108D
PWR
MUTE
VOL +
VOL -
INPUT 2
INPUT 1
INPUT 3
INPUT 4
Video
Audio
HDBaseT
Control
2
1
TX TXRX RX
RS-232 RS-232
1 2
HDMI IN
3
HDBaseT IN
48V
LINE
MIC
+
-
4
5
5 6 7L R
+
+
-
-
TXRX
AUDIO INMIC/LINE IN
5 6
VGA IN HDMI OUT
AT-UHD-EX-100CE-RX
AT-UHD-EX-100CE-RX
6
L R
+
+
-
TXRX
RS-232
-
AUDIO IN
ETHERNET
TX
P
RX
S
RS-232
IR OUT
IR IN
TXRX
RS-232
FW
S
HDBaseT IN
HDMI OUT
POWER
L R
+
AUDIO OUT
HDBaseT OUT
PDU 1LAN 1
1
2
PDU 2 Modem
LAN 2
LINK
AT-UHD-CLSO-612ED
IN
+
-
-
P
S
LAN
SETUP
1
2
USB
OUT
MASTER
S
TXRX
RS-232
+
-
DC 48V
FW
15
16
atlona.com
11
Toll free: 1-877-536-3976
Local: 1-408-962-0515
Page 12

Safety Information
Safeguards
To reduce the risk of electric shock, do not
expose this product to rain or moisture
If the wall plug does not fit into your local
power socket, hire an electrician to replace
your obsolete socket.
Do not modify the wall plug. Doing so will
void the warranty and safety features.
This equipment should be installed near
the socket outlet and the device should
be easily accessible in the case it requires
disconnection.
Precautions
FCC regulations state that any unauthorized changes or modifications to this equipment, not
expressly approved by the manufacturer, could void the user’s authority to operate this equipment.
Operate this product using only the included external power supply. Use of other power supplies
could impair performance, damage the product, or cause fires.
In the event of an electrostatic discharge this device may automatically turn off. If this occurs,
unplug the device and plug it back in.
Protect and route power cords so they will not be stepped on or pinched by anything placed on or
against them. Be especially careful of plug-ins or cord exit points from this product.
Avoid excessive humidity, sudden temperature changes or temperature extremes.
Keep this product away from wet locations such as bathtubs, sinks, laundries, wet basements, fish
tanks, and swimming pools.
Use only accessories recommended by Atlona to avoid fire, shock, or other hazards.
Unplug the product before cleaning. Use a damp cloth for cleaning and not cleaning fluid or
aerosols. Such products could enter the unit and cause damage, fire, or electric shock. Some
substances may also mar the finish of the product.
Never open, remove unit panels, or make any adjustments not described in this manual.
Attempting to do so could expose you to dangerous electrical shock or other hazards. It may also
cause damage to your product. Opening the product will void the warranty.
Do not attempt to service the unit. Disconnect the product and contact your authorized Atlona
reseller or contact Atlona directly.
atlona.com
12
Toll free: 1-877-536-3976
Local: 1-408-962-0515
Page 13

Atlona, Inc. (“Atlona”) Limited Product Warranty Policy
Coverage
Atlona warrants its products will substantially perform to their published specifications and will be free from defects in
materials and workmanship under normal use, conditions and service.
Under its Limited Product Warranty, Atlona, at its sole discretion, will either:
A) repair or facilitate the repair of defective products within a reasonable period of time, restore products to their
proper operating condition and return defective products free of any charge for necessary parts, labor and shipping
B) replace and return, free of charge, any defective products with direct replacement or with similar products deemed
by Atlona to perform substantially the same function as the original products
C) refund the pro-rated value based on the remaining term of the warranty period, not to exceed MSRP, in cases
where products are beyond repair and/or no direct or substantially similar replacement products exist.
Repair, replacement or refund of Atlona’s products is the purchaser’s exclusive remedy and Atlona’s liability does not
extend to any other damages, incidental, consequential or otherwise.
This Limited Product Warranty extends to the original end-user purchaser of Atlona’s products and is non-transferrable to
any subsequent purchaser(s) or owner(s) of these products.
Coverage Periods
Atlona’s Limited Product Warranty Period begins on the date of purchase by the end-purchaser. The date contained on
the end-purchaser‘s sales or delivery receipt is the proof purchase date.
Limited Product Warranty Terms – New Products
• 10 years from proof of purchase date for hardware/electronics products purchased on or after June 1, 2013
• 3 years from proof of purchase date for hardware/electronics products purchased before June 1, 2013
• Lifetime Limited Product Warranty for all cable products
OR
OR
Limited Product Warranty Terms – Refurbished (B-Stock) Products
• 3 years from proof of purchase date for all Refurbished (B-Stock) hardware and electronic products purchased on or
after June 1, 2013
Remedy
Atlona recommends that end-purchasers contact their authorized Atlona dealer or reseller from whom they purchased
their products. Atlona can also be contacted directly. Visit www.atlona.com for Atlona’s contact information and hours
of operation. Atlona requires that a dated sales or delivery receipt from an authorized dealer, reseller or end-purchaser is
provided before Atlona extends its warranty services. Additionally, a return merchandise authorization (RMA) and/or case
number, is required to be obtained from Atlona in advance of returns.
Atlona requires that products returned are properly packed, preferably in the original carton, for shipping. Cartons not
bearing a return authorization or case number will be refused. Atlona, at its sole discretion, reserves the right to reject
any products received without advanced authorization. Authorizations can be requested by calling 1-877-536-3976 (US
toll free) or 1-408- 962-0515 (US/international) or via Atlona’s website at www.atlona.com.
Exclusions
This Limited Product Warranty excludes:
• Damage, deterioration or malfunction caused by any alteration, modification, improper use, neglect, improper
packing or shipping (such claims must be presented to the carrier), lightning, power surges, or other acts of nature.
• Damage, deterioration or malfunction resulting from the installation or removal of this product from any installation,
any unauthorized tampering with this product, any repairs attempted by anyone unauthorized by Atlona to make
such repairs, or any other cause which does not relate directly to a defect in materials and/or workmanship of this
product.
• Equipment enclosures, cables, power supplies, batteries, LCD displays, and any accessories used in conjunction with
the product(s).
• Products purchased from unauthorized distributors, dealers, resellers, auction websites and similar unauthorized
channels of distribution.
atlona.com
13
Toll free: 1-877-536-3976
Local: 1-408-962-0515
Page 14

Disclaimers
This Limited Product Warranty does not imply that the electronic components contained within Atlona’s products will
not become obsolete nor does it imply Atlona products or their electronic components will remain compatible with any
other current product, technology or any future products or technologies in which Atlona’s products may be used in
conjunction with. Atlona, at its sole discretion, reserves the right not to extend its warranty offering in instances arising
outside its normal course of business including, but not limited to, damage inflicted to its products from acts of god.
Limitation on Liability
The maximum liability of Atlona under this limited product warranty shall not exceed the original Atlona MSRP for
its products. To the maximum extent permitted by law, Atlona is not responsible for the direct, special, incidental or
consequential damages resulting from any breach of warranty or condition, or under any other legal theory. Some
countries, districts or states do not allow the exclusion or limitation of relief, special, incidental, consequential or indirect
damages, or the limitation of liability to specified amounts, so the above limitations or exclusions may not apply to you.
Exclusive Remedy
To the maximum extent permitted by law, this limited product warranty and the remedies set forth above are exclusive
and in lieu of all other warranties, remedies and conditions, whether oral or written, express or implied. To the maximum
extent permitted by law, Atlona specifically disclaims all implied warranties, including, without limitation, warranties
of merchantability and fitness for a particular purpose. If Atlona cannot lawfully disclaim or exclude implied warranties
under applicable law, then all implied warranties covering its products including warranties of merchantability and fitness
for a particular purpose, shall provide to its products under applicable law. If any product to which this limited warranty
applies is a “Consumer Product” under the Magnuson-Moss Warranty Act (15 U.S.C.A. §2301, ET SEQ.) or other
applicable law, the foregoing disclaimer of implied warranties shall not apply, and all implied warranties on its products,
including warranties of merchantability and fitness for the particular purpose, shall apply as provided under applicable
law.
Other Conditions
Atlona’s Limited Product Warranty offering gives legal rights, and other rights may apply and vary from country to
country or state to state. This limited warranty is void if (i) the label bearing the serial number of products have been
removed or defaced, (ii) products are not purchased from an authorized Atlona dealer or reseller. A comprehensive list of
Atlona’s authorized distributors, dealers and resellers can be found at www.atlona.com.
Atlona Product Registration
Thank you for purchasing this Atlona product. - We hope you enjoy it and will take an extra few moments to
register your new purchase.
Registration creates an ownership record if your product is lost or stolen and helps ensure you’ll receive
notification of performance issues and firmware updates.
At Atlona, we respect and protect your privacy, assuring you that your registration information is completely
secure. Atlona product registration is completely voluntary and failure to register will not diminish your limited
warranty rights.
To register go to: http://www.atlona.com/registration
atlona.com
14
Toll free: 1-877-536-3976
Local: 1-408-962-0515
 Loading...