

Page 1

Atlona HDMI Troubleshooting Guide
Page 2
Quick Setup Guide
www.atlona.com · Toll-Free 1.877.536.3976 · International 408.962.0515 · Fax 408.743.5622
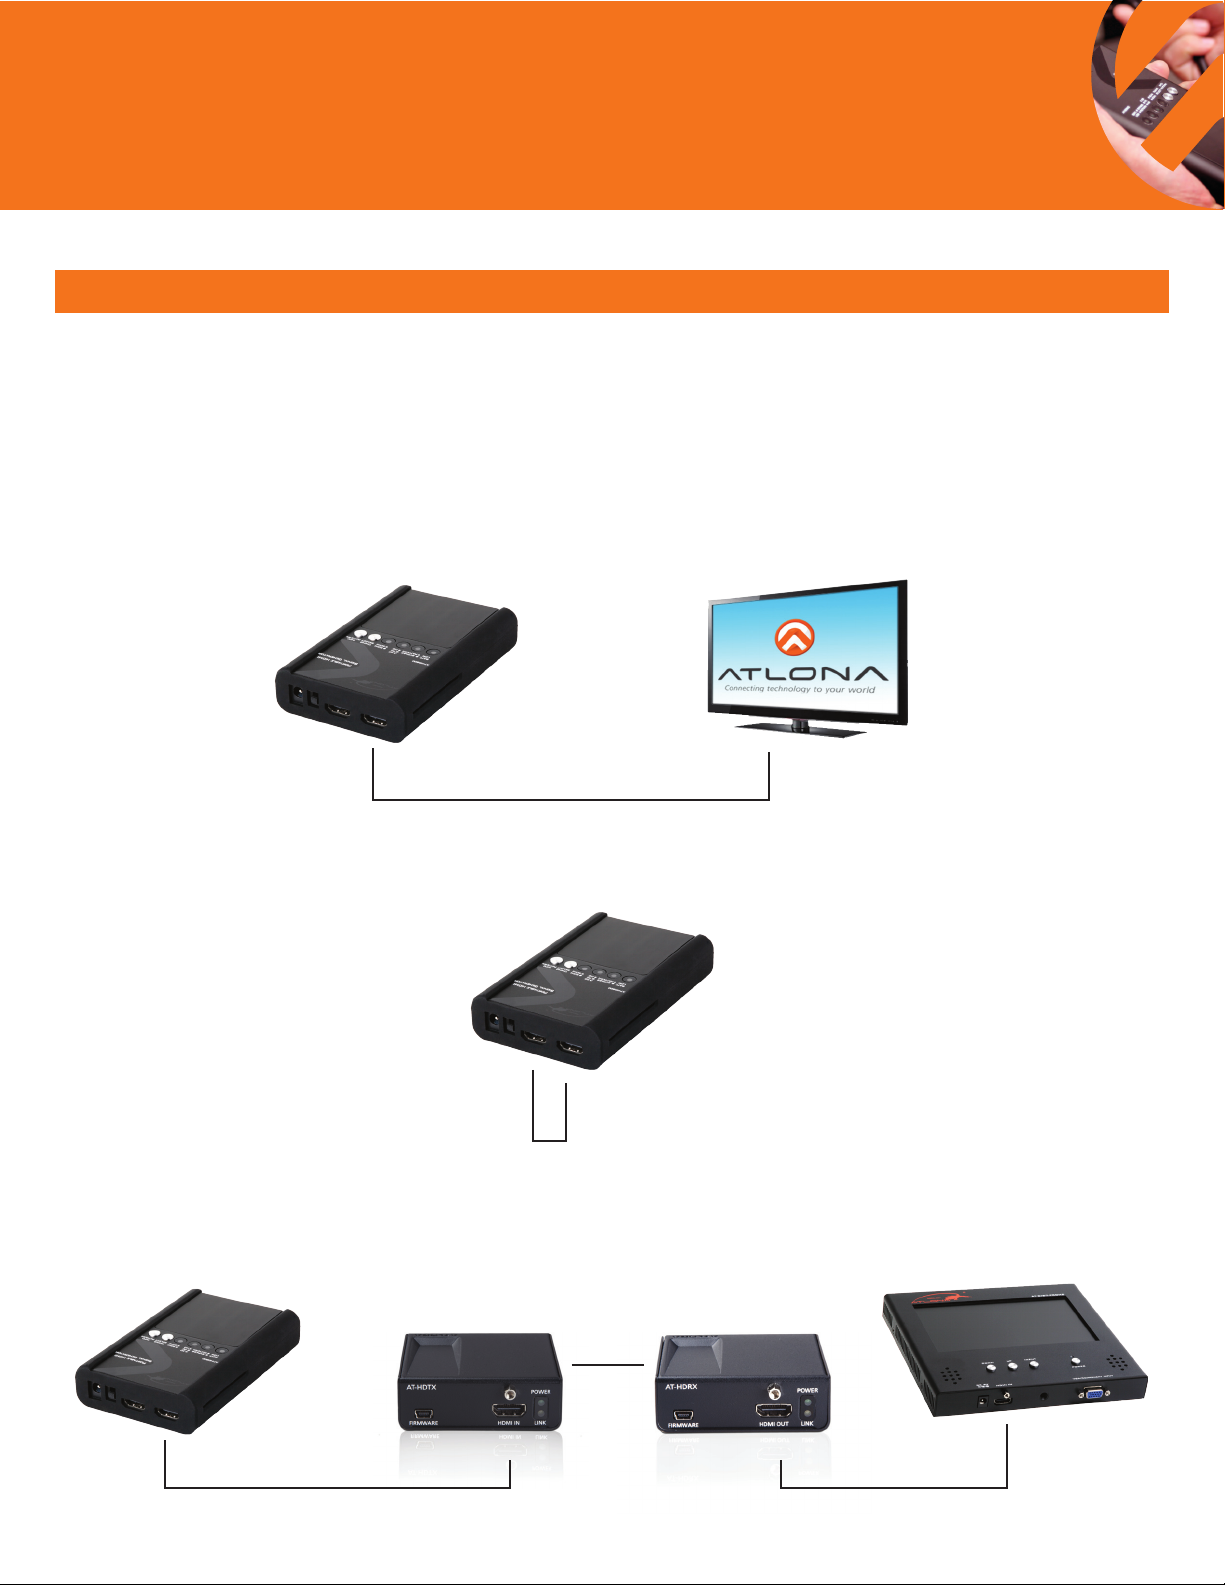
HD800 Basic Operation
Typical usage of an HD800 is to allow users to diagnose specific resolution, video timing, EDID and color space issues in any DVI
or HDMI video system. It features an HDMI output as well as an HDMI pass through to easily switch between test patterns and
content from any other digital sources, while also giving the ability to read the EDID from the input source and displaying it on the
display. It can also perform a cable test on any HDMI cable.
USE #1
HDMI pass through to easily switch between test pattern and content from any other digital sources, while
also giving the ability to read the EDID from the connected display.
HD-800 Display*
* EDID information
HDMI Cable
displayed on screen
USE #2
HD800 can also perform a cable test on and HDMI cable.
HD-800
HDMI Cable
USE #3
HD800 is to allow users to diagnose specic resolution, video timing, EDID, and color space issues in any
DVI or HDMI video system.
HD-800
HDTX HDRX
Category
cable in wall
AT-DIS7-PROHD
HDMI Cable HDMI Cable
1
Page 3

Quick Setup Guide
www.atlona.com · Toll-Free 1.877.536.3976 · International 408.962.0515 · Fax 408.743.5622
HD800 Basic Operation
USE #1 Operation
Cycle thru resolutions:
• Insert HDMI cable to HD800 output, insert the other end to displays input
• Turn on HD800
• Press Timing/Select button, OSD menu will reveal forward/backward navigation for resolution settings
• Within three seconds press Timing/Select button to scroll forward, or press Info/Pattern to scroll backwards
through resolution options
• 25 options available for video, VESA and 3D resolutions
Source and display EDID comparison:
• Insert HDMI cable to source output, insert cable to HD800 input
• Insert HDMI cable to HD800 output, insert the other end to displays input
• Turn on HD800
• Press Info/Pattern button to display side by side capabilities from OSD menu
• Press button again to disable
USE #2 Operation
Cable Integrity test:
•Insert one end of the HDMI cable to HD800 input, insert the other end to the output
•Turn on HD800
•Press and hold Timing/Select button for 3 seconds then release to enable this function
• If all LED/s are solid, cable has passed the test. If all LED’s are ashing, cable is NOT transferring signal
properly and has failed the test.
•Press and hold Timing/Select button for 3 seconds then release to disable this function.
USE #3 Operation
Cycle thru Patterns (color bar, full scree purity, 3D, patterns):
• Insert HDMI cable to HD800 output, insert the other end to displays input
• Turn on HD800
• Press Info/Pattern button
• Within three seconds press Timing/Select button to scroll forward, or press Info/Pattern to scroll backwards
through pattern options.
• To view all 19 options resolution MUST be set to 720p. Only 10 options available in all other resolutions.
Display EDID Information:
• Insert HDMI Cable to HD800 output, insert the other end to display’s input
• Turn on HD800
• Press Timing/Select button, OSD menu will reveal forward/backward navigation for resolution settings
• Within three seconds press Timing/Select button to scroll forward, or press Info/Pattern to scroll backwards
through resolution options
• Select 720p (can only view EDID for display in this mode)
• Wait until OSD menu disappears then press Info/Pattern button
• Within three seconds scroll forward or backward until you get to VESA Timing, scroll forward once more
for Video Timing.
2
Page 4

Quick Setup Guide
www.atlona.com · Toll-Free 1.877.536.3976 · International 408.962.0515 · Fax 408.743.5622
AT-HDSync Scenarios
Typical placement of an HDSync is between source and display that is having HDMI troubleshooting issues. In a bigger HDMI
system (HDMI Matrix, AV receivers, and/or multiple HDMI splitters/repeaters/switchers, etc) Atlona recommends to still place
HDSync directly after source as a pass-thru conguration.
(See illustrations)
HDSync Between Source and Display
Challenge: No Picture from Source
Blu-ray
HDMI
HDMI
X
Set-top Box
X
Display
Solution: Place HDSync in-line to resolve EDID issue
Blu-ray
HDMI
Set-top Box
HDMI
HDSync in a bigger HDMI System
(HDMI Matrix, multiple HDMI splitters/repeaters/switchers, AV Receivers)
Set-top Box
Blu-ray Blu-ray
Media Player
X
HDMI
HDMI HDMI
HDMI
HDMI
Display
AT-HDSync
Media PlayerSet-top Box
HDMI
Display
3
A/V Receiver A/V Receiver
HDMI HDMI
HDMI HDMI
Display Display Display
X
AT-HDSync
Page 5

Quick Setup Guide
www.atlona.com · Toll-Free 1.877.536.3976 · International 408.962.0515 · Fax 408.743.5622
HDSync Scenarios Explained
Troubleshooting Issue #1
Two or more sources hooked up to one display
Challenge: Customer connects both a Set-Top Box and a Blu-Ray
player to a Display, on two different inputs on TV (Fig.1). BluRay player always works, but set-top box is constantly displaying
“error” signal. Powering down temporarily solves the issue, but
as soon as customer switchers from Blu-Ray to Set-top box and
back again, error occurs.
Solution: HDSync. Root cause is the set-top box as a source
(Fig.1). The set-top box must support a special function of HDCP
called “HotPlug ON” in standby mode. If the source does not
support it, the HDMI connection will be inactive and unable to
re-handshake to TV.
Atlona’s HDSync maintains an always on, “HotPlug ON”
connection with HDMI, thus keeping your connection live to the
TV. When your input source says “no Sync” think HDSync!
Figure 1.
Media Player
Set-top Box
HDMI
Blu-ray
Set-top Box
HDMI
HDMI
X X
AT-HDSync
HDMI
Display
Display
Troubleshooting Issue #2
A/V Repeater hooked up in-between source and TV
Challenge: Customer connects one source (media player, set-top
box, etc) directly to a display with an HDMI cable, and it works!
As soon as something is introduced in the middle however (A/V
receiver, Matrix switch, distribution amplier, etc) (Fig. 2), an error
occurs on TV in form of snow or no picture. The EDID of the
Display is not correctly exchanged, so the error occurs.
Solution: Use an HDSync to re-capture the EDID of the display
(Fig. 2), and present it again to the source, or use on of HDSync’s
position-6 to record EDID’s to match your source content.
Troubleshooting Issue #3
Multiple sources hooked up to switcher/splitter/AV Receiver
and to multiple TV’s
Challenge: Customer connects multiple sources (media players,
set-top boxes, Blu-Rays, etc) directly to a middle point (splitter,
switcher, AV Receiver, etc) then is split/routed to multiple
displays! (Fig. 3) System only works in a particular sequence or
combination of sources and displays. Error is displayed on TV, or
source, or both. Possible root problem: the EDID of the Display is
not correctly exchanged, so the error occurs.
Solution: First use an HDSync in front of the source which is
giving errors; this will let you block out all EDIDs in the system.
(Fig. 3) Try out the appropriate mode that matches your
equipment as found on page 6 (1080p - 2Ch audio, 1080p Multichannel audio, etc). If that doesn’t work, then record the
EDID manually from the HDMI monitor as found at the top of
page 6; once recorded, plug HDSync back in front of the source.
Figure 2.
Media Player
Media Player
Figure 3.
Set-top Box Set-top Box
Display
HDMI
X
Blu-ray
HDMI
A/V Receiver
HDMI
X
HDMI HDMI
AT-HDSync
Media Player Media Player
HDMI
HDMI
HDMI
Display
X
A/V Receiver
A/V Receiver
Display
Blu-ray
HDMI
A/V Receiver
HDMI
HDMI
Display
X
HDMIHDMI
HDMI
AT-HDSync
HDMI
Display
4
Page 6

Quick Setup Guide
www.atlona.com · Toll-Free 1.877.536.3976 · International 408.962.0515 · Fax 408.743.5622
EDID:
Modes
Mode 0: 1080p - 2Ch audio
*3D and multichannel audio will not work in this mode*
Mode 1: 1080p - Multichannel audio
*3D will not work in this mode*
Mode 2: 1080p - 2Ch audio - 3D
*Multichannel audio will not pass in this mode*
Mode 3: 1080p - Multichannel audio - 3D
*The highest resolution the display and source are capable of will pass in this mode*
Mode 4: 1080p - Dolby Digital audio - 3D
*Only Dolby Digital and 2Ch will pass in this mode*
Mode 5: 1080i or 720p - 2ch audio
*Multichannel audio will not pass in this mode*
Mode 6: 1080p - EDID learning
*Learn the EDID of the display while in this mode. The EDID learn is non-volatile*
Mode 7: Software mode
*Read, save, and analyze EDID or update firmware with the included software in this mode*
Learn:
1. Connect the HDSync Display HDMI port to the displays HDMI port
2. Plug in the 5V DC power supply to the HDSync and wall
3. Turn on the display
4. Turn the HDSync rotary to mode 6
*Status LED will blink while learning the EDID*
5. When LED stops blinking, the EDID learn is complete. Leave the EDID rotary on mode 6
** To relearn or learn a different EDID, turn the rotary from mode 6 clockwise until it reaches mode 6 once more.
Repeat the above steps**
Software:
Read, save, or analyze EDID and update firmware from your computer using the included software. Easily
troubleshoot compatibility issues or verify what a device is capable of.
Setup:
1. Connect a 9-pin to 9-pin cable from the HDSync to your PC
2. Turn on your PC and HDSync
3. Insert the included software into your computers disc drive
4. Open the software le "HDMI EDID Recorder". For detailed instructions see HDSync instruction
manual (latest version)
5
Page 7

Quick Setup Guide
www.atlona.com · Toll-Free 1.877.536.3976 · International 408.962.0515 · Fax 408.743.5622
HDSync How to:
Read the EDID manually from an HDMI monitor or projector
• Connect the HDMI display device to the HDSync via the HDMI port labeled display.
• Plug in the 5V DC power supply unit.
• Set HDSync to MODE 6.
• The EDID reading sequence is done when the green LED stops blinking.
• Leave the dial set on position-6.
NOTE: DO NOT let the rotary arrow pass by Mode 5, which will erase the EDID just learned, and restore the default EDID
HDSync Dial Modes:
1 2 3
1. Connect a 9-pin to 9-pin cable to a computer to use the included software
2. Connect to an HDMI or DVI (with adapter) source.
3. EDID rotary for switching between EDID modes
Mode 0 = 1080p - 2Ch audio
Mode 1 = 1080p - Multichannel audio
Mode 2 = 1080p - 2Ch audio - 3D
Mode 3 = 1080p - Multichannel audio - 3D
Mode 4 = 1080p - Dolby Digital audio - 3D
Mode 5 = 1080i or 720p - 2ch audio
Mode 6 = 1080p - EDID learning
Mode 7 = Software mode
6
Page 8

Quick Setup Guide
www.atlona.com · Toll-Free 1.877.536.3976 · International 408.962.0515 · Fax 408.743.5622
Testing with HD800
IFIF FunctionFunction ResultResult ConnectionConnection
Testing Cable
function
Insert one end of
the HDMI cable to
HD800 input, insert the
other end to the output
If all LED’s are solid, cable has
passed the test. If all LED’s
are flashing, cable is NOT
transferring signal properly
and has failed the test.
Testing color
space or
picture quality
Press Timing/Select button, OSDmenu will
reveal forward/backward navigation for
resolution settings. Cycle through desired
patterns. Test Solid Red, Green, & Blue for
visual color correctness
Testing with DIS7-PROHD
Test resolution and
timing compatibility
of display
Insert HDMI cable to
HD800 output ,
insert the other end
to displays input
If colors appear distorted or
discolored, use the display’s
calibration settings to adjust
image settings.
Test signal path
(baluns)
Connect baluns as directed from manufacturer.
Connect the HDMI output from the balun
to the display. Connect HDMI cable between
the HD800 output and the input of the
balun transmitter.
Press Timing/Select button,
OSDmenu will reveal forward/
backward navigation for
resolution settings.
If display accepts
resolution it will be
displayed. If not screen
will remain black.
Test signal path
(Matrix Switch)
Connect AV system completely. Connect
HDMI cable between the HD800 output
and one of the inputs of the matrix
switch. Set all outputs to display the
HD800's input
Cycle through desired resolutions
and timings to match intended
source resolutions.
If signal pathways are
intact and functioning
patterns can be seen
on display
DIS7-PROHD
Testing Cable
function
Insert one end of
the HDMI cable to
HD800 input, insert
the other end into the
DIS7-PROHD’s HDMI
input
Press info/pattern button, OSD menu will
reveal forward/backward navigation for
resolution settings. Cycle through desired
patterns. Test Solid Red, Green, & Blue for
visual color correctness
If image is showing on the
DIS7 monitor, cable has
passed the test. If image is
discolored or not present the
cable has failed
Test signal path
(baluns)
Connect baluns as directed
from manufacturer. Connect
HDMI cable between the
HD800 output and the input
of the balun transmitter.
Connect the balun receiver
to the DIS7-P R OHD’s
HDMI input
Cycle through desired resolutions
and timings to match intended
source resolutions.
If signal pathways are intact
and functioning patterns
can be seen on display
Test signal path
(Matrix Switch)
Connect AV system
completely. Connect HDMI
cable between the HD800
output and one of the inputs
of the matrix switch. Set
all outputs to display the
HD800's input. Connect the
DIS7-PROHD to the
7
Page 9

Quick Setup Guide
www.atlona.com · Toll-Free 1.877.536.3976 · International 408.962.0515 · Fax 408.743.5622
Atlona HDMI Test Kits
Atlona Custom Installation Testing Kits are designed to diagnose
digital connectivity issues in A/V systems. This complete tool suite
allows residential and commercial integrators and installers
the ability to diagnose 99% of all digital connectivity issues in
moments, saving time, labor profit dollars, and overhead.
KIT-PROHD3
Signal Generator AT-HD800
Monitor AT-DIS7-PROHD
HDMI EDID Emulator AT-HDSync
Monitor Battery AT-BAT-DIS7PRO
AT-HD800
• Portable size and
battery operated
HDMI generator
• Supports 13 Testing
Patterns which
includes 6 x 3D, and
over 20+ resolutions
• EDID Reading function,
allows user to view
display’s capabilities
(video + audio formats)
HDMI in/HDMI for
passthru EDID
reading
AT-HDSYNC
• HDMI 1.3c, DVI
1.0 and HDCP 1.1
compliant
• Built-in default EDID
• Able to read and store
the EDID of monitors/
projectors/TVs
• Prevent computers
from deactivating
inactive HDMI ports
AT-BAT-DIS7PRO
• Portable battery for
AT-DIS7-PROHD.
• Up to 4 hour Battery
• Comes in a leather
case with all
required adapters.
AT-DIS7-PROHD
• 7" PRO HDMI, DVI,
VGA and Component
(HDMI and
HD15 inputs)
• From 480p to
1920x1200,
• HDCP Compliant, with
display indicator
• Built-in Speakers
8
 Loading...