

Atlona AT-UHD-CLSO-840 User Manual
atlona.com
Toll free: 1-877-536-3976
Local: 1-408-962-0515
4K/UHD 8x4 HDBaseT and HDMI
Matrix Switcher with PoE
User Manual
AT-UHD-CLSO-840

2
atlona.com
Toll free: 1-877-536-3976
Local: 1-408-962-0515
1. Introduction ................................................................................. 3
2. Package Contents ................................................................................. 3
3. Features ................................................................................. 3
4. Before You Start ................................................................................. 3
5. Panel Descriptions
• Front Panel ................................................................................. 4
• Back Panel ................................................................................. 5
6. Rack Mounting ................................................................................. 5
7. Category Cable ................................................................................. 6
8. Captive Screw ................................................................................. 7
9. Connection Diagram ................................................................................. 8
10. Button Set Up ................................................................................. 9-12
11. WebGUI ................................................................................. 13-21
12. RS-232 ................................................................................. 22-24
14. Specifications ................................................................................. 25
15. Safety Information ................................................................................. 26
16. Warranty ................................................................................. 27-28
17. Atlona Product Registration ................................................................................. 28
Table of Contents

3
atlona.com
Toll free: 1-877-536-3976
Local: 1-408-962-0515
Introduction
Package Contents
Features
• HDBaseT ports for up to 100 meters (328 feet)
• Two HDMI and HDBaseT independent outputs
• PoE (Power over Ethernet) to power up to five compatible PoE series receivers or transmitters
e.g. AT-UHD-EX-100CE-RX, AT-HDVS-200-TX, etc
• EDID learning for up to 8 video display EDIDs
• Built in internal EDID mode provides 14 unique EDIDs to ensure compatibility
• Multiple control options such as RS-232, TCP/IP, webGUI, AMS, and front panel
• 2Ch audio embedding and de-embedding through captive screw ports
• Independent zone volume control, mute, and 5 band EQ for captive screw audio outputs
• HDCP 1.4 compliant
• Multi-channel audio pass through up to Dolby Digital Plus, Dolby TrueHD, DTS-HD Master Audio,
and Dolby Atmos on digital outputs
• Supports digital audio up to 24-bit, 192 kHz
• Internal international power supply
Before You Start
• Make sure when connecting a category cable a 568B termination method is used. See page 6 for
more details.
• Use a component surge suppressor with line conditioning for best results.
Note: Atlona’s warranty does not cover damage due to electrical disturbances. A component surge
suppressor with line conditioning is highly suggested, especially in areas with electrical
storms.
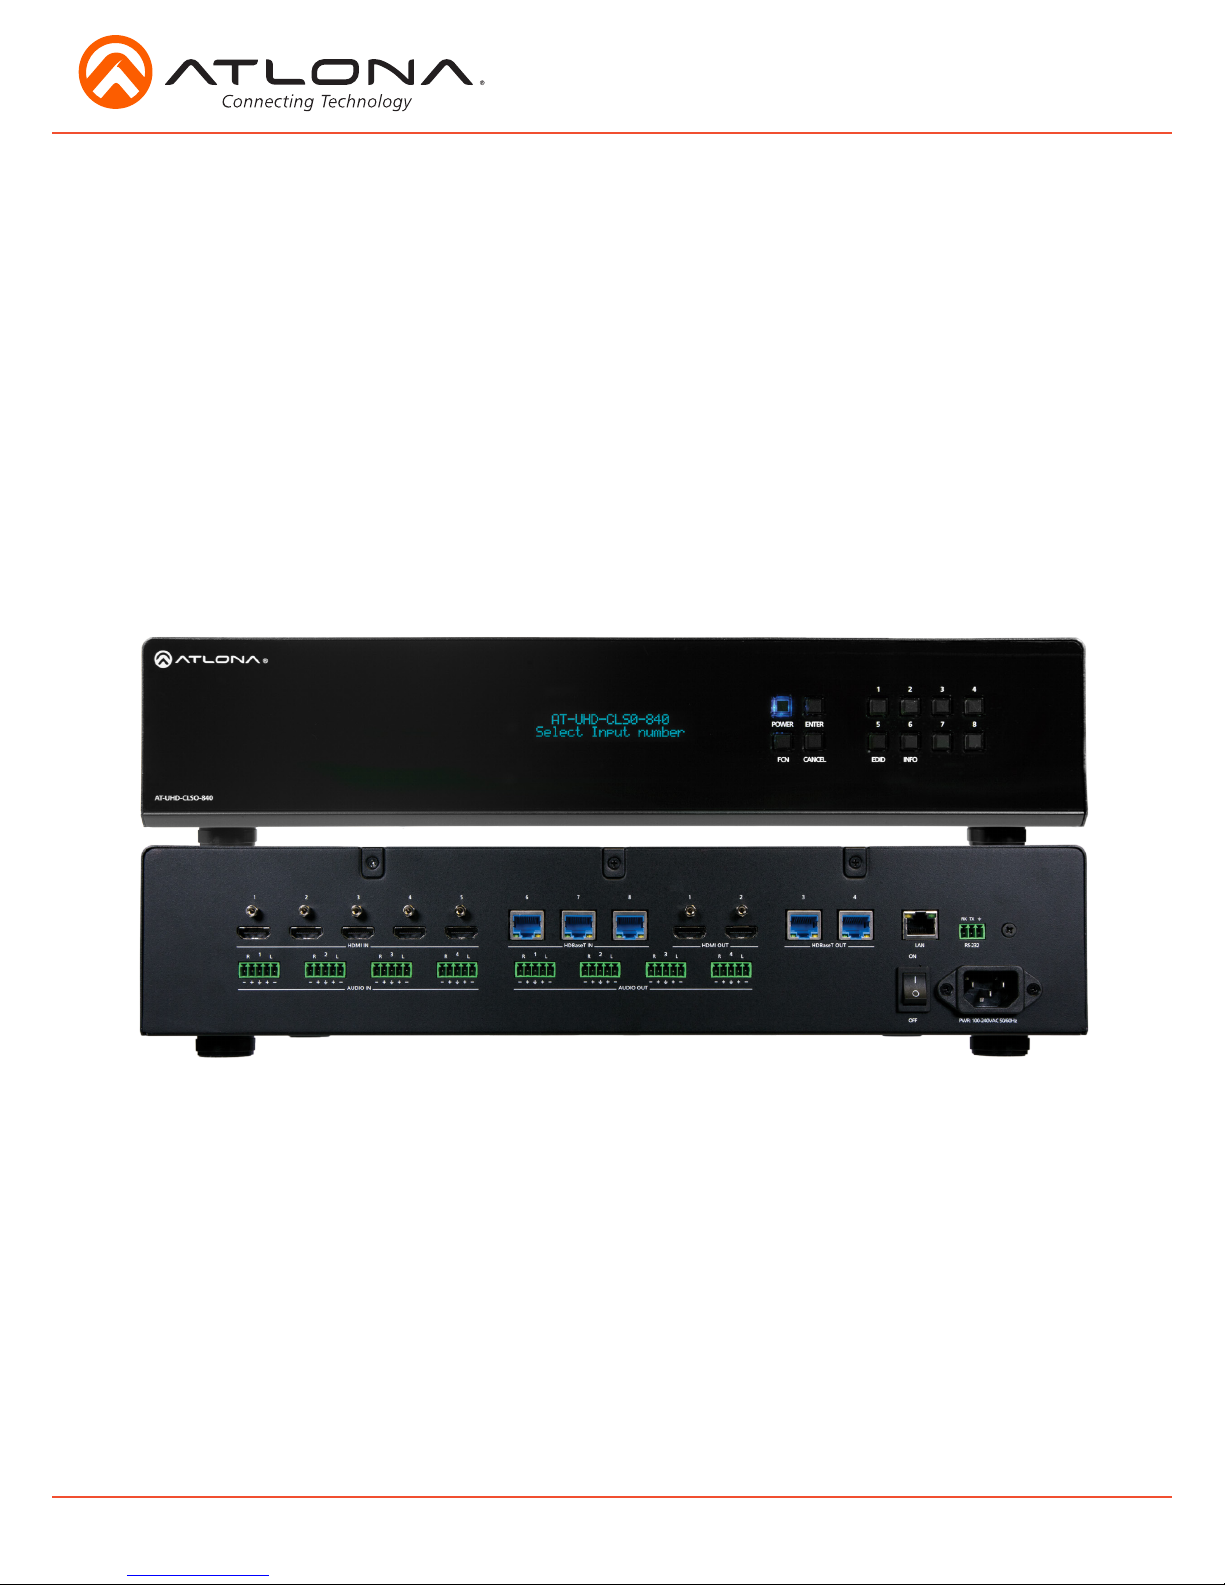
The Atlona AT-UHD-CLSO-840 is a 4K/UHD 8x4 matrix switcher with HDMI® and HDBaseT™
inputs and outputs, flexible audio integration capabilities, and Ethernet-enabled 100 meter
HDBaseT extension with PoE remote device powering. It is highly versatile and ideal for presentation
environments with content on multiple displays, as well as videoconferencing, presentation
capture, and divisible rooms. The AT-UHD-CLSO-840 supports resolutions up to 4K/UHD at 60 Hz
with 4:2:0 chroma subsampling. Ethernet pass-through allows HDBaseT Ethernet extension from
a control system or network. Audio system integration is streamlined with audio embedding and
de-embedding, independent audio matrix switching, dedicated input and output gain controls, and
a five-band EQ for each output. The AT-UHD-CLSO-840 is configured and managed using Atlona
Management System software or webGUI to simplify installation and support.
• 1 x AT-UHD-CLSO-840
• 8 x 5 pin captive screw female connector
4 x Audio IN and 4 x Audio OUT
• 1 x 3 pin captive screw female connector
RS-232
• 1 x IEC C13 power cable
• 1 x Pair of rack mount ears
• 1 x Installation guide
4
atlona.com
Toll free: 1-877-536-3976
Local: 1-408-962-0515
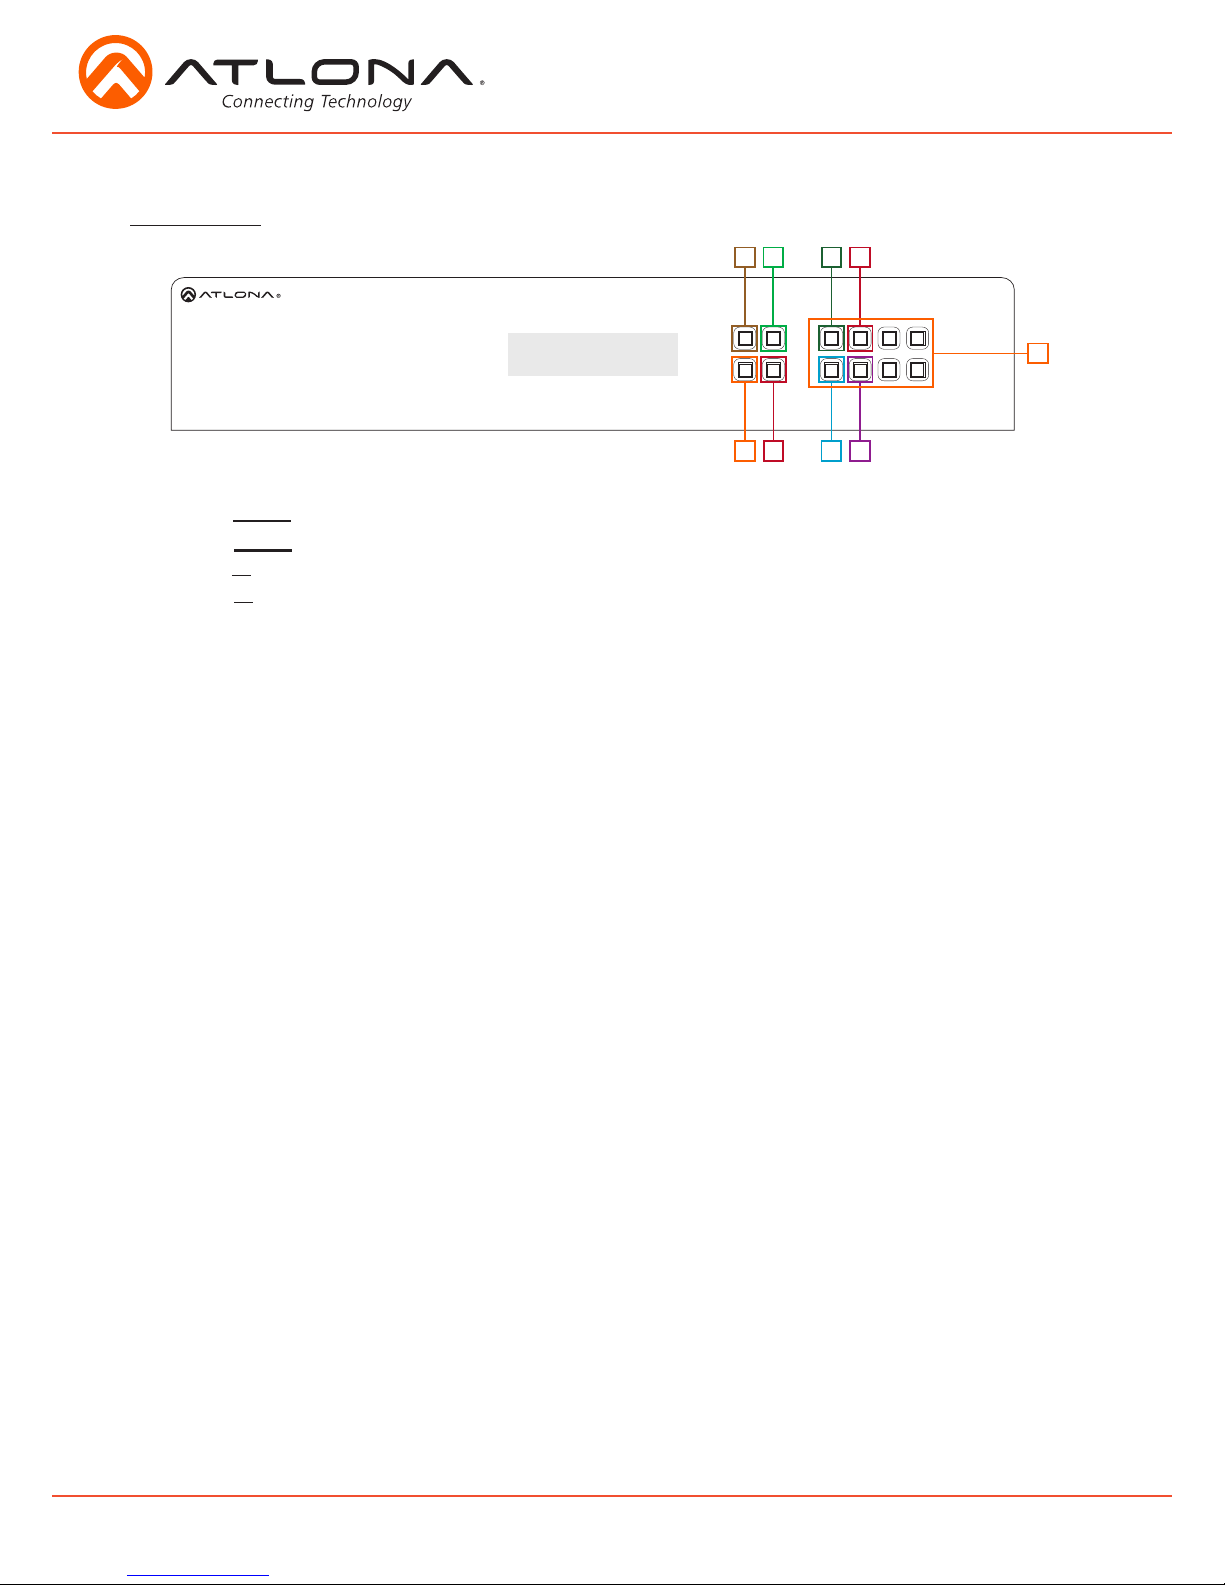
Panel Description
Front Panel
EDID
POWER
ENTER
FCN CANCEL
INFO
1
2 3
4
5
6 7 8
AT-UHD-CLSO-840
1. Function (FCN) Button - Select for command options. (blue backlight when selected)
a. EDID: Save/Load EDIDs to individual inputs
b. INFO: Displays the firmware, IP, and MAC address
c. 1: Save a single input to all the outputs with this function
d. 2: View additional matrix and output RS-232 baud information
2. Cancel Button - Within the function menu use this button to go back one screen or to return to
the home screen
Note: You cannot power off or change functions unless you return to the home screen
3. Power Button - Cycles the power between On (blue backlight) or Standby (red backlight) mode
4. Enter Button - Use to view current status for inputs and outputs or to confirm a command
5. Number buttons - Use these buttons to select input and output paths or use with the function
button to change matrix settings
5
1
4 c d
a b
3
2
5
atlona.com
Toll free: 1-877-536-3976
Local: 1-408-962-0515
EDID
POWER
ENTER
FCN CANCEL
INFO
1
1
HDMI IN
HDBaseT OUT
2 3 4
1
2
3 45
6 7 8
2 3
4
5
6 7 8
AT-UHD-CLSO-840
LAN
RS-232
AUDIO OUT
HDBaseT IN
HDMI OUT
AUDIO IN
1
R
L
R
L
R
L
R
L
R
L
R
L
R
L
R
L
2
3 4
1
2
3 4
RX
TX
PWR: 100-240VAC 50/60Hz
OFF
ON
+ +
--
+ +
-
-
+ +
-
-
+ +
--
+ +
--
+ +
--
+ +
-
-
+ +
--
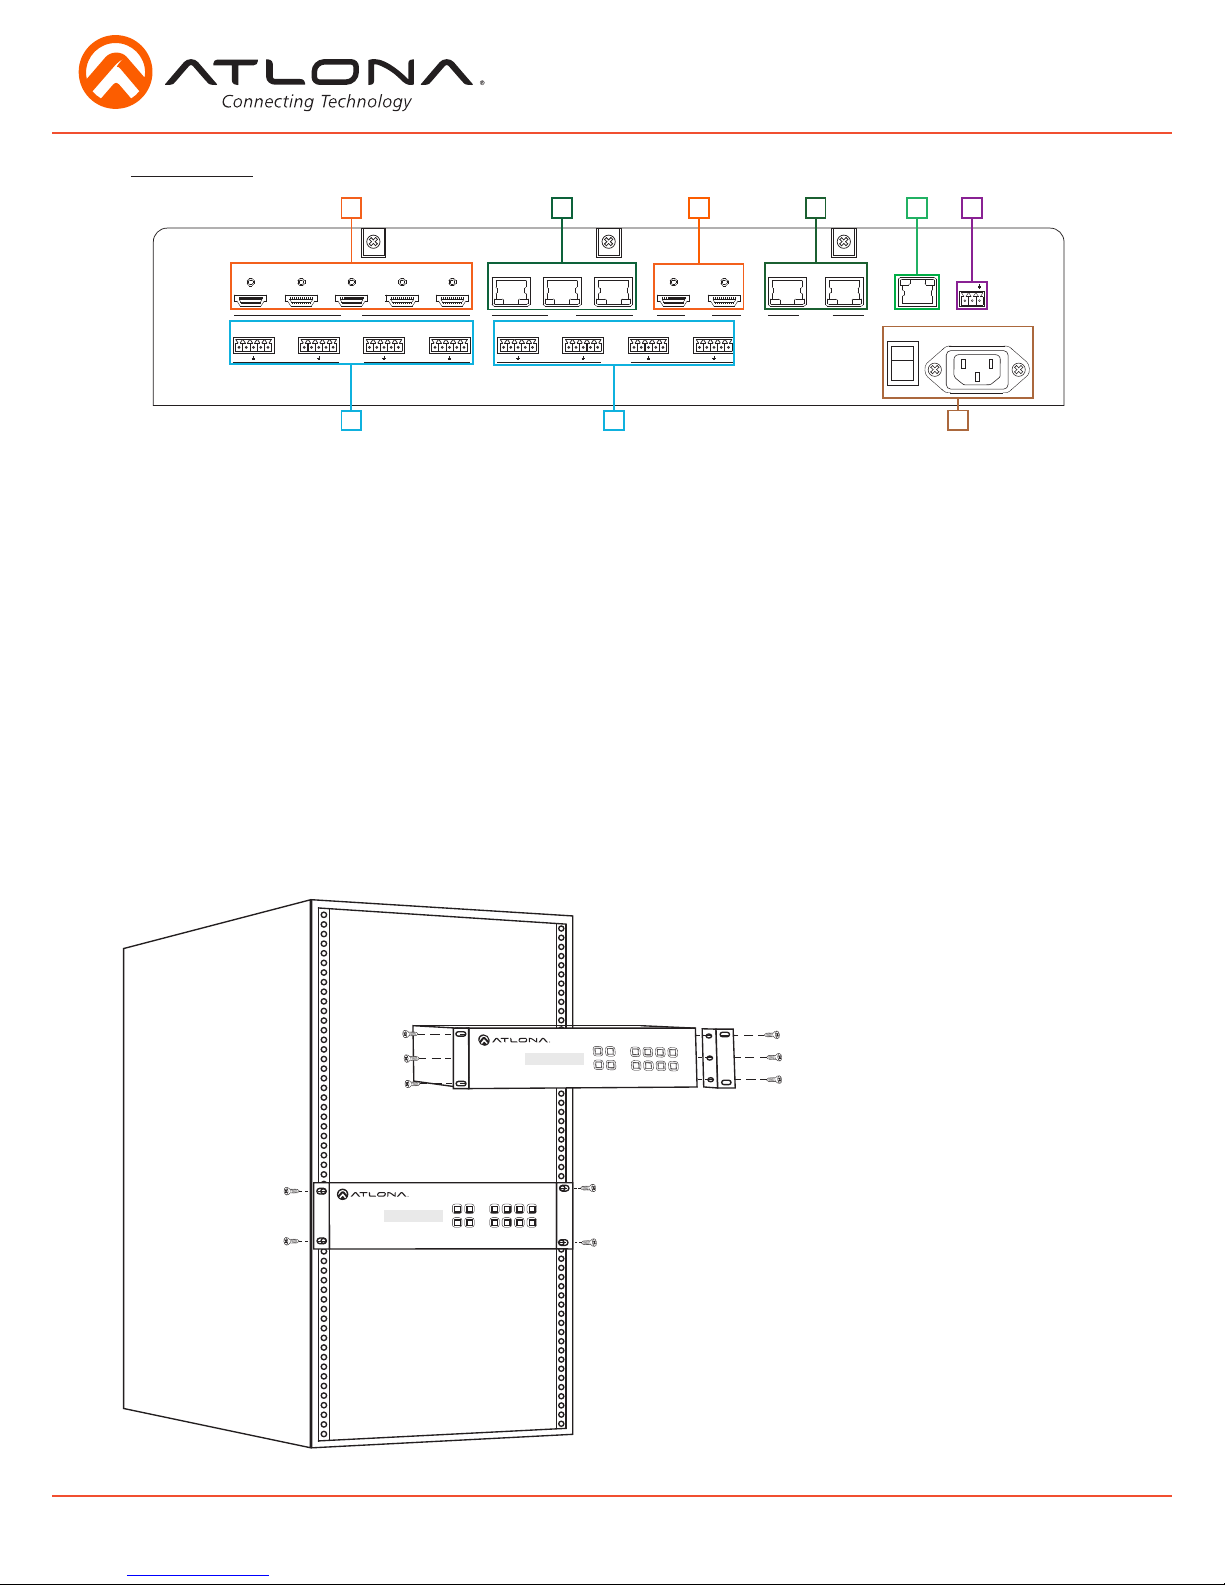
Back Panel
1. HDMI Input - Connect HDMI sources to these ports
e.g. DVD players, Blu-ray players, computers, game consoles, etc
2. HDBaseT Inputs - Connect compatible PoE transmitters to these ports e.g. AT-UHD-EX-100CE-TX
3. HDMI outputs - Connect to local displays, AVRs, or transmitters e.g. AT-UHD-EX-100CE-KIT
4. HDBaseT Outputs - Connect to compatible PoE receivers
e.g. AT-UHD-EX-100CE-RX or AT-HDVS-200-RX for scaling
5. LAN port - Connect to a network switch for TCP/IP, webGUI, and AMS control, as well as
firmware updating
6. RS-232 port - Control the matrix or send zone commands through HDBaseT ports
7. Audio IN - Connect analog audio sources here - Audio inputs follow the corresponding HDBaseT outputs
e.g. Audio IN 1 follows HDBaseT OUT 1
8. Audio out - Captive screw analog audio outs for use with a sound system or multi-channel
zone amplifier - Audio outputs can be mirrored to any output or paired to any analog input.
9. Internal power supply - Connect included IEC C13 power cable from here to a power outlet.
1
2 4 5 63
7 8
9
To rack mount the UHD-CLSO-840
unit: use the rack mount ears, the 6
screws from the sides of the UHDCLSO-840, and 4 rack screws.
To affix the rack mount ears,
remove the three screws on each
side of the UHD-CLSO-840 and affix
the rack ears to the UHD-CLSO-840
(as shown in the picture to the left).
Place the UHD-CLSO-840 in the
rack, lining the holes in the rack
ears with the holes in the rack.
Once placed, use the rack screws to
keep the unit in place. (as shown in
the picture to the left).
Note: Increase the air flow as needed
to maintain the recommended
temperature inside the rack.
Note: Do not exceed maximum weight
loads for the rack. Install heavier
equipment in the lower part of
the rack for stability.
POWER ENTER
CANCEL
INFO
EDID
FNC
5
6
7
1
2 3
8
4
POWER ENTER
CANCEL
INFO
EDID
FNC
5
6
7
1
2 3
8
4
Rack Mounting
6
atlona.com
Toll free: 1-877-536-3976
Local: 1-408-962-0515
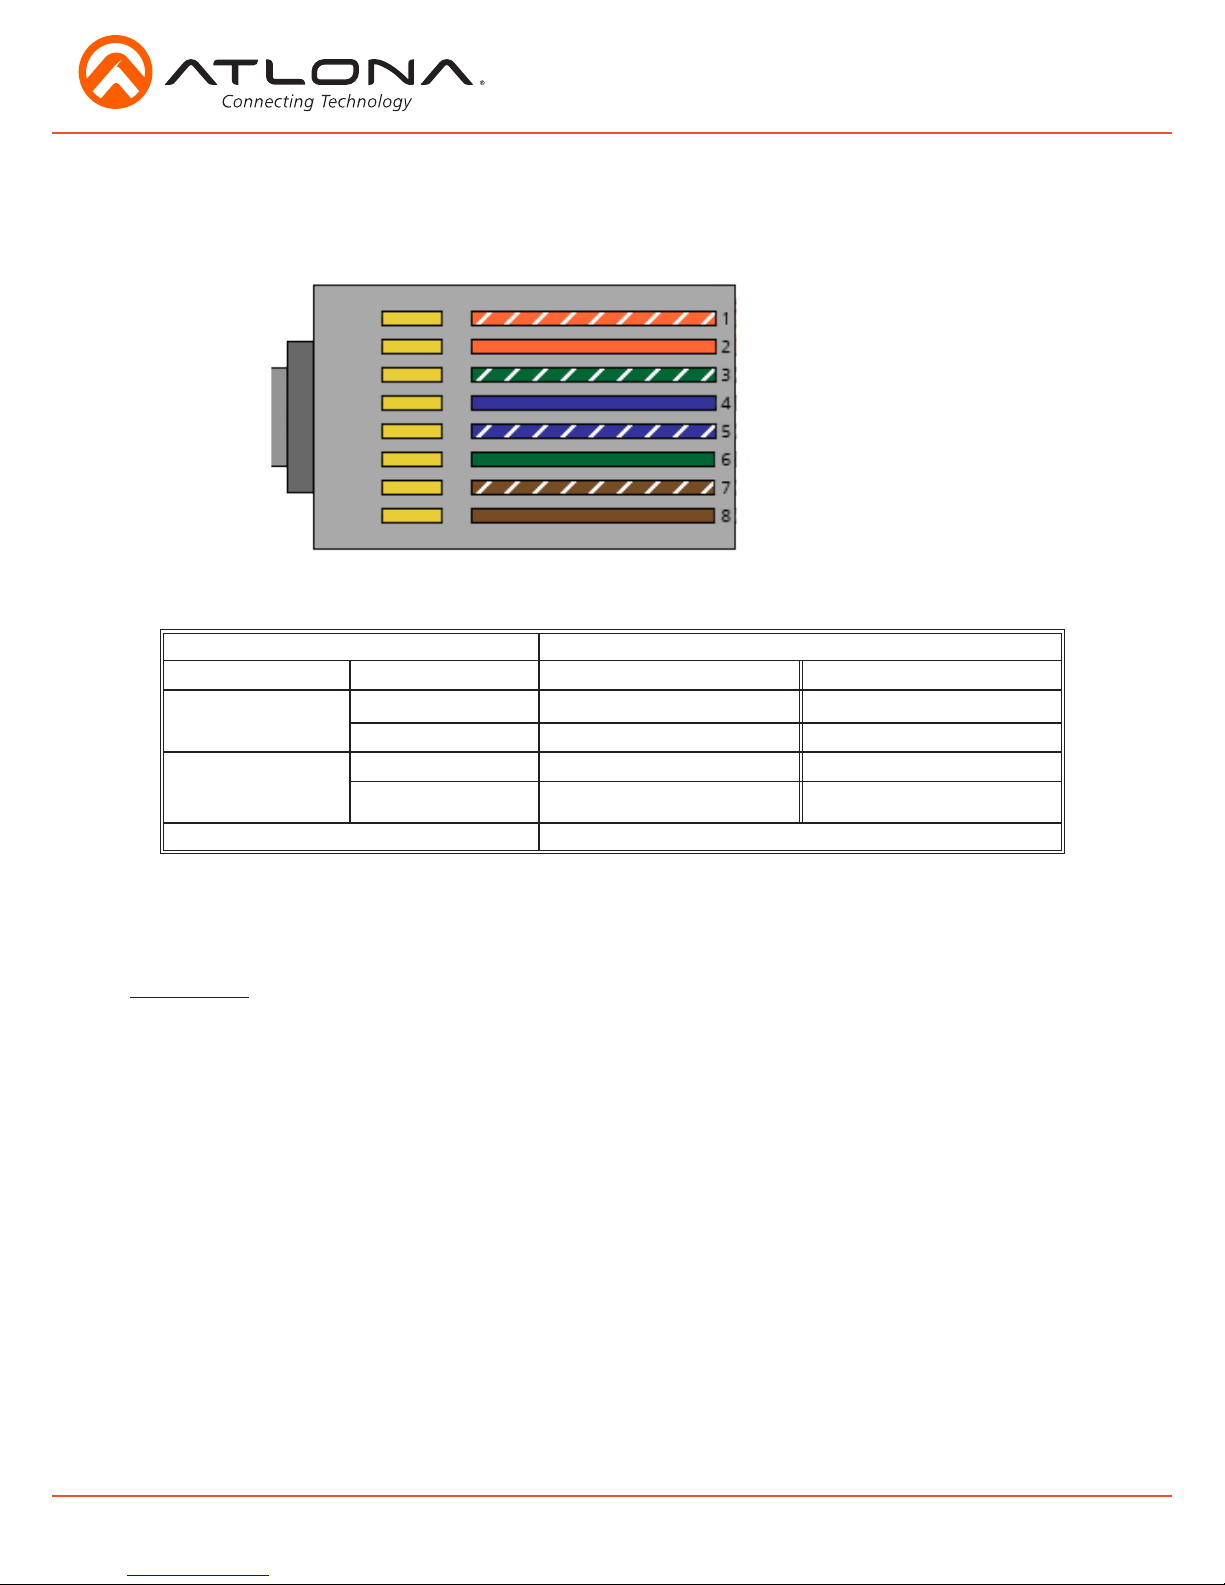
Category Cable
For the category cables used in the installation of these products, please be sure to use a 568B
termination as pictured below:
Connector type and size is very important to ensure extenders work correctly. Please use the
matching cable type with the correct RJ45 connector.
CAT5e cables should use only CAT5e RJ45 connectors
CAT6 cables should use only CAT6 connectors
CAT6a cables should use only CAT6a connectors
CAT7 cables should use only CAT7 connectors
Using the wrong size connectors may result in interference causing loss of signal.
Important! “EZ RJ45 connectors” are not recommended with HDBaseT extenders. Doing so may result in interference
with audio and video transmission.
Use the table below to verify the best category cable for the installation.
Important! 4K (UHD) signals are sensitive to cable quality and installation technique. It is recommended to
use CAT6a/7 solid core shielded cables for best results.
Note: For cable distances see the specifications on page 25
Performance Rating Type of LAN cable
Wiring Shielding CAT5e/6 CAT6a/7
Solid
Shielded (STP/FTP)
*** ****
Unshielded (UTP) ** N/A
Stranded - Patch
cable
(Not recommended)
Unshielded (UTP) * N/A
Shielded (STP/FTP)
* N/A
Termination Please use EIA/TIA-568-B termination
1. White - Orange
2. Orange
3. White - Green
4. Blue
5. White - Blue
6. Green
7. White - Brown
8. Brown
Connector
7
atlona.com
Toll free: 1-877-536-3976
Local: 1-408-962-0515
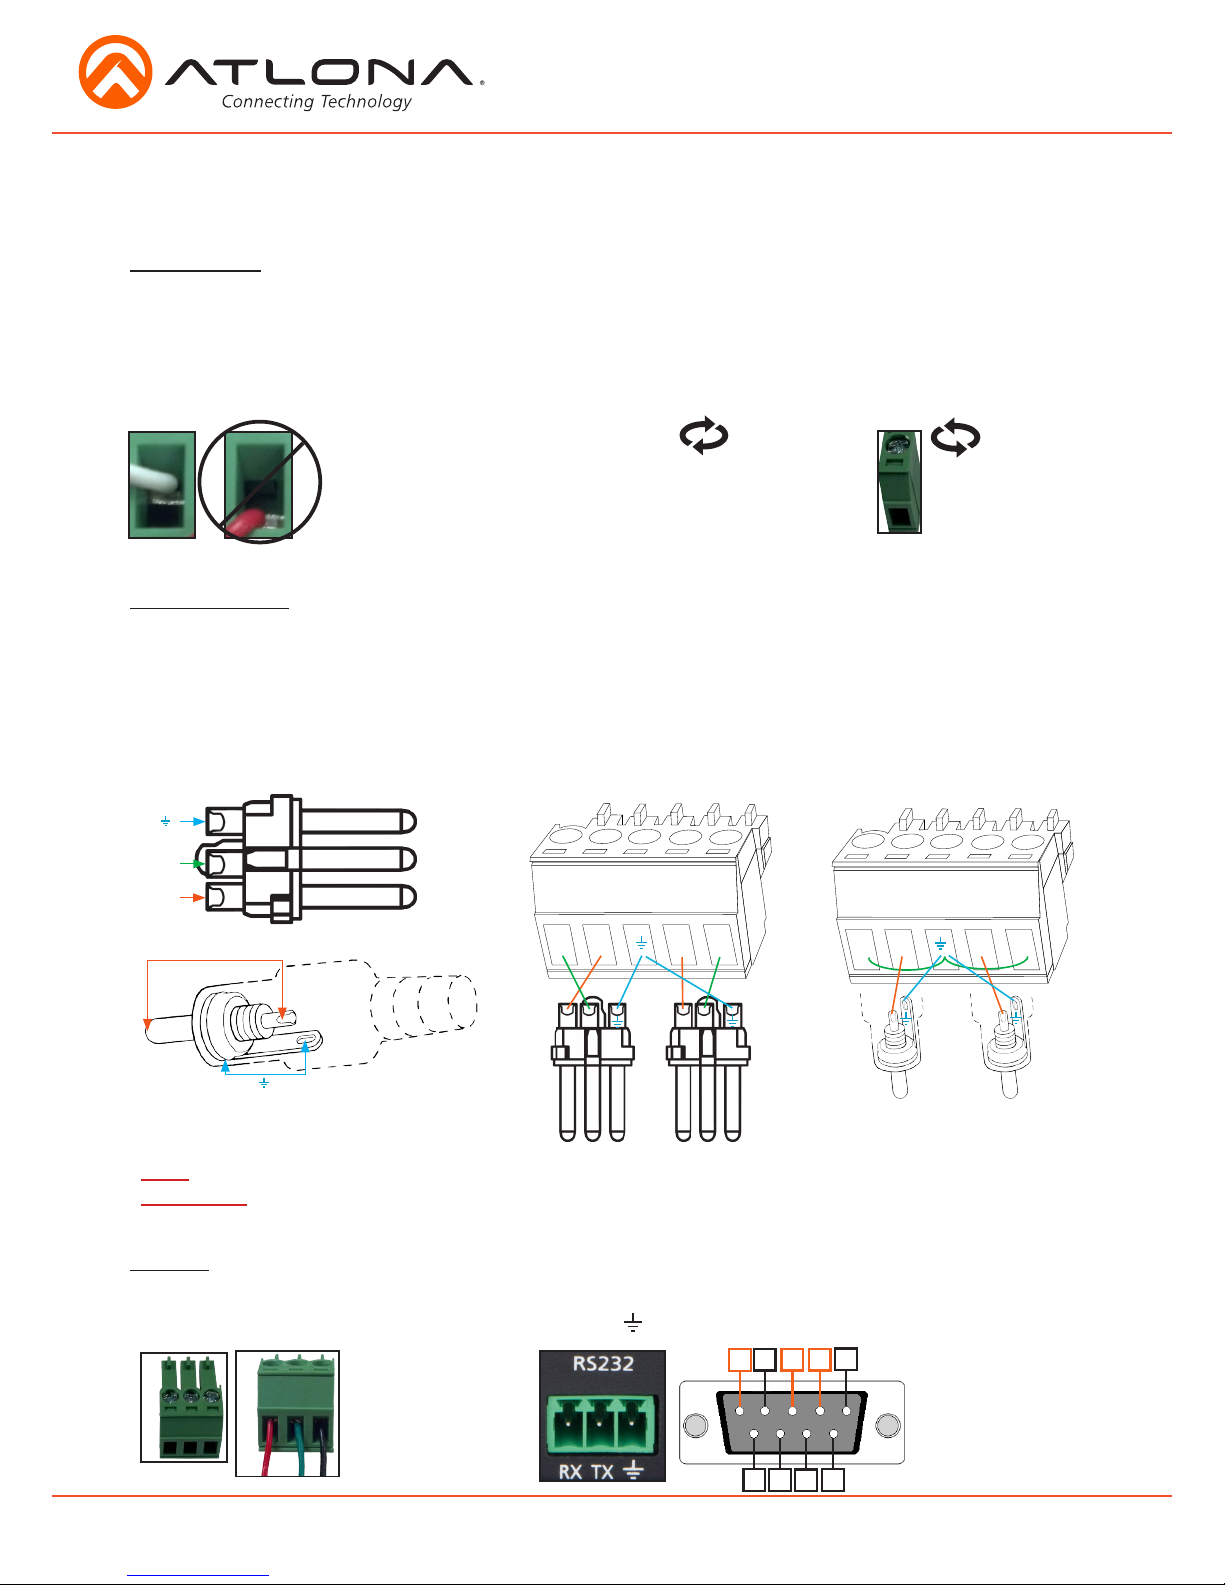
Captive Screw
The captive screw connectors allow you to cut cables to a suitable length, reducing cable clutter
while providing a more reliable connection.
Connecting
The captive screw connectors have
a contact bar that is adjusted to
compress the wire against the top
contact plate. Use the screws at the
top of the connector to compress
the wire against the contact plate.
When connecting the cables to the female captive screw connector it is important that the wires be
terminated correctly. The female captive screw connector has a contact plate at the top and must
have the wires touching it for signal to pass. When wired correctly (see picture A) the signal will pass,
incorrectly (see picture B) no signal will pass.
Clockwise
Counter
Clockwise
Turn the screws clockwise to
raise the contact bar to the
upper contact plate and hold
the wires in place.
Turn the screws counter
clockwise to lower the
contact bar to release the
wires.
A
B
Tip (+)
Analog Audio
A captive screw analog audio connector is provided to ensure a more reliable and secure
connection. The captive screw connector supports unbalanced and balanced audio output.
Unbalanced audio connections use one signal wire and a ground, when connecting the wires a
jumper between the negative and ground will help alleviate extra noise on the line. Unbalanced
audio connections are used if other system components don’t support balanced signals.
Note: Pin outs may vary, please refer to the audio device’s manual to ensure a correct connection.
Important! When terminating cables, please ensure exposed adjacent wires do not touch. This may result in
a short that can damage connected devices.
XLR
RCA
Sleeve ( Ground)
2 ( + )
3 ( - )
1 ( )
+
+
+
+
+
+
-
-
-
-
-
-
L / R
BALANCED
UNBALANCED
L / R
+ +
RS-232 captive screw connector is included. RS-232 pin out will be determined by the RS-232 cable
and will connect as Rx (receiver), Tx (transmitter), and (ground). (See picture 1)
RS-232
Typical pin out:
2 - TX - Transmitter
3 - RX - Receiver
5 - GND - Ground
Pin out color will
differ per RS-232
cable.
1
5
4 3 2
9
8
7
6
1
RS-232
8
atlona.com
Toll free: 1-877-536-3976
Local: 1-408-962-0515
Note: These products are meant for indoor use only. Do not install or connect the products to any outdoor components.
EDID
POWER
ENTER
FCN CANCEL
INFO
1
1
HDMI IN
HDBaseT OUT
2 3 4
1
2
3 45
6 7 8
2 3
4
5
6 7 8
AT-UHD-CLSO-840
LAN
RS-232
AUDIO OUT
HDBaseT IN
HDMI OUT
AUDIO IN
1
R
L
R
L
R
L
R
L
R
L
R
L
R
L
R
L
2
3 4
1
2
3 4
RX
TX
PWR: 100-240VAC 50/60Hz
OFF
ON
+ +
--
+ +
-
-
+ +
-
-
+ +
--
+ +
--
+ +
--
+ +
-
-
+ +
--
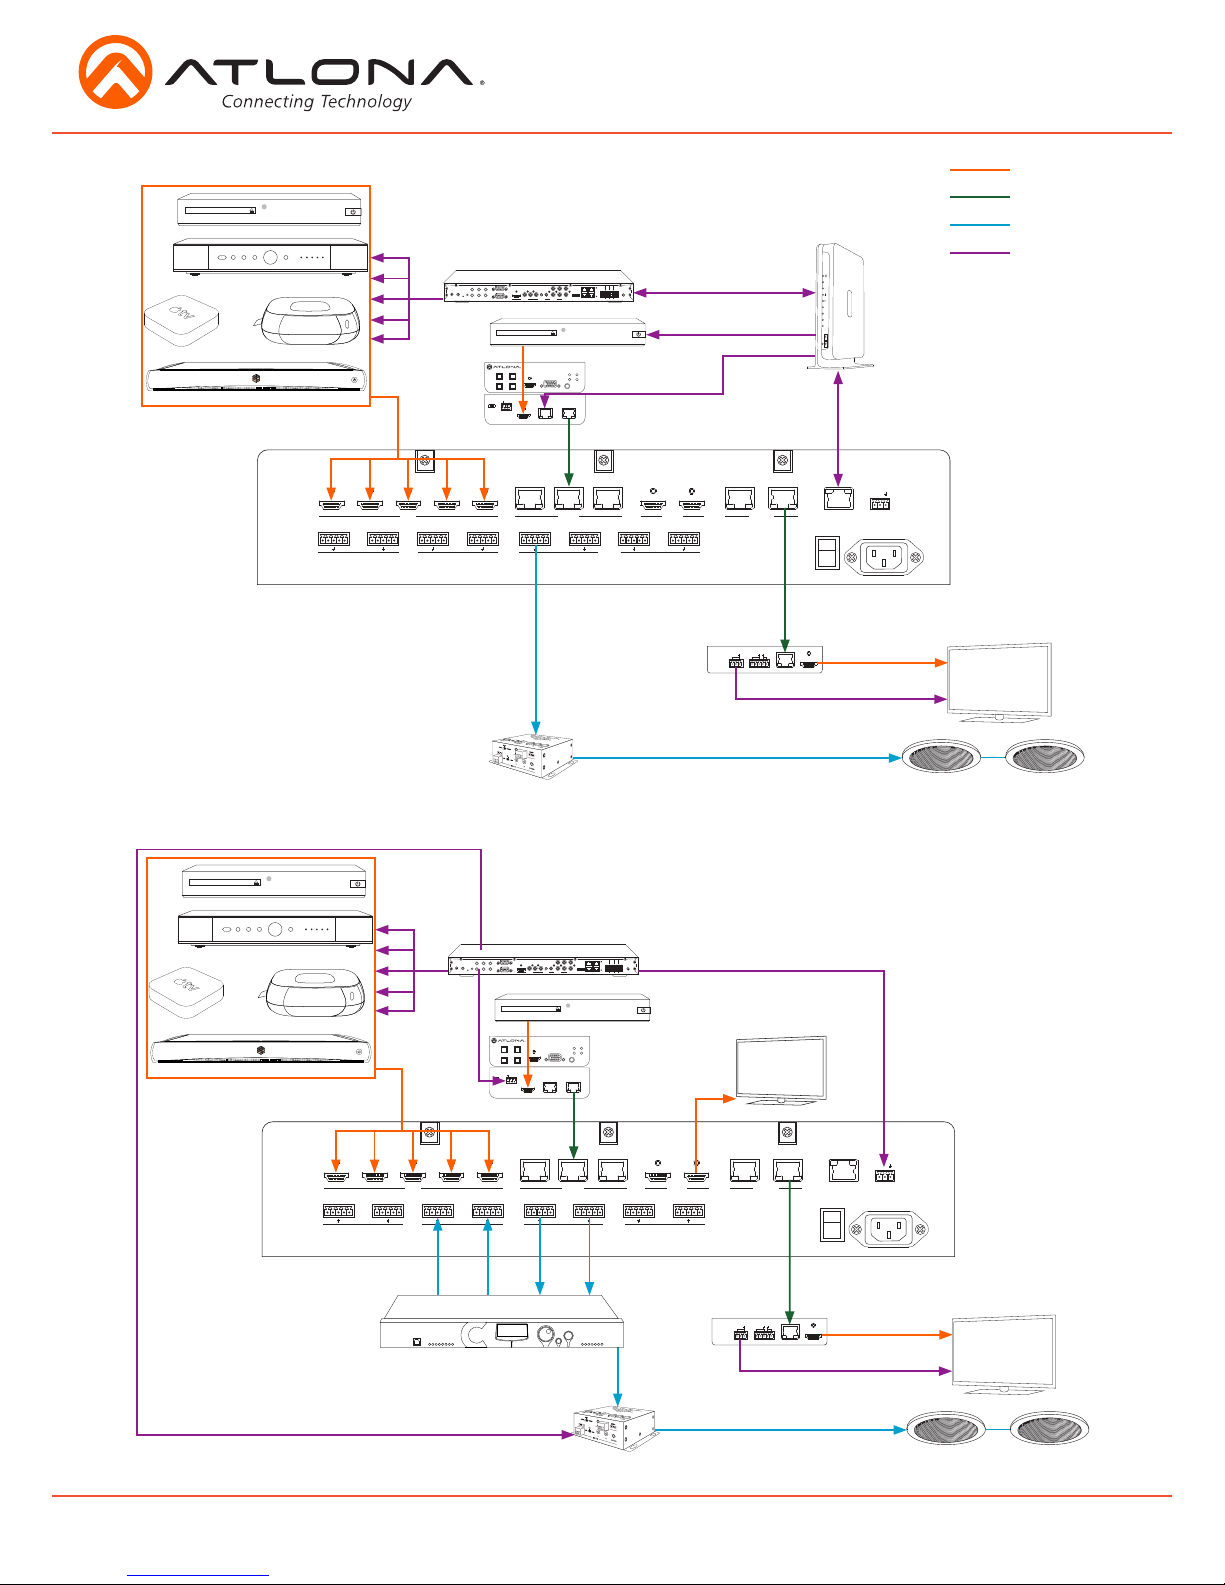
Connection Diagram
Video
HDBaseT
Audio
Control
Router
AT-UHD-EX-100CE-RX
AT-UHD-EX-100CE-RX
NO
NC
COM
NO
NC
COM
NO
NC
COM
NO
NC
COM
GND
SIG
+12V
GND
SIG
+12V
GND
SIG
+12V
GND
SIG
+12V
1 2 3 4
RELAYS
WIFI 2
ZIGBEE 12V DC
IR OUT
IDFACTORY
RESTORE
SERIAL 1
SERIAL 2
HDMI
COMPONENT
VIDEO OUT
ETHERNET
CONTACTS
AUDIO OUT
AUDIO IN
WIFI 1
eSATADIGITAL
COAX OUT
1
2
345
6
L
R
NO
NC
COM
NO
NC
COM
NO
NC
COM
NO
NC
COM
GND
SIG
+12V
GND
SIG
+12V
GND
SIG
+12V
GND
SIG
+12V
1 2 3 4
RELAYS
WIFI 2
ZIGBEE 12V DC
IR OUT
IDFACTORY
RESTORE
SERIAL 1
SERIAL 2
HDMI
COMPONENT
VIDEO OUT
ETHERNET
CONTACTS
AUDIO OUT
AUDIO IN
WIFI 1
eSATADIGITAL
COAX OUT
1
2
345
6
L
R
FW
LINK
POWER
AT-UHD-EX-70C-RX
RS-232
RX
TX
IR IN
P
S
IR OUT
S
HDBaseT IN
HDMI OUT
FW
LINK
POWER
AT-UHD-EX-70C-RX
RS-232
RX
TX
IR IN
P
S
IR OUT
S
HDBaseT IN
HDMI OUT
Control
Control
Control
Control
Control
Control
Control
Control
Control
Video
Video
Control
Control
HDBaseT
HDBaseT
HDBaseT
HDBaseT
Video
Video
Video
Video
Video
Audio
Audio
Audio
Audio
Audio
Audio
Audio
Audio
Blu-ray player
Blu-ray player
Set top box
Set top box
Media Player
Media Player
Media Player
Media Player
Media Player
Media Player
Control System
Control System
ROUTER
2.4 5
1
2
3
4
i
e
3
M
R
d
i
a
3
e
3
M
R
d
i
a
3
AT-PA100-G2
AT-PA100-G2
DSP
HDMI IN 1
1
2
HDMI IN 2
HDMI
AUDIO IN
PW
VGA IN
VGA
HDBaseT OUTLAN
DISPLAY
^
^
INPUT
VOL
FW RS-232
AT-HDVS-200-TX
RX
TX
HDMI IN 1
1
2
HDMI IN 2
HDMI
AUDIO IN
PW
VGA IN
VGA
HDBaseT OUTLAN
DISPLAY
^
^
INPUT
VOL
FW RS-232
AT-HDVS-200-TX
RX
TX
AT-HDVS-200-TX
AT-HDVS-200-TX
Conference Monitor
1
-30-10-40
MENU
ESC
METER
AUDIO
CONFERENCING
DSP
SELECT
+4
+8+122
3
4
567
8

9
atlona.com
Toll free: 1-877-536-3976
Local: 1-408-962-0515
I/O Control
The AT-UHD-CLSO-840’s front panel has 3 functions: I/O control, EDID, and matrix settings. The
following sections go over step by step setup & control.
I.E. Input 1 to output 2
I.E. Input 1 to output 1 through 8
To route an input to an output
To route one input to all outputs
Feedback =”Input # routed to
Output #”
Matrix Front Panel Functions
--->
--->
---> ---> --->
--->
--->
--->
--->
---> --->
---> --->
AT-UHD-CLSO-840
Select Input Number
AT-UHD-CLSO-840
Select Input Number
Select Function
Select Input to
route to all Outputs
Select input
Enter to confirm
home screen
input selection
input selection
output selection
home screen
through
through
through
Select output
Press enter to confirm
Feedback = ”Input # saved to
all outputs”
 Loading...