

Page 1
User Manual
AtlonA
16x16 HDMI matrix Switch with
16 x CAT5/6 Receivers included
AT-PROHD1616M-SR
AT-PROHD1616M-S
AT-PROHD1616M-R
www.atlona.com | toll free: 1-877-536-3976
For International: 1-408-962-0515
Page 2

TABLE OF CONTENTS
1. Introduction .................................................. 3
2. Package Contents .................................................. 3
3. Features .................................................. 3
4. Specication .................................................. 4
5. Panel Description .................................................. 4
5.1 Main Unit .................................................. 4
5.1.1. Front Panel .................................................. 4
5.1.2. Rear Panel .................................................. 5
5.2 HDMI Receiver .................................................. 5
6. Connection and Operation .................................................. 6
7. LCD Display .................................................. 6
7.1. Main Menu .................................................. 7
7.2. Switch Menu .................................................. 7
7.3. Preview Menu .................................................. 7
7.4. Observe Menu .................................................. 8
7.5. Save Menu .................................................. 8
7.6. Setting Menu .................................................. 8
7.6.1. EDID menu .................................................. 8
7.6.2. Long Cable Mode .................................................. 10
7.6.3. IR Mode .................................................. 10
7.6.4. EQ Mode .................................................. 10
7.6.5. RST Mode .................................................. 11
7.7. Info Menu .................................................. 11
8. IR Remote Control .................................................. 11
8.1. RS232 Control .................................................. 12
8.2. RS232 Cable Wiring .................................................. 13
9. F.A.Q. .................................................. 13
10. Safety Information .................................................. 14
11. Warranty .................................................. 15
12. Atlona Product Registration .................................................. 16
www.atlona.com | toll free: 1-877-536-3976
For International: 1-408-962-0515
2
Page 3

INTRODUCTION
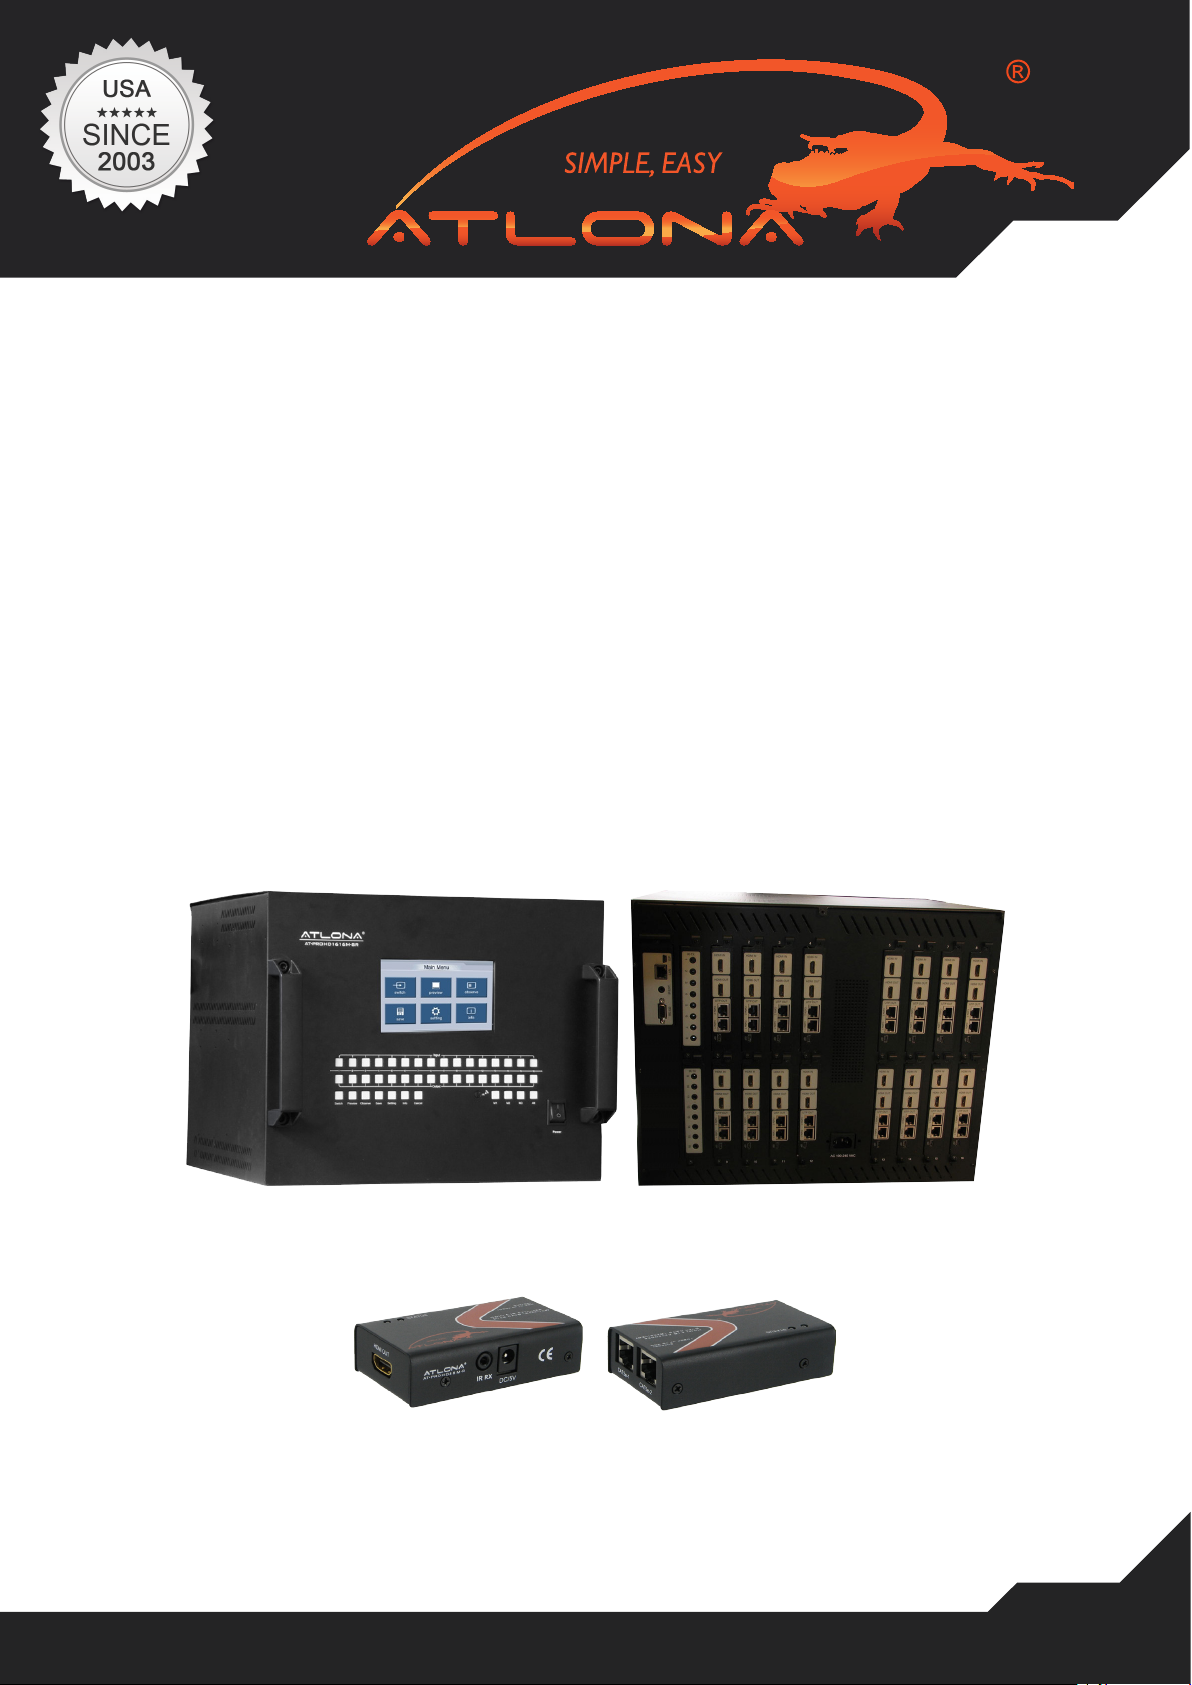
Atlona Technologies’ AT-PROHD1616M-SR is a 16x16 HDMI Matrix Switcher over Twisted Pair designed to
work as a switcher for multiple Audio/Video sources and displays. The Atlona unit is capable of switching HDMI
signals between sixteen sources (such as: BluRay players, HD set top boxes, game systems, etc.) and sixteen
displays. Because it is a matrix switch, any or all of the 16 inputs can simultaneously be switched to any or all
of the outputs. Along with supporting HDMI 1.3 and HDCP compliance, the switcher will support high denition
video in multiple resolutions of up to 1080p or 1920x1200. Six switching modes are available including a front
panel touch screen, local IR, IR call back from remote locations, RS232, RS485 and a TCP/IP LAN connection.
The AT-PROHD1616M is capable of routing IR signals from remote locations to the main location where the
switcher is. The IR emitters/receivers can control the switch as well as sources next to it.
The Atlona PROHD1616M-SR has 16 dual* outputs.
*Dual Output: HDMI + Dual Twisted Pair output where both are active at the same time. Each output could be
connected to either 2 displays or AVR and a Display; however the signal from both outputs will be identical.
PACKAGE CONTENTS:
• AT-PROHD1616M-SR (main switch)
• 16 x AT-PROHD-REC (CAT5/6/7 receivers)
• 16 x 5V DC Power Supply (110/240v universal) – for receivers
• 1 x 12V DC Power Supply (110/240v universal) – for the main switch
• 1 x IR Remote.
• 1 x IR receiver extension cable.
• 16 x IR (IR emitter cables).
• Rack Ears
• 1 x USB to RS232 adapter cable.
• Manual
FEATURES:
• HDMI 1.3b, HDCP and EDID compatible
• 16 x CAT5/6/7 receivers are included
• Allows up to 16 HDMI sources to be independently switched to 16 HDMI outputs, where each output is
featured with HDMI and Twisted pair connections and both are active at the same time.
• The 16 outputs could show the same or different sources simultaneously
• Supports high denition resolutions up to 1920x1200 or 1080p
• Supports all latest HDMI audio formats including Dolby TrueHD and DTS-HD Master Audio
• Switcher is featured with an IR call back function which allows each remote location to send IR signals though
CAT5/6/7 receivers back to the switch and further down to the nearby sources.
• Each CAT5/6/7 output can go up to 165ft @ 1080p on CAT5/6 cables and up to 250ft @ 1080p on the CAT7
cable (tested with Tyco wire). If more distance is required, Atlona offers CAT5/6/7 repeater units (AT-PROHD RP) which can double the distance and allow chaining up to 6 units.
• Each input and output port is able to support HDMI or DVI signals. For DVI signals an adapter will be
required.
• Six switching modes: front touch panel, local IR, IR call back from remote locations, RS232, RS485 and a
TCP/IP LAN connection.
• Rack Mountable, comes with 19-inch Rack-Ears (6U)
www.atlona.com | toll free: 1-877-536-3976
For International: 1-408-962-0515
3
Page 4
SPECIFICATIONS:
Operating Temperature Range -5 to +35°C (-41 to +95 °F)
Operating Humidity Range 5 to 90 % RH (no condensation)
Input Video Signal 0.5-1.0 volts p-p
Input DDC Signal 12v (main unit) and 5v (receivers)
Video Format Supported HDTV: 480i/480p/576p/720p/1080i/1080p (50/60Hz)
Computer: up to 1920x1200
Audio Format Supported All latest HDMI audio formats including Dolby TrueHD
and DTS-HD
HDMI Standard HDMI 1.3c
Maximum Output Distance
55ft (16m)
(HDM out)
Maximum Output Distance
RJ45 outputs
165ft (50m) @ 1080p on CAT5/6 cables and
Up to 250ft (80m) @ 1080p on the CAT7 cable
(Tested with Tyco wire)
Power Consumption 60wtts (Max)
Dimensions (inch) 17.32” W x 13.78” H x 15.35” D – 6U
Main Unit Weight/Receiver 44.1LB/0.3LB (20kg)/(0.1kg)
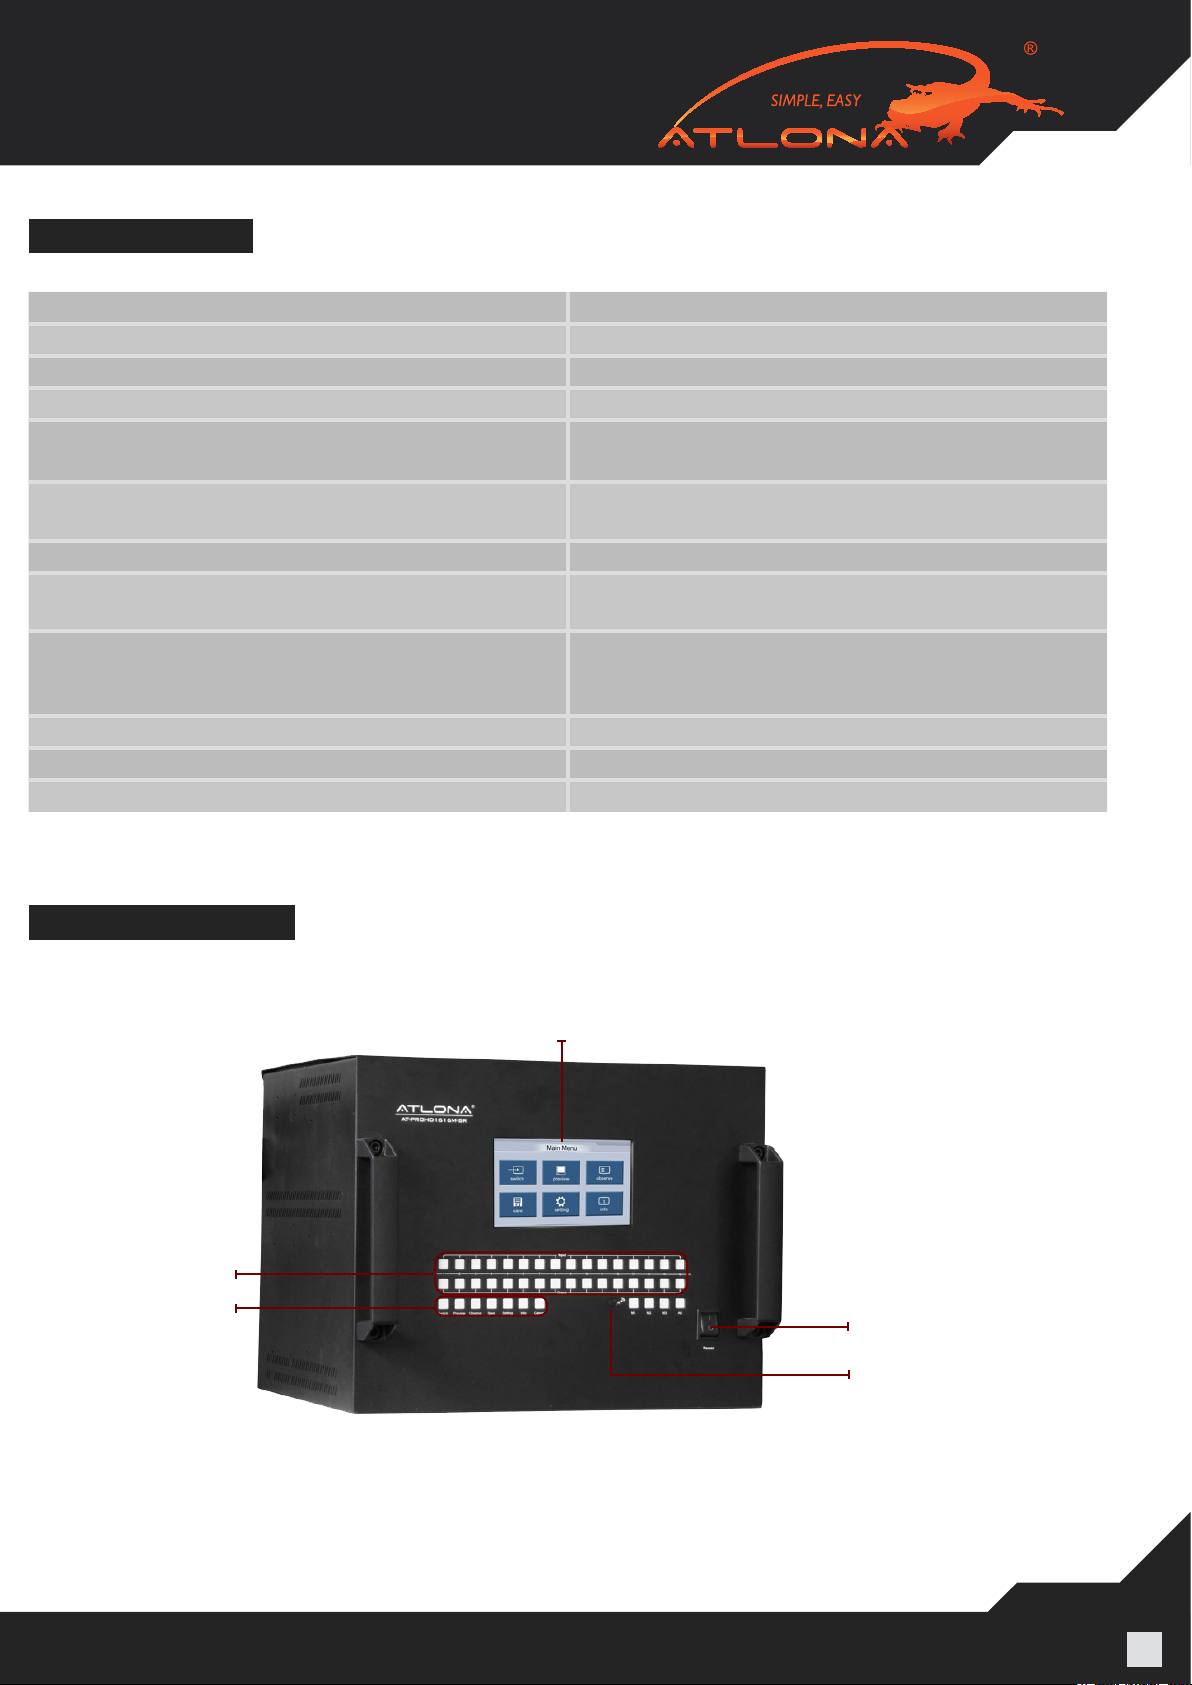
PANEL DESCRIPTION
Main Unit
1. Front Panel
3
2
1. Touch Panel
2. Function Panel Buttons
3. Keypad
4. IR Receiver
5. Power Switch
1
5
4
www.atlona.com | toll free: 1-877-536-3976
For International: 1-408-962-0515
4
Page 5

2. Rear Panel
1
2
3
4
5
9
6
7
8
1. ISP Port (Service) 6. HDMI Input Ports
2. LAN port 7. HDMI Output Ports
3. IR Extensions 8. UTP Output Ports
4. RS232 Port 9. Power Input
5. IR Transmitters
Note: The TCP/IP port has to be connected to the computer via direct Crosswire CAT5/6/7 wire while if connected to the router it needs to be connected though Straight wire.
RS232 port, RS485 port and LAN port are for matrix control. The LAN port is connected to the computer via
direct UTP and connected to the router via cross UTP. ISP port is only for upgrading.
HDMI Receiver (16 x Receivers included)
Power Input
HDMI Out
IR Input RX
RJ45 Inputs
RJ45 inputs – please be careful when connecting RJ45 # 1 and # 2 inputs. They absolutely have to match the
outputs on the switch. Output # 1 should be connected to Input # 1 and Output # 2 should be connected to
Inputs # 2.
www.atlona.com | toll free: 1-877-536-3976
For International: 1-408-962-0515
5
Page 6

CONNECTION AND OPERATION
1) Connect the HDMI input sources (such as BluRay, PS3, AppleTV, DirecTV etc) into the inputs on
AT-PROHD1616M-SR.
2) Connect the HDMI outputs from AT-PROHD1616M-SR (such as LCD, Plasma, LED, Projector, Monitor)
3) Power on the input source you want to show. (Keep the unused input power OFF, otherwise it may interfere
with the normal display.)
4) Use IR remote, front panel, RS232, TCP/IP or RS485 connections to choose desired input source.
5) IR calls back from remote locations allows controlling the matrix switch as well as nearby sources (such as
BluRay, AppleTV, Satellite, Cable and etc…).
6) Instruction on IR Emitter.
The sequence of “IR1, IR2, IR3, IR4, IR5, IR6, IR7, IR8, etc.” one-to-one correspond with “HDMI Inputs
1~16”. When an output chooses certain input, the call-back IR signal of RJ45 on this output will choose the
corresponding “IR” port to send the signal out.
For example, OUTPUT#1 chooses INPUT#3, then the call-back IR signal of RJ45 on OUTPUT#1 will choose
“IR 3” to send the signal out.
Note: For better functionality of the IR, we suggest to place the IR receiver Eye at the IR Eye of the controlling source.
LCD DISPLAY
If the touch screen becomes insensitive, calibration is required
Press the panel button “Setting” in the home menu status, holding until the following prompt appears(about 4s).
Press the symbol’s center, until the one disappears and another symbol appears, and press its
center again until the end of the calibration—OK or Failure. If the calibration failED, please conrm whether the
symbol’s center was aligned, then try again. After calibration is nished, press the panel button “Setting”, holding
until exit the calibration menu (about 4s)
www.atlona.com | toll free: 1-877-536-3976
For International: 1-408-962-0515
6
Page 7

Operations on Touch panel
7.1. Main Menu
7.2. Switch Menu
TYPE A:
Step A.1: Select an output port or ‘A’, and press “OK”,
Step A.2: Select an input source, and press “OK”.
TYPE B:
Step B.1: Select a memory, and press “OK”.
A - Stands for All and M – Stand for Memory; C - Stand for Clear
7.3. Preview Menu
Step: Select an Input port, and press “OK”
www.atlona.com | toll free: 1-877-536-3976
For International: 1-408-962-0515
7
Page 8

7.4. Observe Menu
Step: Select an output port, and press “OK”
7.5. Save Menu
Step: Select a save model, and press “OK”.
7.6. Settings Menu
There are 5 sub-menus here: EDID/LC/IR/EQ/RST.
7.6.1. EDID menu
There are 6 mode provided. When select a different mode, and press “OK”, the following warning box
will pop up:
The mode selected will be effective after next power-on.
www.atlona.com | toll free: 1-877-536-3976
For International: 1-408-962-0515
8
Page 9

EDID mode details:
Index EDID Mode Details Remark
1 Full Copy Copy HDMI output’s edid to the specied input port Mode #1
2 Limited Copy Limited copy HDMI output’s edid to the specied input
Mode #2
port
3 Fixed 1080P-2CH Fixed EDID--1080P stereo Mode #3
4 Fixed 1080P-6CH Fixed EDID--1080P 5.1Audio Mode #4
5 Fixed 1080P-8CH Fixed EDID--1080P 7.1Audio Mode #5
6 Fixed 1080i-2CH Fixed EDID—1080i stereo Mode #6
NOTE:
Mode # 1
If one of your Output devices is a projector or a display with a unique resolution your sources/source which are/
is connected to the switch might not send out a proper video format which will result image to intermit or signal not show up on the display. Therefore our switcher is featured with EDID learning function which allows to
copy Output Data and embed it on the input. This will trick the source to think that it is connected to the output
directly rather than though the switch.
When this mode is effective, press “CPY”, select the output port and input port. For example, if you want to
copy EDID from an output # 4 to an input # 6, you would press #4 OK #6 OK
Mode # 2
This function is very similar to Mode # 1; however it is designed for users who have very long CAT5/6/7 cables
and signal is going in and out. This DIP Switch setting will replace some of the hdmi control signals with video,
which will allow picture to stabilize.
Mode # 3
Atlona Switcher has a few built-in EDID modes; this mode is for resolutions up to 1080P with Stereo Au¬dio.
Mode # 4
Atlona Switcher has a few built-in EDID modes; this mode is for resolutions up to 1080P with 5.1 Digi¬tal Audio.
Mode # 5
Atlona Switcher has a few built-in EDID modes; this mode is for resolutions up to 1080P with 7.1 Digi¬tal Audio.
Mode # 6
Atlona Switcher has a few built-in EDID modes; this mode is for resolutions up to 1080i with Stereo Audio. This
mode is recommended if some of the displays connected to the output of the switcher are only able to support 1080i/720p. If user still wants the highest possible resolution to be sent from the source even if the display
doesn’t support it, Atlona makes a great down-scaler AT-HD550 which will down-scale any input resolution
such as 1080p to 720p or 1080i
www.atlona.com | toll free: 1-877-536-3976
For International: 1-408-962-0515
9
Page 10

7.6.2. Long Cable Mode
This function is designed for users who are using long HDMI and or Long CAT5/6/7 Cables and the video is not
stable or has a lot of static. We do suggest to enable the Long Cable Mode.
There are 4 modes in Long Cable menu.
Index Long cable mode Details
1 H-OFF, UTP-ON HDMI Long Cable mode OFF; CAT5/6 mode ON (Default)
2 H-OFF, UTP-OFF HDMI Long Cable mode OFF; CAT5/6 mode OFF
3 H-ON, UTP-ON HDMI Long Cable mode ON; CAT5/6 mode ON
4 H-ON, UTP-OFF HDMI Long Cable mode ON; CAT5/6 mode OFF
7.6.3. IR Mode
The Atlona AT-PROHD1616M-SR is featured with an ability of transferring IR signal from a remote location (for
example Bedroom) to a main switch, which allows users to control the switcher and the devices next to it via
IR. This mode could be Turned ON or Turned OFF. The ON mode is default.
7.6.4. EQ Mode
This mode is designed to adjust Equalization of the HDMI output. If the HDMI output is showing static or signal
is over modulated (red/green colors are mixed), this EQ needs to be adjusted. Please do not use it unless you
understand how this mode works.
www.atlona.com | toll free: 1-877-536-3976
For International: 1-408-962-0515
10
Page 11

Index Setting details Index Setting details Index Setting details Index Setting details
1 0db/0db (default) 9 16db/0db 17 23db/0db 25 26db/0db
2 0db/-3db 10 16db/-3db 18 23db/-3db 26 26db/-3db
3 0db/-6db 11 16db/-6db 19 23db/-6db 27 26db/-6db
4 0db/-9db 12 16db/-9db 20 23db/-9db 28 26db/-9db
5 10db/0db 13 19db/0db 21 25db/0db 29 27db/0db
6 10db/-3db 14 19db/-3db 22 25db/-3db 30 27db/-3db
7 10db/-6db 15 19db/-6db 23 25db/-6db 31 27db/-6db
8 10db/-9db 16 19db/-9db 24 25db/-9db 32 27db/-9db
7.6.5. RST Mode
Press “RST”, all of the settings will be reset to original manufacture default.
7.7. Info Menu
Press “MS”-----View the current status of matrix switcher
Press “M1, 2, 3”-----View the pre-existing Memory #1, 2, 3
IR REMOTE CONTROL
www.atlona.com | toll free: 1-877-536-3976
For International: 1-408-962-0515
11
Page 12

The AT-PROHD1616M-SR comes with an IR remote control, which could be used to control the switcher when pointing
at it or controlling the switcher from a remote location by pointing the remote control to the IR Eye connected to the HDMI
receiver.
For users who would like to use a 3rd party IR remote control or IR remote system, we recommend either learning IR
codes off the remote or copying and pasting the IR HEX code into the remote control software. The le with HEX codes
could be found on Atlona website under downloads for AT-PROHD1616M-SR.
There are 2 scenarios which codes to use:
• User will need to learn all 32 x codes in order to control each location when pointing at the switcher
• User will only need to learn 16 x codes if there will be a separate remote for each remote location
Note: The switcher can only accept and route IR signal which doesn’t exceed 38 KHz. In other words, if you are trying to
send IR signal from the remote location through HDMI receiver and the IR signal is higher than 38 KHz, the IR signal will
not pass though.
VERY IMPORTANT:
When connecting IR receivers and IR emitters, be very careful as if they are reversed the IR Eye will burn-out
and also may damage the IR module inside of the switch and Receiver.
TX – Connects to the Switch
RX – Connects to the HDMI Receivers
RS232 Control:
Baud Rate: 9600 bps
Data bits: 8 bits
Parity: None
Stop bits: 1 bit
Flow control: None
www.atlona.com | toll free: 1-877-536-3976
For International: 1-408-962-0515
12
Page 13

RS232 Cable Wiring:
AT-PROHD1616M-SR Controller
Pin Denition Pin Denition
1 NC 1 NC
2 Tx 2 Rx
3 Rx 3 Tx
4 NC 4 NC
5 GND 5 GND
6 NC 6 NC
7 NC 7 NC
8 NC 8 NC
9 NC 9 NC
PLEASE DOWNLOAD RS232 COMMANDS FROM ATLONA WEBSITE
F.A.Q.
Question: Some of my sources are not HDMI, how can I have them all routed though this switch?
Answer: Atlona offers a wide range of scalers and converters for converting: Composite, S-Video, Component,
VGA, DVI, HDSDI to HDMI
Question: What type of cable do you suggest I use for connecting the matrix switch to the HDMI receiver?
Answer: CAT7 would be the best, then CAT6, and then CAT5e and the last would be CAT5
Question: How do I terminate the RJ45 cable?
Answer: We strongly suggest terminating your RJ45 cables 568B for the best performance4.
Question: On one of the TV’s the signal is going in and out; however it is able to support as high of resolutions
as other TV’s
Answer: We recommend illuminating RJ45 wall plates and patch panels and connect the output of the switch
directly with the receiver. b) Also, we suggest checking the termination of the wire with RJ45 tested, all 8 wires
have to work. c) HDMI receiver is not plugged in to the power outlet. d) Try another input on the TV.
Question: The audio which comes into the Audio receiver is only Stereo or PCM
Answer: Please check EDID conguration page, as it fully explains the audio works.
Question: I have a universal remote control and I would like to program this switcher into it.
Answer: Under the download page on Atlona website you would be able to nd IR codes in HEX format which
you use to program your remote control or you can also learn the commands.
Question: When using local HDMI outputs the signal is going in and out; however when connecting displays
though CAT5/6 receivers everything is ne.
Answer: Our switcher has priority set on CAT5/6 outputs and some sources require priority to be changed in
order to work properly. Please refer to the Long Cable operation menu previously discussed in the manual.
www.atlona.com | toll free: 1-877-536-3976
For International: 1-408-962-0515
13
Page 14

SAFETY INFORMATION
Safeguards
To reduce the risk of electric shock, do not
expose this product to rain or moisture.
If the wall plug does not t into your local
power socket, hire an electrician to replace
your obsolete socket.
Do not modify the wall plug.
Doing so will void the warranty and safety
features.
This equipment should be installed near
the socket outlet and the device should
be easily accessible in case it requires
disconnection.
Precautions
FCC Regulations state that any
unauthorized changes or modications to
this equipment not expressly approved by
the manufacturer could void the
user’s authority to operate this
equipment.
Avoid excessive humidity, sudden
temperature changes or temperature
extremes.
Keep this product away from wet locations
such as bathtubs, sinks, laundries, wet
basements and swimming pools.
Use only accessories recommended by
ATLONA to avoid re, shock or other
hazards.
Unplug the product before cleaning. Use
a damp cloth for cleaning. Do not use
cleaning uid or aerosols, which could
enter the unit and cause damage, re or
electrical shock. Some substances may
also mar the nish of the product.
Never open or remove unit panels or make
any adjustments not described in this
manual. Attempting to do so could expose
you to dangerous electrical shock or other
hazards. It may also cause damage to your
AT-PROHD1616M-SR. Opening the product
will void the warranty.
Operate this product using only the
included external power supply. Use of
other power supplies could impair
performance, damage the product or cause
res.
In the event of an electrostatic discharge,
this device may automatically turn off. If this
occurs, unplug the device, and plug it back
in.
Protect and route power cords so they will
not be stepped on or pinched by anything
placed on or against them. Be especially
careful of plug-ins, or cord exit points from
this product.
www.atlona.com | toll free: 1-877-536-3976
For International: 1-408-962-0515
Do not attempt to service the unit. Instead
disconnect it and contact your Authorized
ATLONA reseller or contact ATLONA
directly.
14
Page 15

1. LIMITED WARRANTY
Atlona Technologies warrants that (a) its products (the “Product”) will perform substantially in accordance with the ac-
companying written materials for a period of 3 YEARS from the date of receipt and (b) that the Product will be free from
defects in materials and workmanship under normal use and service for a period of 3 years. In the event applicable law
imposes any implied warranties, the implied warranty period is limited to 3 years from the date of receipt. Some jurisdic-
tions do not allow such limitations on duration of an implied warranty, so the above limitation may not apply to Customer.
2. CUSTOMER REMEDIES
Atlona Technologies and its suppliers’ entire liability and Customer’s exclusive remedy shall be, at Atlona Technologies’
option, either return of the price paid for the Product, or repair or replacement of the Product that does not meet this
Limited Warranty and which is returned to Atlona Technologies with a copy of Customer’s receipt. This Limited Warranty
is void if failure of the Product has resulted from accident, abuse, or misapplication. Any replacement Product will be war-
ranted for the remainder of the original warranty period or 3 year, whichever is longer.
3. NO OTHER WARRANTIES
TO THE MAXIMUM EXTENT PERMITTED BY APPLICABLE LAW, ATLONA TECHNOLOGIES AND ITS SUPPLIERS
DISCLAIM ALL OTHER WARRANTIES, EITHER EXPRESS OR IMPLIED, INCLUDING, BUT NOT LIMITED TO IM-
PLIED WARRANTIES OF MERCHANTABILITY AND FITNESS FOR A PARTICULAR PURPOSE, WITH REGARD TO
THE PRODUCT AND ANY RELATED WRITTEN MATERIALS. THIS LIMITED WARRANTY GIVES CUSTOMER SPE-
CIFIC LEGAL RIGHTS. CUSTOMER MAY HAVE OTHER RIGHTS DEPENDING ON THE JURISDICTION.
4. NO LIABILITY FOR DAMAGES
TO THE MAXIMUM EXTENT PERMITTED BY APPLICABLE LAW, IN NO EVENT SHALL ATLONA TECHNOLOGIES OR
ITS SUPPLIERS BE LIABLE FOR ANY DAMAGES WHATSOEVER (INCLUDING WITHOUT LIMITATION, SPECIAL, IN-
CIDENTAL, CONSEQUENTIAL, OR INDIRECT DAMAGES FOR PERSONAL INJURY, LOSS OF BUSINESS PROFITS,
BUSINESS INTERRUPTION, LOSS OF BUSINESS INFORMATION, OR ANY OTHER PECUNIARY LOSS) ARISING
OUT OF THE USE OF OR INABILITY TO USE THIS PRODUCT, EVEN IF ATLONA TECHNOLOGIES HAS BEEN AD-
VISED OF THE POSSIBILITY OF SUCH DAMAGES. IN ANY CASE, ATLONA TECHNOLOGIES’ AND ITS SUPPLIERS’
ENTIRE LIABILITY UNDER ANY PROVISION OF THIS AGREEMENT SHALL BE LIMITED TO THE AMOUNT ACTU-
ALLY PAID BY YOU FOR THE PRODUCT. BECAUSE SOME JURISDICTIONS DO NOT ALLOW THE EXCLUSION OR
LIMITATION OF LIABILITY FOR CONSEQUENTIAL OR INCIDENTAL DAMAGES, THE ABOVE LIMITATION MAY NOT
APPLY TO YOU.
www.atlona.com | toll free: 1-877-536-3976
For International: 1-408-962-0515
15
Page 16

ATLONA PRODUCT REGISTRATION
Thank you for purchasing this Atlona product — we hope you’ll enjoy it.
We also hope that you’ll take a few moments to register your new purchase. Registration creates an ownership
record if your product is lost or stolen and helps ensure you’ll receive notication of performance issues and rmware
updates.
At Atlona, we respect and protect your privacy and assure you that your registration information is completely
secure. Of course, Atlona product registration is totally voluntary and failure to register will not diminish your limited war-
ranty rights.
To register go to www.atlona.com/registration
www.atlona.com | toll free: 1-877-536-3976
For International: 1-408-962-0515
16
 Loading...