

Atlinks VERSATIS P100 User Manual
INTRODUCTION
Thank you for choosing Versatis P100. Before using this phone, please read
the SAFETY INSTRUCTIONS first. Your phone comes with various features.
Please thoroughly read this user manual for all the feature operation and
troubleshooting information you need to install and operate your new phone.
SAFETY INSTRUCTIONS
When using your telephone equipment, basic safety precautions should
always be followed to reduce the risk of fire, electric shock and injury,
including the following:
Read and understand all the instructions.1.
Follow all warnings and instructions marked on the product.2.
Unplug this product from the wall outlet before cleaning. Do not use 3.
liquid cleaners or aerosol cleaners. Use a damp cloth for cleaning.
Do not use this product near water (for example, near a bath tub, 4.
kitchen sink, swimming pool).
Do not overload wall outlets and extension cords as this can result in the 5.
risk of fire or electric shock.
Unplug this product from the wall outlet under the following conditions: 6.
1) When the power supply cord or plug is damaged or frayed.
2) If the product does not operate normally by following the operating
instructions.
3) If the product has been dropped and the cabinet has been damaged.
4) If the product exhibits a distinct change in performance.
Avoid using a telephone (other than a cordless type) during an electrical 7.
storm. There may be a remote risk of electric shock from lightning.
Do not use the telephone to report a gas leak in the vicinity of the leak.8.
Use only the supplied NiMH (Nickel Metal Hydride) batteries! The 9.
operation periods for the handsets are only applicable with the default
battery capacities
The use of other battery types or non-rechargeable batteries/primary 10.
cells can be dangerous. These may cause interference and/or unit
damages. The manufacturer will not be held liable for damage arising
from such non-compliance.
Do not use third party charging bays. The batteries may be damaged.11.
Please note the correct polarity while inserting the batteries.12.
Do not immerse batteries in water, do not place in fire.13.
Battery Safety Precautions
Do not burn, disassemble, mutilate, or puncture. Like other batteries of •
this type, toxic materials could be released which can cause injury.
To reduce the risk of fire or personal injury, use only the battery listed •
in User’s Guide.
Keep batteries out of children.•
Remove batteries if storing over 30 days.•
CAUTION: Danger of explosion if battery is incorrectly
replaced. only with GPI or BYD Ni-MH AAA 1.2V/500mAh
rechargeable battery or equivalent in the handset. Only
use rechargeable batteries with exactly the same specifications
as those supplied with the product. Using non-rechargeable or
non-conforming batteries can damage the product. The batteries
could split or leak if incorrectly inserted, opened or exposed to heat.
Never dispose of batteries in a fire: the cell could explode. Check
with local code for possible special disposal instruction.
MAIN FEATURES
FSK/DTMF Caller ID auto detect•
Up to 10 records of received Call Log•
Up to 10 records of Phonebook•
Up to 5 records of Redial List•
Personalized settings for Handset and Base (Ringer, Ringer Volume, •
Handset Name, etc.)
Visual Message Waiting Indicator (Network independent)•
Alarm•
Before you begin
Electrical safety
Don’t let the base unit or charger gets wet. Electrical equipment can 1.
cause serious injury if used while you are wet or standing in water.
If the base unit or charger ever falls into water, don’t retrieve it 2.
until you have unplugged the power lead from the mains and the
telephone line plug from the telephone socket (base unit only); then
pull it out by the unplugged cables.
Never use your cordless handset outdoors during a thunderstorm 3.
unplug the base unit from the telephone line and the mains socket
when there are storms in your area. Damage caused by lightning is
not covered by the guarantee.
Interference
If the sound quality gets worse as you move around while on a call, this is
probably caused by interference between the handset and the base unit,
perhaps because you are too near to another phone or other electrical
equipment. Move to a different position to clear the interference. If you do
not move, your call may be cut off.
NOTE: Radio interference in the environment may occasionally cause
a short break in the link between the handset and the base unit while
you are on a call. The handset’s display will flash briefly, while the unit
automatically restores the link.
Out of range warning
If you hear a warning tone during a call, and the sound in the earpiece
becomes faint or distorted, you may be going out of range of the base unit.
Move nearer to the base unit within 20 seconds, until the warning tone
stops. Otherwise, your call may be cut off.
PARTS CHECKLIST
Make sure your package includes the items:
Versatis P100
1 Handset1.
1 Base station2.
1 AC power adaptor3.
1 Telephone line cord4.
2 Rechargeable batteries5.
Versatis P100 duo
•2Handsets1.
•1Basestation2.
•1charger3.
•2ACpoweradaptors4.
•1Telephonelinecord5.
•4Rechargeablebatteries6.
NOTE: If you find any of the parts missing, please contact your local
shop where you buy the product. In multi-handset packs, you will find
one or more additional handsets, chargers with power supply units and
additional rechargeable batteries.
Telephone Jack Requirements
To use this phone, you need a RJ11C type
modular telephone jack which might look like
the one pictured here .If you don’t have a jack,
call your local telephone company to find out
how to get one installed.
INSTALLATION AND SETUP
CAUTION: Disconnect the phone cord from the wall outlet before
installing or replacing the batteries.
Never install telephone wiring during lightning storm.•
Never touch un-insulated telephone wires or terminals, unless the •
telephone line has been disconnected at the network interface.
Never install telephone to operate in wet or damp locations.•
Use only the power pack provided for the base station.•
Use only the supplied NiMH rechargeable batteries.•
Installing and Replacing the Batteries
IMPORTANT: If you are not going to use the telephone for more than 30
days, remove the batteries because they may leak and damage the unit.
Slide open the battery compartment cover.1.
Place the 2 batteries as indicated. Respect polarity.2.
Slide the battery compartment cover back.3.
Put the handset on the base and charge for 15 hours first time. A 4.
beep indicates that the handset is properly placed on the base or
charger.
NOTE: Don’t use non-rechargeable batteries in the handset. They may
burst, causing damage.
Installing the base station
Your phone should be placed on a level surface, such as a desk or table
top.
Plug the power supply & line cord into the base station.1.
Plug the power supply & line cord into the wall socket.2.
Always use the cables provided in the box.3.
Installing the charger (Versatis P100 duo)
Plug the power supply into the charger. 1.
Plug the power supply into the wall socket. 2.
Always use the cables provided in the box.3.
CAUTION: Use only the Thomson Telecom power supply
that came with this unit. Using other power supplies may damage
the unit. Base and charger adaptor type is S002CV0600030, 100-
240Vac/6Vdc/300mA.
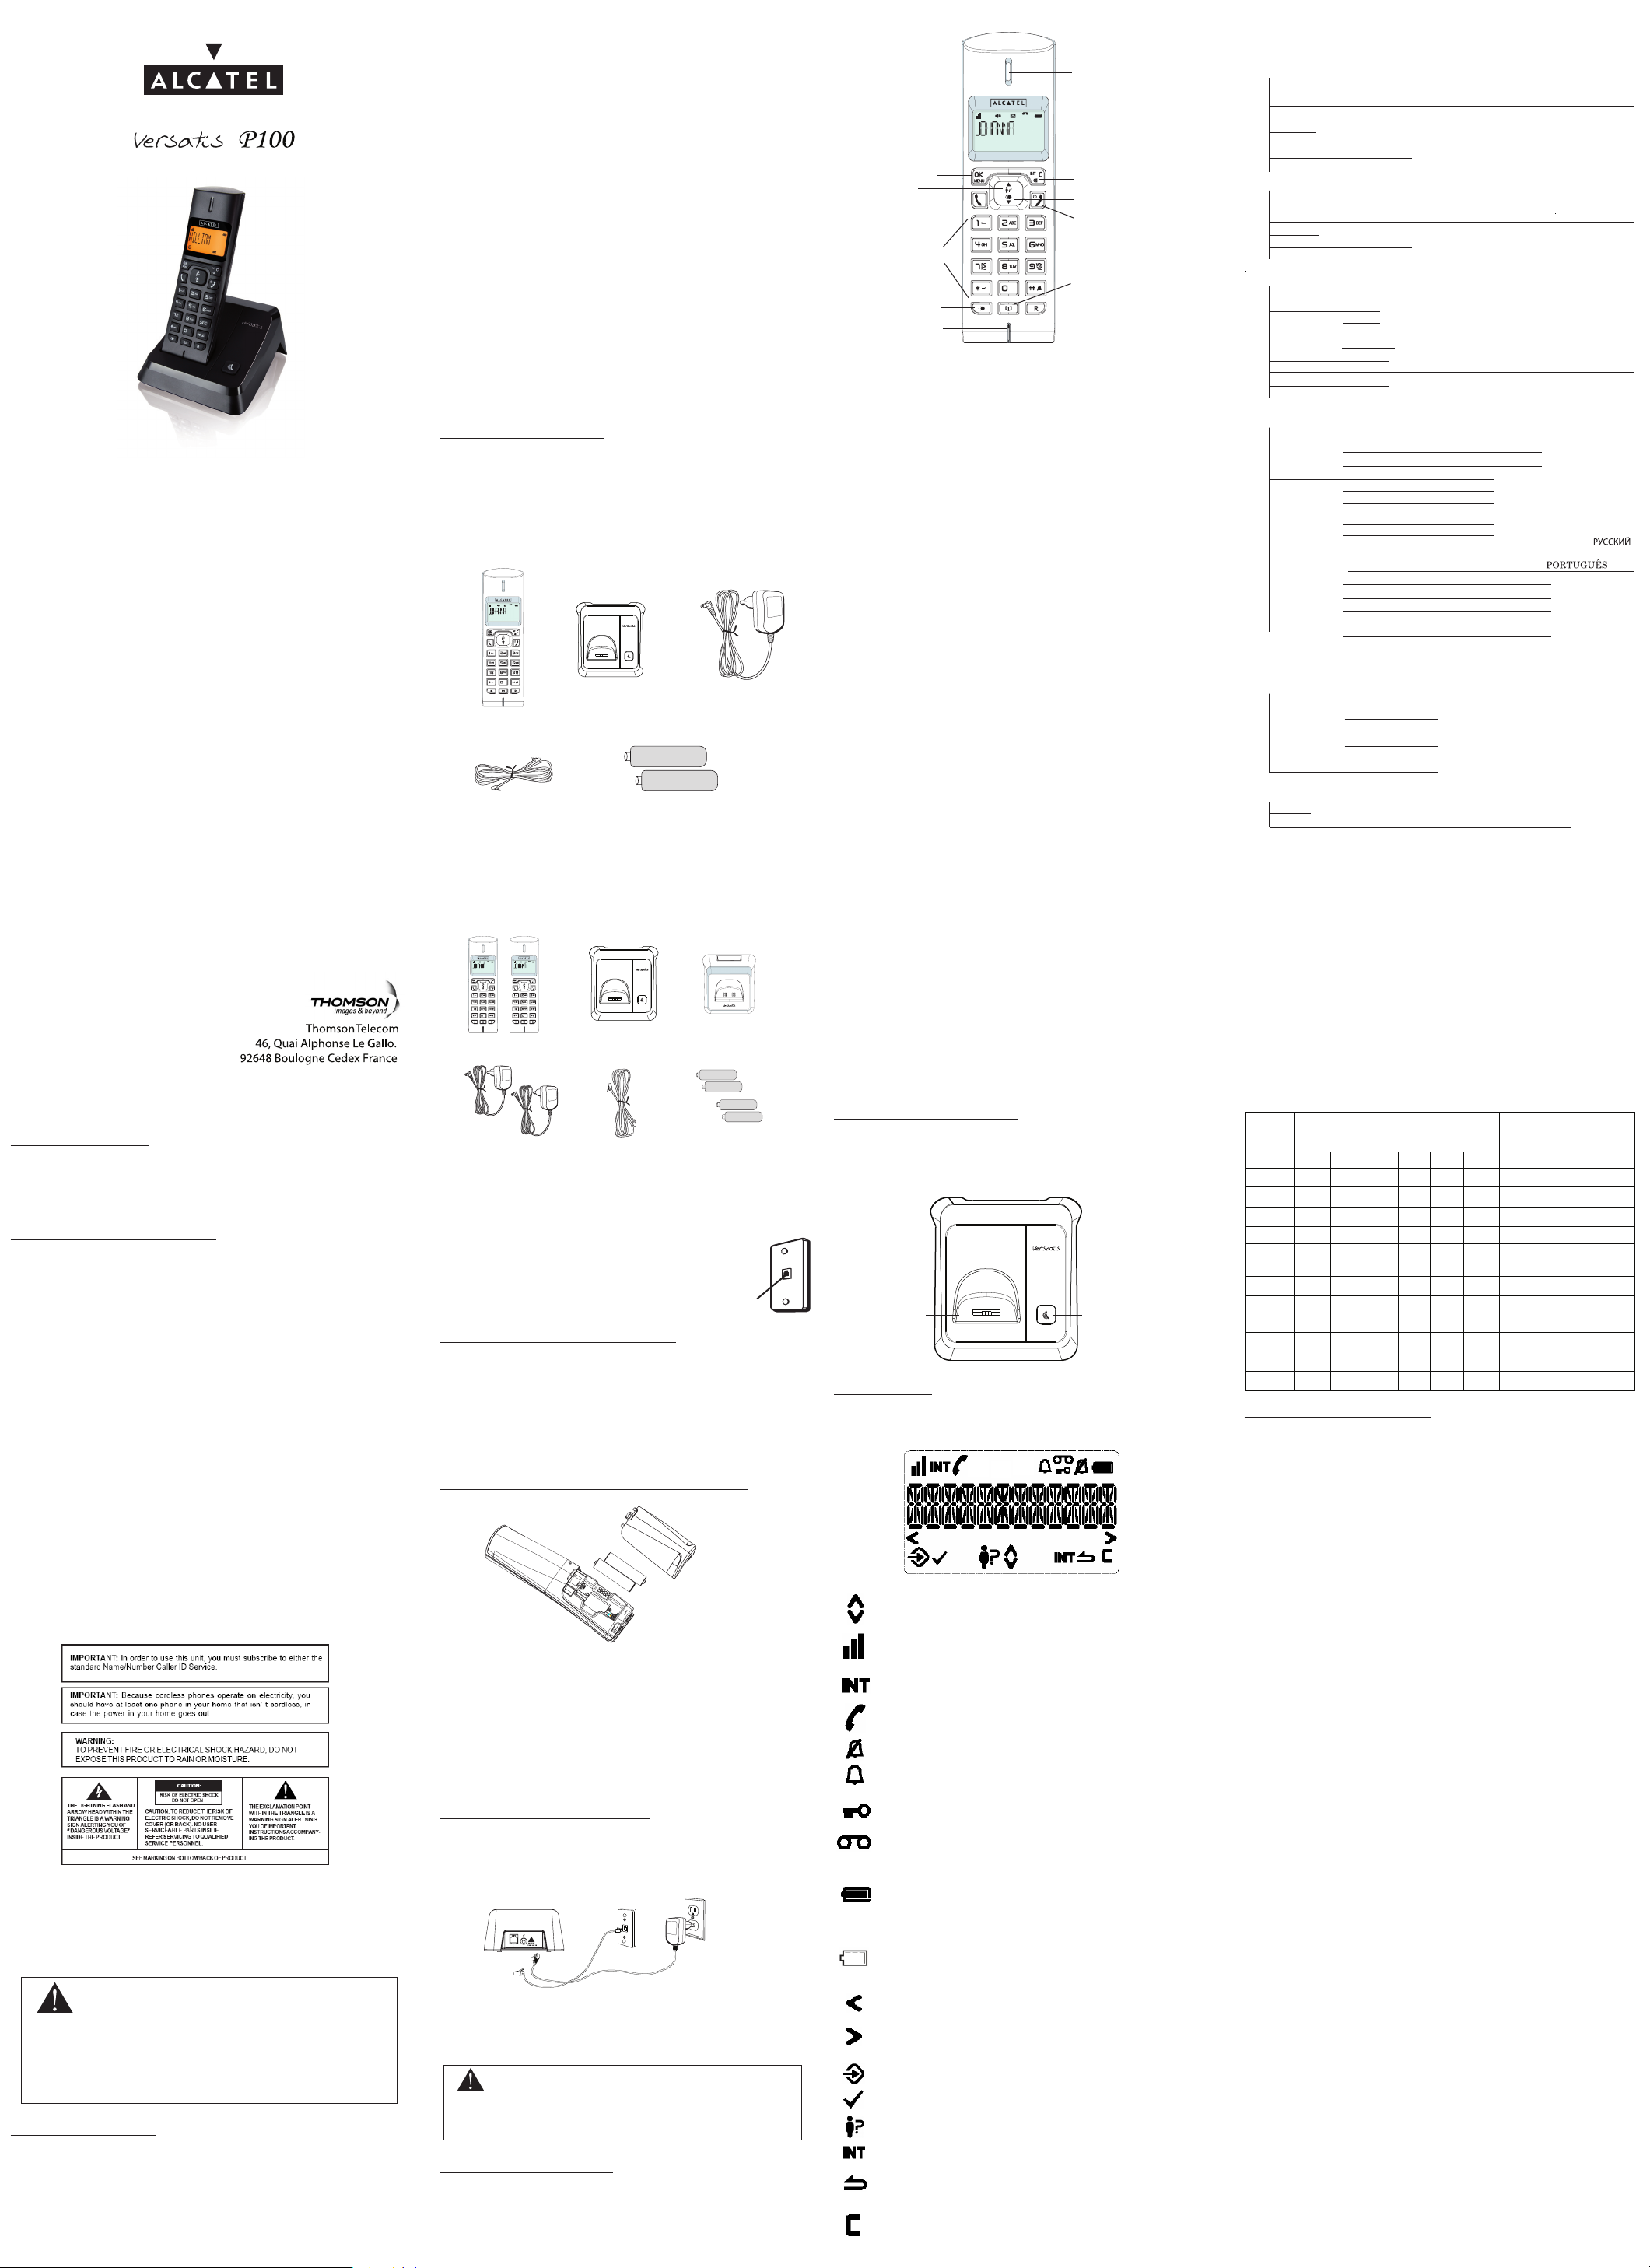
KEYS AND DISPLAY
Handset Overview
1. LEFT SOFT KEY (MENU/OK)
In idle mode: Press to access the main menu•
In sub-menu mode: Press to confirm the selection•
During a call: Press to access Intercom/ Phonebook/ Redial List/ Call •
List
2. RIGHT SOFT KEY (CLEAR/BACK/MUTE/INTERCOM)
In main menu mode: Press to go back to idle screen•
In sub-menu mode: Press to go back to previous level•
In sub-menu mode: Press and hold to go back to idle screen•
In editing / predialing mode: Press to clear a character / digit•
In editing / predialing mode: Press and hold to delete all the characters •
/ digits
During a call: Press to mute / unmute the microphone•
In idle mode: Press to intercom another handset•
3. UP
In idle mode: Press to access the call list•
In menu mode: Press to scroll up the menu items•
In Phonebook list / Redial list / Call List: Press to scroll up the list•
During a call: Press to increase the volume•
In ringing: Press to increase the ringer volume•
4. DOWN
In idle mode: Press to access the redial list•
In menu mode: Press to scroll down the menu items•
In Phonebook list / Redial list / Call List: Press to scroll down the list•
During a call: Press to decrease the volume•
In ringing: Press to decrease the ringer volume•
5. TALK ON
In idle / predialing mode : Press to make a call•
In Redial list / Call List / Phonebook entry: Press to make a call to the •
selected entry in the list
During ringing: Press to answer a call•
6. TALK OFF
During a call: Press to end a call and go back to idle screen•
In menu / editing mode: Press to go back to previous menu•
In menu / editing mode: Press and hold to go back to idle screen•
In idle mode: Press and hold to power off the handset•
In idle mode (when the handset is powered off): Press and hold to power •
on the handset
7. ALPHANUMERIC KEYPAD, * (STAR), # (HASH)
Press to insert a digit / character / * / #•
* key in idle mode: Press and hold to enable or disable the keypad lock•
* key during a call (in Pulse mode): Press to switch to tone mode•
# key in Idle mode: Press and hold to turn on / off the ringer•
0 key in predialing / number editing mode: Press and hold to insert a •
pause
# key in Call List mode: Press to review caller’s number if applicable•
8. REDIAL LIST
In idle mode: Press to access the redial list•
9. PHONEBOOK
In idle mode: Press to access the phonebook list•
10. FLASH
In idle / predialing mode: Press to insert a flash•
During a call: Press to dial a flash•
11. MICROPHONE
12. EARPIECE
Base Station Overview
1. PAGE
Press the Page on the base station to page your handset. It will ring for •
approximately 60 seconds.
2. CHARGING CRADLE
LCD Layout
The screen display gives you information on the current status of the
telephone.
Scroll up / down the menu items / Phonebook list / Redial list / Call
List
Steady when the handset is in range of the base. Flash when out of
range of the base or not registered to the base.
Steady when an intercom is in progress.
Flash when there is an incoming internal call.
Indicate a call is in progress.
Indicate that the ringer is switched off.
Steady when an alarm is set. Flash when the alarm time set before
reaches.
Indicate that the keypad is locked.
Indicate when there are received new Visual Message Waiting
(VMWI) not yet read. Will disappear when all the visual messages
have been read.
Indicate when the battery is fully charged.
Whole icon flashes when the battery performs initial charging.
Internal block icon flashes when the battery is in final charging
stage.
Indicate when the battery needs charging.
Flash when low battery power level is detected.
Indicate when more characters are existed before the text currently
displayed.
Indicate when more characters are existed after the text currently
displayed.
Press to select more menu options if applicable
Press to confirm the current selection if applicable.
Indicate new call in the call list.
Press <C/MUTE> to conduct Intercom call when idle
Press <C/MUTE> to go back to previous menu level or cancel the
current action if applicable
Press <C/MUTE> to clear a character or stop the alarm if applicable,
press to mute / unmute during a call.
Menu Structure (Handset)
In idle mode, press <MENU/OK> will firstly access the Phonebook menu.
Refer to the following for the menu structure.
Text and Digit Entry Table
The following tables show you where each letter and punctuation character
can be found. Respective character table will be used when corresponding
menu language is available to select. This will be helpful when storing a
name in the phonebook and renaming your handset.
In editing mode, a cursor is displayed to indicate the current text entry
position. It is positioned at the right of the last character entered.
WRITING TIPS:
Once a character is selected, the cursor will move to the next position after a
short pause.
You can move the cursor within the text by <UP/DOWN> to amend the text
entry.
Press <C> to delete the last character.
Press and hold <C> to delete the entire text string.
Key Assignment Overview
SETTING THE PHONE
Date and Time Settings
You will need to set the correct time and date so that you know when you
received answering machine or call list entries.
Change the date format
Press <OK> and <UP/DOWN> to select 1. DATE & TIME.
Press <OK> to select 2. DATE FORMAT.
Press <UP/DOWN> to select your desired date format (3. DD-MM-YY or
MM-DD-YY).
Press <OK> to confirm.4.
Change the time format
Press <OK> and <UP/DOWN> to select 1. DATE & TIME.
Press <OK> and <UP/DOWN> to select 2. TIME FORMAT.
Press <UP/DOWN> to select your desired time format (3. 12 HR or 24
HR).
Press <OK> to confirm.4.
Set the time
Press <OK> and <UP/DOWN> to select 1. DATE & TIME.
Press <OK> and <UP/DOWN> to select 2. SET TIME.
Press <OK> to enter the time information. The time entered will be in 3.
the format you set in the Change the time format section.
Press <OK> to confirm.4.
NOTE: If time has been set before, the current time will display, otherwise,
HH:MM will display.
Set the date
Press <OK> and <UP/DOWN> to select 1. DATE & TIME.
Press <OK> and <UP/DOWN> to select 2. SET DATE.
Press <OK> to enter the date information. The date entered will be in the 1.
format you set in the Change the date format section.
Press <OK> to conrm.2.
NOTE: If date has been set before, the current date will display, otherwise, DD-
MM-YY will display.
Alarm Settings
You can use this phone to set an alarm clock. When an alarm is set, the
<ALARM Icon> displays on the screen. When the alarm time is reached, the
<ALARM icon> and ALARM ON flash on the screen ringing with the alarm
melody for a duration of 45 seconds. You can press any key to disable the
alarm. If snooze function is activated, the alarm will sound again at the end
of the snooze period of seven minutes.
NOTE:
Key press is still applicable if handset keypad is locked and when the 1.
alarm time is reached.
The alarm volume level is the same as the settings of the handset 2.
ringer volume. If the handset ringer is set to VOLUME OFF, the alarm
still sounds at VOLUME 1 level.
During an external call or internal call, if an alarm is set and when the 3.
alarm time is reached, the <ALARM icon> and ALARM ON will still
flash. An alarm tone will be emitted from the earpiece to notify user
the alarm time is reached. Once user press any key or press and hold
<TALK OFF> to disable the alarm, it will revert to the call duration
screen.
During paging or ringing, the alarm will not sound when the alarm 4.
time is reached. However, if snooze function is enabled, the alarm
will sound again at the end of the snooze period provided that it’s not
ringing or in paging mode at the end of the snooze period.
Turn on/off the alarm
Press <OK> and <UP/DOWN> to select 1. ALARM.
Alcatel Logo and Alcatel name are trademarks of Alcatel and used
under license by Thomson Telecom.
Wall plate
Modular
telephone
line jack
1
2
4
6
3
5
7
8
11
10
12
9
USER MANUAL
Key
Number Editing (For
phone number editing,
date/time editing)
Alphanumeric Editing (For phonebook
name editing and renaming handset)
Key press
1st
2
nd
3rd 4th
5th
6th
1
space
1
1
2 A B
C
2
2
3 D E
F
3
3
4 G H
I
4
4
5 J
K
L
5
5
6 M N
O
6
6
7
P Q R S 7
7
8 T U
V
8
8
9
W X Y Z 9
9
0 00, P (Pause)
*
*
?
/
/
( )
*
.
#
#
‘
‘
-
-
&
#
1
2
3
4
5
1
2
3
4
5
6
1
2
1. PHONEBOOK
View Records
ADD
Enter the Name
Enter the Number
Select a
Ringer
Melody
VIEW
EDIT
DELETE
DELETE ALL
CONFIRM?
PB STATUS
2. CALL LIST
View Records
ADD TO PB
Enter the Name
Edit the Number
Select a Ringer M
elody
DELETE
DELETE ALL
CONFIRM?
DETAILS
3. BS SETTINGS
DELETE HS
Enter the PIN
Select a Handset to Delete
DIAL MODE
TONE
PULSE
FLASH TIME
SHORT
MEDIUM
LONG
CHANGE PIN Enter the Old PINEnter the New PINEnter the New PIN Again
ECO MODE
ON
OFF
4. HS SETTINGS
RING SETUP
INT RING
Select a Ringer Melody
EXT RING
Select a Ringer Melody
RING VOLUME
Select a Ringer Volume
TONE SETUP
KEY TONE
ON
OFF
BATTERY TONE
ON
OFF
OUT OF RANGE
ON
OFF
LANGUAGE
ENGLISH /DEUTSCH /FRANCAIS /
ITALANO /TURKCE/ESPANOL /E^^HNIKA /
NEDERLANDS /POLSKI
RENAME HS
Enter the Handset Name
HS DISPLAY
HANDSET NAME
TIME
AUTO ANSWER
ON
OFF
5. DATE & TIME
6. ALARM
7. REGISTRATION PIN?
8.
DEFAULT PIN?
DATE FORMAT
DD -MM-YY
TIME FORMAT
12 HR
24 HR
SET TIME
ENTER TIME
ENTER DATE
SET DATE
Set Alarm Time SNOOZE OFF
ON
OFF
MM -DD-
YY
/
DIRECT MEM KEY 1
KEY 2
KEY 3
ON

unsuccessful, the <antenna icon> will still flash.
Reset Your Phone
You can reset your phone to the default settings. After reset, all your
personal settings will be deleted, but your phonebook, call list and redial list
entries remain unchanged.
Press <MENU> and <UP/D OWN> to select DEFAULT.
Press <OK> and you are requested to enter the 4-digit system PIN.
Enter the 4-digit system PIN.
Press <OK> to confirm.
5. Press <OK> to re-confirm.
DEFAULT SETTINGS
PHONE OPERATION
Make a Call
Preparatory dialing
Enter the phone number and press <TALK ON> to dial the number. Press
<C> to clear the entry.
- Direct Dialing
Press <TALK ON> to take the line and enter the phone number.
- Call from Direct Memory
In idle, press and hold <KEY 1>/<KEY 2>/<KEY 3> to dial the number
stored.
OR
Press <TALK ON> and then press and hold <KEY 1>/<KEY 2>/<KEY 3>
to dial the number stored. If there is no number stored, unit will emit double
beep tones.
- Call from the Phonebook
Press <PHONEBOOK> to access the phonebook and press <UP/DOWN>
to select the desired phonebook entry. Press <TALK ON> to dial out to the
selected phonebook entry. Alternatively, press <MENU/OK> to access the
phonebook to get the desired phonebook entry.
- Call from the Call List
Press <UP> to access the Call L ist and press <UP/DOWN> to select the
desired Call List entry. Press <TALK ON> to dial out to the selected Call
List entry. Alternatively, press <MENU/OK> to access the Call List from the
main menu.
- Call from the Redial list
Press <DOWN> or <REDIAL LIST> to access the redial list and press <UP/
DOWN> to select the desired redial number. Press <TALK ON> to dial out
to the selected redial number.
- Call Timer
Your handset automatically times the duration of every call. The call timer
will display a few seconds after the call has made. It is shown in hours,
minutes and seconds format (HH:MM:SS).
Answer a call
If the handset is not on the charging cradle:
When the phone rings, press <TALK ON> to answer a call.
If the handset is on the charging cradle or the base station and if AUTO
ANSWER is set to ON:
When the phone rings, pick up the handset to answer a call.
End a call
During a call connection, press <TALK OFF> to end the call.
OR
Put the handset on the base station to end the call.
Adjust earpiece volume
There are 5 levels (VOLUME 1 to VOLUME 5) to choose from for each of
earpiece volume.
During a call:
Press <UP/DOWN> to select volume 1-5. The current setting is shown. When
you end the call, the setting will remain at the last selected level.
Mute a call
You can talk to someone nearby without letting the caller hear you during a
call.
During a call:
Press <C> to mute the microphone and MUTED will display on the screen.
Your caller cannot hear you. Press <C> again to unmute the microphone.
Set the silent mode
In idle, press and hold <HASH> to turn off the handset ringer. The <RINGER
OFF icon> is displayed on the screen.
Turn on the keypad lock
In idle, press and hold <STAR *> key to turn on the keypad lock. The
<KEYPAD LOCK icon> is displayed on the screen.
Redial the last number
You can redial up to 5 of the last numbers called. If you have stored a name
in the phonebook to go with the number, the name will be displayed instead.
The most recent last number will display at the top of the redial list.
- Redial a Number from the Redial List
In idle mode, press <DOWN> to access the redial list.1.
Remarks: If redial entry with name, press <HASH> to view the number.2.
OR
Press <REDIAL LIST> to access the redial list.1.
Press <UP/DOWN> to browse the redial list.2.
Press <TALK ON> to dial to the selected redial number.3.
NOTE: If there are no numbers in the redial list, the display shows EMPTY.
- Store a Redial Number into the Phonebook
Follow Steps 1 and 2 in the Redial a Number from the Redial List 1.
section.
Press <MENU> to select ADD TO PB.2.
Press <OK> to enter the name.3.
Press <OK> to store the redial number into the phonebook.4.
Press <OK> to select phonebook melody.5.
Press <UP/DOWN> to browse the melody list. The respective melody 6.
will be played when browsing the melody list.
Press <OK> to confirm.7.
- Delete a Redial Number
Follow Steps 1 and 2 in the 1. Redial a Number from the Redial List section.
Press <MENU> and <UP/DOWN> to select 2. DELETE.
Press <OK> to conrm.3.
- Delete the Entire Redial List
Follow Steps 1 and 2 in the 1. Redial a Number from the Redial List
section.
Press <MENU> and <UP/DOWN> to select 2. DELETE ALL.
Press <OK> to confirm.3.
Press <OK> to confirm again.4.
Find the Handset
You can locate the handset by pressing <PAGE> on the base station. All the
handsets registered to the base will produce the paging tone and PAGING is
displayed on the screen. You can stop the paging by pressing <TALK ON> /
<TALK OFF> / <C> on any handset or <PAGE> on the base again.
NOTE: If there is an incoming call during paging, the phone will ring with
the incoming call instead of paging.
Make an Internal Call
This feature is only applicable when there are at least two registered
handsets. It allows you to make internal calls, transfer external calls from
one handset to another handset and make conference calls. If the calling is
not answered within 60 seconds, the called handset will stop ringing and the
calling handset will return to standby mode.
NOTE: If only one handset is registered to the base station, press <INT/
RIGHT SOFT KEY> will display NOT POSSIBLE.
- Intercom another handset
In idle mode, press <INT/RIGHT SOFT KEY> and the registered 1.
handsets will display except the calling handset.
Enter the desired handset number to intercom with.2.
The called handset rings and press <TALK ON> on the called handset 3.
to establish the internal call.
NOTE: If two handsets are registered to the base station, press <INT/RIGHT
SOFT KEY> will connect to another handset immediately.
- Call all handsets
In idle mode, press <INT/RIGHT SOFT KEY> and the registered 1.
handsets will display.
Press <KEY 9> to ring to all registered handsets.2.
- Transfer an external call to another handset
During an external call:
Press <MENU> and <UP/DOWN> to select 1. INTERCOM.
Press <OK> to select the desired handset to intercom with. 2.
The external call is put on hold automatically and the called handset 3.
rings.
Press <TALK ON> on the called handset to establish an internal call.4.
Press <TALK OFF> on the calling handset or put the calling handset on 5.
the charging cradle to end the current call with the external party.
The external call is transferred to the called handset.6.
- Make a 3-way conference call
The conference call feature allows one external call to be shared with two
handsets (in intercom). The three parties can share the conversation and no
network subscription is required.
During an external call:
Follow Steps 1 to 4 in section Transfer an External Call to Another 1.
Handset.
Press and hold <STAR * > on the calling handset to establish the 2.
conference call.
Any handset hangs up during a conference call will leave the other handset
still in connection with the external call.
PRIVATE PHONEBOOK
Your phone can store up to 10 private phonebook entries with names and
numbers. Each phonebook entry can have a maximum of 20 digits for
the phone number and 12 characters for the name. You can also select
different ringtones for your phonebook entries. Phonebook entries are stored
alphabetically by name.
Add a new phonebook entry
In idle:
Press <PHONEBOOK> to access the phonebook.1.
OR
Press <MENU> to select PHONEBOOK main menu item and then press
<OK> to access the phonebook.
Press <MENU> to select ADD.2.
Press <OK> to enter the name.3.
Press <OK> to enter the number.4.
Press <OK> and <UP/DOWN> to select the desired ringtone for your 5.
phonebook entry.
Press <OK> to store the phonebook entry.6.
Search a phonebook entry
In idle:
1. Press <PHONEBOOK> to access the phonebook.
2. Enter the first character of the name by multi-tap.
View a phonebook entry
In idle:
Press <PHONEBOOK> to access the phonebook.1.
Press <UP/DOWN> to select the desired phonebook entry.2.
Press <MENU> and <UP/DOWN> to select VIEW.3.
Press <OK> and <UP/DOWN> to review the name, number and melody 4.
of the selected phonebook entry.
NOTE: If number is more than 12 digits, press <LEFT SOFT KEY> or
<RIGHT SOFT KEY> to view the remaining digits.
Edit a phonebook entry
In idle:
Press <PHONEBOOK> to access the phonebook.1.
Press <UP/DOWN> to select the desired phonebook entry.2.
Press <MENU> and <UP/DOWN> to select EDIT.3.
Press <OK> and the current contents of the selected phonebook entry 4.
displays.
Edit the name and press <OK>.5.
Edit the number and press <OK>6.
Press <UP/DOWN> to select the ringtone and press <OK> to confirm.7.
Delete a phonebook entry
In idle:
Press <PHONEBOOK> to access the phonebook.1.
Press <UP/DOWN> to select the desired phonebook entry.2.
Press <MENU> and <UP/DOWN> to select DELETE.3.
Press <OK> to confirm.4.
Delete the entire private phonebook
Press <PHONEBOOK> to access the phonebook.1.
Press <MENU> and <UP/DOWN> to select DELETE ALL.2.
Press <OK> to confirm.3.
Press <OK> to re-confirm.4.
Check the phonebook usage
You can check how many phonebook entries have been occupied in your
phone and how many phonebook entries are available for you to store in the
phonebook.
Press <PHONEBOOK> to access the phonebook.1.
Press <MENU> and <UP/DOWN> to select PB STATUS.2.
Press <OK> to confirm and X/10 USED will display on the screen.3.
NOTE: X denotes the current number of stored entries, while 10 denotes the
capacity of phonebook memory.
CALLER DISPLAY (NETWORK DEPENDENT)
This feature is available if you have subscribed the Caller Line Identification
service with your network service provider. Your phone can store up to 10
received calls with date/time information in the Call List. The number will
be shown on the screen when the phone is ringing. If the number matches
with one of the entries in your Private Phonebook, the caller’s name stored in
the private phonebook will be displayed alternatively with the number. The
handset will ring with the melody associated with that phonebook entry.
If the caller number is disabled to send caller information, WITHHELD will
display.
If the caller number is not provided, UNAVAILABLE will display.
In standby, if three unanswered calls are received, 3 NEW CALLS will be
displayed.
View the call list
All received calls are saved in Call List with the latest call putting at the top
of the list. When the call list is full, the oldest call will be replaced by a new
call. The unanswered call which has not been read is marked with a <
icon> at the centre of the bottom line of the display.
Press <UP> to access the call list.1.
OR Press <MENU> and <UP/DOWN> to select CALL LIST.
Press <UP/DOWN> to select the desired entry.2.
Press <#> to view the caller’s number if applicable.3.
Store a call list number into the phonebook
Follow Steps 1 and 2 in Section 1. View the call list.
Press <MENU> to select 2. ADD TO PB.
Press <OK> to enter the name.3.
Press <OK> and the selected call list number is displayed.4.
Edit the number if necessary.5.
Press <OK> and <UP/DOWN> to select the melody.6.
Press <OK> to confirm.7.
Delete an entry in the call list
Follow Steps 1 and 2 in Section View the call list.1.
Press <MENU> and <UP/DOWN> to select DELETE.2.
Press <OK> to confirm.3.
Delete the entire list of the call list
Follow Steps 1 and 2 in Section View the call list.1.
Press <MENU> and <UP/DOWN> to select DELETE ALL.2.
Press <OK> to confirm.3.
Press <OK> to re-confirm.4.
View the Details of the Call List Entry
Follow Steps 1 and 2 in Section View the call list.1.
Press <MENU> and <UP/DOWN> to select DETAILS.2.
Press <OK> to display the date and time of the selected call list entry.3.
Press <OK> to go back to previous screen.4.
Voice Mail (Network Dependent)
This feature is available if you have subscribed to the voicemail service from
you network service provider. You can press and hold <Key 1> to dial out to
the voice mail number directly to listen to your voice mail messages.
Access voice mail messages
<VMWI icon> will display and the VMWI entry is stored in the Call List
when you have new message in your voice mailbox.
Press <MENU> and <UP/DOWN> to select CALL LIST.1.
OR Press <UP> in idle to access the call list.
Press <UP/DOWN> to select the desired VMWI entry.2.
Press <TALK ON> to dial out to the voice mail server.3.
NOTE: If a more recent VMWI entry is received from the same network
server number of an existing VMWI entry, the new VMWI will not be stored
but the date/time of the VMWI will be updated on the existing VMWI entry.
After you have accessed to all new voice mail messages, VMWI will turn off
automatically. When the call list is full, the new VMWI entry will replace the
oldest non-VMWI entry in the call list.
Delete VMWI entries
To delete a single VMWI entry from the call list:
Press <MENU> and <UP/DOWN> to select CALL LIST.1.
OR Press <UP> in idle to access the call list.
Press <UP/DOWN> to select the desired VMWI entry.2.
Press <MENU> and <UP/DOWN> to select DELETE.3.
Press <OK> to confirm.4.
To delete all VMWI entries from the call list:
Press <MENU> and <UP/DOWN> to select CALL LIST.1.
OR Press <UP> in idle to access the call list.
Press and hold <Key 4> to delete all VMWI entries.2.
The <VMWI icon> will disappear.
NOTE: If you choose DELETE ALL function in the call list, the handset will
also delete all VMWI entries and CID entries.
TROUBLESHOOTING
No dialing tone when pressing <TALK ON> key
Check the connections. Unplug and plug back in the mains. Check that 1.
the telephone line cord has been plugged into the base station and the
phone socket.
Move the cordless handset closer to the telephone base. It might be out 2.
of range.
Wait until the line is unoccupied.3.
Use the original telephone line cord.4.
Disconnect the telephone base from the telephone jack and connect a 5.
different telephone. If there is no dial tone on that telephone either, the
problem is your wiring or local service. Contact your local telephone
service provider.
My telephone does not ring when there is an incoming call
Make sure the ringer is on.1.
Make sure the telephone line cord and power adapter are plugged in 2.
properly.
The cordless handset maybe too far from the telephone base. Move it 3.
closer to the telephone base.
Re-install the battery and place the cordless handset in the telephone 4.
base or charger.
SEARCHING is displayed
Reduce the range.
Connect base station to mains.
Caller ID features are not working properly
Caller ID is a subscription service. You mush subscribe to this service 1.
from your telephone service provider for this feature to work on your
telephone.
The caller may not be calling from an area which supports Caller ID.2.
No display
Recharge battery.
This telephone is not equipped with a grounding function. Therefore some of
the functions may be limited when used in PBX systems.
General Product Care
To keep your telephone working and looking good, follow these guidelines:
Avoid putting the phone near heating appliances and devices that •
generate electrical noise (for example, motors or fluorescent lamps ).
DO NOT expose to direct sunlight or moisture.•
Avoid dropping the unit and other rough treatment.•
Clean with a soft cloth.•
Never use a strong cleaning agent or abrasive powder because this will •
damage the finish.
Retain the original packaging in case you need to ship the phone at a •
later date.
Periodically clean the charge contacts on the handset and base with a •
soft cloth.
Environment
Used equipment must be disposed of in compliance with current
environmental protection regulations. You should return it to your reseller or
dispose of it in an approved recycling centre.
“WEEE” Weight: 0.32kg
Do not attempt to open the batteries, as they contain chemical substances.
In the event of leakage, avoid contact with the skin, eyes and mouth. In the
event of contact, rinse the affected part for several minutes in running water.
Clean the product with absorbent paper or a dry cloth and contact your
reseller for replacement batteries.
Press <OK> and <UP/DOWN> to select 2. ON/OFF.
Press <OK> to confirm.3.
NOTE: If ON is selected, you will be asked to set the alarm time.
Set the alarm time (if the alarm is set to be ON)
Follow Steps 1 to 3 in Section Turn on/off the alarm.1.
Enter the alarm time.2.
Press <OK> to set the snooze function.3.
Press <OK> and <UP/DOWN> to select ON or OFF.4.
Press <OK> to confirm.5.
Handset Settings
Set the ringer melody for internal calls
Press <MENU> and <UP/DOWN> to select 1. HS SETTINGS.
Press <OK> to select 2. RING SETUP.
Press <OK> to select 3. INT RING.
Press <OK> and <UP/DOWN> to select the desired ringer melody 4.
(a total of 5 melodies for your selection) for setting ringer melody for
internal calls.
NOTE: The respective ringer melody will be played while browsing the
melody list.
Press <OK> to confirm.5.
Set the ringer melody for external calls
Press <MENU> and <UP/DOWN> to select 1. HS SETTINGS.
Press <OK> to select 2. RING SETUP.
Press <OK> and <UP/DOWN> to select 3. EXT RING.
Press <OK> and <UP/DOWN> to select the desired ringer melody 4.
(a total of 5 melodies for your selection) for setting ringer melody for
external calls.
NOTE: The respective ringer melody will be played while browsing the
melody list.
5. Press <OK> to confirm.
Set the ringer volume for external calls
Press <MENU> and <UP/DOWN> to select 1. HS SETTINGS.
Press <OK> to select 2. RING SETUP.
Press <OK> and <UP/DOWN> to select 3. RING VOLUME.
Press <OK> and <UP/DOWN> to select the desired ringer volume (a 4.
total of 6 ringer volume levels including VOLUME OFF).
NOTE: The respective ringer volume will be played during your selection.
If VOLUME OFF is selected, <Ringer Off> icon will display.
5. Press <OK> to confirm.
Set alert tones
A single beep is emitted when you press a key. You can turn on or off the key
tone. You can also turn on the alert tones when low battery and out of range
are detected. Low battery tone will be emitted while you are talking with the
phone to alert you that you need to charge up your battery.
Press <MENU> and <UP/DOWN> to select 1. HS SETTINGS.
Press <OK> and <UP/DOWN> to select 2. TONE SETUP.
Press <OK> and <UP/DOWN> to select 3. KEY TONE / BATTERY
TONE / OUT OF RANGE.
Press <OK> and <UP/DOWN> to turn on or off these tones.4.
Press <OK> to confirm.5.
Set the handset language
Press <MENU> and <UP/DOWN> to select 1. HS SETTINGS.
Press <OK> and <UP/DOWN> to select 2. LANGUAGE.
Press <OK> and <UP/DOWN> to select the desired language.3.
Press <OK> to confirm.4.
Rename the handset
Press <MENU> and <UP/DOWN> to select 1. HS SETTINGS.
Press <OK> and <UP/DOWN> to select 2. RENAME HS.
Press <OK> and enter the name of your handset.3.
Press <OK> to confirm.4.
Choose the information to be displayed in idle
You can choose to display time or handset name in your idle screen.
Press <MENU> and <UP/DOWN> to select 1. HS SETTINGS.
Press <OK> and <UP/DOWN> to select 2. HS DISPLAY.
Press <OK> and <UP/DOWN> to select 3. HANDSET NAME or TIME.
Press <OK> to confirm.4.
Set the auto answer
If you turn on the Auto Answer, you can pick up the call from the cradle
without pressing any key.
Press <MENU> and <UP/DOWN> to select 1. HS SETTINGS.
Press <OK> and <UP/DOWN> to select 2. AUTO ANSWER.
Press <OK> and <UP/DOWN> to turn on or off the auto answer feature.3.
Press <OK> to confirm.4.
Store direct memory access number
You can store three direct access numbers into digit KEY 1, KEY 2 and KEY
3, which will be convenient for you to dial to these numbers directly.
Press <MENU> and <UP/DOWN> to select HS SETTINGS.1.
Press <OK> and <UP/DOWN> to select DIRECT MEM.2.
Press <OK> and <UP/DOWN> to select any one from KEY 1, KEY 2 3.
and KEY 3.
Press <OK> and then enter the number you would like to store, or edit 4.
the number existed before.
Press <OK> to confirm.5.
Base Settings
The current settings are marked an asterisk which is displayed at the
rightmost of the menu item.
De-register a handset
You are requested to enter the 4-digit PIN in order to de-register a handset
from the base station. The antenna icon on the de-registered handset will
blink.
NOTE: You cannot de-register the handset that you are currently using.
Press <MENU> and <UP/DOWN> to select 1. BS SETTINGS.
Press <OK> to select 2. DELETE HS.
Press <OK> and you are requested to enter the 4-digit system PIN.3.
Enter the 4-digit system PIN.4.
Press <OK> and a list of registered handsets is displayed5.
Press <UP/DOWN> to select one of the handsets that you want to de-6.
register.
Press <OK> to confirm.7.
Change the dial mode
Press <MENU> and <UP/DOWN> to select 1. BS SETTINGS.
Press <OK> and <UP/DOWN> to select 2. DIAL MODE.
Press <OK> and <UP/DOWN> to select 3. TONE or PULSE.
Press <OK> to confirm.4.
Change the flash time
The flash time setting is country dependent. Please contact your local service
provider for the correct settings.
Press <MENU> and <UP/DOWN> to select 1. BS SETTINGS.
Press <OK> and <UP/DOWN> to select 2. FLASH TIME.
Press <OK> and <UP/DOWN> to select your desired flash time 3.
(SHORT, MEDIUM, LONG).
Press <OK> to confirm.4.
Change the system PIN code
A 4-digit system PIN code is used for changing the system settings of the
base station. It is used to protect your phone against unauthorized use. The
default system PIN code is 0000.
Press <MENU> and <UP/DOWN> to select 1. BS SETTINGS.
Press <OK> and <UP/DOWN> to select 2. CHANGE PIN.
Press <OK> and you are requested to enter the 4-digit system PIN.3.
Enter the old system PIN.4.
Press <OK> and enter the new system PIN.5.
Press <OK> and enter the new system PIN again.6.
NOTE: If the new PIN entered in Step 6 is not matched with the new system
PIN entered in Step 5, user is requested to enter the valid system PIN again
in Step 5.
Press <OK> to confirm.7.
Change the ECO mode
Press <MENU> and <UP/DOWN> to select 1. BS SETTINGS.
Press <OK> and <UP/DOWN> to select 2. ECO MODE.
Press <UP/DOWN> to select 3. ON or OFF.
Press <OK> to conrm.4.
Registration
Your handset(s) and base station is(are) pre-registered. Up to five handsets
can be registered to a single base station.
If for some reason, the handset is not registered to the base station
(<Antenna icon> flashes even when the handset is near the base station),
register your handset according to the following procedure.
Press and hold <PAGE> on the base station for about five seconds, the 1.
base station is entered into registration mode.
Press <MENU> and <UP/DOWN> to select 2. REGISTRATION.
Press <OK> and you are requested to enter the 4-digit system PIN.3.
Enter the 4-digit system PIN.4.
Press <OK> to confirm.5.
If the handset registration is successful, you will hear a confirmation tone
and the <antenna icon> will stop flashing. The handset will automatically
be allocated the next available handset number. This handset number is
shown in the handset display in standby mode. If the handset registration is
Model Versatis P100
00030325 (Rev 1, E)
09-20
Printed in China
 Loading...