

Page 1
Owner’s Manual
Fixed Install A-Line Manual
Fixed Install A-Line Manual
1601 Jack McKay Blvd. • Ennis, Texas 75119 U.S.A.
Telephone: 800.876.3333 • Fax: 800.765.3435
AtlasIED.com – 1 –
Specifications are subject to change without notice.
Page 2
Fixed Install A-Line Manual
Owner’s Manual
Fixed Install A-Line Manual
This manual covers use and mounting of all of the A-Line xed install product.
EL1503I-B(W)
EJ2003I-B(W)
EJW115AI-B(W)
EJW115XI-B(W)
SW118AI-B(W)
SW118XI-B(W)
Available Mounting Options (Sold Separately)
ALELB1-B(W) – Complete Wall bracket includes both top and bottom bracket and one set of
extensions for small angled adjustments.
ALELCP-B(W) – Bracket to join two EJ2003I or two EL1503I together into a larger line column.
ALELWBEXT-B(W) – Extension kit to angle or add additional distance from the mounted wall bracket.
Operation and Wiring of Fixed Install Systems
Amplier Connections
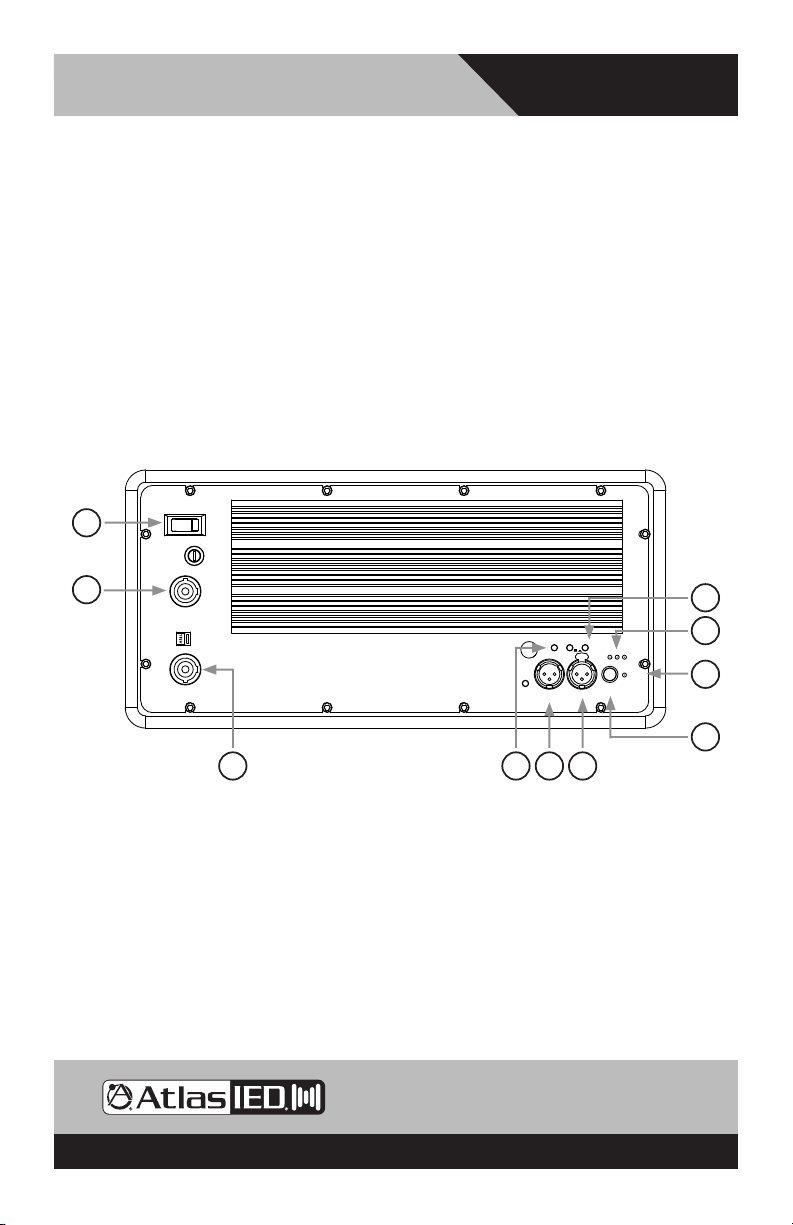
EJW115A-B Rear Panel
1
POWER ON
2
POWERCON
NEUTRIK NAC3FCA
POWER OUTLET
12A MAXIMUM
3
4
1. Power Switch – Turns unit power ON or OFF.
Note: There are two programs loaded into the DSP at the factory: When switching between the
two programs the power on the amplier must be in the OFF position.
2. PowerCON Input – Connect included PowerCON to 3 prong plug to this port in order to deliver
electrical power to the amplier.
3. PowerCON Output – Daisy chain multiple amplied speaker systems using this output reducing
number of wall plugs required.
4. PGM SEL – There are two programs loaded into the DSP at the factory. When switching between
programs, follow these steps:
- The amplier power switch must be in the OFF positon.
- Using the PGM SEL button, press it to the IN or OUT position to make selection.
- Turn the power button switch to the ON position and the new program selection will now be stored.
- When switching between the two programs, repeat the previous steps. If trying to change
program with the power ON, the program will not change.
PGM SEL
OUTPUT
10
MUTE
CH 1 CH 2
MUTE
ON
CLIP
PWR
PROT
SIGNAL
INPUTLOOPING
VOLUME
9
5
6
7
8
1601 Jack McKay Blvd. • Ennis, Texas 75119 U.S.A.
Telephone: 800.876.3333 • Fax: 800.765.3435
AtlasIED.com – 2 –
Specifications are subject to change without notice.
Page 3

Owner’s Manual
Program button IN mode is typically used for speech and acoustic music.
Program button OUT mode is typically used for prerecorded music, with a + 4dB boost on the
woofer cabinet.
5. MUTE CH1 & CH2 - There are two mute switches on the unit. When depressed, the channel is
active and will play sound. CH1 controls the woofer and CH2 controls the line array. Press either
button a second time to activate the mute function.
6. LED Indicators
PWR - Green LED indicates unit is receiving power from wall outlet.
CLIP - Yellow LED indicates that the unit is operating outside its normal range. Reduce output of
source unit to avoid damaging speakers or other components.
NOTE: This unit can ash occasionally during normal use.
PROT - Red LED indicates the amplier is in Protect mode. Do not operate the unit when the red
LED is illuminated.
7. SIGNAL LED - Green LED indicates the unit is receiving signal from the source unit.
8. Volume Control - Adjusts volume of the speaker unit in reference to the master volume set at the
source/mixer, 0 to -36dB.
9. Input - XLR connection delivers signal from source unit.
10. Looping Output - XLR connection delivers signal from source unit.
Each active subwoofer cabinet can only power two line array loudspeakers and a single passive
subwoofer.
Note: For applications using stacked line column loudspeakers using the ALELCP, an active
subwoofer cabinet is required for each side.
Fixed Install A-Line Manual
Wiring the System Elements
1. The active subwoofer has two barrier strip terminals below the amplier. Use this wiring direction
for connection of a single line column loudspeaker to the active subwoofer.
a. The barrier strips accept U terminals or bare speaker wire. AtlasIED recommends using 12-14
AWG twisted pair speaker wire for best performance.
b. The right side of the barrier strip terminal is designed to transfer high frequency signal to
the line column loudspeaker. Either the top or the bottom terminal can be used and can be
connected to the Input terminal on the line column loudspeaker.
c. Ensure the screws are screwed down tightly so they do not become disconnected.
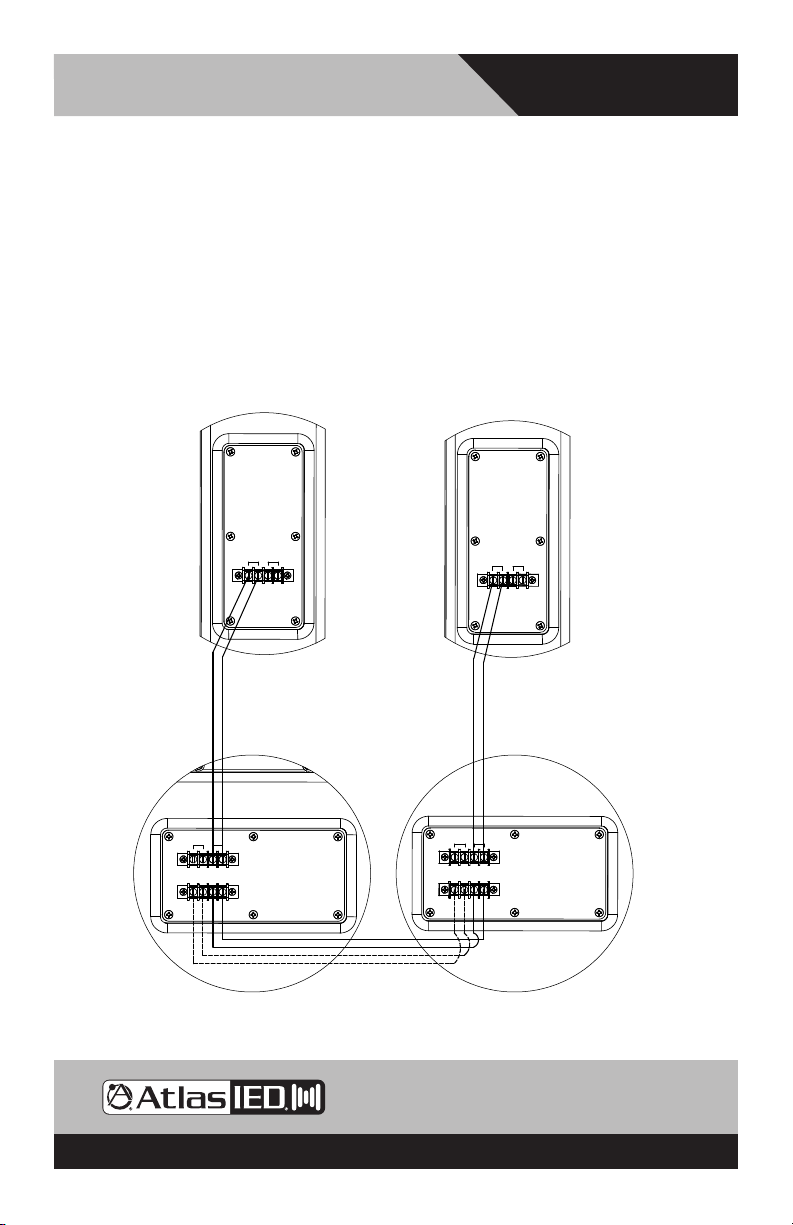
2. Use this wiring direction for connection of a passive subwoofer and two line column loudspeakers
to the active subwoofer.
a. The barrier strips accept U terminals or bare speaker wire. AtlasIED recommends using 12-14
AWG twisted pair speaker wire for best performance.
b. The left side of the barrier strip delivers signal to the passive subwoofer either top or bottom
connections can be used.
c. The right side of the barrier strip terminal is designed to transfer high frequency signal to
the line column loudspeakers. Either the top or the bottom terminal can be used and can be
connected to the Input terminal on one of the line column loudspeakers.
d. The unused right side barrier strip terminal (top or bottom) needs to be connected to either
the top or bottom terminal on the right side of the barrier strip on the passive subwoofer.
Connection then needs to be made from the remaining right side barrier strip terminal to the
Input on the second line column loudspeaker.
e. Ensure the screws are screwed down tightly so they do not become disconnected.
1601 Jack McKay Blvd. • Ennis, Texas 75119 U.S.A.
Telephone: 800.876.3333 • Fax: 800.765.3435
AtlasIED.com – 3 –
Specifications are subject to change without notice.
Page 4
Fixed Install A-Line Manual
Owner’s Manual
3. Use this wiring direction for connection of a two line column loudspeakers to a single active
subwoofer.
a. The barrier strips accept U terminals or bare speaker wire. AtlasIED recommends using 12-14
AWG twisted pair speaker wire for best performance.
b. The right side of the barrier strip terminal is designed to transfer high frequency signal to
the line column loudspeaker. Either the top or the bottom terminal can be used and can be
connected to the Input terminal on the rst line column loudspeaker.
c. Connect the output from the rst line column loudspeaker to the input on the second line
column speaker.
Note: The input and output connections are in parallel, so as long as polarity is maintained
the system will function properly.
d. Ensure the screws are screwed down tightly so they do not become disconnected.
This is just an example and there are other congurations possible.
Sub
-
Input Output
-
Line Column
Loudspeaker 1
Array
-
++
Active
Subwoofer
OutputInput
+-+
Sub Array
-
-
-
++
Line Column
Loudspeaker 2
+-+
Passive
Subwoofer
1601 Jack McKay Blvd. • Ennis, Texas 75119 U.S.A.
Telephone: 800.876.3333 • Fax: 800.765.3435
AtlasIED.com – 4 –
Specifications are subject to change without notice.
Page 5

Owner’s Manual
Fixed Install A-Line Manual
Installation Instructions
1. Position all speakers in the area where they need to be set up. Remember the advantage of the
line column loudspeaker is its wide coverage pattern so place them so they offer optimum room
coverage.
a. The subwoofer cabinets are designed to be oor mounted.
b. The line column loudspeakers can be wall mounted using the ALELB1 bracket.
2. Suspension & mounting or “ying” loudspeaker systems requires training and expertise. Improper
rigging of a ying loudspeaker may result in injury, death, equipment damage, and legal liability.
Installation must be carried out by fully qualied installers, in accordance with all required safety
codes and standards at the place of installation. A 5:1 design factor is a generally accepted
minimum standard. However, legal requirements for overhead suspension vary by municipality;
please consult your local safety standards ofce before installing any product. We also
recommend that you thoroughly check any laws and bylaws prior to installation. Loudspeakers
own in theaters, nightclubs, conference centers, or other places of work and entertainment must
be provided with an independent, correctly rated and securely attached secondary safety — in
addition to the principle suspension point(s). This secondary safety must prevent the loudspeaker
from dropping more than (6") should the principle suspension device fail. If you lack the skills,
training, and proper ancillary equipment to y a speaker system, do not attempt to do so.
3. Using ALELB1 Brackets
a. Mount brackets to the wall.
i. Hardware to fasten the wall bracket to the wall is not included.
ii. Use no less than 3 connections between the wall bracket and the mounting surface to
iii. The line column loudspeaker should then be bolted to the wall mounts using the included
ensure a secure mount.
5
⁄16 bolts. These thread into the top and bottom of the line array elements.
1601 Jack McKay Blvd. • Ennis, Texas 75119 U.S.A.
Telephone: 800.876.3333 • Fax: 800.765.3435
AtlasIED.com – 5 –
Specifications are subject to change without notice.
Page 6

Fixed Install A-Line Manual
Please see the below views for different mounting angles and position.
The wall brackets have a few mounting holes to change cabinet angle and or for adding the
extension pieces.
Owner’s Manual
1601 Jack McKay Blvd. • Ennis, Texas 75119 U.S.A.
Telephone: 800.876.3333 • Fax: 800.765.3435
AtlasIED.com – 6 –
Specifications are subject to change without notice.
Page 7

Owner’s Manual
Angling the loudspeaker can be accomplished using the included extension pieces in the ALELB1 kit.
The kit includes hex nuts to lock the extension plates in place. The extension plates have built in pem
bolts for easy assembly. When assembling the extension, place the two single le pem bolts towards
the wall, and tighten them to the wall bracket rst. See the below view for detail of the complete
ALELB1 kit.
Top View
Complete view of element connected to the wall (EJ2003I-B).
Fixed Install A-Line Manual
1601 Jack McKay Blvd. • Ennis, Texas 75119 U.S.A.
Telephone: 800.876.3333 • Fax: 800.765.3435
AtlasIED.com – 7 –
Specifications are subject to change without notice.
Page 8

Fixed Install A-Line Manual
Multiple extension kits (ALELWBEXT) can be added to achieve the desired placement /angle of the
line array elements.
Two line array elements can be connected together using the ALELCP. This Bracket includes two “L”
plates and twenty #8 screws to lock the two cabinets together. The below illustration shows how
the brackets can combine line column loudspeakers. The ALELCP bracket can connect either two
EJ2003I or two EL1503I loudspeakers.
1. Place the two cabinets together, so they are ush front to back.
2. Take the connector plates and screw them to the cabinet using the included twenty #8 wood screws.
Owner’s Manual
1601 Jack McKay Blvd. • Ennis, Texas 75119 U.S.A.
Telephone: 800.876.3333 • Fax: 800.765.3435
AtlasIED.com – 8 –
Specifications are subject to change without notice.
Page 9

Owner’s Manual
See below view of two line column loudspeakers connected together using the ALELCP, while
connected to the ALELB1 wall mounting brackets.
Fixed Install A-Line Manual
1601 Jack McKay Blvd. • Ennis, Texas 75119 U.S.A.
Telephone: 800.876.3333 • Fax: 800.765.3435
AtlasIED.com – 9 –
Specifications are subject to change without notice.
Page 10

Notes:
Fixed Install A-Line Manual
Owner’s Manual
1601 Jack McKay Blvd. • Ennis, Texas 75119 U.S.A.
Telephone: 800.876.3333 • Fax: 800.765.3435
AtlasIED.com – 10 –
Specifications are subject to change without notice.
Page 11

Owner’s Manual
Notes:
Fixed Install A-Line Manual
1601 Jack McKay Blvd. • Ennis, Texas 75119 U.S.A.
Telephone: 800.876.3333 • Fax: 800.765.3435
AtlasIED.com – 11 –
Specifications are subject to change without notice.
Page 12

Fixed Install A-Line Manual
Owner’s Manual
Limited Warranty
All products manufactured by AtlasIED are warranted to the original dealer/installer, industrial or
commercial purchaser to be free from defects in material and workmanship and to be in compliance
with our published specifications, if any. This warranty shall extend from the date of purchase
for a period of three years on all AtlasIED products, including SOUNDOLIER brand, INNOVATIVE
ELECTRONIC DESIGNS brand, and AtlasIED brand products except as follows: one year on
electronics and control systems; one year on replacement parts; and one year on Musician Series
stands and related accessories. Additionally, fuses and lamps carry no warranty. AtlasIED will solely
at its discretion, replace at no charge or repair free of charge defective parts or products when the
product has been applied and used in accordance with our published operation and installation
instructions. We will not be responsible for defects caused by improper storage, misuse (including
failure to provide reasonable and necessary maintenance), accident, abnormal atmospheres, water
immersion, lightning discharge, or malfunctions when products have been modified or operated
in excess of rated power, altered, serviced or installed in other than a workman like manner. The
original sales invoice should be retained as evidence of purchase under the terms of this warranty.
All warranty returns must comply with our returns policy set forth below. When products returned to
AtlasIED do not qualify for repair or replacement under our warranty, repairs may be performed at
prevailing costs for material and labor unless there is included with the returned product(s) a written
request for an estimate of repair costs before any nonwarranty work is performed. In the event of
replacement or upon completion of repairs, return shipment will be made with the transportation
charges collect.
EXCEPT TO THE EXTENT THAT APPLICABLE LAW PREVENTS THE LIMITATION OF CONSEQUENTIAL
DAMAGES FOR PERSONAL INJURY, ATLASIED SHALL NOT BE LIABLE IN TORT OR CONTRACT
FOR ANY DIRECT, CONSEQUENTIAL OR INCIDENTAL LOSS OR DAMAGE ARISING OUT OF THE
INSTALLATION, USE OR INABILITY TO USE THE PRODUCTS. THE ABOVE WARRANTY IS IN LIEU OF
ALL OTHER WARRANTIES INCLUDING BUT NOT LIMITED TO WARRANTIES OF MERCHANTABILITY
AND FITNESS FOR A PARTICULAR PURPOSE.
AtlasIED does not assume, or does it authorize any other person to assume or extend on its behalf,
any other warranty, obligation, or liability. This warranty gives you specific legal rights and you may
have other rights which vary from state to state.
Service
Should your line column loudspeaker require service, please contact the AtlasIED warranty
department at 1-877-689-8055, ext. 277 or support.atlassound.com to obtain an RA number.
AtlasIED Tech Support can be reached at 1-800-876-3333 or support.atlasied.com.
Visit our website at www.AtlasIED.com to see other AtlasIED products.
Atlas Sound is a trademark of Atlas Sound L.P. IED is a registered trademark of Innovative Electronic Designs, LLC.
All other trademarks are the property of their respective owners. All specs are subject to change without notice.
AtlasIED.com – 12 –
©2016 Atlas Sound L.P. and Innovative Electronic Designs, LLC. All Rights Reserved.
21A10490 – AW0015254 ATS005392 RevA 1/16
1601 Jack McKay Blvd. • Ennis, Texas 75119 U.S.A.
Telephone: 800.876.3333 • Fax: 800.765.3435
Specifications are subject to change without notice.
 Loading...