

Page 1

DPA Amplifier Site Manager
Reference Guide
1601 JACK MCKAY BLVD.
ENNIS, TEXAS 75119 U.S.A.
TELEPHONE: (800) 876-3333
SUPPORT@ATLASIED.COM
– 1 –
AtlasIED.com
Page 2

DPA Amplifier Site Manager
Reference Guide
DPA Amplifier Site Manager, Reference Guide
The AtlasIED DPA amplifier Site Manager is a Windows based software application that is designed to locate, communicate with, and monitor DPA
Series amplifiers connected to a Local Area Network (LAN). DPA Series amplifiers feature an onboard web browser interface to allow access to the
amplifier’s configuration, control functions, and DSP settings. The DPA Site Manager is a quick and simple way to discover the IP addresses of multiple
DPA Series amplifiers within a LAN. Once the IP addresses are located, access to a specific DPA amplifier web interface is a click away.
The DPA Site Manager can also perform other functions including remote monitoring of network status, fault condition status, and fault reporting via
email, Input / Output status, amplifier configuration file management, firmware updating, and weekly scheduler for DPA amplifier energy-saving power
management. Note: the DPA102PM model has limited functions with the DPA Site Manager software. Refer to “DPA102PM Limitation Notes” at the
end of this document for details.
Features
• DPA Amplifier IP Discovery
• Works with Multiple DPA Amplifiers
• Network Status Remote Monitoring
• DPA Amplifier Status: Fault, Sleep / APD Mode, Active
• Input / Output Status: Active and Mute
• Two Level Fault Reporting Email Configuration
• DPA Amplifier Design File / Configuration File Transfer Management
• Firmware Update Management
• Scheduler 24/7 for DPA Amplifier Energy Saving Power Management
Installation of Software
1. Download the DPA Site Manager software from the AtlasIED web page, http://www.atlasied.com/dpa-series.
2. Unzip the file, open the folder, and click on the file “AtlasIED DPA Amplifier Site Manager”.
3. Follow the installation wizard prompts.
Note: The program requires Java JRE 1.8 to be installed on the system. The Java JRE 1.8 comes bundled with the installer package and the user can
follow on screen instructions to install.
Getting Started
1. Connect all DPA amplifiers to the same network as the computer running the DPA Site Manager software. Make sure the amplifiers are plugged in
and the Ethernet port on the rear of the amplifier shows traffic with both the green & yellow LEDs blinking.
2. Open the DPA Site Manager software and click on the discover tab. A timer wheel will appear indicating an IP search is in progress. A list of DPA
Amplifiers along with their IP and MAC addresses will appear.
1601 JACK MCKAY BLVD.
ENNIS, TEXAS 75119 U.S.A.
TELEPHONE: (800) 876-3333
SUPPORT@ATLASIED.COM
– 2 –
AtlasIED.com
Page 3
DPA Amplifier Site Manager
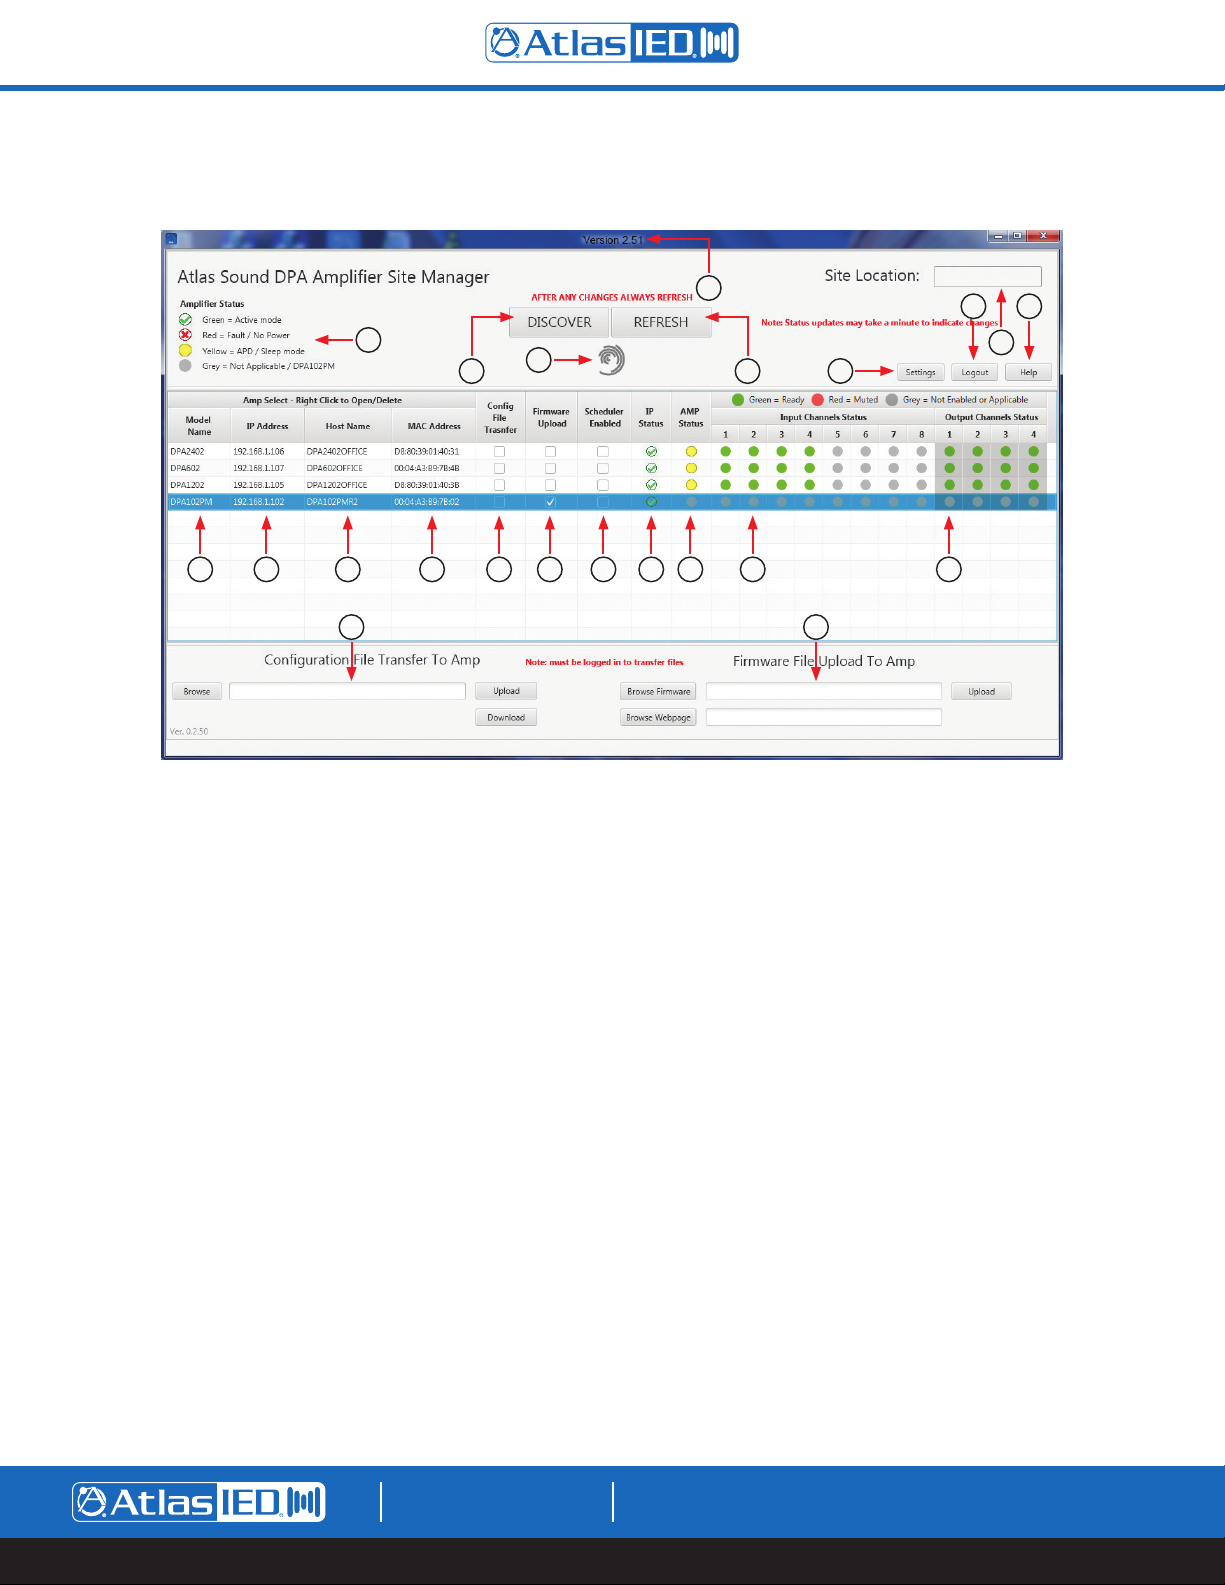
DPA Site Manger Features & Description
Reference Guide
17
18
1
3 4 5
19 20
1. Discover Tab – When first using the DPA Site Manager, no amplifiers will be listed. Click on the Discover tab and the process of Auto discovery
will start. The software will search the LAN for any DPA amplifiers active within the LAN. Firewall and network configuration settings created
by the network administrator may cause issues with discovery. Contact the facility IT department should this issue arise.
Note for support: The application uses UDP to search for the amplifiers. Some networks may block all UDP traffic. If the user cannot find an
amplifier, AtlasIED suggests using a direct Ethernet connection from the computer to the amplifier. This indicates that the network may be at fault.
Refer to the DPA owners manual for Direct Connection instructions.
If no amplifier is shown, the user will have to disable all firewalls/antivirus programs in order to try again. If an amplifier does show in a direct
connection, but not when it is connected to a router, then most likely it is the network blocking the programs access to the network. In this case,
the user must request assistance from a network administrator.
2. Discovery In Process Indicator – This rotating icon indicates the IP Discovery search is in progress. When the search is finished, the icon will
disappear.
3. Model Number – After a DPA amplifier is discovered, a list will be generated showing all models connected and found on that network. This field
is the DPA Amplifier model number. Right click on the model and select OPEN or DELETE. Selecting OPEN will open the DPA amplifier’s onboard
web page. Clicking DELETE will remove the amplifier from the list. The web page can be also selected by double clicking the amplifier in the table.
4. IP Address – This is the Internet Protocol numerical label that is assigned to each device. This address is assigned to the DPA amplifier from a
DHCP Server when the amplifier is in DHCP mode or by a technician that has assigned the unit a static IP address.
5. Host Name – This is the name of the DPA Amplifier that was assigned. This name may not match the amplifier model number if it has been
changed so that it can be identified easier on the LAN. It is common to change the HOST name when there are multiple units that are the same
model on the same LAN. For example, in a school with 30 classrooms that each has a DPA602, the amplifiers could be named after each
classroom number, RM222.
6 7 8 9 10 11 12 13
2
22
15
14 16
21
1601 JACK MCKAY BLVD.
ENNIS, TEXAS 75119 U.S.A.
TELEPHONE: (800) 876-3333
SUPPORT@ATLASIED.COM
– 3 –
AtlasIED.com
Page 4

DPA Amplifier Site Manager
Reference Guide
DPA Site Manger Features & Description
6. MAC Address – This is the physical address of the amplifier when the product was made. It cannot be changed.
7. Configuration File Upload– A configuration file is a file with specific data pertaining to a DPA amplifier that contains all the Level settings, routing,
and EQ. This works in conjunction with #19 Configuration File Transfer. This box needs to be checked for the amplifier to execute a file to be
uploaded from the computer to the amplifier or downloaded from the amplifier to the computer.
8. Firmware Upload – There are times when a new feature is issued or a bug is discovered in the software. This box needs to be checked for the
firmware files to be uploaded from the computer to the amplifier. Multiple DPA amplifiers of the same model can have firmware updated at the
same time. This works in conjunction with #20 Firmware File Transfer section.
9. Scheduler – A DPA amplifier can be automatically turned On or Off via the DPA Site Manager using the scheduler to send the commands to the
amplifier. This box needs to be checked if that specific amplifier is to be assigned to the schedule. Refer to section #22 Settings – line F- Scheduler
- for information on setting days and times. Note: After setting the schedule in the Setting / Scheduler page, selct the amplifer that will follow the
created schedule.
10. IP Status – This indicator informs the user if the DPA amplifier has a connection to the network. Green means the amplifier and the DPA Site
Manager software are communicating and Red indicates there is no connection or communication. A notification email can be sent if the
connection is lost. Refer to section #22 Settings – line C – Email Settings – to set up an email warning notification.
11. Amplifier Status – This indicator has three color references to indicate the status of the amplifier.
• Green – Indicates the amplifier is working properly.
• Yellow - Indicates the amplifier is in Sleep Mode or APD (Auto Power Down) mode. APD Mode is activated when the amplifier does not
detect an audio signal for 30 minutes and will automatically enter into a lower power consumption state to meet Energy Star
standards. When the amplifier detects a signal above 1mV, the amplifier will return to active idle status. The indicator will go from Yellow to
Green. Refer to the DPA Owner’s manual for details on the DPA’s three power states.
• Red – Indicates an amplifier’s channel has a fault condition or the amplifier has lost AC Mains power. If the amplifier loses AC Mains power the
IP Status indicator will also be Red. Note: A fault message can be sent, refer to section #22
Settings – line C – Email Settings – to set up an email warning notification.
12. Input Channel Status – This indicator has three color references to indicate the status of the amplifier inputs.
• Green – Indicates the Input is on and ready.
• Red – Indicates the Input is muted.
• Gray – Indicates the inputs 5-8 are not enabled. Note: For the model DPA102PM refer to the section “DPA102PM Limitation Notes”
13. Output Channel Status – This indicator has three color references to indicate the status of the amplifier Outputs.
• Green – Indicates the Output is on and ready.
• Red – Indicates the Output is muted.
• Gray – Indicates this feature is not applicable for the DPA102PM. Note: For the model DPA102PM refer to the section “DPA102PM Limitation
Notes”
®
standby
1601 JACK MCKAY BLVD.
ENNIS, TEXAS 75119 U.S.A.
TELEPHONE: (800) 876-3333
SUPPORT@ATLASIED.COM
– 4 –
AtlasIED.com
Page 5

DPA Amplifier Site Manager
Reference Guide
DPA Site Manger Features & Description
14. Login / Logout – Before any file transfer can be completed, the user must log into the software. The factory defaults are below. The user must
be logged in first, then click on the Change Username / Password button to customize or change access. If either the username or password is
lost, contact AtlasIED customer support at 1-800-876-3333 or support@atlasied.com for instructions on how to reset to factory default settings.
• Username: admin (lowercase)
• Password: admin (lowercase)
15. Settings – This tab allows access to the Site Location, Server, Email Warning, Account, Scheduler, and About settings. Note: The user must be
logged in before gaining access, see #14.
16. Help – Opens the Help document.
1 7. Software Version – Revision number of the software. Check the AtlasIED web site for the latest version.
18. Amplifier Status Indicator Chart – This charts indicates what the colors of the Amplifier Status indicator mean.
1601 JACK MCKAY BLVD.
ENNIS, TEXAS 75119 U.S.A.
TELEPHONE: (800) 876-3333
SUPPORT@ATLASIED.COM
– 5 –
AtlasIED.com
Page 6

DPA Amplifier Site Manager
Reference Guide
DPA Site Manger Features & Description
19. Configuration File Transfer – A configuration file is a file with specific data to a DPA amplifier containing all the Level settings, routing, and EQ.
This works in conjunction with the Configuration File Upload check box. See #7 Configuration File Upload for details. This box needs to be checked
for the amplifier to execute a file uploaded from the computer to the amplifier or downloaded from the amplifier to the computer.
To Upload a Configuration file:
A. Check the amplifier’s Configuration File Upload box on the amplifier that a preset is being uploaded to. More than one amplifier can be
selected at a time. The models do not matter because they all share the same Web interface and features. The file extensions will be viewed
as a “properties” file type. The same configuration will work on the DPA602 / 1202 / 2402 amps.
B. Select the Browse button and go to the location on the computer where the file is stored and select it.
C. Select Upload. When the process is completed, the word Finished will appear in this area.
To Download a Configuration file:
A. Check the amplifier’s Configuration File Download box that is going to send the download / save to a computer.
B. Select the Browse button and go to the location on the computer where the file should be saved.
C. Select Download. When the process is completed, the word Finished will appear this area.
20. Firmware File Upload To Amplifier – There are times when a new feature is issued or a bug is discovered in the software. The Firmware Upload
box needs to be checked for the firmware files to be uploaded from the computer to the amplifier. Multiple DPA amps of the same model can
execute firmware updates at the same time. This works in conjunction with #8 Firmware Upload selection section. To update the amplifiers’
firmware refer to the DPA manual for details. Note: The user does not need to use the DPA Site Manager to upload firmware. Always check the
AtlasIED web site for the latest firmware.
To upload firmware to the amplifier using the site manager follow these steps:
A. First download the latest DPA firmware from the AtlasIED website and unzip the file / folder. There will be a HOST (HEX) firmware file for each
model and a WEB (BIN) file that is common to all DPA models except the DPA102PM. The DPA102PM will have its own WEB file. The HOST
firmware controls protection settings, fans, control ports, etc. The WEB firmware controls the graphical images in the GUI. Note: Updating the
firmware may not require an update to the WEB file, but will always require a HOST file. Note: The file names are to remain unchanged,
otherwise the files will not be uploaded to the amplifier.
B. On the DPA Site Manager main page, select the (#8) Firmware Upload box of the model to be updated. It is OK to select more than one
amplifier of the same model.
C. Click on “Browse HOST Firmware” and a file browser window will open. Navigate to the location where the new firmware was saved. Select
the unzipped HOST firmware file that matches the model selected in #8. Select the file and select OPEN. The file name and path will appear in
the text box. Do not select the Upload tab yet, first move to step D.
D. Click on the “Browse Webpage Firmware” and a file browser window will open. Navigate to the location where the new firmware was saved.
Select the unzipped WEB firmware file. Select the file and click OPEN. The file name and path will appear in the text box. Now, select
“Upload” and a dialog window will appear indicating the process time. This process can take a few minutes.
21. Site Location – Name of the location where the LAN and amplifiers are installed. This should reflect the name of the location where all of the
amplifiers are installed, for example this could be a city, school, or company name.
22. Refresh – This button does two actions:
• Forces table data to update with the newest values available.
• Hides all visual elements that appeared and were involved in uploading files to the amplifiers.
1601 JACK MCKAY BLVD.
ENNIS, TEXAS 75119 U.S.A.
TELEPHONE: (800) 876-3333
SUPPORT@ATLASIED.COM
– 6 –
AtlasIED.com
Page 7

DPA Amplifier Site Manager
Reference Guide
DPA Site Manger Features & Description
23. Settings Tab – Here a Location Name can be entered, Email Notifications can be set-up, LAN Discovery, About, Server Setup and configure a
Schedule information can be accessed.
A. Site Location Page – This is the location of the job site. The box can hold 11 characters. It is not case sensitive.
B. Server Page – The Server tab is where the outgoing email server information can be set-up to allow an email to be sent for amplifier issues
including loss of power, loss of IP connection, or a fault condition. An email account is required to send a warning message. The SMTP
information can be found in the email settings of the email program you are using. An example of a common email Setup is shown below.
1601 JACK MCKAY BLVD.
ENNIS, TEXAS 75119 U.S.A.
TELEPHONE: (800) 876-3333
SUPPORT@ATLASIED.COM
– 7 –
AtlasIED.com
Page 8

DPA Amplifier Site Manager
Reference Guide
DPA Site Manger Features & Description
C. Email Warning Page – This page is where a warning email can be configured. Two email addresses can be entered per warning. A brief note
can be added to the email body. There are two separate warning conditions that can be applied. An example of the setup is shown along with
the email that was received. All of the amplifier’s identifying information, along with fault and location are listed.
D. Account Page – This page is where the login name and password can be changed. Factory default for the Username is “admin” and for the
Password it is “admin” (Lowercase).
1601 JACK MCKAY BLVD.
ENNIS, TEXAS 75119 U.S.A.
TELEPHONE: (800) 876-3333
SUPPORT@ATLASIED.COM
AtlasIED.com
– 8 –
Page 9

DPA Amplifier Site Manager
Reference Guide
DPA Site Manger Features & Description
E. Scheduler Page – This page allows a user to automatically turn ON/OFF amplifiers on a 24/7 schedule. The time will automatically be synced
with the computer the program is associated with. Note: After setting the schedule in the Setting / Scheduler page, selct the amplifer that will
follow the created schedule.
F. About Page – This page provides the program’s revision identification.
DPA102PM Limitation Notes
The DPA102PM uses a different communication protocol that requires a future design upgrade to communicate with the DPA Site Manager as the
DPA602, DPA804, DPA1202, DPA1604 and the DPA2402 models do.
1. IP Discovery is functional
2. IP Status is functional
3. Fault email warning is functional
4. All other features do not operate at this time. Features not functioning will have the status indicators grayed out.
1601 JACK MCKAY BLVD.
ENNIS, TEXAS 75119 U.S.A.
TELEPHONE: (800) 876-3333
SUPPORT@ATLASIED.COM
– 9 –
AtlasIED.com
Page 10

Notes:
DPA Amplifier Site Manager
Reference Guide
1601 JACK MCKAY BLVD.
ENNIS, TEXAS 75119 U.S.A.
TELEPHONE: (800) 876-3333
SUPPORT@ATLASIED.COM
– 10 –
AtlasIED.com
Page 11

Notes:
DPA Amplifier Site Manager
Reference Guide
1601 JACK MCKAY BLVD.
ENNIS, TEXAS 75119 U.S.A.
TELEPHONE: (800) 876-3333
SUPPORT@ATLASIED.COM
– 11 –
AtlasIED.com
Page 12

Limited Warranty
All products manufactured by AtlasIED are warranted to the original dealer/installer, industrial or commercial purchaser to be free from defects in
material and workmanship and to be in compliance with our published specifications, if any. This warranty shall extend from the date of purchase for
a period of three years on all AtlasIED products, including SOUNDOLIER brand, and ATLAS SOUND brand products except as follows: one year on
electronics and control systems; one year on replacement parts; and one year on Musician Series stands and related accessories. Additionally, fuses
and lamps carry no warranty. AtlasIED will solely at its discretion, replace at no charge or repair free of charge defective parts or products when the
product has been applied and used in accordance with our published operation and installation instructions. We will not be responsible for defects
caused by improper storage, misuse (including failure to provide reasonable and necessary maintenance), accident, abnormal atmospheres, water
immersion, lightning discharge, or malfunctions when products have been modified or operated in excess of rated power, altered, serviced or installed
in other than a workman like manner. The original sales invoice should be retained as evidence of purchase under the terms of this warranty. All
warranty returns must comply with our returns policy set forth below. When products returned to AtlasIED do not qualify for repair or replacement
under our warranty, repairs may be performed at prevailing costs for material and labor unless there is included with the returned product(s) a written
request for an estimate of repair costs before any nonwarranty work is performed. In the event of replacement or upon completion of repairs, return
shipment will be made with the transportation charges collect.
EXCEPT TO THE EXTENT THAT APPLICABLE LAW PREVENTS THE LIMITATION OF CONSEQUENTIAL DAMAGES FOR PERSONAL INJURY, ATLASIED
SHALL NOT BE LIABLE IN TORT OR CONTRACT FOR ANY DIRECT, CONSEQUENTIAL OR INCIDENTAL LOSS OR DAMAGE ARISING OUT OF THE
INSTALLATION, USE OR INABILITY TO USE THE PRODUCTS. THE ABOVE WARRANTY IS IN LIEU OF ALL OTHER WARRANTIES INCLUDING BUT
NOT LIMITED TO WARRANTIES OF MERCHANTABILITY AND FITNESS FOR A PARTICULAR PURPOSE.
AtlasIED does not assume, or does it authorize any other person to assume or extend on its behalf, any other warranty, obligation, or liability. This
warranty gives you specific legal rights and you may have other rights which vary from state to state.
Service
Should your DPA Series Multi-Channel Power Amplifier require service, please contact the AtlasIED warranty department at
1-877-689-8055, ext. 277 or www.atlasied.com/support to obtain an RA number.
AtlasIED Tech Support can be reached at 1-800-876-3333 or www.atlasied.com/support.
Visit our website at www.AtlasIED.com to see other AtlasIED products.
©2019 Atlas Sound L.P. The Atlas “Circle A”, Soundolier, and Atlas Sound are trademarks of Atlas Sound L.P. IED is a registered trademark of Innovative Electronic Designs LLC. All Rights Reserved.
All other trademarks are the property of their respective owners. All specs are subject to change without notice. ATS005515 RevB 2/19
1601 JACK MCKAY BLVD.
ENNIS, TEXAS 75119 U.S.A.
TELEPHONE: (800) 876-3333
SUPPORT@ATLASIED.COM
AtlasIED.com
– 12 –
 Loading...