

Page 1

System Administrator’s Manual
Key System US
West Palm Beach, Florida
Page 2

Legal Notice
Key System US provides this document "as is," with no representations or warranties, either
explicit or implied, including but not limited to the implied warranties of merchantability,
title, or fitness for a particular purpose.
Key System US reserves the right to make changes in product software, hardware, or
documentation at any time, with no obligation to inform any persons or entities of such
changes. Every attempt has been made to ensure the accuracy of this document. However,
Key System US assumes no responsibility for any losses, whether electronic, financial, or
other, that might accrue from inadvertent inaccuracies that the software or documentation
might contain.
Some states or jurisdictions do not allow disclaimer of explicit or implicit warranties in certain
situations. Therefore, this statement might not apply to you.
Copyright © 2000. Key System US. All rights under copyright reserved.
The WAV engine is covered by patent pending and copyright protection.
The contents of this document may not be duplicated by any means, whether electronic,
graphic, or mechanical, including, but not limited to, photocopying, recording, taping, or
information recording and retrieval systems, for any purpose but the original purchaser's
personal use, without prior written permission of Key System US.
Trademark Information
WAV, Key System US, and Atlas IIE are trademarks of KS Telecom Inc.
All other trademarks are the property of their respective owners.
4910 Dyer Blvd., West Palm Beach, Florida 33407
Key System US
Page 3

Table of Contents
CHAPTER 1 Overview of the WAV
The Purpose of this manual 1
Information Contained in this manual 1
Conventions used 2
Using the Atlas WAV 2
Starting the Atlas WAV 2
Exiting the Atlas WAV 2
Types of Screens in the Atlas WAV 3
Menu 3
List 3
Form 4
Confirmation Box 4
Information Box 5
Atlas WAV Runtime Help 5
Saving Your Changes 6
CHAPTER 2 Quick Guide to System Administration
Basic Atlas WAV Terms 1
System Administrator Responsibilities 2
Auto Attendant Greetings 2
Setting Up Atlas WAV Boxes 3
Programming a Subscriber or Department Box 3
Programming an Information Box 7
Programming a Group Box 9
Programming a Uniform Call Distribution Box 10
Programming a Visual Tree Box 11
Maintaining Your Atlas WAV 18
CHAPTER 3 The Automated Attendant
What is the Automated Attendant? 2
How Audio Menus Work 2
Setting Up the Automated Attendant 3
Programming the Hours of Operation 3
Defining Which Prompts to Play 3
Naming the Prompts to Play 4
Defining Times of Day to Play Prompts 4
Enabling Levels 4
Selecting Day of the Week 5
Copying Prompts to Different Days 5
Changing the Current Company 5
Saving Changes 5
Exiting the Hours of Operation Form 5
Recording Prompts 5
Defining Main Greeting Audio Options 6
Page 4

CHAPTER 4 Setting Up a BASIC Atlas WAV System
Basic Information Requirements 2
Basic WAV Setup 2
Integrating the WAV to the Atlas Phone System 3
Programming the Atlas Phone System for WAV Operation 3
Voice Mail Ports 3
Station Hunt Group 4
Ringing Assignments 4
Entering System Administration 4
Logging On 5
Set Up the Operator 5
Edit Subscriber 6
Select As Operator 7
Set Type 7
Set up Company Fax Machine 9
Set Up Subscriber Mailboxes 11
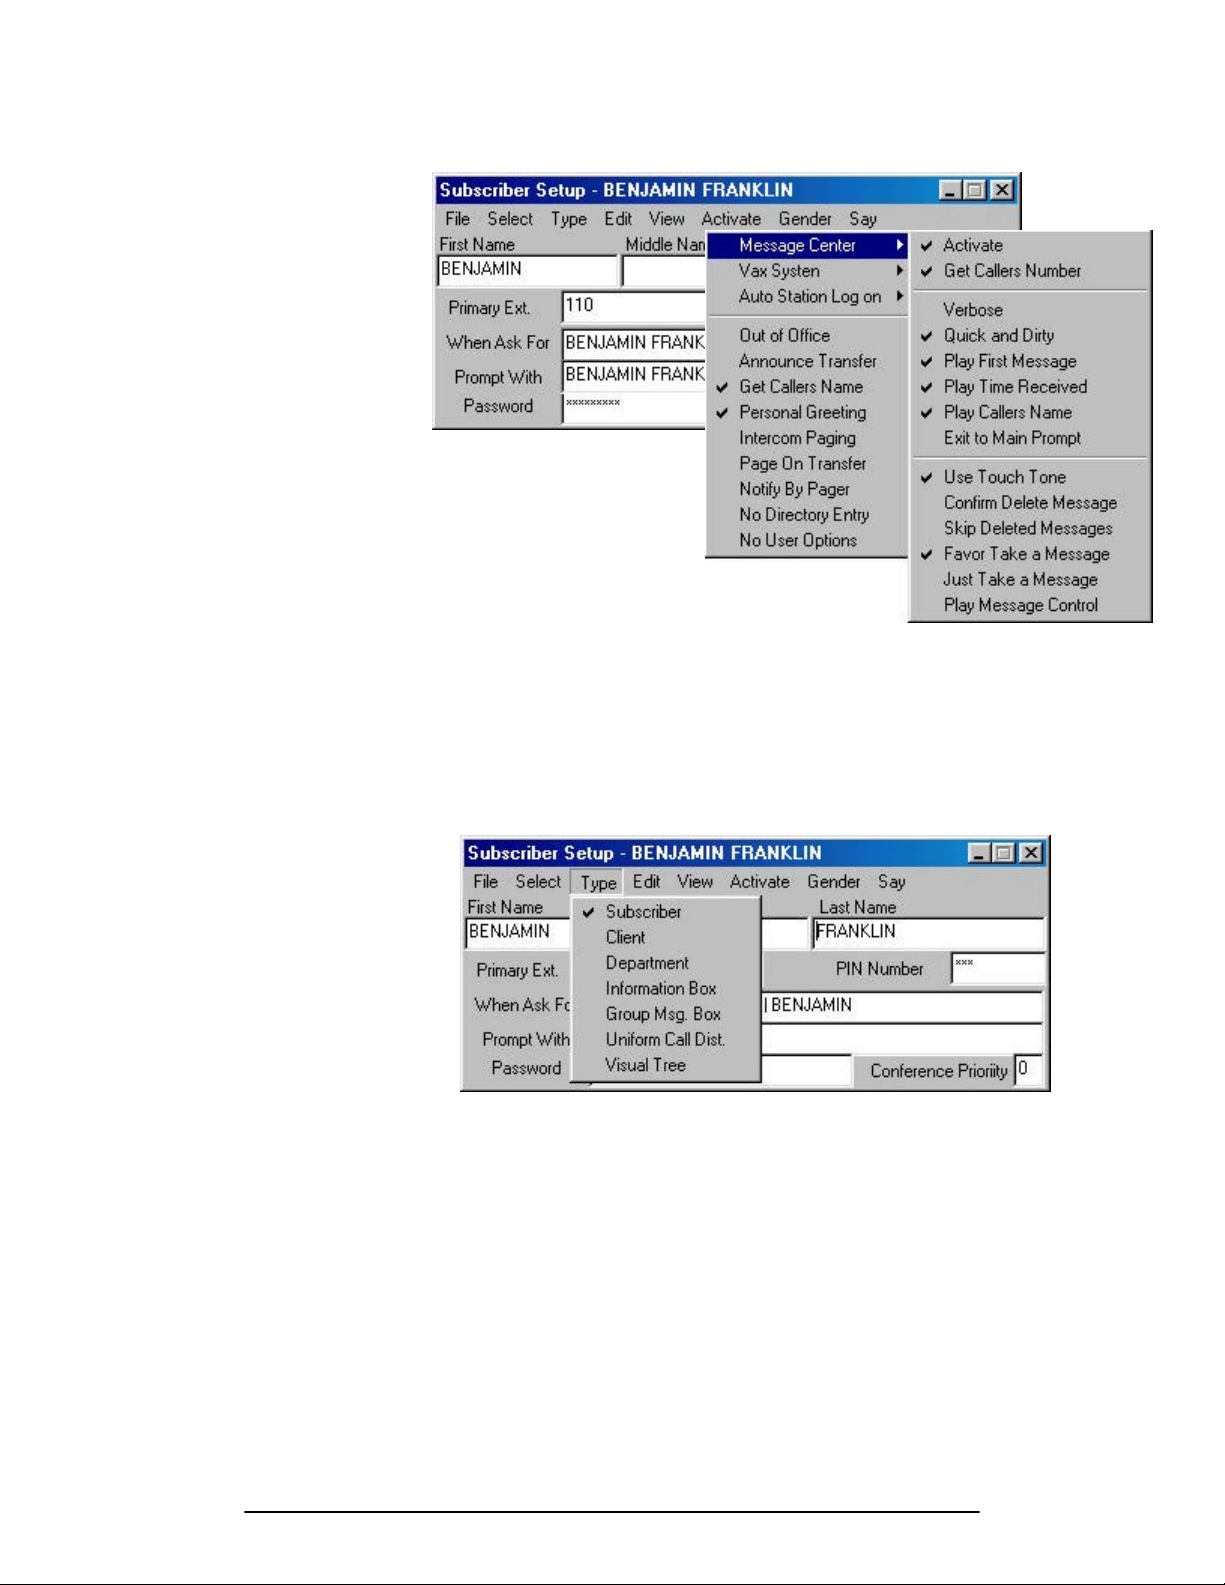
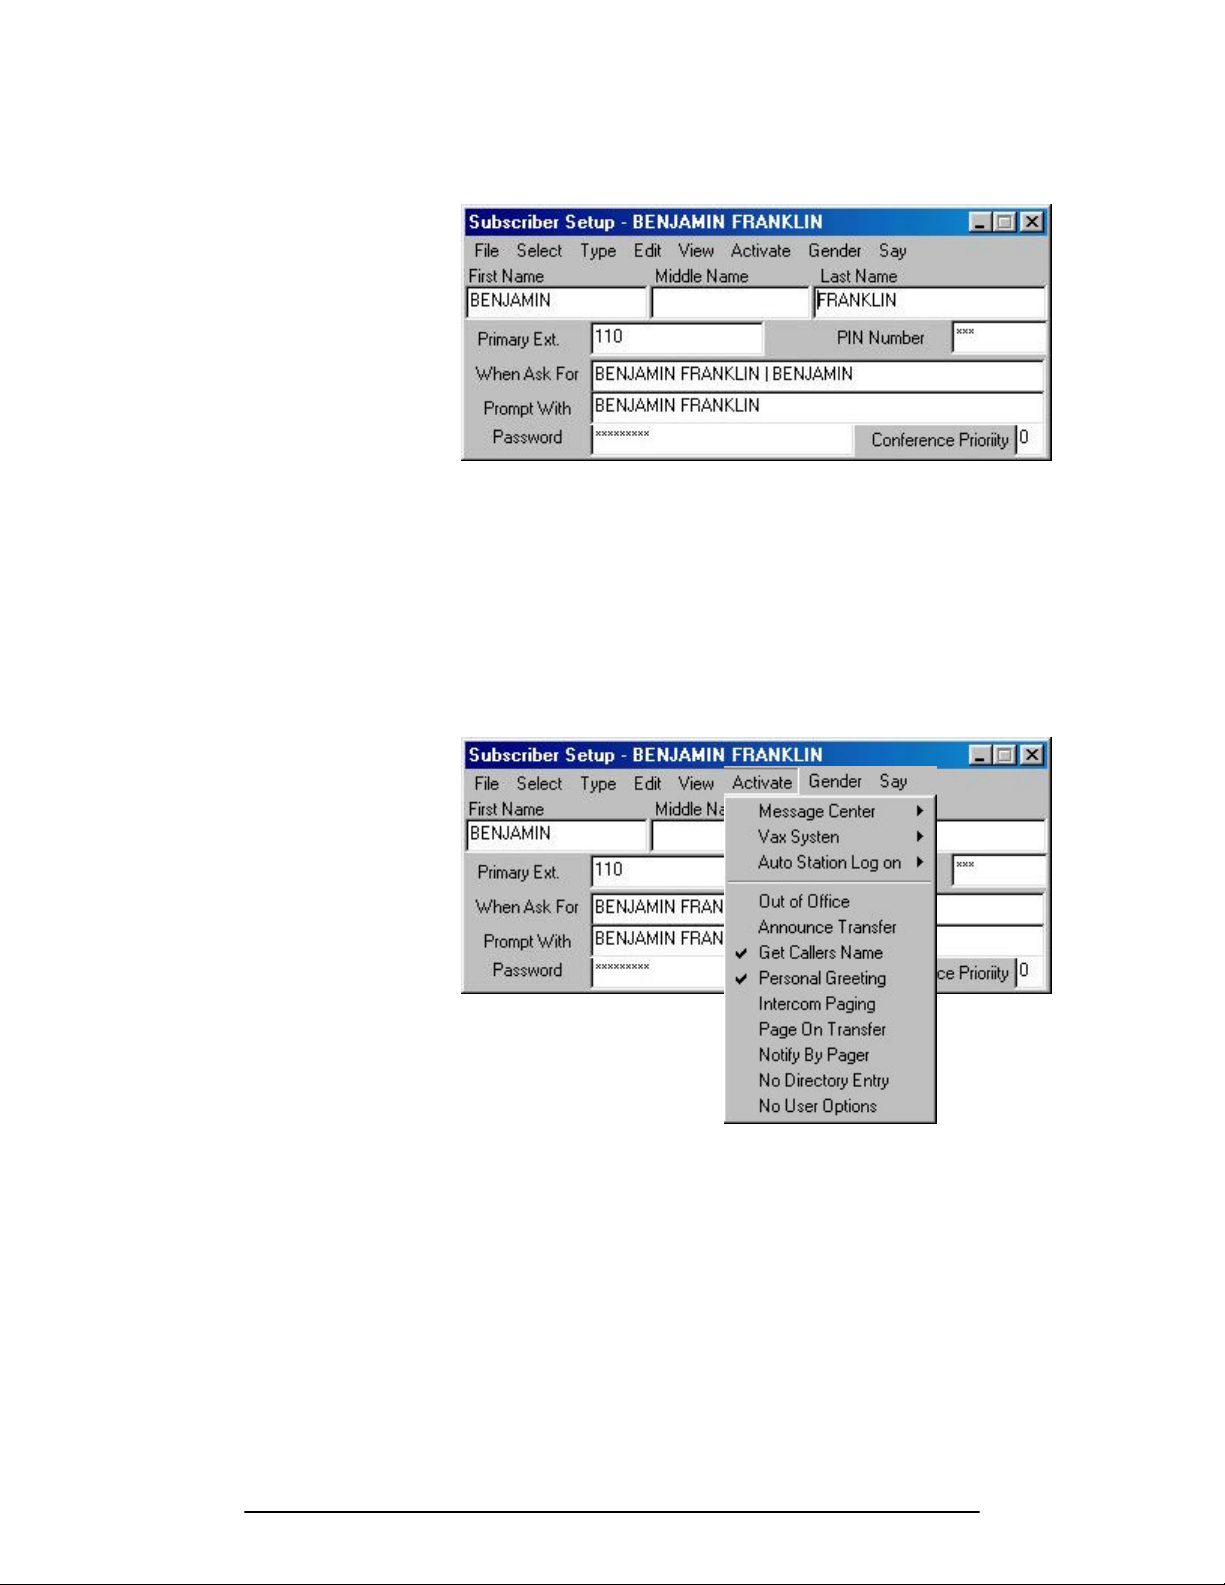
Subscriber Setup 12
Activate Menu 14
Auto Station Log On 14
Activate Message Center 15
Gender Menu 16
Device Setup 16
Set Up Hours of Operation 18
Record Your Company Greetings 20
Dialing Options in the Main Menu 23
In Band General System Interface 24
Main Greeting 25
CHAPTER 5 Using Advanced WAV Features
Client Box 1
Information Box 1
Group Box 2
Uniform Call Distribution Box 5
Visual Tree Box 8
Call Control 11
CHAPTER 6 Atlas WAV Main Screen
Atlas WAV Main Screen 1
Main Dialog 2
File Menu 3
Password 3
Set Menu 4
Select Menu 4
Edit Menu 5
View Menu 5
Update Menu 6
Restart Menu 6
Page 5

Schedule Menu 7
Channel Dialog 7
Channel Menu 7
Actions Menu 8
Prompts Menu 9
Schedule Dialog 9
File Menu 10
Edit Menu 10
Log Menu 11
CHAPTER 7 Atlas WAV Main Dialog – Edit / Subscriber Menu
Atlas WAV Main Dialog 1
Menu Bar 1
Edit Menu 2
Edit / Subscriber 2
Subscriber Setup Field Definitions 3
File Menu 4
Duplicate Subscriber 5
Select Menu 6
Company 6
Toll Restriction 7
Type Menu 7
Edit Menu 8
Device Setup 10
Field Definitions 10
Msg. Delivery Definitions 10
File Menu 11
Edit Menu 12
Transfer Type Menu 12
Define As Menu 13
Options Menu 14
Supervision Menu 14
Call Control 15
Field Definitions 15
File Menu 16
Select Menu 16
Reset Menu 17
Call Screening 17
Field Definitions 18
File Menu 19
View Menu 20
Prompts Menu 20
Sequence Menu 20
Call Routing 21
View Menu 21
Detail Tree 22
Expanded Detail Tree 22
Activate 23
Activate Message Center 24
VAX System 25
Page 6

Auto Station Log On 26
Gender 27
Say 27
CHAPTER 8 Main Dialog Additional Edit Menus
Main Dialog Edit Menus 1
Schedule 1
Field Definitions 2
File Menu 2
Select Menu 3
Hours of Operation 3
Field Definitions 3
File Menu 4
Select Menu 4
Day of Week Menu 4
Copy From Menu 5
Holiday Schedule 5
File Menu 6
Select Menu 6
Clear Menu 7
Month Menu 7
In / Out Status 8
Field Definitions 8
File Menu 8
Company Database 9
Field Definitions 9
File Menu 10
Trunk Database 10
Field Definitions 11
File Menu 11
InnFone 11
CHAPTER 9 Main Dialog – Additional File / Edit Menus
Switch Integration 1
Field Definitions 2
Switch Integration Setup Symbols 5
File Menu 6
Setup Menu 6
Edit Menu 7
Tone Definition Tables 8
File Menu 9
Update Menu 9
Main Greeting 9
Field Definitions 10
File Menu 11
View Menu 12
Prompt Menu 12
Call Screening 13
In Band System Signaling 13
Page 7

In Band Play Message Control 13
In Band Define Phone Numbers 13
Activate Menu 14
Voice Detection 14
Conference 15
VAX Call Back on Trunk 15
System Signaling Definitions 16
Main Greeting Signaling Definitions 18
Call Screening Signaling Definitions 19
Message Play Control Signaling Definitions 20
Define Phone Number Signaling Definitions 20
Page 8

CHAPTER
1
Overview of WAV
Page 9

1
A
BBOOUUTT TTHHIISS
A
M
AANNUUAAL
M
L
Purpose of this manual
This manual guides a system administrator in setting up and
maintaining an Atlas WAV system after installation by a certified
professional. This manual provides a valuable reference guide for
making changes to the system.
Information contained in this manual
The chapters of this Atlas WAV contains the following
information:
Chapter 1 explains how to maneuver through Atlas WAV.
Chapter 2 is quick guide to system administrating.
Chapter 3 explains what the Auto Attendant is and how to program the Atlas
WAV as an Auto Attendant.
Chapter 4 explains how to set up a basic Atlas WAV system.
Chapter 5 describes some of the more advanced features.
Chapter 6 describes the Atlas WAV Main Screen, Port Status Screens and
Scheduler screen.
Chapter 7 describes all forms, menus and lists found under the subscriber field.
Chapter 8 describes additional edit menus found in the main dialog.
Chapter 9 describes additional edit menus found in the file area of the main dialog
and also explains all signaling definitions.
Chapter 10 contains troubleshooting information.
Chapter 11 contains technical tips about the Atlas WAV.
Chapter 12 contains useful forms for planning your Atlas WAV system.
Atlas WAV Chapter 1 Page
Page 10

2
Conventions
¤
Key Information
Lowercase x indicates a variable in a file, version, etc.
ALL CAPS indicates a file or directory
< italics > indicates a variable or place holder
example of a “path” that a user can follow to get
:
< > indicates a keyboard command such as < Enter >
Lowercase bold
¤Note:
to a particular screen or field.
used for commands or data to be typed at the
keyboard
information that is vital to the success of a
process
a shortcut or helpful hint
æTip:
possible damage to equipment
I Caution:
U
SSIINNGG
U
Note:
You must be
logged into the
system before
exiting.
A
TTLLAASS
A
The Atlas WAV is a computer telephony solution that integrates
with Microsoft’s Windows operating systems. The Atlas WAV
uses standard computer hardware to integrate electronic data and
voice messages in an accessible format. In addition, The Visual
CTI interface, a Windows based “visual voicemail” application,
allows end users to initiate voicemail commands from the desktop.
WWAAVV
Starting the Atlas WAV
To start the Atlas WAV click on the Start button on the Windows
toolbar, select Programs, select Key System US and then select
AVM.
The second way you may start the program by clicking on Start,
selecting Run and then typing in “C:\Program Files\Key System
US\WAV”.
Exiting the Atlas WAV
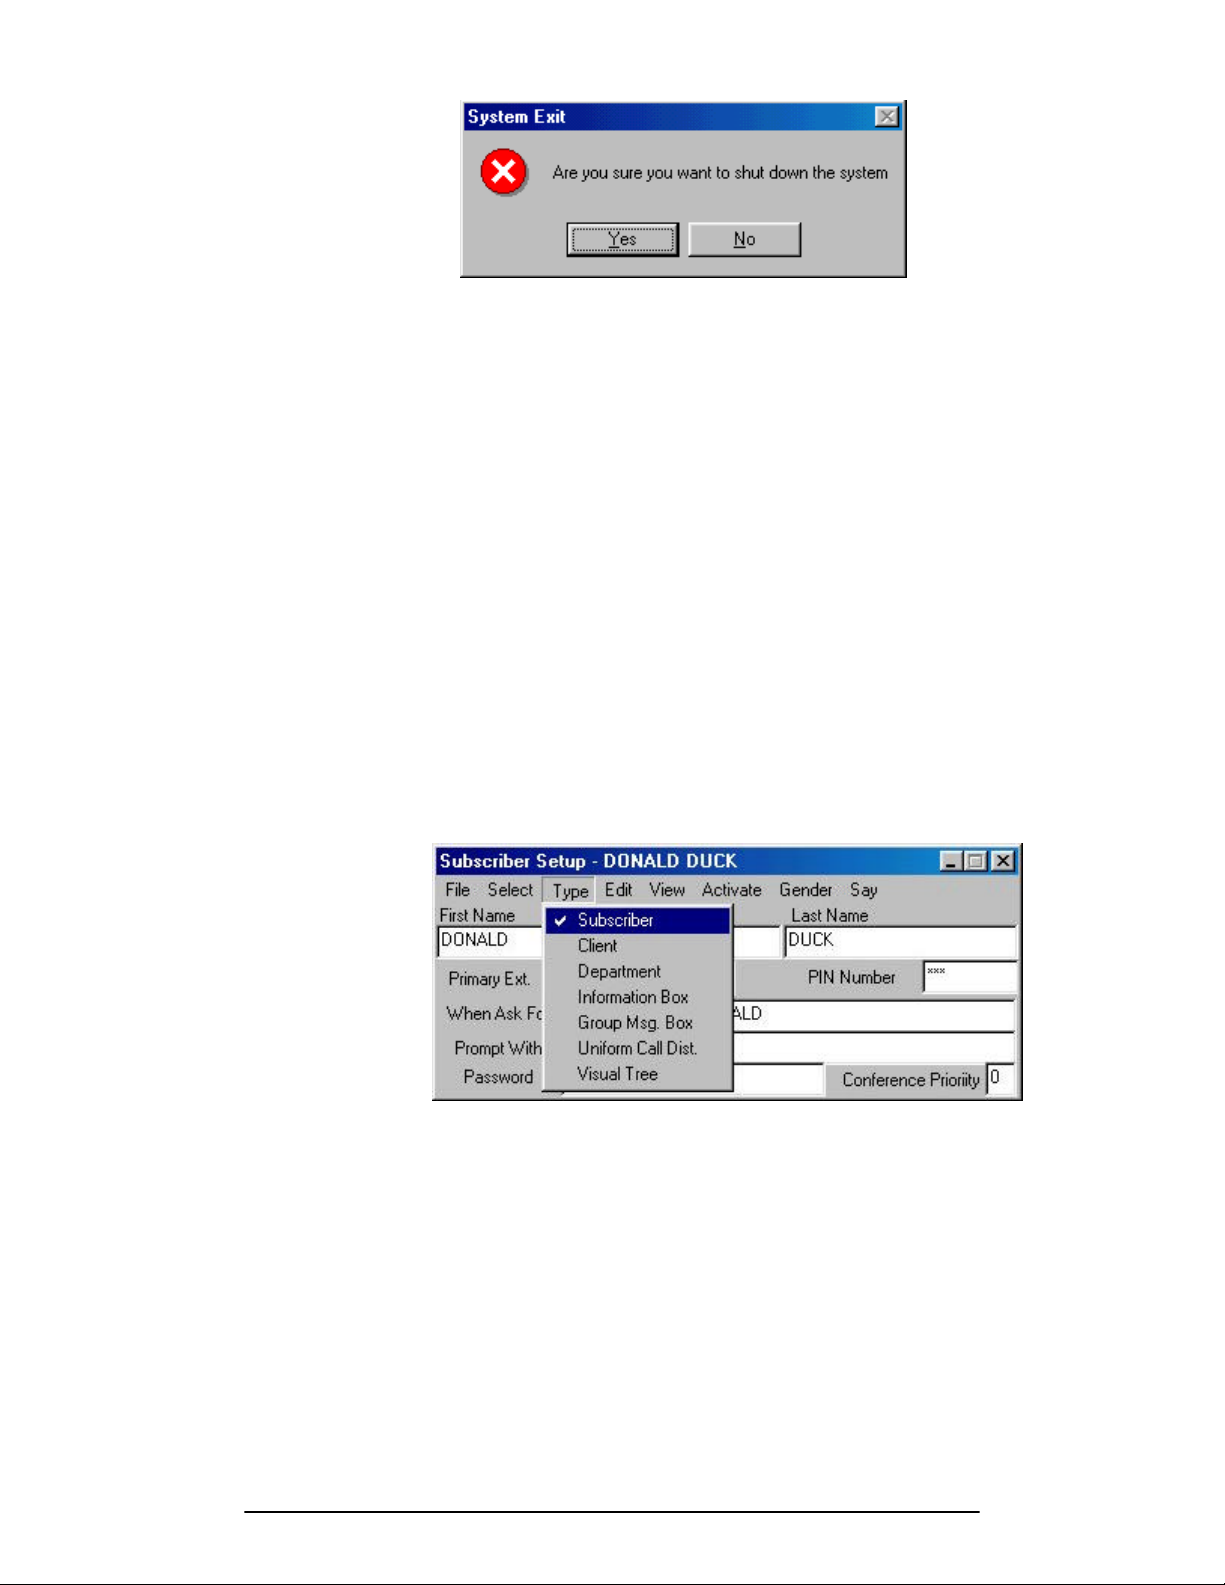
To exit the system, select File from the main toolbar and then
select Exit. The system will ask you if you are sure you want to
shut down the system, select Yes.
Atlas WAV Chapter 1 Page
Page 11
3
¤
Note:
When you shut
down the system
it will end all
calls currently in
progress.
Types of Screens in the Atlas WAV
Figure 1-1: The System Exit Window
There are five type of graphical boxes, or screens, used in the
Atlas WAV. These are menus, lists, forms, confirmation boxes
and information boxes. These Windows type screens provide
information about the system and contain fields where the installer
or administrator may modify system parameters.
Menu
• Offers choice among dissimilar items.
• Can be navigated by using cursor movement keys or a
mouse.
• You can jump to a line by typing the first letter of that
line.
• Any item that is enabled will have a check mark next to it.
Figure 1-2: Example of Menu
List
• Offers a choice among like items.
• Can be navigated by using cursor movement keys or a
mouse.
• You can jump to a line by typing the first letter of that
line.
• May have up or down arrows if lists extend beyond
Atlas WAV Chapter 1 Page
Page 12

4
screen.
Figure 1-3: Example of a List
Form
• Has Fields where you can enter or change information.
• Fields can contain sub-menus.
• Can be navigated using the TAB key or a mouse.
• Has both read only information and variables.
Figure 1-4: Example of a Form
Confirmation Box
• Appears when the system requests an input from the
administrator.
• Offers a choice of Yes or No only.
• Although confirmation boxes are referred to as needed,
they are not generally shown in this document.
Atlas WAV Chapter 1 Page
Page 13

5
Figure 1-5: Example of a Confirmation Box
Information Boxes
• Displays read-only information.
• Has multiple levels. (Indicated by a “+” sign next to a
particular option.)
Figure 1-6: Example of an Information Box
Atlas WAV Runtime Help
The Atlas WAV was designed with a built in online help option.
If you require information on any particular item of field simply
select, or go to, that field and press the F1 key. This will bring up
a help box on that particular item. You may also refer to the
online manual for a more detailed explanation of that particular
field/option.
Atlas WAV Chapter 1 Page
Page 14

6
¤
Saving Your Changes
Note:
If you make a
mistake in a form
you can simply
close that form
and the changes
will be discarded
if you have not
saved them.
After you have finished editing parameters in a form or making
changes on a menu, you must save your changes for them to take
effect. To save your changes click on File, or press the <ALT>
key followed by the <F> key, and then select Save, or press the
<S> key. If you close the current screen before saving changes the
changes will not be made to the system.
Atlas WAV Chapter 1 Page
Page 15

CHAPTER
2
Quick Guide to System
Administration
Page 16

1
This chapter is an overview of what you, as a system
administrator, need to do to implement and maintain your Atlas
WAV. If your system is new, you will be helping to lay out the
basic system design and to plan how to route incoming calls.
After the system is in place you will be responsible for making
modifications and additions as you administer the system.
Before beginning, you need to understand a few basic terms used
in the Atlas WAV.
B
AASSIICC
B
A
TTLLAASS
A
Group Box A type of mailbox that takes messages and
Subscriber A type of mailbox that is used for a individual.
Department A type of mailbox used for a group of phones.
Information A type of box that is used to provide pre-recorded
ACD A type of mailbox used to evenly distribute the
Visual Tree A type of box used to create a “Tree” for callers to
Auto Attendant A set of prompts that are recorded to be
Greeting A message recorded by a box owner to be played
PIN Number Allows box owners private access to their boxes
Log On/Off Allows private access to the system administration
Prompt A pre-recorded instruction played by the system
Acronyms
WWAAV
V
T
EERRMMS
T
uniformly distributes them to other boxes.
information to an outside caller.
call volume between several subscribers.
get to a more specific option. (i.e. Press 1 for
Technical Support… Press 1 for telephone
technical support or 2 for voicemail technical
support.)
played back to the outside callers when the
voicemail answers an incoming call.
when a caller reaches their mailbox.
and provides security for box owners’ messages.
and the installation and integration portions of the
Atlas WAV. Only authorized personnel should have
access to these passwords.
over a telephone to a box owner or caller.
S
CO Central Office
CPE Customer Premise Equipment
CTI Computer Telephone Integration
DID Direct Inward Dial
DTMF Dual Tone Multi Frequency
PBX Private Branch Exchange
Atlas WAV Chapter 2 Page
Page 17

2
POTS Plain Old Telephone System
PSTN Public Switched Telephone Network
SMDI Simplified Message Desk Interface
SMDR Station Message Detailing Report
S
YYSSTTEEMM
S
A
UUTTOO
A
A
A
:Screen Path:
Select:
• Editè
• Hours of
Operation
A
DDMMIINNIISSTTRRAATTOORR
A
As a system administrator, you are responsible for the setup and
continuing management of your Atlas WAV. Your duties include:
• Helping the installer design your system.
• Planning and implementing the Auto Attendant.
• Planning and setting up Visual Trees.
• Planning and setting up Subscribers and other type of boxes.
• Recording greeting for the Auto Attendant as well as any other
Visual Trees and Information Boxes.
• Maintaining and modifying the Atlas WAV.
TTTTEENNDDAANNTT
You can configure the Atlas WAV to work as an auto attendant to
handle all of your incoming calls. When you set up the auto
attendant, callers have the flexibility to choose where their calls
will be directed. Callers may listen to pre-recorded Greetings,
Information Boxes or Visual Tree Boxes. The auto attendant can
be configured to allow for single digit dialing options if required
and also allows the caller the opportunity to transfer to an
operator. With the Voice Recognition option installed callers may
simply ask for the person they wish to speak with.
To set up auto attendant greetings, you must first decide what
prompts need to be recorded and select a name for each prompt.
You can string together several prompts to form a greeting. For
example you may want to have Good_Morning,
Main_Day_Greeting for the morning greeting and
Good_Afternoon, Main_Day_Greeting for the afternoon greeting.
In this example the same main prompt is used just the first prompt
is changed to indicate the time of day. There are six different
levels of greetings per day, so you may have up to six different
greetings on any given day of the week. For detailed information
on setting up greetings, see “Setting Up the Auto Attendant” on
page 3-3.
After you have programmed the greeting parameters, you also
need to record the audio portion of your greetings.
G
RREEEETTIINNGGS
G
R
EESSPPOONNSSIIBBIILLIITTIIEES
R
S
S
Atlas WAV Chapter 2 Page
Page 18

3
S
EETTTTIINNGG
S
Subscriber and Department Boxes
U
A
PP
U
There are eight type of active boxes in the Atlas WAV. They are
Subscriber, Client, Department, Information, Group Box,
Automatic Call Distribution, Visual Tree and Extension Only.
Subscriber and Department boxes can be used for the following:
Programming a Subscriber or Department Box
You may either program an existing box or create a new box.
When you select Edit – Subscriber a list of all boxes currently in
the system is displayed on the screen. At this point you should
either select one of the subscribers listed or select the close button
on the top right corner of the list to create a new subscriber. To set
up and customize a subscriber box, use the following forms and
menus. The only difference between Subscriber and Department
Boxes is that Department Boxes only allow for First name while
Subscriber boxes allow for First and Last name.
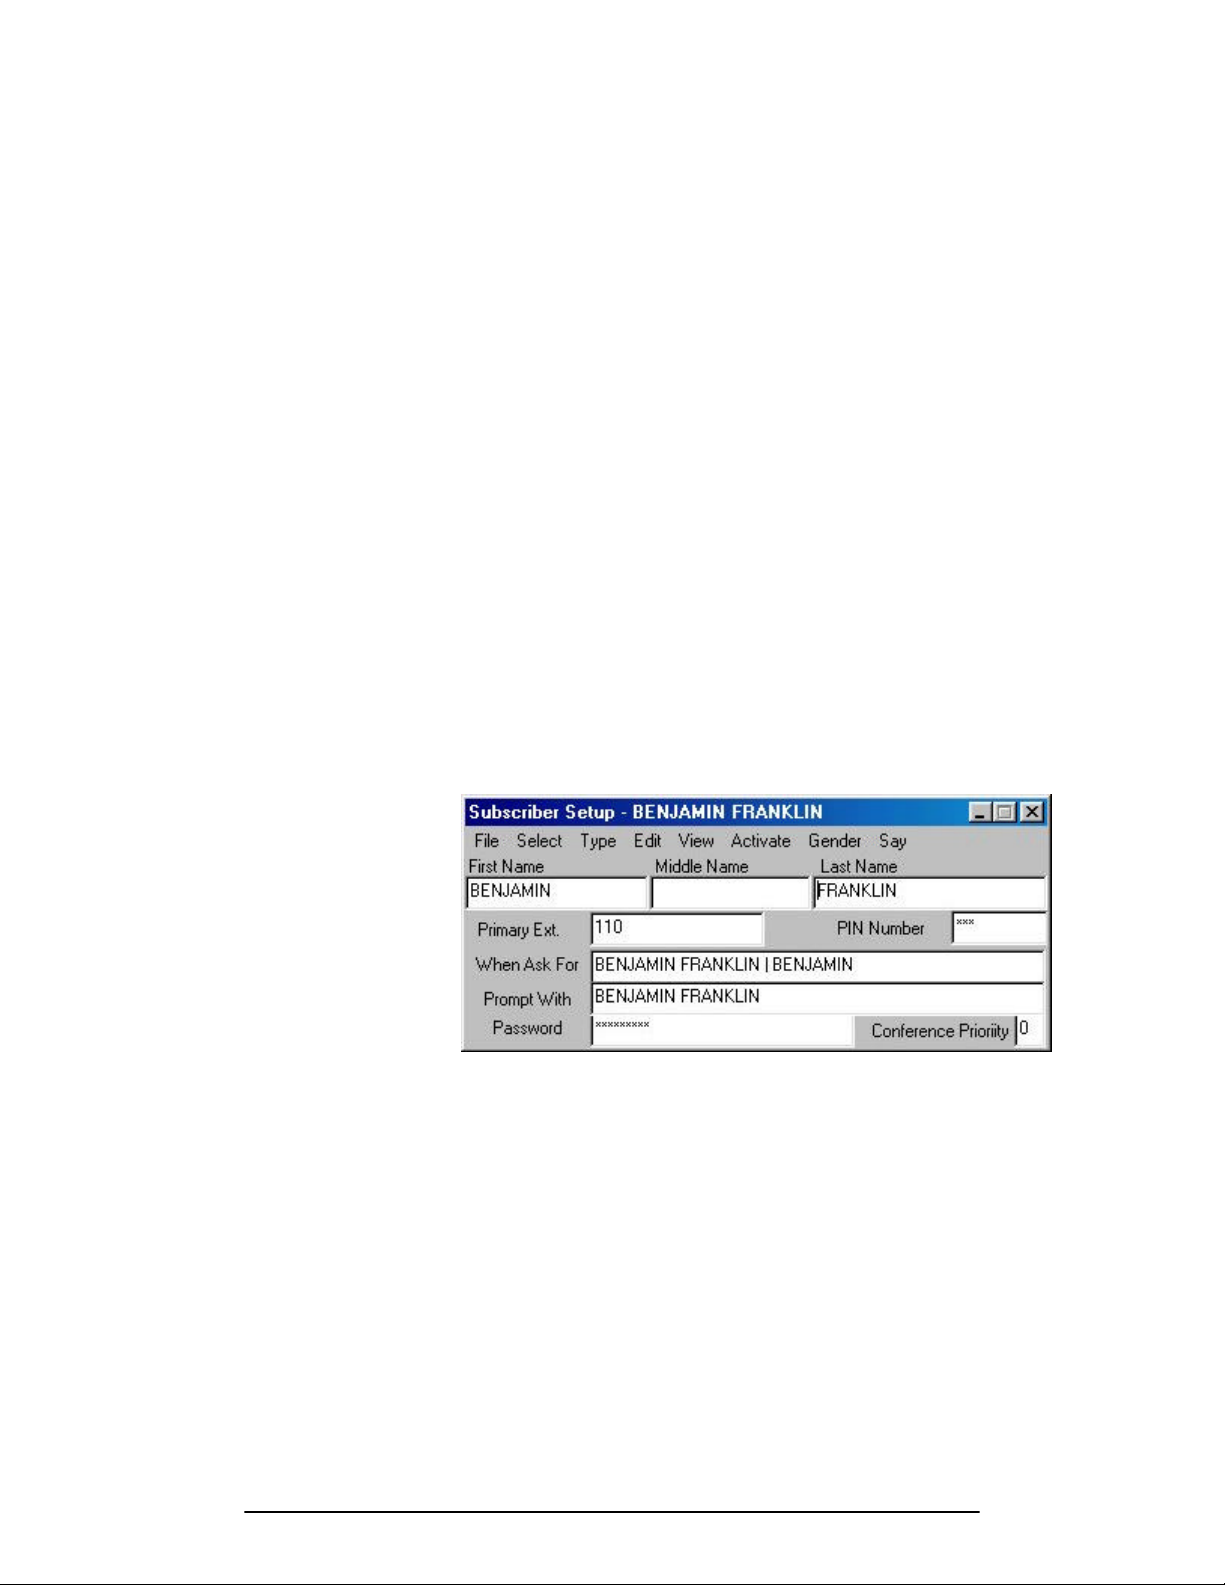
Subscriber Setup Form
The Subscriber Setup Form contains general information about the
box.
TTLLAASS
A
• Record and store messages from both inside and outside
callers.
• Make and send messages to other box owners.
• Give a copy of a message to another box owner.
• Notify a box owner of newly received messages
• Transfer a call to an extension.
• Provide alternate call handling if an extension is busy or
doesn’t answer.
• Forward callers to other subscribers automatically.
• Subscriber Setup Form
• Activate Menu
• ActivateèMessage Center Menu
• Type Menu
• Call Control Form
• Device Setup Form
WWAAV
V
B
B
OOXXEES
S
Atlas WAV Chapter 2 Page
Page 19

4
:
Screen Path:
Select:
• Edit à
• Subscriber à
• Choose Subscriber à
• Or Close Choose
Subscriber Window
For New Subscriber
Activate Menu
The Activate Menu allows you to enable or disable user features
for the current subscriber box.
:Screen Path:
Select:
• Edità
• Subscriberà
• Choose Subscriberà
• Or Close Choose
Subscriber Window
For New Subscriberà
• Select Activate From
Toolbar
Figure 2-1: The Subscriber Setup Form
Figure 2-2: The Activate Window
Atlas WAV Chapter 2 Page
Page 20
5
ActivateèèMessage Center Menu
The Activateà Message Center Menu allows you to enable or
disable options the user will have while inside their mailbox.
:Screen Path:
Select:
• Edità
• Subscriberà
• Choose Subscriberà
• Or Close Choose
Subscriber Window
For New Subscriberà
• Select Activate From
Toolbarà
• Select Message Center
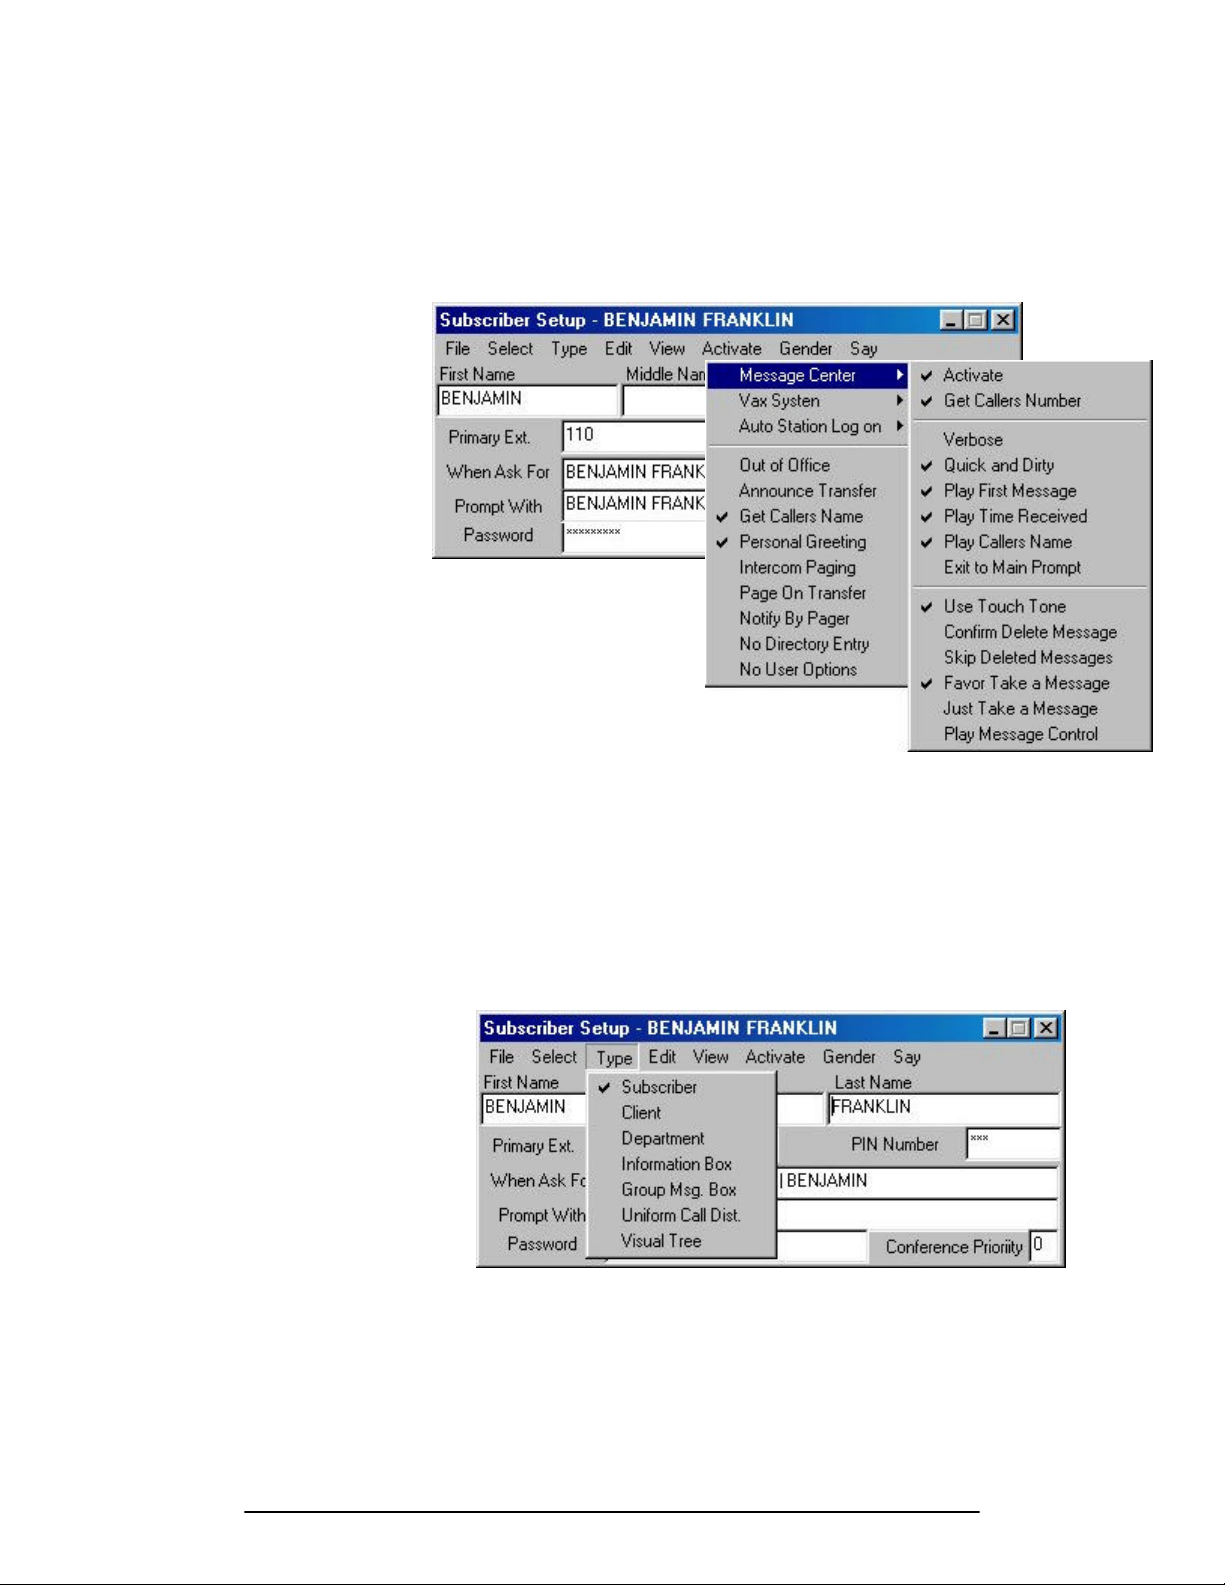
Type Menu
The Type Menu allows you to select the type of box the current
subscriber is. (Set this for either Subscriber or Department.)
:Screen Path:
Select:
• Edità
• Subscriberà
• Choose Subscriberà
• Or Close Choose
Subscriber Window
For New Subscriberà
• Select Type From
Toolbar
Figure 2-3: The Activate Message Center Menu
Figure 2-4: The Type Menu
Atlas WAV Chapter 2 Page
Page 21

6
Message Call Control Form
The Message Call Control Form allows you to change message
and call delivery for the current subscriber.
:Screen Path:
Select:
• Edità
• Subscriberà
• Choose Subscriberà
• Or Close Choose
Subscriber Window
For New Subscriberà
• Select Edità
• Select Message Call
Control
Device Setup Form
The Communications Link Form allows you to change advanced
options of the call transfer features for the current subscriber. You
:Screen Path:
Select:
• Edità
• Subscriberà
• Choose Subscriberà
• Or Close Choose
Subscriber Window
For New Subscriberà
• Select Edit From
Toolbarà
• Select Communications
Link
may also create new devices for transfer purposes.
Figure 2-5: The Message Call Control Form
Figure 2-6: The Device Setup Form
Atlas WAV Chapter 2 Page
Page 22

7
Client Boxes
Client boxes are currently not used for anything. They will
eventually be used for speed dial type purposes through voicemail.
Information Boxes
Information boxes are used to provide information to a caller.
This is in the form of a pre-recorded message. The information
box can then transfer a caller to an extension after the message is
played and/or take a message from the caller.
Programming an Information Box
You may either program an existing box or create a new box.
When you select Edit - Subscriber a list of all boxes currently in
the system is displayed on the screen. At this point you should
either select one of the subscribers listed or select the close button
on the top right corner of the list to create a new information box.
To set up and customize an Information box, use the following
forms and menus.
• Subscriber Setup Form
• Activate Menu
• ActivateèMessage Center Menu
• Type Menu
• Device Setup Form
Subscriber Setup Form
The Voice Link Form contains general information about the box.
:
Screen Path:
Select:
• Edit à
• Subscriber à
• Choose Subscriber à
• Or Close Choose
Subscriber Window
For New Subscriber
Figure 2-7: The Subscriber Setup Form
Activate Menu
The Activate Menu allows you to enable or disable user features
for the current subscriber box.
Atlas WAV Chapter 2 Page
Page 23

8
:Screen Path:
Select:
• Edità
• Subscriberà
• Choose Subscriberà
• Or Close Choose
Subscriber Window
For New Subscriberà
• Select Activate From
Toolbar
ActivateèèMessage Center Menu
The Activateà Message Center Menu allows you to enable or
disable options the user will have while inside their mailbox.
:Screen Path:
Select:
• Edità
• Subscriberà
• Choose Subscriberà
• Or Close Choose
Subscriber Window
For New Subscriberà
• Select Activate From
Toolbarà
• Select Message Center
Figure 2-8: The Activate Menu
Figure 2-9: The Activate Message Center Menu
Type Menu
The Type Menu allows you to select the type of box the current
subscriber is. (Set this for Information.)
Atlas WAV Chapter 2 Page
Page 24
9
:Screen Path:
Select:
• Edità
• Subscriberà
• Choose Subscriberà
• Or Close Choose
Subscriber Window
For New Subscriberà
• Select Type From
Toolbar
:Screen Path:
Select:
• Edità
• Subscriberà
• Choose Subscriberà
• Or Close Choose
Subscriber Window
For New Subscriberà
• Select Edit From
Toolbarà
• Select Device Setup
Figure 2-10: The Type Menu
Device Setup Form
The Device Setup Form allows you to change advanced options of
the call transfer features for the current subscriber. You may also
create new devices for transfer purposes.
Figure 2-11: The Device Setup Form
Group Boxes
Group Boxes are used to distribute messages among a group of
two or more boxes. The group box may contain all active
subscribers and/or departments in the system. These type of boxes
are popular in Customer Support departments to distribute
messages to the technicians.
Atlas WAV Chapter 2 Page
Page 25
10
Programming a Group Box
You may either program an existing box or create a new box.
When you select Edit - Subscriber a list of all boxes currently in
the system is displayed on the screen. At this point you should
either select one of the subscribers listed or select the close button
on the top right corner of the list to create a new Information box.
To set up and customize an Information box, use the following
forms and menus.
Subscriber Setup Form
The Subscriber Setup Form contains general information about the
box.
:
Screen Path:
Select:
• Edit à
• Subscriber à
• Choose Subscriber à
• Or Close Choose
Subscriber Window
For New Subscriber
• Subscriber Setup Form
• ActivateèMessage Center Menu
• Type Menu
• Subscriber Group Selection List
Figure 2-12: The Subscriber Setup Form
ActivateèèMessage Center Menu
The Activateà Message Center Menu allows you to enable or
disable options the user will have while inside their mailbox.
Atlas WAV Chapter 2 Page
Page 26
11
:Screen Path:
Select:
• Edità
• Subscriberà
• Choose Subscriberà
• Or Close Choose
Subscriber Window
For New Subscriberà
• Select Activate From
Toolbarà
• Select Message Center
Type Menu
The Type Menu allows you to select the type of box the current
subscriber is. (Set this for Group Box.)
Figure 2-13: The Activate Message Center Menu
:Screen Path:
Select:
• Edità
• Subscriberà
• Choose Subscriberà
• Or Close Choose
Subscriber Window
For New Subscriberà
• Select Type From
Toolbar
Subscriber Group Selection List
The Subscriber Group Selection List allows you to add or remove
subscribers from the group box.
Figure 2-14: The Type Menu
Atlas WAV Chapter 2 Page
Page 27

12
Figure 2-15: The Subscriber Group Selection List
Uniform Call Distribution Boxes
Uniform Call Distribution Boxes are used to send callers to a
group of two or more subscribers using a circular hunt method.
This type of box is useful if you have a department(s) and you
wish to evenly distribute calls among the personnel in that
department.
Programming a Uniform Call Distribution Box
You may either program an existing box or create a new box.
When you select Edit - Subscriber a list of all boxes currently in
the system is displayed on the screen. At this point you should
either select one of the subscribers listed or select the close button
on the top right corner of the list to create a new Uniform Call
Distribution box. To set up and customize an Uniform Call
Distribution box, use the following forms and menus.
• Subscriber Setup Form
• Activate Menu
• Type Menu
• Uniform Call Distribution Selection List
Subscriber Setup Form
The Subscriber Setup Form contains general information about the
box.
Atlas WAV Chapter 2 Page
Page 28
13
:
Screen Path:
Select:
• Edit à
• Subscriber à
• Choose Subscriber à
• Or Close Choose
Subscriber Window
For New Subscriber
Activate Menu
The Activate Menu allows you to enable or disable user features
for the current subscriber box.
Figure 2-16: The Voice Link Form
:Screen Path:
Select:
• Edità
• Subscriberà
• Choose Subscriberà
• Or Close Choose
Subscriber Window
For New Subscriberà
• Select Activate From
Toolbar
Type Menu
The Type Menu allows you to select the type of box the current
subscriber is. (Set this for Uniform Call Dist.)
Figure 2-17: The Activate Menu
Atlas WAV Chapter 2 Page
Page 29

14
:Screen Path:
Select:
• Edità
• Subscriberà
• Choose Subscriberà
• Or Close Choose
Subscriber Window
For New Subscriberà
• Select Type From
Toolbar
UniformCall Distribution Selection List
The Uniform Call Distribution Selection List allows you to add or
remove subscribers in the Uniform Call Distribution group.
Figure 2-18: The Type Menu
Figure 2-19: The Uniform Call Distribution List
Visual Tree Boxes
Visual Tree Boxes allow you to set up a multiple level system.
The system will play a pre-recorded audio menu offering callers
options on how their call will be directed. The Visual Tree box
allows you to have dial options for several different types system
functions.
Atlas WAV Chapter 2 Page
Page 30
15
Programming a Visual Tree Box
You may either program an existing box or create a new box.
When you select Edit - Subscriber a list of all boxes currently in
the system is displayed on the screen. At this point you should
either select one of the subscribers listed or select the close button
on the top right corner of the list to create a new Visual Tree box.
To set up and customize a Visual Tree box, use the following
forms and menus.
• Subscriber Setup Form
• Activate Menu
• Type Menu
• Visual Tree Interface Form
Subscriber Setup Form
The Subscriber Setup Form contains general information about the
box.
:
Screen Path:
Select:
• Edit à
• Subscriber à
• Choose Subscriber à
• Or Close Choose
Subscriber Window
For New Subscriber
Activate Menu
The Activate Menu allows you to enable or disable user features
for the current subscriber box.
Figure 2-20: The Subscriber Setup Form
Atlas WAV Chapter 2 Page
Page 31

16
:Screen Path:
Select:
• Edità
• Subscriberà
• Choose Subscriberà
• Or Close Choose
Subscriber Window
For New Subscriberà
• Select Activate From
Toolbar
Type Menu
The Type Menu allows you to select the type of box the current
subscriber is. (Set this for Visual Tree.)
Figure 2-21: The Activate Menu
:Screen Path:
Select:
• Edità
• Subscriberà
• Choose Subscriberà
• Or Close Choose
Subscriber Window
For New Subscriberà
• Select Type From
Toolbar
Figure 2-22: The Type Menu
Atlas WAV Chapter 2 Page
Page 32

17
Visual Tree Interface Form
The Visual Tree Interface Form allows you to define where or
how different caller dialed digit entries are routed.
Figure 2-23: The Visual Tree Interface Form
Atlas WAV Chapter 2 Page
Page 33

18
M
AAIINNTTAAIINNIINNGG
M
Y
OOUURR
Y
Some of the tasks required in the maintenance of your Atlas
WAV are listed below:
• Modify boxes as needs change.
• Create new boxes or delete ones no longer needed.
• Record new greetings and Visual Trees or modify existing
ones.
• Set up or modify Communication Links for box owners.
• Troubleshoot problems.
A
A
TTLLAASS
WWAAVV
Atlas WAV Chapter 2 Page
Page 34

CHAPTER
3
The Automated Attendant
Page 35

2
W
“For Sales, Press 2”
HHAATT IISS TTHHEE
W
A
UUTTOOMMAATTEEDD
A
The Automated Attendant is a prerecorded greeting that eliminates
the need for an operator because it allows callers to direct their
calls. When calls come in, the Automated Attendant greets the
callers and informs them of various ways the callers can direct
their calls. Callers then make their selections by pressing keys on
their telephones.
There are two ways to use an Automated Attendant: the first is as
a primary Automated Attendant the other is as a secondary or
backup Automated Attendant. A primary Automated Attendant
answers every call that comes into the company. A secondary
Automated Attendant answers overflow calls that can not be
answered by the operator.
When programmed correctly, the Automated Attendant can:
• Receive incoming telephone calls
• Greet callers
• Offer callers an audio menu of forwarding
destinations to select from
• Play recorded information, based on caller responses
to an audio menu
• Direct calls to an operator
A
TTTTEENNDDAANNT
A
T
??
H
H
OOWW
A
A
UUDDIIOO
M
EENNUUSS
M
An audio menu is a recorded message that verbally gives a caller
options associated with keypad numbers. Pressing the key
associated with the option performs the action described by the
option.
The following is an example of an audio menu.
Figure 3-1: An Example of an Audio Menu
W
W
“For Shipping, Press 3”
“For a Company Directory, Press 4”
“For an Operator, Press 0”
K
OORRK
Atlas WAV Chapter 3 Page
Page 36

3
S
¤
form will appear.
EETTTTIINNGG
S
U
U
In a new Atlas WAV system there is a default greeting
prerecorded. This means that any calls coming into the system
will receive this greeting. To set up the Automated Attendant, you
must program the Hours of Operation form, record a greeting and
program the main greeting visual tree.
Programming The Hours of Operation
The Hours of Operation form allows you to define different
greetings for different days, different times of day and different
companies.
To open the Hours of Operation box from the main screen select
Edit - Hours of Operation. The following form should now be on
the screen.
:Screen Path:
Select:
• Edità
• Hours of Operationà
PP TTHHEE
A
UUTTOOMMAATTEEDD
A
A
TTTTEENNDDAANNT
A
T
Note:
If you have more then
one company defined
in the system you will
have to select the
company before the
Hours of Operation
Figure 3-2: Hours of Operation Form
Defining Which Prompts to Play
The Atlas WAV allows for extreme flexibility in setting up the
Automated Attendant Greetings. The Administrator is able to use
several different prompts strung together to create a single
message for the outside caller.
A prompt is a file that is recorded into the system and played back
to callers. These prompts can be up to 74 minutes long.
Selecting which prompts to play will depend greatly on the setup
that your customer requires. There may be some instances where
you only need one prompt defined for everyday all day and other
instances where you need to very your prompts for different times
of the day and different days of the week. So before proceeding it
is a good idea to determine what type of application you will be
attempting to install.
Atlas WAV Chapter 3 Page
Page 37

4
¤
word (no spaces).
¤
Naming the Prompt to Play
The prompt(s) to be played must have a name. It is recommended
that you name the prompt something that will be easily associated
with what it is used for. For example, if you wanted to have a
Note:
When naming
prompts they
have to be one
To space out a
prompt name use
the “_”
(underline) key
for a space.
prompt that said “Good Morning” you might call it
good_morning or goodmorning. In a multiple company
application you might refer to this prompt as good_morning_abc,
where “abc” is the company name.
In the screen sample on the previous page you will notice that
there are a few different prompt names on the same line. This
allows you to just record one main greeting and also allow for a
different opening for the caller during different time of the day.
For example the “OPEN” prompt is used in a couple of different
time slots but it is proceeded by either “good_morning”,
“good_afternoon” or “good_evening”. Programming the hours of
operation this way gives the caller a little bit more personal feeling
when interacting with the voicemail.
Defining Times of Day to Play Prompts
Each level has a “From” and “To” field. These are used to define
the time period that a prompt is played for. The only one of these
fields that is settable is the “To” field. The “From” field is
Note:
When using the
12 hour format be
sure to put a
space between
the time and AM
or PM
controlled by the previous levels “To” field.
The “To” field is the time that you wish the current prompt to stop
playing and the next level to start. This time can either be entered
in a 24 hour format or in a 12 hour format using AM and PM.
There must be a colon between the hour and minutes. For
example 2 o’clock PM can be entered as either 02:00 PM or 14:00.
Enabling Levels
The Atlas WAV allows for up to six different greetings per day
per company. The number of greetings that are enabled is
controlled by the “Levels” buttons. On the screen these are
labeled Closed, Morning, Lunch, Afternoon, Evening and Closed.
This labeling is for reference only. The levels do not have to be
used for what they are labeled.
To enable or disable a specific level simply click on the button for
that level. If the button is pushed in that level is enabled if the
button is pushed out it is disabled.
You may have as few as one level enabled or as many as six.
When enabling or disabling levels keep in mind that the system
always looks at level one first and the level two etc.. until it finds
an enabled level. If there are no levels enabled the system defaults
back to the previous greeting that was being played.
Atlas WAV Chapter 3 Page
Page 38

5
Selecting Day of Week
The current day of the week that you are programming is located
at the left hand side of the form. To select a different day click on
Day of Week and then click on the day you wish to program or
press the <ALT> key followed by the <D> then use the arrows to
select the day you wish and press the <Enter> key.
Copying Prompts to Different Days
To copy the settings from one day to another select the day you
wish to change (see the previous paragraph). Then click on Copy
From and then click on the day of week you wish to copy the
settings from or press the <ALT> key followed by the <C> key.
Then use the arrow keys to select the day of the week to copy the
settings from and then press <Enter>.
Changing the Current Company
You should save any changes you wish to keep before changing
companies. To change the current company you are working on
click on Select and the Company. A list of companies will now be
displayed. Double click on the company you wish to edit next.
Saving Changes
To save your changes click on File and then Save or press the
<ALT> key followed by the <S> key.
Exiting the Hours of Operation Form
To exit the Hours of Operation Form click on File and the Exit or
press the <ALT> key followed by the <E> key.
Recording Prompts
Recording the prompts that you set up in the Hours of Operation
form requires that the Atlas WAV be attached to a telephone
system.
To start recording the prompts select a channel that has a single
line port attached to it by clicking on the window for that channel.
After selecting an active channel click on Prompts and the
Greetings. The following screen should now appear.
Atlas WAV Chapter 3 Page
Page 39

6
Figure 3-3: System Greetings Form
To begin recording greetings enter an extension number of a
telephone nearby that you can use to record the prompts in the
phone number field. Then click on File and the Dial. The system
will call the extension that you entered into the phone number
field, while the phone is ringing pick up the handset and say hello.
You should notice that the text on the screen will change from
gray to black.
Once the text has changed from gray to black double click on the
company that you wish to record the greetings for in the left hand
column. The greetings you have set up in the Hours of Operation
Form will now appear in the right hand column. Click on the
greeting you wish to record and then click on Greeting and the
Record. You will now hear beep. After the beep start recording
the prompt. Once you have recorded the prompt the system will
play the recording back to you to verify that it sounds correct. If
you approve of the recording continue for any other prompt that
needs to be recorded. If you do not like the recording simply click
on record again to rerecord it.
After you have finished recording all of the greetings Click on File
and then Exit to close the System Greetings Form.
Defining Main Greeting Audio Options
In your main greeting prompt(s) you may want to give the caller
single digit dialing options, for example dial 1 for sales or dial 2
for shipping. These options can very by company.
Atlas WAV Chapter 3 Page
Page 40

7
The screen to define the main greeting audio options can be
accessed by Clicking on Edità Switch Integration, Edit – In Band
– Main Greeting. The following screen will then open.
Figure 3-4: Main Greeting Caller Options
See Chapter 4 (Setting up a Basic WAV System) for detailed
information on adding dialing options to the Main Greeting.
Atlas WAV Chapter 3 Page
Page 41

CHAPTER
4
Setting Up a BASIC
Atlas WAV System
Page 42

2
This chapter will provide step by step instructions to set up a basic
Atlas WAV Voice Mail / Auto Attendant system. You will need
to determine several items and operations prior to programming
your Atlas WAV system. It would be very helpful for you to write
these things down so that you can see how you want your system
to operate:
BASIC INFORMATION REQUIREMENTS
• Mailbox Numbers (should match your extension numbers)
• List of Mailbox Subscribers (owners) & extension numbers
• Hours of operation (Day / Night / etc.)
• Company Greeting (what your callers will hear when the Auto
Attendant answers) You may need several:
• Normal morning greeting
• Normal afternoon greeting
• Closed for business greeting
• Weekend greeting
• Caller Options (what you will allow your callers to do from
the Company Greeting)
• Dial an extension
• Call the Operator
• Access a company directory
• Access pre-recorded information (directions, business
hours, promotions, etc.)
BASIC WAV SETUP
The Atlas WAV system is a very full featured Voice Mail / Auto Attendant system
with a very complete set of features to match almost any customer requirement. In
many cases a basic system is all that is required and the WAV can be set up as a
basic system very quickly and with very little programming. Simply:
• Set up The Operator
• Set up your mailboxes
• Set up your Hours of Operation
• Record your company greetings
• Set up dialing options in your main greeting
Atlas WAV Chapter 4 Page
Page 43

3
INTEGRATING THE WAV TO THE ATLAS PHONE
¤
¤
properly.
SYSTEM
You need to make all the connections between the Atlas WAV and
the Atlas phone system first. Next you need to do the appropriate
programming in the phone system. When this is done you will
have “integration” between the two systems.
Please see the Atlas WAV Quick Start Guide (Section 2) for
detailed instructions on the following:
• Connect the SMDI (integration) cables to the appropriate
COM port of the SMDR unit of your Atlas phone system and
to the COM 1 port of the Atlas WAV.
Note:
Make sure that
each successive
port is a higher
numbered port
than the previous
port.
• Pay attention to the DIP Switch settings on the SMDR unit (or
card) that are required for proper WAV operation and
integration.
• Connect the Single Line Ports to be used for Voice Mail from
your Atlas phone system to the Voice Card ports on the back
of the Atlas WAV.
• Be aware that the single line ports used must observe the
following order: Port 2 must be a higher numbered port than
port 1, port 3 must be a higher numbered port than port 2, etc.
PROGRAMMING THE ATLAS PHONE SYSTEM FOR
WAV OPERATION
You must program the Single Line Ports used for the WAV to be
defined as Voice Mail Ports and they must be set up in a Station
Hunt Group for ease of operation. Determine if you want the
WAV to be the primary answering device for your calls or
whether it will be a backup to a live operator and program the
ringing assignments accordingly.
Please see the Atlas WAV Quick Start Guide (Section 2) for
detailed instructions on the following:
Note:
If ports not used
in the WAV are
set to “Voice
Mail Port” then
integration will
not work
• VOICE MAIL PORTS
• Each of the Single Line Ports used for the WAV must be
defined in their class of service as a Voice Mail Port. (Set
to YES)
• It is very important to make sure that all other ports in the
Atlas phone system are not defined as Voice Mail Ports
(Must be set to NO)
Atlas WAV Chapter 4 Page
Page 44

4
STATION HUNT GROUP
¤
• Select the appropriate station hunt group to be used for the
Atlas WAV
• Program all of the Single Line Ports used for the WAV into
this station hunt group
• You may program one of the flexible keys on the Atlas
keyphones to be a “one button” access to the WAV if desired.
RINGING ASSIGNMENTS
• Direct Ringing
• Program Direct Ringing if you want the WAV Auto
Attendant to answer all incoming calls immediately.
• To have a live operator serve as backup program the
operator station(s) for delayed ringing.
• Delayed Ringing
• Program Delayed Ringing if you want the WAV Auto
Attendant to answer only after calls have been ringing for
a pre-determined period of time
• In this scenario the live operator would be programmed to
ring immediately on incoming calls.
ENTERING PROGRAMMING (SYSTEM
ADMINISTRATION)
With the WAV installed and powered up you should be at the
main screen as shown in Fig. 4-1:
Figure 4-1: WAV Main Screen
Note:
If you have more
than 4 ports,
those ports will
also show up as
individual
channels.
Atlas WAV Chapter 4 Page
Page 45

5
:Screen Path:
Select:
• Fileà
• Logà
• ONà
• Enter password (install)
when requested
Once you are at the WAV Main Screen you must Log On to the
system as system administrator. Using your mouse, “click” on
File – Log – On as shown in Figure 4-2.
Figure 4-2: Logging On
The WAV will then ask for your password. See Figure 4-3.
Enter “install”. This is the default password. When the correct
password is entered the WAV will tell you that you have system
access. You may now proceed with the necessary programming to
set up your system.
Figure 4-3: Entering Password
SET UP THE OPERATOR
You should always have an operator programmed in the Atlas
WAV. When the Auto Attendant answers the incoming call and
also when an outside caller leaves a message in a mailbox, many
times they need to be able to dial “0” and be transferred to a live
operator. All mailbox owners including the Operator are called
“subscribers” in the Atlas WAV.
Atlas WAV Chapter 4 Page
Page 46

6
¤
Note:
When setting up a
Subscriber or
Department box
use the following:
Subscriber Setup
Type Menu
Select Menu
Device Setup
Activate Menu
Message Center
Call Control Form
From the Main Screen select Edit – Subscriber as shown in Figure
4-4. Then the Select Subscriber screen (Figure 4-5) will open and
will show existing subscribers (if any) and their extension /
mailbox numbers.
Figure 4-4: Edit Subscriber
Figure 4-5: Select Subcriber Screen
You may select one of the existing subscribers to edit their
mailbox by “double clicking” on that subscriber. To enter a new
subscriber simply select the close button at the upper right corner
of the Select Subscriber screen. A blank Subscriber Setup form
(Figure 4-6) will open and you can enter information for a new
subscriber. You must begin by clicking File – New.
Atlas WAV Chapter 4 Page
Page 47

7
¤
Note:
When you enter
any new
subscriber you
must begin by
clicking File –
New and then
entering the
information.
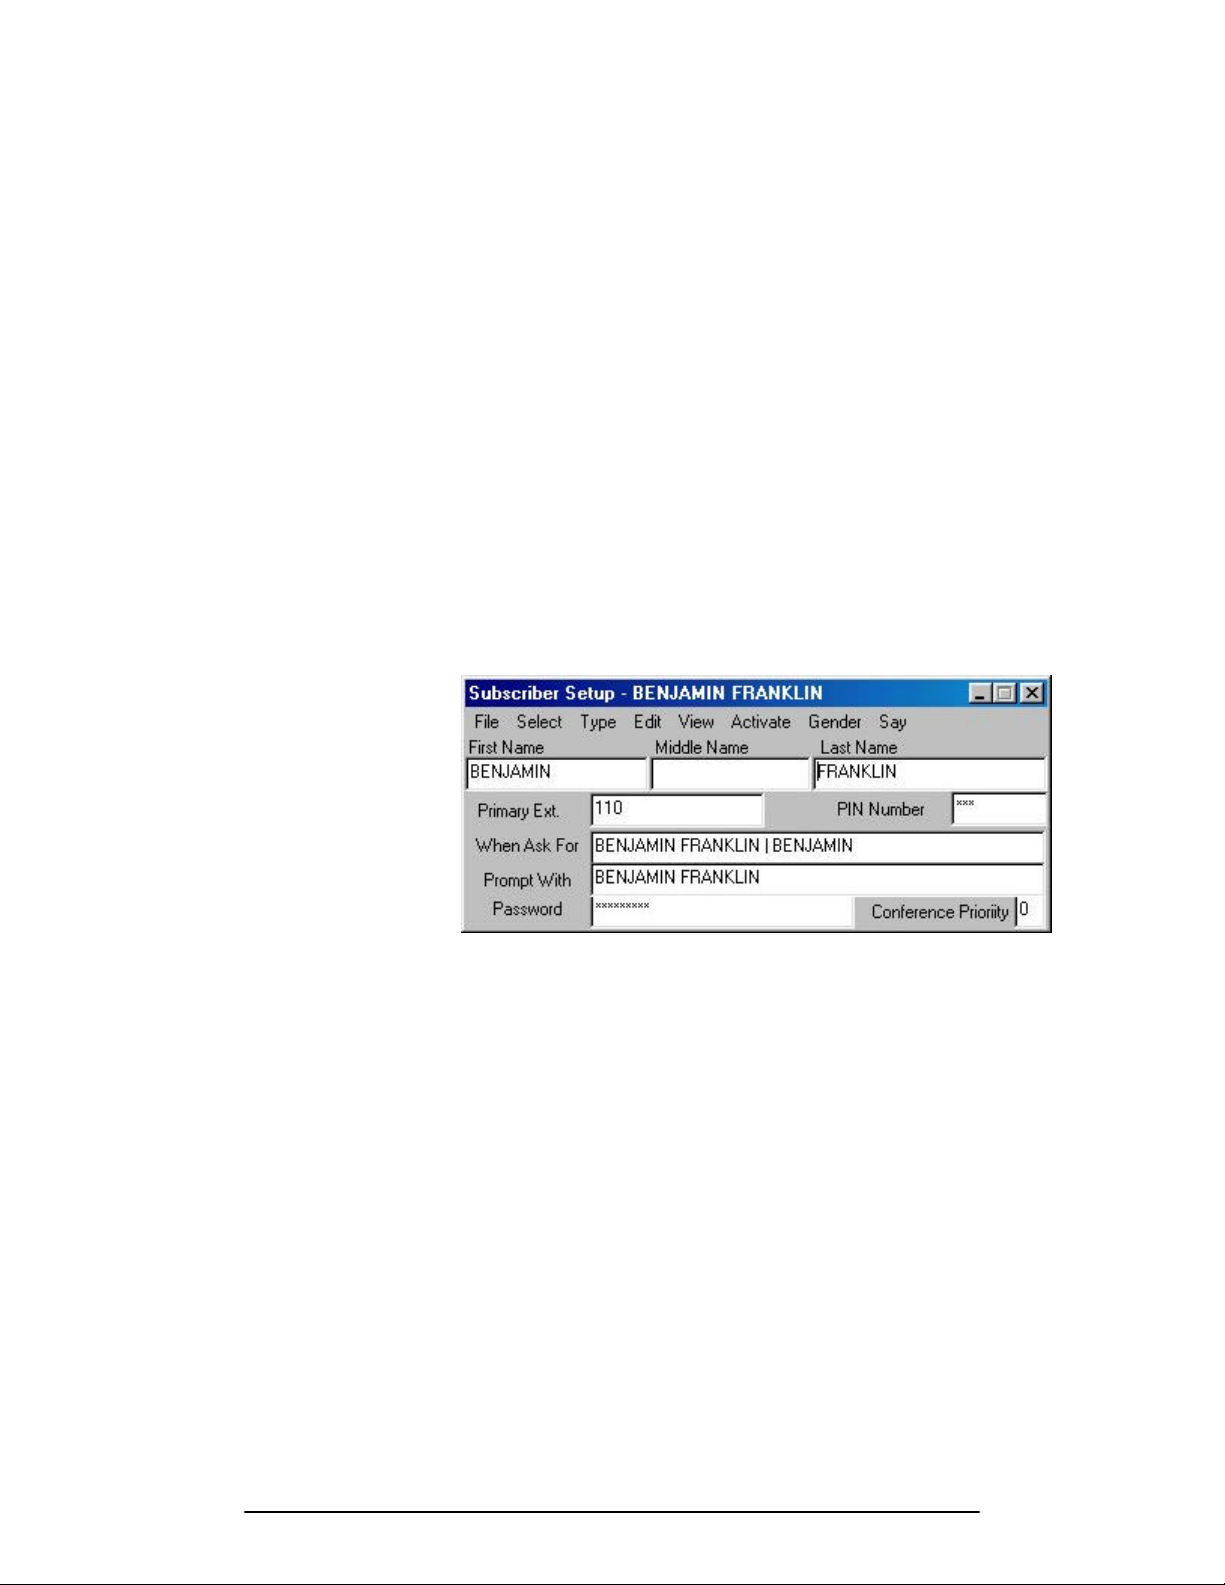
Figure 4-6: Subscriber Setup
Enter OPERATOR as First Name, (no last name) and enter
primary extension (extension number). Then choose Select and
check “as Operator” (Figure 4-7).
Figure 4-7: Select “As Operator”
Next choose Type and you will see that Operator is automatically
set as a Department (Figure 4-8). Operator is set as a Department
because there is no last name entered.
Figure 4-8: Set Type as Department
Atlas WAV Chapter 4 Page
Page 48

8
¤
Note:
To make your
changes permanent
you must “click”
File – Save. If you
close a form or
screen without
doing this, your
changes will not be
made.
When this is entered select File - Save (Figure 4-9)and the WAV
will automatically enter the rest of the information on the
Subscriber Setup form. (Figure 4-10)
Figure 4-9: File – Save
Figure 4-10: Subscriber Setup – Operator
The PIN number is the mailbox Personal Identification Number
(password) that is entered via the touch tone pad of the telephone.
The default PIN is 123. The Password shown at the bottom of the
form is a verbal password spoken by the mailbox owner only if the
voice recognition option is ordered.
When you enter File – Save you will hear “Changing office
extension to primary extension 100”. The WAV automatically
sets up the Device Setup (Figure 4-11) for your office extension.
If your subscriber does not have any additional communications
devices – such as pagers and cell phones – then you do not need to
do anything else with the Device Setup form.
Atlas WAV Chapter 4 Page
Page 49

9
Figure 4-11: Device Setup
If the installation has a general company fax machine then this
fax machine must be associated with the Operator. The general fax
is used to receive a fax whenever fax tone is received on an
incoming line. This device is used whenever fax tone is detected
by the Auto Attendant. This information is entered in the Device
Setup – Operator screen.
Begin by clicking File – New (Figure 4-12).
Figure 4-12
Atlas WAV Chapter 4 Page
Page 50

10
Enter FAX in the Label field. Enter the Single Line Port
Extension Number connected to the Fax machine in the Number
field. Enter FAX MACHINE in the Prompt Field. (Figure 4-13)
Then select Define As and define the device as a FAX device.
(Figure 4-14)
Figure 4-13: Operator Fax Machine
Figure 4-14: Define as Fax Device
Select File – Save to save the entries. Your screen will appear as
in Figure 4-15.
Atlas WAV Chapter 4 Page
Page 51

11
Figure 4-15: FAX Device Saved
For explanations of the Activate Menu, Message Center Menu and
Call Control Form see Setting Up Subscriber Mailboxes.
SET UP SUBSCRIBER MAILBOXES
Subscriber and Department boxes can be used for the following:
• Record and store messages from both inside and outside
callers.
• Make and send messages to other box owners.
• Give a copy of a message to another box owner.
• Notify a box owner of newly received messages
• Transfer a call to an extension.
• Provide alternate call handling if an extension is busy or
doesn’t answer.
• Forward callers to other subscribers automatically.
Atlas WAV Chapter 4 Page
Page 52

12
¤
Note:
When you enter
any new
subscriber you
must begin by
clicking File –
New and then
entering the
information.
You may either program an existing box or create a new box.
When you select Edit - Subscriber a list of all boxes currently in
the system is displayed on the screen. At this point you should
either select one of the subscribers listed or select the close button
on the top right corner of the list to create a new subscriber. To set
up and customize a subscriber box, use the following forms and
menus. The only difference between Subscriber and Department
Boxes is that Department Boxes only allow for First name while
Subscriber boxes allow for First and Last name.
• Subscriber Setup
• Type Menu
• Device Setup
• Activate Menu
• Message Center Menu
• Call Control Form
You can setup each subscriber basically the same way as the
Operator. Start with the Subscriber Setup form as in Figure 4-6
and enter the subscribers first name, last name and extension
number. See figure 4-16.
Figure 4-16: New Subscriber
When you set up a subscriber mailbox (first & last names) the
WAV will automatically set the type as subscriber. You can click
on Type to verify this. (Figure 4-17)
Figure 4-17: Type – Subscriber
Atlas WAV Chapter 4 Page
Page 53

13
Then, as always, click File – Save to save your changes. When
you do this the WAV will automatically fill in the rest of the
information in the New Subscriber Form (Figure 4-17) and will set
up the Office Extension (Figure 4-18).
Figure 4-17
Figure 4-18: Office Extension Setup
The WAV will automatically set up some default capabilities for
the mailbox that can be seen in the Activate Menu and the
Activate - Message Center Menu. (Figure 4-19 ,4-20 & 4-21)
Atlas WAV Chapter 4 Page
Page 54

14
Figure 4-19: Activate Menu
When the Activate Menu is opened (Figure 4-19) it will show the
default options that are active for the mailbox. These options have
a check mark by them. Get Callers Name will ask the incoming
caller for their name: “May I say who is calling?”. Personal
Greeting will play the personal greeting the mailbox owner has
recorded when the caller reaches the mailbox.
Message Center Will open up the Message Center Menu
Vax System Will open up the Vax System Menu.
(Optional Feature)
Auto Station Log On will open up the following menu:
Figure 4-20: Auto Station Log on
Atlas WAV Chapter 4 Page
Page 55

15
¤
Note:
Activate MUST
be checked in the
Message Center
Menu for the
mailbox to be
able to take
messages.
Auto Station Log on (Figure 4-20) shows the default as Direct
Access. When this is checked the mailbox owner can get into the
mailbox without entering a password. To require a password
simply check Request PIN. When the mailbox owner accesses the
mailbox the message “Please enter your PIN Number” will be
heard and the PIN Number must be entered before the mailbox can
be entered.
Next you can open the Activate – Message Center Menu and you
will see the options that are enabled in default: (Figure 4-21)
Figure 4-21: Activate Message Center Menu
The options shown with a check mark in the Activate Message
Center Menu are those enabled in default. It is important that the
top item – Activate – is checked (it will be by default). If it is not
checked then callers will not be able to leave a message for the
mailbox owner. The default settings will be suitable for most
general applications
See Chapter 7 for a description of all of the options related to the
Subscriber Setup screens.
Atlas WAV Chapter 4 Page
Page 56

16
Figure 4-22: Gender Menu
The Gender Menu will allow you to select whether the subscriber
is male or female. This is used in the phrases such as “Please hold
while I try his cell phone” or “Would you like me to try her cell
phone?”
Some subscribers, such as outside salesmen, would like to be
notified when a message is left in their mailbox. The most
common is to have the WAV call their cell phone and let them
know that they have a message. This can be done very simply
through the Device Setup screen. (Figure 4-23)
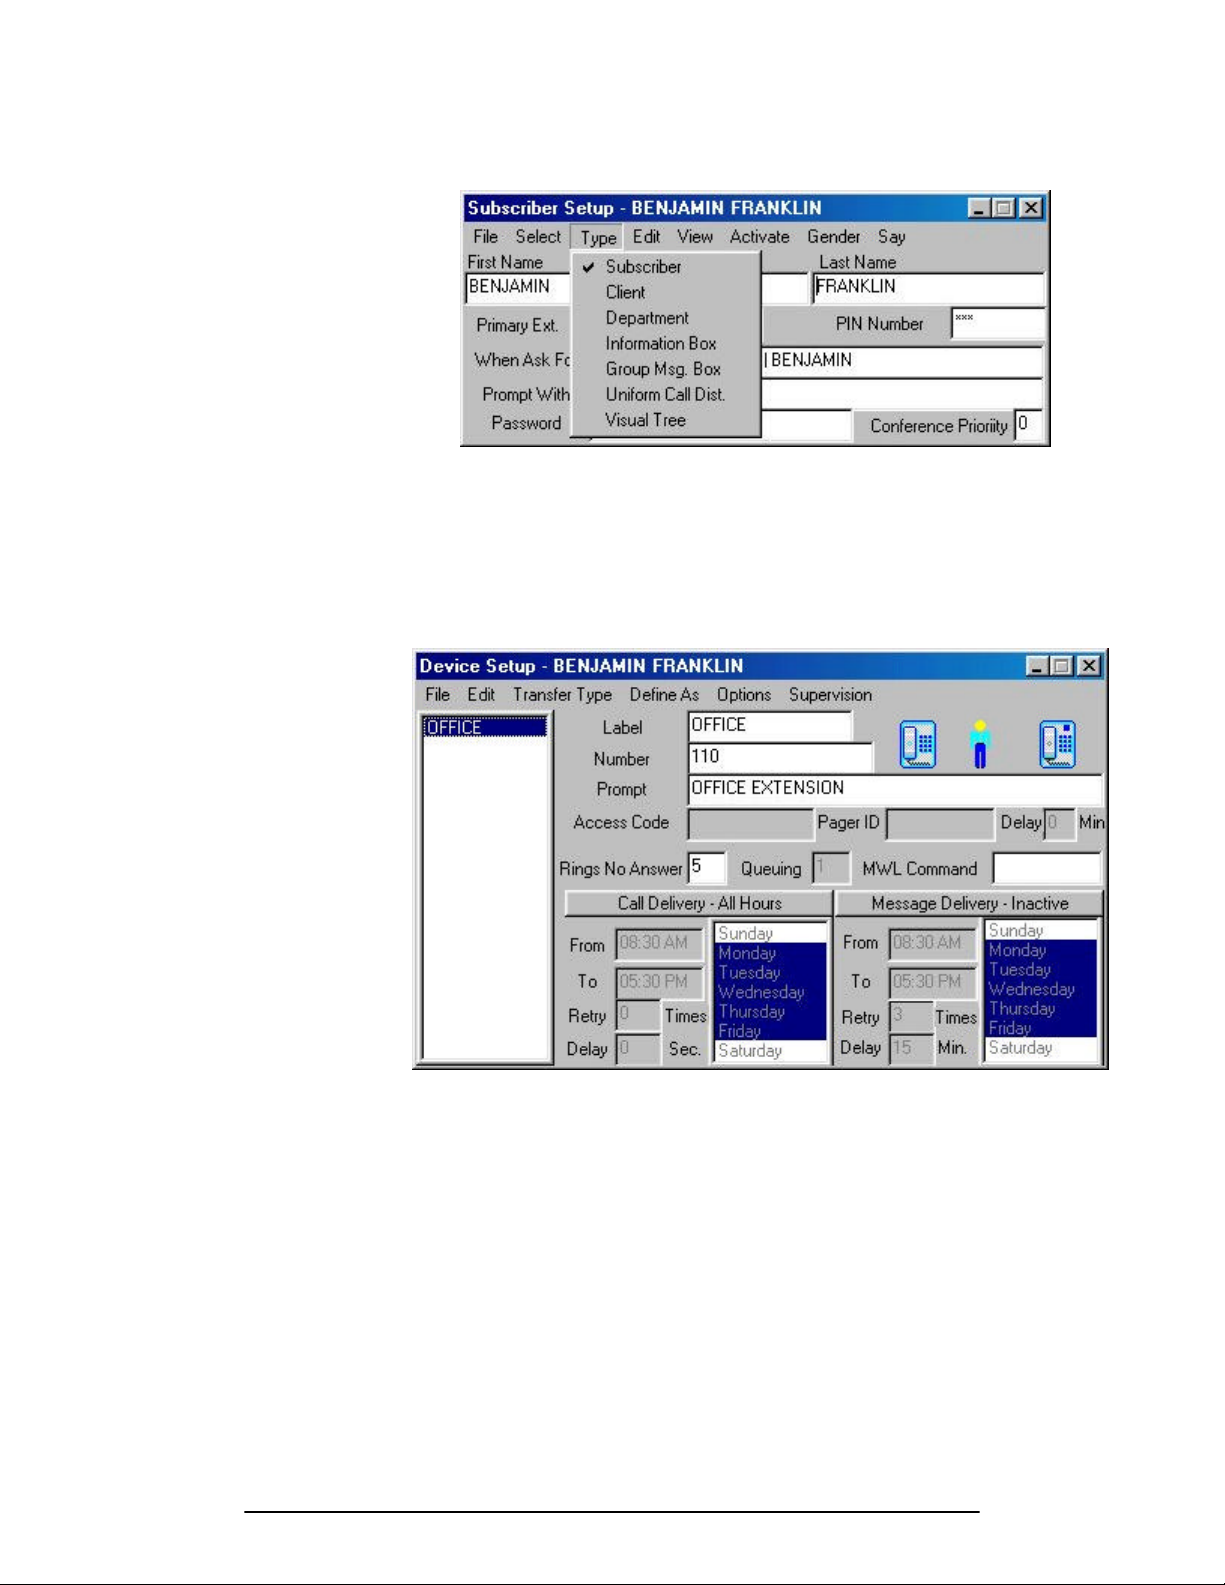
Figure 4-23: Device Setup
Figure 4-23 shows the subscriber with two devices associated with
his mailbox. One is the office phone and the other is the cell
phone. The cell phone is set up by going through the following
steps after opening up the Device Setup screen:
Atlas WAV Chapter 4 Page
Page 57

17
• File – New
¤
• For Label – Type: Cell
• For Number – Type the Cell Phone Number
(Do not enter 9 for outside line access)
• For Prompt – Type Cell Phone
• Transfer Type – Select Trunk
• Define As – Select Cell Phone
• Message Delivery – Inactive (Default)
Note:
Message Delivery –
Inactive will light
the Message
Waiting Light on
the Office Phone
but will not call the
cell phone
Without changing the default Message Delivery there would
be no call to the cell phone when a message is left in the
mailbox. You must change this to active and then set the
notification times and the days to be active.
• Message Delivery – Active
This example shows Message Delivery active Monday
through Friday from 8:30 AM until 5:30 PM. The WAV will
retry 3 times with 15 minutes between attempts.
Atlas WAV Chapter 4 Page
Page 58

18
¤
SET UP YOUR HOURS OF OPERATION
The Hours of Operation form allows you to define different
greetings for different days, different times of day and different
companies.
To open the Hours of Operation box from the main screen select
Edit - Hours of Operation. The following form should now be on
the screen.
Note:
If you have more
then one company
defined in the
system you will
have to select the
company before the
Hours of Operation
form will appear.
Figure 4-24: Hours of Operation Form
If the WAV serves more than one company use Select – Company
and then double click on the company you wish to program:
Figure 4-24 above shows the Hours of Operation schedule for
Monday. There can be up to 6 different time periods defined for
each day. The “Prompt to Play” section shows the prompt (or
combination of individual prompts) that will be played when the
Auto Attendant answers the incoming call during the time periods
indicated.
Each prompt must consist of one word or more than one word
connected by the “_” character. In Figure 4-24 the Lunch time
prompt is actually 3 prompts tied together: Good_Afternoon plus
Welcome plus Lunch_Hours. This will allow you to record a
particular prompt once but be able to use it in combination with
other prompts. As in the above the prompt “Welcome” is used in
all time periods but only has to be recorded once.
Atlas WAV Chapter 4 Page
Page 59

19
In Figure 4-24 above the Evening Level is not active. To make it
¤
active you must click on the button “Evening”. Clicking on an
active button will make it inactive. The only time periods that you
can program are the “To” periods. When a time is entered in a
“To” period it is duplicated in the next active “From” period.
Therefore if the Evening period was activated then the Evening
“From” period would automatically be set at 5:30 PM (from the
Afternoon “To” period) and whatever was entered in the Evening
“To” period would automatically be entered in the Closed “From”
period.
To select a different day of the week to program then click on Day
of the Week and select the day you need.
In most cases Monday through Friday will all be programmed with
the same prompts. If this is the case you may simply copy one
day’s information to another. For example: Select Day of Week
and check Tuesday. Then select Copy From and select Monday.
This will automatically duplicate all of the Monday Hours of
Operation information to Tuesday. Then select Day of Week and
check Wednesday. Then select Copy From and select Monday
again. Do this for all days that are going to be the same.
Note:
To make your
changes permanent
you must “click”
File – Save. If you
close a form or
screen without
doing this, your
changes will not be
made.
Atlas WAV Chapter 4 Page
Page 60

20
RECORD YOUR COMPANY GREETINGS
Recording the prompts that you set up in the Hours of Operation
form requires that the Atlas WAV be attached to a telephone
system. To start recording the prompts select a channel that has a
single line port attached to it by clicking on the window for that
channel.
After selecting an active channel click on Prompts and then
Greetings.
The following screen should now appear.
Figure 4-25: System Greetings
The System Greetings screen appears and the existing greetings
listed are shown in grey. To begin recording greetings enter an
extension number of a telephone nearby that you can use to record
the prompts in the “Ext” field. Then click on File and then Dial.
Atlas WAV Chapter 4 Page
Page 61

21
The system will call the extension that you entered into the “Ext”
field. While the phone is ringing pick up the handset and say hello
until you notice that the text on the screen changes from gray to
black.
Once the text has changed from gray to black double click on the
company that you wish to record the greetings for in the left hand
column. The greetings you have set up in the Hours of Operation
Form will now appear in the right hand column. Click on the
greeting you wish to record and then click on Greeting and then
Record.
You will now hear beep and a window will open up indicating that
you should start recording.
After the beep start recording the prompt.
Atlas WAV Chapter 4 Page
Page 62

22
Once you have recorded the prompt the system will play the
recording back to you to verify that it sounds correct. If you
approve of the recording continue for any other prompt that needs
to be recorded. If you do not like the recording simply click on
record again to rerecord it.
After you have finished recording all of the greetings Click on File
and then Exit to close the System Greetings Form.
SUBSCRIBER PROMPTS
When you set up your subscribers and closed the Subscriber Setup
screen, you probably got a message over the speakers that said:
“You have <number> subscriber prompts to be recorded”.
You record these new subscriber prompts using the same
procedure that you used for recording your greetings. Select
Subscriber Prompts:
The Subscriber Prompt screen will appear.
Follow the same procedure as you did for recording your
Company Greetings.
• Enter Extension number in Phone Number area
• File – Dial / Answer and say “Hello”
• Click on Name prompt
• Prompt – Record / “beep” / Then record prompt
Atlas WAV Chapter 4 Page
Page 63

23
DIALING OPTIONS IN THE MAIN GREETING
Before setting Dialing Options in the Main Greeting you should
look at the default settings in the System Signaling section. These
default settings are global, meaning they are in effect anywhere in
the WAV system.
By looking at these you will reduce the number of entries that you
will have to make in your Main Greeting.
The screen that shows System Signalling can be accessed from the
main screen by Clicking on File - Edit – Switch Integration, Edit
– In Band – System Signalling.
When the screen appears then double click on the line
“00 SYSTEM – General System Interface”. This will show all of
the In Band Signaling Codes that are already programmed in the
WAV. (Figure 4-26) These codes are available throughout the
WAV. If you need to change any of these simply double click on
the particular code you wish to change and modify the entries that
appear in the upper part of the screen.
Atlas WAV Chapter 4 Page
Page 64

24
Figure 4-26: General System Interface
This screen shows what can be dialed by the caller and what action
will take place when that digit(s) is dialed. For example: If the
caller dials the pound key twice (##) the WAV will respond with
“Using your touch tone pad, please enter the first few letters……”.
Or if the caller dials “0” they will be transferred to the Operator.
All of the entries shown in the General System Interface are
available in the Main Greeting. If there are additional items you
would like to have available in the Main Greeting then you can
enter these for the Main Greeting as shown below.
In your main greeting prompt(s) you may want to give the caller
single digit dialing options, for example dial 1 for sales or dial 2
for shipping. These options can vary by company.
An audio menu is a recorded message that verbally gives a caller
options associated with keypad numbers. Pressing the key
associated with the option performs the action described by the
option.
Atlas WAV Chapter 4 Page
Page 65

25
“For Sales, Press 1”
¤
Note:
Be sure that
you record the
dialing options
in your main
greeting prompt
The following is an example of an audio menu that can be used as
the Main Greeting.
“For Shipping, Press 2”
“For a Company Directory, Press ##”
“For an Operator, Press 0”
The entries for Company Directory and for Operator are already
present in the General System Interface so they are already
available. Sales and Shipping need to be entered in the Main
Greeting.
The screen to define the main greeting audio options can be
accessed from the main screen by Clicking on File - Edit – Switch
Integration, Edit – In Band – Main Greeting.
Atlas WAV Chapter 4 Page
Page 66

26
The following screen will then open:
Next double click on “Master Record” so that it is highlighted and
then click File – New to begin your first entry: “For Sales, Press
1”. In the field “Tree Entry” enter the digit that the caller will dial
– in this case the digit 1.
In the lower right hand box are listed the different possibilities that
can happen when the “Tree Entry” digit is dialed. Double click on
“Goto Subscriber”.
The Select Subscriber window (Figure 4-5) will open up. Double
click on the subscriber that you want to be dialed when the caller
presses “1”. In this example you double clicked on Sales.
Then click File – Save. Double click on Master Record and you
will see that “1 Goto Subscriber SALES” has been added.
Next click File – New / enter “2” in the Tree Entry field / double
click on “Goto Subscriber” / select SHIPPING (double click on it)
and then click File – Save.
Atlas WAV Chapter 4 Page
Page 67

27
Double click on Master Record and you will see a screen as
shown in Figure 4-28.
Figure 4-28: Main Greeting Call Control
This chapter allowed you to set up your Atlas WAV in a manner
that will fit most of your applications. The next chapter will
present more advanced features that are available to be
programmed.
Atlas WAV Chapter 4 Page
Page 68

CHAPTER
5
Using Advanced
WAV Features
Page 69

1
In Chapter 4 you used Subscriber and Department mailboxes in
setting up a basic WAV system. There are additional types of
mailboxes that can be used to enhance the WAV even further.
The types of boxes available in the WAV are:
• Subscriber
• Department
• Client Box
• Information Box
• Group Box
• Uniform Call Distribution Box
• Visual Tree Box
CLIENT BOX
The Client Mailbox is currently not available. It will be available
in future releases of the Atlas WAV.
INFORMATION BOX
Information boxes are used to provide information to the caller.
This is in the form of a pre-recorded message. The message is
recorded as the personal greeting of the Information Box. The
information box can then transfer a caller to an extension after the
message is heard and/or take a message from the caller.
You initially set up an Information Box in much the same manner
as you do for a Subscriber Box using the following:
• Subscriber Setup
• Type Menu
• Activate
• Message Center
• Call Control Form
These are not all required but are available if needed.
From the Main Screen select Edit – Subscriber
From Subscriber Setup select File – New
First Name – enter Company Directions
Primary Ext. – enter a “fake” ext. number
(this will become the box number and does not have
to be a valid PBX extension)
Atlas WAV Chapter 5 Page
Page 70

2
Enter Type – Information Box
Enter File – Save
When an incoming caller dials the Information Box number they
will hear the message recorded as the personal greeting and then
will hear the message: “How may I direct your call?”
Many times an Information box(es) is used in a Visual Tree.
GROUP BOX
Group Boxes are used to distribute messages among a group of
two or more boxes. The group box may contain active subscribers
and/or departments.
These types of boxes are typically for customer service
department, sales department, etc. or in any situation where there
is a need to be able to distribute the same voice message to many
(two or more) subscriber boxes. For example: one voice message
could be recorded in a sales box. This message will be duplicated
in every box assigned to the sales box.
Atlas WAV Chapter 5 Page
Page 71

3
For this example there will be a Sales Group Box with three sales
person’s mailboxes included.
Set up a Group Box using the following forms and menus:
• Subscriber Setup
• Type Menu
• Message Center
• Select Subscriber form
From the Main Screen select Edit – Subscriber
From Subscriber Setup select File – New
First Name – enter Sales Group Box
Primary Ext. – enter a “fake” ext. number
(this will become the box number and does not have
to be a valid PBX extension)
Enter Type – Group Msg. Box
Enter File - Save
Atlas WAV Chapter 5 Page
Page 72

4
Enter Edit – Group Message Box
The Subscriber Group Selection Box will open. In this box there
is a list of all subscribers in the right hand column (Selection List).
Double click the subscribers that you want to move to the lefthand column (Active Group). Those listed in the active group are
the subscribers that will get messages left in the Sales Group Box.
Enter File – Save in the Subscriber Group Selection Box
In this example anyone calling in and dialing “510” will get the
recorded name in mailbox 510 (Sales Group Message Box as an
example) and they can leave a message. This message will be
recorded in each mailbox that is in the Subscriber Group Selection
Box Active Group (Donald Duck, James Dean and Operator)
Atlas WAV Chapter 5 Page
Page 73

5
UNIFORM CALL DISTRIBUTION BOX
Uniform Call Distribution boxes are used to send callers to a
group of two or more subscribers using a circular hunt method.
This type of box is useful where you have a department with
several people (a sales group for example) and you wish to have
the WAV evenly distribute calls to the people in that department.
For this example there will be a UCD Box that will distribute
incoming calls to three sales people.
Set up a Uniform Call Distribution Box using the following forms
and menus:
• Subscriber Setup
• Type Menu
• Activate Menu
• Select Subscriber form
From the Main Screen select Edit – Subscriber
From Subscriber Setup select File – New
First Name – enter Sales UCD Group
Primary Ext. – enter a “fake” ext. number
(this will become the box number and does not have
to be a valid PBX extension)
Enter Type – Uniform Call Dist.
Next open the Activate Menu in the Subscriber Setup and click on
any features that you want to activate.
Atlas WAV Chapter 5 Page
Page 74

6
Enter File – Save
Enter Edit – Uniform Call Distribution
The Uniform Call Distribution Selection Box will open. In this
box there is a list of all subscribers in the right hand column
(Subscriber List). Double click the subscribers that you want to
move to the left-hand column (Active Group). Those listed in the
active group are the subscribers that will get calls directed to the
UCD Sales Group.
Atlas WAV Chapter 5 Page
Page 75

7
Enter File – Save in the Uniform Call Distribution Selection Box
To make this UCD group available to incoming callers through the
WAV you need to set up a dialing option in the Main Greeting.
Do this the same way you did in Chapter 4:
• From the Main Screen: File - Edit – Switch
Integration, Edit – In Band – Main Greeting
• Double click on Master Record
• Enter “4” in the Tree Entry field
• Double click on “Goto Subscriber”
• The Select Subscriber window will open up. Double
click on the subscriber you want to be called when the
WAV caller dials “4”.
Atlas WAV Chapter 5 Page
Page 76

8
¤
Note:
Be sure to record
“Dial 4 for…….”
in your main
greeting to inform
callers
• Then click File – Save
• Then double click on Master Record and you will see
the following entries:
In this example anyone calling in and hearing the main greeting
will be transferred to the UCD Sales Group when they dial “4”.
VISUAL TREE BOX
Visual Tree Boxes allow you to set up a multiple level prompt.
The system will play a pre-recorded audio menu offering callers
options on how their call will be directed. The audio menu is
recorded as the name in the Visual Tree Box. The Visual Tree
Box allows you to have dial options for several different types of
system functions.
In this example there will be a Visual Tree Box called Company
Information. The caller will have the option to press 1 for
directions, press 2 for store hours or press 0 for the Operator.
Directions (1) and Store Hours (2) are each an Information Box
that was previously programmed and recorded. (0) will transfer
the call to the Operator.
Set up a Visual Tree Box using the following forms and menus:
• Subscriber Setup
• Type Menu
• Activate Menu
• Select Subscriber form
From the Main Screen select Edit – Subscriber
Atlas WAV Chapter 5 Page
Page 77

9
From Subscriber Setup select File – New
First Name – enter Company Information
Primary Ext. – enter a “fake” ext. number
(this will become the box number and does not have
to be a valid PBX extension)
Enter Type – Visual Tree
Enter File – Save and it will show the following:
Enter Edit – Visual Tree
This will bring up the Visual Tree Interface Screen
Double click on the Master Record
Atlas WAV Chapter 5 Page
Page 78

10
Then click File – New
Enter “1” in Tree Entry
Double click on “Goto Subscriber”
(This will open the Subscriber Selection screen)
Double click on CO DIRECTIONS
Then click File – Save
Then click File – New
Enter “2” in Tree Entry
Double click on “Goto Subscriber”
Double click on OFFICE HOURS
Then click File – Save
Atlas WAV Chapter 5 Page
Page 79

11
Then double click on Master Record and you should see :
Dial “0” for the Operator is already valid from the General System
Interface Master Record. (These are valid in any menu)
Reminder:
• Record in Personal Greeting of Information Box
• Record in Name of Visual Tree Box
• Record the dialing options in the Main Greeting
CALL CONTROL
The Call Control window is available from the Edit menu of the
Subscriber Setup window. The Call Control window gives you
options on Message and Call Delivery for the current subscriber.
Call Control also allows you to set the message aging and
maximum message length for each subscriber.
Atlas WAV Chapter 5 Page
Page 80

12
From the Subscriber Setup window click on Edit – Call Control.
This will bring up the Call Control window.
• Escalation Messages To will put a copy of a message in
another subscribers mailbox after “X” minutes if this
subscriber does not retrieve that message. If the After ___
Min. setting is left at “0” the message will escalate
immediately.
• Forward All Messages To will take the message and put it in
the assigned subscribers mailbox. It will not leave a copy in
this mailbox.
• Forward All Calls To will immediately forward all calls
handled by the WAV to the assigned subscriber. Then that
subscriber answers the call the WAV will say: “You have a
call from _________” (Incoming Caller’s Name) and then say
“for” (Original Subscriber’s Name) and then “Connecting
Call”.
Atlas WAV Chapter 5 Page
Page 81

13
To set up any of the features click on Select:
This will bring up the Select Message Escalation window .
Then double click on the subscriber that you want to receive a
copy the message left in your mailbox. When this is done the Call
Control window will show:
Atlas WAV Chapter 5 Page
Page 82

14
Reminder: You need to set the number of minutes after which the
copy of the message will be made. If left at “0”, the message will
escalate immediately.
When you are finished you must click on File – Save in this Call
Control window.
To remove any of the Call Control settings you must click on
Reset and then the appropriate entry.
When this is done the Message Escalation will be removed:
Atlas WAV Chapter 5 Page
Page 83

CHAPTER
6
Atlas WAV Main Screen
Page 84

1
This chapter will describe the different areas of the Atlas WAV
Main Screen. This is the first screen that you will see when the
system has completed the power up sequence.
It is from this screen that you will enter your password and will
then be able to enter programming and make any changes /
additions to the system.
THE ATLAS WAV MAIN SCREEN
FIGURE 6-1: THE MAIN SCREEN
The Main Screen is broken down into three different dialog boxes.
ONE MAIN DIALOG BOX
• Access Databases
• Access System Setup
• Access Switch Integration
• Access System Information
• Status Window that displays system activity
SCHEDULE DIALOG
• Display Current Schedule Information and Control
Atlas WAV Chapter 6 Page
Page 85

2
CHANNEL DIALOG(S)
• One for each Channel
• Record Prompts
• Access System Prompts
• Access History Information
• Access Company Based Subscribers
• Line Control
Within each of these dialog boxes there are pull down menus and
sub-menus which will allow you to see settings and make changes
in a manner consistent with typical Windows Operation.
THE MAIN DIALOG
FIGURE 6-2: THE MAIN DIALOG
The Main Dialog Box is the gateway to most of the areas you will
be dealing with when you are setting up the WAV and when you
are making changes in the future.
The large white area below the menu bar is the status
window. Every action taken by the WAV or by an outside
caller or by a mailbox owner will be shown (in real time) as
it happens in this window. To clear this window of all past
activity simply double click anywhere in the window.
Atlas WAV Chapter 6 Page
Page 86

3
Immediately below the title bar is a menu bar with the
following items: File, Set, Select, Edit, View, Update,
Restart and Schedule.
The File Menu
When you click on Log – On you will be prompted to enter
the password.
Enter the default password (install).
File Menu
MENU ITEM DESCRIPTION
Log – On
Log – Off
Log onto system by entering password
Take the system out of programming mode
(Will automatically log-off after 4 Min. of inactivity
Validate
(Phone Schedules)
Clean Up
(Deleted Messages)
Prompts
(Remove List)
Edit
Check all subscribers phone schedules for valid
devices and times
Clean up messages that have been deleted or no
longer belong to anyone
Removes list of prompts (found in Channel Dialog /
Prompts / Subscriber) that need to be recorded
Should only be used under the direction of Key
System US Technical Support (See Chapter 9)
Backup / Restore
Exit
Used to make a full or database backup
Used to shut down the Atlas WAV system
Atlas WAV Chapter 6 Page
Page 87

4
The Set Menu
Set Menu
MENU ITEM DESCRIPTION
Recognition
Reset Speech Recognition default values
Use only under direction of KSUS Technical Support
PBX Information
Message Waiting
Lights
Use this selection to set all valid message waiting
lights on if needed
The Select Menu
Select Menu
MENU ITEM DESCRIPTION
Select Company
Used to select a specific company in a multi –
company installation
Default Switch
Trunk to Subscriber
Set the default switch to be used with the system
Used to assign specific trunks to specific companies
in a multi – company installation
Atlas WAV Chapter 6 Page
Page 88

5
The Edit Menu
The Edit Menu is used extensively in programming and
administering the Atlas WAV system. See Chapter 7 for
complete detail of this menu.
The View Menu
View Menu
MENU ITEM DESCRIPTION
Subscriber Tree
View all subscriber information. Information is
viewed in a tree like format. Used to view such
information as transfer schedule, devices, etc.
System Information
Schedule Log
Compile Log
SMDR Log
System History
View system information such as number of ports,
release date, etc.
View the Schedule Log
Used in speech recognition option only
Used to view the SMDR history log
Atlas WAV Chapter 6 Page
Page 89

6
The Update Menu
” information has been
Shut down the system and restart from the beginning.
Update Menu
MENU ITEM DESCRIPTION
Subscriber Database
Rebuild speech recognition grammars. Only needed
when a new subscriber has been added or a
subscriber’s “when ask for
changed (Speech Recognition only)
The Restart Menu
MENU ITEM DESCRIPTION
Channels
Restart the channels in a case where a channel or line
fails to operate
System
Atlas WAV Chapter 6 Page
The system will exit and restart itself
Restart Menu
Page 90

7
The Schedule Menu
Schedule Menu
MENU ITEM DESCRIPTION
Start Up
Shut Down
Start up the schedule window after it has been shut
down or closed out
Shut down the schedule window after it has been
started up
CHANNEL(S) DIALOG
The Channel Menu
Atlas WAV Chapter 6 Page
Page 91

8
nel after it has been started
CHANNEL MENU
MENU ITEM DESCRIPTION
Test Recognition
View History Log
Used to test speech recognition on a new company
Select to view a history log of current activity within
the system
Select (Operator’s
Voice)
Selects from a choice (if available) of operator voices
for the channel
The Actions Menu
Actions Menu
MENU ITEM DESCRIPTION
Start Channel
Stop Channel
On Hook
Used to start the channel after it has been stopped
Used to stop the chan
This will stop all incoming calls to the channel
Used to manually stop the channel and place it on
hook
Off Hook
Used to manually stop the channel and place it off
hook
Atlas WAV Chapter 6 Page
Page 92

9
The Prompts Menu
Prompts Menu
MENU ITEM DESCRIPTION
Subscriber
System
Greetings
Holidays
Edit user prompts such as first and last name or
prompts that have been defined by the subscriber
Edit system prompts – These prompts are the heart of
the system and should only be changed under the
direction of Key System US Technical Support
Used to edit greetings such as welcome, closing and
company greetings
Used to edit holiday greetings such as Thanksgiving,
Christmas and others used in Holiday Scheduling
THE SCHEDULER
Atlas WAV Chapter 6 Page
Page 93

10
The File Menu
File Menu
MENU ITEM DESCRIPTION
Start
Stop
Exit
Used to manually start the scheduler
Used to manually stop the scheduler
Used to exit the scheduler and shut down scheduling
The Edit Menu
Edit Menu
MENU ITEM DESCRIPTION
Edit (Schedule)
Edit the current scheduling
Atlas WAV Chapter 6 Page
Page 94

11
The Log Menu
Log Menu
MENU ITEM DESCRIPTION
On
Off
Activate schedule logging
Deactivate schedule logging
Atlas WAV Chapter 6 Page
Page 95

CHAPTER
7
Atlas WAV Main Dialog
Edit / Subscriber Menu
Page 96

1
This chapter will describe the different sections available from the
Edit Menu of the Atlas WAV Main Dialog. Most of your time
will be spent in this menu when you are setting up or adding to
your Atlas WAV system.
THE ATLAS WAV MAIN DIALOG
THE MAIN DIALOG
The Main Dialog Box is the gateway to most of the areas you will
be dealing with when you are setting up the WAV and when you
are making changes in the future.
The large white area below the menu bar is the status
window. Every action taken by the WAV or by an outside
caller or by a mailbox owner will be shown (in real time) as
it happens in this window. To clear this window of all past
activity simply double click anywhere in the window.
Immediately below the title bar is a menu bar with the
following items: File, Set, Select, Edit, View, Update,
Restart and Schedule.
The Menu Bar
Atlas WAV Chapter 7 Page
Page 97

2
The Edit Menu
Edit / Subscriber
When selecting Edit – Subscriber you will be presented with
a list of current subscribers. You may double click one to
edit or close the list to enter a new subscriber.
This Subscriber Setup screen is where you enter all of the
pertinent subscriber information for setting up the main
extension, additional communication devices, message
center parameters, etc.
Atlas WAV Chapter 7 Page
Page 98

3
“I’m sorry <Benjamin Franklin> did not answer.
Define the subscriber’s priority for a conference call.
Subscriber Setup Field Definitions
NAME OF ITEM DESCRIPTION
First Name
For a subscriber this field contains the first name of
the subscriber. (Required)
For a department this field contains the name of the
department. (Required)
Middle Name
Last Name
Primary Ext.
The subscribers middle name if any.
The subscriber’s last name. (Required)
This is the Office Extension of the subscriber. Any
time this is changed the office extension is also
changed automatically.
Pin Number
A four digit number used to gain entry into the
subscribers message center. Access is gained at the
main greeting prompt by pressing: “#” + Ext.
Number + PIN Number.
When Ask For
Defines the speech recognition used to locate the
current entry. Use the vertical bar to separate
different selections to be used such as Benjamin
Franklin or Benjamin.
Prompt With
This field is used when speaking the subscriber’s
name, like on a transfer or no answer. Example:
Password
Would you like to leave a message.
Define a subscriber’s verbal password when DTMF
is not used. This can be any phrase of group of
words such as: “My dog is black with white feet.”
Conference Priority
The higher the number, the higher the priority.
File Menu
Atlas WAV Chapter 7 Page
Page 99

4
MENU ITEM DESCRIPTION
New
Clear out the subscriber dialog and reset subscriber
information. To add a new subscriber.
Save
Save Name Change
Save the current subscriber information.
Save the name change when the name has been
changed on a current subscriber.
Delete
Delete the current subscriber and reset the subscriber
dialog.
Delete List
Select a group of subscribers to delete from the
system.
Duplicate
Subscriber
Exit
Save & Exit
Duplicate the current subscriber information into a
given number of subscribers.
Exit the subscriber dialog.
Save the current subscriber information and exit the
subscriber dialog.
When selecting Delete List a Subscriber Deletion List will
open and then you simply double click a name to move it
from one list to the other.
File Menu
Atlas WAV Chapter 7 Page
Page 100

5
MENU ITEM DESCRIPTION
Save
Deletes all subscribers contained in the Group to
Delete list.
Reset
Clear out all subscribers listed in the Group to Delete
list.
Exit
Exit the Subscriber Deletion List dialog.
You may save time when entering a large number of new
subscribers that all have the same feature requirements by
using the Duplicate Subscriber dialog.
Duplicate Subscriber
NAME OF ITEM DESCRIPTION
Starting Extension
The new subscriber extension number to start with –
such as 120.
Increment By
The number by which to increment the extension
number – such as 5 – resulting in new subscribers
120, 125, 130, etc.
Number of
The number of new extensions needed – for example
10 – would create 10 new subscribers.
OK
Cancel
Will create the extensions or subscribers defined.
Will cancel the creation of new subscribers or
extensions.
Atlas WAV Chapter 7 Page
 Loading...