

Page 1
L
L
o
o
e
e
k
kii
a
a
n
n
d
d
B
B
e
ellll
o
o
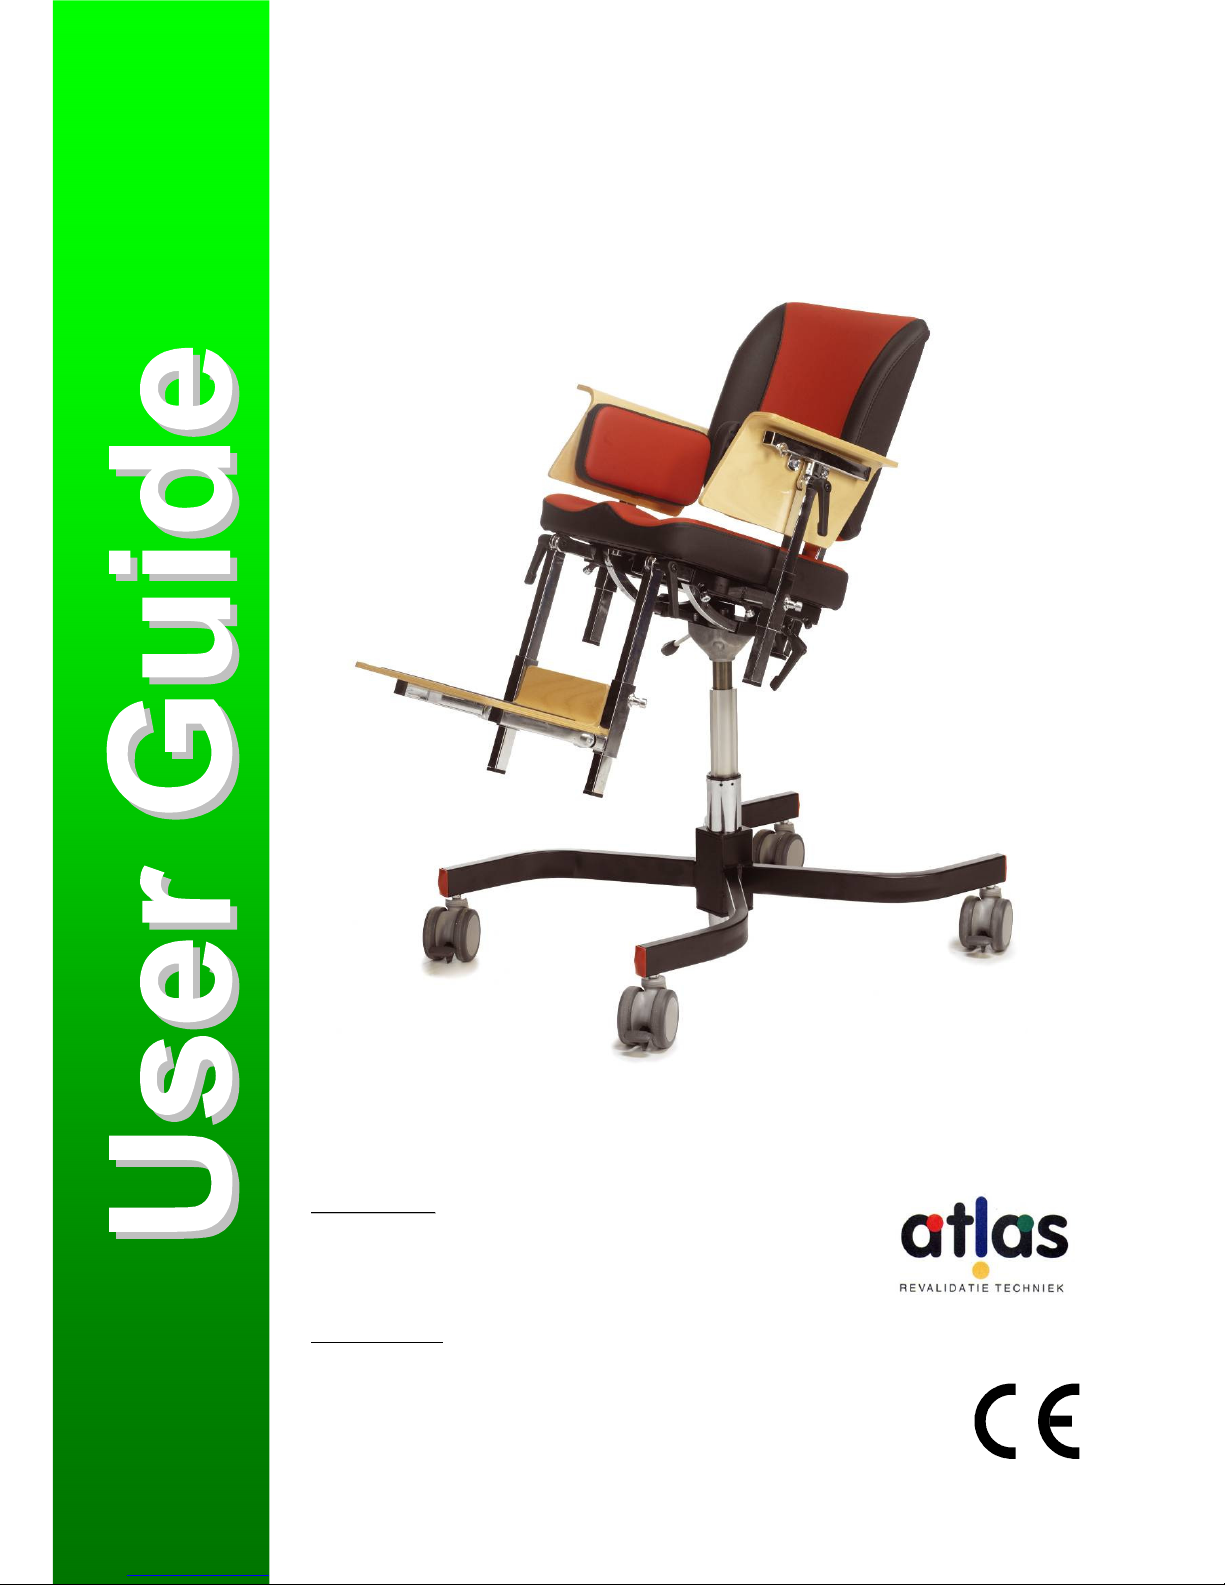
The Atlas highchairs
PPoossttaall aaddddrreesss
s
Atlas Revalidatie Techniek BV
PO Box 106
5370 AC Ravenstein
The Netherlands
Visiting address
Korte Stukken 7
5371 MN Ravenstein
The Netherlands
Tel: +31 (0)486-45 33 44
Fax: +31 (0)486-45 35 15
www.atlas-rehab.nl
info@atlas-rehab.nl
MMaayy 2200008
8
Page 2

Loeki and Bello User Guide
Foreword
No part of this User Guide may be reproduced, stored in a retrieval system, or published, in any form or by any means, electronic,
mechanical, photocopying, recording or otherwise, without the prior written permission of Atlas Revalidatie Techniek BV.
© 2008 Atlas Revalidatie Techniek B.V.
1
FFoorreewwoorrdd
This user guide is intended for parents and/or supervisors of children using one of the following
Atlas highchairs: the Loeki or the Bello.
The Altas Loeki and Bello highchairs are designed as a resource for children with simple or
multiple handicaps. The various models can be used indoors; in rehabilitation centres and
institutions, as well as in the home.
Each chair bears the CE marking, which indicates that it meets the European requirements.
The settings of the chairs are adjusted by the dealer prior to delivery. After this, the most important
settings can be changed without difficulty to ensure that the child derives optimal benefits from
his/her highchair by following the directions contained in this user guide. The child’s attending
therapist can use this guide to make optimal use of the highchair’s facilities that are designed to
accommodate the child’s growth.
The user guide contains a great many photographs that will facilitate finding the adjustment
facilities on the chair.
Your experiences with the Loeki and Bello highchairs are important for their continual
improvement. If you have remarks or suggestions for improvement of this product, please contact
us via:
Postal address:
Atlas Revalidatie Techniek BV
Antwoordnummer 3509
5370 ZX Ravenstein
The Netherlands
Internet:
www.atlas-rehab.nl
info@atlas-rehab.nl
Read this user guide carefully.
Page 3

Loeki and Bello User Guide
Contents
No part of this User Guide may be reproduced, stored in a retrieval system, or published, in any form or by any means, electronic,
mechanical, photocopying, recording or otherwise, without the prior written permission of Atlas Revalidatie Techniek BV.
© 2008 Atlas Revalidatie Techniek B.V.
2
CCoonntteennttss
1. THE LOEKI AND THE BELLO ........................................................................................................................... 3
2. SAFETY.................................................................................................................................................................... 4
2.1 S
AFETY INSTRUCTIONS
....................................................................................................... 4
2.2 I
MMEDIATE DANGER
............................................................................................................ 4
3. INITIAL USE ........................................................................................................................................................... 6
3.1 L
IFTING THE CHILD INTO THE CHAIR
...................................................................................... 6
3.2 L
IFTING THE CHILD OUT OF THE CHAIR
.................................................................................. 6
4. OPERATION ........................................................................................................................................................... 7
4.1 D
AILY ADJUSTMENTS
.......................................................................................................... 7
4.1.1 The brakes.................................................................................................................................................... 7
4.1.2 Adjusting the height of the seat .................................................................................................................... 9
4.1.3 Adjusting the seating angle (Bello only) ...................................................................................................... 9
4.1.4 Adjusting the angle of the footrest (Bello only) ......................................................................................... 10
4.1.5 Adjusting the angle of the armrests (Bello only)........................................................................................ 10
4.1.6 The height of the head support................................................................................................................... 10
4.1.7 The tray table (optional) ............................................................................................................................ 11
4.1.8 The parts to secure the child in position (optional) ................................................................................... 11
4.1.9 Turning the leg supports aside (optional).................................................................................................. 12
4.2 S
TANDARD SETTINGS (IT IS ADVISABLE TO HAVE THESE SETTINGS FIXED BY A PARAMEDIC
) .... 13
4.2.1 The height and angle of the back support ................................................................................................... 13
4.2.2 Seat depth and seat width .......................................................................................................................... 13
4.2.3 The height of the armrests.......................................................................................................................... 14
4.2.4 The height, depth and angle of the footrest................................................................................................ 14
4.2.5 The height and depth of the head support (optional) ................................................................................. 16
4.2.6 The width of the side supports for the back support (optional).................................................................. 16
4.2.7 The height, depth and width of the leg supports (optional)........................................................................ 17
4.2.8 The gas spring............................................................................................................................................ 18
5. MAINTENANCE ................................................................................................................................................... 19
6. REPAIRS ................................................................................................................................................................ 19
7. WARRANTY.......................................................................................................................................................... 19
8. TECHNICAL DATA ............................................................................................................................................. 20
8.1 S
TANDARD DIMENSIONS OF THE LOEKI AND THE BELLO
....................................................... 20
8.2
UPHOLSTERY
.................................................................................................................. 20
8.3 O
PTIONS
.......................................................................................................................... 20
Page 4
Loeki and Bello User Guide
1. The Loeki and the Bello
No part of this User Guide may be reproduced, stored in a retrieval system, or published, in any form or by any means, electronic,
mechanical, photocopying, recording or otherwise, without the prior written permission of Atlas Revalidatie Techniek BV.
© 2008 Atlas Revalidatie Techniek B.V.
3
11.. TThhee LLooeekkii aanndd tthhee BBeelllloo
The “Loeki” and “Bello” Atlas highchairs are solid eating/working chairs available in three sizes.
The chairs are adjustable in all directions to accommodate the child’s growth and to provide good
sitting support.
Loeki settings
The height of the chair is adjustable using a gas spring and the subframe is equipped with four
double locking swivel wheels. The seat width, seat depth and the footrest are easy to adjust using
head screws. The height and width of the armrests, and the height and depth of the backrest are
adjustable so that an optimal seating posture can be attained.
Bello settings
The Bello is adjustable in the same way as the Loeki. In addition, it is possible to adjust the angle
of the armrests and the footrest, thereby further optimising the child’s seating arrangements.
Children with poor truncal balance in particular benefit from these adjustable settings. «
Standard features
The chairs come with covered contour seats and a preformed backrest. The chair is modular which
means that the chair can be constructed to fit individual needs.
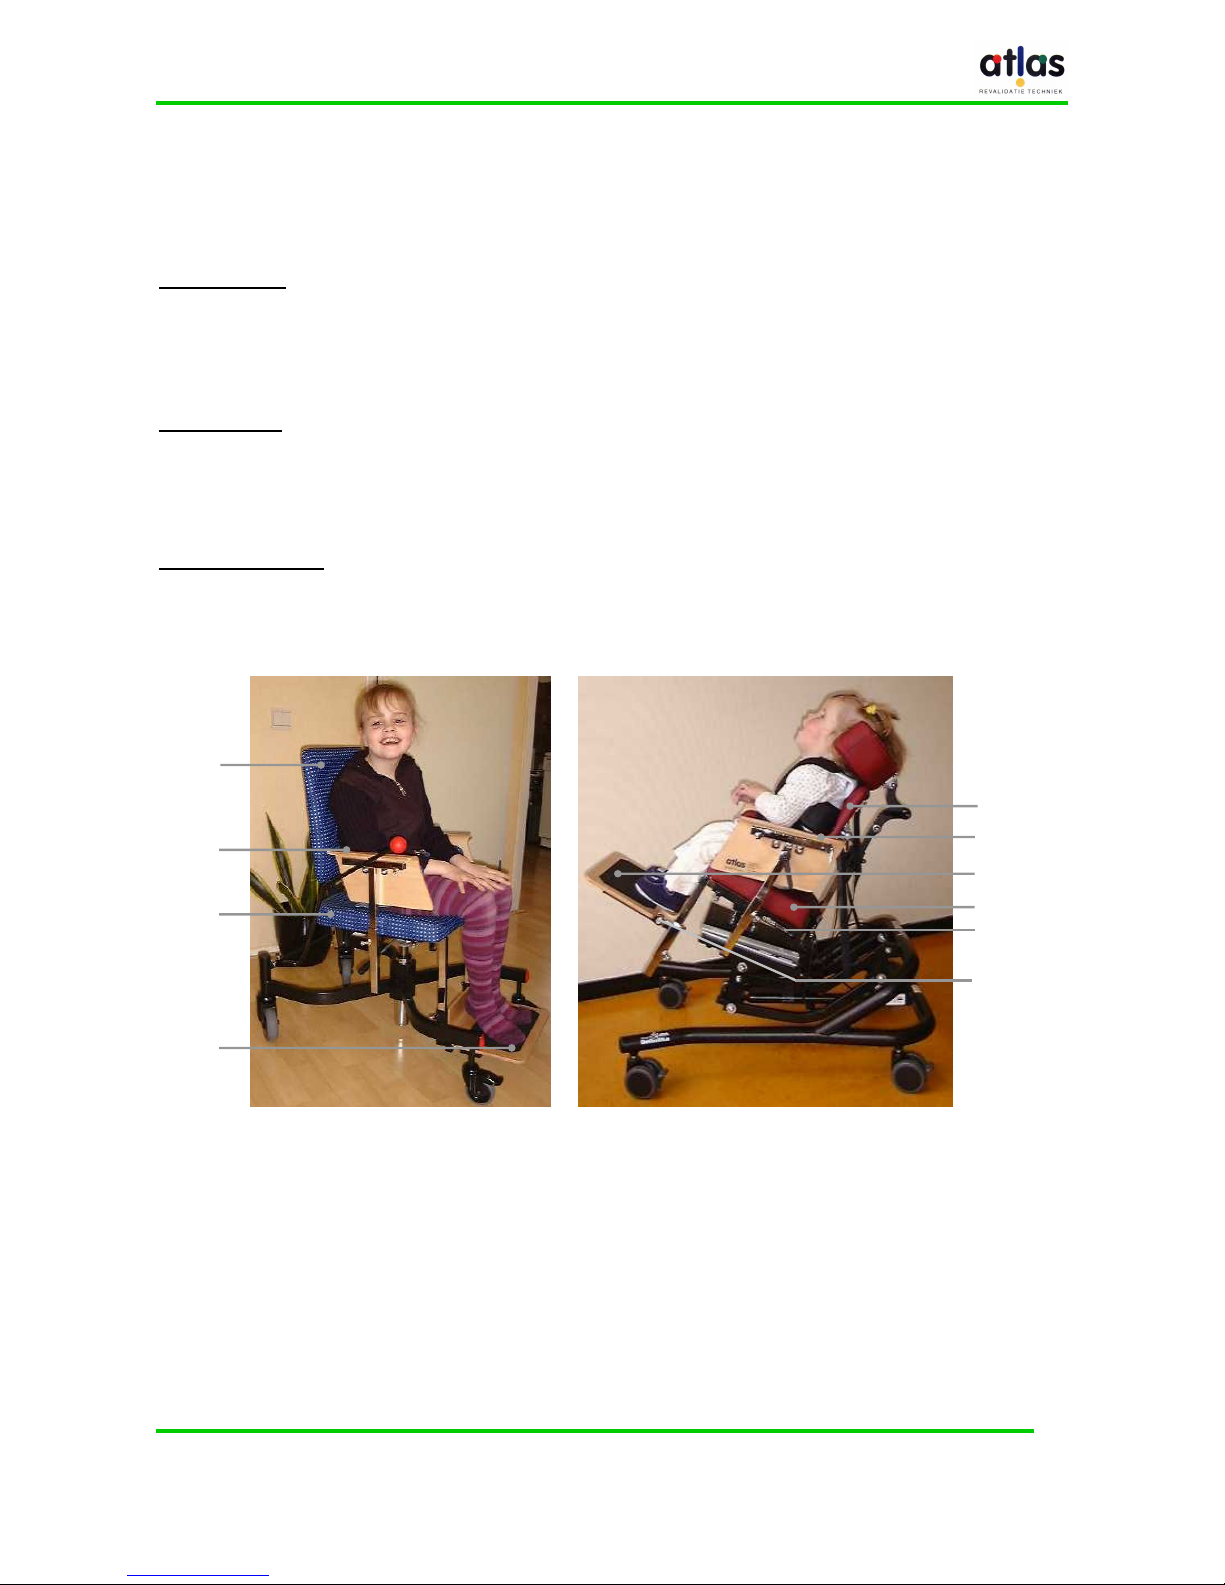
Illustration 1:
Standard features of the Loeki, with
standard subframe.
a) Backrest
b) Armrest
c) Seat
d) Footrest
Standard features of the Bello, including
head support and optional subframe.
e) Setting to change seating angle
f) Setting to change angle of footrest
a
b
c
a
b
c
d
d
e
f
Page 5
Loeki and Bello User Guide
2. Safety
No part of this User Guide may be reproduced, stored in a retrieval system, or published, in any form or by any means, electronic,
mechanical, photocopying, recording or otherwise, without the prior written permission of Atlas Revalidatie Techniek BV.
© 2008 Atlas Revalidatie Techniek B.V.
4
22.. SSaaffeettyy
Atlas put a great deal of care into ensuring the child’s safety. A great deal of effort went into
creating the proper design for the chair and its accessories. This extends to the initial settings of
the chair, which have been expertly engineered by Atlas. Nevertheless, it is imperative for the
child’s supervisors and parents to adhere to the following safety instructions in order to safeguard
the safe use of the highchair.
2.1 Safety instructions
a) Never leave your child alone in the chair and always supervise its use.
b) Ensure that all fastenings and parts used to secure the child in position are properly tightened.
c) Only use the chair on level ground.
d) Engage the brakes on at least two of the four wheels.
e) The Atlas chair is designed exclusively for interior use.
f) The Atlas highchair must not be used as a means of transportation.
g) Do not allow other children to play with the chair, push the chair forward or hang onto the
armrests.
h) Adjustments may only be done by parents or carers. Unless absolutely necessary, this should
not be done with the child still in the chair.
i) Once the adjustments have been made, properly tighten the lock screws and the adjusting
knobs and verify this has been done after each adjustment. Always turn the clamps to the
inside to avoid clothes from catching.
j) When adjusting the seating angle for the Bello, hold on to the chair in order to prevent it from
tilting too far when the seat is unlocked.
k) When turning over the tray table, be careful to ensure that the child’s fingers cannot become
jammed.
l) When moving or adjusting the chair, make sure that any loose fitting clothes, tablecloths, etc.
cannot be caught by the chair’s bolts, clamps or corners.
m) Avoid adopting an uncomfortable position for long periods of time while you are busy with a
child seated in the highchair. The legs of the subframe are designed so that it is easy for you to
stand between them while you lift the child in and out of the chair. However, be aware that the
legs protrude some distance away from the chair.
n) Never use the maximum height, width or depth to ensure a sturdy connection.
o) Do not exceed the maximum permissible load of 75 kg.
p) Any service carried out by someone other than a person authorised by Atlas Revalidatie
Techniek voids the warranty and causes Atlas Revalidatie Techniek’s general liability to lapse.
Safety instructions ‘a’ and ‘b’ are repeated on a warning sticker affixed to the highchair (see figure
below). Make sure that this text remains legible at all times. If necessary ask for a new copy of this
sticker.
2.2 Immediate danger
Practice the following steps designed to rapidly retrieve your child from the chair in the event of fire
or other immediate danger, until you are able to carry them out quickly.
Acting quickly in the event of fire or other immediate danger:
a) Unlock the tray table, pull it to the front and turn it to the side and turn the knee supports away,
if present;
Ensure that all the fastenings and par
ts used to secure
the child in position are properly tightened.
Never leave your child alone in the chair.
Always supervise its use.
Page 6

Loeki and Bello User Guide
2. Safety
No part of this User Guide may be reproduced, stored in a retrieval system, or published, in any form or by any means, electronic,
mechanical, photocopying, recording or otherwise, without the prior written permission of Atlas Revalidatie Techniek BV.
© 2008 Atlas Revalidatie Techniek B.V.
5
b) Quick release the front of the body harness used to secure the child in position and open the
clasp of the hip belt or the leg harness that secures the child in position, if present;
c) Lift the child out of the chair.
Page 7

Loeki and Bello User Guide
3. Initial Use
No part of this User Guide may be reproduced, stored in a retrieval system, or published, in any form or by any means, electronic,
mechanical, photocopying, recording or otherwise, without the prior written permission of Atlas Revalidatie Techniek BV.
© 2008 Atlas Revalidatie Techniek B.V.
6
33.. IInniittiiaall uussee
Before putting the highchair into use, inspect it for visible defects. In case of doubt consult the
supplier. Ask the supplier to instruct you, if you are not yet familiar with the use of this type of
highchair.
The highchair is delivered with the features specifically ordered for your child. The adjustments to
corrective accessories are exclusively made on the basis of the advice of a paramedic. It is
possible that after initial use, changes to the standard settings are required. You must make an
appointment with the supplier for this purpose. Please note: standard settings may only be
adjusted by a trained expert!
Please read this user guide carefully prior to making use of the chair and verify that the use and
purpose of all components and accessories are clear to you (try everything out first, before placing
the child in the chair). Familiarise yourself with the safety instructions in chapter 2.
Arrangements can be made to receive personal instruction from you supplier. In case of problems,
contact the treating therapist or the supplier of the highchair.
3.1 Lifting the child into the chair
To lift the child into the chair in a safe and responsible way it is important to carefully adhere to the
sequence of steps described below. Please refer to chapter 4, “Operation”, for the chair’s operating
instructions.
a) Set the brakes on at least two of the chair’s four wheels, so that the chair cannot roll away as
you lift the child into the chair;
b) Ensure that all settings are properly secured;
c) Place the seat at the desired height using the gas spring adjustment mechanism;
d) If applicable: turn the leg supports aside and turn the tray table out of the way;
e) Loosen the parts used to secure the child in position;
f) Lift the child into the chair (the subframe is designed so that it is possible to adopt a
comfortable position between the chair’s legs during lifting);
g) Hold the child firmly and tighten the parts that secure the child in position;
h) If applicable: turn the leg supports into position and reposition the tray table;
i) If necessary, change some settings to make the child’s seating position more comfortable;
j) Never leave the child alone in the chair and always supervise its use.
3.2 Lifting the child out of the chair
To lift the child out of the chair in a safe and responsible way it is important to carefully adhere to
the sequence of steps described below. Please refer to Chapter 4, Operation, for the chair’s
operating instructions.
a) Set the brakes on at least two of the chair’s four wheels, so that the chair cannot roll away as
you lift the child out of the chair;
b) Verify that all settings are properly secured;
c) Place the seat at the desired height using the gas spring adjustment mechanism;
d) Turn the leg supports, if any, aside;
e) Hold the child firmly and loosen the parts that secure the child in position;
f) Lift the child out of the chair.
Attention:
Read chapter 4, “Operation”, before using the chair for the first time.
Page 8

Loeki and Bello User Guide
4. Operation
No part of this User Guide may be reproduced, stored in a retrieval system, or published, in any form or by any means, electronic,
mechanical, photocopying, recording or otherwise, without the prior written permission of Atlas Revalidatie Techniek BV.
© 2008 Atlas Revalidatie Techniek B.V.
7
44.. OOppeerraattiioonn
A distinction is made between standard settings and daily adjustments to the highchair. Changes to
the standard settings always require tools. The daily settings are indicated by the clamps and the
adjusting knobs (see illustration 2).
4.1 Daily adjustments
There are a few settings that are adjusted as part of the daily use of the highchair. These
adjustments are required to lift the child in and out of the chair or to be able to change the seating
position of the child somewhat when needed. As shown in illustration 2, these daily adjustments do
not require any tools.
4.1.1 The brakes
• The brakes on the Atlas highchairs can be engaged and released by using the black lip attached
to each one of the four wheels.
• Engaging the brake:
Push the lip down with the front part of the shoe until it stays down (see illustration 3A).
• Releasing the brake:
Push up the lip with the front part of the shoe (see illustration 3B).
Illustration 2:
Above: adjusting knob.
Right: clamp.
Attention:
Adopt a comfortable posture while loosening or tightening the adjusting knobs.
Once the
adjustments have been made, be sure to retighten the adjusting knobs.
Always turn the clamps to
the inside so that clothes cannot catch on them.
To do this press the button at the top and set the
clamp to the desired position without loosening the adjusting screw.
Page 9

Loeki and Bello User Guide
4. Operation
No part of this User Guide may be reproduced, stored in a retrieval system, or published, in any form or by any means, electronic,
mechanical, photocopying, recording or otherwise, without the prior written permission of Atlas Revalidatie Techniek BV.
© 2008 Atlas Revalidatie Techniek B.V.
8
Attention:
Only operate the brakes while wearing footwear.
Illustration 3A:
Engaging the brake.
Illustration 3B:
Releasing the brake.
Page 10

Loeki and Bello User Guide
4. Operation
No part of this User Guide may be reproduced, stored in a retrieval system, or published, in any form or by any means, electronic,
mechanical, photocopying, recording or otherwise, without the prior written permission of Atlas Revalidatie Techniek BV.
© 2008 Atlas Revalidatie Techniek B.V.
9
4.1.2 Adjusting the height of the seat
• The lever for adjusting the height of the seat is located at the bottom of the seat (see illustration
4).
• Hold the chair steady with one hand and with the other hand move the lever up or down to set
the seat to the desired height. Depending on the weight of the child, additional pressure may be
required to move the seat up or down.
• The seat’s height must be adjusted so that the child is seated at a good working height for the
supervisor, is seated at the same height as the other children or, for example, can be properly
positioned at a table.
4.1.3 Adjusting the seating angle (Bello only)
• The clamp for adjusting the seating angle is located to the left below the seat (see illustration
5A) and the adjusting screw is located to the right (see illustration 5B).
• First loosen the clamp for adjusting the seating angle. Then, while holding the backrest in
position with one hand, pull out the seating angle locking knob. Tilt the seat into the desired
position at a point where the locking knob springs back into its locking position. Retighten the
clamp and verify that the seating angle is properly secured by pushing firmly on the seat and the
backrest.
• If required, a passive or active seating posture can be achieved using the seating angle
adjustment mechanism. A change in seating posture is also a positive experience for the child.
Attention:
The initial settings or important changes to the seating posture may only be made by specially
trained personnel.
The highchair may only be adjusted by parents or carers after elaborate
instruction and careful study of this guide.
Illustration 4:
Adjusting the seat’s height.
Attention:
Make sure to hold the chair firmly while unlocking the seating angle to prevent the chair from tilting
too far.
Illustration 5A:
The clamp for adjusting the seating angle.
Illustration 5B:
The knob for adjusting the seating angle.
Page 11

Loeki and Bello User Guide
4. Operation
No part of this User Guide may be reproduced, stored in a retrieval system, or published, in any form or by any means, electronic,
mechanical, photocopying, recording or otherwise, without the prior written permission of Atlas Revalidatie Techniek BV.
© 2008 Atlas Revalidatie Techniek B.V.
10
4.1.4 Adjusting the angle of the footrest (Bello only)
• The clamps for adjusting the angle of the footrest are located on both sides of the footrest (see
illustration 6).
• Loosen the clamps on both sides and adjust the bars to which the footrest is attached to the
desired position. After this, retighten the clamps securely. Make sure that the bars on the left
and the right are at the same angle. Verify that the bars have been securely tightened.
• If necessary, the angle of the footrests can also be adjusted. This provides the possibility of
setting the ankle and knee angles in an optimal position. Particularly children with poor truncal
balance benefit from this option.
4.1.5 Adjusting the angle of the armrests (Bello only)
• The clamps for adjusting the angle of the armrests are
located in the middle below the armrests (see illustration 7).
• Hold on to the armrest with one hand and loosen the clamp
with the other hand. Set the armrest to the desired position
and retighten the clamp securely. Adjust the other armrest so
that it is in the same position. Verify that the armrests have
been securely tightened. Ensure that the tray table is properly
secured and therefore cannot shift while the angle is
adjusted.
• When necessary, the possibility of adjusting the angle of the
armrests further increases the child’s potential seating
comfort. When the seat is tilted, the armrests (possibly
together with the tray table) can be placed in a horizontal
position again.
4.1.6 The height of the head support
• The clamp for adjusting the height of the head support is
located at the back of the head support (see illustration 8).
• Hold on to the head support with one hand and loosen the
clamp for adjusting the height of the head support with the
other hand. Position the head support at the desired height
and retighten the clamp securely. Push up on the head
support to verify that it is properly secured. If the height of the
head support is adjusted this way, it is important to make sure
that the angle of the head support is also adjusted properly.
• The head support must be able to provide support when the
head is positioned straight above the trunk.
Illustration 6:
Adjusting the angle of the footrest.
Illustration 7:
Adjusting the angle of the armrests
(Bello only).
Illustration 8:
Adjusting the angle of the head
support.
Page 12

Loeki and Bello User Guide
4. Operation
No part of this User Guide may be reproduced, stored in a retrieval system, or published, in any form or by any means, electronic,
mechanical, photocopying, recording or otherwise, without the prior written permission of Atlas Revalidatie Techniek BV.
© 2008 Atlas Revalidatie Techniek B.V.
11
4.1.7 The tray table (optional)
• The clamp for adjusting the tray table is located at the front
below the armrest (see illustration 9).
• Loosen the clamp, pull the tray table slightly to the front and
move the tray table out of the way beside the chair (see
illustration 9).
Once it is repositioned, the depth of the tray table can be
readjusted by sliding it. Retighten the clamp and verify that
the tray table is properly secured by pulling at the front of the
tray table.
• If necessary, the depth of the tray table must be adjusted so
that the child is not wedged. Make sure that there is not too
much room between the child and the tray table so that, for
example, the child’s arms could become wedged.
4.1.8 The parts to secure the child in position (optional)
Leg harness:
• There are 4 fastenings at the back
of the seat for attaching the leg
harness that secures the child in
position (see illustration 10a).
There are two quick release clasps
at the front of the leg harness (see
illustration 10b).
• Only the locks at the front of the
leg harness are released when the
child is lifted into or out of the
chair. The fastenings at the back of
the seat remain locked in place.
• When necessary, the leg harness
keeps the child positioned at the
back of the seat and ensure that he/she cannot slide out of the chair. The leg harness must be
firmly secured, but must not pinch the child.
Belt:
• The belt to secure the child in
position is fastened to the chair at
the back of the seat. The belt can
be adjusted near the seat and near
the clasp (see illustration 11).
• The quick release mechanism at
the front of the belt is used when
the child is lifted into or out of the
chair.
• When necessary, the belt keeps
the child positioned at the back of
the seat and ensures that he/she
cannot slide out of the chair. The
Illustration 9:
Adjusting the tray table.
Attention:
Whenever you turn over the tray table, make sure that no one’s fingers become
jammed.
Illustration 10:
Fasteners for the leg harness.
a) Back
b) Front
a b
Illustration11:
The fastenings for the belt.
a) Back
b) Front
a b
Page 13

Loeki and Bello User Guide
4. Operation
No part of this User Guide may be reproduced, stored in a retrieval system, or published, in any form or by any means, electronic,
mechanical, photocopying, recording or otherwise, without the prior written permission of Atlas Revalidatie Techniek BV.
© 2008 Atlas Revalidatie Techniek B.V.
12
Illustration 12:
The fastenings for the body
harness.
belt must be firmly secured, but must not pinch the child.
Body harness
• The body harness to secure the child in position is fastened to the
chair at the back (see illustration 12). The body harness can also be
adjusted using the bottom two clasps at the front.
• The quick release mechanism at the front of the body harness is
used when the child is lifted into or out of the chair.
• When necessary, the body harness ensures that the child is able to
stay seated upright. The body harness must be firmly secured, but
must not pinch the child.
4.1.9 Turning the leg supports aside (optional)
• The bar for turning the leg supports aside is located
at the front of the chair. The locking knob is
attached to the bar (see illustration 13).
• Push the bar on one side gently to the inside, pull
the locking knob up and then turn the leg support to
the side. Do the same thing on the other side. Make
sure that when the leg supports are repositioned,
the locking knob springs back into position and
verify that the leg supports are properly secured.
• If necessary, the leg support must be properly
positioned in line with the upper leg, preferably with
the child’s kneecap positioned in the hollow of the
support. To make sure that the leg supports fit
snugly along the sides, bend the side plates,
without pinching. The Atlas logo on the leg supports
must always appear upside down.
Attention:
After each adjustment, verify that the parts used to secure the child
in position are properly secured.
Attention:
After each adjustment,
verify that the parts used to secure the child
in position are properly secured.
Illustration13:
Turning aside the leg support.
Page 14

Loeki and Bello User Guide
4. Operation
No part of this User Guide may be reproduced, stored in a retrieval system, or published, in any form or by any means, electronic,
mechanical, photocopying, recording or otherwise, without the prior written permission of Atlas Revalidatie Techniek BV.
© 2008 Atlas Revalidatie Techniek B.V.
13
Attention:
Adopt a comfortable posture while loosening or tightening the adjusting screws.
Never use the maximum height, width or depth to ensure a sturdy connection.
4.2 Standard settings (it is advisable to have these settings fixed by a paramedic)
A number of standard settings must be fixed in accordance with the child’s length, weight and
handicap; these will have to be altered after a while, if necessary in consultation with the attending
therapist.
4.2.1 The height and angle of the back support
Height
• The screw for adjusting the height of the back support is located at the bottom of bar to which
the back support is attached (see illustration 14). Hexagonal key (Allen key) number 6 is
required to make the adjustment.
• Hold on to the back support with one hand and loosen the adjusting
screw with the other hand. Position the back support at the desired
height and retighten the adjusting screw securely. Push down on
the back support to verify that it is properly secured.
• The height must be adjusted so that when the child is seated upright
in the chair, the top of the back support is level with the top of the
child’s shoulders.
Angle
• The nut for adjusting the angle of the backrest is located at the back
of the back support (see illustration 14). Nut spanner number 17 is
required to make the adjustment.
• Hold on to the back support with one hand and loosen the adjusting
nut with the other hand. Position the back support at the desired
angle and then retighten the adjustment nut securely. Verify that the
back support has been securely fastened.
• The back support is normally adjusted to an angle of 90° to the seat.
Make sure that the adjusting nut is always properly tightened.
4.2.2 Seat depth and seat width
Seat depth
• The screw for adjusting the seat’s depth is located at the back at the
bottom of the seat (see illustration 15). Hexagonal key (Allen key)
number 6 is required to make the adjustment.
• Loosen the screw for adjusting the seat depth. After this, using the
bar to which the back support is attached, adjust the back support to
the desired position. Then retighten the adjusting screw securely
and verify that the bar of the back support is once again securely
fastened.
• Make sure that the child’s entire lower leg is supported and that the
knees are positioned at an angle of 90°.
Illustration 14:
Adjusting the height of
the
backrest.
a)
Adjusting nut for setting
the angle of the backrest.
a
Illustration 15:
Adjusting the seat’s depth.
Page 15

Loeki and Bello User Guide
4. Operation
No part of this User Guide may be reproduced, stored in a retrieval system, or published, in any form or by any means, electronic,
mechanical, photocopying, recording or otherwise, without the prior written permission of Atlas Revalidatie Techniek BV.
© 2008 Atlas Revalidatie Techniek B.V.
14
Seat width
• The screw for adjusting the seat’s width is located at the side and
bottom of the seat (see illustration 16). Hexagonal key (Allen key)
number 6 is required to make the adjustment. On the right hand
side, it may be necessary to tilt the seat to the front in order to be
able to reach the adjusting screw.
• Loosen the screw for adjusting the seat’s width and place the
armrest in the desired position. Place the other armrest at exactly
the same distance. Be sure to retighten the adjusting securely.
Verify that the armrests have been securely tightened.
• Make sure that the cushions in the seat fit at the height of the
child’s pelvis.
4.2.3 The height of the armrests
Height of the armrests
• The screw for adjusting the height of the armrests is located
below the armrests (see illustration 17). Hexagonal key (Allen
key) number 6 is required to make the adjustment.
• Hold on to the armrest with one hand and loosen the screw for
adjusting the height of the armrest with the other hand. Position
the armrest at the desired height and retighten the adjusting
screw securely. Push down on the armrest to verify that it is
properly secured. Place the other armrest at exactly the same
height.
• The armrests must be positioned so that the child is able to rest
his/her arms on the armrests while keeping the shoulders
relaxed. If a tray table is to be attached to the armrests, the
screws for adjusting the height of the armrests can be used to set
the height of the tray table.
4.2.4 The height, depth and angle of the footrest
Height
• The screw for adjusting the height of the footrest is located at the
side of the footrest (see illustration 18). Hexagonal key (Allen key) number 6 is required to make
the adjustment.
• Hold on to the footrest with one hand and loosen the screws for adjusting the height with the
other hand. Place the footrest in the desired position and retighten the adjusting screws
securely. Make sure that the left and right sides of the footrest are positioned at the same
height. Verify that the footrest is securely fastened by pushing down on it with your hands.
• The height of the footrest must be adjusted so that the child is seated with the knees bent at a
90° angle.
Illustration 16:
Adjusting the seat’s width.
Illustration 17:
Adjusting the height of the
armrests.
Illustration 18:
Adjusting the height of the footrest.
Page 16

Loeki and Bello User Guide
4. Operation
No part of this User Guide may be reproduced, stored in a retrieval system, or published, in any form or by any means, electronic,
mechanical, photocopying, recording or otherwise, without the prior written permission of Atlas Revalidatie Techniek BV.
© 2008 Atlas Revalidatie Techniek B.V.
15
Depth
• The screw for adjusting the depth of the footrest is located at the side and bottom of the seat
(see illustration 19). Hexagonal key (Allen key) number 6 is required to make the adjustment.
• Loosen the adjusting screws on both sides and place the bars to which the footrest is attached
in the desired position. Retighten the adjusting screws securely. Make sure that the bars on the
left and the right are at the same depth. Verify that the bars have been securely tightened.
• The depth of the footrest must be adjusted so that the child is seated with the knees at a 90°
angle and so that the footrest provides support for the child’s entire foot.
Angle at the ankle joint (Bello only)
• The screw for adjusting the angle of the footrest is located at the side of the footrest (see
illustration 20). Hexagonal key (Allen key) number 6 is required to make the adjustment.
• Hold on to the footrest with one hand, loosen both adjusting screws and place the footrest in the
desired position. Retighten the screws securely and verify that the footrest is secure by pushing
down on it with your hands.
• The possibility of adjusting the angle of the footrest even further increases the child’s potential
seating comfort.
Illustration 20:
Adjusting the angle of the footrest (Bello only).
Illustration 19:
Adjusting the depth of the footrest.
Page 17

Loeki and Bello User Guide
4. Operation
No part of this User Guide may be reproduced, stored in a retrieval system, or published, in any form or by any means, electronic,
mechanical, photocopying, recording or otherwise, without the prior written permission of Atlas Revalidatie Techniek BV.
© 2008 Atlas Revalidatie Techniek B.V.
16
4.2.5 The height and depth of the head support (optional)
Height
• The screw for adjusting the height of the head support is located at
the back of the back support (see illustration 21). Hexagonal key
(Allen key) number 6 is required to make the adjustment.
• Hold on to the head support with one hand and loosen the adjusting
screw with the other hand. Position the head support at the desired
height and retighten the adjusting screw securely. Push down on
the head support to verify that it is properly secured.
• The head support must be able to provide support at the middle of
the back of the head.
Depth
• The screw for adjusting the depth of the head support is located at
the back of the head support (see illustration 22). Hexagonal key
(Allen key) number 6 is required to make the adjustment.
• Hold on to the head support with one hand and loosen the adjusting
screw with the other hand. Position the head support at the desired
depth and retighten the adjusting screw securely. Push back on the
head support to verify that it is properly secured. Make sure that the
head support is positioned at the desired angle.
• The headrest must be able to provide support when the head is
positioned straight above the trunk.
Angle
• The screw for adjusting the angle of the head support is located at
the back of the head support (see illustration 23). Hexagonal key
(Allen key) number 6 is required to make the adjustment.
• Hold on to the head support with one hand and loosen the screw
for adjusting the angle of the head support with the other hand.
Position the head support at the desired angle and retighten the
adjusting screw securely. Push up on the head support to verify
that it is properly secured.
• The head support must be able to provide support when the head is
positioned straight above the trunk.
4.2.6 The width of the side supports for the back support
(optional)
• The screw for adjusting the width of the side supports is located at
the back of the backrest (see illustration 24). Hexagonal key (Allen
key) number 6 is required to make the adjustment.
• Hold on to one of the side supports with one hand and loosen the
adjusting screw for that side support with the other hand. Position
the side support at the desired width and retighten the adjusting
screw securely. Adjust the other side support to be in the same
position. Verify that the side supports have been securely
tightened.
• If necessary, the width of the side supports must be adjusted so
that they both fit snugly to the child’s trunk.
Illustration 22:
Adjusting the depth of the head
support.
Illustration 21:
Adjusting the height of the head
support.
Illustration 23:
Adjusting the angle of the head
support.
Illustration 24:
Adjusting the width of the side
supports.
Page 18

Loeki and Bello User Guide
4. Operation
No part of this User Guide may be reproduced, stored in a retrieval system, or published, in any form or by any means, electronic,
mechanical, photocopying, recording or otherwise, without the prior written permission of Atlas Revalidatie Techniek BV.
© 2008 Atlas Revalidatie Techniek B.V.
17
4.2.7 The height, depth and width of the leg supports (optional)
Height
• The screws for adjusting the height of the leg supports are located on the bars of the armrests
(see illustration 25). Hexagonal key (Allen key) number 6 is required to make the adjustment.
• Hold on to the bar with one leg support with one hand and loosen the screw for adjusting the
height with the other hand. Position the bar with the leg support at the desired height and
retighten the adjusting screw securely. Position the
bar with the leg support on the other side at the
same height. Verify that the leg supports have been
securely tightened.
• If necessary, the height must be adjusted so that the
leg support is positioned in line with the child’s upper
leg. Make sure that they are not positioned lower.
Depth
• The screws for adjusting the depth of the leg supports are located at the side of the leg supports
(see illustration 26). Hexagonal key (Allen key) number 6 is required to make the adjustment.
• Hold on to one of the leg supports with one hand
and loosen the screw for adjusting the depth with the
other hand. Position the leg support at the desired
depth and retighten the adjusting screw securely.
Adjust the other leg support to be in the same
position. Verify that the leg supports have been
securely tightened.
• If necessary, the depth of the leg supports must be
adjusted so that when the child is seated at the back
of the seat, the leg supports fit snugly against the knees.
Width
• The screws for adjusting the width of the leg supports are located at the front of the leg supports
(see illustration 27). Hexagonal key (Allen key) number 6 is required to make the adjustment.
• Hold on to one of the leg supports with one hand and loosen the screw for adjusting the width
with the other hand. Position the leg support at the desired width and retighten the adjusting
screw securely. Adjust the other leg support to be in
the same position. Verify that the leg supports have
been securely tightened.
• If necessary, the width must be adjusted so that
when the child is seated at the back of the seat with
the legs slightly apart, the leg support is positioned in
front of the knee. To make sure that the leg support
fits snugly along the sides, bend the side plates,
without pinching.
Illustration 25:
Adjusting the height of the leg supports.
Illustration 26:
Adjusting the depth of the leg supports.
Illustration 27:
Adjusting the width of the leg supports.
Page 19

Loeki and Bello User Guide
4. Operation
No part of this User Guide may be reproduced, stored in a retrieval system, or published, in any form or by any means, electronic,
mechanical, photocopying, recording or otherwise, without the prior written permission of Atlas Revalidatie Techniek BV.
© 2008 Atlas Revalidatie Techniek B.V.
18
4.2.8 The gas spring
• The screws for fastening the gas spring are located in the middle of the subframe.
• This adjustment is only carried out in exceptional circumstances. When the chair is delivered, it
is already set at the right height.
• Position a book/wooden block in the middle of
the subframe, right below the gas spring (see
illustration 28). Loosen both adjusting screws.
Stand on the frame as a result of which the
frame shifts down relative to the gas spring.
Retighten both adjusting screws securely. Push
down on the seat to verify that the gas spring
does not shift in its mounting.
Page 20

Loeki and Bello User Guide
5. Maintenance / 6. Repairs / 7. Warranty
No part of this User Guide may be reproduced, stored in a retrieval system, or published, in any form or by any means, electronic,
mechanical, photocopying, recording or otherwise, without the prior written permission of Atlas Revalidatie Techniek BV.
© 2007 Atlas Revalidatie Techniek B.V.
19
55.. MMaaiinntteennaannccee
• Check daily that all fastenings, knobs and adjusting screws are properly secured.
• Attend to daily hygiene. The highchair can be cleaned using general domestic cleaning agents.
Ensure that no soap residues that could cause skin irritation are left on the highchair.
• The fabric straps to secure the child in position are not protected against the penetration of
substances such as urine or food. They should be regularly washed in a lukewarm soap bath
using a mild detergent. The synthetic leather parts with which the child can be secured in
position can be cleaned using water and a domestic cleaning agent.
• The cushions on the arm supports are removable and are affixed with Velcro so that the hidden
surfaces can also be cleaned.
• Keep the Atlas highchair free from dirt: for example clean the wheels once a week.
• Lightly spray the moving parts with silicon spray once a year. (Note: silicon spray may leave
stains on surfaces.)
66.. RReeppaaiirrss
• Contact the supplier immediately to arrange for repairs in case of defects that could endanger
the child.
• If the child works his or her way up between the armrests, the child could fall out of the chair.
To prevent this, additional parts to secure the child in position must be used in consultation with
the therapist and the supplier.
• If you are unsure about the correctness of the adjustments, the correct use of parts for securing
the child in position or the correct form and use of accessories, contact the therapist or supplier
about possible changes that may be required.
77.. WWaarrrraannttyy
The following warranty covers normal use:
• A warranty of 12 months from the delivery date of the Atlas highchair. This warranty only
applies if original Atlas parts are used.
Exceptions:
• The warranty does not cover parts that are subject to normal wear;
• Manufacturing defects in upholstery and parts used to secure the child in position are covered
by a three-month warranty;
• The metal framework is covered by a three-year warranty.
The warranty will be voided in case of:
Damage as a result of misuse, neglect, an accident, incorrect repair, exposure to corrosive or
abrasive agents, using or storing the highchair in damp conditions, any failure to follow
maintenance or safety instructions, or if replacements or modifications are made by anyone other
than a person authorised by Atlas Revalidatie Techniek.
Atlas Revalidatie Techniek liability
If the warranty is voided, Atlas Revalidatie Techniek’s general liability also lapses.
The chair must be serviced once a year, otherwise Atlas Revalidatie Techniek can no longer be
held liable.
Please include your name, address, type of highchair, serial number and the date of initial use in
any correspondence.
Page 21

Loeki and Bello User Guide
8. Technical data
No part of this User Guide may be reproduced, stored in a retrieval system, or published, in any form or by any means, electronic,
mechanical, photocopying, recording or otherwise, without the prior written permission of Atlas Revalidatie Techniek BV.
© 2007 Atlas Revalidatie Techniek B.V.
20
88.. TTeecchhnniiccaall ddaattaa
8.1 Standard dimensions of the Loeki and the Bello
Loeki
Size 1
Size 2
Size 3
Bello
Size 1
Size 2
Size 3
Seat width:
18 – 32 cm 23 – 37 cm 28 – 42 cm 18 – 32 cm 23 – 37 cm 28 – 42 cm
Seat depth:
18 – 32 cm 25 – 39 cm 32 – 46 cm 18 – 32 cm 25 – 39 cm 32 – 46 cm
Min. - max. seat
height:
43 – 69 cm 43 – 69 cm 43 – 69 cm 47 – 63 cm 47 – 63 cm 47 – 63 cm
Width of subframe:
48 cm 48 cm 48 cm 48 cm 48 cm 48 cm
Length of subframe:
66 cm 66 cm 66 cm 66 cm 66 cm 66 cm
Max. user weight:
75 kg 75 kg 75 kg 75 kg 75 kg 75 kg
Subframe: coated metal with chromium-plated components
Subframe colour: black
Armrests and footrest: beech with clear lacquer
8.2 Upholstery
The upholstery used for the standard highchair, the parts used to secure the child in position, the
accessories and the anatomically shaped components is made of non-toxic, non-flammable, flameretardant and non-irritating materials.
The upholstery used by Atlas for its highchairs is urine-resistant and easy to clean with general
domestic cleaning agents.
8.3 Options
• Various head supports;
• Various parts to secure the child’s pelvis and trunk in position;
• Backrest with side supports that are width and height adjustable;
• Set of moveable knee supports to prevent the child from slumping;
• Tray table that can be folded away (made from Duropal or transparent Lexan);
• Double fixated tray table;
• Anatomically shaped backrest;
• Threshold seat;
• Set of side support cushions for a symmetric posture;
• Abduction block;
• Central brake-setting mechanism for the back wheels;
• Foldable footrest;
• Resilient footrest;
• Various subframes can be attached to sitting unit;
• Various types of upholstery, imitation leather or fabric, in various colours;
• Individual adjustments;
• Adjustment to tilting setting up to a maximum of 45° (Bello).
 Loading...