

Page 1

C
Cll
o
o
Z
Ziitt
Shower/toilet chair
Postal address
Atlas Revalidatie Techniek
PO Box 106
5370 AC Ravenstein
The Netherlands
Visiting address
Korte Stukken 7
5371 MN Ravenstein
The Netherlands
Tel: +31 (0)486-45 33 44
Fax: +31 (0)486-45 35 15
www.atlas-rehab.nl
info@atlas-rehab.nl
May 2008
Page 2

1
FFoorreewwoorrdd
This user guide is intended for parents and/or supervisors of children who use the CloZit.
The CloZit bears the CE marking, which indicates that it meets European safety requirements.
The settings of the shower/toilet chair are adjusted by the dealer prior to delivery. After this, the
most important settings can be changed without difficulty to ensure that the child derives optimal
benefits from his/her CloZit by following the directions contained in this user guide.
The user guide contains a great many photographs that will facilitate finding the adjustment
facilities on the shower/toilet chair.
Your experiences with the CloZit are important for its continual improvement. If you have remarks
or suggestions for improvement of this product, please contact us via:
Postal address:
Atlas Revalidatie Techniek BV
Antwoordnummer 3509
5370 ZX Ravenstein
The Netherlands
Internet:
www.atlas-rehab.nl
info@atlas-rehab.nl
Read this user guide carefully.
No part of this User Guide may be reproduced, stored in a retrieval system, or published, in any
form or by any means, electronic, mechanical, photocopying, recording or otherwise, without
the prior written permission of Atlas Revalidatie Techniek BV.
© 2008 Atlas Revalidatie Techniek B.V.
Page 3

2
CCoonntteennttss
1. THE CLOZIT........................................................................................................................................................... 3
2. SAFETY.................................................................................................................................................................... 4
2.1 S
AFETY INSTRUCTIONS
...................................................................................................................................... 4
2.2 I
MMEDIATE DANGER
.......................................................................................................................................... 4
3. INITIAL USE ...........................................................................................................................................................5
3.1 L
IFTING THE CHILD INTO THE SHOWER/TOILET CHAIR
........................................................................................ 5
3.2 L
IFTING THE CHILD OUT OF THE SHOWER/TOILET CHAIR
.................................................................................... 5
4. OPERATION ........................................................................................................................................................... 6
4.1 T
HE BRAKES
.......................................................................................................................................................6
4.1.1 The tilting angle of the chair ....................................................................................................................... 6
4.1.2 The height of the push bar ...........................................................................................................................6
4.1.3 The height of the backrest ........................................................................................................................... 7
4.1.6 The height, depth and width of the armrests (optional) ..............................................................................7
4.1.7 The height of the head support (optional)................................................................................................... 8
4.1.8 The belt to secure the child in position (optional)....................................................................................... 8
4.1.9 The height and depth of the footrest (optional)...........................................................................................8
4.1.10 The potty (optional) ..................................................................................................................................... 9
5. MAINTENANCE ................................................................................................................................................... 10
6. REPAIRS ................................................................................................................................................................10
7. WARRANTY.......................................................................................................................................................... 10
8. TECHNICAL DATA ............................................................................................................................................. 11
APPENDIX:
USER QUESTIONNAIRE .............................................................................................................. 12
Page 4
3
11.. TThhee CCllooZZiitt
The CloZit is a shower/toilet chair that makes it possible to care for the child in the most
comfortable way possible. The ergonomic design of the seat, the adjustment facilities and the
many accessories provide the child with optimal support and safety.
The CloZit is available in 4 different sizes. Different seat and back sizes can be combined so that
the shower/toilet chair can be tailored to fit the individual user.
Standard features
The chair comes equipped with following standard features. The seat and the backrest are covered
with a soft material. This cover is washable and is furthermore water and dirt repellent.
The backrest’s height is adjustable and the seating angle is manually adjustable. The entire chair
(back and seat) can be titled to the front or the back using a gas spring or a manual setting.
The quality of the materials used ensures that the CloZit is maintenance-friendly and easy to clean
and consequently has a long lifespan. The materials are waterproof, which also makes the chair
suitable for use in showers.
Frame
The frame can be set to the desired height using the frame’s adjustment tubes. This makes it
possible to place the seat above a toilet or to set the chair at a better working height in a shower.
The swivel wheels are equipped with brakes and make it easy to move the CloZit. The frame
comes equipped with a push bar or push handles as a standard feature.
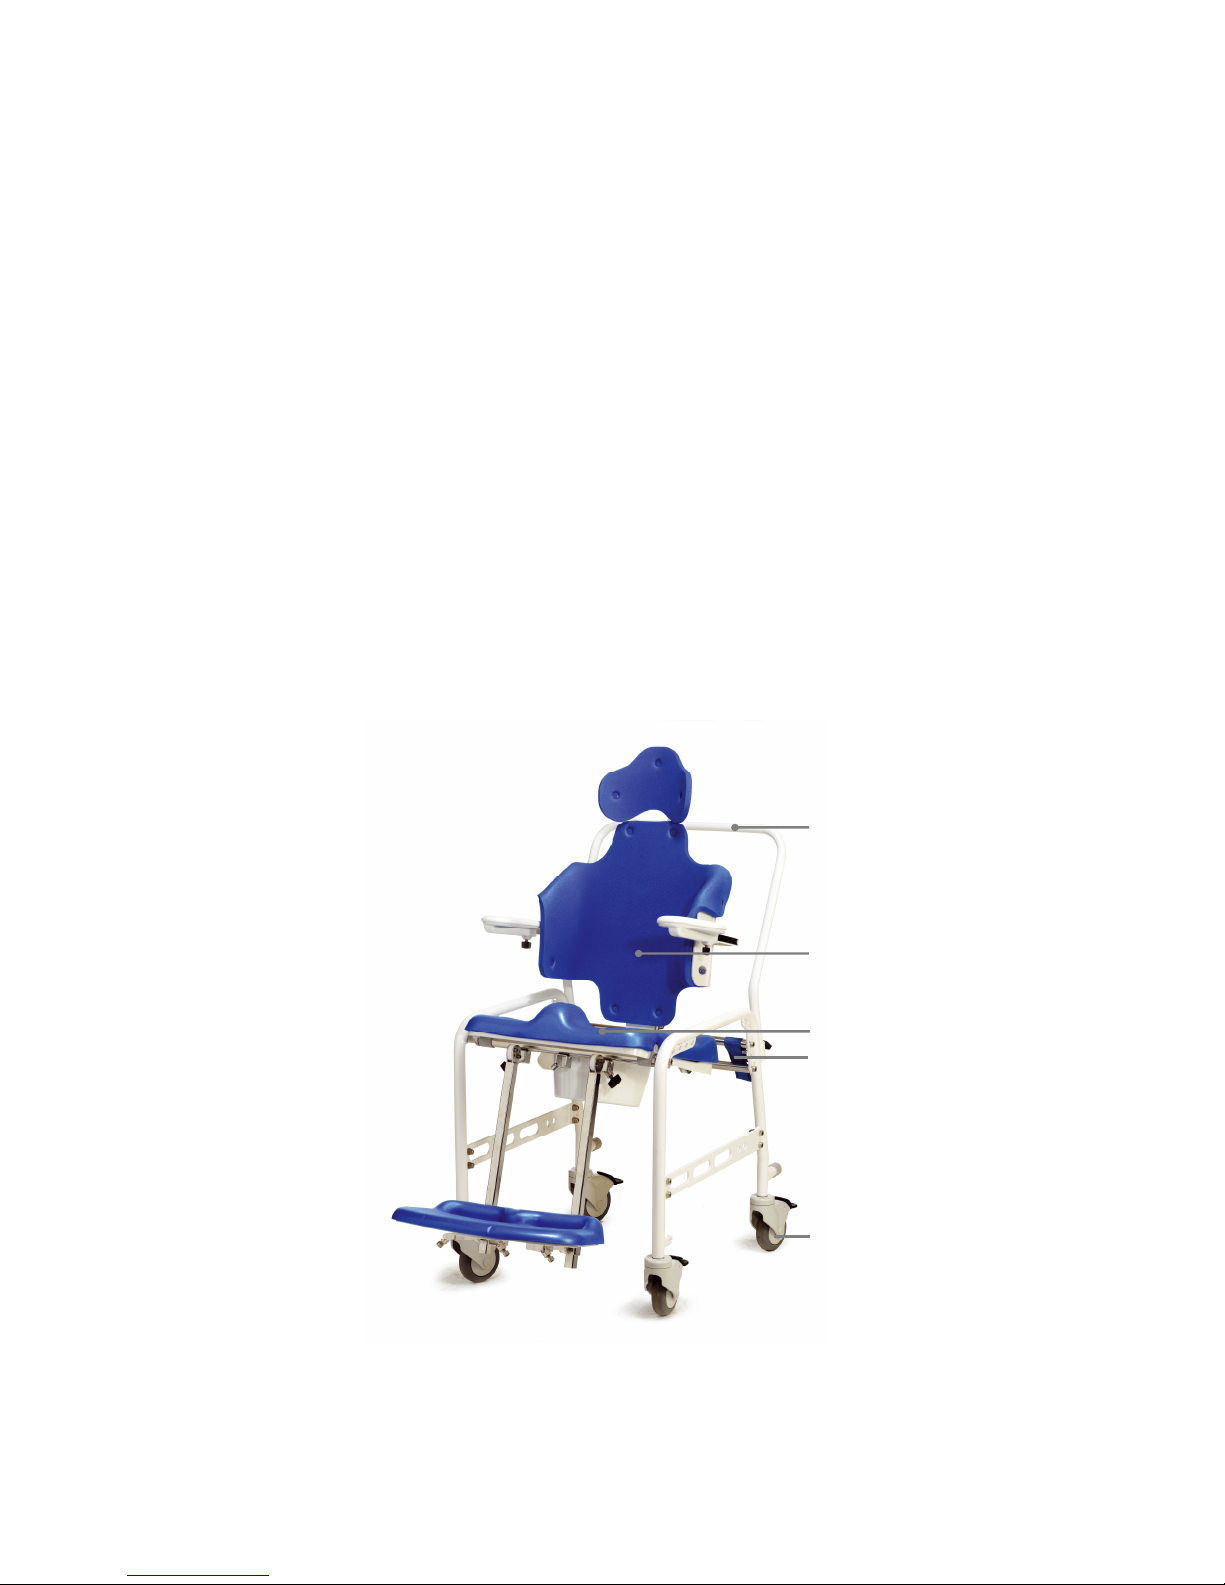
Figure 1:
Standard CloZit configuration.
a) Seat
b) Backrest
c) Push bar
d) Swivel wheels
e) Tool bag
d
a
b
c
e
Page 5

4
22.. SSaaffeettyy
It is imperative for the child’s supervisors and parents to adhere to the following safety instructions
in order to safeguard the safe use of the CloZit.
2.1 Safety instructions
a) First read this user guide and try out the shower/toilet chair before it is actually used;
b) Never leave your child alone in the shower/toilet chair and always supervise its use;
c) Ensure that all fastenings and parts used to secure the child in position are properly tightened;
d) Adjustments may only be made by the child’s parents or carers. Unless absolutely necessary,
this should not be done with the child still in the shower/toilet chair;
e) Do not allow other children to play with or ride on the shower/toilet chair;
f) Avoid adopting an uncomfortable position for long periods of time while you are attending to a
child seated in the CloZit;
g) Never use the maximum height, width or depth to ensure a sturdy connection;
h) Do not exceed the maximum user weight of 80 kg.
Safety instructions ‘b’ and ‘c’ are repeated on a warning sticker affixed to the shower/toilet chair
(see figure below). Make sure that this text remains legible at all times. If necessary ask for a new
copy of this sticker.
2.2 Immediate danger
Practice the following steps designed to rapidly retrieve your child from the CloZit in the event of
fire or other immediate danger, until you are able to carry them out quickly.
Acting quickly in the event of fire or other immediate danger:
a) Engage the brakes on at least two of the four wheels;
a) Hold the child firmly and loosen all parts used to secure the child in position (if applicable);
b) Lift the child out of the shower/toilet chair.
Ensure that all fastenings and parts used to secure
the child in position are properly tightened.
Never leave your child alone in the shower/toilet chair.
Always supervise its use.
Page 6

5
33.. IInniittiiaall uussee
Before putting the shower/toilet chair into use, inspect it for visible defects. In case of doubt consult
the supplier. Ask the supplier to instruct you, if you are not yet familiar with the use of this type of
shower/toilet chair.
Please read this user guide carefully prior to making use of the chair and verify that the use and
purpose of all components and accessories are clear to you (try everything out first, before placing
the child in the shower/toilet chair). Familiarise yourself with the safety instructions in chapter 2.
Arrangements can be made to receive personal instruction from your supplier. In case of problems,
contact the treating therapist or the supplier of the shower/toilet chair.
3.1 Lifting the child into the shower/toilet chair
To lift the child into the shower/toilet chair in a safe and responsible way it is important to carefully
adhere to the sequence of steps described below. Please refer to chapter 4, “Operation”, for the
shower/toilet chair’s operating instructions.
a) Engage the brakes on at least two of the four wheels;
b) Loosen all parts used to secure the child in position (if applicable);
c) Lift the child into the shower/toilet chair;
d) Securely tighten all parts used to secure the child in position (if applicable);
e) Never leave your child alone in the shower/toilet chair and always supervise its use.
3.2 Lifting the child out of the shower/toilet chair
To lift the child out of the shower/toilet chair in a safe and responsible way it is important to
carefully adhere to the sequence of steps described below. Please refer to chapter 4, “Operation”,
for the shower/toilet chair’s operating instructions.
b) Engage the brakes on at least two of the four wheels;
c) Hold the child firmly and loosen all parts used to secure the child in position (if applicable);
d) Lift the child out of the shower/toilet chair.
Attention:
Read chapter 4 “Operation”, before using the shower/toilet chair for
the first time.
Page 7

6
44.. OOppeerraattiioonn
The tools required to adjust the various components of the CloZit are located in the tool bag
attached to the bar at the back of the seat (see Figure 1).
4.1 The brakes
• The brakes on the shower/toilet chair can be engaged and released with the projecting lips
attached to each one of the four wheels.
• Engaging the brake:
Push the front lip down with the front part of the shoe until it stays down (see Figure 2A).
Releasing the brake:
Push the top lip to the front with the front part of the shoe (see Figure 2B).
4.1.1 The tilting angle of the chair
• The lever for adjusting the tilting angle is located at the back of the backrest (see Figure 3).
• Hold the CloZit steady with one hand and with the other hand move the lever up or down to set
the chair at the desired angle. Depending on the weight of the child, additional pressure may
be required to tilt the chair.
• It may also be required to adjust the chair’s tilting angle manually.
4.1.2 The height of the push bar
• The adjusting knobs for adjusting the height of the
push bar are located below the push bar (see
Figure 4).
• Loosen both adjusting knobs and position the push
bar at the desired height. Securely retighten the
knob and verify that the push bar is securely
fastened.
• This height adjustment feature makes it possible to
set the push bar at the ideal pushing height for
parents and/or carers.
Attention:
Always set the brakes on at least 2 of the wheels.
Figure 2A:
Engaging the brake
Figure 2B:
Releasing the brake
Attention:
Adopt a comfortable posture while loosening or tig
htening the adjusting crews. Once the
adjustments have been made, be sure to securely retighten the adjusting crews.
Unless absolutely necessary, adjustments should not be made with the child still in the
shower/toilet chair.
Figure 3:
Adjusting the tilting angle
of the chair.
Figure 4:
Adjusting the height of
the push bar.
Page 8

7
4.1.3 The height of the backrest
• The 4 screws for adjusting the height of the backrest are located at each
side of the column at the back of the backrest (see Figure 5). Hexagonal
key number 6 is required to make the adjustment.
• Loosen the adjusting screws and position the backrest at the desired
height. Securely retighten the adjusting screws and verify that the
backrest is securely fastened.
• The height must be adjusted so that when the child is seated upright in
the chair, the top side of the backrest is level with the top of the child’s
shoulders.
4.1.6 The height, depth and width of the armrests (optional)
Height
• The screw for adjusting the height of the armrests is
located at the back of the backrest (see Figure 6).
Hexagonal key number 6 is required to make the
adjustment.
• Loosen the adjusting screw and position the armrest at
the desired height. Securely retighten the adjusting screw
and verify that the armrest is securely fastened.
• The armrests must be positioned so that the child is able
to rest his/her arms on the armrests while keeping the
shoulders relaxed.
Depth
• The adjusting knob for adjusting the depth of the armrest is
located at the back of the armrest (see Figure 7).
• Loosen the adjusting knob, position the armrest at the desired
depth and securely retighten the adjusting knob. Position the
armrest on the other side at the same depth and securely
retighten this knob as well. Verify that the armrests have been
securely tightened.
• The armrests must be positioned so that the child is able to rest
his/her full forearms on the armrests.
Width
• The adjusting knob for adjusting the width of the armrest
is located at the back of the backrest (see Figure 8).
• Loosen the adjusting knob, position the armrest at the
desired width and securely retighten the adjusting knob.
Position the armrest on the other side to the same width
and securely retighten this knob as well. Verify that the
armrests have been securely tightened.
• The armrests must be positioned so that the child is able
to rest his/her arms on the armrests straight below the
shoulders.
Figure 7:
Adjusting the depth of the armrests.
Figure 5:
Adjusting the height of the
backrest.
Figure 6:
Adjusting the height of the armrests.
Figure 8:
Adjusting the width of the armrests.
Page 9

8
4.1.7 The height of the head support (optional)
• The 2 screws for adjusting the height of the head support are located at
the back of the backrest (see Figure 9). Hexagonal key number 6 is
required to make the adjustment.
• Loosen the adjusting screws and position the head support at the
desired height. Securely retighten the adjusting screws and verify that
the head support is securely fastened.
• The head support must be able to provide support when the head is
positioned straight above the trunk.
4.1.8 The belt to secure the child in position (optional)
• The belt to secure the child in position is fastened to the chair
at the back of the seat. The belt can be adjusted near the
sliding rings.
• The quick release mechanism at the front of the belt is used to
lift the child into or out of the chair (see Figure 10).
• The belt keeps the child positioned at the back of the chair
and ensures that he/she cannot slide out of the chair. The belt
must be firmly secured, but must not pinch the child.
4.1.9 The height and depth of the footrest (optional)
Height
• The 2 adjusting knobs for adjusting the height of the
footrest are located on each side of the footrest (see
Figure 11).
• Hold on to the footrest with one hand and loosen the
adjusting knobs for adjusting the height with the
other hand. Position the footrest at the desired height
and retighten the knobs securely. Make sure that the
left and right sides of the footrest are positioned at
the same height. Verify that the footrest has been
securely tightened.
• The height of the footrest must be adjusted so that
the child is seated with the knees bent at a 90°
angle.
Depth
• The adjusting screws for adjusting the depth of the
footrest are located below the footrest (see Figure
12). Hexagonal key number 6 is required to make
the adjustment.
• Loosen the adjusting screws on both sides and place
the footrest in the desired position. Retighten the
adjusting screws securely. Make sure that the depth
of the footrest is the same on the left and the right
side. Verify that the footrest has been securely
tightened.
• The depth of the footrest must be adjusted so that
the child is seated with the knees at a 90° angle and
so that the footrest provides support for the child’s
Figure 9:
Adjusting the height of the
head support.
Figure 10:
Attaching the belt.
Figure 12:
Adjusting the depth of the footrest.
Figure 11:
Adjusting the height of the footrest.
Page 10

9
entire foot.
4.1.10 The potty (optional)
• The potty is located below the seat.
• The potty can be removed and reinserted using its
handle (see Figure 13).
• Remove the potty carefully after use.
Figure 13:
Removing the potty.
Page 11

10
55.. MMaaiinntteennaannccee
• Check daily that all fastenings and adjusting knobs and screws are properly secured.
• Attend to daily hygiene. The cover of the shower/toileting chair can be cleaned using non-
chlorinated general domestic cleaning agents. Ensure that no soap residues that could cause
skin irritation are left on the chair.
• Lightly spray the moving parts with silicon spray once a year. (Note: silicon spray may stain
surfaces.)
66.. RReeppaaiirrss
• Contact the supplier immediately to arrange for repairs in case of defects that could endanger
the child.
• If you are unsure about the correctness of the adjustments, the correct use of parts for securing
the child in position or the correct form and use of accessories, contact the therapist or supplier
about possible adjustments that may be required.
77.. WWaarrrraannttyy
The following warranty covers normal use:
• A warranty of 12 months from the delivery date of the CloZit for manufacturing defects.
Please include your name, address, type of shower/toilet chair, serial number and the date of initial
use in any correspondence.
Page 12

11
88.. TTeecchhnniiccaall ddaattaa
Size 1 Size 2 Size 3 Size 4
Seating width: 28 cm
33 cm
38 cm
43 cm
Seating depth: 28 cm
33 cm
38 cm
43 cm
Max. user weight: 80 kg
Total weight of CloZit: 15 kg
Basic frame dimensions: 45 x 63 cm
Height of push handles: 98 cm
Diameter of wheels: 10 cm
Options
• Armrests;
• Head support;
• Various options to secure the child in position;
• Footplate;
• Tray table;
• Driving wheels;
• Potty below the CloZit.
Page 13

12
AAppppeennddiixx:: UUsseerr qquueessttiioonnnnaaiirree
Your experiences with our products are very important for helping us to make ongoing
improvements to our products. We therefore request that you complete this questionnaire and
return it to us, postage free. This will enable us to optimise our products and services.
The user *
Name:
Address:
Town:
Date of birth:
*
You may also return the questionnaire anonymously.
The product
Type: **
Seating / Standing / Walking / Lying / Transportation / Care / Work / School /
Therapy / Custom
Name:
Size:
Is the product user-friendly? **
Yes / No / Don’t know
What, if any, problems did you
experience?
W
hich improvements would you like to
see made to the product?
Other comments and suggestions:
The fitting
Were you as parent/supervisor present
during the fitting? **
Yes / No / Don’t know
Was the technical advisor of Atlas
present during the fitting? **
Yes / No / Don’t know
Were your questions answered to your
satisfaction? **
Yes / No / Don’t know
Were there any problems during the
fitting? **
No / Don’t know
Yes, ………………
Other comments and suggestions:
**
Circle the option that applies.
Page 14

13
Our service
Was an appointment made to deliver
the product? **
Yes / No / Don’t know
Was the product delivered on the
agreed time? **
Yes / No / Don’t know
Was the product delivered to your
satisfaction? (neatness, settings, etc.)
**
Yes / Don’t know
No, ………………
Were there any problems? **
No / Don’t know
Yes, ………………
Was the user guide clear? ** Yes / Don’t know
No, ………………
Other comments and suggestions:
The questionnaire
Which improvements would you like to
see made?
Other comments:
**
Circle the option that applies.
Thank you very much for your cooperation.
Atlas Revalidatie Techniek
Antwoordnummer 3509
5370 ZX Ravenstein
The Netherlands
 Loading...