

Page 1
Postal address
Postbus 106
5370 AC Ravenstein
The Netherlands
Visiting address
Korte Stukken 7
5371 MN Ravenstein
The Netherlands
Tel: +31 (0)486-45 33 44
Fax: +31 (0)486-45 35 15
www.atlas-rehab.nl
info@atlas-rehab.nl
B
Bllii
x
x
e
e
m
m
b
b
o
o
s
s
c
c
h
h
Standing frame
MMaayy 2200008
8
Page 2

Blixembosch User Guide
Foreword
None of the contents of this User Guide may be copied, stored in an automatic data file, or published electronically, mechanically, by
photocopy, recording, or in any other way, without the prior written permission of Atlas Revalidatie Techniek BV.
© 2008 Atlas Revalidatie Techniek B.V.
2
FFoorreewwoorrdd
This user guide is intended for parents and/or supervisors of children who use the Blixembosch
standing frame.
The Blixembosch bears the CE marking, which indicates that it meets European safety
requirements.
The settings of the Blixembosch are adjusted by the dealer prior to delivery. This user guide
subsequently helps you to make the most important daily adjustments to the standing frame, thus
enabling the child for whom it is intended to make optimal use of it.
The user guide contains a great many photographs that will facilitate finding the adjustment facilities
on the standing frame.
Your experiences with the Blixembosch are important for its continual improvement. After you have
used the standing frame for several weeks, we kindly request that you complete the questionnaire at
the back of this user guide and return it to us at the address below:
Atlas Revalidatie Techniek
Antwoordnummer 3509
5370 ZX Ravenstein
The Netherlands
Read this user guide carefully.
Page 3

Blixembosch User Guide
Contents
None of the contents of this User Guide may be copied, stored in an automatic data file, or published electronically, mechanically, by
photocopy, recording, or in any other way, without the prior written permission of Atlas Revalidatie Techniek BV.
© 2008 Atlas Revalidatie Techniek B.V.
3
CCoonntteennttss
1. THE BLIXEMBOSCH STANDING FRAME ........................................................................................................ 4
2. SAFETY...................................................................................................................................................................... 5
2.1 S
AFETY INSTRUCTIONS
........................................................................................................................................ 5
2.2 I
MMEDIATE DANGER
............................................................................................................................................ 5
3. INITIAL USE ............................................................................................................................................................. 6
3.1 T
RANSFERRING THE CHILD TO THE STANDING FRAME
.......................................................................................... 6
3.2 T
RANSFERRING THE CHILD FROM THE STANDING FRAME
..................................................................................... 6
4. OPERATION ............................................................................................................................................................. 7
4.1 D
AILY ADJUSTMENTS
........................................................................................................................................... 7
4.1.1 The brakes...................................................................................................................................................... 7
4.1.2 Fasten the brace with the back and sacral supports;..................................................................................... 8
4.1.3 The pelvic band .............................................................................................................................................. 8
4.1.4 Securing the child’s feet in the shoe holders.................................................................................................. 8
4.2 S
TANDARD SETTINGS (IT IS ADVISABLE TO HAVE THESE SETTINGS FIXED BY A PARAMEDIC
) ............................... 9
4.2.1 The height and depth of the tray table ........................................................................................................... 9
4.2.2 The height of the sacral support .................................................................................................................. 10
4.2.3 The height and depth of the pelvic support .................................................................................................. 10
4.2.4 The width of the sides of the pelvic support ................................................................................................. 11
4.2.5 The height and depth of the back support .................................................................................................... 11
4.2.6 The width of the sides of the pelvic support (optional) ................................................................................ 12
4.2.7 The length of the wheeled base .................................................................................................................... 12
4.2.8 Height, width and depth of the leg supports ................................................................................................ 12
4.2.9 Width and depth of the shoe holders ............................................................................................................ 13
4.2.10 Correcting the angle of the feet ................................................................................................................ 13
5. MAINTENANCE ..................................................................................................................................................... 15
6. REPAIRS .................................................................................................................................................................. 15
7. WARRANTY............................................................................................................................................................ 15
8. TECHNICAL DATA ............................................................................................................................................... 16
8.1 D
IMENSIONS OF THE BLIXEMBOSCH
................................................................................................................... 16
8.2 U
PHOLSTERY
..................................................................................................................................................... 16
8.3 O
PTIONS
............................................................................................................................................................. 16
Appendix: User Questionnaire………………………………………………………………………...…………………...16
Page 4
Blixembosch User Guide
1. The Blixembosch standing frame
None of the contents of this User Guide may be copied, stored in an automatic data file, or published electronically, mechanically, by
photocopy, recording, or in any other way, without the prior written permission of Atlas Revalidatie Techniek BV.
© 2008 Atlas Revalidatie Techniek B.V.
4
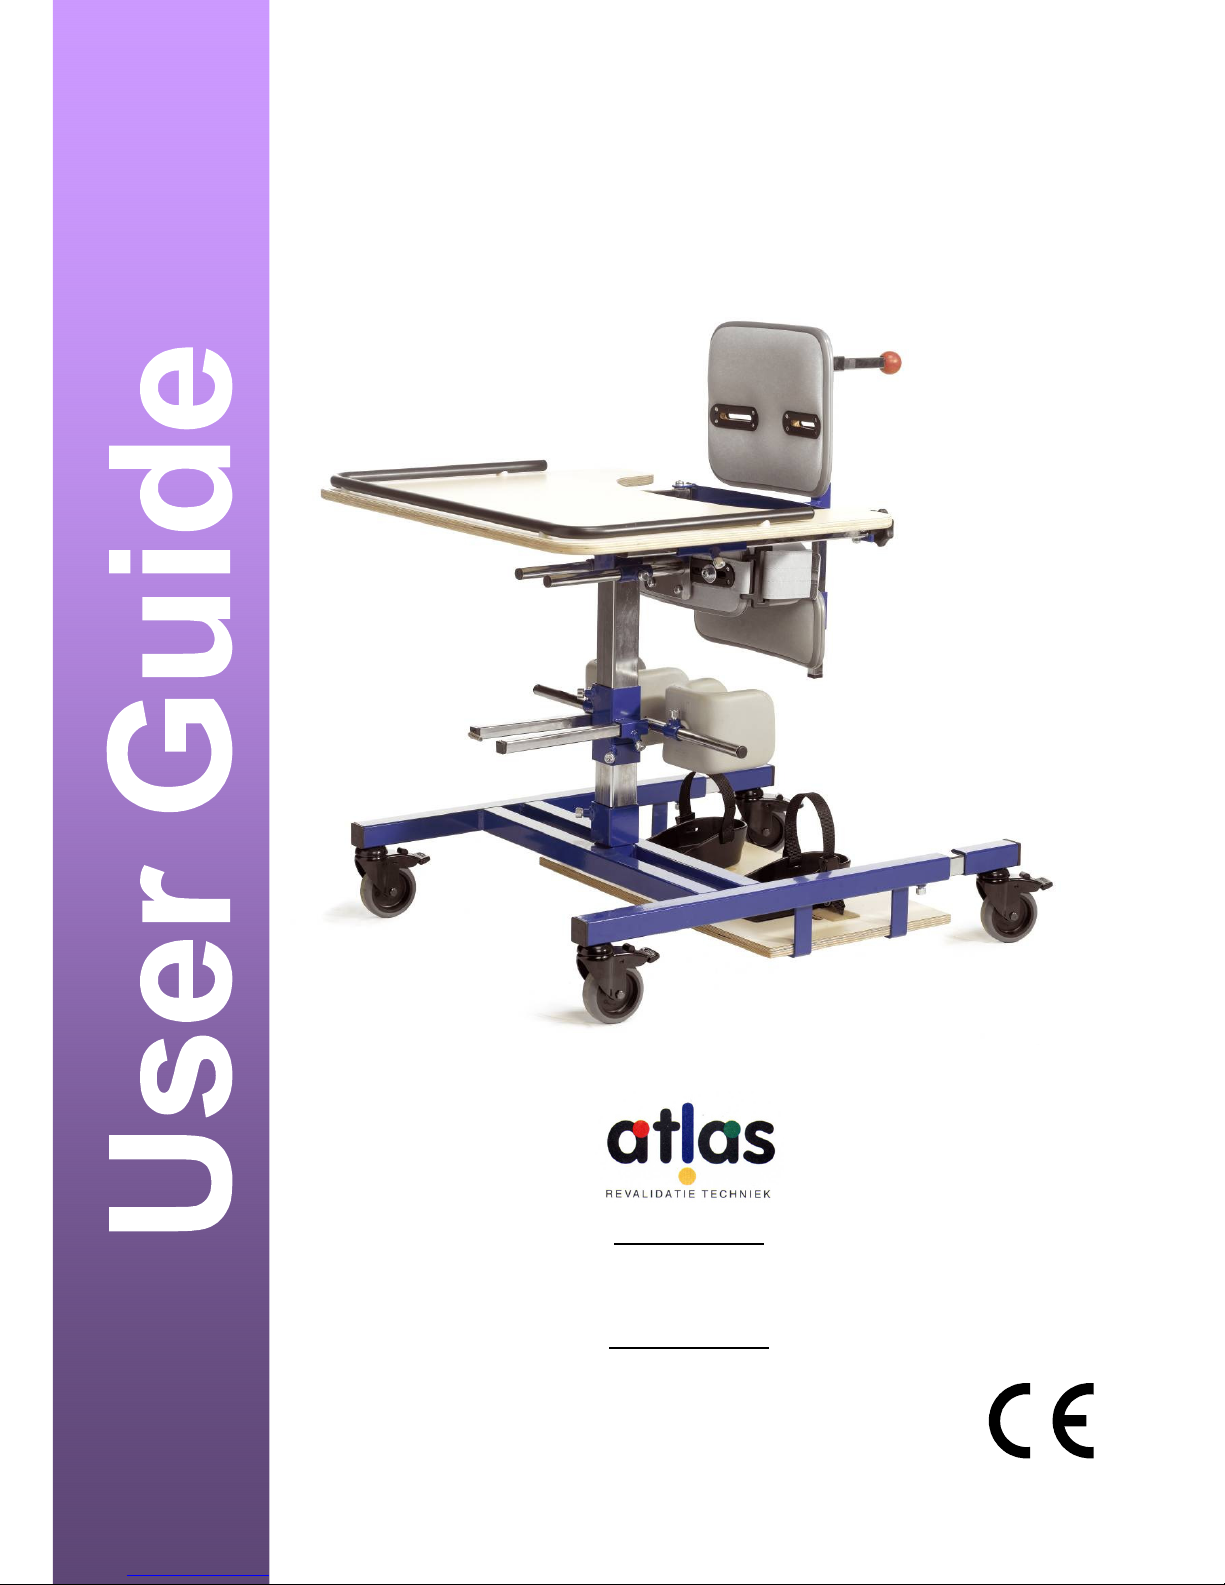
11.. TThhee BBlliixxeemmbboosscchh ssttaannddiinngg ffrraammee
The Blixembosch is a vertical standing frame. It was developed in close collaboration with the
similarly-named rehabilitation centre in Eindhoven, the Netherlands, and is available in two sizes.
This standing frame is characterised by sacral and back supports, which can be swung out of the
way, and an extra low step so that a child can step into it easily.
Erect standing position
This standing frame enables the child that uses it to maintain an erect standing position, providing
support up to the pelvis. This promotes the balance of the head and trunk. Moreover, the
Blixembosch is eminently suitable for realising an increasingly active position by means of simple
interventions, namely by reducing or removing the support provided.
Support
The child is secured in position using a pelvic support (the depth of which can be adjusted) with
sides and band, a sacral support, a back support, flexible leg supports and shoe holders.
Illustration 1:
The standard Blixembosch model.
a) Back support;
b) Pelvic support with side pads and band for
securing the child in position;
c) Sacral support;
d) Flexible leg supports;
e) Wooden tray table;
f) Shoe holders with safety straps;
g) Set of wedges (not visible)
e
b
a
d
f
c
Page 5

Blixembosch User Guide
2. Safety
None of the contents of this User Guide may be copied, stored in an automatic data file, or published electronically, mechanically, by
photocopy, recording, or in any other way, without the prior written permission of Atlas Revalidatie Techniek BV.
© 2008 Atlas Revalidatie Techniek B.V.
5
22.. SSaaffeettyy
Atlas has paid a great deal of attention to the design of this standing frame and the child’s safety;
the settings are adjusted professionally prior to the initial use of the frame. It is, however, imperative
that the following safety instructions be observed by the child’s parents and supervisors to
guarantee that it is used safely.
2.1 Safety instructions
a) First read this user guide and test the standing frame before it is used;
b) Never leave the child alone in the standing frame and always supervise its use;
c) Ensure that all fastenings and parts used to secure the child in position are properly tightened;
d) Tighten the adjusting screws and knobs firmly and check them after each adjustment;
e) Only use the standing frame on a flat surface;
f) Always put the brakes on at least two of the four wheels;
g) The standing frame may only be used inside;
h) The standing frame may not be used for transport purposes;
i) Do not allow other children to play with the standing frame or ride on it;
j) Adjustments may only be made by the child’s parents or carers. Adjustments may not be made
with the child in the standing frame unless absolutely necessary;
k) The child may become dizzy, always bear this in mind;
l) Increase the period for which the child uses the standing frame slowly (in consultation with the
therapist);
m) If the child has developed and grown, check that the standing frame does not cause discomfort
by pinching or squeezing him or her;
n) If the child has grown, only change the settings in consultation with the therapist;
o) Ensure that you adopt a comfortable position when helping the child in the standing frame for
long periods of time;
p) Never use the maximum height, width or depth to ensure a sturdy connection;
q) Do not exceed the maximum user weight of 50 kg (size 1) or 75 kg (size 2);
r) Any service carried out by a person who has not been authorised by Atlas Revalidatie Techniek
will invalidate the warranty and Atlas Revalidatie Techniek will no longer be liable for injuries
and/or damage.
Safety instructions “b” and “c” are repeated on the standing frame in the form of a warning sticker
(see figure below). Ensure that this text remains legible at all times. If necessary, request a new
copy of the sticker.
2.2 Immediate danger
Practice the following operations so that you can remove the child from the standing frame rapidly in
the event of fire or other immediate danger.
Act quickly in the event of fire or other immediate danger:
a) Put at least two of the standing frame’s brakes on;
b) Loosen the shoe holder safety straps;
c) Loosen the brace with the back and sacral supports;
d) Hold the child firmly and loosen the pelvic band;
e) Lift the child out of the standing frame.
Ensure that all the fastenings and parts used to
secure the child in position are properly tightened.
Never leave the child alone in the standing frame.
Always supervise its use.
Page 6

Blixembosch User Guide
3. Initial use
None of the contents of this User Guide may be copied, stored in an automatic data file, or published electronically, mechanically, by
photocopy, recording, or in any other way, without the prior written permission of Atlas Revalidatie Techniek BV.
© 2008 Atlas Revalidatie Techniek B.V.
6
33.. IInniittiiaall uussee
Before using the standing frame, check it for visible defects. Contact your supplier if you have any
doubts about its safety. Ask your supplier to instruct you if you are not yet familiar with the use of the
standing frame.
Before using the standing frame, read this user guide carefully and ensure that you understand the
purpose of all the parts. (Test everything before allowing the child to use the standing frame.)
Familiarise yourself with the safety instructions in chapter 2.
Your supplier can instruct you personally. In the event of problems, contact the attending therapist
or the supplier of the standing frame.
3.1 Transferring the child to the standing frame
To transfer the child to the standing frame safely and responsibly, the following instructions must be
observed in the order indicated. See chapter 4 “Operation” for instructions on how to operate the
standing frame.
a) Put the brakes on at least two of the four wheels so that the standing frame cannot roll away
while you are transferring the child;
b) Ensure that all the adjustments are properly tightened;
c) Loosen the shoe holder safety straps;
d) Loosen the pelvic band and brace with the back and sacral supports;
e) Transfer the child to the standing frame and fasten the pelvic band;
f) Fasten the brace with the back and sacral supports;
g) Tighten the shoe holder safety straps;
h) If necessary, make any adjustments that might make the child more comfortable in his or her
standing position;
i) Never leave the child alone in the standing frame and always supervise its use.
3.2 Transferring the child from the standing frame
To transfer the child from the standing frame safely and responsibly, the following instructions must
be observed in the order indicated. See chapter 4 “Operation” for instructions on how to operate the
standing frame.
a) Put the brakes on at least two of the four wheels so that the standing frame cannot roll away
while you are transferring the child;
b) Loosen the shoe holder safety straps;
c) Loosen the brace with the back and sacral support;
d) Hold the child firmly and loosen the pelvic band;
e) Transfer the child from the standing frame.
Attention:
Read chapter 4 “Operation” before using the standing frame for the first
time.
Page 7

Blixembosch User Guide
4. Operation
None of the contents of this User Guide may be copied, stored in an automatic data file, or published electronically, mechanically, by
photocopy, recording, or in any other way, without the prior written permission of Atlas Revalidatie Techniek BV.
© 2008 Atlas Revalidatie Techniek B.V.
7
44.. OOppeerraattiioonn
A distinction is made between the daily and the standard settings of the standing frame. Tools are
always required for the standard adjustments.
4.1 Daily adjustments
Several settings are adjusted continually during the daily use of the standing frame, for example,
when transferring the child to and from the standing frame and when changing his or her standing
position slightly if this is required. No tools are required for the daily adjustments.
4.1.1 The brakes
• The brakes of the Blixembosch consist of a projecting lip at the top of each wheel.
• Brake on:
Push the projecting lip downwards with the front of your shoe (see illustration 2A) until it remains
in a fixed position.
Brake off:
Push the smaller lip forwards with the front of your shoe (see illustration 2B) so that the larger lip
comes up again.
Attention:
Always use at least two of the four brakes.
Illustration 2A:
Brake on.
Illustration 2B:
Brake off.
Attention:
Adopt a comfortable posture when tightening/loosening adjusting screws and knobs.
Tighten
adjusting screws and knobs firmly again after making adjustments.
Attention:
The first adjustments or major alterations in the standing posture may only be made by personnel
specially instructed to do so. The standing frame may only
be adjusted by parents or carers after
comprehensive instruction and careful studying of this user guide.
Page 8

Blixembosch User Guide
4. Operation
None of the contents of this User Guide may be copied, stored in an automatic data file, or published electronically, mechanically, by
photocopy, recording, or in any other way, without the prior written permission of Atlas Revalidatie Techniek BV.
© 2007 Atlas Revalidatie Techniek B.V.
8
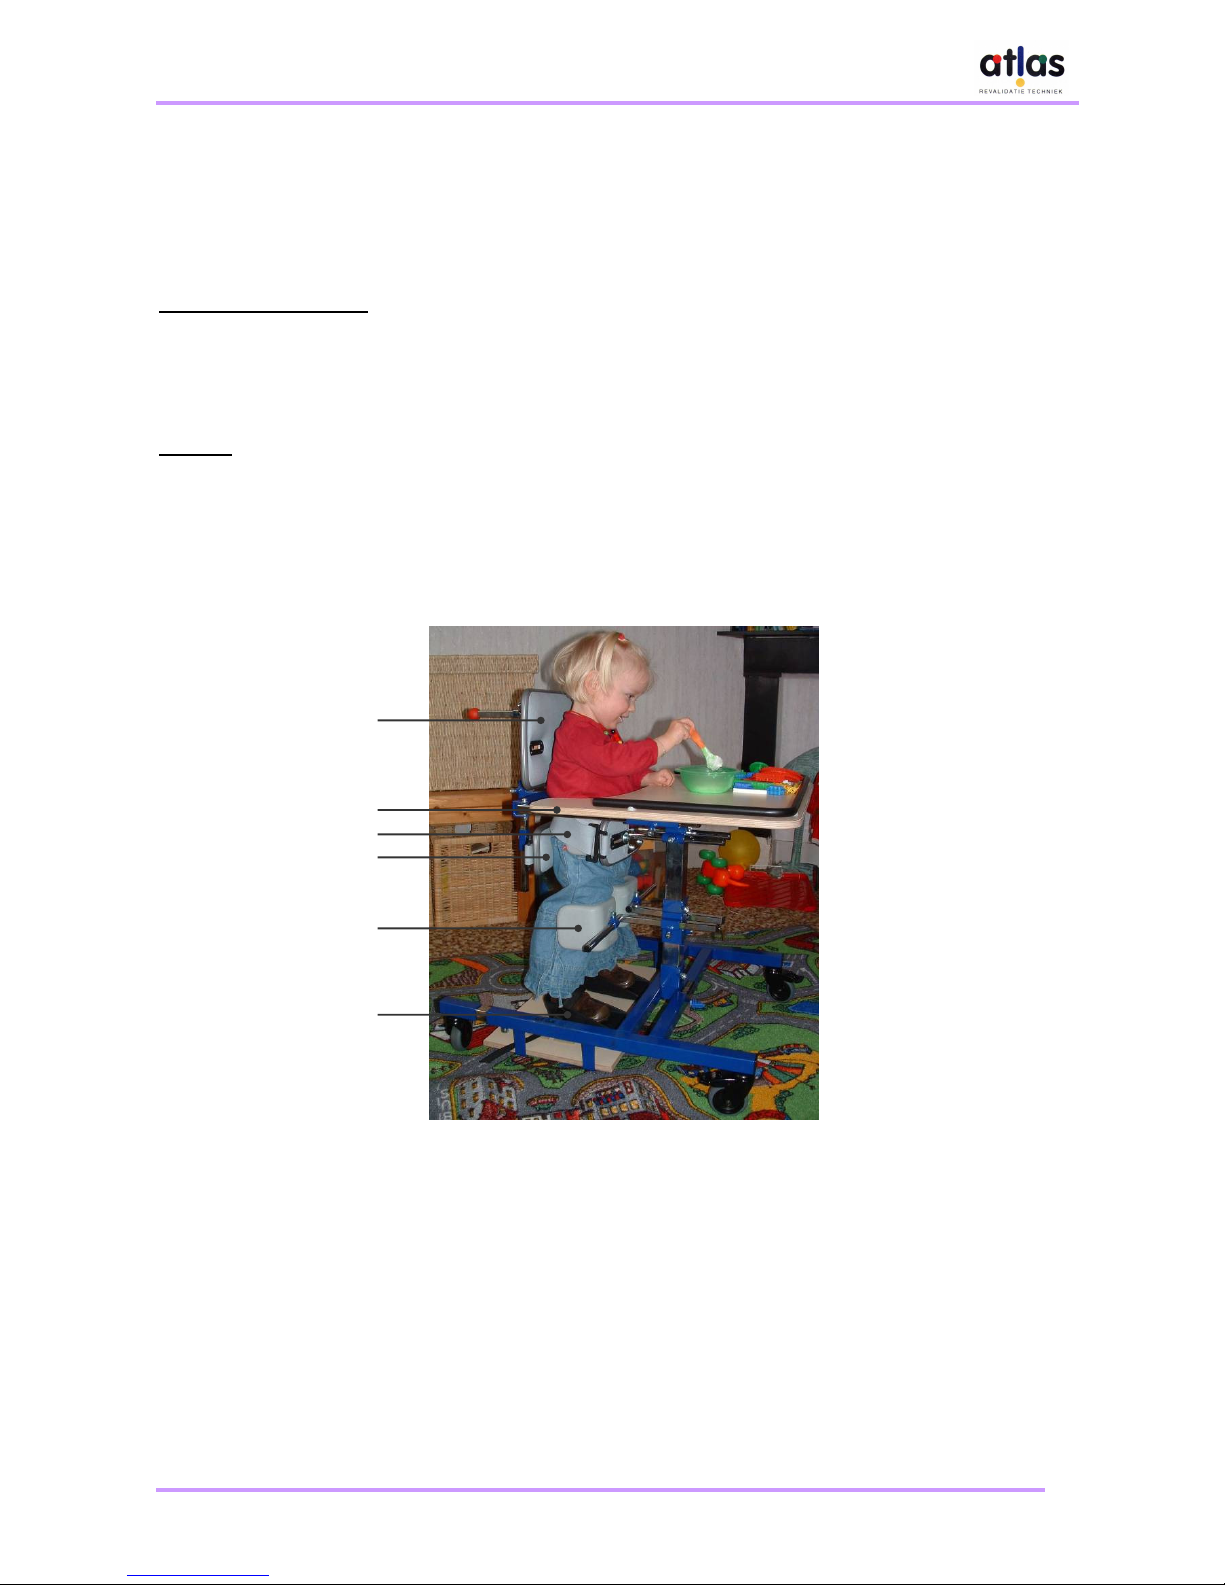
Illustration 3:
Swinging the brace to one side.
Illustration 4:
Adjusting the pelvic band.
Illustration 5:
Adjusting the safety straps.
4.1.2 Fasten the brace with the back and sacral
supports;
• The adjusting knob for the brace is located on the back of
the tray table (see illustration 3).
• Hold the standing frame firmly in position with one hand and
turn the brace knob to the left with the other. Then push the
knob to the left so that the brace is released and can be
swung aside. After returning the brace to its position, tighten
the knob firmly again and check that the brace is properly
fixed.
• The brace can be swung sideways to facilitate transferring
the child to and from the standing frame.
4.1.3 The pelvic band
• The pelvic band is located on the pelvic support (see
illustration 4).
• Place the band across the child’s pelvis, feed it through the
slot and then pull it back across the child's pelvis. The band
is fixed in place using the velcro.
• The pelvic band ensures that the child can be secured in
position when he or she is placed in the standing frame.
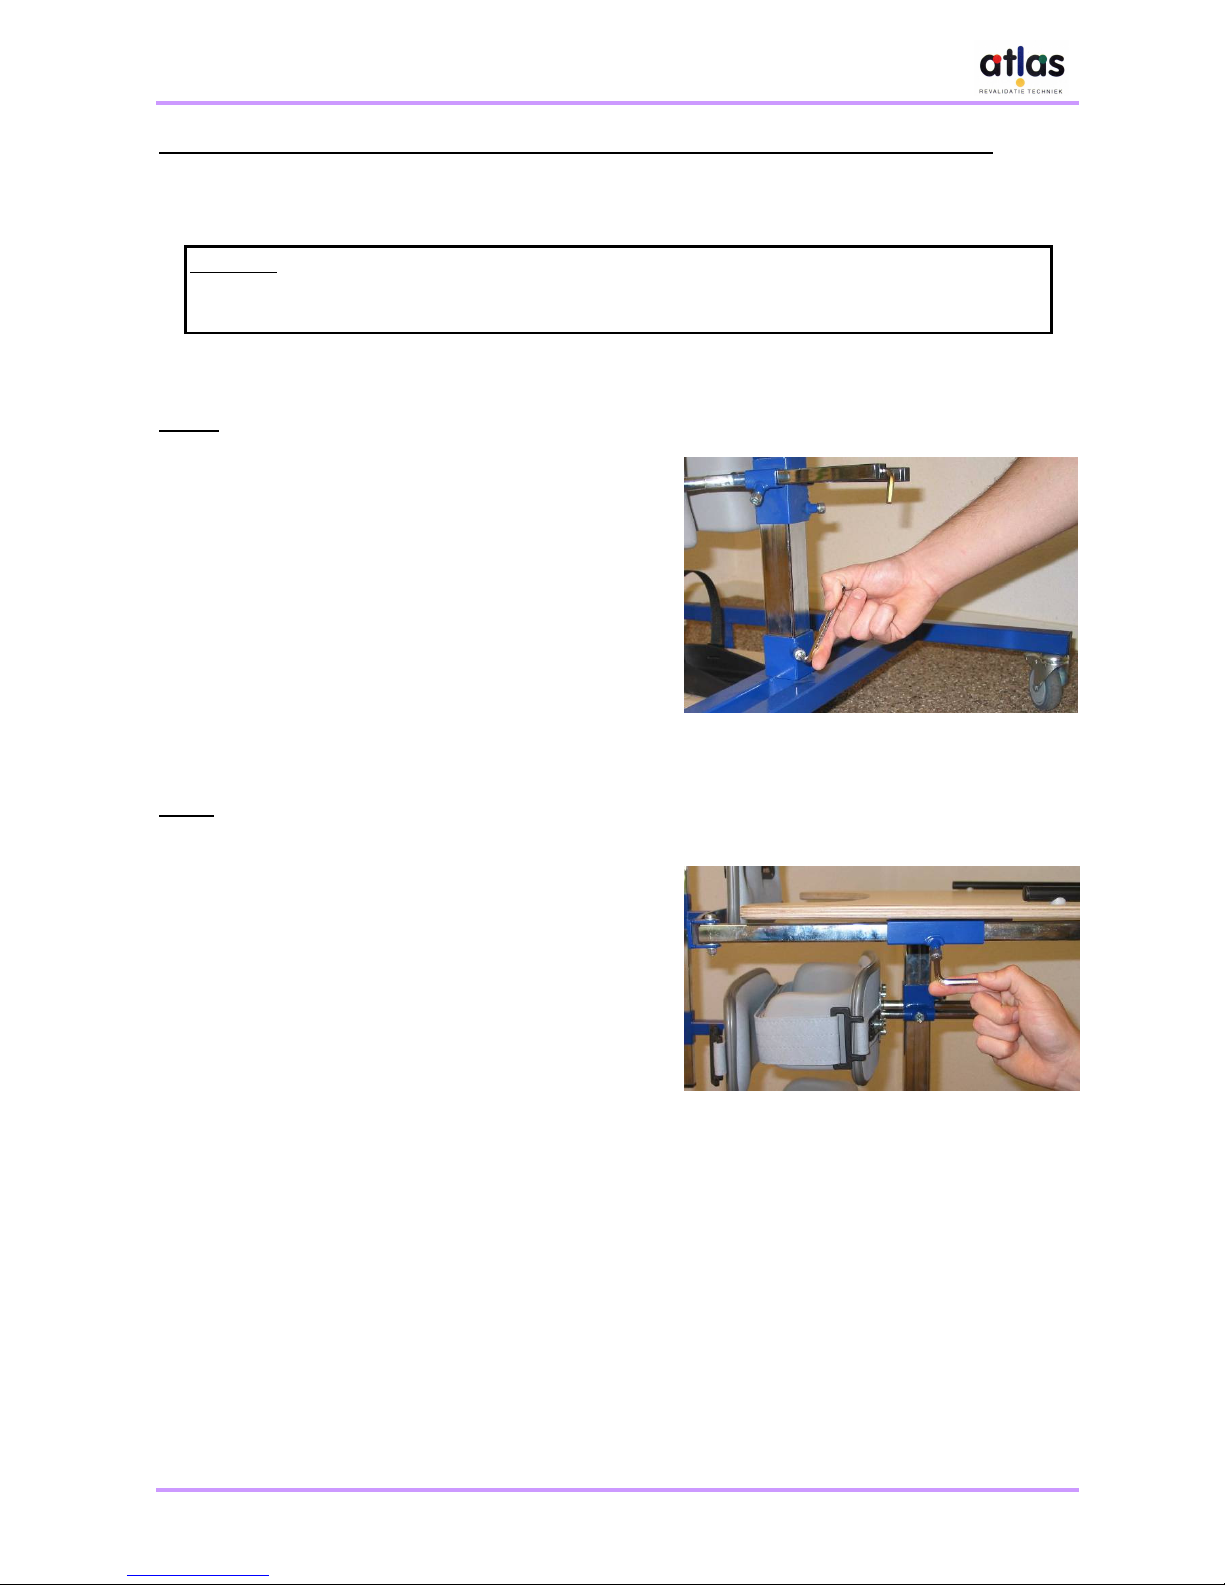
4.1.4 Securing the child’s feet in the shoe holders.
• The safety straps are located on the sides of the shoe holders (see
illustration 5). These straps are fastened when the child is in the
standing frame. Make sure that at least two of the standing frame’s
brakes are on;
• Hold the child’s foot firmly in the shoe holder with one hand. Place the
safety strap across the child’s instep in the quick fastener and click it
downwards. Check that the strap is properly fixed. Ensure that the
strap does not pinch.
• The shoe holders with safety straps ensure that the child’s feet
remain vertically under the trunk so that he or she can maintain his or
her standing position.
Page 9
Blixembosch User Guide
4. Operation
None of the contents of this User Guide may be copied, stored in an automatic data file, or published electronically, mechanically, by
photocopy, recording, or in any other way, without the prior written permission of Atlas Revalidatie Techniek BV.
© 2007 Atlas Revalidatie Techniek B.V.
9
4.2 Standard settings
(it is advisable to have these settings fixed by a paramedic)
A number of standard settings must be fixed in accordance with the child’s length, weight and
handicap; these will have to be altered after a while, if necessary in consultation with the attending
therapist.
4.2.1 The height and depth of the tray table
Height
• The screw for adjusting the height of the tray table
is located at the bottom of the column (see
illustration 6).
• Hold the frame firmly with one hand and loosen
the height adjusting screw with the other. Adjust
the tray table to the required height and tighten
the screw firmly again. Check that the tray table is
properly fixed. The pelvic and knee supports
move up and down together with the tray table;
after adjusting the tray table, adjust them to the
required height again.
• The tray table must be adjusted such that the
child can lean with his or her elbows on it, with his
or her shoulders relaxed.
Depth
• The screw for adjusting the depth of the tray table
is located under the tray table in the middle (see
illustration 7).
• Hold the frame firmly with one hand and loosen
the depth adjusting screw with the other. Place
the tray table at the required depth and tighten the
screw firmly again. Check that the tray table is
properly fixed. Ensure that the length of the frame
is adjusted to suit the depth of the tray table.
• The depth of the tray table must be adjusted such
that the child has sufficient room and is not
pinched or squeezed. In addition, ensure that
there is not too much room between the tray table
and the child, or the child’s arms may become
caught in the space.
Attention:
Adopt a comfortable posture when tightening/loosening adjusting screws.
Never use the maximum height, width or depth to ensure a sturdy connection.
Illustration 6:
Adjusting the height of the tray table.
Illustration 7:
Adjusting the depth of the tray table.
Page 10

Blixembosch User Guide
4. Operation
None of the contents of this User Guide may be copied, stored in an automatic data file, or published electronically, mechanically, by
photocopy, recording, or in any other way, without the prior written permission of Atlas Revalidatie Techniek BV.
© 2007 Atlas Revalidatie Techniek B.V.
10
Illustration 8:
Adjusting the height of the sacral support.
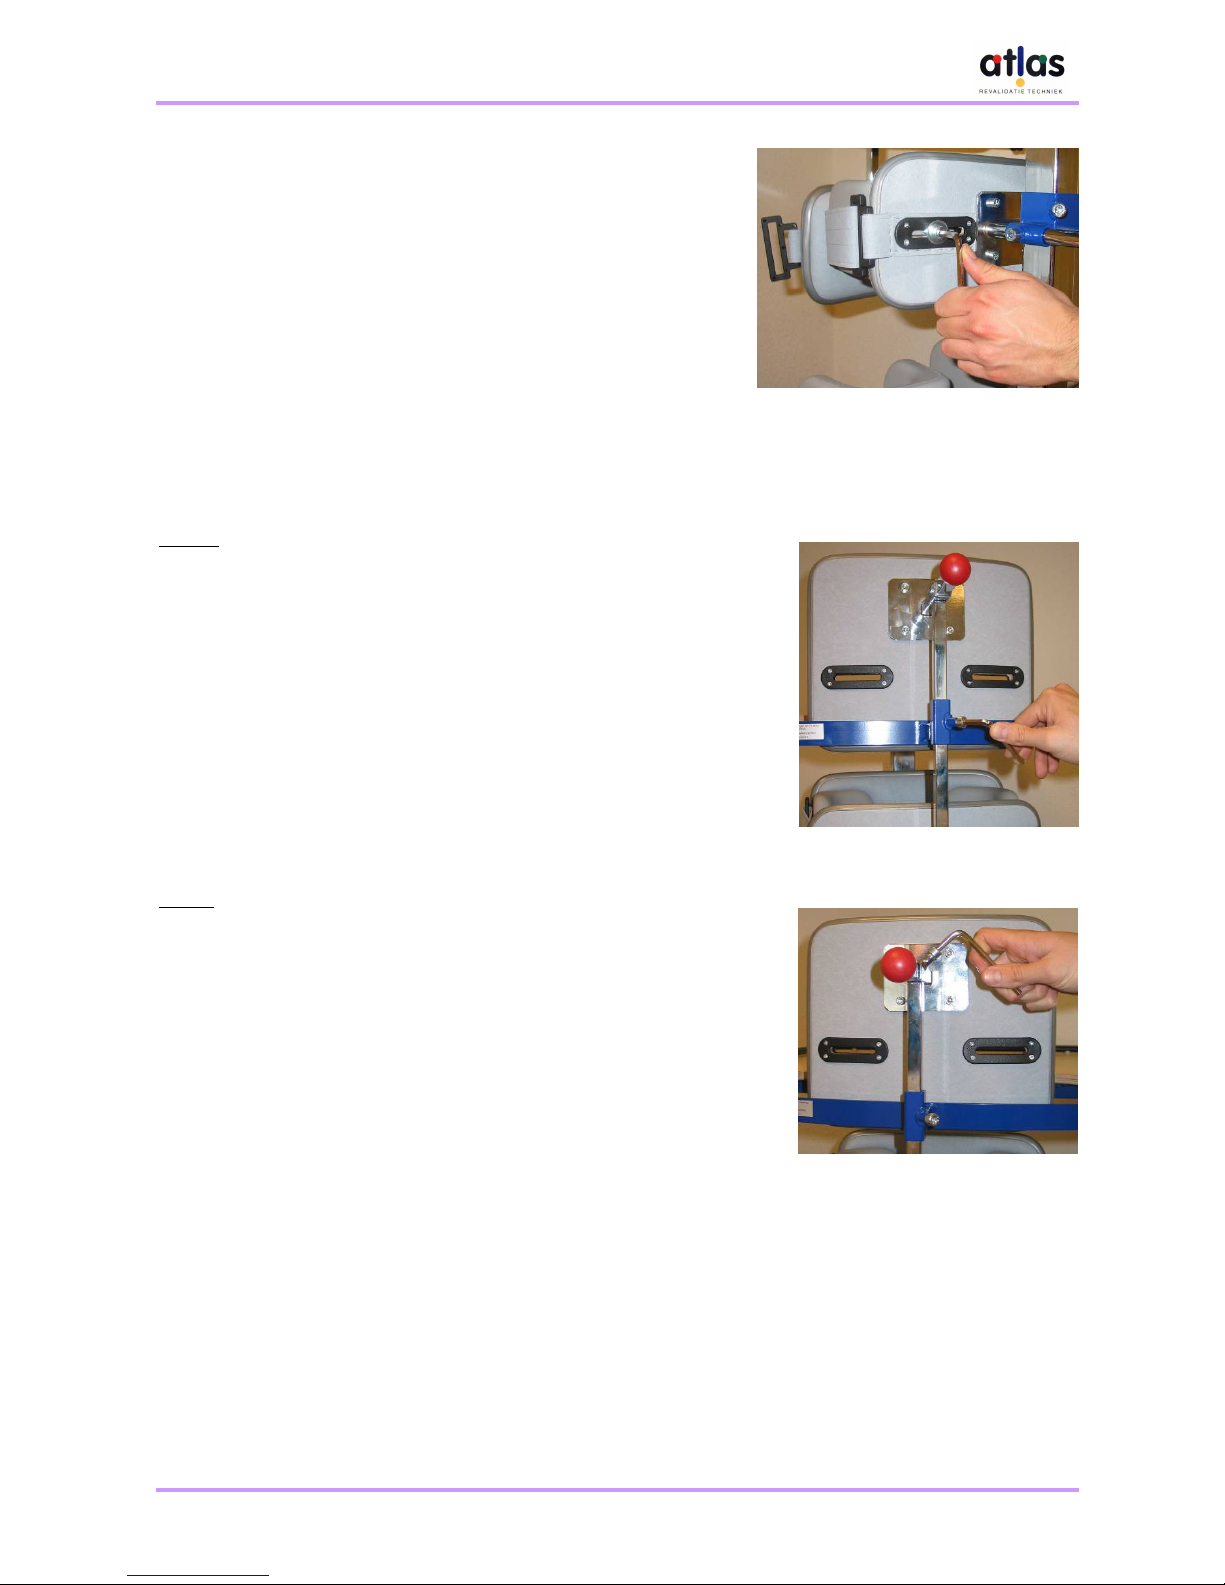
4.2.2 The height of the sacral support
• The screw for adjusting the height of the sacral support is
located on the back of the sacral support (see illustration 8).
You will need hexagonal key (Allen key) number 6 to make
this adjustment.
• Hold the sacral support firmly in position with one hand and
loosen the height adjusting screw with the other. Adjust the
sacral support to the required height and tighten the screw
firmly again. Check that the sacral support is properly fixed.
• The sacral support must be located level with the child’s
sacrum; the sacral support and the pelvic support are jointly
responsible for the total support of the pelvis.
4.2.3 The height and depth of the pelvic support
Height
• The screw for adjusting the height of the pelvic support is located on the front of the column (see
illustration 9). You will need hexagonal key (Allen key) number 6 to make this adjustment.
• Hold the pelvic support firmly in position with one hand and loosen the height adjusting screw
with the other. Adjust the pelvic support to the required height and tighten the screw firmly again.
Check that the pelvic support is properly fixed.
• The pelvic support must be located level with the parts that project at the front of the user’s
pelvis. The sacral and pelvic supports are jointly responsible for the total support of the pelvis.
Depth
• The screw for adjusting the depth of the pelvic support is located on the side of the column (see
illustration 9). You will need hexagonal key (Allen key) number 6 to make this adjustment.
• Hold the pelvic support firmly in position with one hand and loosen the depth adjusting screw
with the other. Adjust the pelvic support to the required depth and tighten the screw firmly again.
Check that the pelvic support is properly fixed.
• The pelvic support must be adjusted such that the child cannot place his or her arms between
his or her tummy and the tray table.
Illustration 9:
Adjusting the height and depth of the pelvic support.
a) The screw for adjusting the height;
b) The screw for adjusting the depth.
a
b
Page 11
Blixembosch User Guide
4. Operation
None of the contents of this User Guide may be copied, stored in an automatic data file, or published electronically, mechanically, by
photocopy, recording, or in any other way, without the prior written permission of Atlas Revalidatie Techniek BV.
© 2007 Atlas Revalidatie Techniek B.V.
11
Illustration 10:
Adjusting the width of the sides of the
pelvic support.
Illustration 11:
Adjusting the height of the back
support.
Illustration 12:
Adjusting the depth of the back
support.
4.2.4 The width of the sides of the pelvic support
• The screw for adjusting the width of the sides of the pelvic
support is located on the back of the pelvic support (see
illustration 10). You will need hexagonal key (Allen key)
number 6 to make this adjustment.
• Hold one of the sides firmly in position with one hand and
loosen the adjusting screw with the other. Adjust the side to
the required width and tighten the screw firmly again.
Adjust the other side to the same position. Check that the
sides are properly fixed.
• The width of the sides must be adjusted such that the child
is supported on both sides. This setting will vary according
to the child.
4.2.5 The height and depth of the back support
Height
• The screw for adjusting the height of the back support is located
on the back of the brace (see illustration 11). You will need
hexagonal key (Allen key) number 6 to make this adjustment.
• Hold the back support firmly in position with one hand and
loosen the height adjusting screw with the other. Adjust the
back support to the required height and tighten the screw firmly
again. Check that the back support is properly fixed. Adjusting
the height of the back support also alters the height of the sacral
support. After adjusting the back support, ensure that the sacral
support is adjusted to the correct height once more, too.
• The height must be adjusted such that if the child stands up
straight in the standing frame, the top of the back support is
level with his or her shoulders.
Depth
• The screw for adjusting the depth of the back support is located
on the back of the back support (see illustration 12). You will
need hexagonal key (Allen key) number 6 to make this
adjustment.
• Hold the back support firmly in position with one hand and
loosen the depth adjusting screw with the other. Adjust the back
support to the required depth and tighten the screw firmly again.
Check that the back support is properly fixed.
• The depth of the back support is adjusted according to how
much support the child needs. If the back support is only used
for safety reasons, it is placed above or behind the brace.
Page 12

Blixembosch User Guide
4. Operation
None of the contents of this User Guide may be copied, stored in an automatic data file, or published electronically, mechanically, by
photocopy, recording, or in any other way, without the prior written permission of Atlas Revalidatie Techniek BV.
© 2007 Atlas Revalidatie Techniek B.V.
12
4.2.6 The width of the sides of the pelvic support (optional)
• The screw for adjusting the width of the sides of the
pelvic support is located on the back of the back support
(see illustration 13). You will need hexagonal key (Allen
key) number 6 to make this adjustment.
• Hold one of the sides firmly in position with one hand and
loosen the adjusting screw with the other. Adjust the side
to the required width and tighten the screw firmly again.
Adjust the other side to the same position. Check that the
sides are properly fixed.
• The width of the sides must be adjusted such that the
child is supported on both sides. This setting will vary
according to the child.
4.2.7 The length of the wheeled base
• The screw for adjusting the length of the wheeled base is
located under the frame (see illustration 14). You will
need hexagonal key (Allen key) number 6 to make this
adjustment.
• Hold the frame firmly with one hand and loosen the
length adjusting screw with the other. Adjust the wheeled
base to the required length and tighten the screw firmly
again. Adjust the other side to the same length and check
that the wheeled base is properly fixed.
• If the tray table is moved a long way forward, and the
back support is therefore a long way to the back, the
length of the wheeled base must also be adjusted
accordingly or the child may be able to fall over backwards.
4.2.8 Height, width and depth of the leg supports
Height
• The screw for adjusting the height of the leg supports is
located on the front of the column (see illustration 15). You
will need hexagonal key (Allen key) number 6 to make this
adjustment.
• Hold one of the leg support bars firmly with one hand and
loosen the adjusting screw with the other. Adjust the leg
support to the required height and tighten the screw firmly
again. Place the other leg support in the same position.
Check that the leg supports are properly fixed.
• The opening on the inside of the leg support must rest on
the top of the kneecap so that the upper leg, in particular, is
supported.
Width
• The screw for adjusting the width of the leg supports is
located on the front of the leg supports (see illustration 16).
You will need hexagonal key (Allen key) number 6 to make
this adjustment.
• Hold one of the knee supports firmly with one hand and
loosen the width adjusting screw with the other. Adjust the
knee support to the required width and tighten the screw
firmly again. Adjust the other knee support to the same
position. Check that the knee supports are properly fixed.
Illustration 14:
Adjusting the length of the wheeled base.
Illustration 13:
Adjusting the width of the sides supports.
Illustration 15:
Adjusting the height of the leg supports.
Illustration 16:
Adjusting the width of the leg supports.
Page 13

Blixembosch User Guide
4. Operation
None of the contents of this User Guide may be copied, stored in an automatic data file, or published electronically, mechanically, by
photocopy, recording, or in any other way, without the prior written permission of Atlas Revalidatie Techniek BV.
© 2007 Atlas Revalidatie Techniek B.V.
13
• The child’s legs must be slightly apart when he or she is in the standing frame. Bend the side
plates round, without them pinching, so that the leg supports make good contact on the sides.
Depth
• The screw for adjusting the depth of the leg supports is
located on the side of the column (see illustration 17). You
will need hexagonal key (Allen key) number 6 to make this
adjustment.
• Hold one of the knee supports firmly with one hand and
loosen the depth adjusting screw with the other. Adjust the
knee support to the required depth and tighten the screw
firmly again. Adjust the other knee support to the same
position. Check that the knee supports are properly fixed.
• The child’s legs must be vertically under the trunk in a
slightly bent position (the knees may not be overstretched)
when he or she is in the standing frame.
4.2.9 Width and depth of the shoe holders
• The wing nuts for adjusting the width and depth of the shoe holders are located underneath the
footplate (see illustration 18).
• Place a raised object (for example a thick book) under the footplate to support it. Hold the shoe
holder and the width adjusting screw firmly with one hand and loosen the wing nut with the
other. Adjust the shoe holder to the required position and tighten the wing nut firmly again.
Repeat this for the other shoe holder. Check that the shoe holders are properly fixed.
• The width of the shoe holders must be adjusted such that the feet are slightly apart and are in
line with the knee supports. The depth must be adjusted such that the child’s legs are vertically
under his or her trunk.
4.2.10 Correcting the angle of the feet
• The wedges for correcting the angle of the child’s feet are attached
to the lower surface of the tray table with velcro. They are simple to
remove and place under the shoe holders (see illustration 19).
• Place a raised object (for example a thick book) under the footplate
to support it. Hold the shoe holder and the adjusting screw firmly
with one hand and unscrew the wing nut under the footplate with
the other. As a result room will be created under the shoe holder
and a wedge can be pushed under it. Adjust the angle and then
tighten the wing nut firmly again. Repeat this on the other side, if
required, and then check that the shoe holders and wedges are
properly fixed. Ensure that the shoe holders are adjusted to the
correct widths once more.
• The wedges enable you to adjust the angle of the feet to suit the
child’s capabilities.
Illustration 17:
Adjusting the depth of the leg supports.
Illustration 18:
Adjusting the shoe holders.
Illustration 19:
Correcting the angle of
the feet.
Page 14

Blixembosch User Guide
4. Operation
None of the contents of this User Guide may be copied, stored in an automatic data file, or published electronically, mechanically, by
photocopy, recording, or in any other way, without the prior written permission of Atlas Revalidatie Techniek BV.
© 2007 Atlas Revalidatie Techniek B.V.
14
Page 15

Blixembosch User Guide
5. Maintenance/ 6. Repairs/ 7. Warranty
None of the contents of this User Guide may be copied, stored in an automatic data file, or published electronically, mechanically, by
photocopy, recording, or in any other way, without the prior written permission of Atlas Revalidatie Techniek BV.
© 2008 Atlas Revalidatie Techniek B.V.
15
55.. MMaaiinntteennaannccee
The Blixembosch requires little maintenance:
• Check daily that all the fastenings, clamps and adjusting screws are properly fixed;
• Attend to daily hygiene. The standing frame can be cleaned using general domestic cleaning
agents that do not contain chlorine. Ensure that no residues of soap remain on the standing
frame as this could cause skin irritation;
• Keep the Blixembosch clean: for example, clean the wheels every week;
• Lightly spray the moving parts with silicon spray once a year (note: oil may leave stains on
surfaces).
66.. RReeppaaiirrss
• In the event of defects that could endanger the child, contact the supplier immediately to arrange
for repairs.
• If you are unsure about the correctness of the adjustments, the correct use of parts for holding
the child in position, or the correct form and use of accessories, contact the therapist or the
supplier about possible changes that may be required.
77.. WWaarrrraannttyy
The following warranty covers normal use:
• A warranty of 12 months from the delivery date of the Blixembosch standing frame. This
warranty only applies if original Atlas parts are used.
Exceptions:
• The warranty does not cover parts that are subject to normal wear;
• Manufacturing defects in upholstery and parts used to secure the child in position are covered
by a three-month warranty;
• The metal framework is covered by a three-year warranty.
The warranty will be voided in case of:
• Damage resulting from misuse, neglect, an accident, incorrect repair, exposure to corrosive or
abrasive agents, the use or storage of the Blixembosch in damp conditions, any failure to follow
maintenance or safety instructions or if replacements or modifications are made by anyone other
than a person authorised by Atlas Revalidatie Techniek.
In any correspondence, please state your name, address, type of standing frame, serial number and
the date of initial use:
Page 16

Blixembosch User Guide
8. Technical data
None of the contents of this User Guide may be copied, stored in an automatic data file, or published electronically, mechanically, by
photocopy, recording, or in any other way, without the prior written permission of Atlas Revalidatie Techniek BV.
© 2008 Atlas Revalidatie Techniek B.V.
16
88.. TTeecchhnniiccaall ddaattaa
8.1 Dimensions of the Blixembosch
Size 1: Size 2:
Suitable for a child with a
height of:
70 – 120 cm 115 – 155 cm
Minimum - maximum height: 57 – 85 cm 77 – 117 cm
Frame width: 55 cm 70 cm
Frame length: 70 cm 80 cm
Maximum user weight: 50 kg 75 kg
Frame: coated metal with chromium-plated parts
Frame colour: blue
Upholstery: grey imitation leather
8.2 Upholstery
The upholstery of the Blixembosch and its accessories are made from non-toxic, non-flammable,
flame-retardant material that does not irritate the skin.
The material used by Atlas for the upholstery of the Blixembosch is resistant to urine and can easily
be cleaned with general domestic cleaning agents.
8.3 Options
• Sides for the back support;
• Derotation band;
• Truncal band.
Page 17

Gebruiksaanwijzing Blixembosch
Bijlage: Gebruikersenquête
None of the contents of this User Guide may be copied, stored in an automatic data file, or published electronically, mechanically, by
photocopy, recording, or in any other way, without the prior written permission of Atlas Revalidatie Techniek BV.
© 2007 Atlas Revalidatie Techniek B.V.
17
AAppppeennddiixx:: UUsseerr qquueessttiioonnnnaaiirree
Your experiences with our products are important for helping us to make ongoing improvements to
our products. We therefore request that you complete this questionnaire after a few weeks and
return it to us, postage free. This will enable us to optimise our products and services.
Date
The user *
Name of contact person:
Telephone number:
Name of user:
Address:
Town:
Date of birth:
*
You may also return the questionnaire anonymously.
The product
Name:
Pumpi subframe
Is the product user-friendly? **
Yes/ No/ No idea
What, if any, problems did you
experience?
Which improvements would you like to
see made to the product?
Other comments and suggestions:
The fitting
Were you as parent/ supervisor present
during the fitting? **
Yes/ No
Was the technical advisor of Atlas
present during the fitting? **
Yes/ No/ I don’t know
Were your questions answered to your
satisfaction? **
Yes/ No
Were there any problems during the
fitting? **
No,
Yes, …..
Other comments and suggestions:
**
Circle the option that applies.
Page 18

Gebruiksaanwijzing Blixembosch
Bijlage: Gebruikersenquête
None of the contents of this User Guide may be copied, stored in an automatic data file, or published electronically, mechanically, by
photocopy, recording, or in any other way, without the prior written permission of Atlas Revalidatie Techniek BV.
© 2007 Atlas Revalidatie Techniek B.V.
18
Our service
Was an appointment made to deliver
the product? **
Yes/ No/ I don’t know
Was the product delivered on the
agreed time? **
Yes/ No/ I don’t know
Was the product delivered to your
satisfaction? (neatness, settings, etc.)
**
Yes/ No/ I don’t know
Comments:
Were there any problems? **
Yes/ No/ I don’t know
Comments:
Was the user guide clear? ** Yes/ No/ I don’t know
Comments:
Other comments and suggestions:
General
Are there any other points that Atlas
could improve?
**
Circle the option that applies.
Thank you very much for your cooperation.
Atlas Revalidatie Techniek
Antwoordnummer 3509
5370 ZX Ravenstein
The Netherlands
 Loading...