

Page 1
ISO 9001:2000 Certified Company
DiskMaster NASG501D
Dual Bay Gigabit Network
Storage
Where solutions begin
MULTILANGUAGE
Quick Start Guide
A06-NASG501D_GX01
Page 2

ISO 9001:2000 Certified Company
ITALIANO
Questo prodotto è coperto da garanzia Atlantis On-Center della
durata di 2 anni. Per maggiori dettagli in merito o per accedere alla
documentazione completa in Italiano fare riferimento al sito
www.atlantis-land.com.
ENGLISH
This product is covered by Atlantis 2 years On-Center warranty.
For more detailed informations please refer to the web site
www.atlantis-land.com.
For more detailed instructions on configuring and using the Switch,
please refer to the online manual.
FRANCAIS
Ce produit est couvert par une garantie Atlantis On-Center de 2
ans. Pour des informations plus détaillées, référez-vous svp au site
Web www.atlantis-land.com.
DEUTSCH
Dieses Produkt ist durch die Atlantis 2 Jahre On-Center Garantie
gedeckt. Für weitere Informationen, beziehen Sie sich bitte auf Web
Site www.atlantis-land.com.
ESPAÑOL
Este producto està cubierto de garantía Atlantis On-Center por 2
años. Para una información más detallada, se refiera por favor al
Web site www.atlantis-land.com.
Where solutions begin
Page 3
ISO 9001:2000 Certified Company
The award of the information is facultative, but its lack will prevent
R
R
R
e
e
e
g
g
g
i
i
i
s
s
s
t
t
t
e
e
e
r
r
r
y
y
y
o
o
o
u
u
u
r
r
r
p
p
p
r
r
r
o
o
o
d
d
d
u
u
u
c
c
c
t
t
t
!
!
!
w
w
w
w
w
w
w
w
w
.
.
.
a
a
a
t
t
t
l
l
l
a
a
a
n
n
n
t
t
t
i
i
i
s
s
s
-
-
-
l
l
l
a
a
a
n
n
n
d
d
d
.
.
.
c
c
c
o
o
o
m
m
m
Registration on the web site
www.atlantis-land.com within 15 days
from the purchase of the product dismiss
the customer from showing a valid proof of
purchase (Sale Receipt or Invoice) in case
of the request of intervention. For further
information we invite you to look at our web
site at the section WARRANTY.
ATLANTIS® from starting the Guarantee process requested.
Copyright
The Atlantis logo is a registered trademark of Atlantis. All other
names mentioned mat be trademarks or registered trademarks of
their respective owners. Subject to change without notice. No
liability for technical errors and/or omissions.
Where solutions begin
Page 4

MULTILANGUAGE QUICK START GUIDE
ITALIANO
1.1 Caratteristiche Principali .............................................................9
1.2 Contenuto della confezione ..................................................... 10
1.3 Requisiti di Sistema ................................................................. 10
1.4 Dove posizionare il DiskMaster ............................................... 10
1.5 Schema di Applicazione.......................................................... 11
1.6 I LED frontali ............................................................................ 12
1.7 Le porte posteriori .................................................................... 14
1.8 Settaggi di Default .................................................................... 15
1.9 Inserimento dei dischi .............................................................. 16
1.10 Installazione delle Utility ........................................................ 19
1.11 Formattazione degli Hard Disk .............................................. 19
1.12 Connessione di rete ............................................................... 22
Creazione della Connessione Remota in Windows XP . 22
Creazione della Connessione Remota in Windows Vista25
1.13 Risoluzione dei problemi ........................................................ 26
A.1 Utilizzare i LED per la diagnosi dei problemi ........... 26
A.1.1 LED Power ................................................................... 26
A.1.2 LED Link ...................................................................... 26
A.2 Login con Username e Password ............................ 26
A.3 Interfaccia WEB ....................................................... 27
A.4 Varie ……………………………………......................28
1.14 Supporto Offerto .................................................................... 30
ENGLISH
1.1 An Overview of the DiskMaster ............................................... 33
1.2 Package contents .................................................................... 34
1.3 System Requirements.............................................................. 34
1.4 Choosing a place for your DiskMaster ..................................... 34
1.5 DiskMaster Application ............................................................ 35
1.6 The Front LEDs ........................................................................ 36
1.7 The Rear Ports ......................................................................... 38
1.8 Default Settings ........................................................................ 39
1.9 Hardware Installation ............................................................... 40
DiskMaster 4
Page 5

MULTILANGUAGE QUICK START GUIDE
1.10 Installing the NAS Utility ........................................................ 43
1.11 Formatting the installed hard disks ........................................ 43
1.12 Mapping a Network Drive ...................................................... 46
Mapping a Network Drive in Windows XP ...................... 46
Mapping a Network Drive in Windows Vista ................... 48
1.13 Troubleshooting ..................................................................... 49
A.1 Using LEDs to Diagnose Problems .......................... 49
A.1.1 Power LED ................................................................... 49
A.1.2 LED Link ...................................................................... 49
A.2 Login: Username and Password ............................ 50
A.3 WEB INTERFACE .................................................... 50
A.4 General..................................................................... 51
1.14 Product Support ..................................................................... 52
APPENDIX
APPENDIX A: Technical Features ................................................. 53
A06-NASG501D_GX01(V1.03 July 2008)
DiskMaster 5
Page 6

ITALIANO
AVVERTENZE Abbiamo fatto di tutto al fine di evitare che nel testo, nelle immagini e nelle tabelle presenti in questo manuale, nel software e nell'hardware fossero presenti degli errori. Tuttavia, non possiamo garantire che non siano presenti errori e/o omissioni. Infine, non possiamo essere ritenuti responsabili per qualsiasi perdita, danno o incomprensione compiuti direttamente o indirettamente, come risulta dall'utilizzo del manuale, software e/o hardware. Il contenuto di questo manuale è fornito esclusivamente per uso informale, è soggetto a cambiamenti senza preavviso (a tal fine si invita a consultare il sito www.atlantisland.it o www.atlantis-land.com per reperirne gli aggiornamenti) e non deve essere interpretato come un impegno da parte di Atlantis che non si assume responsabilità per qualsiasi errore o inesattezza che possa apparire in questo manuale. Nessuna parte di questa pubblicazione può essere riprodotta o trasmessa in altra forma o con qualsiasi mezzo, elettronicamente o meccanicamente, comprese fotocopie, riproduzioni, o registrazioni in un sistema di salvataggio, oppure tradotti in altra lingua e in altra forma senza un espresso permesso scritto da parte di Atlantis. Tutti i nomi di produttori e dei prodotti e qualsiasi marchio, registrato o meno, menzionati in questo manuale sono usati al solo scopo identificativo e rimangono proprietà esclusiva dei loro rispettivi proprietari.
Restrizioni di responsabilità CE/EMC
Il prodotto descritto in questa guida è stato progettato, prodotto e
approvato in conformità alle regole EMC ed è stato certificato per non
avere limitazioni EMC.
Se il prodotto fosse utilizzato con un PC non certificato, il produttore non
garantisce il rispetto dei limiti EMC. Il prodotto descritto è stato costruito,
prodotto e certificato in modo che i valori misurati rientrino nelle limitazioni
EMC. In pratica, ed in particolari circostanze, potrebbe essere possibile
che detti limiti possano essere superati se utilizzato con apparecchiature
non prodotte nel rispetto della certificazione EMC. Può anche essere
possibile, in alcuni casi, che i picchi di valore siano al di fuori delle
tolleranze. In questo caso l’utilizzatore è responsabile della “compliance”
con i limiti EMC. Il Produttore non è da ritenersi responsabile nel caso il
prodotto sia utilizzato al di fuori delle limitazioni EMC.
DiskMaster 6
Page 7

ITALIANO
CE Mark Warning
Questo dispositivo appartiene alla classe B. In un ambiente domestico il
dispositivo può causare interferenze radio, in questo caso è opportuno
prendere le adeguate contromisure.
Dichiarazione di Conformità (Contrassegno CE)
Con la presente Sidin SpA dichiara che questo Dual Bay NAS è conforme
ai requisiti essenziali ed alle altre disposizioni pertinenti stabilite dalla
direttive CE 2004/108/EC sulla “compatibilità elettromagnetica” e
successive 92/31/ECC e 93/68/EEC.
Restrizioni di responsabilità
Atlantis non potrà essere ritenuta responsabile per un’eventuale perdita di
dati sugli Hard Disk inseriti nell’apparato né per un loro danneggiamento.
Tutti i costi da sostenere per un eventuale recupero di dati corrotti
dovranno essere totalmente sostenuti dall’acquirente.
Il software di backup, ove presente, è dato in licenza. Atlantis non offrirà
supporto sull’utilizzo né potrà essere ritenuta responsabile per
malfunzionamenti e/o perdita di dati da questo generati.
Informazioni sulla Sicurezza
Solo personale qualificato è autorizzato ad interventi sull’apparato.
La pulizia del prodotto va effettuata evitando di utilizzare spray
detergenti e soluzioni contenenti alcool o liquidi infiammabili.
E’ fondamentale evitare che l’apparato possa surriscaldarsi. Questo
potrebbe diminuire la durata del dispositivo.
E’ opportuno proteggere l’apparato da elevata umidità, irraggiamento
solare diretto e da temperature estremamente basse o elevate.
Non depositare liquidi sopra o accanto l’apparecchio.
Se l’apparecchio viene spostato da un ambiente freddo ad un locale
più caldo è possibile che si formi condensa. E’ opportuno non
accendere l’apparecchio prima che questi fenomeni siano esauriti.
L’apparecchio può contenere sino a 2 Hard Disk va assolutamente
protetto da vibrazioni durante il funzionamento.
Utilizzare esclusivamente l’adattatore di rete AC/DC incluso nella
confezione. In caso contrario l’apparecchio potrebbe manifestare
malfunzionamenti.
Utilizzare i gommini per evitare che l’apparecchio possa scivolare
facilmente sul piano di utilizzo. Posizionare il dispositivo su una
superficie antisdrucciolo.
I gommini in gomma/plastica possono danneggiare la superficie.
DiskMaster 7
Page 8

ITALIANO
Utilizzare solo i cavi specifici per le applicazioni. Utilizzare le porte
indicate senza forzare.
Verificare regolarmente che tutti i cavi di connessione non siano
danneggiati. In caso lo fossero sostituirli immediatamente.
Verificare che nella prese di collegamento non entrino oggetti e/o cavi
estranei.
Taluni Hard Disk potrebbero non essere compatibili con i controller
dell’apparato. A questo scopo consultare la lista di compatibilità
presente sul sito nell’apposita sezione.
Convenzioni
Nel seguente documento sono utilizzati i seguenti simboli:
DiskMaster 8
Page 9

ITALIANO
Grazie per aver acquistato il DiskMaster. Grazie alla velocità offerta,
l’ampia capacità di stoccaggio, la facilità d’uso ed il supporto di
numerose applicazioni, il DiskMaster rappresenta la soluzione ideale
per ogni necessità di immagazzinamento dati.
1.1 Caratteristiche Principali
Condivisione dei dati nella rete Locale o attraverso Internet in tutta
sicurezza
DiskMaster è un dispositivo di storage a doppia baia con porta Gigabit
integrata, grazie al quale è possibile condividere documenti, file musicali e
video sia sulla rete LAN locale sia tramite Internet.
Basato sul protocollo IP (Internet Protocol), DiskMaster può essere
utilizzato da qualunque piattaforma, indipendentemente dal sistema
operativo installato, sia esso Windows, Mac o Linux.
Grazie al server FTP integrato è possibile accedere ai file memorizzati sia
da postazione locale che da Internet, configurando opportunamente
account con differenti livelli di permessi a seconda delle necessità.
Confort, prestazioni e sicurezza
DiskMaster permette di scegliere tra tre differenti modalità di
configurazione dei due dischi.
La modalità RAID1 è adatta allo stoccaggio di file ritenuti critici; anche in
caso di rottura di uno dei due hard disk nessun dato viene perso.
La modalità RAID0 permette performance eccellenti arrivando ad ottenere
un transfer rate sino a 260Mb/s in lettura e 220Mb/s in scrittura (nel
modello con porta Gigabit).
Utilizzando, invece, la modalità JBOD è possibile ottenere un’elevata
capacità sommando quella dei due dischi.
La ventilazione forzata, inoltre, permette di evitare problemi dovuti a
surriscaldamento.
iTunes®. BitTorrentTM e Print Server USB
Il client BitTorrentTM integrato nel dispositivo permette il download di
contenuti da Internet anche a PC spento.
Inoltre, una volta attivato il server iTunes®, DiskMaster viene riconosciuto
dal software iTunes installato sul PC, rendendo possibile la ricerca e la
lettura di musica direttamente dal dispositivo.
L’apparato consente, tramite la porta USB, la condivisione di una
stampante che diviene a tutti gli effetti una stampante di rete.
DiskMaster, adatto ad un utilizzo sia in casa che in ufficio, rappresenta la
soluzione ideale per la sicurezza dei dati a costo contenuto.
DiskMaster 9
Page 10

ITALIANO
1.2 Contenuto della confezione
Prima di utilizzare il prodotto verificare che la confezione contenga:
Un DiskMaster Dual Bay Network Storage
Un cavo RJ45 CAT5
Una guida rapida multilingua (Italiano, Inglese)
Un CD contenente driver, utilità e manuale dell’utente
Adattatore AC-DC (12V, 7A), fornito di cavo schuko
Kit di montaggio HD composto da viti e 4 slitte
Qualora uno di questi componenti dovesse mancare è opportuno
contattare immediatamente il rivenditore.
1.3 Requisiti di Sistema
Prima di utilizzare il prodotto verificare che i seguenti requisiti siano
soddisfatti:
CPU 1Ghz o superiore
Almeno 512MB di RAM
30MB dii spazio libero sull’HD (per le installazione delle utility)
Un CD contenente driver, utilità e manuale dell’utente
Una scheda di rete
Un browser WEB (IE6.0, FireFox 2.0.0.4 o superiore) per accedere
all’interfaccia GUI del DiskMaster
Windows XP Service Pack2, Windows 2000 Service Pack4, Windows
Vista (in caso di utilizzo dell’Utility)
1.4 Dove posizionare il DiskMaster
E’ importante selezionare accuratamente il luogo dove DiskMaster verrà
collocato. Seguire a tal proposito le seguenti direttive:
Collocare il prodotto su un piano stabile capace di supportare almeno
5Kg.
Collocare l’apparato vicino ad una presa Ethernet.
Lasciare almeno 10 cm di spazio dalla parte posteriore per favorire il
ricircolo forzato dell’aria.
Collegare il dispositivo ad una presa elettrica dotata della messa a
terra. Si consiglia l’uso di un UPS (almeno dotato di AVR) per
migliorare la stabilità della tensione di alimentazione del DiskMaster.
Evitare di collegare l’apparato a prese controllate da temporizzatori. La
mancanza di corrente può generare il blocco del Sistema Operativo
DiskMaster 10
Page 11

ITALIANO
del DiskMaster e dunque causare perdita e/o danneggiamento dei
dati.
Tenere lontano dall’appararto ogni altro apparecchio possibile fonte di
campi elettromagnetici (speaker, telefoni cordless ecc..).
Evitare di esporre direttamente il prodotto alla luce solare, ad
eccessivo calore e/o in ambienti ove sia presente polvere.
1.5 Schema di Applicazione
In figura un esempio tipico di applicazione.
DiskMaster 11
Page 12
ITALIANO
No.
LED
Colore
Descrizione
1
Power
LED
Verde
Indica che il DiskMaster è acceso.
Spento
Indica che il DiskMaster è spento.
2
System
LED
Verde
Indica che il Diskmaster ha
correttamente effettuato la
procedura di boot ed è pronto per
essere utilizzato.
Lampeggiante
Verde
Indica che il DiskMaster sta
effettuando la procedura di boot.
3
HDD1
Access
LED
Verde
Indica che l’HD1 è attivo.
Ambra
Indica che la capacità dell’HD1 è
prossima all’esaurimento (meno
del 10% è disponibile).
Lampeggiante
Verde
Indica attività sull’HD1.
Ambra
Lampeggiante
Indica attività sull’HD1 (la cui
capacità è prossima
all’esaurimento ).
4
HDD2
Verde
Indica che l’HD2 è attivo.
1.6 I LED frontali
1
DiskMaster 12
Page 13

ITALIANO
Access
LED
Ambra
Indica che la capacità dell’HD2 è
prossima all’esaurimento (meno
del 10% è disponibile).
Lampeggiante
Verde
Indica attività sull’HD2.
Ambra
Lampeggiante
Indica attività sull’HD2 (la cui
capacità è prossima
all’esaurimento ).
5
LAN
LED
Verde
Acceso quando connesso ad un
dispositivo Ethernet a 1000Mbps.
Lampeggiante
Verde
Indica attività (1000Mbps).
Ambra
Acceso quando connesso ad un
dispositivo Eternet a 10/100Mbps.
Lampeggiante
Ambra
Indica attività (100Mbps).
DiskMaster 13
Page 14
ITALIANO
PORTE
UTILIZZO
1
LAN(RJ45)
Connettere con un cavo UTP.
2
USB(V2.0)
Connettere la stampante USB per farla
diventare una stampante di rete.
1.7 Le porte posteriori
DiskMaster 14
Page 15
ITALIANO
3
RESET
Dopo che il dispositivo è acceso, premere
(per 5 secondi) per effettuare il reset
dell’apparato (utilizzare, per esempio, in
caso si perdesse la password di accesso).
4
POWER(ON/OFF)
Bottone di accensione/spegnimento. La
fase di accensione/spegnimento necessita
sino a 3 minuti.
5
POWER (jack)
Connettere l’alimentatore a questo jack.
Non ostruire mai la ventola di raffreddamento
dell’apparato. Lasciare uno spazio di almeno 10 cm.
1.8 Settaggi di Default
Prima di iniziare la configurazione del DiskMaster è necessario conoscere
i settaggi di default. Utilizzando questi settaggi e seguendo il Wizard
dell’utility NAS è possibile rendere operativo l’apparato in pochissimo
tempo. Per una configurazione dettagliata fare riferimento al manuale
presente sul CD. Le configurazioni di Default del DiskMaster sono:
Username: admin
Password: admin
Indirizzo IP: 192.168.1.10
Server name: NAS
DiskMaster 15
Page 16
ITALIANO
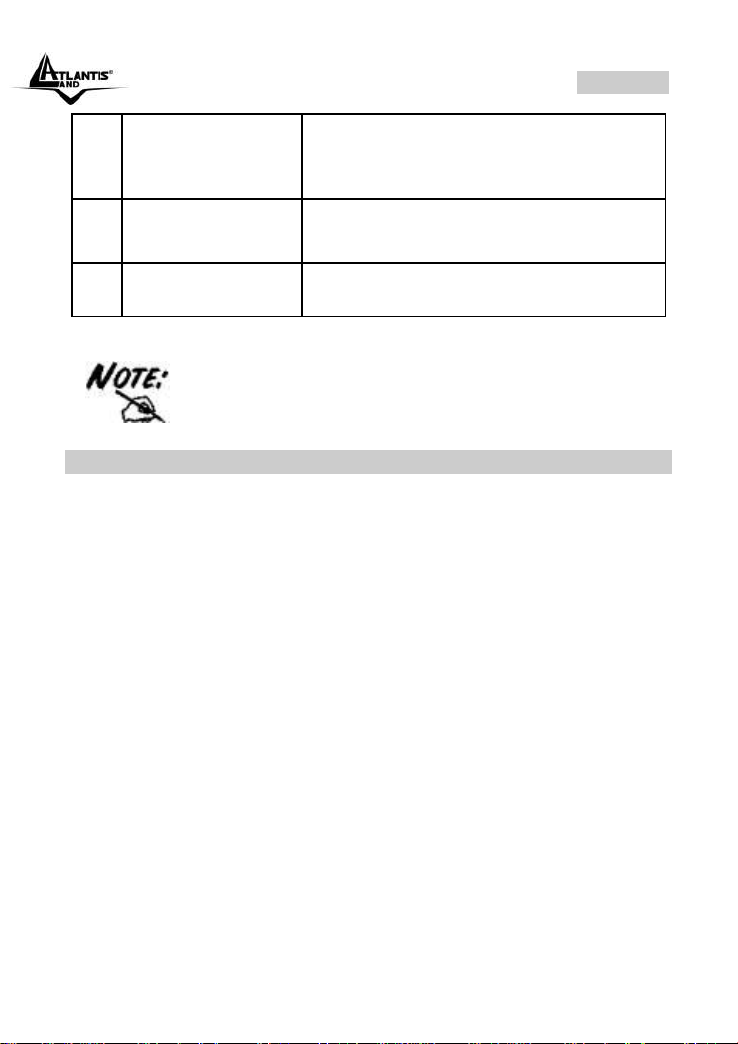
1.9 Inserimento dei dischi
Il dispositivo supporta 2 dischi con interfaccia Serial ATA. Seguire le
istruzioni seguenti per l’inserimento degli Hard Disk nell’apparato.
Avvitare 2 sliitte per ogni HD da 3.5” (sono disponibili 8 viti) come
da figura.
Aprire lo sportello frontale del DiskMaster premendo sull’apposita
area (evidenziata con la scritta PUSH). Inserire l’HDD.
DiskMaster 16
Page 17
ITALIANO
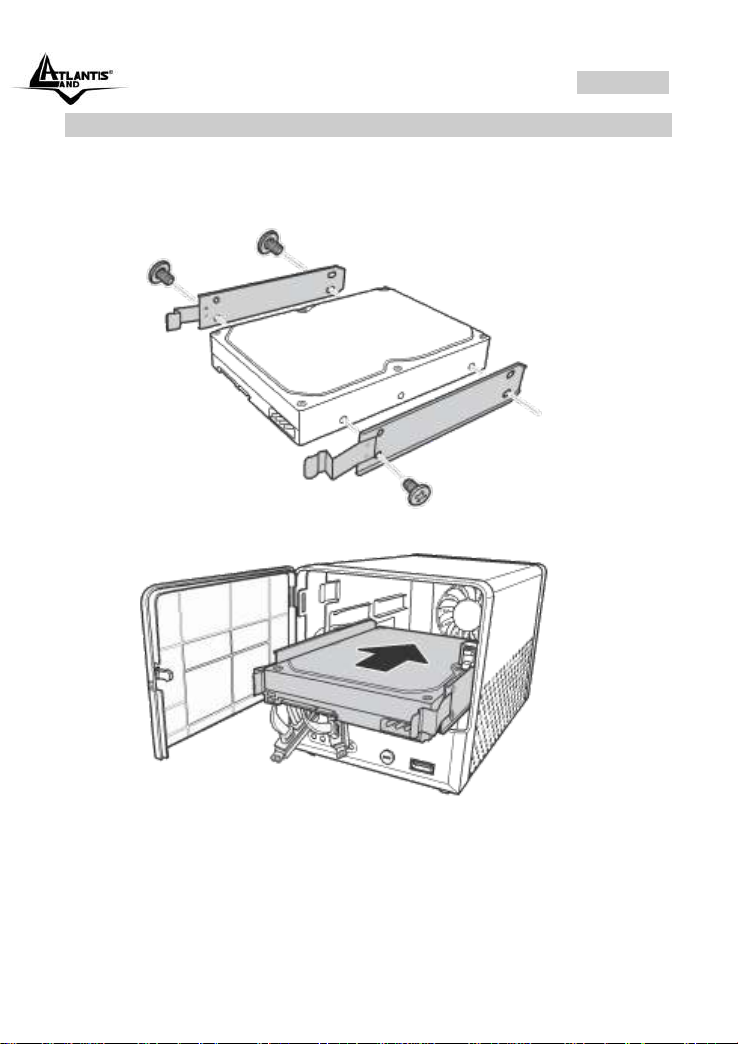
Connettere all’HDD il cavo SATA + Alimentazione. Ripetere
eventualmente l’operazione per il secondo HD.
Chiudere lo sportello frontale.
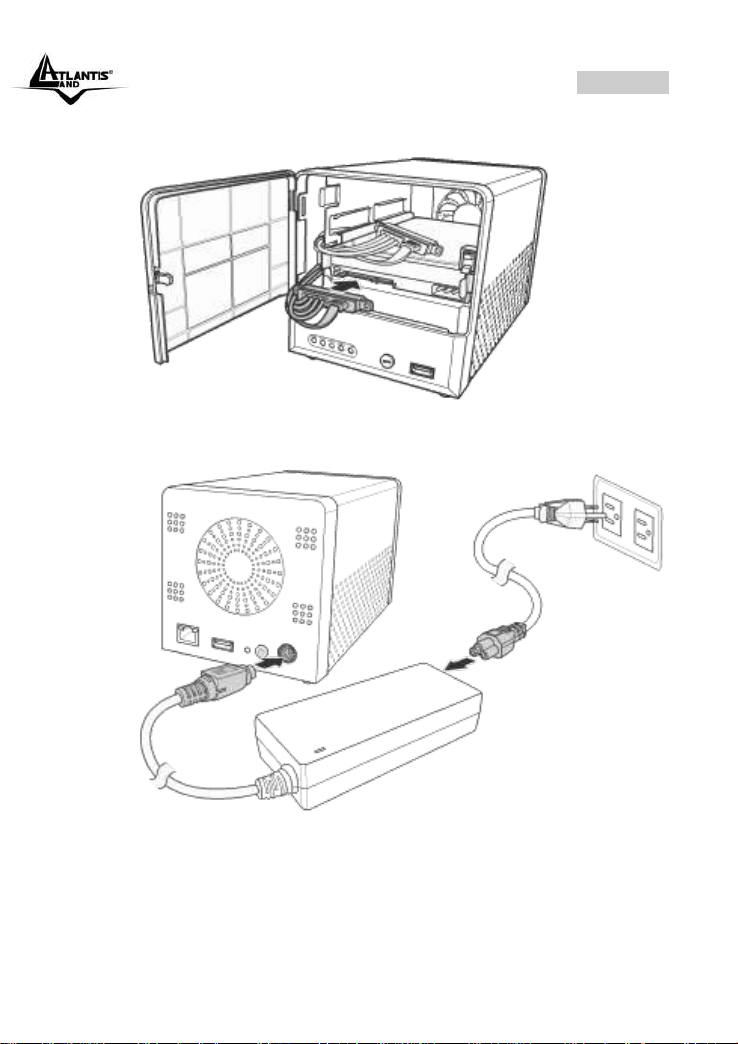
Collegare al DiskMaster il cavo di alimentazione come da figura.
Collegare infine il cavo di alimentazione all’alimentatore switch ed
infine alla rete elettrica (verificare che il LED verde
sull’alimentatore sia acceso).
Collegare, tramite il cavo RJ45 in dotazione, il DiskMaster alla
rete (Switch, Router o PC direttamente).
DiskMaster 17
Page 18

ITALIANO
Accendere il DiskMaster premendo il bottone posto nel pannello
posteriore per qualche secondo.
DiskMaster 18
Page 19

ITALIANO
1.10 Installazione delle Utility
A questo punto è necessario procedere all’installazione delle Utility fornite
a corredo (per sitemi Windows® XP/2000/Vista). Per lanciare
direttamente l’installazione dell’utility, una volta inserito il CD nell’apposito
lettore, cliccare sull’icona setup (CDRom:\Utility\setup.exe) o utilizzare
l’interfaccia grafica visualizzata a video.
Seguire le istruzioni a video per portare a termine l’installazione.
Una volta terminata l’installazione lanciare l’applicativo (Programmi->Nas
Utility->Nas Utility).
1.11 Formattazione degli Hard Disk
A questo è opportuno procedere alla formattazione del DiskMaster.
Lanciare l’utility cliccando 2 volte sull’icona sul desktop
oppure usando il link (Programmi->Nas Utility->Nas Utility).
Partirà il NAS Discovery, selezionare il NAS (dovrebbe avere l’indirizzo IP
102.168.1.10) e cliccare su Attach. Scrivere admin nel nel campo
Password e cliccare su Login.
Selezionare dalla combo-box Format Mode la tipologia di funzionamento
(Individual Disks , RAID0, RAID1 o JBOD). Selezionare poi dalla combobox Format Type (EXT2, EXT3) la modalità di formattazione. Cliccare su
Next e poi confermare cliccando su OK.
DiskMaster 19
Page 20

ITALIANO
Dopo qualche istante apparirà un’altra finestra in cui cliccare su Finish,
una volta terminata la fase di formattazione.
A questo punto l’Utility provvederà ad effettuare l’upload del Remote
Package. Questo processo potrebbe essere estremamente lento.
Alla fine l’utility effettuarà un reboot del NAS e nella sezione Action Tip
verrà visualizzato Install Successfully. Cliccare su Finish per terminare.
DiskMaster 20
Page 21

ITALIANO
Alcune opzioni sono disponibili solo nel caso in cui 2
Hard Disk vengano installati nell’apparato.
La formattazione e/o il cambiamento da una modalità
RAID ad un’altra distruggerà, in maniera irreparabile, tutti
i dati presenti sull’Hard Disk. Accertarsi di aver effettuato
il backup dei dati importanti prima di procedere. La
creazione del RAID è un processo che potrebbe
richiedere diverso tempo (anche alcune ore). E’
opportuno attendere che il dispositivo abbia terminato
questo processo prima di fare alcunché.
Sono disponibili 3 configurazioni:
RAID 0= Ideale per applicazioni in cui la velocità è il
fattore più importante. Questa tipologia di RAID non è
ridondante ma si limita a scrivere l’informazione
segmentandola su entrambi i dischi (da ciò risulta
una grande velocità di lettura). La capacità risultante
DiskMaster 21
Page 22

ITALIANO
sarà 2 volte la capacità del disco più piccolo (meglio
usare due dischi identici). I dati conservati saranno
irrimediabilmente persi laddove anche un solo disco
dovesse rompersi.
RAID 1= Ideale per applicazioni in cui la sicurezza è
il fattore fondamentale. Questa tipologia di RAID è
ridondante e crea una copia esatta dei dati nel
secondo Hard Disk. I dati conservati non saranno
persi laddove un solo disco dovesse rompersi
(l’array passa in uno stato degradato da cui è
possibile tornare ad una situazione di normalità
cambiando il disco rotto).
JBOD= Ideale per applicazioni in cui la capacità è il
fattore più importante. I due dischi sono trattati come
un unico disco. La capacità risultante sarà la somma
delle 2 capacità. I dati conservati saranno
irrimediabilmente persi laddove anche un solo disco
dovesse rompersi.
1.12 Connessione di rete
Creazione della Connessione Remota in Windows XP
In Windows XP è possibile creare la connessione di Rete operando come
segue:
Start->Pannello di Controllo
Cliccare sul menu Strumenti e poi Connetti unità di Rete
Cliccare su Sfoglia, poi selezionare sotto WorkGroup il nome
precedentemente attribuito all’apparato (NAS nel caso di default)
e poi la cartella Share e cliccare su OK.
DiskMaster 22
Page 23

ITALIANO
Spuntare la voce Riconnetti all’avvio, come in Figura.
DiskMaster 23
Page 24

ITALIANO
In caso di problemi è possibile forzare direttamente
l’indirizzo IP dell’apparato per la mappatura di un’unità di
rete usando la sintassi:\\192.168.1.10\Share nel campo
cartella (l’indirizzo IP 192.168.1.10 si riferisce alle
condizioni id default). Cliccare poi su Fine.
Cliccare poi su Fine.
A questo punto è possibile accedere al disco inserito nel DiskMaster
(utilizzando la cartella Share) come fosse un disco del proprio PC.
Per ulteriori dettagli su una configurazione avanzata fare riferimento al
manuale completo presente su CD.
DiskMaster 24
Page 25

ITALIANO
In caso di problemi è possibile forzare direttamente
l’indirizzo IP dell’apparato per la mappatura di un’unità di
rete usando la sintassi:\\192.168.1.10\Share nel campo
cartella (l’indirizzo IP 192.168.1.10 si riferisce alle
condizioni id default). Cliccare poi su Fine.
Creazione della Connessione Remota in Windows Vista
In Windows Vista è possibile creare la connessione di Rete operando
come segue:
Start->Computer
Cliccare su Connetti unità di Rete
Cliccare su Sfoglia, poi selezionare il nome precedentemente
attribuito all’apparato (NAS nel caso di default) e poi la cartella
Share e cliccare su OK.
Spuntare la voce Riconnetti all’avvio e cliccare poi su Fine.
A questo punto è possibile accedere al disco inserito nel DiskMaster
(utilizzando la cartella Share) come fosse un disco del proprio PC.
Per ulteriori dettagli o la configurazione avanzata fare riferimento al
manuale completo presente su CD.
DiskMaster 25
Page 26

ITALIANO
Steps
Azione Correttiva
1
Accertarsi che l’alimentatore sia connesso al DiskMaster ed
alla rete elettrica. Utilizzare unicamente l’alimentatore fornito a
corredo.
2
Verificare che l’alimentatore sia connesso a una presa
elettrica attiva e in grado di fornire la tensione necessaria al
funzionamento del prodotto. Accendere il dispositivo
premendo il tasto ON/OFF sul retro dell’apparato.
3
Accertarsi che il Plug dell’alimentatore sia correttamente
inserito.
4
Se il problema dovesse persistere contattare l’assistenza
tecnica Atlantis.
Steps
Azione Correttiva
1
Verificare la connessione del cavo di rete tra il DiskMaster e il
PC o lo Switch di rete.
2
Verificare che il cavo sia funzionante.
3
Verificare che la scheda di rete del PC funzioni correttamente.
4
Se il problema dovesse persistere contattare l’assistenza
tecnica Atlantis.
Steps
Azione correttiva
1
Se è stata cambiata la password di accesso ed è stata
dimenticata, è necessario caricare la configurazione di default.
1.13 Risoluzione dei problemi
Questo capitolo illustra come identificare e risolvere eventuali problemi sul
DiskMaster.
A.1 Utilizzare i LED per la diagnosi dei problemi
I LEDs sono un utile strumento per individuare eventuali problemi,
osservandone lo stato è possibile individuare velocemente dove si verifica
un eventuale malfunzionamento.
A.1.1 LED Power
Il LED PWR non si accende
A.1.2 LED LAN
Il LED LAN (nel pannello posteriore) non si accende.
A.2 Login con Username e Password
E’ stata dimenticata la password di accesso.
DiskMaster 26
Page 27

ITALIANO
Ciò cancellerà tutte le configurazioni eseguite dall’utente e
ripristinerà la password di default.
Premendo il pulsante “Reset” presente nel pannello posteriore
del prodotto per 5 (o più) secondi, il DiskMaster riporterà tutte
le impostazioni ai valori iniziali.
2
Le configurazioni di Default del DiskMaster sono:
Username: admin
Password: admin
Indirizzo IP: 192.168.1.10
Server name: NAS
3
Per incrementare il livello di sicurezza del sistema è molto
importante modificare la password di accesso di default.
Steps
Azione correttiva
1
Accertarsi di utilizzare Internet Explorer 5 o una versione
successiva.
2
Eliminare i files temporanei di Internet ed eseguire un nuovo
login (Strumenti->Opzioni Internet->Avanzate->Reimposta).
Steps
Azione correttiva
1
Verificare che il LED LAN sia cceso
2
Accertarsi di utilizzare un indirizzo IP corretto, appartenente
alla stessa rete del DiskMaster.
3
Se è stato modificato l’indirizzo IP del DiskMaster è
necessario modificare l’URL di accesso al prodotto. Lanciare
l’utility a corredo per cercare il nuovo indirizzo IP.
4
Se i problemi persistono effettuare un reset dell’apparato.
A.3 Interfaccia WEB
Le schermate di configurazione Web non vengono visualizzate
correttamente.
Non è possible accedere al DiskMaster dalla LAN.
DiskMaster 27
Page 28

ITALIANO
Steps
Azione correttiva
1
Spegnere il NAS premendo per 5 secondi il bottone posto nel
retro dell’apparato. Riaccendere l’apparato.
2
Lanciare nuovamente le NAS Utility, il sistema provvederà ad
effettuare un nuovo upload del Remote Package.
3
Disisntallare l’Utility del CD e provvedere ad installare l’Utility
scaricata dal sito web nella pagina di prodotto [A06NASG501D[Utility V1.10 and Remote Package V1.40].zip].
Ripetere l’operazione.
4
Laddove il problema persistesse, lanciare Iinternet Explorer,
digitare l’IP del NAS (192.168.1.10), digitare username e
password di accesso (admin, admin). A questo punto
l’apparato mostrerà l’immagine seguente:
Cliccare su Sfoglia per indicare il percorso in cui è contenuto
il Remote Package (scaricabile dal sito WEB, oppure indicare
il file default_remote_package.bin contenuto nella cartella
dove è stato installata la NAS Utility). Cliccare poi su Install.
Dopo qualche minuto l’apparato dovrebbe essere pronto
all’uso.
A.4 Varie
Durante la procedura di upload del Remote Package l’utility rimane
bloccata e nel campo Action Trip viene visualizzata la scritta “Cecking
Package Validation”?
DiskMaster 28
Page 29

ITALIANO
Steps
Azione correttiva
1
La modalità FAT32 non supporta funzionalità RAID.
2
Riformattare gli Hard Disk in modalità EXT2 o EXT3.
Attenzione tutti i dati verranno irrimediabilmente persi col
cambio di formattazione.
Steps
Azione correttiva
1
Molte funzionalità richiedono che sia installato un Hard Disk.
Per talune funzionalità (RAID) è necessario installare 2 Hard
Disk.
Steps
Azione correttiva
1
L’apparato integra un server SAMBA (basato su SMB, Server
Message Block) per il file sharing. In altre parole se il PC
utilizza il protocollo IP può accedere ai file condivisi.
Alternativamente il server FTP integrato permette di ottenere
le stesse funzionalità (sul PC deve però essere presente un
FTP client).
Steps
Azione correttiva
1
Le stampanti basate su GDI/Host-based non sono supportate.
Talune stampanti multifunzione (MFP), potrebbero non
funzionare.
Steps
Azione correttiva
Perché non è possibile utilizzare la modalità RAID se i dischi sono
formattati in modalità FAT32?
Perché alcuni menu riportati nel manuale non sono disponibili a video?
Quali protocolli sono utilizzati dal DiskMaster per il servizio di condivisione
di file?
Perché il DiskMaster non rileva la stampante USB correttamente
collegata?
DiskMaster supporta la funzionalità di risparmio energetico (Power
Management)?
DiskMaster 29
Page 30

ITALIANO
1
Si, il DiskMaster superato un tempo di inattività dei dischi
procede ad attivare una modalità risparmio energetico.
Quando l’utente effettuerà un accesso ai dischi questi saranno
automaticamente riattivati in maniera assolutamente
trasparente (questo genera un attesa di qualche secondo).
1.14 Supporto Offerto
Per qualunque altro problema o dubbio è possibile contattare l’help desk
telefonico (02/93907634) gratuito di Atlantis che fornirà assistenza da
lunedì al giovedì dalle 9:00 alle 13:00 e dalle 14:00 alle 18:00. Il venerdì
dalle 9:00 alle 13:00. E’ possibile anche utilizzare il fax (02/93906161) o la
posta elettronica (tecnici@atlantis-land.com) per esporre eventuali
domande o problemi.
Atlantis
Via Pelizza da Volpedo, 59
20092 Cinisello Balsamo (MI) Italy
Fax: +39.(0)2.93906161
Help Desk :+39.(0)2.93907634
Email: tecnici@atlantis-land.com
WWW: www.atlantis-land.com
DiskMaster 30
Page 31

ENGLISH
Copyright Statement
No part of this publication may be reproduced, stored in a retrieval system,
or transmitted in any form or by any means, whether electronic,
mechanical, photocopying, recording or otherwise without the prior writing
of the publisher. Windows™ 98SE/2000/ME/XP/VIsta are trademarks of
Microsoft® Corp. Pentium is trademark of Intel. All copyright reserved.
The Atlantis logo is a registered trademark of Atlantis. All other names
mentioned mat be trademarks or registered trademarks of their respective
owners. Subject to change without notice. No liability for technical errors
and/or omissions.
CE/EMC Restriction of Liability
The product described in this handbook was designed, produced and
approved according to the EMC-regulations and is certified to be within
EMC limitations.
If the product is used in an uncertified PC, the manufacturer undertakes no
warranty in respect to the EMC limits. The described product in this
handbook was constructed, produced and certified so that the measured
values are within EMC limitations. In practice and under special
circumstances, it may be possible, that the product may be outside of the
given limits if it is used in a PC that is not produced under EMC
certification. It is also possible in certain cases and under special
circumstances, which the given EMC peak values will become out of
tolerance. In these cases, the user himself is responsible for compliance
with the EMC limits.
CE Mark Warning
This is a Class B product. In a domestic environment, this product may
cause radio interference, in which case the user may be required to take
adequate measures.
Declaration of Conformity (CE Mark)
Hereby, Sidin SpA, declares that this Dual Bay NAS is in compliance with
the essential requirements and other relevant provisions of Directive
2004/108/EC “Electromagnetic Compatibility” and 92/31/ECC and
93/68/EEC within CE Marking Requirememnt.
Limited Warranty
Our warranties (for hardware and software) do not cover data loss – back
up the contents of your drive to a separate storage medium on a regular
basis. Also, consequential damages; incidental damages; and costs related
to data recovery, removal and installation are not recoverable under our
warranties.
DiskMaster 31
Page 32

ENGLISH
Safety Information
Only qualified personnel should carry out technical work on the
device.
When cleaning, avoid using cleaning sprays and any kinf of
solution containing alcohol or other flammable liquids.
Avoid overheating. This may reduce the life of the device.
Protect your device from humidity, direct sunlight as well as high
and extremely low temperatures.
Do no place any liquids on or close to the unit.
If the device is brought from a cold environment into a warmer
installation site, bedewing may occur. Wait until the temperature
of the device has equalised and it is completely dry before you
connect to AC main.
As this device contains up to 2 Hard Disk, particular care must be
taken to ensure that is not exposed to vibrations during operation.
Please use the supplied AC/DC Adapter included into g-box. If it is
connected to other devices, this product or power supply unit may
be damaged.
We recommend that you place the device on a non-slip surface.
Please note that the rubber/plastic feet on the devices may
damage the surface.
Check the cable regularly for damage. Damaged cables must be
replaced immediately.
Ensure that no objects enter the connection sockets.
DiskMaster 32
Page 33

ENGLISH
Thank you for purchasing the DiskMaster storage solution. With
speed, ease of use, high capacity, and support for numerous
applications, DiskMaster is the ideal solution for all of your data
storage needs.
1.1 An Overview of the DiskMaster
Securely access all of your multimedia, music and data files on your
local LAN or through Internet.
Thanks to its Gigabit port and its capacity for two Hard Disks, the
DiskMaster provides high speed data throughput with the security that all
your data is safe (only RAID1).
Based on the IP protocol, the DiskMaster allows you to access all of your
files from anywhere (an FTP server is included), giving you complete
control on space and user access providing a very granular level of
security. Furthermore, the Diskmaster allows you to use your favorite
operating system; Windows®, Mac or Linux.
Ease of use, performance and security.
The DiskMaster can be used in three modes: single volume, performance,
or security mode.
As a single volume, or JBOD, DiskMaster will show both Hard Disk Drives
as a single unit, providing maximum capacity and ease of use. If
performance is what you need, you can configure the Diskmaster in RAID0
and stream your multimedia and graphic files for multiple users with up to
260Mb/s reading and 220Mb/s writing speeds (for Gigabit) for immediate
access to your data.
Finally, if your business or home needs full data security, DiskMaster not
only provides a full featured backup software, but also RAID1 functionality.
This way, even if you lose one of disks, you will have an image of your data
on the other.
iTunes®, BitTorrentTM and USB Print Server
Turn off your computer and use the DiskMaster as your server. DiskMaster
integrates a BitTorrent client so that you can now download any file you
want without the need to use your computer. Now, you will not only will you
be able to share your multimedia or data files, but you will also be able to
use the Diskmaster as a iTunes server and play your favorite songs directly
from the Diskmaster. Additionally, thanks to the DiskMaster’s USB port,
you can now connect your normal USB printer and turn it into a fully
functional networked shared printer. Doing away with the need to have a
DiskMaster 33
Page 34

ENGLISH
computer connected to it, and allowing you to share it with the rest of the
users in the office or at home.
1.2 Package contents
Unpack the package and check all the items carefully. Also, keep the box
and packing materials in case you need to ship the unit in the future. The
package should contain the following items:
DiskMaster Dual BAY Network Storage
RJ45 CAT 5 cable
One Quick Start Guide (English, Italian)
One CD with driver, utility and manuals
Power Adapter AC-DC (12V, 7A)
HDD Brackets x 4 and screw pack
If any item contained is damaged or missing, please contact your local
dealer as soon as possible.
1.3 System Requirements
Before using the Multimedia NAS, make sure you have a computer with the
following requirements:
1Ghz processor or higher
512 MB RAM or above
30 MB available hard disk space
CD-ROM drive (for software installation)
Installed network adapter
Any installed web browser (IE6.0, Firefox version:2.0.0.4 or above) to
view the web UI
Windows XP SP2, Windows 2000 SP4, or Windows Vista (for
Windows based configuration utility) operating system
1.4 Choosing a place for your DiskMaster
When selecting a place to set up your DiskMaster , be sure to follow these
guidelines:
Place on a flat and stable surface capable of supporting at least 5Kg.
Place the DiskMaster close enough to a network jack for the Ethernet
cable to reach it.
Leave at least 10cm of space at the rear of the device for ventilation.
Use a grounded wall outlet (uninterruptible online power supply with
AVR is recommended.)
DiskMaster 34
Page 35

ENGLISH
Avoid an electrical outlet controlled by wall switches or automatic
timers. Accidental disruption of the power source may wipe out data in
the memory of your computer or DiskMaster.
Keep the entire system away from potential sources of
electromagnetic interference, such as loudspeakers, cordless
telephones, etc.
Avoid direct sunlight, excessive heat, moisture, or dust.
1.5 DiskMaster Application
When you have completed the steps in this Quick installation Guide, your
connected network should look similar to this:
DiskMaster 35
Page 36

ENGLISH
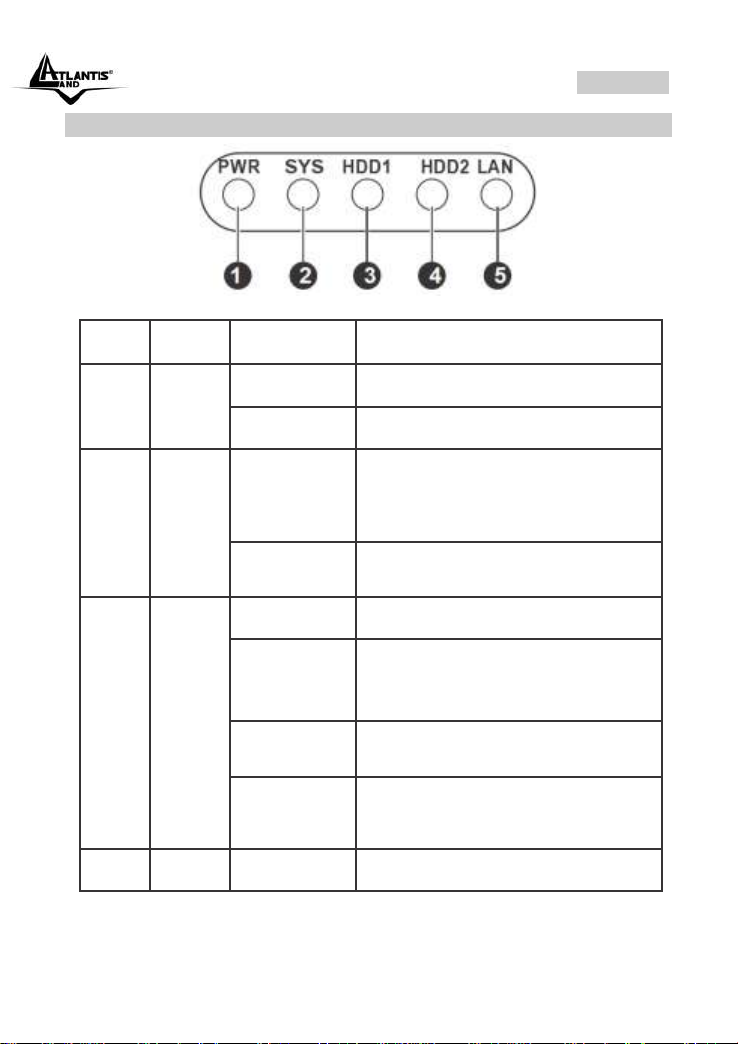
No.
LED
Color
Description
1
Power
LED
Green
Indicates the Multimedia NAS is
turned on.
Off
Indicates the Multimedia NAS is
turned off.
2
System
LED
Green
Indicates the Multimedia NAS is
ready for use.
Blinking
Green
Indicates the Multimedia NAS is in
the system boot process.
3
HDD1
Access
LED
Green
Indicates HDD1 link.
Amber
Indicates HDD1 link and the
capacity is less than 10%.
Blinking
Green
Indicates HDD1 activity.
Blinking
Amber
Indicates HDD1 activity and the
capacity is less than 10%.
4
HDD2
Access
LED
Green
Indicates HDD2 link.
Amber
Indicates HDD2 link and the
capacity is less than 10%.
Blinking
Green
Indicates HDD2 activity.
1.6 The Front LEDs
The following figures illustrate the connector locations for the DiskMaster.
DiskMaster 36
Page 37

ENGLISH
Blinking
Amber
Indicates HDD2 activity and the
capacity is less than 10%.
5
LAN
LED
Green
Indicates network link(1000Mbps).
Blinking
Green
Indicates network activity.
Amber
Indicates network
link(10/100Mbps).
Blinking
Amber
Indicates network activity.
DiskMaster 37
Page 38

ENGLISH
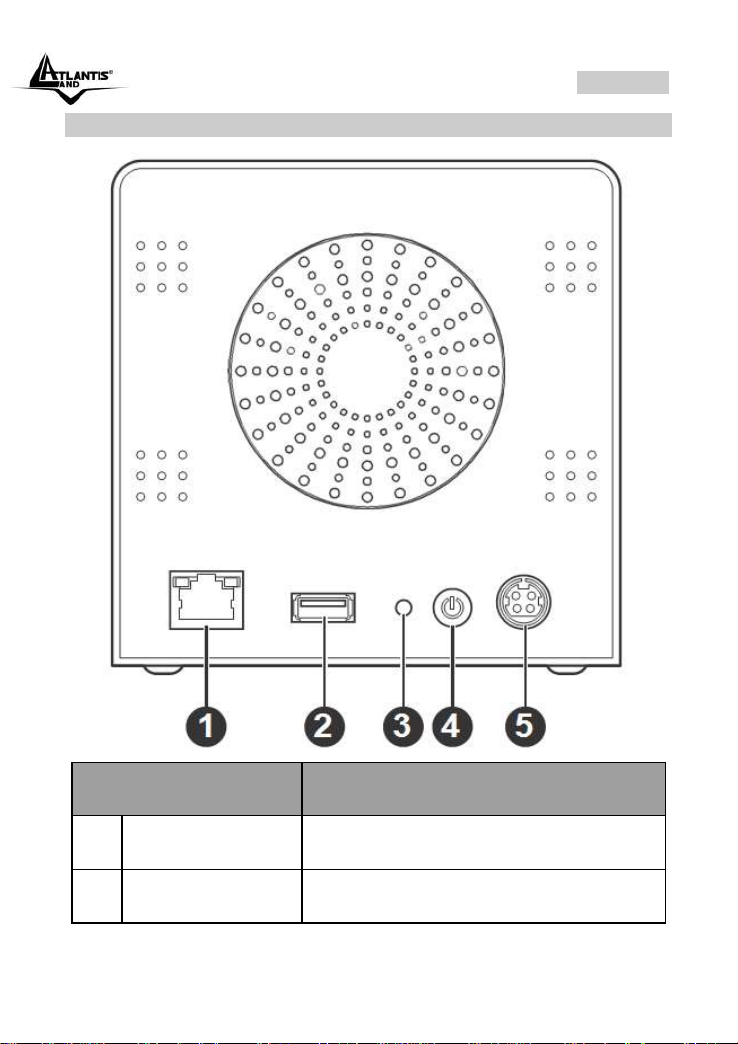
PORT
MEANING
1
LAN(RJ45)
Please use the Ethernet cable to connect
the DiskMaster to network.
2
USB(V2.1)
Please use the USB printer cable to
connect the device’s USB port (fro printe
server).
1.7 The Rear Ports
DiskMaster 38
Page 39

ENGLISH
3
RESET
After the device has turned on (turn on the
power and wait 3 minutes), press and hold
reset button for 5 seconds, then release it
to reset it (this is used when you can not
login to the DiskMaster, e.g. forgot the
password.
4
POWER(ON/OFF)
Press the power switch to start/shutdown
the DiskMaster. It will take approximately 3
minutes to boot up/and shutdown the
Operating System.
5
POWER (jack)
Connect the supplied power adapter to
this jack.
Leave at least 10cm of space at the rear of the device
for ventilation.
1.8 Default Settings
The TCP/IP protocol stack and Ethernet network adapter must be installed.
If not, please refer to MS Windows relative manuals.
Before you configure this device you need to know the following default
settings:
Username: admin
Password: admin
IP address: 192.168.1.10
Server name: NAS
DiskMaster 39
Page 40

ENGLISH
1.9 Hardware Installation
This section provides information to help you set up your DiskMaster
before you can use it.
The DiskMaster supports up to two Serial ATA (SATA) hard disks. To
install hard disks into the Multimedia NAS, follow the steps as described
below.
Secure the supplied HDD brackets to the both sides of a 3.5” hard
disk using four screws as shown.
Push to open the HDD enclosure (click PUSH) door and install the
hard disk into the DiskMaster as shown.
DiskMaster 40
Page 41

ENGLISH
Connect the SATA cable connector to the hard disk. Repeat the
same steps to install the second hard disk.
Close the HDD enclosure door when the installation is complete.
Connect one end of the supplied power adapter to the power jack
on the rear of the DiskMaster.
Then connect one end of the power cord to the power adapter and
the other end to a wall outlet as shown.
DiskMaster 41
Page 42

ENGLISH
Connect one end of the supplied RJ-45 cable to an available port
on your network hub or router. Connect the other end of the RJ-45
cable to the LAN port on the rear of the Multimedia NAS.
To turn your Multimedia NAS on, press and hold the POWER
button on the rear of the Multimedia NAS at least 1 second.
DiskMaster 42
Page 43

ENGLISH
1.10 Installing the NAS Utility
You can run the NAS Utility on either a Windows® XP or Windows® Vista
operating system. Follow the steps below to install the NAS Utility onto
your computer.
Turn on your computer and insert the supplied NAS Utility CD into
the CD-ROM Drive.
Select Install Utility from the following pop-up screen. The
installation program starts automatically.
If the CD does not start up automatically, browse your CD-ROM
drive and double click the Setup.exe file
(CDRom:\Utility\setup.exe).
Follow the on-screen instructions to install the utility.
Upon completion, you can start to manage your DiskMaster with
the NAS Utility.
If you are using the default installation directory, locate the NAS Utility as
described below:
Windows Vista users: Go to Start > All Programs > NAS Utility >
NAS Utility.
Windows XP users: Go to Start > Programs > NAS Utility > NAS
Utility.
1.11 Formatting the installed hard disks
If the hard disks are being installed for the first time, you need to initialize
the disks before you can use them. Follow the steps described below.
To launch the NAS Utility, double click the NAS Utility icon ( )
from your desktop or the program entry in the Start menu. If you are using
the default installation directory, locate the NAS Utility as described below:
Windows Vista users: Go to Start > All Programs > NAS Utility >
NAS Utility.
Windows XP users: Go to Start > Programs > NAS Utility > NAS
Utility.
If the hard disks are being installed for the first time, you need to initialize
the disks before you can use them. Follow the steps described below.
DiskMaster 43
Page 44

ENGLISH
If only one drive is installed, the RAID configuration will
not be available.
Creating the RAID system will take several hours,
depending on HDD capacity. Do not turn off the power or
interrupt the system in any other way during this process!
We recommend using the EXT2 file system for optimum
performance and functionality. Changing the RAID setup
will require you to re-format the drives. Make sure you
backup all data before doing so!
Select the format mode ((Individual Disks , RAID0, RAID1 or JBOD) and
Format type(EXT2, EXT3) from the drop-down menus. The available
options are listed as below. After making your selection, click Next to
continue.
A new message pops up to make you aware of the data loss resulting in
this action. Click OK to continue. The system starts to format the hard
disks. When the format is complete, click Finish.
DiskMaster 44
Page 45

ENGLISH
When the settings are made, the DiskMaster system
starts formatting the disks. This procedure will destroy all
the data on the disks. Make sure You have backed up
any important data on the disks before the format
process. It may require some times; do not perform other
jobs during hard drive formatting
There are 3 differents RAID mode:
RAID 0= RAID 0, known as disk striping, has
generally the best performance, but does not offer
any redundancy. In this level, data is broken into
small units called sectors, and sectors are distributed
across all disks in the array. As it does not provide
any data protection, if any disk in the array fails then
all data in the array is lost. Such stripes allocation
allows to enhance I/O performance.
RAID 1= RAID Level 1, known as disk mirroring, is a
popular approach to protect data from adisk failure.
To implement RAID Level 1, you need at least two
physical hard drives. As the disks are paired up, all
disk writes are duplicated on both disks. You can
back up data without interruption using this algorithm.
In case of a disk failure, the system can continue to
run without being affected.
JBOD=JBOD (Just a Bunch Of Disks) is a group of
disks. JBOD is not technically RAID but “disk
spanning.” In this mode, all the disks are grouped
together so they appears as a large single disk. Each
disk can operate independently and is seen as an
individual disk. Therefore, the total capacity of JBOD
is the sum of the capacities of each disk. This allows
the user to add disks until the desired total capacity is
reached. Since JBOD provides no performance
increase and data protection, it is seldom used.
DiskMaster 45
Page 46

ENGLISH
1.12 Mapping a Network Drive
Mapping a Network Drive in Windows XP
Start->Control Panel.
Go to the Tools menu and select Map Network Drive.
Follow the setup wizard and fill in the path to your DiskMaster.
Alternatively, you can also browse for the shares by clicking on
the Browse button and locating the folder that way (choose NAS
then share folders).
Select Reconnect at Logon.
DiskMaster 46
Page 47

ENGLISH
In event of problem, please write directly the IP (instead
of name) in the folder name. Please write:
\\192.168.1.10\share. Then click Finish.
Then click Finish.
Once the drive has been mapped, you are able to find and access it under
My Computer. This link will still be there even after rebooting your
Operating System.
DiskMaster 47
Page 48

ENGLISH
If event of problem , please write directly the IP (instead
of name) in the folder name. Please write:
\\192.168.1.10\share. Then click Finish.
Mapping a Network Drive in Windows Vista
Start->Computer
Click on Map Network Drive.
Follow the setup wizard and fill in the path to your DiskMaster.
Alternatively, you can also browse for the shares by clicking on
the Browse button and locating the folder that way (choose NAS
then share folders).
Select Reconnect at Logon then click Finish.
Once the drive has been mapped, you are able to find and access it under
My Computer. This link will still be there even after rebooting your
Operating System.
DiskMaster 48
Page 49

ENGLISH
Steps
Corrective Action
1
Make sure that the DiskMaster’s power adaptor is connected
to the device and plugged in to an appropriate power source.
Use only the supplied power adaptor.
2
Check that the DiskMaster and the power source are both
turned on and the device is receiving sufficient power.
3
Check the power jack and verify.
4
If the error persists, you may have a hardware problem. In this
case, you should contact your vendor.
Steps
Corrective Action
1
Check the Ethernet cable connections between the
DiskMaster and the computer or hub.
2
Check for faulty Ethernet cables.
3
Make sure your computer’s Ethernet card is working properly.
4
If these steps fail to correct the problem, contact your local
distributor for assistance.
1.13 Troubleshooting
This chapter covers potential problems and the corresponding remedies.
A.1 Using LEDs to Diagnose Problems
The LEDs are useful aides for finding possible problem causes.
A.1.1 Power LED
The PWR LED on the front panel does not light up.
A.1.2 LED LAN
The LAN LED on the front panel does not light up.
DiskMaster 49
Page 50

ENGLISH
Steps
Corrective Action
1
If you have changed the password and have now forgotten it,
you will need to upload the default configuration file. This will
erase all custom configurations and restore all of the factory
defaults including the password.
2
Before you configure this device you need to know the
following default settings:
Username: admin
Password: atlantis
IP address: 192.168.1.10
Server name: NAS
3
It is highly recommended to change the default username and
password. Make sure you store the username and password
in a save place.
Steps
Corrective Action
1
Make sure you are using Internet Explorer 5.0 and later
versions.
2
Delete the temporary web files and log in again.
In Internet Explorer, click Tools, Internet Options and then
click the Delete Files ... button.
When a Delete Files window displays, select Delete all offline
content and click OK. (Steps may vary depending on the
version of your Internet browser.)
E.G. Internet Explorer 7 (Tools->Internet Options->Advanced>Reset).
Steps
Corrective Action
1
Check LAN LED (green).
2
Make sure you are using the correct IP address of the
DiskMaster.
3
Found the new IP address of the DiskMaster with Utility.
4
Reset the device.
A.2 Login: Username and Password
I forgot my login username and/or password.
A.3 WEB INTERFACE
I cannot access the web configurator.
I cannot access the web configurator.
DiskMaster 50
Page 51

ENGLISH
Steps
Corrective Action
1
FAT32 format doesn’t support RAID functions.
2
To perform RAID functions please use EXT2 or EXT3 format.
Steps
Corrective Action
1
Many of the functions require a hard drive to be installed.
Make sure you have at least one HDD installed and formatted
in EXT2 or EXT3.
Steps
Corrective Action
1
The NAS uses standby mode for power management (Sleep
time), if there is no any activity for several minutes.
Steps
Corrective Action
1
DiskMaster has the built-in Samba Server for file sharing, it is
using SMB (Server Message Block) protocol to integrate
TCP/IP, NETBUEI and IPX/SPX protocol. In other words, if
the client PC that can support TCP/IP, NETBUEI or IPX/SPX,
it will be compatible with DUAL HDD NAS. You can also use
the built-in FTP Server for file sharing with Internet client.
Steps
Corrective Action
1
The NAS Printer server does not support GDI/Host-based
printers. For some Multi Function Printers (MFP); scanning
functions might not be functional probably. Please contact
Printer Manufacture for detail Specifications
A.4 General
Why Can’t I perform RAID function under FAT32 format?
Some of the functions and menus are not available!
Does the NAS support Hard disk Power Management?
What is the protocol of network file sharing system using by DiskMaster?
Why My USB Printer can not be detected by the NAS Printer server?
DiskMaster 51
Page 52

ENGLISH
1.14 Product Support
If you have any problems with the DiskMaster, please contact the dealer
where you bought this product. If you have any other questions you can
contact the Atlantis company directly at the following address:
Atlantis
Via Pelizza da Volpedo, 59
20092 Cinisello Balsamo (MI) Italy
Fax: +39.(0)2.93906161
Help Desk :+39.(0)2.93907634
Email: tecnici@atlantis-land.com
WWW: www.atlantis-land.com
DiskMaster 52
Page 53

APPENDIX A
Protocols
IP, NBNS(“NetBios” Name Server),
Microsoft Networks (CIFS/SMB),
DHCP Server/Client, SNTP Client, NTP
LAN port
1 x RJ45 10/100/1000 Base-T port
USB A Port
2*USB V2.0 (Print Server Port or External HD)
LED Indicators
Power, SYS, HDD1, HDD2, LAN
Hard Disk
2 x SATA I/II
Supported System
Format:
EXT2, EXT3 and FAT32
CPU
Marvell 8F5182/A2/0614
Sharing Protocol
SAMBA, FTP
Advanced Features
iTunes®, BitTorrent and USB Print Server
External buttons
Reset/Power Switch
Input Power
12V DC @ 7A
Power Consumption
< 20 watts
Agency and Regulatory
CE
Dimensions
240mm x 120mm x 120mm (W*H*D)
Weight
1300g (exclude Hard Disk)
Housing
Metal
Operating Temperature
0° to 40°C
Storage Temperature
-10° to 60°C
Operating Humidity
10-85% non-condensing
APPENDIX A: Technical Features
DiskMaster 53
Page 54

APPENDIX B
DiskMaster 54
Page 55

ISO 9001:2000 Certified Company
Atlantis
Via Pelizza da Volpedo, 59
20092 Cinisello Balsamo – MI – Italy
info@atlantis-land.com
Where solutions begin
 Loading...