

Page 1

ISDN Router
with 10/100 LAN port
User’s Manual V1.0
Page 2

COPYRIGHT
The Atlantis Land logo is a registered trademark of Atlants Land SpA. All other names mentioned mat be
trademarks or registered trademarks of their respective owners. Subject to change without notice. No
liability for technical errors and/or omissions. Copyright 2002 by this company.
DISCLAIMER
This company makes no representations or warranties, either expressed or implied, with respect to the
contents hereof and specifically disclaims any warranties, merchantability or fitness for any particular
purpose. Any software described in this manual is sold or licensed "as is". Should the programs prove
defective following their purchase, the buyer (and not this company, its distributor, or its dealer) assumes
the entire cost of all necessary servicing, repair, and any incidental or consequential damages resulting
from any defect in the software. Further, this company reserves the right to revise this publication and to
make changes from time to time in the contents hereof without obligation to notify any person of such
revision or changes.
SUPPORT
If you have any problems with the ADSL Router, please consult this manual.
If you continue to have problems you should contact the dealer where you bought this ADSL Router. If
you have any other questions you can contact the Atlantis Land company directly at the following address:
AtlantisLand spa
Via Gandhi 5 Ing2,Scala A
20017 Mazzo di Rho(MI)
Tel: 02/93906085, 02/93907634(help desk)
Fax: 02/93906161
Email: info@atlantisland.it
WWW: http://www.atlantis-land.com
or tecnici@atlantisland.it
or www.atlantisland.it
All brand and product names mentioned in this manual are trademarks and/or registered trademarks of
their respective holders.
Page 3

Table of Contents
CHAPTER 1............................................................................................................................................... 1
INTRODUCTION ................................................................................................................................... 1
1.1 An overview of the ISDN Router........................................................................................................ 1
1.2 Package contents ................................................................................................................................. 1
1.3 ISDN Router Features ......................................................................................................................... 2
1.4 ISDN Router Application.................................................................................................................... 2
CHAPTER 2............................................................................................................................................... 3
USING THE ISDN ROUTER ................................................................................................................. 3
2.1 Cautions for using the ISDN Router ................................................................................................... 3
2.2 The front LEDs.................................................................................................................................... 3
2.3 The rear ports....................................................................................................................................... 4
2.4 Cabling ................................................................................................................................................ 4
CHAPTER 3............................................................................................................................................... 6
ONFIGURATION................................................................................................................................. 6
C
3.1 Before Configuration........................................................................................................................... 6
3.2 Configuring with GUI program......................................................................................................... 10
CHAPTER 4............................................................................................................................................. 21
REMOTE CONFIGURATION ............................................................................................................... 21
4.1 Remote Office Access by ISDN........................................................................................................ 21
4.2 Advanced Options for Remote Office Access Profiles ..................................................................... 23
4.3 Deleting Remote Office Access Profile ............................................................................................ 25
CHAPTER 5............................................................................................................................................. 26
DIAL-IN USER ACCESS CONFIGURATION......................................................................................... 26
5.1 Configuring a Dial-in User Profile.................................................................................................... 26
5.2 Deleting Dial-in User Profiles........................................................................................................... 28
5.3 Packet Filtering.................................................................................................................................. 28
HAPTER 6............................................................................................................................................. 30
C
M
ANAGEMENT .................................................................................................................................. 30
6.1 How to Upgrade the Firmware.......................................................................................................... 30
6.3 How to Change ISDN Router Manager Password ............................................................................ 31
6.4 What if I Forget the Password? ......................................................................................................... 31
CHAPTER 7............................................................................................................................................. 32
T
ROUBLESHOOTING ......................................................................................................................... 32
ATLMMR_ME01
ii
Page 4

Chapter 1
Introduction
1.1 An overview of the ISDN Router
The device is a small desktop router that sits between your local Ethernet network and a remote
network (For example, the Internet or a remote office). It contains an ISDN S/T interface, a 10/100
Base-T LAN port, and an auxiliary port for a directly connected management console.
Data comes into ISDN Router from the LAN and then is “routed” to the remote network, and vice
versa. In addition to its capability to route IP traffic, it also acts as a bridge for other network protocols,
such as Appletalk or SNA.
The main functions of the device are to support your LAN to access the Internet, to support
remote users to dial in and to access resources on your LAN, and to support communications among
branch offices.
The most common use for the device is to provide Internet access, so that everyone on your LAN
can surf the web, send/receive e-mail or files. It automatically acquires the necessary IP address when
the connection to the Internet is established. You don’t need to apply for and assign an IP address to
each PC or workstation on your network.
The device supports “bandwidth on demand”. For example, any user’s initial intent to access to
the Internet will trigger a B-channel connection to the Internet to be set up. As the traffic builds up
(For example, more users try to access the Internet, or the same user generates a lot of traffic), it will
establish a second connection through the other B-channel. As traffic decreases, one B-channel will be
taken down, until finally, after a configurable period of inactivity, the remaining B-channel will also
be disconnected.
1.2 Package contents
1. ISDN Router
2. AC Power Adapter
3. RS-232 cable (Null type)
4. RJ-45 ISDN cable
5. RJ-45 LAN cable
6. CD-ROM containing the on-line manual
7. Quick Start Guide
1
Page 5

1.3 ISDN Router Features
The ISDN Router provides the following features
The router equipped with a single ISDN Basic Rate Interface (2B+D) that supports S/T interface
specification, would support European ISDN requirements.
Supports remote access functions among branch offices and allows remote users to dial-in to your network.
Supports IP sharing function, allowing multiple users share one Internet account.
Supports industry standard Point-to-Point Protocol (PPP) and Multilink PPP.
Supports Dial-on-Demand and Bandwidth on Demand function.
User-friendly management through web-based configurator, telnet management, console port management,
and remote upgrades.
PAP/CHAP/MS-CHAP, Call Back, IP Packet Filtering, and Caller ID Authentication for firewall security.
Supports operating systems such as Windows 95/98/NT/2000/ME, Mac, Unix and Linux
1.4 ISDN Router Application
2
Page 6

Using the ISDN Router
2.1 Cautions for using the ISDN Router
Do not place the ISDN Router under high humidity and high temperature.
Do not use the same power source for ISDN Router with other equipment.
Do not open or repair the case yourself. If the ISDN Router is too hot, turn off the power
immediately and have a qualified serviceman repair it.
Place the ISDN Router on the stable surface.
Only use the power adapter that comes with the package.
Chapter 2
2.2 The front LEDs
1 2 3 4 5 6 7
LED Meaning
1 Power Lit when AC power is connected
2
3
4
5
6
7
LAN /
100/10
LAN /
ACT
LAN /
COL
ISDN /
SYNC
ISDN /
B1
ISDN /
B2
Lit Green when connected at 100 Mbps
Lit Yellow when connected at 10 Mbps
Lit when connected to a LAN device
Flashes when sending/receiving data
Flashes when collisions happen
Lit when ISDN Layer 1 is activated
Flashes when B1 channel is in use
Flashes when B2 channel is in use
3
Page 7

2.3 The rear ports
Power
(jack)
Console
(port)
ISDN So
(RJ-45
connector)
LAN
(RJ-45
connector)
Connect the supplied power adapter to this jack
Connect the supplied Null type RS-232 cable to this
port when connecting to a PC’s RS-232 port (9-pin
serial port).
Connect an RJ-45 cable to this port when
connecting to the ISDN.
Connect an UTP Ethernet cable to this port when
connecting to a LAN such as an office or home
network.
2.4 Cabling
Now you should be ready to connect your ISDN Router on your LAN and ISDN wall jacks. Follow these
steps to install:
˙Attach the ISDN line to the ISDN connector (S/T interface).
˙
Connect the PC to the RJ-45 LAN connector. Two or more PCs can connect to a multi-port Hub first and
then uplink (cascade) port on the hub must be connected to ISDN Router port.
˙Plug the power adapter into a wall outlet and into the AC connector on the back of ISDN Router.
˙The Auxiliary connector is only used to connect a terminal to run the Command Line Interface using
the null modem cable. (This is an optional connection.)
4
Page 8

˙There is a DIP switch located on the rear panel for setting the terminating resistor.
You only need to adjust this switch if there are two or more external ISDN equipments attached to the
local telephone line.
5
Page 9
Chapter 3
Configuration
3.1 Before Configuration
This section describes the configuration required by LAN-attached PCs that communicate with ISDN
Router, either to configure ISDN Router, or for network access. These PCs must have an Ethernet interface
installed properly, be connected to ISDN Router either directly or through an external repeater hub, and have
TCP/IP installed and configured to obtain an IP address through a DHCP server.
Directly connect a Windows OS to ISDN Router. If TCP/IP is not already installed, follow the steps below
for its installation.
Any TCP/IP capable workstation can be used to communicate with or through ISDN
Router. To configure other types of workstations, please consult the manufacturer’s
documentation
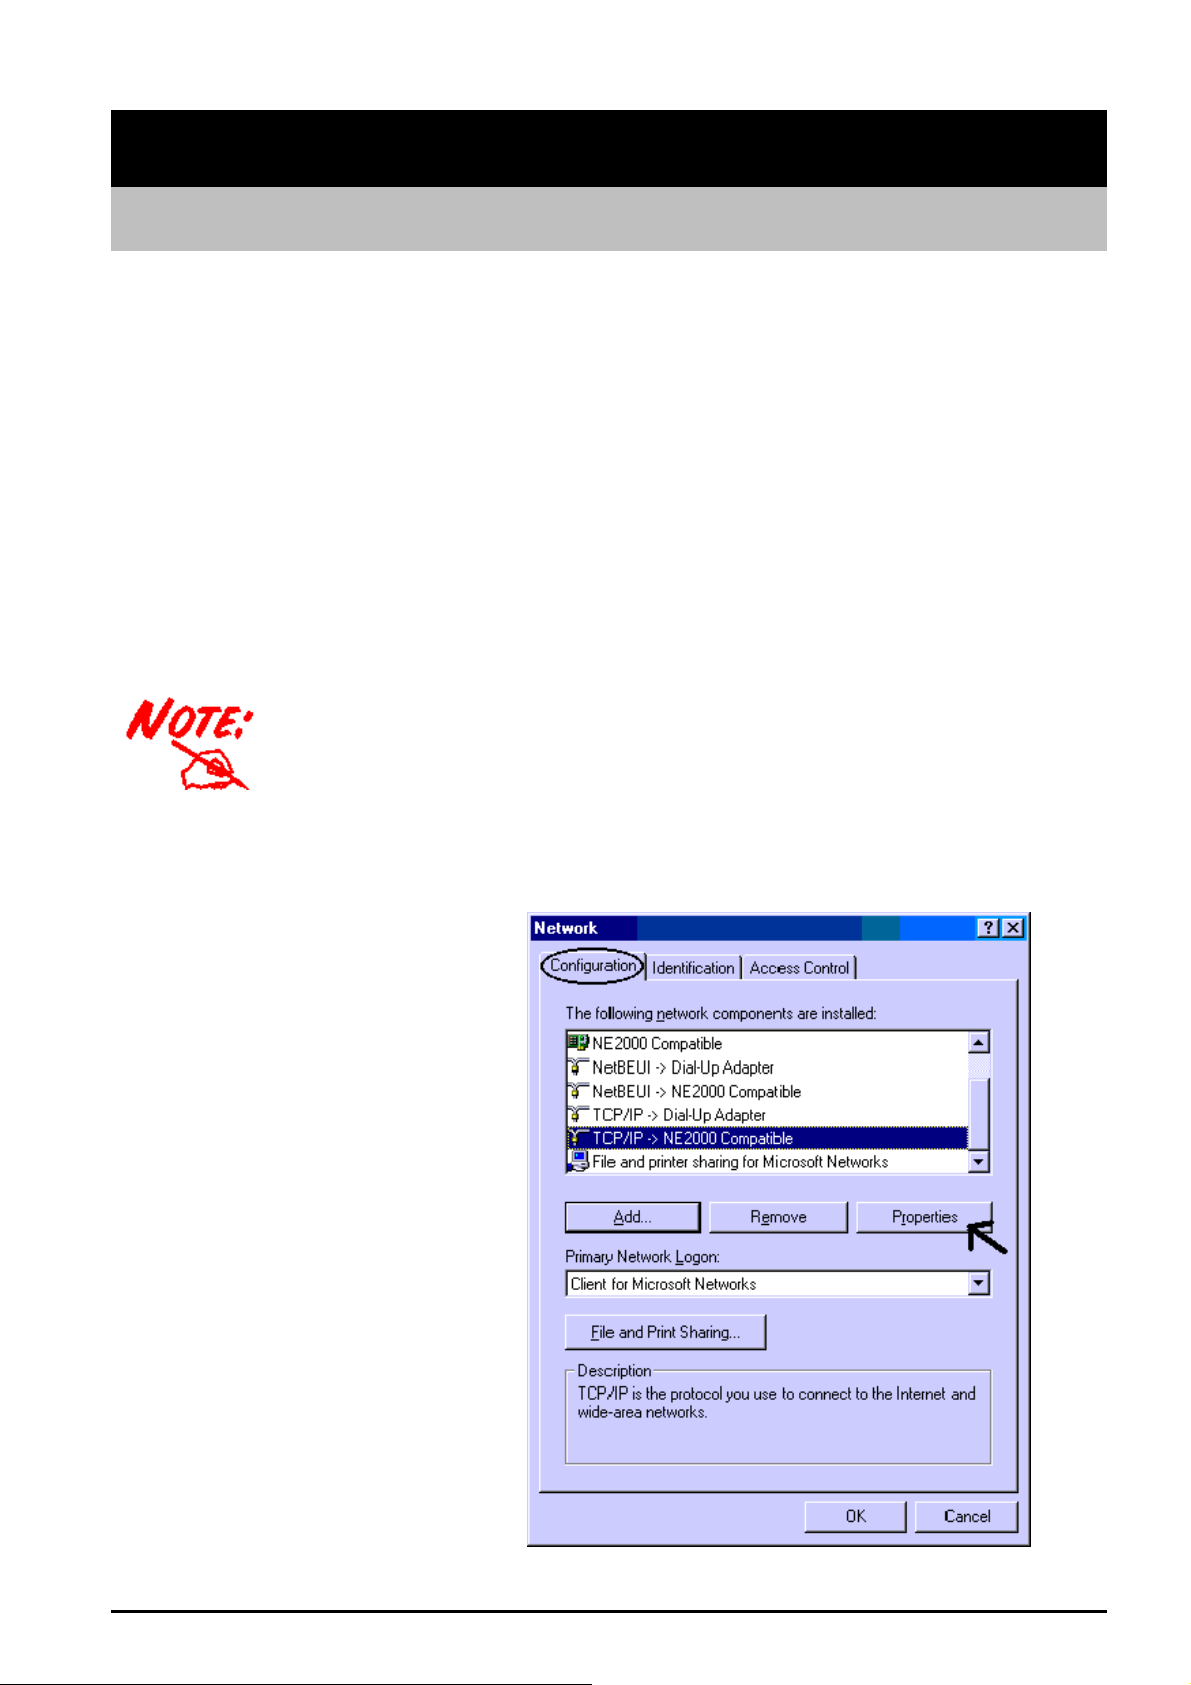
Configuring PC in Windows 95/98/ME
1. Go to Start/Settings/Control
Panel. In the Control Panel
double-click on Network and
choose the Configuration tab.
2. Select TCP/IP ->
NE2000 Compatible, or any
Network Interface Card (NIC)
in your PC.
6
Page 10
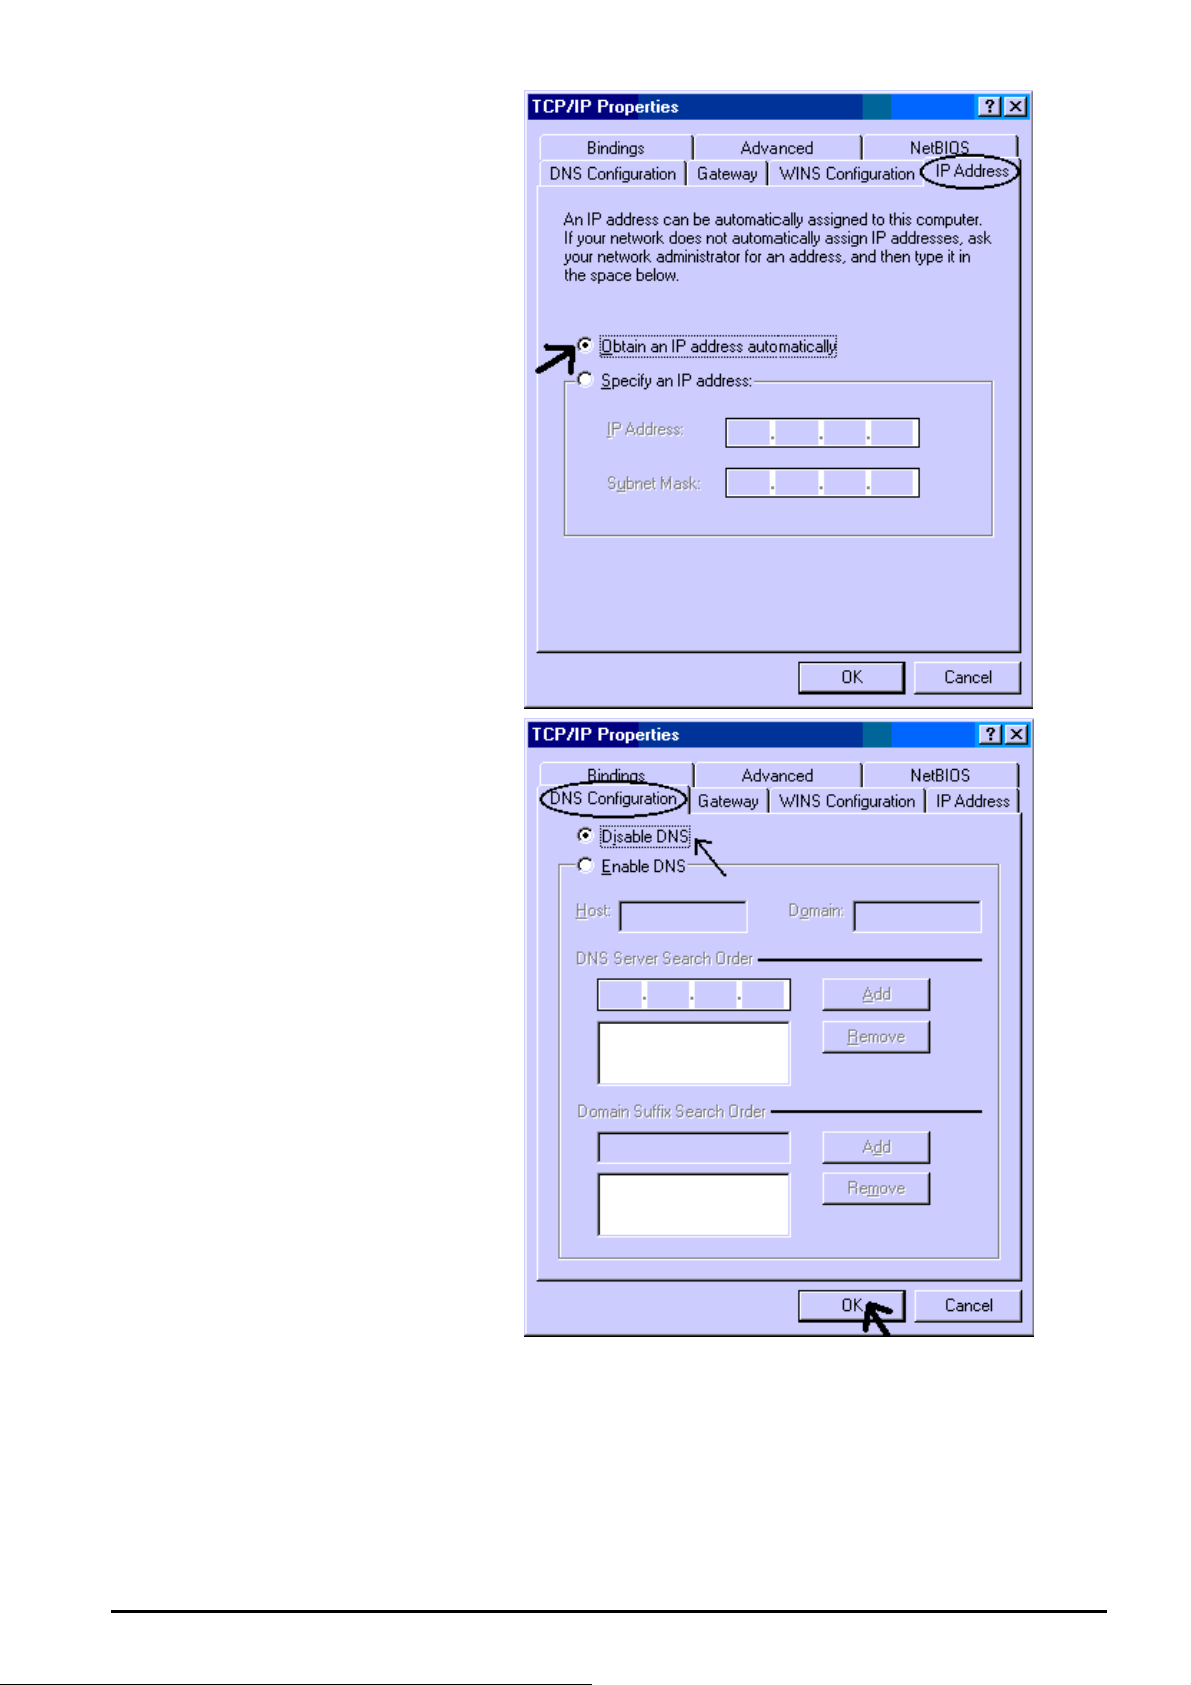
3. Select the Obtain an IP
address automatically radio
button.
4. Then select the DNS
Configuration tab.
5. Select the Disable DNS radio
button and click OK to finish
the configuration.
7
Page 11
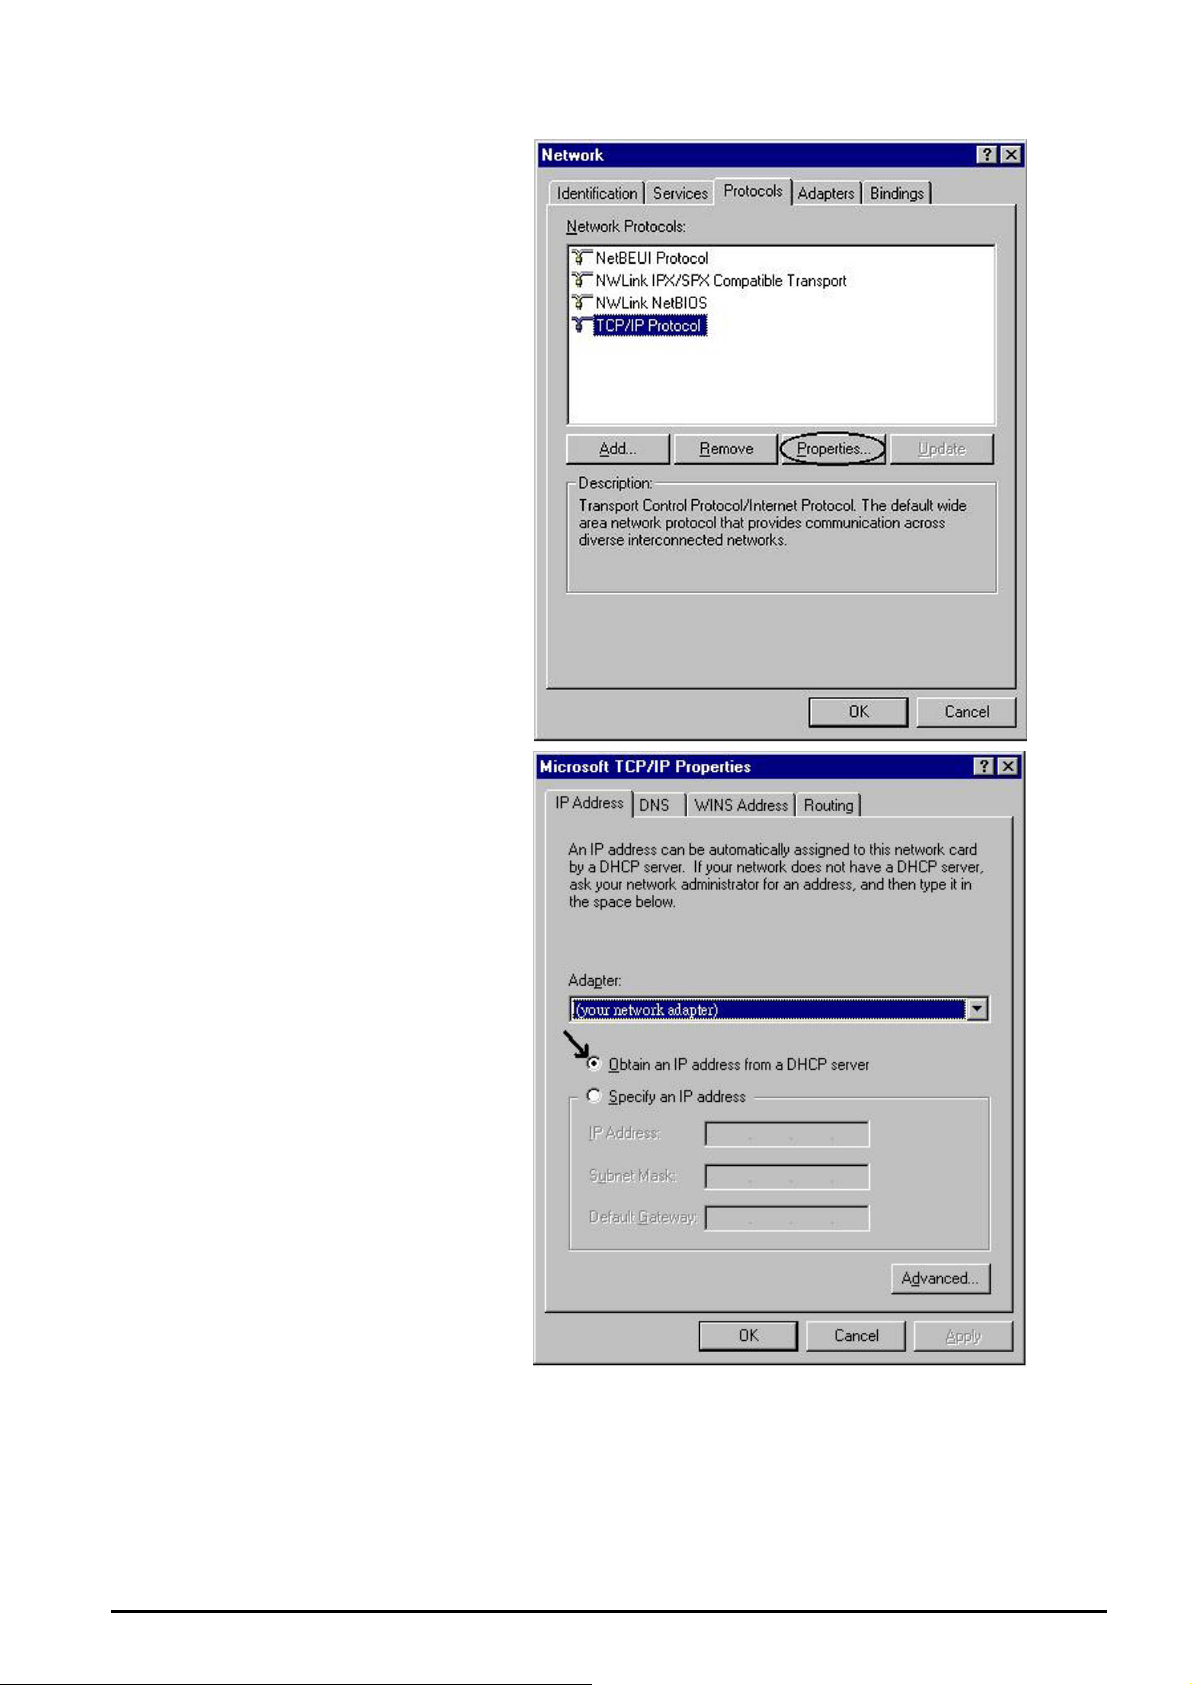
Configuring PC in Windows NT4.0
1. Go to Start/Settings/ Control
Panel. In the Control Panel
double-click on Network and
choose the Protocols tab.
2. Select TCP/IP Protocol and
click Properties.
3. Select the Obtain an IP
address from a DHCP server
radio button and click OK.
8
Page 12
Configuring PC in Windows 2000
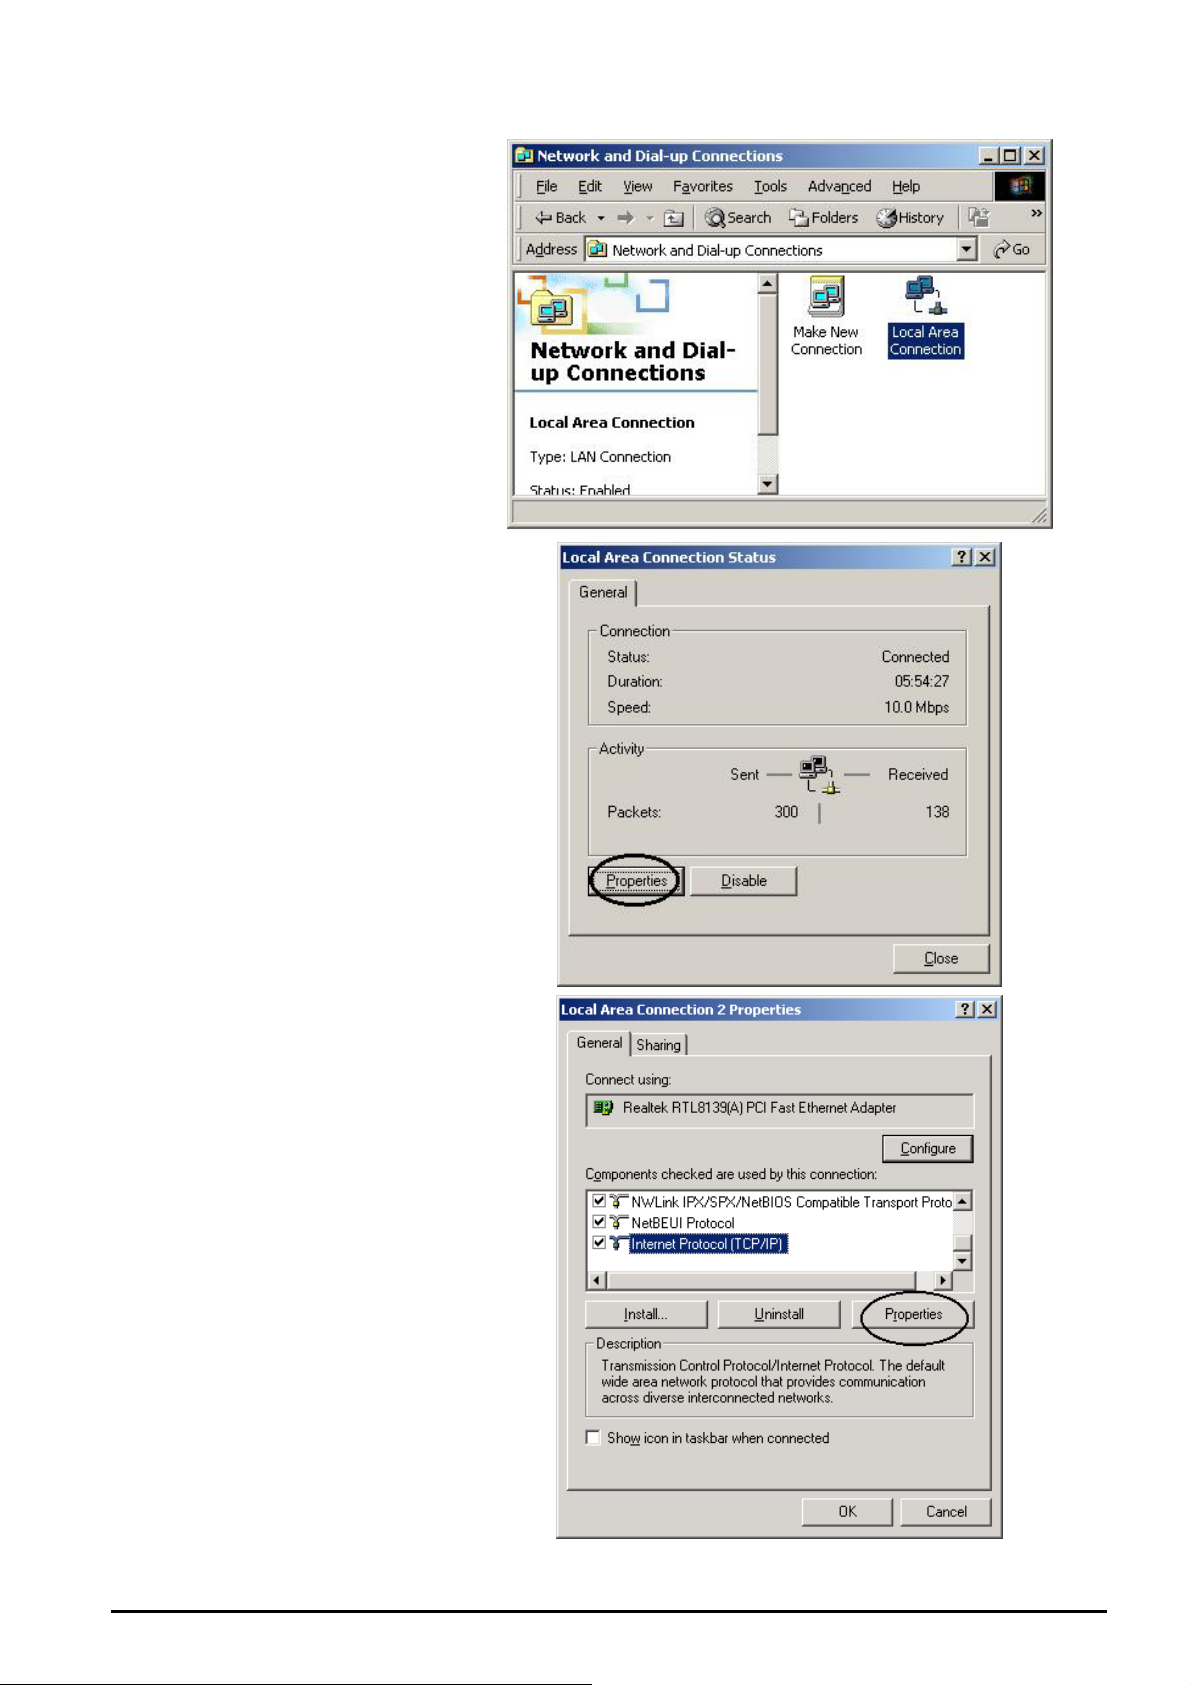
1. Go to Start/Settings/Control
Panel. In the Control Panel
double-click on Network and
Dial-up Connections.
2. Double-click Local Area
Connection.
3. In the Local Area Connection
Status window click
Properties.
4. Select Internet Protocol
(TCP/IP) and click Properties.
9
Page 13

5. Select the Obtain an IP
address automatically and the
Obtain DNS server address
automatically radio buttons.
6. Click OK to finish the
configuration.
3.2 Configuring with GUI program
3.2.1 Using Different Browsers for ISDN Router
To configure your ISDN Router, you can use a popular browser, such as Netscape 4.x and Internet
Explorer 5.x. The following describes how to use it to start “ISDN Router Manager” through IE or Navigator.
Netscape Navigator 4.x:
In the Location box (where you normally enter the URL address), enter the default private IP address of
ISDN Router followed by hitting the return key:
http://192.168.168.230
Internet Explorer 5.x:
In the Address box (where you normally enter the URL address), enter the default private IP address of
ISDN Router followed by hitting the return key:
http://192.168.168.230
10
Page 14

3.2.2 Password
A password screen will ask you to log on after you enter the default IP address described above. If you are
logging on for the first time, you should accept the factory default password (which is “password”). The
password is always displayed as a string of asterisks (“*”). Clicking the Log On button will begin the
Configurations for ISDN Router.
The next time you log in, even if you have modified the password, the default password (“password”) will
still be used as the default. You need to change it to the correct password before you will be let in. If you forget
the password, you need to follow the steps described in the latter chapter to be able to log on.
3.2.3 Customize User Interface
When you log on for the first time, click “Customize User Interface” in the SYSTEM TOOLS bar on the
left side of the screen, allowing you to customize ISDN Router Manager to suit your own specific needs: The
selections you make determine what configuration menus and buttons will appear in the screen. For example, if
you select Basic Internet Access only, the interface will only display buttons that you need for basic Internet
access.
If you subsequently use ISDN Router Manager to configure ISDN Router for other applications, you can
return to this screen to “re-customize” your interface by selecting Customize User Interface from the
SYSTEM TOOLS Menu.
3.2.4 Basic Internet Access Configuration
What is Basic Internet Access? It means accessing the Internet, surfing the web, accessing a remote FTP
server (to send or receive files), and sending and receiving e-mail. These are the tasks that users perform most.
11
Page 15
When you apply for an account with your Internet Service Provider (ISP), you will be given the necessary
information, including your account name, account password, and the ISP’s local access ISDN telephone
number. Have these available and then follow the steps below.
Step 1: When you logon, select Customize User Interface in the SYSTEM TOOLS Menu. Accept the
Basic Internet Access selection and click Next. The configuration window will be displayed,
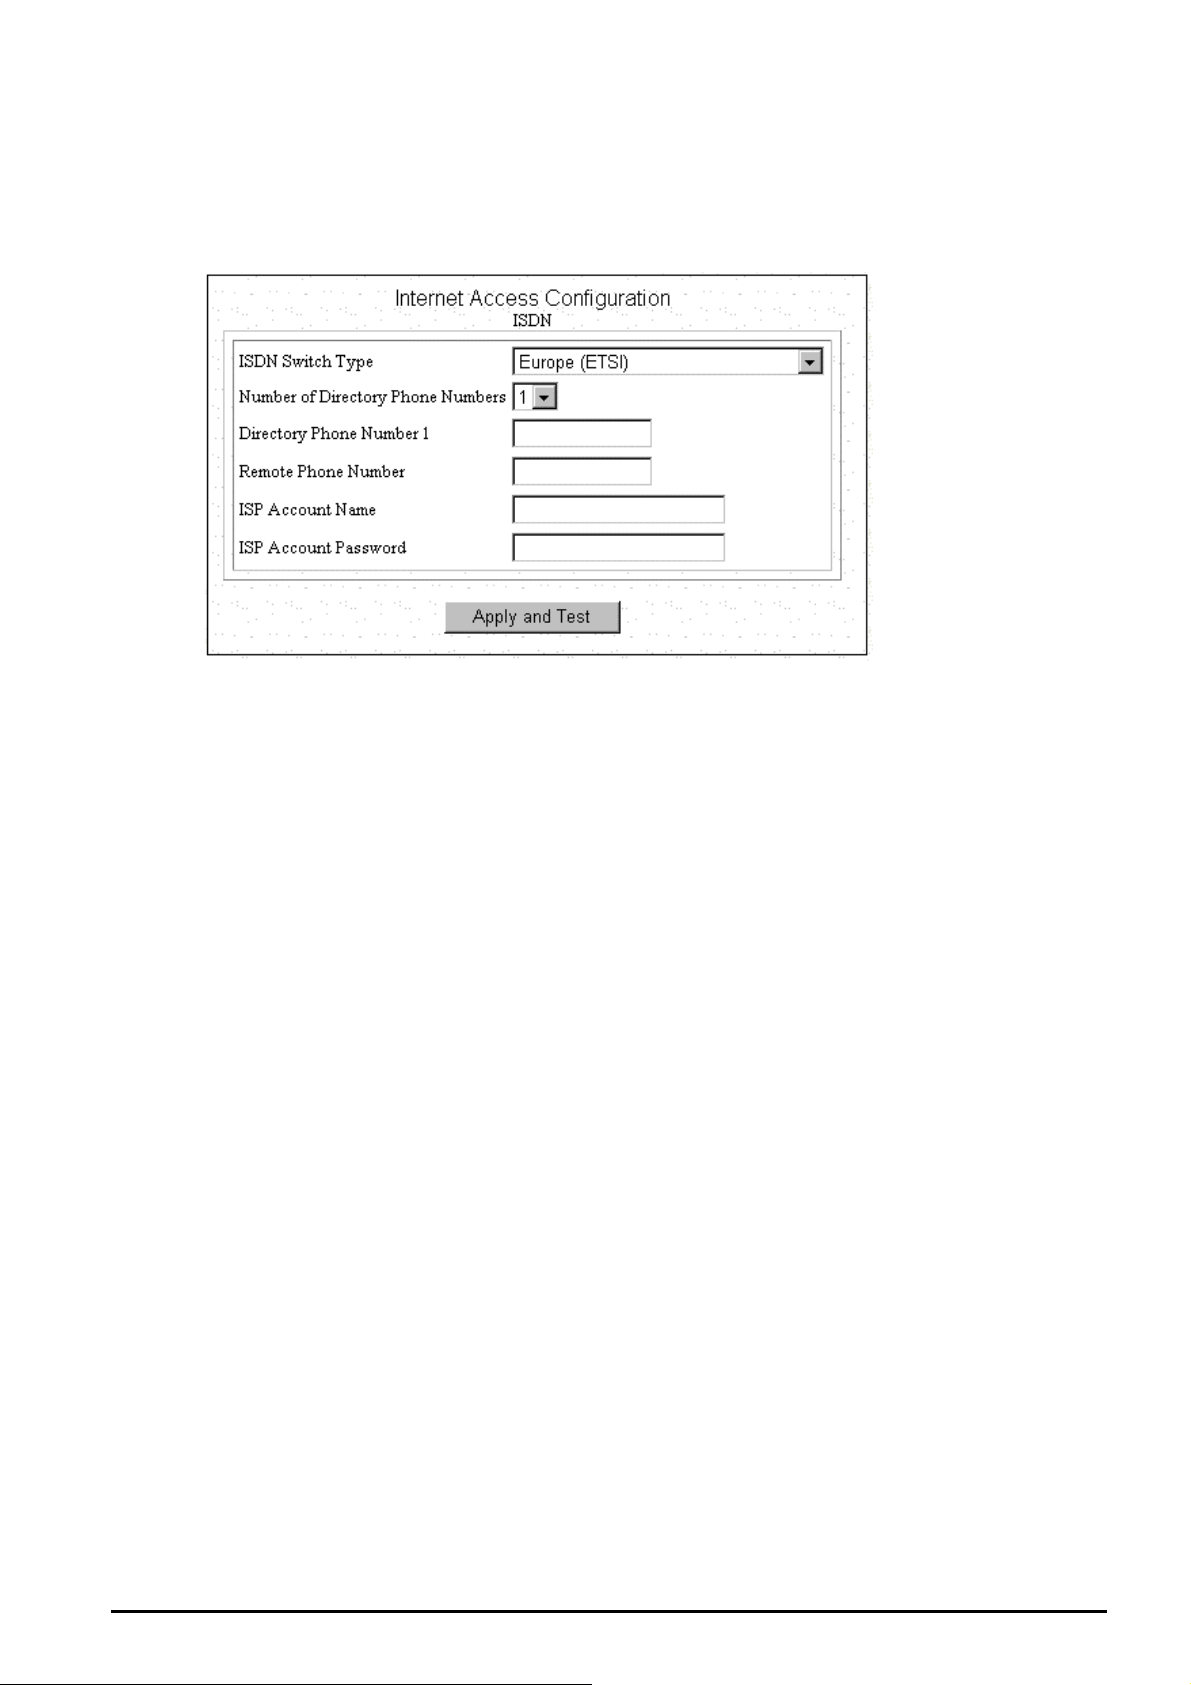
Step 2: Select the ISDN switch type that your ISP will tell you.
Step 3: Select the number of the directory phone numbers and enter the directory phone numbers in the
corresponding blanks.
Step 4: Enter the following information:
Remote Phone Number: the ISDN telephone number of your ISP.
ISP Account Name: the username of your ISP account.
ISP Account Password: the password of your ISP account.
Step 5: Click Apply and Test.
After the successful Apply and Test, any users in the LAN should restart their PC. Now you can surf in
the Web, receive E-mails, or transmit files. For more advanced configurations, refer to the following context.
3.2.5 Internet Access with Advanced Configuration
Step 1: When you logon, select Customize User Interface in the SYSTEM TOOLS Menu. Accept the
Internet Access with Advanced Configuration selection and click Next. The configuration window
will be displayed. Skip to Step 5 if you have already completed Basic Internet Access Configuration
described in the previous section.
12
Page 16
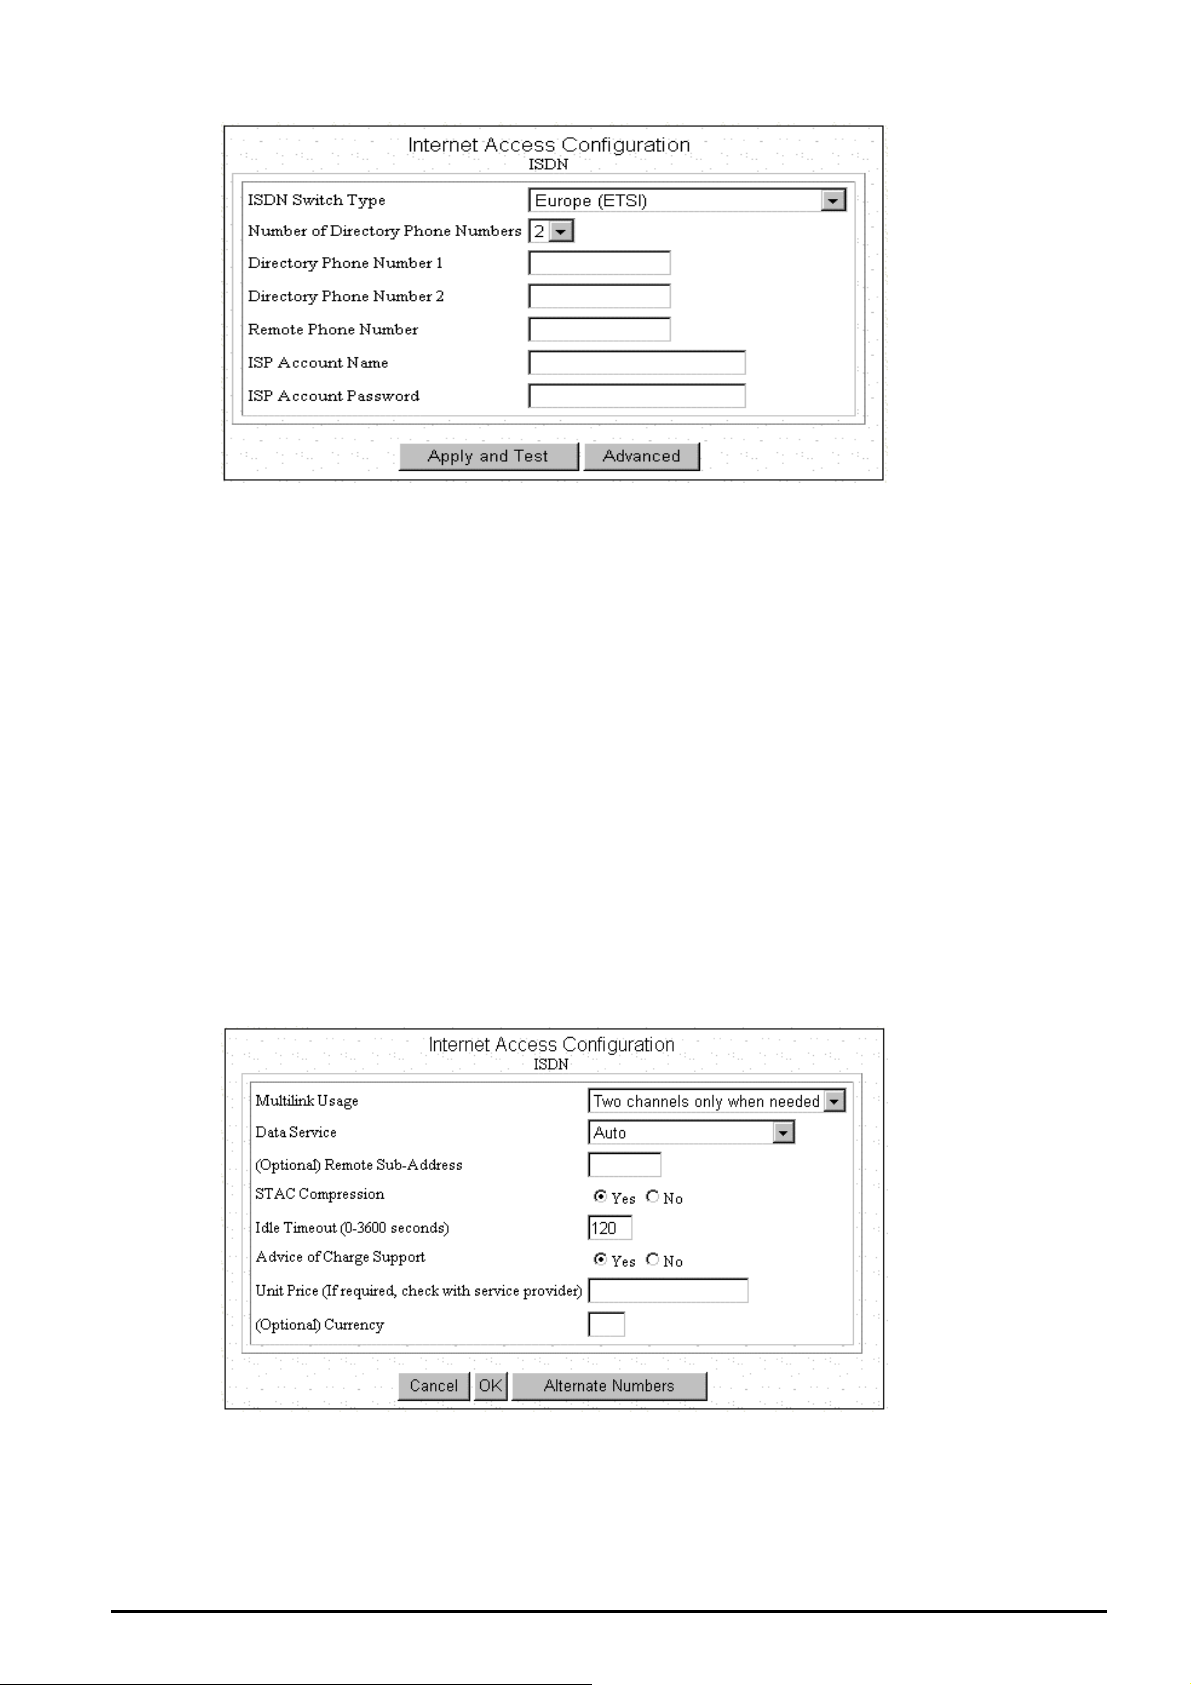
Step 2: Select the ISDN switch type that your ISP will tell you.
Step 3: Select the number of the directory phone numbers and enter the directory phone numbers in the
corresponding blanks.
Step 4: Enter the following information:
Remote Phone Number: the ISDN telephone number of your ISP.
ISP Account Name: the username of your ISP account.
ISP Account Password: the password of your ISP account.
Step 5: Click Advanced and the following configuration window will appear.
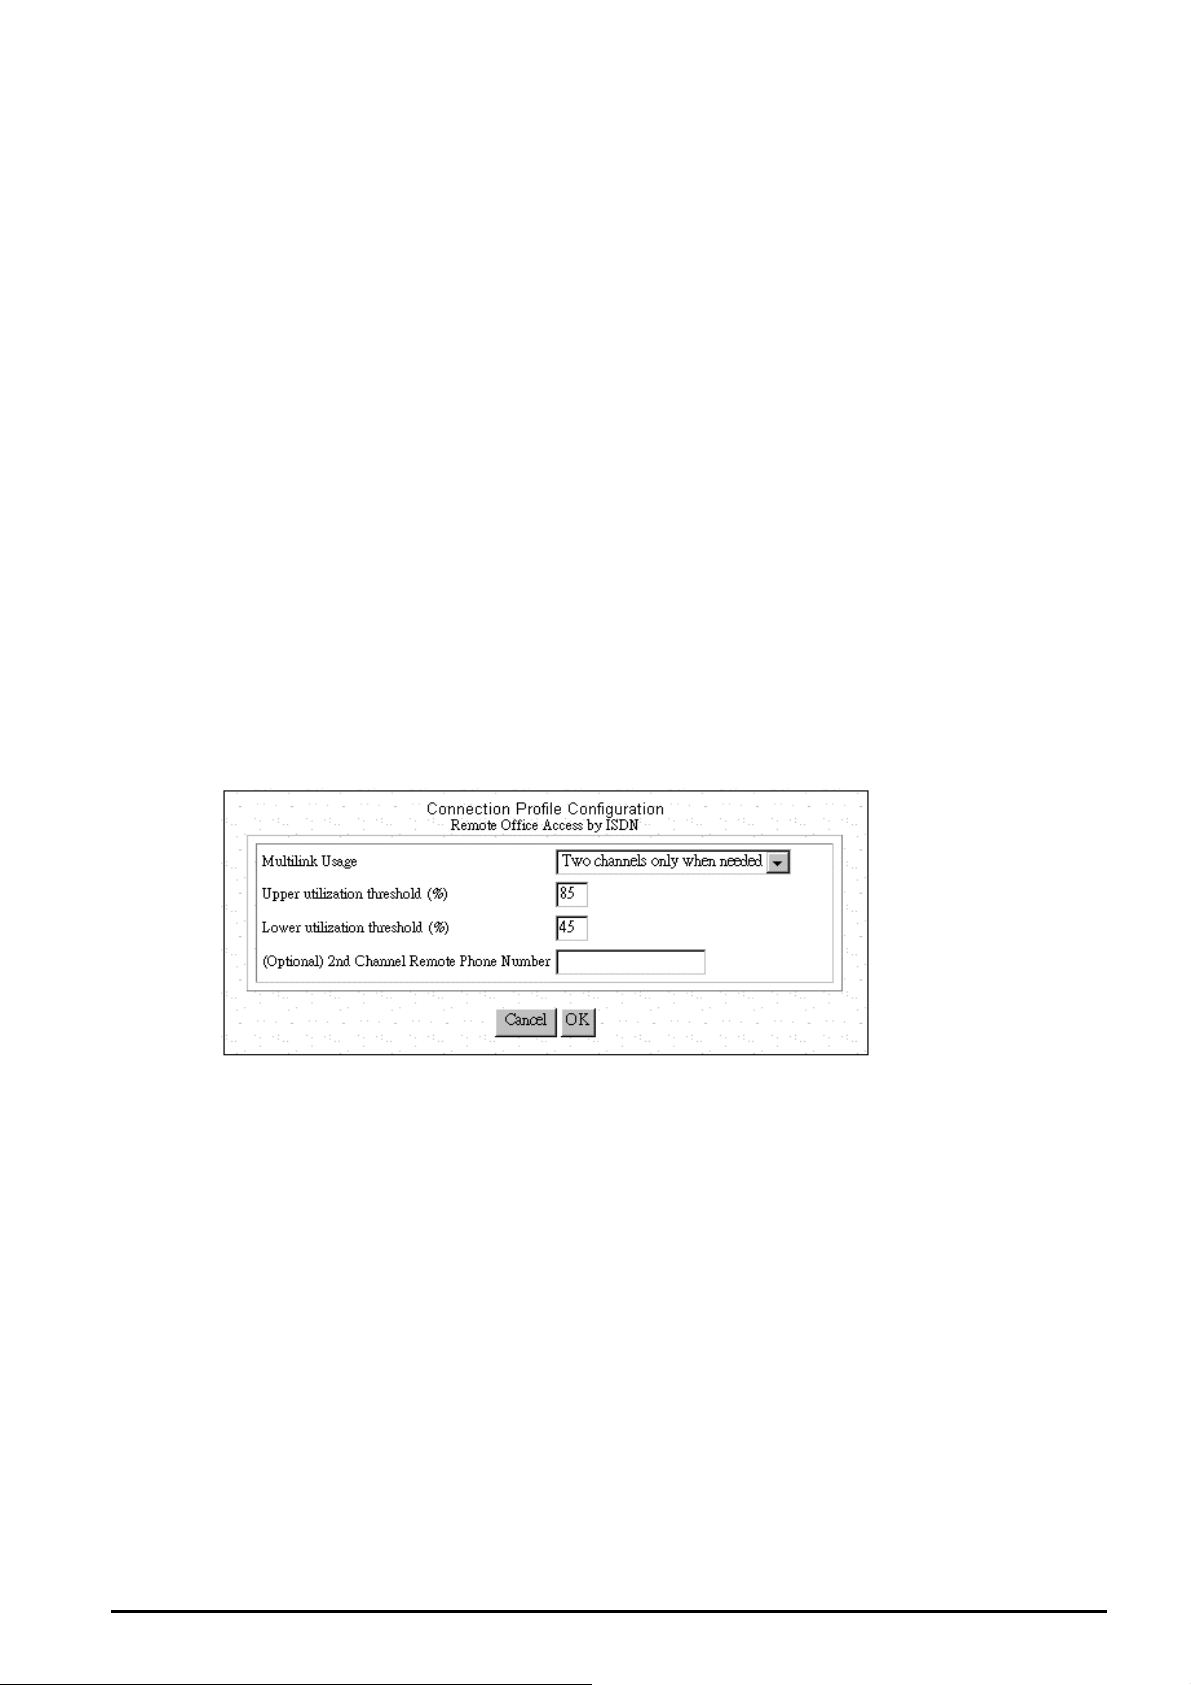
Step 6: Set Multilink Usage parameters. This determines how the device utilizes the two B channels for
your Internet connection. Available options are:
13
Page 17
One B Channel Only:
Two B Channels Only When Needed:
Always two B Channels:
Step 7: Select Data Service. Available options are Data Over Voice Channel, 64K , 56K , and Auto.
Recommended selection is Auto.
Step 8: Enter Remote Sub Address Number if necessary.
Step 9: Select STAC compression option.
Step 10: Set Idle Timeout number. The range is from 0 to 3600 seconds.
Step 11: Select Advice of Charge Support option and enter the Unit Price and Currency in the
corresponding blanks if the selection is Yes.
Step 12: Click OK to return to the main configuration screen and skip to next step. Otherwise click
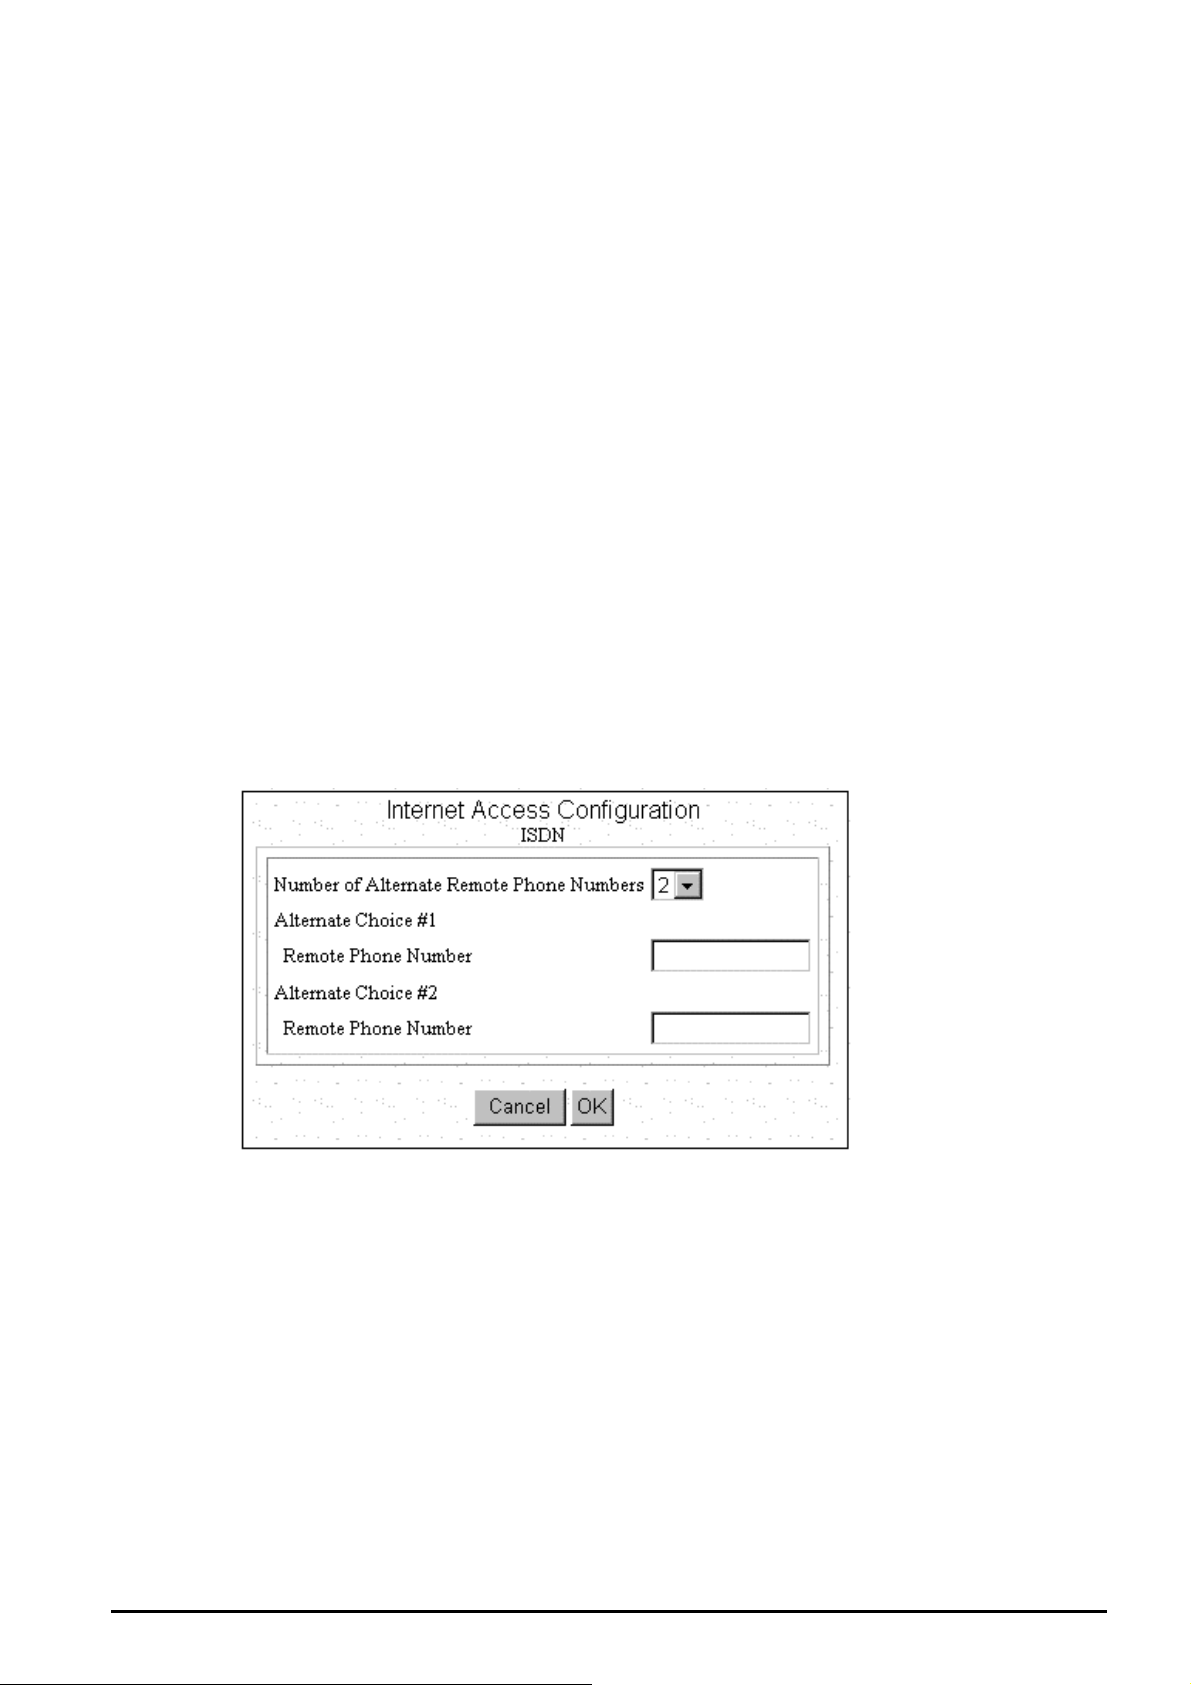
Alternative Number if there is one or more alternative remote phone numbers. Enter the alternative
remote phone number in the corresponding blanks. Then press OK to return to the previous screen. Again
press OK to back to main configuration screen.
Step 13 Click Apply and Test
3.2.6 IP Configuration for Internet Access
Using IP options in the Menu Window, you can assign a public IP address to ISDN Router, modify the
private IP address, DNS addresses, and enable or disable DHCP.
Step 1: Select Internet Access with Advanced Configuration from ISDN Router Manager. Then click
IP from the Menu Window.
Step 2: The Advanced Internet Access Setup screen appears:
14
Page 18

To install public servers on your network (For Example, Web or ftp
servers), you need to apply for an IP address for each server plus one
for the LAN port. All these public IP addresses have to belong to the
same IP network
Set the following parameters:
Public IP Address: the public IP address for the LAN interface on ISDN Router.
Public IP Netmask: the network mask for the public network address on LAN.
Private IP Address: the private IP address for the LAN interface on ISDN Router. The default private IP
address is 192.168.168.230.
Private IP Netmask: the network mask for your private network. Its value is 255.255.255.0, and cannot
be changed.
Primary DNS IP Address: the IP address of the primary Domain Name Server (DNS). If properly
configured, when a device reboots and acquires the IP address from ISDN Router, the IP addresses of
both the primary and the secondary DNS server will be provided for client workstations or PCs.
Secondary DNS IP Address: the IP address of the secondary domain name server.
DHCP: If you want to act, as a DHCP server and assigns private IP addresses to any requesting DHCP
client, make sure DHCP is enabled. When enabled, it will provide an IP address, network mask, gateway
address (ISDN Router’s private IP address), and DNS addresses to any workstations on the local area
network that are configured as a DHCP client. Devices on your network that are configured with public
IP addresses are not DHCP clients. Therefore, you need to assign their IP addresses, network mask, and
default gateway’s IP address, primary and secondary DNS IP addresses manually.
IP Address Assignment-High & Low: the setting about the maximum and minimum of private IP
address for each client PC or workstation in the LAN. The range is from 1 to 254.
Step 3: Click Routing, Address Translation or Static DHCP if it is necessary to set these
configurations. Otherwise click Apply to confirm the configuration and return to the main configuration
screen.
3.2.7 The IP Routing Table
The IP Routing Table contains all the information that the ISDN Router needs to route an IP data
packet. You can view the IP Routing Table by clicking on the Routing button at the bottom of the
Advanced Internet Access Setup screen (described in the previous section). From this screen, you can
also add new routing entries to the table. The following screen shows an example of the IP Routing Table.
15
Page 19

An entry for a specific host or network may be added manually. An “S” in the Flags field indicates this
“static route”. Other flag field entries are “H” for host, and “G” for gateway.
Follow the steps to add or to change the default route or add a static route:
Step 1: Click the Add button in the IP Routing Table screen to display the following screen:
Step 2: Enter the following information:
Default Route: select if you want to specify a new default route. Note that the Remote IP Address and
Remote IP netmask fields do not appear if you select this option. CAUTION: Mis-configuring the default
route may result in abnormal system behavior and/or unnecessary telephone charges.
Static Route: select if you want to add a static route.
Remote IP Address: the remote IP address of the new route.
Remote IP Netmask: the IP netmask of the new route.
16
Page 20

Gateway: identifies if the gateway is an IP address or interface.
Hop Count: the maximum number of hops for this route.
Step 3 Click APPLY.
3.2.8 IP Address Translation Configuration
For security and economic purposes, the device supports Single User Account feature (SUA). Multiple
users in the LAN can share a public IP address from ISP and Internet users would view the whole LAN as
a big “device”.
17
Page 21
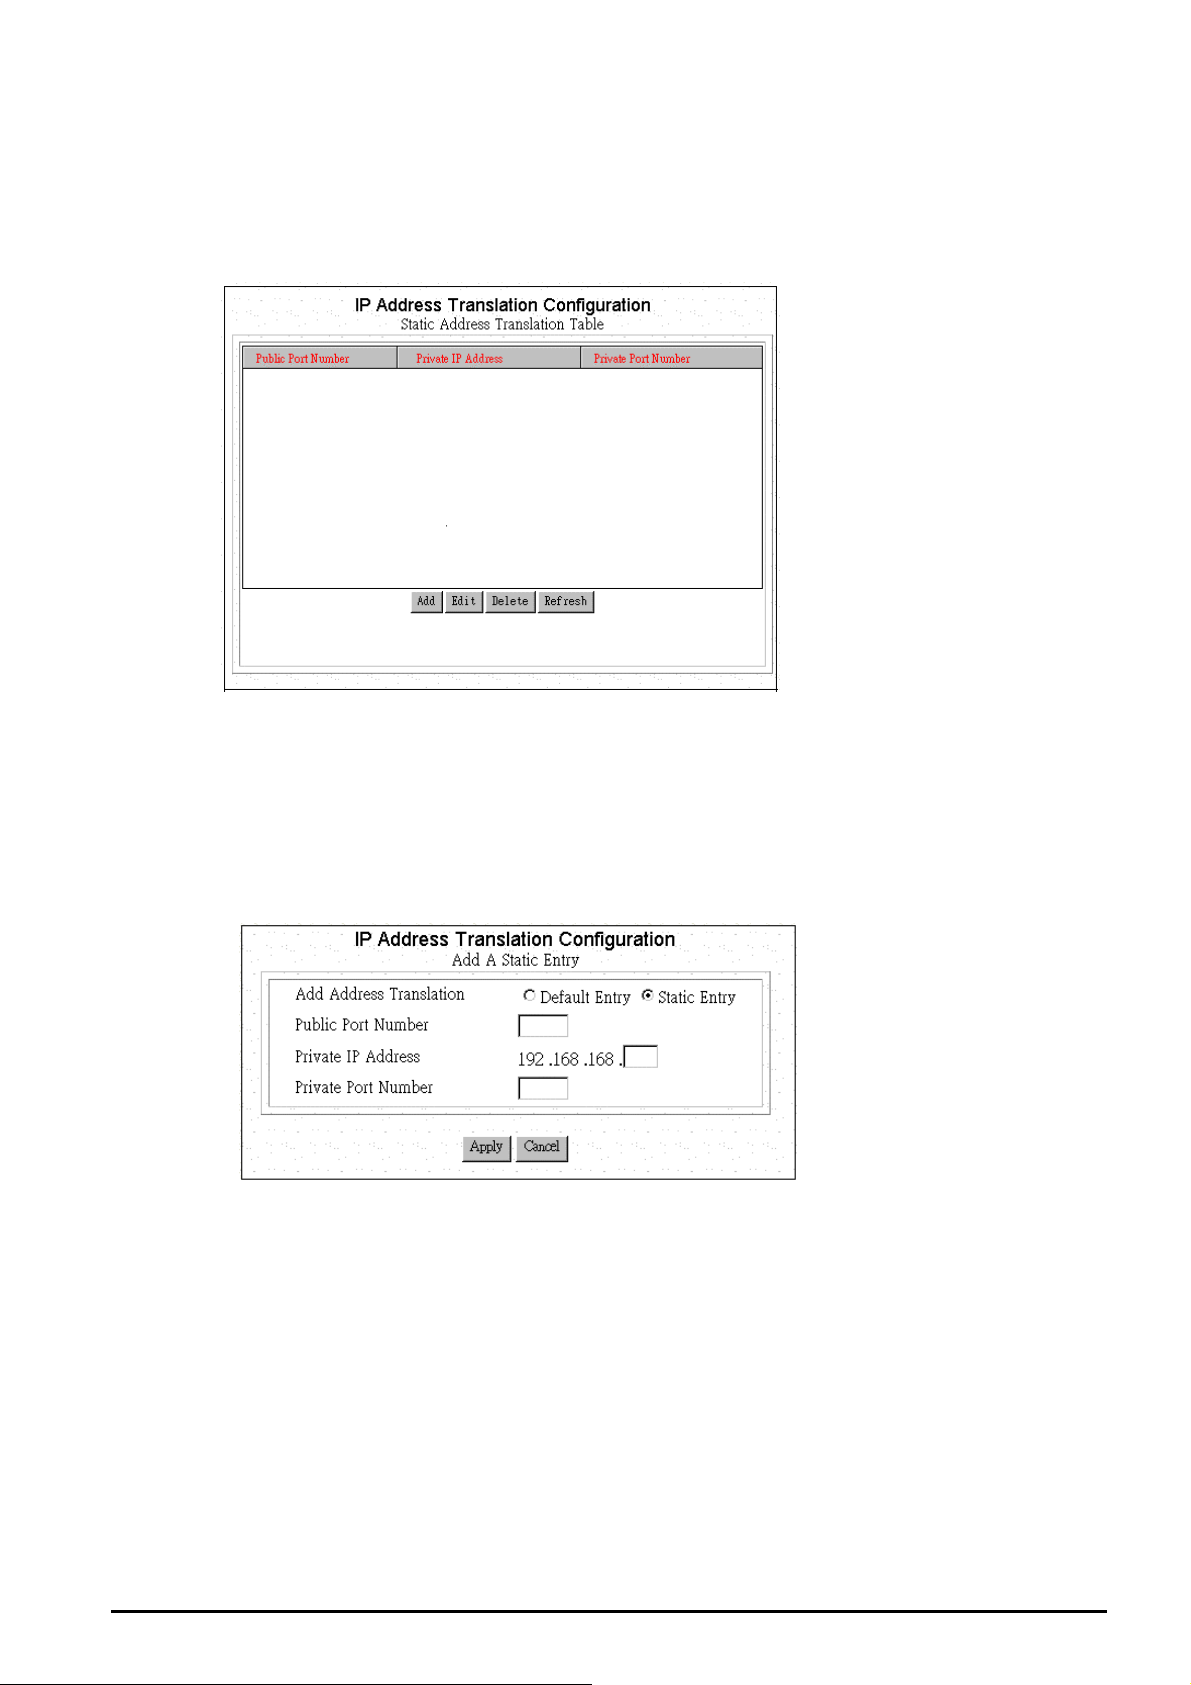
3.2.9 Add or Edit IP Address Translation
Step 1: Click Address Translation button in the Advanced Internet Access Setup screen. The following
IP Address Translation Configuration screen will appear.
Step 2: Click Add for adding a set of IP address translation, or click Edit for editing an existing set of IP
address translation after selecting the set of IP address translation that you want to edit. The Following
screen will appear.
Step 3: Enter the following parameters.
Add Address Translation: Available options are Default Enter and Static Entry.
Public Port Number: The public port number corresponding to the service that the specific server
provides.
Private IP Address: The private IP address that you want to assign to the server.
18
Page 22

Private Port Number: The private port number corresponding to the service that the specific server
provides. Public Port Number and Private Port Number should be the same.
Step 4: Click Apply.
Delete a Set of IP Address Translation
Step 1: Select the set of IP address translation that you want to delete from the IP Address Translation
Configuration screen.
Step 2: Click Edit.
3.2.10 Static DHCP Configuration
By built-in DHCP feature, the device can automatically assign a private IP address to each PC or
workstation in the LAN. But under some situations, you need to set a static private IP address for certain PCs or
workstations. Follow the steps to assign a static private IP address to a PC or a workstation.
Add or Edit a Set of static private IP address
Step 1: Click Static DHCP from Advanced Internet Access Setup Screen. The following screen will
appear.
Step 2: Click Add for adding a set of static private IP address, or click Edit for editing a existing set of
static private IP address after selecting the set of static private IP address. The following screen will
appear.
19
Page 23

Name: A name is assigned for router manager identification purpose.
IP Address: The static private IP address that you want to assign.
MAC Address: The MAC address of the physical interface between the device and the PC or
workstation.
Step 3: Click Apply.
Delete a Set of static private IP address
Step 1: Select the Set of static private IP address that you want to delete form the DHCP Configuration
window.
Step 2: Click Delete.
20
Page 24

Chapter 4
Remote Configuration
The remote site does not have to have an ISDN router, and may
not be configurable by the local administrator. Make sure the
configuration matches the requirements of the remote site
4.1 Remote Office Access by ISDN
To configuring the ISDN interface for Remote Office connectivity, follow these steps:
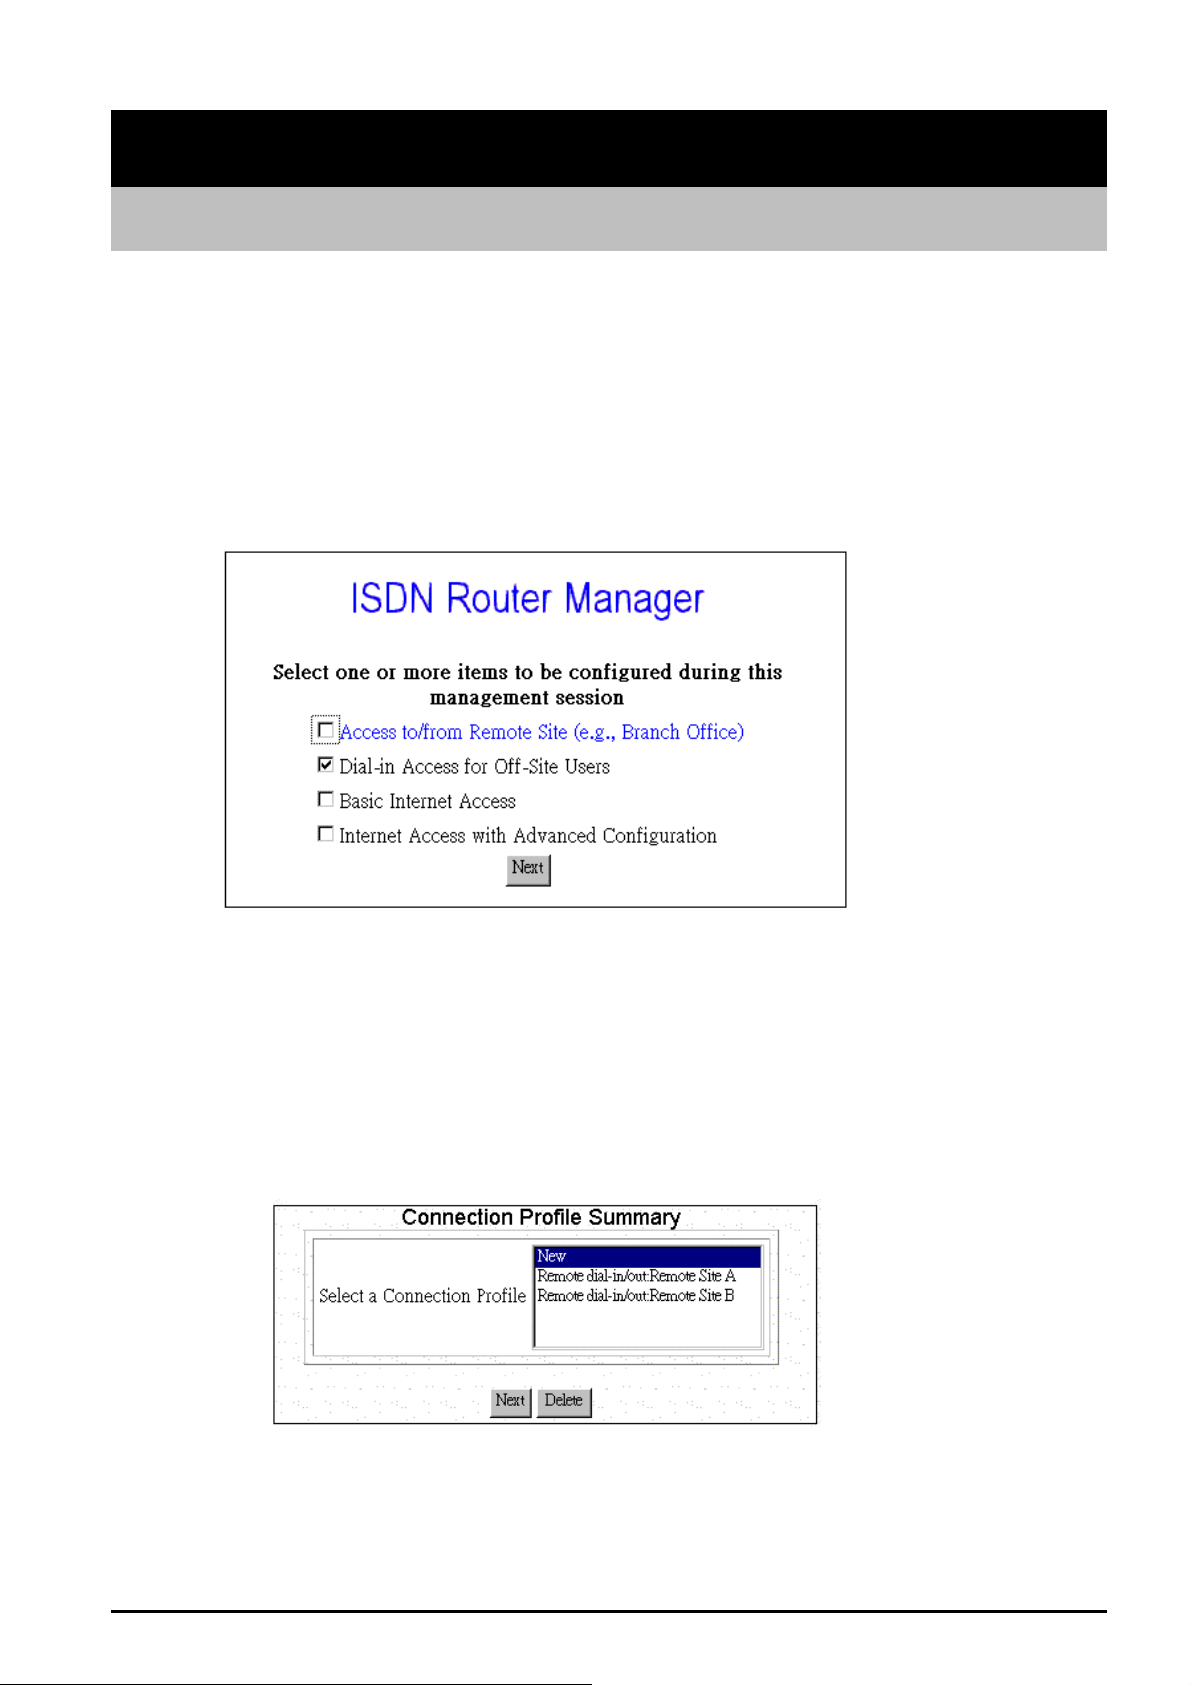
Step 1: Select Access to/from Remote Site in the ISDN Router Manager screen and click Next:
Step 2: If you have already configured your ISDN interface, skip to Step 3. Otherwise, configure your
ISDN interface in the way described in the chapter 3.
Step 3: Click Connection Profiles in the Menu Window. The Connection Profile Summary window
will appear if there is already any connection profile configured previously.
21
Page 25

Step 4: Select New and Click Next, the Connection Profile Configuration window should appear as
follows,
Step 5: Enter the following information:
Profile Name: a name associated with this profile.
Call Direction: if the remote site will be dialing in, select Incoming. If the device will dial out to the
remote site, select Outgoing. Select Both if either side can initiate the connection. The default setting is
Both.
Call Back: if Call Back is enabled (Yes is selected), it checks the Remote System Name and Remote
Password. If a call is received and authentication succeeds, it disconnects the incoming call, and calls the
number in the Call Back field. If Call Back is not enabled (No), the Call Back Number field will not
display. If the Call Direction is Outgoing only, Call Back options will not display.
Remote Phone Number:
My System Name:
My System Password:
22
Page 26

Make sure the remote site is configured with the same values you specify in My
System Name and My System Password.
Remote System Name:
Remote System Password:
Step 6: If you selected Outgoing or Both as your Call Direction, click APPLY and TEST, or select
ADVANCED for more options. You must still click Apply and Test even if the other end of the
connection has not been configured. In this case the test will fail, but that can be considered normal.
4.2 Advanced Options for Remote Office Access Profiles
If you press the Advanced button from the above Connection Profile Configuration, the following
screen appears.
Step 1: Set any of the following parameters:
Data Service: choose 64K, 56K, or Auto. Select Auto unless you know the speed required by the other
end of the connection requiring either 64K or 56K.
Remote Sub-Address:
Caller ID Authentication: select Yes if you want to check the caller ID before accepting the call. This
service may require a special agreement with your ISDN service provider.
Caller ID Number:
23
Page 27
STAC Compression: allows outgoing data to be compressed to achieve higher throughput, and
compressed incoming data to be recognized. The ability to use compression depends on the capabilities of
the ISP.
Idle Timeout: the number of seconds of inactivity over the connection. When this value is reached, it
will disconnect the call. You can set the idle timeout from 0 to 3600 seconds. The default setting is 120
seconds. If you select 0, the connection will never time out.
Enable IP:
IP RIP:
Remote IP Address:
Remote IP Netmask:
Enable Bridging:
Step 2: If advanced configuration is required for the operation on the ISDN, and its load sharing
capabilities, then click Multilink. Alternatively skip to step 4.
Step 3: Click OK after completing the parameters in the following windows.
Step 4: Skip to step 6 or click Alternative Numbers if it is required to set more than one choice of
remote phone numbers. The screen will appears as follows,
24
Page 28

Step 5: Select the Number of Alternative Remote Phone Numbers and then enter the remote phone
numbers in the corresponding blanks. Click OK to back to the previous screen.
Step 6: Click OK to back to main configuration screen and click Apply and Test.
4.3 Deleting Remote Office Access Profile
Follow the steps to delete a Connection Profile:
Step 1: Select Connection Profiles in the Menu Window.
Step 2: Highlight the entry in the list you want to delete, and click Delete.
25
Page 29
Dial-in User Access Configuration
5.1 Configuring a Dial-in User Profile
Step 1: Select Dial-in Access for Off-Site Users in the ISDN Router Manager screen.
Chapter 5
Step 2: Select Connection Profiles from the Menu Window. Information about each dial-in user who is
allowed to access is stored in a “connection profile.” When you select Connection Profiles, the
Connection Profile Summary screen appears only if there is any existing Connection Profile. Select
New from the pull-down menu.
Step 3: Click Next to continue and display the Connection Profile Configuration screen. The following
screen will appear.
26
Page 30

Step 4: Enter the information of screen:
Step 5: Select APPLY to add the connection profile to it’s database, or select ADVANCED for more
options and proceed to following steps.
Step 6: Enter the information:
Step 7: Click OK to return to the previous screen and click APPLY to add the connection profile to it’s
database. Otherwise click Multilink if advanced configuration is required for the operation on the ISDN,
and its load sharing capabilities. Then enter the following parameters.
27
Page 31
Step 8: Click OK to back to the previous screen and click OK again to back to Connection Profile
Configuration screen.
5.2 Deleting Dial-in User Profiles
Follow the steps to delete a Dial-in User Connection Profile.
Step 1: Select Connection Profiles from the Menu Window.
Step 2: Highlight the entry in the list you want to delete, and click Delete.
5.3 Packet Filtering
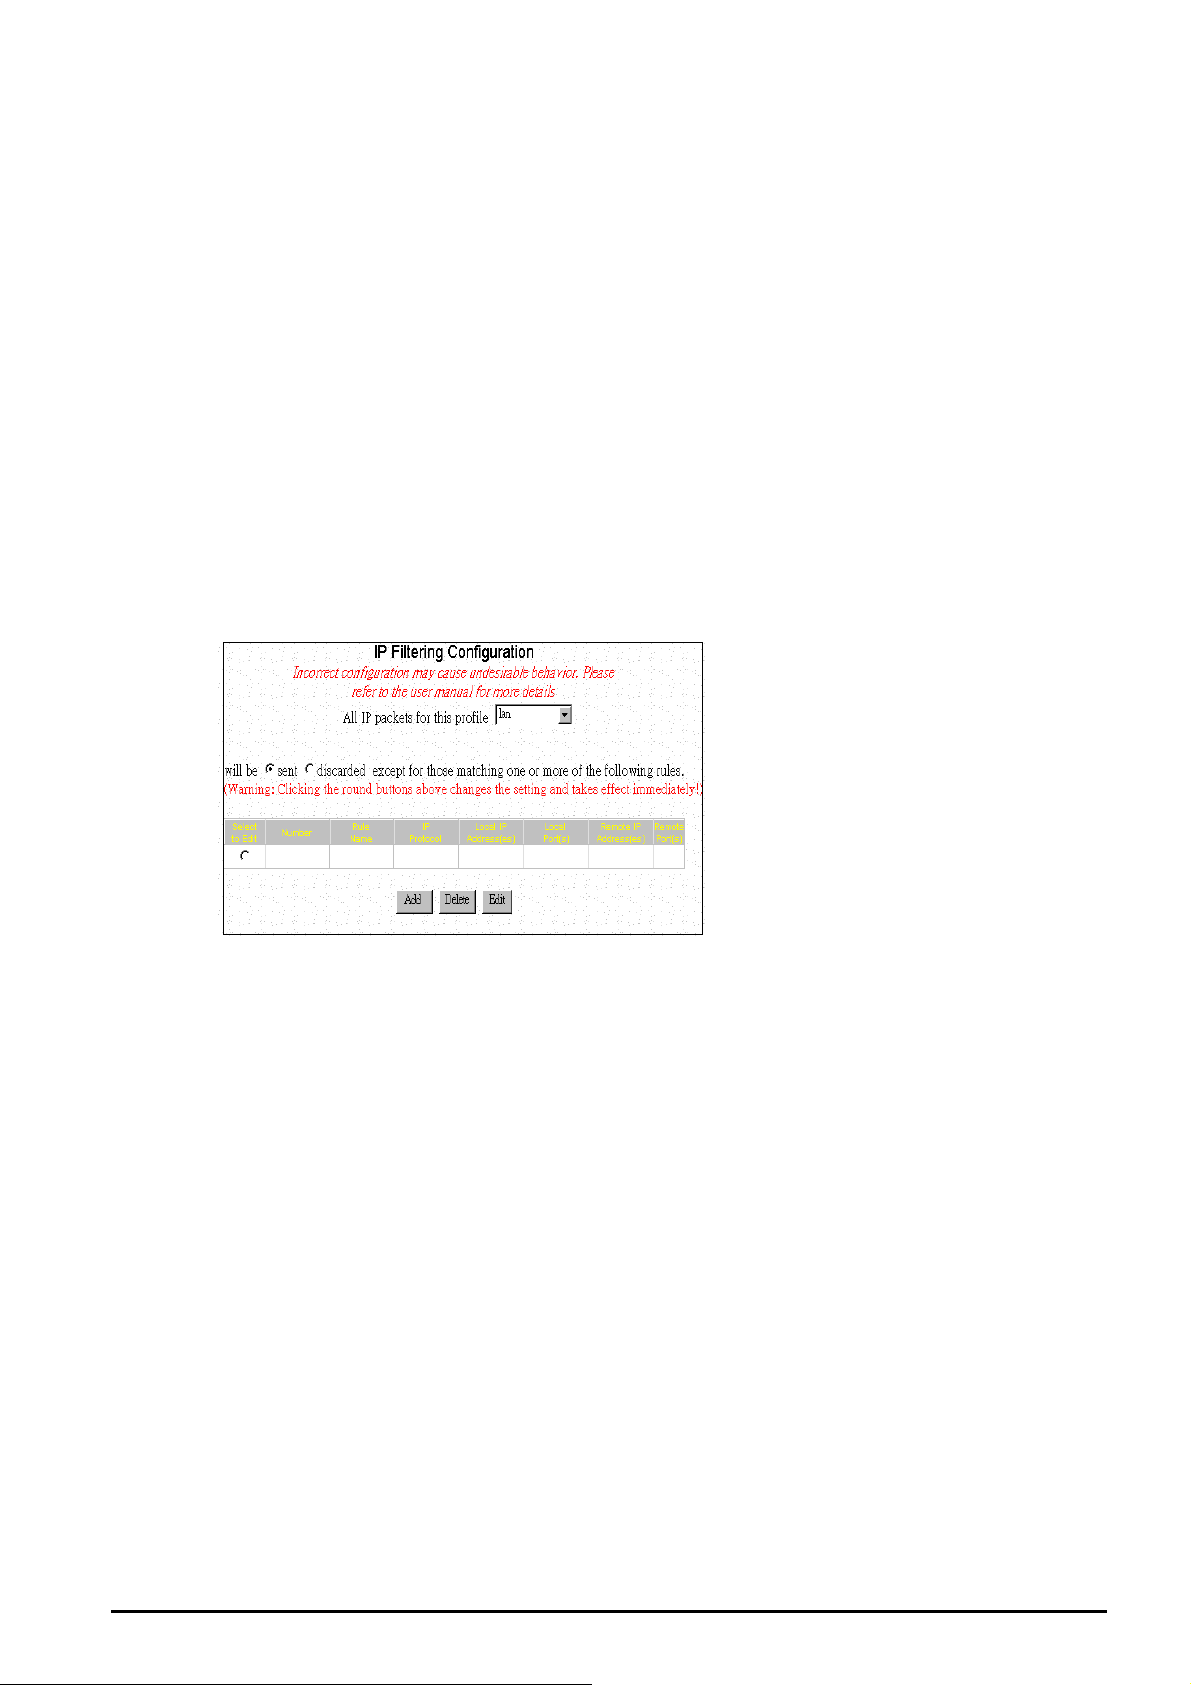
To add a new packet rule or to edit an existing one, select IP Filter from the Configuration Menu. Then
IP Filtering Configuration window will appear.
Step 1: From the IP Filtering Configuration screen, select the WAN profile of interest from the pull
down menu. For example, if your only need is to access the Internet, you should only select the Internet
access profile.
Step 2: Select send or discarded as desired, which is equivalent to allow and disallow, respectively.
Step 3: If you are just starting, click Add to add a new selection rule. If you have previously defined
rules, you will see those rules shown as entries in the rule table, and you can edit the rule by first
highlighting the desired entry in the rule table followed by clicking the Edit button.
Step 4: In case of adding a new selection rule, the following screen shows.
28
Page 32

If you highlighted an existing entry in the IP Filtering Configuration window and clicked Edit instead, a
similar screen will display, with all fields already filled out previously. Then you can make changes if necessary.
If you highlighted an existing entry and clicked Delete instead, the corresponding entry in the rule table will be
removed.
29
Page 33

Chapter 6
Management
6.1 How to Upgrade the Firmware
Step 1: Select System Upgrade from the Menu Window. The following screen is displayed:
Step 2: To update ISDN Router firmware, download the firmware from Atlantis Land’s web site and
install the firmware in your local environment first, then from the above screen enter a path or filename,
or click Browse to select a path to the firmware. Next, Click the Upgrade button below the file name and
follow the onscreen instructions. The new firmware will begin loading across the network. After the
operation is complete, be sure to reset the system to have the new firmware take effect.
6.2 How to Reset
You can reset the system from the System Tools Menu or by unplugging and plugging back in the power
connector to the device. Follow the steps to reset the system:
Step 1: Select Reset System from the System Tools Menu. The following screen displays.
Step 2: Click YES to reset the ISDN Router.
30
Page 34
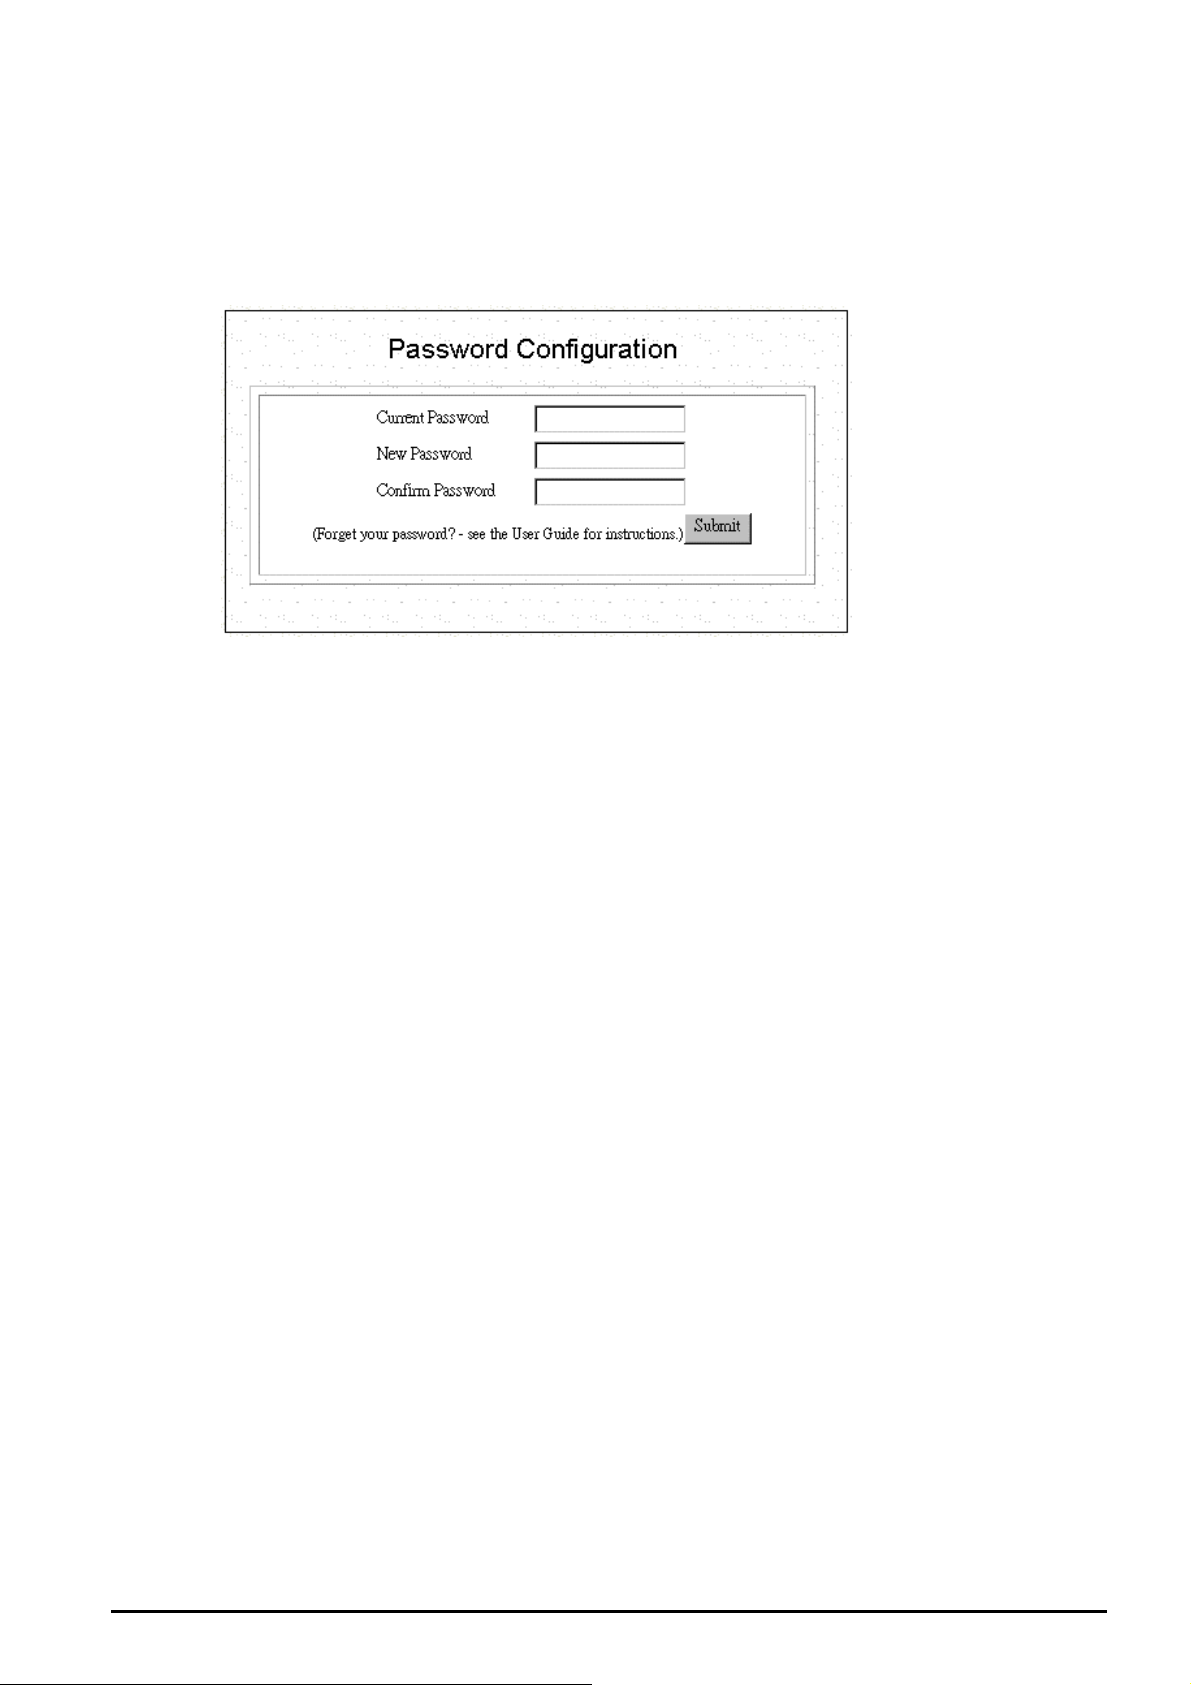
6.3 How to Change ISDN Router Manager Password
After you start using the ISDN Router, you should change the factory default password. Follow the steps to
change the password.
Step 1: Select Change Password from the System Tools Menu: The following screen displays:
Step 2: Enter the following information:
Current Password:
New Password:
Confirm Password:
Step 3 Click Submit.
6.4 What if I Forget the Password?
If you forget the ISDN Router Manager password, the only way to recover is clear the entire configuration
and return the unit to its original state as shipped from the factory. Unfortunately, this means that you have to
re-enter all of your configuration data.
To clear the configuration and restore the password to the default, follow these steps:
Step 1: Using the supplied Null Modem Cable, connect a console (or a PC running a terminal emulation
program such as HyperTerminal) to ISDN Router Console port. The default port settings are 19200, N, 8,
1, no flow control.
Step 2: Turn off the ISDN Router, then turn it on again. In the console window, you’ll see the message
“Loading firmware...”.
Step 3: When you see the message "Ready", immediately (within one second) press Ctrl+C.
Step 4: When this is complete, ISDN Router will return all settings to the factory default. The password
will once again be “password”.
31
Page 35

Chapter 7
Troubleshooting
What is NAT?
Answer. NAT is Network Address Translation. It is proposed and described in RFC-1631 and is originally for
solving the IP address depletion problem. Basically, "each NAT box has a table consisting of pairs of
locally private IP addresses and globally unique public IP addresses," by which the box can "translate"
the private IP addresses to public IP address and vice versa. The device supports the feature of NAT.
With proper configuration, multiple users can access the Internet using a single account via the NAT
device
How many rules can be used in IP Filtering function?
Answer. There are totally 8 filtering rules can be applied in the LAN and WAN ports.
How do I change the CLI mode form Advanced Prompt Mode into Express Prompt Mode? And vice
versa?
Answer. Press Ctrl+E key under CLI mode, it will show Advanced Prompt Mode, then press Ctrl+E key again,
it will back to Express Prompt Mode.
Why should I need to assign static private IP Address to certain workstations or PCs?
Answer. With built-in DHCP feature, each workstation or PC will be assigned by the device a different private
IP address whenever power is on. For specific-purpose workstations, such as Mail server, FTP server,
or Mail Server, we need to set up the static private IP address to prevent from losing connection.
How do I set up the Idle Time?
Answer. The default setting for Idle Time is 120 seconds; meaning that router will shut down ISDN connection
automatically once the router have no traffic on the connection over 120 seconds. To keep ISDN on
without interruption, reset the Idle Time to 0.
Is there any effect if I add another DHCP server into the local network in which connected with an
existing DHCP server?
Answer. When it hooks up with power and network, it will detect whether there is any DHCP Server existed
automatically. If it does, the device will shut down DHCP feature automatically, and will close this
detective function as well.
Meanwhile, it will also detect the DHCP once Private IP changed.
32
Page 36

Do I be able to pick up more than one configuration-selection at once while I set up Customize User
Interface function?
Answer. Yes, you do, but we would like to recommend that users should configure the router step by manual.
Why does the configuration lost from previous usage?
Answer. Please keep in mind to save all configurations while you complete setting process.
Please choice Configuration Data Options\Save Button.
Why do I spend longer time to update firmware in GUI screen?
Answer. Because the GUI of the device was written by JAVA program, we would like to suggest user to use
Netscape Navigator, and please enable JAVA function under Internet Explorer environment. Please
also keep in mind to close other application programs while updating firmware.
What’s Data over Voice Channel?
Answer. In Europe, there is some Tele-company have higher charging in data calls than voice calls. Using the
Data over Voice Channel can save you more money.
Why can’t I use ICQ software under the device?
Answer. With built- in NAT (network address translation), it can’t transfer ICQ packets via default TCP port to
ICQ server. It means ICQ can’t work well under such circumstances.
Solution. In order to solve this problem, we can use ISQ software with the function of automatically searching
TCP port, or we can set up the TCP port to port 21(FTP port). For other games over the Internet, we
must add a set of static network address translation to ensure TCP ports are used by the game.
If I have several legal IP addresses, how do I use it on WAN to LAN communication?
Answer. The public IP address is used in PC connected with Router as a FTP/Mail/Web server, the others PC
connected with Router will get the private IP address from the DHCP server of Router automatically.
Solution. First of all, to ensure it’s under off-line condition, and complete the profile set up process, then add
another Routing Table entry.
(1) Under GUI Mode:
Key in correct Public IP address for Gateway / Netmask
(2) Under CLI Mode:
Add a PAT Entry
Set IP LAN “Public Gateway Address” “Netmask”
33
,
Page 37

For example, set IP LAN to 202.39.52.190 255.255.255.0
What can I do if PCs or workstations in the LAN can’t be connected to Internet after setting public
IP address?
Solution. First, Please make sure that the public IP address you set is a legal public IP address, and then check
that the public IP address has not occupied by other users. Second, make sure the IP address of each
server is static and the IP Address/ Netmask/ Gateway information is completed.
And to make sure all PC is connects router with correct ISP.
Why can’t I set up IP Filter function in GUI?
Answer. Due to the consideration of security, you only can set up Profile in GUI Mode, and for the LAN; it
only can be revised under the CLI Mode.
Solution. Connect the PC to the device with a null modem type cable and enter CLI mode to start IP Filtering
by Telnet or Hyper-terminal.
What should I do if the Firmware upgraded fail in the device, and it affects me have trouble to get
into CLI & GUI screen?
Answer. It will go through the process of Vector->Boot Code->App Code once its power on, the CLI can be
used to update Firmware as long as the Boot Code doesn’t expired.
Solution.
1. Open Hyper terminal
2. Make sure baud rate is 19200,n, 8,1,none
3. Connect the cable with both Com Port and Console Port
4. Turn on the router
5. Choice the connection speed, then you can update the Firmware by delivery the chosen Firmware file.
How can I get into Router what if I forgot the password?
Answer.
Solution.
If you forget the password, you can clean the password first, but all configuration will be disappeared once
the password cleaned.
1. To get into Hyper Terminal first.
34
Page 38

2. Make sure baud rate is 19200,n, 8,1,none
3. Turn off the Router, and connect the Console Port Cable.
4. Turn on the Router.
5. Press Ctrl+C while the message “Loading Firmware” shows up.
6. Then it will show “Clearing System Configuration” once the system is ready.
7. Therefore, it will recover the default password while the router reboot automatically.
Why does the ISDN Router connect with ISP sometimes automatically?
Answer.
Why didn’t the router offline automatically even my Idle Time exceeded?
Answer.
Why can’t I connect successfully while I use Remote Dial-in?
The Router will build up connected function once LAN’s PC has any packet need to send . This function
calls Dial on Demand.
There are several reasons for in-completed offline:
1. The setting Idle time is greater than the confirmed connection packet from ISP.
2. If there is any packet flow into the LAN, Idle Time will always recalculated.
3. LAN’s PC is running Program for the Network, And Program send the packet to the Internet.
You could use the window in Show Profile Status to monitor the packet quantity in Network.
Answer.
Please be sure both Remote User’s Username and password are correct, and keep the setting information
identically at two sides of Router. The best way is setting the Router in MultiPPP.
35
Page 39

36
 Loading...