

Page 1
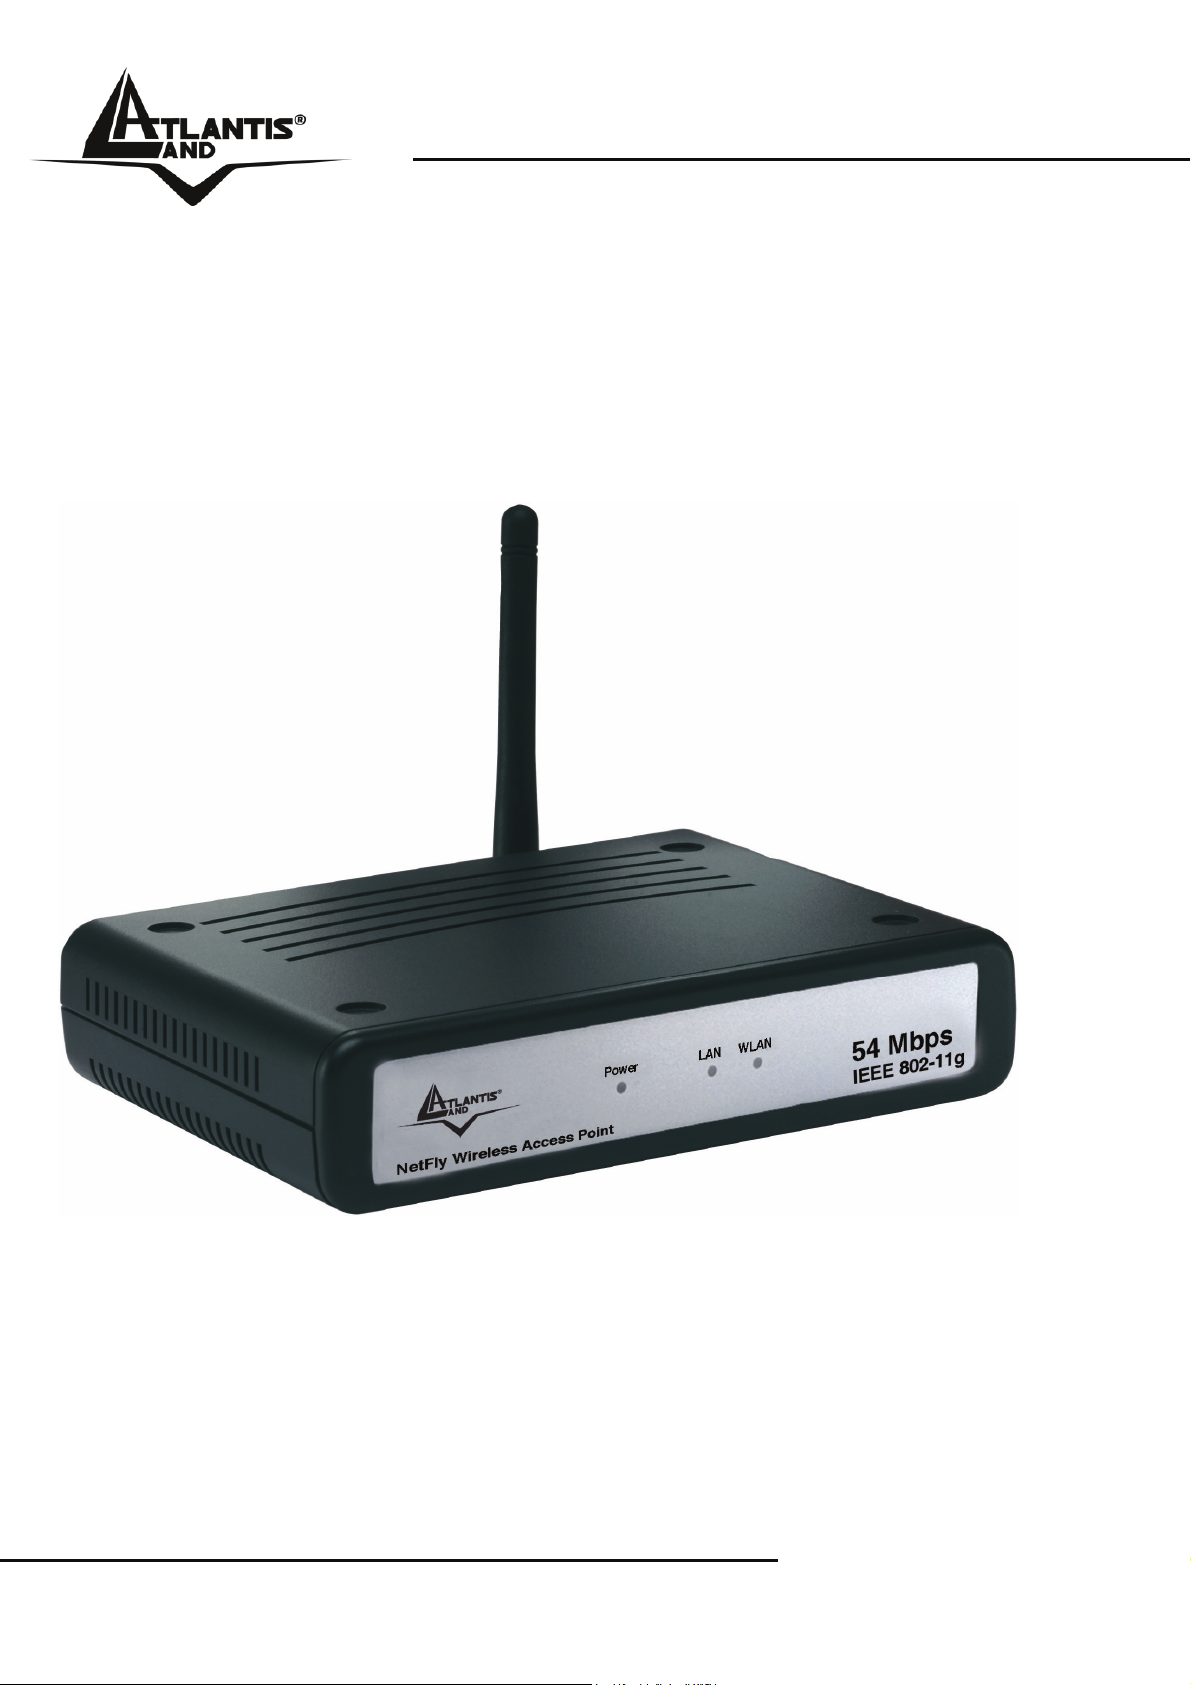
NetFly AP1-54
Wireless Multi-Function
Access Point
A02-AP1-W54
MULTILANGUAGE
QUICK START GUIDE
A02-AP1-W54_GX01
Company certified ISO 9001:2000
Where solutions begin
Page 2

ITALIANO
Questo prodotto è coperto da garanzia Atlantis Land Fast
Swap della durata di 3 anni. Per maggiori dettagli in merito o
per accedere alla documentazione completa in Italiano fare
riferimento al sito www.atlantis-land.com.
ENGLISH
This product is covered by Atlantis Land 3 years Fast Swap
warranty. For more detailed informations please refer to the web
site www.atlantis-land.com.
For more detailed instructions on configuring and using this
device, please refer to the online manual.
FRANCAIS
Ce produit est couvert par une garantie Atlantis Land Fast
Swap de 3 ans. Pour des informations plus détaillées, référez-
vous svp au site Web www.atlantis-land.com.
DEUTSCH
Dieses Produkt ist durch die Atlantis Land 3 Jahre Fast Swap
Garantie gedeckt. Für weitere Informationen, beziehen Sie sich
bitte auf Web Site www.atlantis-land.com.
ESPAÑOL
Este producto està cubierto de garantía Atlantis Land Fast Swap
por 3 años. Para una información más detallada, se refiera por
favor al Web site www.atlantis-land.com
.
Company certified ISO 9001:2000
Where solutions begin
Page 3
The award of the information is facultative, but its lack will
prevent ATLANTIS LAND® from starting the Guarantee process
requested.
r
a
a
y
o
u
r
p
r
o
d
u
c
t
!
c
u
u
o
o
c
o
c
m
t
t
m
m
!
!
y
o
u
r
p
r
o
n
n
y
n
t
o
t
t
u
r
i
s
-
l
i
s
-
l
i
s
-
d
p
r
o
d
a
n
d
.
a
n
n
d
d
c
.
c
.
a
l
R
e
g
i
s
t
e
R
e
g
R
e
w
w
w
w
w
w
g
w
w
w
Registration on the web site
r
i
s
t
e
r
i
s
t
e
.
a
t
l
a
.
a
t
l
.
a
t
l
www.atlantis-land.com within 15 days
from the purchase of the product dismiss
the customer from showing a valid proof of
purchase (Sale Receipt or Invoice) in case
of the request of intervention. For further
information we invite you to look at our web
site at the section WARRANTY.
Copyright
The Atlantis Land logo is a registered trademark of Atlantis Land
SpA. All other names mentioned mat be trademarks or
registered trademarks of their respective owners. Subject to
change without notice. No liability for technical errors and/or
omissions.
Company certified ISO 9001:2000
Where solutions begin
Page 4

MULTILANGUAGE QUICK START GUIDE
ITALIANO
1.1 Contenuto della confezione ............................... 7
1.2 I LED frontali......................................................... 7
1.3 Le porte posteriori................................................ 8
1.4 Cablaggio.............................................................. 8
1.5 Settaggi di Default ............................................... 9
1.6 Configurazione di IE.......................................... 10
1.7 Configurazione del PC...................................... 10
Configurazione del PC in Windows 95/98/ME .......10
Configurazione del PC in Windows NT4.0.............11
Configurazione del PC in Windows 2000.............. 11
Configurazione del PC in Windows XP.................12
1.8 Configurazione Router...................................... 12
Quick Wizard Setup ...............................................13
ENGLISH
1.1 Package contents.............................................. 17
1.2 The Front Panel LEDs ...................................... 17
1.3 The Rear Ports................................................... 18
1.4 Cabling ................................................................ 19
1.5 Default Settings.................................................. 19
1.6 IE Configuration ................................................. 21
1.7 TCP/IP Configuration ........................................ 21
Configuring PC (Windows 95/98/ME) ....................21
Configuring PC (Windows NT4.0)........................ 21
Configuring PC (Windows 2000)........................... 22
Configuring PC (WindowsXP).............................. 22
1.8 Browser configuration ....................................... 23
Quick Wizard Setup ...............................................24
4
Page 5

MULTILANGUAGE QUICK START GUIDE
FRANCAIS
1.1 Contenu de la boîte........................................... 28
1.2 Face avant .......................................................... 28
1.3 Face arrière ........................................................ 29
1.4 Câblage............................................................... 29
1.5 Configuration initiale.......................................... 30
1.6 Configuration du TCP/IP................................... 31
Configuration sous Windows 95/98/ME ................. 31
Configuration sous Windows NT4.0....................... 32
Configuration sous Windows 2000 ......................32
Configuration sous Windows XP..........................33
1.7 Vérification .......................................................... 33
1.8 Configuration avec le Browser......................... 34
Quick Wizard Setup ...............................................35
DEUTSCH
1.1 Inhalt der Verpackung....................................... 40
1.2 Die frontalen LED .............................................. 40
1.3 Die Hinterturen................................................... 41
1.4 Verdrahtung........................................................ 41
1.5 Einstellung des Default..................................... 42
1.6 Die IE Konfiguration .......................................... 43
1.7 Konfiguration des PC........................................ 43
Konfiguration des PC in Windows 95/98/ME .........43
Konfiguration des PC in Windows NT4.0............... 44
Konfiguration des PC in Windows 2000................44
Konfiguration des PC in Windows XP.................... 45
1.8 Konfiguration des Router.................................. 45
Quick Wizard Setup ...............................................46
5
Page 6

MULTILANGUAGE QUICK START GUIDE
ESPANOL
1.1 Contenido de la caja ......................................... 50
1.2 Los LED frontales.............................................. 50
1.3 Los puertos posteriores .................................... 51
1.4 Cableado............................................................. 52
1.5 Configuración de fábrica................................... 52
1.6 Configuración de Internet Explorer................. 53
1.7 Configuración del PC ........................................ 53
Configuración del PC en Windows 95/98/ME ........53
Configuración del PC en Windows NT 4.0............. 54
Configuración del PC en Windows 2000...............55
Configuración del PC en Windows XP.................. 56
1.8 Configuración del Punto de Acceso ............... 56
Asistente de Configuración .................................... 57
A02-AP1-W54_GX01(V1.0 May 2006)
6
Page 7
ITALIANO
Questo manuale è inteso come una guida rapida,
pertanto per ulteriori dettagli sulla configurazione fare
riferimento al manuale esteso presenti sul CDRom
allegato.
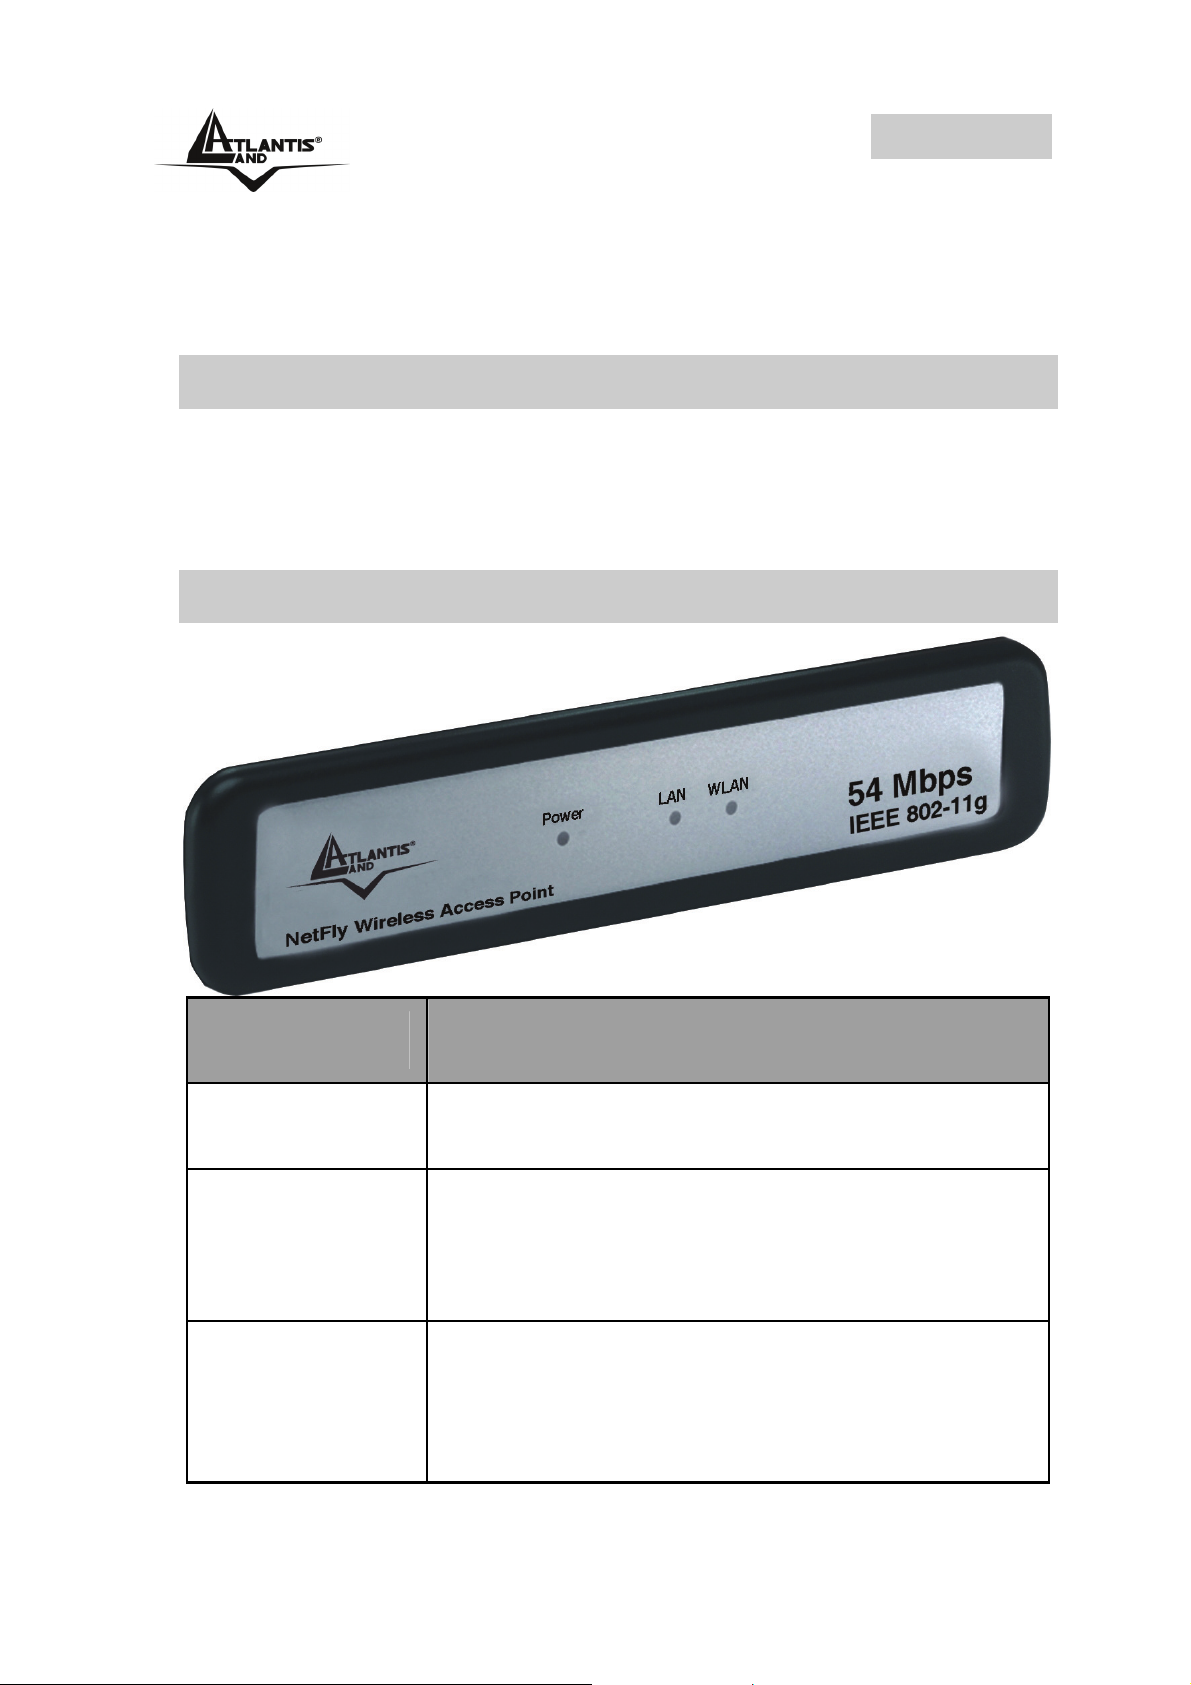
1.1 Contenuto della confezione
Atlantis Land WirelessMulti-Function Access Point, CDRom
contenente il manuale, Guida di Quick Start, antenna
esterna da 2 dBi, Alimentatore esterno (7.5V, 1A).
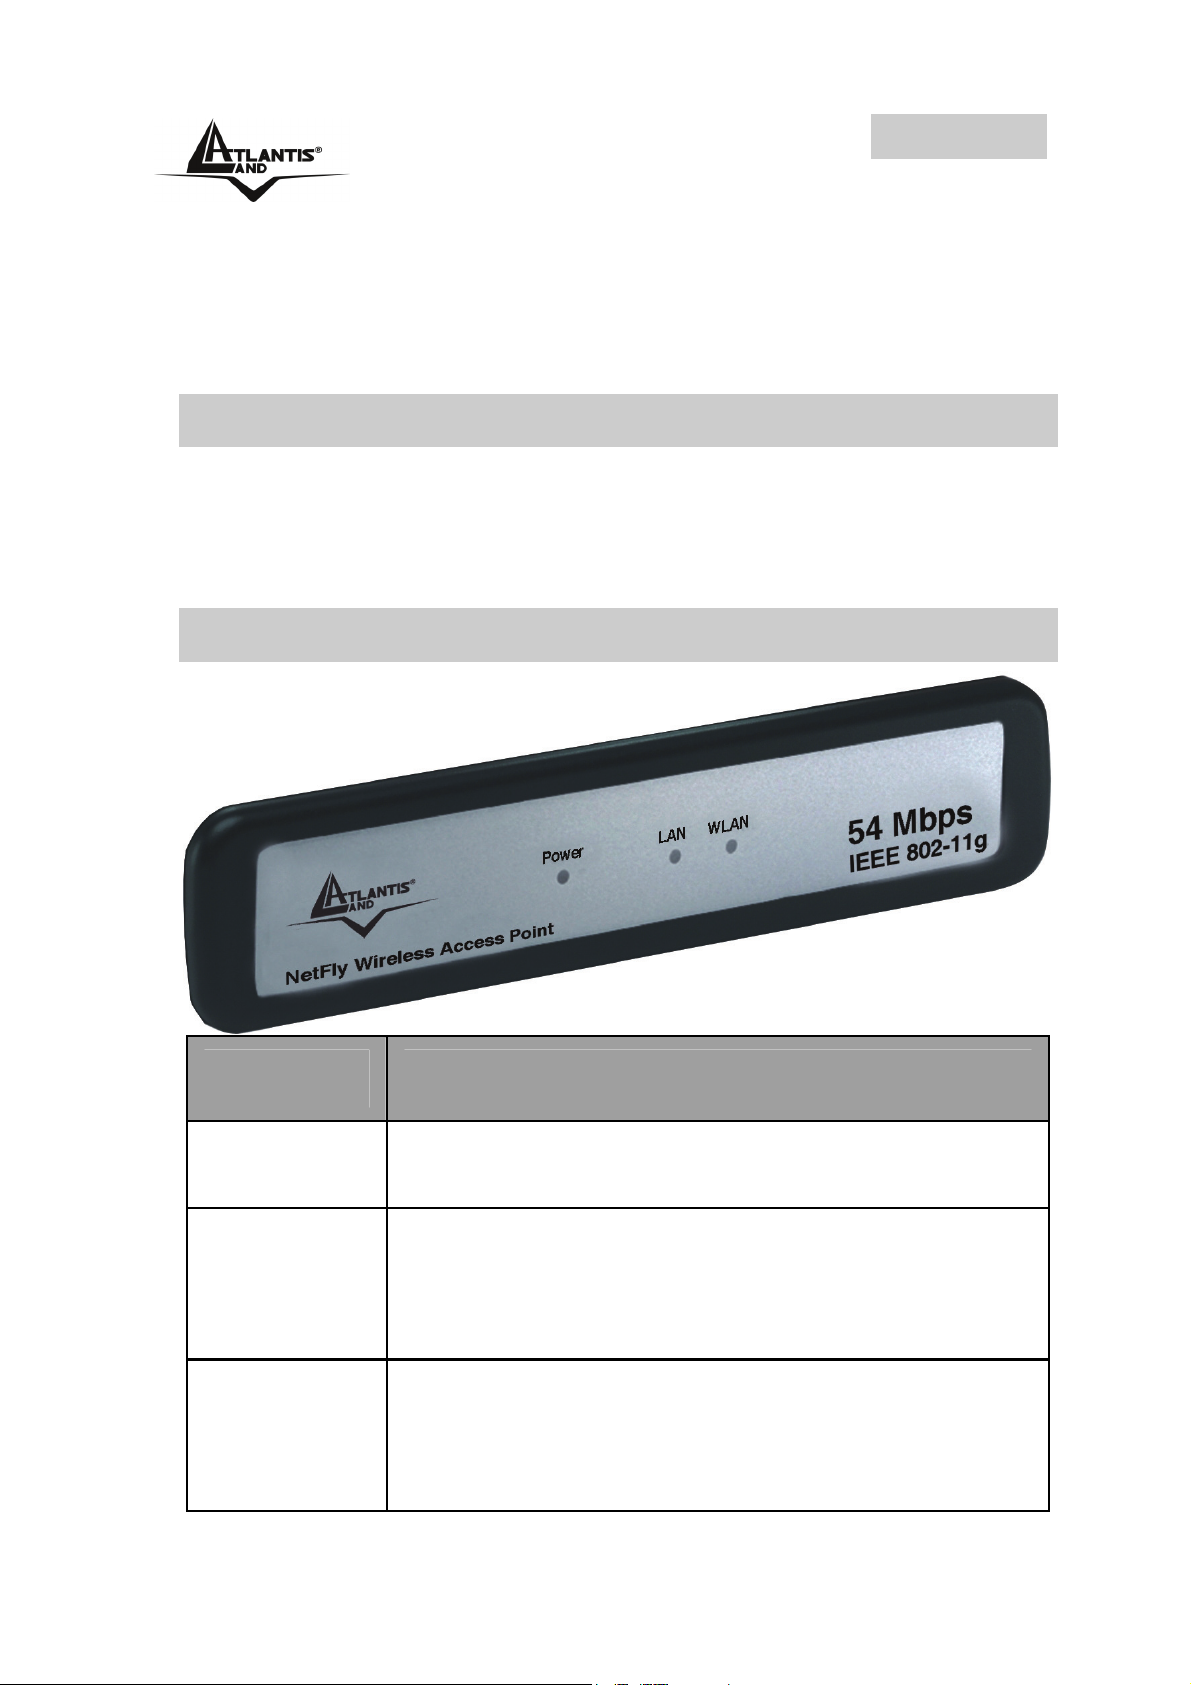
1.2 I LED frontali
LED INFORMAZIONE
Acceso quando connesso alla rete
POWER
elettrica.
Acceso fisso quando il modulo wireless è
correttamente caricato.
WLAN
Lampeggiante quando vi è
trasmissione/ricezione.
Acceso quando connesso ad un dispositivo
Ethernet
LAN
Verde= connessione a 10 o 100Mbps
Lampeggiante quando vi è
7
Page 8
ITALIANO
trasmissione/ricezione.
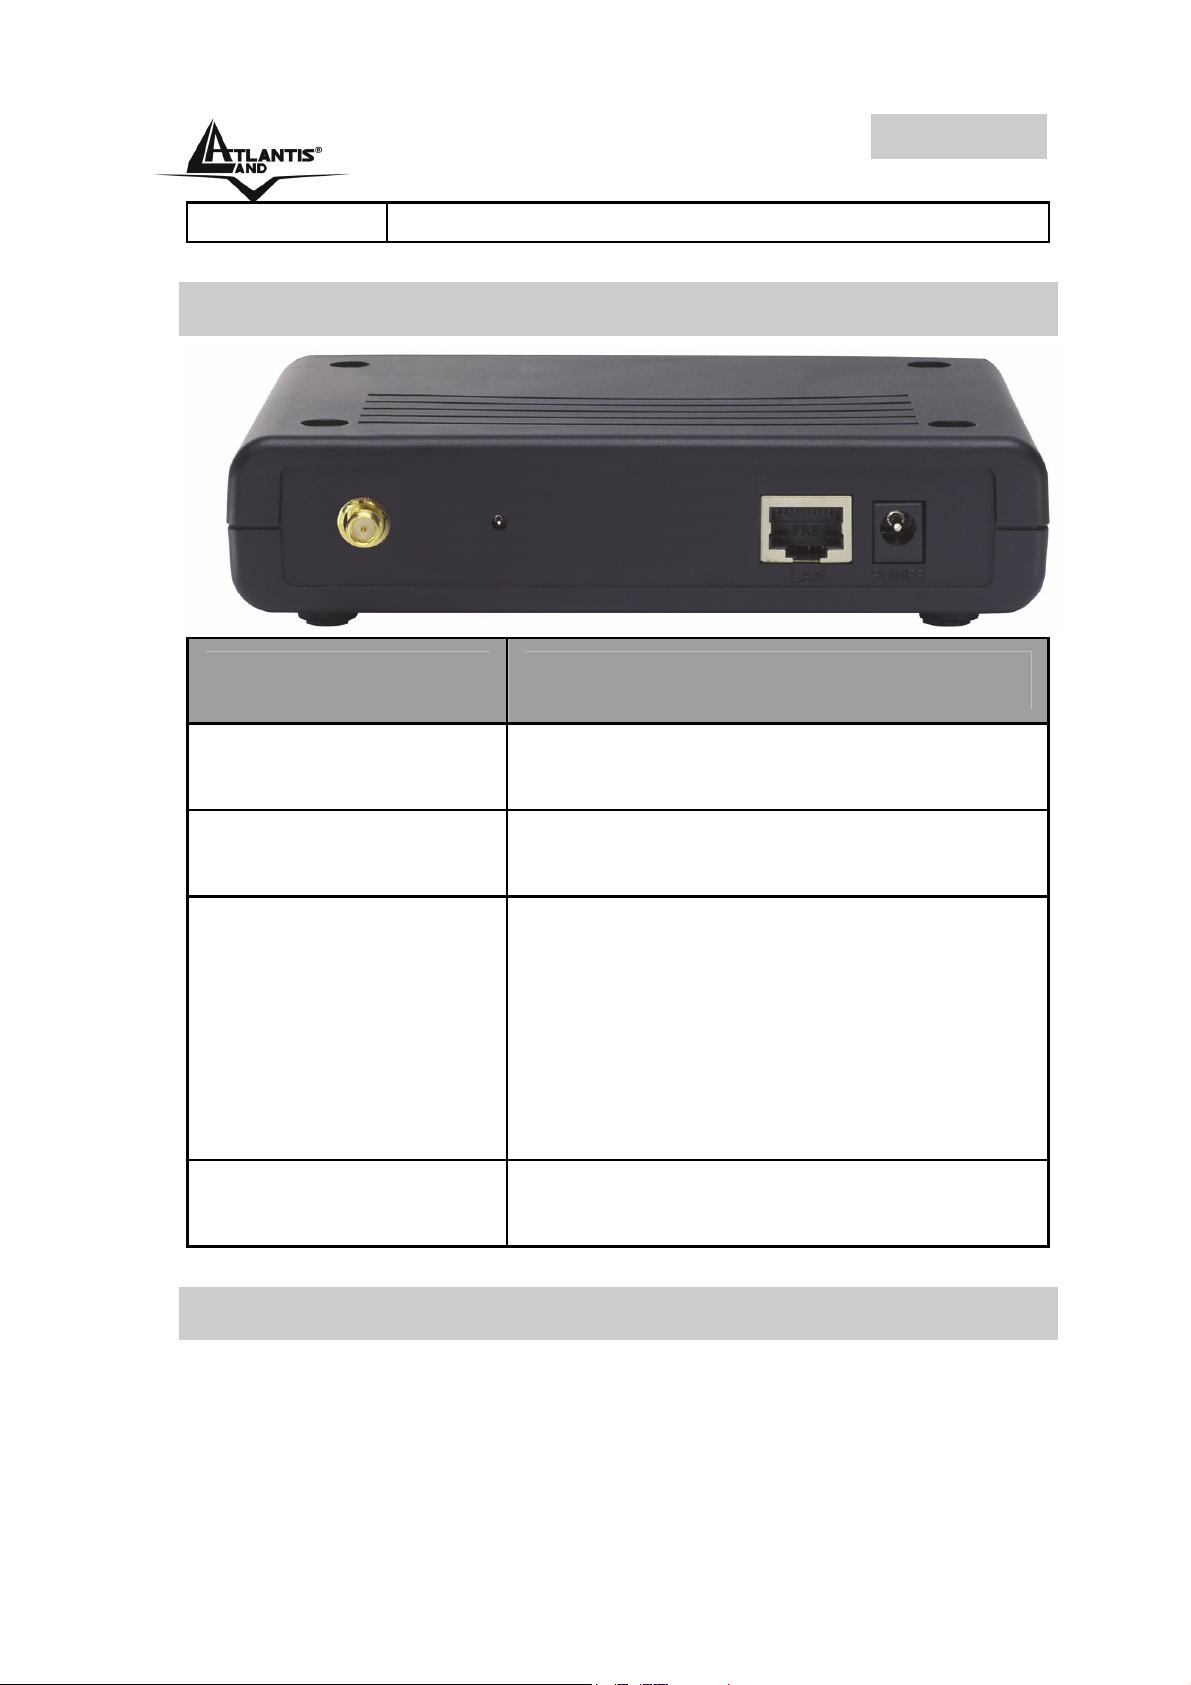
1.3 Le porte posteriori
PORTE UTILIZZO
POWER Jack
LAN
Reset
Reverse SMA
1.4 Cablaggio
Connettere l’alimentatore a questo
jack.
Connettere con un cavo UTP.
Dopo che il dispositivo è acceso,
premere per effettuare il reset per
almeno 5 secondi, rilasciare e
questo punto il bottone. Tutti i LED
si accenderanno e poi il sistema
effettuerà un reboot caricando i
parametri di default.
Collegare l’antenna fornita in
dotazione.
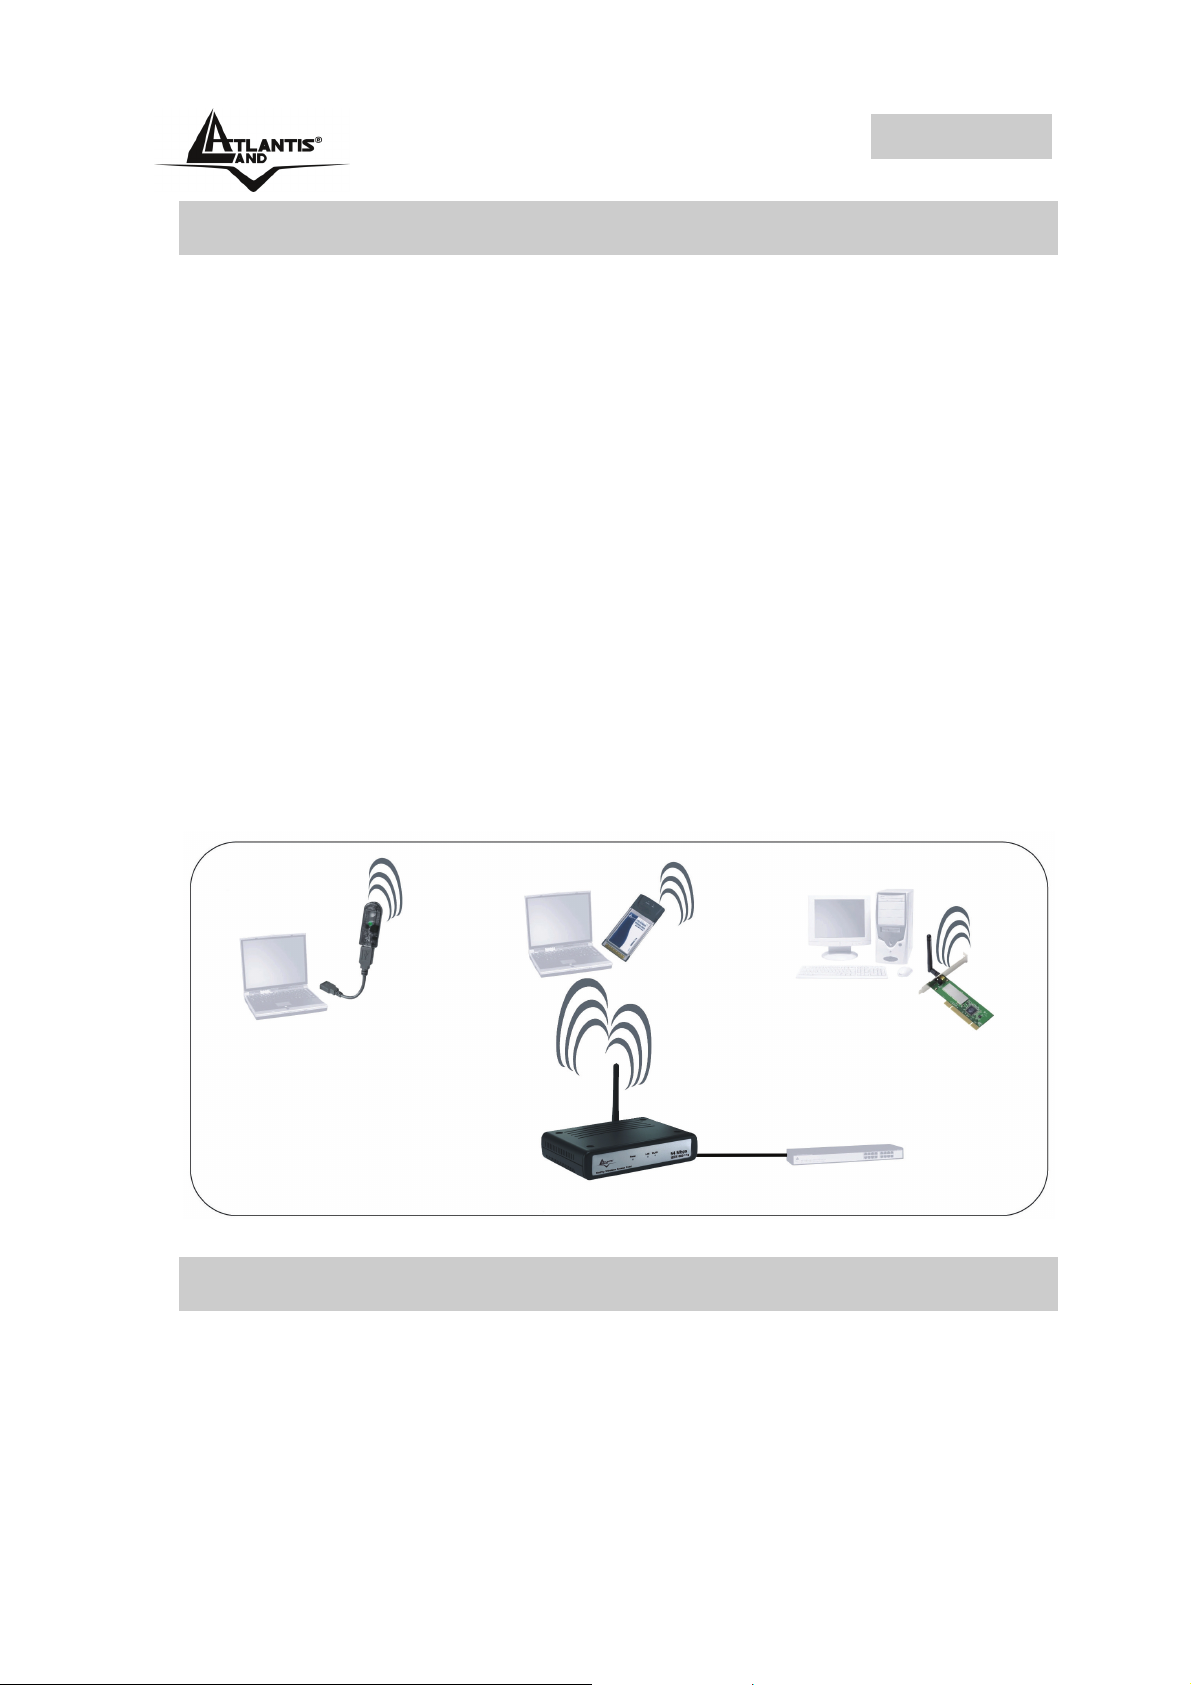
Anzitutto collegare la porta RJ45 alla Lan e collegare
l’alimentatore all’Access Point ed alla presa elettrica. Una
volta effettuati tutti i collegamenti il prodotto effettuerà una
diagnostica la cui durata è di circa una decina di secondi.
8
Page 9
ITALIANO
Terminata questa fase il Led POWER sarà acceso verde
fisso ed il i Led LAN/WLAN saranno accesi (a seconda dei
collegamenti fatti) o lampeggianti .
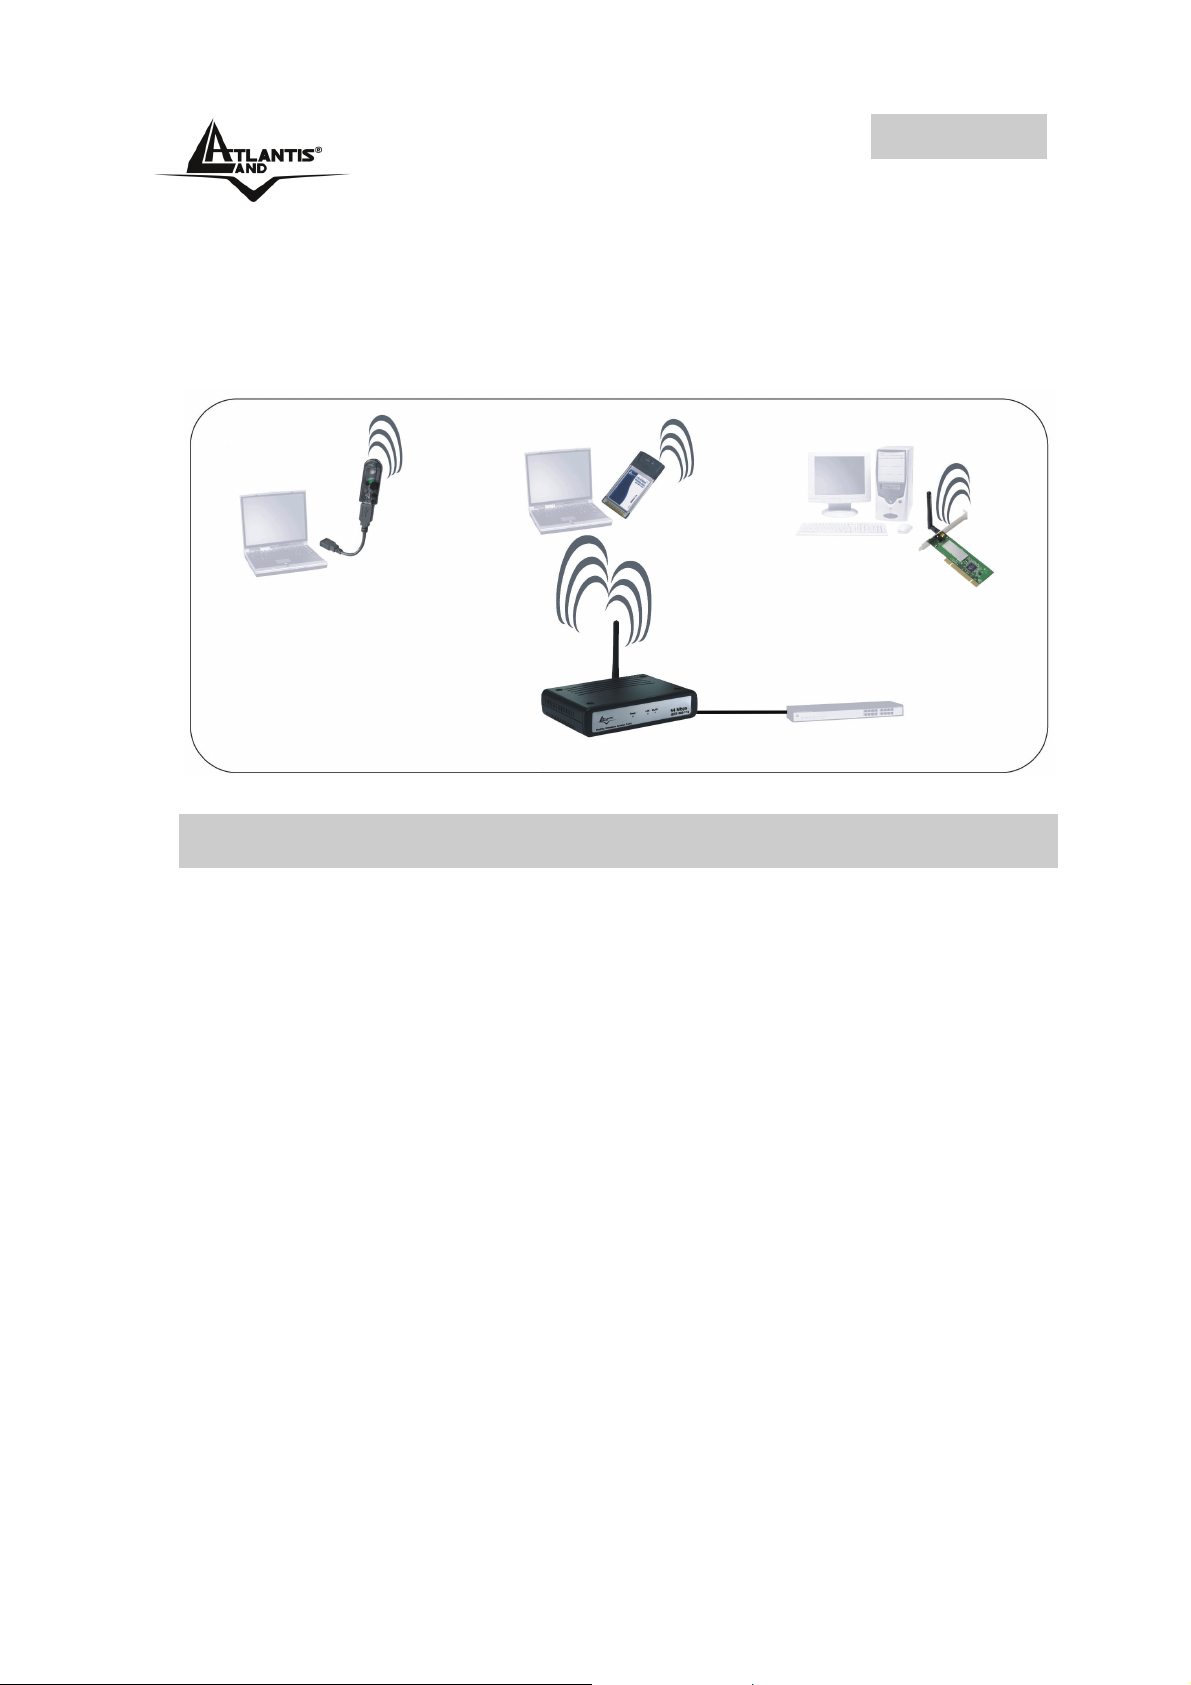
In figura è possibile osservare una tipica installazione
domestica in modalità Access Point.
1.5 Settaggi di Default
Prima di iniziare la configurazione dell’Atlantis Wireless
Multi-Function Access Point è necessario conoscere quali
siano i settaggi di default. Lasciando questi settaggi e
impostando sui PC un idirizzo IP statico privato (come da
istruzioni seguenti) è possibile utilizzare l’Atlantis Wireless
Multi-Function Access Point in pochissimo tempo. L’indirizzo
IP, normalmente appartenente ad una classe privata, deve
stare nella classe 192.168.1.x con Subnet 255.255.255.0.
Anzitutto è necessario preparare i PC inserendovi (qualora
non vi fosse già) la scheda di rete / Adattatore Wireless. E’
necessario poi installare il protocollo TCP/IP. Qualora il
TCP/IP non fosse correttamente configurato, seguire gli
steps successivi. Per una configurazione più dettagliata fare
riferimento al manuale presente sul CD. Le configurazioni di
Default dell’Atlantis Wireless Multi-Function Access Point
sono:
• Username:admin
9
Page 10

ITALIANO
• Password: admin
• Indirizzo IP LAN: (192.168.1.1), Subnet Mask
(255.255.255.0)
• DHCP Server: disabilitato
• SSSID= default, Channel=6, WEP/WAP=disabilitato
1.6 Configurazione di IE
A questo punto è necessario lanciare IE, andare nel menù
strumenti, poi scegliere la sezione Connessioni e spuntare
una delle seguenti voci:
• Non utilizzare mai connessioni remote
• Usa connessione remota se non è disponibile una
connessione di rete
1.7 Configurazione del PC
Configurazione del PC in Windows 95/98/ME
1. Andare in Start/Settings/Control Panel. Cliccare 2
volte su Network e scegliere Configuration.
2. Selezionare TCP/IP->NIC F/E, o qualsiasi Network
Interface Card (NIC) del PC.
3. Cliccare su Properties.
4. Selezionare l’opzione Specify an IP address (dopo
aver scelto IP Address) ed introdurre un indirizzo IP del
tipo 192.168.1.x (X compreso tra 2 e 254 escluso 1 che
è l’IP utilizzato del Wireless Multi-Function AP) e subnet
mask 255.255.255.0.
5. Andare su DNS Configuration.
10
Page 11

ITALIANO
6. Selezionare l’opzione Enable DNS ed introdurre
l’indirizzo IP del server DNS. Premere su OK per
terminare la configurazione.
Riavviare il PC affinché i cambiamenti abbiano effetto.
Configurazione del PC in Windows NT4.0
1. Andare su Start/Settings/ Control Panel. Cliccare per
due volte su Network e poi cliccare su Protocols .
2. Selezionare TCP/IP Protocol e poi cliccare su
Properties.
3. Selezionare l’opzione Specify an IP Address e ed
introdurre un indirizzo IP del tipo 192.168.1.x (X
compreso tra 2 e 254 escluso 1 che è l’IP utilizzato del
Wireless Multi-Function AP)e subnet mask
255.255.255.0. Premere OK per terminare.
Configurazione del PC in Windows 2000
1. Andare su Start/Settings/Control Panel. Cliccare due
volte su Network and Dial-up Connections.
2. Cliccare due volte su Local Area Connection.
3. In Local Area Connection Status cliccare Properties.
4. Selezionare Internet Protocol (TCP/IP) e cliccare su
Properties.
5. Selezionare l’opzione Use the Following IP address ed
introdurre un indirizzo IP del tipo 192.168.1.x (X
compreso tra 2 e 254 escluso 1 che è l’IP utilizzato del
Wireless Multi-Function AP) e subnet mask
255.255.255.0.
11
Page 12
ITALIANO
6. Successivamente scegliere Use the Following DNS
server address (chiedere tale informazione al proprio
ISP) ed introdurre l’indirizo IP dei server DNS.
7. Premere su OK per terminare la configurazione
Configurazione del PC in Windows XP
1. Andare su Start e poi Control Panel. Cliccare due
volte su Network (in Classic View) Connections.
2. Cliccare due volte su Local Area Connection.
3. In Local Area Connection Status cliccare Properties.
4. Selezionare Internet Protocol (TCP/IP) e cliccare su
Properties.
5. Selezionare l’opzione Use the following IP address ed
introdurre un indirizzo IP del tipo 192.168.1.x (X
compreso tra 2 e 254 escluso 1 che è l’IP utilizzato del
Wireless Multi-Function AP) e subnet mask
255.255.255.0.
6. Successivamente Use the following DNS server
addresses (chiedere tale informazione al proprio ISP)
ed introdurre l’indirizzo IP dei server DNS.
7. Premere su OK per terminare la configurazione.
1.8 Configurazione Router
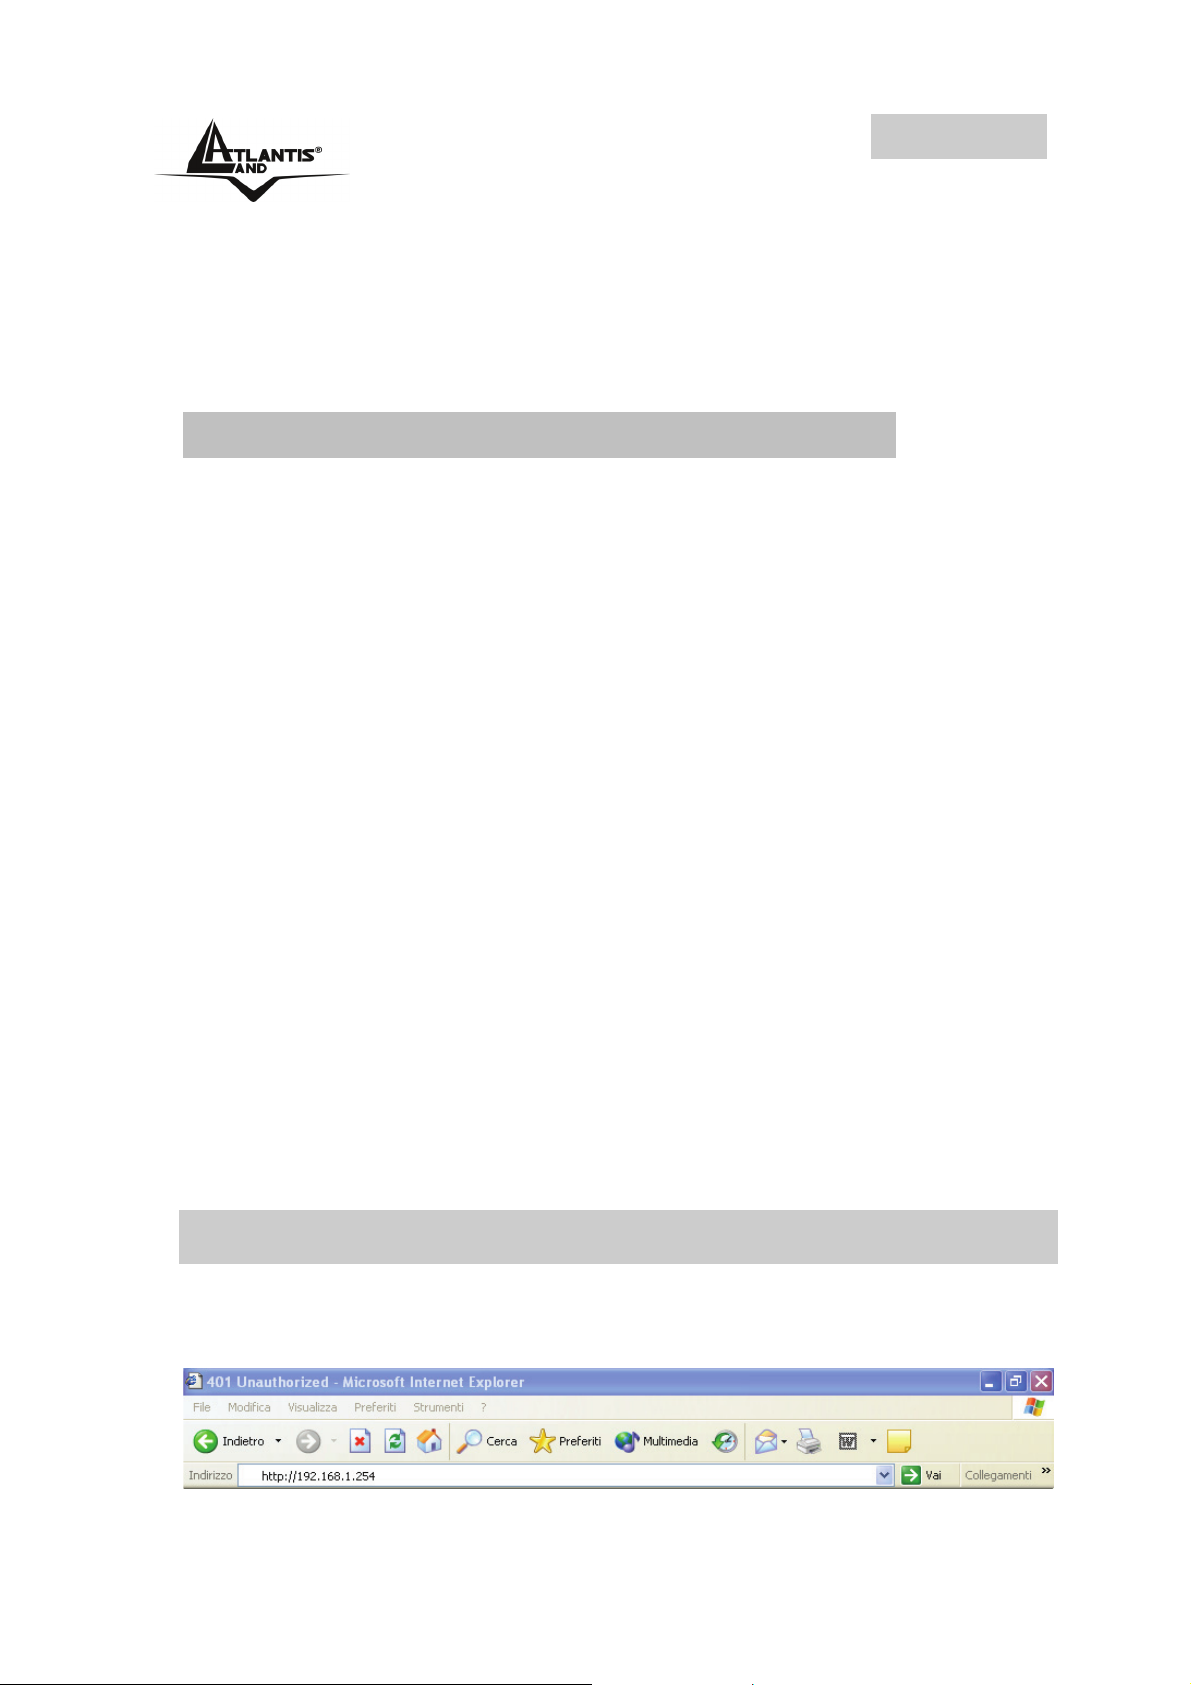
Digitare nel browser web il seguente indirizzo IP:
http://192.168.1.1 e premere il tasto invio.
12
Page 13
ITALIANO
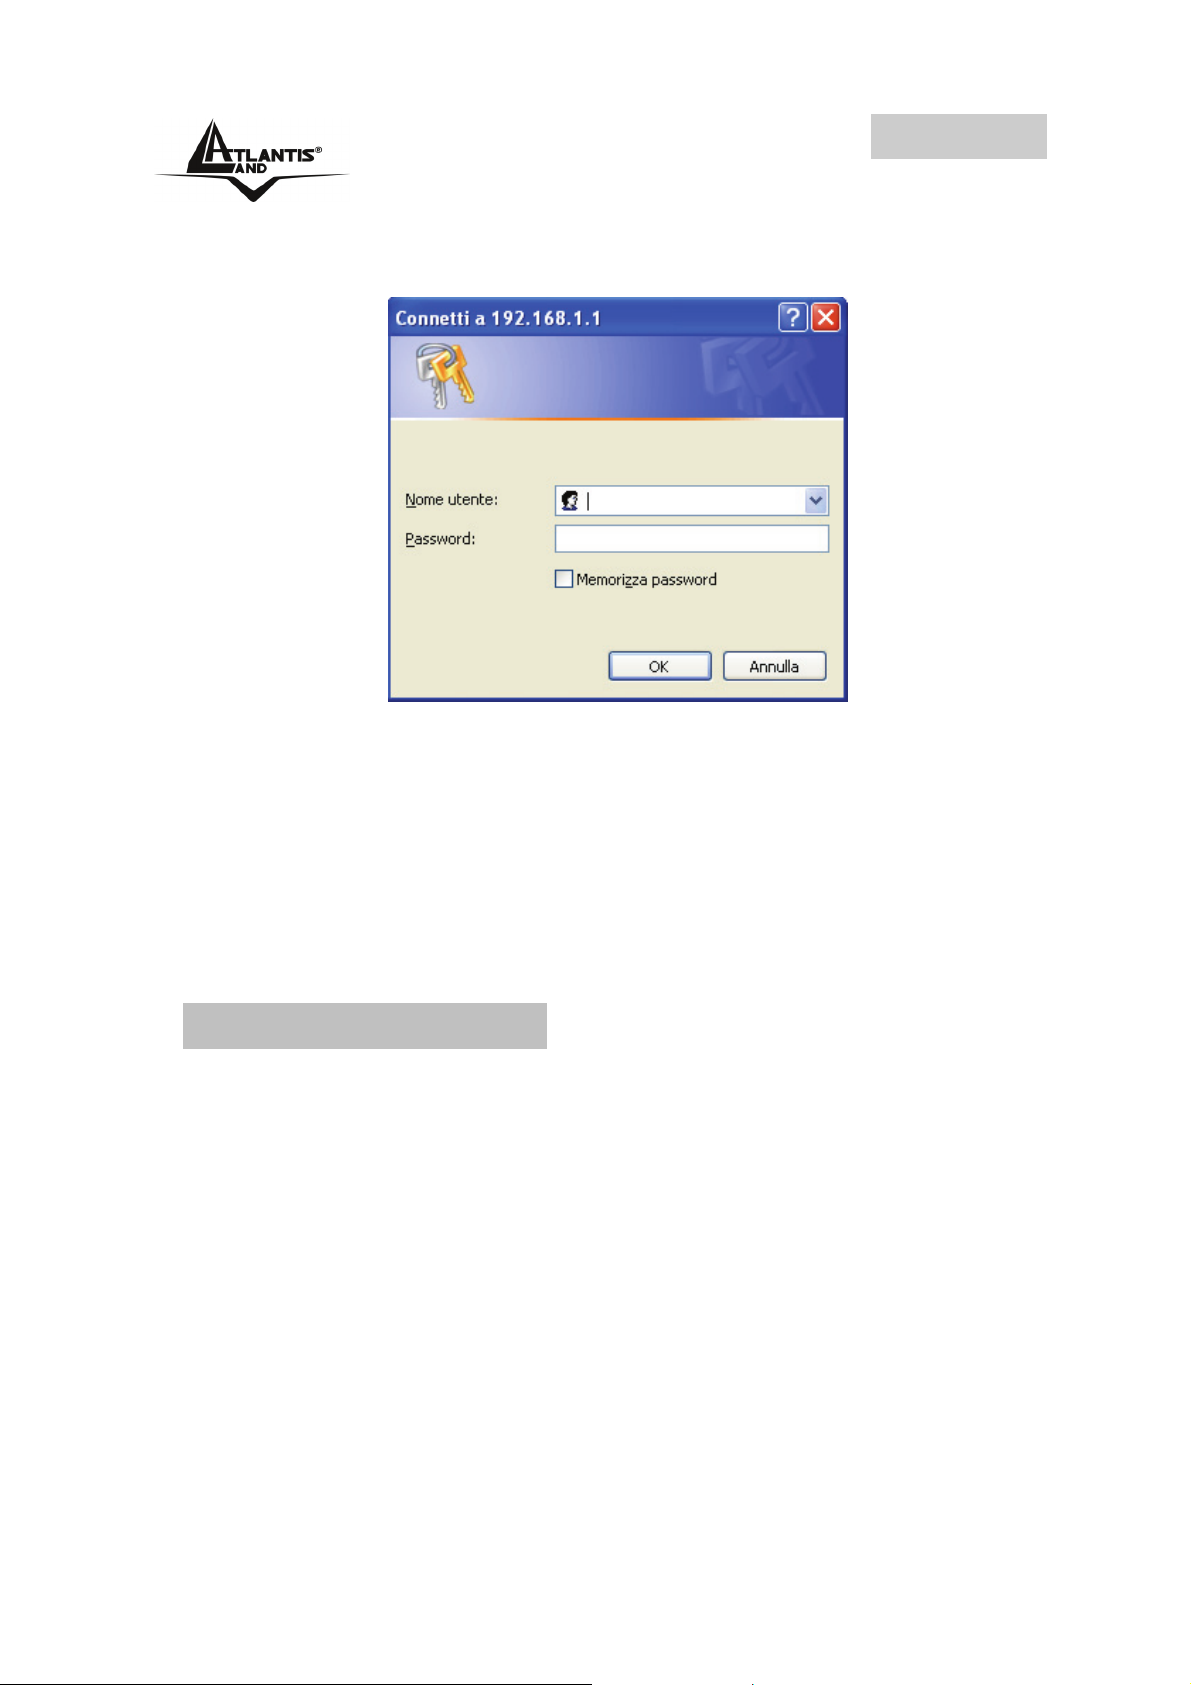
Utilizzare admin (come nome utente) e admin (come
password). Premere OK per continuare.
Apparirà a questo punto la configurazione Wizard che
consente una configurazione guidata dell’apparato.
Chiudendo la Wizard è possibile accedere al Menù
Principale dove è possibile configurare dettagliatamente il
dispositivo (si rimanda al manuale completo presente su
CDRom). Nel caso il Wizard non fosse presente è
sufficiente cliccare sull’apposita voce per avviarlo.
Quick Wizard Setup
Grazie a questo Wizard è possibile configurare il dispositivo
in brevissimo tempo. Apparirà l’immagine di sotto (qualora
non fosse così, cliccare sul bottone Wizard). Cliccare su
Next per proseguire.
13
Page 14

ITALIANO
Step 1: Modifica Password
E’ possibile adesso cambiare la password, cliccare poi su
Next per passare al prossimo step.
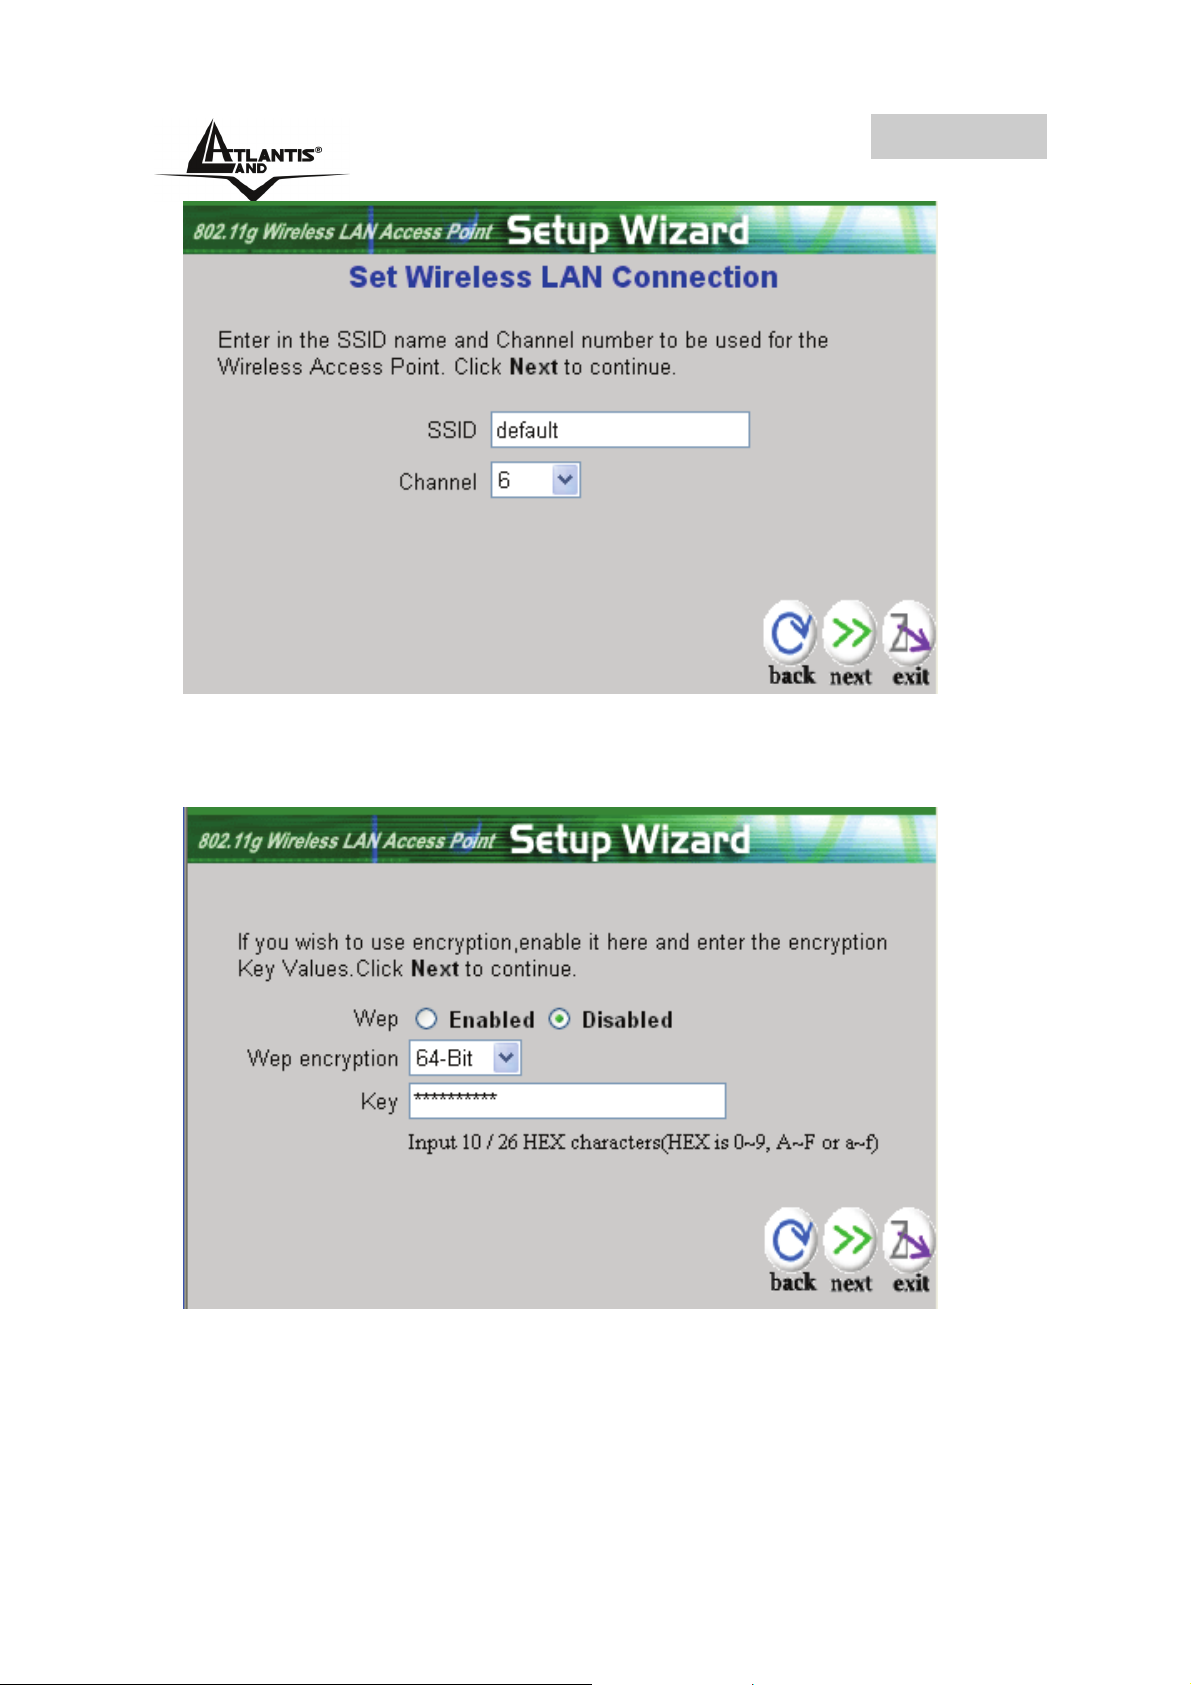
Step 2: Set Wireless LAN connection
Introdurre il valore di SSID (deve essere identico in tutti i
dispositivi) e scegliere il canale su cui opererà il dispositivo.
14
Page 15
ITALIANO
Cliccare poi su Next per passare al prossimo step.
Step 3: Set WEP Encryption
Per abilitare la cifratura WEP spuntare enable, scegliere la
lunghezza della chiave WEP tra 64 e 128 bit ed immettere la
chiave nel campo Key. Cliccare su Next per proseguire.
15
Page 16
ITALIANO
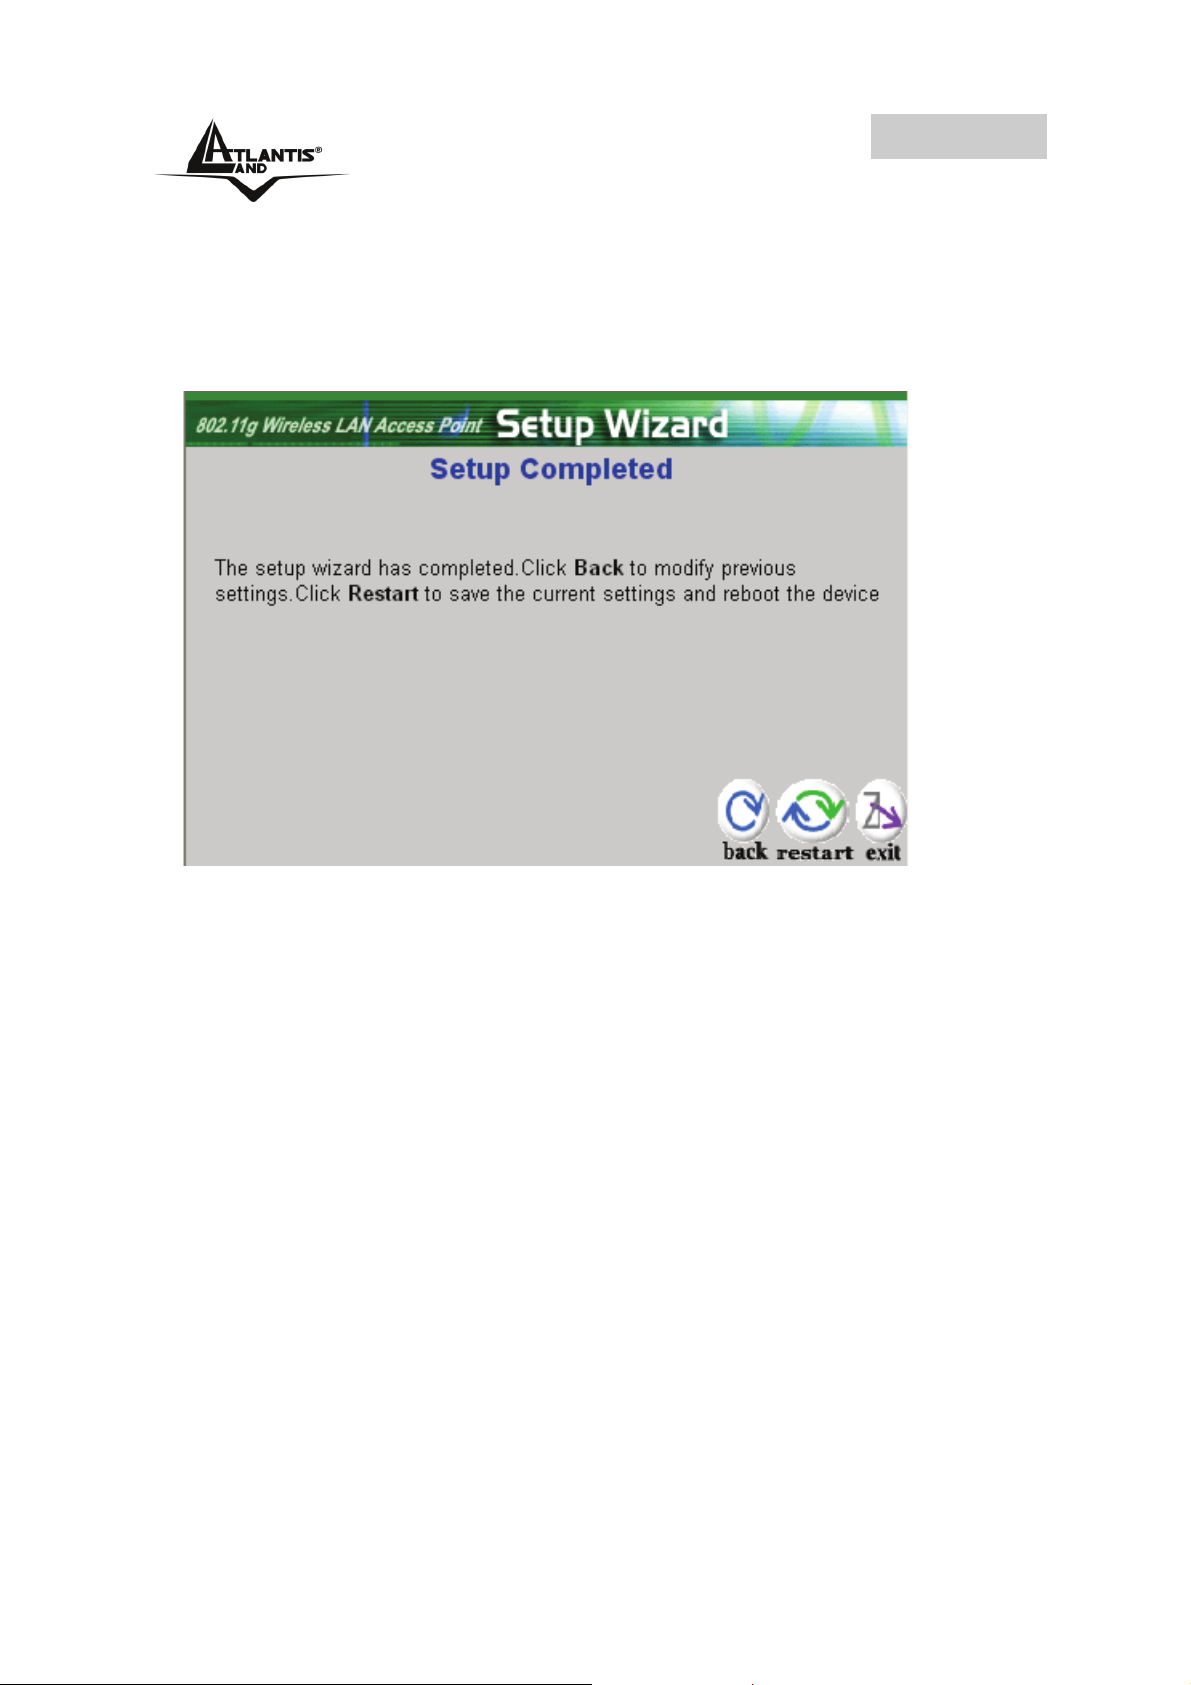
Step 6: Restart
A questo punto la configurazione è terminata, riavviare il
Wireless Multi-Function Access Point premendo su Restart.
Cliccando invece su exit tutti i settaggi impostati non
verranno salvati.
Provare ad effettuare una prova di navigazione.
In caso di problemi fare riferimento al manuale esteso
presente sul CDRom allegato.
16
Page 17
ENGLISH
For more detailed instructions on configuring and using
the Wireless Multi-Function Access Point, please refer
to the online manual.
1.1 Package contents
Atlantis Land WirelessMulti-Function Access Point, CDRom
with manual, Quick Start Guide, External 2 dBi Antenna,
Power Adapter AC-DC (7.5V, 1A).
1.2 The Front Panel LEDs
LED MEANING
This indicator lights green when the hub
POWER
is receives power, otherwise it is off.
This indicator lights green when there
are wireless devices connected and
WLAN
transmitting data to the Wireless Access
Point.
These indicators light green when the
LAN ports were connected successfully.
LAN
These indicators blink green while the
LAN ports were transmitting data.
17
Page 18

ENGLISH
1.3 The Rear Ports
PORT MEANING
Connect the supplied power
POWER Jack
adapter to this jack.
LAN
Reset
Connect an UTP Ethernet cable to
one of the four LAN ports when
connecting to a PC or an
office/home network of 10Mbps or
100Mbps.
After the device has turned on,
press it to reset the device or
restore to factory default settings.
Use a pin-shape item to push to
reset this device to factory default
settings. It will be useful too when
the manager forgot the password
to login, but the setting will be back
to default setting.
Reverse SMA
There is one 2dBi Gain Antenna in
the rear panel for wireless
connection.
18
Page 19
ENGLISH
1.4 Cabling
Connect to the Switch/Hub
1. Plug in one end of the RJ45 network cable to the
Switch/Hub port,
2. Plug in the other end of the RJ45 network cable to
the Wireless Access Point.
Check the installation
The LEDs of the Access Point are clearly visible and the
status of the network link can be seen instantly:
• With the power source on, once the device is
connected, the Power, LAN and WLAN port LEDs
will light up indicating a normal status.
• If the LAN Port’s Link indicator does not light up then
check the RJ-45 cable if it is firmly feed to the RJ45
port, while the LAN is link up to the Switch/Hub, the
LAN port’s LED will light up.
1.5 Default Settings
The Wireless Multi-Function Access Point can be configured
with your Web browser. The web browser is included as a
standard application in following operation systems, UNIX,
Linux, Mac OS, Windows 95/98/NT/2000/Me, etc. The
19
Page 20

ENGLISH
product provides a very easy and user-friendly interface for
configuration.
Before Configuration
This section describes the configuration required by LANattached PCs that communicate with the Wireless MultiFunction Access Point, either to configure the device or for
network access. These PCs must have an Ethernet interface
(or wireless adapter) installed properly, be connected to the
Wireless Multi-Function Access Point either directly or
through an external repeater hub or by wireless, and have
TCP/IP installed and configured with a fixed IP address that
must be in the same subnet of the Wireless Multi-Function
Access Point. The default IP address of the Wireless MultiFunction Access Point is 192.168.1.1 and subnet mask is
255.255.255.0. For example, when the default network
address of the default IP address of the AP is 192.168.1.1,
then the manager PC should be set at 192.168.1.x (where x
is a number between 2 and 254), and the default subnet
mask is 255.255.255.0.
Please follow the steps below for PC’s network environment
installation. First of all, please check your PC’s network
components. The TCP/IP protocol stack and Ethernet
network adapter must be installed. If not, please refer to MS
Windows related manuals.
Before you configure this Wireless Multi-Function Access
Point, you need to know the following default settings:
• Username:admin
• Password:admin
• IP LAN address: (192.168.1.1), Subnet Mask
(255.255.255.0)
• DHCP Server: disable
• SSSID= default, Channel=6, WEP/WAP=disable
20
Page 21

ENGLISH
1.6 IE Configuration
Now open IE, go to Instruments menu, select the
Connections tab and select one of the following options:
• Never use remote connection
• Use remote connection if another network
connection isn’t available
1.7 TCP/IP Configuration
Configuring PC (Windows 95/98/ME)
1. Go to Start / Settings / Control Panel. In the Control
Panel, double-click on Network and choose the
Configuration tab.
2. Select TCP / IP -> NIC Compatible, or the name of
any Network Interface Card (NIC) in your PC.
3. Click Properties.
4. Select the IP Address tab. In this page, click the
Specify an IP address radio button (EG
IP=192.168.1.2 and subnet Mask=255.255.255.0).
5. Then select the DNS Configuration tab.
6. Select the Enable DNS radio button and click OK to
finish the configuration.
Configuring PC (Windows NT4.0)
1. Go to Start / Settings / Control Panel. In the Control
Panel, double-click on Network and choose the
Protocols tab.
21
Page 22

ENGLISH
2. Select TCP/IP Protocol and click Properties.
3. Select the Obtain an IP address from a DHCP
server radio button and click OK.
4. Select the IP Address tab. In this page, click the
Specify an IP address radio button (EG
IP=192.168.1.2 and subnet Mask=255.255.255.0).
Configuring PC (Windows 2000)
1. Go to Start / Settings / Control Panel. In the Control
Panel, double-click on Network and Dial-up
Connections.
2. Double-click LAN Area Connection.
3. In the LAN Area Connection Status window, click
Properties.
4. Select Internet Protocol (TCP/IP) and click
Properties.
5. Select Use the Following IP Address (EG
IP=192.168.1.2 and subnet Mask=255.255.255.0).
6. Click OK to finish the configuration.
Configuring PC (WindowsXP)
1. Go to Start / Control Panel (in Classic View). In the
Control Panel, double-click on Network Connections.
7. Double-click Local Area Connection.
22
Page 23

ENGLISH
2. In the LAN Area Connection Status window, click
Properties.
3. Select Internet Protocol (TCP/IP) and click
Properties.
4. Select the Use the following IP address radio
buttons (EG IP=192.168.1.2 and subnet
Mask=255.255.255.0).
5. Click OK to finish the configuration
1.8 Browser configuration
Open the web browser, enter the local port IP address of this
Wireless Multi-Function Access Point, which default at
192.168.1.1, and click Go to get the login page.
The default username is admin, password admin and click
OK to continue. Click on the desired item to expand the
page with all settings in the main navigation panel.
Following next steps you can make operating Wireless
Multi-Function Access Point in short time using PCs in
DHCP mode. Refer to manual on Installation CD if you
need personalized configuration.
Setup wizard is provided as the part of the web
configuration utility. You can simply follow the step-by-step
process to get your wireless router configuration ready to
run in 6 easy steps by clicking on the Wizard button on the
function menu.
23
Page 24

ENGLISH
Quick Wizard Setup
The following screen will appear. Please click Next to
continue.
Step 1: Set Password
You can change the password as you like and then click
Next to continue.
24
Page 25

ENGLISH
Step 2: Set Wireless LAN connection
Please type the SSID in the text box and select a
communications channel. The SSID and channel must be
the same as wireless devices attempting communication to
the router. Select a channel number and click on Next.
Step 3: Set WEP Encryption
If user wants to enable WEP, please click Enabled. Then,
select the key size of WEP encryption and enter the key
value in the key text box. Please click Next to continue.
25
Page 26

ENGLISH
Step 4: Restart
The Setup wizard is now completed. The new settings will
be effective after the Wireless Multi-Function Access Point
restarted. Please click Restart to reboot the router. If you
do not want to make any changes, please click exit to quit
without any changes. You also can go back to modify the
setting by clicking Back.
26
Page 27

ENGLISH
Then relaunch your Web browser, to link to your favorite
Web site to test your Internet connection.
For additional settings or information, refer to the
Manual located on the CD.
27
Page 28

FRANCAIS
Ce guide d’installation rapide vous permet d’installer et
de configurer le NetFly AP1-54 suivant des paramètres
standards. Pour plus de précisions, tant sur les
méthodes de configuration que sur le paramétrage
avancé, reportez-vous au Manuel sous format
électronique (PDF) disponible sur le CD Rom fourni.
1.1 Contenu de la boîte
Avant l’installation, assurez-vous de disposer des éléments
suivants : Wireless Multi-Function Access Point, adaptateur
secteur (7.5V, 1A), CDRom avec manuels et logiciels
(firmware), Antenne 2 dBi, guide à l'installation.
1.2 Face avant
LED SIGNIFICATION
Allumée quand le Wireless Multi-
POWER
Function Access Point est sous tension.
WLAN
Clignotant vert pour indiquer la
transmission des donnée et allumée
pour indiquer le correct fonctionnement
de module wireless.
28
Page 29

FRANCAIS
Allumée quand le LAN (réseau) est
connecté
LAN
Il clignote lors des transferts de
données.
1.3 Face arrière
PORT USAGE
Connectez l’alimentation fournie à
POWER Jack
LAN
Reset
(remise à zéro)
Reverse SMA
cette prise.
Relier directement avec un câble
Ethernet standard ou croisé aux
PC ou à un port uplink
(Hub/Switch).
Dispositif allumé, presser pour
effectuer le reset ou le restore.
Pressez le reset pour 5s pour
effectuer une remise à zéro du
dispositif.
Il faut connecter l’antenne dans la
boite.
1.4 Câblage
Après avoir terminé le câblage, raccordez l’alimentation pour
mettre le NetFly sous tension. Assurez-vous que les LEDs
29
Page 30

FRANCAIS
sont correctement allumés. Connectez un câble réseau
standard ou croisé pour relier le NetFly rà un Hub/Switch ou
aux PC. L’interface Wireless intégrée permet aux
utilisateurs dotés d’interfaces wireless d’aller sur Internet en
utilisant le protocole IEEE802.11b ou IEEE802.11g. Une
fois toutes les liaisons effectuées et le Wireless MultiFunction Access Point effectuera un diagnostique (d'une
soixantaine de secondes). Quand cette étape sera terminée
les LED POWER,WLAN (LAN si est connectée) seront fixes,
ce qui signifie que le produit fonctionne correctement.
En illustration il est possible d'observer une installation
domestique typique.
1.5 Configuration initiale
Avant de commencer la configuration du Wireless MultiFunction Access Point il est nécessaire de connaître la
configuration initiale (paramètres par défaut).
Pour pouvoir utiliser le Wireless Multi-Function Access Point
en peu de temps, il suffit de garder la configuration par
défaut, de mettre les PC avec une adresse IP. Tous les
ordinateurs doivent avoir une carte réseau Ethernet ou
Wireless installée correctement et être connectés à
l’appareil directement (sur câble à travers un Hub/Switch ou
en wireless). Ils doivent avoir le protocole TCP/IP installé et
30
Page 31

FRANCAIS
correctement configuré avec une adresse IP qui doit rester
dans le même sous réseau. L’adresse IP par défaut est
192.168.1.1 et le masque de sous réseau 255.255.255.0.
Pour une configuration plus détaillée faire référence au
manuel complet sur le CD-Rom.
La configuration initiale (paramètres par défaut) est:
• User : admin
• Password : admin
• Adresse LAN IP: (192.168.1.1), Subnet Mask
(Masque de sous réseau)=255.255.255.0
• DHCP (Fonction serveur DHCP) : Desactivée
SSSID= default, Channel=6, WEP/WAP=non
•
activé
1.6 Configuration du TCP/IP
Configuration sous Windows 95/98/ME
1. Allez dans Panneau de Configuration. Double-
cliquez sur Réseau.et enfin affichez l’onglet
Configuration.
2. Sélectionnez le protocole TCP/IP ->
NIC carte, ou quelconque carte réseau Ethernet dans
le PC.
3. Cliquez sur Propriétés
4. Dans l’onglet Adresse IP Sélectionnez l’option
Specify an IP address et introduisez 192.168.1.2 (IP)
et subnet 255.255.255.0 (Subnet Mask).
5. Sélectionnez l’onglet DNS.
31
Page 32

FRANCAIS
6. Sélectionnez l’option Activer DNS et cliquez sur OK
pour terminer la configuration. Vous devez redémarrer
l’ordinateur pour que les changements prennent effet.
Configuration sous Windows NT4.0
1. Allez au Panneau de Configuration. Double-cliquez
sur Réseau et enfin sélectionnez l’onglet Protocole .
2. Sélectionnez TCP/IP Protocol et après cliquez sur
Propriétés.
3. Sélectionnez (votre carte Réseau) l’onglet Specify
an IP address et après cliquez et introduisez
192.168.1.2 (IP) et subnet 255.255.255.0 (Subnet
Mask).
Configuration sous Windows 2000
1. Allez au Panneau de Configuration. Double-cliquez
sur Connexions Réseau et accès à distance..
2. Double-cliquez sur connexion au réseau local.
3. Dans Connexion au réseau local cliquez sur
Propriétés.
4. Sélectionnez Internet Protocol (TCP/IP) et cliquez
sur Propriétés.
5. Sous l’onglet Général, sélectionnez l’onglet Use the
following IP address et après cliquez et introduisez
192.168.1.2 (IP) et subnet 255.255.255.0 (Subnet
Mask).
6. Cliquez sur OK pour terminer la configuration.
32
Page 33

FRANCAIS
Configuration sous Windows XP
1. Allez sur Panneau de Configuration. Double-cliquez
sur Accès Réseau.
2. Double-cliquez sur Connexion au Réseau local.
3. Cliquez Propriétés.
4. Sélectionnez Internet Protocol (TCP/IP) et cliquez
sur Properties.
5. Sélectionnez Utiliser l’adresse IP suivante
(192.168.1.2) et et 255.255.255.0 (masque de sous
réseau).
6. Cliquez sur OK pour terminer la configuration.
1.7 Vérification
Pour vérifier le succès de la configuration (après avoir
redémarré le PC, opération nécessaire sous Win98, SE,
ME) utiliser le PING. Dans la fenêtre Dos écrivez: PING
192.168.1.1.
Si le message suivant apparaît:
Pinging 192.168.1.1 with 32 bytes of date:
Reply from 192.168.1.1: bytes=32 times <10ms TTL=64
Reply from 192.168.1.1: bytes=32 times <10ms TTL=64
Reply from 192.168.1.1: bytes=32 times <10ms TTL=64
Vous pouvez procéder en allant au point suivant. Si par
contre le message suivant apparaît:
Pinging 192.168.1.1 with 32 bytes of date:
Request timed out.
Request timed out.
Request timed out.
Vérifiez que le Led LAN est bien allumé.
33
Page 34

FRANCAIS
Vérifiez l'adresse de votre PC en écrivant WINIPCFG (pour,
Win95,98,ME) ou IPCONFIG (pour Win2000, XP) et
éventuellement réinstallez le stack TCP/IP.
1.8 Configuration avec le Browser
Pour accéder à l’interface Web, lancez un navigateur
Internet et tapez dans la barre adresse l’IP suivante :
http://192.168.1.1
Un mot de passe vous est demandé, pour la première
connexion. Nom d’Utilisateur (User) = admin et Mot de
Passe (Password) = admin et appuyez sur OK pour aller
dans la configuration.
Il apparaîtra à ce point le Menu Principal.
Dans la partie gauche on pourra accéder, à toutes les
sections disponibles.
En suivant les indications ci-dessous il est possible de
rendre opérationnel le Wireless Multi-Function Access Point
en peu de temps à condition d'utiliser les PC du réseau
comme client DHCP. Pour une configuration personnalisée
du réseau et du Router faire référence au manuel complet
dans le CD Rom.
Apparaîtra à ce point la configuration Wizard (s'il ne part pas
automatiquement cliquer sur le bouton Wizard ) qui vous
permettra une configuration guidée de l’apparat. En fermant
la Wizard vous irez dans le Menu Principal et vous pourrez
configurer en détail le dispositif (on renvoie au manuel
complet présent sur CDRom).
34
Page 35

FRANCAIS
Quick Wizard Setup
Grâce à cet Wizard vous pourrez configurer le dispositif en
très peu de temp. Vous devrez voir l’image en bas (dans le
cas que n’est pas comme ça, cliquez sur le bouton Wizard).
Cliquez sur Next pour continuer.
Step 1: Modification du mot de passe
Vous pouvez maintenant changer le mot de passe, cliquez
puis sur Next pour passer au prochaine pas.
35
Page 36

FRANCAIS
Step 2: Set Wireless LAN connection
Introduisez la valeur de SSID (il doit être identique en tous
les dispositifs)dans le champ du texte et sélectionnez le
canal de communication. Le canal SSID doit être le même
que celui des apparats wireless qui essayent la
communication avec le router.
Cliquez puis sur Next pour passer au prochaine pas.
36
Page 37

FRANCAIS
Step 3: Set WEP Encryption
Dans cette section, vous pourrez configurer le type
d’authentification entre les appareils afin d’obtenir une
communication sans fil sécurisée. Sélectionnez enable et
après le nombre de bits utilisé pour la clé (64 ou 128 la plus
sécurisante) Introduisez manuellement la clé puis cliquez
sur Next pour passer au prochaine pas.
Step 4: Restart
À ce point la configuration est terminée, redémarrez les
Router en appuyant sur Restart. En cliquant par contre
sur exit vous effacerez toutes les positions faites.
37
Page 38

FRANCAIS
En exécutant maintenant le browser vous devriez être
capables d’aller sur internet. Pour problèmes faire
référence au manuel complet.
38
Page 39

FRANCAIS
39
Page 40

DEUTSCH
Das ist ein Handbuch,das wie eine kurze Anleitung
ausgedacht wird, deshalb nehmen Sie Bezug auf das
vollig Hanbuch, das im CD ist,wenn Sie weitere
Einzelheiten uber die Konfiguration brauchen.
1.1 Inhalt der Verpackung
Atlantis Land WirelessMulti-Function Access Point, CDRom
der das Handbuch enthalt, Quick Start Anleitung, Antenna
2 dBi, Speiseleitung (7.5V, 1A).
1.2 Die frontalen LED
LED INFORMATION
Fest eingeschaltet,wenn es zum
POWER
Elektrizitatsnetz verbunden ist
Grün blitzende, um die Verlegung der
Daten zu zeigen. Fest grün eingeschaltet,
WLAN
um die richtige Arbeiweise des wireless
Modul zu zeigen.
Es ist eingeschaltet,wenn es zu einer
Ethernet Vorrichtung verbunden ist
LAN
Grun= Verbindung zu 100Mbps/10Mbps.
Es blitzt, wenn es Ubersendung/Empfang
40
Page 41

DEUTSCH
gibt
1.3 Die Hinterturen
TUREN BENUTZUNG
Verbinden Sie den Speiser mit
POWER Jack
LAN Verbinden Sie mit einem UTP
Reset
Reverse SMA Es ist notwendig, die verhaltene
diesem jack.
Kabel.
Nachdem die Vorrichtung
eingeschaltet ist,drucken Sie auf
die Taste,um der reset oder der
restore zu machen.
Antenne mit der Schachtel zu
verbinden
1.4 Verdrahtung
Zunächst müssen Sie die PC Ihres Lan oder die Switch den
Türen RJ45 verbinden. Endlich verbinden Sie den Speiser
dem Router und der Steckdose. Wenn Sie alle
Verbindungen gemacht haben, wird das Produkt eine
Diagnose, die etwa zen Sekunden dauert, machen. Wenn
41
Page 42

DEUTSCH
dieses Phase beendet ist, wird der Led POWER fest grün
eingeschaltet sein um die die korrekte Arbeitsweise des
Produkt zu bezeichnen. Die Led LAN/WLAN söllten
eingeschaltet (nach den gemachten Verbindungen) oder
blitzende sein.
1.5 Einstellung des Default
Bevor Sie die Konfiguration des Atlantis Wireless MultiFunction Access Point beginnen,ist es notwendig,dass sie
die Einstellung des Default kennen.
Indem Sie diese Einstellung aufheben und die PC als client
DHCP (wie als die folgende Anleitungen) einstellen und
endlich die Verbindung zum ISP,(das wird alle Parameter
des Falls sagen) darstellen,konnen Sie schnell den Atlantis
Wireless Multi-Function Access Point benutzen. Fur eine
eingehende Konfiguration,nehmen Sie Bezug auf den
Handbuch,das im CD findet.
Die Konfigurationen des Default des Atlantis Wireless MultiFunction Access Point sind:
• Username:admin
• Password:admin
• Adresse LAN IP: (192.168.1.1), Subnet Mask
(255.255.255.0)
• DHCP Server staatlich: unfähig
42
Page 43

DEUTSCH
• SSSID= default, Channel=6, WEP/WAP=unfähig
1.6 Die IE Konfiguration
Jeztz ist es notwendig,IE einzufuhren, in Menu Instrument
zu gehen, dann der tab Verbindungen wahlen und eine der
folgende Stimmen zu wahlen:
• Benutzen Sie nie remote Verbindung
• Benutzen Sie remote Verbindung, wenn es keine
netz Verbindung disponibel ist.
1.7 Konfiguration des PC
Konfiguration des PC in Windows 95/98/ME
1. Gehen Sie in Start/Settings/Control Panel. Drucken
Sie zweimal auf Networ und wahlen Sie
Configuration.
2. Wahlen Sie TCP/IP ->
NIC Compatible,oder irgendein Network Interface
Card (NIC) des PC.
3. Drucken Sie auf Properties.
4. Wahlen Sie die Option Obtain an IP address
automatically (nachdem Sie IP Address gewahlt
haben).
5. Gehen Sie auf DNS Configuration.
6. Wahlen Sie die Option Disable DNS und drucken Sie
auf OK, um die Konfiguration zu enden.
Leiten Sie wieder den PC,damit die Anderung
geschehen.
43
Page 44

DEUTSCH
Konfiguration des PC in Windows NT4.0
1. Gehen Sie auf Start/Settings/ Control Panel.
Drucken Sie zweimal auf Network und dann auf
Protocols .
2. Wahlen Sie TCP/IP Protocol dann drucken Sie auf
Properties.
3. Wahlen Sie den Option Obtain an IP address from a
DHCP server und drucken Sie auf OK
Konfiguration des PC in Windows 2000
1. Gehen Sie auf Start/Settings/Control Panel. Drucken
Sie zweimal auf Network and Dial-up Connections.
2. Drucken Sie zweimal auf Local Area Connection.
3. In Local Area Connection Status drucken Sie auf
Properties.
4. Wahlen Sie Internet Protocol (TCP/IP) und drucken
Sie auf Properties.
5. Wahlen Sie die Option Obtain an IP address
automaticall und spater Obtain DNS server
address automatically.
6. Drucken Sie auf OK,um die Konfiguration zu enden.
44
Page 45

DEUTSCH
Konfiguration des PC in Windows XP
1. Gehen Sie auf Start dann auf Control Panel.
Drucken Sie zweimal auf Network (in Classic View)
Connections.
2. Drucken Sie zweimal auf Local Area Connection.
3. In Local Area Connection Status drucken Sie auf
Properties.
4. Wahlen Sie Internet Protocol (TCP/IP) und drucken
Sie auf Properties.
5. Wahlen Sie die Option Obtain an IP address
automatically und spater Obtain DNS server
address automatically .
6. Drucken Sie auf OK,um die Konfiguration zu enden..
1.8 Konfiguration des Router
Mit dem browser web, kommen Sie in den folgenden IP
Adresse (wo man den URL steckt)dessen default ist:
192.168.1.1,und drucken Sie die Taste Ubersendung.
Benutzen Sie admin (als user name) und admin (als
password). Drucken Sie OK, um weiter zu gehen.
Jetzt wird die Wizard Konfiguration, die Ihnen eine geleitet
Konfiguration des Apparat erlaubt, erscheinen. Schliessen
Sie den Wizard und gehen Sie in den Hauptmenu, Sie
können eingehend die Vorrichtung gestalten (verweisen Sie
auf das ganze Handbuch auf der CDRom).
45
Page 46

DEUTSCH
Quick Wizard Setup
Dank dieses Wizard, können Sie im kurzen Zeit die
Vorrichtung gestalten. Sie söllten das Bild hierunter (wenn
es nicht so ist, drücken Sie auf die Taste Wizard). Drücken
Sie auf Next um weiter zu gehen.
Step 1: Password Änderung
Jetzt können Sie die password ändern, drücken Sie dann
auf Next um in den nächste step zu gehen.
46
Page 47

DEUTSCH
Step 2: Set Wireless LAN connection
Führen Sie das SSID Wert ein (es muss identisch in alle
Vorrichtungen sein) um wireless LAN zu befähigen.
Wenn Sie die wireless LAN befähigen, schreiben Sie das
SSID in den text box und wählen Sie ein
Mitteilungskanal. Das SSID und der Kanal müssen
dieselbe als wireless device sein, wenn Sie Mitteilung mit
dem Router suchen
47
Page 48

DEUTSCH
Step 3: Restart
Jetzt ist die Konfiguration beendet, leiten Sie den Router
wieder, indem Sie auf Restart drücken. Statt, wenn Sie auf
exit drücken, werden Sie alle angelegte Einstellungen
auslöschen.
48
Page 49

DEUTSCH
49
Page 50

ESPAÑOL
Este manual es una guía rápida, para los detalles relativos
a la configuración personalizada puede acudir al manual
completo que se encuentra en el CD.
1.1 Contenido de la caja
Atlantis Land Punto de Acesso Inalámbrico Multifunción,
CD-Rom con el manual, guía rápida, Antena externa de 2
dBi, Alimentador (7,5V y 1A).
1.2 Los LED frontales
LED DETALLE
La luz se enciende de forma permanente
POWER
WLAN
LAN
cuando el aparato está conectado a la red
eléctrica.
Encendido de forma fija cuando ha terminado
de cargar el módulo inalámbrico.
Intermitente cuando hay transmisión/
recepción de datos.
Encendido de forma fija cuando está
conectado a un dispositivo Ethernet
100Mbps/10Mbps.
Intermitente cuando hay transmisión/
50
Page 51

ESPAÑOL
recepción de datos.
1.3 Los puertos posteriores
Puertas Utilizaciòn
POWER Jack
LAN
Reset
Conector para el transformador.
Conectar un cable Ethernet
En el caso de que necesitara
reiniciar el dispositivo, y una vez
que se ha encendido, presione con
un clip, o similar, el botón durante
al menos 5 segundos. Una vez que
haya hecho esto, todas las luces
del panel se encenderán, después
de lo cual el sistema se reiniciará
con la configuración de fábrica.
Reverse SMA
Enrosque la antena removible
(incluida) al conector.
51
Page 52

ESPAÑOL
1.4 Cableado
En primer lugar conecte el puerto RJ45 a la red y enchufe el
transformador del Punto de Acceso a la red eléctrica. Una
vez efectuadas las conexiones el dispositivo efectuará un
diagnóstico interno de aproximadamente 10 segundos,
después de lo cual el LED POWER se encenderá verde fijo
y el LED LAN/ WLAN verde fijo o parpadeante según el tipo
de conexión.
En la figura se detalla una instalación típica en modalidad
Punto de Acceso.
1.5 Configuración de fábrica
Antes de comenzar con la configuración del Atlantis
Wireless Access Point es importante conocer la
configuración de fábrica, ya que esta nos puede servir en un
futuro como referencia. Utilizando los valores de fábrica del
Punto de Acceso, configurando el ordenador con un IP
estático (como se indica más abajo) y utilizando los datos
suministrados por su proveedor de internet es posible
comenzar a navegar rapidamente con el Atlantis Wireless
Access Point. Si necesita realizar una configuración más
detallada, consulte el manual incluído en el CD.
52
Page 53

ESPAÑOL
La configuración de fábrica del Atlantis Wireless Access
Point es como sigue:
• Password:admin
• Userneme:admin
• Dirección LAN IP (192.168.1.1), Máscara de red
(255.255.255.0)
• DHCP Server: Deshabilitado
• SSSID= default, Channel=6, WEP/WAP=
Deshabilitado
1.6 Configuración de Internet Explorer
Abra Internet Explorer. En el menú Herramientas
seleccione Opciones de Internet y active una de las
siguientes casillas:
• No marcar una conexión nunca
• Marcar cuando no esté conectado a la red.
1.7 Configuración del PC
Configuración del PC en Windows 95/98/ME
1. Vaya a Inicio/Configuración/Panel de Control y haga
doble clic sobre sobre el icono de Red.
2. Bajo la pestaña de Configuración elija el protocolo
TCP/IP.
3. Pulse el botón de Propiedades.
4. Seleccione Especificar una dirección IP e introduzca
una dirección IP dentro de la clase 192.168.1.X del
Punto de Acceso, el cual viene configurado de fábrica
con la IP 192.168.1.1. Por ejemplo, en Dirección IP
introduzca 192.168.1.2 y como Máscara de subred
53
Page 54

ESPAÑOL
255.255.255.0. Asegúrese que esta dirección IP no se
este utilizando en la red ya que entraría en conflicto con
esta..
5. Pinche sobre la pestaña Puerta de enlace e introduzca
la IP del router de su red o la que le haya dado su
proveedor
6. Pinche sobre la lengüeta Configuración DNS.
7. Active la opción Activar DNS e introduzca las
direcciones IP que le haya facilitado su proveedor
internet. Finalmente, pulse el botón de Aceptar para
aplicar los cambios.
8. Reinicie el ordenador para que los cambios surtan
efecto.
Configuración del PC en Windows NT 4.0
1. Vaya a Inicio/Configuración/Panel de Control, haga
doble clic sobre sobre el icono de Red y seleccione
Protocolos.
2. Seleccione el protocolo TCP/IP, pulsando a
continuación el botón de Propiedades.
3. Seleccione Especificar una dirección IP e introduzca
una dirección IP dentro de la clase 192.168.1.X del
Punto de Acceso, el cual viene configurado de fábrica
con la IP 192.168.1.1. Por ejemplo, en Dirección IP
introduzca 192.168.1.2 y como Máscara de subred
255.255.255.0. Asegúrese que esta dirección IP no se
este utilizando en la red ya que entraría en conflicto con
esta. Como Gateway utilize la del router de su red o la
que le haya dado su proveedor
4. Pinche sobre la lengüeta Configuración DNS.
54
Page 55

ESPAÑOL
5. Active la opción Activar DNS e introduzca las
direcciones IP que le haya facilitado su proveedor
internet. Finalmente, pulse el botón de Aceptar para
aplicar los cambios.
6. Reinicie el ordenador para que los cambios surtan
efecto.
Configuración del PC en Windows 2000
1. Vaya a Inicio/Configuración/Panel de Control y haga
doble clic sobre sobre el icono Conexiones de red.
2. Haga doble click sobre Conexión de área local
pulsando a continuación el botón de Propiedades.
3. Seleccione Protocolo Internet (TCP/IP) volviendo a
pulsar sobre el botón de Propiedades.
4. Seleccione Usar la siguiente dirección IP e introduzca
una dirección IP dentro de la clase 192.168.1.X del
Punto de Acceso, el cual viene configurado de fábrica
con la IP 192.168.1.1. Por ejemplo, en Dirección IP
introduzca 192.168.1.2 y como Máscara de subred
255.255.255.0. Asegúrese que esta dirección IP no se
este utilizando en la red ya que entraría en conflicto con
esta. Como Puerta de enlace predeterminada utilize la
del router de su red o la que le haya dado su proveedor.
5. Seleccione las opciónes Usar las siguientes
direcciones de servidor DNS e introduzca las
direcciones IP que le haya facilitado su proveedor
internet.
6. Pulse Aceptar para aceptar los cambios.
55
Page 56

ESPAÑOL
Configuración del PC en Windows XP
1. Vaya a Inicio/Configuración/Panel de Control y haga
doble clic sobre sobre el icono Conexiones de red.
2. Haga doble click sobre Conexión de área local
pulsando a continuación el botón de Propiedades.
3. Seleccione Protocolo Internet (TCP/IP) volviendo a
pulsar sobre el botón de Propiedades.
4. Seleccione Usar la siguiente dirección IP e introduzca
una dirección IP dentro de la clase 192.168.1.X del
Punto de Acceso, el cual viene configurado de fábrica
con la IP 192.168.1.1. Por ejemplo, en Dirección IP
introduzca 192.168.1.2 y como Máscara de subred
255.255.255.0. Asegúrese que esta dirección IP no se
este utilizando en la red ya que entraría en conflicto con
esta. Como Puerta de enlace predeterminada utilize la
del router de su red o la que le haya dado su proveedor.
5. Seleccione las opciónes Usar las siguientes
direcciones de servidor DNS e introduzca las
direcciones IP que le haya facilitado su proveedor
internet.
6. Pulse Aceptar para aceptar los cambios.
1.8 Configuración del Punto de Acceso
Abra el navegador e introduzca la siguiente dirección IP:
http://192.168.1.1 y pulse intro.
56
Page 57

ESPAÑOL
Utilize admin como nombre usuario y admin como
contraseña y pulse Aceptar.
Después de autentificarse le aparecerá un asistente para la
confituración del punto de acceso. Si quiere configurar de
forma detallada el dispositivo, puede cerrar el asistente y
acceder al Menú Principal. En el caso de que necesitara
hacer una configuración personalizada de la red interna o
del punto de acceso, puede encontrar más información en el
manual completo incluido en el CD.
En el caso de que no se iniciara de forma automática el
asistente, lo puede iniciar pinchando sobre la opción
pertinente en el menú principal.
Asistente de Configuración
Gracias a este asistente es posible configurar el dispositivo
en muy poco tiempo. Cuando le aparezca el menú de la
imagen, pulse Next para continuar.
57
Page 58

ESPAÑOL
Paso 1: Modificar la Contraseña
Introduzca en las dos casillas la contraseña que quiera
utilizar para acceder al punto de acceso y pulse
Next para seguir con la configuración.
Paso 2: Configuración de la conexión inalámbrica
Introduzca el SSID, nombre con el que se identificará la red
inalámbrica y que debe ser igual en todos los dispositivos
58
Page 59

ESPAÑOL
que accederán a esta, y escoja el canal en el cual operará el
dipositivo.
Pulse Next para continuar.
Paso 3: Encripción WEP
Para habilitar la cifratura WEP seleccionar Enabled. A
continuación y seleccionar la longitud de la llave, de 64 o
128 bits, e introduzca en el casilla Key la llave a utilizar.
Recuerde que esta llave será la que utilizará posteriormente
para poder conectarse a la red inalábrica.
59
Page 60

ESPAÑOL
Pulse Next para continuar.
Paso 4: Reiniciar
En este momento la configuración a terminado. Reinicie el
Punto de Acceso Inalábrico Multifunción pulsando Restart.
Si, por el contrario pulsa Exit, la configuración no se
guardará.
60
Page 61

ESPAÑOL
Una vez que se haya reiniciado el punto de acceso, pruebe
a ver si navega.
En el caso de que no funcionara, consulte el manual
incluido en formato electrónico en el CD-ROM incluido.
61
Page 62

NOTE
62
Page 63

NOTE
63
Page 64

Where solutions begin
Company certified ISO 9001:2000
Atlantis Land S.p.A.
Viale De Gasperi, 122
Mazzo di Rho – MI – Italy
info@atlantis-land.com
sales@atlantis-land.com
 Loading...