

Page 1
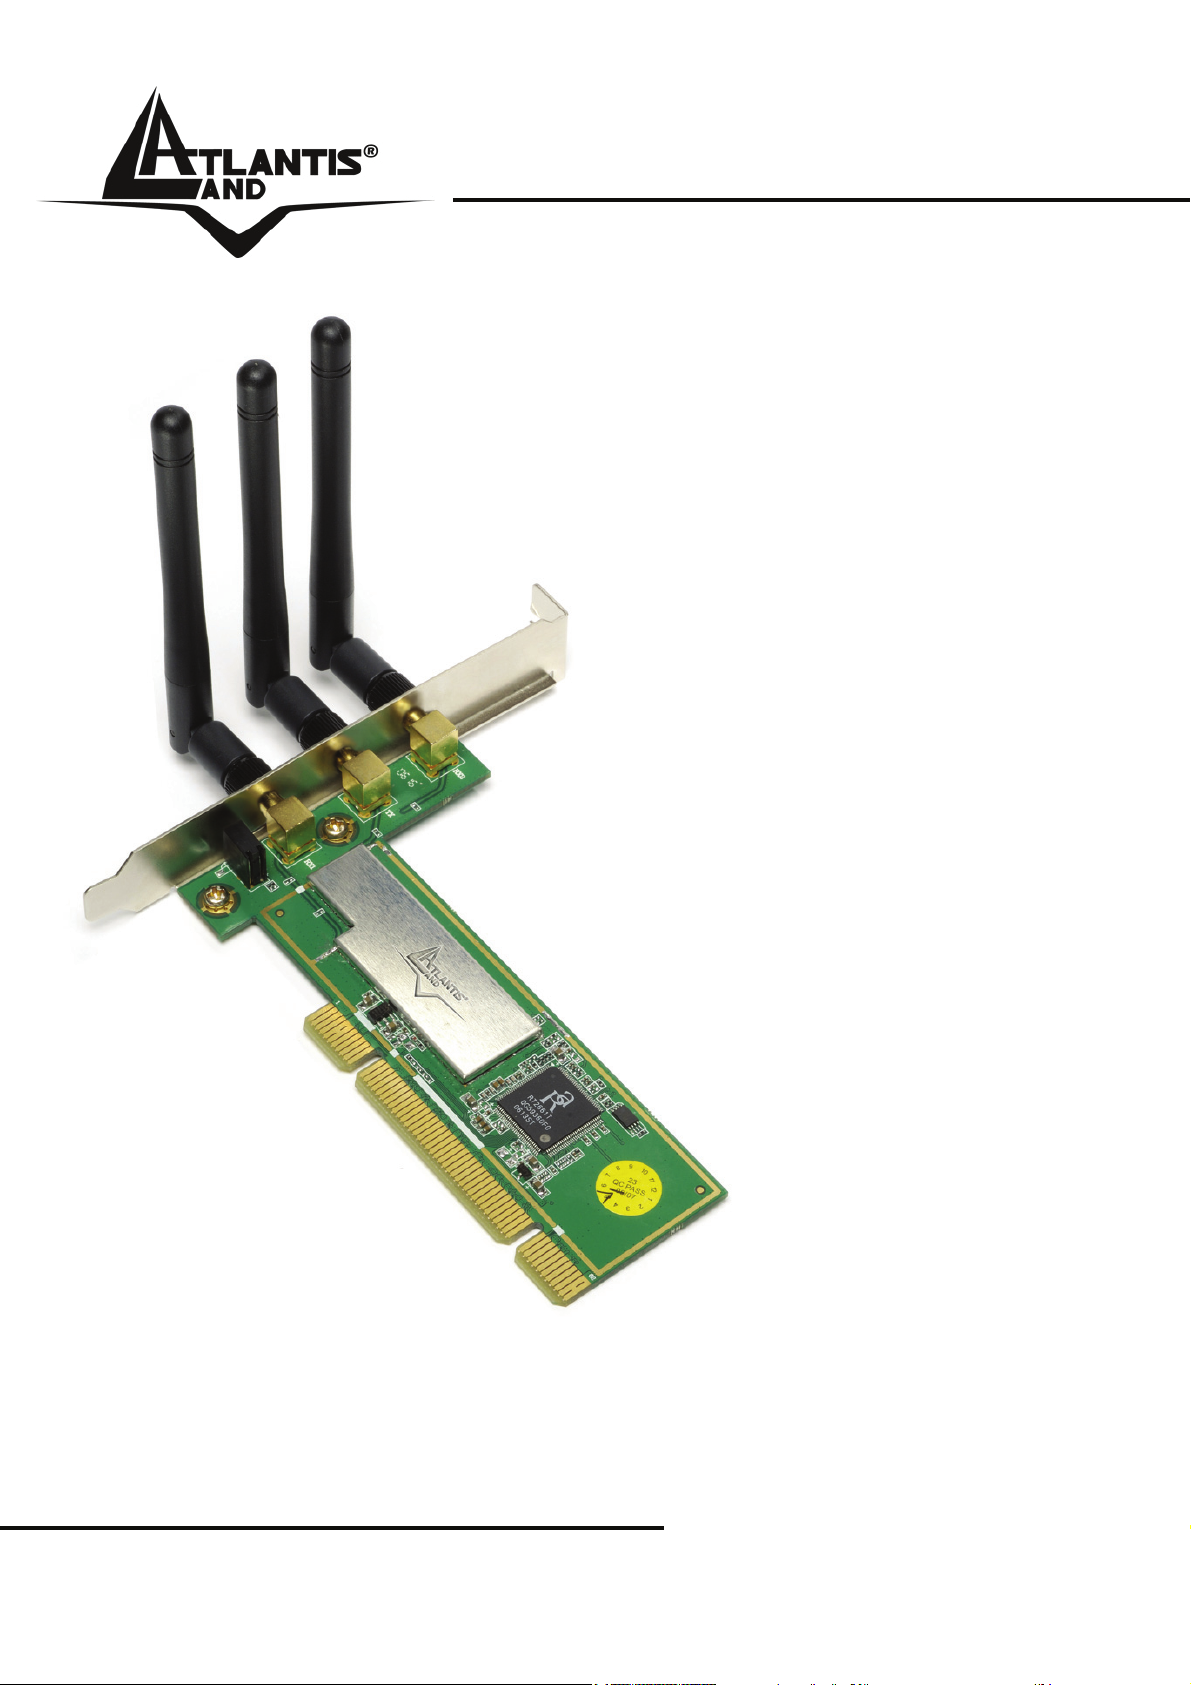
Wireless MIMO
Card
A02-PCI-W54M
A02-PCM-W54M
MULTILANGUAGE
MANUAL
A02-PCX-W54M_MX01
Where solutions begin
ISO 9001:2000 Certified Company
Page 2

MultiLanguage Manual
Gu
ITALIANO
Questo prodotto è coperto da garanzia Atlantis Land Fast-Swap della durata di 3
anni. Per maggiori dettagli in merito o per accedere alla documentazione completa in
Italiano fare riferimento al sito www.atlantis-land.com.
ENGLISH
This product is covered by Atlantis Land 3 years Fast-Swap warranty. For more
detailed informations please refer to the web site www.atlantis-land.com.
For more detailed instructions on configuring and using this device, please refer to the
online manual.
FRANCAIS
Ce produit est couvert par une garantie Atlantis Land Fast-Swap de 3 ans. Pour des
informations plus détaillées, référez-vous svp au site Web www.atlantis-land.com.
DEUTSCH
Dieses Produkt ist durch die Atlantis Land 3 Jahre Fast-Swap Garantie gedeckt. Für
weitere Informationen, beziehen Sie sich bitte auf Web Site www.atlantis-land.com.
ESPAÑOL
Este producto esta cubierto por Atlantis Land con una garantía Fast-Swap de 3 años.
Para mayor información diríjase a nuestro sitio Web www.atlantis-land.com
.
Page 3
MultiLanguage Manual
Gu
The award of the information is facultative, but its lack will prevent ATLANTIS LAND®
from starting the Guarantee process requested.
R
e
g
i
s
t
Registration on the web site www.atlantis-land.com
days from the purchase of the product dismiss the customer from
showing a valid proof of purchase (Sale Receipt or Invoice) in case
of the request of intervention. For further information we invite you
to look at our web site at the section WARRANTY.
R
w
w
R
w
e
w
w
e
w
g
g
w
w
w
e
i
s
t
e
i
s
t
e
.
a
t
l
.
a
t
.
a
t
r
y
o
u
r
p
r
o
d
u
c
t
!
r
y
o
u
r
p
r
o
r
y
o
u
a
n
t
i
s
l
a
l
-
n
t
i
s
n
-
t
i
s
a
d
r
p
r
o
l
a
n
d
.
l
a
n
d
-
l
a
n
d
d
.
u
c
t
!
u
c
t
!
c
o
m
c
o
m
.
c
o
m
within 15
Copyright
The Atlantis Land logo is a registered trademark of Atlantis Land S.p.A. All other
names mentioned mat be trademarks or registered trademarks of their respective
owners. Subject to change without notice. No liability for technical errors and/or
omissions.
Page 4

MultiLanguage Manual
Gu
INDEX
ITALIANO
1 Wireless MIMO Card............................................................................... 11
1.1 Come funziona la scheda di rete Wireless................................. 11
1.2 Requisiti di sistema .................................................................... 13
1.3 Contenuto della confezione........................................................ 13
1.4 Panoramica Hardware ...............................................................14
2. Installazione Driver e Utilità su Sistemi WIndows................................... 15
3. Installazione dell’hardware (A02-PCI-W54M)......................................... 17
4. Utility di configurazione della connessione Wireless .............................. 18
4.1 Introduzione ...............................................................................18
4.2 Utilizzare l’utility di configurazione .............................................19
4.2.1 Profile ......................................................................................20
4.2.2 Link Status ..............................................................................22
4.2.3 Site Survey..............................................................................23
4.2.4 Statistics..................................................................................25
4.2.5 Advanced ................................................................................ 27
4.2.6 QoS .........................................................................................29
4.2.7 About....................................................................................... 30
4.3 AP Mode (solo in Windows XP) ................................................. 31
5 Rimozione Driver ed Utility...................................................................... 33
6 Problemi comuni e soluzioni ................................................................... 34
Disabilitare il gestore delle connessioni Wireless di Windows XP ...34
Domande frequenti...........................................................................34
7. Supporto Offerto .....................................................................................36
ENGLISH
1 Wireless MIMO Card............................................................................... 39
1.1 How the Adapter works ..............................................................39
1.2 System Requirements................................................................40
1.3 Package Contents...................................................................... 40
1.4 Product View ..............................................................................41
2 Software Installation................................................................................ 42
5
Page 5

MultiLanguage Manual
Gu
3 Hardware Installation (A02-PCI-W54M).................................................. 43
4. Wireless Network Utility .......................................................................... 44
4.1 Introduction ................................................................................44
4.2 Using the Configuration Utility.................................................... 45
4.2.1 Profile ......................................................................................47
4.2.2 Link Status ..............................................................................48
4.2.3 Site Survey..............................................................................50
4.2.4 Statistics..................................................................................53
4.2.5 Advanced ................................................................................ 54
4.2.6 QoS .........................................................................................56
4.2.7 About....................................................................................... 57
4.3 AP Mode (Windows XP only).....................................................58
5 Uninstallation ..........................................................................................61
6 Troubleshooting ...................................................................................... 62
Common Problems and Solutions.................................................... 62
Disable “Windows XP Wireless Zero Configuration......................... 62
Frequently Asked Questions............................................................62
7 Product Support .......................................................................................64
FRANCAIS
1 Wireless MIMO Card................................................................................68
1.1 Modes de Fonctionnement ..............................................68
1.2 Besoin système................................................................ 70
1.3 Contenu de l’emballage ................................................... 70
1.4 Carte ................................................................................ 72
2 Installation sous Windows........................................................................ 73
3 Installation Hardware (A02-PCI-W54M)................................................... 73
4. Configuration...........................................................................................75
4.1 Logiciel de configuration ............................................................75
4.2 Logiciel de configuration ............................................................76
4.2.1 Profile ......................................................................................77
4.2.2 Link Status ..............................................................................78
4.2.3 Site Survey..............................................................................79
4.2.4 Statistics..................................................................................83
6
Page 6

MultiLanguage Manual
Gu
4.2.5 Advanced ................................................................................ 84
4.2.6 QoS .........................................................................................86
4.2.7 About....................................................................................... 86
4.3 AP Mode (seulement pour Windows XP)................................... 88
5 Supprimer les drivers et l’utilitaire............................................................ 91
6 Résolution de problèmes ......................................................................... 91
Problèmes et Solutions .................................................................... 91
Désactivation du controleur de Windows XP ................................... 92
Questions fréquentes .......................................................................92
7 Support ....................................................................................................93
ESPAÑOL
1 Tarjeta Inalámbrica MIMO ......................................................................97
1.1 Cómo funciona el adaptador ......................................................97
1.2 Requisitos del sistema ............................................................... 99
1.3 Contenidos de la caja............................................................... 100
1.4 Vista General del Producto ...................................................... 101
2 Instalación del Software.........................................................................102
3 Instalación del Hardware (A02-PCI-W54M)........................................... 104
4. Utilidad de la Red Inalámbrica..............................................................105
4.1 Introducción.............................................................................. 105
4.2 Utilizar la aplicación de configuración...................................... 106
4.2.1 Perfiles .................................................................................. 107
4.2.2 Estado de la Conexión – Link Status .................................... 109
4.2.3 Sondeo Ambiental – Site Survey ..........................................110
4.2.4 Statistics - Estadísticas .........................................................113
4.2.5 Advanced – Configuración Avanzada...................................115
4.2.6 QoS – Calidad del Servicio. .................................................. 117
4.2.7 About – Acerca de................................................................. 118
4.3 AP Mode – Modalidad Punto de Acceso (solo en Windows XP)
.......................................................................................................119
5 Uninstallation - Desinstalación.............................................................. 121
6 Problemas Comunes y Soluciones........................................................122
7
Page 7

MultiLanguage Manual
Gu
Deshabilitar el gestor de conexiones de red inalámbricas de
Windows XP................................................................................... 122
Preguntas Frecuentes....................................................................123
7. Soporte Técnico.................................................................................... 124
APPENDIX A ............................................................................................126
APPENDIX B ............................................................................................127
A02-PCX-W54M_MX01(V1.0 July 2006)
8
Page 8

ITALIANO
AVVERTENZE
Abbiamo fatto di tutto al fine di evitare che nel testo, nelle immagini e nelle tabelle
presenti in questo manuale, nel software e nell'hardware fossero presenti degli errori.
Tuttavia, non possiamo garantire che non siano presenti errori e/o omissioni. Infine,
non possiamo essere ritenuti responsabili per qualsiasi perdita, danno o
incomprensione compiuti direttamente o indirettamente, come risulta dall'utilizzo del
manuale, software e/o hardware.
Il contenuto di questo manuale è fornito esclusivamente per uso informale, è soggetto
a cambiamenti senza preavviso (a tal fine si invita a consultare il sito
www.atlantisland.it
deve essere interpretato come un impegno da parte di Atlantis Land spa che non si
assume responsabilità per qualsiasi errore o inesattezza che possa apparire in questo
manuale. Nessuna parte di questa pubblicazione può essere riprodotta o trasmessa in
altra forma o con qualsiasi mezzo, elettronicamente o meccanicamente, comprese
fotocopie, riproduzioni, o registrazioni in un sistema di salvataggio, oppure tradotti in
altra lingua e in altra forma senza un espresso permesso scritto da parte di Atlantis
Land spa. Tutti i nomi di produttori e dei prodotti e qualsiasi marchio, registrato o
meno, menzionati in questo manuale sono usati al solo scopo identificativo e
rimangono proprietà esclusiva dei loro rispettivi proprietari.
Restrizioni di responsabilità CE/EMC
Il prodotto descritto in questa guida è stato progettato, prodotto e approvato in
conformità alle regole EMC ed è stato certificato per non avere limitazioni EMC.
Se il prodotto fosse utilizzato con un PC non certificato, il produttore non garantisce il
rispetto dei limiti EMC. Il prodotto descritto è stato costruito, prodotto e certificato in
modo che i valori misurati rientrino nelle limitazioni EMC. In pratica, ed in particolari
circostanze, potrebbe essere possibile che detti limiti possano essere superati se
utilizzato con apparecchiature non prodotte nel rispetto della certificazione EMC. Può
anche essere possibile, in alcuni casi, che i picchi di valore siano al di fuori delle
tolleranze. In questo caso l’utilizzatore è responsabile della “compliance” con i limiti
EMC. Il Produttore non è da ritenersi responsabile nel caso il prodotto sia utilizzato al
di fuori delle limitazioni EMC.
CE Mark Warning
Questo dispositivo appartiene alla classe B. In un ambiente domestico il dispositivo
può causare interferenze radio, in questo caso è opportuno prendere le adeguate
contromisure.
ATTENZIONE
Lasciare almeno 30cm di distanza tra le antenne del dispositivo e l’utilizzatore.
o www.atlantis-land.com per reperirne gli aggiornamenti) e non
9
Page 9

ITALIANO
Dichiarazione di Conformità
Questo dispositivo è stato testato ed è risultato conforme alla direttiva 1999/5/CE del
parlamento Europeo e della Commissione Europea, a proposito di apparecchiature
radio e periferiche per telecomunicazioni e loro mutuo riconoscimento. Dopo
l’installazione, la periferica è stata trovata conforme ai seguenti standard: EN
300.328(radio), EN 301 489-1, EN 301 489-17(compatibilità elettromagnetica) ed EN
60950(sicurezza). Questa apparecchiatura può pertanto essere utilizzata in tutti i paesi
della Comunità Economica Europea ed in tutti i paesi dove viene applicata la Direttiva
1999/5/CE, senza restrizioni eccezion fatta per:
Francia:
Se si utilizza all’aperto tale dispositivo, la potenza in uscita è limitata (potenza e
frequenza) in base alla tabella allegata. Per informazioni ulteriori consultare
www.art-telecom.fr
.
Luogo Banda di
Frequenze(MHz)
Chiuso (senza restrizioni) 2400-2483,5 100mW(20dBm)
Aperto 2400-2454
2454-2483,5
Se l’uso di questa apparecchiatura in ambienti domestichi genera interferenze, è
obbligo dell’utente porre rimedio a tale situazione.
Italia:
Questa periferica è conforme con l’Interfaccia Radio Nazionale e rispetta i requisiti
sull’Assegnazione delle Frequenze. L’utilizzo di questa apparecchiatura al di fuori di
ambienti in cui opera il proprietario, richiede un’autorizzazione generale. Per ulteriori
informazioni si prega di consultare: www.comunicazioni.it
.
Potenza (EIRP)
100mW(20dBm)
10mW(10dBm)
10
Page 10

ITALIANO
La ringraziamo per aver scelto la Wireless MIMO Card, la via più semplice per il
Wireless networking. Questo manuale contiene informazioni dettagliate in merito
all’installazione e all’utilizzo del prodotto, lo utilizzi come riferimento per qualsiasi
problema o informazione.
1 Wireless MIMO Card
La Wireless MIMO Card (IEEE802.11g a 54Mbps), consente ad utenti dotati di
apparati wireless di navigare e/o condividere files in piena libertà e sicurezza (grazie
anche all'adozione del robusto protocollo WPA/WPA2).
Le 3 antenne (rimovibili R-SMA nella scheda PCI) da 2 dBi e la tecnologia MIMO XR™
permettono inoltre sia una copertura enormemente superiore rispetto alle normali reti
IEEE802.11g che un throughput decisamente più uniforme (la presenza di zone morte
verrà decisamente ridimensionata).
La tecnologia Packet-Overdrive ™ infine permette di ottenere prestazioni velocistiche
importanti rendendo l’apparato ideale anche per le applicazioni più impegnative
(streaming Video HD).
Con questo Adapter sarà possibile muoversi all’interno del proprio ufficio o da una
stanza all’altra della propria casa senza mai disconnettersi dalla rete. Questo prodotto
è compatibile con i sistemi Windows® XP/2000/ME/98SE ed è in grado di funzionare
in modalità Ad-Hoc (computer-computer), in modalità in Infrastructure (computer ad
access point) ed anche in modalità Access Point.
1.1 Come funziona la scheda di rete Wireless
A differenza delle reti LAN le reti Wireless hanno due differenti modalità di
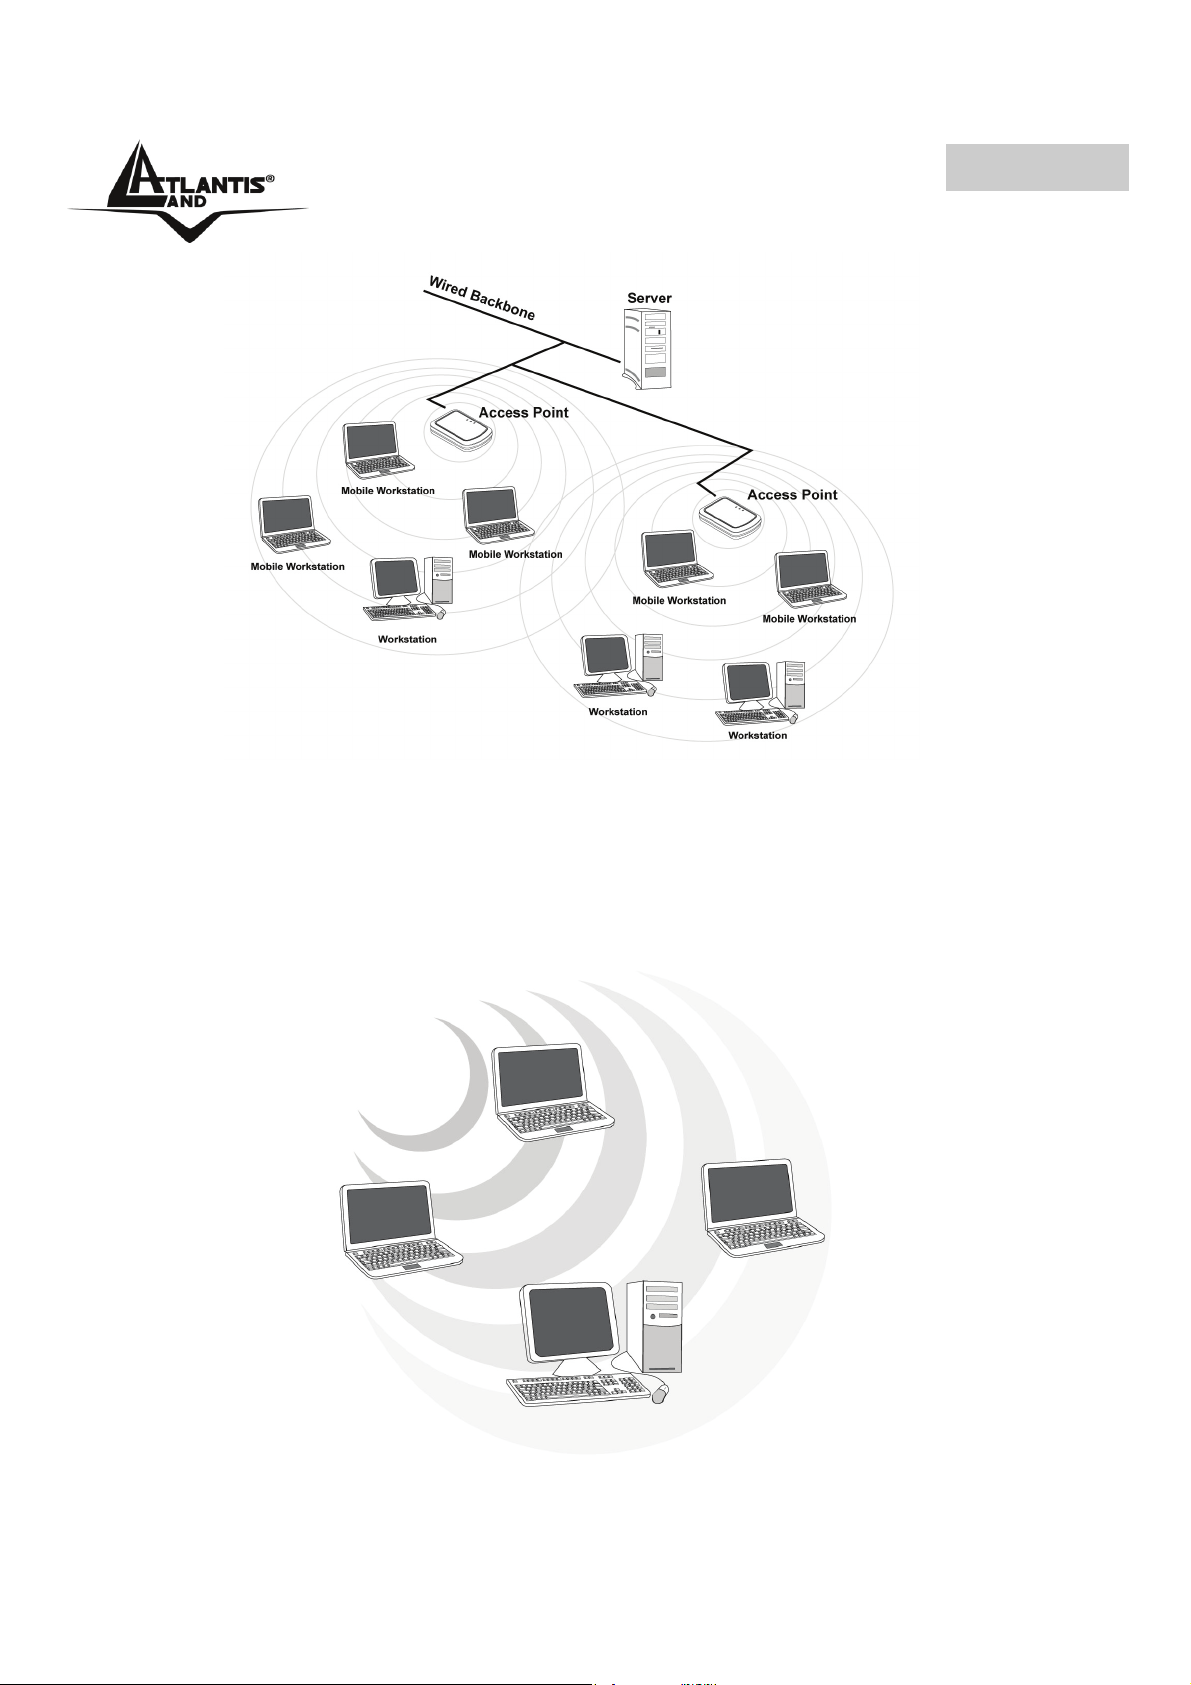
funzionamento: infrastructure ed ad-hoc. Nella configurazione Infrastructure una rete
WLAN e una rete WAN comunicano tra loro tramite un access point. In una rete adhoc i client wireless comunicano tra loro direttamente. La scelta tra le due
configurazioni è quindi dettata dalla necessità o meno di mettere in comunicazione una
rete wireless con una cablata.
Se i computer collegati alla rete wireless devono accedere a risorse o periferiche
condivise sulla rete cablata sarà necessario utilizzare la modalità infrastructure (Figura
2-1). L’ Access Point trasmetterà le informazioni ai client wireless che potranno
muoversi all’interno di un determinato raggio di azione. L’impiego contemporaneo di
più Access Point permetterà di estendere l’area di copertura del segnale. I client
wireless stabiliranno automaticamente il link con il dispositivo che fornisce il segnale
migliore grazie alla funzionalità roaming.
11
Page 11
ITALIANO
Figura 2-1
Se la rete wireless ha dimensioni relativamente ridotte e se le risorse condivise sono
dislocate sui personal computer che ne fanno parte, è possibile utilizzare la modalità
ad-hoc (Figura 2-2). Questa modalità permette di collegare i client wireless tra loro
direttamente senza la necessità di un access point. La comunicazione tra i client è
limitata direttamente dalla distanza e dalle interferenze che intercorrono tra loro.
Figura 2-2
12
Page 12

ITALIANO
La scheda inoltre supporta una modalità Access Point che permette al PC con la
scheda Wireless MIMO di funzionare come un vero e proprio Access Point. In questo
modo è possibile costruire una vera è propria rete wireless a costi contenuti.
1.2 Requisiti di sistema
Prima di procedere con l’installazione del prodotto verificare di disporre dei seguenti
requisiti:
PC desktop con uno slot PCI 2.1/2.2 libero (A02-PCI-W54M)
Portatile con uno slot PCMCIA CardBus 32 bit Type II libero (A02-PCM-W54M)
Processore Intel® Pentium®III 600Mhz o compatibile con 128 MB RAM
Sistema operativo Windows 98SE/ME/2000/XP e Linux
15MB di spazio libero su disco
Lettore CD-Rom
Il prodotto è stato testato con kernel 2.4 e 2.6. Atlantis Land
non garantisce che il dispositivo funzioni su distribuzioni/kernel
diverse da quelle elencate né, dato il vasto numero di
combinazioni, potrà offrire supporto. Si invita a tal fine a
reperire gli ultimi driver direttamente sul sito del produttore del
chipset (www.ralink.com.tw).
1.3 Contenuto della confezione
Prima di utilizzare il prodotto verificare che la confezione contenga i seguenti oggetti:
Una Wireless MIMO Card
3 antenne esterna da 2 dBi (A02-PCI-W54M)
Una guida rapida multilingua
Un CD contenente driver, utility e manuale dell’utente
13
Page 13
ITALIANO
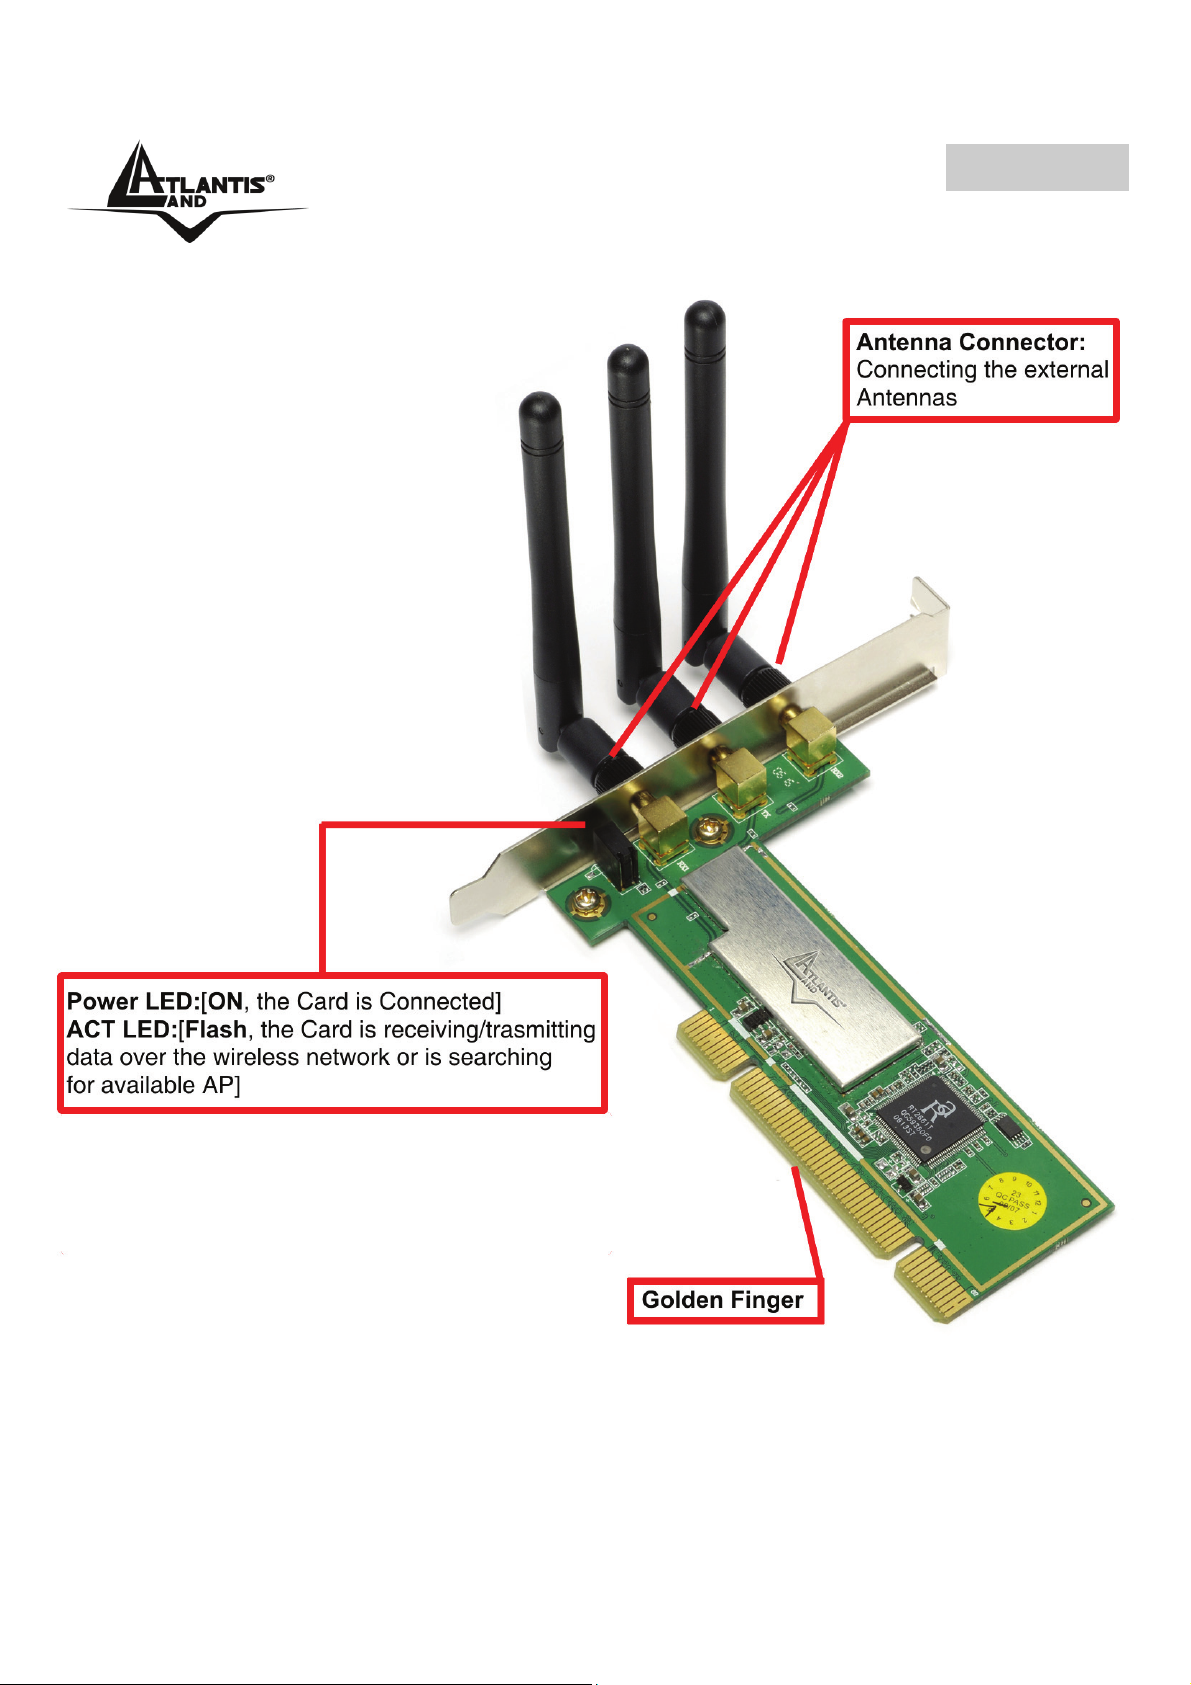
1.4 Panoramica Hardware
14
Page 14

ITALIANO
2. Installazione Driver e Utilità su Sistemi WIndows
Questa sezione descrive la procedura di installazione di driver e utility della Wireless
MIMO PCI/PCMCIA Card. Seguire le istruzioni passo a passo per installare driver
utility. Se si utilizza un sistema Windows 98 o Me è necessario reperire il cd di
installazione del sistema operativo, potrebbe essere richiesto in fase di installazione.
Per lanciare direttamente i driver/utility, una volta inserito il CD nell’apposito lettore,
cliccare sull’icona setup (CDRom:\driver\setup.exe) o utilizzare l’interfaccia grafica
visualizzata a video.
Non inserire la scheda PCI/PCMCIA nel PC prima di aver
installato i driver/utilità.
Seguire le istruzioni a video per portare a termine la procedura.
Cliccare su Yes per proseguire.
15
Page 15

ITALIANO
Spuntare la voce Ralink Configuration Tool per utilizzare l’utility a corredo o
Microsoft Zero Configuration Tool per utilizzare l’utility integrata nel sistema
operativo. Cliccare poi su Next.
Scegliere Optimized for WiFi mode (scelta raccomandata in caso si riscontrino di
problematiche di interoperabilità) oppure Optimized for performance mode (scelta
raccomandata). Cliccare poi su Next.
A questo punto apparirà la scritta in cui viene richiesto di inserire la scheda PCMCIA.
Una volta inserita verrà riconosciuta ed installata automaticamente.
16
Page 16

ITALIANO
Per terminare la procedura di installazione scegliere Yes, I want to restart my
computer now e cliccare poi su Finish.
3. Installazione dell’hardware (A02-PCI-W54M)
Lo schema seguente fornisce alcune informazioni in merito all’installazione della
Wireless PCI Card, la procedura è utilizzabile con la maggior parte dei PC in
commercio. Per maggiori informazioni fare riferimento al manuale della mainboard.
Step 1. Spegnere il PC e rimuovere la copertura esterna. Localizzare uno slot PCI
libero.
Step 2. Posizionare il Wireless PCI Adapter sullo slot PCI e premere per inserirlo.
17
Page 17

ITALIANO
Step 3. Dopo aver bloccato correttamente la scheda PCI con l’apposita vite
richiudere la copertura esterna del PC.
Step 4. Connettere le 3 antenne esterne avvitandole delicatamente sino a giungere
a fine corsa.
Step 5. Accendere il PC.
4. Utility di configurazione della connessione Wireless
4.1 Introduzione
Con il driver è stato installato anche un applicativo (se durante l’installazione è stata
spuntata l’opzione Ralink Configuration Tool )che permette in modo facile, chiaro e
veloce di configurare le impostazioni della connessione Wireless.
Una volta terminata l’installazione, è possibile vedere l’icona (
taskbar.
Qualora l’icona sia di colore:
)in figura nella
• Verde(
• Gialla(
): Indica un ottimo livello segnale e la connessione attiva.
): Indica un buon livello segnale e la connessione attiva.
18
Page 18

ITALIANO
• Rossa( ): Indica un basso livello segnale e la connessione attiva.
• Icona Rossa con Barra Rossa(
• Icona Nera con Barra Nera(
Andando sull’icona e premendo il tasto destro del mouse verrà mostrato un menu
contenente 4 scelte:
• Launch Config Utilities
• Use Zero Configuration as Configuration Utility
• Switch to AP mode
• Exit
Per utilizzare l’utility Zero Configuration di Microsoft per la
configurazione Wireless cliccare sulla voce Use Zero
Configuration as Configuration Utility. Una volta in questa
modalità è possibile tornare ad utilizzare l’utility semplicemente
cliccando sulla voce Use RaConfig as Configuration Utility.
4.2 Utilizzare l’utility di configurazione
Cliccare due volte sull’icona dell’utility di configurazione per avviarla, altrimenti cliccare
sull’ icona con il tasto destro e selezionare Launch Configuration Utility.
Grazie a questa utility è possibile configurare e monitorare nel dettaglio la scheda
PCI/PCMCIA Wireless MIMO.
L’Utility di configurazione include 7 tabs: Profile, Link Status, Site Survey,
Statistics, Advanced, QoS ed About.
): Connessione non attiva.
): Scheda non rilevata.
19
Page 19
ITALIANO
4.2.1 Profile
Questa sezione permette la creazione di profili personalizzati. E’ possibile creare più
profili ed attivaredi volta in volta quello adatto.
Per attivare un profilo esistente è necessario evidenziarlo (andandoci sopra con un
click del mouse) e cliccare poi su Activate.
Alla stessa maniera è possibile, premendo il tasto Delete/Edit, cancellare o editare un
profilo selezionato.
Connection status:
• Icona Verde(
• Icona Rosso (
): Indica che il corrente profile è attivo.
): Indica un problema nell’attivazione del profilo selezionato.
Quando si utilizza il tab Site Survey per effettuare una
connessione nessuno dei profili creati avrà l’icona di stato.
20
Page 20

ITALIANO
Per creare un nuovo profilo è possibile operare in 2 differenti modalità:
• Andare sotto il tab Site Survey, scegliere una rete (cliccare su Rescan) e
cliccare poi su Add to Profile (se cifrata verrà chiesta la password e modalità di
accesso).
• Cliccare sul bottone Add e impostare tutti i campi opportuni (Nome Profilo, SSID
e cifratura).
Creazione di un nuovo Profilo
Cliccare su Add, spuntare il tab Configuration ed impostare i seguenti campi:
• Profile Name: Inserire il nome del profilo.
• SSID: Inserire l’SSID oppure tramite il menù a tendina scegliere tra quelli
individuati.
• PSM: Scegliere tra le modalità CAM e PSM.
• Network Type: Scegliere Infrastructure.
• TX Power: E’ possibile selezionare la potenza del segnale trasmesso. Sono
disponibili le seguenti scelte: 12.5%, 25%, 50%, 100% oppure Auto.
• RTS Threshold: L’ RTS (Request To Send) threshold (espresso in numero di
bytes) per l’abilitazione dell’handshake RTS/CTS. Inserire un valore compreso
tra 0 e 2347.
• Fragment Threshold: Il Fragmentation Threshold è la dimensione massima di
frammentazione dei dati (tra 256 e 2346 bytes) che può essere trasmessa in una
rete Wireless prima che il dispositivo effettui un ulteriore divisione in frames più
piccoli. Un alto valore di Fragmentation Threshold è indicato per reti esenti da
interferenze, mentre per reti soggette ad interferenze e con un traffico molto
elevato è preferibile optare per un valore più basso. Se viene impostato un
valore più basso dell’RTS/CTS i dati verranno frammentati prima della fase di
handshake la quale non verrà effettuata.
Nel caso in cui la modalità Network Type sia su ad-Hoc è
necessario selezionare la lunghezza del preambolo e la
modalità di funzionamento della rete, ed il canale utilizzato
mentre la configurazione PSM verrà disabilitata. Per ulteriori
dettagli si consulti la sezione 1.1 di questo manuale.
21
Page 21

ITALIANO
Selezionare il tab Authentication and Security per configurare la sicurezza utilizzata
nella rete Wireless. Per maggiori informazioni is consulti la sez 4.2.3.
4.2.2 Link Status
Questa schermata fornisce le statistiche di trasmissione/ricezione dati.
Status: Mostra lo stato corrente. In caso di connessione assente verrà mostrata la
scritta Disconnected. In caso di connessione attiva verrà mostrato SSID ed il MAC
Address.
Extra Info: Viene mostrato lo stato del Link ed il canale utilizzato.
Link Speed: Viene mostrato in Mbps il rate in trasmissione e ricezione.
Throughput: Viene mostrato in Kbps il throughput istantaneo in trasmissione e
ricezione.
Link Quality: Viene mostrata la qualità della connessione basata sulla potenza del
segnale e tasso d’errore. Più alto è questo valore migliore è la performance ottenibile
dall’apparato.
22
Page 22

ITALIANO
Signal Strength: Potenza del segnale in ricezione. E’ possibile impostare l’output
anche in dBm.
Noise Level: Viene mostrata la potenza del rumore. E’ possibile impostare l’output
anche in dBm.
4.2.3 Site Survey
In questa pagina è possibile vedere tutti gli AP disponibili nelle vicinanze rilevati del
client.
Rescan: Cliccare per ottenere la lista di tutti gli AP disponibili nelle vicinanze rilevati
dal client.
Connect: Cliccare (dopo aver evidenziato un AP) per connettere il client all’AP
selezionato. La visualizzazione dell’icona (
l’AP selezionato.
Add to Profile: Cliccare (dopo aver evidenziato un AP) e impostare tutti i campi
opportuni (Nome Profilo e cifratura) per creare un nuovo profilo.
) indica l’avvenuta connessione con
23
Page 23
ITALIANO
Se l’AP selezionato ha la cifratura abilitata è necessario
configurare i parametri di accesso adeguati nella schermata
Authentication and Security (WEP/WPA/WPA2) per avere
accesso alla rete wireless.
Autentication and Security:
Tramite l’utilizzo di questa funzione è possibile da un lato limitare l’accesso alla rete da
parte di utenti non autorizzati e dall’altro limitare l’intelleggibilità delle informazioni
trasmesse.
• WPA-PSK/WPA2-PSK: WPA-PSK (Wi-Fi Protected Access pre-shared key)è
una versione semplificata che non richiede un server RADIUS per
l’autenticazione mutua. Introdurre, una volta scelta l’encryption tra TKIP o AES,
una passhprase precondivisa di almeno 8 caratteri.
24
Page 24

ITALIANO
• WPA/WPA2: WPA (Wi-Fi Protected Access) è richiesto un server RADIUS per
l’autenticazione mutua. Cliccare, una volta scelta l’encryption tra TKIP o AES, sul
bottone 802.1x setting per completare il profilo di accesso.
• LEAP:Introdurre i campi identità e password.
• Open System: Questo algoritmo è quello utilizzato di default. Il mittente e il
destinatario non condividono le chiavi segrete per la comunicazione. Le parti
generano loro stesse una coppia di chiavi e chiedono alla rispettiva controparte
di accettarle. Le chiavi vengono rigenerate ogni volta che la connessione viene
stabilita. Non resta che introdurre le chiavi WEP o effettuare la configurazione
802.11x setting.
• Shared Key: Mittente e destinatario condividono le stesse chiavi segrete,
utilizzandole fino a che l’utente non decide di modificarle. Non resta che
introdurre le chiavi WEP o effettuare la configurazione 802.11x setting.
Configurazione WEP: Scegliere prima il numero identificativo
della chiave. Introdurre a questo punto la chiave associata.
Ripetere l’operazione per le 4 chiavi. E’ possibile immettere
anche una sola chiave WEP.
E’ possibile scegliere la lunghezza in bit [64,128] della chiave e
la tipologia[ASCII, HEX].
ASCII HEX
64 bit 5*X 10*Y
128 bit 13*X 26*Y
X=[(0~9, A~Z, a~z Alphanumeric]
Y=[0~9, A~F Hexadecimal]
Ad esempio una chiave WEP da 128 bit in ASCII potrebbe
essere “atlantisland1”. [una stringa composta da 13 caratteri].
Una chiave HEX da 128 bit potrebbe essere usa stringa di 26
caratteri [0,1,2,3,4,5,6,7,8,9,A,B,C,D,E,F]
Il WEP viene oggi considerata non come assolutamente sicura e
pertanto laddove possibile si consiglia l’uso del WPA.
4.2.4 Statistics
In questa sezione vengono visualizzate tutte le statistiche relative alla sezione radio.
25
Page 25
ITALIANO
Transmit Statistics:
• Frames Transmitted Successfully: Numero di frames trasmessi con successo.
• Frames Transmitted Successfully Without Retry: Numero di frames trasmessi
con successo senza nessun reinvio.
• Frames Transmitted Successfully After Retry: Numero di frames trasmessi
con successodopo almeno un rinvio.
• Frames Fail To Receive ACK After All Retries: Numero di frames trasmessi
senza successo.
• RTS Frames Successfully Receive CTS: Ricezioni del frame CTS dopo aver
spedito il frame RTS.
• RTS Frames Fail To Receive CTS: Non ricezioni del frame CTS dopo aver
spedito il frame RTS.
26
Page 26
ITALIANO
Receive Statistics:
• Frames Received Successfully: Numero di frames ricevuti con successo.
• Frames Received With CRC Error: Numero di frames ricevuti con errori di
CRC.
• Frames Dropped Due To Out-of-Resource: Frames tagliati per mancanza di
risorse allocabili.
• Duplicate Frames Received: Numero di frame duplicati.
Cliccare sul buttoner Reset counters to zero per azzerare il conteggio delle
statistiche.
4.2.5 Advanced
Wireless mode: Selezionare la modalità wireless adatta tra 802.11B only e 802.11
B/G mixed.
B/G Protection: Selezionare la modalità operativa tra Auto, ON ed OFF.
• Auto: Client si adatta all’AP utilizzando o meno la protezione.
27
Page 27

ITALIANO
• On: I frame sono sempre inviati con protezione.
• Off: I frame sono sempre inviati senza protezione.
TX Rate: Selezionare tra Auto o forzare la velocità in Tx.
TX Burst: Spuntare per attivare la modalità Frame Burst Mode(proprietaria di Ralink).
Fast Roaming at: Utilizzare per favorire un fast Roaming. Introdurre il valore limite per
effettuare la disconnessione (introdurre un valore tra -60 e -90).
Select Your Country Region Code: E’ possibile scegliere la regione in cui il
dispositivo wireless verrà utilizzato. Questo, automaticamente, regolerà l’apparato nel
rispetto delle regole vigenti. La selezione errata della regione (nel campo Country
Domain) potrebbe portare ad un utilizzo di frequenze vietate. E’ necessario scegliere la
regione corretta.
CCX2.0: Per attivare il supporto supporto Cisco Compatible Extensions:
• LEAP turn on CCKM: Spuntare per attivare tale funzionalità.
• Enable Radio Measurement: Impostare i millisecondi che passano tra 2
misurazioni del canale di trasmissione. Il valore va impostato tra 0-2000ms.
Turn radio ON/OFF: Per abilitare/disabilitare la radio.
Apply: Per rendere attivi I cambiamenti.
La selezione errata della regione (nel campo Select Your
Country Domain) potrebbe portare ad un utilizzo di frequenze
vietate. E’ necessario scegliere la regione corretta. Consultare
la tabella ripielogativa contenuta all’Appendice A. Per l’Italia
scegliere 1 (Canali 1-13).
28
Page 28
ITALIANO
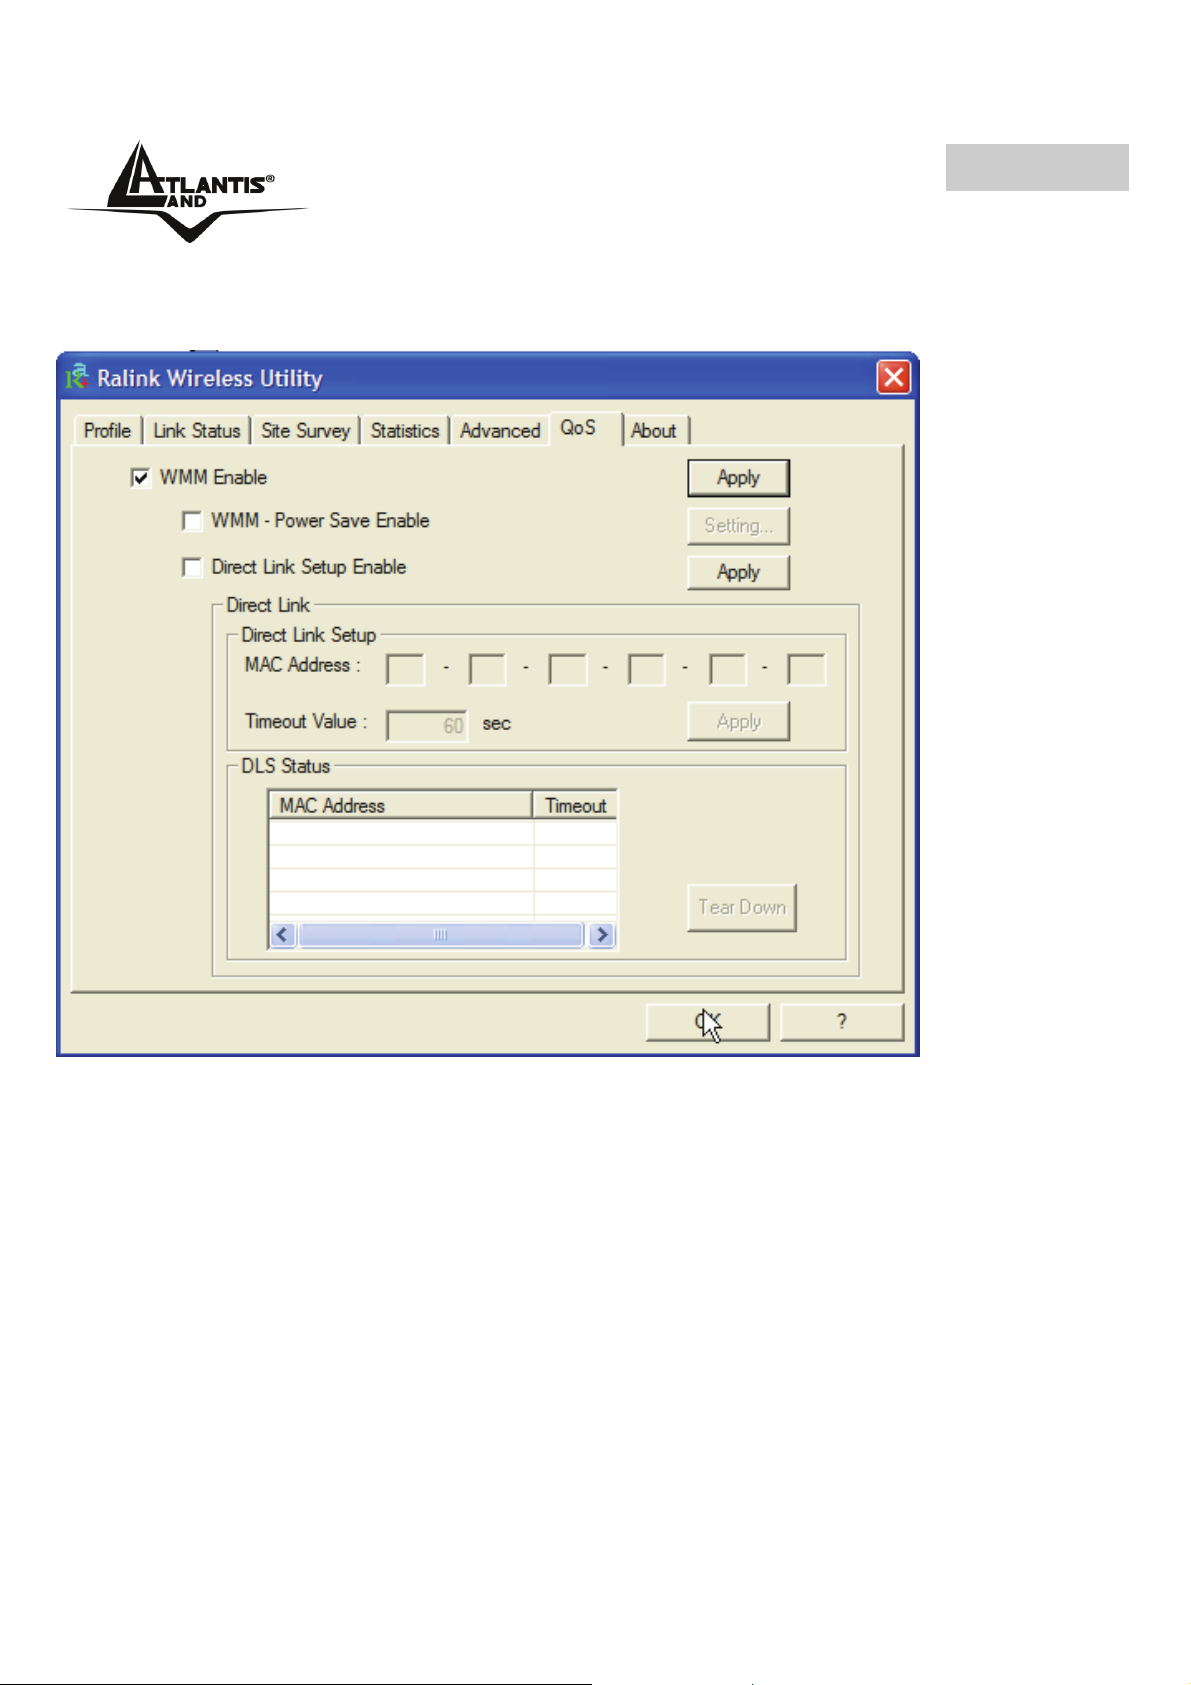
4.2.6 QoS
In questo Tab è possibile attivare la funzionalità di WMM (Wi-Fi Multi-Media) al fine di
ottenere una prioritizzazione del traffico in Tx.
Per attivare la funzionalità WMM, anzitutto spuntare il bottone WMM Enable e cliccalre
poi su Apply.
Una volta attivata questa funzionalità è possibile attivare WMM- Power Save Enable e
Direct Link Setup.
• WMM Power Save Enable: Spuntare la voce WMM Power Save Enable,
cliccare su Setting e scegliere la tipologia più adatta e confermare
cliccando su OK.
• Direct Link Setup: Modalità proprietaria che verrà rilasciata con
successive release di driver che, permettendo una connessione diretta tra
2 client, permette un importante aumento di throughput.
29
Page 29

ITALIANO
4.2.7 About
Questa sezione riporta versione e data di driver, firmware ed utility, viene visualizzato
inoltre il MAC address e la configurazione IP della scheda wireless.
30
Page 30
ITALIANO
4.3 AP Mode (solo in Windows XP)
In questa modalità è possibile trasformare la scheda in un vero e proprio AP. Per
tornare alla modalità client, selezionare la voce Switch to Station Mode e cliccarci
sopra.
L’Utility di configurazione, in modalità Access Ponit, include 6 tabs: Config, Access
Control List, Mac Table, Event Log, Statistics ed About.
4.3.1 Config
In questa sezione è possibile configurare tutti i parametri tipici di un Access Point quali
SSSID, Wireless Mode( B/G, solo G o solo B), Tx rate e Channel. Cliccare su Auth.
Vs. Security (vedere sezione 4.2.3) per attivare la configurazione del sistema di
sicurezza da utilizzare.
Per ulteriori dettagli si consulti l’help integrato.
31
Page 31

ITALIANO
Il range di frequenze radio usate dalle apparecchiature Wireless IEEE
802.11g/b è suddiviso in “canali”. Il numero di canali disponibili dipende
dall’ area geografica di appartenenza. E’ possibile selezionare canali
differenti in modo da eliminare eventuali interferenze con gli Access Point
vicini. L’interferenza si verifica quando due o più canali si sovrappongono
degradando le prestazioni, questa sovrapposizione è chiamata “Overlap”.
E’ consigliabile mantenere una distanza di 5 canali tra due utilizzati (es.
AP1 posizionato sul canale 1, AP2 posizionato sul canale 6).
Da questo si evince che soltanto 3 Access Point possono essere usati in
caso di sovrapposizioni spaziali(copertura) e temporali(funzionano allo
stesso tempo).
32
Page 32

ITALIANO
4.3.2 Access Control
In questa sezione è possibile configurare il Wireless Multi-Function Access Point in
modo da fornire l’accesso solo dopo aver controllato il MAC address del client
wireless.
Access
Policy
Default
Access
Effetto
4.3.3 Mac Table
Vengono mostrate le informazioni (MAC Address, AID e Power Saving Mode) delle
stazioni loggate all’AP.
4.3.4 Event Log
Vengono visualizzate una serie di tuple contenenti un campo data ed un campo
descrizione.
4.3.5 Statistics
Si faccia riferimento alla sezione 4.2.4.
4.3.6 About
Si faccia riferimento alla sezione 4.2.5.
Allow All Reject All Disable
Access Reject Access
Tutti vengono abilitati
all’accesso a meno di
quei MAC Address
presenti nell’ Access
List.
Nessuno viene abilitato
all’accesso a meno di
quei MAC Address
presenti nell’ Access
List.
Tutti vengono
abilitati all’accesso.
5 Rimozione Driver ed Utility
Per disinstallare la Wireless MIMO PCI/PCMCIA Card effettuare la seguente
procedura:
• Chiudere eventuali applicazioni attive
• Cliccare sull’icona Risorse del Computer ed andare in Pannello di controllo.
• Cliccare sull’icona Installazioni Applicazioni, evidenziare Ralink Wireless LAN
Card e cliccare su Aggiungi/Rimuovi, confermare poi la procedura di
33
Page 33

ITALIANO
disinstallazione (alternativamente in Programmi->Ralink Wireless-> Uninstall
RT-6x).
• Cliccare su Remove ALL [oppure su Overwrite the older version install
without remove].
• Al termine della procedura scegliere Yes, I want to restart my computer now e
cliccare poi su Finish.
• A questo punto, una volta spento il PC, è possibile rimuovere la scheda.
6 Problemi comuni e soluzioni
Questo capitolo fornisce alcune soluzioni in merito ai problemi nei quali si potrebbe
incorrere durante l’installazione e l’utilizzo del prodotto. Leggere le seguenti
indicazioni per risolvere eventuali problemi.
1. Il personal computer non rileva la periferica.
Accertarsi che la scheda non sia fisicamente danneggiata.
Accertarsi che la scheda sia correttamente inserita nello slot PCI/PCMCIA.
Provare uno slot PCI/PCMCIA differente.
2. Non è possibile accedere a nessuna risorsa Wireless
Assicurarsi che il PC sia acceso
Assicurarsi che le impostazioni di rete wireless siano corrette. Verificare
con l’amministratore di rete SSID, canale utilizzato, ecc.
Disabilitare il gestore delle connessioni Wireless di Windows XP
In Windows XP è raccomandato utilizzare il software di gestione delle connessioni
senza fili fornito a corredo del prodotto. Una volta conclusa l’installazione del driver
seguire i seguenti passi per disabilitare il gestore delle reti wireless integrato in
Windows XP
1 Aprire il “Pannello di controllo” e cliccare su “Connessioni di rete”.
2 Cliccare con il tasto destro sull’ icona “Connessione di rete senza fili” relativa
alla scheda di rete PCI/PCMCIA, e selezionare “Proprietà”.
3 Selezionare il tab “Reti senza fili”, e deselezionare la voce “Usa Windows per
configurare le impostazioni della rete senza fili”, cliccare quindi su “OK”.
Domande frequenti
1. Posso avviare un’ applicazione da un computer remoto presente sulla rete
wireless?
34
Page 34

ITALIANO
Questo dipende direttamente dall’applicazione stessa, se è stata progettata per
lavorare in rete (non fa differenza che sia wireless o cablata) non ci sarà alcun
problema.
2. Posso giocare in rete con gli altri computer presenti sulla WLAN?
Si, se il gioco è dotato di funzionalità multiplayer in rete.
3. Cos’è lo Spread Spectrum?
La trasmissione Spread Spectrum si basa sulla dispersione dell’informazione su una
banda molto più ampia di quella necessaria alla modulazione del segnale disponibile. Il
vantaggio che si ottiene da questa tecnica di modulazione è infatti una bassa
sensibilità ai disturbi radioelettrici anche per trasmissioni a potenza limitata. Questa
caratteristica è ovviamente preziosa quando si devono trasmettere dei dati.
4. Cosa sono DSSS e FHHS?
DSSS (Direct-Sequence Spread-Spectrum): E' una particolare tecnologia di
trasmissione per la banda larga che consente di trasmettere ogni bit in maniera
ridondante. E' adatta in particolare per la trasmissione e la ricezione di segnali deboli.
FHHS (Frequency Hopping Spread Spectrum): è una tecnologia che permette la
condivisione tra più utenti di uno stesso insieme di frequenze. Per evitare interferenze
tra periferiche dello stesso tipo le frequenze di trasmissione cambiano sino a 1.600
volte ogni secondo.
5. Le informazioni inviate via wireless possono essere intercettate?
La scheda PCI/PCMCIA offre funzionalità di crittografia WEP fino a 128 bit, ciò
provvede a rendere sicure le trasmissioni dati wireless. L’utilizzo del WPA rende
ancora più sicura la trasmissione wireless.
6. Cosa è il WEP?
WEP è la sigla di Wired Equivalent Privacy, un protocollo di sicurezza per le reti locali
senza fili (WLAN) definito dallo standard 802.11b.
7. Cosa è la modalità Infrastructure?
Nella configurazione Infrastructure una rete WLAN e una rete WAN comunicano tra
loro tramite un access point.
8. Cosa è il Roaming?
Il Roaming è la capacità di un utente che possiede un computer portatile di
comunicare senza interruzioni mentre si muove liberamente all’interno di una rete
wireless la cui estensione è stata incrementata grazie all’utilizzo di più access point.
9. Cosa è la banda ISM?
Questa frequenza è stata messa a disposizione dalla FCC, su richiesta delle aziende
che intendevano sviluppare soluzioni wireless per l'uso civile quotidiano ed è
generalmente contraddistinta dalla sigla ISM band (Industrial, Scientific and Medical).
35
Page 35

ITALIANO
In questa frequenza operano solo dispositivi industriali, scientifici e medici a basse
potenze.
10. Cosa è lo standard IEEE 802.11g ?
Il nuovo standard 802.11g opera alla frequenza di 2,4 GHz e quindi è pienamente
compatibile con la più diffusa versione b. Il vantaggio è che consente una velocità di
trasferimento di 54 Mbps, cinque volte superiore allo standard 802.11b.
7. Supporto Offerto
Per qualunque altro problema o dubbio (prima è necessario conoscere tutti i parametri
usati nella rete wireless) è possibile contattare l’help desk telefonico (02/93907634)
gratuito di Atlantis Land che fornirà assistenza da lunedì al giovedì dalle 9:00 alle
13:00 e dalle 14:00 alle 18:00 ed il venerdì dalle 9:00 alle 13:00. E’ possibile anche
utilizzare il fax (02/93906161) la posta elettronica (info@atlantis-land.com
tecnici@atlantis-land.com
Atlantis Land SpA
Viale De Gasperi 122
20017 Mazzo di Rho (MI)
) per esporre eventuali domande o problemi.
oppure
Tel: +39.(0)2.93906085 (Fax: +39.(0)2.93906161)
Help Desk :+39.(0)2.93907634
36
Page 36

ENGLISH
Copyright Statement
No part of this publication may be reproduced, stored in a retrieval system, or
transmitted in any form or by any means, whether electronic, mechanical,
photocopying, recording or otherwise without the prior writing of the publisher.
Windows™ 98SE/2000/ME/XP are trademarks of Microsoft® Corp. Pentium is
trademark of Intel. All copyright reserved.
The Atlantis Land logo is a registered trademark of Atlantis Land SpA. All other names
mentioned mat be trademarks or registered trademarks of their respective owners.
Subject to change without notice. No liability for technical errors and/or omissions.
Wireless LAN, Health and Authorization for use
Radio frequency electromagnetic energy is emitted from Wireless LAN devices. The
energy levels of these emissions however are far much less than the electromagnetic
energy emissions from wireless devices like for example mobile phones. Wireless LAN
devices are safe for use frequency safety standards and recommendations. The use of
Wireless LAN devices may be restricted in some situations or environments for
example:
·On board of airplanes, or
·In an explosive environment, or
·In case the interference risk to other devices or services is perceived or identified as
harmful
In case the policy regarding the use of Wireless LAN devices in specific organizations
or environments (e.g. airports, hospitals, chemical/oil/gas industrial plants, private
buildings etc.) is not clear, please ask for authorization to use these devices prior to
operating the equipment.
Regulatory Information/disclaimers
Installation and use of this Wireless LAN device must be in strict accordance with the
instructions included in the user documentation provided with the product. Any
changes or modifications made to this device that are not expressly approved by the
manufacturer may void the user’s authority to operate the equipment. The
Manufacturer is not responsible for any radio or television interference caused by
unauthorized modification of this device, of the substitution or attachment.
Manufacturer and its authorized resellers or distributors will assume no liability for any
damage or violation of government regulations arising from failing to comply with these
guidelines.
37
Page 37

ENGLISH
CE Mark Warning
This is a Class B product. In a domestic environment, this product may cause radio
interference, in which case the user may be required to take adequate measures.
CE in which Countries where the product may be used freely:
Germany, UK, Italy, Spain, Belgium, Netherlands, Portugal, Greece, Ireland, Denmark,
Luxembourg, Austria, Finland, Sweden, Norway and Iceland.
France: except the channel 10 through 13, law prohibits the use of other channels.
CE/EMC Restriction of Liability
The product described in this handbook was designed, produced and approved
according to the EMC-regulations and is certified to be within EMC limitations.
If the product is used in an uncertified PC, the manufacturer undertakes no warranty in
respect to the EMC limits. The described product in this handbook was constructed,
produced and certified so that the measured values are within EMC limitations. In
practice and under special circumstances, it may be possible, that the product may be
outside of the given limits if it is used in a PC that is not produced under EMC
certification. It is also possible in certain cases and under special circumstances,
which the given EMC peak values will become out of tolerance. In these cases, the
user himself is responsible for compliance with the EMC limits.
Declaration of Conformity
This equipment has been tested and found to comply with Directive 1999/5/CE of the
European Parliament and of the Council on radio equipment and telecommunications
terminal equipment and the mutual recognition of their conformity. After assessment,
the equipment has been found to comply with the following standards: EN 300.328
(radio), EN 301 489-1, EN 301 489-17 (electromagnetic compatibility) and EN 60950
(safety). This equipment may be used in all European Union contries and in all
countries applying Directive 1999/5/CE, without restriction, with the exception of the
following countries:
France:When this equipment is used outdoors, output power is limited to within the
frequency bans listed on the chart. For more info, consult the website www.art-
telecom.fr.
Location Frequency Band (MHz) Power (EIRP)
Indoor (no restriction) 2400-2483,5 100mW(20dBm)
Outdoor 2400-2454
2454-2483,5
Italy: For more info, consult the website www.comunicazioni.it
100mW(20dBm)
10mW(10dBm)
38
Page 38

ENGLISH
Thank you for purchasing the Wireless MIMO Card that provides the easiest way to
wireless networking. This User Manual contains detailed instructions in the operation
of this product. Please keep this manual for future reference.
1 Wireless MIMO Card
The Wireless PCI/PCMCIA MIMO Card (hereafter called the Adapter) is a highefficiency wireless LAN Card for wireless networking at home, in office or in public
places. The data rate can be up to 54 Mbps and auto-negotiated to 48, 36, 24, 18, 12,
9, 6Mbps (IEEE 802.11g), or 11, 5.5, 2, 1Mbps (IEEE802.11b).
With the Adapter, you can roam between conference room and office without being
disconnected the LAN cables; in addition, sharing files and printers can be easy tasks.
The Wireless MIMO PCI Card is available to Microsoft Windows operating systems
(Windows® XP/2000/ME/98SE) and can be integrated into networking with either Adhoc mode (computer-to-computer, without an Access Point), Infrastructure mode
(computer-to-access point, an Access Point is required) or Access Point Mode.
The device offers quick and easy access among wired network and wireless network.
The Wireless MIMO PCI Card also supports WPA/WPA2 security, it increases the
level of data protection and access control for Wireless LAN.
MIMO XR™ and 3 x 2 dBi Antennas (Reverse-SMA for A02-PCI-W54M) provide
extended coverage and low throughput fluctuations.
Last but not least Packet-Overdrive™ technology offers an high throughput for HD
Video Streaming.
1.1 How the Adapter works
Ad-hoc Mode: An Ad-hoc network is a local area network or other small network,
especially one with wireless or temporary plug-in connections, in which some of the
network devices are part of the network only for the duration of a communications
session. Users in the network can share files, print to a shared printer, and access the
Internet with a shared modem. In this kind of network, new devices can be quickly
added; however, users can only communicate with other wireless LAN computers that
are in this wireless LAN workgroup, and are within range.
Infrastructure Networking Mode: The difference between Infrastructure network and
Ad-hoc network is that the former one includes an Access Point. In an Infrastructure
network, the Access Point can manage the bandwidth to maximize bandwidth
utilization. Additionally, the Access Point enables users on a wireless LAN to access
an existing wired network, allowing wireless users to take advantage of the wired
39
Page 39

ENGLISH
networks resources, such as Internet, email, file transfer, and printer sharing. The
scale and range of the Infrastructure networking are larger and wider than that of the
Ad-hoc networking.
Access Point Mode: PC with Wireless MIMO PCI/PCMCIA card work as an Access
Point. You can save money and make a little network using Your PC+Card as an
Access Point.
1.2 System Requirements
Before installing the Adapter, your PC should meet the following:
Desktop PC with available PCI2.1/2.2 slot
Notebook with available PCMCIA CardBus Type II 32 bit slot
Intel® Pentium®III 600Mhz or compatible processor with 128MB RAM
Windows 98SE/ME/2000/XP or Linux operating system
Minimum 15 Mbytes free disk space for installing the driver and utilities
CD-Rom drive
1.3 Package Contents
Unpack the package and check all the items carefully. If any item contained is
damaged or missing, please contact your local dealer as soon as possible. Also, keep
the box and packing materials in case you need to ship the unit in the future. The
package should contain the following items:
One Wireless MIMO Card
3 external 2 dBi antenna (A02-PCI-W54M)
One Quick Start Guide
One CD with driver/utilities and user’s manual
40
Page 40

ENGLISH
1.4 Product View
41
Page 41

ENGLISH
2 Software Installation
This section describes the procedures of installing the driver and utility. Follow the
instruction step by step to finish the installation. If you use Windows® 98SE/ME,
please prepare the Windows® Setup CD at hand before installing the driver; because
the system will ask you to insert the Setup CD to copy files during the installation.
Start Windows. Insert the driver CD into your CD-Rom drive.
Go to your Windows Start menu and choose Run, type “CDRom:\Driver\Setup.exe” in
the dialog box and click OK. Simply follow the instructions below which outline what
you needto do.
Click Yes.
In the next windows choose Ralink Configuration Tool, then click Next.
Chose Optimazed for Wi-Fi mode, then click Next.
Please plug Wirless MIMO PCMCIA Card cable into PCMCIA Slot, it will be recognized
and auto installed.
42
Page 42

ENGLISH
In the last Windows please select Yes, I want to restart my computer, then click on
Finish.
3 Hardware Installation (A02-PCI-W54M)
The following diagrams provide you a basic installation for the Adapter, which is
suitable for most desktop PCs. For more information about the PCI slot, please refer to
the user's manual of your main board.
Step 1. Power off the computer, and then remove the computer cover. Locate the
available PCI slot on your main board.
Step 2. Put the Adapter directly over the PCI slot and press it into the slot firmly.
43
Page 43

ENGLISH
Step 3. Replace the computer cover after securing the Adapter with a bracket
screw.
Step 4. Gently connect the 3 external antennas to the connectors on the Adapter’s
bracket.
Step 5. Power on your PC.
4. Wireless Network Utility
4.1 Introduction
After installing the driver, the Adapter provides a convenient and powerful utility that
allows you to set up, configure, and know your networking status easily and clearly.
You will see the icon(
Besides, the small icon will change color to reflect current wireless network connection
status. The status indicates as follow:
) on the Windows task bar when you finish the installation.
•
•
: Indicate Connected and Signal Strength is Good.
: Indicate Connected and Signal Strength is Normal.
44
Page 44

ENGLISH
• : Indicate Connected and Signal Strength is Weak.
•
•
When You click on this icon in the Windows task bar You can see 4 different links:
• Launch Config Utilities
• Use Zero Configuration as Configuration Utility
• Switch to AP mode
• Exit
4.2 Using the Configuration Utility
Double-click the Wireless LAN icon (or right-click and then select Launch Config
Utilities) to launch the Configuration Utility. With the Wireless PCI//PCMCIA Adapter
utility, users can configure all the functions provided by the Wireless Monitor Utility.
Double-click the utility icon that appears in the taskbar.
: Indicated not connected yet.
: Indicated wireless NIC not detected.
In windows XP, it provides wireless configuration utility named
“windows zero configuration” which provides basic
configuration function for Wirless MIMO Card. Currently,
Ralink’s utility provides WPA-PSK supplicant’s functionality. If
user required WPA function.
Please select WZC as main utility. To make it easier for user to
select the correct utility. RaConfig will let user make the
selection when it first ran after XP boot. Click the icon of will
bring up the selection window and let user make the selection.
When coexisting with WZC, RaConfig only provides monitoring
function, such as link status, site surveying, statistic counters
and advance feature status.
45
Page 45

ENGLISH
The Wireless Monitor Utility includes seven tabs: Profile, Link Status, Site Survey,
Statistics, Advanced, QoS and About.
46
Page 46

ENGLISH
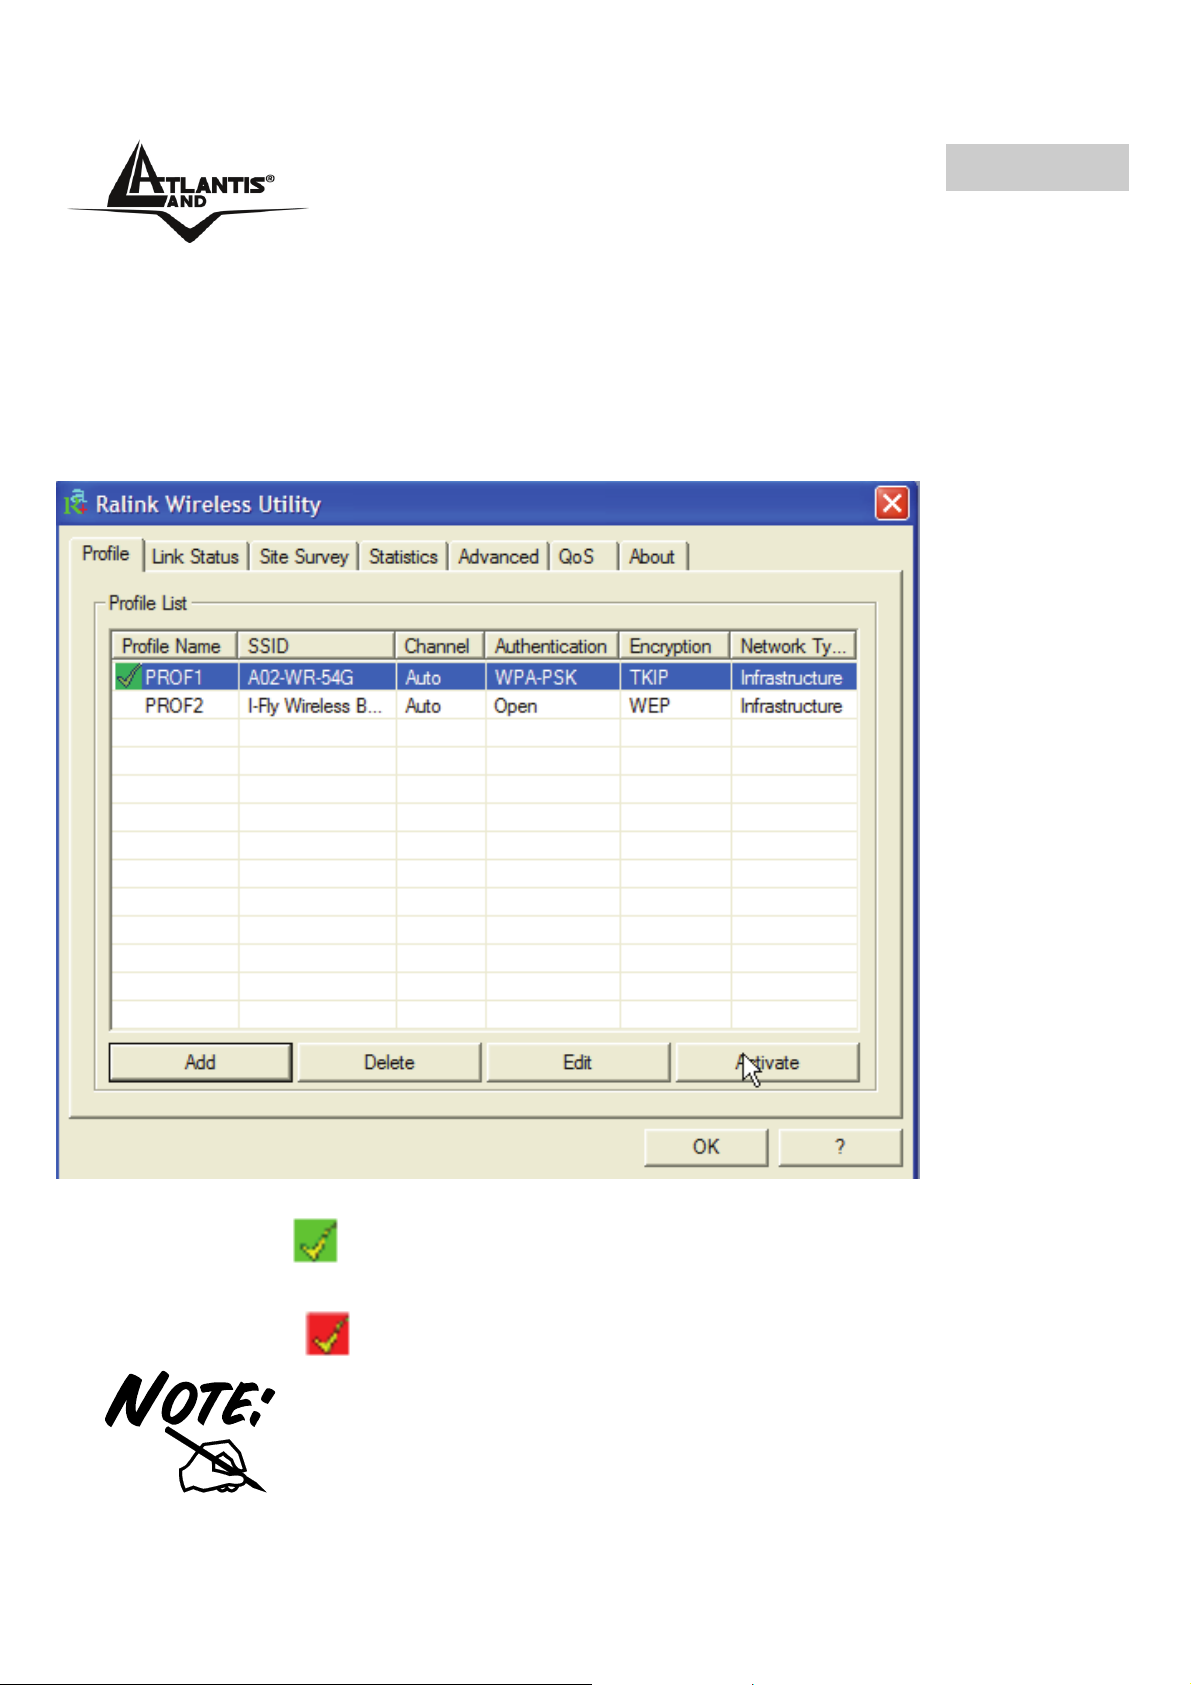
4.2.1 Profile
Profile can book keeping your favorite wireless setting among your home, office, and
other public hotspot. You may save multiple profiles, and activate the correct one at
your preference. The picture shows the profile page setting.
Connection status:
• Green Icon(
• Red Icon (
Click Add button in order to make a new profile.
):Indicate connection is successful on currently activated profile.
)Indicate connection is failed on currently activated profile.
When use site survey to make the connection. None of the
profile will have the connection status icon.
47
Page 47

ENGLISH
Chose a profile and click Delete button in order to erase an existing profile.
Click Edit button to change the selected Profile.
Chose a profile and click Activate button in order to selected profile.
Add a new profile:
Click Add button and chose Configuration tab:
• Profile: Name of profile, preset to PROF* (* indicate 1, 2, 3,).
• SSID: AP or Ad-hoc name.
• Cannel: Channel in use for Ad-Hoc mode.
• Authentication: Authentication mode.
• Encryption: Security algorithm in use.
• Network Type: Network’s type, including infrastructure and Ad-Hoc.
Click on Authentication and Security tab in order to configure wirless security
(please check 4.2.3 for more info).
4.2.2 Link Status
This picture is the link status page; it displays the detail information current connection.
48
Page 48

ENGLISH
Status: Current connection status. If no connection, if will show Disconnected.
Otherwise, the SSID and BSSID will show here.
Extra Info: Display link status and current channel in use.
Link Speed: Show current transmit rate and receive rate.
Throughout: Display transmits and receive throughput in unit of K bits/sec.
Link Quality: Display connection quality based on signal strength and TX/RX packet
error rate.
Signal Strength: Receive signal strength, user can choose to display as percentage
or dBm format.
Noise Level: Display noise signal strength.
49
Page 49

ENGLISH
4.2.3 Site Survey
Under the site survey page, system will display the information of surrounding APs
from last scan result. List information’s include SSID, BSSID, Signal, Channel,
Encryption algorithm, and Network type as picture shown.
Rescan: Issue an rescan command to wireless NIC to update information on
surrounding wireless network.
Connect: Command to connect to the selected network.
Add to Profile: select an AP profile, click Add to Profile. It will bring up profile page
and save user’s setting to a new profile.
If selected AP supports WEP or WPA/WPA2 You have to
chose Authentication and Security tab in order to connect to
the wireless network.
50
Page 50

ENGLISH
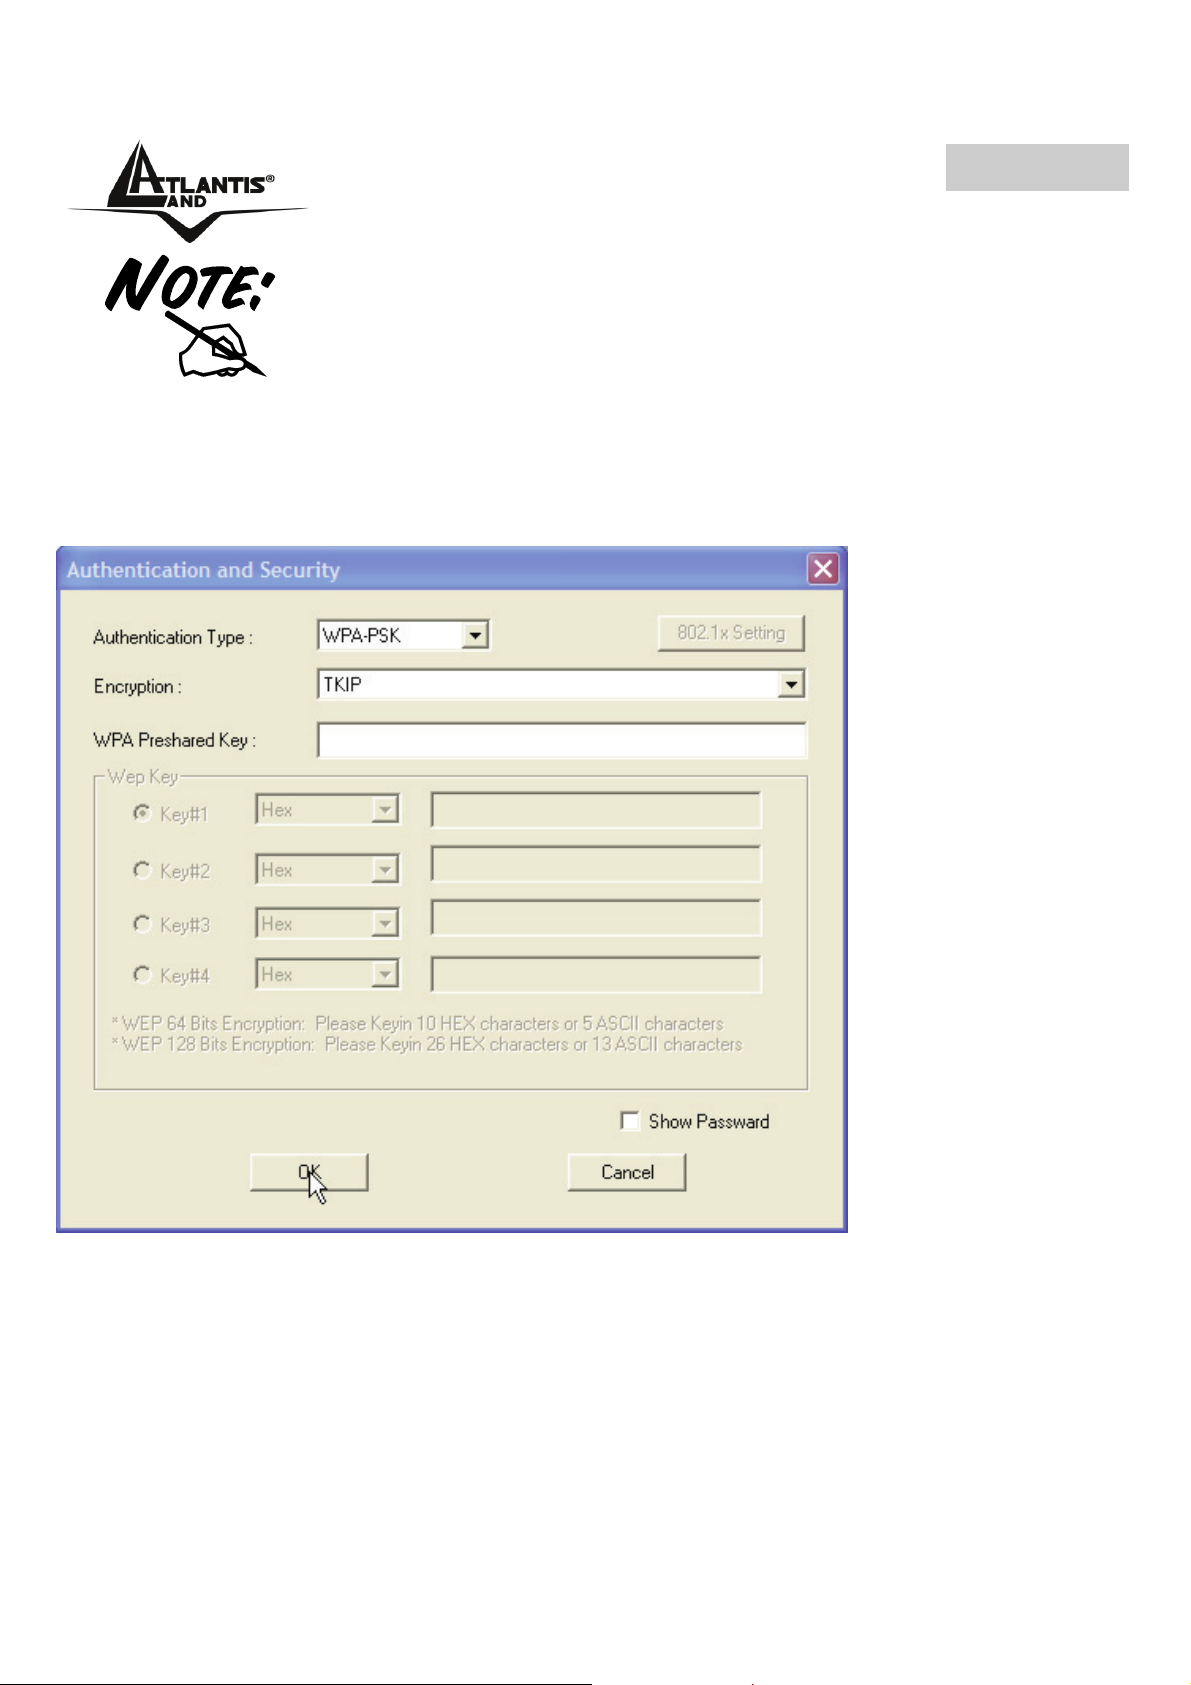
Authentication and Security
This function is used to protect wireless communication from eavesdropping. A
secondary function of encryption is to prevent unauthorized access to a wireless
network, and it can be achieved by using the Encryption function. This Card provides
three modes for Security Encryption: WPA/WPA2, 802.1x and WEP.
• WPA-PSK/WPA2-PSK: Wi-Fi Protected Access (WPA) is the newest and best
available standard in Wi-Fi security. Pre-Shared Key gives you a choice of two
encryption methods: TKIP (Temporal Key Integrity Protocol), which utilizes a
stronger encryption method and incorporates Message Integrity Code (MIC) to
provide protection against hackers, and AES (Advanced Encryption System),
which utilizes a symmetric 128-Bit block data encryption. Type in 8 ~ 63
characters inside the dialog box to have the WPA password between the AP and
the clients.
51
Page 51

ENGLISH
• WPA/WPA2: A RADIUS server is used to authenticate the connection for clients
and return authentication key parameters to the users to connect to the wireless
networking.
• RADIUS (Remote Authentication Dial-In User Service) utilizes a RADIUS server
for authentication and the use of dynamic TKIP, AES, or WEP. Click on 802.11x
Settings in order to finish the configuration.
• LEAP: Please insert username and password.
• Open System: with the same WEP key between the stations, the stations don’t
need to be authenticated, and this algorithm was set to default. Please select
WEP or 802.11x Settings in order to complete the configuration.
• Shared Key: with the same WEP key between the stations in this Authentication
algorithm, this type will use packets with encryption by transferring a challenge
text which will be acknowledge by both side of the stations. In order to choose
which authentication algorithm will be used, you must know which one the station
supports this algorithm first. Please select WEP or 802.11x Settings in order to
complete the configuration.
How to configure WEP security:
If you select 64bit in Hex format, you must type 10 values in
the following range (0~F, hexadecimal), or 64bit in ASCII
format, you must type 5 values in the following range (0~9,
A~Z and a~z Alphanumeric).
If you select 128bit in Hex format, you must type 26 values
(0~F, hexadecimal), or 128bit in ASCII format, you must type
13 values in the following range (0~9, A~Z and a~z
Alphanumeric).
ASCII HEX
64 bit 5*X 10*Y
128 bit 13*X 26*Y
X=[(0~9, A~Z, a~z Alphanumeric]
Y=[0~9, A~F Hexadecimal]
Be sure that the PCI/PCMCIA Adapter and the wireless station
(AP) were set in the same key.
52
Page 52

ENGLISH
WEP is not completely secure. If possible please use WPA-PSK.
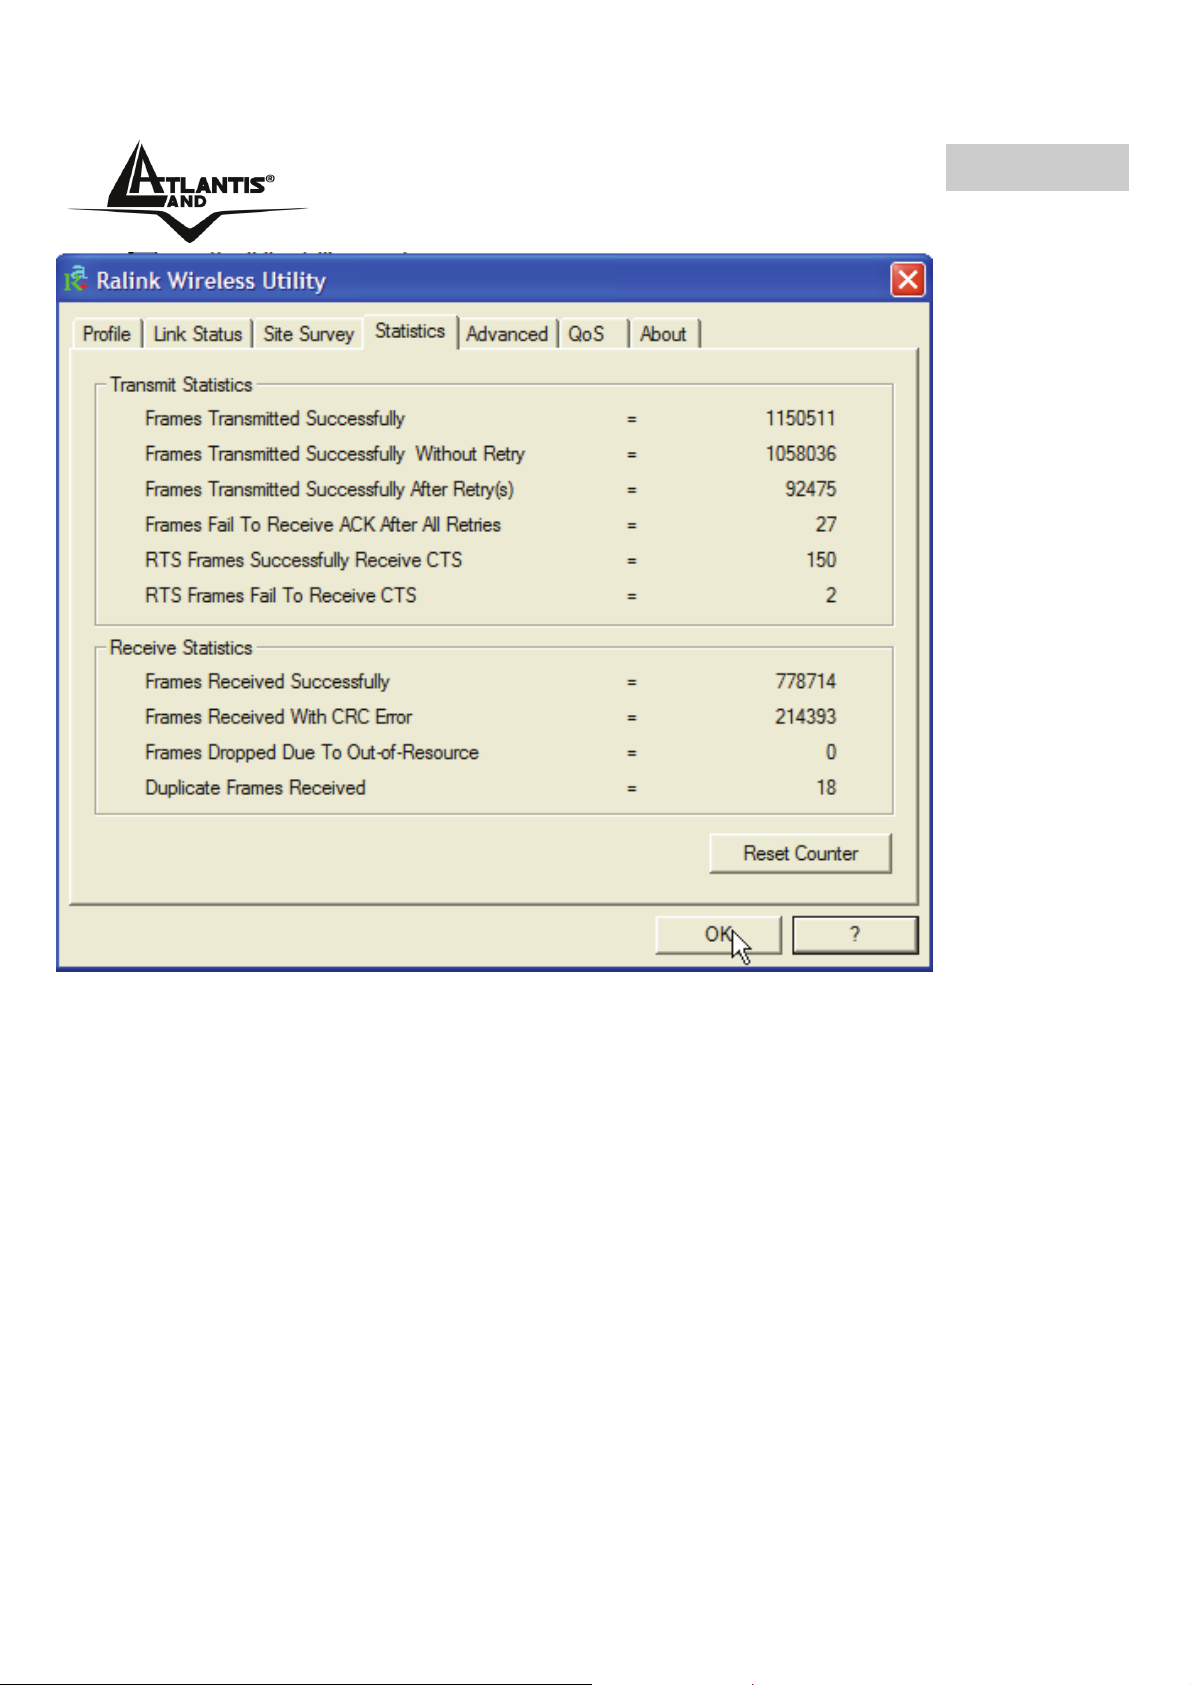
4.2.4 Statistics
Statistics page displays the detail counter information based on 802.11 MIB counters.
This page translates that MIB counters into a format easier for user to understand. The
picture shows the detail page layout.
Transmit Statistics:
• Frames Transmitted Successfully: Frames successfully sent.
• Frames Transmitted Successfully Without Retry: Frames successfully sent
without any retry.
53
Page 53

ENGLISH
• Frames Transmitted Successfully After Retry: Frames successfully sent with
one or more reties.
• Frames Fail To Receive ACK After All Retries: Frames failed transmit after
hitting retry limit.
• RTS Frames Successfully Receive CTS: Successfully receive CTS after
sending RTS frame.
• RTS Frames Fail To Receive CTS: Failed to receive CTS after sending RTS.
Receive Statistics:
• Frames Received Successfully: Frames received successfully.
• Frames Received With CRC Error: Frames received with CRC error.
• Frames Dropped Due To Out-of-Resource: Frames dropped due to resource
issue.
• Duplicate Frames Received: Duplicate received frames.
Reset counters to zero.
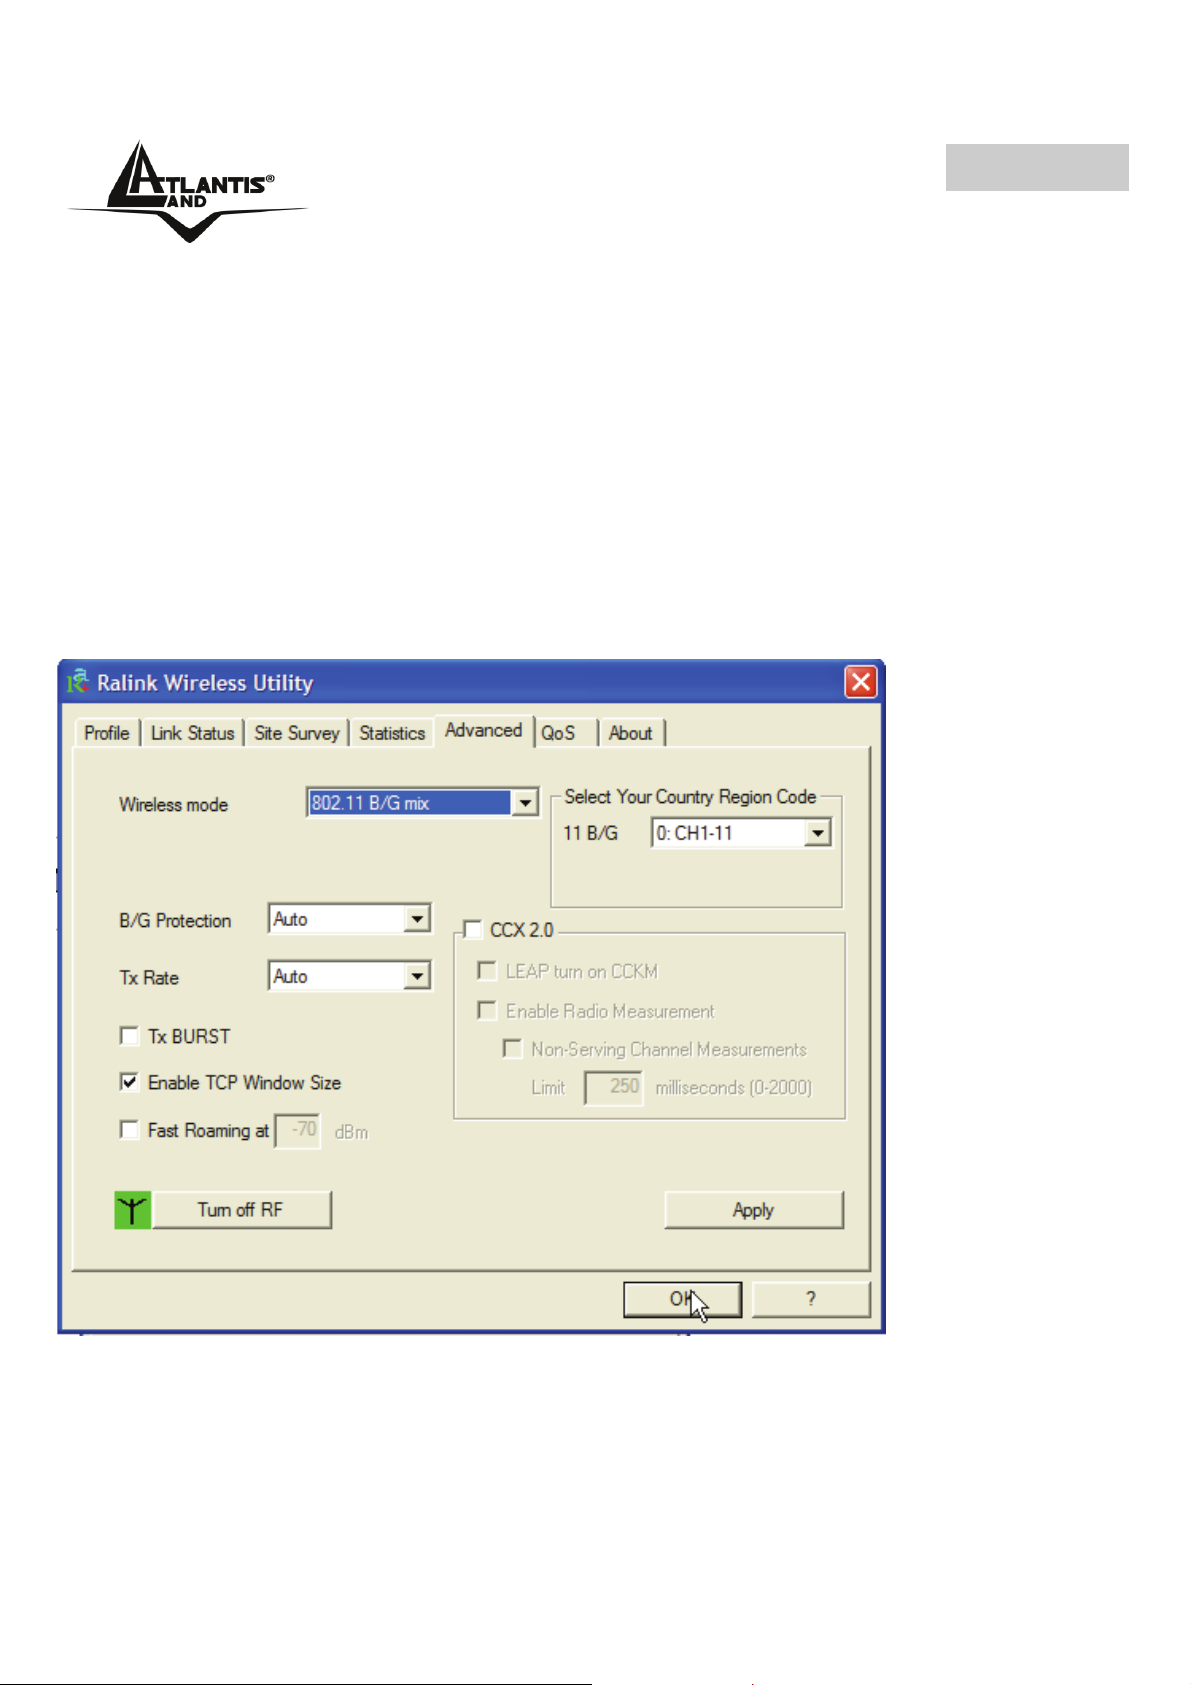
4.2.5 Advanced
The picture shows advance setting page of RaConfig.
54
Page 54

ENGLISH
Wireless mode: Select wireless mode: 802.11B only, 802.11 B/G mixed modes are
supported.
B/G Protection: ERP protection mode of 802.11G definition. User can choose from
Auto, On, and Off.
• Auto: STA will dynamically change as AP announcement.
• On: Always send frame with protection.
• Off: Always send frame without protection.
TX Rate: Manually force the Transmit using selected rate. Default is auto.
TX Burst: Ralink’s proprietary frame burst mode.
Fast Roaming at: fast to roaming, setup by transmit power.
Select Your Country Region Code: eight countries to choose. Country channel list:
Country channel list
CCX2.0: support Cisco Compatible Extensions function:
• LEAP turn on CCKM
• Enable Radio Measurement: can channel measurement every 0~2000
milliseconds.
55
Page 55

ENGLISH
Turn radio ON/OFF for FAA requirement.
• Radio On: Indicate to turn on radio.
• Radio Off: Indicate to turn off radio.
Apply the above changes.
Select the country where you are using this Wireless Device,
users are responsible for ensuring that the channel set
configuration is in compliance with the regulatory standards of
these countries. Please chek on the Appendix A fore more
information.
4.2.6 QoS
It involves “WMM Enable”, “WMM – Power Save Enable” and DLS setup. The
introduction indicates as follow:
56
Page 56

ENGLISH
If you want to use WMM – Power Save or Direct Link, you must enable WMM. The
setting method of enabling WMM indicates as follows:
• Click WMM Enable, then click Apply. Change to Site Survey Page. And
add a AP that supports WMM features to a Profile.
• Click WMM – Power Save Enable. And Click Setting… button. After
clicking Setting… button, show Power Save Setting dialog. Please select
which ACs you want to enable. Then click Apply button. The setting of
enabling WMM – Power Save is successfully.
• Direct Link Setup Function will be released with the new driver.
4.2.7 About
The About section shows the Driver Version, Firmware Version, MAC Address, IP
Configuration and the Utility version.
57
Page 57

ENGLISH
4.3 AP Mode (Windows XP only)
Double-click the Wireless LAN icon (or right-click and then select Launch Config
Utilities) tand chose Switch to AP mode. With the Wireless PCI/PCMCIA Adapter
utility, users can configure all the functions provided by the Wireless Monitor Utility.
Double-click the utility icon that appears in the taskbar.
The Wireless Monitor Utility includes six tabs: Config, Access Control List, Mac
Table, Event Log, Statistics and About.
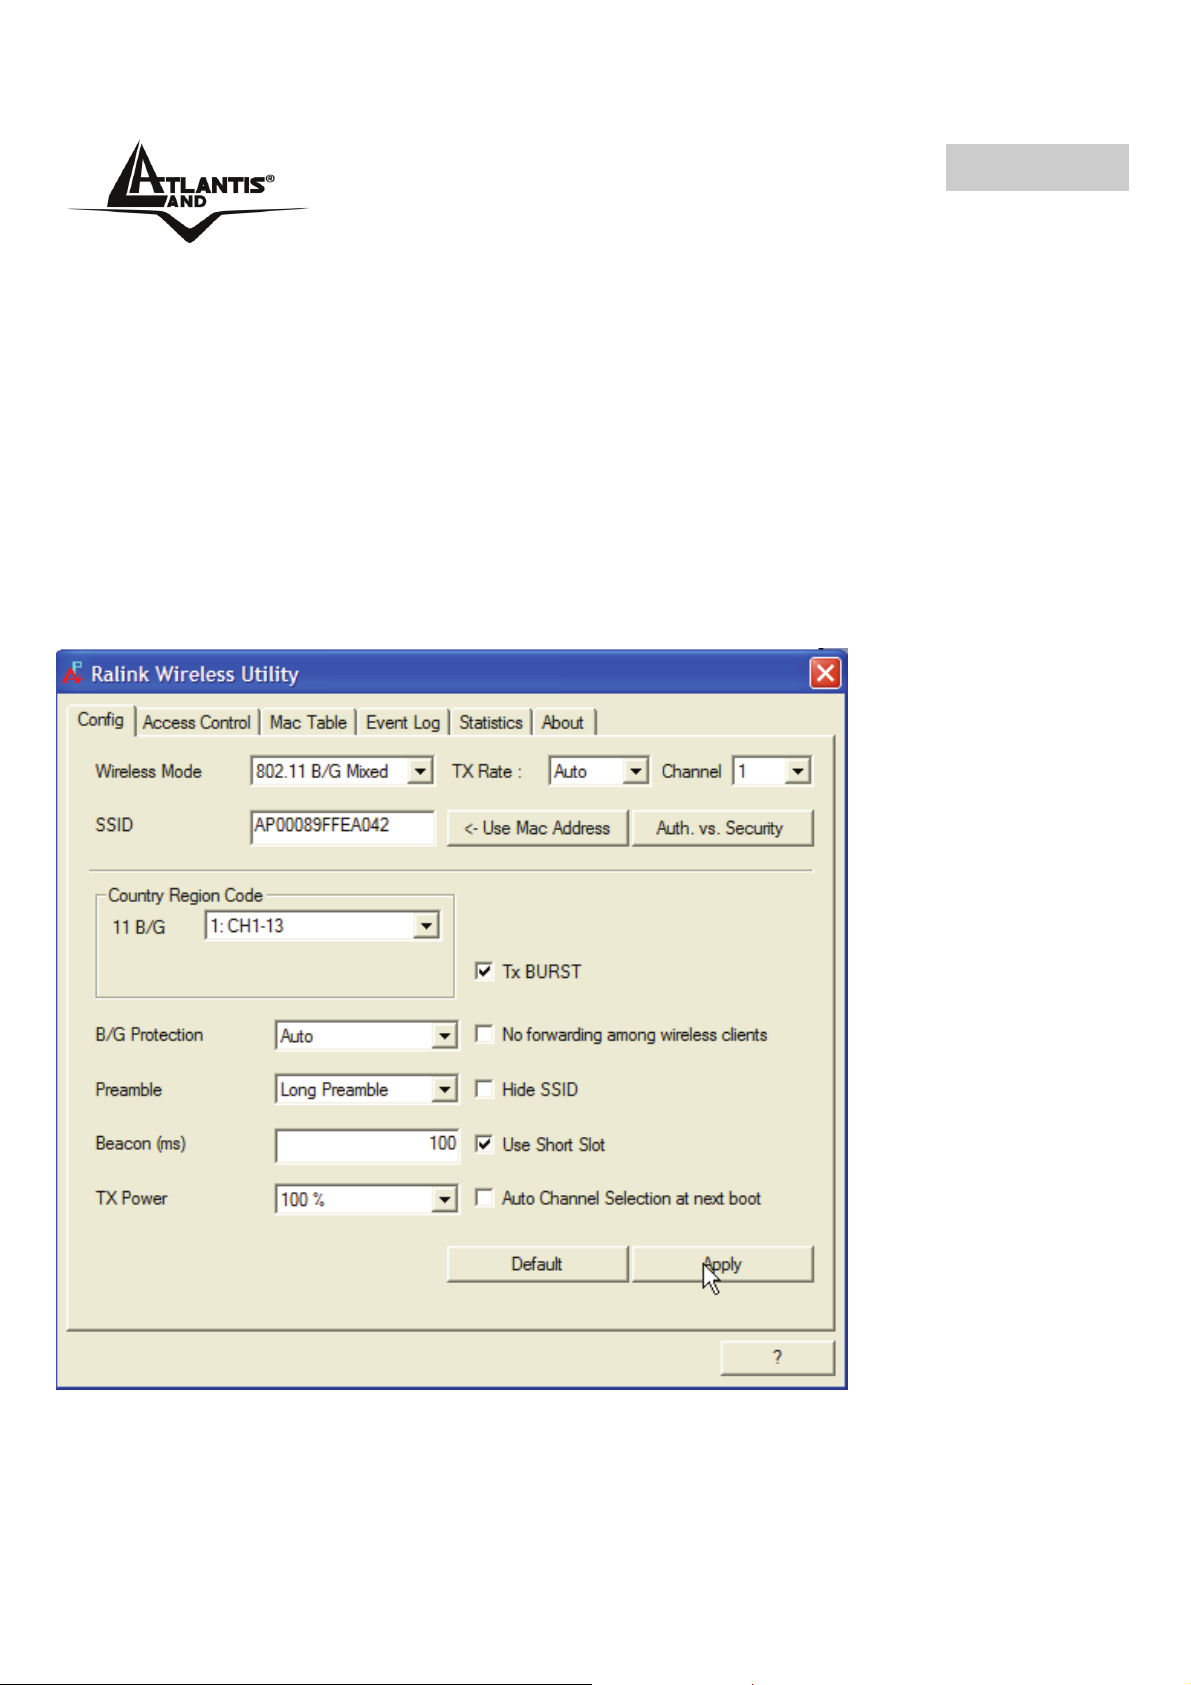
4.3.1 Config
This page can setting and display Soft AP detail information.
Definition of each field
58
Page 58

ENGLISH
Wireless Mode: Select wireless mode 802.11 b/g mixed, 802.11b only are supported.
System default is 802.11 b/g mixed.
SSID: AP name of user type. User also can select [Use Mac Address] to display it.
System default is SoftAP-XX.
Country Region Code: eight countries to choose. Country channel list:
Select the country where you are using this Wireless Device,
users are responsible for ensuring that the channel set
configuration is in compliance with the regulatory standards of
these countries. Please chek on the Appendix A fore more
information.
B/G Protection: ERP protection mode of 802.11G definition. User can chose from
Auto, on, and off. System default is auto.
• Auto: STA will dynamically change as AP announcement.
• On: Always send frame with protection.
• Off: Always send frame without protection.
Preamble: Preamble frames. Long preamble (128 bits sync field) and short preamble
(56 bits sync field) are supported. System default is long preamble.
Beacon (ms): The time between two beacons. System default is 100 ms.
TX Power: Manually force the AP transmits power. System default is 100%.
TX Rate: Manually force the Transmit using selected rate. Default is auto.
Channel: Manually force the AP using the channel. System default is channel 1.
Auth. Vs. Security: Authentication mode and encryption algorithm used within the AP.
System default is no authentication and encryption. Please refer t osectin 4.2.3 for
more info.
TX Burst: Ralink’s proprietary frame burst mode. System default is no TX Burst.
No forwarding among wireless clients: No beacon among wireless client, clients
can’t share information each other. System default is no forwarding.
Hide SSID: Don’t display AP name. System default no hide.
Use Short Slot: Slot time. Short slot time is 9 us, long slot time is 20 us. System
default is long slot time.
Auto Channel Selected at next boot: System will make a random channel next boot.
(PCI/PCMCIA device only)
Default: Use system default value.
Click Apply in order to save all settings.
59
Page 59

ENGLISH
For more info please click on helb button.
The range of radio frequencies used by IEEE 802.11g wireless devices is
called a “channel”. Channels available depend on your geographical area.
You may have a choice of channels (for your region) so you should use a
different channel than an adjacent AP (access point) to reduce
interference. Interference occurs when radio signals from different access
points overlap causing interference and degrading performance.
Adjacent channels partially overlap however. To avoid interference due to
overlap, your AP should be on a channel at least five channels away from a
channel that an adjacent AP is using. For example, if your region has 11
channels and an adjacent AP is using channel 1, then you need to select a
channel between 6 or 11.
60
Page 60

ENGLISH
4.3.2 Access Control
AP connected or can’t connect with Mac address that user setting.
Access
Policy
Default
Access
Result
4.3.3 Mac Table
This screen displays the station detail information of current connection.
Detail information:
• MAC Address: The station’s Mac address of current connection.
• AID: Raise value by current connection.
• Power Saving Mode: The station of current connect whether it have to support.
4.3.4 Event Log
Record Soft AP all event time and message.
Allow All Reject All Disable
Access Reject Access
Access Control function
doesn’t allows clients
whose MAC addresses
in the list will be able to
connect to this Access
Point.
Access Control function
allows clients whose
MAC addresses in the
list will be able to
connect to this Access
Point.
Access Point doesn’t
check MAC
addresses
• Event Time (yy/mm/dd-hh:mm:ss): Record event time.
• Message: All event message.
4.3.5 Statistics
Please check 4.2.4.
4.3.6 About
Please check 4.2.5.
5 Uninstallation
To uninstall the Wireless MIMO NIC Card, go to the Control Panel of your system.
• Open the Add/Remove Programs.
• Select the Ralink Wireless Lan Card in the Add/Remove Programs and then
click on the Remove.
61
Page 61

ENGLISH
• Click on Remove ALL [or Overwrite the older version install without
remove].
• Then chose Yes, I want to restart my computer and click Finish.
• Now You can remove the Card.
6 Troubleshooting
Common Problems and Solutions
This chapter provides solutions to problems that may occur during the installation and
operation of the WLAN 802.11g PCI/PCMCIA Adapter. Read the descriptions below to
solve your problems.
2. My computer cannot find the Adapter
Make sure the Adapter has no physical damage.
Make sure the Adapter is properly inserted in the PCI/PCMCIA slot.
Try the Adapter in other PCI/PCMCIA slots.
Try another Adapter in that particular PCI/PCMCIA slot.
2. Cannot access any network resources from the computer.Make sure that
the notebook PC is powered on.
Make sure that the notebook PC is powered on.
Make sure that the Cardbus is configured with the same SSID and security
options as the other computers in the infrastructure configuration.
Disable “Windows XP Wireless Zero Configuration
In Windows XP, it is recommended that you use the WLAN 802.11g Utility. Right after
the installation, before opening the Utility, please follow the steps below to disable the
Windows XP Zero Configuration:
1 Go to “Control Panel” and double click “Network Connections”.
2 Right-click “Wireless Network Connection” of WLAN 802.11gWireless LAN, and
select “Properties”.
3 Select “Wireless Networks” tab, and uncheck the check box of “Use Windows to
configure my wireless network settings”, and then click “OK”.
Frequently Asked Questions
1. Can I run an application from a remote computer over the wireless
network?
62
Page 62

ENGLISH
This will depend on whether or not the application is designed to be used over a
network. Consult the application’s user guide to determine if it supports operation over
a network.
2. Can I play computer games with other members of the wireless network?
Yes, as long as the game supports multiple players over a LAN (local area network).
Refer to the game’s user guide for more information.
3. What is Spread Spectrum?
Spread Spectrum technology is a wideband radio frequency technique developed by
the military for use in reliable, secure, mission-critical communications systems. It is
designed to trade off bandwidth efficiency for reliability, integrity, and security. In other
words, more bandwidth is consumed than in the case of narrowband transmission, but
the trade-off produces a signal that is, in effect, louder and thus easier to detect,
provided that the receiver knows the parameters of the spread-spectrum signal being
broadcast. If a receiver is not tuned to the right frequency, a spread-spectrum signal
looks like background noise. There are two main alternatives, Direct Sequence Spread
Spectrum (DSSS) and Frequency Hopping Spread Spectrum (FHSS).
4. What is DSSS? What is FHSS? And what are their differences?
Frequency-Hopping Spread-Spectrum (FHSS) uses a narrowband carrier that changes
frequency in a pattern that is known to both transmitter and receiver. Properly
synchronized, the net effect is to maintain a single logical channel. To an unintended
receiver, FHSS appears to be short-duration impulse noise. Direct-Sequence SpreadSpectrum (DSSS) generates a redundant bit pattern for each bit to be transmitted. This
bit pattern is called a chip (or chipping code). The longer the chip, the greater the
probability that the original data can be recovered. Even if one or more bits in the chip
are damaged during transmission, statistical techniques embedded in the radio can
recover the original data without the need for retransmission. To an unintended
receiver, DSSS appears as low power wideband noise and is rejected (ignored) by
most narrowband receivers.
5. Would the information be intercepted while transmitting on air?
WLAN features two-fold protection in security. On the hardware side, as with Direct
Sequence Spread Spectrum technology, it has the inherent security feature of
scrambling. On the software side, WLAN offers the encryption function (WEP) to
enhance security and access control.
6. What is WEP?
WEP is Wired Equivalent Privacy, a data privacy mechanism based on a 64-bit or 128bit shared key algorithm, as described in the IEEE 802.11 standard.
7. What is infrastructure mode?
63
Page 63

ENGLISH
When a wireless network is set to infrastructure mode, the wireless network is
configured to communicate with a wired network through a wireless access point.
8. What is roaming?
Roaming is the ability of a portable computer user to communicate continuously while
moving freely throughout an area greater than that covered by a single access point.
Before using the roaming function, the workstation must make sure that it is the same
channel number with the access point of dedicated coverage area.
9. What is ISM band?
The FCC and their counterparts outside of the U.S. have set aside bandwidth for
unlicensed use in the ISM (Industrial, Scientific and Medical) band. Spectrum in the
vicinity of 2.4 GHz, in particular, is being made available worldwide. This presents a
truly revolutionary opportunity to place convenient high-speed wireless capabilities in
the hands of users around the globe.
10. What is the IEEE 802.11g standard?
Approved in June, 2003 as an IEEE
(WLANs), 802.11g offers wireless transmission over relatively short distances at up to
54 megabit
802.11b
thus compatible with it.
s per second (Mbps) compared with the 11 megabits per second of the
(Wi-Fi) standard. Like 802.11b, 802.11g operates in the 2.4 GHz range and is
standard for wireless local area networks
7 Product Support
If you have any problems with the Wireless MIMO PCI/PCMCIA Card, please consult
this manual. If you continue to have problems you should contact the dealer where you
bought this device. If you have any other questions you can contact the Atlantis Land
company directly at the following address:
Atlantis Land SpA
Viale De Gasperi, 122
20017 Mazzo di Rho(MI)
Tel: +39. 02.93906085, +39. 02.93907634(help desk)
Fax: +39. 02.93906161
Email: info@atlantis-land.com
WWW: http://www.atlantis-land.com
or tecnici@atlantis-land.com
64
Page 64

ENGLISH
65
Page 65

FRANCAIS
Copyright
Copyright. 2002 est la propriété de cette société. Tout droits réservés. Sont interdites,
la reproduction, la transmission, la transcription, la mémorisation dans un système de
sauvegarde où la traduction dans une autre langue ou en langage informatique quels
qu’ils soient, de la présente publication, sous quelque forme que ce soit ou quelque en
soit le moyen, électronique, mécanique, magnétique, optique, chimique, manuel ou de
tout autre genre, sans avoir obtenu préalablement l’autorisation de notre entreprise.
Non-responsabilité
La présente entreprise n’admet ni requêtes ni de garantie, explicites ou implicites, au
sujet du contenu et de manière spécifique exclue la possibilité de garantie,
communicabilité ou adaptabilité pour des finalités particulières. Le logiciel décrit dans
le présent manuel est vendu ou concédé en licence “tel quel”. Si les programmes
devaient présenter des problèmes après l’achat, l’acquéreur (et non pas la présente
entreprise, son distributeur ou concessionnaire) est tenu de prendre en charge tous les
coûts de manutention ainsi que les coûts dus à des dommages accidentels ou des
conséquences dérivants d’un défaut du logiciel. La présente entreprise se réserve en
outre le droit de revoir le contenu de cette publication et d’y apporter des modifications
de temps en temps, sans obligation d’informer les utilisateurs de ces changements.
Nous avons fait tout notre possible afin d’éviter la présence d’erreurs dans le texte, les
images, les tableaux présents dans ce manuel et dans le Cd-Rom. Cependant, nous
ne pouvons pas garantir l’absence totale d’erreurs et/ou d’omissions, nous vous
remercions donc de nous les signaler et vous prions de nous en excuser. Enfin, nous
ne pouvons être tenus pour responsables dans quelque perte que ce soit, dommage
ou incompréhension à la suite directe ou indirecte de l’utilisation de notre manuel, le
logiciel Cd-Rom et/ou disque dur.
Toutes les marques ou noms de produits mentionnés dans le présent manuel sont des
marques commerciales et/ou brevetées par leurs propriétaires respectifs.
Marquage CE
Cet appareil, qui appartient à la Classe B peut causer des interférences radio, dans ce
cas nous vous invitons à prendre les contre-mesures appropriées.
ATTENTION
Laisser au moins 30 cm de distance entre les antennes du dispositif et les utilisateurs.
Domaine de régulation
Chaque pays utilise des bandes de fréquences fixées par cet organisme, l’utilisateur
final doit donc s’assurer du bon réglage de son AP sur un canal autorisé dans son
pays.
66
Page 66

FRANCAIS
Déclaration de Conformité
Cet appareil a été testé et est conforme à la Directive 1999/5/CE du Parlement
européen et du Conseil concernant les équipements hertziens et les équipements de
terminaux de télécommunications et la reconnaissance mutuelle de leur conformité.
Après évaluation du matériel, celui-ci est conforme aux normes suivantes : EN
300.328 (radio), EN 301 489-1, EN 301 489-17(compatibilité électromagnétique) et EN
60950 (sécurité). Ce matériel peut être utilisé dasn tous les pays de l’Union
Européenne et dans tous les pays appliquant la Directive 1999/5/CE, sans limitations,
à l’exception des pays suivants :
France :
En cas d’utilisation de ce matériel en extérieur, la puissance de sortie est limitée dans
les plages de fréquences ci-dessous. Pour de plus amples informations, consultez le
site de l’ART : www.art-telecom.fr
Site Plage de fréquences
(MHz)
Intérieur (aucune restriction) 2400-2483,5 100mW(20dBm)
Extérieur 2400-2454
2454-2483,5
Italie :
Cet appareil est conforme à l’interface radio nationale et aux exigences de la table
d’allocation des fréquences. L’utilisation de ce produit sans fil en dehors du cadre de la
propriété de l’acquéreur nécessite une autorisation générale. Pour da plus amples
informations, consultez le site www.comunicazioni.it
Puissance (EIRP)
100mW(20dBm)
10mW(10dBm)
67
Page 67

FRANCAIS
Félicitations pour avoir choisit ceproduit. Ce manuel a été rédigé pour une utilisation
avancée du Wireless MIMO Card, le terme Carte sera utilisé dans ce manuel pour
désigner cet appareil.
1 Wireless MIMO Card
La Carte PCI/PCMCIA est une carte réseau Sans fil utilisable à la maison, au bureau
ou dans des lieux publics. Ce produit gère la vitesse de transfert 54 Mbps et peut autonégocier les vitesses de 48, 36, 24, 18, 12, 9, 6 Mbps (IEEE 802.11g) ou 11, 5.5, 2, 1
Mbps (IEEE802.11b).
Les 3 antennes (amovibles R-SMA dans la carte PCI) de 2 dBi chacune et le MIMO
XR™ assurent une couverture étendue avec un débit constant permanent.
Avec la technologie Packet-Overdrive ™ enfin le dispositif permets d’envoyer sur le
réseau sans fil aussi du video HD.
Avec ces fonctions intégrées, le produit vous donne la flexibilité nécessaire pour
configurer le dispositif de manière à répondre aux besoins de votre environnement.
Les chipsets supportent le Wi-Fi Protected Access (WPA/WPA2) et le nouveau
standard de sécurité IEEE802.11i en hardware, ainsi que le moteur d’encryptage
haute vitesse sans dégradation des performances.
Les fonctions de sécurité avancée vous protègent des attaques de hacker.
Il est compatible avec les systèmes Windows® XP/2000/ME/98SE ou Linux et
fonctionne en mode Ad-Hoc (d’un ordinateur à un autre) ou en mode Infrastructure
(d’un ordinateur à un point d’accès). La carte est aussi capable de fonctionner, dans
Windows XP, comme Point d’Accès.
1.1 Modes de Fonctionnement
A la différence des réseaux filaires (LAN), les réseaux Sans fil (WLAN) peuvent
fonctionner selon deux modes différents: infrastructure ou ad-hoc.
En mode Infrastructure un réseau WLAN et un réseau WAN communiquent entre eux
à travers un point d’accès. En mode ad-hoc les clients Sans fil communiquent entre
eux directement. Le choix entre ces deux configurations est donc guidé par la
nécessité ou pas de mettre en communication un réseau sans fil avec un réseau
câblé.
Si les ordinateurs connectés au réseau wireless doivent accéder à des ressources ou
des périphériques partagés sur un réseau câblé, il faudra utiliser le mode infrastructure
(Figure 2-1). L’Access Point transmettra les informations aux clients sans fil qui
pourront se déplacer dans la zone de couverture. L’usage de plusieurs Access Point
permet d’étendre cette zone. Les clients sans fil établissent automatiquement la
68
Page 68

FRANCAIS
connexion avec le dispositif qui fournit le meilleur signal grâce à la fonction de
roaming.
Figure 2-1
Si le réseau sans fil est de dimension plus réduite et que les ressources partagées
sont localisées sur des ordinateurs qui en font partie, il devient possible d’utiliser le
mode ad-hoc (Figure 2-2). Ce mode permet de connecter les clients sans fil entre eux
directement sans avoir besoin d’un point d’accès. La qualité de la communication entre
clients est limitée par la distance et les interférences potentielles.
69
Page 69

FRANCAIS
Figure 2-2
La carte est aussi capable de fonctionner, dans Windows XP, comme Point d’Accès.
1.2 Besoin système
Avant de commencer l’installation, vérifiez que vous disposez bien des ressources
suivantes:
• PC desktop avec un slot PCI 2.1/2.2 libre
• Portable avec un slot PCMCIA CardBus Type II 32 bit libre
• Processeur Intel® Pentium® III 600Mhz ou compatible et 128 Mo de mémoire
vive ou plus
• Système Windows 98SE/ME/2000/XP ou Linux
• 15MB d’espace libre sur disque
• Lecteur CDRom
Le produit n’a été testé que sur les kernel 2.4 et 2.6 et avec les
distributions citées. Atlantis Land ne garantit pas le
fonctionnement sur d’autres distribution/kernel et ne pourra
donc pas offrir de support.
1.3 Contenu de l’emballage
Une fois ouvert, vous devriez trouver les éléments suivants:
70
Page 70

FRANCAIS
• Wireless MIMO Card (Carte PCI ou PCMCIA)
• 3 Antennes externes (Connecteur SMA) (A02-PCI-W54M)
• Guide d'installation rapide (en Anglais, Français et Italien)
• CDRom avec manuels et logiciels
Si vous constatez qu’un de ces composants manque, merci de vous adressez à votre
revendeur.
Le produit n’a été testé que sur les kernel et avec les
distributions citées. Atlantis Land ne garantit pas le
fonctionnement sur d’autres distribution/kernel et ne pourra
donc pas offrir de support.
71
Page 71

FRANCAIS
1.4 Carte
72
Page 72

FRANCAIS
2 Installation sous Windows
Munissez vous du CD Rom d’installation Windows, il peut être demandé lors de
l’installation du logiciel de la Carte PCI/PCMCIA. Allumez l’ordinateur. Introduisez le cd
du logiciel dans le lecteur Cd-rom. Une nouvelle fenêtre apparaîtra. Cliquez sur
Setup.exe pour exécuter l’installation du logiciel. (“CDRom:\Driver\Setup.exe”).
Cliquez sur Oui pour continuer.
Choisir Ralink Configuration Tool et après cliquer sur Suivant.
Choisir Optimized Wi-Fi mode et après cliquer sur Suivant.
A ce stade connecter la carte PCMCIA, lorsque le message est visualisé.
Suivez maintenant la procédure d’installation jusqu’à la fin puis redémarrez
l’ordinateur.
3 Installation Hardware (A02-PCI-W54M)
1. Eteignez votre ordinateur et coupez le courant en enlevant le câble
d’alimentation.
2. Ouvrez votre ordinateur.
3. Dévissez la protection d’un des slots PCI libres.
73
Page 73

FRANCAIS
4. Insérez délicatement la carte PCI dans l’emplacement prévu à cet effet. Ne
forcez pas pour ne risquer pas de l’endommager.
5. Après avoir correctement installé la carte PCI (s’assurer que la carte est bien
insérée dans le slot PCI), remettez la vis pour sécuriser l’installation. Visser
délicatement les 3 antennes de 2 dBi chacune.
6. Replacez le capot de votre ordinateur et rebranchez le courant.
74
Page 74

FRANCAIS
ATTENTION: Assurez-vous que le slot PCI dans lequel vous avez introduit la carte de
réseau n’a pas été désactivé au niveau du BIOS. Dans ce cas entrez dans le BIOS de
la carte-mère (consulter le manuel du produit) et activer le slot PCI.
4. Configuration
4.1 Logiciel de configuration
Lors de l’installation logicielle, en plus des pilotes, une application permettant de
configurer rapidement la connexion a été installée.
Double cliquez sur l’icône LAN Wireless (
Config Utilities pour lancer l’utilitaire de configuration.
• Vert(
• Jaune(
• Rouge(
est faible.
• Blue croisée
carte est correctement installée.
• Noir croisée (
carte peut ne pas être correctement installé.
Clic droit sur (
): L’adaptateur est relié à un réseau Sans-Fil et le signal est fort
): L’adaptateur est relié à un réseau Sans-Fil et le signale est bon.
):L’adaptateur est relié à un réseau Sans-Fil mais le signal
: L’adaptateur n'est pas relié à un réseau Sans-Fil mais la
): L’adaptateur n'est pas relié à un réseau Sans-Fil et la
) puis sélectionnez entre :
) ou clic droit puis sélectionnez Launch
• Launch Config Utilities
• Use Zero Configuration as Configuration Utility
• Switch to AP mode
• Exit
75
Page 75

FRANCAIS
Pour l’activation du controleur de Windows XP choisir Use
Zero Configuration as Configuration Utility. Pour reutiliser
le logiciel de Ralink choisir Use RaConfig as Configuration
Utility.
4.2 Logiciel de configuration
Double cliquez sur l’icône LAN Wireless (ou clic droit puis sélectionnez Launch
Configuration Utilities pour lancer l’utilitaire de configuration.
Avec cet utilitaire, vous pouvez configurer toutes les fonctions de votre Carte
PCI/PCMCIA grâce aux 7 sous menus: Profile, Link Status, Site Survey, Statistics,
Advanced, QoS et About.
76
Page 76

FRANCAIS
4.2.1 Profile
Afin de créer des profils contenant toutes les informations de réglages. Vous pouvez
supprimer un profil avec la touche Delete. Pour activer/changer un profil, choisissez le
dans le champ Nom du Profil puis cliquez sur Activate/Edit.
Connection status:
• Vert(
• Rouge (
Pour créer un nouveau profil il est possible d'opérer en 2 modalités différentes:
):L’adaptateur est relié à un réseau Sans-Fil.
):Il y a un problème dans l'activation du profil.
Combien on utilise le tab Site Survey pour effectuer une
connexion, il n'y aura pas l'icône d'état.
77
Page 77

FRANCAIS
• Cliquer sur Site Survey, choisir un un réseau sans fil (cliquer sur Rescan) et
après cliquers sur Add to Profile (il faut mettre la clé si la sécurité est active).
• Cliquer sur Add et tapez: Nom du Profil, SSID et sécurité.
Créer des profils
Cliquer sur Add, puis sur le tab Configuration:
• Profile Name: pour créer et gérer vos profils (la maison, le bureau ou d’autres).
• SSID: Le SSID permet d’identifier le Réseau Wireless (WLAN), il faut donc que
tous les appareils soient réglés avec le même SSID pour accéder à ce réseau.
• PSM: Choisir entre CAM ou PSM.
• Network Type: Pour vous connecter à un Point d’Accès, utilisez le mode
Infrastructure. Pour vous connecter uniquement à un autre appareil, utilisez le
mode Ad-Hoc.
• TX Power (Puissance d’émission): Pour choisir entre Minimum, 12.5%, 25%,
50%, 100% ou Auto.
• RTS Threshold: RTS (Request To Send) threshold. Pour éviter les collisions
entre les stations (0 à 2347).
• Fragment Threshold: La fragmentation des paquets (256 à 2346) permet
lorsque le lien est médiocre d’améliorer les temps d’attente que sont les
réexpéditions de paquets perdus.
Cliquer sur Authentication and Security pour pour protéger les communications
Wireless d’écoute indésirable. Pour plus d’info il faudrait lire la section 4.2.3.
4.2.2 Link Status
Cette section vous indique en temps réel, les paquets reçus et envoyés de votre
adaptateur PCI/PCMCIA.
78
Page 78

FRANCAIS
4.2.3 Site Survey
Pour voir, sélectionner et se connecter à l’un des réseaux Sans-Fils disponibles dans
l’environnement de travail.
79
Page 79

FRANCAIS
Site Survey – affiche les réseaux Sans-Fils visibles depuis l’Adaptateur. Sélectionnez
le réseau désiré puis cliquez sur le bouton Connect pour établir une connexion (
Cliquez sur le bouton ReScan pour exécuter une nouvelle recherche des réseaux
disponibles.
Add to Profile: pour créer et gérer vos profils (la maison, le bureau ou d’autres). En
double cliquant sur le profil créé, toutes les options spécifiées dans le profil comme le
SSID, le canal et la clé WEP/WPA/WPA2 seront utilisées.
Autentication and Security:
Ces fonctions sont utilisées pour protéger les communications Wireless d’écoute
indésirable et le cryptage permet d’interdire l’accès au réseau WLAN.
).
80
Page 80

FRANCAIS
• WPA-PSK/WPA2-PSK: Le WPA-PSK (Wi-Fi Protected Access pre-shared key)
est une version simplifiée du WPA qui ne supporte pas la norme 802.1x et qui
nécessite un serveur RADIUS pour les contrôles d’authentification. Entrez une
Phrase Clé qui doit être la même dans tous les appareils connectés au réseau
WLAN.
• WPA/WPA2: Un serveur RADIUS permet d’authentifier un client en lui
retournant une clé permettant de se connecter au réseau wireless, le tout en
utilisant les protocoles dynamiques TKIP, AES, ou WEP.
• LEAP: Entrez le 2 Phrases Clés.
• Open System: l’expéditeur et le destinataire ne partagent pas de clés secrètes
pour la communication. Les 2 parties créent elles-mêmes un jeu de clé et
demandent à l’autre de les accepter. Les clés sont régénérées chaque fois que
la connexion est établie. A ce stade il faut cliquer sur le WEP ou 802.11x
setting.
• Shared Key: avec la même clé WEP entre les stations, elles s’authentifient par
l’échange de paquets encryptés
pour choisir un mode d’Authentification, il faut d’abord s’assurer que les
reconnus par l’ensemble des stations Attention,
81
Page 81

FRANCAIS
différentes stations du réseau implémentent bien le mode désiré. A ce stade il
faut cliquer sur le WEP ou 802.11x setting.
Longueur (Key Lenght), Format (Key Format) et Type de
clé WEP (Wep Key):
Si vous sélectionnez 64bits
• en format Hexadécimal, vous devez choisir 10
caractères dans la plage (0~9, A~F)
• en format ASCII format, vous devez choisir 5 caractères
dans la plage (0~9, A~Z et a~z)
Si vous sélectionnez 128bits
• en format Hexadécimal, vous devez choisir 26
caractères dans la plage (0~9, A~F)
• en format ASCII format, vous devez choisir 13
caractères dans la plage (0~9, A~Z et a~z)
Vérifiez que l’adaptateur PCI/PCMCIA et les autres appareils
Wireless partagent bien la même clé.
ASCII HEX
64 bit 5*X 10*Y
128 bit 13*X 26*Y
X=[(0~9, A~Z, a~z Alphanumeric]
Y=[0~9, A~F Hexadecimal]
Aujourd'hui le WEP n'est plus considéré comme étant très securisé, il
est plutot conseillé d’utiliser le WPA.
Le cryptage WEP n'a pas été défini en même temps que les standards
802.11. Ce qui veut dire qu'il y a plusieurs méthodes d'encryption
WEP. De plus, le WEP n'est pas complètement sécurisé, l'adresse
MAC n’est pas cryptée et des hackers peuvent l’utiliser pour pénetrer
dans un réseau par « spoofing » ou « faking ».
82
Page 82

FRANCAIS
4.2.4 Statistics
Pour les statistiques de la partie wireless.
83
Page 83

FRANCAIS
4.2.5 Advanced
Wireless mode: Pour sélectionner le type de bande utilisée (mode mixte, uniquement
G ou B).
B/G Protection: Choisir entre:Auto, ON et OFF.
TX Rate: Pour bloquer la vitesse de l’AP sur une valeur précise (indiquée en
Mégabit/second) ou laisser sur Auto.
TX Burst: Pour activer la modalité TXBurst (Ralink).
Fast Roaming at: Pour activer le Fast Roaming.
Select Your Country Region Code: En France choisir 3 (chenaux 10-13).
CCX2.0: Pour activer Cisco Compatible Extensions:
• LEAP turn on CCKM: Selectionner pour activer cette fonction.
Turn radio ON/OFF: Pour activer/ désactiver la section sans fil.
Apply: Cliquer pour confirmer.
Pour régler sur le pays ou l’appareil est utilisé. L’Organisme de
Régulation a attribué à chaque pays une bande de fréquence
utilisable, l’utilisateur est responsable du bon respect de ces
règles.
84
Page 84

FRANCAIS
En France choisir 3 (chenaux 10-13).
L’utilisateur final doit donc s’assurer du bon réglage de son AP
sur un canal autorisé dans son pays.
85
Page 85

FRANCAIS
4.2.6 QoS
Il est possible d’activer la fonction WMM (Wi-Fi Multi-Media) pour acheminer les
informations issues des applications en fonction de leur priorité.
Selectionner WMM Enable et cliquer sur Apply.
4.2.7 About
Cette fonction vous permet de voir la version du driver et du Firmware, l’adresse MAC
et la version de l’utilitaire de configuration.
86
Page 86

FRANCAIS
87
Page 87

FRANCAIS
4.3 AP Mode (seulement pour Windows XP)
Il est possibile de changer la carte MIMO dans un Point d’Accés san fils. Clic droit sur
l’icône LAN Wireless puis sélectionnez Switch to AP mode et après Launch
Configuration Utilities pour lancer l’utilitaire de configuration. Avec cet utilitaire, vous
pouvez configurer toutes les fonctions de votre Carte PCI/PCMCIA grâce aux 6 sous
menus: Config, Access Control List, Mac Table, Event Log, Statistics et About.
4.3.1 Config
Dans cette section il est possible de choisir la configuration du Point d’Accés
(Wireless Mode, SSID, TXRate, Channel). Cliquez sur Auth. Vs. Security (voir la
section 4.2.3 de ce manuel) pour protéger vos communications wireless des écoutes
indésirables.
Pour autres détails il est possible de consulter l'help intégré.
88
Page 88

FRANCAIS
La plage de fréquences radio utilisées par les appareils Wireless IEEE
802.11g, est partagée en “canaux”. Le nombre de canaux disponibles
dépend de la zone géographique d’appartenance. Sélectionnez des
canaux différents pour éliminer d’éventuelles interférences avec des Points
Access proches. L’interférence se vérifie quand deux ou plusieurs canaux
s’interposent en dégradant les performances, c’est l’“Overlap”.
On conseille de maintenir une plage de 5 canaux entre deux utilisés (ex.
AP1-canal 1, AP2-canal 6).
89
Page 89

FRANCAIS
4.3.2 Access Control
Seuls les clients dont l’adresse MAC est réglée sur Accept peuvent accéder au réseau
wireless.
• Default Access: Selectionnez Allow ALL pour autoriser les clients à se
connecter et Reject ALL pour les en empecher.
• Specific Clients: Pour ajouter les adresses MAC des clients à controler, en
leur permettant ou non d’acceder à l’AP.
Access
Policy
Default
Access
Effet
4.3.3 Mac Table
Cette fonction permet de visualiser les produits wireless proches(MAC Address, AID e
Power Saving Mode) de l’AP.
4.3.4 Event Log
Pour les évenements intervenus sur l’AP, appuyez sur Clear pour éffacer la liste
actuelle.
4.3.5 Statistics
Voir la section 4.2.4 de ce manuel.
4.3.6 About
Voir la section 4.2.5 de ce manuel.
Allow All Reject All Disable
Access Reject Access
Tous les clients sont
autorisés. Pour
empecher les clients à
se connecter il suffirt de
metre le MAC dans la
liste.
Seul les clients dans la
liste sont autorisés.
Tous les clients sont
autorisés.
90
Page 90

FRANCAIS
5 Supprimer les drivers et l’utilitaire
Pour supprimer complètement pilotes et utilitaire, lancez le programme de
désinstallation :
• Cliquez sur Démarrer, choisissez Paramètres, puis cliquez sur Panneau de
configuration.
• Dans le Panneau de configuration, cliquez deux fois sur Ajout/Suppression de
programmes.
• Dans la fenêtre Ajout/Suppression de programmes qui s'affiche, sélectionnez
Ralink Wireless Lan Card.
• Cliquez sur le bouton Modifier/Supprimer.
• Sélectionnez l'option Remova all et cliquez sur Suivant (Next)
• Vous serez alors invité à confirmer que vous souhaitez désinstaller la carte
entièrement, cliquez sur Oui. Le programme d'installation supprimera les pilotes
de la carte. Cela peut prendre quelques minutes. Choisir Yes, I want to restart
my computer now.
• A ce stade il est possible de débrancher la carte de l’ordinateur.
6 Résolution de problèmes
Ce chapitre donne quelques solutions aux problèmes pouvant être rencontrés lors de
l’installation ou l’usage du produit.
Problèmes et Solutions
L’ordinateur ne trouve pas la Carte PCI/PCMCA.
La carte n’est pas mécaniquement endommagée.
La carte est bien insérée dans le slot PCI/PCMCIA.
Essayez un autre slot PCI/PCMCIA.
Je ne peux pas accéder aux ressources réseau à partir de mon ordinateur.
Les configurations du réseau wireless sont correctes. Vérifiez le SSID, le
canal utilisé et le cryptage.
91
Page 91

FRANCAIS
Désactivation du controleur de Windows XP
Sous Windows XP, il est conseillé d’utiliser le logiciel de gestion des connexions sans
fils fourni avec ce produit. Quand l’installation du pilote est terminée, suivez les étapes
suivantes pour désactiver le contrôleur de réseau wireless intégré dans Windows XP
2. Ouvrez le Panneau de configuration puis cliquez sur Connexions réseau.
3. Cliquez avec le bouton droit sur l’icône Connexion réseaux sans fils relatif à
la Carte PCI/PCMCIA puis sélectionnez Propriétés.
4. Sélectionnez l’onglet Configuration réseaux sans fils puis desélectionnez
Utilisez Windows pour configurer mon réseau sans fil , cliquez sur OK.
Questions fréquentes
Puis je démarrer une application d’un ordinateur présent dans le réseau WLAN?
Dépend directement de l’application concernée, si elle a été developpée pour travailler
en réseau (wireless ou filaire), pas de problème.
Puis je peux jouer en réseau avec les autres ordinateurs présents dans le
WLAN?
Oui, si le jeu est doté de la fonctionnalité multi-joueur en réseau.
Qu’est-ce que le Spread Spectrum?
La transmission Spread Spectrum est basée sur la dispersion de l’information sur une
bande beaucoup plus large que celle nécessaire à la modulation du signal. L’avantage
obtenu avec cette technique est en fait une basse sensibilité aux bruits
radioélectriques même pour des transmissions à puissance limitée. Cette
caractéristique est précieuse quand on doit transmettre des données.
Qu’est-ce que le DSSS et FHHS?
DSSS (Direct-Sequence Spread-Spectrum): Technologie de transmission en large
bande permettant de transmettre chaque bit d’une façon redondante. Particulièrement
adaptée à la transmission et à la réception de signaux faibles.
FHHS (Frequency Hopping Spread Spectrum): Technologie permettant le partage
entre plusieurs utilisateurs d’un même ensemble de fréquences. Pour empêcher les
interférences entrent périphériques du même type, les fréquences de transmission
changent jusqu’à 1.600 fois par seconde.
92
Page 92

FRANCAIS
Les informations circulant sur le WLAN peuvent elles être interceptées?
L’AP permet le cryptage WEP jusqu’à 128 bits, la transmission des données est donc
plus sure.
Qu’est-ce que le WEP?
WEP est le sigle de Wired Equivalent Privacy, un protocole de sécurité pour les
réseaux locaux sans fils (WLAN) défini par le standard 802.11b.
Qu’est-ce que le mode infrastructure?
Dans cette configuration, un réseau WLAN et un réseau WAN communiquent entre
eux à travers un point d’accès.
Qu’est ce que le roaming?
Le Roaming est la fonction qui permet à un utilisateur de communiquer sans
interruptions pendant qu’il se déplace à l’intérieur d’un réseau wireless, cette fonction
peut être etendue en utilisant plusieurs point d’accès.
Qu’est-ce que la bande ISM ?
Cette fréquence a été mise à la disposition des entreprises (par la FCC) qui voulaient
développer des solutions wireless pour un usage professionnel ; elle est généralement
caractérisée par le sigle ISM band (Industrial, Scientific and Medical ). Sur cette
fréquence ne travaillent que des dispositifs industriel, scientifique et médical à basse
puissance.
Qu’est-ce que le standard IEEE 802.11g?
Ce nouveau standard 802.11g travaille à la fréquence de 2,4 Ghz et est donc
totalement compatible avec le 802.11 b. L’avantage réside dans sa vitesse de transfert
à 54 Mbps, cinq fois supérieur au standard 802.11b.
7 Support
Pour tous problèmes ou renseignements (il est IMPERATIF de connaître au
préalable les paramètres utilisés par le FAI), vous pouvez contacter la « help desk »
téléphonique gratuite d’Atlantis Land qui vous fournira assistance du: lundi au jeudi
de 9.00 à 13.00 et 14.00 à 18.00. Le vendredi de 9.00 à 13.00.
Vous pouvez aussi nous contacter par email :
tech-fr@atlantis-land.com
93
Page 93

FRANCAIS
Atlantis Land France
57, Rue d’Amsterdam
75008 Paris
WWW: http://www.atlantis-land.fr
Important :
Pensez à consulter notre site Web, pour prendre connaissance d’éventuelles
mises à jour de Firmware, clauses de garantie, etc...
94
Page 94

ESPAÑOL
AVISO
Hemos hecho todo lo posible para evitar que en el texto, las imágenes, tablas,
software y hardware, y la información presentada en general sea carente de errores. A
pesar de ello, no podemos garantizar la ausencia de estos.
Atlantis Land no se hacen responsable de daños o pérdidas directas o indirectas,
incluidos, pero sin limitación, los daños causados por la imposibilidad su uso, la
pérdida de datos o software y/o los daños o pérdidas causados por el uso o
funcionamiento incorrecto del equipo y accesorios. En ningún caso, Atlantis Land será
responsable de las pérdidas financieras como pérdida de beneficios, daños por
inactividad, daños a la reputación, etc.
El contenido de este manual se provee a título informativo y es sujeto a cambios sin
previo aviso (invitándose a los clientes a consultar nuestro sitio Web www.atlantisland.com para mantenerse informados de estos) no haciéndose Atlantis Land
responsable de cualquier error o inexactitud que pueda aparecer en esta guía.
Esta publicación no puede ser traducida ni reproducida, ni en todo ni en parte, ni
registrada en, o transmitida por, un sistema de recuperación de información, en
ninguna forma ni por ningún medio, sea mecánico, fotoquímico, electrónico,
magnético, electrónico, por fotocopia, o cualquier otro, sin permiso previo por escrito
de Atlantis Land.
Los nombres de los fabricantes, de sus productos, así como de cualquier marca,
registradas o no, mencionadas en este manual, son usados a título de referencia,
siendo propiedad exclusiva de sus respectivos dueños.
Declaración de conformidad CE/EMC
El producto descrito en esta guía ha sido diseñado, producido y aprobado en
conformidad con las reglas EMC, siendo certificado en cumplimento de la normativa.
Si el producto se usara con un ordenador no certificado, el productor no puede
garantizar el respeto a los límites de compatibilidad electromagnética. En la práctica, y
en circunstancias particulares, es posible que dichos límites puedan ser superados si
se utilizan dispositivos que no respetan la normativa EMC y que, por tanto, no han
sido certificados. Asimismo, es posible, que de forma puntual ocurran picos de valor
que se encuentran por encima de las tolerancias. En este caso, el usuario es
responsable que el dispositivo vuelva a ser conforme con los límites EMC. El
fabricante no puede hacerse responsable en el caso de que el producto sea utilizado
fuera de los límites dictados por la normativa EMC.
ATENCIÓN
Para cualquier dispositivo inalámbrico dejar al menos 30cm de distancia entre la
antena del dispositivo y el usuario.
95
Page 95

ESPAÑOL
Aviso sobre el distintivo CE
Este es un producto de Clase B. En un entorno doméstico este producto puede
provocar interferencias de radio por lo que, si fuera así, es necesario que el usuario
tome las medidas adecuadas
Países CE donde este producto puede ser usado libremente:
España, Alemania, Reino Unido, Italia, Bélgica, Holanda, Portugal, Grecia, Irlanda,
Dinamarca, Luxemburgo, Austria, Finlandia, Suecia, Noruega e Islandia.
En Francia esta permitido el uso de los canales 10 y 13 excluyendo el uso de otros
canales.
Declaración de Conformidad
Este dispositivo ha sido probado, determinándose conforme con la directiva
1999/5/CE del Parlamento Europeo y de la Comisión Europea referente a equipos de
radio y periféricos de telecomunicaciones y el reconocimiento mutuo de su
conformidad. Después de su valoración, se ha establecido que el dispositivo se ajusta
a los siguientes estándares: EN 300.328(radio), EN 301 489-1, EN 301 48917(compatibilidad electromagnética) y EN 60950(seguridad). Este dispositivo puede
ser utilizado en todos los países de la Comunidad Económica Europea sin restricción
alguna y en aquellos, que aún sin permanecer a esta, aplican la Directiva 1999/5/CE,
a excepción de:
Francia:
En el caso de utilizar el dispositivo en exteriores, la potencia de salida y la frecuencia
usada deberán de ajustarse a los que se detallan en la tabla. Para mayor información
consulte el sitio Web www.art-telecom.fr
.
Lugar Banda de Frecuencias
(MHz)
Interior (sin restricciones) 2,400-2,483.5 100mW(20dBm)
Exterior 2,400-2,454
2,454-2,483.5
Si el uso de este dispositivo en un ambiente domestico generara interferencias, es
obligación del usuario poner remedio a la situación.
Italia:
Este dispositivo es conforme la normativa de Radio Nacional y respeta los requisitos
de Asignación de las Frecuencias. El uso de este dispositivo fuera del uso doméstico
necesita de una autorización general. Para más información diríjanse al sitio:
www.comunicazioni.it
.
Potencia (EIRP)
100mW(20dBm)
10mW(10dBm)
96
Page 96

ESPAÑOL
Gracias por comprar la tarjeta inalámbrica MIMO la cual proporciona la forma más fácil
de conectarse a una red inalámbrica. Este manual de usuario le describe de forma
detallada el funcionamiento del producto. Por favor, conserve el mismo para uso
futuro.
1 Tarjeta Inalámbrica MIMO
La tarjeta inalámbrica MIMO (IEE802.11g a 54Mbps) permite a los usuarios dotados
de aparatos inalámbricos de navegar o compartir sus ficheros con gran facilidad y
seguridad gracias al uso de los robustos protocolos de encriptación WPA/ WPA2.
Las 3 antenas - R-SMA removibles en la tarjeta PCI – de 2dBi y la tecnología MIMO
XR™ permiten tanto una cobertura netamente superior respecto a las redes
IEE802.11g como una tasa de transferencia más uniforme, reduciendo así las zonas
de sombra de forma considerable.
La tecnología Packet-Overdirve ™, por otra parte, permite obtener incrementos de
velocidad de transmisión considerables, convirtiéndolo en un aparato ideal para
aplicaciones que necesitan de un alto rendimiento, como por ejemplo, el streaming de
video de alta definición (HD Video).
Con este adaptador le será posible una mayor movilidad tanto dentro de su propia
oficina como de su casa, sin pérdida de conectividad.
Este producto es compatible con Windows® XP/2000/ME/98SE, y es capaz de
funcionar en modalidad Ad-Hoc (PC a PC), infraestructura (PC a Punto de Acceso) y
como Punto de Acceso.
1.1 Cómo funciona el adaptador
A diferencia de las redes LAN las redes inalámbricas tienen dos modalidades
diferentes de funcionamiento: modo infraestructura y ad-hoc. En la modalidad
infraestructura, una red WLAN (Red Inalámbrica LAN) y una red WAN (Red de Área
Extensa) se comunican entre ellas a través de un Punto de Acceso. En una red adhoc, los clientes inalámbricos se comunican entre ellos sin intermediarios. Por ello, la
elección entre una modalidad u otra viene dictada por la necesidad de conectar una
red cableada con una inalámbrica.
Si un ordenador de una red inalámbrica tienen la necesidad de acceder a los recursos
o periféricos compartidos de una red cableada, será necesario utilizar la modalidad de
infraestructura (ver fig. 2-1). El Punto de Acceso podrá transmitir la información dentro
de cobertura delimitada por la potencia de su radio de acción. Esta cobertura se
puede ampliar utilizando de forma contemporánea más Puntos de Acceso. Al itinerar
97
Page 97

ESPAÑOL
dentro de la cobertura de estos, el cliente inalámbrico se conectará de forma
automática al Punto de Acceso que provea una señal más fuerte.
Figura 2-1
Si la red inalámbrica tiene una dimensiones relativamente reducidas, y si los recursos
a compartir se encuentran dentro de un ordenador que forma parte de esta, es posible
utilizar la modalidad ad-hoc (ver fig. 2-2). Esta modalidad permite que se conecten los
clientes inalámbricos entre si sin necesidad de un Punto de Acceso. Al no contar con
un punto central para la gestión y amplificación de la señal, la comunicación entre los
clientes se verá limitada en mayor grado por la distancia y las interferencias entre los
mismos.
98
Page 98

ESPAÑOL
Figura 2-2
Además, es posible utilizar la tarjeta inalámbrica MIMO en modalidad Punto de
Acceso con toda la funcionalidad de este. De esta forma es posible crear una
verdadera red inalámbrica con unos costes muy limitados.
1.2 Requisitos del sistema
Antes de proceder a la instalación del producto verifique que su ordenador dispone de
los siguientes requisitos.
• Sistema operativo Windows® 98SE, Windows® Me, Windows® 2000,
Windows® XP y Linux
• Procesador Intel® Pentium® III 600Mhz o compatible con al menos 128 MB de
memoria RAM
• Ordenador Sobremesa con Ranura PCI 2.1/2.2 (A02-PCI-W54M)
• Portátil con una ranura PCMCIA CardBus 32 bits Type II (A02-PCM-W54M)
• Al menos 15MB de espacio en disco duro
• Lector CD-ROM
El producto ha sido probado con los kernels 2.4 y 2.6. Atlantis
Land no garantiza su funcionamento con otras distribuciones o
kernels a los mencionados. Dado la ingente cantidad de
posibles combinaciones de kernels y distribuciones
99
Page 99

ESPAÑOL
disponibles, Atlantis Land no ofrece asistencia técnica del
sistema operativo Linux. Por ello, se aconseja a los usuarios
de este sistema operativo dirigirse al sitio Web del productor
del chipset – www.ralink.com.tw
últimos controladores y para obtener mayor información.
1.3 Contenidos de la caja
Antes de utilizar el producto verifique que la caja contenga el siguiente material:
Una tarjeta inalámbrica MIMO
3 antenas externas R-SMA de 2dBi (A02-PCI-W54M)
Una guía rápida multilingüe
Un CD con los controladores, utilidades y el manual de usuario.
- para la descarga de los
100
Page 100

ESPAÑOL
1.4 Vista General del Producto
101
 Loading...