

Page 1
v
WebRunner USB
V.90/V.92 56K Modem
A01-PU3
MULTILANGUAGE
Manual
A01-PU3_MX01
Where solutions begin
ISO 9001:2000 Certified Company
Page 2

ITALIANO
Questo prodotto è coperto da garanzia Atlantis Land On-Site della
durata di 3 anni. Per maggiori dettagli in merito o per accedere alla
documentazione completa in Italiano fare riferimento al sito www.atlantis-
land.com.
ENGLISH
This product is covered by Atlantis Land 3 years On-Site warranty. For
more detailed informations please refer to the web site www.atlantis-
land.com.
For more detailed instructions on configuring and using this device, please
refer to the online manual.
FRANCAIS
Ce produit est couvert par une garantie Atlantis Land On-Site 3 ans.
Pour des informations plus détaillées, référez-vous svp au site Web
www.atlantis-land.com.
DEUTSCH
Dieses Produkt ist durch die Atlantis Land 3 Jahre On-Site Garantie
gedeckt. Für weitere Informationen, beziehen Sie sich bitte auf Web Site
www.atlantis-land.com.
ESPAÑOL
Este producto està cubierto de garantía Atlantis Land On-Site por 3 años.
Para una información más detallada, se refiera por favor al Web site
www.atlantis-land.com
.
Page 3

The award of the information is facultative, but its lack will prevent
ATLANTIS LAND® from starting the Guarantee process requested.
R
e
g
i
s
t
e
R
e
g
R
e
w
w
w
w
w
w
g
w
w
Registration on the web site
i
w
r
s
t
e
r
i
s
t
e
.
a
t
l
a
.
a
t
l
.
a
t
l
r
a
a
y
o
u
r
p
r
o
d
u
c
t
!
c
u
u
o
o
o
c
c
t
m
m
m
!
t
!
y
o
u
r
p
r
o
n
n
y
n
o
u
r
i
s
-
l
t
i
s
-
l
t
s
-
t
i
a
l
a
p
a
n
n
r
n
d
o
d
d
d
.
d
.
c
.
c
www.atlantis-land.com
purchase of the product dismiss the customer from
showing a valid proof of purchase (Sale Receipt or
within 15 days from the
Invoice) in case of the request of intervention. For
further information we invite you to look at our web
site at the section WARRANTY.
Copyright
The Atlantis Land logo is a registered trademark of Atlantis Land SpA. All
other names mentioned mat be trademarks or registered trademarks of their
respective owners. Subject to change without notice. No liability for
technical errors and/or omissions.
Page 4

MultiLanguage Manual
ITALIANO
1.1 Panoramica...............................................................................9
1.2 Contenuto della Confezione......................................................9
1.3 Caratteristiche Tecniche ...........................................................9
1.4 Requisiti di Sistema.................................................................10
1.5 Visione d’insieme ....................................................................11
1.6 Installazione Hardware............................................................12
1.7 Installazione dei Driver su sistemi Windows ...........................13
Windows XP e Windows 2000 .................................................13
Windows Vista..........................................................................14
Windows 98SE / ME.................................................................14
1.8 Verifica Installazione (opzionale) ............................................15
1.9 Rimozione Driver ed Utility......................................................16
1.10 Supporto Offerto....................................................................16
ENGLISH
1.1 Overview of the WebRunner USB..........................................19
1.2 Package Contents...................................................................19
1.3 WebRunner USB Features .....................................................19
1.4 Hardware Requirements .........................................................20
1.5 Device Design.........................................................................21
1.6 Connecting The Modem To Your Computer ...........................22
1.7 Installing Your Modem Driver..................................................23
Windows XP/2000....................................................................23
Windows Vista..........................................................................23
Windows 98SE/ME...................................................................23
1.8 Verifying Your Modem.............................................................24
1.9 Uninstalling the WebRunner USB ...........................................25
1.10 Support .................................................................................25
A01-PU3 5
Page 5

MultiLanguage Manual
FRANCAIS
1.1 Panorama ...............................................................................29
1.2 Contenu de la boîte.................................................................29
1.3 Caractéristiques principales....................................................30
1.4 Besoins système..................................................................... 30
1.5 Device Design.........................................................................31
1.6 Installation Hardware ..............................................................32
1.7 Installation des Pilotes sous Windows ....................................33
Windows XP/2000...................................................................33
Windows Vista..........................................................................34
Windows 98SE / ME.................................................................35
1.8 Supprimer les drivers et l’utilitaire ...........................................36
1.9 Support ...................................................................................37
A01-PU3_MX01(V1.0 April 2007)
A01-PU3 6
Page 6

ITALIANO
AVVERTENZE
Abbiamo fatto di tutto al fine di evitare che nel testo, nelle immagini e nelle
tabelle presenti in questo manuale, nel software e nell'hardware fossero
presenti degli errori. Tuttavia, non possiamo garantire che non siano
presenti errori e/o omissioni. Infine, non possiamo essere ritenuti
responsabili per qualsiasi perdita, danno o incomprensione compiuti
direttamente o indirettamente, come risulta dall'utilizzo del manuale,
software e/o hardware.
Il contenuto di questo manuale è fornito esclusivamente per uso informale,
è soggetto a cambiamenti senza preavviso (a tal fine si invita a consultare il
sito www.atlantisland.it
aggiornamenti) e non deve essere interpretato come un impegno da parte
di Atlantis Land spa che non si assume responsabilità per qualsiasi errore
o inesattezza che possa apparire in questo manuale. Nessuna parte di
questa pubblicazione può essere riprodotta o trasmessa in altra forma o
con qualsiasi mezzo, elettronicamente o meccanicamente, comprese
fotocopie, riproduzioni, o registrazioni in un sistema di salvataggio, oppure
tradotti in altra lingua e in altra forma senza un espresso permesso scritto
da parte di Atlantis Land spa. Tutti i nomi di produttori e dei prodotti e
qualsiasi marchio, registrato o meno, menzionati in questo manuale sono
usati al solo scopo identificativo e rimangono proprietà esclusiva dei loro
rispettivi proprietari.
Restrizioni di responsabilità CE/EMC
Il prodotto descritto in questa guida è stato progettato, prodotto e approvato
in conformità alle regole EMC ed è stato certificato per non avere limitazioni
o www.atlantis-land.com per reperirne gli
EMC.
Se il prodotto fosse utilizzato con un PC non certificato, il produttore non
garantisce il rispetto dei limiti EMC. Il prodotto descritto è stato costruito,
prodotto e certificato in modo che i valori misurati rientrino nelle limitazioni
EMC. In pratica, ed in particolari circostanze, potrebbe essere possibile che
detti limiti possano essere superati se utilizzato con apparecchiature non
prodotte nel rispetto della certificazione EMC. Può anche essere possibile,
in alcuni casi, che i picchi di valore siano al di fuori delle tolleranze. In
A01-PU3 7
Page 7

ITALIANO
questo caso l’utilizzatore è responsabile della “compliance” con i limiti EMC.
Il Produttore non è da ritenersi responsabile nel caso il prodotto sia
utilizzato al di fuori delle limitazioni EMC.
A01-PU3 8
Page 8

ITALIANO
1.1 Panoramica
Atlantis Land Web Runner USB è il prodotto ideale per accedere in maniera
semplice e funzionale alla rete PSTN. Il Web Runner USB è facile da
installare e semplice da configurare, grazie al supporto Plug’n’Play per i
sistemi operativi più diffusi. Il supporto del nuovo protocollo V.92 rende il
WebRunner USB lo strumento ideale per la connessione ad Internet. E’
inoltre utilizzabile per l’invio/ricezione di Fax (il software non è incluso nelle
dotazione).
1.2 Contenuto della Confezione
Una volta aperta la confezione in cartone dovrebbero essere presenti i
seguenti componenti:
• Web Runner USB
• CR Rom contente driver, manuali e software NetWaiting™
• Cavo Telefonico RJ11
• Manuale cartaceo
• Garanzia
Qualora mancasse uno qualsiasi di questi componenti è necessario
rivolgersi immediatamente al rivenditore.
1.3 Caratteristiche Tecniche
• Supporto V.92 (sino a 56 Kbps in download, sino a 48 Kbps in upload)
• Modem on Hold (V.92) e Quick Connect (V.92)
• Compressione dati V.44/V.42 bis/MNP 5
• Collegabile e staccabile a caldo dal PC
• Plug and Play 98/98SE/ME/2000/XP/Vista
• Alimentato tramite il bus USB
• Fax Gruppo 3, Classe 1 (da 9600 a 14.400 bps)
• Supporto per video conferenza V.80/H.324 P
• Correzione dati V.42/MNP 2-4
A01-PU3 9
Page 9

ITALIANO
1.4 Requisiti di Sistema
Verificare di avere a disposizione tutto il necessario per eseguire
l’installazione del WebRunner USB. E’ necessario disporre di:
• Un PC con un connettore USB libero ed il controller USB
correttamente installato
• Microsoft Windows 98SE, ME,2000, XP o Vista
• Almeno 10 MB di spazio libero sull’Hard Disk
• Almeno Intel® Pentium® 233 Mhz o superiore con 128MB RAM con
lettore CDRom
A01-PU3 10
Page 10

ITALIANO
1.5 Visione d’insieme
Label Stato Descrizione
POWER
DATA
USB
LINE
Spento Il modem non è alimentato
Acceso Il modem è correttamente alimentato
Spento Nessuna attività
Acceso Il modem sta inviando/ricevendo dati
Collegare alla porta USB del PC
Utilizzare il cavo RJ11 fornito per la
connessione alla linea telefonica
A01-PU3 11
Page 11
ITALIANO
1.6 Installazione Hardware
Collegare una estremità del cavo USB nella rispettiva porta USB del PC. A
questo punto il Sistema Operativo rileverà un nuovo dispositivo e chiederà
come procedere per l’installazione dei driver. Bloccare quindi l’installazione
manuale cliccando su Annulla.
Passare dunque all’installazione dei driver a seconda del Sistema
Operativo utilizzato (si veda il paragrafo seguente).
Accertarsi che la presa telefonica utilizzata sia di tipo
analogico (la normale linea di casa); alcuni centralini
utilizzano linee digitali che potrebbero danneggiare
irrimediabilmente il modem.
A01-PU3 12
Page 12

ITALIANO
1.7 Installazione dei Driver su sistemi Windows
Per lanciare direttamente i driver/utility, una volta inserito il CD nell’apposito
lettore (accertarsi di aver già collegato il modem al PC ed aver bloccato
l’installazione dei driver), lanciare il setup (CDRom:\driver\USB\Sistema
Operativo \setup.exe).
Windows XP e Windows 2000
Inserire il CDRom nell’apposito lettore e lanciare il file setup.exe (contenuto
nella directory CDRom:\driver\USB\WinXP oppure
CDRom:\driver\USB\Win2000).
Cliccare su OK per iniziare l’installazione (nella prima finestra visualizzata).
All’apparire delle finestra sulla mancata compatibilità col programma di
certificazione WinLogo (potrebbe apparire diverse volte su Windows 2000)
premere Continua.
Cliccare infine su OK per terminare l’installazione.
Terminata la procedura di installazione dei driver collegare il cavo telefonico
RJ11 fornito al WeB Runner USB (nell’apposito jack) e ad una presa
telefonica.
A questo punto non resta che creare la connessione remota per accedere
ad Internet.
• Windows XP: Andare in Pannello di controllo (passare alla
visualizzazione classica) poi connessioni di rete e crea nuova
connessione. Scegliere poi l’opzione connessione ad Internet, poi
imposta connessione manualmente ed infine connessione tramite
modem remoto.
• Windows 2000: Andare in Pannello di controllo (passare alla
visualizzazione classica) poi Reti e connessioni remote e crea
nuova connessione. Scegliere poi l’opzione connessione ad
Internet, poi imposta connessione manual ed infine tramite linea
telefonica o modem. A questo punto scegliere il modem ed immettere
poi i dati relativi alla connessione.
A01-PU3 13
Page 13

ITALIANO
Windows Vista
Inserire il CDRom nell’apposito lettore e lanciare il file setup.exe (contenuto
nella directory CDRom:\driver\USB\WinVista).
Cliccare su Continua (nella finestra di richiesta autorizzazione
dell’utente).
Cliccare su OK per iniziare l’installazione (nella prima finestra visualizzata).
All’apparire delle finestra di Protezione di Windows (impossibile verificare
l’autore del sofware del driver) selezionare Installa il software del driver.
Cliccare infine su OK per terminare l’installazione.
Terminata la procedura di installazione dei driver collegare il cavo telefonico
RJ11 fornito al WeB Runner USB (nell’apposito jack) e ad una presa
telefonica.
A questo punto non resta che creare la connessione remota per accedere
ad Internet.
• Windows Vista: Start->Pannello di Controllo->Centro
Connessione di rete e Condivisione. Cliccare su Configura
Connessione o Rete. Selezionare Connessione ad Internet e
cliccare su Avanti. Cliccare su Remota, nella schermata seguente.
Compilare i campi richiesti ed infine cliccare su Connetti. Una volta
effettuata la connessione Vista chiederà di scegliere la tipologia di
utilizzo tra Abitazione/Ufficio e Luogo Pubblico.
Windows 98SE / ME
Dopo aver connesso il Web Runner USB al PC, tramite il cavo USB, verrà
visualizzata la finestra di dialogo in cui il Sistema Operativo informerà di
aver rilevato una periferica (foto sotto), premere su Annulla
Inserire il CDRom nell’apposito lettore e lanciare il file setup.exe (contenuto
nella directory CDRom:\driver\USB\Win98SE oppure
CDRom:\driver\USB\WinME).
Seguire le istruzioni a video per completare l’installazione.
Cliccare su OK per iniziare l’installazione.
A01-PU3 14
Page 14

ITALIANO
Cliccare infine su OK per terminare l’installazione.
Potrebbe apparire la richiesta di inserire il CDRom del
Sistema Operativo (inserirlo ed indicarne il percorso).
Potrebbe essere necessario riavviare il computer.
A questo punto non resta che creare la connessione remota per accedere
ad Internet.
• Andare in Pannello di controllo poi connessioni remote e crea
nuova connessione. Nel caso di Win98 andare in Risorse del
computer e poi Accesso remoto. A questo punto scegliere il modem
ed immettere poi i dati relativi alla connessione.
Terminata la procedura di installazione dei driver collegare il cavo telefonico
RJ11 fornito al WeB Runner USB (nell’apposito jack) e ad una presa
telefonica.
1.8 Verifica Installazione (opzionale)
E’ possibile verificare la corretta installazione del modem seguendo le
seguenti modalità (tra parentesi le istruzioni per Windows Vista):
• Cliccare sull’icona Risorse del Computer ed andare in Pannello di
controllo (Start).
• Cliccare sull’icona Sistema, spuntare il tab Hardware e poi cliccare su
Gestione Periferiche (Sistema->Gestione dispostivi, poi cliccare su
Continua).
• Cliccare su modem, selezionare Conexant UCM92 Data Fax RTAM
USB Modem e cliccarci sopra 2 volte.
• Selezionare il tab Diagnostica ed infine cliccare su Interroga modem.
Nella videata che apparirà, verranno visualizzate le risposte che il modem
avrà dato (con tutti i relativi comandi AT e le impostazioni della porta seriale
cui il WebRunner USB è collegato). Nel caso la videata risulti vuota, oppure
il programma di diagnostica non riesca a individuare o dialogare col
modem, rimuovere la periferica e ripetere l’installazione da capo.
A01-PU3 15
Page 15

ITALIANO
Laddove il WebRunner USB dovesse avere problemi
di connessione anzitutto è opportuno accertarsi di
avere correttamente installato i driver a corredo sul CD.
Eventualmente staccare e ricollegare il dispositivo al
PC.
1.9 Rimozione Driver ed Utility
Per disinstallare il modem seguire le istruzioni sincerandosi che il
WebRunner USB sia connesso alla porta USB del PC prima di avviare la
procedura di disinstallazione (tra parentesi le istruzioni per Windows Vista):.
• Chiudere eventuali applicazioni attive
• Cliccare sull’icona Risorse del Computer ed andare in Pannello di
controllo
• Cliccare sull’icona Installazioni Applicazioni (Programmi e
Funzionalità)
• Evidenziare Conexant UCM92 Data Fax RTAM USB Modem e
cliccare su Aggiungi/Rimuovi (Disinstalla/Cambia).
• Il Sistema Operativo procederà alla rimozione dei driver.
• A questo punto è possibile rimuovere il WebRunner USB
1.10 Supporto Offerto
Per ogni problema con il WebRunner USB consultare questo manuale alla
sezione 1.8. Nel CDRom allegato inoltre è presente nella cartella
Manuals\FAQ della documentazione aggiuntiva.
Per qualunque altro problema o dubbio (prima è necessario conoscere
tutti i parametri usati dall’ISP) è possibile contattare l’help desk telefonico
(02/93907634) gratuito di Atlantis Land che fornirà assistenza da lunedì al
giovedì dalle 9:00 alle 13:00 e dalle 14:00 alle 18:00. Il venerdì dalle 9 :00
alle 13 :00. E’ possibile anche utilizzare il fax (02/93906161) la posta
elettronica (info@atlantis-land.com oppure tecnici@atlantis-land.com).
AtlantisLand SpA
A01-PU3 16
Page 16

ITALIANO
Viale De Gasperi 122
20017 Mazzo di Rho(MI)
Tel: 02/93907634(help desk)
Fax: 02/93906161
Email: info@atlantis-land.com
(mettere nell’oggetto il codice del prodotto di cui si chiede
assistenza)
WWW: http://www.atlantisland.it
oppure tecnici@atlantis-land.com
o www.atlantis-land.com
A01-PU3 17
Page 17

ENGLISH
Copyright Statement
No part of this publication may be reproduced, stored in a retrieval system,
or transmitted in any form or by any means, whether electronic, mechanical,
photocopying, recording or otherwise without the prior writing of the
publisher. Windows™ 98SE/2000/ME/XP are trademarks of Microsoft®
Corp. Pentium is trademark of Intel. All copyright reserved.
The Atlantis Land logo is a registered trademark of Atlantis Land SpA. All
other names mentioned mat be trademarks or registered trademarks of their
respective owners. Subject to change without notice. No liability for
technical errors and/or omissions.
CE Mark Warning
This is a Class B product. In a domestic environment, this product may
cause radio interference, in which case the user may be required to take
adequate measures.
CE/EMC Restriction of Liability
The product described in this handbook was designed, produced and
approved according to the EMC-regulations and is certified to be within
EMC limitations.
If the product is used in an uncertified PC, the manufacturer undertakes no
warranty in respect to the EMC limits. The described product in this
handbook was constructed, produced and certified so that the measured
values are within EMC limitations. In practice and under special
circumstances, it may be possible, that the product may be outside of the
given limits if it is used in a PC that is not produced under EMC certification.
It is also possible in certain cases and under special circumstances, which
the given EMC peak values will become out of tolerance. In these cases,
the user himself is responsible for compliance with the EMC limits.
A01-PU3 18
Page 18

ENGLISH
1.1 Overview of the WebRunner USB
Hassle-free installation for instant fastspeed connection, the WebRunner
USB modem delivers unparalleled high speed, reliable performance and
guarantees uninterrupted 56K connections. Powered packed with advanced
features, it satisfies all your communication and telephony requirements.
Installed in seconds, you do not require any external power supply and it
offers USB Plug & Play installation.
The USB provide a 12Mbps high bandwidth for virtually unlimited data
throughput instead of the legacy 16550 UART bottleneck with the traditional
modems. Atlantis USB Modem is a very flexible modem that has one of the
smallest real estate and power consumption out on the market. Because of
the simplicity of the modem design, the time to market is quick and less
overhead. With this modem, all future driver releases will be a simple
software update.
1.2 Package Contents
• Web Runner USB
• CR Rom with driver, manuals and NetWaiting™
• Telephone Extension Cable RJ11
• Quick Start Guide
• Warranty
If any of the above items are missing, please contact your reseller.
1.3 WebRunner USB Features
The Webrunner USB supports many standard and enhanced features,
including the following:
• Support V.92 (up to 56 Kbps download, 48 Kbps upload)
• Modem on Hold (V.92) and Quick Connect (V.92)
• Data Compression V.44/V.42 bis/MNP 5
• Hot Plug and Play 98/98SE/ME/2000/XP/Vista
• No external power supply is required.
A01-PU3 19
Page 19

ENGLISH
• Fax Group 3, Class 1 (14.400 bps)
• V.80/H.324 P
• Error Correction V.42/MNP 2-4
1.4 Hardware Requirements
Make sure that you have all you need to install the WebRunner r USB. You
should have the following:
• A PC that has USB connector and its USB controller is working
properly as shown below
• Microsoft Windows 98SE, ME,2000, XP or Vista
• At least 10MB of free disk space for the driver and software
• Intel® Pentium® 233 Mhz or compatible processor with 128MB RAM
with CDRom drive
A01-PU3 20
Page 20

ENGLISH
1.5 Device Design
Label Status Description
POWER
DATA
USB
LINE
Off No power is supplied to the device
Steady light Power is detected
Off No activity
Steady light Data is being transmitted/received
Used for connecting to the computer
Used for connecting to the telephone
line via telephone cable
A01-PU3 21
Page 21

ENGLISH
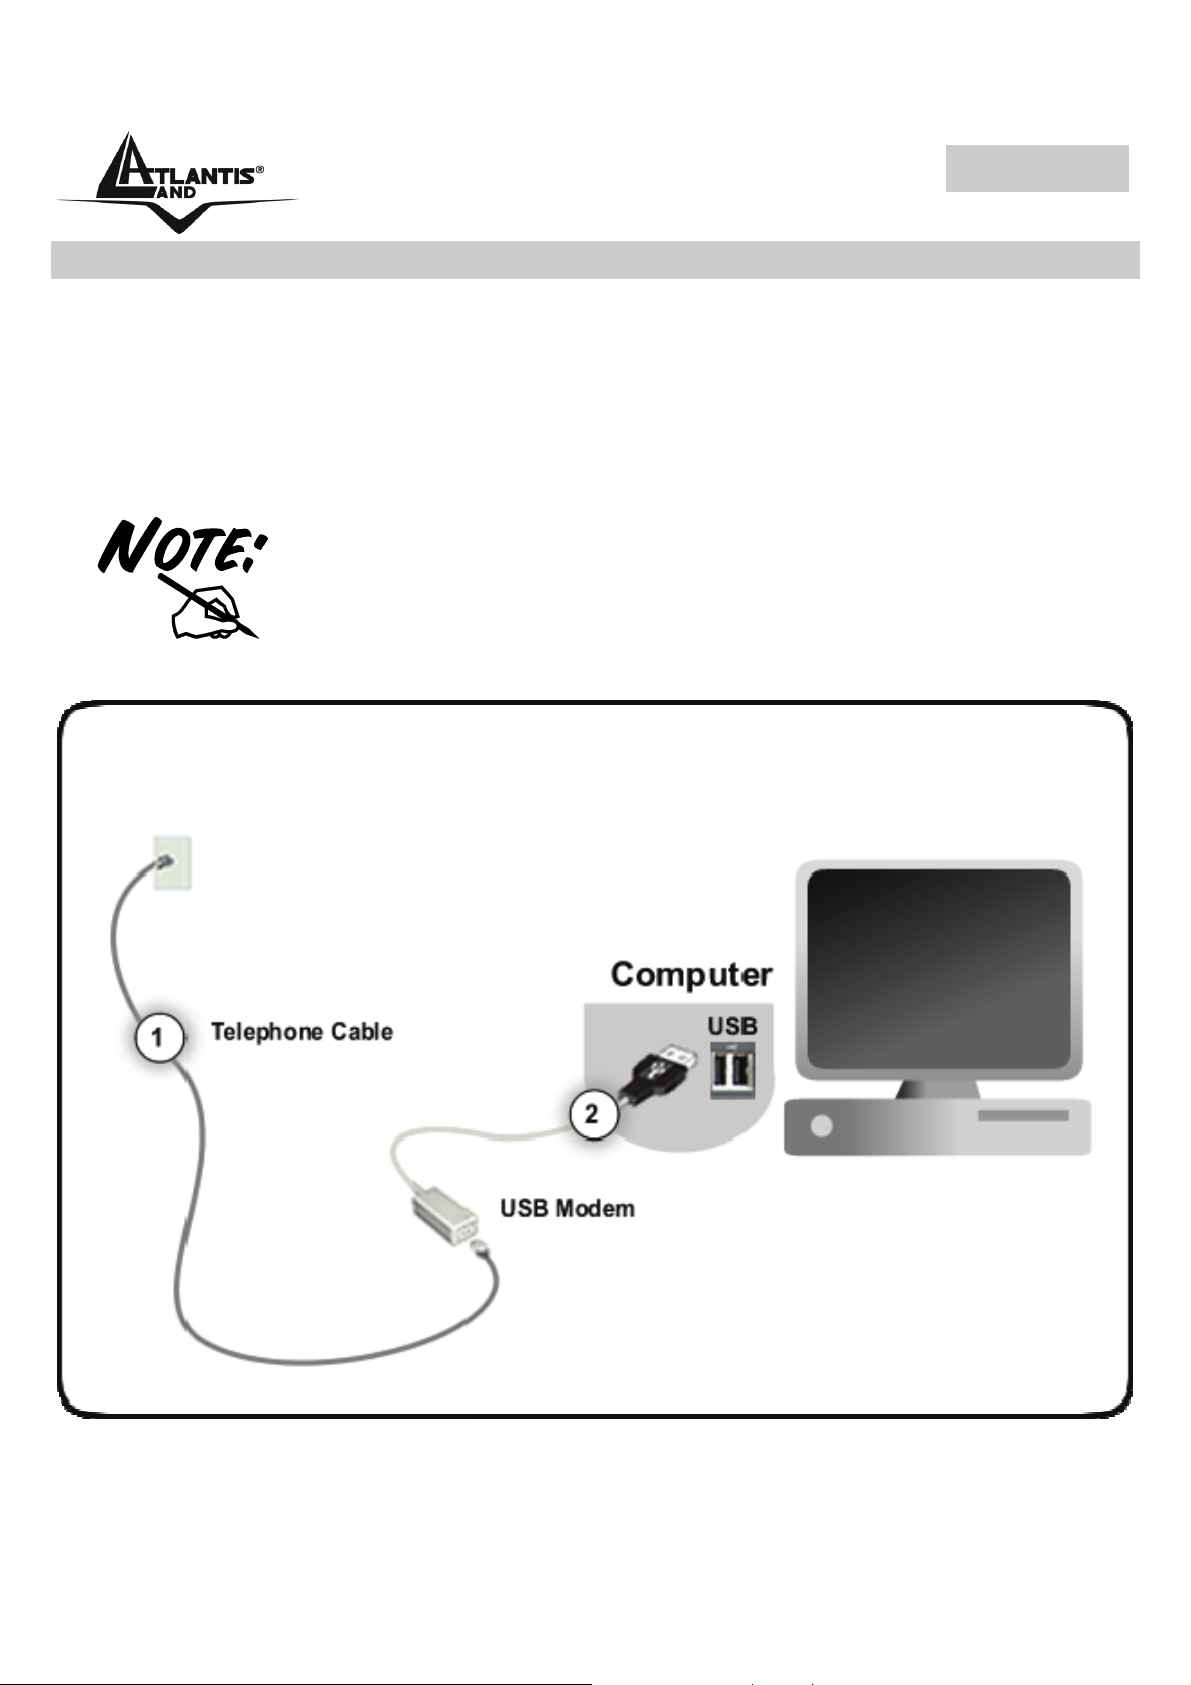
1.6 Connecting The Modem To Your Computer
The WebRunner USB Modem is a Plug’n’Play device. You may connect
your modem to your computer anytime without having to power down your
system. Connect as follow and your Windows will immediately detect the
new hardware and prompt for its driver. Connect one end of the telephone
extension cable to the LINE jack on Modem and the other end to your
Telephone Wall Socket. Connect the USB cable of the Modem to the USB
port on your computer. This completes the modem connections. Please
proceed to driver/utility installation.
A01-PU3 22
Page 22

ENGLISH
1.7 Installing Your Modem Driver
Connect as follow and your Windows will immediately detect the new
hardware and prompt for its driver, then click to Cancel. Insert the CD into
your computer’s CD Rom drive. If You want install immediately the driver,
click setup (CDRom:\Driver\USB\Operating System\setup.exe) to
continue.
Simply follow the instructions below which outline what you need to do.
Windows XP/2000
Insert the CD into your computer’s CD Rom drive. If You want install
immediately the driver, click setup (CDRom:\Driver\USB\WinXP\setup.exe
or CDRom:\Driver\USB\Win2000\setup.exe) to continue. Installation will
start automatically.
Windows Vista
Please plug WebRunner USB Modem into USB Slot, it will be recognized.
When Vista ask driver, please click Cancel. Place the Installation CD into
your CDRom Drive. If You want install immediately the driver, click setup
(CDRom:\Driver\USB\WinVista\setup.exe) to continue. Installation will
start automatically.
Click Continue (An program needs your permission to continue), then
click OK (2 times) in order to complete installation.
Windows 98SE/ME
Place the Installation CD into your CDRom Drive. If You want install
immediately the driver, click setup
(CDRom:\Driver\USB\Win98SE\setup.exe or
CDRom:\Driver\USB\WinME\setup.exe ) to continue. Installation will start
automatically.
A01-PU3 23
Page 23

ENGLISH
Depending on your system configurations you may be prompted for your
Windows 98 CDRom. Replace the installation CD with your Windows 98
CDRom and click OK. At the copying files dialog box, enter the path of your
windows CDRom (e.g. D:\Win98) and click OK.
1.8 Verifying Your Modem
• From your Windows desktop, right-click on My Computer icon and
click Properties.
• Click on the Hardware tab and then click Device Manager.
• Double-click on the Modem device. You should see the Conexant
UCM92 Data Fax RTAM USB Modem is being listed. This means that
your modem driver is successfully installed. If you see a yellow
exclamation mark besides Conexant UCM92 Data Fax RTAM USB
Modem, it means that your driver is not installed successfully. Right-
click on the device and then uninstall the modem. Restart the system
and then install your modem driver again.
In order for the Quick Connect and V.44 features
to work, your ISP must support the V.92
protocol. In order for the Modem on Hold
features to work, your ISP must support the V.92
protocol and your phone line must be
provisioned with “call waiting”. If your phone line
is also provisioned with “caller ID on call
waiting”, then the modem can identify the caller
ID information of the incoming call while
connected to the V.92 ISP.
V.92 Features Setting
The V.92 Feature Setting application provides control over various V.92
features. When launched you will see the V.92 Feature tab.
This tab provides the ability to enable/disable Quick Connect as well as to
clear the Quick Connect memory. When you click on the Clear Data button
A01-PU3 24
Page 24

ENGLISH
the next V.92 connection will be forced a non Quick Connect connection. All
V.92 connection attempts after that will be Quick Connect connections.
This tab also provides the ability to enable/disable V.44 Compression.
For commonly asked questions, please refer to the Frequently Asked
Questions in the Installation CD under the \Manuals folder.
For instructions on Modem Settings please refer to the Modem Settings
and V.92
Features Settings in the Installation CD under the \Manuals
folder.
1.9 Uninstalling the WebRunner USB
To uninstall the modem, go to the Control Panel of your system
(Instructions for Windows Vista).
• Open the Add/Remove Programs (Programs and Features).
• Select the Conexant UCM92 Data Fax RTAM USB in the
Add/Remove Programs (Uninstall or Change Programs) and then
click on the Remove (Uninstall/Change).
• Follow the on screen instructions to uninstall the modem.
1.10 Support
If you have any problems with the WebRunner USB, please consult this
manual. If you continue to have problems you should contact the dealer
where you bought this device. If you have any other questions you can
contact the Atlantis Land company directly at the following address:
Atlantis Land SpA
Viale De Gasperi, 122
20017 Mazzo di Rho(MI)
Tel: +39. 02.93906085, +39. 02.93907634(help desk)
Fax: +39. 02.93906161
Email: info@atlantis-land.com
WWW: http://www.atlantis-land.com
or tecnici@atlantis-land.com
A01-PU3 25
Page 25

ENGLISH
A01-PU3 26
Page 26

FRANCAIS
Copyright
Copyright . 2002 est la propriété de cette société. Tous droits réservés.
Sont interdites, la reproduction, la transmission, la transcription, la
mémorisation dans un système de sauvegarde où la traduction dans une
autre langue ou en langage informatique quels qu’ils soient, de la présente
publication, sous quelque forme que ce soit ou quel qu’en soit le moyen,
électronique, mécanique, magnétique, optique, chimique, manuel ou de tout
autre genre, sans avoir obtenu au préalable le consentement de notre
entreprise.
Non-responsabilité
La présente entreprise n’admet pas de requêtes ni de garantie, explicites
ou implicites, au sujet du contenu et de manière spécifique exclu la
possibilité de garantie, commerciabilité ou adaptabilité pour des buts
particuliers. Le logiciel décrit dans le présent manuel est vendu ou concédé
en licence “tel quel”. Si les programmes devaient présenter des problèmes
après l’achat, l’acquéreur (et non pas la présente entreprise, son
distributeur ou concessionnaire) est tenu de prendre en charge tous les
coûts de manutention ainsi que les coûts dus à des dommages accidentels
ou des conséquences dérivants d’un défaut du logiciel. La présente
entreprise se réserve en outre le droit de revoir le contenu de cette
publication et d’y apporter des modifications de temps en temps, sans
obligation d’informer les utilisateurs de ces changements. Nous avons fait
tout notre possible afin d’éviter la présence d’erreurs dans le texte, dans les
images et dans les tableaux présents dans ce manuel, dans le logiciel et le
disque dur. Cependant, nous ne pouvons pas garantire l’absence totale
d’erreurs et/ou omissions et nous vous prions de nous les signaler. Enfin,
nous ne pouvons être retenus responsables pour quelque perte que ce soit,
dommage ou incompréhension avenus directement ou indirectement, suite
à l’utilisation de notre manuel logiciel et/ou disque dur.
Toutes les marques ou noms de produits mentionnés dans le présent
manuel sont des marques commerciales et/ou brevetées par leurs
propriétaires respectifs.
A01-PU3 27
Page 27

FRANCAIS
Marquage CE
Cet appareil, qui appartient à la Classe B peut causer des interférences
radio, dans ce cas nous vous invitons à prendre les contre-mesures
appropriées.
A01-PU3 28
Page 28

FRANCAIS
1.1 Panorama
Félicitations pour votre choix, ce modem données/fax comporte les
innovations les plus récentes du haut débit RTC, des innovations qui
rendent la communication plus rapide et plus simple. Le guide de
démarrage rapide contient les informations d’installation et d’utilisation du
modem pour profiter au maximum de ses fonctionnalités. Installation
simple, Utilisation facile et Connexion rapide. Il répond aux exigences
particulières USB, en effet, il peut être branché ou débranché du PC sous
tension et ne nécessite pas d’alimentation externe puisqu’il est alimenté
directement par le bus USB. Le nouveau standard V.92 permet une
connexion rapide en ignorant certaines phases de la séquence
d’initialisation et en stabilisant la connexion plus rapidement; à cela s’ajoute
la communication à une vitesse montante jusqu’à 48Kb/s. Grâce au
protocole V.44, il améliore la compression des données jusqu’à 30%,
diminuant ainsi les temps d’attente.
1.2 Contenu de la boîte
Une fois ouverte, vous devriez trouver les éléments suivants:
• WebRunner USB
• CD avec pilotes, manuels et NetWaiting
• Guide d'installation
• Câble téléphonique (RJ11)
• Coupon de Garantie
Si vous constatez qu’un de ces composants manque, merci de vous
adressez à votre revendeur.
™
A01-PU3 29
Page 29

FRANCAIS
1.3 Caractéristiques principales
Le WebRunner USB offre les caractéristiques suivantes:
• Modem USB PSTN
• Technologie V92 (quick connect, modem-on-hold et V.44) vous offre
des téléchargements rapides, ainsi que de nouvelles fonctionnalités
• Jusqu’à 56Kbps en flux descendant
• Chip: Conexant™
• Connexion par port USB V1.1 (12Mbps)
• Installation/désinstallation à chaud (hotswap), Hot Plug&Play
• Fax haute vitesse : envoi et réception jusqu'à 14400 bps
• Systèmes d’exploitation: Windows 98 / Me / 2000 / XP et Vista
• Livré avec NetWaiting
• Langage de commandes: AT classiques
• Protocoles de communication gérés :
• Vitesse descendante jusqu’à 56Kbps
• ITU-V.92/V.90 56K
• Correction d’erreurs: ITU-V.42 et MNP 2–4
• Compression de données: ITU-V.44, V.42 bis et MNP 5
• V.80/H.324
1.4 Besoins système
Avant de commencer l’installation, vérifiez que vous disposez des
ressources suivantes:
• PC desktop ou portable avec un slot USB 1.1 libre
• Système Windows 98SE, ME, 2000, XP ou Vista
• 10MB d’espace libre sur disque dur
™
• Processeur Intel® Pentium® 233 Mhz ou compatible et 128 Mo de
mémoire vive ou plus avec Lecteur CDRom
A01-PU3 30
Page 30

FRANCAIS
1.5 Device Design
Label Status Signification
POWER
DATA
USB
LINE
Off Le WebRunner n’est pas actif
Allumée Le WebRunner est actif
Off La connexion n’est pas active
Allumée Données en cours de transfert
Pour la connexion au port USB de
l’ordinateur
Connexion à la prise téléphonique avec
le câble RJ11 fourni
A01-PU3 31
Page 31

FRANCAIS
1.6 Installation Hardware
Connectez le câble USB du modem à un port USB de votre ordinateur. Dès
que vous connectez le modem au port USB de l’ordinateur, une nouvelle
fenêtre apparaîtra. Cliquez sur Annuler. Raccordez le câble téléphonique
(fourni) sur votre ligne téléphonique.
S'assurer que la prise téléphonique utilisée soit de type
PSTN analogique, la ligne ISDN (RNIS) peut
endommager le modem.
A01-PU3 32
Page 32

FRANCAIS
1.7 Installation des Pilotes sous Windows
Insérer le CD dans le lecteur de CDRom,
Pour lancer les Pilotes/Utilitaire directement, une fois le CD inséré dans le
lecteur CDRom, cliquer sur l'icône setup
(CDRom:\driver\USB|SO\setup.exe).
Suivez maintenant la procédure d’installation jusqu’à la fin puis Il faut créer
la connexion Internet.
Windows XP/2000
Pour lancer les Pilotes/Utilitaire directement, une fois le CD inséré dans le
lecteur CDRom, cliquer sur l'icône setup
(CDRom:\driver\USB\WinXP\setup.exe ou
CDRom:\driver\USB\Win2000\setup.exe).
Suivez maintenant la procédure d’installation jusqu’à la fin.
Répondez Continuer aux questions éventuelles (Signature Numérique)
puis cliquez sur Suivant.
Cliquez enfin sur Terminer pour finir l’installation.
A ce point les pilotes ont été installés avec succès, Il faut maintenant créer
la connexion Internet.
• Win2000 : Cliquez sur Démarrer, puis sélectionnez Paramètres et
Connexions réseau et accès à distance. Double-cliquez sur Etablir
une nouvelle connexion dans la fenêtre Connexions réseau et
accès à distance. Dans la prochaine fenêtre, la page d'accueil de
l'Assistant Connexion réseau, cliquez sur Suivant pour continuer.
Cochez Connexion à Internet puis cliquez sur Suivant. Cochez
l'option Je veux configurer ma connexion Internet manuellement
ou me connecter via un réseau local (LAN), puis cliquez sur
Suivant. Dans la prochaine fenêtre, cochez la ligne en utilisant ma
ligne téléphonique et un modem et cliquez sur Suivant. Saisissez
le numéro d'appel composé par votre modem dans le champ Numéro
de téléphone et cliquez sur Suivant. Saisissez alors votre Nom
A01-PU3 33
Page 33

FRANCAIS
d'utilisateur dans la case Nom d'utilisateur et votre mot de passe de
connexion dans la case Mot de passe. Cliquez ensuite sur Suivant.
Insérez, enfin, le Nom de la Connexion pour terminer.
• WinXP : Cliquez sur Démarrer, puis sélectionnez Paramètres et
Panneau de configuration. Double-cliquez sur Connexions réseau
et cliquez sur Créer une nouvelle connexion. Vous arrivez sur lla
page d'accueil de l'Assistant Nouvelle Connexion, cliquez sur
Suivant pour continuer. Cochez Etablir une connexion à Internet
puis cliquez sur Suivant. Cochez Configurer ma connexion
manuellement et cliquez ensuite sur Suivant. Cochez Se
connecter en utilisant un modem d'accès à distance et cliquez
ensuite sur Suivant. Sélectionnez le modem que vous utilisez en
cochant la case correspondante. Maintenant vous insérez :Nom du
fournisseur, Numéro de téléphone, Nom d'utilisateur, Mot de
passe.
Windows Vista
Dès que vous connectez le modem au port USB de l’ordinateur, une
nouvelle fenêtre apparaîtra (Nouveau metériel étété). Cliquez sur Annuler.
Pour lancer les Pilotes/Utilitaire directement, une fois le CD inséré dans le
lecteur CDRom, cliquer sur l'icône setup
(CDRom:\driver\USB\WinVista\setup.exe ou).
Cliquer sur Continuer (dans Un programme a besoin de votre
autorisation pour continuer).
Suivez maintenant la procédure d’installation jusqu’à la fin (cliquez sur OK
2 fois).
A ce point les pilotes ont été installés avec succès, Il faut maintenant créer
la connexion Internet.
• WinVista : Cliquez sur Démarrer, puis sélectionnez Panneau de
configuration. Double-cliquez sur Centre Réseau et partage et
cliquez sur Configurer une connexionou un réseau. Vous arrivez
sur la page d'accueil de l'Assistant Nouvelle Connexion, cochez sur
A01-PU3 34
Page 34

FRANCAIS
Se connecter à Internet puis Suivant pour continuer. Cochez Accès
à distance. Maintenant vous insérez :Nom du fournisseur, Numéro
de téléphone, Nom d'utilisateur, Mot de passe et cliquez sur
Connecter.
Windows 98SE / ME
Insérez le CD fourni et allumez l’ordinateur. Dès que vous connectez le
Web Runner USB modem au port USB de l’ordinateur, une nouvelle fenêtre
apparaît. Cliquez sur Annuler .
Pour lancer les Pilotes/Utilitaire directement, une fois le CD inséré dans le
lecteur CDRom, cliquer sur l'icône setup
(CDRom:\driver\USB\Win98\setup.exe ou
CDRom:\driver\USB\WinME\setup.exe).
Suivez maintenant la procédure d’installation jusqu’à la fin.
Répondez Continuer aux questions éventuelles (Signature Numérique)
puis cliquez sur Suivant.
Cliquez enfin sur Terminer pour finir l’installation.
Attention: Windows 98 peut nécessiter une mise à jour. Insérez le CDRom d’origine de Windows 98 et cliquez sur OK. La fenêtre de copie des
fichiers apparaît, tapez le chemin d’accès aux fichiers sur votre lecteur de
CD-Rom (D:\WIN98) ou sur votre disque dur. Cliquez sur OK pour
continuer l’installation.
Il faut maintenant créer la connexion Internet.
• Win98 : Double-cliquez sur l'icône Poste de travail situé sur le
bureau. Ensuite double-cliquez sur Accès réseau à distance. Double-
cliquez sur Nouvelle connexion dans la fenêtre Accès réseau à
distance. Dans la prochaine fenêtre, dans le champ Entrez un nom
pour l'ordinateur appelé, entrez le nom de votre choix. Par défaut
votre modem s'affiche dans le champ Sélectionnez un périphérique :
ne changez rien. Cliquez ensuite sur Suivant. Saisissez le numéro
A01-PU3 35
Page 35

FRANCAIS
d'appel composé par votre modem. Dans le champ Indicatif du Pays
ou de la Région choisir France(33). Cliquer sur Suivant pour terminer.
• WinME : Cliquez sur Démarrer, puis sélectionnez Paramètres et
Accès réseau à distance. Double-cliquez sur Nouvelle connexion
dans la fenêtre Accès réseau à distance. Dans la prochaine fenêtre,
dans le champ Entrez un nom pour l'ordinateur appelé, entrez le
nom de votre choix. Par défaut votre modem s'affiche dans le champ
Sélectionnez un périphérique : ne changez rien. Cliquez ensuite sur
Suivant. Saisissez le numéro d'appel composé par votre modem.
Dans le champ Indicatif du Pays ou de la Région choisir France(33).
Cliquer sur Suivant pour terminer.
1.8 Supprimer les drivers et l’utilitaire
Pour supprimer complètement pilotes et utilitaire, lancez le programme de
désinstallation (entre parenthèse les instructions pour Windows Vista).
Mais Attention pour désinstaller le modem il faut au préalable enlever les
pilotes (le WebRunner USB doit être relier au PC).
• Cliquez sur Démarrer, choisissez Paramètres, puis cliquez sur
Panneau de configuration .
• Dans le Panneau de configuration, cliquez deux fois sur
Ajout/Suppression de programmes (Programmes et
Fonctionnalités).
• Dans la fenêtre Ajout/Suppression de programmes (Désinstaller
ou Modifier un programme) qui s'affiche, sélectionnez Conexant
UCM92 Data Fax RTAM USB Modem.
• Cliquez sur le bouton Modifier/Supprimer (Désinstaller/Modifier). Le
programme d'installation supprimera les pilotes du modem. Cela peut
prendre quelques minutes.
• Débranchez les câbles du modem pour terminer.
A01-PU3 36
Page 36

FRANCAIS
1.9 Support
Pour tous problèmes ou renseignements (il est IMPERATIF de connaître
au préalable les paramètres utilisés par le FAI), vous pouvez contacter
la « help desk » téléphonique gratuite d’Atlantis Land qui vous fournira
assistance du lundi au jeudi de 9.00 à 13.00 et 14.00 à 18.00, le vendredi
de 9.00 à 13.00
Vous pouvez aussi nous contacter par email :
tech-fr@atlantis-land.com
Atlantis Land France
57, Rue d’Amsterdam
75008 Paris
WWW: http://www.atlantis-land.fr
Important :
Pensez à consulter notre site Web, pour prendre connaissance
d’éventuelles mises à jour de Firmware, clauses de garantie, etc...
A01-PU3 37
Page 37

Atlantis Land S.p.A.
Viale De Gasperi, 122
Mazzo di Rho – MI – Italy
info@atlantis-land.com
sales@atlantis-land.com
www.atlantis-land.com
Where solutions begin
 Loading...