

Page 1

WebRunner Clipper
ADSL USB Modem
A01-AU3
MANUAL
A01-AU3_ME01
Company certified ISO 9001:2000
Where solutions begin
Page 2

Page 3
ITALIANO
Questo prodotto è coperto da garanzia Atlantis Land On-Site
della durata di 3 anni. Per maggiori dettagli in merito o per
accedere alla documentazione completa in Italiano fare
riferimento al sito www.atlantis-land.com.
ENGLISH
This product is covered by Atlantis Land 3 years On-Site
warranty. For more detailed informations please refer to the web
site www.atlantis-land.com.
For more detailed instructions on configuring and using this
device, please refer to the online manual.
FRANCAIS
Ce produit est couvert par une garantie Atlantis Land On-Site
3 ans. Pour des informations plus détaillées, référez-vous svp
au site Web www.atlantis-land.com.
DEUTSCH
Dieses Produkt ist durch die Atlantis Land 3 Jahre On-Site
Garantie gedeckt. Für weitere Informationen, beziehen Sie sich
bitte auf Web Site www.atlantis-land.com.
ESPAÑOL
Este producto està cubierto de garantía Atlantis Land On-Site
por 3 años. Para una información más detallada, se refiera por
favor al Web site www.atlantis-land.com
.
Page 4

The award of the information is facultative, but its lack will
prevent ATLANTIS LAND® from starting the Guarantee process
requested.
r
a
a
y
o
u
r
p
r
o
d
u
c
t
!
c
u
u
o
o
c
o
c
m
t
t
m
m
!
!
y
o
u
r
p
r
o
n
n
y
n
t
o
t
t
u
r
i
s
-
l
i
s
-
l
i
s
-
d
p
r
o
d
a
n
d
.
a
n
n
d
d
c
.
c
.
a
l
R
e
g
i
s
t
e
R
e
g
R
e
w
w
w
w
w
w
g
w
w
w
Registration on the web site
r
i
s
t
e
r
i
s
t
e
.
a
t
l
a
.
a
t
l
.
a
t
l
www.atlantis-land.com within 15 days
from the purchase of the product dismiss
the customer from showing a valid proof of
purchase (Sale Receipt or Invoice) in case
of the request of intervention. For further
information we invite you to look at our web
site at the section WARRANTY.
Copyright
The Atlantis Land logo is a registered trademark of Atlantis Land
SpA. All other names mentioned mat be trademarks or
registered trademarks of their respective owners. Subject to
change without notice. No liability for technical errors and/or
omissions.
Page 5

INDEX
INDEX
1.1 Overview of the Clipper USB............................. 7
1.2 Package Contents ............................................... 7
1.3 Clipper USB Features......................................... 7
1.4 Before Installing ................................................... 8
1.5 The Front Panel LEDs ........................................ 9
1.6 The Rear Ports..................................................... 9
1.7 Information from ISP ......................................... 10
1.8 Cabling ................................................................ 12
1.9 Installing the USB Driver on Windows ........... 12
1.10 Installing the USB Driver on Mac OS 9/X.... 14
Control Panel (MAC OS 9):....................................16
Development Mode(MAC OS 9): ...........................18
Control Panel Application(MAC OS X):..................22
Development Mode( MAC OS X):..........................24
1.11 Installing the USB Driver on Linux................ 28
Configuring PC in Linux: ........................................29
Configuring the Network Properties--- WAN Adapter
29
1.12 Connection PPPoA/PPPoE (Windows) ....... 30
1.13 LAN Driver (RFC 1483 / 1577)...................... 31
For Windows 2000 / XP .........................................31
For Windows 98SE/ME..........................................32
1.14 Advanced Configuration ................................. 34
1.15 Uninstalling the Clipper USB ......................... 35
Windows 35
Linux 35
Mac OS9 / X...........................................................36
1.16 Support.............................................................. 38
A01-AU3_ME01(V1.0 April 2006)
Page 6

Clipper USB
Copyright Statement
No part of this publication may be reproduced, stored in a
retrieval system, or transmitted in any form or by any means,
whether electronic, mechanical, photocopying, recording or
otherwise without the prior writing of the publisher.
Windows™ 98SE/2000/ME/XP are trademarks of Microsoft®
Corp. Pentium is trademark of Intel. All copyright reserved.
The Atlantis Land logo is a registered trademark of Atlantis
Land SpA. All other names mentioned mat be trademarks or
registered trademarks of their respective owners. Subject to
change without notice. No liability for technical errors and/or
omissions.
CE Mark Warning
This is a Class B product. In a domestic environment, this
product may cause radio interference, in which case the
user may be required to take adequate measures.
CE/EMC Restriction of Liability
The product described in this handbook was designed,
produced and approved according to the EMC-regulations
and is certified to be within EMC limitations.
If the product is used in an uncertified PC, the manufacturer
undertakes no warranty in respect to the EMC limits. The
described product in this handbook was constructed,
produced and certified so that the measured values are
within EMC limitations. In practice and under special
circumstances, it may be possible, that the product may be
outside of the given limits if it is used in a PC that is not
produced under EMC certification. It is also possible in
certain cases and under special circumstances, which the
given EMC peak values will become out of tolerance. In
these cases, the user himself is responsible for compliance
with the EMC limits.
Page 7

Clipper USB
1.1 Overview of the Clipper USB
Atlantis Land ’s Clipper complies with ADSL standards and
supports downstream rate of up to 8Mbps. With its userfriendly installation utility and plug-and-play USB interface, it
can be easily installed on a desktop PC or notebook PC
without opening the case of the computer or adding any
network interface card (NIC). Users can enjoy ADSL
services and broadband multimedia applications such as
interactive gaming, video streaming and real-time audio
much easier and faster than ever before. Where the
technology is not all, but a refined and attractive design,
which converts a technological product into a furnishing
object, a perfect accessory for offices or modern and rational
furnishings.
1.2 Package Contents
• Clipper USB
• Vera (Multilanguage Interactive Tutorial)
• One CD-Rom containing Driver, Manuals and Utility
• One Quick Start Guide
• One USB Cable
• One ADSL (RJ11) Cable
If any of the above items are missing, please contact
your reseller.
1.3 Clipper USB Features
The Clipper USB supports many standard and enhanced
features, including the following:
• Compliant with Universal Serial Bus Specification
Revision v1.1
• Supports downstream data rates up to 8Mbps and
upstream data rates up to 1024 kbps
Page 8

Clipper USB
• USB bus-powered; no external power supply is
required.
• Hot Plug and Play for Microsoft Windows 98 (SE),
2000, Me, and XP
• Mac OS and Linux
• Supports NDIS interface for RAS and Dial-Up
Networking
• Software upgradable
• Supports multiple data encapsulation formats,
including PPPoE, PPPoA, IPoA, and RFC1483
bridged or routed
• Friendly GUI Configuration Program
1.4 Before Installing
Make sure that you have all you need to install the Clipper
USB. You should have the following:
• A PC that has USB connector and its USB controller
is working properly as shown below
• Microsoft Windows 98SE, ME,2000 or XP
• Mac OS: 9.2.1 / 10.1 / 10.2.3
• Linux OS: [RedHat 7.1 (kernel 2.4.2-2), RedHat 8.0
(kernel 2.4.18-14), RedHat 9.0 (kernel 2.4.20-8)]
• At least 10MB of free disk space for the driver and
software
• An ADSL contract
• Intel® Pentium®III 600Mhz or compatible processor
with 128MB RAM with CDRom drive
Page 9
Clipper USB
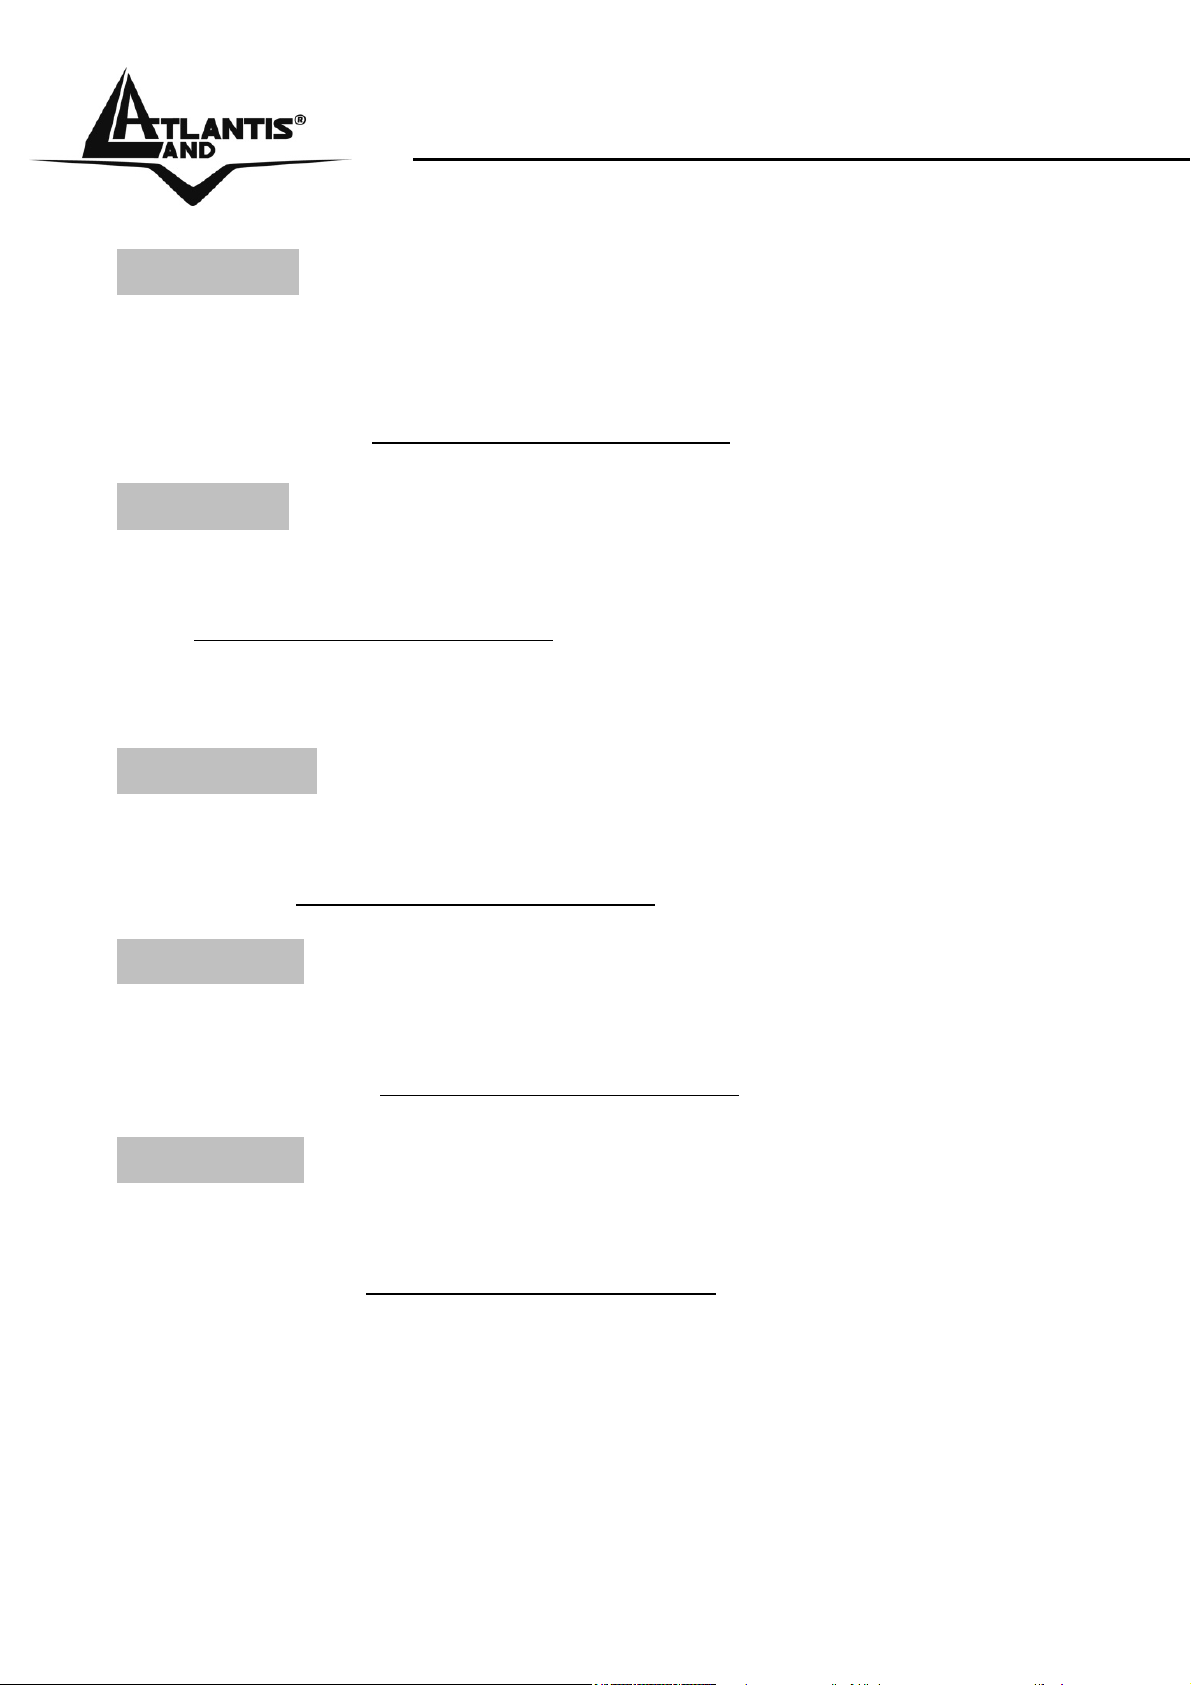
1.5 The Front Panel LEDs
LED MEANING
Lit when successfully connected to an
ADSL
ADSL DSLAM (“linesync”)
When this LED is flashing constantly, it
DATA
indicates the Modem is
transmitting/receiving data
Lit when the USB port is connected to the
USB
PC and working properly
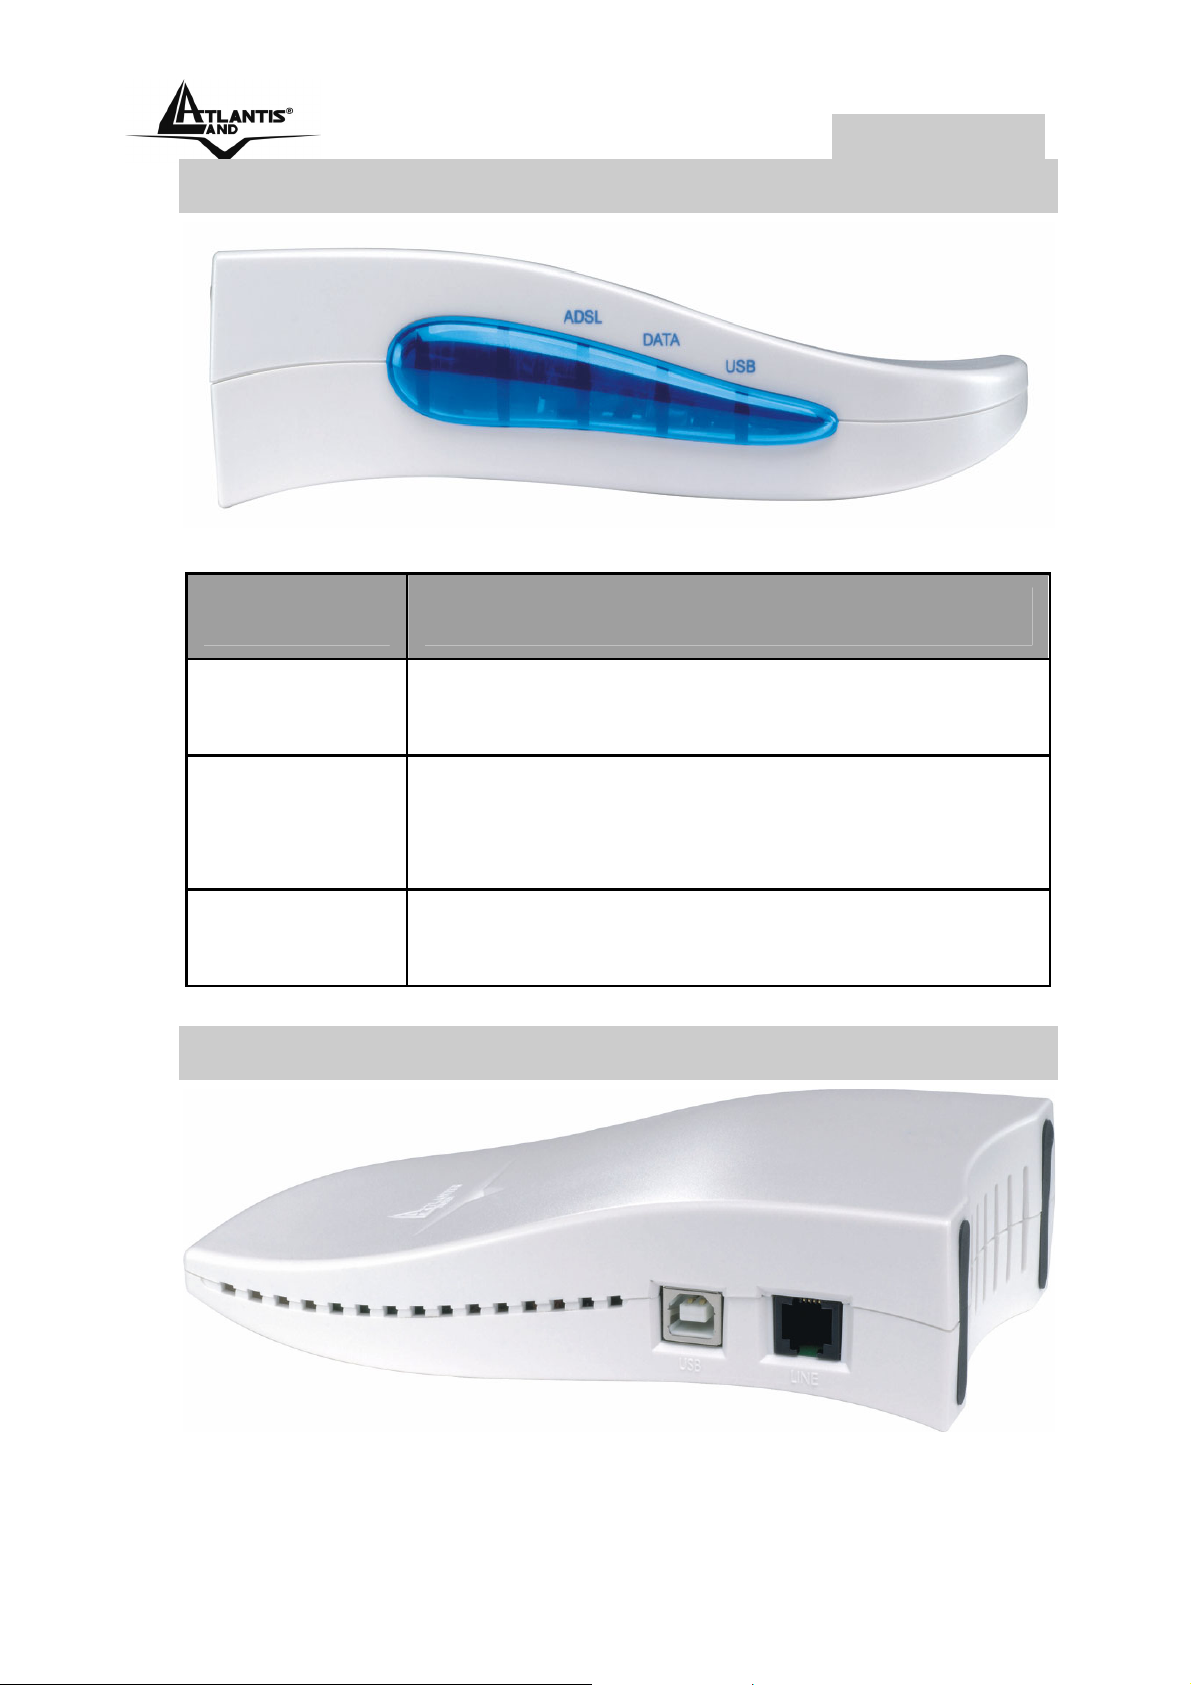
1.6 The Rear Ports
Page 10

Clipper USB
PORT MEANING
Connect the supplied USB cable to
USB
LINE
this port when connecting to the
Personal Computer.
Connect the supplied ADSL(RJ11)
cable to this port when connecting to
the ADSLnetwork.
1.7 Information from ISP
Before you start installing this device, you have to check with
your ISP what kind of service (connection method) is
provided such as PPPoE, PPPoA, RFC1483 bridged or
routed, IPoA.
Gather the information as illustrated in the following table
and keep it for reference.
If your ISP provides PPPoE or PPPoA connection method,
please select “PPPoA or PPPoE” to install driver. If your ISP
provides RFC1483 Bridged or Routed or IPoA, please select
“RFC1483 Routed” to install driver.
VPI/VCI: Consult the telephone company to get the Virtual
Path Identifier (VPI) and Virtual Channel Identifier (VCI)
numbers. The valid range for the VPI is 0 to 255 and for the
VCI is 32 to 65535. The default value VPI is 0 and VCI is 32.
For BT (VPI=0, VCI=38) and for KC (VPI=1, VCI=50).
NAT: The NAT feature allows multiple-user Internet access
for the cost of a single IP account. Encapsulation Method:
Be sure to use the encapsulation method (LLC/SNAP or VC
MUX) required by your ISP. Gather the information as
illustrated in the following table and keep it for reference.
Page 11

Clipper USB
PPPoE
PPPoA
RFC1483
Bridged
RFC1483
Routed
• VPI/VCI
• VC-based/LLC-based multiplexing
• Username, Password
• Domain Name System (DNS) IP
address
• VPI/VCI
• VC-based/LLC-based multiplexing
• Username, Password
• Domain Name System (DNS) IP
address
• VPI/VCI
• VC-based/LLC-based multiplexing
• VPI/VCI
• VC-based/LLC-based multiplexing
• IP address, Subnet mask, Gateway
IPoA
address
• Domain Name System (DNS) IP
address (it is fixed IP address)
• VPI/VCI
• VC-based/LLC-based multiplexing
• IP address, Subnet mask, Gateway
address
• Domain Name System (DNS) IP
address (it is fixed IP address)
Page 12

Clipper USB
1.8 Cabling
Please refer to the following instructions and figures for
installation procedures:
• Connect your ADLS line to the RJ-11 jack labeled
LINE on the back of the Clipper USB.
• Connect the USB cable to the jack labeled USB on
the back of the Clipper. Connect the other end to
the PC or to a self-powered USB hub device, e.g.,
monitor.
Do not plug USB cable into ADSL USB
Modem before to install the USB Driver.
Ensure that all other devices connected to the same
telephone line as your Clipper (e.g. telephones, fax
machines, analog modems) have a line filter (A01-AF2)
connected between them and the wall socket (unless you
are using a Central Splitter or Central Filter installed by a
qualified and licensed electrician), and ensure that all line
filters are correctly installed and the right way around.
1.9 Installing the USB Driver on
Windows
Insert the CD into your computer’s CD Rom drive. Vera can
explain all step in order to help You to install easily this
device. If You want install immediately the driver, click setup
(CDRom:\Driver\setup. exe) to continue.
Simply follow the instructions below which outline what you
needto do.
Page 13

Clipper USB
This section is described based on Windows XP/
2000/Me/98ME and all systems will automatically
acknowledge the modem has been connected to your
computer. Do not plug USB cable into ADSL USB Modem
before to install the USB Driver.
Choose service provider from the list below and then click
Next to continue.
• PPPoA (If You have Username and Password)
• PPPoE (If You have Username and Password)
• LAN (If You have RFC 1483 with Fixed IP address)
• Other Service Provider (If You have a different
protocol)
Please plug USB cable into ADSL USB Modem (when
windows titled Digital Signature Not Found appear, press
Yes to continue the installation). Select Yes, reboot the
computer now, than close the windows.
After Clipper ADSL USB Modem driver is successfully
installed, you will see these 2 icons on your desktop:
Page 14

Clipper USB
• Clipper Dial-Up Connection (only if You have
chosen PPPoA/PPPoE)
• DSL Status
After a few minutes the led ADSL should be turned on fixed.
If You click on the icon DSL Status is possible to check the
state of the modem and the speed of alignment.
In case the LED ASDL is blinking You can force the type of
modulation (to make reference to the section 1.13 of this
manual).
1.10 Installing the USB Driver on Mac
OS 9/X
Please refer to the complete manual on CDRom
(CDRom:\manual).
• Start Windows. Then insert the installation CD into
the CD-ROM drive. In next window, click the driver
installer (CDRom:\driver\Mac OS).
Page 15

Clipper USB
• The “Welcome” screen will appear, then, click
“Next”.
• Input the user name and password of your Mac
system.
Page 16

Clipper USB
The “License Agreement” screen will appear, then
•
click “Accept”.
• To click the type of setup you prefer, then click Next
>.
• When all necessary files have been copied, select
“Restart now”, than close the windows.
Control Panel (MAC OS 9):
The Clipper ADSL USB Modem control panel program
provides a quick and easy way to configure and check the
performance of the modem and the ADSL connection. When
open, the monitor window updates every 2 seconds.
Page 17

Clipper USB
• To access the modem control Panel on a Macintosh,
click on the Apple icon then select Control Panels -
> ADSL Setup.
• The “ADSL USB Modem” window will appear, with
two informational tabs:
• The “DSL Status” tab provides status information for
DSL line, such as the upstream/downstream data
rates, the modulation and whether it is operational or
not. The “System info” tab provides general
information about the various software/ firmware
versions.
Page 18

Clipper USB
To access the Control Panel, the device driver must be
installed.
Development Mode(MAC OS 9):
Development Mode is intended for OEM only. When in this
mode, the Control Panel display Modem configuration
information and advanced statistics about the modem.
• In order to transition to the Development Mode of
the Control Panel, while in the Control Panel, press
the “Ctrl +1” key simultaneously.
• The “DSL Status” tab provides status information for
the DSL line. Click Retrain or Disconnect a
connection for testing purposes.
Page 19

Clipper USB
• The “System info” tab provides general information
about the various software/firmware version using
the same screen as the generally available Control
panel previously described.
Page 20

Clipper USB
• Click on the “Configuration” tab to view and modify
the Modulation type, VPI and VCI values,
Encapsulation Mode and ATM Modes. If you have
made any changes, click Apply.
• The “ATM” tab provides transmission statistics such
as the number of cells or packets sent and received,
and errors.
Page 21

Clipper USB
• Click on the “DSL Advanced” tab to view more
advanced statistics.
Page 22

Clipper USB
Local/Remote Attenuation: The extent of the local/remote
attenuation expressed in decibels (dB)
Local SNR Margin: The signal to noise ratio margin. A
positive number roughly indicates the number of dB that the
noise could increase before the modem produces errors.
FEC-Interleaved: Count of local and remote FEC (Forward
Error Correction) errors for the interleaved data stream.
FEC-Fast: Count of local and remote FEC (Forward Error
Correction) errors for the fast data stream.
CRC-Interleaved: Count of local and remote CRC (Cyclic
redundancy check) errors for the interleaved data stream.
CRC-Fast: Count of local and remote CRC (Cyclic
redundancy check) errors for the fast data stream.
Control Panel Application(MAC OS X):
• Access the modem Control Panel on your Macintosh
(Go Applications DSL MODEM ADSL USB
MODEM)
• The “ADSL USB Modem” window will appear, with
two informational tabs:
• The “DSL Status” tab provides status information for
the DSL line, such as the upstream/downstream
data rates, the modulation and whether it is
operational or not.
Page 23

Clipper USB
• The “System info” tab provides general information
about the various software/firmware versions.
Page 24

Clipper USB
Development Mode( MAC OS X):
Development Mode is intended for OEM only. When in this
mode, the Control Panel display Modem configuration
information and advanced statistics about the modem.
• In order to transition to the Development Mode of
the Control Panel, while in the Control Panel, press
the “Ctrl +1” key simultaneously
• The “DSL Status” tab provides status information for
the DSL line. Click Retrain or Disconnect a
connection for testing purposes.
• The “System info” tab provides general information
about the various software/firmware version using
the same screen as the generally available Control
Page 25

Clipper USB
panel previously described.
• Click on the “Configuration” tab to view and modify
the Modulation type, VPI and VCI values,
Encapsulation Mode and ATM Modes.
Page 26

Clipper USB
• The “ATM” tab provides transmission statistics such
as the number of cells or packets sent and received,
and errors.
Page 27

Clipper USB
• Click on the “DSL Advanced” tab to view more
advanced statistics.
Page 28

Clipper USB
Local/Remote Attenuation: The extent of the local/remote
attenuation expressed in decibels (dB)
Local SNR Margin: The signal to noise ratio margin. A
positive number roughly indicates the number of dB that the
noise could increase before the modem produces errors.
FEC-Interleaved: Count of local and remote FEC (Forward
Error Correction) errors for the interleaved data stream.
FEC-Fast: Count of local and remote FEC (Forward Error
Correction) errors for the fast data stream.
CRC-Interleaved: Count of local and remote CRC (Cyclic
redundancy check) errors for the interleaved data stream.
CRC-Fast: Count of local and remote CRC (Cyclic
redundancy check) errors for the fast data stream.
1.11 Installing the USB Driver on Linux
This driver supports Linux-2.4 kernels.
The Linux kernel sources can be download from:
http://www.kernel.org/pub/linux/kernel/v2.4/
The installed system should already have the kernel sources
installed in the /usr/src/linux directory. If they are not there,
try to get them off the installation disks for your distribution,
or download the latest Linux-2.4 kernel, and configure and
build that. One common problem while compiling modules
on a new kernel is not to create link /usr/src/linux which
should point to the relevent kernel source directory. On a
freshly installed system this link might not be present and
Page 29

Clipper USB
needs to be created before the kernel or any driver module
can be compiled. There are lots of books and documents
available describing how to extract, configure and build the
kernel from it's sources.
The driver is compiled and tested for:
• RedHat 7.1 : kernels 2.4.2-2 using gcc 2.96
• RedHat 8.0 : kernel 2.4.18-14 using gcc 3.2
• RedHat 9.0 : kernel 2.4.20-8 using gcc 3.2
For Linux installation instructions, please refer to the text file
provided with your Linux driver’s package.
Configuring PC in Linux:
To enable LAN traffic over the ethernet interface:
% ifconfig eth2 192.168.1.200 up
You may also need to modify the netmask and route for the
interface. Refer to the manual pages for ifconfig and route
for more information.
To test the LAN connection is alive by pinging the remote
side: % ping 192.168.1.1
To disconnect the LAN interface: % ifconfig eth2 down
Configuring the Network Properties--- WAN
Adapter
The PPP daemon (pppd) talks to the driver over TTY
devices. Before the driver can be used, the devices
/dev/ttyG0 and /dev/cug0 need to be reated. This can be
performed by executing: % make devnodes
Page 30

Clipper USB
1.12 Connection PPPoA/PPPoE
(Windows)
PPPoE (PPP over Ethernet) provides access control in a
manner similar to dial-up services using PPP. It provides
access control and billing functionality in a manner similar to
dial-up services using PPP.
Double click on the Clipper Dial-up PPP connection icon
on the desktop. Then, the following window will appear.
Enter the User name and Password provided by your
ISP(Let the Phone number field be blank, in Windows 98SE/
ME). Click Connect and get ready to surf the Internet!
Page 31

Clipper USB
1.13 LAN Driver (RFC 1483 / 1577)
For Windows 2000 / XP
• Go to Start / Settings / Control Panel. In the
Control Panel, double-click on Network and Dialup Connections.
• Right–click on Local Area Connection that is using
the Clipper USB ADSL LAN Adapter and then click
Properties.
Page 32

Clipper USB
• Select Internet Protocol (TCP/IP). Then, click
Properties.
• Select Use the following IP address, and then
enter the IP address, Subnet mask, and Default
gateway provided by your ISP.
• Select Use the following DNS server addresses
and then enter the provided DNS server IP address.
For Windows 98SE/ME
• Go to Start / Settings / Control Panel. In the
Control Panel, double-click on Network and
choose the Configuration tab.
Page 33

Clipper USB
• Select TCP/IP → Clipper USB ADSL LAN
Adapter. Then, click Properties.
• Select the IP Address tab. In this page, click the
Specify an IP address radio button and enter the IP
address and Subnet Mask provided by your ISP.
• Select the Gateway tab. Enter the gateway provided
by your ISP and click Add.
• In the DNS Configuration page. Click the Enable
DNS radio button. Enter the Host name and DNS
Page 34

Clipper USB
Server IP address provided by your ISP. Then,
press the Add button.
1.14 Advanced Configuration
Once the Clipper ADSL USB Modem and software have
been installed, the communication settings may be easily
updated by performing the following steps: From your PC
desktop, click Start->Programs-> Clipper ADSL USB
Modem->Configure. The Communication Settings
window will be displayed.
Make the necessary changes to the VPI/VCI, Encapsulation
type and/or Modulation type and click Next>. The system
has rebooted to have the new setting take effect, therefore,
the Reboot window will appear, select Yes, reboot the
computer now, and click close to reboot.
Page 35

Clipper USB
1.15 Uninstalling the Clipper USB
Windows
The setup information for the Clipper is saved by Windows.
If you decide to permanently remove the driver and utility of
the Clipper from your system, you must run the
uninstallation program from the ISDN Utility program group
as follows:
• Open the Programs folder on the Start menu and
click the Clipper ADSL USB Modem item.
• Click the Uninstall item. The uninstallation program
will run.
• A message will be displayed asking you to remove
of the ADSL USB Modem software, click Yes.
The USB cable should not be
unplugged until you are prompted to
do so.
The USB cable must be unplugged
before the system is rebooted.
Linux
To unload an unused module:
% rmmod ./GSPNModem (Command to be executed from
directory monaco_linux/ModemDrv)
You may need to exit or disconnect any program current
using the module before it will unload. If the module was
configured for LAN, shutdown the ethernet interface:
% ifconfig eth2 down
Note: If multiple ethernet interfaces are created then all the
ethernet interfaces need to be brought down before
Page 36

Clipper USB
unloading the driver.
If the module was configured as a WAN device, you may
need to disconnect the PPP daemon (pppd) from the TTY
interfaces. Do this by terminating the PPP daemon:
% killall pppd
Mac OS9 / X
• Invoke the Uninstaller from the DSL Modem folder
(Application -> Clipper ADSL USB Modem -
>Uninstall)
• The “Uninstall” screen will appear. Select “Yes,
remove the software from my computer” and click
Next>
Type the administrator name and password at the
•
“Authenticate” screen and click OK.
Page 37

Clipper USB
The “Finish” screen will appear. The computer must
•
be restarted to complete the uninstall process.
Select “Restart now” and click Finish.
Page 38

Clipper USB
1.16 Support
If you have any problems with the Clipper USB, please
consult this manual. If you continue to have problems you
should contact the dealer where you bought this device. If
you have any other questions you can contact the Atlantis
Land company directly at the following address:
Atlantis Land SpA
Viale De Gasperi, 122
20017 Mazzo di Rho(MI)
Tel: +39. 02.93906085, +39. 02.93907634(help desk)
Fax: +39. 02.93906161
Email: info@atlantis-land.com
WWW: http://www.atlantis-land.com
or tecnici@atlantis-land.com
Page 39

Where solutions begin
Company certified ISO 9001:2000
Atlantis Land S.p.A.
Viale De Gasperi, 122
Mazzo di Rho – MI – Italy
info@atlantis-land.com
sales@atlantis-land.com
www.atlantis-land.com
 Loading...