

Page 1

Page 2

ITALIANO
Questo prodotto è coperto da garanzia Atlantis della durata di 2 anni. Per maggiori
dettagli in merito o per accedere alla documentazione completa in Italiano fare
riferimento al sito www.atlantis-land.com.
ENGLISH
This product is covered by Atlantis 2 years warranty. For more detailed informations
please refer to the web site www.atlantis-land.com.
For more detailed instructions on configuring and using this device, please refer to
the online manual.
FRANCAIS
Ce produit est couvert par une garantie Atlantis de 2 ans. Pour des informations
plus détaillées, référez-vous svp au site Web www.atlantis-land.com.
DEUTSCH
Dieses Produkt ist durch die Atlantis 2 Jahre Garantie gedeckt. Für weitere
Informationen, beziehen Sie sich bitte auf Web Site www.atlantis-land.com.
ESPAÑOL
Este producto esta cubierto por Atlantis con una garantía de 2 años. Para mayor
información diríjase a nuestro sitio Web www.atlantis-land.com.
2
Page 3

ITALIANO
1. PANORAMICA DI PRODOTTO .............................................................. 8
1.2 Requisiti di sistema ...................................................................... 8
1.2 Configurazione di Default ............................................................. 9
2. CONTENUTO DELLA CONFEZIONE ....................................................... 9
3. INSTALLAZIONE HARDWARE .............................................................. 9
4. INSTALLAZIONE SOFTWARE (Windows) ............................................ 10
4.1 Network Printer Wizard .............................................................. 11
4.2 Network USB Server ................................................................... 15
5. INSTALLAZIONE IN AMBIENTE MAC OS X .......................................... 23
6. SUPPORTO OFFERTO ........................................................................ 26
ENGLISH
1. PRODUCT OVERVIEW ....................................................................... 30
1.1 System Requirements ................................................................ 30
1.2 Factory Default Settings ............................................................. 31
2. PACKAGE CONTENTS ........................................................................ 31
3. HARDWARE INSTALLATION .............................................................. 31
4. USB LPR printer Setup on Windows ................................................... 32
4.1 Network Printer Wizard .............................................................. 33
4.2 Network USB Server ................................................................... 36
4.3 Uninstallation............................................................................ 44
5. USB LPR Printer Setup on Mac OS X .................................................. 45
6. Support ............................................................................................ 48
APPENDIX
APPENDIX A: NetServer USB2.0 LPR Printer Compatibility List ................. 49
APPENDIX B: Technical Specifications .................................................... 54
A02-PSU2_MX01 (v1.01 Dec 2010)
3
Page 4

AVVERTENZE
Abbiamo fatto di tutto al fine di evitare che nel testo, nelle immagini e nelle tabelle
presenti in questo manuale, nel software e nell'hardware fossero presenti degli
errori. Tuttavia, non possiamo garantire che non siano presenti errori e/o omissioni.
Infine, non possiamo essere ritenuti responsabili per qualsiasi perdita, danno o
incomprensione compiuti direttamente o indirettamente, come risulta dall'utilizzo del
manuale, software e/o hardware.
Il contenuto di questo manuale è fornito esclusivamente per uso informale, è
soggetto a cambiamenti senza preavviso (a tal fine si invita a consultare il sito
www.atlantisland.it o www.atlantis-land.com per reperirne gli aggiornamenti) e non
deve essere interpretato come un impegno da parte di Atlantis che non si assume
responsabilità per qualsiasi errore o inesattezza che possa apparire in questo
manuale. Nessuna parte di questa pubblicazione può essere riprodotta o trasmessa
in altra forma o con qualsiasi mezzo, elettronicamente o meccanicamente,
comprese fotocopie, riproduzioni, o registrazioni in un sistema di salvataggio,
oppure tradotti in altra lingua e in altra forma senza un espresso permesso scritto
da parte di Atlantis. Tutti i nomi di produttori e dei prodotti e qualsiasi marchio,
registrato o meno, menzionati in questo manuale sono usati al solo scopo
identificativo e rimangono proprietà esclusiva dei loro rispettivi proprietari.
Restrizioni di responsabilità CE/EMC
Il prodotto descritto in questa guida è stato progettato, prodotto e approvato in
conformità alle regole EMC ed è stato certificato per non avere limitazioni EMC.
Se il prodotto fosse utilizzato con un PC/apparati non certificati, il produttore non
garantisce il rispetto dei limiti EMC. Il prodotto descritto è stato costruito, prodotto
e certificato in modo che i valori misurati rientrino nelle limitazioni EMC. In pratica,
ed in particolari circostanze, potrebbe essere possibile che detti limiti possano
essere superati se utilizzato con apparecchiature non prodotte nel rispetto della
certificazione EMC. Può anche essere possibile, in alcuni casi, che i picchi di valore
siano al di fuori delle tolleranze. In questo caso l’utilizzatore è responsabile della
“compliance” con i limiti EMC. Il Produttore non è da ritenersi responsabile nel caso
il prodotto sia utilizzato al di fuori delle limitazioni EMC.
CE Mark Warning
In un ambiente domestico il dispositivo può causare interferenze radio, in questo
caso è opportuno prendere le adeguate contromisure.
4
Page 5
Dichiarazione di Conformità Sintetica
Con la presente Atlantis SpA dichiara che questo apparato soddisfa tutti i requisiti
applicabili alla tipologia del prodotto e richiesti dalla regolamentazione delle
telecomunicazioni secondo direttiva 2004/1008/CE (compatibilità elettromagnetica)
e 2006/95/CE (sicurezza elettrica) tramite l’utilizzo delle norme pubblicate nella
gazzetta ufficiale della comunità Europea.
Il dispositivo inoltre è Conforme alla Direttiva Europea 2005/32/CE e relativi
regolamenti sul Risparmio Energetico e Rendimento
La dichiarazione di conformità nella sua forma completa è disponibile presso il sito
www.atlantis-land.com (alla pagina del prodotto) o può essere richiesta a
info@atlantis-land.com.
riciclaggio/smaltimento di questa apparecchiatura
Importanti informazioni per il corretto
Il simbolo qui sotto indicato, riportato sull'apparecchiatura elettronica da Lei
acquistata e/o sulla sua confezione, indica che questa apparecchiatura elettronica
non potrà essere smaltita come un rifiuto qualunque ma dovrà essere oggetto di
raccolta separata.
Infatti i rifiuti di apparecchiatura elettroniche ed elettroniche devono essere
sottoposti ad uno specifico trattamento, indispensabile per evitare la dispersione
degli inquinanti contenuti all''interno delle apparecchiature stesse, a tutela
dell'ambiente e della salute umana. Inoltre sarà possibile riutilizzare/riciclare parte
dei materiali di cui i rifiuti di apparecchiature elettriche ed elettroniche sono
composti, riducendo così l'utilizzo di risorse naturali nonché la quantità di rifiuti da
smaltire.
Atlantis, in qualità di produttore di questa apparecchiatura, è impegnato nel
finanziamento e nella gestione di attività di trattamento e recupero dei rifiuti di
apparecchiature elettriche ed elettroniche compatibili con l'ambiente e con la salute
umana.
E' Sua responsabilità, come utilizzatore di questa apparecchiatura elettronica,
provvedere al conferimento della stessa al centro di raccolta di rifiuti di
apparecchiature elettriche ed elettroniche predisposto dal Suo Comune. Per
5
Page 6
maggiori informazioni sul centro di raccolta a Lei più vicino, La invitiamo a
contattare i competenti uffici del Suo Comune.
Qualora invece avesse deciso di acquistare una nuova apparecchiata elettronica di
tipo equivalente e destinata a svolgere le stesse funzioni di quella da smaltire, potrà
portare la vecchia apparecchiatura al distributore presso cui acquista la nuova. Il
distributore sarà tenuto ritirare gratuitamente la vecchia apparecchiatura1.
Si tenga presente che l'abbandono ed il deposito incontrollato di rifiuti sono puniti
con sanzione amministrativa pecuniaria da € 103 a € 619, salvo che il fatto
costituisca più grave reato. Se l'abbandono riguarda rifiuti non pericolosi od
ingombranti si applica la sanzione amministrativa pecuniaria da € 25 a € 154.
Il suo contributo nella raccolta differenziata dei rifiuti di apparecchiature elettriche
ed elettroniche è essenziale per il raggiungimento di tutela della salute umana
connessi al corretto smaltimento e recupero delle apparecchiature stesse.
1 Il distributore non sarà tenuto a ritirare l'apparecchiatura elettronica qualora vi sia un rischio di
contaminazione del personale incaricati o qualora risulti evidente che l'apparecchiatura in
questione non contiene i suoi componenti essenziali o contiene rifiuti diversi da apparecchiature
elettriche e/o elettroniche.
NB: le informazioni sopra riportate sono redatte in conformità alla Direttiva 2002/96/CE ed al D.
Lgs. 22 lugli
nonché particolari modalità di trattamento e smaltimento dei rifiuti di apparecchiature elettriche
ed elettroniche (RAEE). Per ulteriori informazioni in materia, la invitiamo a consultare il nostro sito
www.atlantis-land.com
AVVERTENZE
Non usare il dispositivo in un luogo in cui ci siano condizioni di alte
temperatura ed umidità, il dispositivo potrebbe funzionare in maniera
impropria e danneggiarsi.
Non usare la stessa presa di corrente per connettere altri apparecchi al di
fuori del dispositivo in oggetto.
Non aprire mai il case del dispositivo né cercare di ripararlo da soli.
Se il dispositivo dovesse essere troppo caldo, spegnerlo immediatamente e
rivolgersi a personale qualificato.
Non appoggiare il dispositivo su superfici plastiche o in legno che potrebbero
non favorire lo smaltimento termico.
Mettere il dispositivo su una superficie piana e stabile
Usare esclusivamente l’alimentatore fornito nella confezione, l’uso di altri
alimentatori farà automaticamente decadere la garanzia.
6
Page 7
La marcatura CE ( poste sull’etichetta di prodotto
potrebbero non rispettare le dimensioni minime stabilite
dalla normativa a causa delle ridotte dimensioni di
quest’ultima.
Il logo WEEE ( ) posto sull’etichetta di prodotto
potrebbe non rispettare le dimensioni minime stabilite dalla
normativa a causa delle ridotte dimensioni di quest’ultima.
Atlantis invita a visitare il sito web www.atlantis-land.com
alla relativa pagina di prodotto per reperire manualistica e
contenuti tecnici (aggiornamenti driver e/o funzionalità,
utility, support note) aggiornati.
Tutte le condizioni di utilizzo e clausole contenute in questo
manuale e nella garanzia si intendono note ed accettate. Si
prega di restituire immediatamente (entro 7 giorni
dall’acquisto) il prodotto qualora queste non siano
accettate.
Per usufruire delle condizioni di garanzia
migliorative associate al prodotto (Fast Swap, On
Site e On Center) è opportuno provvedere alla
registrazione dello stesso sul sito www.atlantisland.com entro e non oltre 15 giorni dalla data di
acquisto. La mancata registrazione entro il termine
di sopra farà si che il prodotto sia coperto
esclusivamente dalla condizioni standard di
garanzia.
Non effettuare upgrade del firmare utilizzando apparati/client wireless ma
solo wired. Questo potrebbe danneggiare il dispositivo ed invalidare la
garanzia.
7
Page 8

Il prodotto supporta una svariata quantità di stampanti
LPR. Si prega di consultare la lista di compatibilità al fine di
verificare il supporto della propria stampante
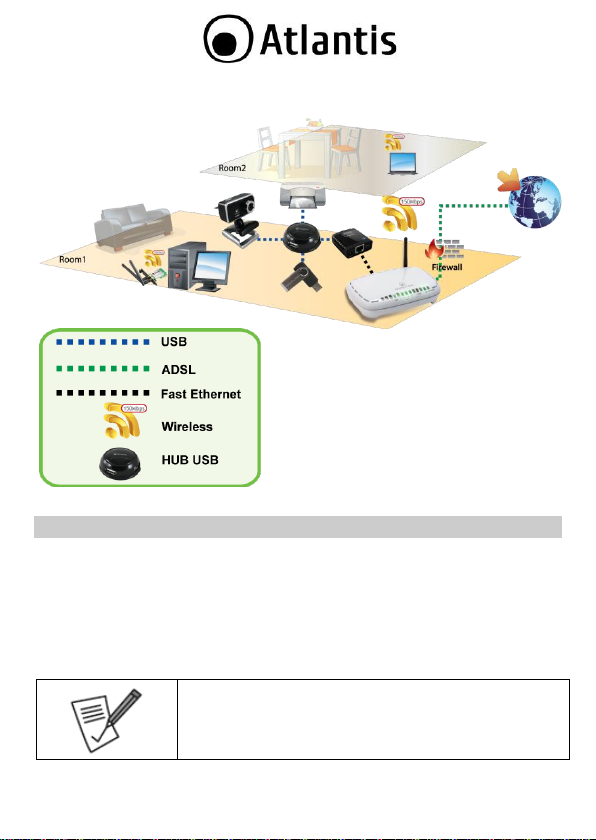
La ringraziamo per aver scelto NetServer Advanced, la via più semplice per
trasformare una stampante USB LPR/MFP in una stampante di rete utilizzabile da
tutti i PC della LAN. NetServer Advanced inoltre permette di condividere in rete LAN
sino a 4 dispositivi USB 2.0 (tramite un hub USB esterno) quali WebCam, Storage,
Mouse, Tastiere superando la limitazione fisica della lunghezza del cavo USB.
Questo manuale fornisce una panoramica per una rapida installazione del prodotto,
si prega di conservarlo per consultazioni future.
1. PANORAMICA DI PRODOTTO
Il print server fornisce una porta di stampa USB 2.0 ad alta velocità per la
connessione di una stampante LPR con interfaccia USB.
Il dispositivo, dotato di interfaccia Ethernet 10/100Mbps per la connessione alla
LAN, consente la condivisione di una stampante che diviene a tutti gli effetti una
stampante di rete.
La configurazione del dispositivo può avvenire sia tramite interfaccia WEB che
utilizzando l’apposito software fornito a corredo.
Il print server infine, supportando i più svariati sistemi operativi e protocolli di rete,
garantisce una vasta flessibilità di utilizzo sia in ambiente domestico che nel piccolo
ufficio.
NetServer Advanced PSU2 inoltre permette di condividere in rete sino a 4 (tramite
un hub USB esterno) dispositivi USB 2.0 (come WebCam, Storage, Mouse, Tastiere,
Joystick, Altoparlanti USB), permettendo a tutti i PC in rete di utilizzarli, superando
la limitazione fisica della lunghezza del cavo USB.
1.2 Requisiti di sistema
Prima di procedere con l’installazione del prodotto verificare di disporre dei seguenti
requisiti:
Processore Intel® Pentium®III 600Mhz o compatibile con 512 MB RAM
Sistema operativo Windows 2000/XP/Vista/7 o Mac OS X
45MB di spazio libero su disco
Lettore CD-Rom
8
Page 9

LED
Status
PWR
Acceso verde fisso
LAN ACT
Acceso verde fisso o lampeggiante in caso di invio/ricezione
dati
LAN Link
Acceso giallo fisso
1.2 Configurazione di Default
Prima di iniziare la configurazione del NetServer Avanced è necessario conoscere i
settaggi di default.
Password:
LAN IP Address: Client DHCP Attivo, se non è disponibile un server DHCP
il dispositivo utilizzerà il seguente indirizzo: 169.254.10.10
2. CONTENUTO DELLA CONFEZIONE
Prima dell’utilizzo, verificare che la scatola contenga i seguenti elementi:
NetServer Advanced PSU2
Alimentatore AC-DC (5V@2A)
Cavo RJ45 CAT 5
Una guida rapida multilingua (Italiano, Inglese)
Un Cd-Rom contenente utility e manuale dell’utente (Italiano, Inglese)
Coupon di Garanzia e WEEE
Nel caso in cui il contenuto non sia quello sovradescritto, contattare il
proprio rivenditore immediatamente.
3. INSTALLAZIONE HARDWARE
Questa sezione descrive la procedura di installazione hardware del dispositivo.
Collegare il cavo USB della stampante alla porta USB del NetServer Advanced.
Collegare un capo del cavo Ethernet allo Switch (Router o altro) della LAN e
l’altro capo alla presa LAN del NetServer Advanced.
Collegare prima l’alimentatore alla presa elettrica e dopo qualche secondo
inserire il jack nel connettore del NetServer Advanced.
A questo punto il dispositivo è correttamente collegato.
9
Page 10
In caso di installazione manuale delle utility, fare
riferimento alla cartella CDRom:\A02-PSU2\Utility.
In figura un esempio tipico di installazione (al NetServer Advanced PSU2 è stato
collegato un HUB USB per aumentare il numero di periferiche USB collegabili).
4. INSTALLAZIONE SOFTWARE (Windows)
Nel CD incluso nella confezione sono presenti 2 utility per la configurazione e
manutenzione del NetServer.
NetWork Printer Wizard(7/Vista/XP/2K) va installata obbligatoriamente
e permette, in pochi click, di rendere la stampante USB una stampante di
rete.
Network USB Server (Vista/7/XP e 2K) invece è una utility opzionale che
permette la manutenzione del dispositivo. Va installata nel caso si colleghi al
NetServer Advanced una periferica diversa dalla stampante.
10
Page 11

La gestione dell’apparato può essere fatta anche via WEB
(si veda la sezione apposita).
4.1 Network Printer Wizard
Una volta installato il Network Printer Wizard, cliccare sull’icona creata sul
desktop.
Partirà la configurazione guidata. Cliccare Avanti nella prima schermata.
11
Page 12
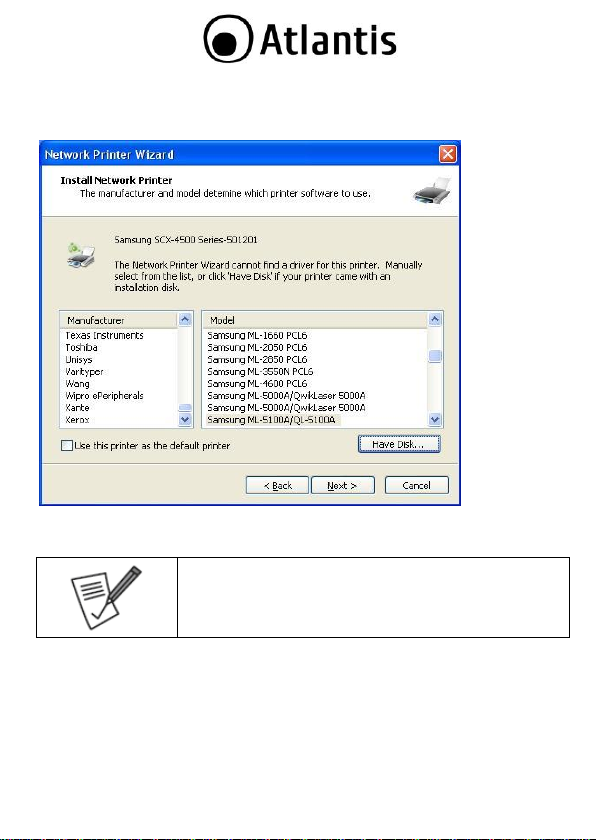
Il prodotto supporta una svariata quantità di stampanti
LPR. Si prega di consultare la lista di compatibilità al fine di
verificare il supporto della propria stampante.
Selezionare poi la stampante collegata al NetServer Advanced (in figura sono
mostrati più dispositivi collegati ciascuno a stampanti diverse). Cliccare su
Avanti/Next.
A questo punto va selezionato il driver per la stampante. Nel caso non fosse
presente nella lista è possibile cliccare su Have Disk ed indicarne poi il percorso.
Cliccare su Next.
12
Page 13
Verificare in Pannello di Controllo->Stampanti che la
stampante sia stata correttamente installata.
Il programma va lanciato soltanto la prima volta che si
installa la stampante (o se questa viene rimossa).
Per rimuovere la stampante appena installata è sufficiente
cancellarne l’icona in Pannello di Controllo>Stampanti.
Per disinstallare le utility effettuare la seguente procedura:
Chiudere eventuali applicazioni attive.
Cliccare sull’icona Risorse del Computer ed andare
in Pannello di controllo.
Cliccare sull’icona Installazioni Applicazioni
(Programmi e Funzionalità), evidenziare
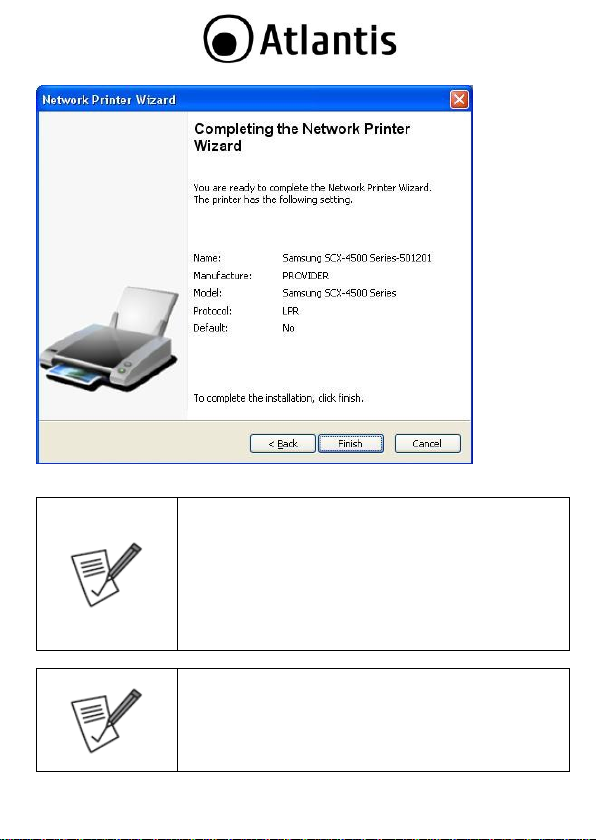
A questo punto il processo di installazione è terminato. Il Wizard in un paio di
minuti terminerà la configurazione della stampante.
13
Page 14

Networking USB Server /Networking Printer
Wizard e cliccare su Aggiungi/Rimuovi
(Disinstalla), confermare poi la procedura di
disinstallazione.
Al termine della procedura potrebbe essere chiesto un
riavvio del PC.
14
Page 15
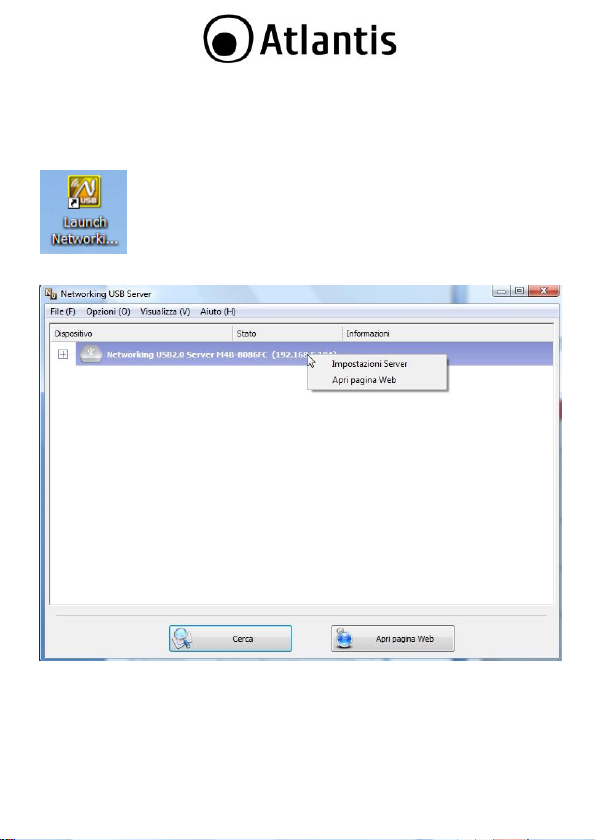
4.2 Network USB Server
Una volta installato il Network USB Server (scegliere il link adatto al proprio
sistema operativo) è opportuno riavviare il PC.
Per lanciare il programma cliccare sull’icona creata sul desktop.
Il programma esegue una scansione automatica e visualizzerà tutti i
NetServer/NetServer Advanced rilevati nella rete.
Evidenziare il NetServer Advanced opportuno (nel caso ce ne fossero diversi) e
cliccare il tasto destro del mouse. Selezionare Impostazione Server o Apri
Pagina WEB per cambiare le impostazioni del dispositivo.
15
Page 16
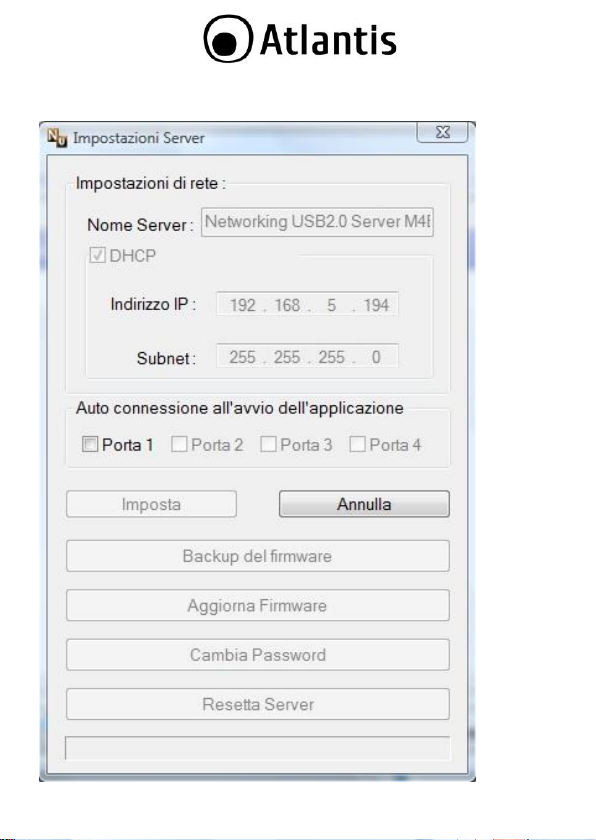
Impostazione Server
Verrà visualizzata la seguente schermata.
16
Page 17
VOCE
SIGNIFICATO
Nome Server
Immettere il nome del NetServer Advanced.
DHCP
Se spuntato il dispositivo all’accensione richiederà l’indirizzo
IP che gli verrà assegnato da un server DHCP presente nella
rete.
Se questo campo non è spuntato è opportuno introdurre a
mano l’indirizzo IP/Subnet utilizzati dal NetServer.
Cliccare poi su Imposta per rendere effettive le impostazioni
o su Annulla per cancellarle.
Auto
Connessione
all’avvio
E’ possibile selezionare la connessione automatica di uno o
più periferiche USB. Talune periferiche non sono attivabili
contemporaneamente.
Backup
Firmware
Permette di effettuare il download del firmware dall’apparato
su una periferica di memorizzazione esterna. Selezionare il
percorso opportuno e cliccare su Salva.
Aggiorna
Firmware
Permette di aggiornare il firmware dell’apparato. Una volta
selezionato il file, la procedura partirà immediatamente.
Cambia
Password
E’ possibile cambiare la password di accesso al NetServer.
Digitare 2 volte la nuova password e cliccare su Conferma
per renderla attiva.
Resetta Server
Cliccare per effettuare un reboot del dispositivo. Se il
dispositivo è occupato questa funzione non è attiva.
Se una volta aperta la finestra di Impostazione Server è
impossibile cambiare talune configurazioni, è opportuno
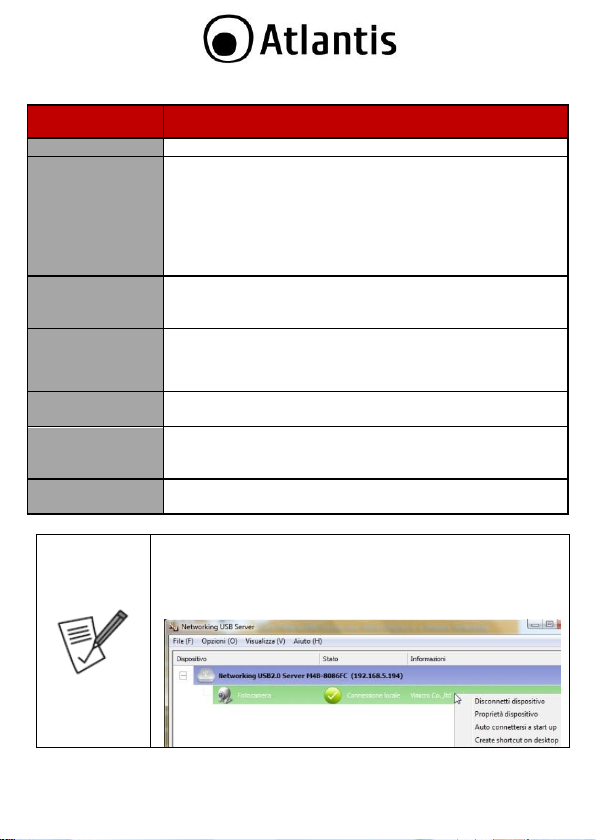
sconnettere tutte le periferiche attive (selezionari i dispositivi e,
premendo il tasto destro del menu, evidenziare Disconnetti
Dispositivo).
17
Page 18

Per effettuare un reset hardware mantenere premuto, per
circa 10 secondi, l’apposito bottone situato nella parte
laterale dell’apparato.
18
Page 19

Networking USB Server GUI
Accedendo ai menù è possibile:
File->Chiudi: Chiudere il programma.
Opzioni->Lingue: Scegliere la lingua di visualizzazione.
Opzioni->Esegui all’avvio del PC: Permette la partenza automatica del
software col Sistema Operativo.
Opzioni->Impostazioni Server: Si veda sez 4.2.
Opzioni->Apri pagina WEB: Si veda paragrafo seguente.
Opzioni->Scollegare Storage automaticamente quando idle: permette
di scollegare automaticamente la periferica di storage connessa quando in
modalità idle (selezionare nel caso di uso condiviso).
Visualizza->Solo dispositivi: permette di passare alla visualizzazione dei
soli dispositivi rilevati e non i server cui sono connessi.
Aiuto->Informazioni: mostra la release del software in uso.
Aiuto->Log Files: abilita la registrazione dei log di sistema. Visualizzabili poi
col comando Extract Log.
19
Page 20

ICONA
SIGNIFICATO
La periferica è online e non connessa.
Il dispositivo è già occupato (connesso) ad un altro utente.
Il dispositivo è già connesso al PC su cui si sta eseguendo
Networking USB server.
NetServer Advanced sta connettendo la periferica.
Il dispositivo ha rilevato un errore.
Il dispositivo connesso non è supportato da NetServer
Advanced.
Tipologia di
Periferica
Ogni dispositivo USB, se supportato, viene associato ad una
delle seguenti categorie (con relativa immagine).
USB Scanner
USB Single Function Printer
USB Multi-Function Printer
USB Computer Device
USB Audio Device
USB Input
USB WebCam
USB Fax Machine
USB Gamepad
USB Display Device
USB Network Device
USB Home Automation Device
USB Home Security Device
USB Phone Device
USB Storage Device
Other Device
L’associazione viene fatta leggendo le informazioni
direttamente dal dispositivo USB.
Connessione
di un
Dispositivo
Un dispositivo di storage può essere connesso (e dunque
utilizzato) da soltanto un utente alla volta. Per effettuare la
connessione è possibile utilizzare una delle 3 seguenti
metodologie:
cliccare 2 volte sul dispositivo.
20
Page 21

Selezionare, dal menu visualizzato alla pressione del
tasto destri, Connetti Dispositivo e cliccare il tasto
sinistro.
Cliccare sul bottone Connetti Dispositivo.
Il processo può durare qualche secondo.
Nel caso di periferiche di storage queste appariranno disponibili
come dischi locali (come se fossero connesse direttamente ad
una porta USB del PC).
Sconnessione
di un
Dispositivo
Un dispositivo può essere connesso (e dunque utilizzato) da
soltanto un utente alla volta. Per effettuare la sconnessione è
possibile utilizzare una delle 3 seguenti metodologie:
cliccare 2 volte sul dispositivo.
Selezionare, dal menu visualizzato alla pressione del
tasto destri, Disconnetti Dispositivo e cliccare il tasto
sinistro.
Cliccare sul bottone Disconnetti Dispositivo.
Il processo invia all’utente proprietario (nel caso di talune
tipologie di periferiche, tra cui quelle di Storage) un
messaggio in cui gli si chiede di liberare la risorsa. Una risposta
positiva permetterà il rilascio della periferica. Una risposta
negativa invece impedirà di connettersi alla periferica (la nuova
richiesta di disconnessione può essere inviata dopo almeno 3
minuti).
21
Page 22

Configurazione via WEB
E’ possibile sccedere col browser web digitando l’indirizzo visualizzato dal
Networking USB Server oppure, selezionare il NetServer da configurare e cliccare su
Apri Pagina WEB.
Apparirà a questo punto il Menù Principale, nella cui parte sinistra è possibile
accedere (come se si stessero vedendo i links in una homepage) a tutte le sezioni
disponibili:
Device Status (per visualizzare lo stato di funzionamento del dispositivo)
Network (per cambiare l’indirizzo IP)
Reset Device (reboot del dispositivo)
Factory Default (restore della configurazione iniziale)
Password Change (cambiare la password di accesso)
Compatibility List
22
Page 23

Accedere in Device Status e verificare in Device
information che la stampante/periferica collegata venga
rilevata correttamente.
Al fine di non interrompere task attivi, alcune funzionalità
potrebbero essere temporaneamente non disponibili.
5. INSTALLAZIONE IN AMBIENTE MAC OS X
Il Mac OS X include nativamente una utility di configurazione molto simile al
Networking Printer Wizard per ambienti Windows.
Per partire accedere a System Preferences nel menu Dock.
Cliccare 2 volte sull’icona Print & Fax, verranno mostrate le stampanti già installate
nel sistema.
Per installare una nuova stampante cliccare su +.
23
Page 24

Selezionare adesso dalla lista la stampante da installare (il numero dipende da
quante stampanti sono disponibili in rete). Se non viene visualizzata alcuna
stampante verificare che il dispositivo sia correttamente collegato alla rete e sotto
tensione.
24
Page 25

Selezionare la stampante (il protocollo Bonjour mostrerà nel campo Print Using il
driver) e cliccare su Add per effettuare l’installazione.
Una volta terminata l’installazione cliccando sull’icona Print & Fax (in System
Preferences) la stampante connessa al NetServer dovrebbe essere visibile.
25
Page 26

Il programma va lanciato soltanto la prima volta che si
installa la stampante (o se questa viene rimossa).
Per rimuovere la stampante, accedere a Print & Fax (in
System Preferences), selezionare la stampante e cliccare
su -.
6. SUPPORTO OFFERTO
Per qualunque altro problema o dubbio sul funzionamento del prodotto, è possibile
contattare il servizio di assistenza tecnica Atlantis tramite l’apertura di un ticket on-
line sul portale http://www.atlantis-land.com/ita/supporto.php.
Nel caso non fosse possibile l’accesso al portale di supporto, è altresì possibile
richiedere assistenza telefonica al numero +39 - 02 - 78.62.64.37 (consultare il sito
per verificare gli orari in cui il servizio viene erogato).
Per esporre eventuali richieste di supporto prevendita o richieste di contatto , si
invita ad utilizzare gli indirizzi mail info@atlantis-land.com oppure
prevendite@atlantis-land.com.
Atlantis SpA
Via S. Antonio 8/10
20020 Lainate (MI) - Italy
Website: http://www.atlantis-land.com
Email: info@atlantis-land.com
26
Page 27

Copyright Statement
No part of this publication may be reproduced, stored in a retrieval system, or
transmitted in any form or by any means, whether electronic, mechanical,
photocopying, recording or otherwise without the prior writing of the publisher.
Windows™ 98SE/2000/ME/XP/VISTA are trademarks of Microsoft® Corp. Pentium is
trademark of Intel. All copyright reserved.
The Atlantis logo is a registered trademark of Atlantis. All other names mentioned
mat be trademarks or registered trademarks of their respective owners. Subject to
change without notice. No liability for technical errors and/or omissions.
Regulatory Information/disclaimers
Installation and use of this Wireless LAN device must be in strict accordance with
the instructions included in the user documentation provided with the product. Any
changes or modifications made to this device that are not expressly approved by
the manufacturer may void the user’s authority to operate the equipment. The
Manufacturer is not responsible for any radio or television interference caused by
unauthorized modification of this device, of the substitution or attachment.
Manufacturer and its authorized resellers or distributors will assume no liability for
any damage or violation of government regulations arising from failing to comply
with these guidelines.
CE Mark Warning
In a domestic environment, this product may cause radio interference, in which
case the user may be required to take adequate measures.
CE/EMC Restriction of Liability
The product described in this handbook was designed, produced and approved
according to the EMC-regulations and is certified to be within EMC limitations.
If the product is used in an uncertified PC, the manufacturer undertakes no
warranty in respect to the EMC limits. The described product in this handbook was
constructed, produced and certified so that the measured values are within EMC
limitations. In practice and under special circumstances, it may be possible, that
the product may be outside of the given limits if it is used in a PC that is not
produced under EMC certification. It is also possible in certain cases and under
special circumstances, which the given EMC peak values will become out of
tolerance. In these cases, the user himself is responsible for compliance with the
EMC limits.
27
Page 28

Declaration of Conformity
Hereby, Atlantis SpA, declares that this product is in compliance to all relevant
essential requirements of the Electromagnetic Compatibility Directive
2004/1008/CE, Safety (2006/95/CE) and EuP. CE Declaration is available on the
web site www.atlantis-land.com.
procedures of this equipment
Important information for the correct recycle/treatment
The crossed-out wheeled bin symbol printed on the unit label or unit packaging
indicates that this equipment must not be disposed of as unsorted municipal waste
but it should be collected separately.
The waste of electric and electronic equipment must be treated separately, in order
to ensure that hazardous materials contained inside the equipment are not buried
thereby providing potential future problems for the environment and human health.
Moreover, it will be possible to reuse and recycle some parts of the waste of electric
and electronic equipment, contributing to reduce the quantities of waste to be
disposed of and the depletion of natural resources.
As user of this equipment, you are responsible to return this waste of electronic
equipment to an authorised collection facility set up by your Municipality. More
detailed information on your nearest collection centre can be obtained from your
Municipality or from other competent local entities.
If you are replacing the old equipment with a new equivalent product, the
distributor must take-back the old equipment free of charge on a one-to one basis
as long as the equipment is of equivalent type and fulfilled the same functions as
the supplied equipment.
Your rôle in participating to the separate collection of waste of electric and
electronic equipment is essential to ensure that environmental protection and
human health objectives connected to a responsible treatment and recycling
activities are achieved.
PS.: The above mentioned information are reported herewith in compliance with Directive
2002/96/CE, which requires a separate collection system and specific treatment and disposal
procedures for the waste of electric and electronic equipments (WEEE). For further and more
detailed information, we invite you to visit our website at www.atlantis-land.com
28
Page 29

CE Logo with attention Mark ( ) aren’t fully
compliant with minimum dimensions requirement to
European Directive due to limited sticker area.
WEEE BIN Logo ( ) isn’t fully compliant with
minimum dimensions requirement to European Directive
due to limited sticker area.
Atlantis suggest to vistit the web site www.atlantis-
land.com in order to retrieve update manual, techsheet
and driver.
Before starting, take a few minutes to read this manual.
Read all of instructions and save this manual for later
reference.
29
Page 30

Please check on the Appendix A or on the web site the
NetServer USB2.0 LPR Printer Compatibility List.
Thank you for purchasing NetServer Advanced that provides the easiest and fastest
way to deploy printers on your network. This User Manual contains detailed
instructions in the operation of this product. Please keep this Manual for future
reference.
1. PRODUCT OVERVIEW
NetServer provides an high speed USB 2.0 print port for the connection with an
LPR printer.
The device, provided with an Ethernet 10/100Mbps interface for the LAN
connection, allows the sharing of a printer which actually becomes a network
printer.
The NetServer features a Web-based Configuration Utility, which allows you to set
up the print server through the web browser easily and quickly. It also includes a
simple software utility Network Printer Wizard, a user-friendly program that
allows you to complete settings for the print server.
Finally the print server, since it supports most operative systems and network
protocols, guarantees a wide flexibility of use both in domestic environment and in
a small office.
Share up to 4 USB devices (with an external USB HUB) with multiple users through
your home network. NetServer Advanced supports external hard drive, flash
memory, webcam, mouse, USB Speaker and keyboards.
1.1 System Requirements
Before installing NetServer, your PC should meet the following:
Intel® Pentium®III 600Mhz or compatible processor with 512 MB RAM
Windows® 2000/XP/Vista/7 or Mac OS X
Minimum 45 Mbytes free disk space for installing the utilities
CD-Rom drive
30
Page 31

LED
Status
PWR
Lit green
LAN ACT
Blinking green if any device is sending data, Lit when
cooected.
LAN Link
Lit Yellow
1.2 Factory Default Settings
Before you configure this NetServer, you need to know the following default
settings:
Password:
LAN IP Address: by DHCP (If a DHCP server isn’t available in the network,
the device will use 169.254.10.10 and Subnet Mask 255.255.255.0)
2. PACKAGE CONTENTS
Open the box and carefully unpack it. The box should contain the following items:
NetServer Advanced PSU2
AC-DC Adapter (5V@2A)
1 x RJ45 CAT5 Cable
Quick Start Guide (English and Italian)
CD-Rom with Manual (English and Italian) and Utility
1 x Warranty Card and 1 x WEEE Card
If any item is found missing or damaged, please contact immediately your
local reseller for replacement.
3. HARDWARE INSTALLATION
This section will lead you to install correctly this device.
Please follow these steps:
Connect a USB cable from the USB Printer (or other devices) to the USB port
on the NetServer Advanced.
Connect one end of the Ethernet patch cable to the Ethernet port on the
Netserver Advanced and connect the other end of the Ethernet cable to the
network (router, Ethernet switch/hub)
Connect the Power adapter to the USB Server.
Once you’ve checked all the connections the product will carry on immediately a
autotest. Finished this, the LEDs status will be the following:
31
Page 32

If you need to install the utility manually, refer to the
following CD-Rom directory path: CDRom:\A02-
PSU2\Utility.
4. USB LPR printer Setup on Windows
Insert the CD-ROM and the Auto-run program will appear (alternatively, open a file
browser and double click on the start.htm file located in the CD directory). There
are 2 Utility for management and configuration.
NetWork Printer Wizard(7/Vista/XP/2K): Provides a straight forward
and easy-to-use utility that helps you to set up USB printers connects to LPR
Printer server as network printers, Network Printer Wizard. This utility reduces
the dozens of steps in setting up network printer via Windows build-in printer
setup program to a few point-and-clicks with the mouse. Users no longer
need to deal with the confusing IP setting, queue name entering and port
configuration.
Network USB Server (Vista/7/XP and 2K) is an utility for management,
the installation is optional.
32
Page 33

4.1 Network Printer Wizard
Once Network Printer Wizard installed, You can found this shortcut on the
Desktop. Please click on the Launch Network Printer Wizard icon created on the
desktop.
Please click on Next to continue when you see this welcome dialog box.
Please select the printer you would like to setup on this list and then Click on Next.
33
Page 34

The number of printers you see on this list depends on the
number of printers that are connected to your network. If
you only have one printer on the network, you see only one
printer on this list. If you don’t see any printers, please
make sure your printers and USB LPR Printer Server is
correctly powered on and connected to the network.
Please check on the Appendix A or on the web site the
NetServer USB2.0 LPR Printer Compatibility List.
On the next dialog box, please select the driver form the list if it’s there, and then
click on the Next button and go to netx step. f you can’t find the target printer’s
driver on the list, please insert the disk containing the printer’s driver, click on Have
Disk. You must browse to the folder that contains the driver for your printer and
click on OPEN to use it: Then, select the driver from the list again and then click on
the Next button. If you didn’t select the correct driver, here is the chance for you
to verify. Please click on Have Disk again to re-select.
34
Page 35

After the printer has been setup correctly, you can see it
under Control Panel > Printers:
REMEMBER, THIS SETUP IS A ONE-TIME THING. YOU DO
NOT HAVE TO RUN THIS PROCESS EVERY TIME YOU
WANT TO PRINT. HOWEVER, OF COURSE, IF YOU REMOVE
THE NETWORK PRINTER WIZARD PROGRAM, YOUR
PRINTER SETUP WILL NO LONGER WORK.
To remove the printer setup, please go to the Control
Panel > Printers dialog box and remove the printer entry
from it.
Simply Delete this icon by pressing Del key on your
keyboard. Then it will be removed from the list of usable
printers when you print document.
Once you have selected the correct driver from the list, please click on Finish
button. The wizard might take a minute to setup the network printer for you.
35
Page 36

This dialog box indicates a protective password has been
set. In order to access the configuration functions, you
must enter the correct password.
4.2 Network USB Server
The installer will automatically install the program. When done click on Finish to
exit the installer and complete the process. Select Yes, I want to restart my
computer now and click Finish to reboot your computer.
Once Network Usb Server installed, You can found this shortcut on the
Desktop. Please click on the Launch Network Printer Wizard icon created on the
desktop.
Networking USB Server utility provides some advanced setting function for users to
configure the device to better fit their needs. The Networking USB Server utility
looks like this at start up: It shows you some basic information about the utility and
a device list that displays all the NetServer you can access.
Select a NetServer and click on right button. Select Setting Server or Open WEB
page in order to configure the device.
36
Page 37

37
Page 38

Setting Server
If the correct password has been entered or Password null, you should see this
following dialog box. As you can see, this dialog box comes with many functions
and some of these functions are similar to that you see on the web pages.
38
Page 39

BUTTON
MEANING
Nome Server
First thing you would see is the text filed for you to change
the server name and IP address.
DHCP
You may have noticed the DHCP checkbox. When this
checkbox is checked, the fields for you to enter IP address
grays out. That is because checking this box meaning you
want the server to get IP automatically like your PC does,
so the IP address fields grays out. If you are a seasoned
network device user and you would like to set the IP
address by yourself, simply Uncheck this checkbox.
And you will be able to enter a Fixed IP address for your
server. Once you have entered the new server name and
IP address, click on Set button to finalize the new setting.
The Cancel button exits this dialog box without doing any
thing.
Connect devices
whenapplication
starts
Backup Firmware
Backup firmware function is a fail-save mechanism for the
Update Firmware function. You can backup the current
firmware of your server and save it on your PC in case you
updated the latest firmware and want to revert back for
some reasons. Click on the Backup Firmware button
then
Browse button allows you to choose where on your PC
you would like to save the backed-up firmware. Once the
save location is set, click on Submit to start backing up.
Cancel button exits this dialog box without doing
anything.
Update Firmware
Clicking on the Update Firmware button brings up a
dialog box. Clicking on Browse to choose the latest
firmware your vender provided and then click on the
Submit to start updating. Cancel button exits this dialog
box without doing anything.
Change Password
This function allows you to change the current password or
set a new password if none has been set. Click on the
button to bring up a dialog window. Enter the password
you want to set and enter it again for confirmation, then
press Submit button to finalize it.
39
Page 40

Restart Server
As it suggests, this button resets the server.
Please note that this function will not work if the device is
currently occupied.
In order to reset this device, please press for 10 seconds
the button on the rear panel.
Networking USB Server GUI
Accedendo ai menù è possibile:
File->Quit: Close the program.
Options->Languages: You can select the language used on the interface.
Options->Run this application when PC start: The software will start
automatically with PC OS.
Options->Server Configuration: Section 4.2.
40
Page 41

IMAGE
MEANING
Device online and Free for connection.
Device Occupied by other user.
Device occupied by yourself.
Device Connecting.
Have error.
Device unsupported.
Device Icon
Each USB device falls into a category of USB device type. This
software would use a specific icon to represent the device’s
category.
USB Scanner
USB Single Function Printer
USB Multi-Function Printer
USB Computer Device
USB Audio Device
USB Input
USB WebCam
USB Fax Machine
USB Gamepad
USB Display Device
USB Network Device
USB Home Automation Device
USB Home Security Device
USB Phone Device
USB Storage Device
Options->Open WEB page: Next Section.
Options->Disconnect Storage device when idle: this menu offer
automatic disconnection of usb storage when idle time is verified.
View->Show devices only: the users can see ad manage all the available
USB devices on the network.
Help->About: information on the software release.
41
Page 42

Other Device
Eacu USB device reports its own device type when plugged
into the USB Server.
Conecting
Device
Before You can use a network storage device You must first
connect to it. Basically this connection is like when You plug an
external USB storage device into Your PC. Please note that a
device can be connected by one user at time.
Te connection process would take a few seconds. Once
connected, the network USB Storage device would appear
under “MY Computer” as one of Your local drives.
Then You can access the data on the network usb storage
device as you would from a local hard drive on Your PC.
There are 3 ways to disconnect a device:
double-click on the device on the list.
using the Connect Device option on the right-click menu.
use the Connect Device button.
Disconnect
Device
Since each Network USN Storage device could only be
connected by one user at each time, you should disconnect a
device once you are done with it so other users could use it.
There are 3 ways to disconnect a device:
double-click on the device on the list.
using the Disconnect Device option on the right-click
menu.
use the Disconnect Device button.
Device control request: to request other user to release a
Network USB storage device, use this Request Disconnect
Device option from the right-click menu.
Of course this option would only be enabled when the device is
currently occupied by someone else. The current occupied user
will see a message into a pop-up windows.
If the occupying user deny when receive the rRequest
Disconnect Device the system allow a new Request
Disconnect Device only after 3 minutes.
42
Page 43

WEB Page Configuration
Use the Open Web Page option on the Network USB Server GUI right-click menu
to opren up the web-base UI of a device.
At the configuration homepage, the left navigation pane where bookmarks are
provided links you directly to the desired setup page (Click on the desired item to
expand the page with all settings in the main navigation panel), including:
Device Status (You can check the status of NetServer and connected
devices)
Network (You can change the network setting according to your need)
Reset Device (With the Reset Server button you can reboot the server.)
Factory Default (Clicking on this link takes you the page where you can
restore the server’s settings back to default)
Password Change (in order to change password)
Compatibility List
43
Page 44

Click on Device Status and verify if into Device
information there are details about connected printer.
A Server with busy device(s) connected is prohibited to be
configured to prevent interruption of any on-going tasks.
4.3 Uninstallation
To uninstall the Utility, go to the Control Panel of your system.
Open the Add/Remove Programs.
Select the Networking USB Server /Networking Printer Wizard in the
Add/Remove Programs and then click on the Remove.
Click on Remove ALL.
Then chose Yes, I want to restart my computer and click Finish.
44
Page 45

5. USB LPR Printer Setup on Mac OS X
MAC OS by Apple Inc. comes with a built-in utility very similar to Network Printer
Wizard. To start, please go to System Preferences on the Dock menu:
Once you have the System Preferences window up, please locate the Print &
Fax item.
Double click on Print & Fax to start selecting printer for installation.
This window shows you the printers that have been installed on your Mac. To install
a new printer, please click on the “+” button to select printers.
45
Page 46

Select the printer you would like to setup from the list. The number of printers you
see on this list depends on the number of printers that are connected to your
network. If you only have one printer on the network, you see only one printer on
this list.
If you don’t see any printers, please make sure your printers and NetServer is
correctly powered on and connected to the network
46
Page 47

As you select the printer to install, Bonjour will select the correct printer driver for
you and is shown at the Print Using: field. Once you have highlighted the printer
to install, click on Add button to install it.
47
Page 48

After the printer has been setup correctly, you can see it
under Print & Fax:
REMEMBER, THIS SETUP IS A ONE-TIME THING. YOU DO
NOT HAVE TO RUN THIS PROCESS EVERY TIME YOU
WANT TO PRINT. HOWEVER, OF COURSE, IF YOU REMOVE
THE NETWORK PRINTER WIZARD PROGRAM, YOUR
PRINTER SETUP WILL NO LONGER WORK.
To remove a printer setting, please go to your Printer and
FAX again: Select from the available printer list on the left
and then click on the - button to remove it. Once removed,
the printer will disappear from the list
Once installation is done, you should be able to see this on your Print & Fax
window: You will see that the new printer appeared on the available printer list. You
can now use this printer for printing your documents or pictures.
6. Support
For technical questions and support, please contact our help-desk by ticket on
http://www.atlantis-land.com/ita/supporto.php.
For generic informations, please send an e-mail to info@atlantis-land.com.
For presales informations, please send an e-mail to prevendite@atlantis-land.com.
Atlantis SpA
Via S. Antonio 8/10
20020 Lainate (MI) - Italy
Website: http://www.atlantis-land.com
Email: info@atlantis-land.com
48
Page 49

Brand
Model Name
XP
Vista
Brother
HL 2040
Pass
Pass
Brother
MFC 3320CN
Pass
Pass
Brother
MFC 3820CN
Pass
Pass
Canon
ImageClass MF3110
Pass
Pass
Canon
ImageClass MF3112
Pass
Pass
Canon
ImageClass MF3220
Pass
Pass
Canon
ImageClass MF3222
Pass
Pass
Canon
iP100
Pass
Pass
Canon
iP2500
Pass
Pass
Canon
iP6700D
Pass
Pass
Canon
iP7500
Pass
Pass
Canon
iP90
Pass
Pass
Canon
iP90v
Pass
Pass
Canon
LBP3200
Pass
Pass
Canon
MP110
Pass
Pass
Canon
MP130
Pass
Pass
Canon
MP145
Pass
Pass
Canon
MP150
Pass
Pass
Canon
MP160
Pass
Pass
Canon
MP170
Pass
Pass
Canon
MP180
Pass
Pass
Canon
MP450
Pass
Pass
Canon
MP460
Pass
Pass
Canon
MP470
Pass
Pass
Canon
MP510
Pass
Pass
Canon
MP520
Pass
Pass
Canon
MP600
Pass
Pass
APPENDIX A: NetServer USB2.0 LPR Printer Compatibility
List
Please check on this List if Your Printer is supported.
49
Page 50

Canon
MP610
Pass
Pass
Canon
MP810
Pass
Pass
Canon
MP830
Pass
Pass
Canon
MP960
Pass
Pass
Canon
MP970
Pass
Pass
Canon
MX308
Pass
Pass
Canon
MX700
Pass
Pass
Canon
MX7600
Pass
Pass
Canon
MX850
Pass
Pass
Canon
Pro9000
Pass
Pass
Canon
Pro9500
Pass
Pass
Canon
Satera MF4010
Pass
Pass
Canon
Satera MF4150
Pass
Pass
Dell
Photo 720
Pass
Pass
EPSON
AL-C900
Pass
Pass
EPSON
EPL-5800
Pass
Pass
EPSON
EPL-N2500
Pass
Pass
EPSON
PM-100
Pass
Pass
EPSON
PM-3700C
Pass
Pass
EPSON
PM-A840
Pass
Pass
EPSON
PM-A840S
Pass
Pass
EPSON
PM-A950
Pass
Pass
EPSON
PM-G4500
Pass
Pass
EPSON
PM-G5300
Pass
Pass
EPSON
PM-G860
Pass
Pass
EPSON
PM-T940
Pass
Pass
EPSON
PM-T960
Pass
Pass
EPSON
PM-T990
Pass
Pass
EPSON
PX-501A
Pass
Pass
EPSON
PX-5600
Pass
Pass
EPSON
PX-5800
Pass
Pass
50
Page 51

EPSON
PX-A640
Pass
Pass
EPSON
PX-A740
Pass
Pass
EPSON
PX-FA700
Pass
Pass
EPSON
PX-V780
Pass
Pass
EPSON
Stylus C45
Pass
Pass
EPSON
Stylus C61
Pass
Pass
EPSON
Stylus C65
Pass
Pass
EPSON
Stylus C66
Pass
Pass
EPSON
Stylus C67
Pass
Pass
EPSON
Stylus C90
Pass
Pass
EPSON
Stylus CX3500
Pass
Pass
EPSON
Stylus CX3700
Pass
Pass
EPSON
Stylus CX3810
Pass
Pass
EPSON
Stylus CX4700
Pass
Pass
EPSON
Stylus CX4800
Pass
Pass
EPSON
Stylus Photo 2200
Pass
Pass
EPSON
Stylus Photo 830
Pass - EPSON
Stylus R320
Pass
Pass
EPSON
Stylus R510
Pass - HP
Deskjet 3744
Pass
Pass
HP
Deskjet 3745
Pass
Pass
HP
Deskjet 640C
Pass
Pass
HP
Deskjet D2360
Pass
Pass
HP
Deskjet D2460
Pass
Pass
HP
Deskjet D3745
Pass
Pass
HP
Deskjet D4160
Pass
Pass
HP
Deskjet D4260
Pass
Pass
HP
Deskjet F300
Pass
Pass
HP
Deskjet F340
Pass
Pass
HP
Deskjet F350
Pass
Pass
HP
Deskjet F370
Pass
Pass
51
Page 52

HP
Deskjet F379
Pass
Pass
HP
Deskjet F380
Pass
Pass
HP
LaserJet 1010
Pass
N/A
HP
LaserJet 1015
Pass
N/A
HP
LaserJet 1018
Fail
Fail
HP
LaserJet 1020
Fail
Fail
HP
LaserJet 2600n
Fail
Fail
HP
LaserJet 3030
Pass
Pass
HP
LaserJet 3050
Pass
Pass
HP
LaserJet 3050z
Pass
Pass
HP
LaserJet 3330
Pass
Fail
HP
LaserJet 3380
Pass
Fail
HP
Officejet 5510
Pass
Pass
HP
Officejet 5610
Pass
Pass
HP
Photosmart 3110
Pass
Pass
HP
Photosmart 3210
Pass
Pass
HP
Photosmart 3310
Pass
Pass
HP
Photosmart 335
Pass
Pass
HP
Photosmart 8030
Pass
Pass
HP
psc 1210
Pass
Pass
HP
psc 1315
Pass
Pass
HP
psc 1402
Pass
Pass
HP
psc 1410
Pass
Pass
HP
psc 1510
Pass
Pass
HP
psc 1610
Pass
Pass
HP
psc 2410
Pass
Pass
HP
psc 2510
Pass
Pass
LEXMARK
1270(w internal hub)
Fail
Fail
LEXMARK
E120n
no ink
no ink
LEXMARK
p4350
Fail
Fail
LEXMARK
p6250
Fail
Fail
52
Page 53

LEXMARK
x2650
Fail
Fail
LEXMARK
x3470
Fail
Fail
LEXMARK
x3550
Fail
Fail
LEXMARK
x4270
Fail
Fail
LEXMARK
x7350
Fail
Fail
Samsung
ML2010
Pass
Fail
Samsung
SCX-4500
Pass
Pass
53
Page 54

Technical Specs
Code
A02-PSU2
Standards
TCP/IP
Network Interface
1 x Fast Ethernet Port
LPR Printer Connection
1 x USB2.0 backward compatible with USB 1.1
LED
3 (Power, Link, ACT)
Management
Web Interface, Windows Utility
Standards
10/100Mbps Base Ethernet, TCP/IP, HTTP Server,
LPR/MFP, Bonjour Search, DHCP, Auto-MDIX, USB 2.0
Hi Speed
Supported Printer
Compatible with a wide range of printers, please check
on the website the Compatibility List in order to verify
if Your printer is supported
Supported OS (Printer)
MS Windows® VISTA
MS Windows® XP
MS Windows® 2000
MS Windows® 7
Mac OS X (only LPR)
Networking USB Server
Share up to 4 USB devices (with an external USB
HUB) with multiple users through your home network.
NetServer Advanced supports external hard drive,
flash memory, webcam, mouse, USB Speaker,
keyboards, Joystick etc.
MS Windows® VISTA
MS Windows® XP
MS Windows® 2000
MS Windows® 7
Management Interface
Web Interface
Windows Utility
Certifications
CE (Europe)
Dimensions(mm)
50 x 54 x 18
Temperature Range
Operation: 0°C ~ 40°C
Storage: -10°C ~ 60°C
Humidity
10% ~ 75% (non Condensing)
System Requirements
Intel® Pentium®III 600Mhz or compatible
processor with 512 MB RAM
Windows® 2000/XP/Vista/7 or Mac OS X
Minimum 45 Mbytes free disk space for
APPENDIX B: Technical Specifications
54
Page 55

installing the utilities (Windows)
CD-Rom drive
Package Contents
NetServer Advanced PSU2
AC Adapter (5V@2A)
Cat 5 LAN Cable
Quick Start Guide (English and Italian)
CD-Rom with Utility, Driver and Manual
(English and Italian)
1 x Warranty Card and 1 x WEEE Card
All rights registered
Microsoft and Windows are registered trademarks of Microsoft Corporation
All trade names and marks are registered trademarks of respective companies
Specifications are subjected to change without prior notice. No liability for technical
errors and/or omissions.
Please check on the website the Compatibility List in order to verify if Your printer is
supported
55
Page 56

Via S. Antonio 8/10
Lainate – MI – Italy
info@atlantis-land.com
 Loading...