

Atlantis NetFly UP WN, NetFly PCI WN, NetFly UP1 WN, NetFly UP4 WN, NetFly PCI1 WN Quick Start Manual
Page 1
Page 2
ITALIANO
Questo prodotto è coperto da gara nzia Atlantis della durata d i 2 ann i. Per maggiori
dettagli in mer ito o per accedere alla d ocumentazione completa in Italiano fare
riferimen to al sito www.atlantis-land.com.
ENGLISH
This produc t is covered b y Atlantis 2 year s warran ty. For more d etai led in formation s
please re fer t o the web site www.atlantis-land.com.
For more detailed in structions on configuring and using th i s device, please refer to
the online manual.
FRANCAIS
Ce produ it est couvert par une garan tie Atlantis de 2 an s. Pour d es in form ation s
plus dé taillées, référez-vous svp au site W eb www.atlantis-land.com.
DEUT SCH
Dieses Produ kt ist durch die Atlantis 2 Jah re Gar antie gedec kt. Für weiter e
Informationen, beziehen S ie sich bitte auf Web S ite www.atlantis-land.com.
ESPAÑOL
Este produc to esta cubierto por Atlantis c on un a gar antía de 2 años. Par a m ayor
informac ión diríjase a nue stro sitio Web www.atlantis-land.com.
2
Page 3

ITALIANO
1. PANORAMI CA DI PRODOTT O............................................................................ 10
1.2 Requisiti di sistema ................................................................................... 10
2. CONTENUTO DELLA CONFEZ IONE .................................................................... 11
3. INSTALLAZIONE S OFT WARE............................................................................. 12
3.1 Installazione dei driver/utility..................................................................... 12
3.2 Rimozione dei dr iver/utilit y ........................................................................ 13
4. INSTALLAZIONE H ARD WARE ............................................................................ 13
4.1 Installazione m odelli PCI ........................................................................... 13
4.2 Installazione m odelli USB .......................................................................... 13
4.3 Verifica dell’in stallazione ........................................................................... 14
5. RaUI FOR WINDOWS ....................................................................................... 15
5.1 Creazione Profilo di Conne ssione ............................................................... 16
6. SUPPORTO OFFER TO ....................................................................................... 18
APPENDICE A: Disabilitare Zero Configuration ........................................................ 19
APPENDICE B: WPS (Wi- Fi Protected Setup) .......................................................... 20
APPENDICE C: Conn essi one usando i l Client di Windows ........................................ 22
ENGLISH
1. PRODUCT OVER VIEW ...................................................................................... 29
1.2 System Requirements ............................................................................... 29
2. PACKAGE CONTENTS ....................................................................................... 30
3. SOFTWARE INSTALLATION .............................................................................. 30
3.1 Utility and Driver Installation ..................................................................... 30
3.2 Un installation .......................................................................................... 31
4. HARD WARE INS TALLATION.............................................................................. 32
4.1 Hard ware Installation for PCI Card............................................................. 32
4.2 Hard ware Installation for USB Adap ater ..................................................... 32
4.3 Using the Configu ration Utility ................................................................... 33
5. RaUI CONFIGURATION UTILITY ....................................................................... 34
5.1 Net work 35
6. Supp ort ........................................................................................................... 36
APPENDIX A: Connect to a network u sing Windows client ....................................... 37
FRANCAIS
1. ADAPTATE UR WIRE LESS .................................................................................. 43
1.2 Besoin système ........................................................................................ 43
1. Contenu de l’emballage .................................................................................... 44
3. INST ALLATION S OFTWARE .............................................................................. 44
3.1 Installati on Sous Wind ows ........................................................................ 44
3.2 Supprimer les dr ivers et l’utilitaire .............................................................. 45
4. INSTALLATION HARDWARE .............................................................................. 45
4.2 Installati on physique pour la car te PCI ....................................................... 45
3
Page 4

4.2 Connecter l’adap tateu r USB ....................................................................... 46
4.3 Logiciel de configura tion ........................................................................... 46
5. RaUI LOGI CIEL DE CONFIGURATION POUR WIND OWS ..................................... 47
5.1 Net work 48
6. Supp ort ........................................................................................................... 49
APPENDICE A: Conf iguration de la con nession sans fil s en utilisant l’utilitaire de
Windows ............................................................................................................. 50
ESPANOL
1. Llave inalámbrica USB /PCI ................................................................................ 54
1.1 Requisitos del sistem a .............................................................................. 54
1.2 Contenid os de la ca ja................................................................................ 55
2. Instalación del S oftwar e ................................................................................... 55
3. Utilid ad de la Red Inalámbrica .......................................................................... 57
3.1 Intr oducc ión ............................................................................................ 57
3.2 Utilizar la aplicación de conf iguración ......................................................... 58
3.3 Connexion ( Site Survey) .......................................................................... 59
4. Unin stallation - Desin stalac ión........................................................................... 60
5. Sop orte Técnico ............................................................................................... 61
APPENDIX
APPENDIX A: Country Ch annel List ........................................................................ 62
APPENDIX B: Technical Specifications ................................................................... 63
A02-WC-W(300)N( v1.25)_GX01 (v1.25 J an 2012)
4
Page 5

AVVERTENZE
Abbiamo fa tto di tutto a l fine di evitare ch e nel testo, n elle imm agini e nelle tabelle
presen ti in questo manuale, nel software e ne ll'hard ware fossero present i degli
errori. Tuttavia, non possiamo garantire ch e n on sian o pre senti errori e/o omissioni.
Infine, non possiamo e ssere ritenuti respon sabili per qualsiasi perdita, danno o
incompr ensione compiu ti direttamente o indirettamente, come risulta dall'utilizzo del
manual e, software e/o hardwar e.
Il contenuto di que sto manuale è fornito esclusivamen te per uso informale, è
soggetto a cambiamen ti senza preavviso (a tal fine si invita a consultare il sito
www.atlantisland.it o www. atlan tis-land.com p er reper irne gli aggiornamenti) e n on
deve essere interpretato come un impegn o da p arte di Atlan tis ch e n on si assume
responsabilità per qualsiasi error e o inesattezza che possa apparire in questo
manual e. Nessuna parte di questa pubblicazione può essere riprodotta o tr asmessa
in altra forma o con qualsiasi mezzo, elettronicamen te o meccanicamente, comprese
fotocop ie, ripr oduzioni, o registrazion i in un sistema di salvataggio, oppure trad otti
in altra lingua e in altra forma senza un espresso perme sso scritto da parte di
Atlantis. Tutti i nomi di produttori e dei prodot ti e qualsiasi marchio, r egistrato o
meno, menzionati in questo m anua le sono usati al solo scopo identificativo e
rimang ono propriet à esclusiva dei lor o rispettivi proprietari.
Restrizioni di responsabilità CE/E MC
Il prodot to d escritto in questa guida è stato pr ogettato, prodotto e approvato in
conformità a lle regole EMC ed è sta to certificato per n on a vere li mitazioni EMC.
Se il prodotto f osse utilizzato con un PC /apparati n on certificati, il produ ttore non
garantisce il rispetto de i limiti EMC. Il pr odotto descritto è stato costruito, prodotto e
certificato in mod o che i valori misurati r ientrino nelle limitazioni EMC. In pratica, ed
in par ticolar i circostan ze, potrebbe essere possibile ch e de tti limiti p ossano essere
supera ti se utilizzato con apparecchiature non prodotte nel rispetto della
certifica zione EMC. Può anche essere possibile, in alcun i casi, che i picc hi di valore
siano al di fuori delle tolleran ze. In que sto caso l’utilizzatore è responsabile della
“compliance” con i limiti EM C. Il Produttore non è da ritener si responsabile nel caso
il prod otto sia utilizzato al di fuori delle limitazioni EMC.
CE Mark Warning
In un ambien te domestico il dispositivo può causare interferen ze r adio, in questo
caso è opportuno pr ender e le adegua te contromisure.
Dichiarazione di Conformità
Questo disp ositivo è stato testato ed è risultato conforme alla direttiva 1999/5/CE
del parlamen to Eur opeo e della Com missione Eur opea, a pr oposito di
apparecchiatu re rad io e periferiche per telecomunica zioni e loro mutuo
5
Page 6
Luogo
Banda di Frequ enze(MHz)
Potenza (EIR P)
Chiuso (senza
restrizioni)
2400-2483,5
100mW (20dBm)
Aperto
2400-2454
2454-2483,5
100mW (20dBm)
10mW(10dBm)
riconosc imen to. Dop o l’installazione, la periferica è stata trovata conforme ai
seguenti stand ard: EN 300.328(radio), EN 301 489-1, EN 301 489-17(comp atibilità
elettromagne tica) ed EN 60950(sicure zza). Que sta appar ecch iatura può pertan to
essere utilizzata in t utti i pae si della Comunità Ec onomica Eur opea ed in tu tti i pae si
dove viene app licata la Direttiva 1999/5/CE, sen za restrizion i ecce zion fa tta p er:
Francia(FR):
(potenza e f reque nza) in base alla tabella allegata. Per infor mazion i ulteriori
consulta re
Se l’uso d i questa apparecchia tura in a mbienti domestichi genera in terfer enze, è
obbligo dell’utente p orre rimedio a tale situazione.
Italia(IT):
i requisiti su ll’Assegnazione delle Frequenze. L’utilizzo di questa apparecchiatura al
di fuori di ambienti in cui opera il pr oprietario, richied e un’au torizzazione g ener ale.
Per ulteriori in formazioni si prega di c onsultare:
Lussemburgo:
l’autorizzazione.
Norvegia (NO):
di raggio nei pressi di Ny Alesund.
Russia (CCP):
Se si utilizza all’aperto tale dispositivo, la potenza in uscita è limitata
www.art-telecom.fr.
Questa p erifer ica è conf orme con l’Interfaccia Radi o Nazionale e rispetta
www.comun icazioni.it.
Se utilizzato per servizi networ k o privati è da richieder e
apparecchiatura da n on utilizzare in un ar esa geografica di 20 km
solo per uso in terno.
Dichiarazione di Conformità Sintetica
Con la pr esen te dich iariamo ch e questo appara to è conforme ai r equisiti essenziali
ed alle altre disposizioni pertinenti stabilite dalla direttive 1999/5/CE . La
dichiara zione di conformità nella sua forma completa è disponibile pre sso il sito
www.atlantis- land.com (alla pagina del prodotto) o può essere rich iesta a
info@atlantis-land.c om.
6
Page 7

riciclaggio/smaltimento di questa apparecchiatura
Importanti informazio ni per il co rretto
Il simbolo qui sotto indicato, riportato sull'apparecchiatura elettronica da Lei
acquistata e/o sulla sua confezione, indica che qu esta apparecch iatur a e lettronica
non p otrà essere smaltita come un rifiuto qualunque ma dovrà essere ogg etto di
raccolta separ ata.
Infatti i rifiuti di apparecchiatu ra elet troniche ed e lettron iche devono essere
sottoposti ad uno specifico trattamento, indispensabile per evitare la d isper sione
degli inquinanti con tenuti all''intern o delle apparecchiature stesse, a tutela
dell'ambiente e della salute umana. Inoltre sarà possibile r iutilizzare/riciclare parte
dei materiali di cui i rifiu ti di apparec chiature elettr iche ed elettroniche sono
composti, riduc end o così l'utilizzo di risorse naturali n onché la quantità di rif iuti da
smaltire.
Atlantis, in qualità di produ ttore di questa apparecchiatura, è impegnato nel
finanziamento e n ella gestione di attività di trattamen to e recupero dei rifiuti d i
apparecchiatu re elettr iche ed elet troniche compat ibili con l'ambiente e c on la salute
umana.
E' Sua resp onsab ilità, come utilizzator e di questa appa recchiatura elettronica,
provvede re al conferimento della stessa al centro d i racc olta di rifiuti di
apparecchiatu re elettriche ed elettroniche predisposto dal Suo Comune. Per
maggiori informazioni sul centro di ra ccol ta a Lei più vicin o, La invitiamo a
contattare i competenti uffici del Suo Comu ne.
Qualora invece avesse de ciso d i acquistare un a nuova app arecc hiata elettronica di
tipo equivalente e de stinata a svo lgere le stesse funzioni di quella da smaltire, potrà
portare la vecchia apparecchiatura al distributore p resso cu i acquista la nuova. Il
distributore sarà tenuto ritirare gratu itamente la vecch ia apparecchiatura1.
Si teng a presente c he l'abbandono ed il deposito incon trollato di r ifiuti sono puniti
con sanzione amministrativa pecuniaria da € 103 a € 619, salvo che il fatto
costituisca più gra ve rea to. Se l'abb and ono riguarda rifiuti non per icolosi od
ingombr anti si applica la sanzione am mini strativa pecuniaria da € 25 a € 154.
Il suo contributo nella raccolta differenziata dei rifiuti di appare cchiature elettriche
ed elettroniche è essenziale per il ragg iungimento di tutela della salut e umana
connessi al corretto smaltiment o e recuper o delle app arecchia ture stesse.
7
Page 8
La ma rcatura CE con il simbolo di a ttention Mark (
) poste sull’etichetta di prodotto potrebbero
non rispettar e le dimensioni minime stab ilite dalla
normativa a c ausa delle ridotte dime nsioni di qu est’ultima.
Il logo WEEE ( ) posto sull’etichetta di prodotto
potrebbe n on rispettare l e d imen sioni minime stabilite dalla
normativa a c ausa delle ridotte dime nsioni di qu est’ultima.
Tutte le condizioni di u tilizzo e clausole contenu te in questo
manual e e nella garanzia si in tendono note ed accettate. Si
prega di restituire immediatamente ( entro 7 giorni
dall’acqu isto) il prod otto qualora qu este non siano
accettate.
1 Il distribu tore no n sarà tenuto a ri tirar e l 'appar ecchi atur a elettro nica q ualor a vi si a un rischio di
contami nazion e del person ale incaricati o qu alora risulti evide nte che l'appare cchia tur a in
questio ne n on contien e i suo i compone nti essenzi ali o contien e rifiuti diversi da appar ecchiatur e
elettri che e/o elettro nich e.
NB: le in form azio ni sopr a ripor tat e so no redatte in confor mità alla Dire ttiva 2002/96/ CE ed al D.
nonché par ticol ari m odalit à di trat tam ento e sm altimento d ei rifi uti di app arec chiatur e el ettric he e d
elettronich e (RA EE). Per ulte riori inform azioni in materi a, l a invi tiamo a consultare il no stro sito
www. atlan tis-l and.com
AVVERTENZE
Utilizzar e e sclusivamente l’antenn a f ornita a corred o. Antenne diverse e/o con
guadagn o differente potrebbero violare le normative vigenti. Atlantis si intend e
sollevata da ogni responsabilità in caso di utilizzo di acc essori (an tenne e/o
alimentatori) non c ontenuti nell’imb allo.
Lasciare almen o 30cm di d istan za tr a l’an tenna del dispositivo e l’uti lizzat ore.
8
Page 9
Atlantis invita a visitare il sito web www.atlantis-land.co m
alla relativa pagina di prod otto per reper ire manualistica e
contenu ti tecn ici (aggiornam enti driver e/ o funzionalità,
utility, support note) aggiornati.
Per usufruire delle condizioni di garanzia
migliorative associate al prodotto (Fast Swap, On
Site e On Center) è opportuno provvedere alla
registrazione dello stesso sul sito www.atlantis land.co m entro e non oltre 15 giorni dalla data di
acquisto. La mancata registrazione entro il termine
di sopra farà si che il prodotto si a coperto
esclusivamente dalla condizioni standard di
garanzia.
9
Page 10

La ringrazia mo per a ver scelto l’adattatore N etFly Wireless, la via più semplice per il
Wireless networking. Questa guida rapida f ornisce una p an oramica per una r apida
installa zione del prodotto, per ulteriori dettagli in merito all’installazi one e all’utilizzo
consulta re il manuale su l CDRom.
1. PANORAMICA DI PRODOTTO
La ringraziam o per a ver scelto un pr odotto della serie Ne tFly.
Questo d ispositivo grazie al p ieno supporto dello d elle più recenti spe cifich e IE EE
802.11n e grazie a lla tecnologia radio MIMO (Mu ltiple Input Mu ltiple Outpu t,
presen te nel so lo modello a 300Mbps), è in grado d i offirire prestazioni senza
precedenti, con un imp ortan te incremento sia in termini d i velocità che d i c opertura
rispetto agli standard preced enti. Il supporto dei sietemi Windo ws®
VISTA/XP/2000/7, Linux e MAc OS X(solo per i modelli USB) rende que sti adattatori
estremamente versatili.
Inoltre, grazie a ll’integ razione delle specifche WPS, la messa in sicurezza d ella rete
wireless non è mai stata cosi facile; basterà la pr essione di un bottone per dire
addio a tentativi di accesso non autorizzat i.
Queste caratteristiche, unite alla piena compatibilità con gli standard precedenti,
permettono finalmente di unire la velocità di un a re te cab lata alla mob ilità di una
wireless LAN.
L’adattatore in oltre (su determinati si stemi Wind ows) supporta una m odalità Access
Point che permette al PC c on la scheda Wirele ss USB di f unzionare come un vero e
proprio Access Point (disponib ile solo nei sistemi Windows 7/Vist a ed XP). In
questo modo è possibile costru ire una vera è propria r ete wireless a costi contenuti.
Compatibile c on una vasta gam ma di appara ti HDTV Samsung (LED/LCD/ Plasma e
lettori Blu-Ray), NetFly UP4 WN permetter à a l vostro televisore Samsung d i
comunic are c ol PC/Router/server DLNA grazie ad un link wireless. Questo r ender à
possibile visu alizzare Youtube, utilizzare i widg ets installati o riprodurre i con tenuti
multimediali memor izzati nel server D LNA.
1.2 Requisiti di sistema
Prima di procedere c on l’installazione del pr odo tto verificar e di disporre dei seguenti
requisiti:
PC con uno slot USB V2.0/1.1* libero (A02-UP1-WN, A02- UP-W300N, A02-
UP4-W300N)
PC con un o slot PCI 32bit libero (A02-PCI-WN, A02- PCI1-W30 0N)
Processore In tel® Pentium®III 600Mhz o compatib ile con 512 MB RAM
10
Page 11
Il throughput dell’adattatore Wireless USB è limitato a soli
6Mbps se l’adattatore è c ollegato ad uno slot USB V 1.1.
Il prodotto, nella relea se di driver V 2. 1.2.0(USB) o V2.4.1.1
(PCI), è stato testato con kernel 2.6.29( PCI) e
2.6.31(USB). Atlantis non g aran tisce ch e il d ispositivo
funzioni su distribuzioni/kernel diverse da quelle elencate
né, dato il vasto numero di comb inazioni, potr à offrire
supporto. Si invita a tal fin e a reperire g li ultimi driver
direttam ente sul sito del produttor e del ch ipset
(www.ra link.com.tw).
Il prodotto, n ella release di driver V 2.0.0.0, è stato testato
con siste mi Mac OS X 10.3/10.4/10.5/10. 6. Per ogni
problematica si invita preventivamen te a reperire gli ultim i
driver d irettam ente sul sito del produttore d el chip set
(www.ra link.com.tw) ed eventu almen te a contattarlo
direttam ente.
Sistema oper ativo Windows 2000/XP/Vista/7, Linux e Mac OS X (solo USB)
45MB di spa zio libero su disco
Lettore CD-R om
2. CONTENUTO DELLA CONFEZIONE
Prima de ll’utilizzo, verific are che la scatola cont enga i segu enti elementi:
NetFly USB Wireless Adap ter o NetFly PCI Wir eless Card
Cavo di racc ordo USB (n ei soli modelli A02-UP-W300N o A02-UP4-W300N)
1 o 2 Antenne 2 dBi (A02- PCI-WN o A02-PCI1-W300N) e Lo w profile Bracket
Una guid a rap ida mu ltilingua (Italiano, Inglese e Francese)
Un Cd-Rom contenente utility e manu ale dell’utente (Italiano, Ing lese e
Francese)
Coupon di Gar anzia e WEE E
Nel caso in cui il con tenuto non sia quello sovradescritto, c ontatta re il propr io
rivenditore immed iatamen te.
11
Page 12
In caso di in stallazione manuale dei driver /utility, fare
riferimen to alla car tella CDRom:\USB\<OS>, d ove < OS>
rappresenta la versione di sistema operativo u tilizzato. Nel
caso del mode llo PCI CDRom:\PCI\<O S>.
Questo m anua le pre suppone che si utilizzi l’utility integrata
per la configur azione dell’adattatore (spuntare duran te
l’installazione la voce Install driver e RaLink WLAN
Utility ne l caso di Vis ta/7 oppure Ralink Configuration
Tool nel caso di Windows XP). Laddove si preferisca
utilizzare il clien t inclu so (per i soli sistemi X P/Vista/7)
spuntar e Inst all Driver Only nel caso di Vista/7 o
Microsoft Zero Configuration Tool nel caso di
Window s XP e fare po i riferimento all’ Appendice D.
Laddove il CDR om non d ovesse avviarsi auto maticamente è
possibile laciare il file di avvio loc alizzato in
CDRom:\start.htm.
3. INSTALLAZIONE SOFTWARE
Questa sezion e descrive la procedura di in stallazione dei d river e utility.
3.1 Installazione dei driver/utility
Inserire il CD-Rom contenuto n ella c onfe zione e attendere l’avvio dell’interfaccia d i
navigazione.
Cliccare A02-UP4-W300N o A02-UP-W300N o A02-UP1-WN o A02-
PCI-WN/A02-PCI1-W300N per acced ere alla pagina r elativa al prodotto.
Selezionare Utility e seguire le istruzioni visual izzate a scherm o per
completare l’ installazione.
Al ter mine dell’installazione, collegare il dispositivo al PC c ome da paragraf o 4. Il
sistema rileverà ed i nstallerà in mani era automatica il prodo tto.
12
Page 13

3.2 Rimozione dei driver/utility
Per disinstallare l’adattatore W ireless effettuare la seguente p rocedura:
Chiuder e eventuali applicazioni attive
Cliccare sull’icona Ris orse del Computer ed andare in Pannello di
controllo.
Cliccare sull’icona Installazioni Applicazioni (Programmi e
Funzionalità), eviden ziare Ralink Wireless LAN C ard e cliccare su
Aggiungi/Rimuovi (Disinstalla), confermare poi la pr oced ura di
disinstal lazione (altern ativamente in Programmi->Ralink Wireless->
Uninstall RT 2860).
Al termine de lla pr ocedura potrebbe essere chiesto un riavvio del PC.
A questo punto, una volta spen to il PC, è p ossib ile rimuovere la
scheda/ adattatore.
4. INSTALLAZIONE HARDWARE
4.1 Installazione modelli PCI
Lo schema seguente f ornisce alcune informa zioni di carattere gen erico in merito
all’insta llazione del prodotto. Per magg iori informa zioni fare r iferimento a l manu ale
della ma inboard.
Spegner e il PC e r imuo vere la coper tura esterna. Localizzare un o slot PCI
libero.
Posizion are NetFly PCI sullo slot PCI prec edentemente localizzato e pre mere
per inserirlo.
Dopo aver blocca to correttamen te la scheda PCI c on l’apposita vite, r ichiudere
la copertura esterna del PC.
Connettere l’antenn a esterna.
Accendere il PC.
Terminato il reboot il Sistema Operativo troverà ed installer à la nu ova scheda.
4.2 Installazione modelli USB
Terminata l’installazione de i driver/utility e collegato l’ada ttatore ad una porta US B il
Sistema Operativo provvederà ad installare i dr iver d ella nuova periferica.
13
Page 14
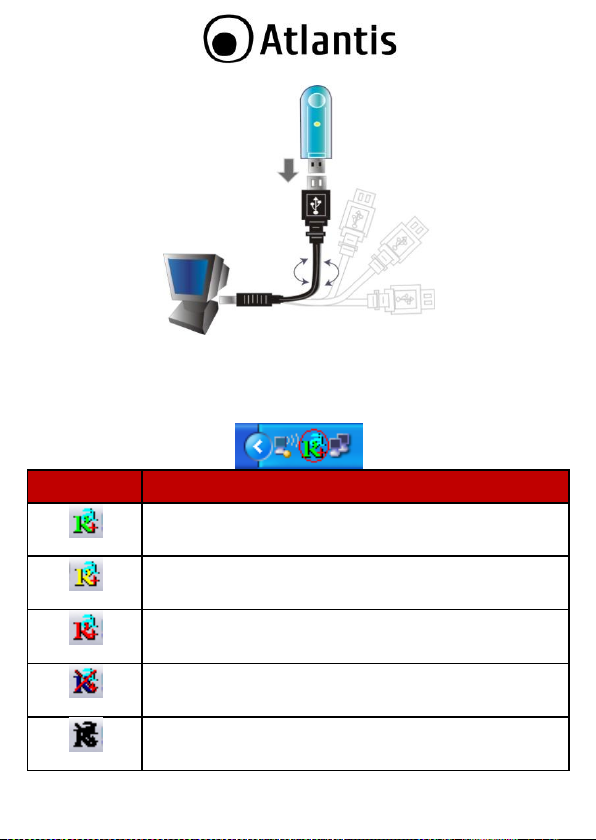
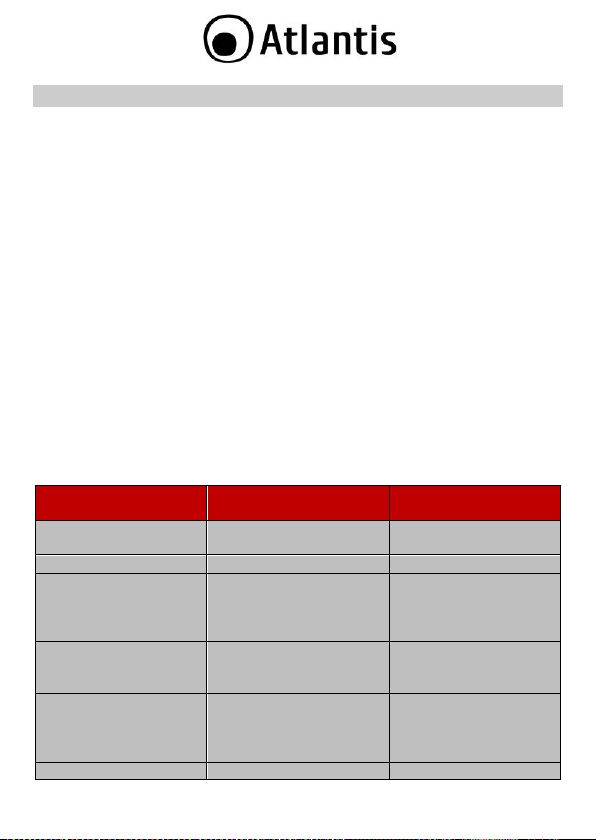
INDICAT ORE
SIGNIFICATO
Segnale ottim o
Segnale medio
Segnale basso
Non conn esso e/o errore di conn essione
Dispositivo non rile vato o non presente
4.3 Verifica dell’i nstall azione
Una volta terminata l’installazione, l’ic ona rappresentata in figura verrà visualizzata
nella taskbar.
14
Page 15
Per disabilitare l’u tility Zero Configuration di Windows XP,
fare riferimento all’appendice A.
In Wind ows X P. Per utilizzare l’utili ty Zero Configuration
di Micr osoft p er la c onfigurazione Wireless cl iccare sulla
voce Use Zero Configuration as Configuration Utility.
Una volta in questa modalità è po ssibile tornare ad
utilizzare l’utilit y semplic emente cliccando sulla voce Use
RaConfig as C onfiguration Utility.
Su sistemi operativi Windows V ISTA l’in terfacc ia grafica
potrebbe subire alcune variazioni.
Andando sull’icona, nella taskbar, e premendo il tasto destro del mouse verrà
mostrato un menu c ontenente 4 scelte:
Launch Config Utilities
Switch to ST A + AP mode
Switch to AP mode
Exit
5. RaUI FOR WINDOWS
RaUI è l’utility grafica per la gestione e configur azione del dispositivo.
L’Utility di configura zione include i segeunti tabs: Site Survey, Link Information,
Profiles, Advanced, Information (tasto aiuto e chiusura).
Tramite la stessa sarà p ossibile c onfigurare tutti i parametri necessari al corretto
funzionamento del prodotto, attivare fun zionalità avanzate quali il supp orto WPS e
WMM e visua lizzare informazioni sulle reti senza fili rilevate d al dispositivo.
Al suo a vvio, in maniera automatica, verrà effettuata un a scansione delle frequenze
al fine di rile vare le reti wireless attive; il dispositivo si connetterà in manier a
automa tica all’Access Point con segnale mig liore oppure all’Acce ss Point segnalato
nel profilo di acce sso (se preconfigu rato). Ne l caso in cui tutte le r eti rilevate fossero
protette e non vi sia alcun profilo di connession e preimp ostato, il dispositivo rimarrà
in uno stat o di stand-b y in attesa della selezione manuale della rete da parte
dell’utente.
15
Page 16
Per visualizzare i dati relativi a lla conne ssione, cliccare sul pulsan te pr esen te ne lla
parte inferiore destra della sch erma ta.
5.1 Creazione Profilo di Connessione
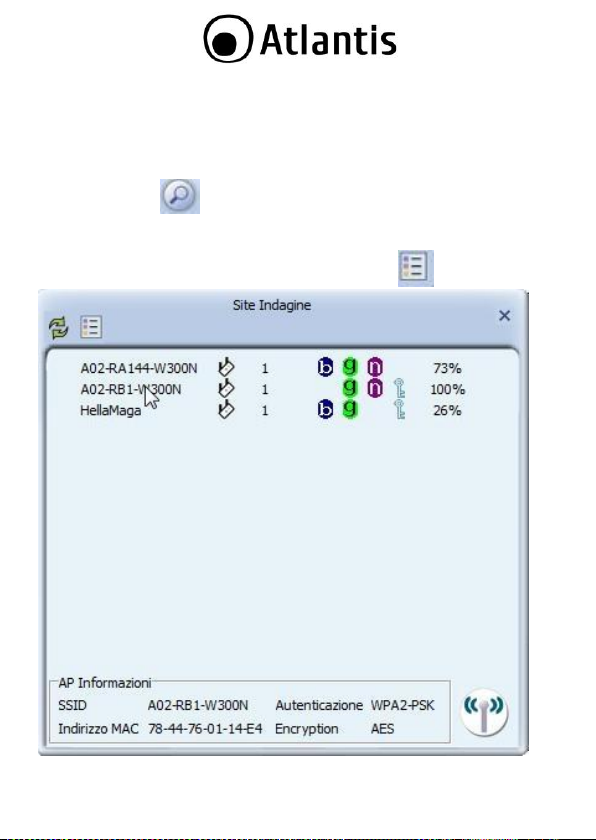
Cliccare sull'icona ( ), verr à visualizzata un a schermata in cu i è è possibile
visualizzare le reti disponibili e visualizzarne i parametri d i base, come la potenza del
segnale, la sicurezza adottata dalla re te, il canale u tilizzato e l’SS ID.
Selezionare l'SSID e cliccar e su ll'icona Aggiungi Profilo ( ).
16
Page 17
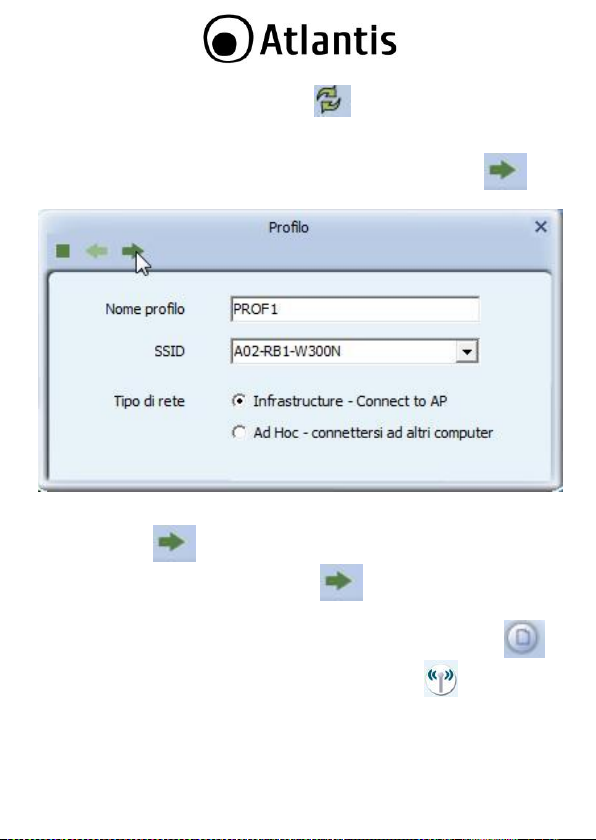
Tramite la pressione del tasto Rescan ( ), sarà possibile effettuare una
scansione delle frequ enze al fin e di rilevare re ti wire less attive.
Si aprirà una nuo va finestra in cui inserire il Nome Profilo (nel caso in cui la rete
non abbia protezione null'altr o è richiesto). Cliccare sull'icona per
prosegu ire.
Verrà mostrata una nuova f inestra con la tipolog ia di cifratura rilevata (n on
modificar e salvo in cui il disposi tivo non riesca ad effettuare il collega mento) ,
cliccare sull'icona per proseguire. In serire adesso la password d i cifratura
della rete e c liccare nuovamen te sull'icona per ter minar e la c rezion e del
profilo.
Non re sta adesso che attivare il pr ofilo app ena creato. Cliccare sull'icona e
poi, dop o aver selezionato il pr ofilo appena cre ato, cliccare su .
Dopo qu alche secondo la scheda dovrebbe connettersi all'AP. E' possibile a que sto
punto leggere maggiori de ttagli circa il link e lo stato d ella sch eda di rete wire less
(SSID, Veloci tà, Canale, IP, SubnetMask)
17
Page 18

6. SUPPORTO OFFERTO
Per qualunque altro problema o dubbio sul funzionamento del prodotto, è possibile
contattare il servizio di assistenza tecnica Atlan tis trami te l’aper tura d i un ticket on-
line sul p ortale http://ww w.atlantis-land.com/ita/supporto.php.
Nel caso non fosse possibile l’accesso al portale di supporto, è altre sì possibile
richieder e assistenza telefonica al numero 02/ 78.62.64. 37 (consultare il sito per
verificare gli orari in cui il servizio viene er oga to).
Per esporre eventua li richieste di supporto prevendita o r ichieste di con tatto , si
invita ad utilizzare gli indirizzi mail info@atlantis-land.com oppure
prevendite@atlantis-land.com.
Atlantis SpA
Via S. Antonio, 8/10
20020 L ainate (MI)
Italia
Fax: +39.02.78.62.64.39
Website: http://www.atlantis-land.c om
Email: info@atlantis-land. com
18
Page 19
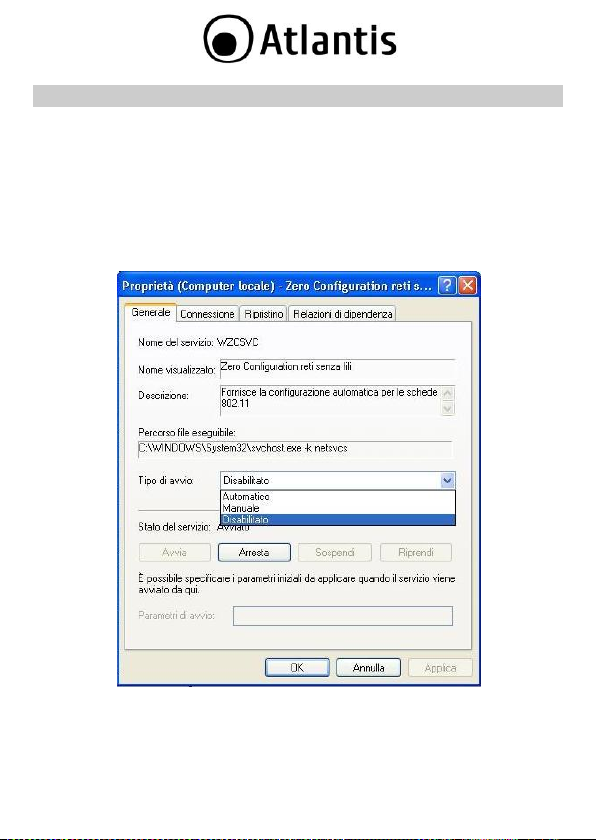
APPENDICE A: Disabilitare Zero Configuration
Di seguito è indicato come d isabilitare il servizio Zero Configuration di Windows X P,
al fine di poter controllare il dispositivo tramite l’utility fornita a corr edo:
Cliccare su Start e poi su Pannello di Controllo
Selezionare da l menu di sinistra la voce Visualizzazione classica
Cliccare su Strumenti di amministrazione
Cliccare su Servizi
Selezionare il servizio Zero Configuratio n e cliccare su Proprietà
Cliccare sul pu lsante Arresta p er terminare temporaneam ente il ser vizio
Impostare il camp o Tipo di Avvio su Disabilitato com e da figura
19
Page 20
Senza WPS
Con WPS
(PIN mode)
Con WPS
(PCB mode)
Accensione dell’Acces
Point
Accensione dell’Ac ces
Point
Accensione dell’ Acces
Point
Accesso all’Access Point
Attivazione de l client
Attivazione de l client
Configurazione
dell’SSID
Genera zione in man iera
automa tica de ll’SSID e
broadcasting della stessa.
Genera zione in maniera
automa tica dell’SS ID e
broadcasting d ella
stessa.
Attivazione della
sicurezza
Accesso al Registar
presen te sull’Access Poin t
Pressione del b ottone
sull’Access Point e sul
client
Impostazione della
parola d i accesso
(WPA) o d elle chiavi di
accesso (WEP)
Insierimento del PIN
relativo al client da
aggiunge re.
Attivazione de l client
Avvio della
APPENDICE B: WPS (Wi-Fi Protected Setup)
WPS (Wi-Fi Protected Setup ) è un in sieme di specifiche mirate a fac ilitar e
notevolmente le opera zioni di aggiun ta di disp ositivi alla propr ia r ete wireless e la
messa in sicurezza della stessa con la sola pressione di un pulsante oppur e tramite
l’immissione di un c odice PIN.
I dispositivi conformi alle specifiche WPS sono quindi in grado, in maniera molto
semplic e, di rile vare le reti con tale supporto, acquisirne le imp ostazioni
basilari(quali SS ID e canale) e negoziare in maniera del tutto automatica un profilo
di sicurezza u tiizzando i più avanzati algori tmi di crittografia come WPA e WPA2.
Nella c onfigurazione PIN, un cod ice PIN univoco viene assegna to ad ogn i dispositivo
che deve far parte della rete; un ade sivo o un etichetta posta sulla p arte p osteriore
del client id entificheranno tale codice in caso di PIN stat ico, o in alternativa questo
verrà generat o in maniera dina mica e visua lizzato tramite utility.
Questo c odice viene u tilizzato per assicurare l’iden tifica zione univoca della per iferic a
e per evitare intrusioni all’interno della rete da parte di periferiche esterne. Gli
utenti, per poter agg iungere il di spositivo alla rete, d ovranno inserire all’intern o del
Registar (p resente all’in terno dell’Access Point), il codice PIN identifica tivo de lla
periferica da c onnettere.
Nella c onfigurazione PCB, l’u tente sarà in gr ado di aggiungere periferich e e mettere
in sicurezza la propria rete tram ite la semplice p ressione di un pulsante (fisico sugli
Access Point e virtuale su i disp ositivi client).
Di seguito una tabella ria ssuntiva sui vantagg i del supp orto WPS e su lle modal ità d i
configura zione:
20
Page 21

sincronizzazione tra AP e
client
Selezione della rete a
cui connettersi
Inserim ento della
chiave di sicurezza per
la conne ssione del
client
21
Page 22

Nel caso in cui non sia possibile visualizzare la lista di reti
senza f ili disponibili, si pr ega d i verificare la corretta
installa zione dei dr iver del clien t USB.
APPENDICE C: Connessione usando il Client di Windows
In Wind ows XP/Vista e 7 è incluso un client che permette la ge stione di un
adattat ore wireless al par i delle Utility.
In Wind ows XP/Vista e 7 è incluso un client che permette la ge stione di un
adattat ore wireless al par i delle Utility.
Windows 7
Cliccare sull’ic ona di rete posizionata sulla System Tray (vedi immagine) e
selezionare l’opzione C entro connessioni di rete e condivisione oppure
cliccare su Start -> Pannello di Controllo -> Centro connessioni di
rete e condivisione.
Selezionare l’opzione Connessione a una rete dal menu di sinistra per
visualizzare la lista di reti wire less d isponibili.
Selezionare l’SSID de lla rete desiderata e prem ere sul pulsan te C onnetti per
avviare la procedura di connessione.
Al termine della procedu ra di conne ssione, un messaggio confermerà l’avvenuta
connessione d el client USB all’AP.
22
Page 23

Nel caso in cui non sia possibile visua lizzare la lista di reti
senza f ili disponibili, si pr ega d i verificare la corretta
installa zione dei dr iver del clien t USB.
Windows VISTA
Cliccare sull’ic ona di rete posizionata sulla System Tray (vedi immagine) e
selezionare l’opzione C entro connessioni di rete e condivisione oppure
cliccare su Start -> Pannello di Controllo -> Centro connessioni di
rete e condivisione.
Selezionare l’opzione Connessione a una rete dal menu di sinistra per
visualizzare la lista di reti wire less d isponibili.
Selezionare l’SS ID della rete desidera ta e premere sul pulsante Connetti per
avviare la procedura di connessione.
Al termine della procedu ra di conne ssione, un messaggio confermerà l’avvenuta
connessione d el client USB all’AP.
23
Page 24

Di seguito è indicato come disabilitare il servizio Zero
Configuration di Windows XP, al fine di p oter controllare il
dispositivo tramite l’utility fornita a c orredo:
Cliccare su Start e poi su Pannello di Controllo
Selezionare d al menu di sinistra la voce
Visualizzazione classica
Cliccare su Strumenti di amministrazione
Cliccare su Servizi
Selezionare il servizio Zero Configuratio n e
cliccare su Proprietà
Cliccare sul pulsante Arresta per termin are
temporaneamente il servizio
Impostare il c ampo Tipo di Avvio su Disabilitato come
da figura
Windows XP
Fare doppio click sull’icona di r ete posizionata sulla System Tray (vedi
immagine).
Selezionare l’SSID de lla rete desiderata e prem ere sul pulsan te C onnetti per
avviare la procedura di connessione.
Al termine della procedu ra di conne ssione, un messaggio confermerà l’avvenuta
connessione d el client USB all’AP.
24
Page 25

Copyright Statement
No part of this publication may be reproduced, stored in a retrieval system, or
transmitted in an y f orm or by any means, whe ther electr onic, mechanical,
photocopying, recording or otherwise without the prior writing of the publisher.
Windows™ 98SE/ 2000/ME/XP/VIS TA are tradem arks of Microsoft® Corp. Pentiu m is
trademark of Intel. All c opyrigh t reserved.
The At lantis logo is a reg istered trademar k of Atlan tis. All oth er names mentioned
mat be tradem arks or r egistered tradema rks of their respective owners. Subject to
change without notice. N o liability for techn ical errors and/or omissions.
Wireless LAN, Health and Authorization for use
Radio frequ ency electr omagnetic energy is emitted from Wireless LAN devices. The
energy levels of these em issions h owever are far much less than the
electromagnetic energ y emissions from wire less devices like for example mob ile
phones. Wireless LAN devices are safe for use frequenc y safety standards and
recommendations. The use of Wireless LAN device s may be restricted in some
situation s or envir onments for examp le:
On board of airplan es, or
In an e xplosive environment, or
In ca se the interference risk to other devices or services is p erce ived or
In ca se the policy rega rding th e use of Wireles s LAN device s in specific
organizations or en vironments (e.g. airports, hospitals, chemical/oil/g as industrial
plants, pr ivate buildings e tc.) is not c lear, please ask for au thorization to use the se
devices p rior to oper ating the equipment.
Regulatory Information/dis claimers
Installation and use o f this Wireless LAN device must be in strict accordance with
the instruc tions inc luded in t he user docum entation provided with the produ ct. An y
change s or m odification s made to this de vice that are not expre ssly a pproved by the
manufac turer may void th e u ser’s authority to operat e the equipment. The
Manufacturer is not responsible for a ny radio or television interference caused by
unauthorized mod ification of th is device, of the sub stitu tion or attach ment.
Manufacturer and its au thorized resellers or di stributors will assume n o liability for
any damage or violation of governme nt r egulation s arising from fa iling to comply
with the se guideline s.
CE Mark Warning
In a do mestic environment, th is product may cause radio interferen ce, in which case
the user may be requ ired to take adequate mea sures.
identified as harmful
25
Page 26

Location
Frequen cy Band (MH z)
Power (EIRP)
Indoor (no restriction)
2400-2483,5
100mW (20dBm)
Outdoor
2400-2454
2454-2483,5
100mW (20dBm)
10mW(10dBm)
CE in which C ountries where the product may be used freely:
German y, UK, Italy, Sp ain, Belgiu m, Neth erland s, Portuga l, Greec e, Ireland,
Denmar k, Luxembourg, Austria, Finland, Swed en, N orway and I celand.
France: except the channel 10 through 13, law pr ohibits the u se of other channels.
CE/EMC Restriction of Liability
The produc t describ ed in this handbook was designed, produced and approved
according to the EM C-regulat ions and is certified to be w ithin EM C limitations.
If the pr oduct is used in an uncertified PC, the manufacturer undertakes no
warran ty in re spect to the EM C limits. The d escribed product in this handb oo k wa s
constructed, produced and certified so that th e measur ed values are within EMC
limitations. In prac tice and under special circum stances, it m ay be p ossible, that
the product may be outside of the given limits if it is u sed in a PC that is not
produced under EMC cer tification. It is also possible in certain cases and under
special cir cumstance s, which the given EMC peak values will become out of
toleranc e. In these cases, the u ser h imself is responsible for complianc e with th e
EMC limits.
Declaration of Conformity
This equipment ha s been tested and found to comply with Direc tive 1999/5/CE of
the European Parliament and of the Council on radio equ ipment and
telecommunications t ermina l equipment and th e mutual recognition of the ir
conformity. After assessment, the equ ipment has been found to c omply with the
following standards: E N 300. 328 (radio), EN 301 48 9- 1, EN 301 489- 17
(electromagnetic c ompa tibility) and EN 60950 (safety). Th is equ ipment may be used
in all European Union contr ies and in all countr ies applying Directive 1999/5/CE,
without restriction, with the exception of the following coun tries:
France (FR):
within the frequency bans listed on the ch art. For more info, consult the website
www.art-telecom. fr.
When this equipm ent is used outdoors, output power is lim ited to
Italy(IT):
Luxembourg:
For more info, c onsult the websi te
General authorization requie f or network and service supply.
www.comun icazioni.it
26
Page 27

Norway (NO) :
of 20 km from the c enter of N y Alesund.
Russia (CCP):
Declaratio n of Conformity
Hereby We declare tha t this produc t is in comp lianc e with the e ssential
requirem ents and o ther re levant provisions of Directive “Electromagnetic
Compatibility” and 1999/5/CE within CE Marking Requireme mnt.
CE Declaration is a vailable on the web site www.atlantis-land.c om.
procedures o f this equipment
The crossed-out wheeled bin symbol printed on the unit label or unit p ackaging
indicates that this equ ipment mu st n ot be disp osed of as un sorted municipal wa ste
but it sh ould be collected separately.
The waste of electric and electronic equ ipment mu st be treated separa tely, in order
to ensur e th at ha zardou s materials contained inside the equipm ent a re not buried
thereb y providing potential fu ture prob lems for the environment and human health.
Moreover, it will be p ossible to reuse and rec ycle some parts of th e waste of electric
and electr onic equipmen t, contributing to reduce the quantities of waste to be
disposed of and the depletion of natural resources.
As user of this equipment, you are re spon sible to return this waste of e lectronic
equipment to an authorised c ollection facility set up b y your Municipality. More
detailed inf orma tion on your n earest collection centre can be obtained from your
Municipality or from other competent loca l entities.
If you are replacing the old equipment with a new equivalent product, the
distributor mu st take-back the old equ ipment free of charg e on a one-to one basis
as long as the equ ipment is of equivalen t type and fulfilled the same functions as
the supp lied equipm ent.
Your rôle in participating to the separate c ollection of waste of electr ic and
electron ic equipmen t is essential to en sure that en vironmen tal protec tion and
This subsection does not app ly for geogr aphic al area within a radiu s
only for indoor applica tion.
Important information for the co rrect recycle/treatment
27
Page 28

CE Logo with attention Mark ( ) aren’t fully
compliant with minimum dimension s requirement to
European Directive due to limited sticker area.
WEEE BIN Logo ( ) isn’t fully compliant with
minimum dimension s requirement to European D irective
due to limited sticker area.
Atlantis suggest to vistit the web site www.atlantis-
land.com in order to retrieve update manual, techsheet
and driver.
Before starting, take a few minutes to read this manual.
Read all of in structions and save this manual for later
referenc e.
human health objectives connected to a respon sible treatmen t and recycling
activities are a chieved.
PS.: T he above mentio ned inform ation are r eported here with in com pliance with Directiv e
2002/96/CE , which requires a sep arate coll ection syst em and specifi c trea tment and dispo sal
proc edur es for the waste of electric and ele ctroni c equipm ents (W EEE). For further an d more
detail ed info rm ation, we i nvit e you to vi sit our we bsit e at www. atlan tis-land.com
28
Page 29

Thank you for purch asing the Wire less USB Adapter that provides the ea siest way to
wireless networking. This User Manua l con tains detailed in structions in the operati on
of this product. Please keep this manual for future refe rence.
1. PRODUCT OVERVIEW
Thank you for purchasing the NetFly that provide s the easiest way to wireless
networking.
The NetFly (hereafter ca lled the Adapter) is a high-efficiency wirele ss LAN
Card/Adapter for wirel ess n etworking at home, in office or in pub lic places. With the
Adapter, you c an r oam betwe en conferenc e r oom and off ice without being
disconnected the LAN cables; in addition, sharing files and printers can be easy
tasks.
The NetFly is available to M icrosoft Windows oper ating systems (Windows®
XP/2000/VISTA/7, Linux and Mac OS X (only for USB Adap ter)) a nd can be
integrated into ne tworking with e ither Ad -hoc mode (computer-to-computer,
without an Acce ss Point), Infra struc ture mod e (c omputer-to-access point, an Access
Point is required) or Acce ss Point Mode.
The de vice offers quick and easy acce ss among w ired network and wireless
network. The NetFly a lso supports WPA/WPA2 security, it inc reases the level of
data pr otection and access c ontrol for Wireless LAN.
MIMO radio technolog y (availab le only on 300Mbps d evices) and multiple An tennas
provide extend ed c overage and low throughput fluctuation s.
Last but not l east WPS and WMM supports offer s an high throughput for H D Vide o
Streaming and an easy way to make sure you w ireless network.
Access Point Mode: PC with Wireless USB /PCI Adap ter/ Card work as an Access
Point. You can save m oney and make a little network using Your PC+Adapter as an
Access Point. This features is availab le on ly on selec ted S O (XP/Vista/7).
The N etFly AP4 WN is a w ireless US B 2.0 adapter that provides instant access to
data like ne ws, weather, sports and stock inform ation on your Sam sung HD TV
screen. It also supp orts Blu- ray Live with Netflix, Pandora and PC streaming of
picture s and videos.
1.2 System Requirements
Before installing the Adap ter, your PC shou ld mee t the following:
PC with available USB V2.0/1.1* slot (A02-UP1-W N, A02-UP-W300N, A02-UP4-
W300N)
PC with availab le PCI 3 2bit slot (A02-PCI-WN/A02-PCI1-W300N)
Intel® Pentium®III 600Mhz or comp atible process or with 512 MB RAM
29
Page 30

The throughput is limited to 6Mbp s if the wireless N Mini
USB adapter is plugg ed on an USB re v1.1 slot.
Windows® 2000 /XP/ Vista/7, Mac OS X(only USB) and Linux opera ting system
Minimum 45 Mbytes free disk space f or in stalling the driver and u tilities
CD-R om drive
*When plug the device in the USB 1.1/1.0 port, the re al throughput will be up to
6Mbps only wh en running 11Mbps or higher speed .
2. PACKAGE CONTENTS
Open the b ox of the NetFly Wirele ss Adapter/Card and carefully unpack it. The box
should contain the following items:
One NetFly USB Wirele ss Adap ter or NetFly PCI Wirele ss Card
USB Cab le (only for A02-UP-W300N, A02-UP4-W300N)
1/2 2 dBi An tennas (A02-PCI-WN or A02-PCI1- W300N)and Low Profile
Adapter Brac ket
One Mu ltiLanguage Quic k Start Guide (Eng lish, French and Italian)
CD-R om with Utility, Dr iver and Manual (English, Fr ench and I talian )
1 x Warranty Card and 1 x WEEE Card
If any item is found missing or damaged, please contact your local reseller for
replace ment.
3. SOFTWARE INSTALLATION
This section w ill lead you to install the driver and utility of the Wireless LAN
Adapter /Card .
3.1 Utility and Driver Installation
Insert the CD-ROM and the Auto-run program will app ear (altern atively, open
a file browser and double click on the start.htm file located in the CD
directory).
Click on A02-UP4-W300N icon (or A02-UP-W300N or A02-UP1-WN
or A02-PCI-WN/A02-PCI1-W300N) to select NetFly USB/Card Ho me
Page.
30
Page 31

If you need to install the driver/u tility manually, refer each
Windows OS to the f ollowing CD-Rom direc tory path: CD-
ROm:\USB\< OS> or CD-ROm:\PCI\< OS>
Windows XP/Vista/7 ha ve its own Wire less Utility; you can
either u se the utility of Windows X P/7/Vista or the provided
utility. In this ca se during in stallation pl ease select Install
Driver Only (for 7/Vista) or Mi crosoft Zero
Coniguration Tool (for XP).
Select Utility and the install wizard will beg in in stalling th e software. F ollow
the install wizard instructions to complete the installati on ( select Install
Driver and RaLink WLAN Utility (for Vista/7) or Ralink Configuration
Tool (for XP)).
Follow the Install Shield Wizard Instructions. Click Next to continu e and
finish it.
Please plug Wire less USB Adapter into USB S lot or PCI Card (shu t d own be fore the
computer the PC) into PCI Slot (check the next section), it will be recognized and
auto in stalled.
The installation progr am will help you to setup the Wireless LAN utility.
3.2 Uninstallation
To uninstall the Wireless USB/PCI Adapter/Adapter, go to the Control Panel of
your system.
Open th e Add/Remove Programs.
Select the Ralink Wireless Lan Card in the Add/Remove Programs and
then click on the Remove.
Click on Remove ALL [or Overwrite the older version install without
remove].
Then chose Y es, I want to restart my computer and click Fi nish.
Now You can r emove the Adap ter/ Card.
31
Page 32

Make sure tha t there is a well environm ent tha t there is n o
much intrusion to have a b etter connection.
4. HARDWARE INSTALLATION
4.1 Hardware Installation for PCI Card
The setup of the Wireless LAN Card can be performed us ing the following steps:
Shut down the computer, unplugs its power cord, and remove the chassis
cover.
Insert the con tact edge of th e N etFly card into the connector of an y available
PCI Bus M aster expansion slot. Press the card firmly into the conn ector su ch
that the c ard’ s contacts are ful ly seated in the c onnector.
Install th e bracket screw and secure the card to the compu ter chassis.
Visuall y inspect th e PCI Adap ter and make sure that it is fully plugged in to
the PCI slot.
Cover the compute r’s cha ssis.
Switch compu ter power on.
The OS wil l start an automatic hardware discovery procedure in order to find and
install th e best dri ver available for the de vice.
4.2 Hardware Installation for USB Adapater
Please plug th e Wirele ss adapter (onl y when r eque sted from OS) to a free USB slot
on the PC.
32
Page 33

ICON
SIGNAL QUALITY
Excellen t
Good Weak
Not connected yet
Device n ot re cognized
In wind ows XP, it pro vides wireless configuration utility
named windows zero configuration wh ich provides
basic configuration function for WirlessUS B Adapter.
Currently, Ralink’s utility pro vides WPA-PSK supplicant’s
functionality. If user requ ired WPA function.
Please select WZC as main u tility. To make it easier for
user to select t he correct utility. RaConfig will let user
make th e selection when it first ran after XP b oot. Click
4.3 Using the Configuration Utility
When the Wirele ss LAN Adapter was installed, you will see the icon on the Wind ows
task bar. The user can con figure the wireless set tings using th e Wireless Adap ter
Configuration Utility. Double-click the utility icon that appea rs in the taskbar
When Y ou click on this icon in the Windows task bar You can see 4 differ ent links:
Launch Config Utilities
Switch to STA + AP mode
Switch to AP mode
Exit
33
Page 34

the icon of w ill bring up the selection window and let
user make th e selection. When coexisting with WZ C,
RaConfig only pr ovides monitoring function, such as lin k
status, site surveying, statistic counters and ad vance
feature status
5. RaUI CONFIGURATION UTILITY
Double- click the Wireless LAN icon (or righ t-click and then select Launch Config
Utilities) t o launch the Con figuration Utility. Wi th the Wirele ss Adap ter utility, users
can c onfigure all th e functions pr ovided b y the Wireless M onitor Utility. Doub le -click
the utility icon that appear s in the taskbar.
The Wireless Monitor Utility inc ludes se veral tabs:
34
Page 35

5.1 Network
Under the Site Survey ( ) page, system will disp lay the info rmation of
surround ing APs fr om last scan result. List information’s include SSID, S ignal,
Channel, Encr yption algorithm, and Network type as picture shown.
Rescan ( ): Issue an rescan command to wireless NI C to upda te inf orma tion
on surrounding wireless networ k.
Connect( ): Command to conn ect to the selected network.
35
Page 36

If selected AP supports WEP or W PA/WPA2 You have to
chose Authentication and Security tab in order to
connect to the wire less n etwork.
Add to Profile ( ): select an AP profile, click Add to Profile. I t will bring up
profile page and sa ve user’s setting to a ne w profile.
6. Support
For techn ical questions and support, please conta ct our help-d esk by ticket on
http://w ww.a tlantis-land.com/ita/suppor to.php.
For gene ric inf orma tions, please send an e-mail to info@atlantis- land.com.
For pre sales informations, please send an e-mail to prevendite@atlantis-land.c om.
Atlantis SpA
Via S. Antonio, 8/10
20020 L ainate (MI)
Italy
Fax: +39.02.78.62.64.39
Website: http://www.atlantis-land.c om
Email: info@atlantis-land. com
36
Page 37

If an y wireless network is available, please check that
the USB/PCI w ireless c lien t is correctly installed on your
PC.
If an y wireless network is available, please check that
the USB/PCI w ireless c lien t is correctly installed on your
PC.
APPENDIX A: Connect to a network using Windows client
MS Window s XP and Windows VISTA/7 can m anag e the USB/PCI client with its
embedded utility for wireless networks; Windows 2000 and MAC OS X r equires an
external manag ement u tlity (pr ovided on the CD) to set and ma nage the USB/PCI
wireless client.
Windows 7
You can access the Connect to a network dialog box from many locations in
Windows 7, including the following:
By clicking Start, and then Control Panel (select Large/Small Icon) then
click on Network and Sharing C enter icon. Click on Co nnect to a
Netwok.
From the Manage wireless co nnections (in the Wireless) select the
wireless network SSID and click Connect.
Windows VISTA
You can access the Connect to a network dialog box from many locations in
Windows Vista, including the following:
By clicking Start, and then Connect to from t he W indow s Vista desktop
From the Manage wireless co nnections dialog b ox
From the Connect/Disconnect conte xt menu option of a wire less ne twork
adapter in the Network Connections folder.
Select Wireless (on the comb o box) in the filed Show, select the w ireless
network SSID and click C onnect.
37
Page 38

If an y wireless network is available, please check that
the USB/PCI w ireless c lien t is correctly installed on your
PC.
Windows XP
Double click on Wireless network icon on the system tray ( see picture).
Select the wireless network SS ID and click Connect.
38
Page 39

Copyright
Copyrigh t. 2002 est la propriété de cette société. Tout droits réservés. Sont
interdites, la repr oduction, l a transmi ssion, la transcription, la mém orisation dans un
système de sauvegard e où la traduc tion dans une autre langue ou en langage
informa tique que ls qu ’ils soien t, de la présente pub lication, sous quelque forme qu e
ce soit ou quelqu e en soit le moyen, électronique, mécanique, magnétiqu e, op tique,
chimique, manu el ou de tout au tre gen re, sans avoir obtenu préalable ment
l’autorisation de no tre en treprise.
Non-responsabilité
La présente entreprise n’admet ni r equê tes ni d e g arantie, exp licites ou i mplicites,
au sujet du contenu et de manière spécifique exclue la possibilité de garantie,
commun icabilité ou adaptabilité pour des finalités particulière s. Le logiciel décrit
dans le présent manuel est vendu ou concédé en licenc e “tel quel”. Si les
programmes devai ent présenter d es problèmes après l’achat, l’acquéreur (et non
pas la pré sente en treprise, son distributeur ou co ncessionnaire) est tenu de
prendre en charge tous les coûts d e manuten tion ainsi que les c oûts dus à de s
dommag es accidentels ou des conséqu ences dérivants d’un défaut du logiciel. La
présen te entrepr ise se réserve en outre le droit de revoir le contenu de cette
publicat ion et d’y apporter des modifications de temp s en temp s, sans obligation
d’informer les u tilisat eurs de ces changements. N ous a vons fait tout notre possible
afin d’éviter la présen ce d’erreur s dan s le texte, le s images, les tableaux présen ts
dans ce manu el et dans le Cd-Rom. Cependant, nous ne pouvons pas garantir
l’absence to tale d’erreu rs et/ou d’omissions, nous vous remercions donc de nou s le s
signaler et vous prions d e nous en excuser. En fin, n ous ne pou vons être tenu s pour
responsables dans quelque p erte que ce soit, dommage ou incompréhension à la
suite d irecte ou indirec te de l’utilisation de n otre manuel, le logiciel Cd-Rom et/ ou
disque dur.
Toutes les marq ues ou noms de produits ment ionné s dans le pré sent manuel sont
des marques comm erciales et/ou bre vetée s par leurs propriétaires respectifs.
Marquage CE
Cet appareil peut cau ser de s interfé rences rad io, dan s ce ca s nous vous invitons à
prendre les contre-mesures appropriées.
ATTENTION
Laisser au moins 30 cm de distance entre les antennes du disp ositif et les
utilisateurs.
Domaine de r égulat ion
Chaque pays u tilise des bandes de fréquences fixées par cet organisme, l’utilisateur
final doit donc s’assurer du b on réglage d e son AP sur un canal autorisé dan s son
pays.
39
Page 40

Site
Plage de fréquences
(MHz)
Puissance (EIRP)
Intérieur (aucune
restriction)
2400-2483,5
100mW (20dBm)
Extérieur
2400-2454
2454-2483,5
100mW (20dBm)
10mW(10dBm)
Déclaration de Co nformité
Cet appareil a été testé et est conforme à la Direc tive 1999/5/CE du Parlement
européen et du Conseil concernan t le s équ ipemen ts hertziens et les équipe ments de
terminau x de télécommunications e t la reconna issanc e mutuelle d e leur conformité.
Après é valuation du matériel, celui -ci est conforme au x norm es suivantes : EN
300.328 (radio), EN 301 489-1, E N 301 489-17(c ompa tibilité électromagnét ique),
EN 60950-1 (sécurité) et EN 50385. Ce matériel peut être u tilisé dasn tous les pays
de l’Union Européenne et dan s tous les pays appliquant la Directive 1999/5/CE, san s
limitations, à l’exception des pays suivants :
France :
En cas d’ utilisation de c e matériel en extérieur, la pu issanc e d e sortie e st limitée
dans les plages de fréquenc es ci-dessous. Pour d e plus amples in formation s,
consult ez le site de l’ART : www.art-teleco m.fr
Italie :
Cet appareil est c onfor me à l’interface radio nation ale et au x exigence s de la table
d’alloca tion d es fréquences. L’utilisation de ce produit sans fil en deh ors du cadr e de
la propriété de l’acquéreur nécessite une autorisation gén érale. Pour da plus amples
informa tions, consultez le site www .comunicazioni.it
Luxembourg:
Norvège (NO):
Russie (CCP):
Il faut de mander une autorisation pour l’installation de cet app areil.
il est interdit d’u tiliser cet appareil (20Km) proche d e Ny Alesund
Utiliser seu lemen t à l’ Intér ieur.
40
Page 41

Déclaration de Co nformité
Nous d éclar ons que cet app areil a été te sté e t est c onforme à la Directive 99/5/CE
du Par lemen t eur opéen et du Conseil concernan t les équ ipemen ts hertziens et les
équipements de term inaux de télécommunications et la reconnaissance mutuelle de
leur con formité. Il est p ossible de té lécharger sur le site web ( www. atlantis-
land.com) le document complet.
équipement
Information impo rtante sur le recycl age et le traitement de cet
Le symbole représentant une poubelle sur r oues barrée d' une cr oix, qui est imprimé
sur l'étiquette ou l'emb allage du produit, indique que cet équipemen t n e doit p as
être éliminé avec les déche ts municipaux non triés mais doit faire l'objet d'une
collecte sélective.
Les déchets d'équipements électriqu es et élec troniqu es d oiven t être traités
séparément afin d'éviter que les matière s dangereuse s con tenues dans ces
équipements ne soient enterrées, ce qui pourrait occasionner des risques futurs
pour l'en vironnemen t et l a santé hum aine. D e plus, certains éléments des déchets
d'équip ements é lectriques et électroniqu es pourront être réutilisés et recyclés, ce
qui contribuera à réduire les quantités de déch ets à élimine r et à limiter
l'épuisement des re ssources naturelles.
En tant qu 'utilisateur de cet équ ipemen t, vous ê tes chargé de rapporter ce déche t
d'équip ement électronique à un centre de collecte autorisé par votre commune.
Vous pouvez obtenir, auprès de votre commun e ou du groupement auquel elle
appartient, de plus amples informations sur votre centr e de collec te l e plu s proche.
Si vous achetez un équipe ment électriqu e ou électronique, le di stributeur reprendra
gratuitement l'équipe ment usag é que vous lu i c èderez, dans la limite de la quantité
et du type d'équipe ment vendu.
Votre p articipation à la collecte sélective des déchet s d'équipements é lectriques et
électron iques est essentielle pour garantir que les objectifs de protec tion de
l'environnemen t et d e la santé humai ne seront attein ts.
PS: L es inform ations sus m entionnées so nt fourni es i ci en co nform ité av ec la Directive 2 002 /96/C E
et le Décr et n° 200 5-829 du 20 juillet 2 005 rel atif à la compo sitio n d es éq uipement s électriq ues et
électroniqu es et à l'élimin ation des déchets issus de ces éq uipement s qui prévoi ent des
proc édur es de c ollec te sélectiv e et d e traitem en t et d 'éliminatio n spécifi ques aux déch ets
41
Page 42

d'équip ements électriqu es e t éle ctroni ques. Pour d e pl us amples info rm ation s, no us vo us invitons à
consul ter no tre site I nternet à l'adr esse suiv ante www. atl antis-land.co m.
42
Page 43

Félicitat ions p our avoir choisit cepr odu it. Ce manuel a é té réd igé pour une utilisation
avancée de l’ Adaptateur Wireless USB, le terme Adapta teur sera utilisé dans c e
manuel p our désign er cet appar eil.
1. ADAPTATEUR WIRELESS
L’adaptateur Wireless NetFly USB/PCI est un adaptateur ré seau San s fil u tilisable à
la maison, au bureau ou dans des lieu x publics. Ce produit gère la vitesse de
transfer t jusqu’à 300Mbps (150Mbp s pour A02- UP1-WN) et peut auto-négocier les
vitesses de 54, 48, 36, 24, 18, 12, 9, 6 Mbps (IEEE 802.11g) ou 11, 5.5, 2, 1 Mbps
(IEEE802.11b).
Avec la techn ologie Packet-Overdrive™ et MIM O (seulem ent dans le modele A02UP-W300N ou A02-UP4-W30N) le dispositif perme ts d’envoyer sur le r éseau sans fil
aussi du vide o HD.
Avec ces fonctions intégrées, le produit vous d onne la flexibilité nécessaire pour
configure r le dispositif de manière à rép ondre aux be soins de votre en vironn ement.
Les chip sets supportent le Wi-Fi Protected Access (W PA/WPA2) et le nou veau
standard de sécurité IEEE8 02.1 1i en h ard ware, ainsi que le moteur d’encryptage
haute vitesse sans dégradation des performances.
Les fonction s de sécurité avancée vous pro tègen t des attaqu es de hacker.
Il e st c ompatible avec les systèmes Windows® XP/2000/7, Linux et M AC OS
X(seulement USB) et fonc tionne en mode Ad-Hoc (d’un ordinateur à un au tre) ou
en mode Infr astructure (d’un ord ina teur à un po int d’acc ès). L’adaptateur e st aussi
capable de fonctionner c omm e Point d’Accès.
Compatible avec be aucoup de téléviseurs Sa msung, NetFly UP4 WN per mettra à
votre téléviseur Sa msung de communiquer avec votre ordinat eur /Ser veur
DLNA/Routeur grâce à une liaison sans fil. Vous pourre z ainsi surfer sur les w idgets
embarqués p our con sulter la mé téo, les ac tualités, etc.
1.2 Besoin système
Avant de commencer l’installation vérifiez si vou s disposez d es suivants requis:
PC desktop avec un slot USB V2.0/1.1* libre (A02-UP-W 300N, A02-UP4-
W300N et A02-UP1-WN)
PC desktop avec un slot PCI 3 2 bit libre (A02-PCI- WN/A02-PCI1-W300N )
Processeur Intel® Pentium® III 600Mhz ou compatible e t 512 M O de
mémoire vive ou plu s
Système Windows® 2000 /XP/ Vista/7, MAC OS X(USB) ou Linux
45MB d’espace libre sur disque
Lecteur CD-Rom
43
Page 44

Le produit (avec la V 2.1. 2.0 p our USB ou V2.4.1.1 p our
PCI) n’a été testé que sur les kerne l 2.6.29(PCI) et
2.6.31(USB) et avec les distribu tions ci tées. Atlantis ne
garantit pa s le fonc tionnement sur d’autres
distribution/kernel et ne pourr a donc pas offrir d e
support.
1. Contenu de l’emballage
Une fois ouvert, vou s de vriez trouver les éléments suivants:
Adaptateur Wirele ss NetFly USB ou PCI
1/2 2 dBi Antenn es (seulemen t pour A02-PCI-WN ou A02-PCI1-W300N) et
LOW Profile Bracket
Cable USB (seuleme nt pour A02-UP-W300N et A02-UP4-W300N)
Guide d'insta llation rapide (en Français, Anglai s, et I talien)
CD-R om a vec manuels(en Fr ançais, Ang lais, et Ita lien), pilotes et logic iels
Garantie et WEEE
Si vou s con statez qu’un de ces co mposants m anque, merci de vous adressez à votre
revendeu r.
3. INSTALLATION SOFTWARE
3.1 Installation Sous Windows
Allumez l’ord inateu r. Introdu isez le cd du logiciel dan s le lecteur Cd -rom. Une
nouvelle fenêtre appar aîtra, il faut choisir la page du produit (A02-UP4-
W300N ou A02-UP1-WN ou A02-UP-W300N ou A02-PCI-WN/A02PCI1-W 300N) et enfin cliquer sur Utilitaires p our exécuter l’in stallation
du logic iel.
Cliquez sur Oui pour continuer, après Choisir Install driver and Ralink
WLAN Utility (pour 7/Vista) ou Ralink Configuration Tool (pour XP) et
après cliquer sur Suivant.
Suivez maintenant la procédure d’ installation jusqu’à la fin (puis red émarrez
l’ordinateur).
44
Page 45

En cas de pr oblemes avec le CD tapez
CDRom:\Start.htm. A ce stade il est possible d e choisir l a
page du produ it et lancer l’installation software.
A ce stade conn ecter l’adaptateur (voir l a section 4) pour terminer l’installa tion.
3.2 Supprimer les drivers et l’utilit aire
Pour suppr imer complètemen t p ilotes et utilitaire, lancez le programme de
désinstallation :
Cliquez sur Démarrer, ch oisissez Paramètres, puis cliqu ez sur Panneau
de configuration.
Dans le Pann eau de c onfigu ration, cliquez deux fois sur Ajout/Suppression
de programmes.
Dans la fenêtre Ajout/Suppression de programmes qui s'affiche,
sélectionnez Ralink Wireless Lan Card.
Cliquez sur le bouton Mo difier/Supprimer.
Sélectionnez l'option Remove all e t cliqu ez sur Suivant (Next)
Vous serez alors invité à c onfirmer qu e vous souhaitez dé sinstaller la carte
entièrem ent, cliquez sur Oui. Le programme d'in stallation supprimera les
pilotes de la carte. Cela peu t prendr e qu elques minu tes. Choisir Yes, I want
to restart my computer now.
A ce stade il e st p ossible de débrancher la carte de l’ordina teur.
4. INSTALLATION HARDWARE
Avant de c onnecter le produit au PC (avec le cable USB ou dan s le slot PCI), il e st
imperatif d’installer le logiciel d e configuration (voir l a section 3 d ans ce manuel).
4.2 Installation physique pour la carte PCI
Eteigne z l’ rd inateu r et c oupez le c ourant en en levant le câb le d’alimen tation.
Ouvrez l’ord inateur.
Dévissez la protection d’un de s slot s PCI libres.
Insérez délicatement la c arte PCI d ans l’emplacemen t prévu à c et e ffet. Ne
forcez pas pour ne r isquer p as de l’endommage r.
Après a voir correc temen t in stallé la c arte PCI (s’assurer que la carte soit bien
insérée d ans le slo t PCI), remettez la vis p our sécuriser l’installation.
Replace z le capot de votre ordinateur et r ebranc hez le cour ant.
45
Page 46

INDICAT EUR
SIGNIFICATION
L’adaptateur est re lié à un réseau S ans-Fil et le sign al e st for t
L’adaptateur est re lié à un réseau S ans-Fil et le sign ale est bon
L’adaptateur est relié à un réseau San s-Fil mais le signal
est faible
4.2 Connecter l’adaptateur USB
4.3 Logiciel de configuration
Lors de l’installa tion logicielle, en plus de s pilotes, une application permettant de
configure r rap idemen t la connexion a été in stallée.
Double clique z sur l’icône LAN Wireless ( ) ou clic droit puis
sélectionnez Launch Co nfig Utility pour lancer l’u tilitair e de configur ation.
46
Page 47

L’adaptateur n'est pas relié à un réseau Sans-Fil m ais la carte est
correctement installée
L’adaptateur n' est pas re lié à un réseau Sans-Fil et la c arte peut
ne pas être correctemen t installé
Pour l’activation du controleur de Wind ows XP choisir
Use Z ero Configuration as Configuration Utility.
Pour r eutiliser le logiciel de Ralink ch oisir Use RaConfig
as Configuration Utility.
Clic droit sur ( ) puis sélec tionnez entre :
Launch Config Utilities
Switch to ST A + AP mo de
Switch to AP mode
Exit
5. RaUI LOGICIEL DE CONFIGURATION POUR WINDOWS
Double clique z sur l’icône LAN Wirele ss (ou c lic droit puis sélectionnez Launch
Configuratio n Utili ty pour lancer l’utilitaire d e conf iguration.
Avec cet u tilitair e, vous pou vez configurer toutes les fonc tions d e votre Adaptateur
USB grâce au x sou s menus:
47
Page 48

5.1 Connexion
Pour voir, sélectionner et se connec ter à l’u n des réseau x Sans-Fils disponibles dans
l’environnemen t de travail. Cliquer sur Sit e Survey ( ).
Cliquer sur ReScan( ) :affiche les réseaux Sans- Fils visibles depuis
l’Adaptateur. Sélectionnez le réseau dé siré puis c liquez sur le bou ton Connect pour
établir une conn exion. Cliquez su r le b outon ReScan p our e xécu ter une nouvelle
recherche des réseaux d isponible s.
48
Page 49

Add to Profile ( ): pour créer e t gérer vos profils (la mai son, le bur eau ou
d’autre s). En d oub le cliquan t sur le profil cr éé, tou tes les options spéc ifiées dans le
profil co mme le SSID, le canal et la c lé WEP/WPA/WPA2 seront utilisées.
Cliquer sur Connexion( ) : Sélectionn er le réseau/profil désiré puis cliquer
sur le bouton Connexion pou r étab lir une connexion.
6. Support
Pour tou s prob lème s ou r enseignemen ts vous pouve z contacter le ser vice
d’assistence w eb d’ Atlantis h ttp://www.a tlantis-land.com/ita/supporto.php.
Pour avoir de s info vous pouvez con tacter inf o@atlantis- land.c om ou
prevendite@atlantis-land.com.
Atlantis SpA
Via S. Antonio, 8/10
20020 L ainate (MI)
Italie
Fax: +39.02.78.62.64.39
Website: http://www.atlantis-land.c om
Email: info@atlantis-land. com
49
Page 50

APPENDICE A: Configuration de la connession sans fils en
utilisant l’utilitaire de Windows
Windows 7
Cliquer sur Start, puis Panneau de Configuration (Grandes/Petites
icônes).
Cliquer 2 fois sur Centre Réseau et Partage, pu is cliquer sur Gérer les
connexions Réseau.
Cliquer sur Connexion à un réseau.
Il y aura les réseaux Sans-F ils visibles depuis l’Adaptateur. Sélectionner le
réseau dé siré puis cliquer sur le bouton Connexion pour établir une
connexion.
Mettre la clé d e sécu rité ou le mot de p asse réseau et cliquer sur Conn exion.
Cliquer en fin sur Fermer pur terminer.
Windows VISTA
Cliquer sur Start, puis Panneau de Configuration (Affichage Classique).
Cliquer 2 fois sur Centre Réseau et Partage, pu is cliquer sur Gérer les
connexions Réseau.
Cliquer 2 fois sur Connexion s ans fil.
Il y aura les réseaux Sans-F ils visibles depuis l’Adap tateur. Sélectionner le
réseau dé siré puis cliquer sur le bouton Connexion pour établir une
connexion.
Mettre la clé d e sécu rité ou le mot de p asse réseau et cliquer sur Conn exion.
Cliquer en fin sur Fermer pur terminer.
Windows XP
Cliquer sur le suivant icôn e (Connexion sans fils)
Il y aura les réseaux Sans-F ils visibles depuis l’Adaptateur. Sélectionner le
réseau dé siré puis cliquer sur le bouton Connexion pour établir une
connexion.
Mettre la clé d e sécu rité ou le mot de pa sse réseau e t cliqu er sur Conn exion.
Cliquer en fin sur Fermer pur terminer.
50
Page 51

AVISO
Hemos hech o todo lo posible para evitar que en el texto, las imágenes, tabla s,
software y hardware, y la infor mación presentada en g eneral sea carente de err ores.
A pesar d e ello, no p odemos gar antizar la ausencia de estos.
Atlantis no se hacen responsable de dañ os o pérdidas direc tas o indirectas,
incluid os, pero sin limitación, los daños causados por la imposibilidad su uso, la
pérdida d e datos o software y/o los daños o pérd idas ca usad os por el uso o
funciona mien to incorrecto del equipo y accesorios. En ningún caso, Atlantis será
responsable de las pérd idas financieras c omo pérd ida de b enef icios, daños por
inactividad, daños a la reputac ión, etc.
El contenid o de este manua l se provee a título informativo y e s sujeto a cambios sin
previo aviso (invitándose a los clientes a c onsultar nuestro sitio Web www.at lantisland.com para m antene rse informados de estos) no haci éndose Atlantis re sponsable
de cualquier error o inexactitud que pueda apar ecer en esta guía.
Esta publicac ión n o puede ser traducida ni reproducida, n i en tod o ni en parte, ni
registrad a en, o tran smitid a por, un sistema de r ecupe ración d e información, en
ninguna forma ni por ningún medio, sea mecánico, fotoquím ico, ele ctrón ico,
magnético, electrónico, por fotocopia, o cu alquier otro, sin permiso previo por
escrito de Atlantis.
Los n ombres de los fabrican tes, de sus productos, así como de cualqu ier marca,
registrad as o no, mencionadas en este manual, son usados a título de ref erencia,
siendo propiedad exclusiva de sus re spectivos dueños.
Declaración de conformidad CE/E MC
El producto descrito en e sta guía ha sido diseñado, p roduc ido y aprobad o en
conformidad c on las reglas EM C, siendo certificad o en cumplimen to de la nor mativa.
Si el producto se usara con u n ordenador no c ertificad o, el produc tor no puede
garantizar el respet o a los límites de comp atibilidad e lectromagn ética. En la prác tica,
y en circun stanc ias particulares, es posible que dichos límites puedan ser superados
si se utilizan dispositivos que n o resp etan la normativa EMC y que, por tanto, n o han
sido ce rtificad os. Asimismo, es p osib le, que de for ma puntua l ocu rran picos de valor
que se encuentr an por encima de las tolerancias. En este caso, e l usuar io es
responsable que el dispositivo vuelva a ser conforme con los límites EMC. El
fabrican te no pued e hacerse responsable en el caso de que el producto sea u tilizado
fuera de los l ímites dictados por la normativa EMC.
ATENCIÓN
Para cualquier dispositivo inalámbrico dejar al menos 30cm de distancia entre la
antena d el dispositivo y el usuario.
51
Page 52

Lugar
Banda de Frecuencias
(MHz)
Potencia (EIRP)
Interior (sin restricciones)
2,400-2,483.5
100mW (20dBm)
Exterior
2,400-2,454
2,454-2,483.5
100mW (20dBm)
10mW(10dBm)
Aviso sobre el distintivo CE
Este es un pr oducto d e Clase B. En un entorno doméstico este producto puede
provocar interferen cias de rad io por lo que, si fuer a así, es necesario que el u suario
tome las medidas adecuad as
Países CE do nde este producto puede ser usado libremente:
España, Alemania, Reino Unido, Italia, Bélgica, Holanda, Portugal, Grecia, Irland a,
Dinamarca, Lu xemburgo, Austr ia, Fin landia, Suecia, Noruega e Islandia.
En Fr ancia esta perm itido el uso de los canales 10 y 13 excluyend o el uso de otros
canales.
Declaración de Conformidad
Este dispositivo ha sido probado, determinánd ose c onforme c on la di rectiva
1999/5/CE de l Parlamento Europeo y de la Comisión Europ ea referente a equipos de
radio y periféricos d e telecomunicacione s y e l recon ocimiento mutuo de su
conformidad. Después de su valoración, se ha establecido que el dispositivo se
ajusta a los siguientes estándare s: EN 300.328(radio), EN 301 489-1, EN 301 48917(compatibilidad elec tromagnética) y EN 60950(segu ridad ). Este d ispositivo pued e
ser utilizado en todos los paí ses de la Comunidad Ec onómica Europea sin re stricción
alguna y en aqu ellos, que aún sin perman ecer a esta, aplican l a Direc tiva
1999/5/CE, a excepc ión de:
Francia:
En el caso de utilizar el d ispositivo en exteriores, la potencia de salida y la
frecuencia usada deb erán de ajustar se a los que se de tallan en la tabla. Para ma yor
información c onsulte el sitio Web
www.art-telecom.fr.
Si el uso d e este d ispositivo en un ambiente do mestico generara interferencias, es
obligación del usuario poner remedi o a la situación.
Italia:
Este dispositivo e s c onforme la normativa de Rad io Nacional y re speta los requisitos
de Asignación de las Frec uenc ias. E l uso de este dispositivo fu era del uso d oméstico
necesita de un a au tor ización gene ral. Para más inf ormación d iríjan se al sitio:
www.comunicazion i.it.
52
Page 53

reciclaje/tratamiento de este aparato
Información importante para el correcto procedimiento de
El símbolo del c ontened or de basura tachado sobre la etique ta o en vase indica que
este apara to no debe ser elim inado como re siduo urbano no selecci onado sino que
debería ser rec ogid o de modo selectivo.
Los residu os de apar atos eléctrico s y electrónicos deben ser tratados de modo
selectivo, en orden de asegurar que los materiale s peligrosos contenidos en los
aparatos n o sean quemados causand o potenciales problema s futur os para el med io
ambien te y la salud humana. Por otro lad o, será po sible la reutilización y rec iclaje de
algunas partes de los re siduos de ap aratos eléc tricos y electrón icos, contribuyend o a
reducir las cantidad es de residuos a eliminar y el agotamiento de los recur sos
naturales.
Como usuario de esto aparato, usted es re spon sable de la devolución de e ste
residuo de aparato electrónico en la instalación de recogida oficial establecido por
su Municipio. Para más infor mación sobre la s instalaciones de recogida má s
próxima s consulte en su s entidades loca les.
Si usted reemp laza un antigu o aparato por un producto nuevo equivalente, el
distribuidor d eber á r ecepc ionar e l an tiguo de for ma gratuita y uno por uno siempr e
que este aparato sea de tipo equivalen te y realice las mismas funciones que el
aparato suministrado.
Su papel en la recog ida selectiva de los re siduos de aparatos eléctricos y
electrón icos es esencial para asegurar que los objetivos de protección del med io
ambien te y de la salud humana, en conexión con un tratamiento y rec iclaje
responsable, sean lograd os.
PD: la información arriba menc ionada ha sido redactada en conc ordancia con el RD 208/200 5 de 25 de Febrero, el
cual establece la recogida separ ada y el diferente tratam iento y eliminación de los residuos d e aparatos eléctricos y
eléctronicos. Para información ad ic ional y en más detalle le invitamos a visitor nuestra pá gina web www.at lantisland.com
53
Page 54

El producto ha sido probad o con los kernels 2.6.31(US B) y
2.6.29 (PCI) Atlan tis no garan tiza su funcion amento con
otras distribuciones o kernels a los mencionados. Dad o la
ingente cantidad de posibles combinaciones de kernels y
distribucione s disponib les, Atlantis no ofrec e a sisten cia
técnica de l sistema opera tivo Linux. Por ello, se aconseja a
Gracias por comprar la lla ve inalámbrica USB/PCI la cual pr oporciona la forma más
fácil de c onectarse a una red inalámbrica. Este manual de usuar io le describe de
forma detallada e l funcionamien to del pr oducto. Por favor, con serve el m ismo par a
uso futuro.
1. Llave inalámbrica USB/PCI
La llave inalámbrica USB/PCI (IEE802.11g /n a 150Mbps) permite a los u suarios
dotados de aparatos inalámbri cos de navegar o c ompartir sus ficheros c on gran
facilidad y seguridad gracias al uso de los robustos protoc olos de encriptación WPA/
WPA2.
La tecn ología Packet-Overdirve ™, por otra parte, permite ob tener incrementos de
velocidad de tran smisión consider ables, convirtiéndolo en un aparato ideal para
aplicaciones que n ecesitan d e un alto rendim iento, como por e jemplo, el streaming
de video de alta definici ón (HD Video).
Con este adaptad or le será posible una mayor movilidad tan to dentro de su pr opia
oficina c omo de su casa, sin pérdida de conectividad.
Este product o es compatible con Windows® XP/2000/VISTA/7, y es capaz de
funciona r en modalidad Ad-Hoc (PC a PC), infraestructura (PC a Punto de Acc eso) y
como Punto d e Acce so.
1.1 Requisitos del sistema
Antes de proceder a la in stalación del p roduc to verifique que su orden ad or cuente
con siguientes requisitos.
Procesador Intel® Pentium® III 600Mhz o compatib le con al men os 512 MB de
memoria RAM
Ordenad or Sobrem esa con puerto USB V2.0/1.1* (A02-UP1-WN), A02-UP-
W300N, A02-UP4-W300N)
Ordenad or con PCI 32bit Slot (A02 -PCI- WN/A02-PCI1- W300N )
Sistema oper ativo Windows® XP/2000/VISTA/7 y Linux
Al men os 45MB de espacio en d isco duro
Lector CD-ROM
54
Page 55

los usuarios de este sistema operativo dirigirse al sitio Web
del produc tor del chip set – w ww.ralink.com.tw - para la
descarga de los ú ltimos controladores y para obtener mayor
informac ión.
En el caso de que el dispositivo se conecte a un puerto USB
V1.1/1. 0 la tasa de tr ansferencia se vera limitada por al
velocidad del mismo. El límite teórico máximo de l estándard
es de 6Mbps.
No inserir la llave in alámbrica US B an tes de haber hecho la
instalación de los controladore s.
1.2 Contenidos de la caja
Antes de utilizar el producto verifique que la caja contenga el siguient e ma terial:
Una llave Wireless USB (A02-UP1-WN), A02-UP-W300N, A02-UP4-W 300N)
Una llave Wir eless PCI (A02-PCI-WN(A02-PCI1-W300N)
Antenn a 2 dBi y Low Profile S ocket (A02- PCI-WN)
2 x Antennaa 2 dBi y Low Profile Soc ket ( A02-PC1I-W300N)
Una guí a rápida mu ltilingü e
Un CD c on los controlad ores, u tilidades y el manual de usuar io.
2. Instalación del Software
En esta secc ión se de scribe el procedimien to para la instalación de los controladore s
y utilidades de la llave in alámbrica USB /PCI. Sig a paso a paso las in strucc iones para
la in stalac ión de los con trolad ores. Para ejecutar el progra ma de instalación, inserir
el CD en el lector y hacer doble clic sobre setup.exe (CDROM:\usb\OS\*.exe o
bien CDROM:\PCI\OS*.exe) e instalar la aplicac ión siguiend o las instrucc iones
de pantalla.
55
Page 56

Pinchar sobre el botón Next para prosegu ir.
56
Page 57

Seleccionar la opción Ralink Driver and WLAN Utility para instalar la utilidad
WIFI incluida – se rec omiend a – o Install driver only para u tilizar la que ya viene
integrad a en con el sistema operativo. Pinchar sobre Next par a continuar después
pinchar sobre el botón Install.
Pinchar a con tinuaci ón sobre el botón Next.
Una vez h echo esto, le aparecerá una ventana que le instará a introducir la llave
inalámbrica USB (o bien PCI). Una vez insertada, será reconocida y se instalará d e
forma au tomá tica.
Para terminar e l procedimien to de instalación pinch ar Yes, I want to restart my
computer no w y despu és Fi nish.
3. Utilidad de la Red Inalámbrica
3.1 Introducción
En esta sección se explica como poder conectar la llave inalámbrica USB/PCI a la
red del modo más sencillo p osible utilizando la aplicación incluida en el CD. Esta
aplicación viene in stalad a si durante la instalación de los c ontroladore s h a escog ido
la opción Ralink Driver and WLAN Utility ( Ralink Configuration Tool).
Una vez qu e se ha termin ado la in stalac ión, debería de apar ecer en la barra de
herramientas el siguiente icono -
Dependiendo d el color de l icono, no encon tramos que si es:
Verde - - Indica un n ivel de señal exc elente y la c one xión activa.
Amarilla - - Indic a un buen n ivel de señal y la conexión ac tiva.
Roja - - Indica un nivel de señal bajo con conexi ón esta ac tiva.
Icono Rojo con Cruz Roja - - La c onexión no esta activa.
Icono Negr o con Cru z N egra - - La tarjeta no h a sido reconocida por el
ordenad or.
Con el pun tero sob re el icono ya men cionad o y hac iendo clic con el b otón der echo
del ratón le aparec erá un menú con las siguientes opciones:
Launch Config Utilities – Ejecutar Utilidades de Configuración
Switch to AP mode + STA – Cambiar a modalidad Punto de Acceso Y
CLIENT.
Switch to AP mode – Cambiar a modalidad Punto de Acceso.
57
Page 58

Si quiere utilizar la aplicación Zero Configuration
integrad a con Wind ows® XP para la configur ación
inalámbrica, lo pued e hacer pinchando en el menú sobre la
opción
Use Zero Configuration as Co nfiguration Utility. En el
caso d e que quisier a volver a utilizar la aplicación in tegrada
con el produc to la encon trará en el menú donde se
encontr aba la an terior con la descripción Use RaConfig as
Configuratio n Utili ty.
Exit – Salir.
3.2 Utilizar la aplicación de configuración
Para hacer arrancar la aplicación hag o doble c lic sobre el icon o o pinch e con el
botón derecho y sele ccion e Launch Config Utilities. Gracias a esta utilidad es
posible c onfigurar y monitorizar con detalle la llave ina lámbr ica US B /PCI.
La aplica ción d e configurac ión c ontiene 6 lengü eta s:
58
Page 59

3.3 Connexion ( Site Survey)
En esta secc ión (pinchar sobra el b oton ) es p osible ver tod os los Pun tos de
Acceso d etec tados en la zona p or el c liente.
Rescan ( ) (Sondeo): Inspecciona el entorno para obtener todos los Puntos
de Acce so detectados por el cliente .
59
Page 60

Si el Punto de Acceso seleccionado tiene la encriptac ión
habilitada es nec esario configur ar l os parámetros de acceso
en el formulario Authentication and Security
(Autentificación y Seguridad) (WEP/WPA/WPA2) para
poder acceder a la r ed inalámbrica.
Connect ( ) (Conectar): Una vez selecc ionad o el Punto d e Acceso, pinche
sobre este botón para c onectar el cliente con e l Punto de Acceso deseado. El ic ono
verde – - ind ica que se ha con ectad o al Punto de Acceso seleccionado.
Add to Profile ( ) (Añadir al Perfil): Una vez seleccionad o el Punt o de
Acceso, pinchar sobre este b otón y r ellen ar los c ampos que se le ind ican para cre ar
un nue vo perfil.
Pinchar a con tinuac ión sobre el botón para conec tar el client e con el Punto de
Acceso d eseado
4. Uninstallation - Desinstalación
Para desinstal ar la llave inalámbrica USB d ebe d e segu ir el siguiente procedimiento:
60
Page 61

Cerrar todas las aplicaciones activas.
Pinchar sobre el ic ono Mi PC y desp ués sobre el Panel de Control.
Pinchar sobre Agregar o quitar pro gramas y seleccionar Rali nk Wireless
LAN Card y pinchar en Quitar para confi rmar el proced imiento d e
desinstalación.
Pinchar sobre Remove All (Desinstal ar T odo), o sobr e Overwrite the older
version install without remove – Sobrescribir la versión anterior.
Al terminar el pr ocedimiento pinchar sobre Yes, I want to restart my
computer no w (Reiniciar el PC) y despu és sobr e Finish (Terminar).
Una vez que ha apag ado el ordenador puede sacar la llave USB.
5. Soporte Técnico
Consultar el sitio Web http://www.atlantis- land.c om o contactarnos a las siguient es
direcciones de cor reo electrónico (info@atlantis-land.com o http: //www. atlan tis-
land.com/ita/supporto.php).
Atlantis
Via S. Antonio, 8/10
20020 L ainate (MI)
Italy
Fax: +39.02.78.62.64.39
Website: http://www.atlantis-land.c om
Email: info@atlantis-land. com
61
Page 62

Country Name
Classificatio n
Range
Argentina, Bahrain, Brazil, Canada, Chile,
Croatia, Ecuad or, Hong Kong, M alaysia,
Mexico, Panama , Peru, Philippines, Puerto
Rico, Ro mania, S audi Arab ia, Taiwan, United
States of Am erica, Urugu ay, Venezuela,
Yugoslavia
0
CH1~11
Australia, Austria, Belaru s, Belgium,
Bolivia, Bulgaria, China, Colombia, Costa
Rica, Cyprus, Czech Repub lic, Den mark,
Egypt, E stonia, Finland, France,
German y, Greec e, Hungary, Iceland,
India, Indonesia, Ireland, I srael, Italy,
Japan3, Jordan, Kuwait, Latvia, Leb anon,
Latvia, Lebanon, Liechtenstein, Lithuan ia,
Luxemb ourg, M aced onia, Morocco,
Nether lands, New Zealand, N igeria,
Norway, Paraguay, Poland, Portugal,
Russia, S ingap ore, Slovakia, Sl ovenia,
South Africa, S outh Korea, Spa in,
Sweden, Switzerland, Tha iland, Turkey,
United Arab Emirates, United Kingdom
1
CH1~13
France2 3 CH10~13
Japan 5 CH1~14
Japan2 4 CH14~14
APPENDIX A: Country Channel List
For some Eur opean Country, it may have its own domain; users are responsible for
ensuring that the c hann el set configura tion is in compliance with the regulator y
standard s of th ese countries.
62
Page 63

Technical Specs
Code
A02-PCI-WN(V1.2)
A02-PCI1-W300N
Standards
IEEE 802.11b /g/n
Chipset
RaLink
®
RT3060F
RaLink
®
RT3062F
Interface
PCI 32b it
LED
2 (Link, ACT)
WPS
Yes (Software)
Antenna
2dBi dipole an tenna with
R-SMA connector
2 x 2d Bi dip ole antenna
with R-SMA c onnector
Advanced Features
AP Mode on Windows 7/Vista/ XP
WMM
Direct Link Setup
Frequency Band
2412 ~ 2483 MHz
Radio T echnology
IEEE 802.11g/n: Orthogonal Frequ enc y
Division Multiplexing (OFDM)
IEEE 802.11b: Direct Sequ ence Spread
Spectrum (DSS S)
Modulations Scheme
DBPSK/DQPSK/CCK/OFDM
Media Access Prot ocol
CSMA/CA with ACK
Transmission Rate
Up to 150Mbps (autosense with auto fallback)
Up to 300Mbps (autosense with auto fallback)
Security
64/128-bit WE P, W PA-PSK, WPA2- PSK
Transmitting Power
802.11b /g/n: up to 16 ± 1 d Bm
Receiver Sensitivity
802.11b (11Mbps): -84dBm @ 8% PER
802.11g (54Mbps): -74dBm @10% PER
802.11n (150Mbp s): -65d Bm @10% PER
802.11n (300Mbps): -65dBm @10% PER
(A02-PCI1- W300N)
Number of Operational
Channel
Europe (13)
Range C overage
Indoor: up to 100 meters
Outdoor: up to 300 meter s
Supported OS
MS Wind ows® VISTA (32/64-b it)
MS Wind ows® XP (32/64-bit)
MS Wind ows® 2000 (SP4 requ ired)
MS Wind ows® 7 (32/64-bit)
Linux Kernel 2.6.29
Certifications
CE (Eur ope), WHQL Certification for dr iver
APPENDIX B: Technical Specifications
63
Page 64

Dimensions(mm)
120 x 53 x 2 (PCB)
Temperature Range
Operation: 0°C ~ 40°C
Storage: -1 0°C ~ 60°C
Humidity
10% ~ 75% (non Conden sing)
Continuos Current
Consumption
220mA (Tx), 380mA (Rx)
System Requirements
PC with availab le PCI 3 2 bit slot
Intel® Pentium®III 600Mhz or compatible
processor with 512MB RAM
Windows® 2000/XP/Vista /7 or Linux
operating system
Minimum 45 Mb ytes free disk spa ce for
installing the driver and utilities
CD-R om drive
Package Contents
NetFly PCI Wirele ss Card
2 dBi An tenna (A02-PCI-WN)
2 x 2 d Bi Ant enna s (A02-PCI- W300N)
Low Profile
Quick Start Guide (English, French and
Italian)
CD-R om with Utility, Driver and Manua l
(English, French and Ital ian)
1 x Warranty Card and 1 x WEEE Card
Mac OS X is a trademark of Apple Inc.
All righ ts registered
Microsoft and Wind ows are reg istered trademarks of Microsoft Corporation
All trade nam es and marks are regi stered trademarks of respective companies
Specific ations ar e subjec ted to change withou t prior n otice. N o liability for t echnical
errors and/or omissions
Performance and Throughp ut are influenced by many fac tors (interferen ce, noise,
environ ments)
64
Page 65

Technical Specs
Code
A02-UP1-WN(V1.2 )
Standards
IEEE 802.11b /g/n
Chipset
RaLink® RT3070
Interface
USB V2.0/V1.1
LED
1 STATUS
WPS
Yes (H W button)
Antenna
Interna l Striped Ant enna
Advanced Features
AP Mode on Windows 7/Vista/ XP
WMM
Direct Link Setup
Frequency Band
2412 ~ 2483 MHz
Radio T echnology
IEEE 802.11g/n: Orthogonal Frequ enc y
Division Multiplexing (OF DM)
IEEE 802.11b: Direct Sequ ence Spread
Spectrum (DSS S)
Modulations Scheme
DBPSK/DQPSK/CCK/OFDM
Media Access Prot ocol
CSMA/CA with ACK
Transmission Rate
Up to 150Mbps (auto-sense with auto fallback)
Security
64/128-bit WE P, W PA-PSK, WPA2- PS K
Transmitting Power
802.11b /g/n: up to 16 ± 1 d Bm
Receiver Sensitivity
802.11b (1Mbp s): -90dBm @ 8% PER
802.11b (6Mbp s): -88dBm @ 8% PER
802.11b (11Mbps): -85d Bm @8% PER
802.11g (54Mbps): -68dBm @10% PER
802.11n (150Mbps): -68dBm @10% PER
Number of Operational
Channel
Europe (13)
Range C overage
Indoor: up to 100 meters
Outdoor: up to 300 meter s
Supported OS
MS Wind ows® VISTA (32/64-b it)
MS Wind ows® XP (32/64-bit)
MS Wind ows® 2000 (SP4 requ ired)
MS Wind ows® 7 (32/64-bit)
Linux Kernel 2.6.29
Mac OS X 10.3/10.4/10. 5/10.6.
Certifications
CE (Eur ope), WHQL Certification for dr iver
Dimensions(mm)
38 x 1 6 x 6 (withou t USB)
Temperature Range
Operation: 0°C ~ 32°C
65
Page 66

Storage: -1 0°C ~ 60°C
Humidity
10% ~ 75% (non Conden sing)
Continuos Current
Consumption
280mA (Tx), 410m A (Rx)
System Requirements
PC with availab le USB V2.0/1.1 slot
Intel® Pentium®III 600Mhz or compatible
processor with 512MB RAM
Windows® 2000/XP/Vista/7, Mac OS X or
Linux op erating system
Minimum 45 Mb ytes free disk spa ce for
installing the driver and utilities
CD-R om drive
Package Contents
One NetFly USB Wireless Adap ter
Quick Start Guide (English, French and
Italian)
CD-R om with Utility, Driver and Manua l
(English, French and Ital ian)
1 x Warranty Card and 1 x WEEE Card
*When plug the device in the USB 1.1/1.0 port, the real throughput will be up to
6Mbps only when running 11Mbps or higher speed
Mac OS X is a trademark of Apple Inc.
All righ ts registered
Microsoft and Wind ows are reg istered trademarks of Microsoft Corporation
All trade nam es and marks are registered trade marks of re spective companies
Specific ations ar e subjec ted to change withou t prior no tice. No liabi lity for techn ical
errors and/or omissions
Performance and Throughp ut are influenced by many fac tors (interferen ce, noise,
environ ments)
66
Page 67

Technical Specs
Code
A02-UP-W300N(V1.2)
A02-UP4-W300N
Standards
IEEE 802.11b /g/n
Chipset
RaLink® RT3072
RaLink® RT2870
Interface
USB V2.0/V1.1
LED
1 STATUS
WPS
Yes (H W button)
Antenna
2 x Internal S triped Antennas
Advanced Features
AP Mode on Windows 7/Vista/ XP
WMM
Direct Link Setup
Frequency Band
2412 ~ 2483 MHz
Radio T echnology
IEEE 802.11g/n: Orthogonal Frequ enc y
Division Multiplexing (OFDM)
IEEE 802.11b: Direct Sequ ence Spread
Spectrum (DSS S)
Modulations Scheme
DBPSK/DQPSK/CCK/OFDM
Media Access Prot ocol
CSMA/CA with ACK
Transmission Rate
Up to 300Mbps (auto-sense with auto fallback)
Security
64/128-bit WE P, W PA-PSK, WPA2- PSK
Transmitting Power
802.11b /g/n: up to 16 ± 1 d Bm
Receiver Sensitivity
802.11b (1Mbp s): -90dBm @ 8% PER
802.11b (6Mbp s): -88dBm @ 8% PER
802.11b (11Mbps): -85d Bm @8% PER
802.11g (54Mbps): -68dBm @10% PER
802.11n (150Mbps): -68dBm @10% PER
802.11n (300Mbps): -68dBm @10% PER
Number of Operational
Channel
Europe (13)
Range C overage
Indoor: up to 100 meters
Outdoor: up to 300 meter s
Supported OS
MS Wind ows® VISTA (32/64-b it)
MS Wind ows® XP (32/64-bit)
MS Wind ows® 2000 (SP4 requ ired)
MS Wind ows® 7 (32/64-bit)
Linux Kernel 2.6.29
Mac OS X 10.3/10.4/10. 5/10.6.
Certifications
CE (Eur ope), WHQL Certification for driver
Dimensions(mm)
68 x 2 7 x 10 (without US B)
67
Page 68

Temperature Range
Operation: 0°C ~ 32°C
Storage: -10°C ~ 60°C
Humidity
10% ~ 75% (non Conden sing)
Continuos Current
Consumption
290mA (Tx), 440mA (Rx)
System Requirements
PC with availab le USB V2.0/1.1 slot
Intel® Pentium®III 600Mhz or compatible
processor with 512MB RAM
Windows® 2000/XP/Vista/7, Mac OS X or
Linux op erating system
Minimum 45 Mb ytes fre e disk spa ce f or
installing the driver and utilities
CD-R om drive
Package Contents
One NetFly USB Wirele ss Adap ter
USB Cab le
Quick Start Guide (English, French and
Italian)
CD-R om with Utility, Driver and Manua l
(English, French and Ital ian)
1 x Warranty Card and 1 x WEEE Card
*When plug the device in the USB 1.1/1.0 port, the real throughput will be up to
6Mbps only when running 11Mbps or higher speed
Mac OS X is a trademark of Apple Inc.
All righ ts registered
Microsoft and Wind ows are reg istered trademarks of Microsoft Corporation
All trade nam es and marks are regi stered trademarks of respective companies
Specific ations ar e subjec ted to change withou t prior no tice. No liabi lity for techn ical
errors and/or omissions
Performance and Throughp ut are influenced by many fac tors (in terf erence, n oise,
environ ments)
68
Page 69

Atlantis SpA
Via S. Antonio, 8/10
20020 Lainate (MI)
Italia
info@atlantis-land.com
 Loading...