

Page 1
Page 2

ITALIANO
Questo prodotto è coperto da garanzia Atlantis della durata di 2 anni. Per maggiori
dettagli in merito o per accedere alla documentazione completa in Italiano fare
riferimento al sito www.atlantis-land.com.
ENGLISH
This product is covered by Atlantis 2 years warranty. For more detailed informations
please refer to the web site www.atlantis-land.com.
For more detailed instructions on configuring and using this device, please refer to
the online manual.
FRANCAIS
Ce produit est couvert par une garantie Atlantis de 2 ans. Pour des informations
plus détaillées, référez-vous svp au site Web www.atlantis-land.com.
DEUTSCH
Dieses Produkt ist durch die Atlantis 2 Jahre Garantie gedeckt. Für weitere
Informationen, beziehen Sie sich bitte auf Web Site www.atlantis-land.com.
ESPAÑOL
Este producto esta cubierto por Atlantis con una garantía de 2 años. Para mayor
información diríjase a nuestro sitio Web www.atlantis-land.com.
2
Page 3

INDEX
1. Introduction ....................................................................................... 8
1.1 Product features: ......................................................................... 8
1.2 System Requirements .................................................................. 8
2. Package contents ............................................................................... 9
3. Getting Started ................................................................................. 10
Before using the 2.5”Smart Backup Disk Enclosure ............................ 10
3.1 Install 2.5 inch SATA hard drive to Smart Backup Disk ................. 10
4. Finding Smart Backup Disk in Windows and Mac OS ......................... 14
4.1 LED 16
4.2 Safely Removing your Smart Backup Disk .................................... 17
5. Backup Software............................................................................... 18
5.1 Button Manager Utility Installation .............................................. 18
5.2 Button Manager Utility Description .............................................. 23
5.3 User Interface Description: ......................................................... 24
5.4 Adding a New Task .................................................................... 25
5.5 Modify or Delete Button Backup Task .......................................... 29
6. How to use an auxiliary power cord or power adapter ......................... 30
6.1 Using extra auxiliary power cord of USB “Y” cable ........................ 30
6.2 Using external AC switching power adapter ................................. 31
7. Troubleshooting ............................................................................... 32
8. Support ............................................................................................ 34
APPENDIX
APPENDIX A: Technical Specs ............................................................... 35
A06-HDE103-BK_ ME01 (v1.2 Apr 2010)
3
Page 4

Copyright Statement
No part of this publication may be reproduced, stored in a retrieval system, or
transmitted in any form or by any means, whether electronic, mechanical,
photocopying, recording or otherwise without the prior writing of the publisher.
Windows™ 98SE/2000/ME/XP/VISTA are trademarks of Microsoft® Corp. Pentium is
trademark of Intel. All copyright reserved.
The Atlantis Land logo is a registered trademark of Atlantis Land. All other names
mentioned mat be trademarks or registered trademarks of their respective owners.
Subject to change without notice. No liability for technical errors and/or omissions.
Regulatory Information/disclaimers
Installation and use of this Wireless LAN device must be in strict accordance with
the instructions included in the user documentation provided with the product. Any
changes or modifications made to this device that are not expressly approved by the
manufacturer may void the user’s authority to operate the equipment. The
Manufacturer is not responsible for any radio or television interference caused by
unauthorized modification of this device, of the substitution or attachment.
Manufacturer and its authorized resellers or distributors will assume no liability for
any damage or violation of government regulations arising from failing to comply
with these guidelines.
CE Mark Warning
In a domestic environment, this product may cause radio interference, in which case
the user may be required to take adequate measures.
CE/EMC Restriction of Liability
The product described in this handbook was designed, produced and approved
according to the EMC-regulations and is certified to be within EMC limitations.
If the product is used in an uncertified PC, the manufacturer undertakes no
warranty in respect to the EMC limits. The described product in this handbook was
constructed, produced and certified so that the measured values are within EMC
limitations. In practice and under special circumstances, it may be possible, that
the product may be outside of the given limits if it is used in a PC that is not
produced under EMC certification. It is also possible in certain cases and under
special circumstances, which the given EMC peak values will become out of
tolerance. In these cases, the user himself is responsible for compliance with the
EMC limits.
4
Page 5
Declaration of Conformity
Hereby We declare that this product is in compliance with the essential
requirements and other relevant provisions of “Electromagnetic Compatibility”
Directive 2004/108/EC within CE Marking Requirememnt.
CE Declaration is available on the web site www.atlantis-land.com.
procedures of this equipment
The crossed-out wheeled bin symbol printed on the unit label or unit packaging
indicates that this equipment must not be disposed of as unsorted municipal waste
but it should be collected separately.
The waste of electric and electronic equipment must be treated separately, in order
to ensure that hazardous materials contained inside the equipment are not buried
thereby providing potential future problems for the environment and human health.
Moreover, it will be possible to reuse and recycle some parts of the waste of electric
and electronic equipment, contributing to reduce the quantities of waste to be
disposed of and the depletion of natural resources.
As user of this equipment, you are responsible to return this waste of electronic
equipment to an authorised collection facility set up by your Municipality. More
detailed information on your nearest collection centre can be obtained from your
Municipality or from other competent local entities.
If you are replacing the old equipment with a new equivalent product, the
distributor must take-back the old equipment free of charge on a one-to one basis
as long as the equipment is of equivalent type and fulfilled the same functions as
the supplied equipment.
Your rôle in participating to the separate collection of waste of electric and
electronic equipment is essential to ensure that environmental protection and
human health objectives connected to a responsible treatment and recycling
activities are achieved.
PS.: The above mentioned information are reported herewith in compliance with Directive
2002/96/CE, which requires a separate collection system and specific treatment and disposal
procedures for the waste of electric and electronic equipments (WEEE). For further and more
detailed information, we invite you to visit our website at www.atlantis-land.com.
Important information for the correct recycle/treatment
5
Page 6
Atlantis Land suggest to vistit the web site www.atlantis-
land.com in order to retrieve update manual, techsheet and
driver.
Before starting, take a few minutes to read this manual.
Read all of instructions and save this manual for later
reference.
Limited Warranty
Our warranties (for hardware and software) do not cover data loss – back up the
contents of your drive to a separate storage medium on a regular basis. Also,
consequential damages; incidental damages; and costs related to data recovery,
removal and installation are not recoverable under our warranties.
Safety Information
Only qualified personnel should carry out technical work on the device.
When cleaning, avoid using cleaning sprays and any kinf of solution containing
alcohol or other flammable liquids.
Avoid overheating. This may reduce the life of the device.
Protect your device from humidity, direct sunlight as well as high and
extremely low temperatures.
Do no place any liquids on or close to the unit.
If the device is brought from a cold environment into a warmer installation
site, bedewing may occur. Wait until the temperature of the device has
equalised and it is completely dry before you connect to AC main.
As this device contains Hard Disk, particular care must be taken to ensure that
is not exposed to vibrations during operation.
Please use the supplied AC/DC Adapter included into g-box. If it is connected
to other devices, this product or power supply unit may be damaged.
We recommend that you place the device on a non-slip surface.
Please note that the rubber/plastic feet on the devices may damage the
surface.
Check the cable regularly for damage. Damaged cables must be replaced
immediately.
Ensure that no objects enter the connection sockets.
6
Page 7

7
Page 8

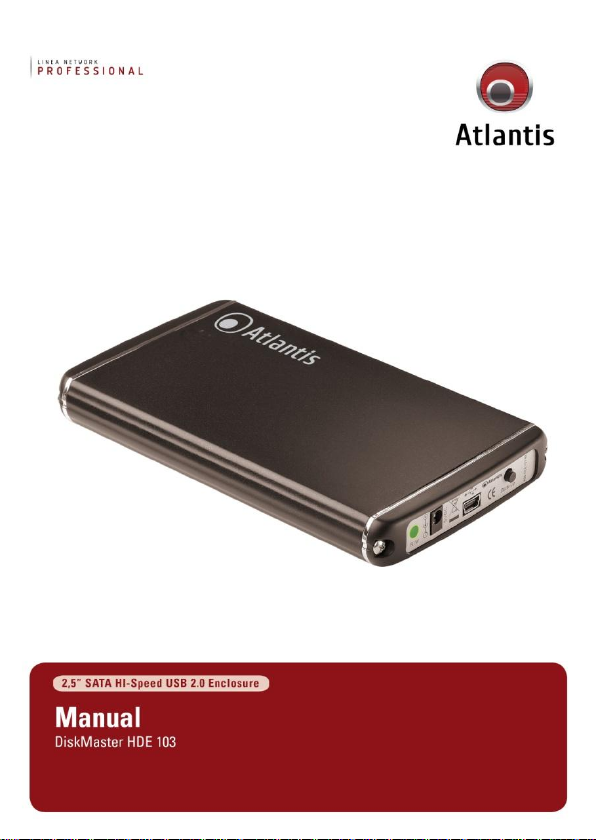
Thank you for purchasing our 2.5” Smart Backup Disk enclosure.
1. Introduction
This guide contains information regarding the product features and the procedures
of installation for this device. Please read this guide thoroughly before you begin its
installation and operation and retain it for future references.
The Smart Backup Disk is a standalone and portable storage enclosure. It allows
you to install a high-speed 2.5” SATA hard drive by DIY and implements a high
performance backup storage device. The Smart Backup provides a friendly one
touch backup button. Users can then regularly synchronize the data from PC’s hard
disk to the Smart Backup drive as a specified location by pressing a backup button.
1.1 Product features:
High performance, USB 2.0 interface
Compliant with USB mass storage class bulk-only transport specification.
SATA 1.0 and SATA II compliant.
Up to 60MB/sec data transfer rate.
Ideal for 2.5” high speed SATA hard drive application
One button data backup
Plug & Play and hot swappable
Perfect for regular or daily backup user.
1.2 System Requirements
PC or Macintosh with a free USB 2.0 connector
Windows2000、Windows XP、WindowsVista or 7.
MacOS 9.x, 10.0.X
SATA 2.5” HDD
The Smart Backup Disk can work at both USB 1.1 and USB 2.0 port, but to achieve
a hi-speed transfer rate, you must connect to an USB 2.0 host port.
8
Page 9

2. Package contents
Please check that the following items are included in the package. If any
the listed items are missing or damaged, please return imediately the
whole package to your local dealer.
Smart Backup Disk enclosure (without hard drive)
USB “Y” cable
Button manager utility disc with manual
Screwdriver
9
Page 10
Before using the 2.5”Smart Backup Disk Enclosure
Electrostatic discharge can damage electronic components.
Be sure you are properly grounded before the beginning of
any procedure.You can touch the metal parts of a
computer’s chassis or power supply unit to discharge any
static charge that may have accumulated inside your body.
To avoid damage to your hard drive, please handle with
much care. Do not shake or drop your hard drive.
All electronic components have a limited lifetime. Electronic
components may be damage by a sudden electrostatic
shock or personal misuse or negligence. Please always
double backup your data in other media formats such as
CD-R or DVD-R to ensure your own data protection.
3. Getting Started
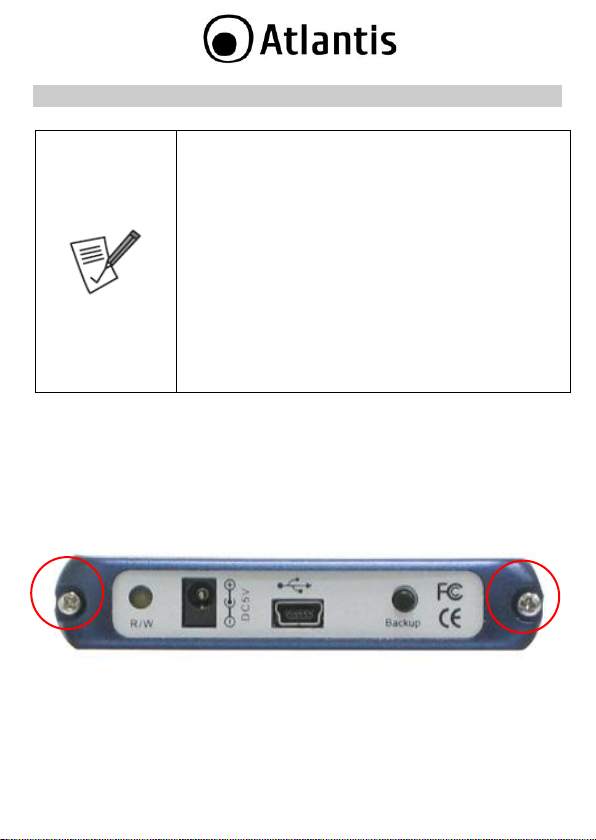
3.1 Install 2.5 inch SATA hard drive to Smart Backup Disk
Remove the screws of the end cover and then open the aluminum
housing.
10
Page 11
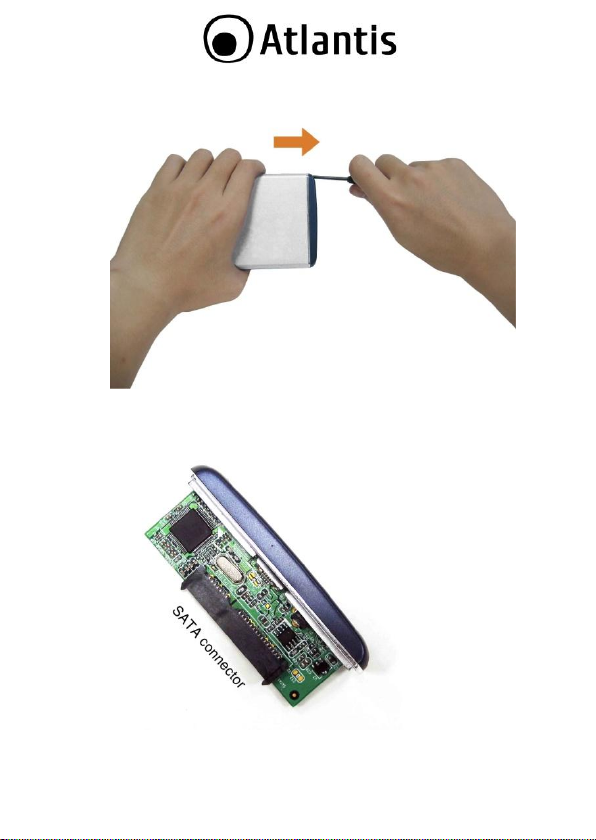
Take out the plastic cover and circuit board.
11
Page 12
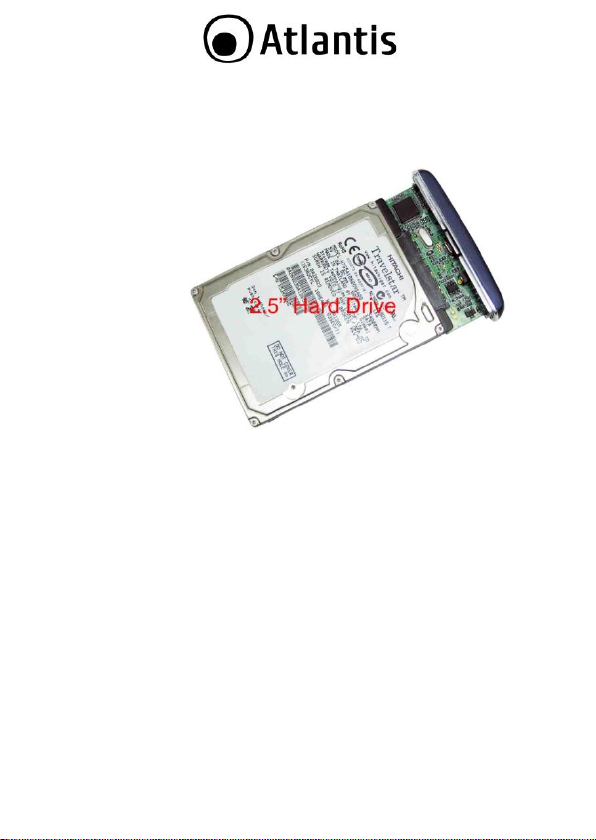
Connect your 2.5” SATA hard drive to the SATA connector on the circuit
Board.
Place the hard drive back to the aluminum housing
1. Slide the hard drive carefully into the bottom of aluminum
housing.
2. The hard drive should be placed in accordance with the
picture below.
3. Close the cover by applying the previously removed screws.
4. Please handle with much care. Make sure that the SATA hard
drive does not become detached in the process.
12
Page 13

Connect the Smart Backup Disk to your computer via the USB “Y” cable .
Connect both USB “A” plugs to your computer’s USB host ports and at
the other end connect to the Smart Backup Disk’s mini USB port.
13
Page 14

4. Finding Smart Backup Disk in Windows and Mac OS
Questo prodotto non necessita di driver per i sistemi operativi Windows2000,
WindowsXP、Windows Vista/7 e Mac OS.X. E’ sufficiente solo collegarlo al PC con
l’apposito cavo. Il sistema installerà automaticamente il software necessario all’
utilizzo del disco esterno, sarà quindi possibile visualizzarlo come una normale
risorsa del sistema.
This DiskMaster is driver-free for Windows2000,WindowsXP,Windows Vista/7
and Mac OS.X, you do not have to install any driver, just connect the DiskMaster to
your PC’s USB2.0 port via an USB Y-cable. Windows will detect your DiskMaster
hard drive automatically and find a new “Removable Disk” or “Local Disk” icon in
“My Computer” windows. A "Removable Device" icon on the Windows status bar will
be shown.
14
Page 15

15
Page 16
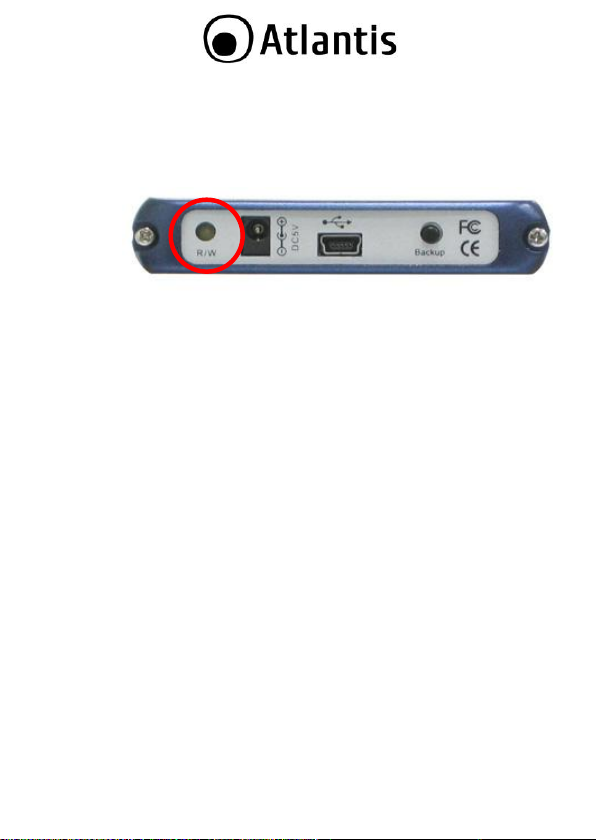
4.1 LED
There is a status LED on the DiskMaster for diagnosis, it lights green when this
device detected by the system and flash orange if the data is being transmitted
between PC and DiskMaster.
16
Page 17
4.2 Safely Removing your Smart Backup Disk
It’s recommended to disable the "Removable Device" icon on the status bar before
unplugging the DiskMaster.
In Macintosh®, you can use “Eject” command to eject this storage device for safe
remove.
17
Page 18

5. Backup Software
5.1 Button Manager Utility Installation
The DiskMaster provides a special backup button for file copy function. It provides
an easy way to make a backup task just by touch of a button. Firstly, install the
button-manager backup utility software that comes with the bundle disc. Please
follow the below steps to complete the Button Manager Utility installation:
NOTE: The utility program is only supported on Windows 2000 and Windows
XP/Vista platforms
Insert the CD-ROM and the Auto-run program will appear (alternatively,
open a file browser and double click on the start.htm file located in the
CD directory). If you need to install the utility manually, refer to the
following CD-Rom directory path: A06-HDE103\Software
18
Page 19
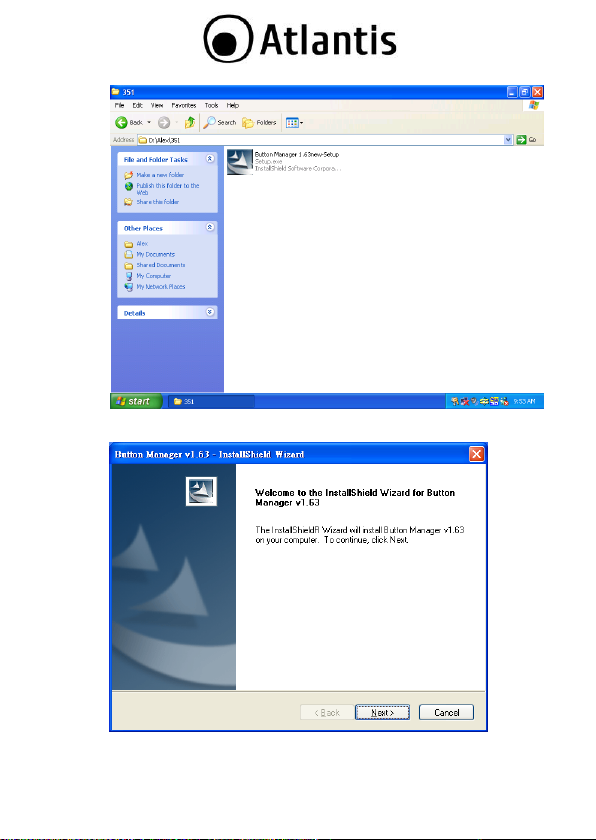
Click the “Next” button.
19
Page 20
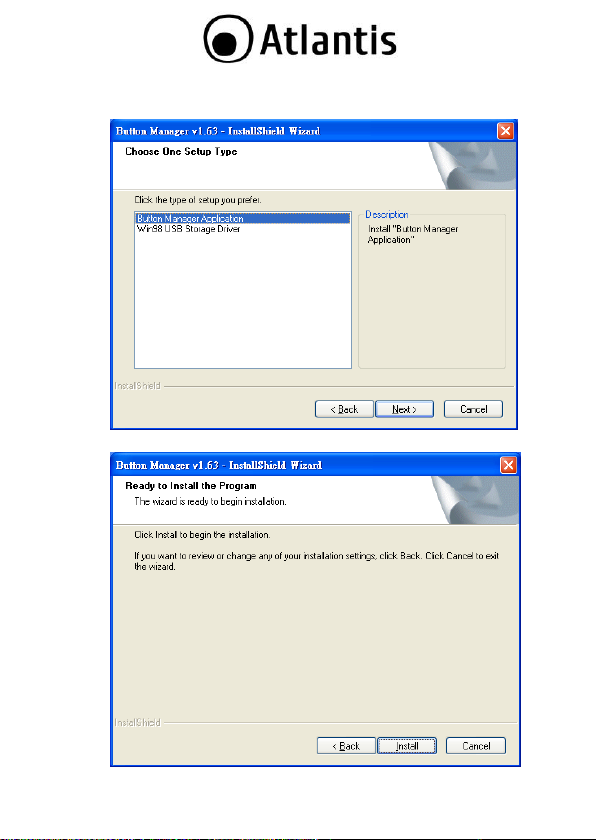
Choose the “Button Manager Application” and click “Next” to
continue.
Click “Install” button to begin the installation.
20
Page 21
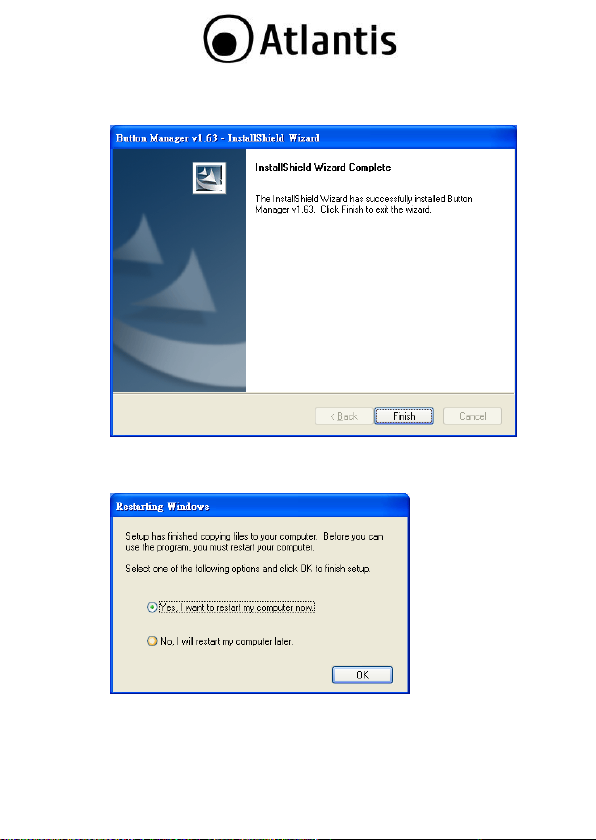
Click “Finish” button to exit the software installation.
Choose “Yes, I want to restart my computer now” and click “OK”
button to restart your computer.
21
Page 22
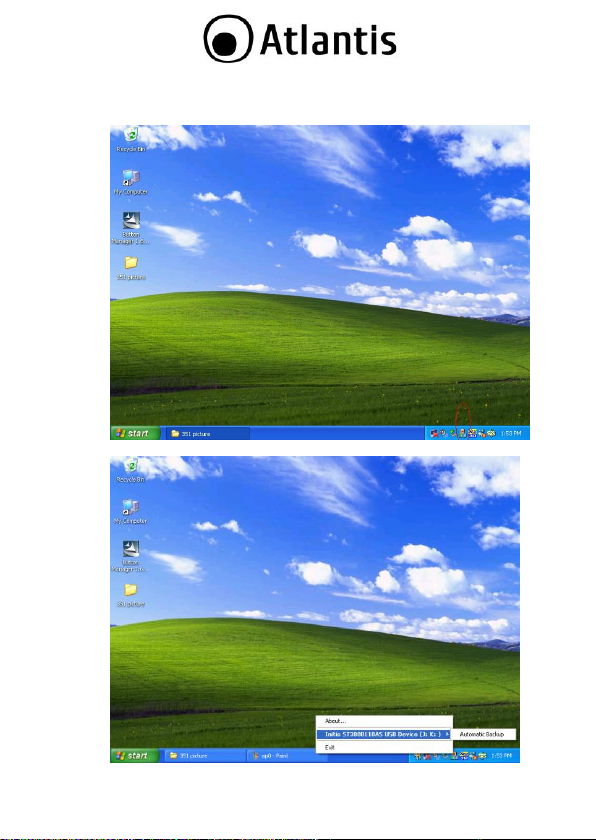
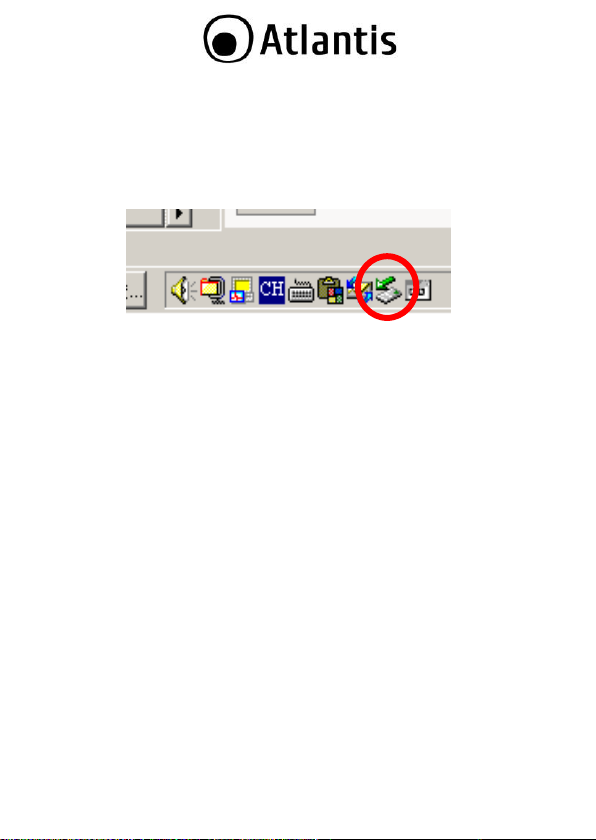
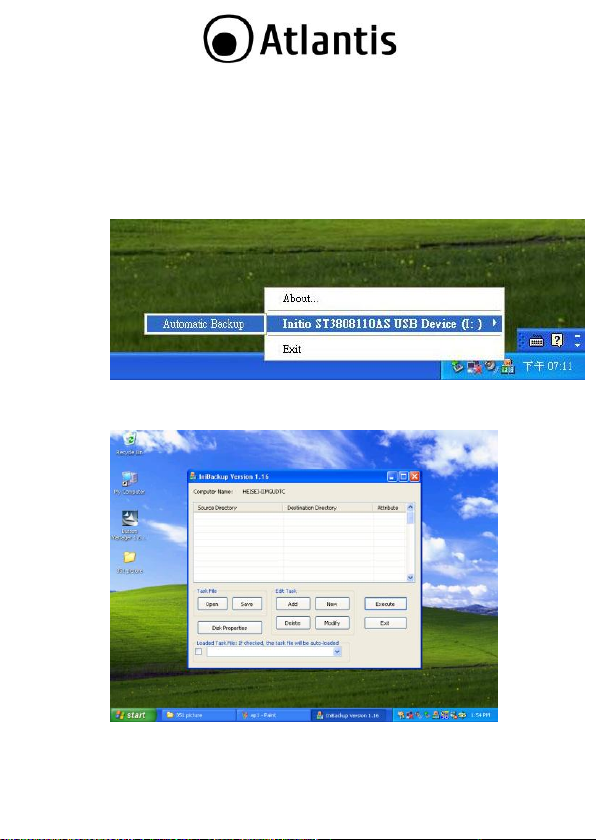
After restarting your computer, the user will find an icon on the status
bar of the windows on the bottom right.
Click on the icon and choose “Automatic Backup”.
22
Page 23

After clicking on the “Automatic Backup”, a backup task window will
pop out for the user to configure the path setting.
5.2 Button Manager Utility Description
When you begin using this Button Manager Utility, you will need to read the
following sections of the “user interface description” and “Adding a new task” to
know how to create a new backup task file that will do what you regularly need.
23
Page 24
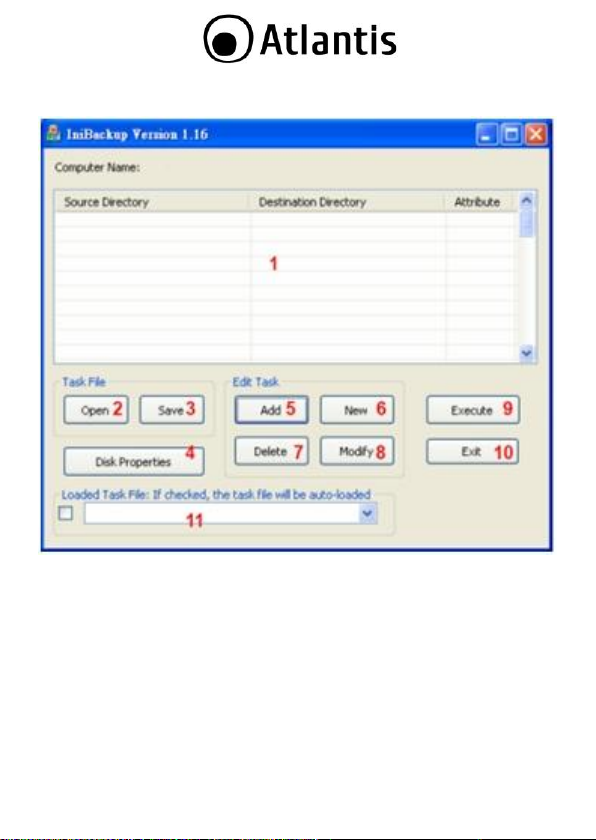
5.3 User Interface Description:
TASK LIST(1): The task window shows all arranged tasks, each task
will comprises of source directory, destination directory and attribute.
OPEN(2): Open a previous preset backup task file.
SAVE(3): Save current task list to a backup task file (as *.iniBackup
file).
Disk Properties(4): Display your host system’s current disk drives
information.
ADD(5): To add a new task in list.
NEW(6): Create a new backup task file.
DELETE(7): Deletes the chosen task.
MODIFY(8): Modifies the chosen task.
EXECUTE(9): Executes the current task list.
EXIT(10): close the task window.
24
Page 25
DISPLAY PATH OF EXECUTING TASK(11): If checked, the preset
task will be automatically loaded by backup button; otherwise the button
function will be disabled.
5.4 Adding a New Task
Click “Automatic Backup” from the status bar icon.
When the task window pops out, click “Add” button to add a new
backup task.
”. Set your daily backup tasks in the “Source Directory” and
“Destination Directory” columns by clicking the browse button and
check the necessary “Attributes” and “Task Direction”.
25
Page 26

o Source Directory: assign Source Directory location.
o Destination Directory: assign backup Destination Directory
location.
Complete the configuration of your presetting backup path then click
“OK” button to continue.
26
Page 27

The current task window will pop out again, you can add another task or
click “Save” button to save the presetting path as a *.ini Backup file.
Press “Exit” button to finish the backup task setting.
27
Page 28

Now, when you press the “Backup Button” on Smart Backup Disk, the
Button Manager utility will do the backup task as previously configured
automatically.
28
Page 29

5.5 Modify or Delete Button Backup Task
Click “Automatic Backup” from the status bar icon.
The current task list window that was previous saved will be shown.
o Select your want to modify or delete task list.
o Press “Modify” or “Delete” button to do change.
o After change your task then press “Save” and “Exit”.
29
Page 30

6. How to use an auxiliary power cord or power adapter
SATA hard drives can be high power consumption storage devices. To operate the
SATA hard drive successfully, you need to connect dual USB ports to get more
power supply from another USB port by an USB Y-cable.
If notebook user can not drive this DiskMaster, you may need use it by an external
AC power adapter. Please refer following description of power supply issue.
6.1 Using extra auxiliary power cord of USB “Y” cable
The USB auxiliary power cord is thinner than a regular USB cable. The picture
showing below is connecting an extra auxiliary power cord to another USB port to
direct more power into the hard drive. The main connector (left) must be connected
for the device to work. Both connectors need to be connected to ensure that the
device runs stably.
30
Page 31

Output Voltage/Current: DC 5V/1.5A
Plug dimension:
a. Inner hole: 1.3mm
b. Outer: 3.5mm
c. Plug length: 6.5-7.5 mm
6.2 Using external AC switching power adapter
The DiskMaster provides a DC jack for notebook user connects an external AC
power adapter. Using an external power adapter can bring enough power for the
SATA hard drive to run stably. You can refer to the following specification to
purchase a suiting power adapter from your dealer.
31
Page 32
Steps
Action
1
Make sure that both USB plugs are properly connected to your host
USB ports. Do not only connect the auxiliary USB plug.
2
Make sure that your host USB port is working properly. If you are
unsure, please try another USB port.
3
If the error persists, you may have a hardware problem. In this
case, you should contact your vendor.
Steps
Action
1
You may be connected to an USB 1.1 low speed port. Please make
sure that you have connected to a high speed USB2.0 host port. The
DiskMaster can work at both USB 1.1 and USB 2.0 ports. However,
to achieve a hi-speed transfer rate, we recommend you to connect
the DiskMaster to an USB2.0 port.
2
If the error persists, you may have a hardware problem. In this
case, you should contact your vendor.
Steps
Action
1
Please make sure that you have installed the backup utility
software. If the software has been successfully installed, it will show
an automatic backup icon in the status bar when windows is
booting.
2
Please make sure that you have configured a copying path in the
button manager utility and specify a suitable backup task and saved
it to a backup file. See “Button Manager Utility Description” section
for more detailed information.
3
You may have closed the button manager utility under windows.
4
The Button Manager Utility only works on Windows 2000 and XP
platforms.
5
If the error persists, you may have a hardware problem. In this
case, you should contact your vendor.
7. Troubleshooting
This chapter covers some basic things you can do in the event that you encounter
problems using this DiskMaster on your system.
Why does the computer not recognize the Smart Backup Disk?
Why is the data transfer rate between the computer and the device
slowing down?
Why does the backup button not work?
32
Page 33

Steps
Action
1
This could be because not enough power is being supplied to your
hard drive. Please make sure that you have connected both A-plugs
of the USB “Y” cable to direct more power supply. See the “How to
use an auxiliary power cord or power adapter” chapter for more
detailed information.
2
If your DiskMaster is connected to a notebook or via a bus hub
(without external powered), you need to connect an external power
adapter to solve the power issue.
3
If the error persists, you may have a hardware problem. In this
case, you should contact your vendor.
Why does the hard disk in the DiskMaster make continuous noises while
the computer can not recognize the DiskMaster?
33
Page 34

8. Support
For technical questions and support, please contact our help-desk by ticket on
http://www.atlantis-land.com/ita/supporto.php.
For generic informations, please send an e-mail to info@atlantis-land.com.
For presales informations, please send an e-mail to prevendite@atlantis-land.com.
Atlantis
Via S. Antonio, 8/10
20020 Lainate (MI)
Fax: +39.02.78.62.64.39
Website: http://www.atlantis-land.com
Email: info@atlantis-land.com
34
Page 35
Technical Specs
Code
A06-HDE103
HDD
Enclosure
• Interface: USB 2.0 specification and backward compatible with
USB 1.1
• HDD Support: 2,5 inch SATA hard drives up to 750 GB
• HDD Interface: SATA II 3 Gbps
• Data Transfer Rate: Up to 60MB/sec
• Indicators: Green activity LED
• Power source: USB Bus powered
• Self- Powered Jack: Supported
• Housing: Aluminum housing with plastic panel
OS Support
• Windows® 2000 /XP/VISTA/7
• Macintosh®: Mac 8.6, 9.X, 10.X or higher (no backup function)
• Linux: Kernel 2.4.x or higher (no backup function)
System
requirements
• Pentium® II processor or higher
• 64 MB of memory
• USB V2.0 or V1.1
• CDRom Reader
Certifications
CE (Europe)
Dimensions
(mm)
80mm x 15mm x 138mm (W*H*D)
Temperature
Range
Operation: 0°C ~ 35°C
Storage: -10°C ~ 60°C
Humidity
10% ~ 75% (non Condensing)
Package
contents
• 2,5 inch backup Mobile Disk enclosure
• USB cable
• PDA wallet
• Screwdriver tool
APPENDIX A: Technical Specs
Mac OS X is a trademark of Apple Inc.
All rights registered
Microsoft and Windows are registered trademarks of Microsoft Corporation
All trade names and marks are registered trademarks of respective companies
Specifications are subjected to change without prior notice. No liability for technical
errors and/or omissions
35
Page 36

Performance and Throughput are influenced by many factors (interference, noise,
environments)
36
Page 37

Atlantis SpA
Via S. Antonio, 8/10
20020 Lainate (MI)
info@atlantis-land.com
 Loading...