

Page 1
User Manual
for
AUW-525C • AUW-555 • AUW-701 • AUW-5600
Page 2

Introduction
Thank you for your purchase of the Atlantis Underwater Camera
System. The Atlantis™, a high-resolution video camera and monitor system, offers multi-purpose applications in aquatic environments.
The Atlantis™ may be used for: sport fishing, search and rescue,
treasure hunting, marine research or for recreational viewing of
underwater activities. The Atlantis™, assisted by lighting, will help
you see elusive underwater objects and find what you desire in
any body of water.
You can search http://www.atlantiscamera.com for all your underwater camera needs: support, accessories, orders, information,
testimonials, and tips on our Atlantis Cameras.
STOP
1. Make sure not to reverse the polarity. It may cause permanent damage to
both monitor and camera. The red power cable and black ground cable should
connect to red and black terminal of battery respectively.
2. Please make sure to turn off the monitor and disconnect power cable from
the battery after use. Also, wipe off any moisture at both terminals on the battery
to prevent from corrosion. This will ensure a clean contact between cables and
terminals for future use.
3. Please remember to recharge the battery after each use until the red light
comes on. You need to leave battery connected to the charger overnight. Keep
battery away from the reach of children.
4. In clear water you should be able to view most objects in regular daylight.
However, as your camera goes deeper underwater, there will be less light available and the camera’s light sources will be needed to view objects clearly.
In some conditions of highly dirty or milky water, it may be impossible to view
any object clearly, even with lighting. This is simply because there are too many
obstructions in the camera’s sight, and is not a malfunction of the camera.
1
Page 3
Features
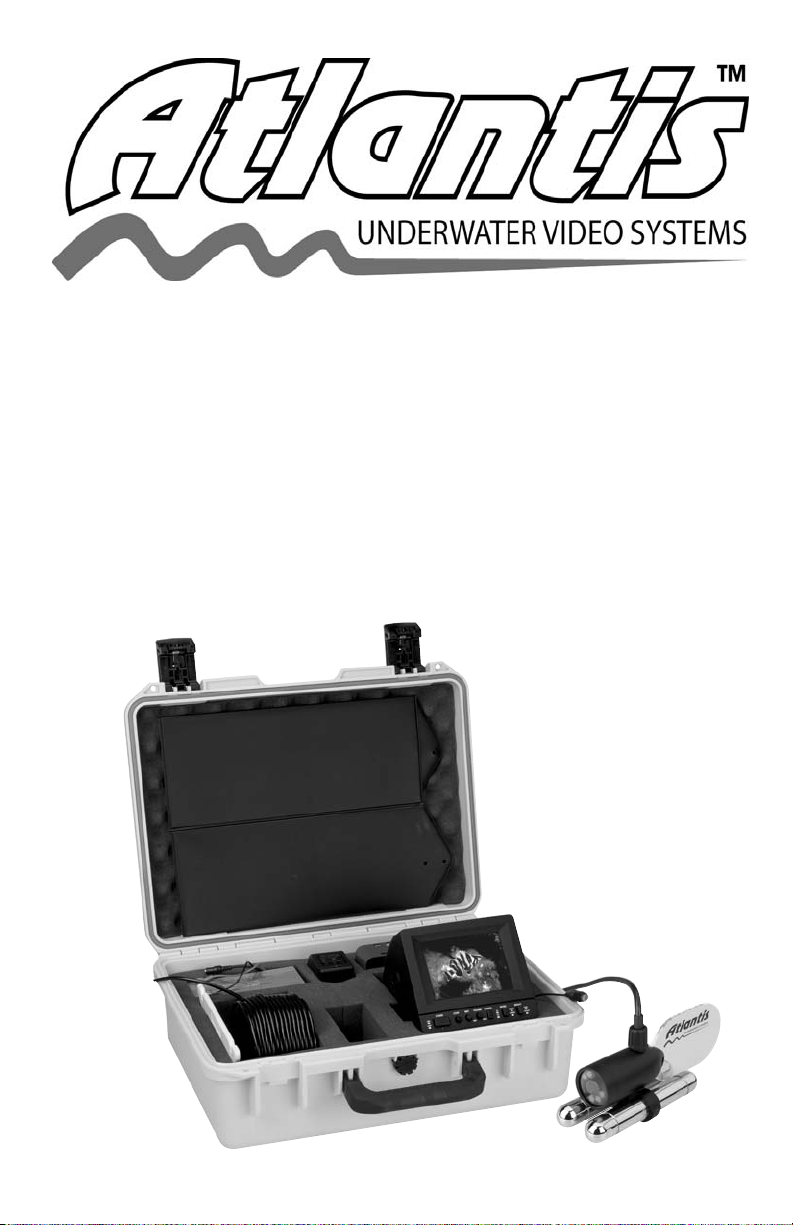
Camera: The Atlantis comes with a high-resolution camera
with a 92 degree viewing angle. The camera is housed in
molded iron casting (aluminum for AUW-555), protecting it
from water pressure and strikes from rocks or hard objects
underwater. The camera also has attachable weights to
stabilize and set the angle at which you want to view the
water. You can attach a fin to the camera to allow it to point
in the direction of the boat. Our cables, up to 200’, are made of steel mesh and
are durable in the water. The camera also is equipped with powerful infrared
and colored LED lights that allow the camera to see in dark areas.
een Screen Monitor: This monitor has special green
Gr
phosphorous tubes that allow the monitor to be viewed with
significantly less glare than traditional black and white moni-
tors. The technology is used to provide the best viewing
ability in sunny conditions. We also conduct a G-5 force
vibration test on all monitors in the factory to ensure its sta-
bility. The monitor also allows connections for up to two
cameras, and has an RCA video out for recording to a VCR or camcorder. You
will also see a small square in the back of the monitor that is a mirror image
switch. This monitor is designed to allow water to run off with a special coating
we apply to the monitor. However, it is not waterproof because the monitors
need vents to allow condensation to be released. In warm weather, if the monitor were sealed, the condensation would short-circuit the monitors, making it
irreparable. Don’t let the monitor sit in water; use the mounting bracket or the
case to protect it.
gh Impact carrying case: The Panning Atlantis Camera
Hi
is packaged in a water and air tight high impact resistant
case. Two springs loaded buttons lock the case, simply
push in the button and lift the lock down tabs to open. We
have dye cut foam inside the case to keep the components
from moving around in transportation. The case also has
slots for locks, and in the event that you drop the unit in the
water, the case will float. This case provides maximum protection for your
investment and it is recommended to only use this case when using your
Atlantis™ system.
2
Page 4

Table of Contents
Introduction / Precautions…………………………………..
Features…………………………………..…..…..…..
Setting Up / Using Atlantis
List of components………………………………….
Charging battery…………………………….............
Preparing for action………………………………....
Additional Functions
Recording…………………………………………...
Replacing or changing fin…………………………..
Adjusting viewing angle …………………………...
Mounting the monitor………………………………………
Panning Camera
Features……………………………………..............
Operating the camera……………………………….
Color Camera
Features……………………………………….........
Parts………………………………………………...
Connection Diagram………………………………..
01
02
04
05
05
07
07
07
08
08
09
09
10
11
FAQ………………………………………………………...
Troubleshooting…………………………………………….
Care & Maintenance………………………………………..
Warranty……………………………………………………
Specifications................................................................
3
12
14
15
15
17
Page 5

1.Setting Up/Using Atlantis™
List of components
Make sure all parts and accessories are included.
___ 1. (1) 5.5” Green tube monitor
(7” Monitor for AUW-701
Color Monitor for AUW-5600)
___ 2. (1) Camera with 125’ cable
(200’ for AUW-701
Color Camera for AUW-5600
Panning Camera for AUW-555)
___ 3. (1) Battery, power cord with fuse
___ 4. (1) Battery charger
___ 5. (1) Boat mounting kit
___ 6. (1) Cigarette Adapter
___ 7. (1) Cable winder
___ 8. (1) Sunshade
___ 9. (1) Carrying case
9
8
5
6
4
3
7
2
4
1
Page 6
Charging the Battery
1. Battery must be charged after each use
and it is recommended that you charge your
battery before you use it the first time.
2. Connect alligator clip to battery
Red: Power source link to red (+) terminal on the battery
Black: Ground link to black (-) terminal on the battery
3. Plug power adapter into 110V AC outlet.
4. Battery and Charger: We use the Rocket 12 volt Gel Cell batteries with our
units which are known for their quality. Our battery charger has a red light indicator on it. When the battery is charging, there will be no light. When the battery is finished charging, the red light will turn on.
5. Unplug the adapter then remove alligator clips from battery.
Preparing for Action
1. Lift the monitor from the case.
2. Connect the battery to the wire according to the corresponding colors. You
can also use the cigarette adapter to plug into your boat’s cigarette lighter and
connect it to the monitor for power.
3. Connect the wire to the back of the monitor on the right.
4. Connect the camera cable to the back of the monitor in slot C1.
5. Turn on the power to the monitor.
6. Pull out the camera from the case and peel off the lens protector. (Blue vinyl)
* Now you should be able to see an image on the monitor. If there is a problem,
refer to the troubleshooting section of this manual.
Monitor AUM-701
5
Page 7

7. Adjust the contrast to highest position and adjust brightness using the controls on the monitor. Place the shade over the monitor for clearer viewing during the daytime.
8. Locate the black three-way switch. Turn it to 0 for regular viewing, I for
infrared lights, and II for colored lights.
O
In clear water you should be able to view most objects in regular daylight.
However as your camera goes deeper underwater, there will be less light available and the camera’s light sources will be needed to view the objects more
clearly.
In some conditions of highly dirty or milky water, it may be impossible to view
any object clearly, even with lighting. This is simply because there are too
many obstructions in the camera’s sight, not because of a malfunction of the
camera.
The camera comes with 11 light emitting diodes (LED). On the sides of the lens
there are six infrared LEDs, which are light pink when turned on. Above and
below the lens are 5 colored LEDs, two green on top and three red on the bottom.
There are different uses for these two light sources. Infrared lights are less likely to scare away fish or other organisms underwater. Colored lights can penetrate milky or dirty water giving a clearer picture. You should adjust the light
depending on the conditions.
9. You may now begin to submerge the camera into the water for viewing.
10. Use the cable winder to wrap up the rest of the cable.
III
ote: If you take your time and wrap the cord up tight and
N
uniform, it will be easier to work with and fit back in the
case easily. The best way to wind the cord on is to leave
about 2 feet of the connection end loose and wrap the
cord on as tight as you can. Wrap the cord back and forth
6
Page 8

keeping the layers close and tight together. This will make it easier to put away
and keep from fighting the cord every time you use the camera. By leaving
about 2 feet on the connection end loose you will be able to move the monitor
easily and set it to your best viewing angle. You can also use the notches on
the line winder to lock the cable in place.
Additional Functions
Recording
1. Connect the other end of the RCA cable to the VIDEO IN on the back of the
VCR or camcorder, which will probably be yellow or white, depending on the
model. Start recording the image, using your VCR’s or camcorder’s controls.
* The green screen monitor will record in black and white, not in green.
RCA OUTPUT
Replacing or Changing Fin
1. Remove the fin from the camera.
2. Attach the regular fin or reverse fin as picture below.
*Phillips screwdriver needed.
Adjusting Viewing Angle (vertical)
1. Loosen screws as shown.
2. Adjust the weights. When the weights are at 1, the camera will point
upwards. When the weights are at 2, the camera will point straight. When the
weights are at 3, the camera will point downward.
7
Page 9

Mounting the Monitor
1. Locate the proper position to place the monitor. Usually it is best to place
the monitor where the system is set up away from the motor to prevent damage
to the camera.
2. Place the mount with the base down, and screw it in place.
3. Use the mounting screws to hold the monitor in place. You can also connect
the sunshade to the mounting bracket.
*It is generally recommended to leave the monitor inside the case tilted upwards
when viewing instead of mounting the monitor because the case can be used to
protect the monitor from water and damage.
Atlantis™ Underwater Panning Camera
The Panning Atlantis™ Camera can see the complete surroundings of an
underwater environment. The camera has a rust proof aluminum design. The
working parts are self-contained in the dome, while the camera itself rotates 310
degrees inside. There is no cable turning which prevents the cable from
becoming damaged from stress. The camera has the same infrared and colored lights as the traditional Atlantis™ systems.
Features
A. Panning Atlantis™ Camera
The Panning Atlantis™ Camera is designed to view 360
degrees. This camera has an electronic compass control
and a remote control wired into the camera connection. The
electronic compass control is set on the top of the monitor
and the remote control is used to control the camera. The
camera is dome shaped with a clear hardened special plastic window, which allows the camera to see through.
B. Panning Remote Control Buttons
1. Left direction
2. Right direction and camera speed
3. Auto / Manual
4. LED Light Control
8
Page 10

Operating the camera
1. Attach the remote control and
electronic compass control securely
to the cables. The yellow end connects to the remote control while the
larger output connects to the elec-
tronic compass control.
2. Connect the cables to the monitor in C1.
3. Place the electronic compass on top of the screen or
nearby pointing away from the viewer.
4. Connect the battery with the corresponding colored wires.
5. Connect the wire to the monitor.
6. Turn on the monitor and make the proper adjustments.
7. Put the camera in the water.
8. To start the camera in Panning
mode push the Auto / Manual on the
remote control. This will start the camera Panning. The
camera will circle around to the left to a 310 degrees
setting and will automatically pan back to the right. To
stop the camera hit the Auto/Manual again. To turn back
to the left hit the left arrow, to turn to the right hit the
right arrow. There are three speeds, which will show on
the bottom right corner of the monitor, showing one, two,
or three arrows according to the speed. There is also an indicator on the monitor that shows where the camera is pointing. When the circle is in the top position the camera is facing forwards.
9. You can also connect the camera to a tripod, to lay the camera down on the
surface. Screw the tripod on the camera and extend the legs out and place the
camera in the water.
The remote control has a LED on/off button for the camera lighting. The camera lights cycle through colored lights, off, and
infrared. Adjust the lighting to best view with the water conditions the camera is in.
Atlantis™ Color Camera
Features
The camera features the latest technology that provides
380 TV lines of resolution and has 6 high power LEDs.
The camera is fully waterproof in a rugged die-cast
housing and has a wide-angle lens for maximum coverage.
9
Page 11

Atlantis™ LCD Color Monitor
The compact and lightweight 5.6" monitor is designed for
energy saving. the package comes with 7.5A rechargeable battery that will last up to 5 hours. The monitor can
watch 2 different sites at the same time using an additional camera.
Parts
1. Camera body
2. White LED
3. Lens
4. Screw cap (Never loosen)
5. Washer
6. Fin
7. Weight
8. Weight adjustment screw
9. Cable
10. Camera plug
11. White LED switch
12. Monitor power
13. Color adjust down
14. Color adjust up
15. Brightness down
16. Brightness up
17. Mirror image switcher on the backside
18. Audio out
19. A/V
20. LCD
21. Bracket adapter
22. Monitor plug
23. Power switcher
24. Camera switcher
25. Camera1 input
26. Camera2 input
27. Video out
28. - To battery
29 + To battery
30. To regular power adapter
31. Monitor output
32. + On battery
33. - On battery
34. + From charger
35. - From charger
10
Page 12

Connection Diagram
11
Page 13

FAQ
How far can I see?
Naturally, the clearer the water, the farther you can see. As a general rule, the
camera has twice the range of what is visible. If you can see 3 feet down, you
will be able to see approximately 6 feet in front of the camera. However, different bodies of water will vary. For anglers studying bottom structure, 2 feet of visibility is sufficient for underwater viewing.
When do I use the Multi-Color lights?
The Multi-Color lights in your AUW-525C camera are designed for use in lowlight situations. Turn the power switch to the "ON/LIGHT" position for maximum
visibility in low light. The Multi-Color lights will provide a minimum of twice the
visibility of traditional infrared lights.
How do I steer the camera?
For viewing in the direction of travel use the Front-viewing Fin. Slowly troll (less
than 2 Knots) or drift along the structure you intend to view. With the Front-viewing Fin, the camera will face the boat’s direction of travel. The opposite holds
true when using the Back-viewing Fin, which positions the camera for viewing in
the direction opposite from the boat’s travel. (The Back-viewing Fin (F-200), not
included with the unit, is available from dealers or online at www.atlantiscamera.com).
Is there a more stable way to move the camera?
Yes, there is a pole adapter available for the Atlantis™ camera. Connect the
pole on to the adapter. Then place the camera into the rack and tighten. Adjust
the pole angle accordingly and place into the water. (The telescopic pole
adapter (AP-20), not included with the unit, is available from dealers or online at
www.atlantiscamera.com).
Can I splice the camera cable to obtain more length?
No. Attempting to splice in additional cable violates the waterproof integrity of
the camera and cable, voiding the warranty.
Can I attach my camera to a downrigger?
Yes, by using the reverse fin accessory. You can attach your camera to your
down rigger cable at any depth, allowing you to watch your lure given adequate
water clarity.
Can I use my camera in saltwater?
Yes. All Atlantis underwater cameras are saltwater-rated, using stainless steel
hardware and materials that are impervious to corrosion.
How fast can I troll with my camera?
It depends on depth and on the length of cable you have out, which determines
water resistance or “drag." The deeper you go, with more cable out, the more
12
Page 14

drag there will be, requiring slower travel for good viewing. Generally, for best
viewing, we recommend going less than 2 Knots. Remember, the slower you
go, the more detail you will see.
Will my Atlantis™ camera work in subfreezing conditions?
Atlantis™ systems are designed to operate at temperatures ranging from -40°F
to 120°F. Expect your battery life to decrease in cold conditions.
What is the viewing angle of the camera?
Your camera lens has a viewing angle of 92 degrees. At 4-1/2 feet in front of the
camera you will be viewing an image approximately 6 feet wide.
What is the resolution of my monitor screen?
The green screen monitors have 600 lines of resolution and the Color LCD has
380 lines of resolution for crystal-clear viewing.
Can I connect my Atlantis™ to a larger monitor or to a hand-held
recorder?
Yes. For use in a permanent fish house or in a large boat with a built-in video
system, your Atlantis can be hooked up to a larger external TV, provided it has a
"VIDEO-IN” jack. The same holds true for a handheld video recorder. See the
"Video Recording with the Atlantis" section of this manual for more details.
Is the Atlantis™ underwater camera legal?
To our knowledge, there are no restrictions anywhere that regulate the use of
Atlantis underwater viewing systems. Atlantis™ is an approved pre-fishing tool
for B.A.S.S. and for P.W.T. events, and for other tournament trails across the
country.
What is the advantage of having a monitor with a green screen?
The military green screen will help users see the image on the screen with
greater clarity than when viewing it in daylight compared to a regular black and
white screen.
Can I troll with the Atlantis™ Panning Camera?
A trolling fin will be available in the future for this unit that will allow users to troll
with it.
13
Page 15

Troubleshooting
NOTHING HAPPENS (SCREEN FAILS TO LIGHT UP) WHEN THE SWITCH
IS IN EITHER THE ON OR ON/LIGHT POSITION.
• Battery not connected. Properly connect the battery: red-to-red, black-to-black.
• Battery not charged.
• Fuse may be blown.
• The AUW-5600 uses a switch box. The switch box may be defective. Switch
boxes are available to purchase from JJC, Inc. for $14.99 plus shipping. If the
switch box is functional, the monitor may be faulty.
THE SCREEN LIGHTS UP, BUT I SEE NO PICTURE.
• Camera cable is disconnected. (Plug the camera cable into the "Camera-In"
jack).
• Camera cable might be damaged. (Consult the "Service” section in this manual.)
• Check the battery. If the battery is fully charged and has enough power for the
whole unit, try switching the camera to a different channel, C1 or C2.
THERE IS A FOGGY PICTURE.
• Check that the lens cover is clean.
• Check for water leaking into the camera.
THE PICTURE FLICKERS OR JUMPS.
• Check that the power cord is securely connected.
SCREWS FOR BALLAST WEIGHTS AND FRONT-VIEWING FIN WON’T GO
THROUGH HOLES IN THE RUBBER CAMERA HOUSING.
• With a screwdriver, screw the bolts through the predrilled holes. (The
holes are a little undersized for firmly gripping the bolts to prevent their
loss.)
I LOWER THE CAMERA TO THE BOTTOM BUT CAN’T SEE ANYTHING.
• The camera may be buried in soft bottom! (Raise the camera
off the bottom.)
• The water might be very murky. Select the ON-LIGHT position on
the AUW-525C switch to activate the Multi-Color lights in your camera
for viewing in low-light conditions.
THERE IS A NICK IN THE CAMERA CABLE.
• See the "Warranty” section of this manual for instructions on How to return the
camera for repair.
THE IMAGE ON MY SCREEN HAS A DARK MARGIN AROUND IT, OR GETS
BLURRY.
• You’re seeing on-screen symptoms of a weakening battery. Charge the battery,
or install a charged battery.
14
Page 16

THE DIRECTIONAL POINTER ON THE MONITOR SCREEN DOES NOT
WORK (DOES NOT SHOW ME DIRECTION).
• Check that the electronic compass control is set on top of the monitor and that
it is properly connected.
• Check to see if the compass is level and pointing the right way (away from the
viewer)
ONLY ONE LINE APPEARS ON THE MONITOR
• Check to see if the battery is charged.
Care and Maintenance
Your Atlantis unit will stay in good condition with proper maintenance.
1. The battery requires regular charging. (See battery charging instructions.)
2. Clean the monitor and camera lens periodically by using mild dish washing
soap, warm water, and a very soft cloth. Do NOT use window cleaner or alcohol-based products, since they may cause permanent fogging.
3. Periodically run your fingers over the entire length of the cable, feeling for
nicks or other cable damage. A damaged cable should be returned to the factory for repair. (See the Service section of this manual.)
4. As a precautionary measure, dry off your monitor after it gets wet from rain or
boat spray.
5. Use the case to protect the unit when not in use.
6. Protect the monitor from liquids, as it is not entirely waterproof.
7. Make sure whenever you submerge the camera that the top of the camera
that the top of the camera connected to the steel mesh wire is tightly screwed.
When the camera is trolled quickly, this will loosen the top, so make sure to
check the camera after every use.
One Year Limited Warranty
During the warranty period, the Atlantis™ Warranty Dept. will honor service for
one (1) year parts and labor from the original date of consumer purchase. See
below for commercial, Industrial or Educational use coverage.
WHO IS PROTECTED
This warranty protects the original owner of this Atlantis™ Product.
WHAT IS COVERED AND HOW LONG
This warranty covers internal operating parts and service/labor to repair or your
Atlantis™ product for one (1) year, from the date of purchase, defined as follows: (1) Original Consumer Retail Purchase; (2) First Rental Purchase
Agreement; or (3) First Lease Purchase Agreement (the “Warranty Period”).
Labor and replacement parts supplied during the Warranty Period are covered
15
Page 17

only for the remaining portion of the original Warranty Period. The Atlantis™
Warranty Dept. shall have no liability for service under this warranty if non-OEM
(Original Equipment Manufacturer) replacement parts are used in the repair of
your Atlantis™ product.
WHAT THE OWNER MUST DO IF SERVICE IS REQUIRED
If service under this warranty is required, contact the Atlantis™ Warranty Dept.
at 1-800-226-9671 during hours of 9:30 - 5:00PM except holidays, deliver the
product, at your expense, to Atlantis™ product service center. Atlantis™ warranty will exchange product to replace once found to be defective during the
Warranty Period.
You can also visit out web site at www.atlantiscamera.com/support for more
information.
OTHER WARRANTY COVERAGE
Commercial, Industrial or Educational use has the same warranty coverage.
WHAT ARE THE EXCEPTIONS
This warranty does not cover:(1) Damage from misuse, abuse, neglect or accident, natural disasters or Acts of God. (2) Cabinetry, decorative parts, A/C
adapters, knobs or buttons. (3) Foreign use of this product. (4) Atlantis™ product, which has been electronically or mechanically modified in any way or incorporated into other products. (5) Installation and set-up service adjustments. (6)
Owner instruction. Your Owner’s Guide provides information regarding operating
instructions and user controls. For additional information, Call 1-800-226-9671
or Visit our web site at www.atlantiscamera.com
Atlantis™ is not responsible for any shipping handling or insurance charges.
This Exclusive Limited Warranty excludes all incidental and consequential damages. Some states do not allow the exclusion of incidental and consequential
damages, so the above exclusion may not apply to you.
ALL IMPLIED WARRANTIES, INCLUDING IMPLIED WARRANTIES OF MERCHANTABILITY AND FITNESS FOR A PARTICULAR PURPOSE ARE LIMITED IN DURATION TO THE DURATION OF THIS WARRANTY PERIOD.
Some states do not allow limitations on how long an implied warranty lasts, so
the above limitation may not apply to you.
This Exclusive Limited Warranty gives you specific legal rights and you may
also have other rights, which vary from state to state.
JJC, Inc.
Atlantis Warranty Dept.
18 West Forest Avenue
Englewood, NJ 07631
1-800-226-9671
service@atlantiscamera.com
16
Page 18

AUW-525C
Monitor AUW-552M
RESOLUTION
POWER SUPPLY VOLTAGE
POWER CONSUMPTION
SCREEN SIZE
OPERATIONAL TEMP
STORAGE TEMP
DIMENSION
WEIGHT
Camera AUC-125C
IMAGE SENSOR
RESOLUTION
VIEWING ANGLE
MIN. ILLUMINATION
POWER REQUIREMENT
OPERATIONAL TEMP
STORAGE TEMP
DIMENSION
WEIGHT
600 CENTER LINE
11V to 32V DC
10.5W with Camera
5.5" Diagonal
7˚ F to 143˚
-22˚ F to 167˚ F
6.5"X 5.9"X 7.9"
Approx. 3 Lbs.
270,000 Pixels 1/3 CCD
420 TV Lines
92˚ Wide, Diagonal
0 Lux with high Power IR LED
DC 9.7V ( Power from monitor )
-4˚ F to 122˚ F
-22˚ F to 167˚ F
3" X 1.5" Diagonal
0.8 LBs.
AUW-555
Monitor
RESOLUTION
POWER SUPPLY VOLTAGE
POWER CONSUMPTION
SCREEN SIZE
OPERATIONAL TEMP
STORAGE TEMP
DIMENSION
WEIGHT
Camera AUC-555
IMAGE SENSOR
RESOLUTION
VIEWING ANGLE
MIN. ILLUMINATION
POWER REQUIREMENT
OPERATIONAL TEMP
STORAGE TEMP
DIMENSION
WEIGHT
270,000 Pixels 1/3 CCD
420 TV Lines
92˚ Wide, Diagonal
0 Lux with high Power IR LED
DC 9.7V ( Power from monitor )
-4˚ F to 122˚ F
-22˚ F to 167˚ F
3" X 1.5" Diagonal
5 LBs.
17
AUW-552M
600 CENTER LINE
11V to 32V DC
10.5W with Camera
5.5" Diagonal
7˚ F to 143˚
-22˚ F to 167˚ F
6.5"X 5.9"X 7.9"
Approx. 3 Lbs.
Page 19

AUW-701
Monitor
RESOLUTION
POWER SUPPLY VOLTAGE
POWER CONSUMPTION
SCREEN SIZE
OPERATIONAL TEMP
STORAGE TEMP
DIMENSION
WEIGHT
Camera AUC-200
IMAGE SENSOR
RESOLUTION
VIEWING ANGLE
MIN. ILLUMINATION
POWER REQUIREMENT
OPERATIONAL TEMP
STORAGE TEMP
DIMENSION
WEIGHT
270,000 Pixels 1/3 CCD
420 TV Lines
92˚ Wide, Diagonal
0 Lux with high Power IR LED
DC 9.7V ( Power from monitor )
-4˚ F to 122˚ F
-22˚ F to 167˚ F
3" X 1.5" Diagonal
0.8 LBs.
AUW-5600
AUW-701M
600 CENTER LINE
11V to 32V DC
19W with Camera
7" Diagonal
7˚ F to 143˚
-22˚ F to 167˚ F
7.3"X 6.9"X 8.7"
Approx. 6.6 Lbs.
Monitor AUM-5600
Monitor
HORIZONTAL RESOLUTION
POWER SUPPLY VOLTAGE
POWER CONSUMPTION
SCREEN SIZE
OPERATIONAL TEMPERATURE
STORAGE TEMPERATURE
DIMENSION
WEIGHT
340 LINES AT CENTER
11V ~ 32 VDC
10.5W WITH CAMERA
5.6 DIAGONAL
7˚F ~ 143˚F
-22˚F ~ 167˚F
6" X 5.25" X 1"
APPROX. 3LBS.
Camera AUC-1500
IMAGE PICK UP DEVICE
RESOLUTION
VIEWING ANGLE
MINIMUM ILLUMINATION
POWER REQUIREMENT
OPERATIONAL TEMPERATURE
STORAGE TEMPERATURE
DIMENSION
WEIGHT
270,000 PIXELS 1/4" CCD
380 TV LINES
92˚ WIDE, DIAGONAL
0 LUX WITH HIGH POWER LED
DC 12V ( POWER FROM MONITOR )
-4˚F ~ 122˚F
-22˚F ~ 167˚F
3" X 1.5"D
0.8 LB.
18
Page 20

Browse through the included catalog for all
your underwater camera needs and place
your order by calling:
800-226-9671
or
visit our web site
www.atlantiscamera.com
 Loading...