

Page 1

Page 2

Federal Communications Commission (F.C.C.) Statement
This equipment has been tested and found to comply with the limits for a class B digital
device, pursuant to Part 15 of the FCC rules. These limits are designed to provide
reasonable protection against harmful interference in a residential installation. This
equipment generates, uses and can radiate radio frequency energy and, if not installed and
used in accordance with the instructions, may cause harmful interference to radio
communications. However, there is no guarantee that interference will not occur in a
particular installation. If this equipment does cause harmful interference to radio or
television reception, which can be determined by turning the equipment off and on, the
user is encouraged to try to correct the interference by one or more of the following
measures:
• Relocate the receiving antenna.
• Increase the distance between the equipment and receiver.
• Connect the equipment into an outlet on a circuit different from that which the receiver
is connected.
• Consult the dealer or an experienced radio/TV technician for help.
Use only shielded cables or connect I/O devices to this equipment.
You are cautioned that changes or modifications not expressly approved by the party
responsible for compliance could void your authority to operate the equipment.
Copyright
This publication including all photographs, illustrations and software, is protected under
international copyright laws, with ail rights reserved. Neither this manual nor any of the
material contained herein may be reproduced without the express written consent of the
manufactu rer.
Disclaimer
The information in this document is subject to change without notice. The manufacturer
makes no representations or warranties with respect to the contents here of merchantability
or fitness for any particular purpose. Further, the manufacturer reserves the right to revise
this publication ad to make changes from time to time in the content hereof without
obligation of the manufacturer to notify any person of such revision or changes.
Trademark Recognition
Microsoft, MS-DOS, and Windows are registered trademarks of Microsoft Corp. Intel,
Pentium, and Pentium II are register trademarks of Intel Corporation. IBM, PC/AT, VGA,
OS/2, and PS/2 are registered trademarks of international Business Machines. Macintosh
II Family, LC, LCII, Quandra, and Power Macintosh are registered trademarks of Apply
Computer, Inc. VESA is a registered trademark of the Video Electronics Standards
Association. DPMS and DDC are trademarks of VESA. The ENERGY STAR name is a
registered mark of the U.S. EnvironmentalProtection Agency. Other product names used
in this manual are the properties of their respective owners and acknowledged.
Page 3

TABLE OF CONTENTS
IMPORTANT SAFETY INSTRUCTIONS....................................................................... 2
INTRODUCTION ........................................................................................................... 3
Product Description ............................................................................................3
Package Overview............................................................................................... 3
Installation of the Monitor Arm...........................................................................4
Recommended Use of the Monitor.....................................................................5
LCD Monitor Base Installation Guide.................................................................6
Guidelines for Operating the Viewing Angle of LCD Monitor
CONTROLS AND ADJUSTMENTS
Front User Controls.............................................................................................8
OSD Directly Adjustment.....................................................................................9
...............................................................................
Brightness............................................................................................... 9
Contrast................................................................................................... 9
Audio....................................................................................................... 9
OSD Main menu (VGA).........................................................................................9
Volume.................................................................................................... 9
Auto-Tune............................................................................................. 10
Color....................................................................................................... 11
Image............. Clock/Phase/Image Position/Smooth
Language............................................................................................... 1 3
Source................................................................................................... 13
OSD Position
.......................................................................................
Reset.................................................................................................... 13
OSD Main menu (DVI)
.......................................................................................
Volume.................................................................................................. 14
Auto-Tune............................................................................................. 14
Color...................................................................................................... 15
Image............. Smooth........................................................................... 1 5
Language.............................................................................................. 16
Source................................................................................................... 16
OSD Position ........................................................................................ 16
Reset..................................................................................................... 16
Energy Declaration............................................................................................ 17
TROUBLESHOOTING ................................................................................................ 18
TECHNICAL INFORMATION.......................................................................................19
Compatibility.......................................................................................................19
Pin Assignment...................................................................................... 1 9
Preset Modes........................................................................................ 19
Other Modes......................................................................................... 19
Pin Assignment (DVI)
...........................................................................
DVI Modes............................................................................................ 20
Specification..................................................................................................... 21
..........................
............................
12
13
14
20
7
8
♦ ♦ ♦
1
Page 4

IMPORTANT SAFETY INSTRUCTIONS
Please read the following instructions carefully. This manual should be retained
for future reference.
1. To clean the LCD Monitor screen make sure the Monitor is in the power off
mode. Unplug the Monitor from its power source before cleaning it. Stand
away from the LCD Monitor and spray cleaning solution onto a rag. Without
applying excessive pressure clean the screen with the slightly dampened rag.
2. Do not place your LCD Monitor near a window. Exposing the Monitor to
rain, water, moisture or sunlight can severely damage it.
3. Do not place anything on top of the Monitor/PC signal cord. Make sure the
cord is placed in an area where it will not be stepped on.
4. Do not apply pressure to the LCD screen. Excessive pressure may cause
permanent damage to the display.
5. Do not remove the cover or attempt to service this unit by yourself. You may
void the warranty. Servicing of any nature should be performed only by an
authorized technician.
6. Safe storage of the LCD Monitor is in a range of minus 20 to plus 60 degrees
Celsius. Storing your LCD Monitor outside this range could result in permanent
damage.
7. If any of the following occurs immediately unplug your Monitor and call an
authorized technician.
• The power or Monitor-to-PC signal cord is frayed or damaged.
• Liquid has been spilled into the Monitor, or it has been exposed to rain.
• The Monitor has been dropped or the case has been damaged.
Notice :
Actual safety specifications please refer to the label on the back of monitor.
2
♦ ♦ ♦
Page 5

INTRODUCTION
Product Description
Congratulations on purchasing this new generation monitor. Your LCD monitor
incorporates high quality display into a small light-weight module. It has power-saving
capabilities and emits no X-ray radiation.
The features are:
• 19" TFT Liquid Crystal Display
• Compatible with IBM VGA, VESA
• Direct RGB input
• Direct DVI input
• SXGA 1280x1024 resolution, up to 1 6M colors
• Lightweight compact design, weighting less than 7.1 Kgs
• DPMS (power saving) Compatible
• Built in universal power supply
• Anti-glare display
• On-Screen Display (OSD) controls and adjustments
• 1W x2 Audio function inside the monitor
• Audio volume adjustment by OSD
Package Overview
Your monitor package contains:
RGB Cable Audio Cable
LCD Monitor
DVI Cable
Power Cord
User's Manual
CAUTION
Keep the shipping carton in case the need arises to store or transport the unit. Let the
LCD lie on its face when you put it into the carton.
3
♦ ♦ ♦
Page 6
INTRODUCTION
Installation of the Monitor Arm
CAUTION
1. The Monitor Arm is an optional item.
2. The Arm Mounting Device must be VESA Flat Physical Mounting Interface
Standard.
3. Please fix LCD monitor to monitor arm with 4x1 0mm screw.
4
♦ ♦ ♦
Page 7

INTRODUCTION
Recommended Use of the Monitor
• Power
- Use the type of power indicated on the marking label.
• Plugs
- Do not remove any of the prongs of the monitor's three-pronged power plug.
- Disconnect the power plug from the AC outlet if you are not going to use it for an
indefinite period of time.
• Power cords
- Use the proper power cord with correct attachment plug type. If the power source
is 120 VC, use a power cord that has UL and CSA approvals. If the power source
is a 240 VAC supply, use the tandem (T blade) type attachment plug with ground
conductor power cord that meets the respective European country's safety
regulations, such as VDE for Germany.
- We recommend using the power cord supplied with the product. However, if
another type of power cord is required power cord H05VV-E or VW-1, 18AWG x
3G should be used.
- Do not overload wall outlets or power cords. Ensure that the total of all units
plugged into the wall outlet does not exceed 7 amperes.
- Ensure that the total ampere ratings on all units plugged into the extension cord is
not above the cord's rating.
- If the power supply cord which came with your monitor is to be connected to the
PC instead of the wall outlet, this equipment should be used with UI7TUV approved
computers with receptacle rated 100~240V AC, 50/60Hz, 1.1A (minimum).
- Do not allow anything to rest on the power cord. Do not locate this product
where persons will walk on the cord.
• Environment
- Place the monitor on a fiat level surface.
- Place the monitor in a well-ventilated place.
- Keep the monitor away from:
rain or water
overly hot, cold or humid places
sunlight
dusty surroundings
equipment that generates strong magnetic fields
♦ ♦ ♦
5
Page 8

INTRODUCTION
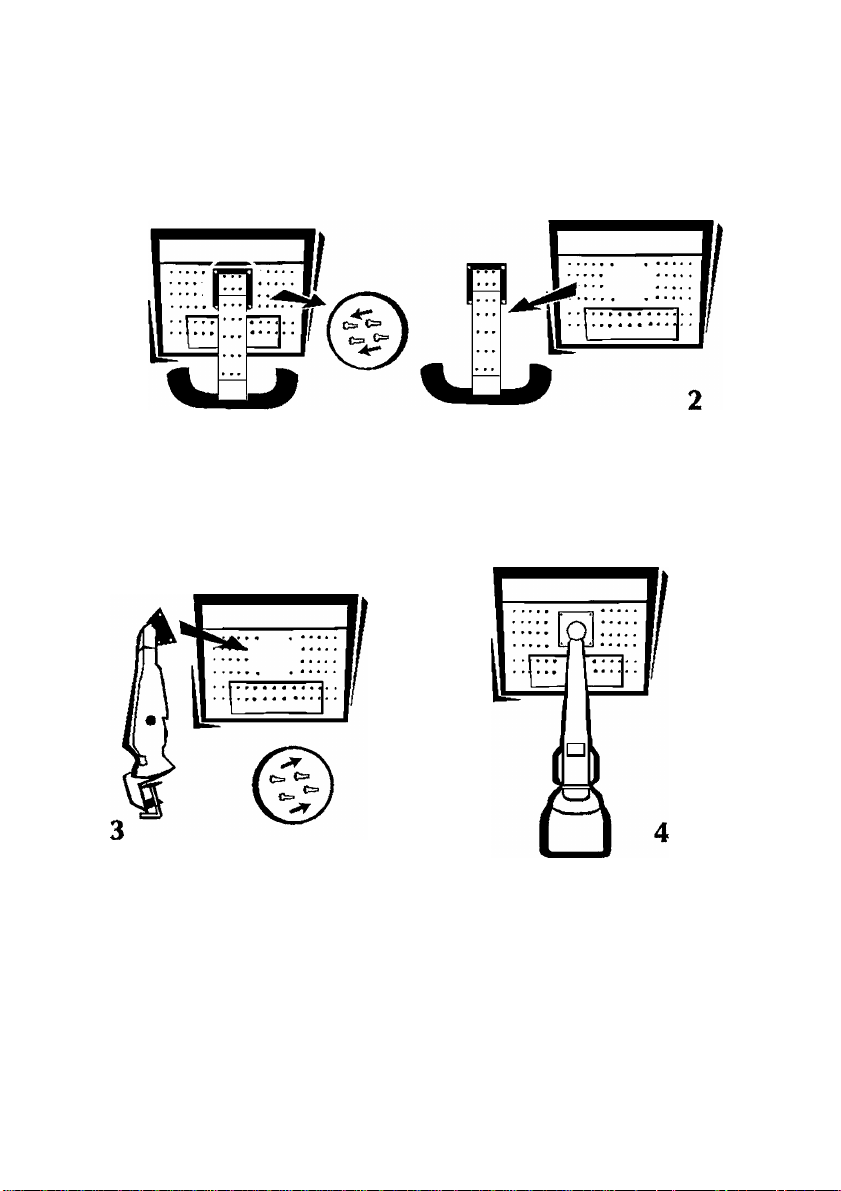
LCD Monitor Base installation Guide
First attach the back cover to the
monitor. Carefully match up the three
hinges at the top of the cover with the
three corresponding slots; slide and
lock into place.
Once the back cover is attached, you
can rotate it down to a fully closed
position.
Using a flathead screwdriver, insert
the screws and tighten in the direction
indicated.
♦ ♦ ♦
6
Page 9

INTRODUCTION
Guidelines for Operating the Viewing Angle of LCD Monitor
Height Adjustment
You can adjust the height of the
monitor by securely holding the base
with one hand and pulling up the
monitor stand with the other. The
height of the monitor can be be
adjusted from 403.5mm to 525mm.
1
^ d
Backward/Forward Angle Adjustment
The vertical angle of the monitor can
be adjusted 3 degrees forward and 35
degrees backward by holding the
monitor support at the top and moving
the monitor screen forward
backward from the bottom.
TVpImI 3' Typical 3ST
or
Rotate
The monitor screen can be swiveled
left or right by holding the monitor
support at the top, grabbing the edge
of the screen and turning it to face 35
degrees left or right.
Pivoting
Grab the opposite corners and rotate
the screen 90 degrees.
♦ ♦ ♦
7
Page 10

CONTROLS AND ADJUSTMENTS
Once you have installed this monitor with your system, please read the instructions
in this section, they give you some guidelines on how to use the monitor more
efficiently. And lead you through the various functions of the user controls and
explain howto adjust the monitor to your personal preference.
Front User Controls
(1) Enter ” J ” button
To display the OSD manual and select functions.
(2) Down ” V” button
To adjust the selected OSD function or the brightness directly.
(3) Up button
To adjust the selected OSD function or the contrast directly.
(4) *'ESC” button
To close the OSD manual and to escape function or audio mute.
(5) Power LED Indicator
As long as the monitor is powered, this indicator is lit. In normal operation, it
lights blue. While in power saving mode, the indicator will turn to amber.
(6) Power Switch
To turn the monitor On or Off.
♦ ♦ ♦
8
Page 11

CONTROLS AND ADJUSTMENTS
OSD Directly Adjustment
BRIGHTNESS
Press the "V" button to enter the brightness, and press the "V"
or "A" button to increase or decrease the brightness level, then
press " ESC" button to exit.
CONTRAST
Press the "A" button to enter the contrast, and press the "V" or
"A" button to increase or decrease the contrast level, then press
" ESC" button to exit.
AUDIO
Os
^ I return to sound playing mode.
1
^ I b. Control the volume
On Screen Display (OSD) Main menu (VGA)
1. Press " J " to open the OSD main menu.
2. Use the "V" and " A " buttons to move through the displayed functions.
3. Press " J " to confirm your selected function.
1. Volume
m •! —
^1
A)t:4
m
lattoxio»«
&
• Normal Mode
a. Press the " ESC
button to enter sound playing mode in
mute mode
b. Press the " ESC " button to enter mute mode in sound playing
mode.
c. Press the " J " to turn on the OSD main menu.
• Power Saving Mode (when power indication lights amber)
a. Mute Hot Key (When playing music)
Press "ESC" to enter Mute Mode, and press "ESC" again to
In Power Saving Mode, press "V" or "A" to enter the volume
tuning window, and press "A" or "V" key to adjust the volume.
After 6 seconds, the volume tuning window will close
automatically.
Press " j " to adjust volume and enter sound playing mode.
mmi
vaatmvB»«
a. Press "V" or "A" to adjust volume .
a»
b. Press " ESC " to leave this function.
9
♦ ♦ ♦
Page 12

2. Auto-Tune
#1 •
m Gt
CONTROLS AND ADJUSTMENTS
Here are some items which can be adjusted as below, please
press " J " to enter the item menu.
¿IS
• Auto Geometry
Press " J " button, the system will automatically adjust the
clock, phase, H-position and V-position values for optimal
maaimSià
ADVANCED AUTO TUNE PATTERN PROGRAM USAGE GUIDE
settings.
• AUTO_TUNE.exe is used for Windows the display mode adjustment. It
will adjust the VGA input level and video quality to optimum.
• DOS_TUNE.exe is used for 720x400 70Hz & 640x 350 70Hz under DOS
mode adjustment. It will adjust the video quality to optimum.
• Eor the adjustment, please execute the program, then select the "Auto
Tune" function in the OSD menu, to get the optimum picture.
mm
Auto Color
Press " J " button, the system will automatically adjust color
balance for optimal setting.
^SÊasmitÊ^
ADVANCED AUTO TUNE PATTERN PROGRAM USAGE GUIDE
• As some VGA Cards do not match the VESA standard they cannot output
0.7 V p-p VESA standard. Therefore, you need the "ADVANCED AUTO
TUNE PATTERN PROGRAM" to modify the parameters of the monitor to
match the different output level of the VGA card.
• AUTO_TUNE.exe is used for Windows the display mode adjustment. It
will adjust the VGA input level and video quality to optimum.
• Eor the adjustment, please execute the program, then select the "Auto
Color" function in the OSD menu, to get the optimum picture.
* •
10
♦ ♦ ♦
Page 13

3. Color
A - ■'
s
CONTROLS AND ADJUSTMENTS
You can choose either the 6500° k, 9300° K color temperature
mode, User mode or Motion Picture to store your user defined
color settings.
• User Mode
a. Press " J " button to enter User mode.
b. Press the "V" or "A" button to select the R/G/B gain , then
press " J " button to proceed.
c. Press "ESC" button to leave this function.
• Motion Picture Mode
Press " J " button to enter Motion Picture mode.
a. Saturation:
Press the "V" or "A" button to adjust Saturation.
b. Tint:
Press the "V" or "A" button to adjust Tint.
c. Flesh Tone:
Press the "V" or "A" button to adjust Flesh Tone.
d. Black Level:
Press the "V" or "A" button to adjust Black Level.
e. Recall:
Press the " J " button to recall factory default settings.
11
♦ ♦ ♦
Page 14

4. image
wia
91 G
lacMiMioa-«
AM
CONTROLS AND ADJUSTMENTS
Here are some items which can be adjusted as below, please
press " J " to enter the item menu.
SiS
• Clock:
Press the "V" or "A" button to adjust the width of the screen.
• Phase:
Press the "V" or "A" button to reduce the noise on the screen.
^ 1 “ »*iS= s'
AM
«1 G
lasoMioa«
i»#a ji«cM>e ■vi»o^
* iM, et sp s*1j»J
«aaoKtoa«
oa« ^
V—Oh*
____
M pi pi ^^51!
AN
91 G
tamiMtoa«
1C
^ <8
• Image Position
a. H - Position:
Press the "V" or "A" button to reposition the Image to the
right or left.
b. V - Position:
Press the"V" button to move the Image downwards and "A"
to move it upwards.
• Smooth:
Press the "V" or "A" button to adjust smooth. The "Smooth"
function key will perform only under the resolution range
1280 X 1024.
12
♦ ♦ ♦
Page 15

5. Language
«r«l
a a f Dautech
r FmracaiB
*■^1
taacMtoM
Mtaai.aKW« v»a«»i
6. Source
c»l«[
A i^[
CONTROLS AND ADJUSTMENTS
Press the "V" or "A" button to select between English, German,
French, Spanish or Italian languages.
Press the "V" or "A" button to select "DVI" or "VGA"
n»m%h€'»0»4,
«I«!
A i^l
9 Q|
-taaoK-ioM
7. OSD Setting
/» ^1
■MHI
Amt
Q G|
laaoKio»«
A
5 Ql
‘■a«ON:1|99Mk
8. Reset
A <»
To adjust the OSD position.
• H - Position:
Press the "V" or "A" button to reposition the OSD window to
the right or left.
• V - Position:
Press the"V" button to move the OSD window downwards
and "A" to move it upwards.
• Center:
The OSD window will be adjusted automatically to the center
of the screen.
•
• Press the "V" or "A" button to select "Yes" or "No".
• Choose Reset to call-back all the settings for the current input
Signal mode to factory preset.
1 3
♦ ♦ ♦
Page 16

CONTROLS AND ADJUSTMENTS
On Screen Display (OSD) Main menu (DVi)
1. Press " J " to open the OSD main menu.
2. Use the "V" and " A " buttons to move through the displayed functions.
3. Press " J " to confirm your selected function.
7. Volume
m m
«1 Q
-» *
mm
AiN
9 S
VoluwM*
B
■taaoKtoa«
J
__ _
V,
70
2. Auto-Tune
Press " J " to adjust volume and enter sound playing mode.
a. Press "V" or "A" to adjust volume .
b. Press " ESC " to leave this function.
Auto-Tune is disabled in DVI mode.
14
♦ ♦ ♦
Page 17

3. Color
/*!.& *«-'
AIM
91 a
ipin
A 1^1 ■*
5 S £
iumfilii“?- '
A|A№
m G
Cotvr
Mt&SaiKMJt VaSi0.tl
CONTROLS AND ADJUSTMENTS
□
« CH
p;
You can choose either the 6500° k, 9300° K color temperature
mode, User mode or Motion Picture to store your user defined
color settings.
• User Mode
a. Press " J " button to enter User mode.
b. Press the "V" or "A" button to select the R/G/B gain , then
press " J " button to proceed.
c. Press "ESC" button to leave this function.
• Motion Picture Mode
Press " J " button to enter Motion Picture mode.
a. Saturation:
Press the "V" or "A" button to adjust Saturation.
b. Tint:
Press the "V" or "A" button to adjust Tint.
c. Flesh Tone:
Press the "V" or "A" button to adjust Flesh Tone.
d. Black Level:
Press the "V" or "A" button to adjust Black Level.
e. Recall:
Press the " J " button to recall factory default settings.
4. Image
<«•1 ..
Q ^
«aaownat«
«•1 ra
A 14:
g Q| 0^^
laatOKioae«
=1.
Press " J " to enter the item menu.
« di
Smooth:
Press the "V" or "A" button to adjust smooth. The "Smooth"
function key will perform only under the resolution range
1280 X 1024.
1 5
♦ ♦ ♦
Page 18

5. Language
mm
A
Ai^i
«1 a
L*fWV«««>
Prancad*
6. Source
mm
/'IB
«I G
flQ
‘i3»ONtoa«
7. OSD Setting
^’*1 MMEli
/» il *“®'
A 1^1
>—«iiawKVt»o»»
^'f! HiBcii
r ^1 M. »M»«rieion
A 1^1
o aj
naatfeK-ioa«
jjgyigy
8. /?esei
m «1
A a.
A.i^,
S'
-laaocc-iOMi
'T**
CONTROLS AND ADJUSTMENTS
Press the "V" or "A" button to select between English, German,
French, Spanish or Italian languages.
Press the "V" or "A" button to select "DVI" or "VGA".
1^
CU
To adjust the OSD position.
• H - Position:
Press the "V" or "A" button to reposition the OSD window to
the right or left.
• V - Position:
Press the"V" button to move the OSD window downwards
and "A" to move it upwards.
• Center:
The OSD window will be adjusted automatically to the center
of the screen.
• Press the "V" or "A" button to select "Yes" or "No".
• Choose Resetto call-back all the settings for the current Input
Signal mode to factory preset.
16
♦ ♦ ♦
Page 19

CONTROLS AND ADJUSTMENTS
Energy Declaration
This monitor is equipped with a function for saving energy, which supports the
VESA Display Power Management Signaling (DPMS) standard. This means that
the monitor must be connected to a computer. The time settings for switching to
a power saving mode are adjusted from the system unit by software. From the first
indication of inactivity to power saving position the total time must not be set to
more than 70 minutes.
Power Consumption (120/230 Vac)
NUTEK VESA state LED indicator Power Consumption
Normal
operation
Power Saving Off Am ber
Power S wi tch
Off
On Blue
Off Off
^5W
<2W *
<1W
* Audio mute mode
This display unit is an electronic product and may contain substances or materials
that require end-of-life processing by a designated organization or agency.
1 7
♦ ♦ ♦
Page 20

TROUBLESHOOTING
Troubleshoo ting
If you are experiencing trouble with the LCD display refer to the following. If the
problem persists please contact your local dealer or our service center.
The monitor does not respond after you turn on the system.
• Check if the monitor is turned on.
• Turn off the power and check the monitor power cord and signal cable are properly
connected.
The characters on the screen are dim.
• Refer to the Controls and Adjustments section to adjust the brightness
(BRIGHTNESS on the OSD sub-menu.)
The screen is blank.
• During use the monitor screen may automatically turn off as a result of the Power
Saving feature. Press any key to see if the screen comes back.
• Refer to the Controls and Adjustments section to adjust the brightness
(BRIGHTNESS on the OSD sub-menu.)
The screen flashes when it initializes.
• Turn off the monitor and turn it on again.
• Refer to the Controls and Adjustments section to reload the default setting (RESET
on the OSD main-menu.)
Partial image or incorrectly displayed image
• Check to see if the resolution of your computer is higher than that of the LCD
display
• Reconfigure the resolution of your computer to make it less than or equal
tol 280x1024 or to make sure reflesh rate is under 75Hz.
image has vertical flickering line bars
• Use "Clock" to make an adjustment
• Check and reconfigure the display mode of the vertical refresh rate of your graphic
card to make it compatible with the LCD display
Image is unstable and flickering
• Use "Phase" to make an adjustment.
Signal out of Range:
• When the input signal is outside the normal specifications the screen will display
a "Signal out of Range" message.
No Signal Input:
• The "No Signal Input" message indicates that the cable may not be plugged
properly into the host system.
WARNING
Do not disassemble the monitor. Contact your dealer if needed.
18
♦ ♦ ♦
Page 21

TECHNICAL INFORMATION
Compatibility
This LCD monitor supports multiple operating platforms such as IBM compatible
computers. This section provides you with detailed information on pin assignment
of the D-Sub connector and the preset timing chart of the prevailing video
standards.
Pin Assignment
Male Mini D-15 Connector
Preset Modes
Resol uti on VCLK(M Hz)
720*400 28,322 31,469 70,000 IBM VG A
640*480 25,1 75 31,469 59,940 IBM VG A
640*480 31,500 37,861 72,000 VES A
640*480 31,500 37,500 75,000 VES A
800*600 40,000 37,879 60,31 7 VESA
800*600 50,000 48,077 72,188 VESA
800*600 49,500 46,875 75,000 V ESA
1024*768 65,000 48,363 60,000 VESA
1024*768 75,000 56,746 70,069
1024*768 78, 750 60,023 75,029 V ESA
1152*864 108,000 67,500 75,000 VESA
1280*1024 108,000 63,981 60,000 VESA
1280*1024 135,000 79,976 75,000 VESA
Signal 15 Pin M ini D-Sub
Red Video 1
Green Video 2
Blue Video 3
Horizontal Sync 13
Vertical Sync 14
Ground 5,6,7,8,10,11
No Connection 4
SDA (DDC) 12
SCL (DDC) 15
+ 5V(DDC) 9
Horizontal
Frequency! KHz)
Vertical
Frequency! Hz)
Standard
VES A
Other Modes
640*350 @70 Hz
640*480 @70 Hz
800*600 @70 Hz
1024*768 @72 Hz
1152*864 @60 Hz, 70 Hz, 72 Hz
1280*720 @60 Hz
1280*960 @60 Hz, 70 Hz, 72 Hz, 75 Hz
1280*1024 @72 Hz
1280*1024 @70 Hz
19
♦ ♦ ♦
Page 22

TECHNICAL INFORMATION
Pin Assignment (DVI)
DVI Connector
Pin Signal Assignment Pin Signal Assignment Pin Signal Assignment
1 T.M.D.S. Data 2- 9 T.M.D.S. Data 1- 17 T.M.D.S. Data 02 T.M.D.S. Data 2 + 10 T.M.D.S. Data 1 + 18 T.M.D.S. Data0+
3 T.M.D.S. Data 2/4 Shield 11 T.M.D.S. Data 1/3 Shield 19 T.M.D.S. Data 0/5 Shield
4 T.M.D.S. NC 12 T.M.D.S. NC 20 T.M.D.S. NC
5 T.M.D.S. NC 13 T.M.D.S. NC 21 T.M.D.S. NC
6 DDC Clock 14 + 5V Power 22 T.M.D.S. Clock Shield
7 DDC Data 15 Ground (for +5V) 23 T.M.D.S. Clock +
8 No Connect 16 Hot Plug Detect 24 T.M.D.S. Clock-
DVI Modes
20
♦ ♦ ♦
Resolution VCLK(MHz)
640*480 25.175 31.469 59.940 IBM VGA
800*600 40.000 37.879 60.000 VESA
1024*768 65.000 48.363 60.000 VESA
1280*1024 108.000 63.981 60.000 VESA
Horizontal
Frequency(KHz)
Vertical
Frequency(Hz)
Standard
Page 23

TECHNICAL INFORMATION
Specifications
LCD Panel 19" TFT LCD module with wide-viewing angle, 0.294
(H)x0.294(V)mm pixel
[Monitor]
Effective display size
Resolution (max.) SXGA 1280x1024
Displayable colors 1 6M True color
Brightness 250 cd/m^ (typical)
Contrast ratio 500:1
Response time 1 6ms
Scan Frequency(D-1 5) Horizontal: 30 to 80kHz
Scan Frequency(DVI)
Audio Input
Audio Output 1W X 2
User controls Power/Enter/Up/Down/Escape/Volume
Power Consumption <45W
Input signal D-1 5
Input signal DVI
Power Supply 100 ~ 240V,50/60 Hz (automatically)
Plug & Play DDC 2B +
[Dimension & Weight]
Size (WxDxH) 428.5x1 97.5x403.5 (smallest) /525 (greatest) mm
Weight (net) 7.1 Kgs
[Operating Environment]
Temperature 5°C~35°C
Humidity 20°/o~80°/o (non-condensing)
[Storage Environment]
Temperature -20°C~60°C
Humidity 10°/o ~ 90°/o (non-condensing)
1 9" (48.0 cm diagonal)
Vertical: 59 to 75 Hz
Horizontal: 30 to 66kHz
Vertical: 59 to 61 Hz
IV(RMS). typical
<2W Power Saving (Audio mute mode)
<1W Power switch off
Analog 0.7V peak to peak separate
TTL Positive or Negative
DVI Rev. 1 TMDS 165MHz 1-channel
Note : Specifications are subject to change without notice
21
♦ ♦ ♦
 Loading...