

Page 1
WINDSOR HEADBOARD
ASSEMBLY INSTRUCTIONS
Before assembling your headboard, please read through these
instructions carefully and familiarize yourself with the different parts.
ATTENTION! If you receive a damaged or defective item,
please contact Atlantic Furniture at [email protected] or 1-800-955-3726 / M-F 9:00-5:00 EST
Instructions apply for sizes of bed
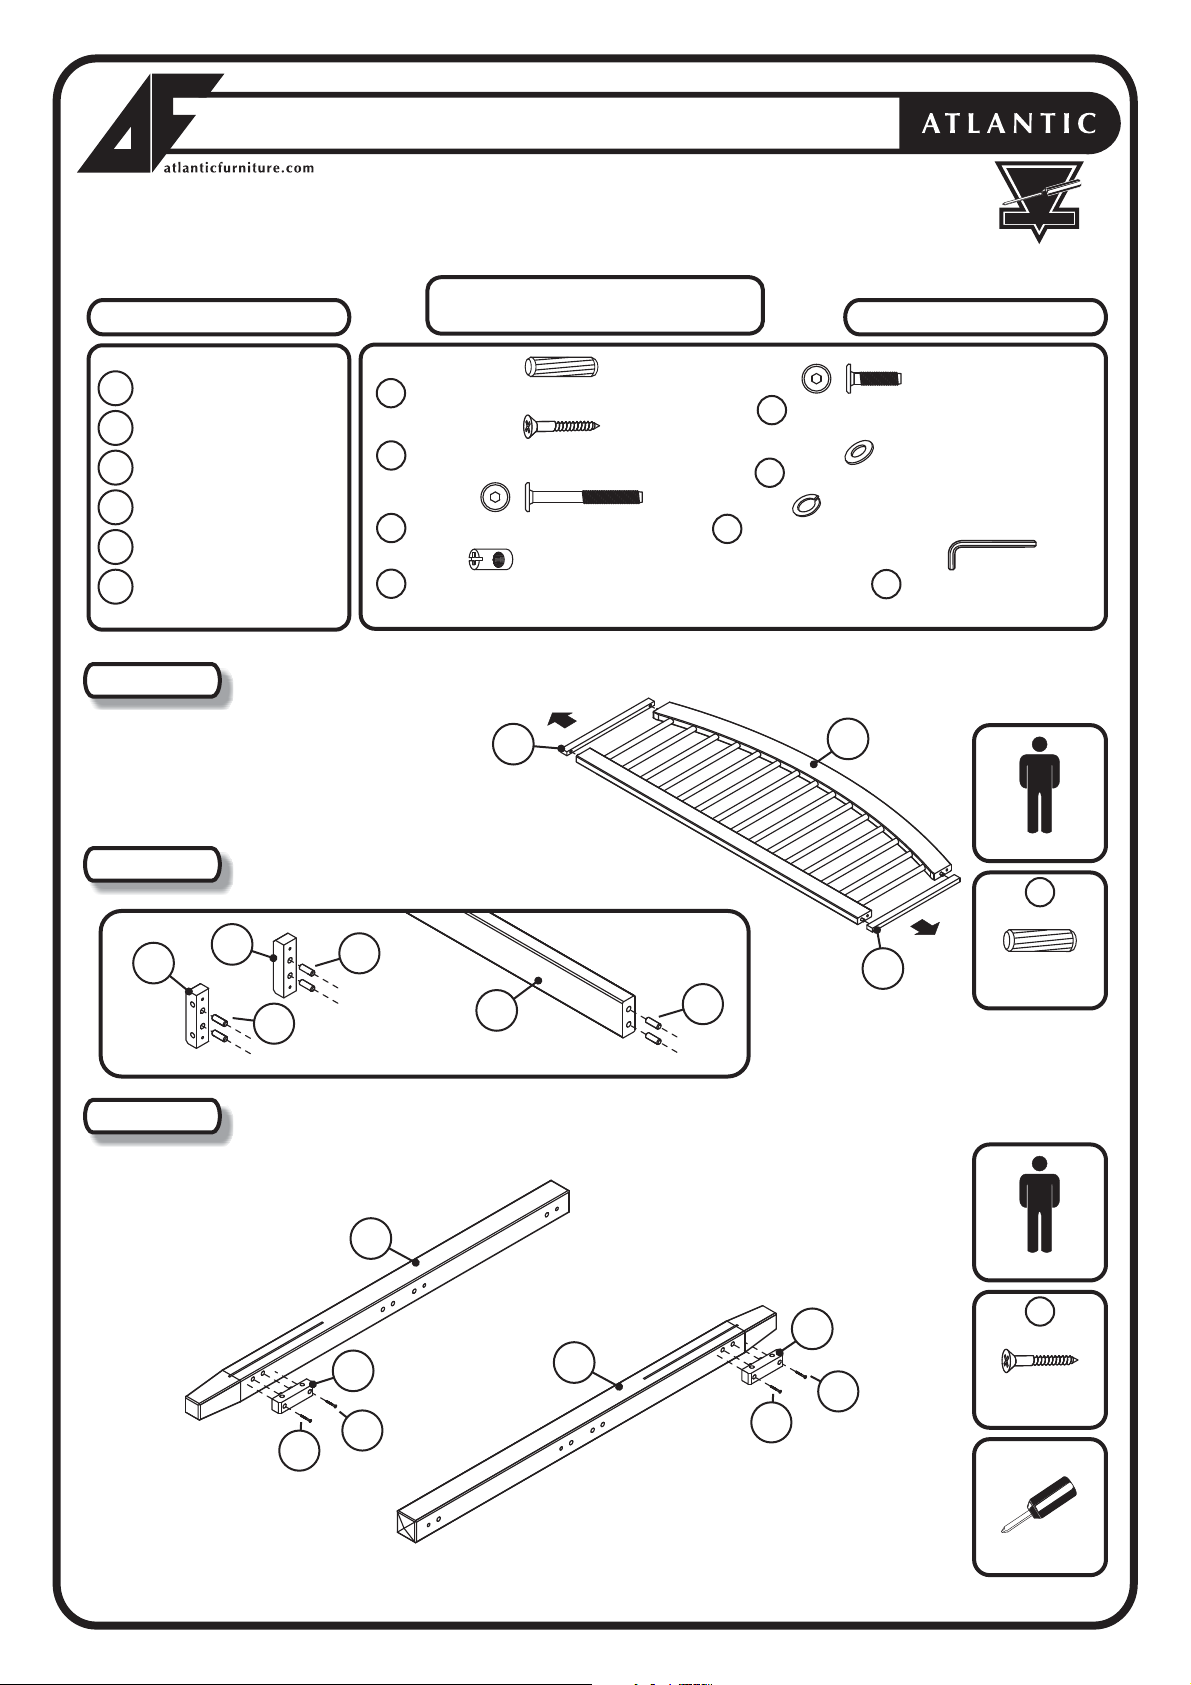
PARTS LIST HARDWARE
HEADBOARD PANEL 1 PC
1
LEFT LEG
2
RIGHT LEG
3
SPACER BLOCK
4
PILLOW STOP
5
SUPPORT BLOCK
6
NOTE: WE INCLUDE SPARE HARDWARE IN CASE THE ALLEN WRENCH, WOODEN DOWEL, WOOD SCREW, JCB , BARREL NUT OR WASHER ARE DAMAGED DURING ASSEMBLY.
Step 1
Remove support block (6) from headboard panel (1) as shown below.
1 PC
1 PC
2 PCS
2 PCS
2 PCS
Wooden dowel (10 X 30mm) - 8 pcs
A
Wood screw (8 X 1 1/4”) - 4 pcs
B
JCB M6 X 100mm (4”) - 4 pcs
C
D
Barrel nut - 4 pcs
Spare - 1 pc
Queen > King
Spare - 1 pc
6
Spare - 2 pcs
Spare - 1 pc
E
JCB M6 X 25mm (1”) - 4 pcs
F
Flat washer - 4 pcs
G
Split washer - 4 pcs
Spare - 1 pc
1
Spare - 1 pc
Spare - 1 pc
H
Allen wrench - 1 pc
READY
TO
ASSEMBLE
Spare - 1 pc
Step 2
4
Step 3
Insert wooden dowels (A) to locator holes on (4) and (5)
as shown below.
4
A
6
A
Attach spacer block (4) to the Legs (2)(3) as shown below, using wood screws (B) tighten with
Phillips head screwdriver (Customer Supplied).
5
A
Adult Assembly
Wooden dowel
10 X 30mm
2
Adult Assembly
4
4
B
B
3
B
B
Wood screw
Phillips head
screwdriver
A
B
Windsor headboard & bed QK
Customer supplied
Page 1 of 6
Page 2
Step 4
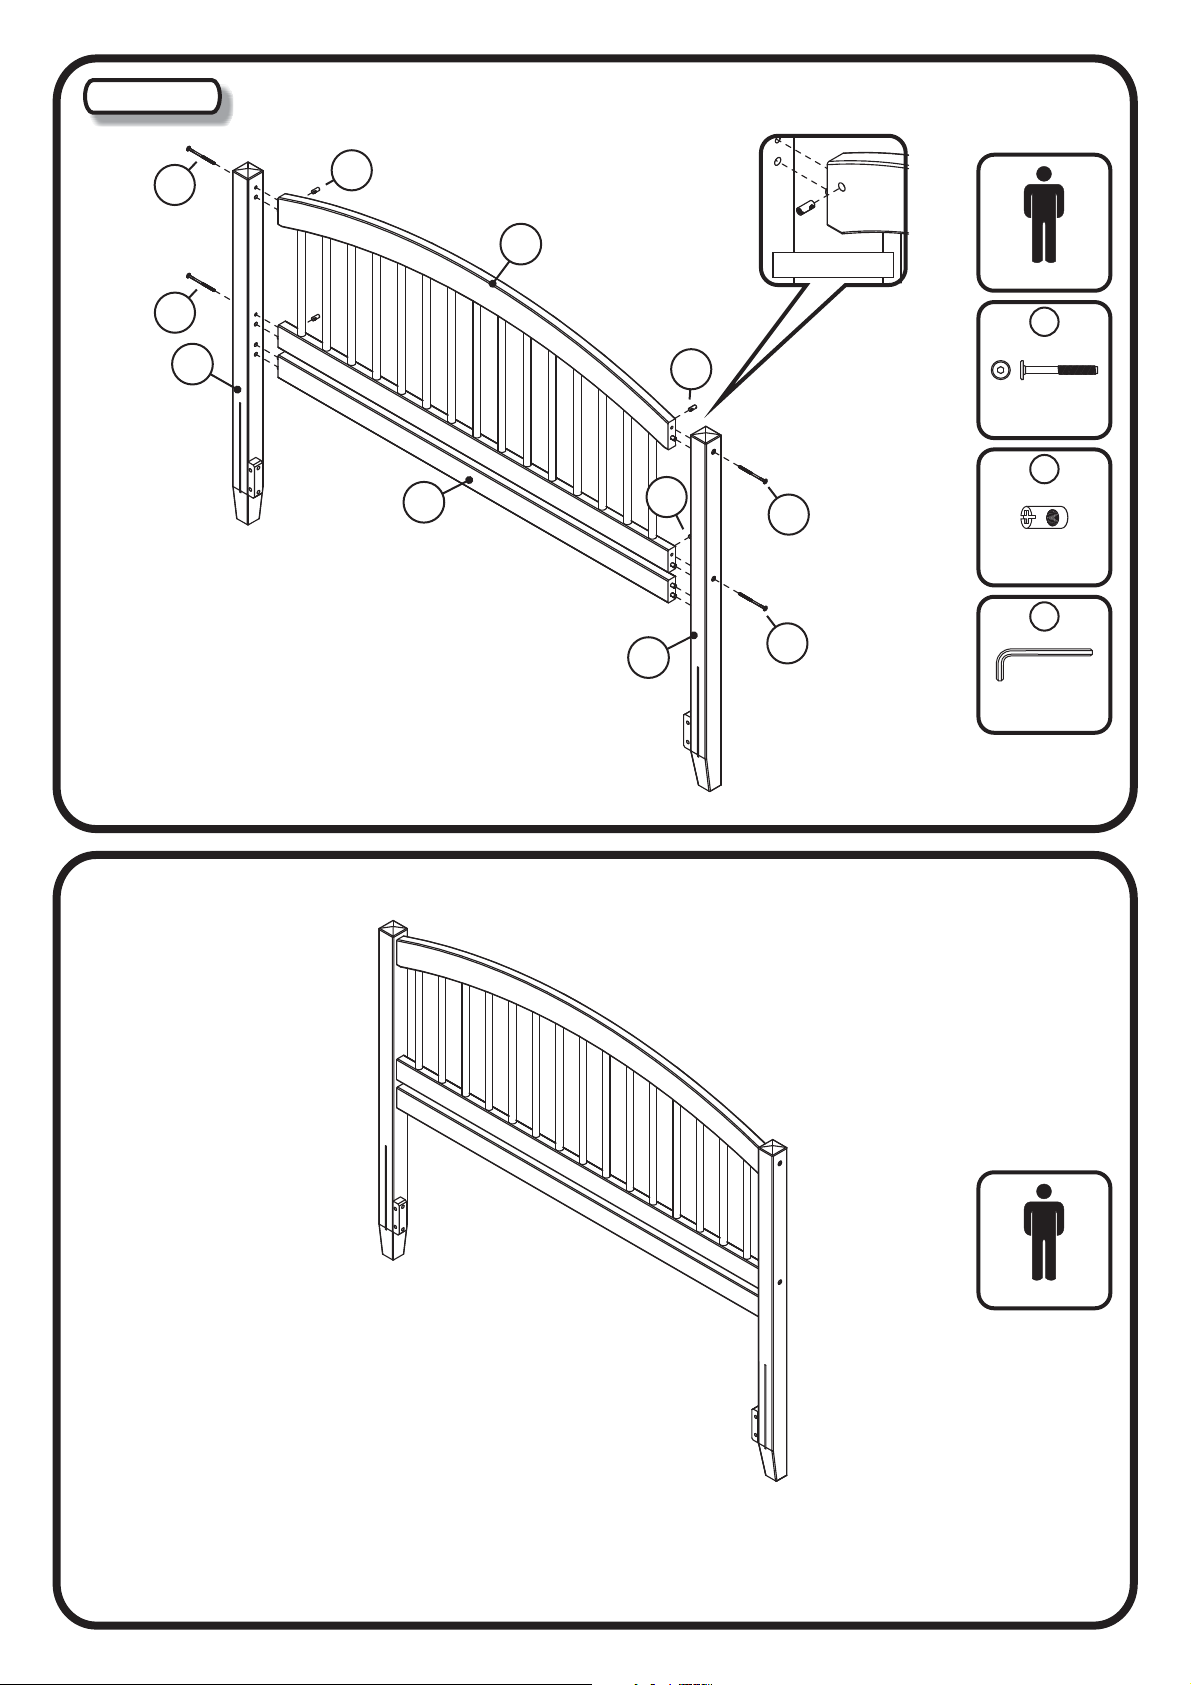
Attach the headboard panel (1) and pillow stop (5) to the legs (2) and (3) as shown below.
Using JCB (C) and barrel nut (D) tighten with Allen wrench (H).
C
C
2
D
5
1
3
D
D
BACK VIEW
C
C
Adult assembly
C
JCB M6 X 4”
D
Barrel nut
H
Allen wrench
Windsor headboard & bed QK
Congratulations!
Your windsor headboard is now ready for use.
To ensure lasting safety, we recommend that you periodically check
that all screws are tight and all parts are secure.
Adult assembly
Page 2 of 6
Page 3
WINDSOR BED
ASSEMBLY INSTRUCTIONS
Before assembling your bed, please read through these
instructions carefully and familiarize yourself with the different parts.
Instructions apply for sizes of bed
Queen > King
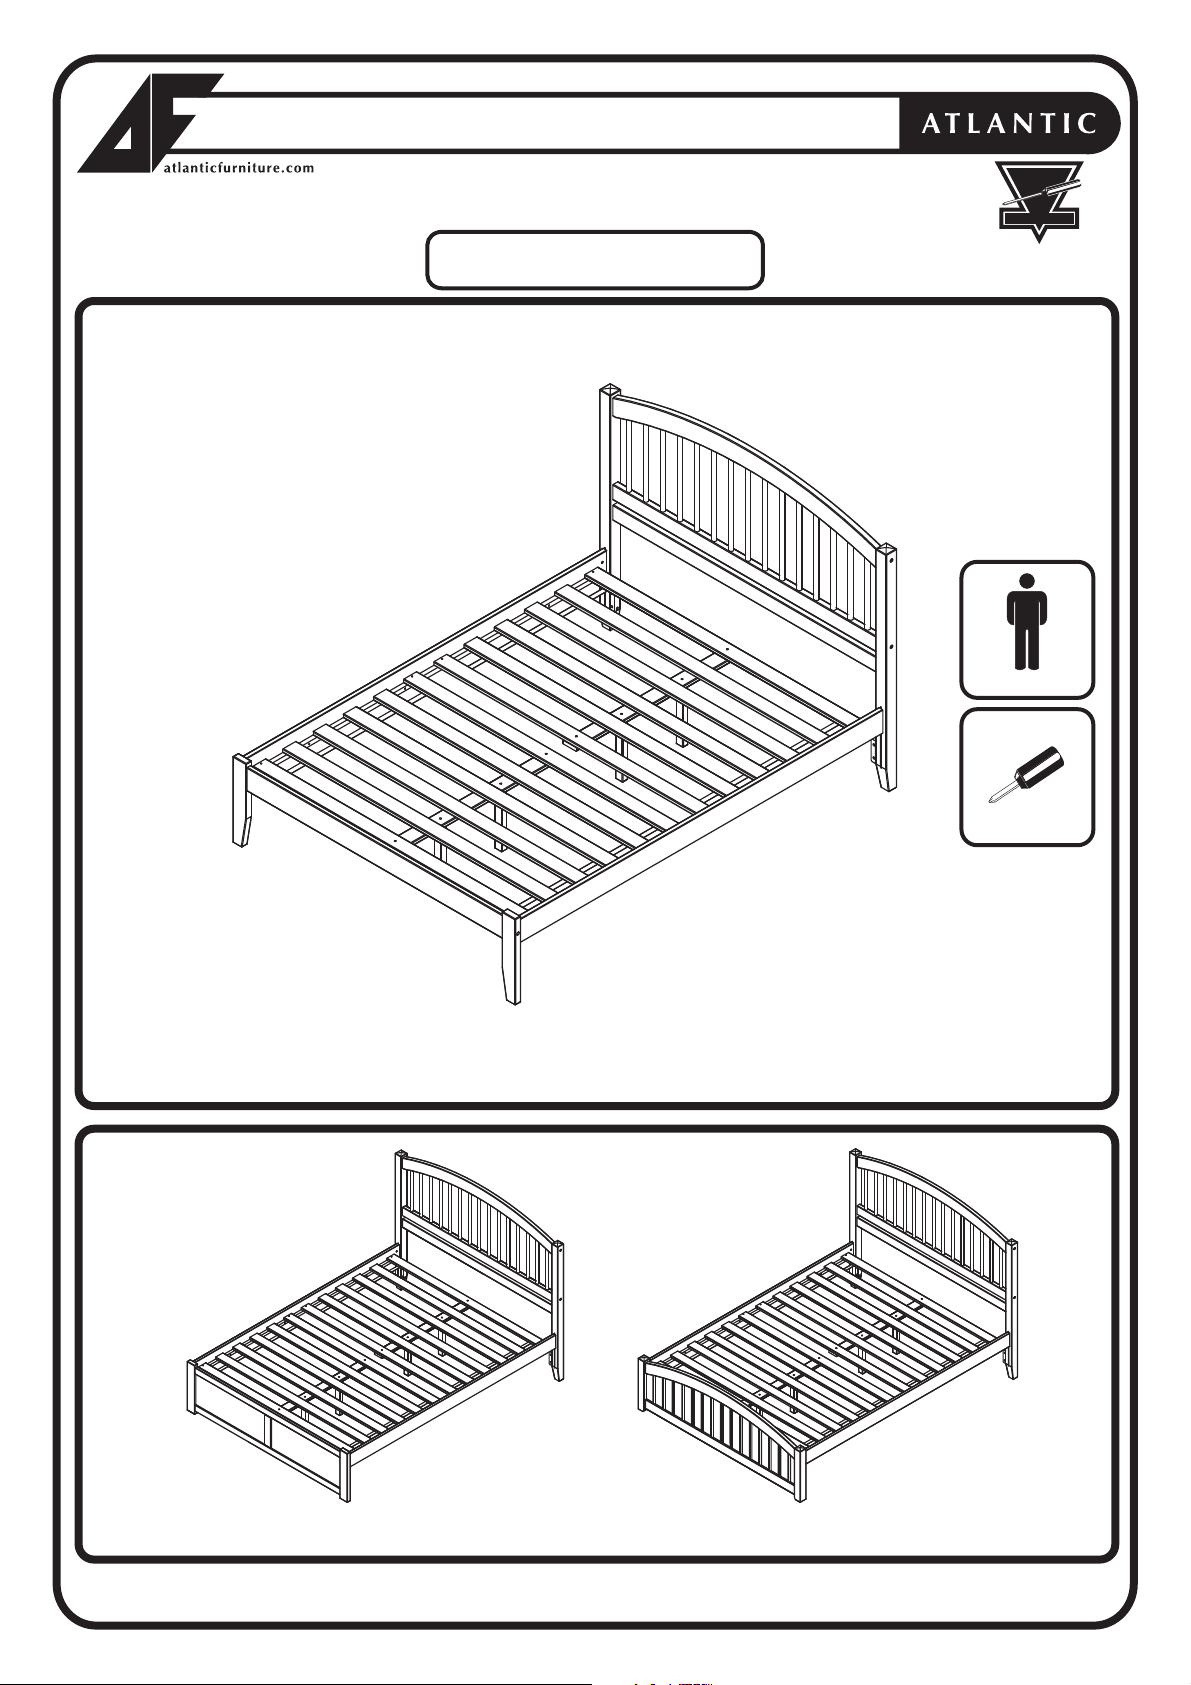
BED SHOWN WITH OPEN FOOTRAIL
READY
TO
ASSEMBLE
Adult assembly
Phillips head
screwdriver
Customer supplied
BED SHOWN WITH FLAT PANEL FOOTBOARD BED SHOWN WITH MATCHING FOOTBOARD
Windsor headboard & bed QK
Page 3 of 6
Page 4
01
HARDWARE
02
HEADBOARD
01
HARDWARE
03
FOOTBOARD
PARTS LIST
BOX 1
BOX 2
02
04
LONG RAILS
01
HARDWARE
05
SLAT KIT
BOX 3
BOX 4
04
05
04
03
01
Step 1
BED SHOWN WITH OPEN FOOTRAIL
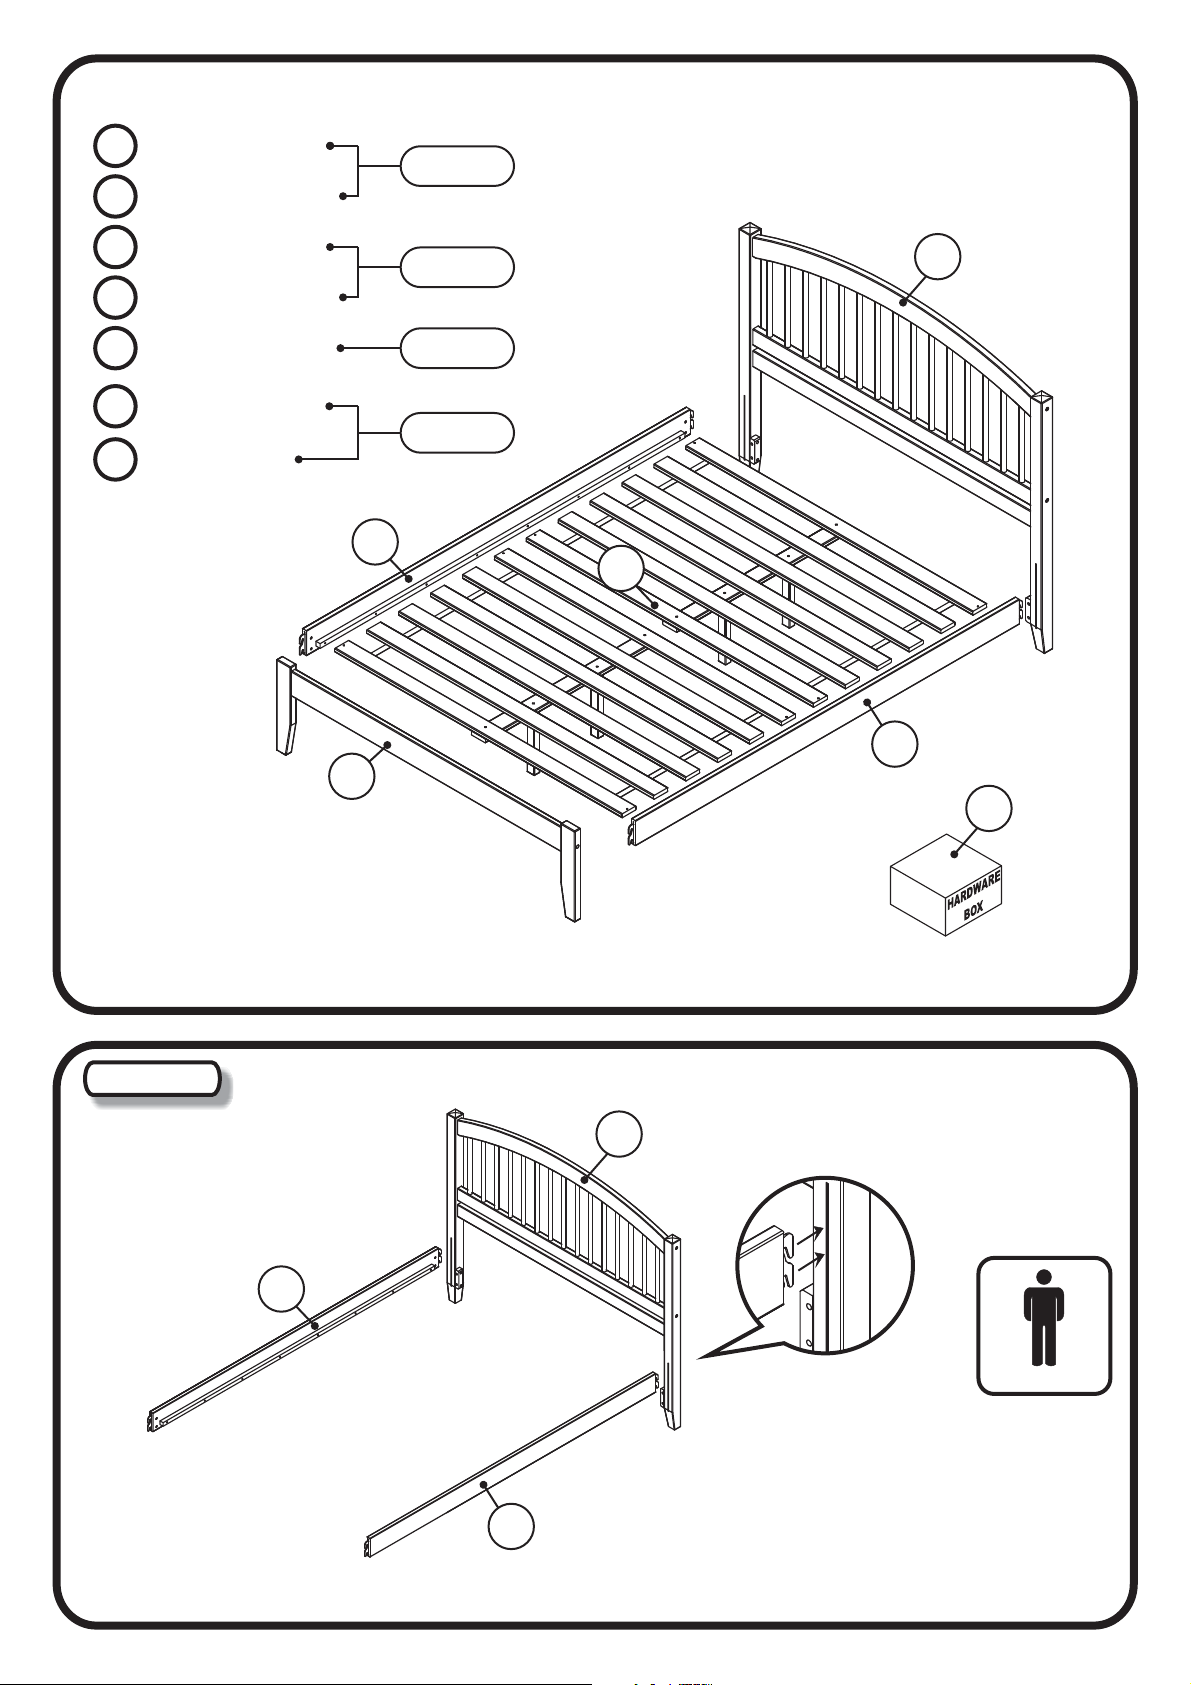
Attach the long rail (04) to the headboard (02) using bed hook as shown below.
02
04
Using the upper set of pins
when using only mattress,
04
and using the lower set of
pins if using both box spring
and mattress.
Adult assembly
Windsor headboard & bed QK
Page 4 of 6
Page 5
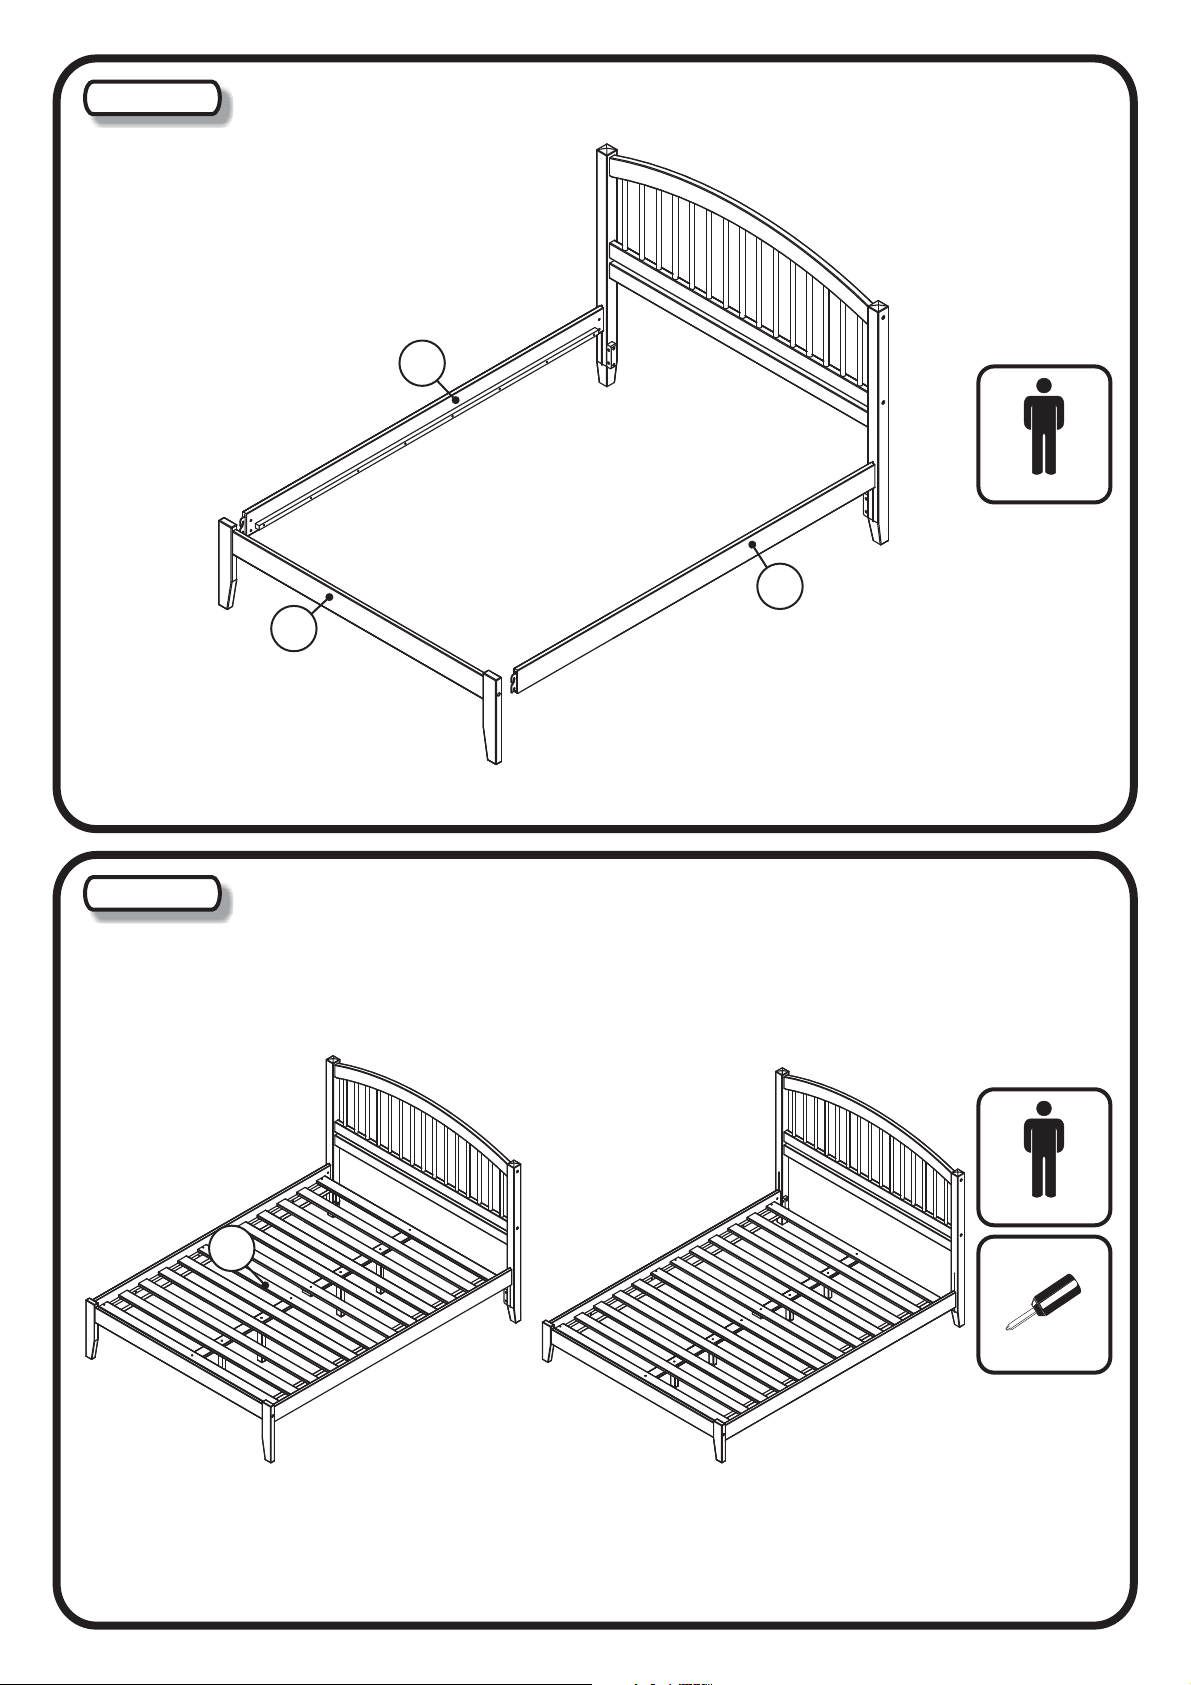
Step 2
Attach the long rail assemblies (04) to the footboard (03) using bed hook as shown below.
04
Adult assembly
04
03
Step 3
BED SHOWN WITH OPEN FOOTRAIL
Lastly, lay slat kit (05) onto the bed.
For slat kit assembly, follow assembly instructions included with slat kit.
BED SHOWN WITH OPEN FOOTRAIL
PLATFORM BED - TALL HEIGHT TRADITIONAL BED - LOW HEIGHT
05
Adult assembly
Phillips head
screwdriver
Customer supplied
Windsor headboard & bed QK
Congratulations!
Your windsor bed is now ready for use.
To ensure lasting safety, we recommend that you periodically check
that all screws are tight and all parts are secure.
Page 5 of 6
Page 6
01
HARDWARE
02
HEADBOARD
WINDSOR HEADBOARD
attach to metal frame sold separately
ASSEMBLY INSTRUCTIONS
Before assembling your bed, please read through these
instructions carefully and familiarize yourself with the different parts.
Instructions apply for sizes of bed
Queen > King
PARTS LIST
Adult assembly
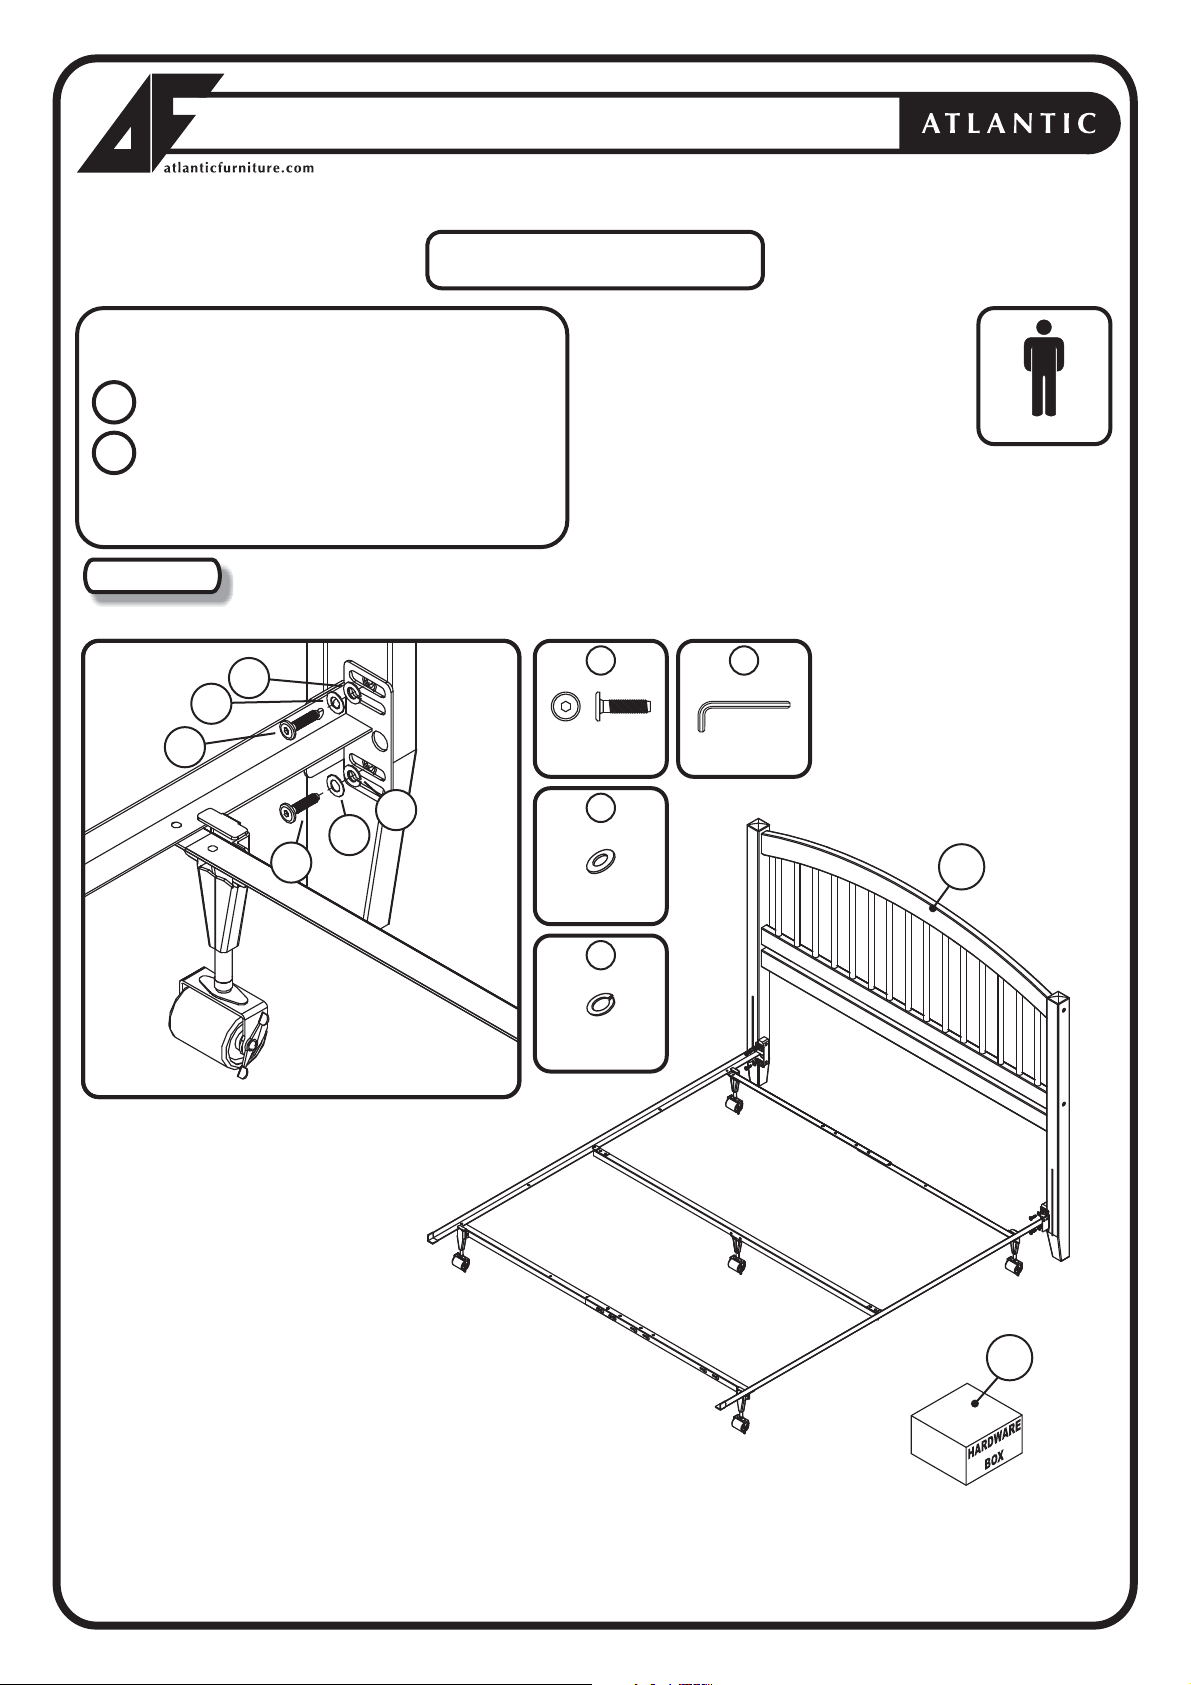
Step 1
E
Attach the headboard assembly (02) to the metal frame using JCB (E), flat washer (F),
and split washer (G) then tighten with Allen wrench, as shown below.
E
H
G
F
G
JCB M6 X 1”
F
ALLEN WRENCH
F
E
FLAT WASHER
G
SPLIT WASHER
02
Windsor headboard & bed QK
Congratulations!
Your windsor bed is now ready for use.
To ensure lasting safety, we recommend that you periodically check
that all screws are tight and all parts are secure.
01
Page 6 of 6
 Loading...