

Page 1
Size of Mattress and Foundation
The length and width of the upper and lower bunk mattress and foundation are as follows :
Width
37 ½”- 38 ½”
52”- 53”
Thickness
9 ½” max
9 ½” max
Twin
Full
LengthSize
74”- 75”
74”- 75”
You must use only this size mattress.
Ensure thickness of upper and lower mattress and foundation combined does not exceed 9 ½”
and that the mattress is at least 5” below upper edge of guardrails.
This Bunk Bed uses a slat kit for mattress foundation.
Replacement Parts
Replacement parts, including additional guardrails, may be obtained from any
Atlantic Furniture dealer
SAFETY WARNINGS
! !
( 1 )
Follow the information on the warnings appearing on the upper bunk end structure
and on the carton. Do not remove warning label from bed.
( 2 )
( 3 )
( 4 )
( 5 )
( 6 )
( 7 )
( 8 )
( 9 )
(10)
(11)
(12)
(13)
Always use the recommended size mattresses or mattress support, or both,
to help prevent the likehood of entrapment or falls.
Surface of mattress must be at least 5 in. (127mm) below the upper edge of guardrails.
Do not allow children under 6 years of age to use the upper bunk.
Periodically check and ensure that the guardrail, ladder, and other component are
in their proper position, free from damage, and that all connectors are tight.
Do not allow horseplay on or under the bed and prohibit jumping on the bed.
Always use ladder for entering or leaving upper bunk.
Do not use substitute parts. Contact the manufacturer or dealer for replacement parts.
Use of a night light may provide added safety precaution for a child using the upper bunk.
Always use guardrails on both long sides of the upper bunk. If the bunk bed will be placed
next to the wall, the guardrail that runs the full length of the bed should be placed against
the wall to prevent entrapment between the bed and the wall.
The use of water or sleep flotation mattresses is prohibited.
STRANGULATION HAZARD : Never attach or hang items to any part of the bunk bed
that are not designed for use with the bed; for example, but not limited to, hooks, belts
and jump ropes.
Keep these instructions for future reference.
BUNK SAFETY WARNING
Page 1 of 11
Page 2

READY
COLUMBIA STAIRCASE BUNK
ASSEMBLY INSTRUCTIONS
(TWIN - TWIN) (TWIN - FULL) (FULL - FULL)
Thank you for choosing Atlantic’s Staircase Bunk Bed.
This practical design offers the utmost in versatility.
Before assembling your Columbia staircase bunk bed, please read through these
instructions carefully. Familiarize yourself with the different parts.
Please note that you will require a Phillips head screwdriver and an Allen wrench.
ATTENTION! If you receive a damaged or defective item,
please contact Atlantic Furniture at [email protected] 1-800-955-3726 / M-F 9:00-5:00 EST
Adult Assembly
Allen wrench
Customer Supplied
TWIN OVER FULL SHOWN
Phillips head
screwdriver
STAIRCASE CAN BE SET UP AT EITHER
END OF THE BUNK BED
TWIN / TWIN FULL / FULL
HARDWARE
NOTE: WE INCLUDE SPARE HARDWARE IN CASE THE ALLEN WRENCH, JCB, BARREL NUT, WOODEN DOWEL,
WOOD BUTTON OR WOOD SCREW ARE DAMAGED DURING ASSEMBLY.
JCB M6 X 3 ½”(90mm) - 24 pcs
A
JCB M6 X 2 1/4”(60mm) - 4 pcs
B
Spare - 2 pcs
Spare - 1 pc
Barrel Nuts - 26 pcs
E
E
F
Spare - 4 pcs
Metal Pins - 4 pcs
Wood Screw 1” - 2 pcs
I
Spare - 1 pc
L Bracket - 1 pc
L
JCB M6 X 1 1/2”(35mm) - 8 pcs
C
JCB M6 X 3/4”(20mm) - 1 pc
ED
Flat Washer - 1 pc
Spare - 1 pc
COLUMBIA STAIRCASE BUNK
Spare - 2 pcs
Spare - 1 pc
E
G
Cap Nut - 3 pcs
Wooden Dowel - 4 pcs
H
8 X 30mm
Spare - 1 pc
Wood Screw 1 ½” - 6 pcs
J
E
Wood screw 3/4” - 1 pc
K
E
Spare - 2 pcs
Spare - 1 pc
In Full lower panel carton
Wood Button - 8 pcs
M
Allen Wrench - 1 pc
N
Spare - 1 pc
Page 2 of 11
Page 3
02
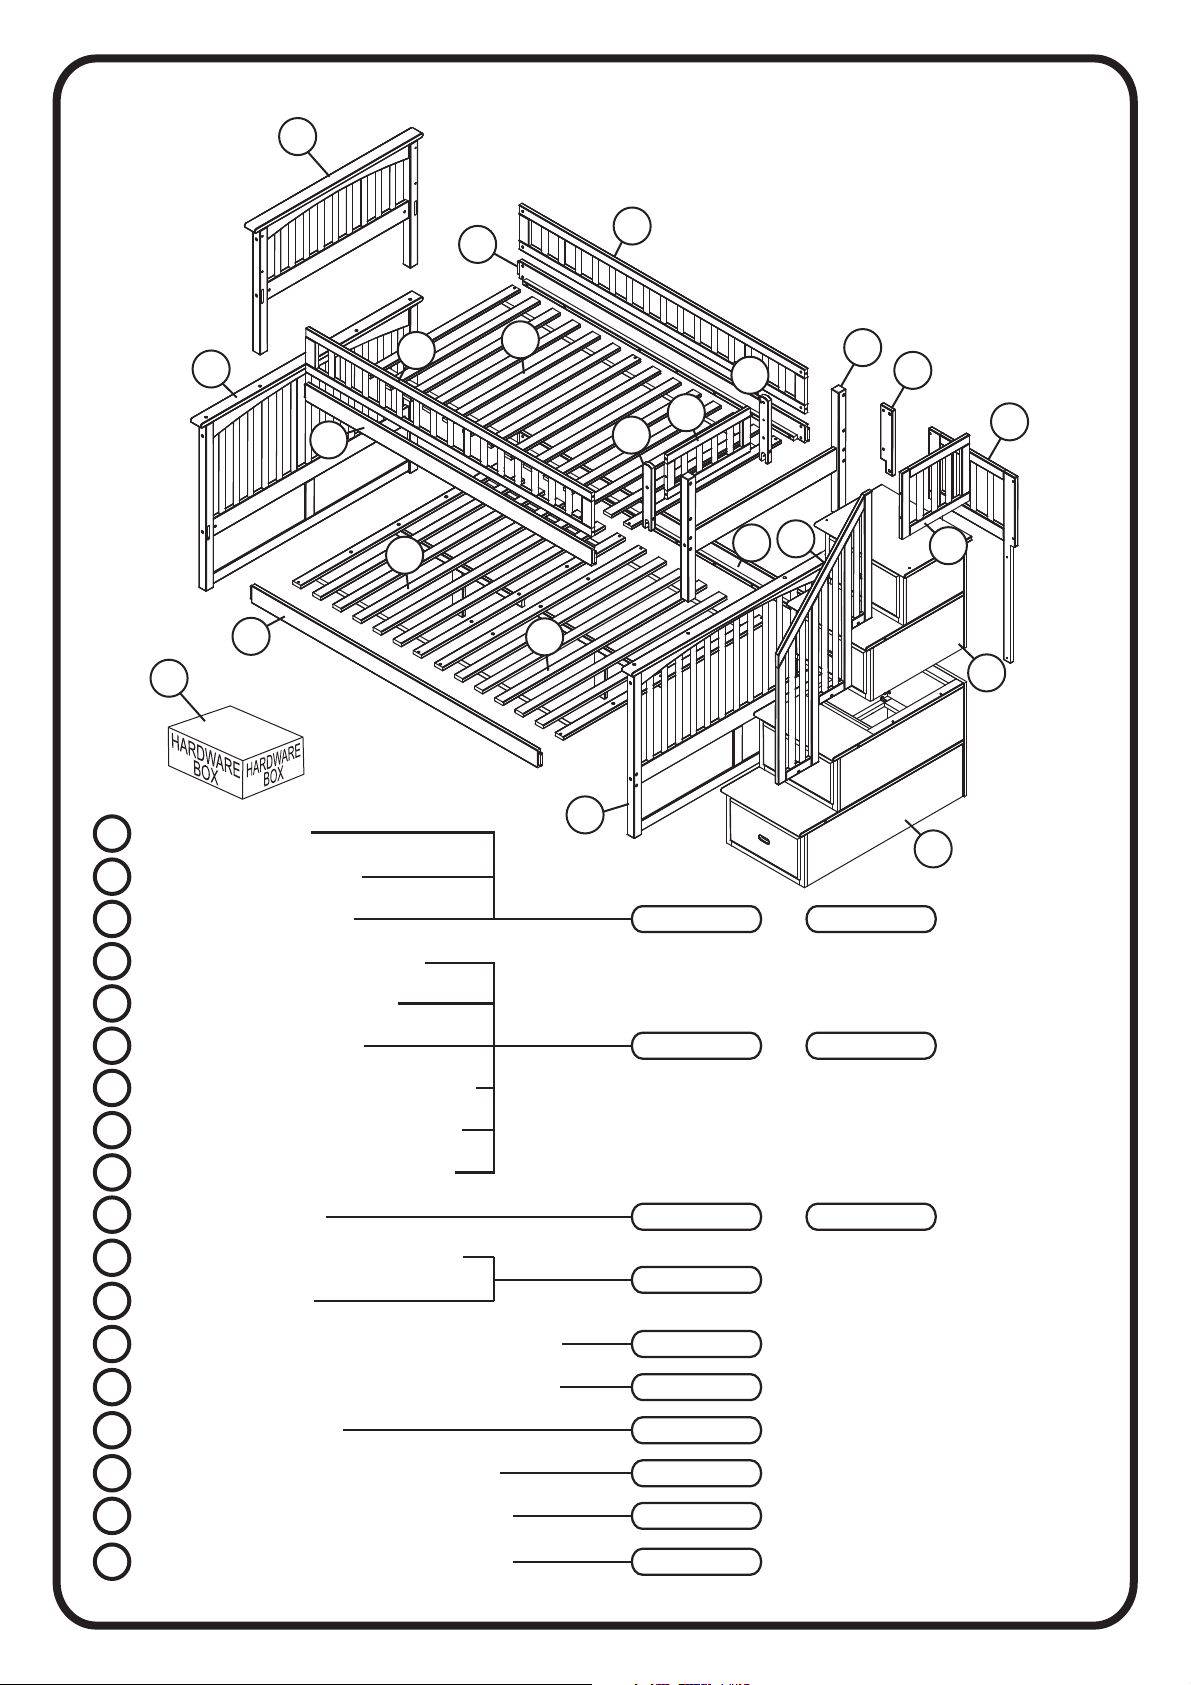
PARTS LIST
01
10
12
12
16
11
12
15
16
11
04
05
TWIN OVER FULL SHOWN
03
04
12
09
06
08
14
07
01
HARDWARE
02
A UPPER PANEL
03
B UPPER PANEL
04
LEFT, RIGHT END CAP
05
SHORT GUARD RAIL
06
WOOD BRACKET
07
SMALL BACK GUARD RAIL
08
SMALL SIDE GUARD RAIL
09
STAIRCASE GUARD RAIL
10
LOWER PANEL
11
FRONT, BACK GUARDRAIL
12
LONG RAILS
13
LOWER STAIRCASE DRAWER STEP
14
UPPER STAIRCASE DRAWER STEP
10
OR
OR
OR
B-5501X
B-5583X
B-5550X
B-5511X
TWIN-TWIN FULL-FULL
B-5582X
TWIN-FULL
B-5520X
B-54X10
B-521X0
B-520X0
13
15
TWIN SLAT KIT
OR
15
FULL UPPER BUNK SLAT KIT
16
FULL LOWER BUNK SLAT KIT
OR
16
TWIN LOWER BUNK SLAT KIT
COLUMBIA STAIRCASE BUNK
E-65200
E-65300
E-65301
E-65200
Page 3 of 11
Page 4
STEP 1
A
02
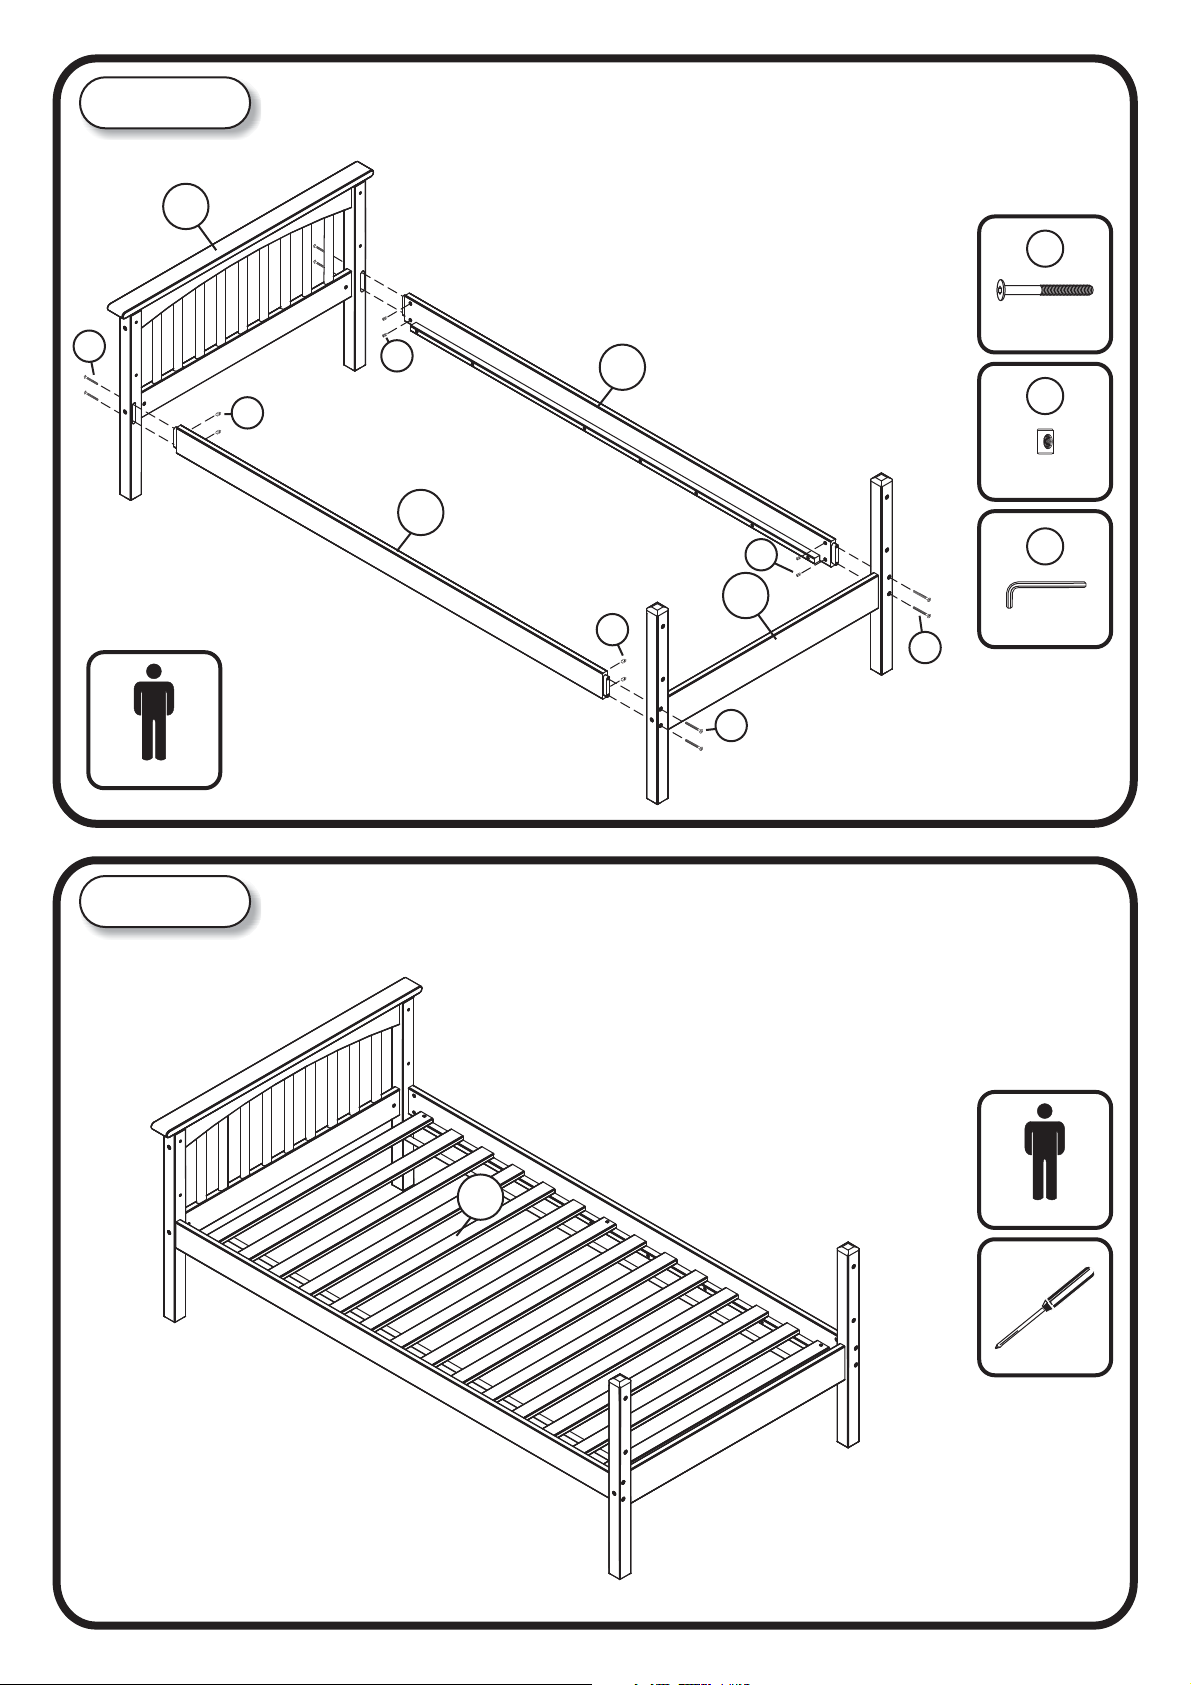
Attach the long rails (12) to the A upper panel (02) and B upper panel (03),
using JCB M6 X 3 ½” (A), and barrel nut (E). Tighten with the Allen wrench (N).
Twin upper panel shown. Full over Full bunk use Full upper panel.
E
12
E
12
E
03
E
A
JCB M6 X 3 ½”
E
Barrel Nut
N
Allen wrench
A
Adult Assembly
STEP 2
A
Lay the twin slat kit (15) onto the bed. Fix in place using wood screws provided in the slat kit box.
FOR SLAT KIT ASSEMBLY follow assembly instructions included with slat kit.
15
Adult Assembly
Customer Supplied
Twin size shown
Full Upper panel uses Full upper slat kit
COLUMBIA STAIRCASE BUNK
Phillips head
screwdriver
Page 4 of 11
Page 5
STEP 3
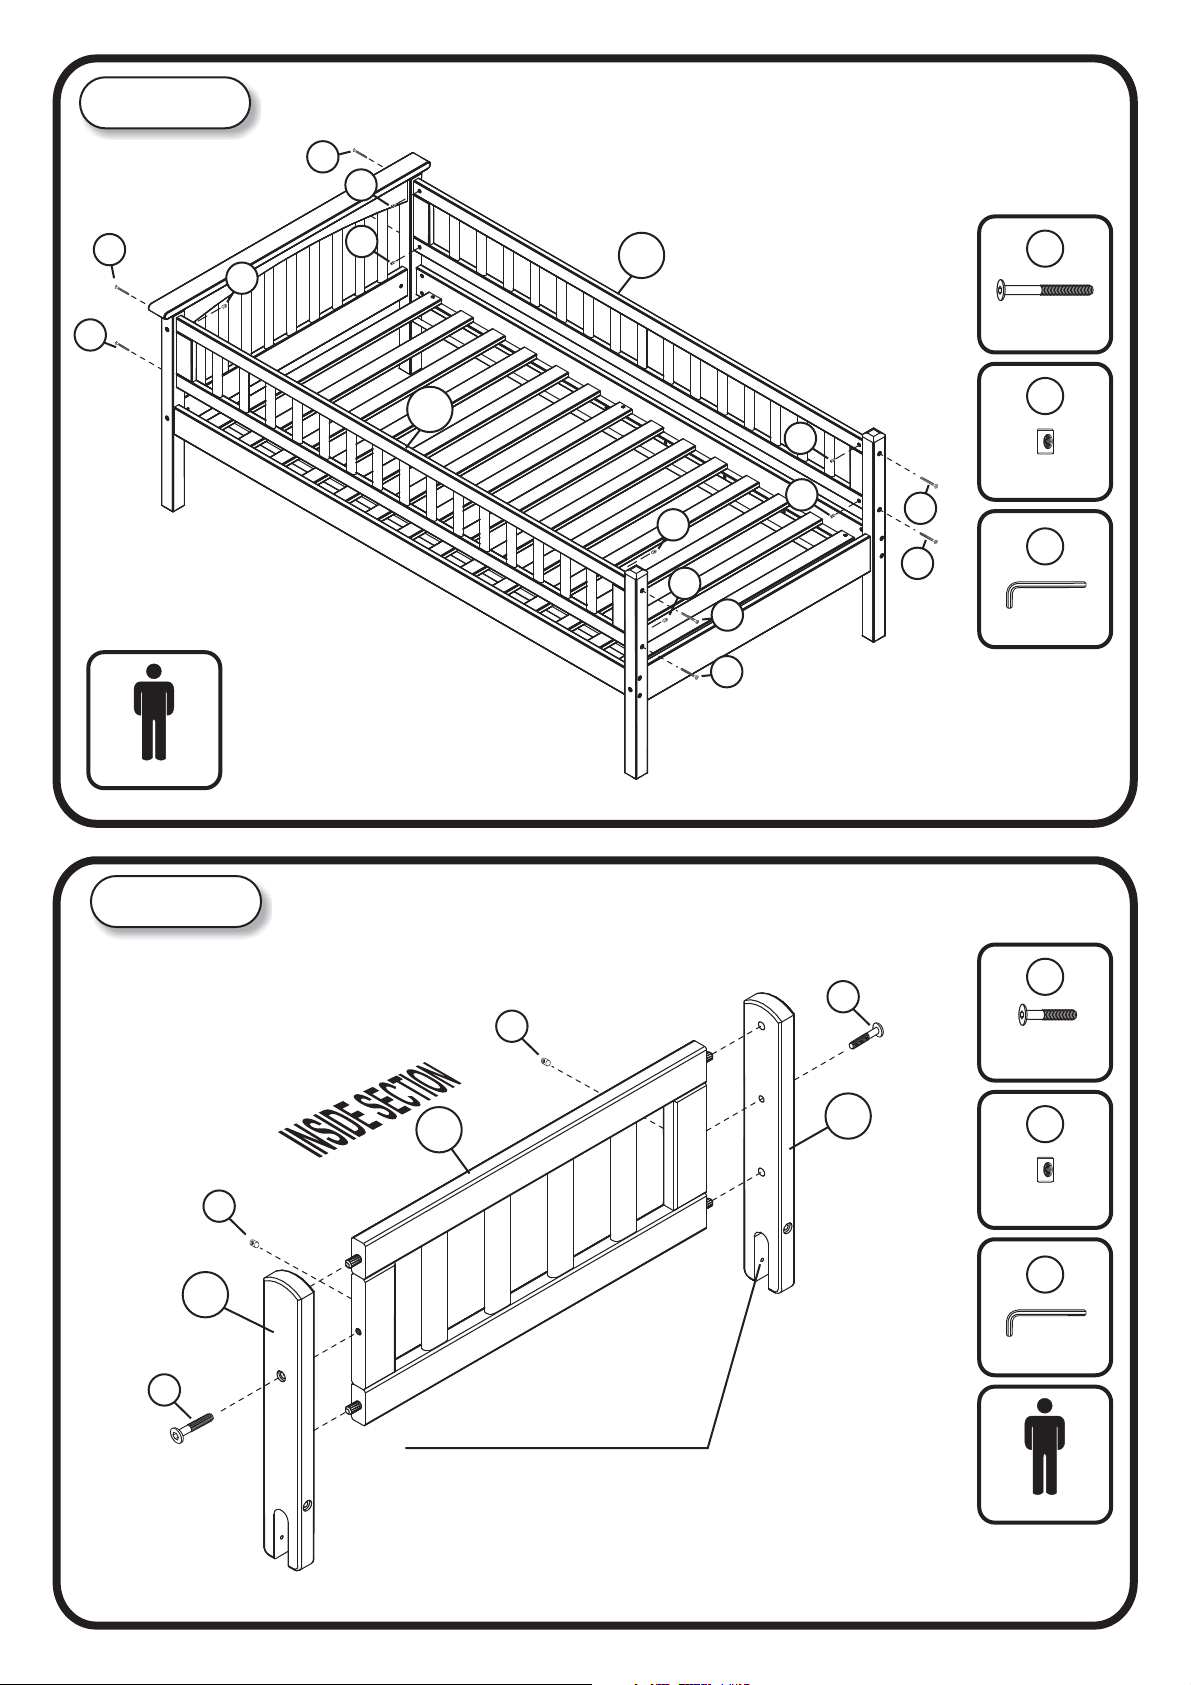
Attach the guard rails (11) to the upper panel assemblies using JCB M6 X 3 ½” (A),
and barrel nut (E). Tighten with the Allen wrench (N).
A
E
A
A
Adult Assembly
E
11
A
E
JCB M6 X 3 ½”
11
E
E
Barrel Nut
E
A
E
A
N
E
A
Allen wrench
A
STEP 4
E
04
B
Attach the short guard rail (05) to the end caps (04), using JCB M6 X 2 1/4”(B),
and barrel nut (E). Tighten with the Allen wrench (N).
B
E
05
04
Note : Screw holes on end caps
go on inside of guard rails.
B
JCB M6 X 2 1/4”
E
Barrel Nut
N
Allen wrench
COLUMBIA STAIRCASE BUNK
Adult Assembly
Page 5 of 11
Page 6
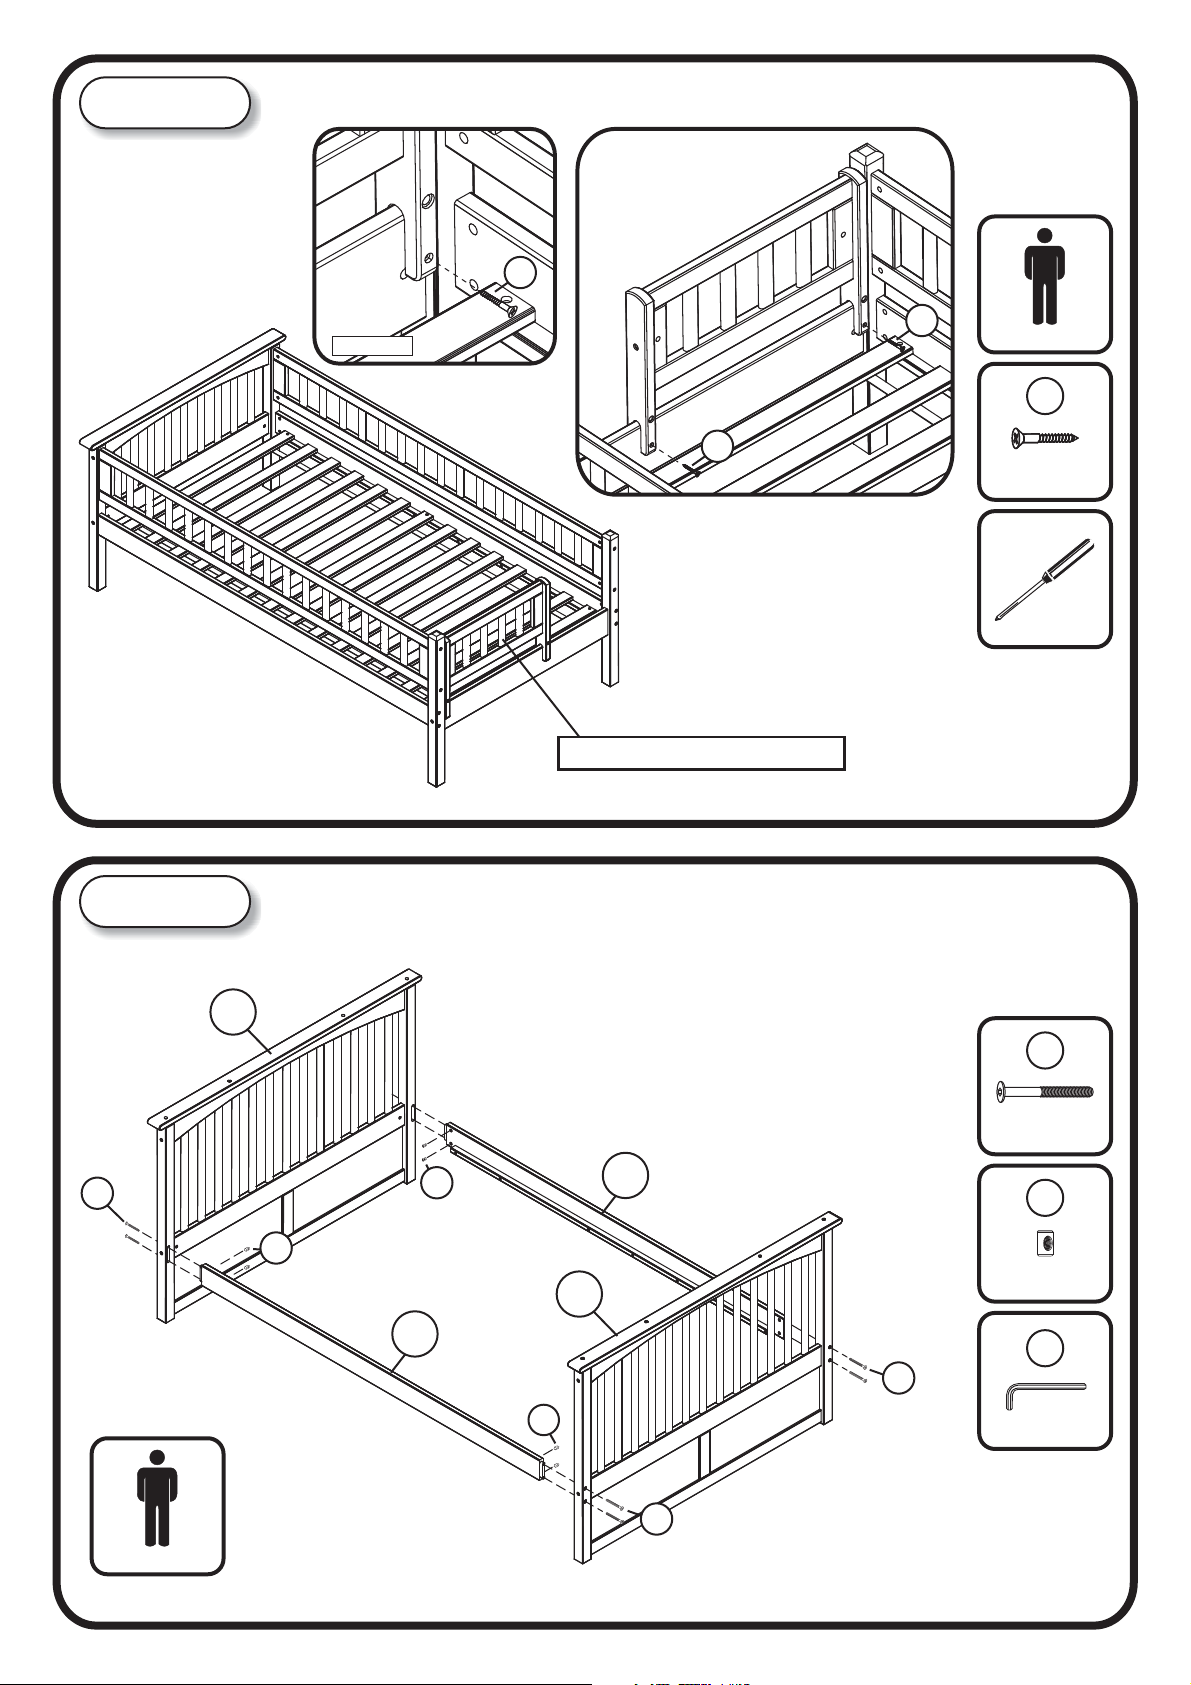
STEP 5
Attach the short guard rail assemblies to the upper panel assemblies as shown below,
using wood screw (I), tighten with the Phillips head screwdriver. ( Customer supplied )
INSIDE VIEW
I
STEP 6
I
ZOOM IN
Adult Assembly
I
I
WOOD SCREW
D6 X 1”
Note : Screw holes on end caps
go on inside of guard rails.
SHORT GUARD RAIL ASSEMBLIES
Customer Supplied
Phillips head
screwdriver
Attach the long rails (12) to the lower panel (10) using JCB M6 X 3 ½” (A), and barrel nut (E).
Tighten with the Allen wrench (N).
Full lower panel shown. Twin over Twin bunk use Twin lower panel.
A
Adult Assembly
10
A
JCB M6 X 3 ½”
E
12
E
E
Barrel Nut
10
12
A
E
A
N
Allen wrench
COLUMBIA STAIRCASE BUNK
Page 6 of 11
Page 7
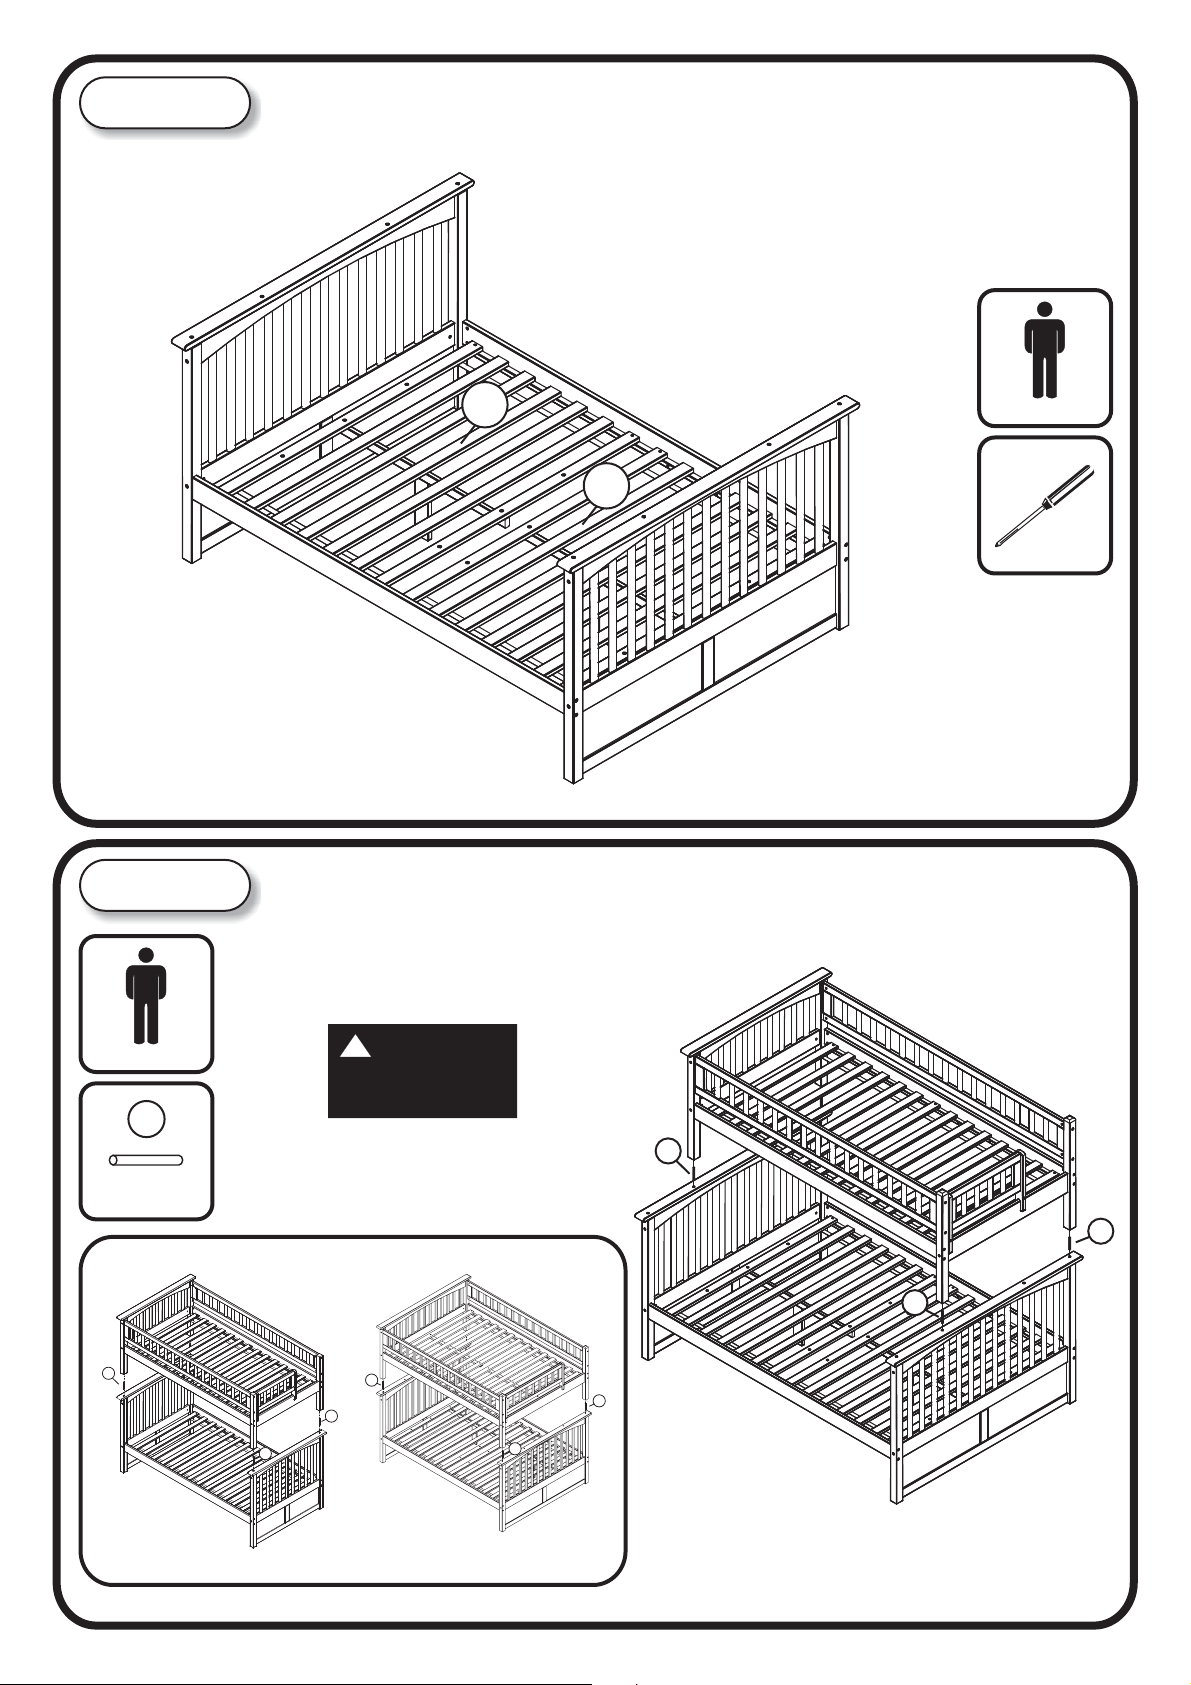
STEP 7
Lay the full slat kit (16) onto the bed. Fix in place using wood screws provided in the slat kit box.
FOR SLAT KIT ASSEMBLY follow assembly instructions included with slat kit.
16
Full size shown
Twin lower panel uses Twin slat kit
STEP 8
Insert metal pins (F) into the holes on top of the lower panels. Lift the upper panels onto the lower
panels as shown, and fit the metal pins into the holes in the bottom of the upper panel legs.
16
Adult Assembly
Customer Supplied
Phillips head
screwdriver
!
Adult Assembly
CAUTION
This step requires
two strong people.
F
Metal Pins
F
F
TWIN / TWIN FULL / FULL
COLUMBIA STAIRCASE BUNK
F
F
F
F
F
F
TWIN / FULL
F
Page 7 of 11
Page 8
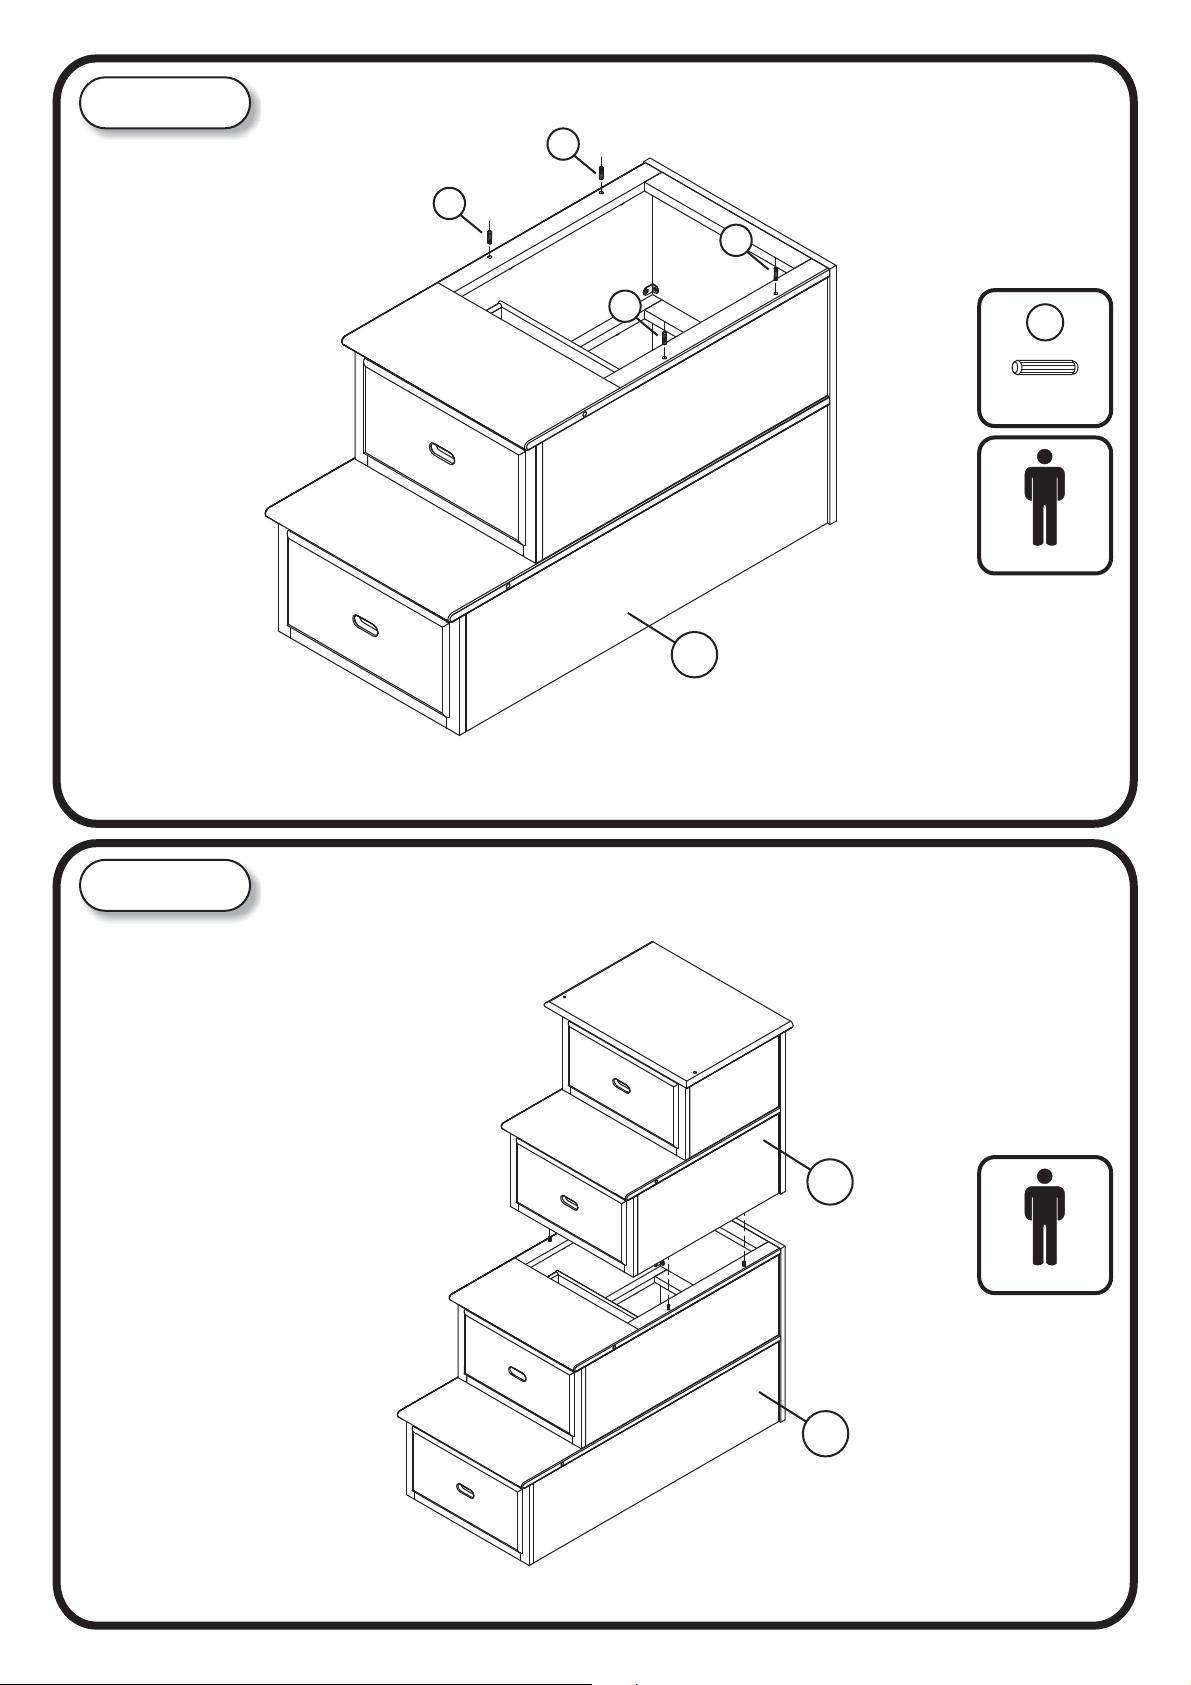
STEP 9
Insert wooden dowel (H) into the lower staircase drawer step (13) as shown below.
H
H
H
STEP 10
H
H
WOODEN DOWEL
Adult Assembly
13
Lift the upper staircase drawer step (14) onto the lower staircase drawer step (13) as shown below
and fit the wooden dowel into the holes in the bottom of the upper staircase drawer step (14).
COLUMBIA STAIRCASE BUNK
14
Adult Assembly
13
Page 8 of 11
Page 9
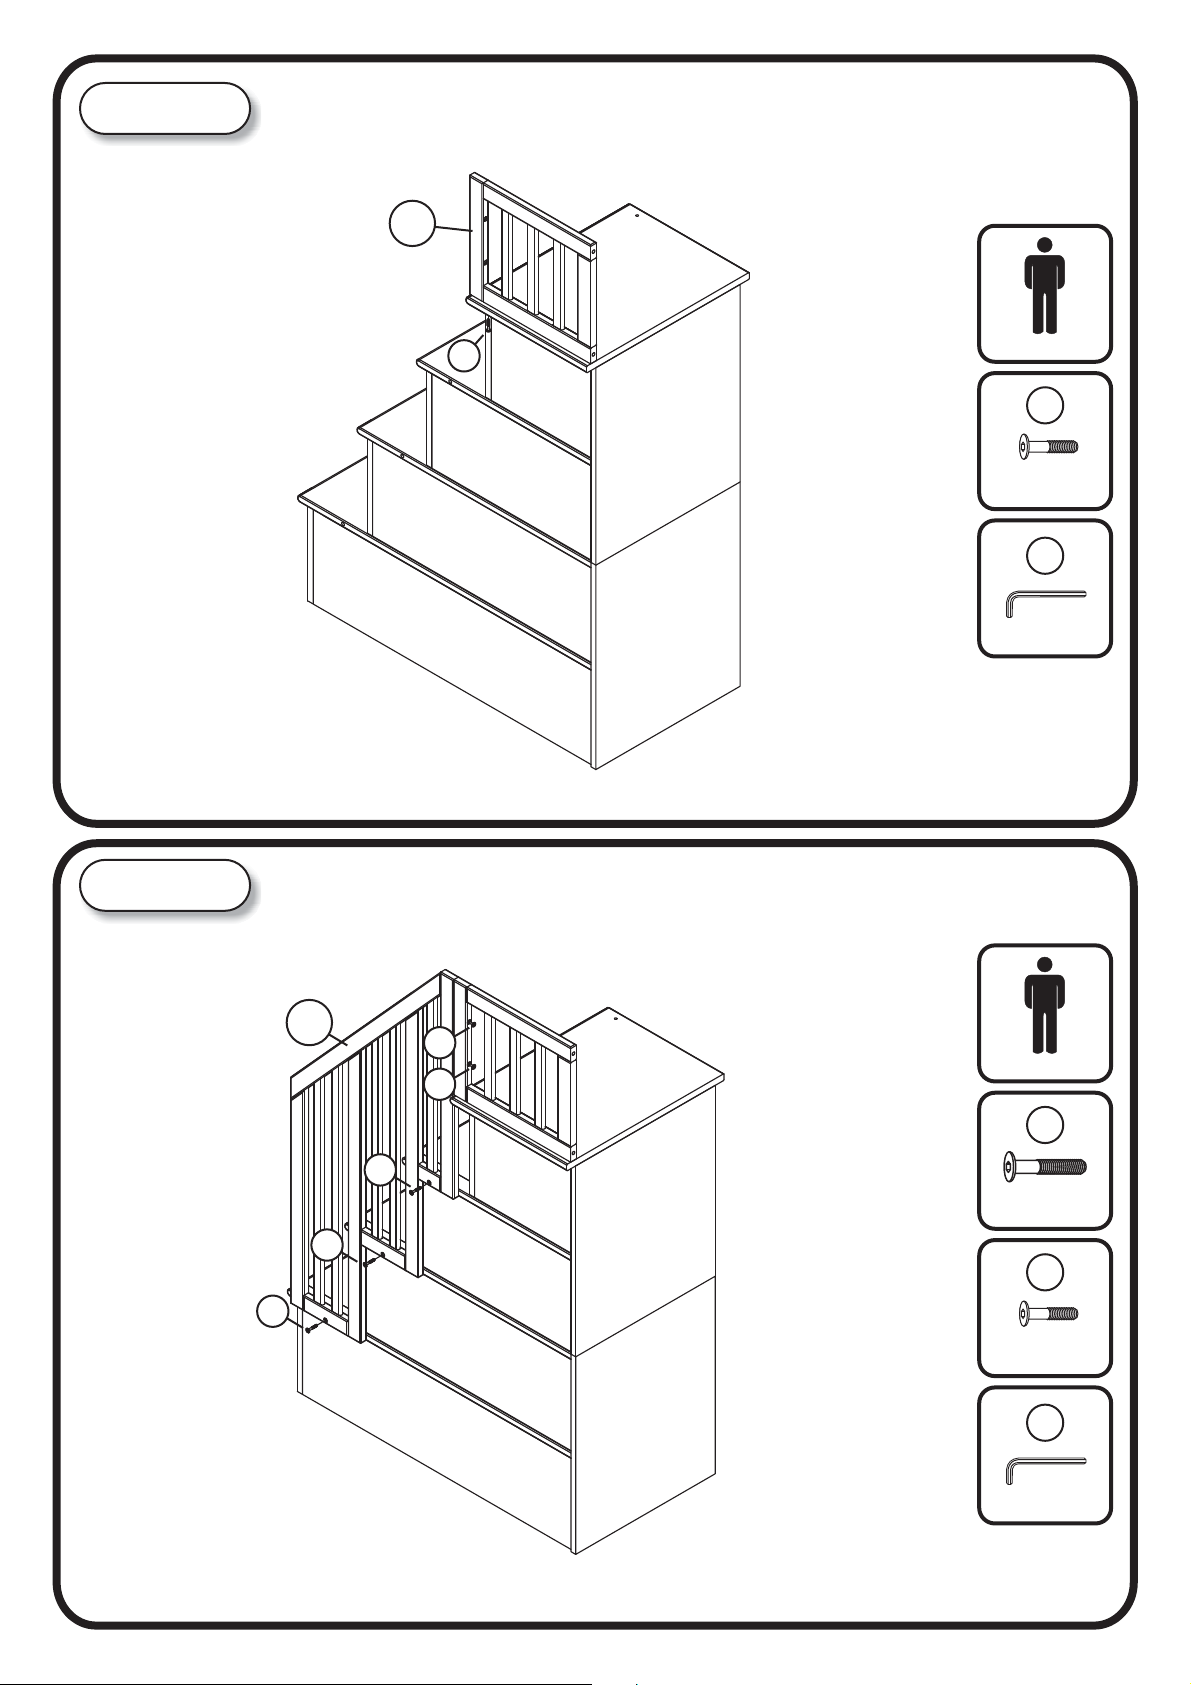
STEP 11
Attach the small side guard rail (08) to the drawer step assemblies . Using JCB M6 X 1 1/2” (C) .
Tighten with the Allen wrench (N).
08
STEP 12
C
Adult Assembly
C
JCB M6 X 1 ½”
N
Allen wrench
Attach the staircase guard rail (09) to the drawer step assemblies as shown below .
Using JCB M6 X 1 1/2” (C) and JCB M6 X 2 1/4”(B), tighten with the Allen wrench (N).
09
C
COLUMBIA STAIRCASE BUNK
B
Adult Assembly
B
B
C
JCB M6 X 2 1/4”
C
C
JCB M6 X 1 1/2”
N
Allen wrench
Page 9 of 11
Page 10
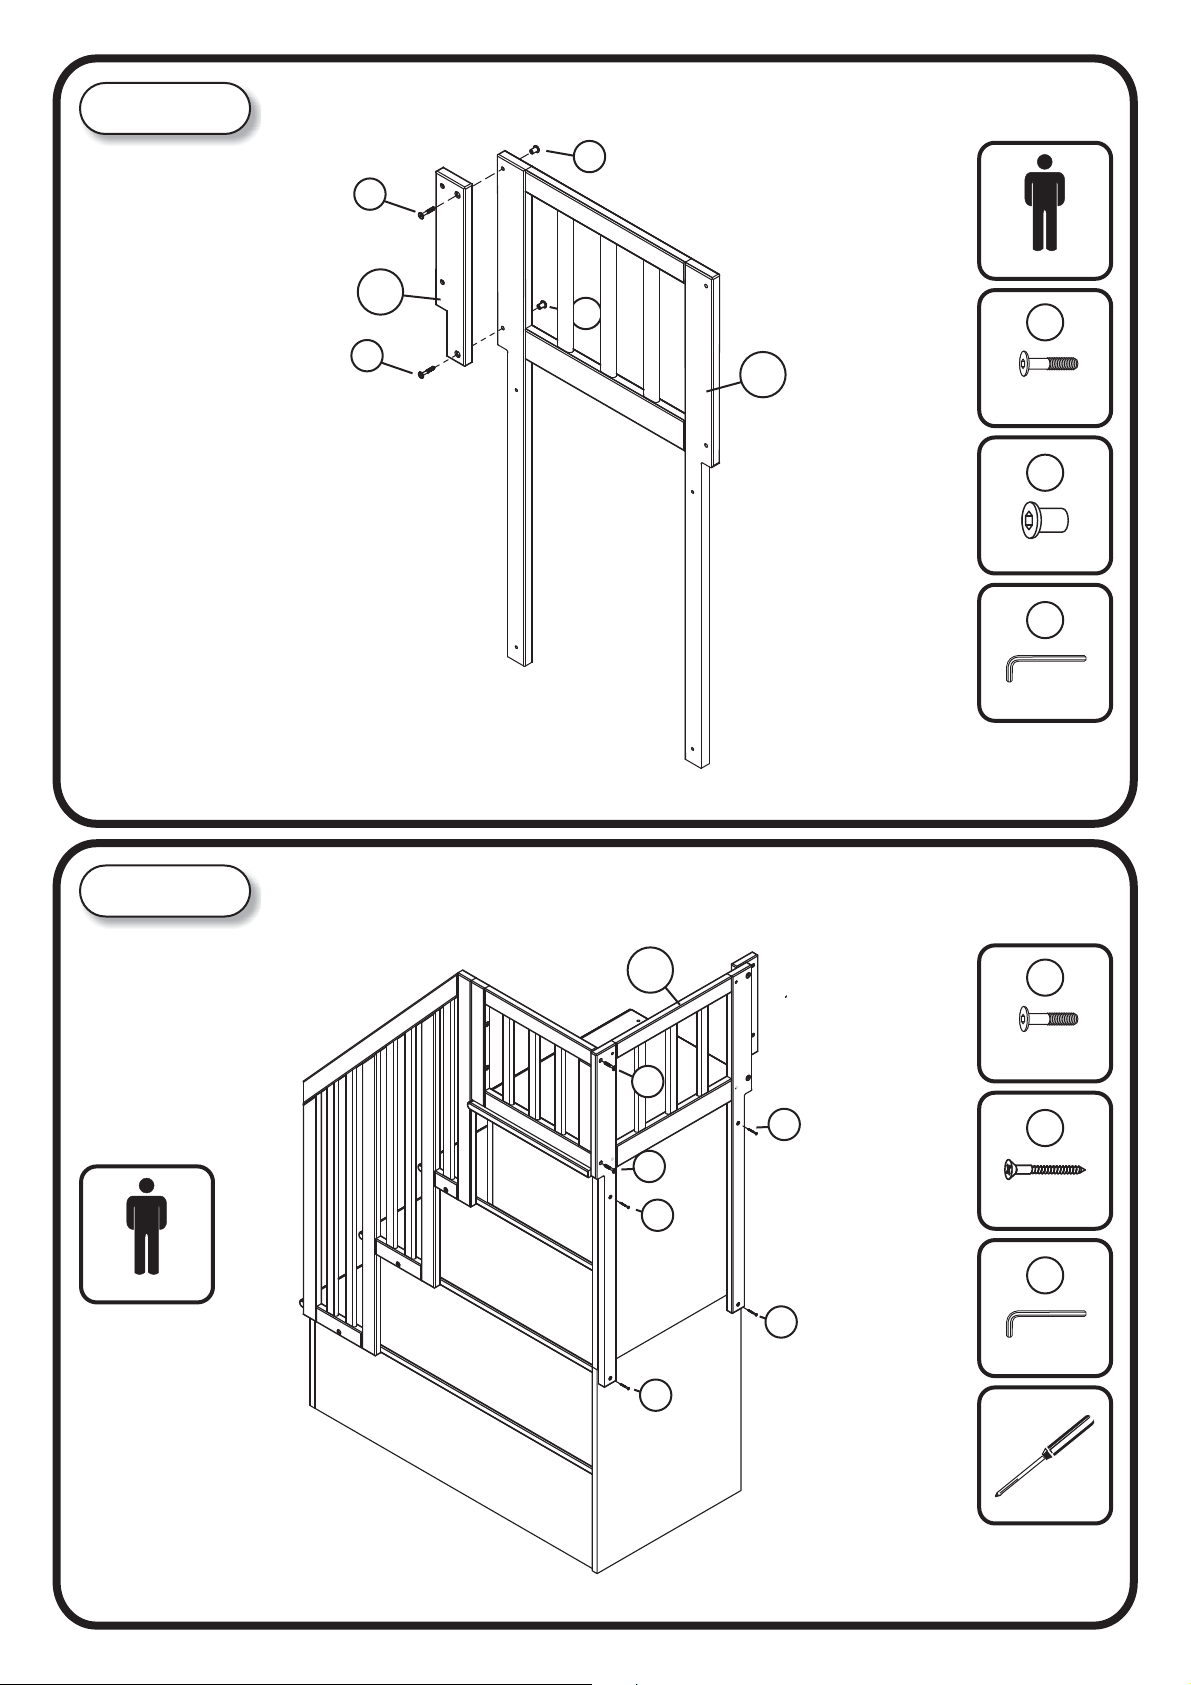
STEP 13
Attach the small back guard rail (07) to the wood bracket (06) . Using JCB M6 X 1 1/2” (C) and
cap nut (G).Tighten with the Allen wrench (N).
G
C
Adult Assembly
06
G
C
C
07
JCB M6 X 1 ½”
G
Cap Nut
N
STEP 14
Allen wrench
Attach the small back guard rail assemblies (07) to the staircase assemblies as shown
below . Using JCB M6 X 1 1/2” (C), tighten with the Allen wrench (N).
Using wood screw (J) tighten with phillips head screwdriver. (Customer supplied )
07
JCB M6 X 1 ½”
C
J
C
J
WOOD SCREW
C
J
6 X 1 ½”
Adult Assembly
COLUMBIA STAIRCASE BUNK
N
J
Allen wrench
J
Customer Supplied
Phillips head
screwdriver
Page 10 of 11
Page 11
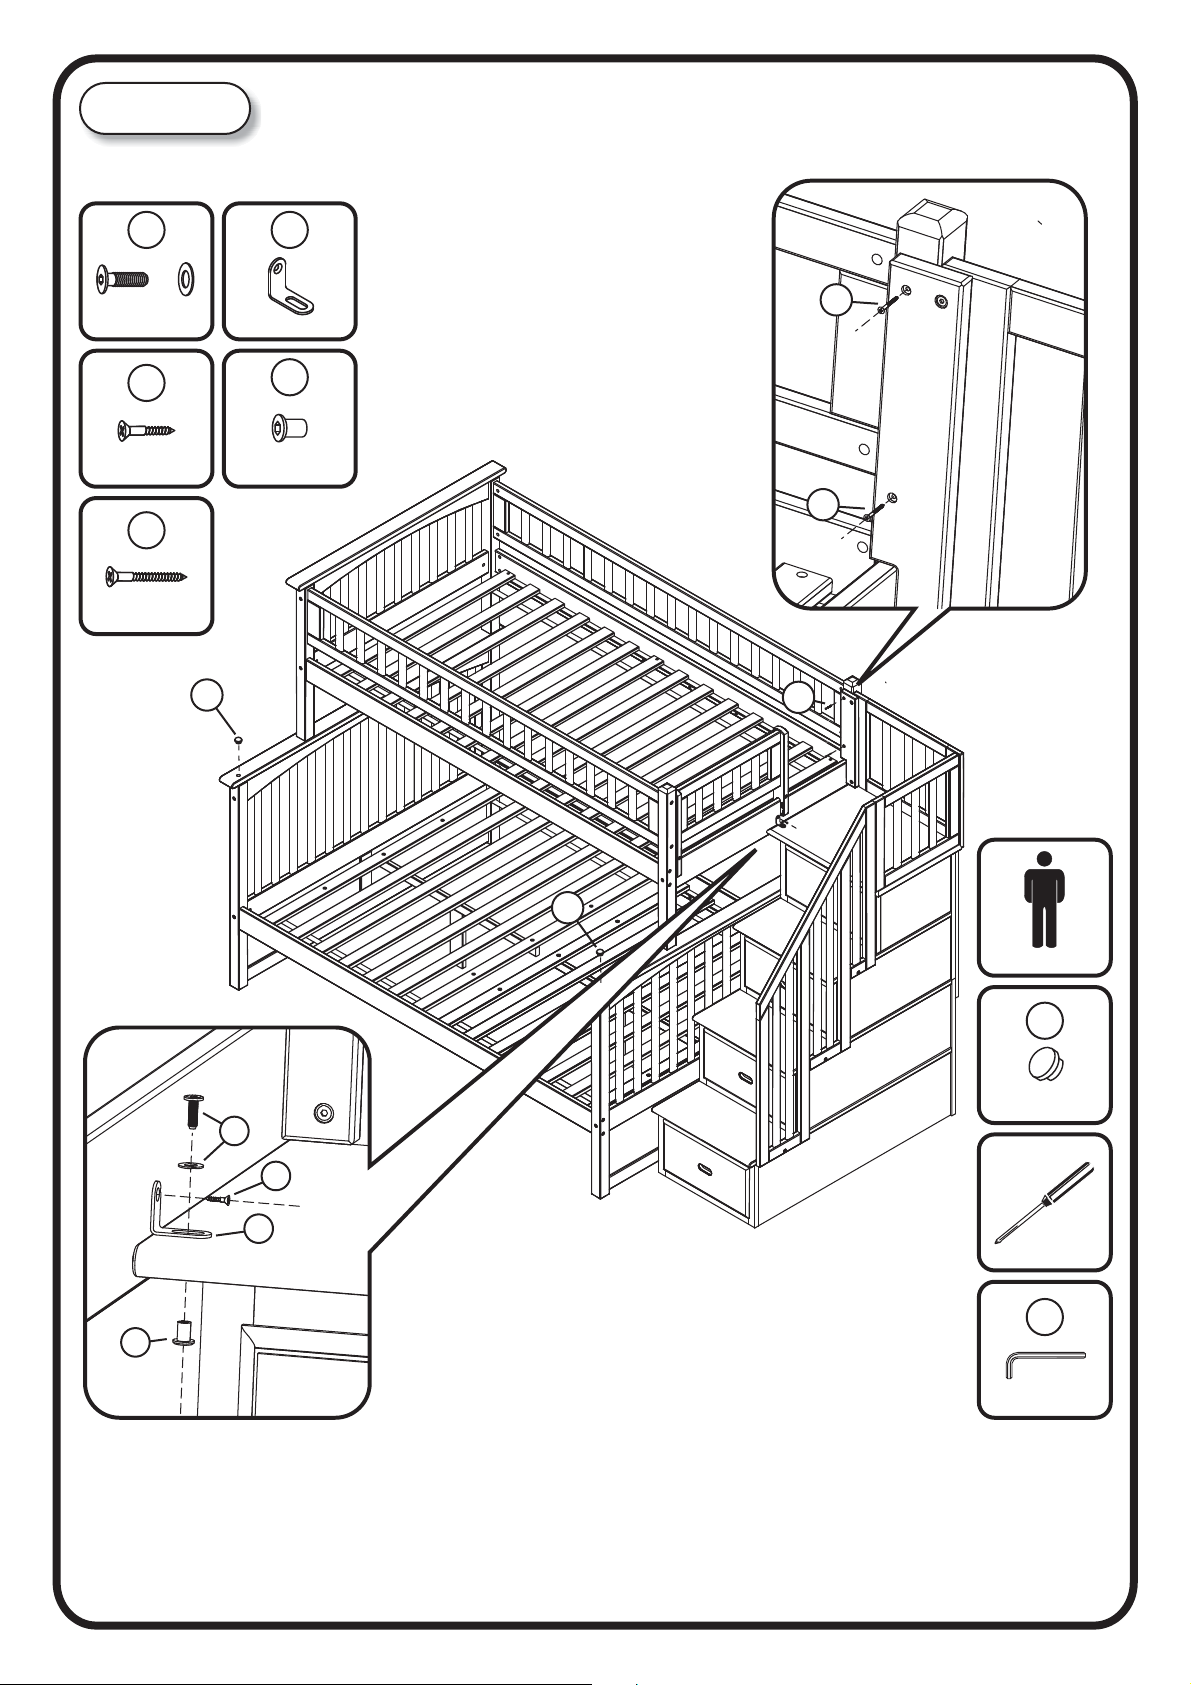
STEP 15
Move the bunk bed and staircase assemblies where you want to place them in the room.
Attach staircase assembly to the bunk bed assembly as shown below. Fix wood bracket
to upper bunk panel using wood screws as shown.
D
JCB M6 X 3/4”
Flat Washer
K
Wood Screw
D6 X 3/4”
J
Wood Screw
D6 X 1 ½”
M
L
J
L Bracket
G
TWIN OVER FULL SHOWN
Cap Nut
J
J
M
Adult Assembly
M
Wood Button
In Full lower panel carton
D
Customer Supplied
K
L
Phillips head
screwdriver
N
G
Using L bracket (L), JCB (D) and cap nut (G). Tighten with Allen
wrench (N). Insert wood screw (J)(K) tighten with Phillips head
Allen wrench
screwdriver. Lastly, cover holes with wood buttons (M)(Twin Full, Full Full ).
Congratulations !
Your Columbia staircase bunk bed is now ready for use.
and that all parts are secure before use and periodically check that all screws are tight to ensure lasting Safety.
We recommend that you double check that all screws are tight,
COLUMBIA STAIRCASE BUNK
Page 11 of 11
 Loading...