

Page 1
Product Manual | Manuel du Produit | Manual del Producto
1.330.274.8317
www.ATLANTICWATERGARDENS.com
SOLW2 / SOLW6 / SOLWLR / SOLWH06 / SOLWH12 /
SOLWSL2 / SOL30X4 / SOLW88X10 / SOLTRANS88
L
Page 2

2
Introduction
Thank you for purchasing Atlantic SOL Lighting. Atlantic’s SOL lighting features solid brass
bodies with an oil-rubbed bronze finish. These lights work under water and in open air
applications to give your water feature a soothing, warming glow after the sun goes down.
Multiple fixtures can be connected to be run through one transformer.
Prior to Operation and Installation
Caution:
• DO NOT operate this product under any conditions other than those for which it is
specified. Failure to observe these precautions can lead to electrical shock, product failure,
or other problems.
• Follow all aspects of electrical codes when installing SOL Lighting.
• To reduce the risk of electrical shock, connect transformer to a 110 volt receptacle protected
by a ground fault circuit interrupter (GFCI).
• Always verify that the lens cover is tightly secured before submersing the fixture
• SOL Warm White lights connect via a 2 wire quick-connect plug that is gasketed for
outdoor use. Quick-connect plugs are not waterproof and should not be submersed.
• Warm White SOL lights require a 12 volt AC power source
• A small rectangular driver labeled *DO NOT REMOVE* is attached to the end of the light
cord by a quick-connect plug. The driver converts AC current from the transformer to DC
current before it is sent to the light.
• The driver may be temporarily disconnected at this junction when pulling the light cord
through a conduit sleeve or hardscape wall. Once the cord is pulled the driver must be
reattached before connecting the light to a power source. Failure to reattach the driver will
damage the LED and void the warranty.
• Permanently removing the driver or cutting/ shortening the cord between the driver and the
light fixture will damage the LED and void the warranty
• Extension cords (part # SOLWEXT) are available to add an additional 20’ of cord to any
SOL Light. Only one cord can be used on each light. Never connect multiple extension
cords together.
• Atlantic SOL Warm White lights can be connected to a larger outdoor lighting system by
cutting the cord and stripping the wires, however this must be done on the 12 volt AC input
side of the driver. A quick-connect pigtail (REP SOLPIGTAIL) is available so lights can be
attached to a larger transformer without cutting/ stripping the wires.
SPOTLIGHTS & LIGHT RING - SOLW2 / SOLW6 / SOLWLR
Installation
SOL Spotlights oer three dierent mounting options for your convenience:
• Adjustable stand: for placement on rock ledges, under waterfalls or for
highlighting streambeds
• Ground stake: for installation around the perimeter of the water feature or
in conventional landscape installations
• Nested: without the stand or stake, amongst the pond stones
The SOL Light Ring is ideal for illuminating fountains and uplighting waterfalls.
Proper light placement is important for every project. Whenever possible, lights should be
positioned facing away from the viewing area to minimize hot spots. When camouflaging the
light cord with rocks and gravel, always leave enough slack in the cord so that the fixture can be
raised above water level for servicing.
Page 3
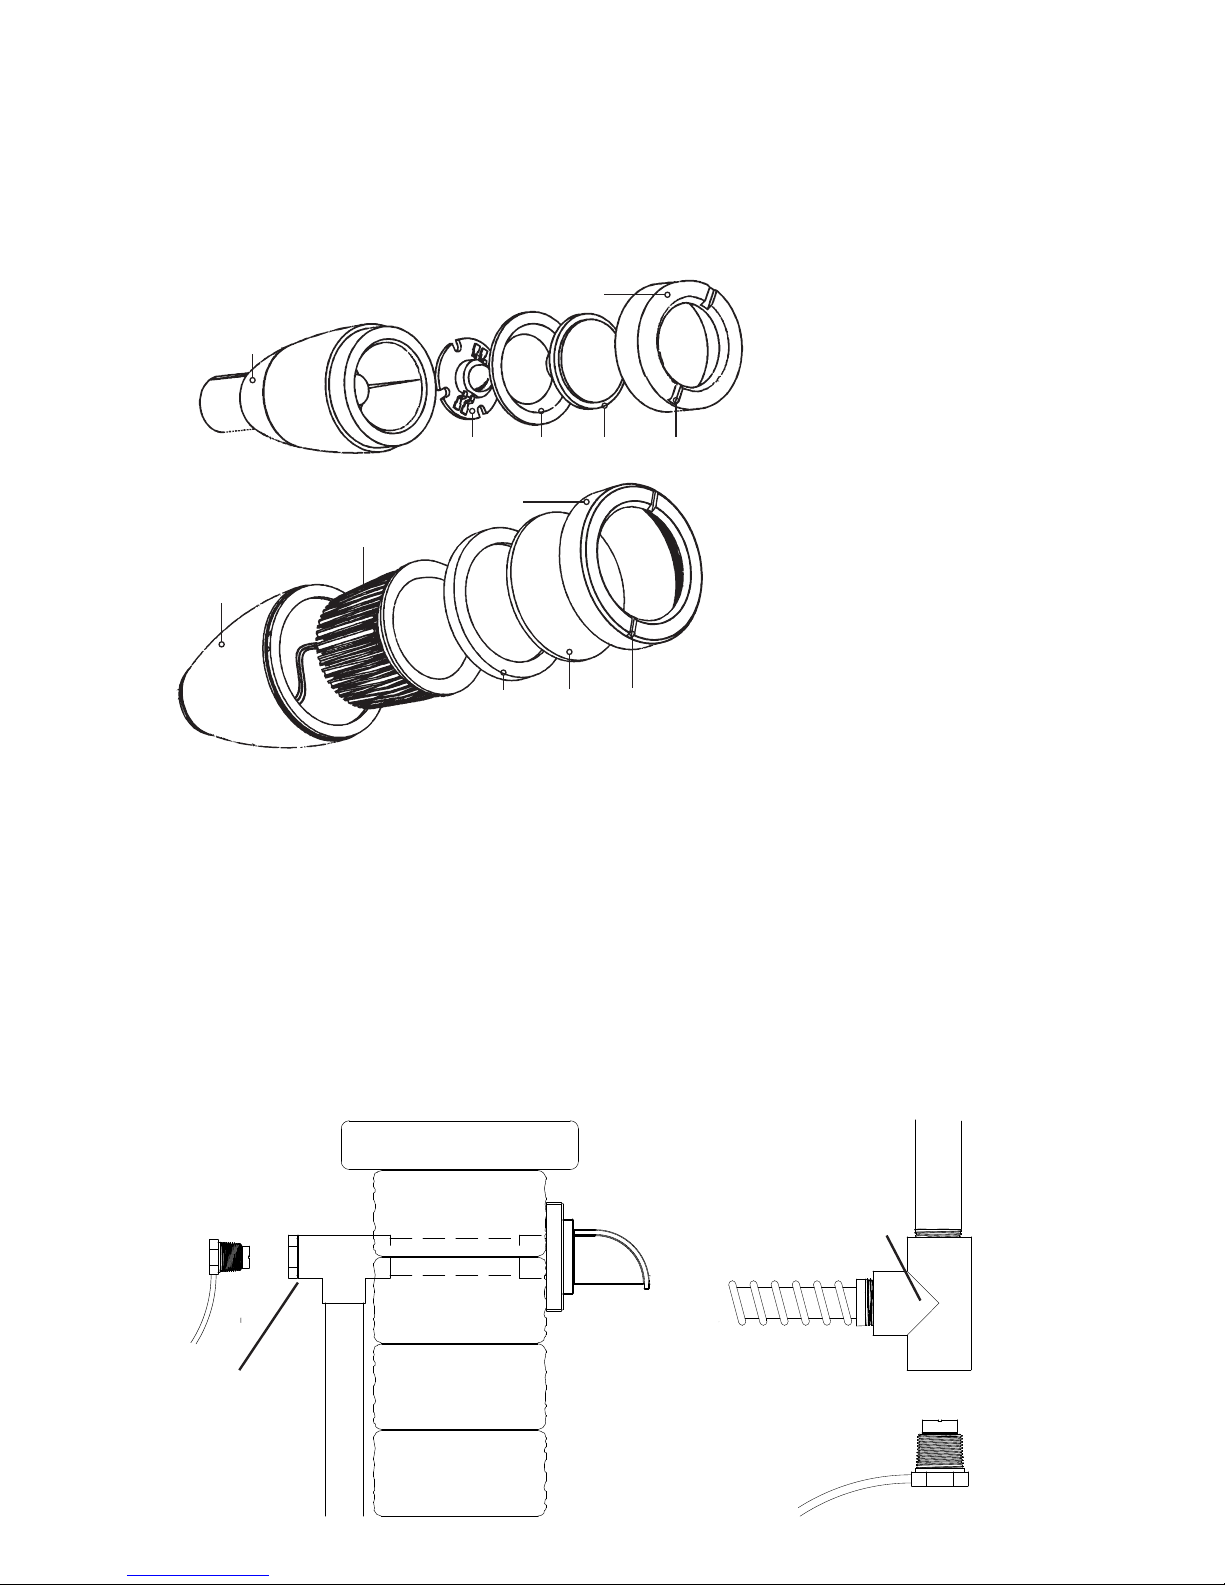
Figure 1.
1½” T
1½” x 1”
Reducing
bushing
3
Brass
Body
Disc Lamp Gasket Lens Slot
Brass Lens Ring
SOLW2:
Maintenance
Replacement LED Bulbs are available for SOL Spotlights and Compact Spotlights. To loosen and
tighten the brass lens ring on SOL Spotlights and Compact Spotlights, use the included key.
Simply place the key in the slots on the brass lens ring to loosen or tighten. Ensure that all
components are installed correctly after servicing. Inspect the silicone gaskets for defects and
proper placement before re-assembling. Ensure that the lens ring is tightly secured before
submersing the fixture.
Brass Body
Brass Lens Ring
LED Bulb
Gasket Lens Slot
SOLW6:
SPOUT LIGHT - SOLWSL2
Installation
The Spout Light can be installed behind a wall, shining through a wall spout (see Figure 1) or
under a core-drilled stone or pot (see Figure 2). The light is designed to be installed in any tee
that has 1” female threads. If the tee is larger than 1”, a reducing bushing with 1” female threads
will be needed. Install the light into the tee, with the light facing the water outlet. Apply teflon
tape, paste or RTV silicone to the threads of the light and thread the light into the fitting. Do not
use the cord to twist in the light or allow it to become twisted when tightening. The spout light
cannot transmit light through sweeps or around corners. There must be a direct path for the
light to be transmitted. The use of rigid PVC plumbing (1” diameter or greater) is highly
recommended for the best results.
Figure 2.
¾” KF tubing
1” Female
threaded T
Page 4
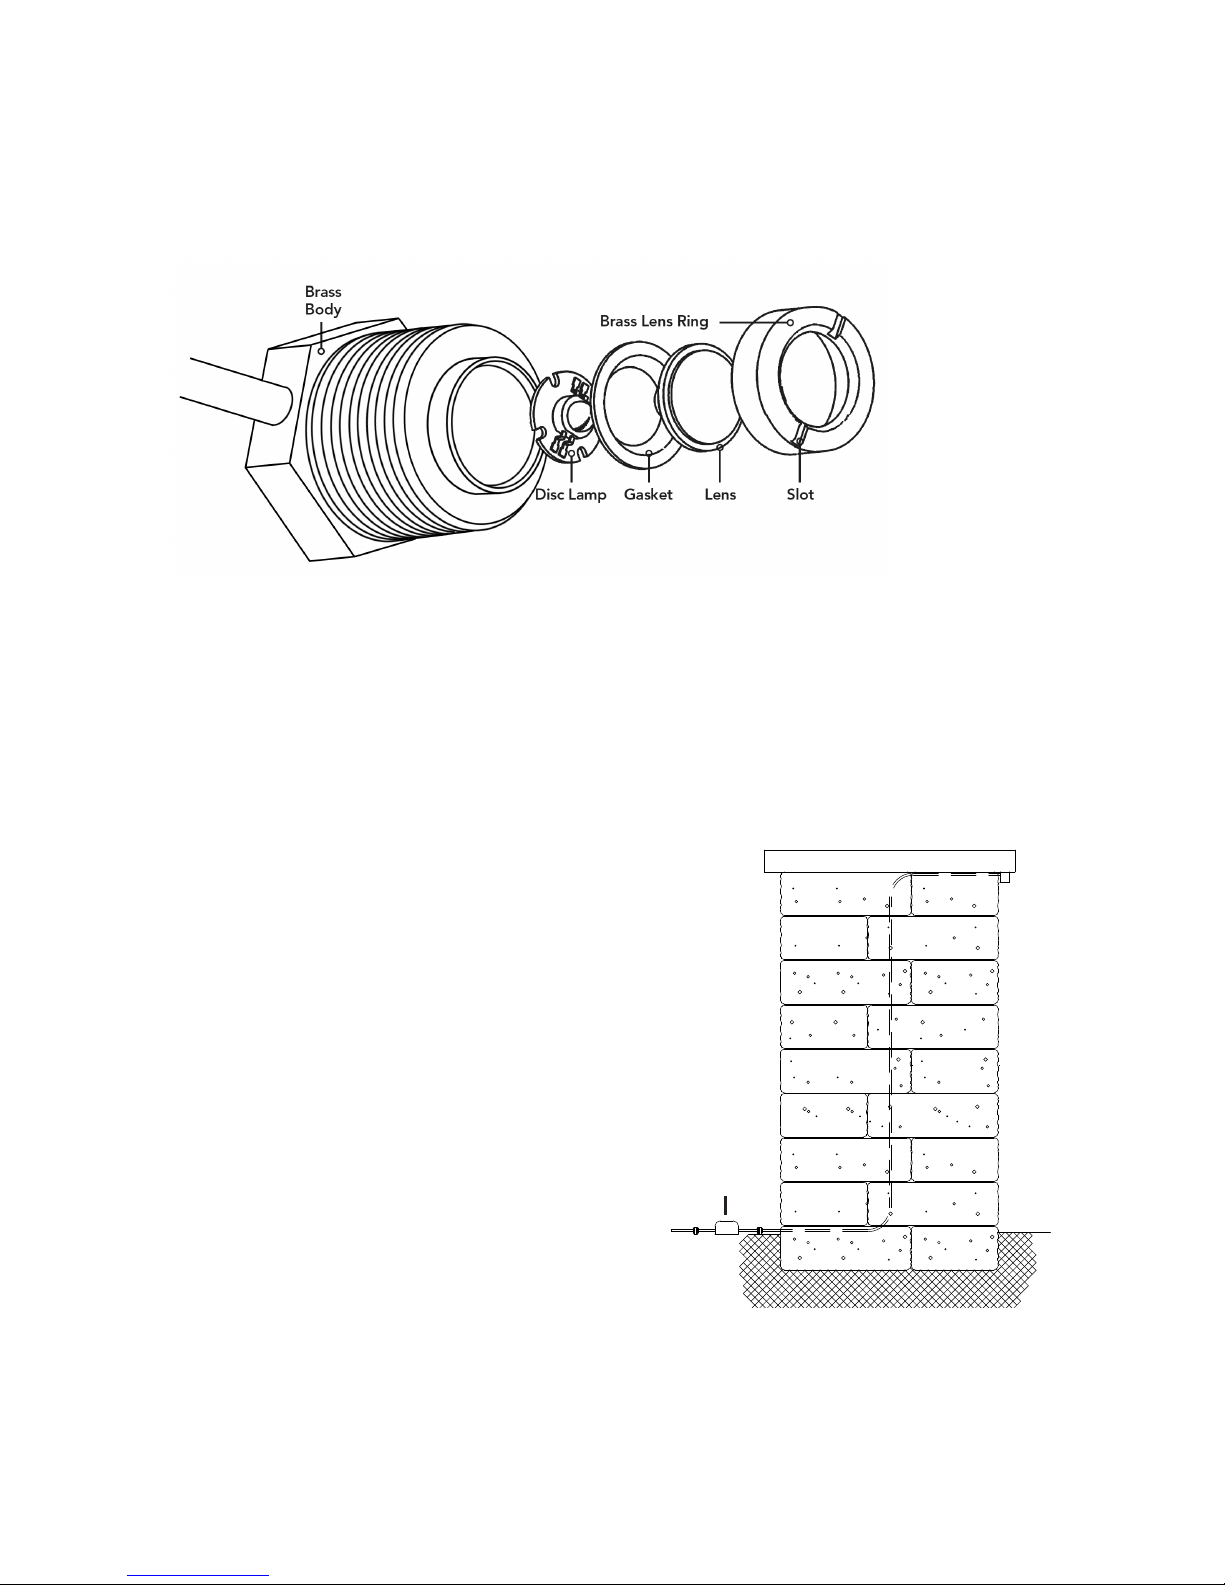
SOLWSL2
Maintenance
Replacement LED Bulbs are available for SOL Spout Lights. To loosen and tighten the brass lens
ring on SOL Spout Lights, use the included key. Simply place the key in the slots on the brass lens
ring to loosen or tighten. Ensure that all components are installed correctly after servicing. Inspect
the silicone gaskets for defects and proper placement before re-assembling. Ensure that the lens
ring is tightly secured before submersing the fixture.
HARDSCAPE LIGHTS - SOLWH06 / SOLWH12
Installation
Hardscape Wall Lights are designed to be installed into walls and columns, just under the
capstone. The LED light strip and driver can be replaced without removing the capstone. The
cord between the driver connection and the light
is approximately 19’, enabling the driver to be left
outside of the column or wall for future access.
When laying the base course of stone, either notch
the cord into the wall or leave a notch slightly larger
than ¾” to pass the cord through. If multiple lights
are going to be installed, the notch will need to be
slightly larger to accommodate multiple cords.
When installing the mounting bracket, make
sure to notch the stone for the ¼”cord. Test fit the
mounting bracket and cord, so that it does not rock
or put too much pressure on the cord. The holes in
the bracket are for glue points to hold the capstone
and bracket in place.
NOTE: The Hardscape Lights are not submersible.
Driver
4
Page 5
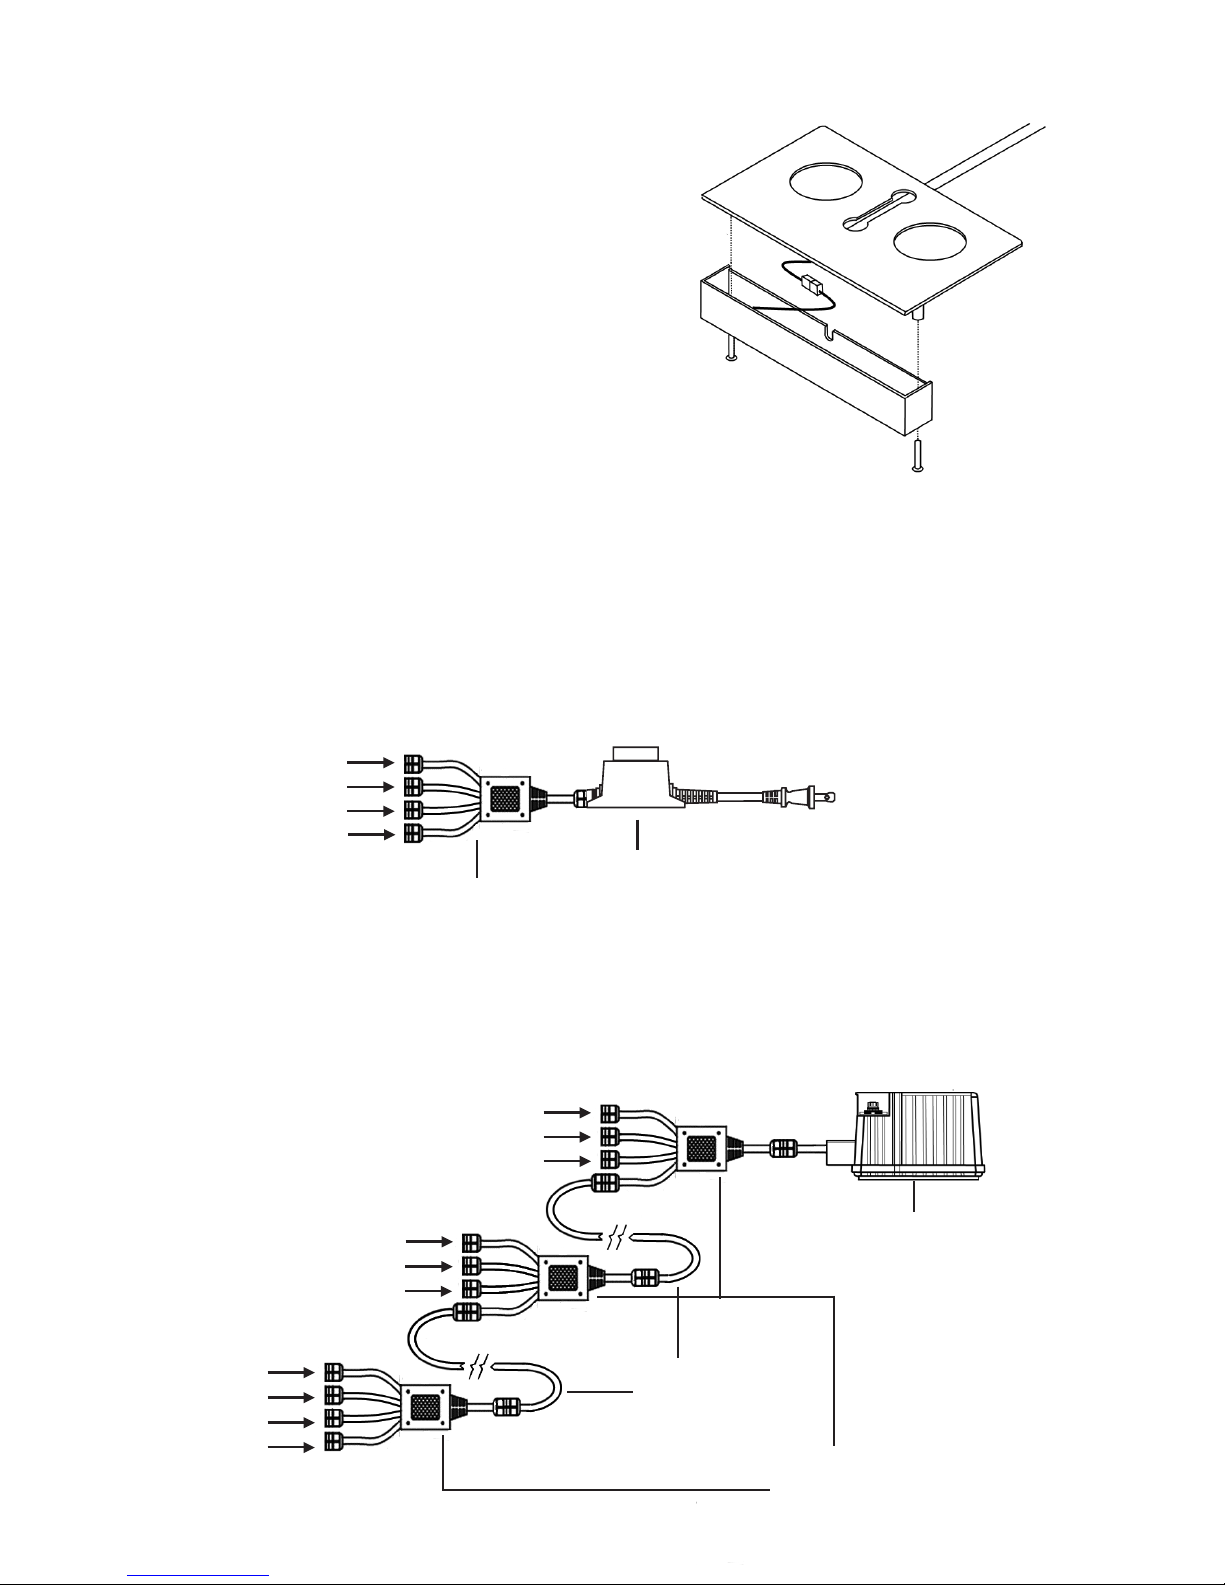
SOLWEXT
20’ EXTENSION
CORD
SOLWSPL4
4-WAY SPLITTER
SOLTRANS88
LIGHT #1
LIGHT #2
LIGHT #3
LIGHT #4
LIGHT #5
LIGHT #6
LIGHT #7
LIGHT #8
LIGHT #9
LIGHT #10
Maintenance
Replacement LED fixtures are available
for Hardscape Lights. Remove the screws
on the existing light, being careful not
to let the light strip fall, as this could break
the plug connecting the light to the cord.
Lower the light and squeeze the locking
clip; this will allow the plug to be separated.
Plug in the new light, making sure the
gasket has not moved or shifted and that
the notched edge of the light strip is
between the two ridges on the cord
gasket. Align the screw holes and hand
tighten the screws.
WIRING KITS - SOL30X4 / SOLW88X10
All SOL Warm White lights and wiring components connect via a 2 wire quick-connect plug
that is gasketed for outdoor use. Quick-connect plugs are not waterproof and should not
be submersed.
The SOL30X4 wiring kit enables up to four SOL Warm White lights (any models) to be
installed together and powered by a single 30 watt transformer. The transformer must
be plugged into a properly grounded GFCI outlet. Please follow the connection diagram
below for proper installation.
The SOL88X10 wiring kit enables up to ten SOL Warm White lights (any models) to be
installed together and controlled by a single transformer and timer. The transformer must
be plugged into a properly grounded GFCI outlet. Please follow the connection diagram
below for proper installation.
SOLWSPL4
4-WAY SPLITTER
30 Watt
Transformer
LIGHT #1
LIGHT #2
LIGHT #3
LIGHT #4
5
Page 6
Operation
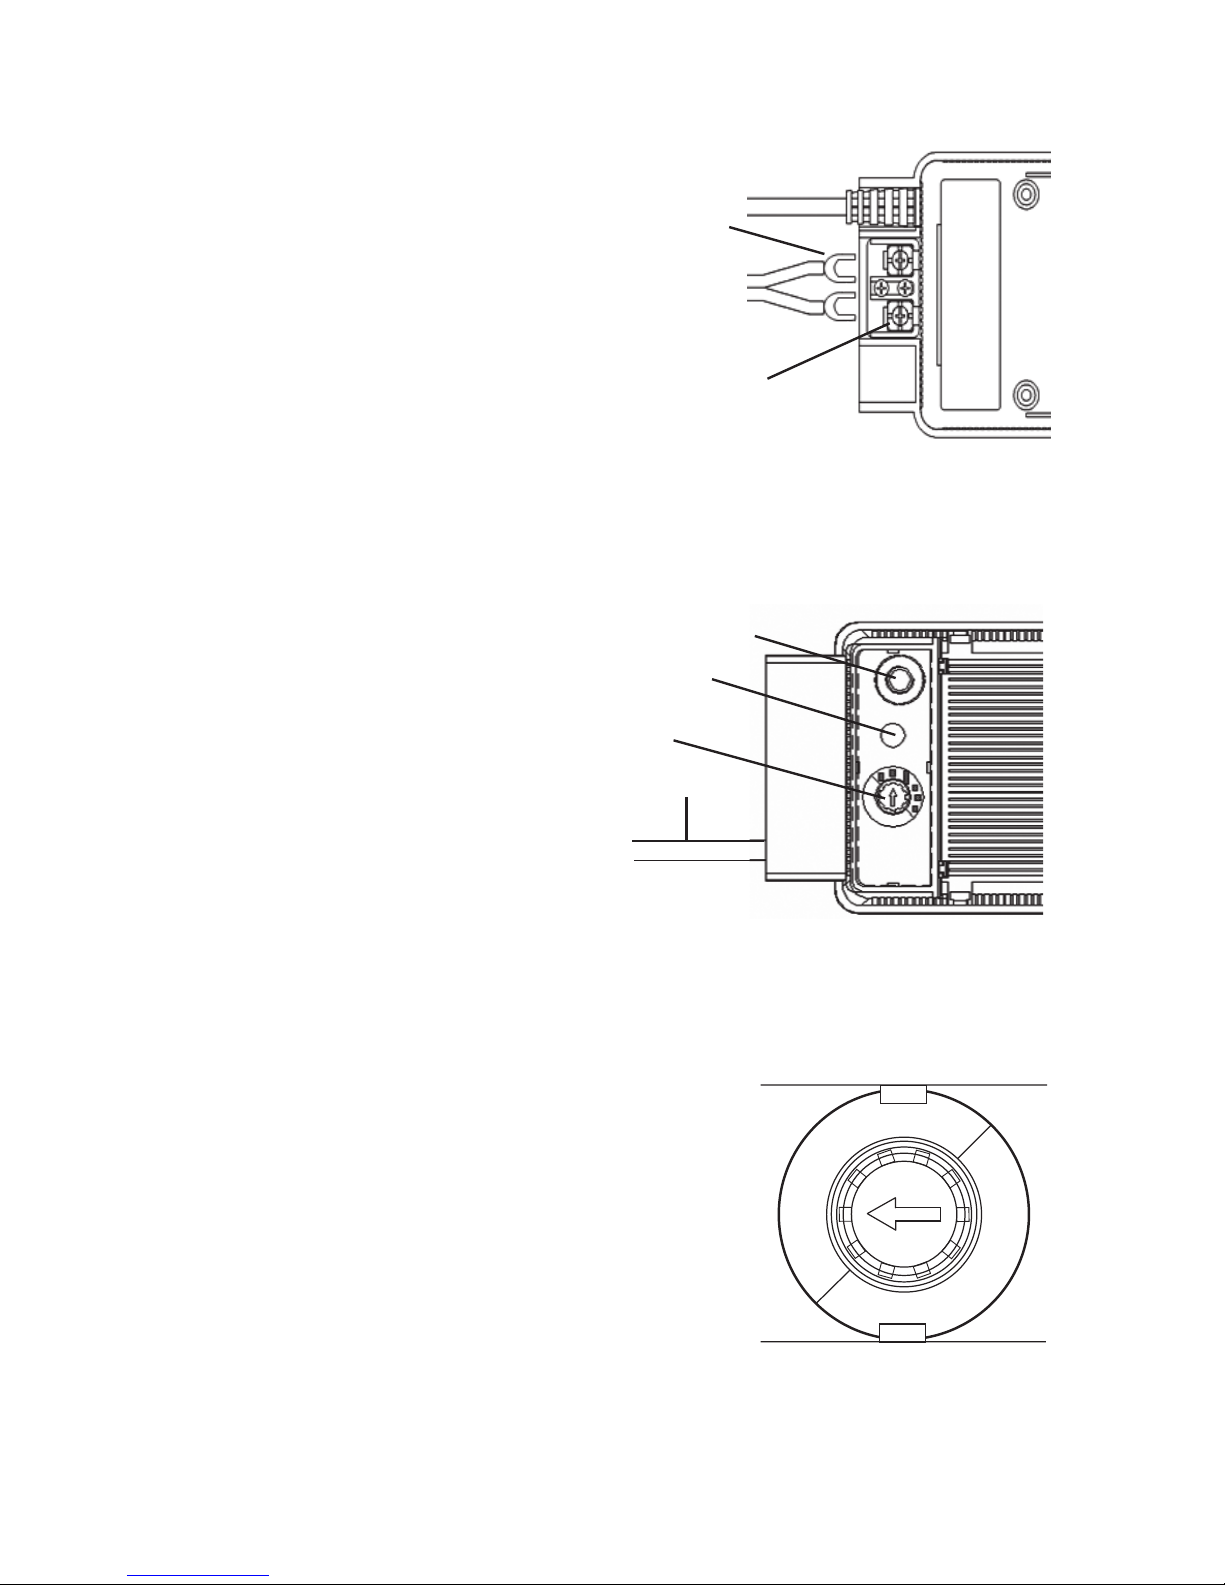
The SOLTRANS88 has an easily
understood control panel
featuring a rotary timer control
switch, photocell and circuit
breaker / reset button.
The circuit breaker will turn o
power to the lighting system in
to case of overload / power surge.
If the circuit is tripped, inspect / repair
the lighting system and depress the reset
button to restore power. The photocell
automatically turns the transformer on
when it begins to get dark outside. The
photocell does not need to be in contact with direct sunlight; however it must have access to
indirect sunlight to operate eectively.
The timer switch provides several modes of operation. You can choose OFF, ON, AUTO, 4H, 6H,
or 8H.
OFF: Output power is o / system is o
ON: Output power is on / system is on at all times
AUTO: Photo cell will turn the output power on at
dusk and o at dawn
4H: Photo cell will turn the output power on at
dusk and it will turn o after 4 hours
6H: Photo cell will turn the output power on at
dusk and it will turn o after 6 hours
8H: Photo cell will turn the output power on at
dusk and it will turn o after 8 hours
Input Power Cord
Timer Control
Photocell Sensor
Circuit Breaker / Reset Button
AUTO
ON
OFF
4H
6H
8H
6
WIRING KITS - SOLTRANS88
Installation
Connect the supplied quick-connect pigtail
to the power outlet on the back of the
transformer. Loosen the screws on the
outlet terminals and slide the spade
connectors on the pigtail under the
screw plate. Tighten the screws to
secure the spade connectors.
Mount the Transformer in the desired location.
The Transformer is weather resistant and must
be mounted above the ground on a wall or post.
Ensure that the power cord is within reach of a properly
grounded Ground Fault Circuit Interrupter (GFCI) outlet.
After all connections to low voltage lights have been completed, plug the input power cord
into the 120 volt GFCI outlet to complete installation.
Spade
Connectors
Outlet Power
Terminals
Page 7
Warranty
All Atlantic SOL Warm White Lighting carries a five-year limited warranty.
All SOL Wiring Components carry a five-year limited warranty.
Atlantic SOLTRANS88 carries a one-year limited warranty.
This limited warranty is extended solely to the original purchaser commencing from the date
on the original purchase receipt and is void if any of the following apply:
• The cord has been cut or altered between the driver and the light body.
• The light body / LED components have been misused or abused.
• The light body / LED components have been disassembled or modified other than as
described in this manual.
This warranty excludes labor / cost of labor for removal or installation of any product.
Troubleshooting Guide
Always turn o power before inspecting the SOL lights. Failure to observe this precaution can
result in a serious accident.
Before ordering repairs, carefully read through this instruction booklet. If the problem persists,
contact your dealer.
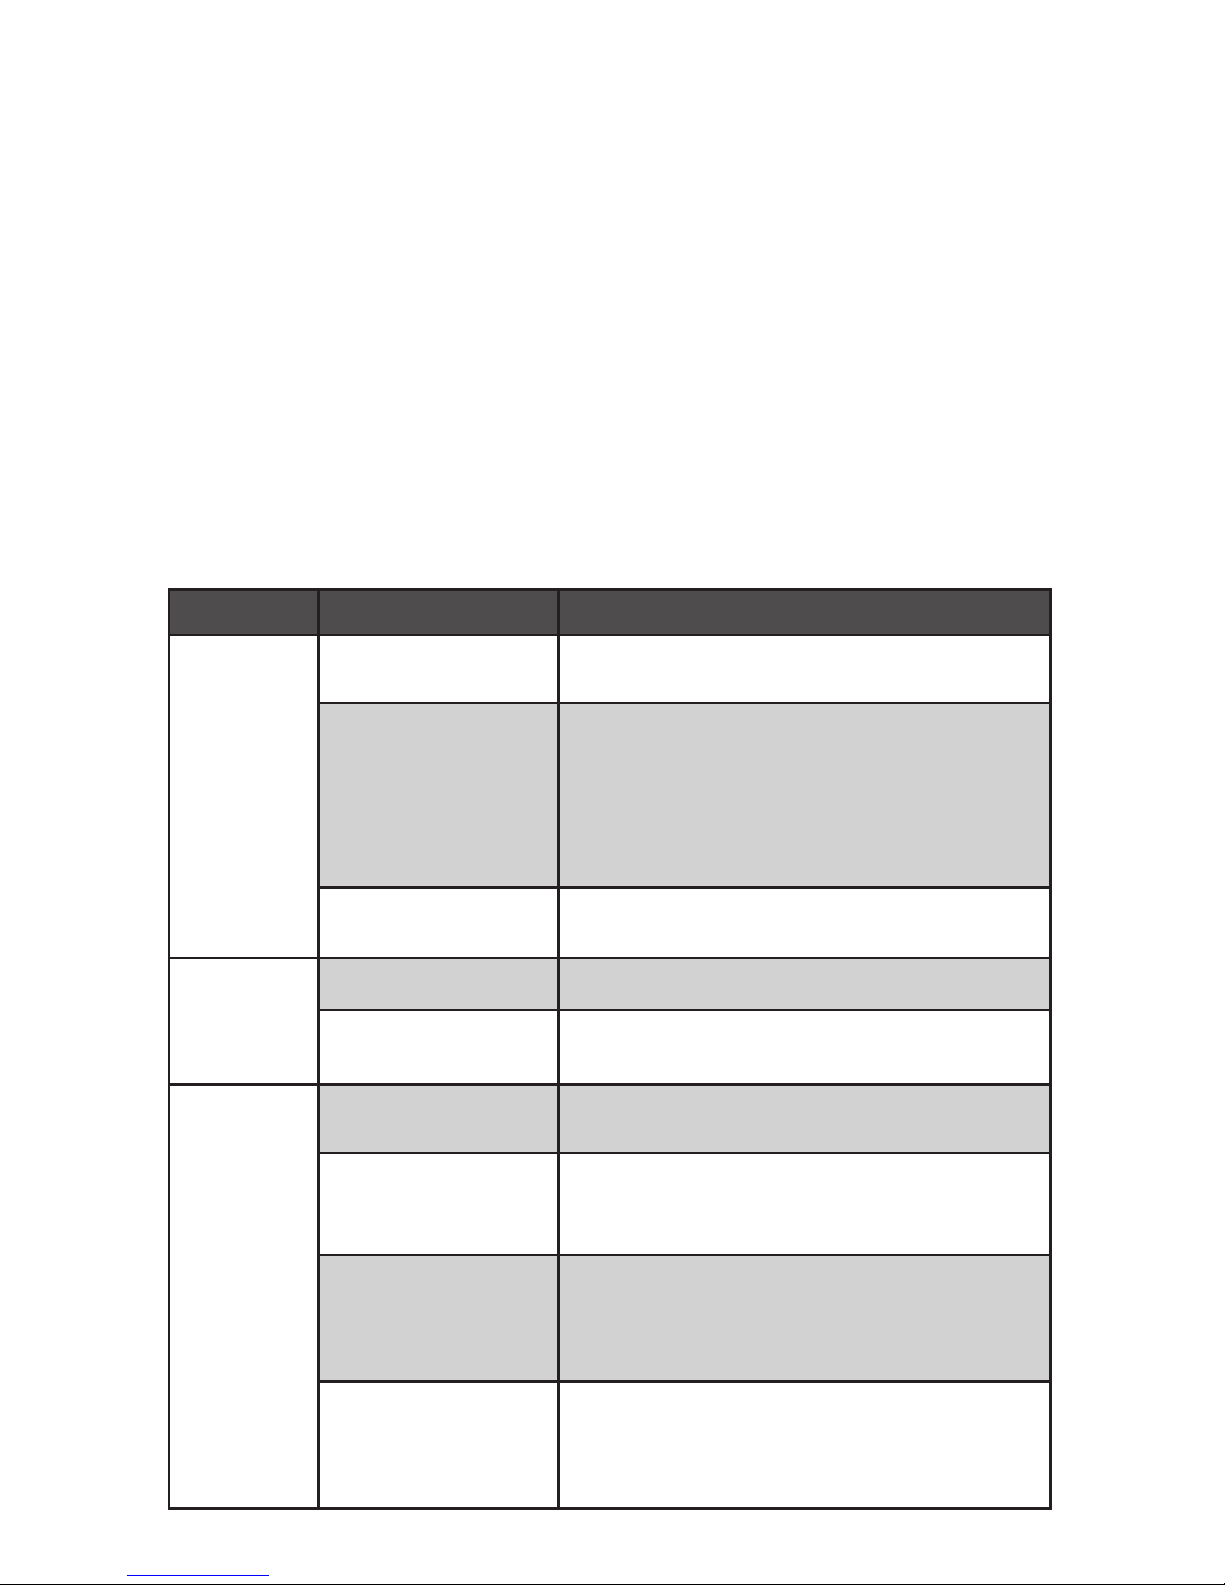
Problem Possible Cause Possible Solution
Lights will
not turn on
No input power to
the transfomer
Verify power to the outlet is on / Check GFCI
reset
No outlet power from
the transformer
Check the reset button / circuit breaker on the
transformer
Verify if the transformer is operational by
moving the timer to the ON position
Use a volt meter to verify transformer is
producing 12 volt AC
Photocell malfunction
Cover the photocell with a piece of dark tape to
check function
Lights will
not turn o
Timer control Make sure timer control is not set to the ON position
Photo cell is covered
Clean sensor and outer clear covering
Make sure nothing is shading the sensor
Individual
lights within
a larger
system not
working
Defective 4-way
splitter
Switch positions with a working light on the same
splitter to identify if the splitter is causing the issue.
Loose connection.
Moisture or corrosion
in connections
Inspect quick-connected plugs for moisture
or corrosion.
Clean/ dry and reassemble.
Failed Driver
If possible, switch out driver with one from a
working light of the same model to determine if
the driver has failed.
Replacement drivers are available.
Failed LED diode/
lamp
If possible, switch out the LED diode/ lamp with
one from a working light of the same model to
determine if the driver has failed.
Replacement LED diodes/ lamps are available.
7
Page 8

1.330.274.8317
www.ATLANTICWATERGARDENS.com
 Loading...