

Page 1

1-877-80-PONDS
www.atlanticwatergardens.com
Color Changing Lighting
Éclairage à couleurs changeantes
Luminarias con cambio de color
Includes Models
Couvre les modèles
Modelos incluidos:
SOLCC2
SOLCC6
SOLCCLR
SOLCCMX3
SOLCCEXT
Operating Manual
Manuel d’utilisation
Manual de operación
LIGHTING
Page 2

Introduction
Thank you for purchasing Color Changing SOL Lighting. Atlantic’s SOL
lighting features solid brass bodies with an oil-rubbed bronze nish. These LEDs
create a vibrant nighttime atmosphere with 48 different colors and 18 different
pre-programed color changing combinations. Multiple LEDs can be connected to
run through one transformer and be controlled by one remote.
Prior to Operation and Installation
Caution:
• DO NOT operate this product under any conditions other than those for which
it is specied. Failure to observe these precautions can lead to electrical shock,
product failure, or other problems.
• Follow all aspects of electrical codes when installing SOL Lighting.
• To reduce the risk of electrical shock, connect only to a 110 volt receptacle
protected by a ground fault circuit interrupter (GFCI).
• The input power to the Color Changing Control Module is 12 volt AC. The
Control Module can be connected to a larger outdoor lighting transformer;
however this must be done on the 12 volt AC input side of Control Module.
Removing the Control Module or tampering with the cord between the Control
Module and the light xture will damage the LEDs and void warranty.
• The Control Module is weather resistant with an IP54 rating. Do not submerse
the Control Module or expose it to heavy rainfall. It must be mounted off the
ground close to the power source. Failure to do so will void the warranty.
Installation
Fixture Installation
SOL Color Changing Spotlights offer three different mounting options for your
convenience:
• Adjustable stand: for placement on rock ledges, under waterfalls or for
highlighting streambeds
• Ground stake: for installation around the perimeter of the water feature or
in conventional landscape installations
• Nested: without the stand or stake, amongst the pond stones
The SOL Color Changing Light Ring is ideal for illuminating fountains and up
lighting waterfalls.
• Proper light placement is important for every project. Whenever possible, lights
should be positioned facing away from the viewing area to minimize hot spots.
• When camouaging the light cord with rocks and gravel, always leave enough
slack in the cord so that the xture can be raised above water level for servicing.
2
Page 3

3
• Always verify that the lens cover is tightly secured before submersing the xture.
• Never cut or shorten the light cord between the Control Module and the light
xture. Altering the Light Cord will damage the LEDs and void warranty.
• 6-wire extension cords (part # SOLCCEXT) are available to add an additional
20’ of cord to any SOL Color Changing Light. Only one cord can be used on
each light. Never connect multiple extension cords together.
SOLCCMX3 Control Module Installation
• The Control Module is weather-resistant with an IP54 rating. Do not submerse
it or expose it to heavy rainfall. It must be mounted off the ground close to the
power source. Failure to do so will void the warranty.
• Remove the red protective cap from the top of the control module and install
the antenna. Thread the black antenna on until snug, making sure it seals
against the gasket.
• Install the control box in a well-ventilated area to ensure that the module
operates within its specied working temperature.
• Verify that the control module input voltage is 12 volt AC. We recommend that
you use the transformer provided with this unit.
• Ensure that all cable connections are secure.
• Do not connect the power before the cord connections are nished.
• Do not cut or alter the cord between the SOL Light and the Control Module.
• The remote control requires two (2) AAA batteries (not included). Do not
touch the face of the remote while inserting batteries.
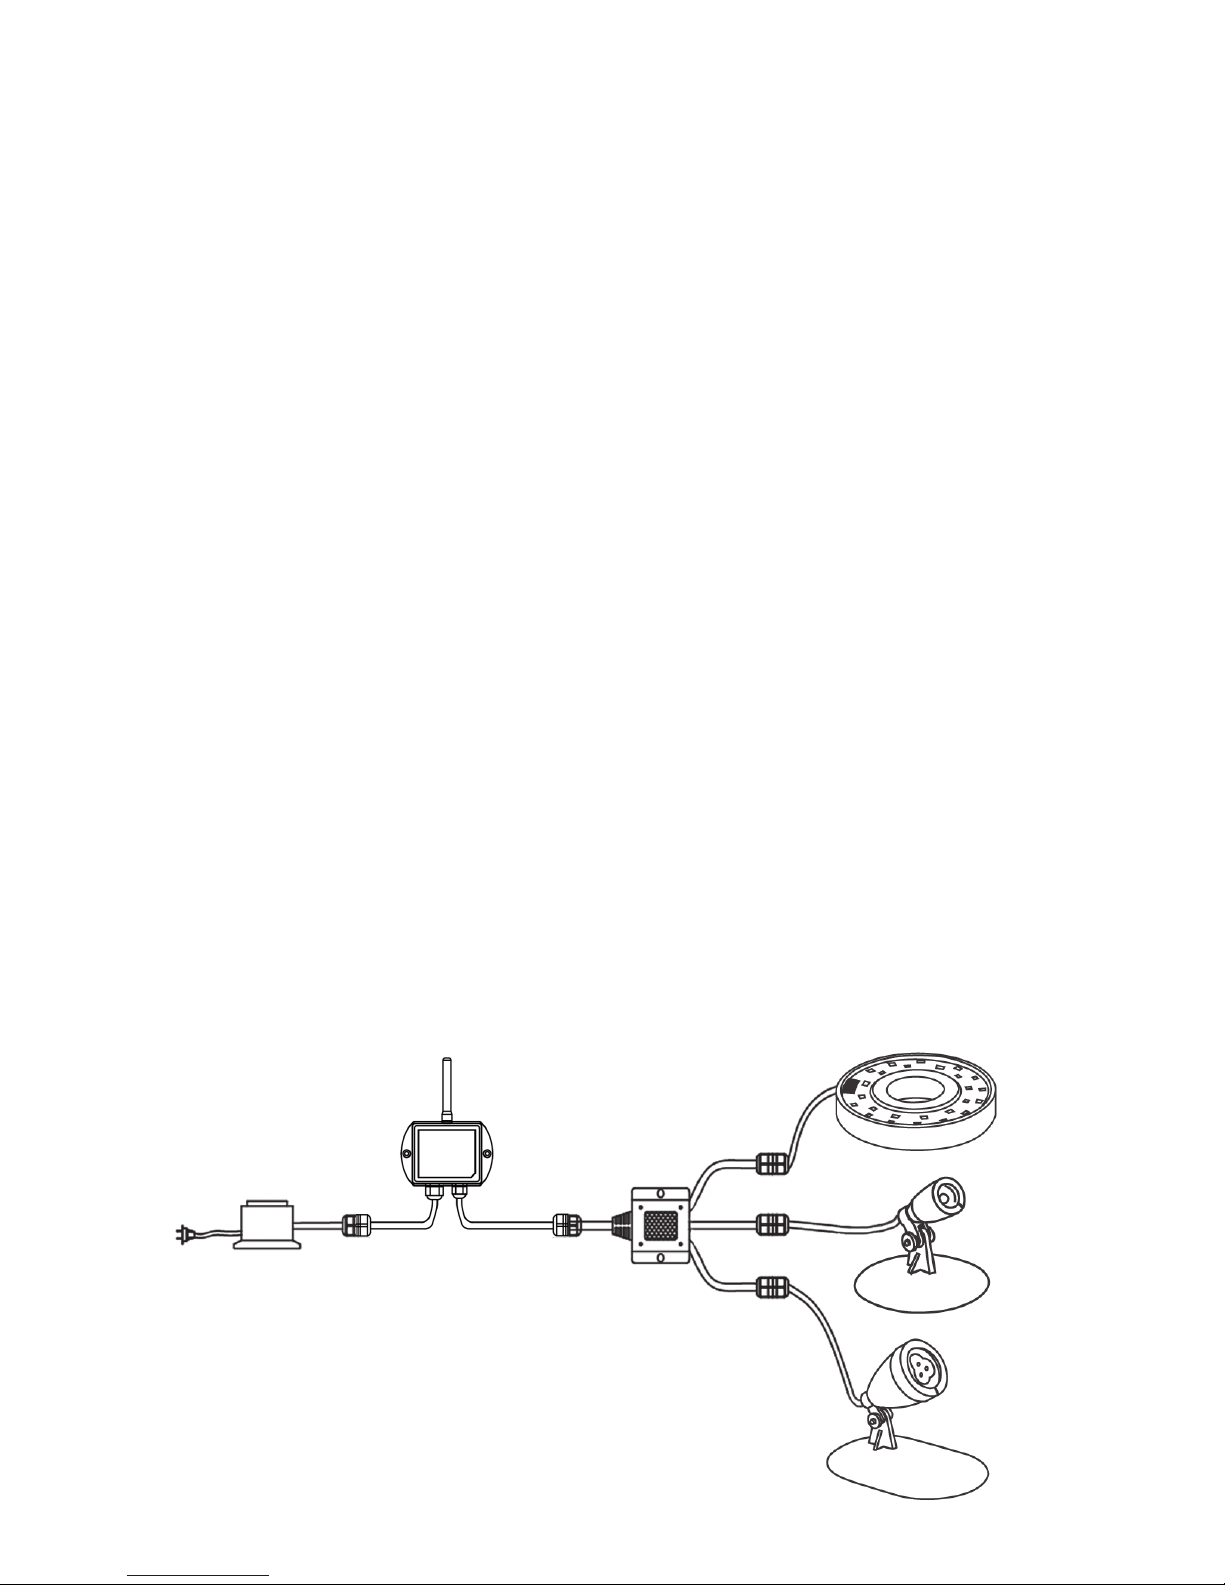
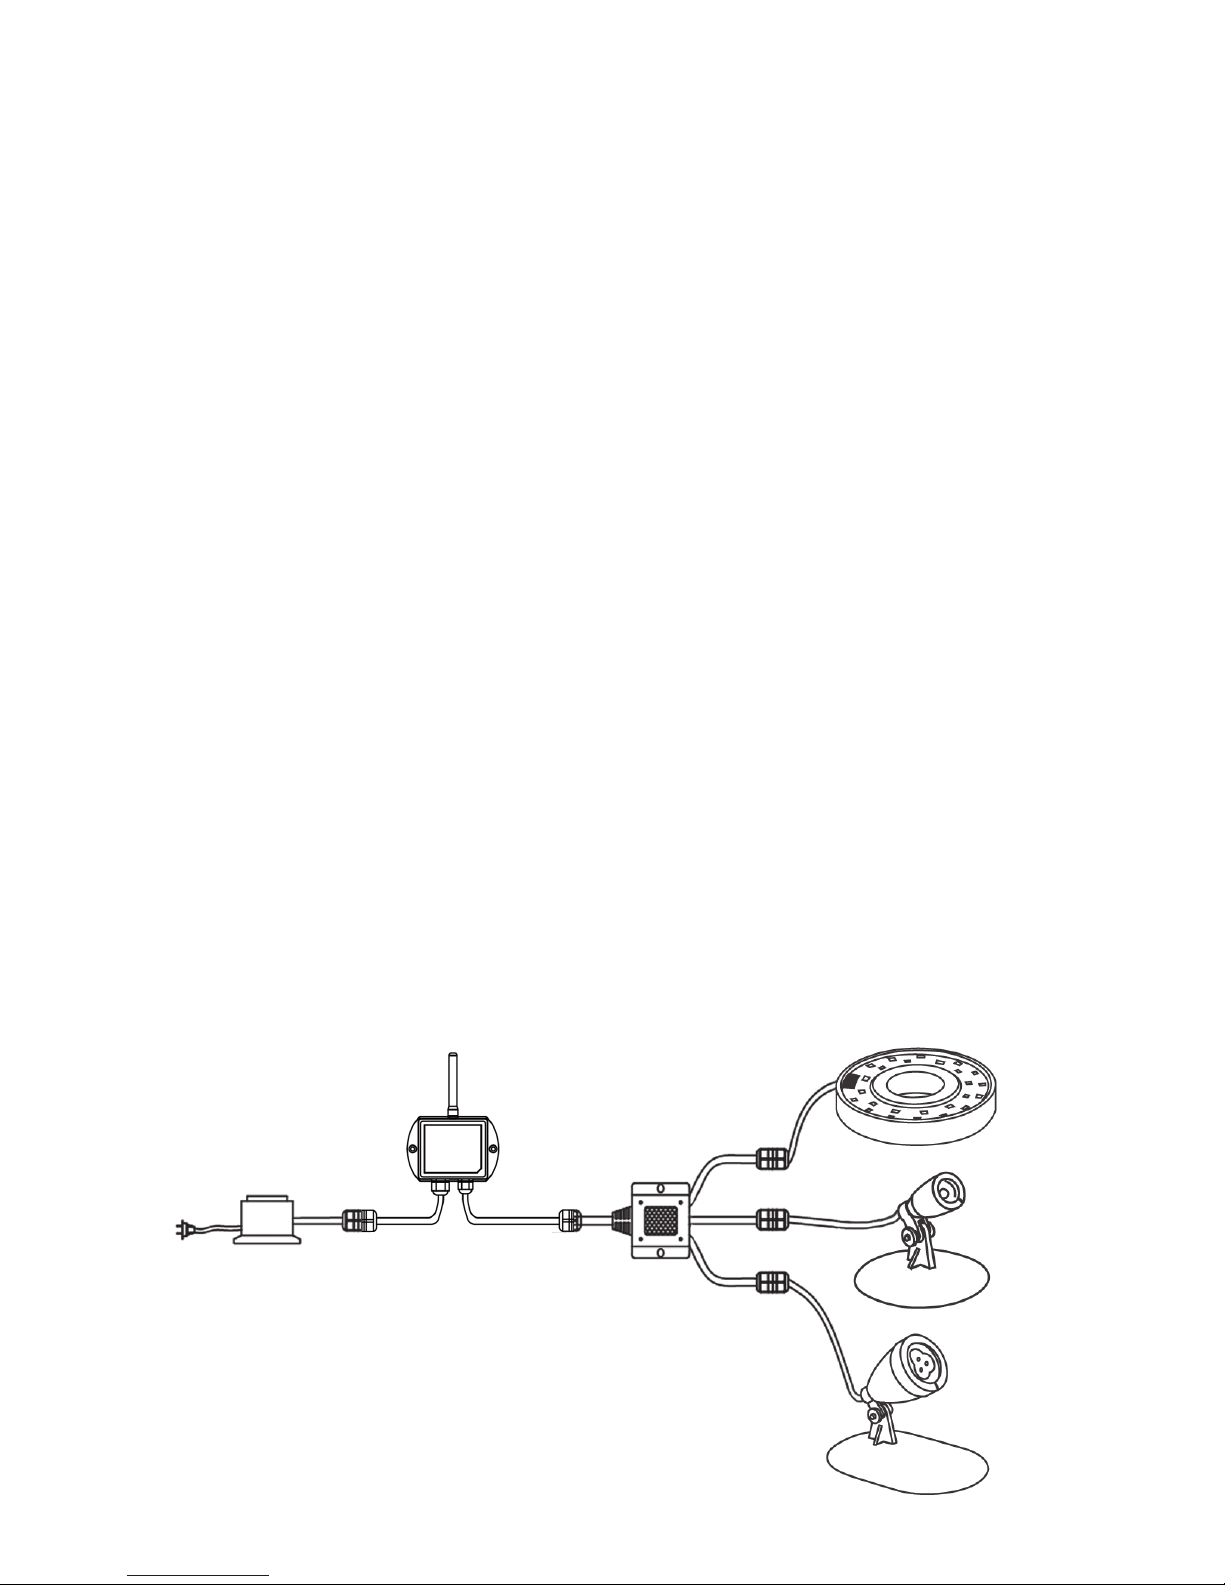
Connecting the Lights
Follow the connecting chart below to connect all cables. The SOLCCMX3 Control
Module and 3-way splitter will accept any combination of Color Changing SOL Light
styles. If more lights are required, multiple splitters can be connected together to
create more outlet connections.
SOLCCLR
Control ModuleTransformer
3-way
Splitter
SOLCC2
SOLCC6
A larger transformer (80 watts maximum) is
required if additional lights are installed.
Do not exceed 80 watts per control unit.
Page 4
4
Input Power: AC12V
Output Power: DC12V - 80 watts max
Output Current: 2A /circuit
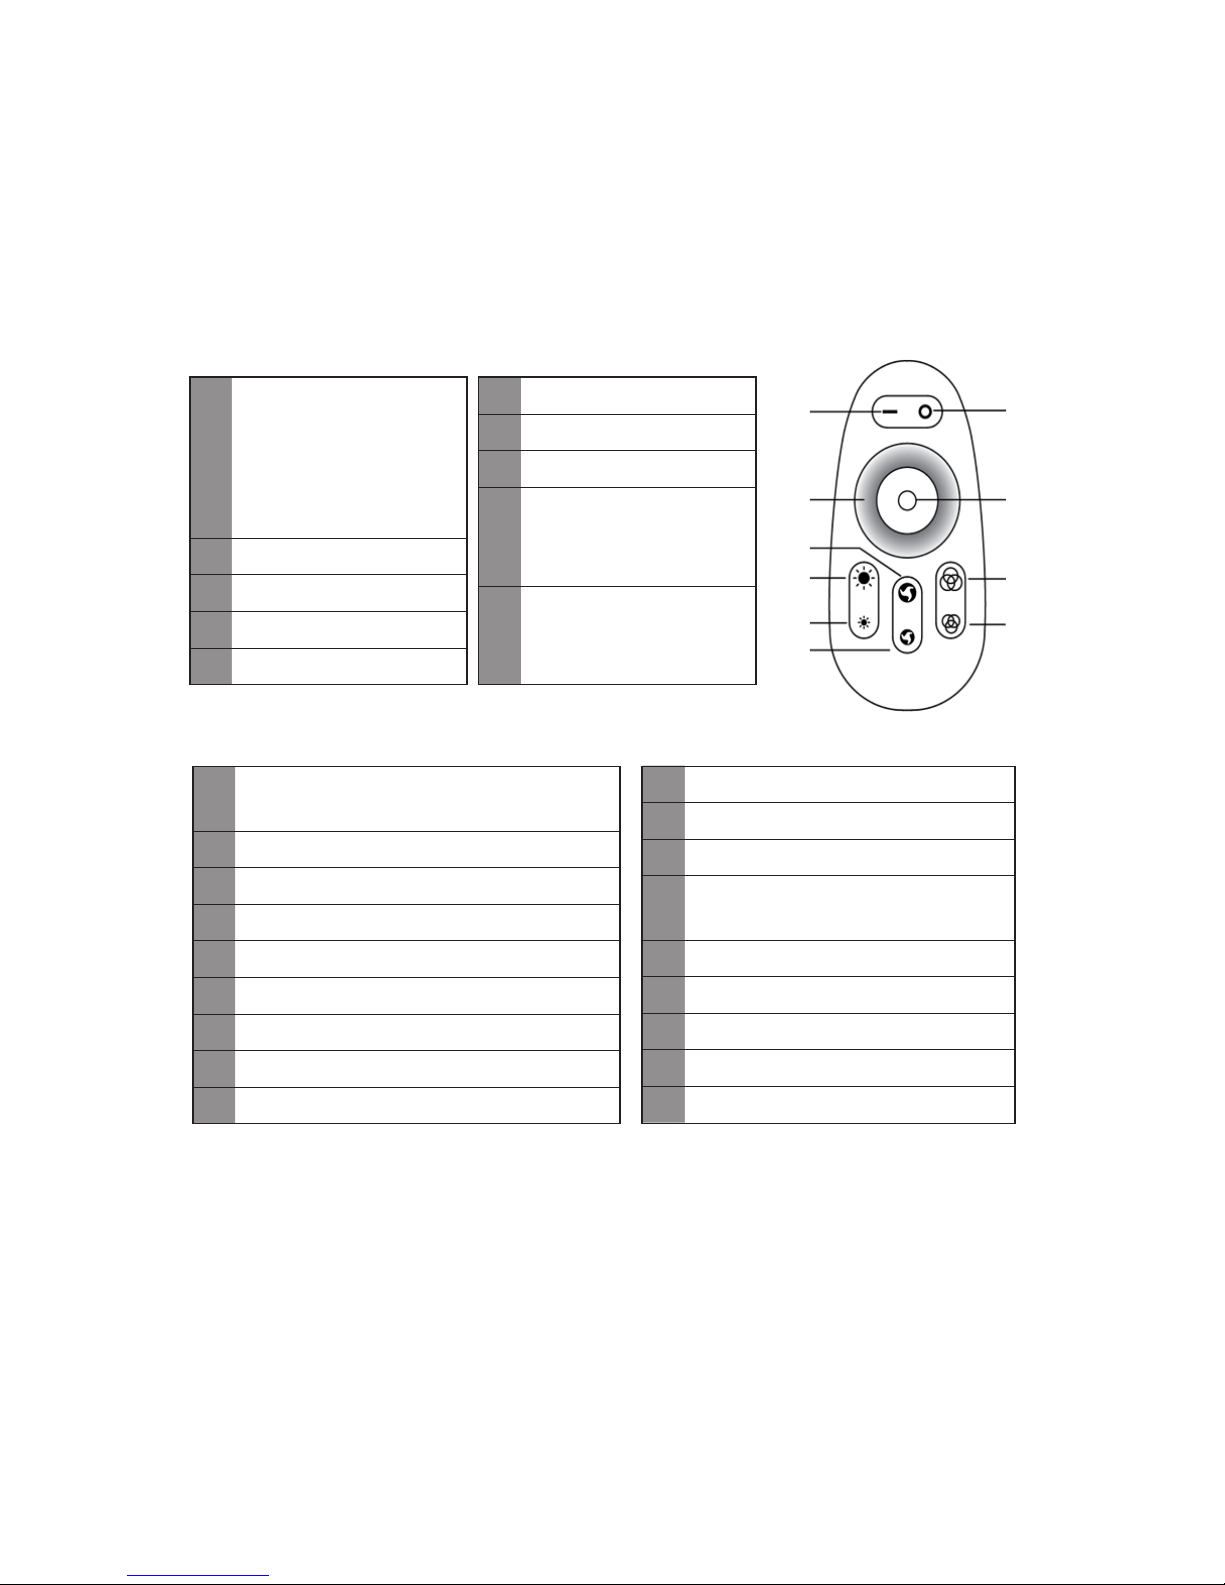
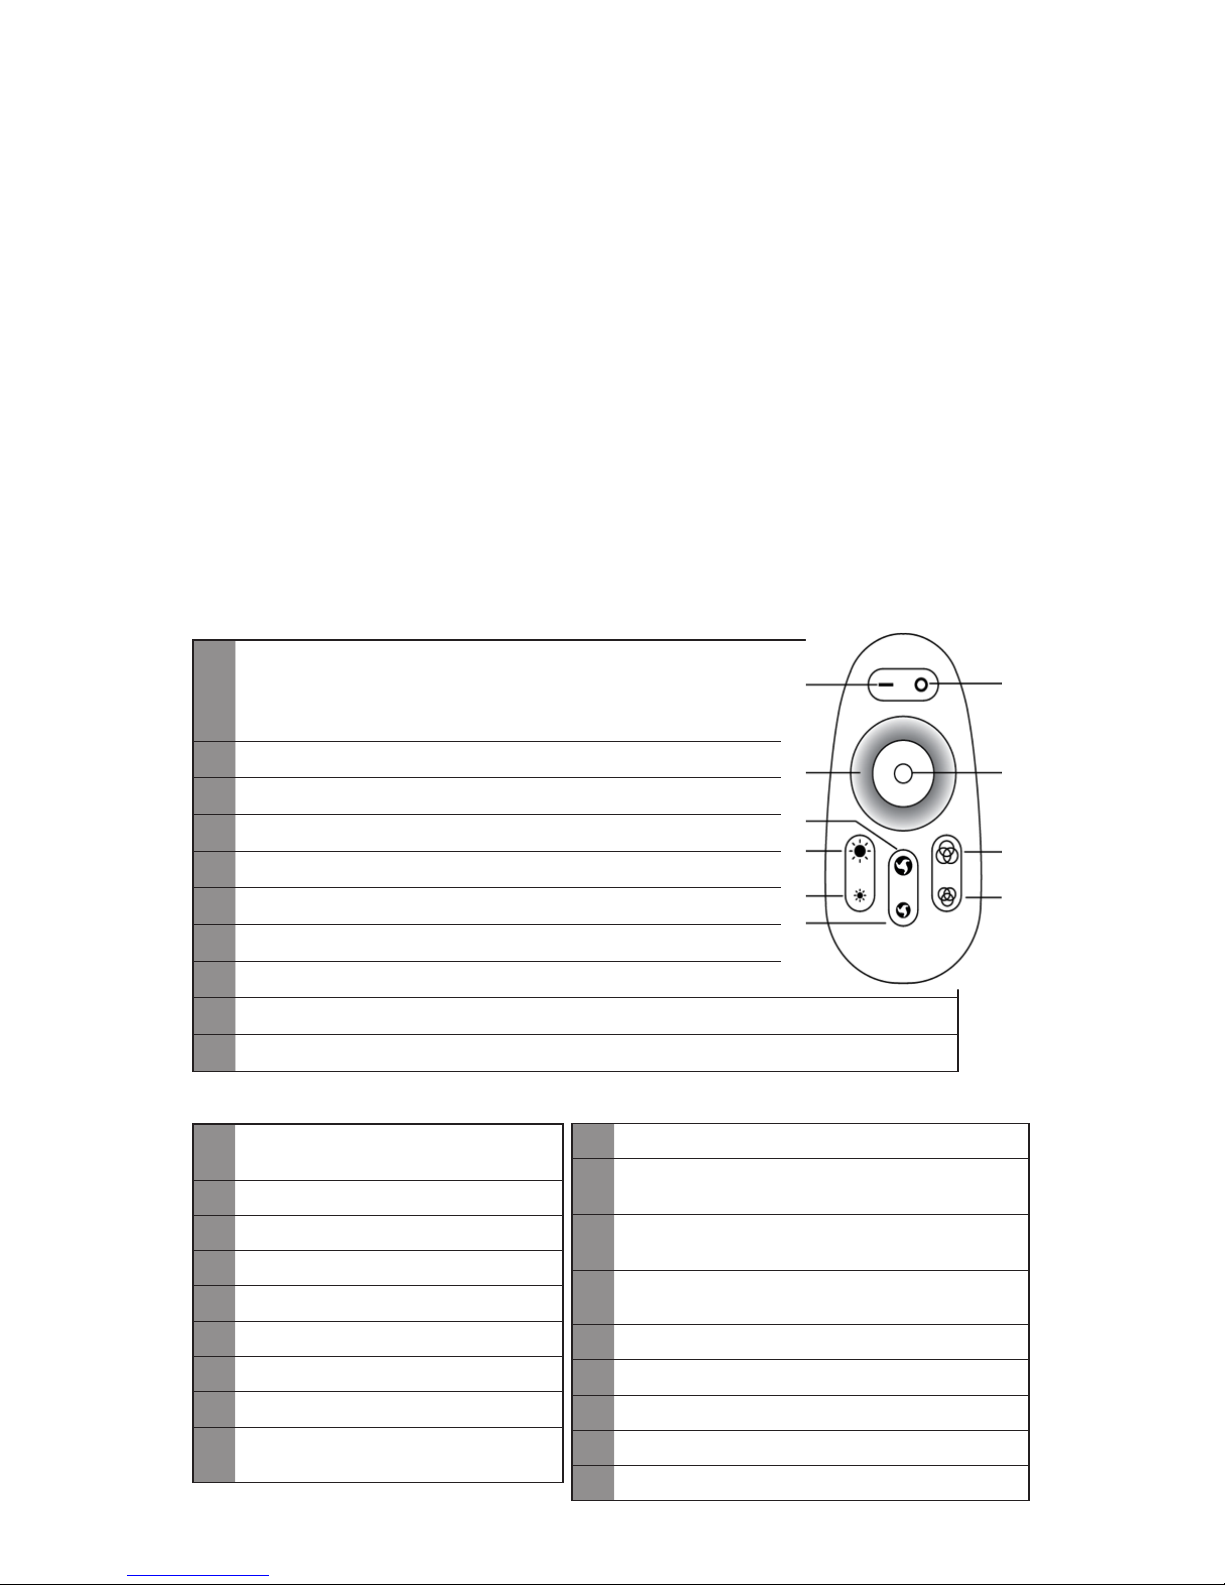
Remote Control Functions
Preset Light Changing Modes
A
B Off Button
C Color Wheel
D Indicator Light
E Brightness (Up)
1
Continuous full spectrum
fade change
2
Solid Crystal White
3
Solid Red
4
Solid Green
5
Solid Blue
6
Solid Aqua
7
Solid Purple
8
Solid Yellow
9
Red-Green-Blue jump change
10
7 color jump change
11
Red-Green-Blue dimmer change
12
7 color dimmer change
13
7 color dimmer then
7 color jump change
14
Crystal White fade on/off
15
Flashing Red
16
Flashing Green
17
Flashing Blue
18
Flashing Red and Blue
On Button
Touch and release to turn
the lights on. Touch for two
seconds to switch between
Color Wheel and Preset
Light Changing Modes
F Brightness (Down)
G Speed (Up)
H Speed (Down)
I
Preset Light Changing
Mode Selection (Up)
J
Preset Light Changing
Mode Selection
(Down)
A
B
C
D
G
E
F
I
J
H
Preset Light Changing Modes
Mode Selection
• To switch to the Color Wheel: hold the A button for two seconds and the light
will return to the last color displayed while in the Color Wheel mode. Run your
nger around the color wheel to select a new color.
• To switch to the Preset Light Changing Modes: hold the A button for two
seconds, and the light will return to the last preset mode displayed while in the
Light Changing Modes. Press the I and J button to switch between the different
preset modes.
Operation
Technical Data (Control Module)
Working Temperature:
0ºF -140ºF (-20°C - 60ºC)
Output: 3 circuits (R/G/B)
Page 5
5
Changing the Brightness and Speed
In all modes, you can use the E and F keys to change the brightness of the light.
In all modes, you can use the G and H keys to change the speed of the light
transitions. There are 10 levels for each.
Synchronizing the Remote to the Control Unit
If the remote control stops working properly, please install fresh batteries. If
problems persist, the remote may need to be re-synced to the control module.
Follow the instructions below to re-sync the remote control.
1. Unplug the transformer.
2. Hold the E button down (The red indicator lamp on the remote will be lit).
3. While still holding the E button down, plug in the transformer. The Colorfalls will
start blinking.
• If the Colorfalls blinks three times and stops, the remote and control unit
are synchronized.
• If the Colorfalls blinks six or more times, it is clearing all codes. Repeat steps
1-3.
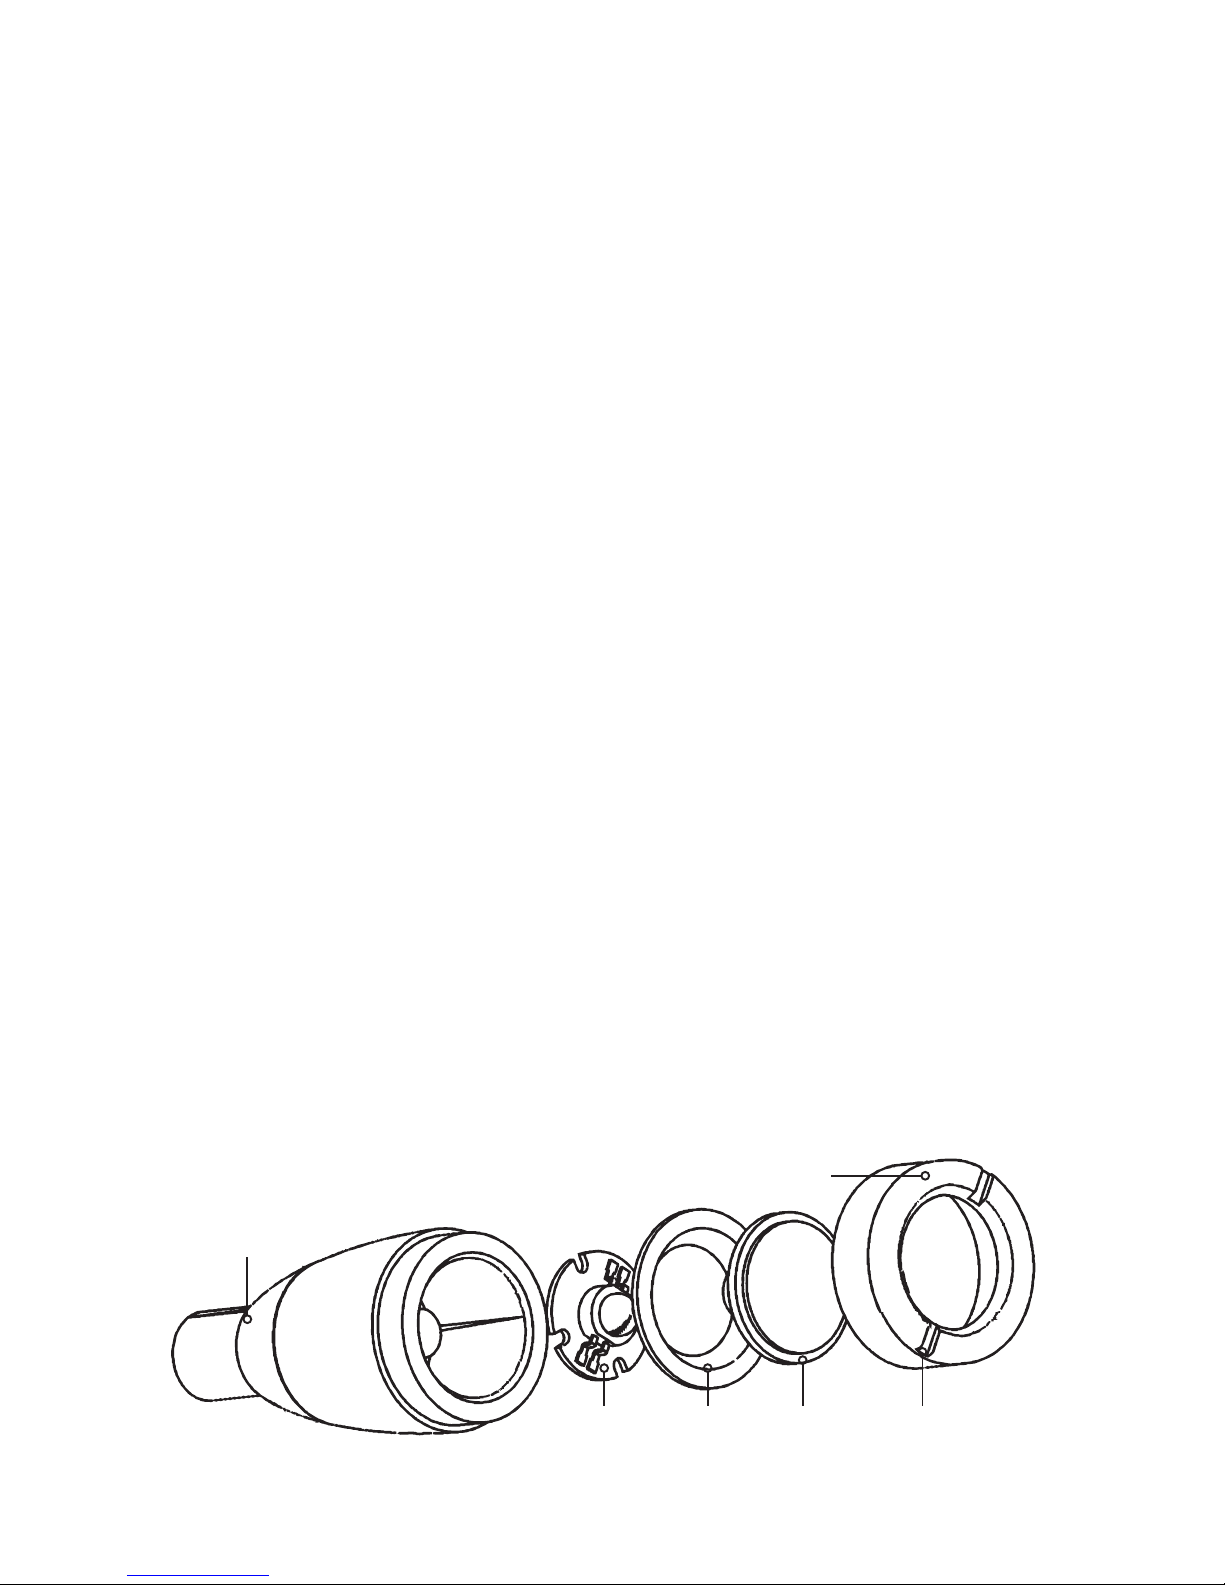
Maintenance
Replacement LED Bulbs are available for SOL Color Changing Spotlights and
Compact Spotlights. To loosen and tighten the brass lens ring on SOL Color
Changing Spotlights and Compact Spotlights, use the included key. Simply place
the key in the slots on the brass lens ring to loosen or tighten. Ensure that all
components are installed correctly after servicing. Inspect the silicone gaskets for
defects and proper placement before re-assembling. Ensure that the lens ring is
tightly secured before submersing the xture.
Brass Body
Disc Lamp Gasket Lens Slot
Brass Lens Ring
SOLCC2:
• To switch to the Preset Light Changing Modes: hold the B button for three
seconds or until the light changes to Crystal White. Press the D button, and the
light will return to the last preset mode displayed while in the Light Changing
Modes. Press the D and E button to switch between the different preset modes.
Page 6
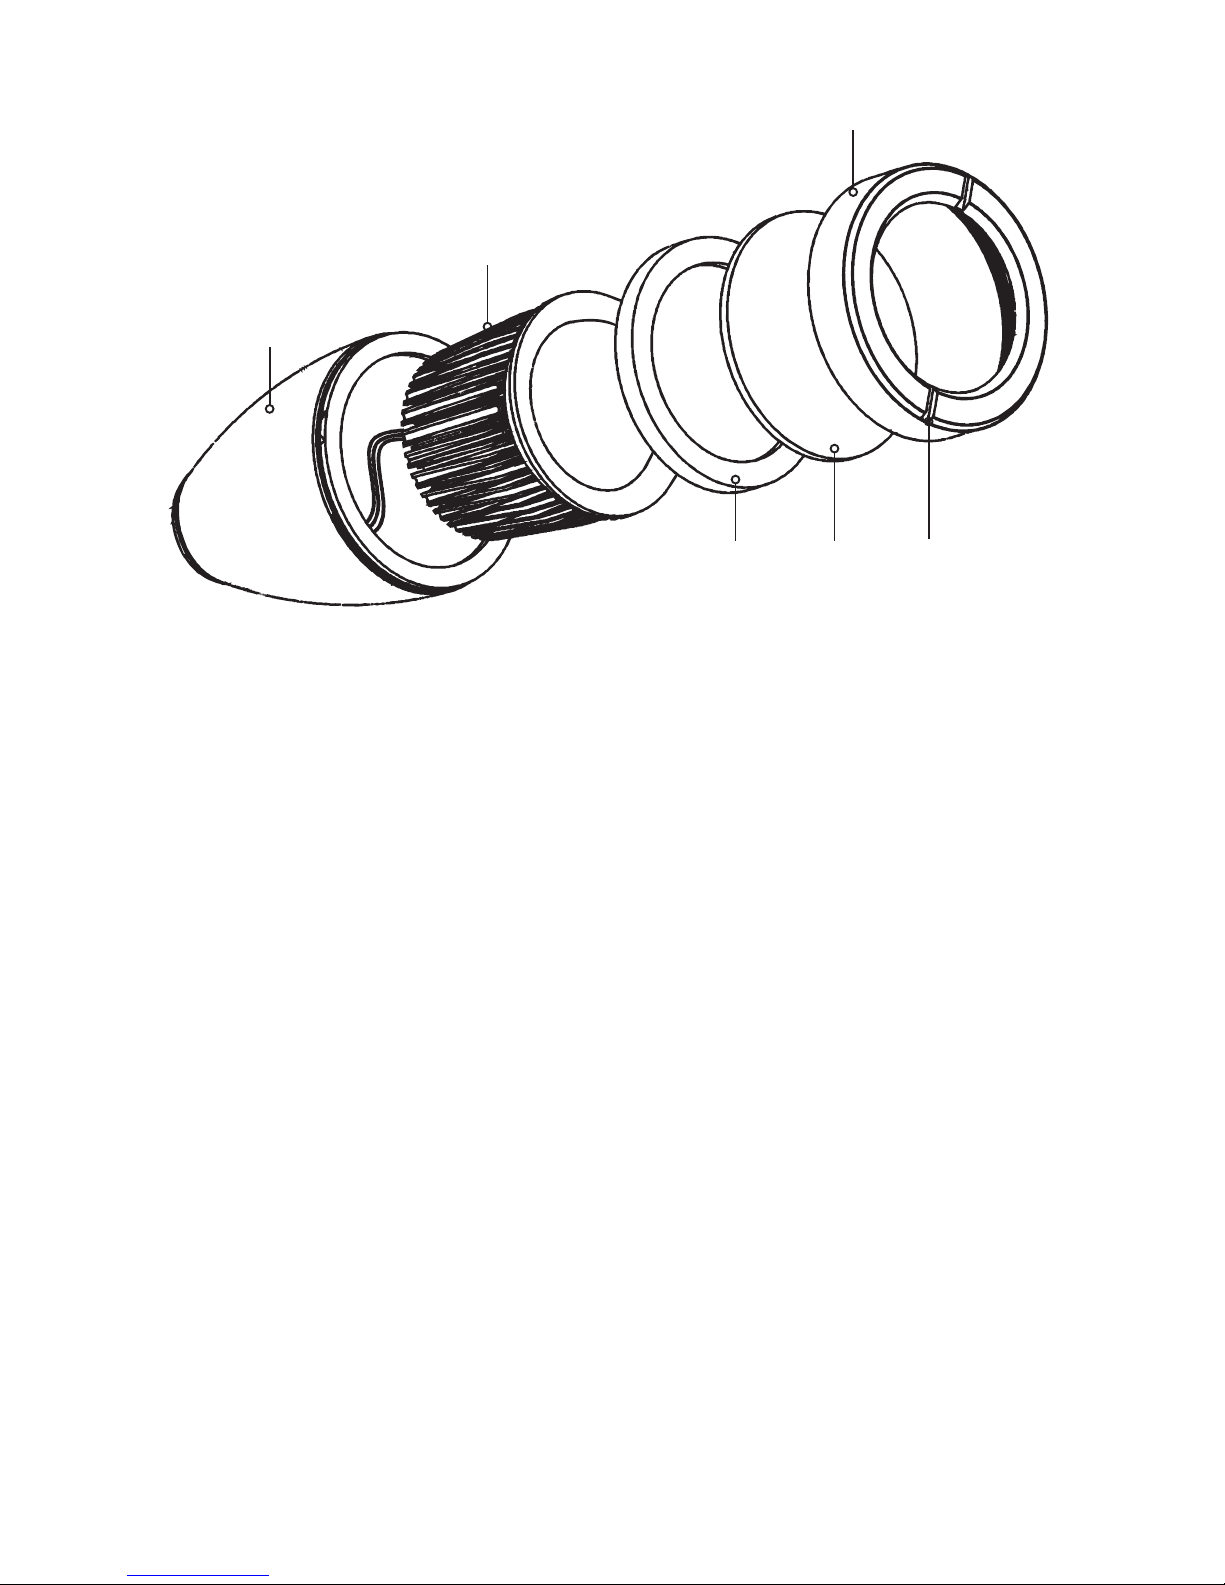
6
Brass Body
Brass Lens Ring
LED Bulb
Gasket Lens Slot
SOLCC6:
Warranty
All SOL Lighting carries a ve-year limited warranty. This limited warranty is
extended solely to the original purchaser commencing from the date of the
original purchase receipt and is void if any of the following apply:
• The cord has been cut or altered between the light body and the Control
Module.
• The light body / LED components have been misused or abused.
• The light body / LED components have been disassembled or
modied other than as described in this manual.
• The Control Module and/or Remote Control have not been adequately
protected from moisture.
Page 7

7
Problem Possible Cause Possible Solution
Remote is not working
(no indicator light)
No batteries / batteries
dead
Put in new batteries.
Remote is not working
(indicator light is on)
Remote is not synced with
Control Module
Refer to synchronizing the
remote instructions on page 5.
LED light will
not illuminate
No power to outlet Conrm power to outlet.
No Power to LED
Check all connections, ensure
cord is not cut or damaged.
LED is broken / defective Replace LED bulb
LED color differs
from remote control
Improper connection
between LED light and
control module
Inspect connection / align
arrow on plugs
Controller failure
Contact Dealer for repair /
replacement
Multiple lights display
different colors when
connected to the
same splitter
Improper connection
between LED light and
3-way splitter
Inspect connection / align
arrow on plugs
Faulty Splitter
Contact Dealer for repair /
replacement
Troubleshooting Guide
Always turn off power before inspecting the Color Changing Fountains. Failure to
observe this precaution can result in a serious accident.
Before ordering repairs, carefully read through this instruction booklet. If the
problem persists, contact your dealer.
Page 8

Introduction
Merci de votre achat d’un éclairage SOL à couleurs changeantes. Tous les éclairages
SOL d’Atlantic comportent des corps en laiton plein avec une nition bronze huilé.
Ses diodes électroluminescentes créent une atmosphère nocturne vibrante avec 48
couleurs différentes et 16 combinaisons programmées à l’avance de changement de
couleurs. Plusieurs éclairages à DEL peuvent être connectés pour être alimentés par
un même transformateur et contrôlés par une télécommande.
Avant l’installation ou l’utilisation
Attention:
• NE FAITES PAS fonctionner cet appareil dans d’autres conditions que celles
pour lesquelles il est spécié. La non-observation de ces précautions peut
entraîner une commotion électrique, mettre le produit en panne ou causer
d’autres problèmes.
• Respectez tous les aspects des normes électriques quand vous installez un
éclairage SOL.
• Pour réduire le risque de commotion électrique, ne branchez que sur une prise
secteur 110 volts protégée par un disjoncteur sur fuite à la terre (GFCI).
• La tension d’entrée du module de commande de changement de couleurs est
de 12 volts CA. Le module de commande peut être raccordé à un transformateur
plus important d’éclairage extérieur ; cependant cela doit être réalisé sur le côté
d’entrée 12 volts CA du module de commande. Enlever le module de commande
ou bricoler le cordon allant du module de commande à l’appareil d’éclairage
endommagerait les diodes électroluminescentes et annulerait la garantie.
• Ce module de commande résiste aux intempéries avec une classication IP54.
N’immergez pas ce module de commande ou ne l’exposez pas à une pluie
intense. Il faut le monter au-dessus du sol, près de sa source d’alimentation.
Ne pas le faire annulerait la garantie.
Installation
Installation de l’appareil
Les éclairages à changement de couleurs offrent trois options de montage
différentes pour votre commodité:
• Support réglable: Pour un positionnement sur un rocher, sous des chutes
d’eau ou pour éclairer des lits de ruisseaux.
• Piquet de sol: Pour une installation sur le périmètre de l’ensemble d’eau
ou pour mettre le paysage en valeur.
• Nichage: Sans support ni piquet, parmi les pierres du bassin.
L’anneau d’éclairage SOL à couleurs changeantes est idéal pour éclairer des
bassins et des chutes d’eau par en dessous.
8
Page 9
9
SOLCCLR
Module de
commande
Transformateur
Répartiteur
3 voies
SOLCC2
SOLCC6
• Ne coupez pas ou n’altérez pas le cordon entre
l’éclairage SOL et le module de commande.
• Un positionnement correct de l’éclairage est important pour chaque projet.
Dans la mesure du possible les éclairages doivent être placés dirigés hors de la
zone de visionnement pour minimiser les points d’aveuglement.
• Quand vous camouez le cordon de l’éclairage avec des cailloux et du gravier,
laissez toujours assez de mou au cordon pour que l’éclairage puisse être sorti
au-dessus du niveau de l’eau pour les interventions de service.
• Assurez-vous toujours que l’anneau de lentille est bien serré avant de submerger
l’appareil.
• Ne coupez ou ne raccourcissez jamais le cordon entre le module de commande
et l’éclairage. Une altération du cordon d’éclairage endommagerait les DEL et
annulerait la garantie.
• Des rallonges à 6 ls (réf. de pièce SOLCCEXT) sont disponibles pour ajouter
6 mètres de plus de cordon à tout éclairage SOL à couleurs changeantes. Un
seul cordon de rallonge peut être utilisé pour chaque éclairage. Ne mettez
jamais plusieurs rallonges bout-à-bout.
Installation du module de commande SOLCCMX3
• Ce module de commande résiste aux intempéries avec une classication IP54. Ne
l’immergez pas ou ne l’exposez pas à une pluie intense. Il faut le monter au-dessus
du sol, près de sa source d’alimentation. Ne pas le faire annulerait la garantie.
• Retirez le capuchon protecteur rouge qui recouvre le module de commande,
puis installez l’antenne. Vissez solidement l’antenne noire, en vous assurant
qu’elle est bien appuyée contre le joint.
• Installez le boîtier de commande dans une zone bien ventilée pour assurer que le
module travaillera dans sa plage spéciée de températures de fonctionnement.
• Vériez que la tension d’entrée du module de commande fait bien 12 volts CA.
Nous vous recommandons d’utiliser le transformateur fourni avec cette unité.
• Assurez-vous que toutes les connexions de câbles sont bien serrées.
• Ne branchez pas l’alimentation avant que les raccordements de cordons
soient terminés.
Page 10
10
• La commande à distance nécessite deux (2) piles AAA (non incluses). Ne touchez
pas la face de cette commande pendant l’installation de ses piles.
Branchement des éclairages
Suivez le schéma de raccordement ci-dessous pour brancher tous les câbles. Le
module de commande SOLCCMX3 et le répartiteur 3 voies accepteront n’importe
quelle combinaison de styles d’éclairage SOL à couleurs changeantes. Si plus
d’éclairages sont nécessaires, plusieurs répartiteurs peuvent être raccordés ensemble
pour créer plus de possibilités de connexions. Un plus gros transformateur (80 W
maximum) est nécessaire si des éclairages additionnels sont installés. Ne dépassez
pas 80 W par unité de commande.
Fonctionnement
Données techniques
(Module de commande)
Température de fonctionnement:
0 à 140ºF (-20 à 60 ºC)
Alimentation électrique: 12 V CA
Tension de sortie: 12 V CC - 80 watts maximum
Courant de sortie: 2A /circuit
Modes de changements d’éclairage prédéterminés
A
B Bouton d’arrêt (Off)
C Disque de couleurs
D Voyant indicateur
E Luminosité (augmentation)
F Luminosité (diminution)
G Vitesse (augmentation)
H Vitesse (diminution)
I Sélection de mode de changement d’éclairage prédéterminé (montant)
J Sélection de mode de changement d’éclairage prédéterminé (descendant)
1
Changement continu sur tout le
spectre par fondu enchaîné
2
Blanc pur cristallin
3
Rouge franc
4
Vert franc
5
Bleu franc
6
Couleur eau
7
Violet franc
8
Jaune franc
9
Changements par bond entre rouge,
vert et bleu
10
Changement par bond entre les 7 couleurs
11
Changements par fondu enchaîné entre rouge,
vert et bleu
12
Changement par fondu enchaîné entre les 7
couleurs
13
Changement entre les 7 couleurs d’abord par
fondus puis par bonds
14
Établissement/enlèvement progressifs du blanc pur
15 Rouge clignotant
16 Vert clignotant
17 Bleu clignotant
18 Rouge et bleu clignotants
Bouton M (On)
Appuyez puis relâchez pour activer les éclairages. Appuyez
pendant deux secondes pour commuter entre les modes de
changement de couleur par roue ou d’éclairage prédéterminé.
A
B
C
D
G
E
F
I
J
H
Page 11

11
Modes de changements d’éclairage prédéterminés
Sélection des modes
• Pour passer au disque des couleurs : Maintenez le bouton A pendant 2 secondes
et l’éclairage va revenir à la dernière couleur afchée en étant dans le mode de
disque des couleurs. Passez votre doigt autour du disque des couleurs pour sélec-
tionner une nouvelle couleur.
• Pour passer en mode de changement de couleurs prédéterminés : Maintenez le
bouton A pendant 2 secondes et l’éclairage va revenir à la dernière couleur dans
le mode de changement des couleurs prédéterminés. Actionnez les boutons I et J
pour commuter entre les différents modes prédéterminés.
Changement de la luminosité et de la vitesse
Dans tous les modes, vous pouvez utiliser les touches E et F pour modier la
luminosité de l’éclairage. Dans tous les modes, vous pouvez utiliser les touches G
et H pour modier la vitesse des transitions d’éclairage. 10 niveaux existent pour
chacun de ces réglages.
Synchronisation de la télécommande avec l’unité de commande
Si la commande à distance cesse de fonctionner correctement, pensez à y installer
des piles neuves. Si le problème persiste, la télécommande peut avoir besoin
d’être resynchronisée avec le module de commande.
1. Débranchez le transformateur.
2. Maintenez le bouton E enfoncé (le voyant indicateur rouge de la télécommande
sera illuminé).
3. Tout en maintenant ce bouton E enfoncé, rebranchez le transformateur. La chute
colorée va commencer à clignoter.
• Si la chute colorée clignote trois fois et cesse, c’est que la télécommande et
l’unité de commande sont synchronisés.
• Si la chute colorée clignote six fois ou plus, c’est qu’il y a effacement de tous
les codes. Recommencez alors les étapes 1 à 3.
Entretien
Des lampes DEL de rechange sont disponibles pour les éclairages SOL à
changement de couleurs et compacts. Pour desserrer ou resserrer l’anneau en
laiton de lentille sur ces éclairages, utilisez la clé incluse. Placez simplement la
clé dans les fentes sur l’anneau de lentille en laiton et tournez dans un sens ou
l’autre. Assurez-vous que tous les composants sont correctement installés après
une intervention. Inspectez les joints silicone pour d’éventuels défauts et leur bon
positionnement avant le remontage. Assurez-vous que l’anneau de lentille est
bien serré avant de submerger l’appareil.
Page 12

12
Garantie
Tous les éclairages solaires portent une garantie limitée de cinq ans. Cette garantie
limitée est accordée seulement à l’acheteur d’origine, et commence à la date de la
facture de l’achat d’origine, elle est caduque si un de ces points s’applique:
• Le cordon a été coupé ou altéré entre le corps d’éclairage et le module
de commande.
• Le corps d’éclairage / les composants DEL ont subi des mésusage ou abus.
• Le corps d’éclairage / les composants DEL ont été démontés ou modiés
différemment de ce qui est décrit dans ce manuel.
• Le module de commande et/ou la commande à distance n’ont pas été
correctement protégés de l’humidité.
Corps en laiton
Anneau de lentille en laiton
Lampe DEL
Joint Fente Fente
SOLCC6:
Corps en laiton
Lampe de
disque
Joint Fente Fente
Anneau de lentille en laiton
SOLCC2:
Page 13

13
Problème Cause possible Solution possible
La commande à
distance ne marche
pas (pas de voyant
allumé)
Pas de piles / piles à plat Insérez des piles neuves
La commande à
distance ne marche
pas (le voyant allumé)
Pas de synchronisation avec
le module de commande
Référez-vous aux instructions
de synchronisation de télécommande en page 11.
L’éclairage à DEL ne
s’allume pas
Pas de secteur sur la prise
Conrmez la présence de
secteur sur la prise
Pas d’alimentation à la DEL
Contrôlez toutes les
connexions, vériez que le
cordon n’est ni entaillé ni
endommagé
La DEL est cassée/défaillante
Remplacez l’ampoule DEL
La couleur de DEL
diffère de celle de la
télécommande
Mauvaise connexion entre
éclairage à DEL et module
de commande
Inspectez la connexion /
alignez les èches sur les
ches
Panne de contrôleur
Contactez le revendeur pour
une réparation ou un remplacement
Différents éclairages
afchent des couleurs
différentes en étant
branchées au même
répartiteur
Mauvaise connexion entre
éclairage à DEL et répartiteur 3 voies
Inspectez la connexion /
alignez les èches sur les
ches
Séparateur défectueux
Contactez le revendeur pour
une réparation ou un remplacement
Guide de dépannage
Coupez toujours l’alimentation électrique avant d’inspecter l’éclairage à DEL. Ne
pas observer cette précaution peut entraîner un accident grave.
Avant de demander des réparations, lisez attentivement ce tableau d’aide. Si le
problème persiste, contactez votre revendeur.
Page 14

Introducción
Gracias por comprar luminarias con cambio de color SOL. La línea de iluminación
SOL de Atlantic cuenta con cuerpos de latón macizo con acabado en bronce
aceitado. Estas luces LED crean una vibrante atmósfera nocturna con 48 colores
distintos y 16 combinaciones diferentes de cambio de color predenidas. También
se pueden conectar varias luminarias LED a un solo transformador y controlarlas
desde un control remoto.
Antes de la instalación y puesta en funcionamiento
Precaución:
• NO UTILICE este producto en condiciones distintas de aquellas para las cuales
ha sido especicado. El incumplimiento de estas precauciones puede provocar
una descarga eléctrica, la avería del producto u otros problemas.
• Siga todas las indicaciones de los códigos eléctricos al instalar luminarias SOL.
• Para reducir el peligro de que se produzca una descarga eléctrica, conecte la
unidad únicamente a una toma de corriente de 110 voltios alimentada a través
de un interruptor de protección contra falla a tierra (GFCI).
• La alimentación al módulo de control del cambio de colores es de 12 Vca. El
módulo de control se puede conectar a un transformador para iluminación
exterior más grande. En este caso, la conexión se debe hacer en el lado de
entrada de 12 Vca del módulo de control. Eliminar el módulo de control o
hacer un puente entre su entrada y su salida para alimentar la luminaria dañará
los LED y anulará la garantía.
• El módulo de control es resistente a la intemperie y su clase de protección es
IP54. No sumerja el módulo de control ni lo exponga a una lluvia fuerte. El
módulo de control se debe instalar separado del suelo, cerca de la
alimentación eléctrica. En caso contrario, se anulará la garantía.
Instalación
Instalación de la luminaria Los reectores SOL con cambio de color se ofrecen en
tres diferentes opciones de montaje:
• Con base regulable: adecuada para colocar sobre salientes de roca, bajo
cascadas o para destacar cursos de agua
• Con estaca para hincar en el suelo: excelente opción para colocar
alrededor de estanques o en instalaciones paisajísticas convencionales
• Luminaria sola: sin base ni estaca, para montar entre las piedras del estanque
El anillo luminoso SOL con cambio de color es ideal para iluminar fuentes y
cascadas desde abajo.
• En todo proyecto es importante colocar adecuadamente la luminaria.
Siempre que sea posible, las luminarias se deben colocar fuera del área de
visión para reducir al mínimo los puntos calientes.
14
Page 15
15
SOLCCLR
Módulo de
control
Transformador
Repartidor
de 3 salidas
SOLCC2
SOLCC6
• El control remoto utiliza tres (3) baterías AAA (no
incluidas). No toque el frente del control remoto
mientras inserta las baterías.
• Siempre que haya que camuar el cable de la luminaria con rocas y grava, deje
cable suciente de manera que sea posible levantarla por encima del nivel del
agua para realizar mantenimiento.
• Siempre verique que el aro de la lente esté rmemente asegurado antes de
sumergir la luminaria.
• Nunca corte ni acorte el cable de la unidad entre el módulo de control y la
lámpara. La modicación del cable de la luminaria dañará los LED y anulará
la garantía.
• Hay disponibles 6 cables de extensión (pieza n.º SOLCCEXT ) para agregar 20
pies (6 m) de cable adicional a una luminaria con cambio de color SOL. Utilice
solo un cable para cada luz. Nunca conecte varios cables de extensión juntos.
Instalación del módulo de control SOLCCMX3
• El módulo de control es resistente a la intemperie y su clase de protección es
IP54. No sumerja el módulo de control ni lo exponga a una lluvia fuerte. El
módulo de control se debe instalar separado del suelo, cerca de la
alimentación eléctrica. En caso contrario, se anulará la garantía.
• Retire la capa roja protectora de la parte superior del módulo de control e
instale la antena. Inserte la antena negra hasta que quede ajustada, asegúrese
de que quede sellado en la junta.
• Instale la caja de control en un lugar bien ventilado para asegurarse de que el
módulo funciona dentro de la temperatura de trabajo especicada.
• Verique que el voltaje de entrada del módulo de control sea 12 Vca.
Recomendamos el uso del transformador suministrado con esta unidad.
• Verique que todas las conexiones estén bien apretadas.
• No conecte la alimentación sin antes haber nalizado las conexiones.
• No corte ni modique el cable entre la luminaria SOL y el módulo de control.
Page 16

16
Conexión de las luces
Conecte todos los cables de acuerdo a lo indicado en el siguiente diagrama de
conexión. El módulo de control SOLCCMX3 y el repartidor de 3 salidas admite
cualquier combinación de luminarias con cambio de color SOL. Si necesita más
luces, se pueden conectar repartidores múltiples entre sí para crear más conexiones
de salida. Si se instalan luces adicionales, se necesita un transformador más grande
(80 watts como máximo). No sobrepase los 80 watts por cada unidad de control.
Utilización
Datos técnicos (módulo de control)
Temperatura de trabajo:
0º F -140º F (-20° C – 60º C)
Salida: 3 circuitos (rojo/verde/negro)
Alimentación. 12 Vca
Salida: 12 Vcd - 80 watts máx
Corriente de salida: 2 A por circuito
Funciones del Control Remoto
Preajuste Luz Cambio de modos
1
Espectro completo continuo,
cambio gradual
2
Blanco cristal continuo
3
Rojo continuo
4
Verde continuo
5
Azul continuo
6
Aguamarina continuo
7
Púrpura continuo
8
Amarillo continuo
9
Rojo-verde-azul, cambio brusco
10
7 colores, cambio brusco
11
Rojo-verde-azul, cambio con atenuador
12
7 colores, cambio con atenuador
13
7 colores, cambio con atenuador, seguido de
7 colores, cambio brusco
14
Blanco cristal, encendido/apagado gradual
15
Rojo destellante
16
Verde destellante
17
Azul destellante
18
Rojo y azul destellantes
A
B Botón Apagado (O)
C Rueda de colores
D Luz indicadora
E Brillo (subir)
F Brillo (bajar)
G Velocidad (subir)
H Velocidad (bajar)
I Selección del Modo de cambio de luces preseleccionado (subir)
J Selección del Modo de cambio de luces preseleccionado (bajar)
Botón Encendido (I)
Toque y suelte para encender las luces. Toque durante dos
segundos para conmutar entre la Rueda de colores y los
Modos de cambio de luces preseleccionados.
A
B
C
D
G
E
F
I
J
H
Page 17

17
Modos de cambio de luces preseleccionados
Selección de modo
• Para conmutar a la Rueda de colores: retenga el botón A durante dos segundos.
La luz volverá al último color exhibido cuando estaba en el modo Rueda de colo-
res. Recorra la rueda de colores con su dedo para seleccionar un nuevo color.
• Para conmutar a los Modos de cambio de luces preseleccionados: retenga el
botón A durante dos segundos. La luz volverá al último modo preseleccionado
exhibido cuando estaba en los modos de cambio de luces. Oprima los botones I y
J para conmutar entre los diferentes modos preseleccionados.
Cambio del brillo y de la velocidad
En todos los modos, puede utilizar las teclas E y F para cambiar el brillo de la luz.
En todos los modos, puede utilizar las teclas G y H para cambiar la velocidad de
las transiciones de la luz. Existen 10 niveles para cada uno.
Sincronización del control remoto con la unidad de control
Si el control remoto deja de funcionar correctamente, instale baterías nuevas. Si
los problemas persisten, es posible que se necesite volver a sincronizar el control
remoto con el módulo de control.
1. Desenchufe el transformador.
2. Mantenga el botón E oprimido (la luz indicadora roja del control remoto
será prendida).
3. Mientras mantiene el botón E oprimido, enchufe el transformador. La Colorfalls
comenzará a destellar.
• Si la Colorfalls destella tres veces y se interrumpe, signica que el control
remoto y la unidad de control están sincronizados.
• Si la Colorfalls destella seis veces o más, signica que está borrando todos
los códigos. Repita los pasos 1 a 3.
Mantenimiento
Hay lámparas LED de repuesto disponibles para los reectores con cambio de
color y reectores compactos SOL. Utilice la llave suministrada para aojar y
apretar el aro de latón de la lente de los reectores con cambio de color y
reectores compactos SOL. Simplemente coloque la llave en las ranuras del aro
de latón de la lente para aojar o apretar. Asegúrese de que todos los
componentes estén correctamente instalados después del mantenimiento.
Inspeccione las juntas de silicona para vericar que estén bien colocadas y que no
presenten defectos antes de volver a armar la luminaria. Siempre verique que el
aro de la lente esté rmemente asegurado antes de sumergir la luminaria.
Page 18

18
Garantía
Todos los artefactos de iluminación SOL cuentan con una garantía limitada por 5
años. Esta garantía limitada se extiende solamente al comprador original, a
contar desde la fecha de la factura original de compra y se anulará ante alguna de
las siguientes circunstancias:
• El cable entre el cuerpo de la luminaria SOL y el módulo de control ha sido
cortado o modicado.
• Los componentes del cuerpo de la luminaria o los LED han sido objeto de un
uso indebido o incorrecto.
• Los componentes del cuerpo de la luminaria o los LED han sido desarmados o
modicados de manera distinta a lo descrito en este manual.
• El modulo de control y/o el control remoto no han sido correctamente
protegidos de la humedad.
Cuerpo de
latón
Aro de latón de la lente
LED Bulb
Junta Lente Ranura
SOLCC6:
Cuerpo de
latón
Disco de
lámparas
Junta Lente Ranura
Aro de latón de la lente
SOLCC2:
Page 19
19
Problema Causa posible Solución posible
El control remoto
no funciona (la luz
indicadora no
enciende)
Faltan las pilas o están
descargadas
Reemplace las pilas.
El control remoto
no funciona (la luz
indicadora está
encendida)
El control remoto no está
sincronizado con el módulo
de control
Consulte las instrucciones para
sincronizar el control remoto
en la página 17.
La luminaria LED no
enciende
No hay electricidad en la
toma de corriente
Verique que haya electricidad
en la toma de corriente
La electricidad no llega a la
luminaria LED
Revise todas las conexiones,
verique que el cable no esté
cortado o dañado.
La luminaria LED está rota o
defectuosa
Reemplace las lámparas LED
El color de los LED
es diferente al
ordenado por el
control remoto
Conexión incorrecta entre la
luminaria LED y el módulo
de control
Inspeccione la conexión y
verique que las echas de los
enchufes estén alineadas
Falla del controlador
Comuníquese con el
distribuidor para proceder a
su reemplazo o reparación
Las luminarias
conectadas al
mismo repartidor
se encienden con
diferentes colores
entre sí
Conexión incorrecta entre la
luminaria LED y el repartidor
de 3 salidas
Inspeccione la conexión y
verique que las echas de los
enchufes estén alineadas
Divisor defectuoso
Comuníquese con el
distribuidor para proceder a
su reemplazo o reparación
Guía de solución de problemas
Siempre apague la alimentación eléctrica antes de inspeccionar las luminarias
con cambio de color. El incumplimiento de esta precaución puede resultar en un
accidente grave.
Antes de solicitar una reparación, lea atentamente este manual de instrucciones.
Si el problema persiste, comuníquese con el distribuidor de su localidad.
Page 20

1-877-80-PONDS
www.atlanticwatergardens.com
 Loading...