

Atlantic FB4600, FB3200 Product Manual
FB3200 / FB4600
Product Manual | Manuel du Produit | Manual del Producto
1.330.274.8317
www.ATLANTICWATERGARDENS.com
F
2
Introduction
Thank you for purchasing the Atlantic FB3200/FB4600 Fountain Basin. Before using this
basin please take a moment to review this manual. Fountain Basins provide a stable,
self-contained base to mount pump and plumbing for decorative water features.
Installation
Begin by excavating a hole at least 6 inches larger than the basin and 12½” deep. This depth
will leave the Fountain Basin slightly higher than the ground around it, which will keep soil,
mulch or gravel from washing in. Angling the sides of the hole outward slightly will aid in the
backfill process.
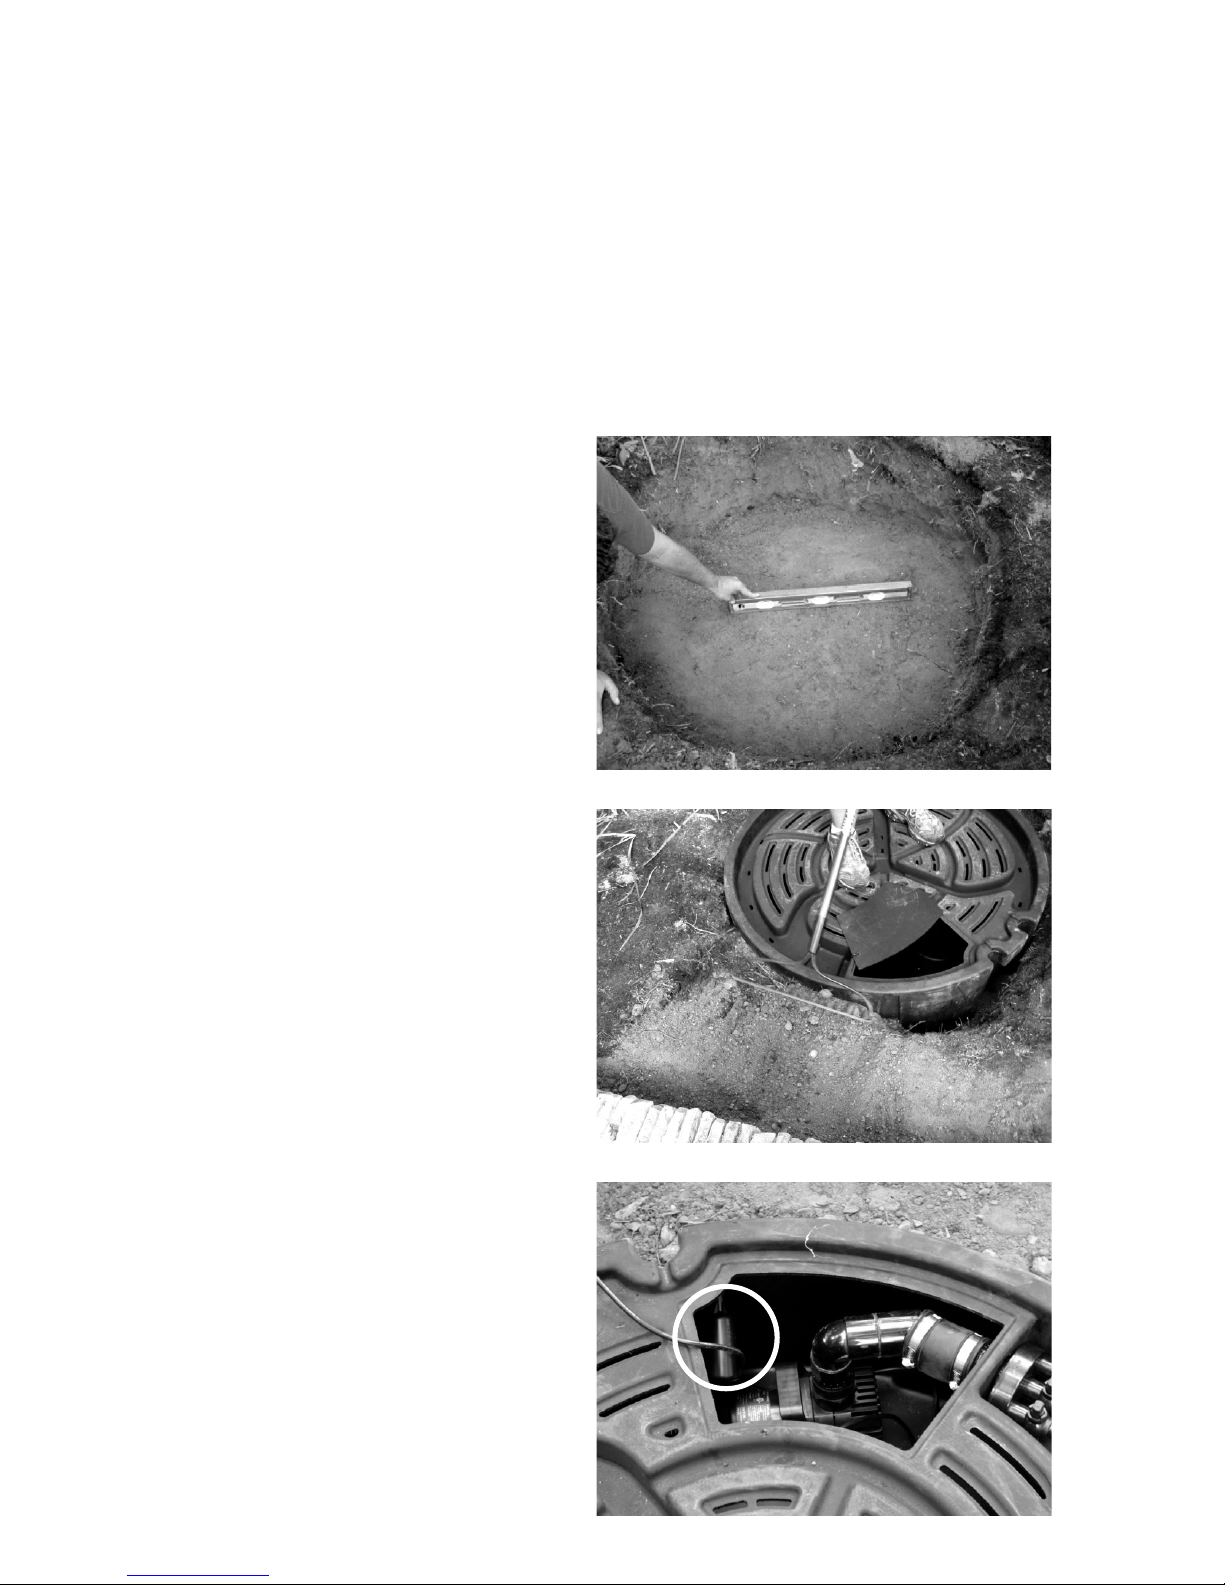
Caution: Do not dig too deep. The Fountain Basin should be set on undisturbed earth if
possible. In case you over-dig, be sure to compact the soil thoroughly to prevent settling. The
bottom of the hole should be level
side-to-side and front-to-back (Figure 1).
Add enough water to the Fountain Basin to
keep it from shifting during the backfill process. Use loose soil from the excavation to fill
the void around the perimeter of the basin,
leaving the area outside the pump chamber
open until all of the electrical and plumbing
connections are made. Lightly compact the
soil around the basin as you backfill (Figure
2). Caution: Over compacting can distort the
side walls of the Fountain Basin.
Plumbing
Note: Auto Fill Kit AF1000 can be added to
any Fountain Basin to keep the basin filled
with water automatically. It is easiest to install
AF1000 before plumbing the pump. Using
a ⁄” bit, drill a hole about 1” below the top
of the flat wall on the left side of the pump
chamber (Figure 3). Connect the Autofill to
your choice of water source using either the
⁄” Garden Hose Adapter, ⁄” rigid PVC slip fitting or ⁄” flexible tubing adapter (all included
in AF1000 Auto Fill Kit). See Kit Instructions
for details.
Atlantic Pro-Series Fountain Basins have
been designed to work in conjunction with
Atlantic FBKIT1/FBKIT3 and TidalWave
TT-Series and MD-Series pumps to simplify
installation. FBKIT1 contains single valve, ⁄”
fittings and tubing needed to connect one
fountain piece. FBKIT3 contains 1⁄” pump
discharge fittings, Triton 3-way manifold, ⁄”
fittings and tubing needed to connect up to
three fountain pieces.
Determine the layout of the fountain pieces,
and the length of the ¾” tubing. The tubing
runs on top of the Fountain Basin within the
plumbing channels (Figure 4).
Figure 2
Figure 1
Figure 3

3
Figure 4
Note: The top deck of Atlantic Pro-Series
Fountain basins are supported by 3
(FB3200) or 7 (FB4600) support cones.
When installing large, heavy fountain
pieces, it is recommended to distribute the
weight evenly over multiple cones to reduce
point loads.
A standpipe set just below the level of the
water overflowing a decorative pot or vase
will create an attractive bubbling eect.
Set the decorative piece over the fitting,
then attach a piece of ¾” Sch40 PVC to the
fitting. Cut the standpipe to just below the
water surface. Seal any gaps between the
standpipe and the hole in the base of the
piece with Atlantic SPSEAL Standpipe Sealant. To center and stabilize the standpipe,
place a few rocks around the pipe to stabilize it (Figure 5). Fill the Basin with water,
connect the pump to a GFI-protected
outlet and adjust flow as desired.
Decoration
To complete the installation, cover the
Fountain Basin with gravel, polished stones,
glass beads or other decorative material.
To disguise the outline of the Basin further,
extend the material past the edge of the
Basin. To enhance nighttime enjoyment of
the fountain, complement your Fountain
Basin with Atlantic’s LED lighting.
Installation of a Fountain Basin in
a Paver Patio or Walkway
The FB4600 and FB3200 Fountain Basin
can be installed within a paver patio or
walkway. Recessed pockets allow 1½”
conduit sleeves to be installed within the
radius of the basin. These sleeves allow
access to the pump cords and low voltage
wiring when surrounding the basin with
hardscape materials. When setting the
Fountain Basin within a paver patio, the top
Figure 5
Figure 6
rim of the basin should be set at least 1” lower than the top of the pavers. This will help retain the
decorative material after it is installed (Figure 6).
Warranty
This product carries a lifetime warranty. This warranty is extended solely to the original
purchaser commencing from the date of original purchase receipt. A misused or abused
product voids this warranty.
Warranty Claims
In case of warranty claims, the complete Basin should be returned to the place of purchase
accompanied by original receipt.
 Loading...