

Page 1

OPERATION MANUAL
AUTOMATIC WASHING MACHINES
GEBRAUCHSANWEISUNG
VOLLAUTOMATISCHE
WASCHMASCHINEN
Page 2

The present Operation Manual describes technical features of the household automatic washing
The Machine is intended to launder textile items by using low-foaming washing powders and synthetic
The Machine is intended for operation in the household conditions (at home) only. Operating it for
The Machine should be operated at:
ATTENTION! Temperature drop in the room below 0°C may result in freezing of the water inside
the Machine and its failure.
The Machine is Class I electric shock protection device, therefore it must be connected to the elec tric
To install a socket with a grounding contact, address an entity authorized to carry out these works.
The protecting system in the filling hose stipulated in the machine depending on the model determines
the water leakage when the hose is damaged – water supply is terminated to the machine from the water
The basic technical characteristics of the Machine are listed in Table 1.
The manufacturer reserves the right to improve the design of the Machine and introduce its new versions
while keeping its basic specifications unchanged.
temperature before connecting to the electric mains.
ATTENTION! The manufacturer (seller) should not be made liable (including during the warran-
ty period) for any defec ts or damage arising due to violation of operation or storage conditions, or
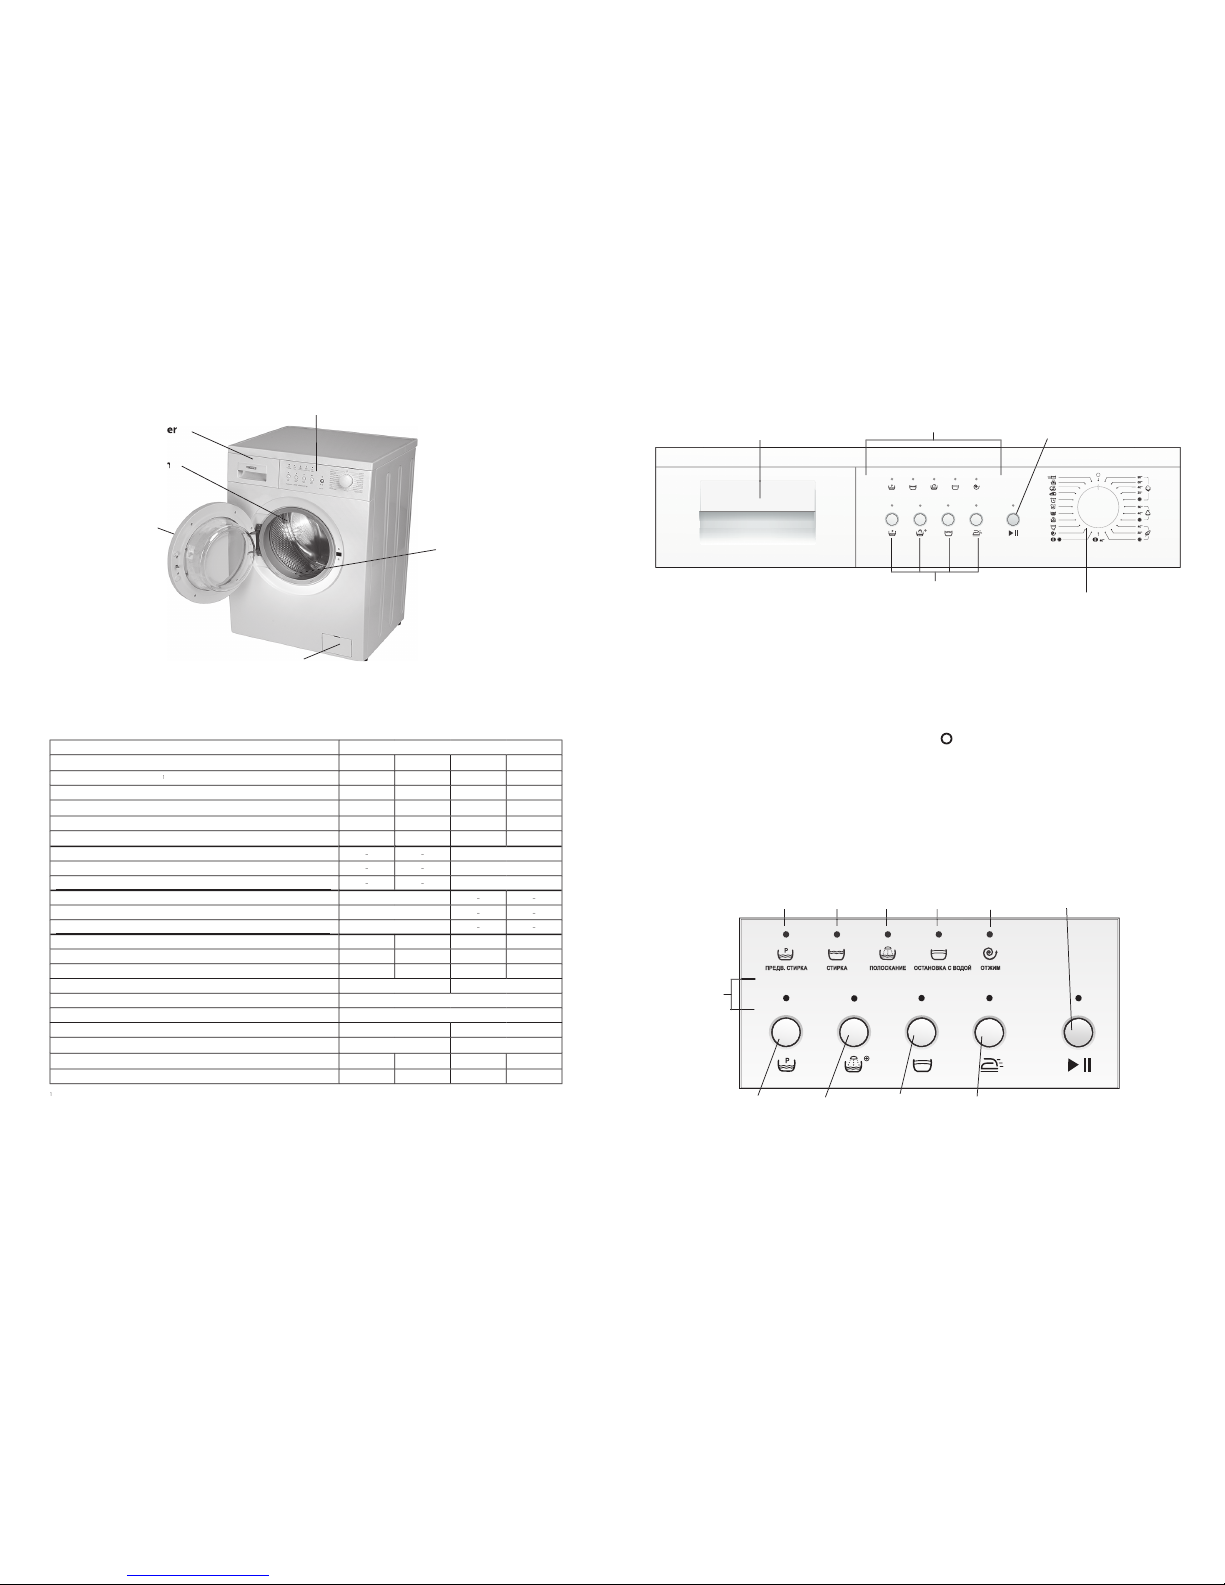
The basic parts of the Machine are shown in Fig. 1.
The control panel of laundry washer with notations of functions is shown in Fig. 2.
With putting the button
(Fig. 2) the indicator on the button lights and the laundry washer runs
The Machine has audio (sound) signalling. The audio signal accompanies the start and the end of the
The Machine has an electronic control system, which contributes to a uniform distribution of washed
The door has an anti-closing blocking in case of accidental switching the Machine on, for example,
Page 3
4
Washing program is selected by the Selector (Knob), which turns in both directions – clockwise and
After setting the Wash Program Selector to the mark
, the Machine is switched off and the selected
To select an optional function, press the button of the needed function – the respective indicator will
ATTENTION! When the selected function is incompatible with the set program, the indicator will
Wash program selector
ADDITIONAL RINSE
WASHING
Wash program stage indicators
Indica-
tors of
functions
Table 1
60С108
Washing efficiency class
AAA
A
Wringing efficiency class
2
Annual energy consumption [kW·h/year]
3
Annual water consumption [l/annum]
3
Water supply system pressure [MPa]
Voltage/Frequency [V/Hz]
A + + + (highest efficiency) to D (least effective).
A (highest efficiency) to D (least effective).
3
On the basis of 220 standard washing cycles within a year when washing cotton at 60 °C and 40 °C at full or partial loading
Page 4
The function is provided for washing of heavily soiled (very dirty) cotton items. When switching the
function on, the items will be washed additionally in the water with detergent at the temperature
Additional rinse
The fu nction is provided for washing children’s clo thes, items of people, who are detergent
function is included into the Wash Program, one more rinse will be added.
to ease subsequent ironing. The function ensures a delicate washing mode and careful spinning
with minimum number of wrinkles after washing.
The function is used, when items of a fine texture are washed, and when there is no possibility to
take items from the Machine immediately after washing, not to get them crumpled. When the fu-
To turn off the machine operation sound alarm, simultaneously press the buttons
and
and
and
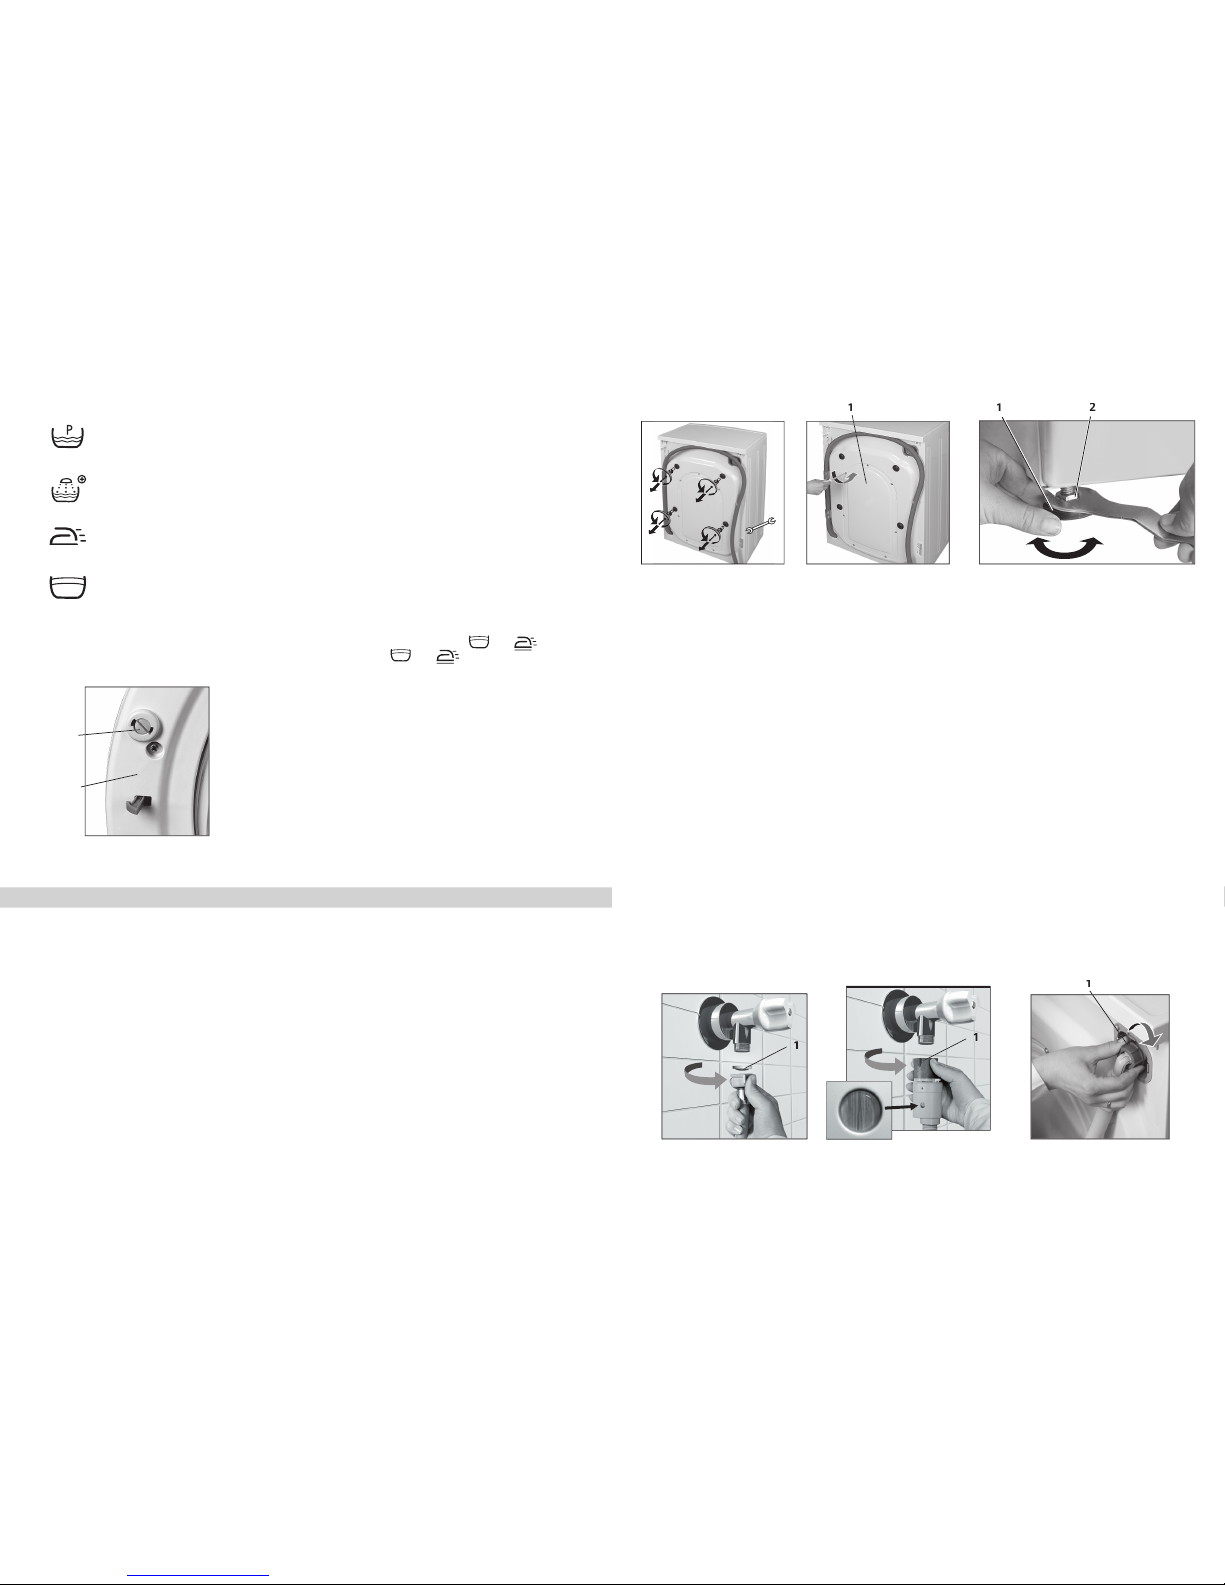
ANTI-CLOSING DOOR BLOCKING
The anti-closing door blocking prevents from accidental Machine
4) by a screwdriver clockwise up against the stop – the lock will move
forward and prevent to close the door. To cancel the lock ing before
washing, perform all the actions in the reverse sequence.
ATTENTION! Not to damage the Machine, never move it by holding the dispenser drawer, door
the bars out. Reinstall the panel. Close the holes with plastic plugs, including in the kit. Keep the bolts and
The Machine should be installed on a solid, even and dry surface. Soft flooring (carpets, polyurethane-
When installed on a wooded floor, the Machine should be first placed onto a wooden slab at least
To increase the stability of the Machine during its operation on a wooden floor, it is recommended to
The Machine should be levelled precisely horizontally by screwing its adjustable supports 1 in or out:
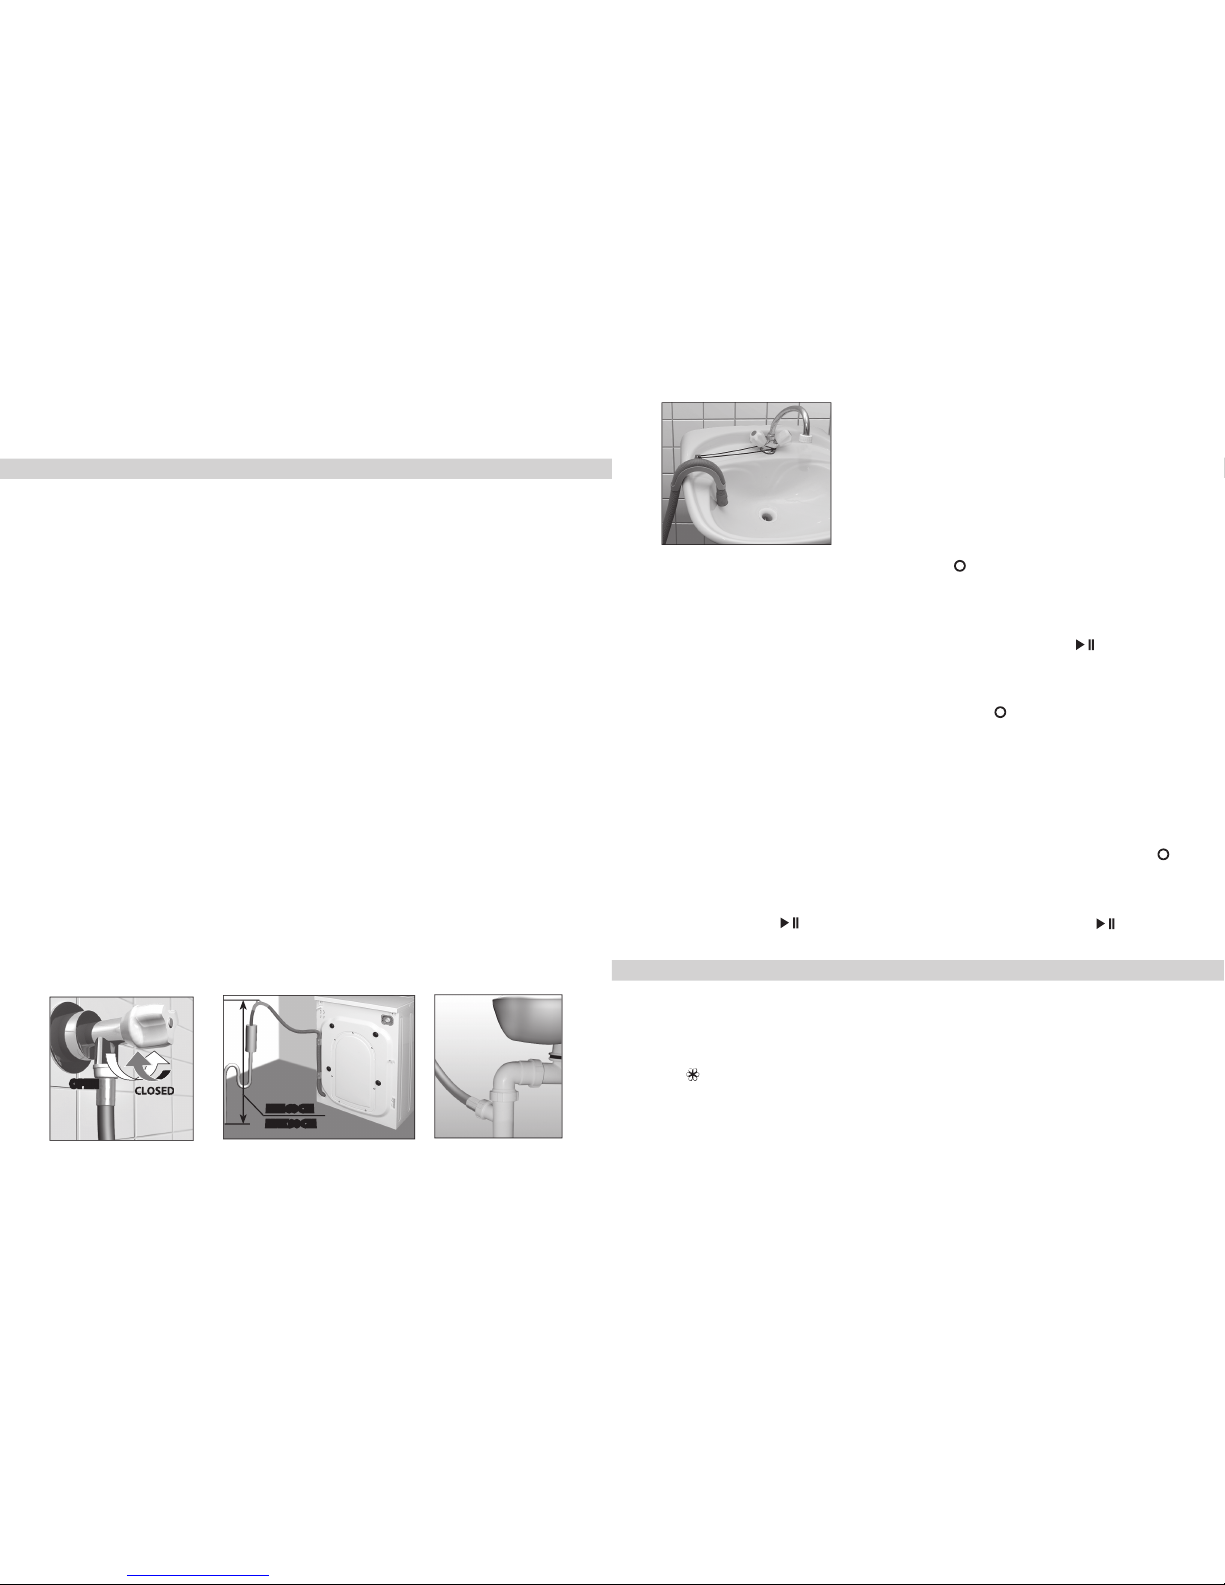
The Machine is connected only to the cold water supply system through a water supply tap with a
in accordance with figure 8a, attention should be paid to
the colour in a special window of the hose.
The yellow colour of the window shows the good state of
the hose.
The draining hose (Fig. 11) should be at least 60 cm and at most 90 cm above the floor level. It this
The draining hose may be connected directly to the trap (Fig. 12), if it has a branch pipe for this pur-
When draining water into the sink or bath the hose (Fig. 13), fix the hose in the bending point by a
ATTENTION! After connecting to the water supply and sewerage, the filling and draining hoses
Page 5
After connecting the Machine to water supply and sewerage, check the tightness of the filling hose
the Machine. To clean the Machine from inside and remove the water that might remain after tests, perform
the fist washing cycle without any items.
ATTENTION! For the first washing, add 1/2 of the recommended dose of washing powder (dete-
ATTENTION! Penetration into the Machine of metal objects (coins, clips) together with clothes
to wash big and small items together.
ATTENTION! At non-uniform distribut ion of items in the drum, the spinni ng speed will drop
towels, gowns, mats, etc.), to avoid overloading.
ATTENTION! Close the door of the Machine until you hear a clear click of the lock (anti-closing blo-
MIN 60 CM
MAX 90 CM
the water supply tap. Connect the filing hose.
and set it to the mark corresponding to the
The averaged laundry time corrected by electronic system depending on the real conditions during
To start the Machine operation under the selected program, pres the button
– the indicator
After the end of the last washing operation, the door blocking device will switch off – a triple sound
mark – the Machine will switch off.
Take the plug out of the mains socket and close the water supply tap.
ATTENTION! A drop (interruption) of electric power supply during washing does not effect further
To make changes in the earlier selected program, set the Wash Program Selector Knob into the mark
.
The Machine is switched off and the program underway is cancelled. Set the Knob to the setting of the
pressed for 2 seconds – until blinking of the indicator in the
button and
The machine has a drawer for loading washing powders or detergents (Fig. 14). The drawer has three
Take for your washing the SDs, bleachers and conditioners intended for automatic washers, and take
ATTENTION! In is not recommended to use gelbleachers for your washing.
ATTENTION! SD overdosage, and use of the SDs intended for manual washing may result in exc-
OPEN
Page 6

When installing in pan section 2, the shutter must moved on the guides in lower position freely.
When you are using SDs as powder, take the shutter out of the main wash compartment 2 (Fig. 14). Be
foam may form during rinsing and white spots may appear on the items.
When choosing optional functions
, place the SD into compartment 1. When using a liquid SD,
Any overdosage of special treatment agents in the
When choosing the program
(Spot Removal), put the bleachers into compartment 1 (Fig. 14), and
the bleaching will take place immediately after the main washing.
ATTENTION! When using a bleacher, never set the optional function of pre-washing.
YES
To improve the washing quality and protect the Machine from lime sediments, when washing in water
to the SD into compartment 2 (Fig. 12) according to manufacturer’s guidelines.
The water hardness is defined according to Table 2. You may obtain data on your water hardness from
the local water supply entity.
the removal methods of various spots.
Wax should be scraped off with a rounded object in order not to damage the cloth, then the item is
for the spot not to bleed.
To remove the chewing gum, rub the cloth with ice, then rub with a force and treat with a piece of
the paint packing (for example, water, turpentine, trichloroethylene), soaped and washed.
To remove nail varnish (polish), put some blotting paper over the dirty cloth and moisten the spot
with acetone from the backside. By frequently changing the paper, moisten the cloth with acetone, until
the spot disappears.
turpentine.
A cloth with spots of blood should be soaked in cold water with adding salt, and then washed with
When washing program and temperature are selected it is recommended that symbols of care on a label
The goods having the labels with the following symbols should be washed in the machine:
— washing,
Water Characterization
Water Hardness in
0
Water Hardness in Milli-Mol per Litre
Table 2
Page 7
— washing at the maximal temperature 95 °С;
— washing at the maximal temperature 60 °С;
— washing at the maximal temperature 40 °С;
— washing at the maximal temperature 30 °С;
— manual washing.
is indicated on the label.
ATTENTION! To save washing powder or detergents and electric power, and to avoid contamination
The Machine is a household appliance that needs no special technical maintenance, and it is designed
for the minimum maintenance and care operations.
ATTENTION! Prior to cleaning, disconnect the Machine from the electric mains and close the
water supply tap.
The Machine should be cleaned on the regular basis. The exterior of the Machine, plastic and rubber
ATTENTION! Carefully remove accumulation of any foreign particles on the door sealing gasket.
The detergents dispenser drawer needs periodic washing. For this purpose, pull the drawer out, and
Take the shutter, caps, and bleach tray out of the drawer (Fig. 14), and carefully wash their internal and
the drum. They should be removed by means of substances intended to clean stainless steel articles.
valve 1 (Fig. 19) are intended to stop mechanical impurities (sand, metal chips, etc.) from getting into the
To clean up the filters, proceed as follows:
After cleaning, install the filters back to the filling hose and into the threaded branch pipe of the electric
valve in the reverse order. Connect the filling hose and check the tightness of connections – they should
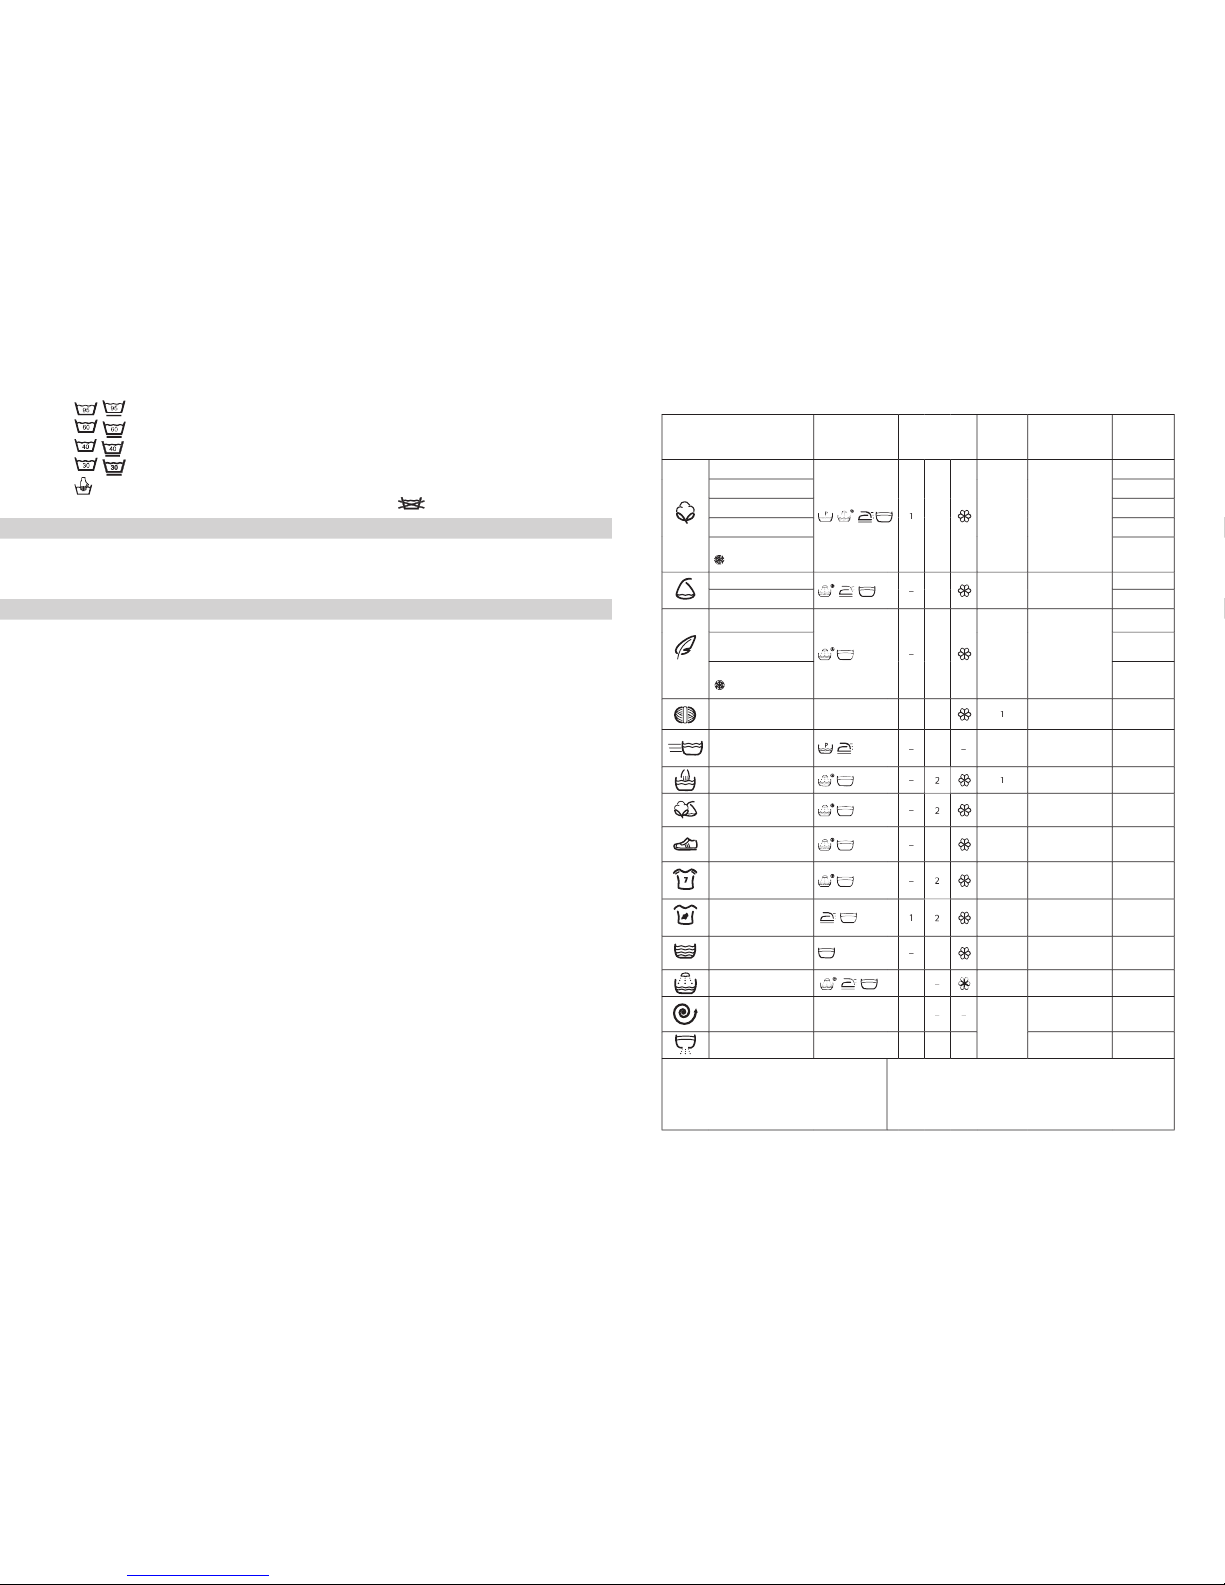
Table 3 – Washing Programs
Wash time,
COTTON 90°
2)3)4)
COTTON 60°
COTTON 40°
COTTON 30°
65
COTTON
(COLD WATER)
60
SYNTHETICS 60°
2)3)4)
SYNTHETICS 40°
DELICATE FABRICS 40°
2)
400
65
DELICATE FABRICS 30°
64
DELICATE FABRICS
(COLD WATER)
62
WOOL 40°
400
QUICK CYCLE
(30°)
2)
HAND WASH (30°)
62
MIXED (40°)
2)
3)
400
4)
SPORT SHOES (30°)
2)3)4)
SPORTSWEAR (30°)
2)3)4)
DRY CLEAN (40°)
2)3)4)
INTENSIVE (60°)
2)3)4)
RINSE
2)3)4)
SPINNING
2)
3)
4)
DRAIN
4) For 50Y108, 60С108.
* the value was calculated in laboratory conditions and it can
vary (it can increase or decrease) during operation of washing
variations in electric mains etc.
Page 8

vessel to collect the water. Take plug 1 out of hose 2 and drain the water down into the vessel. Turn the filter
ATTENTION! Residual water may leak out when filter handle is rotated.
The machine is an electrical household appliance, therefore general electric safety rules should be
fulfilled during its operation.
The appliance is not intended for use by the persons (including children) having lowered physical,
A double-pole socket having the earthing contact for connection of the machine must be located at a
When the power supply cord is damaged in order to avoid any danger it must be replaced by the
ATTENTION! Do not use the machine as a pad, a pedestal, etc. Do not lean on the opened door
to install the machine outside the premise so that not to subject it to atmospheric impact.
to operate the machine without installation of plugs.
When the machine is connected to the cold water supply network only a new filling hose should be
to use in the machine the substances containing solvents, as there is a danger of
After the end of a washing the machine is to be switched off, disconnected from the electrical mains,
the plug is to be pulled out of the socket, and the water supply cock is to be closed.
IS PROHIBITED:
for machine connection to the electrical mains;
water supply cock should be closed, and a mechanical expert of a service company should be called.
ATTENTION! After expiry of the machine service period the manufacturer bears no responsib-
The materials used for packing the Machine may be processed and reused, if delivered to the second-
ATTENTION! Never let children play with the packing materials, since there is a danger to suffocate
The Machine, which is subject to disposal, should be brought to the condition of unfitness by cutting
the door lock. Then, dispose the Machine according to the current legislation of your country.
20
Page 9

Waschmaschine für den Haushaltsgebrauch, sie enthält alle nötigen Informationen über ihren Betrieb,
ACHTUNG! Ein Herabsinken der Umgebungstemperatur unterhalb von 0
von Wasser in der Maschine führen und diese Außer Betrieb setzen.
von Wassers bei Beschädigungen des Schlauches, die Wasserzuführung aus der Wasserleitung in die Maschine
wird unterbrochen, der Waschvorgang eingestellt und am Display erfolgt eine Anzeige über den Defekt.
vor dem Anschluss ans Stromnetz für mindestens 24 Stunden bei Raumtemperatur stehen lassen.
ACHTUNG! Der Hersteller (der Händler) haftet nicht (auch nicht während der Garantiefrist) für
-Knopfes (Abb. 2) leuchtet die Anzeige auf
während des Waschganges gedrückt werden.
vermieden werden.
Abbildung 1
Waschtrommel
Waschmittelkasten
Tabelle 1
Technisch Daten für Haushaltwaschmaschinen gemäß EU-Richtlinie 1061/2010.
ATLANT
60С108
Waschwirkungsklasse
2
3
Wasserverbrauch [l/annum]
3
Verbrauch pro Zyklus 6 kg Baumwolle 60°C [kW·h/l], Programmdauer [min.]
Verbrauch pro Zyklus 3 kg Baumwolle 60°C [kW·h/l], Programmdauer [min.]
Verbrauch pro Zyklus 3 kg Baumwolle 40°C [kW·h/l], Programmdauer [min.]
Verbrauch pro Zyklus 5 kg Baumwolle 60°C [kW·h/l], Programmdauer [min.]
Verbrauch pro Zyklus 2,5 kg Baumwolle 60°C [ kW·h/l], Programmdauer [min.]
Verbrauch pro Zyklus 2,5 kg Baumwolle 40°C [kW·h/l], Programmdauer [min.]
Verbrauch im Standby & Aus Modus [W]
Wasserdruck [MPa]
Anschlusswert [W ]
Abmessungen [H/B/T mm]
A+++ (höchste Effizienz) bis D (geringste Effizienz).
2
A(höchste Effizienz) bis G (geringste Effizienz).
3
auf der Grundlage von 220 Standard-Waschzyklen pro Jahl für 60 °C & 40 °C Baumwollprogramme bei vollständiger
Page 10

Abbildung 2 — Bedienfeld
zeigt, erfolgt das Abschalten der Waschmaschine und das
zuvor ausgewählte Waschprogramm wird zurückgesetzt.
TZUSATZF UNKTIONE N DER MA SCHINE
werden – dann leuchtet die entsprechende Leuchte auf. Bei erneutem Betätigen des Druckknopfes erlischt
ACHTUNG! Wenn die gewählte Funktion mit dem gewählten Programm nicht kompatibel ist,
Waschmittelkasten
Auswahl des Programms
Abbildung 3
Vorwäsche
Zusätzliches Spülen
Waschprogramm ein weiterer Spülvorgang hinzugefügt.
Waschen und behutsames Schleudern mit minimaler Faltenbildung nach dem Waschen.
und
und das Abhalten der Tasten im Laufe von 3 Sekunden aus.
und
Waschmaschine vor, z.B. durch Kinder. Zum Blockieren der Tür ist
Tür. Zur Aufhebung der Blockierung vor dem Waschen führen Sie
VORBE REITUNGE N ZUM AUFS TELLEN
ACHTUNG! Um Schäden an der Waschmaschine zu vermeiden, darf sie beim Verschieben nicht
ten. Mit einem Schraubenschlüssel werden diese vier Transportschrauben herausgeschraubt und dann
Transport in der Zukunft aufzubewahren.
Abbildung 4
Anzeige des
Waschvorg-
zusätzlichen Funktionen
VORWASCHEN
WASCHEN
VORWAESCHE
ZUSAETZLICHES
Page 11

AUFSTE LLEN DER MASCHINE
Auf dem Holzboden ist die Waschmaschine aufzustellen, wenn man vorher auf dem Boden eine Hol-
zplatte von mind. 15 mm Stärke fest anbringt. Für sichereren Stand der Waschmaschine im Betrieb wird es
ttern kann später zu Vibrationen und erhöhtem Geräuschpegel beim Betrieb der Waschmaschine führen.
ANSCH LUSS AN WASSE R- UND A BWASSERLEITUNGEN
Vor dem Anschluss der Waschmaschine an die Wasserleitung ist der Wasserhahn zu öffnen, damit evtl.
Abbildung 5
Abbildung 6
Abbildung 7
Abbildung 8
Abbildung 9
Abbildung 10
AUF
ZU SEIN
zuvor das Vorhandensein des Siebs 1 im Schlauch und seine Sauberkeit überprüft hat (Abb. 8), und an das
Falls der Füllschlauch über ein Schutzsystem laut Abb. 8a verfügt, so ist die Farbe im speziellen Fenster
Während des Waschvorgangs muss der Wasserhahn voll aufgedreht sein (Abb. 10).
Abflussrohr mit einem Innendurchmesser von mindestens 40 mm angeschlossen, damit kein Einsaugen von
Abwasser in die Waschmaschine passiert.
Anschluss verfügt.
ACHTUNG! Die Schlä uche für Wasser zuführ und für den
Abfluss dürfen nach dem Anschluss an die Wasser- und Abflussl-
Jede Waschmaschine durchläuft einen Test beim Hersteller, deshalb kann in der Waschmaschine geringe
(Baumwolle) und Temperatur
von 90 ºС zu bringen.
ACHTUNG! Für den ersten Waschvorgang ist ins Fach 2 des Waschmittelkastens (Abb. 14) die
VORBE REITEN U ND EINFÜ LLEN DER WÄS XHE
Vor dem Waschen ist es notwendig:
ACHTUNG! Metallgegenstände (Münzen, Büroklammern) die versehentlich in die Waschmaschine
Abbildung 11
Abbildung 12
MIN 60 CM
MAX 90 CM
Abbildung 13
Abbildung 8a
Page 12

weil sonst die Verschlüsse durch die Ö ffnungen in der Waschtrommel ins Maschineninnere gelangen und
zum Ausfall der Waschmaschine führen könnten.
wir, größere und kleinere Sachen zusammen zu waschen.
ACHTUNG! Bei ungleichmäß iger Verteil ung der Wäsche in de r Trommel verringert sich die
Wasseraufnahmefähigkeit zu befüllen (Frotteetücher, Bademäntel, Läufer u. ä.), damit keine Überladung
ACHTUNG! Schließen Sie die Einfülltür bis sie spürbar einrastet (die Kindersicherung muss aus
Wenn die Waschmaschine lange Zeit nicht betrieben wurde, ist das Wasser aus dem Zulaufschlauch
zu entfernen, indem man die Mutter löst und den Schlauch vom Wasserhahn trennt. Danach ist der Zulau-
fschlauch wieder anzuschließen.
in die Stell-
Knopf zu drücken – die Leucht
fünfmal ein dreifacher Signalton im Abstand von einer Minute.
zu bringen - die Leuchte auf dem
Knopf erlischt und die Maschine schaltet ab. Ziehen Sie danach den Stromstecker aus der Steckdose
ACHTUNG! Stromausfall während des Waschvorganges hat keine Auswirkung auf das weitere
Arbeiten der Waschmaschine: nachdem die Stromversorgung wieder hergestellt ist, setzt die Maschine
zu bringen.
Wenn die Waschmaschine angehalten werden muss, ohne das Programm zu ändern (z.B. um mehr
Wäsche in die Trommel einzufüllen), halten Sie den
Knopf für 2 Sekunden gedrückt – bis die Leuchte
Verwendung von synthetischen Waschmitteln (SWM)
ACHTUNG! Der Einsatz von gel-artigen Bleichmitteln wird nicht empfohlen.
Wasserhärte zu berechnen.
ACHTUNG! Eine Überdosierung von SWM, sowie Verwendung von SWM für Handwäsche kann zu
führen könnte.
Wenn Sie flüssige Waschmitel verwenden, ist der Trenneinsatz ins Fach 2 (Abb. 14, 16) einzusetzen und
ge-
Wenn Sie flüssige Waschmitel ver wenden, ist der Trenneinsatz ins Fach 2 (Abb. 16) einzusetzen und das
Waschmittel gemäß den Messstrichen einzufüllen.
wird das Waschmittel ins Fach 1 (Abb. 14) eingefüllt. Wenn Sie
flüssige Waschmittel verwenden, sind diese unmittelbar vor dem Waschvorgang einzufüllen.
Abbildung 14
Trenneinsatz
Waschmittelkasten
Abbildung 15
JA
Abbildung 16
Trenneinsatz
Page 13

(über den MAX-Strich hinaus), sowie ein
(Fleckentfernung) werden die Bleichmittel ins Fach 1 eingefüllt (Abb.14)
ACHTUNG! Wenn Sie Bleichmittel verwenden, ist die Verwendung der Zusatzfunktion Vorwäsche
zu verwenden. Er ist dem Waschmittel im Fach 2 (Abb. 14) gemäß Herstellerangaben beizumischen.
Vor dem Beginn des Waschvorganges ist der Waschmittelkasten zu schließen.
Vorschläge zum Entfernen von einigen Fleckenarten.
Wachs wird mit einem abgerundeten Gegenstand abgeschabt, ohne den Stoff zu beschädigen. Danach legt
Achten Sie darauf, dass sich der Fleck nicht ausbreitet.
Wasserstoffperoxydlösung angefeuchtet und für 15 Minuten liegen gelassen.
Azeton getränkten Baumwolllappen.
Trichloräthen), eingeseift und ausgespült.
Trichloräthen.
feuchten Sie den Fleck von der anderen Seite mit Azeton an. Der Stoff wird so oft mit Azeton angefeuchtet
Auf Pflanzenöl- oder Harzflecken wird für eine Zeit Butter aufgetragen und anschließend и смывают
zu waschen.
Abfärben.
— Waschen bei einer maximalen Temperatur 95 °С;
— Waschen bei einer maximalen Temperatur 60 °С ;
— Waschen bei einer maximalen Temperatur 40 °С;
— Waschen bei einer maximalen Temperatur 30 °С ;
aufgetragen ist, ist das Waschen in der Maschine
VERBOTEN.
ACHTUNG! Um Waschmittel und Strom zu sparen und um die Umweltverschmutzung zu vermei-
ACHTUNG! Vor der Reinigung der Maschine unterbrechen Sie die Stromversorgung und schließen
ACHTUNG! Entfernen Sie die Ablagerung von Fremdpartikel an der Dichtung der Einfülltür.
Verwenden Sie zur Reinigung der Waschmaschine keine chemischen Mittel, Scheuermittel, Spiritus,
Außenflächen mit einem warmen Wasserstrahl sorgfältig durchzuspülen. Spülen Sie den Waschmittelkasten
Wenn zusammen mit der Wäsche rostende gegenstände in die Waschmaschine gelangen, könnten
Wassereigenschaft
Wasserhärte в °dH
Wasserhärte in mMol/Lite
weich
Tabelle 2
Page 14

Tabelle 3 - Waschprogramme
Verwendung
Waschmittelkasten
Waschendauer,
BAUMWOLLE 90°
2)
3)
4)
BAUMWOLLE 60°
BAUMWOLLE 40°
BAUMWOLLE 30°
65
BAUMWOLLE
60
KUNSTFASERN 60°
2)
3)
4)
KUNSTFASERN 40°
FEINWÄSCHE 40°
2)
400
65
FEINWÄSCHE 30°
64
FEINWÄSCHES
62
WOLLE 40°
400
(30°)
2)
HANDWÄSCHE (30°)
62
KOMBIWÄSCHE (40°)
2)
3)
400
4)
SPORTSCHUHE
(30°)
3)
4)
SPORTKLEIDUNG (30°)
2)3)4)
FLECK-ENTFERNUNG
(40°)
2)3)4)
INTENSIV-WÄSCHE
(60°)
2)3)4)
SPÜLEN
2)3)4)
2)
3)
4)
ABPUMPEN
Beim Modell 50Y88, 50Y108
2)
Beim Modell 60С88, 60С108.
3)
Beim Modell 50Y88, 60С88.
4)
Beim Modell 50Y108, 60С108.
* Der Wert wurde in labormässigen Bedingungen bestimmt und
Wassertemperatur und dem Wasserdruck im Wasserleitungsnetz,
vom Gewicht der eingeladenen Wäschen, von der Gewebeart
verändern (sich vergrößern oder verringern).
Vor dem Reinigen ist das Restwasser in der Fremdkörperfalle zu entfernen. Öffnen Sie die Abdeckung 1
ACHTUNG! Bei der Drehung des Griffs ist es möglich, dass das Restwasser herausfließt.
Abbildung 17
Abbildung 18
Abbildung 19
Abbildung 20
Abbildung 21
Page 15

falls diese unbeaufsichtigt sind oder nicht durch eine für deren Sicherheit verantwortliche Person für die
Vor Anschluss der Maschine an das Stromnetz ist deren Anschlussschnur einer Sichtprüfung hinsicht-
Wegen der großen Masse des Geräts müssen Ortsveränderungen und Transport der Maschine vorsi-
ACHTUNG! Nutzen Sie die Maschine nicht als Unterständer, Gestell usw. Stützen Sie sich nicht
, die Maschine außerhalb von Räumen aufzustellen, um sie vor atmosphärischen
, die Maschine ohne Anbringung der Flansche.
, in der Maschine lösungsmittelhaltige Mittel zu verwenden, da sonst die Gefahr bes-
teht, dass giftige Gase entstehen, die Maschine beschädigt wird oder Brände oder Explosionen entstehen.
Während des Waschvorgangs sollte man das Glas der Maschinentür nicht berühren, da es sich erhitzt
IST es VERBOTEN
ACHTUNG! Nach Ablauf der Betriebsdauer der Maschine trägt der Hersteller keine Haftung für
zunimmt.
ACHTUNG! Lassen Sie Kinder nicht mit Verpackungen spielen, weil dadurch Erstickungsgefahr
zerstört. Die Waschmaschine ist gemäß den geltenden Vorschriften in Ihrem Land zu entsorgen.
Page 16

Уважаемый покупатель!
0
0
ток которой не менее 16 А.
Для установки розетки с заземляющим контактом необходимо обратиться в организацию, име-
0
условий эксплуатации или его хранения либо действия непреодолимой силы (пожара, стихийного
(рис. 2) световой индикатор на кнопке загорается и машина начинает
Дополнительные функции машины устанавливаются нажатием кнопок (рис. 3).
лоток
дверца
уплотнитель
Таблица 1
Технические данные для бытовых стиральных машин в соответствии с Регламентом (EС) 1061/2010
ATLANT
60С108
2
3
3
Давление воды [MРa]
Уровень шума: стирка / отжим [дБ(A)]
A+++ (наивысшая эффективность) до D (наименьшая эффективность).
2
A (наивысшая эффективность) до D (наименьшая эффективность).
3
На основе 220 стандартных циклов стирки за год при стирке хлопка при температуре 60 °С и 40 °С при полной
Page 17

Дверца имеет блокировку от закрывания, которая предотвращает незапланированное исполь-
деление выбранной программы.
происходит выключение машины и
ДОПОЛ НИТЕЛЬНЫ Е ФУНКЦИИ МАШИНЫ
лоток
0
Дополнительное полоскание
добавляется еще одно полоскание.
Легкое глажение
и
в течение 3 секунд производится
и
звуковая
Для блокиро вки дв ерцы следует поверну ть вту лку
дверца
для возможной транспортировки машины в будущем.
УСТАНОВ КА МАШИНЫ
индикаторы
дополнительных
дополнительное
легкое
Page 18

ОТКРЫТ
ЗАКРЫТ
тра 1 (рис. 8) и его чистоту, и к электроклапану машины 1 (рис. 9),
туго затянув гайки рукой.
данного требования машина работать не будет.
Для слива воды непосредственно в канализацию сливной
ходимо провести первую стирку без загрузки белья.
(Хлопок) и темпера-
туру 90
0
загрузить половину нормы
MIN 60 CM
MAX 90 CM
Page 19

закрывания должна быть снята). Белье не должно быть зажато между дверцей и уплотнителем.
Для включения машины повернуть ручку выбора программы стирки из положения
и установить
Для начала работы машины по выбранной программе следует нажать кнопку
— загорается
.
, и машина
Для изменения ранее выбранной программы следует ручку выбора программы с тирки установить
установить на деление новой программы стирки.
ходимости произвести загрузку повторно.
следует удерживать нажатую кнопку
в течение 2 с — до мигания индикатора на кнопке
и звукового сигнала. Приблизительно через 2 мин отключится
Лоток имеет три отделения, отмеченные цифрами и символом:
— для средств спецобработки (кондиционирующих, смягчающих, крахмалящих, ароматизиру-
Для стирки следует использовать СМС, отбеливатели и кондиционирующие добавки, предназна-
Дозировку СМС следует производить с учетом массы изделий, степени их загрязнения и жест-
Для использования жидкого СМС в отделении 2 лотка предусмотрена шторка в соответствии с
достать шторку. Необходимо следить, чтобы порошок не попадал в отделение для средств спецо-
(рис. 15), так как в процессе полоскания будет образовываться пена и на вещах могут
лить СМС с учетом нанесенных на ней уровней.
(выше уровня MAX на колпачке), а также по-
(Удаление пятен)
Для улучшения качества стирки и защиты машины от известковых отложений при стирке в воде со
14
лоток
ДА
Page 20

добавлять к СМС в отделение 2 (рис.15) согласно рекомендациям производителя.
лучить на местном предприятии водоснабжения.
листами промокательной бумаги и гладят пятно горячим утюгом.
Легкие ожоги ткани утюгом удаляют так же, как и пятна плесени.
Для удаления жевательной резинки ткань протереть льдом, потереть с усилием и обработать
хлопчатобумажной тканью, смоченной ацетоном.
указанным на уп аковке краски (например, водой, ск ипидаром, трих лорэтиленом), н амыливают и
ткань и намочить пятно с обратной с тороны ткани ацетоном. Часто меняя бумагу, ткань чивают аце-
тоном до полного исчезновения пятна.
Ткань с пятнами крови следует замочить в холодной воде с добавлением соли, затем постирать
хозяйственным мылом.
уходу за изделиями на ярлыке, чтобы в процессе стирки вещи не сели и не полиняли.
— стирка,
— деликатная стирка;
— стирка при максимальной температуре 95
0
— стирка при максимальной температуре 60
0
— стирка при максимальной температуре 40
0
— стирка при максимальной температуре 30
0
— ручная стирка.
, в машине стирать
жающей среды при выборе программы стирки учитывайте вид ткани и степень загрязнения
использовать для очистки машины химические вещества, абразивные составы,
Лоток для моющих средств необходимо периодически промывать. Для этого лоток выдвинуть на
Достать из лотка шторку, колпачки, лоток для жидкого отбеливателя (рис. 14) и тщательно вымыть
Для очистки фильтров необходимо:
жесткости
Характеристика воды
Жесткость воды в
0
Жесткость воды в
До 1,3
Жесткая
Таблица 2
Page 21

40
41
Таблица 3 - Программы стирки
температура стирки, °С
дополнительных
Длительность
ХЛОПОК 90°
2)3)4)
ХЛОПОК 60°
ХЛОПОК 40°
ХЛОПОК 30°
65
ХЛОПОК
ХОЛОДНАЯ ВОДА
60
СИНТЕТИКА 60°
2)3)4)
СИНТЕТИКА 40°
ДЕЛИКАТНЫЕ ТКАНИ
40°
2)
400
65
ДЕЛИКАТНЫЕ ТКАНИ
30°
64
ДЕЛИКАТНЫЕ ТКАНИ
ХОЛОДНАЯ ВОДА
62
ШЕРСТЬ 40°
400
ЭКСПРЕСС- ТИРКА
(30°)
2)
РУЧНАЯ СТИРКА
(30°)
62
КОМБИ-СТИРКА
(40°)
2)
3)
400
4)
СПОРТИВНАЯ
ОБУВЬ
(30°)
3)
4)
СПОРТИВНАЯ
ОДЕЖДА
(30°)
2)3)4)
УДАЛЕНИЕ
ПЯТЕН
(40°)
2)3)4)
ИНТЕНСИВНАЯ
СТИРКА
(60°)
(60°)
2)3)4)
ПОЛОСКАНИЕ
2)3)4)
ОТЖИМ
2)
3)
4)
СЛИВ
Для моделей 50Y88, 50Y108
2)
Для моделей 60С88, 60С108.
3)
Для моделей 50Y88, 60С88.
4)
Для моделей 50Y108, 60С108.
* Значение определено в лабораторных условиях и может
в
длинным ворсом.
слить воду в емкость.
и вынуть фильтр.
Удалить из фильтра мусор, промыть фильтр под струей воды.
Установить пробку в шланг и фильтр на место в обратной пос ледовательности. Проверить пра-
знаний, если они не находятся под контролем или не проинструктированы об использовании
Дети должны находиться под контролем для недопущения игры с прибором.
Двухполюсная розетка с заземляющим контактом дл я подключения машины должна быть уста-
Page 22

42
так как она имеет большую массу.
устанавливать машину вне помещения, чтобы не подвергать ее атмосферному
эксплуатировать машину без установки заглушек.
использовать в машине средства, содержащие растворители, так как существует
Для обеспечения электрической и пожарной безопасности
треска, задымления и т.п., следует немедленно отключить машину от электрической сети, вынув вилку
за безопасную работу изделия. Дальнейшая эксплуатация может быть небезопасной, так как
значительно увеличивается вероятность возникновения электро- и пожароопасных ситуаций
Утилизировать машину в соответствии с действующим законодательством страны.
Page 23

 Loading...